- Initial stage: how to cut the LED strip
- How to connect an LED strip without soldering - Your technique
- Rules for connecting tapes
- Using connectors
- Wire connector
- Features of mounting monochrome light strips
- Instructions for connecting a monochrome light strip
- Connecting two or more monochrome ribbons
- Bonding tape with silicone
- Methods and order of soldering
- Solder the wires to the tape
- How to solder silicone coated tape
- Splice without wires
- Soldering wires at an angle
- rgb led strip
- Wiring diagram via power supply
- For short length
- Tapes over 5 meters
- Connecting RGB and RGBW LED
- Kinds
- Version
- Degree of protection against moisture and dust
- Features of the PSU circuitry
- Additional functions
- Use with a computer
- Via USB connector
- Via one of the molex connectors
- Direct to motherboard
- Connection technique using connectors
- Tools and materials for soldering
- Docking with connectors
- What are
- Step-by-step instructions for switching
- LED strip device
- Summing up
Initial stage: how to cut the LED strip
Detailed inspection is the basis of any reasonable action with lighting fixtures.The first rule to remember is the following - each LED strip, regardless of the manufacturer, has specially designated places for fastening.
In the event that there is no such mark or it has worn out under the influence of time, a beginner can rely on the second common rule. You can cut every three LEDs.
Here are some practical tips to help you avoid common mistakes:
- It is necessary to cut strictly between the copper conductors;
- As a result of the manipulations, two or more segments should be obtained, each of which has a pair of copper conductors at both ends;
- It is necessary to divide one large tape so that each resulting segment has at least two connecting points;
- For work, the most sharp scissors are used, otherwise there is a high risk of damage to the contacts through which 220 volts “runs”;
- Sharp scissors help keep the thin silicone layer that protects the tape from water.
A firm hand and sharp scissors are the key to the success of the operation. First you need to find the cut line, which has characteristic marks. Separation of one tape occurs after a mandatory preliminary check. Its task is to ensure the presence of at least two copper conductors on each of the resulting segments.
How to connect an LED strip without soldering - Your technique
The golden rule for installing any electrical system is the minimum number of connections. This rule also applies to LED strips.
But what if you can't do all the work in one piece? Connecting the LED strip to each other is a task that can be solved in different ways.
Rules for connecting tapes
Remember the main rule for installing LED strips - do not join two pieces 5 meters long with each other. The fact is that a large current flows in powerful LED strips. For example, for SMD 5050 60 led / meter - the power is 14.4 W / m. This means that at 12V voltage, more than 1 ampere of current is needed per meter.
In the LED strip, the role of the conductor cable is performed by copper tracks deposited on a flexible base. Their cross section is designed for the operation of 1 bay, the length of which is 5 meters.
Therefore, the connection of several pieces into one chain is carried out in two cases:
- Failure of a fragment is a case of repair;
- sharp bending of the surface - the tape cannot go around turns with a radius of less than 5 cm, the current-carrying paths may be damaged.
When cutting, remember that you can cut near the contact pads according to the marking, into pieces that are multiples of 3 LEDs. Learn more about how to properly cut led.
Using connectors
It should be noted right away that this method is simpler, more expensive and quite reliable.
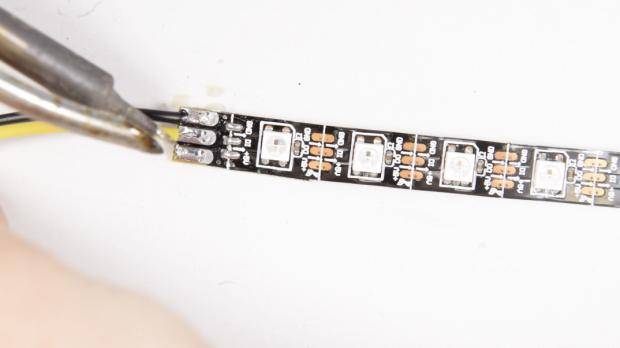
Before proceeding with the connection, find the contact nickels. On different types of tape, they are similar and are located along the cut line. The place of the cut is indicated either by a black (white) line, or the same line with a scissors icon (see above).
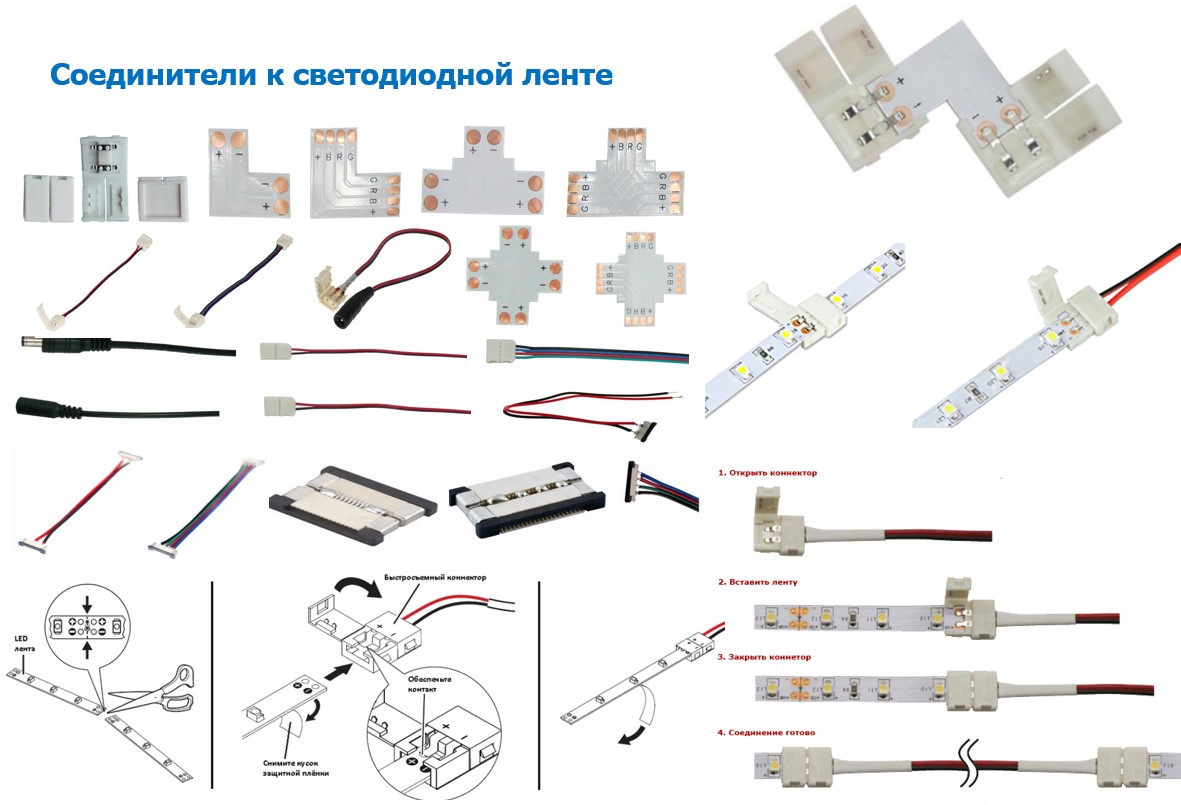
Connectors come in two varieties:
- For single color tape;
- for RGB.
The second factor by which connectors can be classified:
- Connectors with wires;
- butt joint connectors.
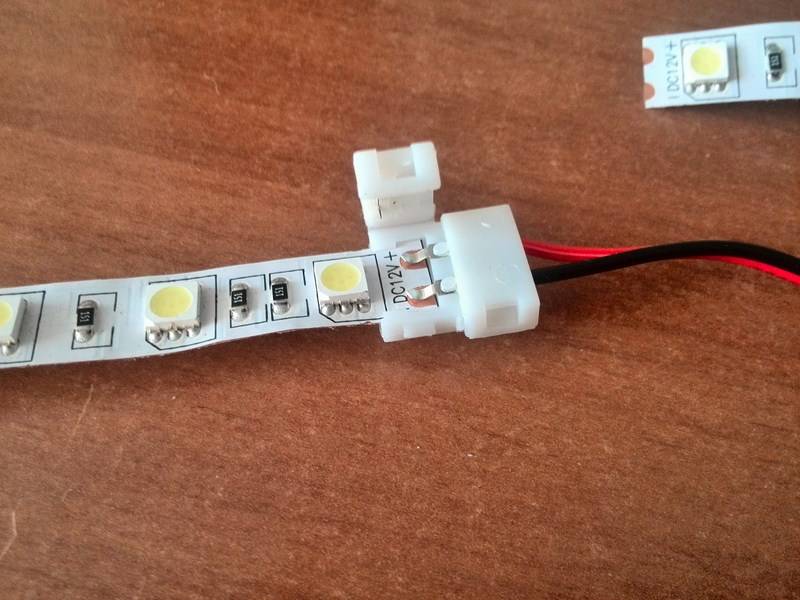
Wire connector
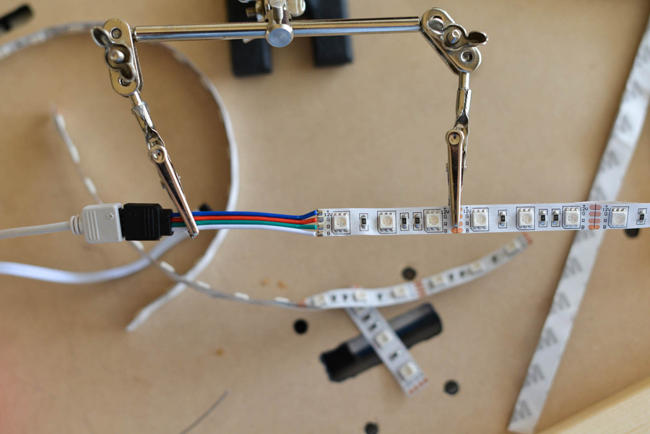
Connector for connecting the LED strip with wires - the type of connector that is needed to swivel the connection of fragments or connect to the power supply.
To connect the LED strip and the connector, you must first prepare the tape.If it is covered with a layer of moisture-proof coating, remove it to such an extent that only the contacts remain uncovered.
To clean the pads of oxides, wipe them with a hard eraser, a toothpick, or the wooden end of a match - the soft material will not damage them, but will remove the oxidation.
After preparation, get contact patches under the
Features of mounting monochrome light strips
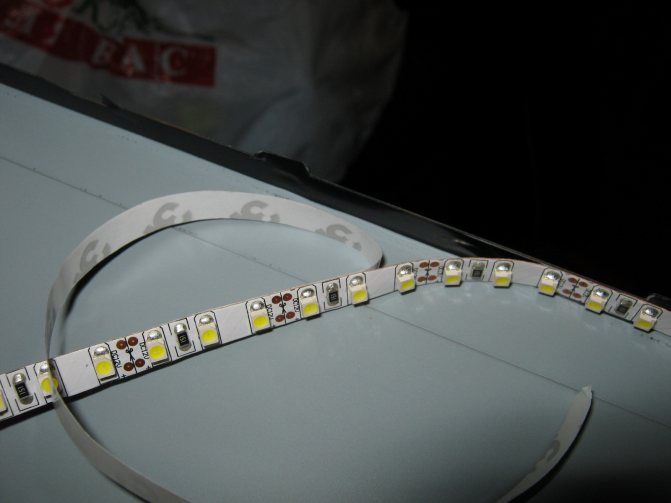
Monochrome LED strips can have different shades, but the most common are strips with a white glow, which, in turn, are divided by temperature. For example, stripes with warm white light, closer in hue to incandescent lamps. This pleasant soft glow of a slightly yellowish tint is used for bedrooms, living rooms and children's rooms. If we talk about cold light, then this is most applicable for office space.
 Monochrome white ribbon in the interior looks pretty good
To connect a monochrome LED strip, only 2 contacts are required: plus and minus. Their installation is much easier than RGB, however, the effect created during the operation of such a strip cannot be called unusual. Let's try to consider in detail how a monochrome LED strip is connected.
Instructions for connecting a monochrome light strip
In order to make the step-by-step installation instructions easier for the reader to understand, we will illustrate all the steps performed with photo examples.
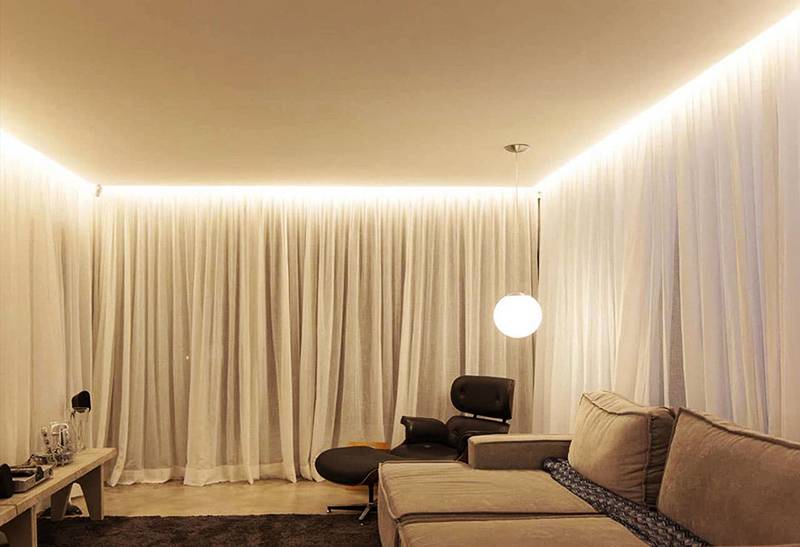
 Low-power tape can be used as a backlight
Consider the simplest option, when all equipment is purchased at the same time as a set. In this case, you do not need a soldering iron or additional connectors. All necessary plugs are already installed on the equipment.
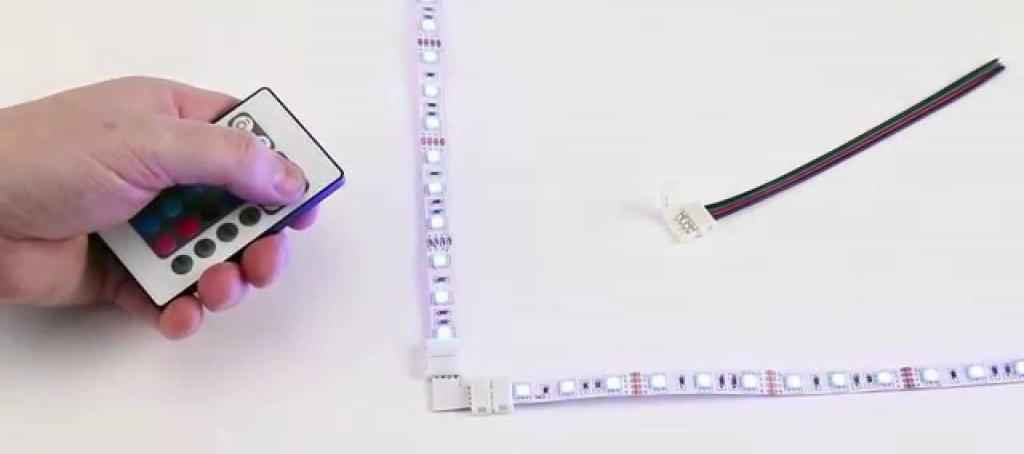
First, let's look at what a kit is.It:
- LED strip 5 m long;
- dimmer with remote control for monochrome tape;
- power supply (in our case, its power is 6 W).
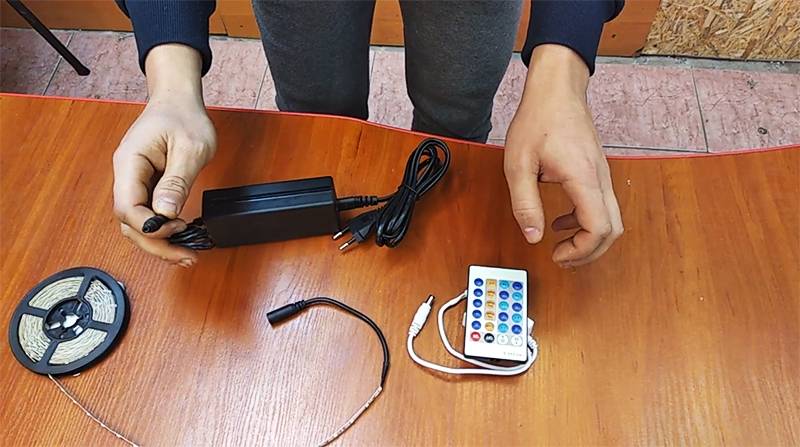 Lighting kit: tape, dimmer, power supply
After unpacking, you need to connect the LED strip to the dimmer, and then to the power supply. It is extremely simple to do this, you just need to insert the plugs into the appropriate sockets.
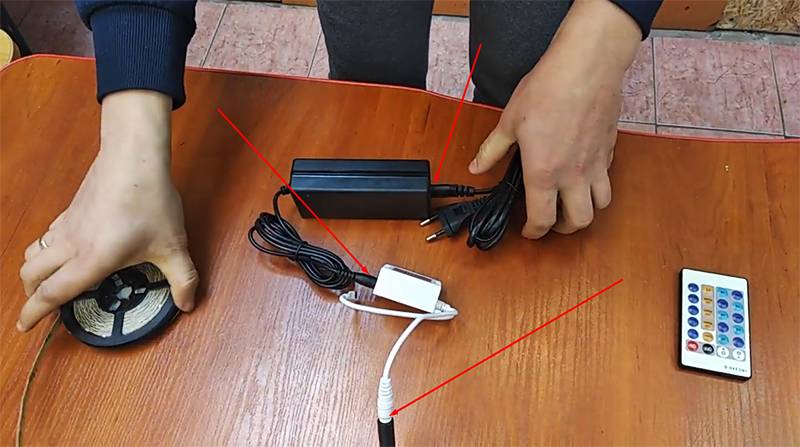 Connection of all elements of the circuit - now you can turn on the power supply to the network
Turning on and off the LED backlight is carried out using the remote control. To do this, it has buttons On and Off.


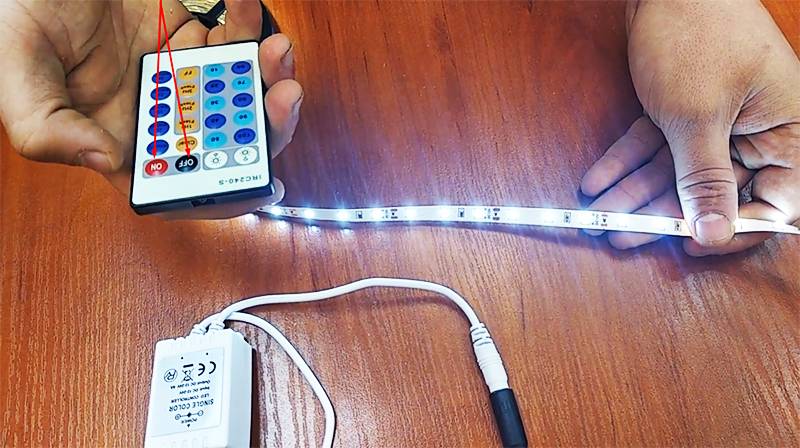 Buttons to turn the LED strip on and off
Additional buttons, in our case orange-brown, adjust the intensity of the flashing of the ribbon LEDs from the slowest (top) to the fastest (bottom). This option can create the necessary atmosphere during any holiday, dance.
 Buttons for adjusting the intensity of the strobe mode
Also on the remote control you can find buttons to enable other modes, such as cyclic slow or fast fading. If you want to manually dim the light intensity a little, then at the top there are keys for these purposes. This, in fact, is the dimmer itself.
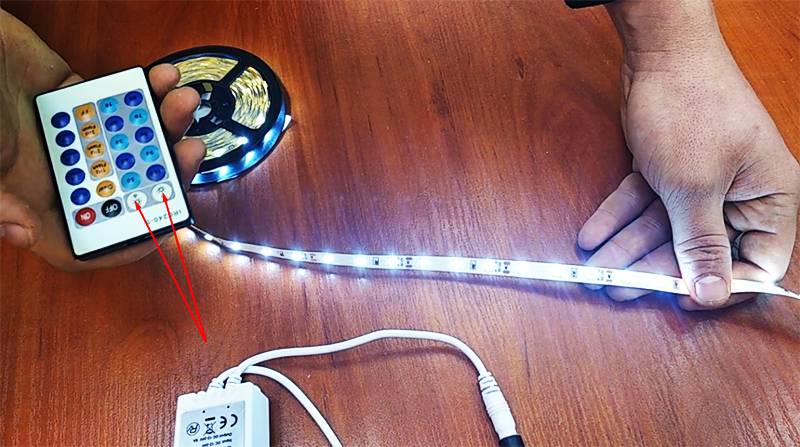 Manual dimming buttons on the remote control
Connecting two or more monochrome ribbons
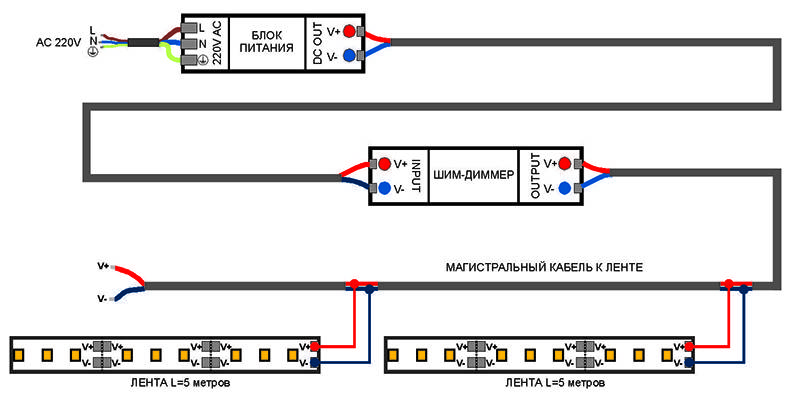
There is no particular difference in connecting additional tapes. However, there are a couple of nuances that should not be ignored. Firstly, LED strips cannot be connected in series, making strips of them longer than five meters. Such actions will lead to overheating and burnout of the tracks located closer to the power supply due to the increased load on them.Therefore, only parallel connection is suitable here.
 Monochrome tape switching scheme
Second, the power supply must have an output power corresponding to all LED strips connected to it. Ideally, the output power of the rectifier should be 30% higher than the power consumed. Otherwise, the power supply will overheat and eventually fail.
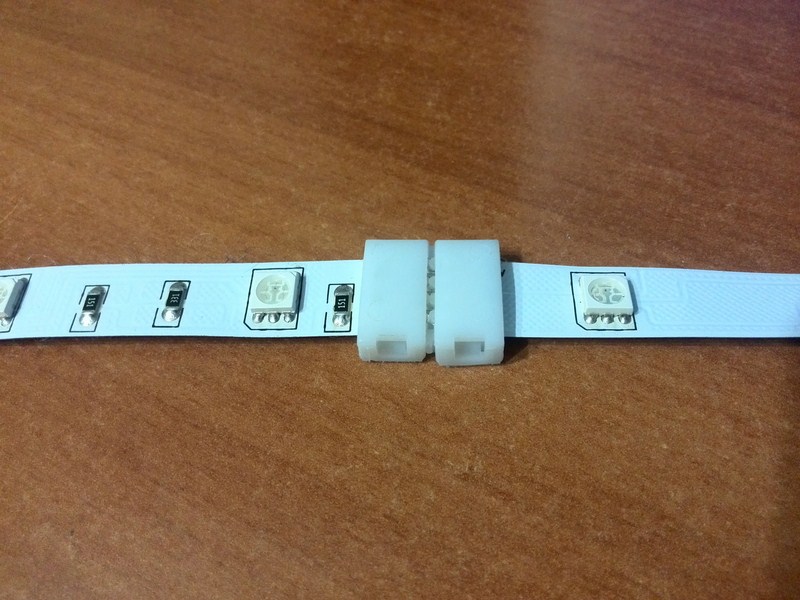
Bonding tape with silicone
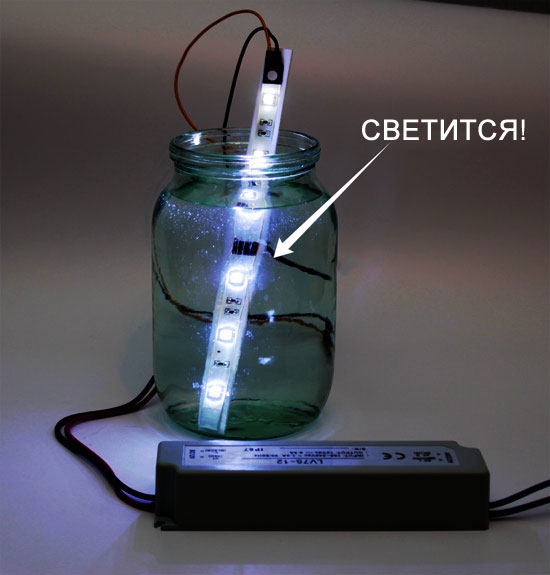
If you have a sealed tape with IP65 protection, then the process of connecting the connectors looks almost identical. Cut with scissors to the lengths you need.
After that, with a clerical knife, first remove the sealant over the contact patches, and then clean the copper pads themselves. All protective silicone from the substrate near the copper pads must be removed.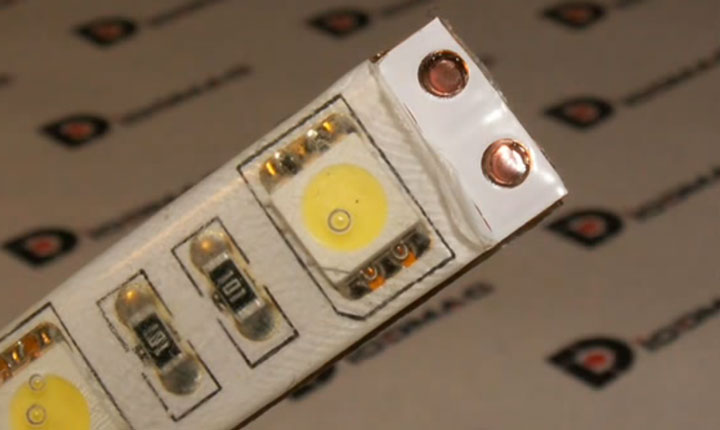
Cut off the sealant just enough so that the end of the tape, together with the contacts, fits freely into the connector. Next, open the cover of the connecting clamp and wind the tape inside.
For better fastening, remove some tape from the back in advance. The tape will go pretty hard. Firstly, because of the adhesive base on the back, and secondly, because of the silicone on the sides.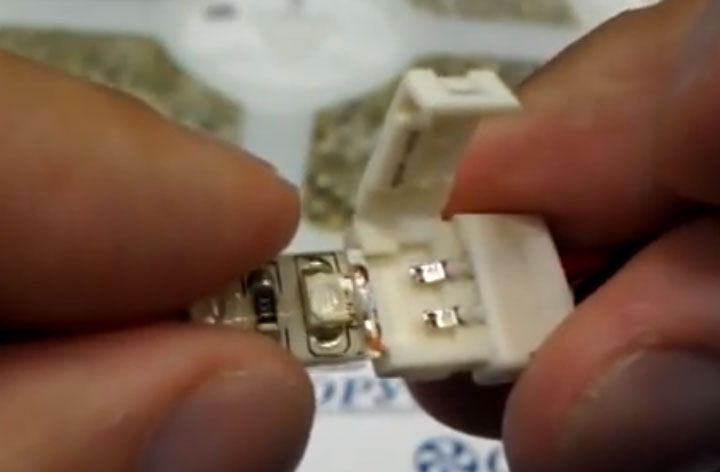
Do the same with the second connector. Then close the lid until a characteristic click.
Often comes across such a tape, where the LED is located very close to the copper pads. And when placed in a clamp, it will interfere with the tight closure of the lid. What to do?
Alternatively, you can cut off the backlight strip not at the place of the factory cut, but in such a way as to leave two contacts on one side at once.
Of course, the second piece of LED strip will lose from this.In fact, you will have to throw out one module of at least 3 diodes, but as an exception, this method has the right to life.
The connectors discussed above are available for various types of connections. Here are the main types of them (name, characteristics, sizes):
 To connect this type, pull out the pressure plate and insert the end of the tape into the socket until it stops.
To fix it there and create contact, you need to push the plate back into place.
After that, be sure to check the security of fixation by slightly pulling on the LED strip.
The advantage of this connection is its dimensions. Such connectors are the smallest in both width and height.
However, unlike the previous model, here you absolutely do not see the state of the contacts inside and how tightly and reliably they are interconnected.
 The two types of connectors discussed above, during long-term operation, show not entirely satisfactory results and contact quality.
For example, in NLSC, the most painful place is the fixing plastic cover. It often either breaks off by itself, or the fixing lock on the side breaks off.
Another disadvantage is the contact patches, which do not always adhere to the entire surface of the pads on the tape.
If the power of the tape is large enough, then weak contacts do not withstand and melt.
Such connectors simply cannot pass large currents through themselves.
When trying to bend them, when there is some mismatch of the pressure spot, they can break off.
Therefore, more modern models designed according to the puncture principle have recently appeared.
Here is an example of a similar double-sided piercing connector.
On one side, it has contacts in the form of a dovetail for a wire.
And on the other in the form of pins - under the LED strip.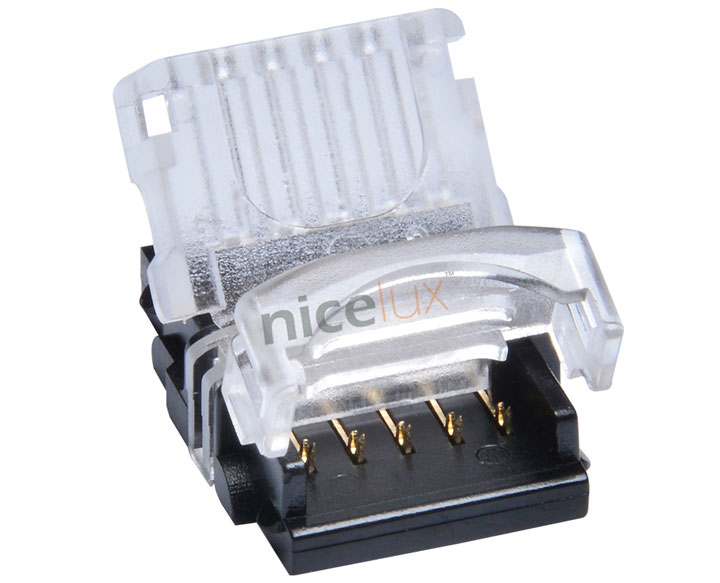
With it, you can connect the LED strip to the power supply. Such models can be found both for tapes of open execution, and for sealed ones in silicone.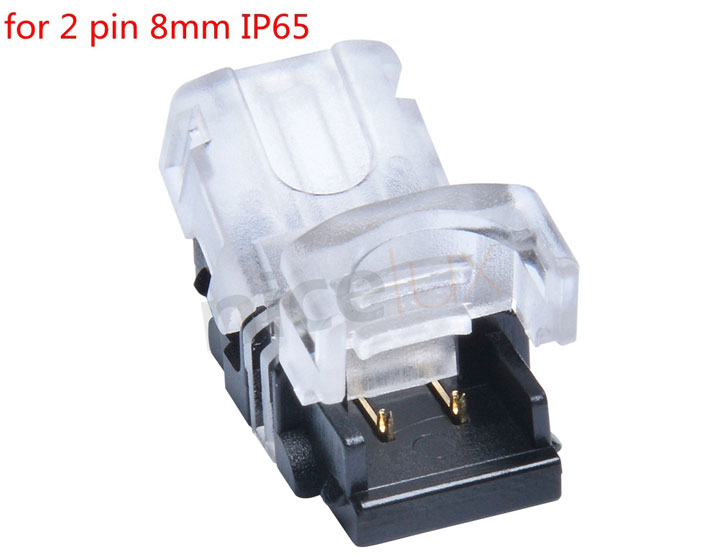


To connect, insert the end or the beginning of the backlight segment into the connector and press it on top with a transparent cover.
In this case, the contact pins first appear below the copper patches, and then literally piercing the protective layer and copper tracks, form a reliable contact.
At the same time, it is no longer possible to pull the tape out of the connector. And you can check the connection points through a transparent cover.
To connect the power wires, they do not even have to be stripped. The process itself is somewhat reminiscent of twisted pair connection in internet outlets.
To open such a connector, you will need to make a certain effort. It's just not possible to do it by hand. Pry off the sides of the lid with a knife blade and lift it up.
Methods and order of soldering
First of all, you need to properly prepare for the soldering process. For this you need:
- Set the LED strip to the appropriate length. They are usually sold in rolls of five meters in length. The incision must be made strictly along the special line marked on it.
- Cut off a piece of heat shrink tubing about two centimeters long.
- If there is a layer of silicone on the contact pads, it must be cut off with a knife edge.
Consider how to properly solder the wires to the LED strip in the standard case, and also when it is covered with silicone, it becomes necessary to overlap without conductors, at an angle and an rgb tape is used.
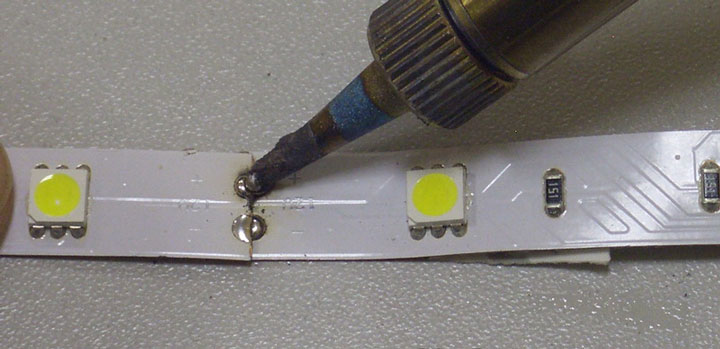
Solder the wires to the tape
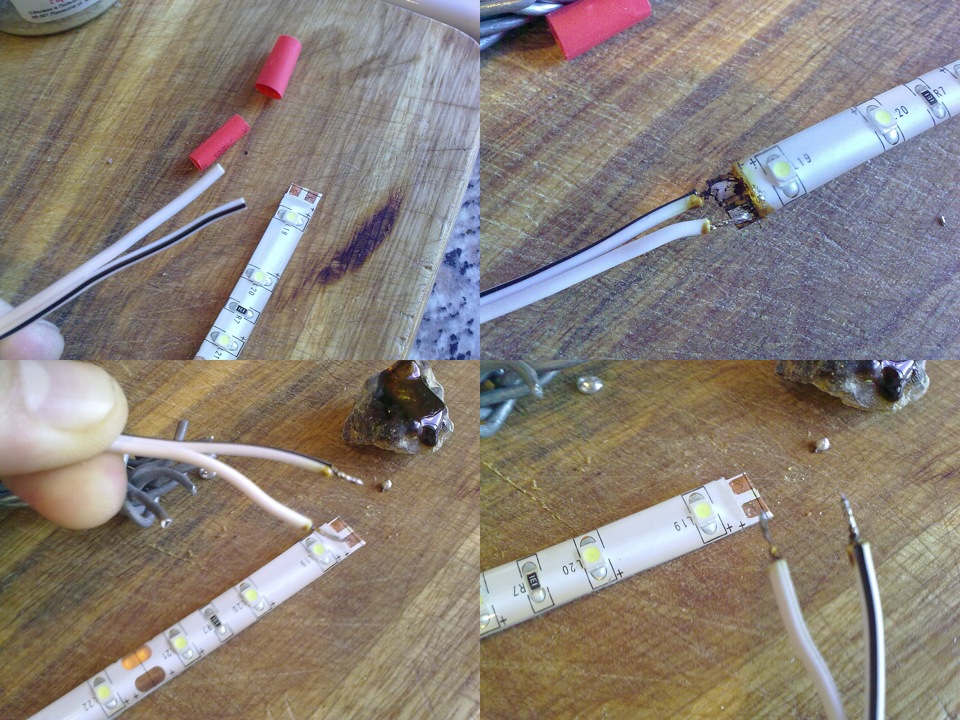
Soldering wiring to the LED strip is carried out in several stages:
- Cleaning and surface preparation of tape contacts.
- Clearing 0.5 cm of the wiring from the insulating sheath.
- Tinning of contacts and conductors.
- Sequential soldering of each wire to the tape with strict observance of polarity.
- Putting a piece of heat shrink tubing on the soldering point, so that the nearest diode remains open.
- Heating the shrink segment in order to shrink it (you can use a building hair dryer, a match, a lighter).
Soldering the wires is not that hard. However, there are some important things to keep in mind during this process:
- A properly tinned surface of contacts and conductors must be completely covered with solder.
- In order not to confuse the polarity in the future, you need to take multi-colored wires.
- During soldering, the soldering iron tip should not come into contact with the contact point for more than 5 seconds, and when using flux - 1-2 seconds.
- Excessive exposure of wires can lead to uncontrolled adhesion. As a result, a short circuit will occur.
- After soldering is completed, the solder substance on each pin should not touch. You can use a voltmeter to check.
How to solder silicone coated tape
Often, users have a question about how to solder together wires and contacts coated with a layer of silicone - the answer to it is simple - you just need to peel off the silicone insulation with a sharp object. For this, a clerical knife is suitable. Further, the soldering process is no different from the above. You need to act in exactly the same way.
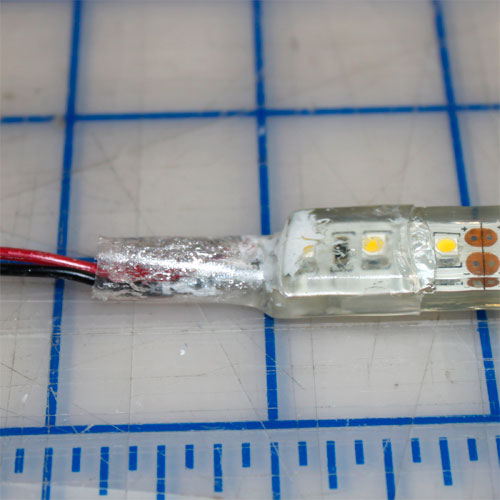
The only thing that may be required upon completion of the soldering operation is to seal the LED strip back, in case it is intended for use in extreme conditions. In addition, it may have a special waterproof insulation. In this case, you need to try to pull this sheath over the place of soldering, and fill the junction with the wires with silicone. At the end, a plug is placed on top, lubricated with sealant from the inside and through the holes of which conductors are passed.
Splice without wires
It is often required to solder segments of LED strips to each other without the use of wires. The procedure consists of the following steps:
- The contact pads of both tapes must be cleaned of the insulation layer and the film - on one side of the LEDs, and on the other - on both sides, then everything should be cleaned and tinned.
- Lay each other's tapes on top of each other by 3 mm so that the tape peeled on both sides lies on the peeled one on only one side.
- Warm up all the contact pads in turn with the tip of a heated soldering iron so that the drops of solder from both tapes are connected to each other (but not between adjacent ones!).
- Move a piece of heat shrink tubing (previously dressed on one of the ends of the tape) to the place of the soldered contacts and, heating it with a building hair dryer or a small open flame, precipitate.
Soldering wires at an angle
The technology for soldering an LED strip at an angle (usually 90 degrees) is no different from the standard procedure described above and contains all the same preparatory and basic steps. The only difference is in the choice of the place of contacts.So that the wires do not intersect and do not close, they must be brought to different contact pads (observing the polarity), divided by the module step - through several diodes. Such placement will not impair the performance of the luminaire in any way, however, it will greatly facilitate the soldering procedure and subsequent operation.
rgb led strip
All four pins of the rgb tape must be connected so that they are not soldered together. Otherwise, a short circuit may occur and, as a result, a violation in its operation - turning off any colors, flashing, fading and completely turning off.
Wiring diagram via power supply
The rated voltage of a standard duralight is 12 V or 24 V, so you should connect the LED strip to a power supply that converts AC to DC.
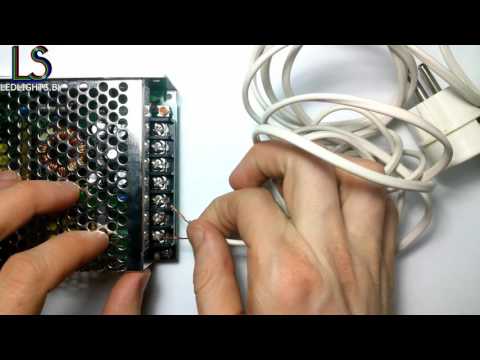
For short length
Standard duralights are sold in bays of 5 m, to connect such a section or less, use the following instructions.
- If 2 power wires were not initially connected to the tape, connect them to 1 of the ends of the tape using special connectors or a soldering iron.
- Clamp the free ends of the contacts in the corresponding PSU terminals (+V, -V), observing the polarity.
- Connect the mains cable to terminals L and N (220V AC).
When connecting the LED strip to a 12 volt PSU in several segments, follow the same steps.
Wiring diagram for a strip of LEDs (up to 5 meters).
Tapes over 5 meters
The wiring diagram for an LED strip longer than 5 m is slightly different from the standard one. There are several possible connection options.
- One powerful power supply unit, providing a current of up to 20 A in the load, for several segments of duralight. To ensure a uniform glow, you need to supply voltage from 2 sides to each section.
- Separate power supplies for each section of 5 m. In this case, you can connect the entire circuit to one outlet or each unit to its own 220 volt source. This method is inconvenient in that it is necessary to lay an additional large number of connecting wires.
- The use of several 12 V DC sources in the circuit, a dimmer for brightness control and a 1-channel amplifier that duplicates the dimmer signal for a section powered by another PSU.
Connecting RGB and RGBW LED
The peculiarity of such duralights is that they create multi-colored lighting:
- RGB - red, green, blue;
- RGBW - 3 of the above colors and white.
The connection is made according to the same rules as with a monochrome LED device, but the circuit should be supplemented with a controller that allows you to select the inclusion of different diodes, control the brightness and create color effects.
A simple circuit for 1 section of a multicolor tape is arranged as follows: 220 V source - 12 V power supply - RGB controller - tape reel. To assemble a chain with several long lengths, follow the connection rules for tapes over 5 m.
Kinds
Power supplies for LED strips powered by 12 volts do not have a single classification, but all of them can be conditionally divided based on technical, design and functional features. Let's consider this point in more detail.
Version
A sealed power supply has several positive aspects at once. Housing made of high-quality material that protects the inside of the device from any external influence. environment.
Degree of protection against moisture and dust
Any commercially available enclosure for electrical equipment is tested for possible penetration into solid objects and moisture according to approved international standards. As a result, the device is assigned a certain degree of protection (abbreviated as IPxx, where xx is a two-digit number), which determines the possible permissible conditions for its operation.


- IP 20, power supply with an open housing type. Circuit elements are protected by a metal casing with holes with a diameter of at least 12.5 mm. The electrical circuit is well protected from the touch of fingers and large objects, there is no protection against water and small objects.
- IP 54 power supply for 12 V LED strip with partial sealing. It has full protection against contact with objects and partly with dust. Water splashes of any direction are not able to penetrate the device.
- IP67 or IP68. Products in a sealed housing with full protection against dust. In the first option, short-term immersion in water is allowed, in the second, the device can work under water for a long time. Usually used in backlighting with LED strips on the street.
Features of the PSU circuitry
According to the principle of operation, all power supplies are divided into 3 types: linear, pulsed and transformerless (below, one version of their circuits is presented). Linear-type power supplies, as an invention of the last century, were actively used before the advent of switching power supplies. Their circuit is extremely simple: a step-down transformer, a rectifier, a filter and an integral stabilizer.
A switching power supply for a 12 V light-emitting LED strip is a little more complicated in circuitry, but it is favorably distinguished by high efficiency, low weight and compact dimensions.
Transformerless type blocks are practically not used to power LED strips. In them, the mains voltage of 220 V is reduced using an RC chain with further stabilization.
Additional functions
Today on the market you can find power supplies with a wide variety of additional functions: from a simple voltage indicator on an LED to remote voltage control. In some cases, add-ons can be very useful, in others they are completely useless. Before choosing a product, it is recommended to clearly define the requirements and functions of the product.
Use with a computer
Duralight can be used to illuminate the workplace. In this case, you can not connect it to a power outlet or through a switch and use the device without a power supply, just connect the LED strip directly to the computer. This can be done in several ways.
Via USB connector
Most standard duralights require a supply voltage of 12 V or 24 V, while the USB port has a voltage of 5 V with a permissible current of up to 500 mA.
The easiest option in this case is to purchase a non-standard 5-volt duralight with a USB connection connector (for example, made in China), it can be connected to any device equipped with a USB port.
The USB option is the only one possible for connecting to a laptop; there are other less labor-intensive ways to power it from the system unit of a desktop computer.
Via one of the molex connectors
There are several of these connectors in the PC, they are located under the side cover of the system unit and have 4 contacts with color-coded insulation - yellow (+12 V), 2 black (GND) and red (+5 V).To connect the LED strip, yellow and 1 of the black wires are used. To make the connection detachable, you can use a MOLEX-SATA adapter. To connect a duralight, the following steps are required.
- Turn off the computer and remove the side cover of the system unit.
- Remove the SATA plug from the adapter, you won't need it.
- Solder to the released ends of 1 of the black wires the duralight contact with the “-“ sign, to the yellow one - the contact with the “+” sign.
- Cut or insulate the remaining black and red pins.
- Find an unused molex connector and connect it to an adapter to test turn on the duralight.
Direct to motherboard
Some PC models allow you to connect the LED strip to the appropriate connector on the motherboard, but it is not available on every device. The easiest and most convenient way to connect a duralight to the motherboard is to buy a ready-made installation kit, which includes an RGB tape and all accessories for installation.
Connection technique using connectors
Among the advantages of LED devices, one of the main places is their optimization, which is also manifested in the minimum requirements for consumables during installation. Nevertheless, sometimes the inclusion of connectors in electrical circuits justifies itself. How to solder LEDs with such elements? Soldering in this case acts as an auxiliary means of ensuring a reliable connection between the wires, and the connectors form a kind of reinforcing inner frame. The optimal size of the connector in width is 8-10 mm. At the first stage, it is necessary to create a structural connection by making the required number of contacts on the board, and then proceed directly to soldering.
At the same time, it should be taken into account that the connection with the connector does not always give an advantage in terms of the future operation of the LED. Firstly, the connection points with such fittings are more prone to burning, and also contribute to the rapid heating of the emitter. Secondly, the glow may worsen, which is expressed in a decrease in brightness. How to solder LEDs on a board with a connector to eliminate such negative effects? It is advisable to abandon copper conductors, and perform the soldering itself in a continuous way, which will eliminate the risk of the formation of oxidation sites.
Tools and materials for soldering
This process is not at all complicated, it is enough to have the necessary materials and follow a few elementary rules.
Here is everything you might need:
soldering iron with a power of not more than 25-40W
thin copper wires with a cross section of 0.5-0.75mm2
rosin
neutral flux gel
knife or stripper for stripping insulation from wires
toothpick for easy application of flux
tin-lead solder POS-60 or equivalent
Briefly, the whole process should look like this:
We prepare the soldering iron Dip in rosin Dip in solder Again in rosin Soldering wires and tape
And now all this is more detailed and with certain nuances.
So, you have a tape and contact points on it, where you should solder the wires.
First of all, find the marking, which contact is “positive” and which is “negative”.
On RGB versions there will be one common plus (+ 12V) and three minuses (R-G-B)
This is important in the future to observe the polarity and supply power from the unit.
Strip the ends of the wires from insulation.It is advisable to take precisely multi-colored cores so as not to be confused with polarity in the future.


Heat the soldering iron, touch the solder and lower the vein into the rosin.
After that, pulling out the core, immediately bring the tip of the soldering iron with tin to it. The tinning process should happen automatically. Do the procedure a couple of times to completely cover the copper core on all sides.
Now you need to tin the contact points on the LED strip. The best way to do this is with flux.
Before doing this, do not forget to thoroughly clean the tip of the soldering iron.
Dip it in rosin and clean off everything superfluous. This can be done with a special sponge, a simple knife, if the soot has eaten in thoroughly, or use a metal sponge.
The main thing is to prevent any foreign elements from getting on the contact pad.
Next, take quite a bit of flux on the tip of a toothpick and apply it to the LED strip.
Then touch the solder with a heated soldering iron and apply its tip for 1-2 seconds to the soldering points on the tape.
It is important that the soldering iron is low-power, with a heating temperature of no more than 250 degrees. What if you don't have a regulator? How to determine the heating temperature?
What if you don't have a regulator? How to determine the heating temperature?
look at the pity. It must be clean, not hot.
when dipped in rosin, the latter should not boil
from the sting should go just a little smoke
The maximum allowable time for applying the tip to the LED strip is no more than 5 seconds. When using flux, this happens much faster than 1-2 seconds.
As a result, you should get two tin tubercles, in which you will then need to “drown” the connecting wires.
Before directly soldering the wires themselves, try on their tips.
They must be stripped exactly along the length of the soldering points. Usually it is no more than 2 mm.
If the bare ends are long enough, then when bent, they can easily short out to each other. Therefore, always bite off the excess, leaving the tip as short as possible.
Touch this tip of the tubercle on the contact of the LED strip and apply a soldering iron on top for 1 second. The tin melts and the wire sinks, as if drowning in it. Do the same with the second wire.
As a result, you should get a fairly large contact area. But most importantly, this place is covered on all sides with a tin “cushion”, which reliably protects the contacts from oxidation.
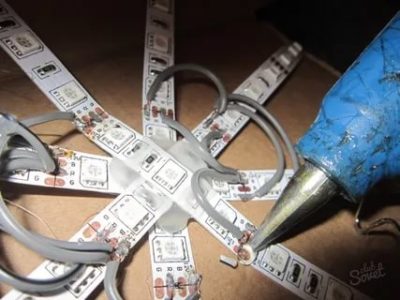
For even greater strength, the place of soldering can be filled with hot melt adhesive, and put on heat shrink on top. Then the wires will not fall off even with constant bends.
This is interesting: How to choose motion sensor to turn on the light: it's educational
Docking with connectors
For a faster and more affordable way to fasten two fragments of LED filaments, special connectors are used. They are a small plastic block with a latch and pads.
What are
Depending on the task, different types of connectors are used:
- With a curve. Such devices help to combine fragments of the thread in any desired direction, put them at different angles and in parallel.
- No bend. Suitable for straight connection only.
- Corner. As the name implies, their purpose is to join fragments at a right angle.
Standard angle connector.
Step-by-step instructions for switching
All that is required for such an operation is sharp scissors.The algorithm is the following:
- Cut two pieces of tape to the desired length. The number of LEDs on each of them must be a multiple of 3.
- If there is a protective silicone coating, clean it with a clerical knife so that the path to the contacts is open.
- Open the connector cover and place one end inside it. The contacts must fit snugly against the pad.
- The cover snaps into place, and the same manipulation is performed with the end of the second output of the LED filament.
- When connecting wires through the connector, you need to make sure that the polarity is correct so that you do not have to do it all over again.
- The final stage is connecting to the network and checking the operation of the tape assembled together.
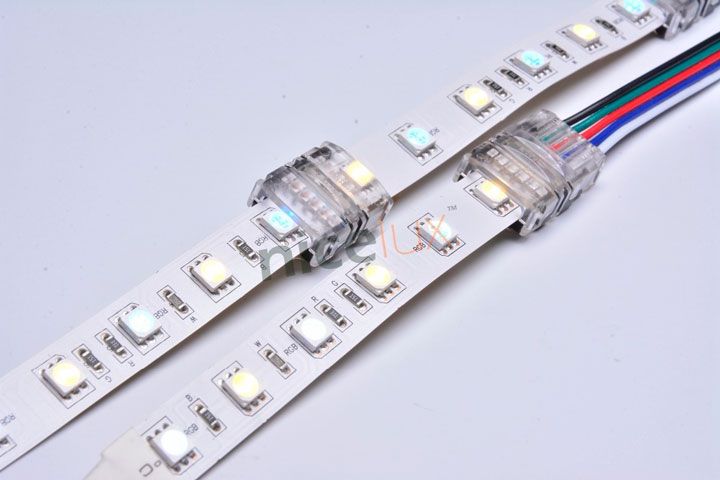
To connect 3 or more fragments of the LED strip, you should use an RGB-type connector. It, unlike standard connectors, has not 2 pads, but 4 - 2 on each side. Between the two ends of the connector runs a 4-wire bus of wires of different colors, it can be folded if necessary.


RGB connector for LED filament.
In addition, a quick connector with two wires can be used to connect pieces of a single-color LED strip. It must be turned over so that the wide white strip is on top, insert each end of the thread into the corresponding connector
In this case, it is important to ensure that polarity is observed. After securely fixing and snapping the box, you can begin to check the operation of the LED strip
Read more:
4 Ways to Repair LED Strip
The choice of LED strip for lighting an apartment
Connecting a 12V LED strip to a computer
LED strip device
To date, the LED-type strip is a printed circuit board that is recombined with a thin, elastic-type base. On the one hand, limiting resistors are applied to this tape, which allows you to connect this product to a power source or another device. It is also worth noting that the product has contacts to which, if necessary, you can solder connecting wires. If you look closely, you can see that through three different elements there are dashes that are located across the product. This is precisely the mark at which the separation of the tape is possible.
There are also tapes that are self-adhesive and with the help of them even a high school student will be able to do the installation. In this case, the installation does not require screws or any other reinforcing materials, it can be firmly fixed at the expense of his grounds.
Summing up
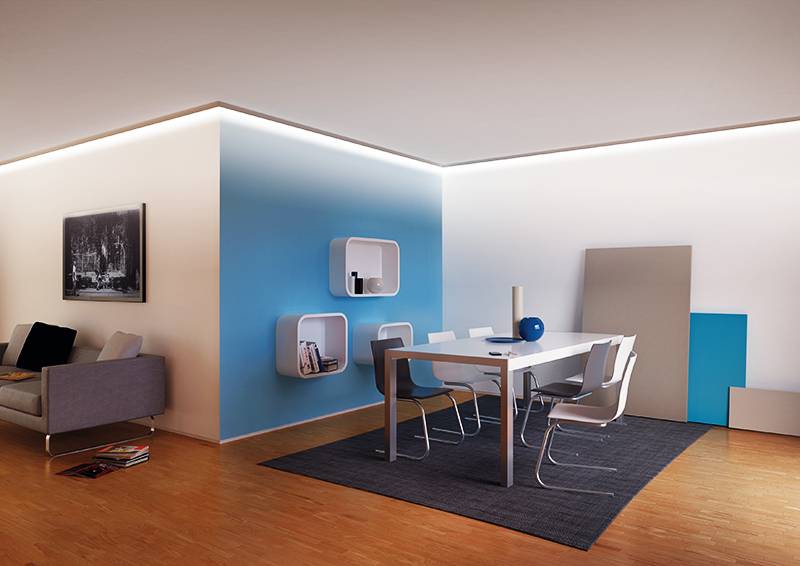
It doesn't matter why the home master decided to use the LED strip - as a backlight or main lighting
One thing is important. The LED strip will fit into any interior, suitable for implementing any, even the most daring ideas related to arranging a romantic setting or delimiting room zones.
Taking into account the ease of installation of such equipment and the gradually decreasing cost of LEDs, we can say with confidence that the popularity of LED strips will not fall, but rather the opposite.
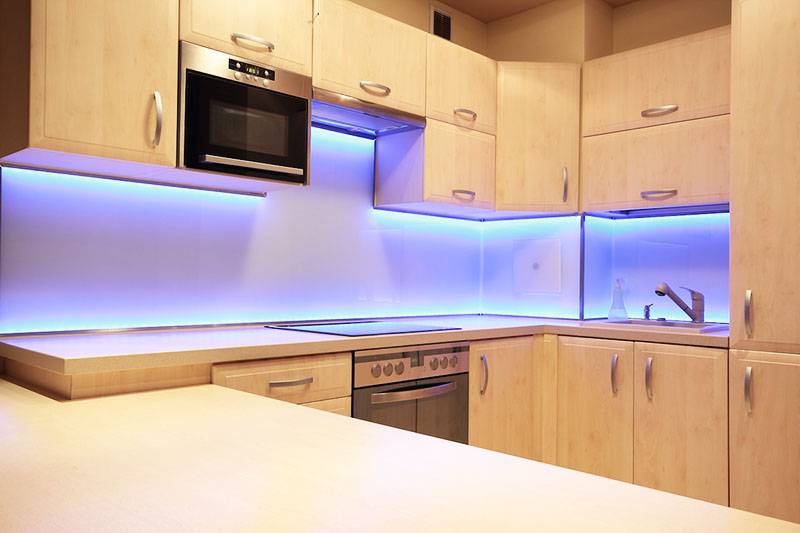 The tape is ideal as a lighting for the working area of \u200b\u200bthe kitchen
We hope that our reader will find the information presented today useful. Perhaps you still have questions, or some points seemed incomprehensible. In that case, simply state their essence in the discussions below.Homius will be happy to explain them. There you can also share your personal experience in installing LED strip, express your personal opinion about the material or leave your comment.
 Watch this video on YouTube
Previous Lighting Ideas for DIY lamps and step by step instructions for making them
Next LightingDiode bridge: purpose, circuit, implementation


