- Stage 8. Assembly and installation of doors
- Rationale and choice of design
- Preparatory stage
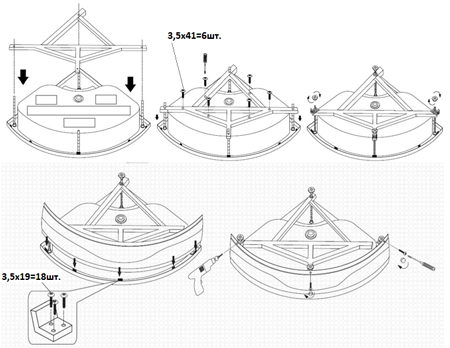
- Stage 5. Assembly and installation of the roof
- What to assemble a shower cabin from
- Installing shower walls
- How to make a do-it-yourself tile shower tray
- Filling the screed
- Ladder installation
- The erection of the side
- Filling the screed inside the pallet
- Waterproofing
- Facing
- How to raise the pallet higher?
- Leg height adjustment
- Increase the length of the studs
- How to make a shower tray with your own hands
- Welded version
- Cement pouring and tile construction
- The basis for the shower enclosure made of bricks
Stage 8. Assembly and installation of doors
8.1. Put long F-shaped silicone profiles (brushes) on the doors so that the fins are directed in your direction.

8.2. Put silicone profiles with magnetic latches on the doors, observe the polarity.
8.3. Install handles.
8.4. Take the top double and bottom rollers with a button and screw them to the door so that the wheels are directed towards the bend of the door.
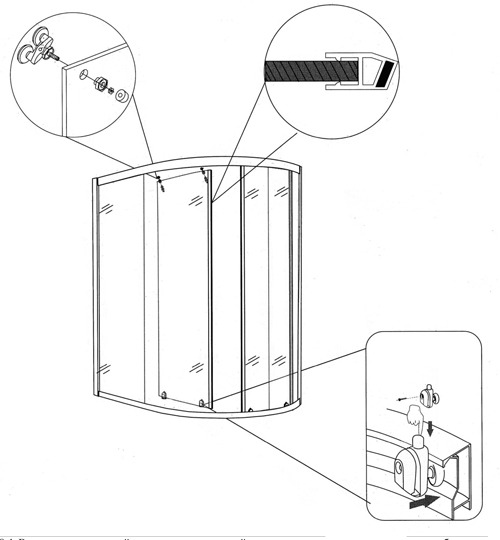
8.5. Slide the doors onto the upper horizontal profile by inserting the upper double rollers into it.
8.6. Insert the lower rollers into the lower horizontal profile by pressing the button.
8.7.Adjust the doors with the screws on the upper rollers so that when the doors are closed there are no gaps between them at the top or bottom.
When installing, apply plumbing sealant to all joints, between profiles, tray, glass.
Do not use the product for 24 hours until the sealant is completely dry
Rationale and choice of design
The main reason that homemade shower cabins have become popular is the savings on their construction. Prices for samples of goods with a set of additional features (including a power shower) simply shock buyers. It seems that manufacturers do not take into account the capabilities of the average user and make booths only "for the rich."
The option considered here is beneficial to those people who plan to assemble a simple shower stall, designed only for washing and replacing a cast-iron bath.
Another reason for making a shower cabin from a bath with your own hands is the ability to install it in any living compartment of the apartment.
Before you make a shower cabin with your own hands, calculate the costs of the following structural elements:
- Reliable waterproofing, lined with a protective film used for finishing pools.
- Convenient drain built into the floor and requiring its dismantling and strengthening.
- To finish the flooring, you will need tiles with a ribbed (non-slip) surface, as well as a water-repellent adhesive.
- To this is added material for the walls (polycarbonate or fiberglass with a set of guides), a finished pallet that you have to buy in a store.
Regarding the last point - you can make a pallet yourself (from brick, for example).
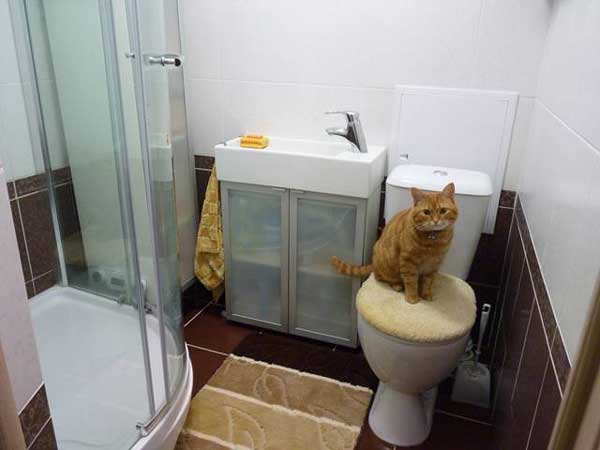
For those who plan to further reduce the cost, experts advise making the simplest version of a shower cabin. It is understood as an ordinary corner (its appearance is shown in the picture on the left and above).


But in any case, the contractor will first need to familiarize himself with the simplest technical solutions that will not exceed the costs included in the estimate.
Preparatory stage
The arrangement of the shower stall is best combined with
major renovation or refurbishment of the bathroom. To simplify installation, it is recommended to develop design drawings -
a simple plan showing the location of individual plumbing units and how to connect parts
It is also important to note in
project, what materials will be used, calculation of their quantity
Before
highlight with a marker the location of the ladder and the walls of the box, you should determine the area for draining the water. Separate drawings are being prepared for
partitions, plumbing access and
points where
it is planned to place a watering can, shelves, etc.
Reference! At
drawing up drawings, it is important to take into account that the installation of the ladder involves lifting the podium to
15 cm from
concrete screed. To do this
it is possible by raising the level of the entire floor or only a dedicated part under the booth
How a shower works
pallet is based on the diversion of wastewater into
the opening of the ladder through the spontaneous flow of water created by the sloping floor. Before
the beginning of installation, the base of the floor (screed) must be treated with a waterproofing material with an approach to the walls up to 25 cm
from floor level. AT
For these purposes, it is appropriate to use bituminous mastic with high hydrophobic properties.
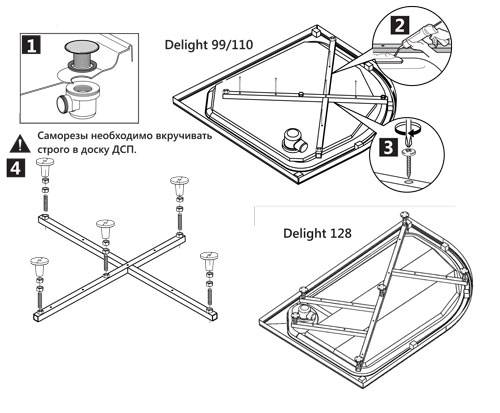
Stage 5. Assembly and installation of the roof
5.1. Remove the film from the roof.
5.2. Attach a lamp to the roof.
5.3.Mount the speaker on the roof using screws (self-tapping screws) and the exhaust fan using screws (self-tapping screws). At the same time, round O-shaped decorative plates are installed on the inside of the roof, covering the speaker and the fan, which are fastened with the same screws (self-tapping screws) as the speaker with the exhaust fan.
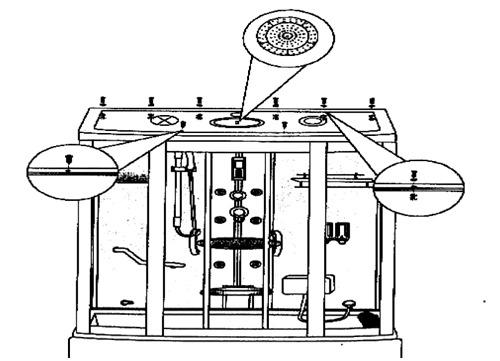
5.4. Install the overhead shower onto the roof and tighten the nut. Connect the hose with plastic elbow and gasket coming from the faucet connected to water outlet with a pointer to reflector "upper shower", to the upper shower.
5.5. Align the assembled roof with the front and back walls and attach it with screws (self-tapping screws) to the back wall.
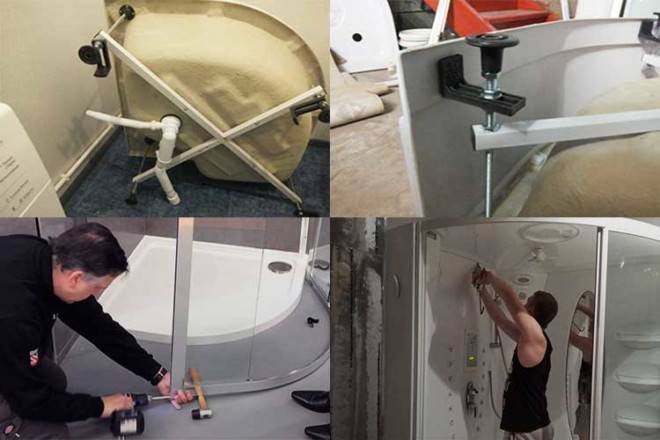
What to assemble a shower cabin from
In most cases, it is advantageous to buy a shower cabin assembled. But not always. Sometimes components can cost less. But the speed of installation and commissioning is still on the side of the finished assembly. In addition, the quality is guaranteed to be high. Here is what the installation process looks like in this case:
- According to the pallet template, the entry point to the sewer is outlined.
- If necessary, a foundation is placed at the building level. For products with legs, each is adjustable to achieve the desired result.
- The pallet must be placed strictly horizontally.
- The corner of the cab is assembled in sections (fencing made of glass and plastic).
This completes the installation. With skill, it hardly takes more than an hour. Of course, if there is no foundation made using a building mixture.


By purchasing the components separately, the owner greatly complicates the procedure.The installation of the pallet is no different from the process described above, and then it all depends on which type of corner is chosen.
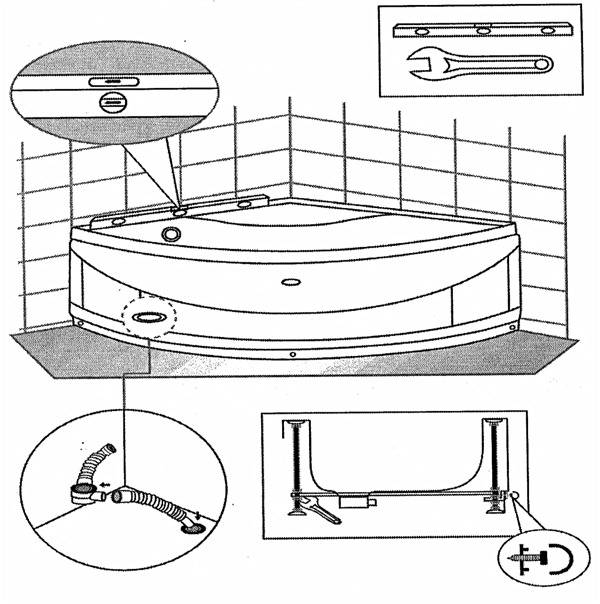
Installing shower walls
Installing a shower cabin with your own hands
Do-it-yourself installation of a shower cabin in an apartment necessarily consists of self-assembly of the walls. To install them correctly, the following guidelines should be followed.
1. Start installation from the back, which contains:
- electrician;
- connection of water and regulation of its temperature.
2. First put it near the panel, connect them together with screws. Self-tapping screws are used to connect the pallet to the back wall. And the joint is treated with a sealant.
Remember! All cabin sides must be assembled separately and only then mounted in the cabin! All fasteners should not be tightened tightly until the end of installation.
3. Place one of the side transparent walls. Locate the pre-cut slots in the pallet and make sure they line up with the identical mounting holes in the panels. Connect them using screws using the special key that comes with the kit. Coat the joints with a sealant.
4. Install the second side wall in the same way.
5. Put the top panel on top. Install it in the same way as the pallet, only completely in a mirror order. Do not apply sealant to anything other than the speaker.
6. Install and attach the planks using self-tapping screws.
7. Standard equipment includes a pair of glasses and a pair of slats. Take any of the strips, lubricate it with sealing agents, insert glass into it.
8. Insert a rubber seal between the grooves of the panel and the glass, having previously lubricated this place with a sealant.
9.In semicircular glasses there are special holes into which you need to insert the wheels so that they are right in the grooves of the curved bar.
10. Using the adjusting screw, which is located in the lower wheels, adjust the level of the door.
11. Don't forget to attach the handles.
12. Connect the water supply.
13. Connect electronics.
14. Place the transformer on top of the booth and power it up.
15. Push the booth tightly into the corner.
16. Check the correct operation of all systems.
17. Tighten all fasteners firmly.
How to make a do-it-yourself tile shower tray
For those people who do not know how to make a shower tray with their own hands, we suggest that you familiarize yourself with the technology of this process, as well as the features of each operation.
The main steps in the manufacture and installation of a tile shower tray:
- Screed filling.
- Ladder installation.
- The erection of the side of the pallet.
- Filling the screed inside the pallet.
- Waterproofing.
- Facing.
Filling the screed
The manufacture of the pallet should begin with preparatory operations, during which the existing base must be brought into the appropriate state. First of all, it is necessary to dismantle the old plumbing and tiles, and then check the quality of the rough screed. If an empty sound comes out when tapping the floor, then it is better to remove the old coating, and instead fill in a layer of a new screed, on which the shower tray will be installed.
After that, two coats of primer should be applied to the floor. Now you can start waterproofing. If a liquid mastic was chosen for these purposes, then this material must be applied to the floor, as well as to the walls (up to 400 mm in height).All corners, as well as the joints of the floor and walls, should be especially carefully processed.
After the mastic has hardened, you can start pouring the rough screed onto the floor, this operation should be performed only if the old rough screed is completely dismantled. If you want your bathroom to be warm and comfortable, you can install an underfloor heating system.
Ladder installation
After the screed poured onto the floor hardens, you can proceed with the installation of the trap. A sewer pipe must be connected to the installation site of the shower tray. So that water does not stagnate in the pan during water procedures, the pipe must be supplied with a certain slope, you can check the slope using a level. Then, under the prepared ladder, you can lay a brick, giving the structure the required height, and fix it with plaster or alabaster.
Ladder installation
When the applied mixtures harden well, it is recommended to test the pan for tightness. To do this, you need to pour some water inside and check how quickly it drains into the sewer pipe, as well as how dry all the joints remain. If you find the slightest leak, do not delay fixing this problem.


The erection of the side
For the manufacture of the side, you can use an ordinary brick. The pallet can have the shape of a square or a rectangle, if desired, you can give it a bend. It is necessary to lay the brick taking into account the chosen configuration, so that the side repeats the shape of the future pallet.
Building a brick wall
Before proceeding with the laying of bricks, it is recommended to make markings on the floor, which will help to make a side of the desired shape.Now you can start preparing the cement-sand mortar and laying the bricks. The side should be higher than the ladder, but it should not be made too high, just a few centimeters is enough.
Filling the screed inside the pallet
Now is the time to start pouring the final screed inside the shower tray. To improve the quality of the solution, it is necessary to add a little liquid glass or other water-repellent components to it.
Be sure to place beacons before pouring. Do not forget that the screed should have a slight slope, this can also be controlled using beacons.
Waterproofing
After the screed has dried, you can proceed to the final waterproofing. Coat the dried screed and brick sides with mastic, this will prevent moisture from getting inside. The waterproofing mastic must be applied very carefully, and its layer should not be too thick, since after that it will be possible to proceed to the final stage of work.
Final waterproofing
Facing
When all the preparatory work has already been completed, you can do the facing work. Choose the tile and the way it is placed so that there are as few swatches as possible, then the work will be easier, and the cladding will look much more beautiful.
Facing work must begin from the floor, and then move on to the sides of the structure. Tiles should be laid on the walls in a vertical direction, clearly level, making sure that the rows are even. Lastly, lay the top of the side.
Final tiling
Now you know how to install a tile shower tray. As you can see, there is nothing supernatural in this.
How to raise the pallet higher?
As a rule, if there is no blockage, the water slowly leaves due to the fact that the angle of inclination of the sewer outlet is not observed. It is recommended to install it so that the height changes by at least 3 cm per linear meter. But it is not always possible to provide such a bias. Therefore, it remains only to raise the shower cabin higher.
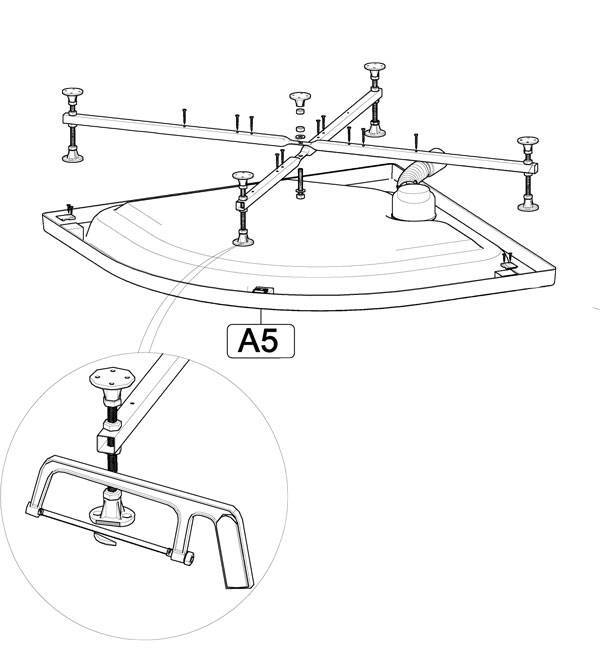
Leg height adjustment
Depending on the situation and the distance of the shower from the drain will require a rise to a height of several up to 10 cm or more.
To do this, it is not necessary to disassemble the structure. If the shower cabin is installed using a metal frame, legs will be screwed into it, the height of which can be easily adjusted.


Legs or studs are metal rods that are threaded. One end is fixed in the cabin frame, and the other end is fixed in a plastic or rubber stand on the floor.
The size of the stud is changed with a wrench. Counterclockwise rotation will make the leg taller, while clockwise rotation will shorten it. You can raise the shower cabin using this method by 3-5 centimeters.
 To increase the lifting height, paving slabs or wood are also used. They can be placed under the legs. Together with adjusting the height of the legs, this method will allow you to raise the booth by 9-11 cm.
A dry hardwood beam will do. So that the fungus does not develop from the contacts of the tree with moisture in the bathroom, the timber is treated with antiseptics and covered with drying oil.
Increase the length of the studs
Unfortunately, adjusting the legs on the shower frame is not always enough.Sometimes you need to raise the booth for a good drain to a height of more than 10 cm, how to do it? There is a solution - completely replace the studs of the legs.
This will require:
- purchase a stud with the same thread and diameter;
- measure the required length
- cut equal parts with a hacksaw
- replace the old legs with new ones by screwing them with one end into the base of the frame, and with the other end into a plastic or rubber support.
In this case, a void is formed between the floor and the pallet. It will facilitate cleaning under the cab, but may not fit into the overall design concept. If desired, the gap can be decorated.
Everything is pretty simple. The only thing to keep in mind is that the longer the studs are, the less load they will be able to withstand. Therefore, it is not recommended that such a leg be longer than 15-17 cm.
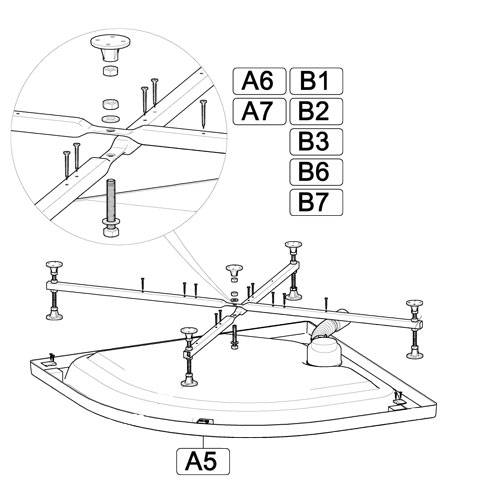
How to make a shower tray with your own hands
In the manufacture of the main criterion is the durability of the material:
Pros of working with tiles: corrosion resistance and aesthetics, but if the wrong type of tile is chosen and it slips, this can easily turn into a minus for the product.
When creating a brick structure, it is also important to choose the right type of material: it must be moisture resistant, otherwise the structure will not withstand hydraulic loads.
Making a pallet from natural stone is an excellent solution, but the disadvantage of this method is the high cost.
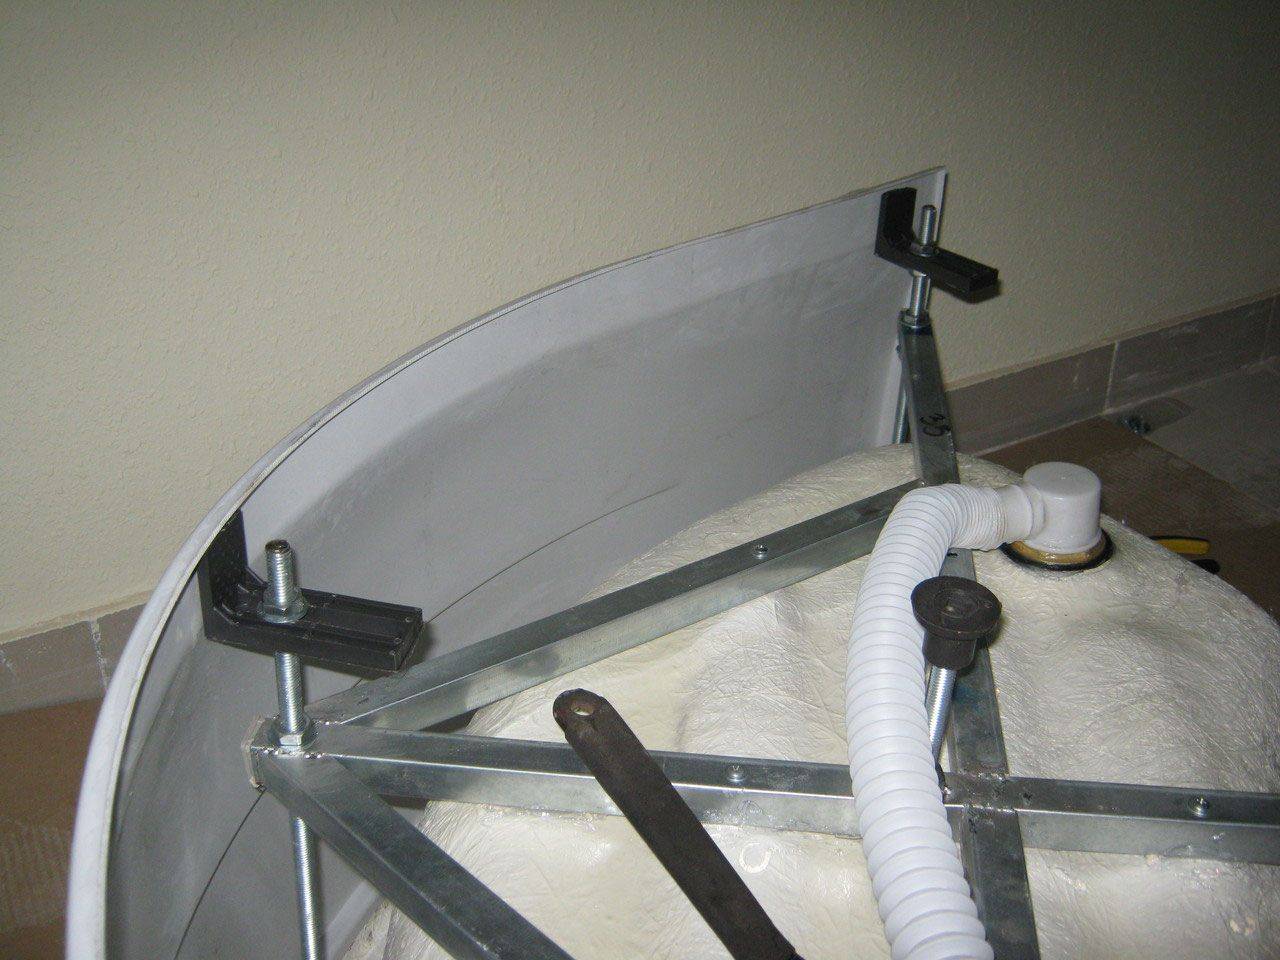
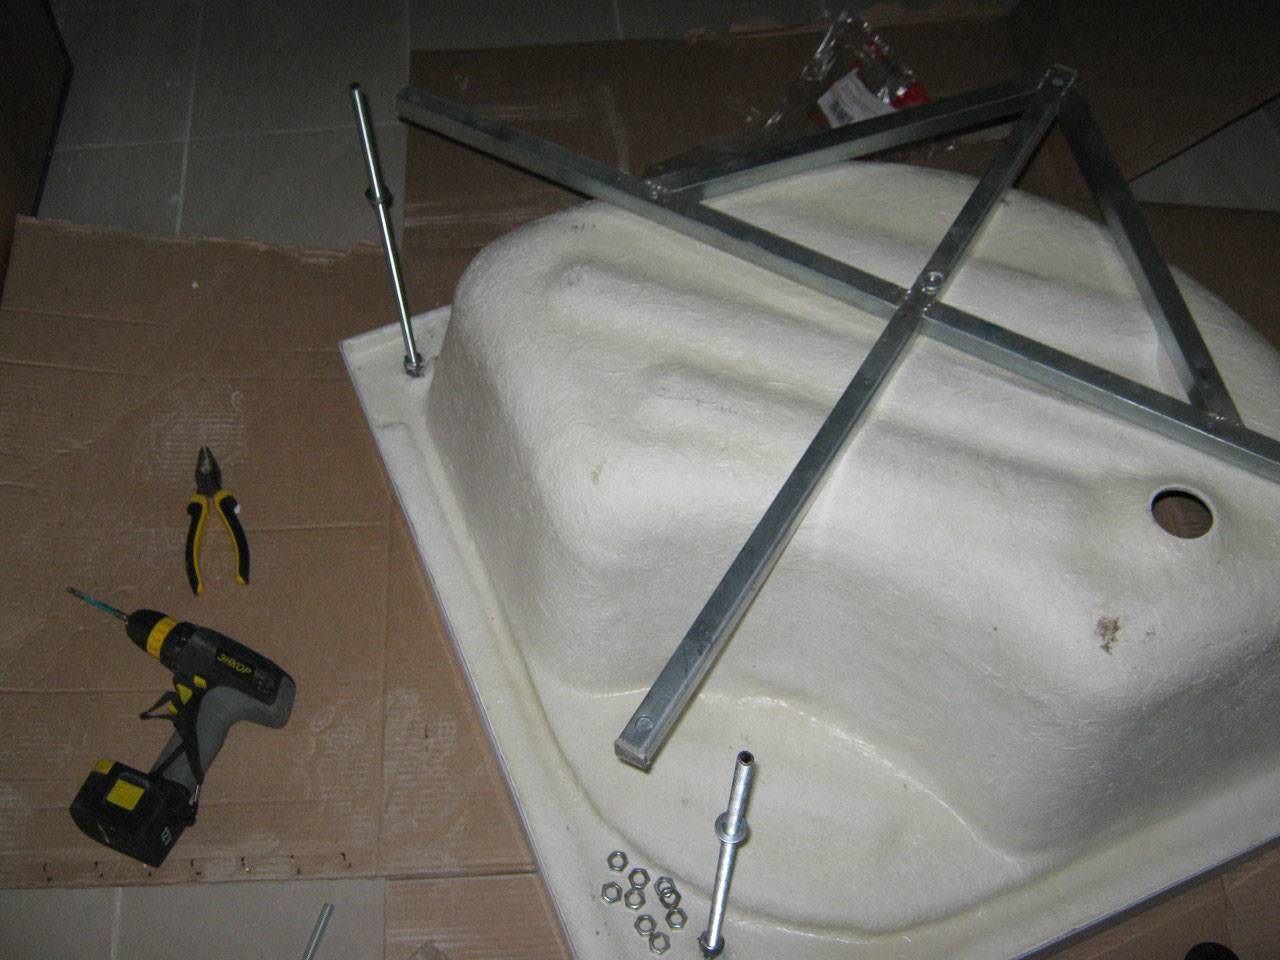
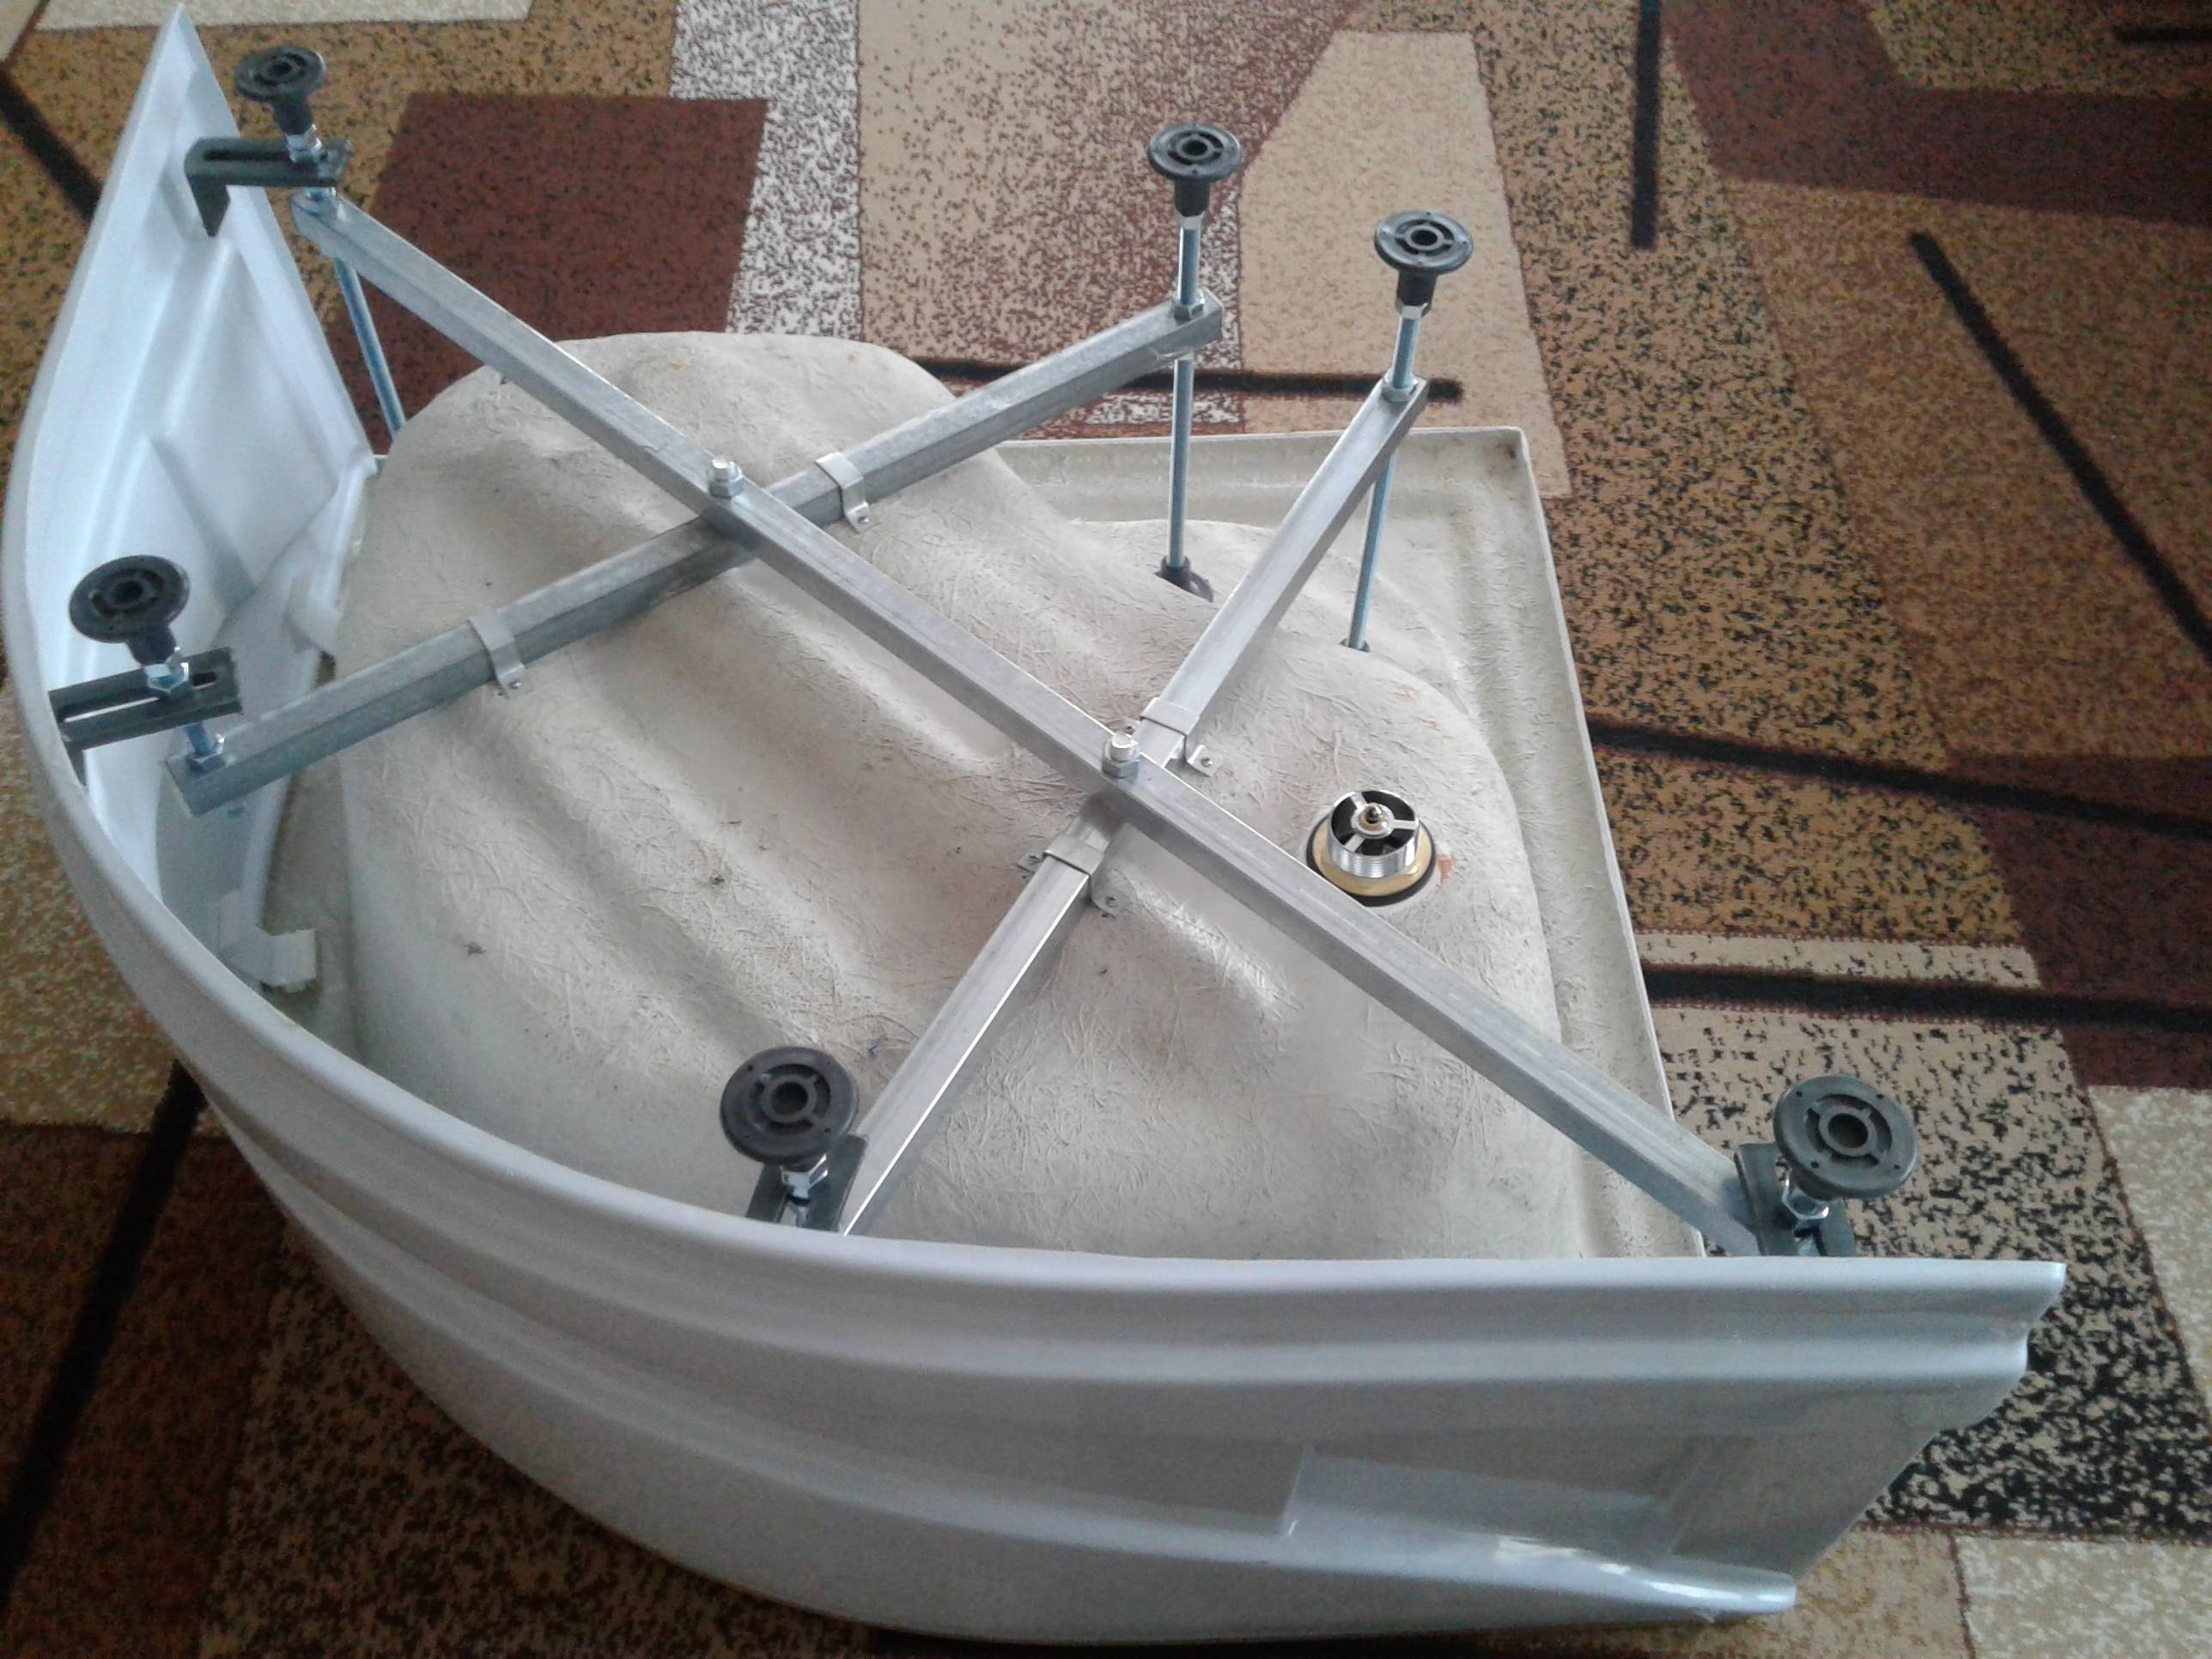
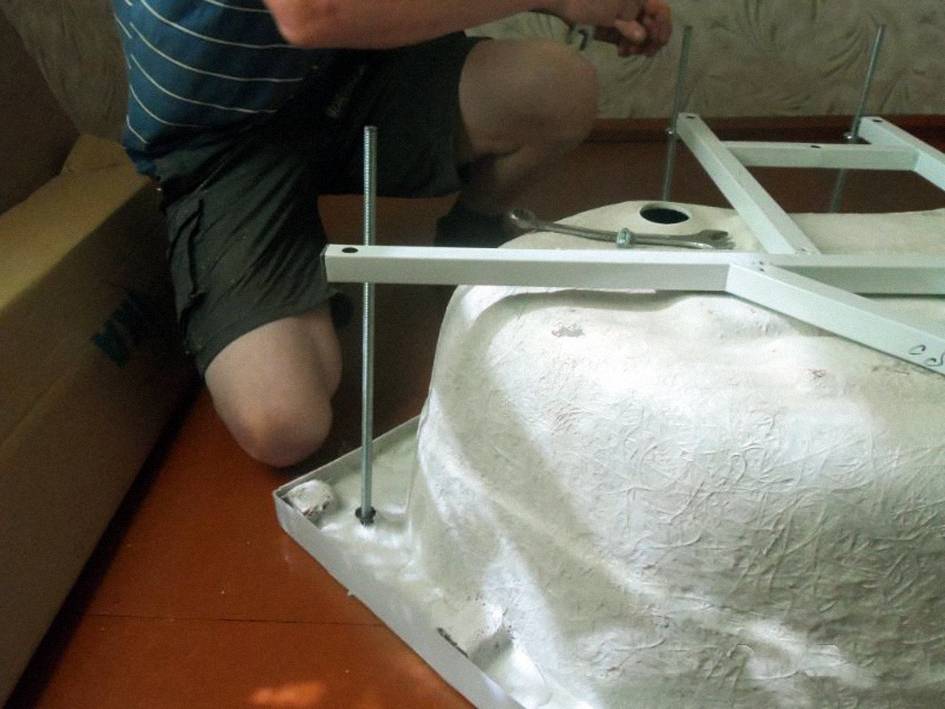
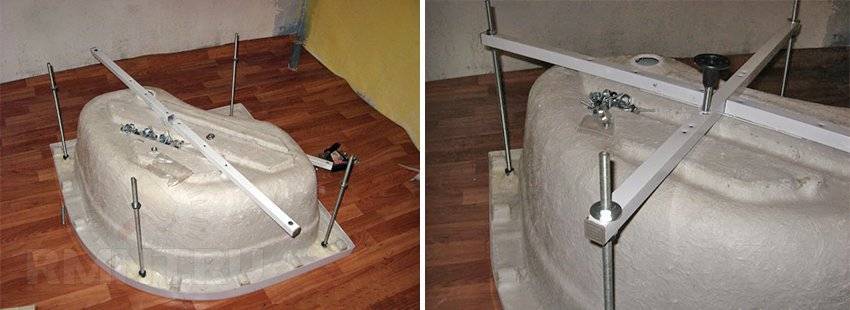
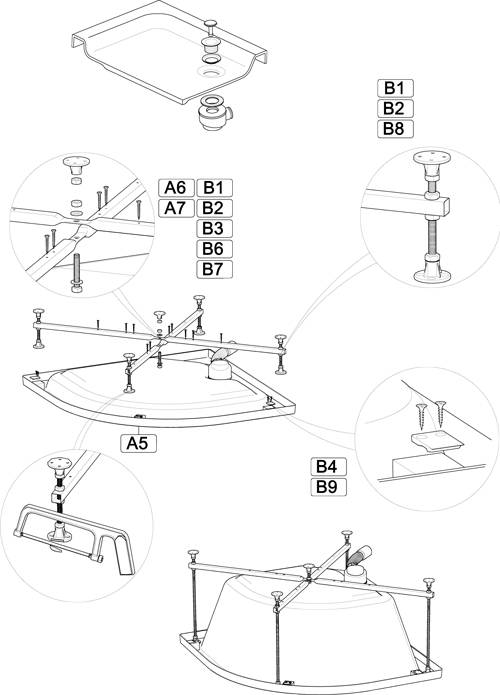
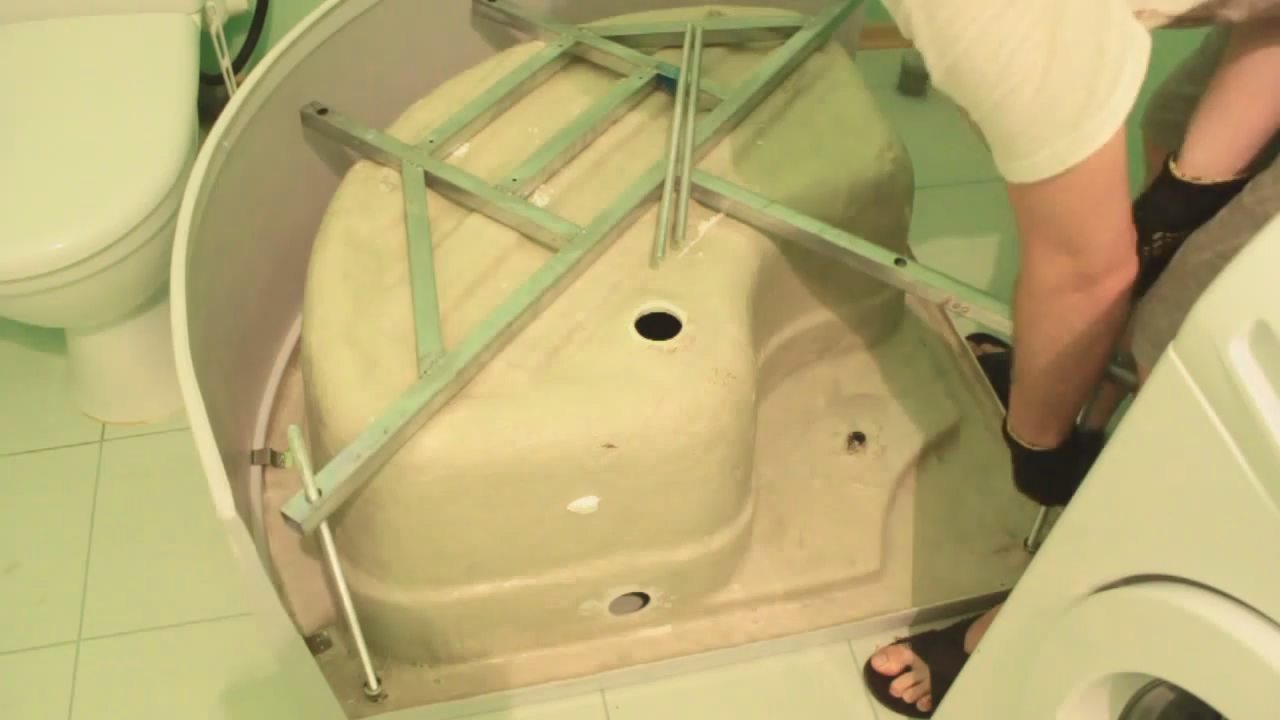
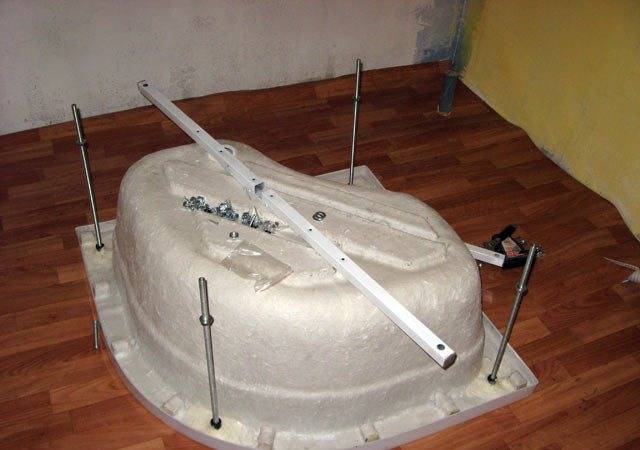
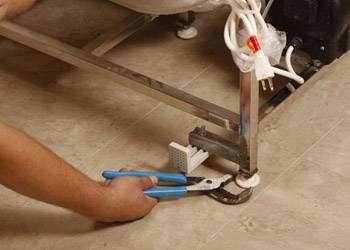
Welded version
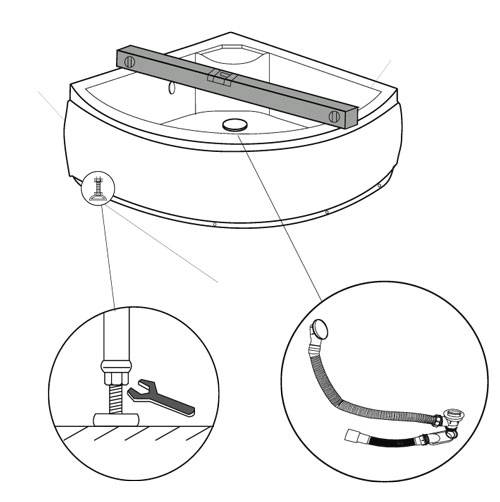
It is mounted on a special stand, which is a profile located along the perimeter of the bottom with threaded bushings welded to it. Legs are inserted into them, which are not provided with the stamping pallet.
Installation involves:
- Drawing markings indicating the drain hole and the stand from the welded profile.
- Screwing the legs in such a way that the siphon does not come into contact with the floor.
- Assembly of the stand according to the marks and installation of pipes and drain system.
- Fixing the pallet in a clear horizontal position, connecting the drain hole to the siphon and sealing it.
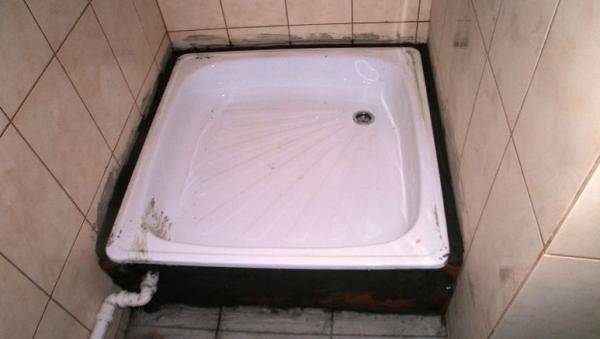
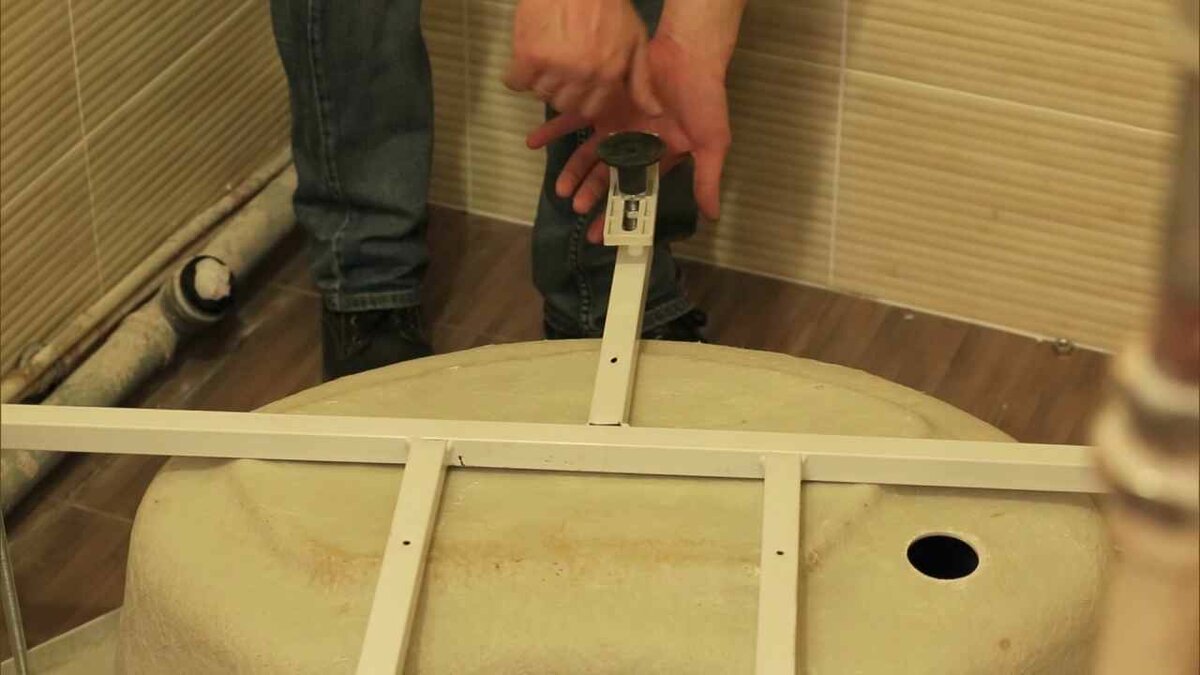
Photo 1. A variant of the welded structure of the pallet assembled and installed in the bathroom niche.
Cement pouring and tile construction
The construction of the structure takes place according to the following scheme:
- A drain and a sewer pipe are installed, which is responsible for connecting to the central sewer. A structure is constructed from wooden blocks on which pipes are laid.
- A formwork is formed and a rough casting is carried out with cement mortar, in which the ratio of cement and sand is 1: 3. The thickness of the layer should be such that the top of the ladder is slightly higher than the level of the base, given that the final pouring and tiling will be carried out in the future. As a result, the drain neck should be flush with the floor. The formwork is left for a day.
- The formwork of the side of the pallet is installed and poured with cement.
- A pallet screed is being made to organize the slope of the floor towards the drain. Next comes the finishing of the sides. They are treated with a solution from the inside and outside.
- The tiles on the pallet are glued from the center to the edges. After the glue dries, the joints are grouted.
Important! The area around the ladder is recommended to be finished with a solution of building alabaster. This will help organize easy access to the pipes.
Alabaster, unlike cement, is easy to remove.
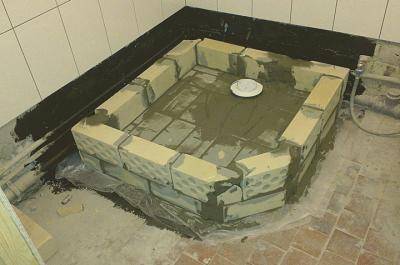
The basis for the shower enclosure made of bricks
This will require the following materials:
- Unary corpulent red moisture resistant brick M-125.
- Assembly and masonry mixture M-200.
- waterproofing materials.
- Expanded polystyrene in slabs for insulation.
- Reinforcing mesh with 10x10 cells.
- Drain organization kit: pipes and shower drain, which can be replaced with a siphon.
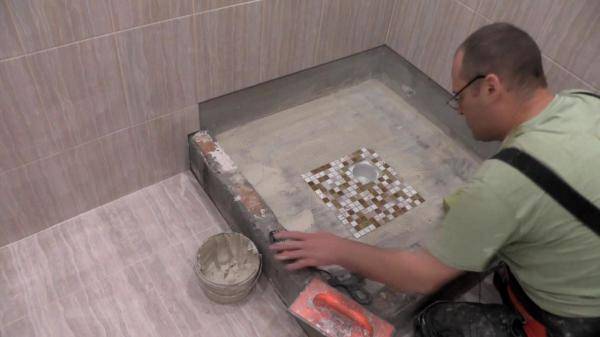
Photo 2. The process of forming the sides of the pallet by laying bricks around the perimeter of the future shower cabin.


Manufacturing steps:
- After installing the sewer, it is necessary to form a raised pallet floor. This is done by laying bricks flat on the floor in a single layer, minimizing gaps.
- This is followed by the processing of the structure with waterproofing materials.
- The side is formed from one row of bricks placed on a long edge.
- After the solution has completely dried, after about three days, with the help of a finishing screed, a slope is made towards the drain and the finishing is carried out with plaster.
Attention! The optimal material for the drain and sewer pipes is plastic, it does not corrode and is easy to install, while the grate of the drain hole is best made of metal so that it can easily support the weight of a person


