- Water connection
- How to install the mixer?
- Purpose and design
- How does a siphon drain work?
- Siphon classification
- Types of mechanism and materials for its manufacture
- How to assemble and install?
- Bathtub overflow drain
- How to assemble a manual siphon
- Varieties according to the material used
- Drain hole cleaning.
- Siphon installation: select material and assemble with your own hands
- Selection Guide
- Siphon for kitchen sinks - types, device and installation
- Purpose and standard configuration of the siphon
- Peculiarities
- Main varieties
- Connecting plumbing in the bathroom
- Dismantling
Water connection
How to install the mixer?
By connecting the sink to the water supply, the installation of the mixer is possible even after attaching it to the wall. However, it would be better if the mixer is mounted before the sink is installed, since everything you need is connected from below.
Mixer installation procedure:
- First, a fixing pin or two pins (depending on the sink) must be screwed into the faucet.
- Next, hoses are installed for supplying cold and hot water, after which they are tightened using an open-end wrench. Tightening is done with gentle movements.
Purpose and design
The sink drain consists of a curved siphon and a waste pipe. The curved design of the siphon provides two important functions:
- protection of the premises from sewer odor penetrating through the drain hole from the sewer pipe;
- protection of the drain pipe from clogging with solid particles entering through the hole in the sink.
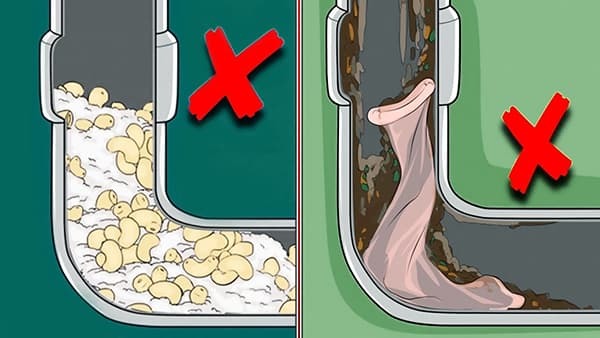
How does a siphon drain work?
When flushing water through the hole, the waste liquid does not immediately enter the internal sewer pipe directly. She descends into the siphon, makes a bend, rises up (along the bent knee) and then moves down into the common drain. With this movement pattern, water remains in the lower part of the bent knee. This is the so-called water lock, which does not let the smells of drains into the living space.
Solid heavy particles or small objects also remain in the bend of the knee siphon, which can accidentally be drained into the sink. To remove them, the knee part of the pipe is removed and cleaned, after which it is reinstalled.
Siphon classification
If design features are used as the main classification criterion, then such types of siphons can be distinguished as:
corrugated - can be considered the simplest option. It is made by hand from an ordinary sewer corrugation - the flexible tube simply bends in the shape of the letter S and is fixed with plastic clamps. Of course, the durability of such a design leaves much to be desired;

An example of a water seal from a sewer corrugation
bottle water seal - this design is collapsible, outwardly it vaguely resembles a bottle. Inside, the partition is divided into 2 zones, due to which a water plug is created, which does not let unpleasant odors from the sewer into the room;
In the photo - bottle water seal

Pipe water seal
Classification can also be given in shape, for example, if a round siphon does not fit on the sink, then you can always use a compact flat analogue. You can also divide into groups and according to the material used - there are devices made of brass, plastic (polyethylene and propylene), cast iron and bronze.


It comes to the fact that some manufacturers automate the operation of such a simple device as a water seal. That is, in the normal state, the drain is closed, and it opens when a button is pressed. Unlike conventional siphons, this allows you to drain the water without even getting your hands wet.
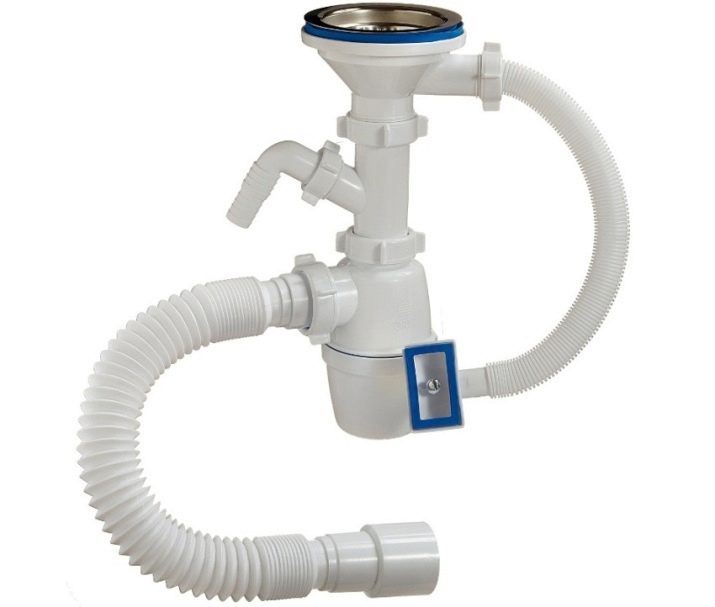
Recently, such a type of these devices as a siphon for a kitchen sink with overflow has become popular. All the difference from conventional models is the presence of an additional drain hole located at the top of the sink.
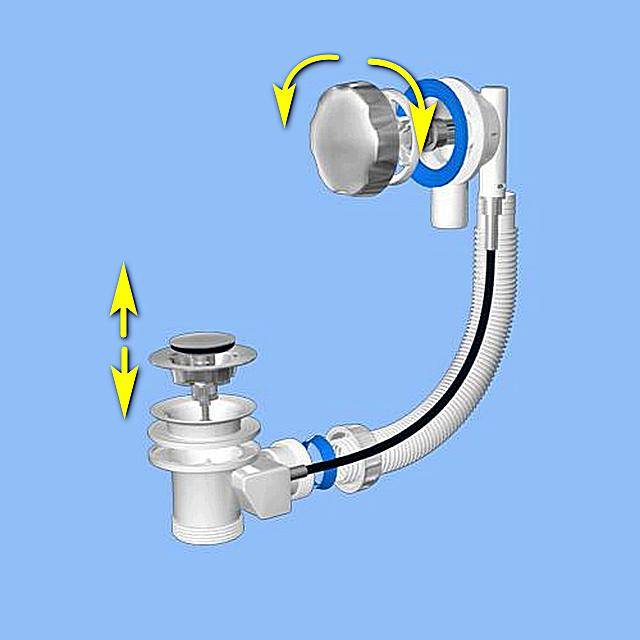
Types of mechanism and materials for its manufacture
The bathroom systems we are interested in can be semi-automatic and automatic. The first type of drain has a small cable. It serves as a connector between the drain plug and the overflow device. Semi-automatic drain is used elementarily. When you need to open its hole, pull the cable and thereby raise the cork. Water from the font rushes into the sewer pipes.
A semi-automatic type drain is inexpensive, it looks quite attractive outwardly, even a child can operate it correctly without any extra effort. The only disadvantage of this design is that the cable that lifts the cork can break with frequent use. However, this problem is inherent in extremely inexpensive mechanisms. Automatic drain is structurally more complex.It functions differently. To lift the cork, you need to click on it. And the automation itself will open the entrance to the drain hole! The mechanism providing this possibility is mounted in the cork itself. The disadvantage of the system is the need to lean towards the bottom of the bath to press the lid.

Drain semi-automatic type
Recently, another type of automatic drain with a special filling device has been actively used. Its installation is recommended for fonts without a mixer. Such a mechanism connects the water supply pipe to the overflow. This allows you to draw water into the bath through an overflow device. Drain-overflow systems are made of metal and chrome-plated brass, as well as polyethylene and various types of polypropylene. Metal products in operation are short-lived. Now they are practically not used.
The most expensive is the brass siphon. He looks great. It is used when they want to create a special interior in the bathroom. But according to some indicators (in particular, in terms of resistance to mechanical stress), brass products are inferior to cheaper and at the same time more resistant polypropylene and plastic structures.
How to assemble and install?
Each type of "drain-overflow" system has its own subtleties of the mount. These are just general guidelines and installation tips. bath straps on one's own.
A small installation guide looks like this:
- choose a siphon of such a design that during installation the distance between its base and the floor is 15 cm;
- you need to connect the hole of the tee with a grate blocking the drain;
- when connecting, it is necessary to fix the gasket-seal;
- with the help of a nut, the siphon itself is installed to the outlet from the tee;
- a side pipe is attached to one of the branches of the tee;
- the end of the siphon plunges into the sewer;
- each part of the structure is compacted.
At the final stage, you need to close the drain hole, fill the bathtub with water. Then, when the water flows through the drain pipe, carefully examine the entire structure for holes. You can lay a dry cloth or paper on the surface under the system. Drops on it will immediately show the result.
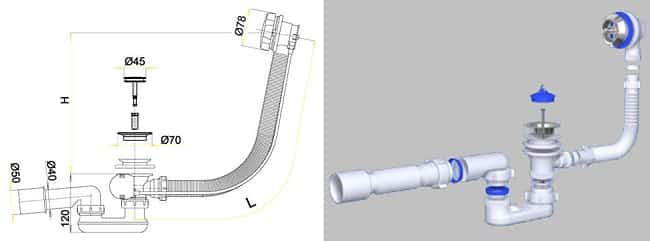
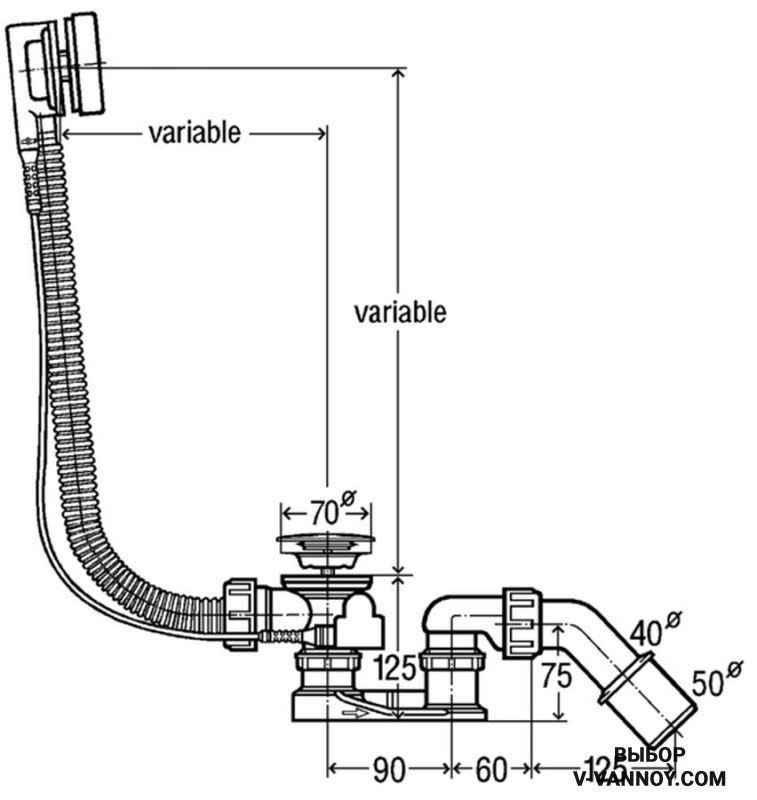
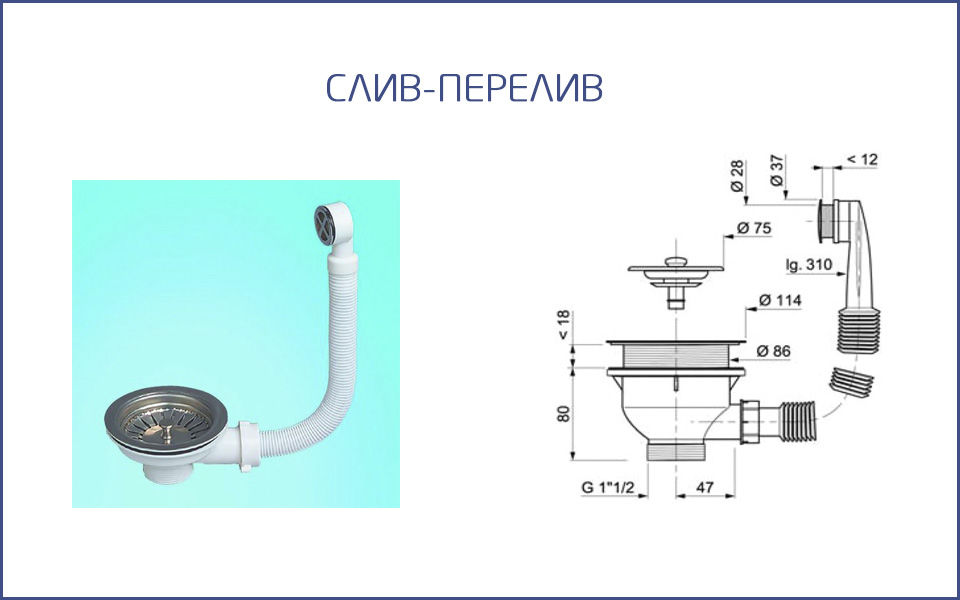
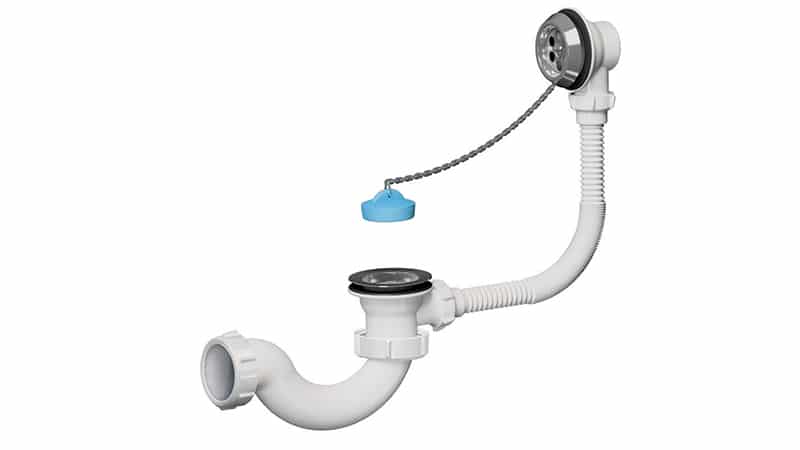
Bathtub overflow drain
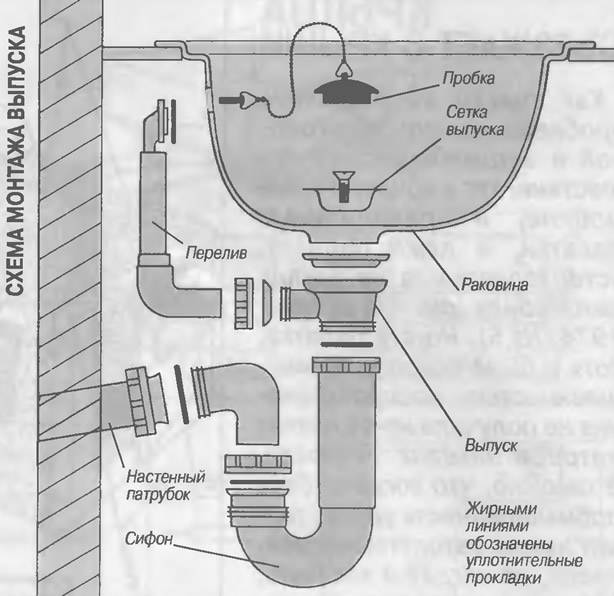
Drain bathtub or sink overflow, in simple terms, the strapping is a design that redirects excess water into the sewer that enters the bathtub or sink, preventing it from overflowing. The device of this drain system is almost the same for both a bathtub and a sink or kitchen sink. Mounting the trim on the bath is a little more difficult, so we will consider this particular option, and we will consider the option of installing a siphon on a sink or sink in more detail in another review.
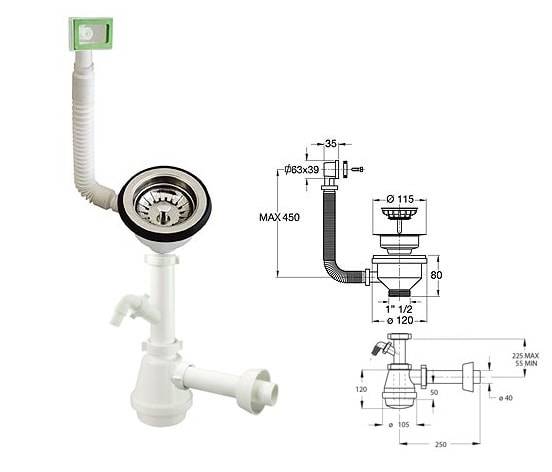
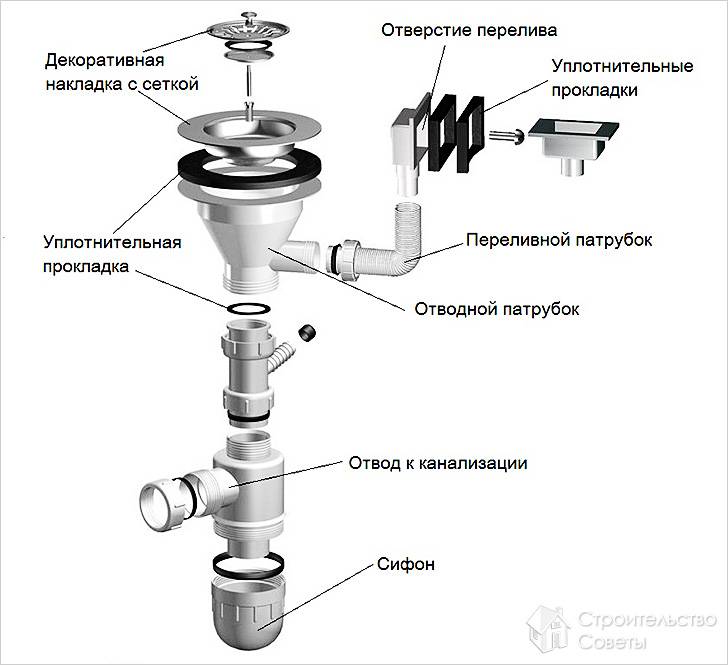
Structurally, the overflow drain for the bath consists of: - a siphon with a water seal; - two gratings - at the outlet and at the overflow receiver; - drain tube - outlet for connection to the sewer;
The set of devices with an additional bath spout includes connection hoses to the plumbing. It can be installed on bathtubs of any sample, the holes for it were prepared initially by the manufacturer.


For bathtubs with individual design and construction features, overflow drain can be supplied as a set.
Depending on the principle of operation, the drain-overflow can be of several types:
- ordinary (consists of a corrugated tube connected to a siphon, the intake opening is closed with a simple plug);
- auto;
- semi-automatic;
- bath spout with overflow system.
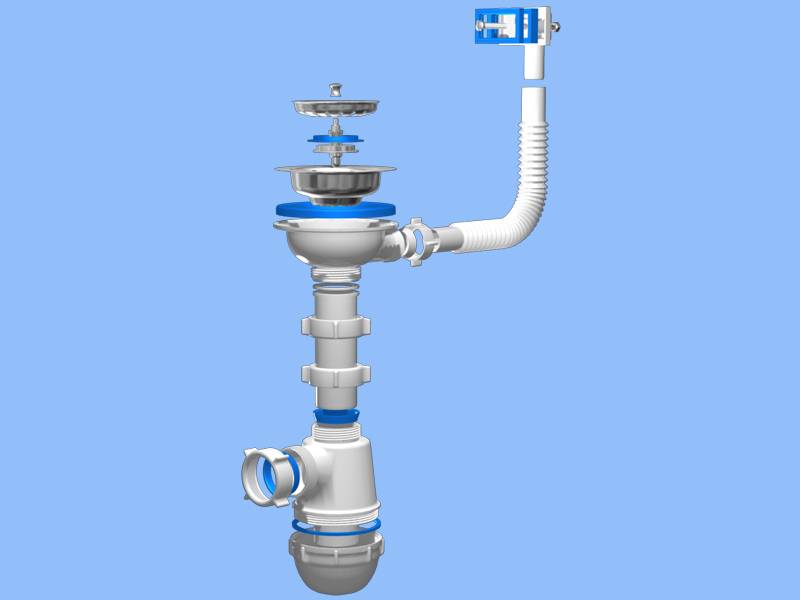
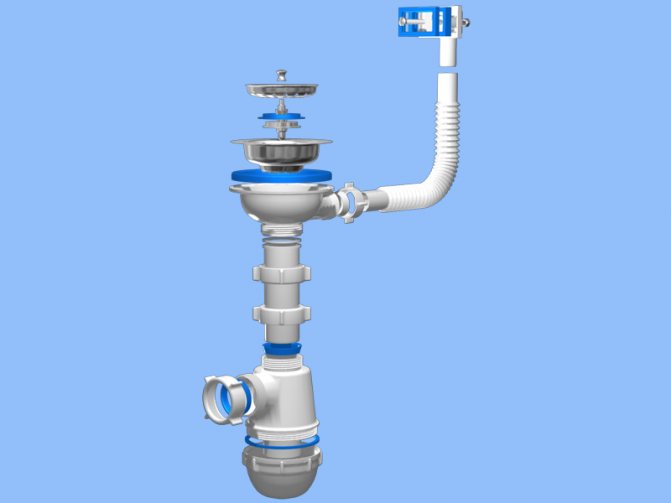
 siphon device with overflow drain system for baths
How to assemble a manual siphon
Despite the difference in the designs of these elements, the assembly of all siphons is carried out in a similar way.
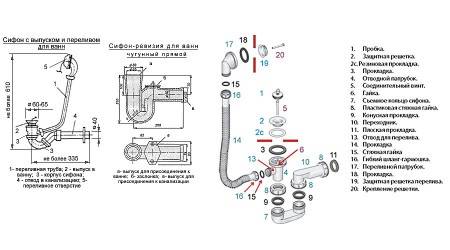
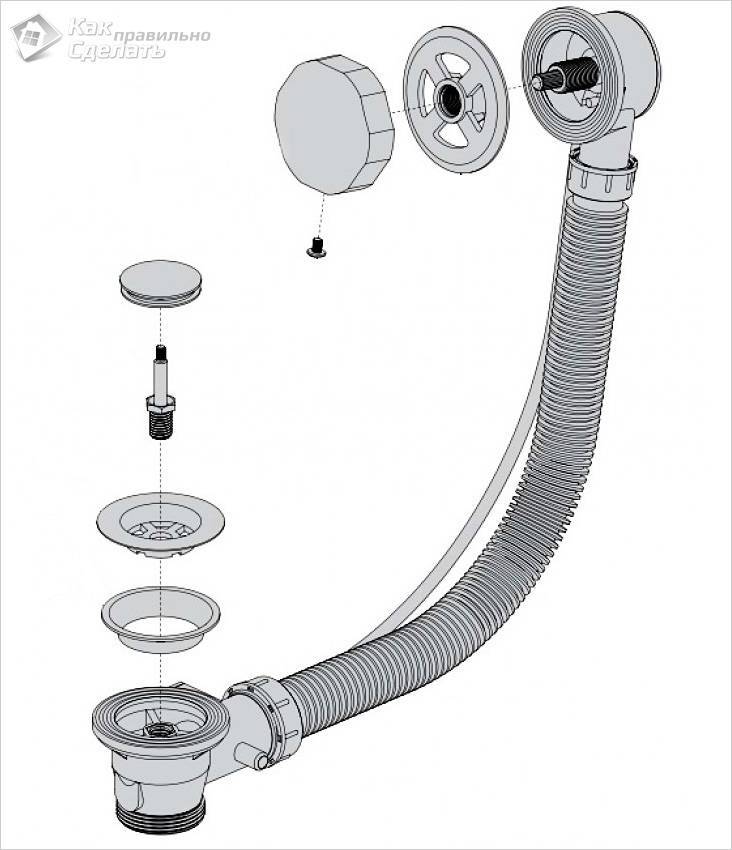
 The design of the manual siphon for the bath
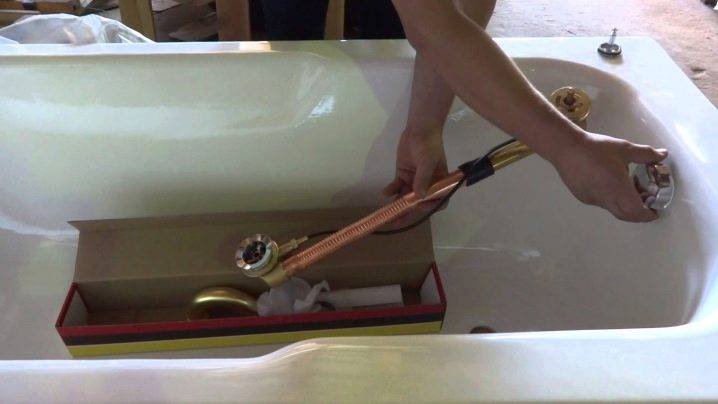
Step-by-step instructions on how to assemble a bath siphon:
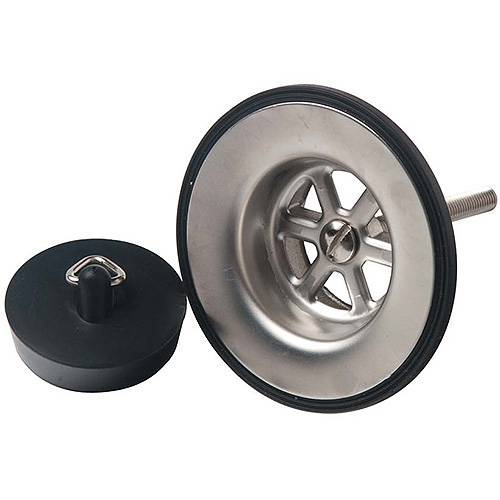
The set of devices includes the sump itself, pipes of different diameters, sealing elements. The sump is taken first, the largest flat gasket is put on its lower part (most often it is blue). When installing it, distortions or other distortions are not allowed;
The overflow and sump pipes are interconnected. If a plastic siphon is assembled, then the FUM tape is not needed - the gasket is enough, but to connect brass or steel to the thread, it is additionally sealed;
On the top and side of such a siphon there are two holes of different diameters. One is designed to connect the side drain, and the other to connect the system to the sewer outlet. In accordance with the dimensions of these holes, a conical gasket (wide) and a union nut are selected;
The first pipe is taken, which will be connected to the central drain. A cap nut is put on it. Then the gasket is put on.
Pay attention to its design. One end of the gasket is blunt and the other is sharp
Here, with a sharp end, the sealant is put on to the nozzle, the blunt one subsequently “sits” on the sump. The gasket is inserted to the maximum position, but be careful not to tear it;
The pipe is inserted into the corresponding hole in the siphon, after which the union nut is tightened. In the same way, a pipe is connected that will lead to the sewer;
If everything is done correctly, then there remains a wide gasket under the sink and a thin rubber ring for sealing the pipe, nuts for connecting the sewer, and a sink drain filter. A wide gasket is installed on the upper pipe. After the outlet is connected to the sink;
Connection to the sink is made using a bolted connection. It is also recommended not to use FUM tape here (if the siphon is plastic). To connect all parts of the structure, you need to install a sealing ring on the upper section of the drain, after a metal mesh filter. The siphon pipe is attached from below, the whole structure is screwed with a bolt;
The output is connected to the sewerage using silicone sealant (for connecting two plastic elements) or a special adapter (for connecting metal and plastic pipes). In the first case, the end parts of the siphon and sewer pipes are lubricated with silicone and connected to each other. In the second, the ends of the adapter are lubricated.
After the installation is completed, you need to wait for the sealant to dry completely (on average, from 4 to 6 hours), only then you can use the system.
Video: siphon assembly for baths
Corrugated models do not require complex assembly work - often, they are simply connected to the drain outlet system. At the same time, flat ones are more complex in design. The main problem is the large number of pipes of different diameters.
Tips for properly assembling the siphon:
- All metal threads must be sealed with FUM tape;
-
Not a single gasket or ring should be left "idle". If after the end of the assembly you still have extra parts, this means that a seal is missing somewhere and it will leak there;
- When connecting pipes, only one gasket can be used. Some home craftsmen install two gaskets at the junction of pipes or during repairs to prevent leaks. This contributes to the violation of the tightness of the system;
- When tightening the union nuts, you need to be very careful (especially if you work with plastic). It is impossible for the connection to be “stretched”, but with a strong impact, there is a chance of damaging the fastener;
- The same goes for installing gaskets. They need to be tightened to the nozzles to the maximum, but if the seals are tightened, they will break;
- Sealing elements must be replaced regularly. Drain gaskets - 1 time in 6 months (on average), thin seals between nozzles - 1 time in 3 months. These times may vary, but timely warning of worn rubber bands will help to avoid flooding and leakage.
Varieties according to the material used
In the modern assortment of sanitary products, one can easily get confused, because sink sinks differ not only in appearance and design, but also in the material from which they are made. The material of the drain system is an important selection factor that has a significant impact on the service life and functionality of the appliance. For the manufacture of the device, such qualities as lightness, corrosion resistance, tightness and durability are important. Most often they are made from the following materials:
-
Various metals and their alloys.Usually, copper, brass are used to make plums, and in the old days, cast iron was actively used for these purposes. The advantages of such models are exceptional strength, durability, resistance to all household detergents, as well as safety for human health. However, only pipe-type plums are produced from such material. Often, due to the rigid shape of such products, they are difficult to install, this will require skills and a special tool.
-
Polymers. Modern plums are made from lightweight, durable, and inexpensive polymers. Plastic can be given almost any shape, so the range of plums from this material is very diverse. Polymer drain systems can be pipe, bottle or even a combination. The service life of such products is much less than metal ones, but they are also cheaper. The main advantage of modern polymer plastics is high resistance to corrosion.
Drain hole cleaning.
The reasons for the appearance of blockages in the drain hole, in addition to hair falling out naturally, are small litter, spools from clothes, pet hair. Accumulating in the drain hole, they form a lump that prevents water from passing through the sewer pipe. A lump of dirt and debris does not allow water to flow freely from the bathroom, collect further debris on itself, and, as a result, cause a foul-smelling blockage. So, let's act. In order to clean the drain hole in the bathroom, there are several ways. But initially we take the path of least resistance.
remove the drain cap and clean out the debris under it. Initially, before removing the cover, it may seem to you that everything is clean there. But visual inspection is deceiving.A huge amount of hair accumulates under the drain cover. This is especially true for drain holes with a cross plug. There are baths in which plugs are pre-installed. For this type of bath, up to how to clean drain hole in the bathroom, you need to lift the plug, unscrew the guide plate. Only after that you remove the cork.
To cleanse a deeper blockage of hair, choose any of the following methods:
- wire hook. You can safely use wire hangers (a bent wire hanger). We unwind the shoulders so that you have a hook with a handle. We insert the tip of the hook into the drain and pull out the hair or other objects that caused the blockage. Never try to push hair or other debris down the drain. Pull the hook towards you and pull the clog out, then throw it in the trash can.
- using a sink plunger. This method is suitable for a small blockage that prevents water from draining. The plunger should be selected according to the size of the drain hole. In principle, this is not difficult to do. Most often, the drain holes in both the bathroom and the kitchen sink are the same diameter, so the plunger will become your assistant for any small blockages. We close the drain hole with a cork, lubricate the plunger with petroleum jelly and press it firmly against the drain. We make about a dozen sharp reciprocating movements. If the water does not go away, then we clean the drain hole by adding hot water. To do this, we collect hot water in the bathroom so that it covers half the rubber bowl of the plunger.Then we immerse the plunger into the water at a drain hole at a slight angle, make several movements with it, and then abruptly pull it out of the water. It is impossible to push hair and other rubbish inside with a hook, since you can only aggravate the situation.
- cable. Serious sewer blockages starting from the drain hole are perfectly eliminated by a plumbing cable, which is a twisted wire coiled into a spiral. To make it convenient to rotate the cable, there is a wooden or plastic handle at its end. The length of the sewer pipe, which can be cleaned with such a cable, is from 5 to 9 meters. To start cleaning, insert the end of the cable into the drain hole and begin to slowly rotate the handle, pushing the cable forward with the other hand. The cable, which consists of hundreds of small interlocking hooks, easily grabs hair from the drain and removes accumulated debris. Feeling the tension in the cable, know ahead - a barrier of hair and litter. Therefore, we pull the cable back and forth several times. Then, breaking through the blockage, drain the water and pull the cable.
- scotch. To clean the drain hole, you can use any adhesive tape that is in the house. Cut off a strip 50 cm long. Then we put it in the drain and draw it along the inner surface. This way all the hair will stick to the tape and you will clean the drain. After that, do not forget to turn on the water and wash off the small remaining particles remaining in the drain hole.
- chemicals. At a home improvement store, ask the salesperson for help choosing a chemical that can dissolve wool and hair in the drain. Otherwise, there is no point in buying household chemicals.
Pour or pour the drain and sewer pipe cleaner into the drain hole and leave for the time specified in the instructions, and then rinse with running water
We would like to draw your attention to the fact that it is impossible to leave the product in the drain for less or more than the time indicated in the instructions. In the first case, the action of household chemicals will be ineffective, in the second, there is a danger of deformation of the material from which the pipes are made. Also, when working with chemicals, you should follow the safety rules.
Work with chemicals only with gloves
Also, when working with chemicals, you should follow the safety rules. Work with chemicals should only be done with gloves.


Siphon installation: select material and assemble with your own hands
Pressing the bulb a few times isn't difficult, but changing the batteries in the siphon is an added headache. And what happens if the electric motor still breaks down….
Battery siphon with mechanical filter
The siphon for cleaning the aquarium is not used only if the aquarium is completely planted with plants. First, I can't imagine how you can siphonize, for example, chemanthus cuba or Eleocharis.
This will inevitably lead to damage to aquarium plants. Secondly, all the sediment that accumulates in the soil is food for aquarium plants. I have not poured the soil for many years, the floors were completely dirty, but now it seems to me that the root will be on my soil.
But still, if there are areas in the aquarium in which plants do not grow siphonized, soil is necessary.
The soil exceeds the number of fish in the aquarium: from once a week to once a month.The soil siphon is suitable for combination with partial water changes - 20% of the sediment is dried, 20% of fresh water is added.
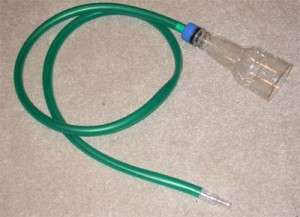
It is not difficult to make a siphon for cleaning the aquarium with your own hands. To do this, you need a hose and a plastic bottle.
on the bottle we cut off the bottom and connected the door to the tube. It is not easy to fix the pumping bulb, so the pipe must be removed to create back draft. But, in my opinion, an aquarium siphon is not equipment that is worth saving less than 100 rubles. It's better to buy ready-made, cheap ones, and you'll be served for years.
Internal siphon
When choosing a siphon, it is necessary to take into account the diameter of the pipe, the larger the diameter of the pipe, the greater the pressure of the water flow.
And if you have a tank of 20 liters, then you don't have time to phon the whole earth faster than to combine all the water in the aquarium :). A 100 liter aquarium fits well with the pipe diameter in centimeters. The siphon process alone will collect about 20 percent of the water needed for water replacement.
Selection Guide
So that after the completion of the work there are no unnecessary problems, you need to make the right choice, following the simple rules of how to assemble a siphon for the sink in the kitchen
- Smooth-walled models are the easiest to clean.
- To prevent the ingress of an unpleasant odor during installation, it is better to plug the sewer pipe with a rag or put a plug.
- Before installing the rubber seal and screwing the siphon to the sink, it is necessary to degrease the area around the drain.
- For reliable protection against leaks, rubber seals are additionally sealed. The rest of the joints are subjected to the same procedure.Only the bottom cover of the siphon does not require this, because it will have to be unscrewed for cleaning.
- To prevent leaks at the bottom of the lid, tow can be used as a sealant.
- Ideal if the siphon hole exactly matches the diameter of the sewer pipe hole.
- It is not necessary to purchase a siphon at the same time as washing. This can be done as needed, the main thing is their combination in size and design.
It is not enough just to buy a siphon for a kitchen sink
It is important to install it correctly and for this you need to carefully study the instructions and strictly follow its recommendations. Often inexpensive siphons are installed faster and easier than their more expensive counterparts of a more complex design.
8 photos
Siphon for kitchen sinks - types, device and installation
The article is posted in the heading|subheading
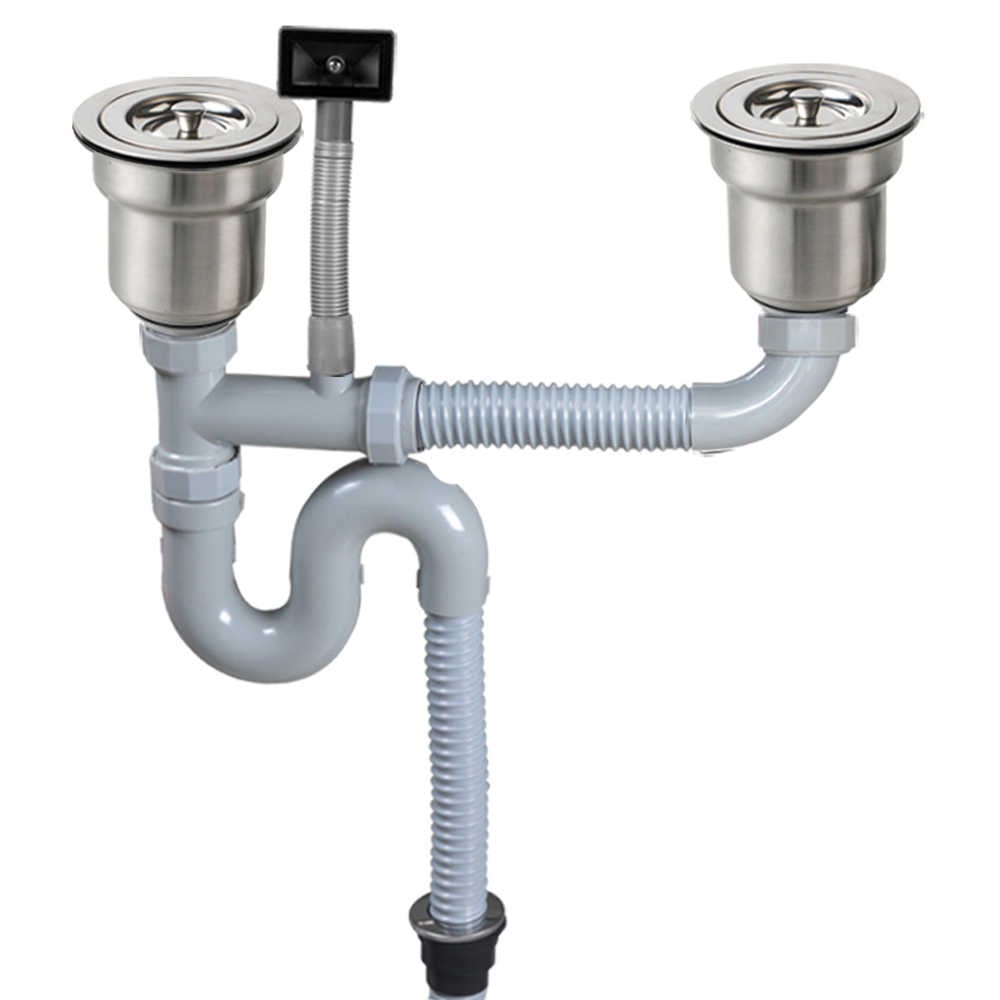
 The kitchen sink is the most important and indispensable element of kitchen plumbing equipment. It consists of several parts, which, when connected together, provide the functionality of the sink. One of the components through which water is drained is a siphon for kitchen sinks. Regardless of its appearance and size, this plumbing element is designed to fulfill its main function - to protect the kitchen from unpleasant odors emanating from sewer pipes. In other words, we have a typical water seal in which a curved tube is constantly filled with water. In addition, the kitchen sink drain prevents clogging of the sewer with solid particles that settle at the bottom of the siphon.


Purpose and standard configuration of the siphon
The main secret of the siphon is in its bend.Water does not completely leave the pipe, remaining in this curved pipe segment. It turns out a kind of permanent sump. Thanks to the water seal, unpleasant odors from the sewer pipe cannot enter the room - bathroom, kitchen, toilet. Thus, a small bend in the pipe, an elementary design, protects our apartments from sewer "aromas".
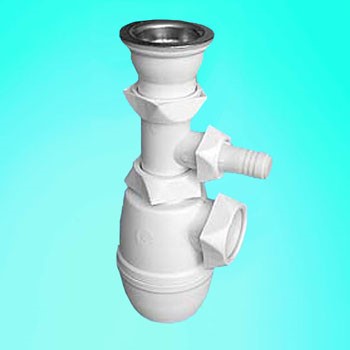
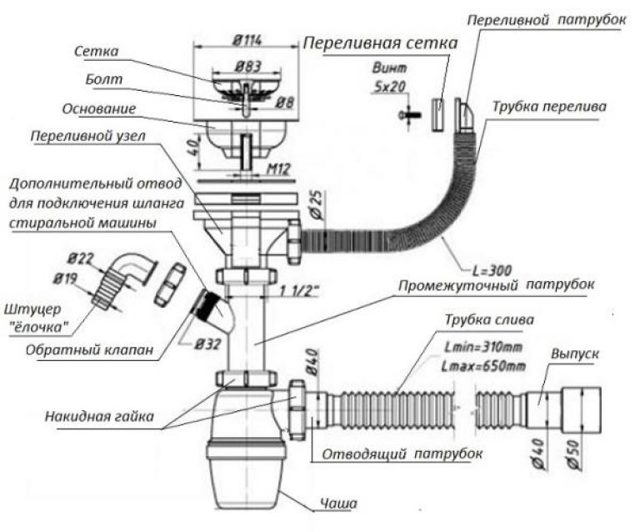
Almost all sinks and sinks are provided with siphons. Therefore, when installing a new sink in your kitchen, you need to provide for the installation of a siphon - a simple procedure that takes a minimum of time. The simplest device is designed for sinks with a single drain hole. This is a siphon with a compact body, the nozzle diameter of which is 32 mm. The product itself and the overflow channel look like a single whole.
The simplest type of sink siphon is a model with one drain hole; and plastic as a manufacturing material is the best option for the kitchen
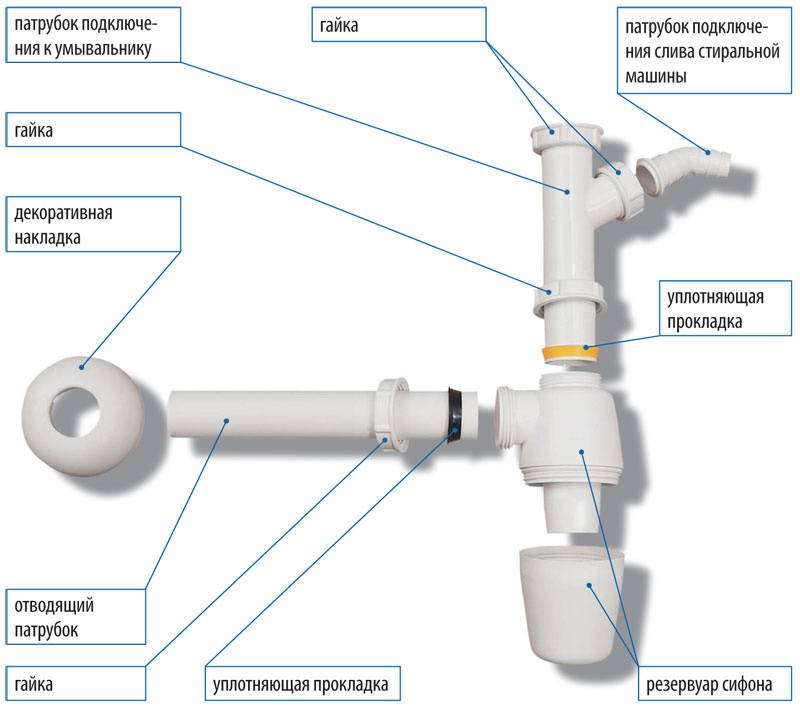
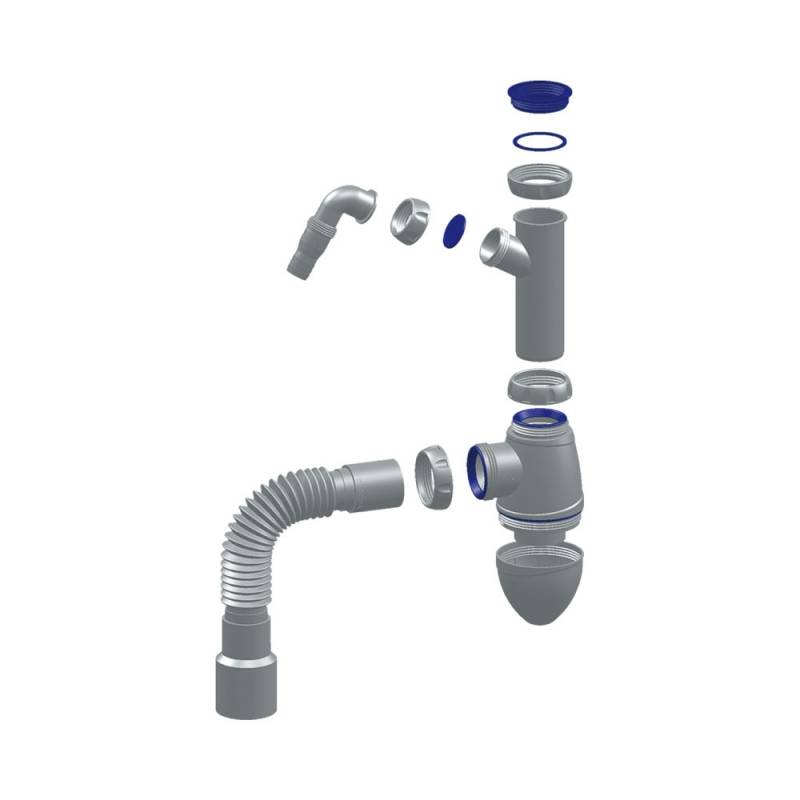
To better imagine how to assemble a sink siphon, consider the standard equipment of the device:
- body of the product;
- plastic exhaust pipe;
- plastic cuff;
- rubber conical cuffs (32 mm);
- plastic nuts (32 mm);
- rubber gaskets;
- rubber stopper;
- bottom plug;
- screw for coupler;
- decorative overlay for draining the sink.
The best material for this type of product is plastic (for example, polyethylene or propylene). Its advantages are obvious: it does not give in to corrosion and rotting, it is durable and resistant to wear. Some use bronze and brass pipes, but they have one drawback: over time, their surface oxidizes and accumulates dirt.

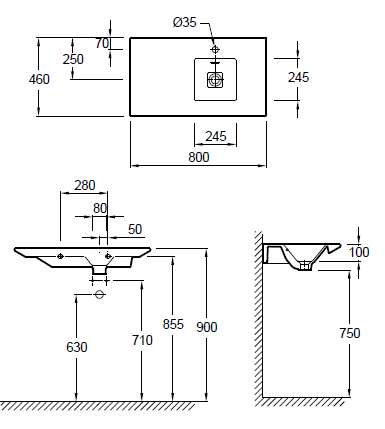
The diagram clearly shows the joints that are hermetically twisted
Peculiarities
A drain is a design with bends, which is required in order to transport excess water to the sewer. Considering this system for the sink and bathtub, it is worth noting their identity.
The drain includes the following elements:
- a special unit called a siphon. Thanks to him, there is an obstacle to the depletion of the nasty smell from the sewer. The same element acts as a protection for the drain pipe, protecting it from blockages;
- a drain pipe through which water flows into the sewer;
- you will also need a corrugation and a hose.
Main varieties
According to their design, all siphons used for kitchen sinks can be divided into several types:
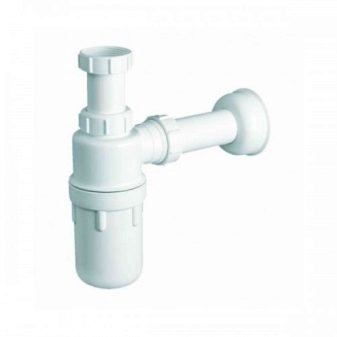
- Bottle. This is a rigid structure that can be unscrewed from below. Thanks to this, the device can be cleaned quickly and easily. In the lower removable part, not only garbage is retained, but also decorations or some solid objects that have accidentally fallen into the sink. A corrugated or rigid drain pipe can be connected to the "bottle". There is always water inside the case, which provides a water seal.
- Corrugated. In fact, this is a flexible pipe, bent in a certain place and fixed with a clamp. The bend is designed to create a water seal. The rest of the siphon can be freely bent in the desired direction. The corrugated siphon for washing has a significant drawback, expressed in the roughness of its inner surface, on which debris lingers. Because of this, the structure often has to be removed and cleaned.
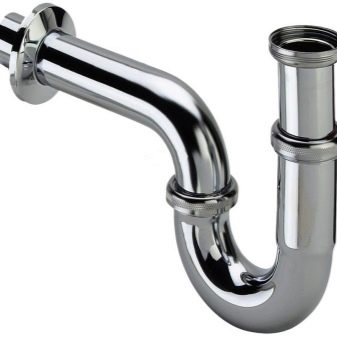
- Pipe. This is a rigid, curved "S" pipe that takes up little space.
- Flat.This is an ordinary siphon, all elements of which are located in a horizontal plane. It is used in cases where there is a shortage of free space under the sink.
- Hidden. It can be a device of any design, which is hidden in a wall or in a box.
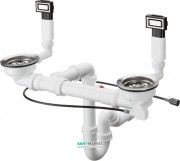
- With overflow. An additional element in the design is a rigid overflow pipe connecting the top of the sink with a drain hose.
- Siphon for a sink with a rupture of a stream. It differs from the usual siphon by the presence of a small gap (2-3 cm) between the outlet and inlet water holes. Thus, the path of penetration of microbes in the direction from the sewer pipe to the sink is stopped. Such products can often be found in catering establishments.
Connecting plumbing in the bathroom
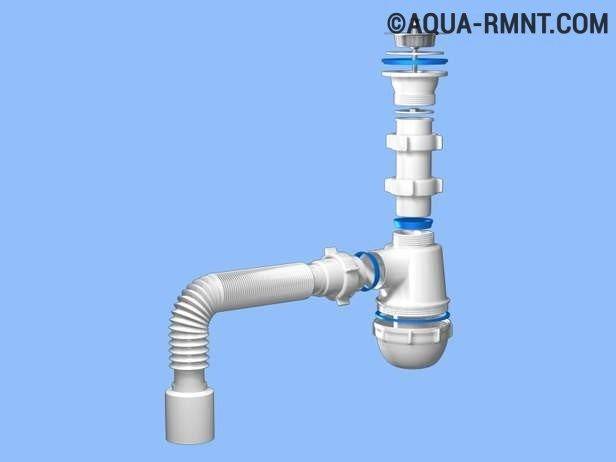
Today, when deciding how to connect a sink to a sewer in a toilet, it should be borne in mind that washbasins are now equipped, as a rule, not with a single outlet pipe, but with a full-fledged drain-overflow system. In this configuration, the drain pipe is supplemented with a pipe leading from a hole located high in the side wall of the sanitary ware, above the mixer, with a drain channel.
Thus, when filling the bowl, the water will not overflow, falling through the drainage tube directly into the siphon.
 Overflow drain system in the sink
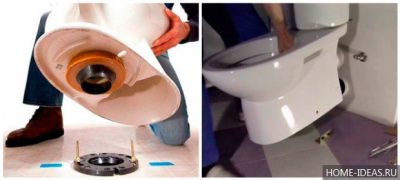
Dismantling
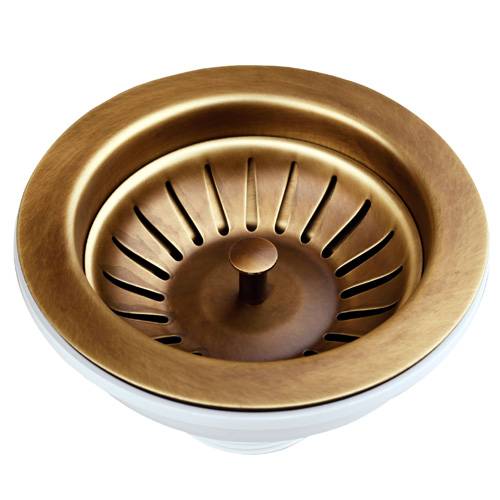
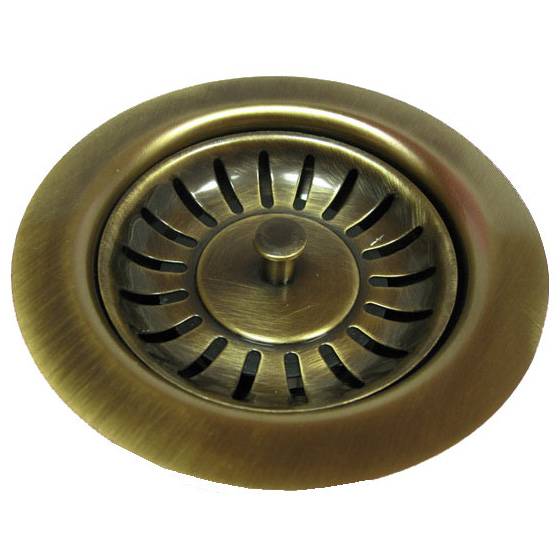
The first step in installing a drain when replacing a washbasin or bathtub is the dismantling of the device that has served its time. To do this, the retaining screw located in the center of the drain grate installed in the washstand is dismantled. Due to long-term operation, parts of this structural element sometimes turn out to be stuck to each other.


In such a situation, the way out is to dismantle the lower flask of the siphon apparatus: then, in the process of scrolling the upper part, the adhesion of the screw and the grate, most likely, can be loosened. There is also the option of using a special tool - a solution that will help remove old contaminants that link parts.
After the siphon flask or pipe is dismantled, it is necessary
clean the drain pipe and then plug it for the duration of the installation
new equipment, such as a rag - if you do not want the open riser
stank and poisoned your existence throughout the renovation process.