- Varieties of brick ovens
- dutch stove
- Sauna brick stoves on wood
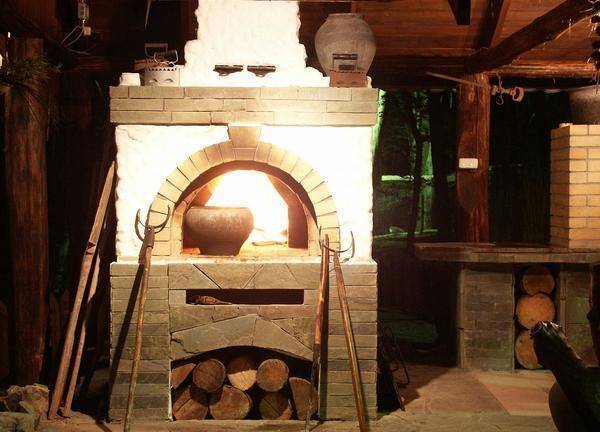
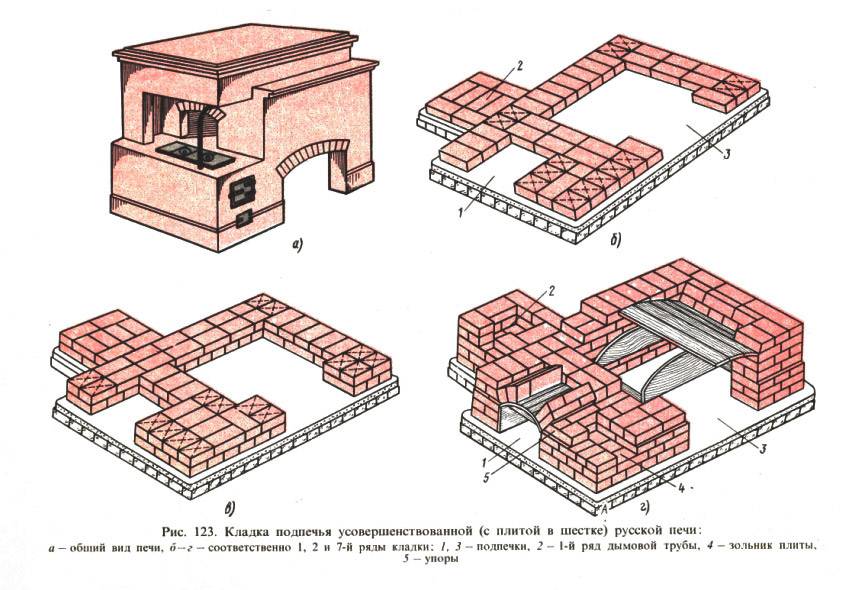
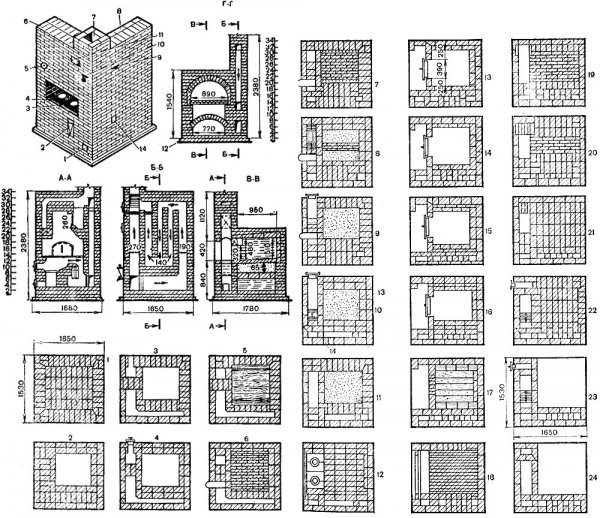
- Russian oven
- Heating and cooking stove
- Do-it-yourself mini-Russian stove: photo
- Russian oven masonry: technology and construction tips
- Rules and nuances of operation
- Cleaning (including from soot)
- Homemade wood-burning stoves for long burning scheme and principle of operation
- Traditional Russian ovens
- With a bed
- with stove
- With water box
- Operating principle
- Ordering a mini-stove
- The process of laying the furnace Radonezh
- Video - Do-it-yourself heating furnaces
- Video - Do-it-yourself heating furnaces
- Ordering the stove
- Features of laying a brick oven with your own hands
- Materials that will be needed for laying the furnace.
- Construction of the furnace foundation
- Stove with stove - multifunctional building
- How to choose a seat
- Conclusions and useful video on the topic
Varieties of brick ovens
Next, we will consider all the main models of furnaces. At the same time, you will learn that they can be not only cooking, but also heating and cooking. Another variety is a wood-fired sauna brick oven (it can be equipped with a conventional or fireplace insert). Let's take a closer look at them.
dutch stove
She is a rough oven - the simplest and most compact, which is why its efficiency suffers somewhat.Therefore, a large amount of generated heat simply flies into the pipe. Furnace heating with coarse is characterized by its simplicity. For example, a Dutch woman may simply not have a blower - in this way she is somewhat similar to the most ordinary fireplace. But in order to increase efficiency, it is still recommended to make a blower.
But such a brick oven is extremely simple in laying - the scheme of the stove is distinguished by its simplicity. Because of this, she earned her popularity. But it does not have a cooking surface. And this is also a plus, since the unit is compact. Channels for the passage of smoke rise in it like a snake from the bottom up, located one above the other. The main advantages of this furnace:
- Compactness - if you want to create stove heating for a private house of a small area, with a limited area of \u200b\u200brooms, then the Dutch rough stove will be the best option;
- A simple masonry scheme is available for a beginner stove-maker;
- The ability to give any shape - from rectangular to round or some other.
It should also be noted that there is a small load on the foundation - this is due to the low weight of the Dutch wood-fired brick oven. Therefore, a strong foundation can not be done.
Sauna brick stoves on wood
In some ways, they are similar to the above-described coarse ones, but they differ in a special design - in their design there are heaters filled with stones. The firebox in them does not go into the steam room, but into the next room. If necessary, the doors of the fireboxes are made of glass - thanks to this, a fireplace is formed in the dressing room, which serves as an excellent decoration.
Russian oven
Considering the schemes of brick ovens for the home, you should definitely pay attention to the scheme of the Russian wood-burning stove.Such a stove will become a worthy decoration of the home. It is universal in use - it acts as a heater, is used for cooking (and right in the firebox), and is used to dry clothes at home.
And you can sleep on it, enjoying the warmth emanating from it.
It is universal in use - it acts as a heater, is used for cooking (and right in the firebox), and is used to dry clothes at home. And you can sleep on it, enjoying the warmth emanating from it.
Sleeping on a Russian stove is a special pleasure, now almost inaccessible. But at least once in your life you should give yourself such pleasure and sleep on a Russian stove heated with firewood.
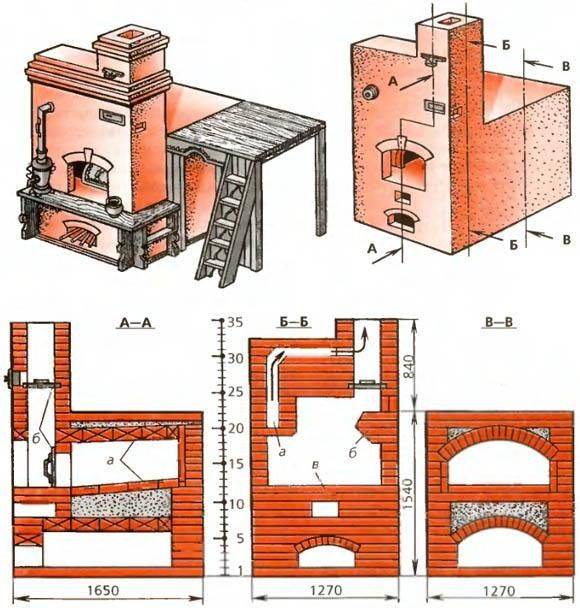
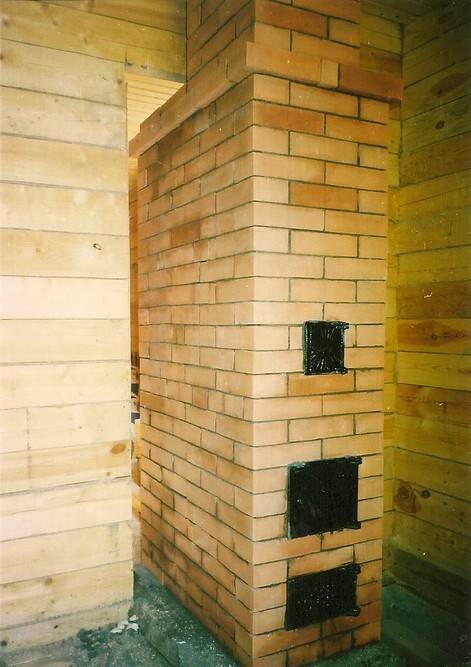
Heating and cooking stove
The assembled brick oven for the house with your own hands can be made according to the universal scheme - according to Swedish. Such a stove (often referred to as a Swede) is wood-burning and is a multi-purpose device. It works as a heating unit, it can heat water and bake pies in the oven, it can be used to cook food in traditional dishes - using a simple hob.
Let's look at the features and advantages of such a brick oven:
- Large firebox for laying firewood - provides long-term burning;
- The presence of an impressive convector - efficient heating of rooms;
- The possibility of embedding water tanks and ovens - expands the functionality of the stove;
- The maximum use of the generated heat - the temperature of the combustion products here is quite low.
It is quite difficult to bring any specific typical drawing of the stove, since the laying patterns are different everywhere.There are also differences in filling - ovens are used somewhere, and somewhere there are built-in tanks for heating water.
The sizes of Swedish brick ovens on wood can be very different. Narrow options include the use of only the hob. If you need an oven, then the stove will increase slightly in size. That is, it can be not only compact, literally a few bricks wide, but also quite overall, occupying a decent area.
Some of these versatile wood-fired brick ovens require a strong foundation for themselves, which imposes restrictions on the possibility of their construction.
Do-it-yourself mini-Russian stove: photo
Today, the dimensions of private houses, dachas and cottages do not always make it possible to practically accommodate a standard Russian stove in the kitchen. If there is no room for a sufficiently large structure, then instead of a traditional oven, you can put a “Swede”. Such a stove will take no more than one square meter, and at the same time it will perfectly cope with heating a room measuring 30 square meters. There are several modifications of the "Swede".
The most common options are a mini-oven with a cast-iron hob built into the oven and a full-fledged three-turn oven with a fireplace, hob, oven and a drying niche.
It is quite difficult to build a “Swede” yourself. In order for the building to effectively cope with its cooking and heating functions, only high-quality materials should be chosen for work. It will help to complete the masonry step by step instructions and recommendations experienced bakers.
We make the first two rows of masonry solid. At the same time, in the 2nd row we install a grate under the fireplace.In the 3rd row of the furnace we build an ash chamber, a vertical channel and a place for the oven, lay out a fireplace firebox. We put the next row as the 3rd, and in the 5th we equip a place for mounting the grate. We block the passage between the oven and the vertical channel in the 6th row.
At the same time, it should be borne in mind that we always put bricks on edge between the oven and the firebox.
In the 7th row above the firebox we put metal strips (2 pcs.), And we do the 8th and 9th rows in the same way as the previous one. We equip the chimney for cleaning the fireplace together with a place for installing a hob in the 10th row. We form the crucible in the 11th row. The front wall of the fireplace in the 12th and 13th rows is laid out with obliquely cut bricks. In order to make a shelf in the 14th row, we extend the bricks by 2.5 cm. We finish laying the cooking niche in the 16th row, and make the next two rows the same.


We lay out the subsequent rows in the same way, and in the 26th row we connect the vertical channel with the chimney. In the 30th row, we push the bricks from all sides 30 mm outward, and we start laying the pipe from the 32nd row.
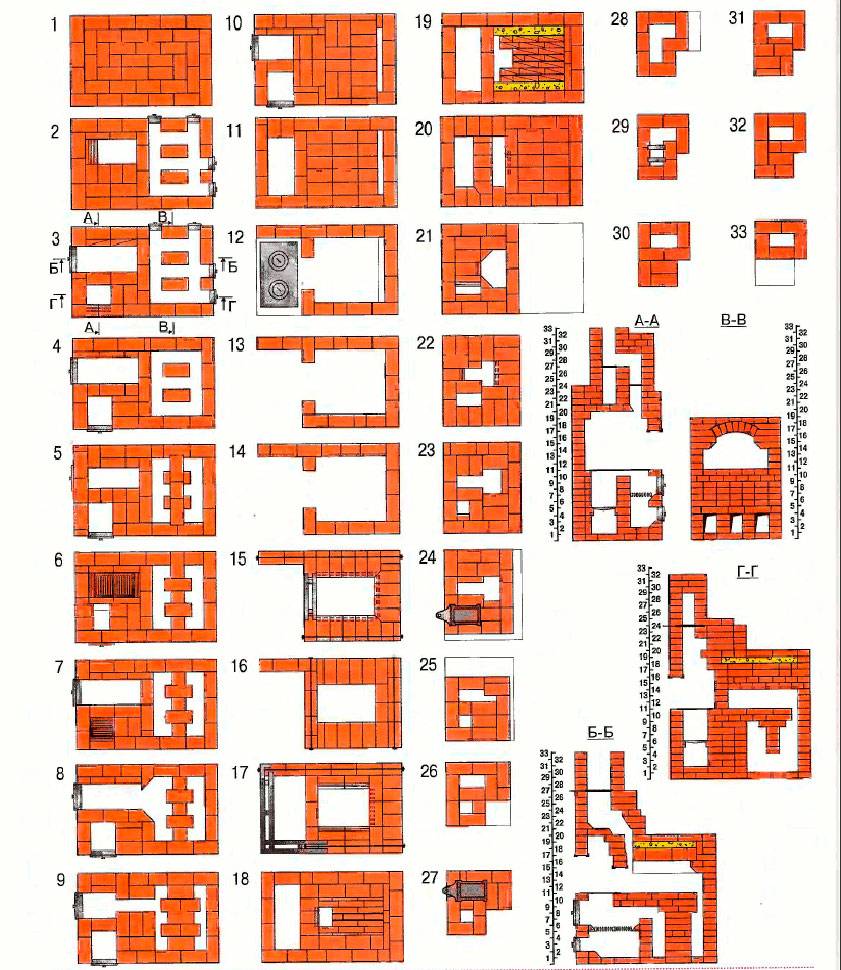
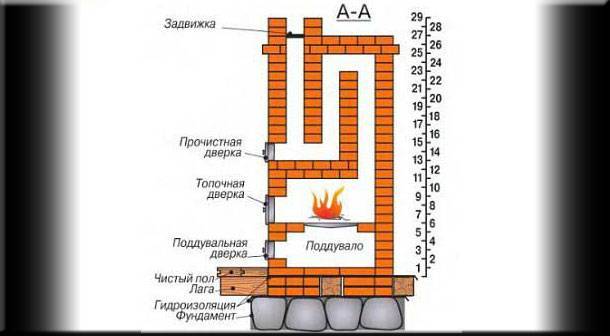
Russian oven masonry: technology and construction tips
In order to fold a simple Russian stove, you need from 1.5 to 2 thousand bricks. Bricks are stacked in rows. A standard oven includes 25-31 rows (excluding chimney).
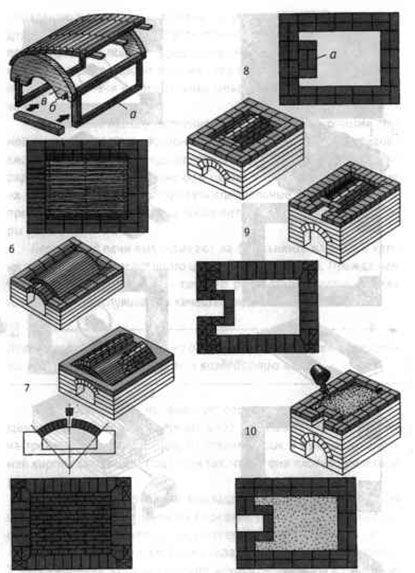
It is better to lay the first row of the furnace with waterproof overheated bricks. We lay down the walls of the crucible with a thickness of one brick, and the front of the hob - half as much. In the opening of the furnace, usually, a formwork made of wood is placed. When laying the vaults of the furnace and the furnace, it is best to use wedge-shaped bricks. They can be easily made with your own hands, as the manufacture includes the processing of ordinary bricks.
Rules and nuances of operation
For a stove to be economical, it must be maintained in good condition. A crack only 2 mm wide in the valve area will provide heat loss at the level of 10% due to uncontrolled air flow through it.
You also need to heat the stove correctly. With a strongly open blower, from 15 to 20% of heat can fly into the chimney, and if the furnace door is open during fuel combustion, then all 40%.
In order for the oven to warm up evenly, the thickness of the logs should be the same - about 8-10 cm.
Firewood is laid in rows or in a cage, so that there is a gap of 10 mm between them. There should be a distance of at least 20 mm from the top of the fuel bookmark to the top of the firebox, even better if the firebox is 2/3 full.
Ignition of the bulk of the fuel is carried out with a torch, paper, etc. It is forbidden to use acetone, kerosene or gasoline.
After kindling, you need to cover the view so that the heat does not erode through the chimney.
When adjusting the draft during kindling, you need to be guided by the color of the flame. The optimal combustion mode is characterized by the yellow color of the fire; if it turned white - the air is supplied in excess and a significant part of the heat is thrown into the chimney; red color indicates a lack of air - the fuel does not burn completely, and a large amount of harmful substances are released into the atmosphere.
Cleaning (including from soot)
Cleaning and repair of the furnace is usually carried out in the summer, but in the winter it will be necessary to clean the chimney 2-3 times. Soot is an excellent heat insulator and with a large amount of it, the stove will become less efficient.
Ash must be removed from the grate before each firebox.
The draft in the furnace, and hence the mode of its operation, is regulated by a view, a valve and a blower door. Therefore, the state of these devices must be constantly monitored. Any damage or wear should be repaired or replaced immediately.
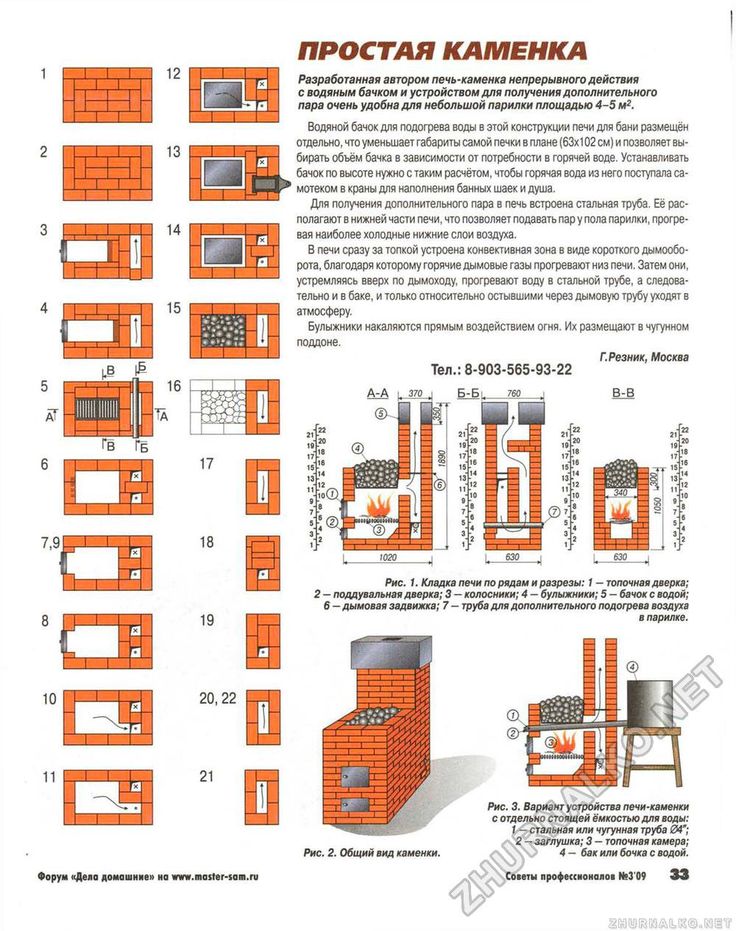
Homemade wood-burning stoves for long burning scheme and principle of operation
If the air supply is free and the draft is strong, dry firewood burns very quickly.
If, with a full load of firewood, by controlling the air supply, combustion is transformed into smoldering, then heat release will drag on for hours or even days.
Here is the device of a simple, but rather effective wood-burning stove, oriented to long burning, which repeats the scheme of the Stropuva boiler. In the people, this stove is called "bubafonya" (after the name of the person who posted the scheme of the stove on the Internet for the first time).
Scheme of a homemade long-burning stove.
It is no more difficult to make such an oven than a potbelly stove more familiar to the general public.
However, the principle of combustion and the design of such a furnace are completely non-standard. Combustion does not take place from the bottom up, as in ordinary stoves, but, starting from the upper layers, goes down until the firewood burns out.
Firewood under the pancake in the firebox is lit from above, thanks to the air supply pipe. When burning, gases seep through the edges of the pancake and exit into the chimney. Pancake as the firewood burns down. It is possible to control the air supply with a damper at the ends of the air supply pipe.
Traditional Russian ovens
Despite all the variety of devices of Russian stoves, there are several of their main types.
With a bed
In the Russian hut on stoves in the cold season, heated sleeping places were arranged.While the thermal insulation of the walls was not reliable, they tried to make such beds as high as possible, where warm air was collected under the ceiling. On the floor you had to climb a ladder. They accommodated from 2 to 6 people.


Traditional Russian oven with stove bench
Later, the design of the buildings improved. The beds were attached to the stoves on the side, passing inside the smoke channel for heating. The height from the floor did not exceed 0.5 m.
with stove
If a heated bench is not attached to the stove, a cast-iron stove is placed above the firebox. It acts as a cooking surface. Covered burners (usually two) are factory cast in the stove. If necessary, the lid can be removed and installed in the opening of the cauldron with food.
With water box
A heating box for water with a collapsible tap is built directly into the masonry. As an option, a metal riveted or welded case is mounted, where a box with water is inserted.
Operating principle
There are quite a lot of models and varieties of the Russian stove. All of them differ in size, shape and principle of operation. As a rule, earlier in one village there were no two identical structures. Each had its own characteristics.
At the moment, devices can be divided according to the following principles:
- Furnace sizes. There are small, medium and large designs.
- functional features. The stove can be made in the classic version, and also complemented by a lounger, hob and fireplace.
- Product form. There are domed, barrel-shaped and three-center products.
In these videos you will learn how to make a Russian oven with your own hands:
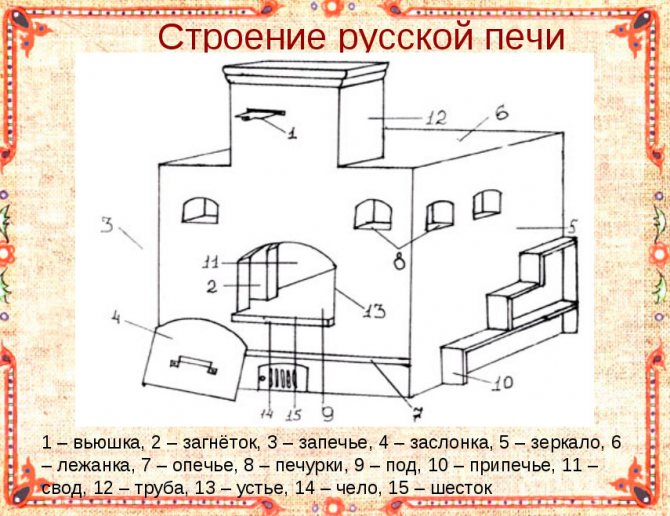
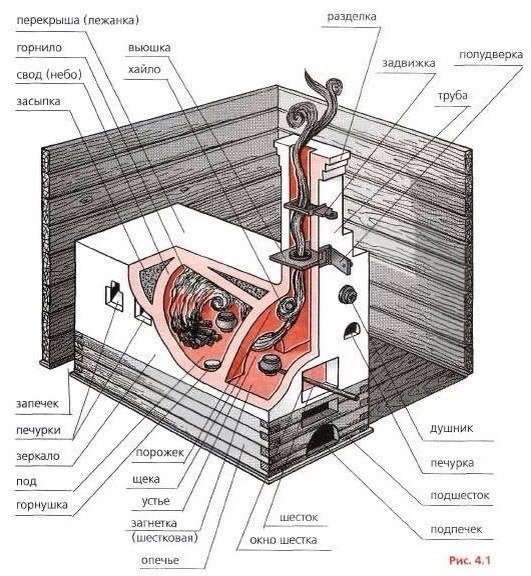
The design also includes the following elements:
- six;
- undercoat;
- bang;
- vault;
- backfill;
- bottom;
- mouth;
- undercooking;
- shestak window;
- hailo;
- vyyushka;
- door;
- valve;
- pipe.
More about the device of the Russian stove:
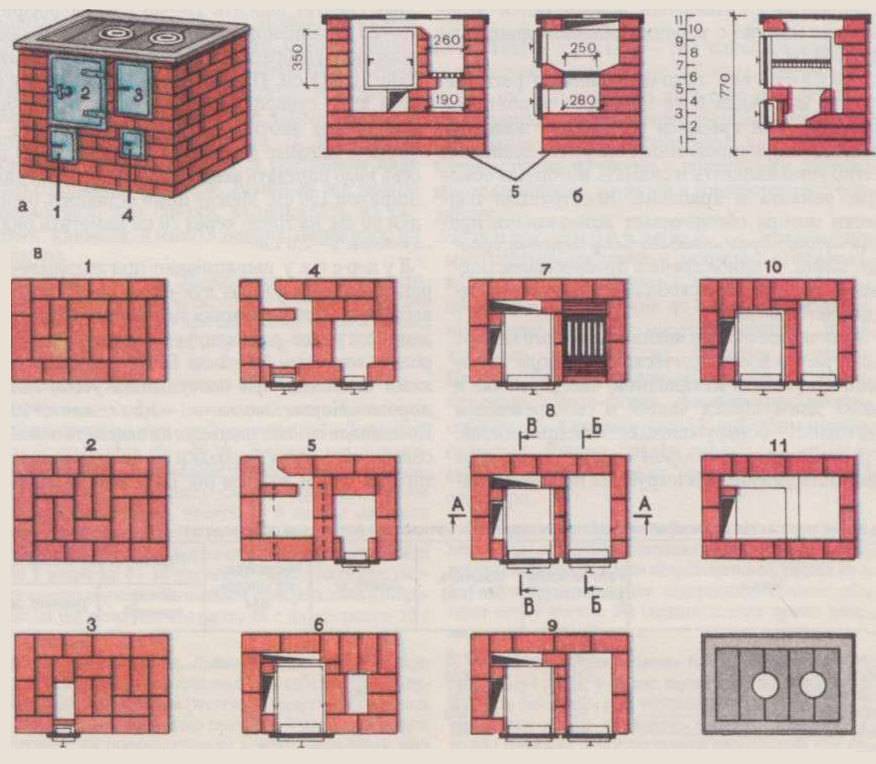
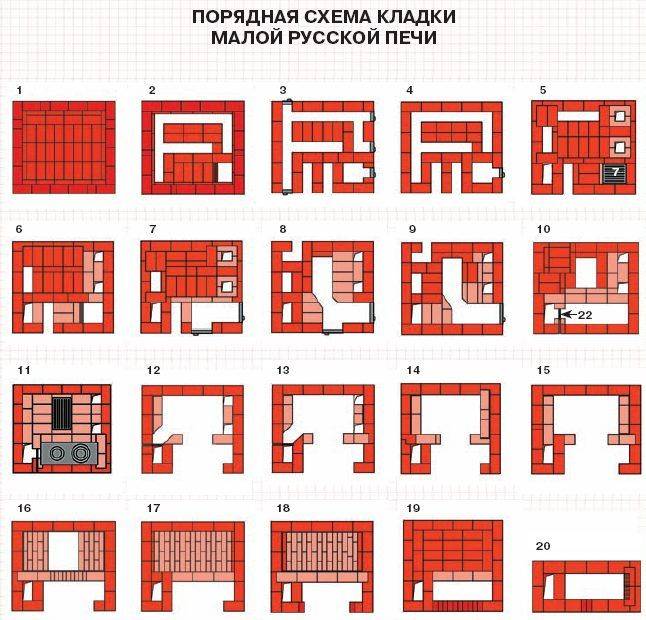
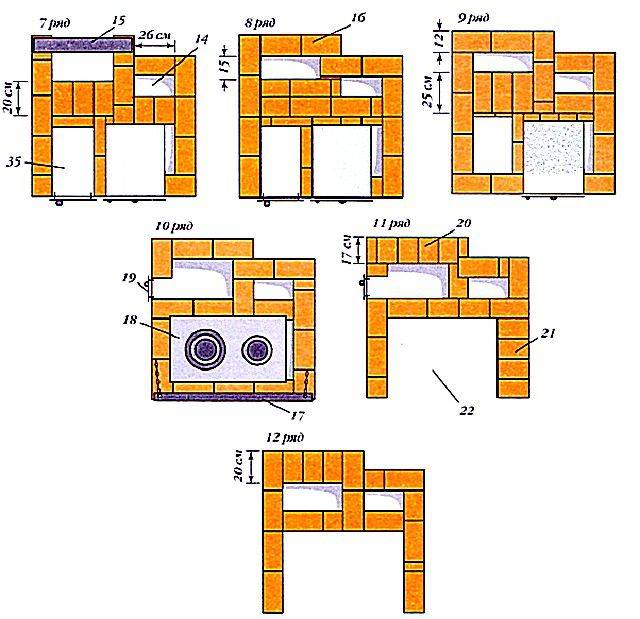
2 id="poryadovka-mini-pechki">Order mini-stove
- 1 row - the wall of the Russian mini oven is laid out with whole bricks with the obligatory dressing of each seam.
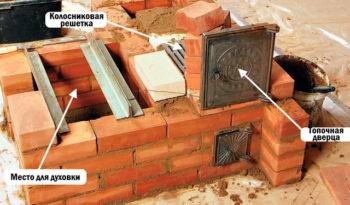
- 2-5 rows - the blowers of the main and small fireboxes are laid out, separately the columns on which the brick arch will be placed. On the same rows, you can immediately attach the doors to the blower.
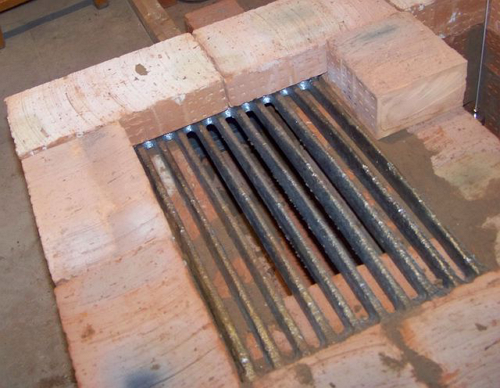
- 6th row - bricks are cut under a cone directly above the grate, and a separate grate is placed in each firebox.
- 7-8 rows - doors are fixed on both fuel chambers.
- 9th row - the beginning of the narrowing of the outlet channel at the exit from the main firebox. The partition, in turn, expands.
- 10th row - is built under so that an outlet channel with a width of about 75-80 mm must necessarily pass along the back wall.
- 11 row - the construction of the hearth continues, and the front wall is additionally fixed with corners.
- 12 row - the channel is closed with a cast iron hob.
- Lay out the 13-16th row completely according to the drawing, and on the 15th, make the connections of the side walls from a metal sheet.
- 17th row - the connections of the side walls are also duplicated with a metal sheet and a base is made for the overtube. Additionally, grooves are cut for the strips.
- 18 row - the beginning of laying the hob, which is traditionally made in the form of an arch. It rests on bricks at an angle of 10 degrees, which are additionally fixed with clay mortar.
- 19 row - the ventilation duct is laid and the laying of the chimney begins.
- 20-21 rows - laid out according to the pattern.
- 22-24 rows - the bricks are cut down under the prefabricated channel, which should turn out to be square.
- 22-25 row - the construction of the chimney continues with a gradual decrease in the clearance so that in the end only 1 brick is obtained.
- 27 row - according to the drawing
- 28-29 rows - connected by a horizontal channel vertical on both sides, and closed with a sheet of metal.
- 30-32 row - according to the drawing.
As you can see, the mini Russian stove "Housekeeper" is built quite quickly and simply. There are no complex brick transitions with an increase and decrease in cross-section and channels, there are no separate chambers, as in a traditional oven, which is why it is fashionable to build it in just a few days.
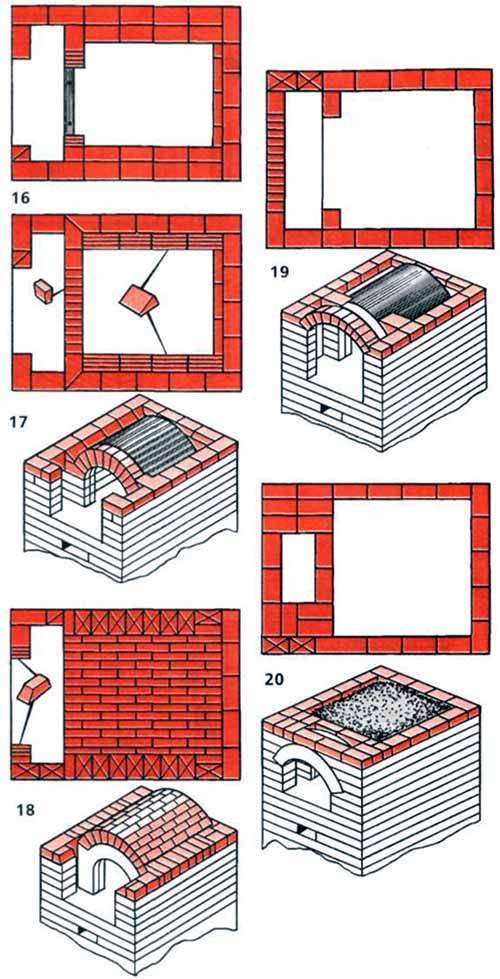
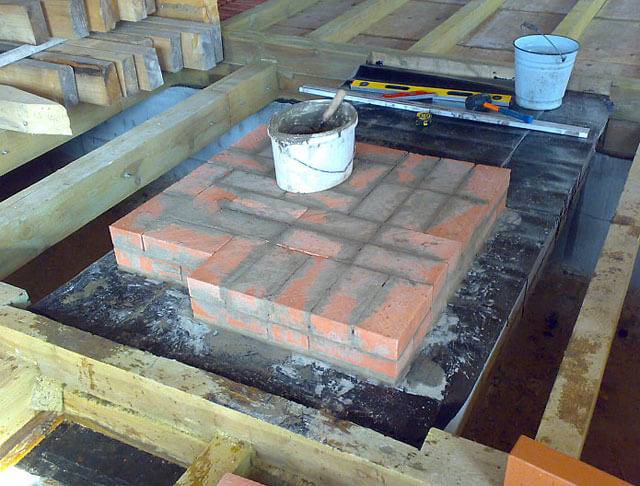
The process of laying the furnace Radonezh
First step. Cut a hole in the wall for the oven. Hammer reinforcing dowels into the ends of the timber (if the wall is made of this material).
Second step. Pour the foundation.
Proceed to masonry 1-1.5 months after the arrangement of the foundation. It is during this period that the concrete will gain the desired strength.
Third step. Cover the dried foundation with waterproofing material.


Fourth step. Lay out the first row of the stove. Check the evenness of the masonry with a level. Make seams no wider than 3 mm.
Continue laying the furnace in accordance with the order.

The grates and the blower are arranged in the combustion chamber. The width of the furnace blower must be sufficient for the inflow of the required amount of air to the loaded fuel during the operation of the heating unit.
Lay out the furnace chamber and sew the channels. Cut off excess solution.
When laying the 26th row, make a 20 mm overlap on each side.
Complete the laying of the main part of the furnace in order and proceed with the laying of the chimney.
Continue the arrangement of the chimney in accordance with the previously prepared project.
Dry the finished oven. To save time, install a fan in the combustion chamber.
After the masonry has dried, do a few test runs. Don't make the first fires too intense.
If everything is done in accordance with the instructions, order and basic requirements, after an average of 30-40 minutes, the side of the stove that goes into the room will heat up. After about 1.5 hours, the unit will warm up evenly and begin to fully heat the room.
The self-made construction of a heating furnace is a rather complicated and lengthy process, but if you wish, you can cope with such an event. It is only necessary to follow the proven technology, use only high-quality building materials and adhere to the chosen masonry scheme in everything.
As a result, the heating unit will serve as long as possible, reliably and efficiently, and you will additionally save on arranging the heating system of your home by refusing the services of third-party stove-makers and doing everything with your own hands.
Video - Do-it-yourself heating furnaces
Video - Do-it-yourself heating furnaces
Everything is very well written. From myself I will add that there is no need to look for refractory clay. Now ready-made mixtures for laying stoves and fireplaces are sold on the building materials market. Everything is already mixed in the right proportion. Even after drying the oven, there is one point. Make the first run using only paper and cardboard as fuel. Firewood is highly undesirable. Then you will get the required temperature. Heat it this way for no longer than an hour. As the clay dries, it may smoke a little. That is, the smoke will be in the room. Don't be afraid of this. The clay will dry very quickly and the stove will work as it should.
I want to suggest one interesting idea that I myself experienced. Inside the furnace, you can lay out "Gabrodiabase". This stone is a type of granite and is used to make monuments. Trimmings can be requested at funeral services, after making sure that this is really gabrodiabase, and not simple granite. You can buy, but this stone is very expensive, because it can withstand high temperatures! Good luck!
On my own in the country, I twice made stoves in the house and in the bathhouse. In the latter, the second option turned out to be relatively successful, but there the design itself is simple. In the house, metal stoves lined with bricks served as the basis. I immediately rather modestly assessed my capabilities in the construction of a more complex structure, and still, having already had experience, I think so. That is, for the construction of a good stove and, moreover, a fireplace, it is best to turn to good stove-makers. By the way, my sister did just that, and until they installed the boiler, she worked great for them.
Have we answered your question?
Ordering the stove
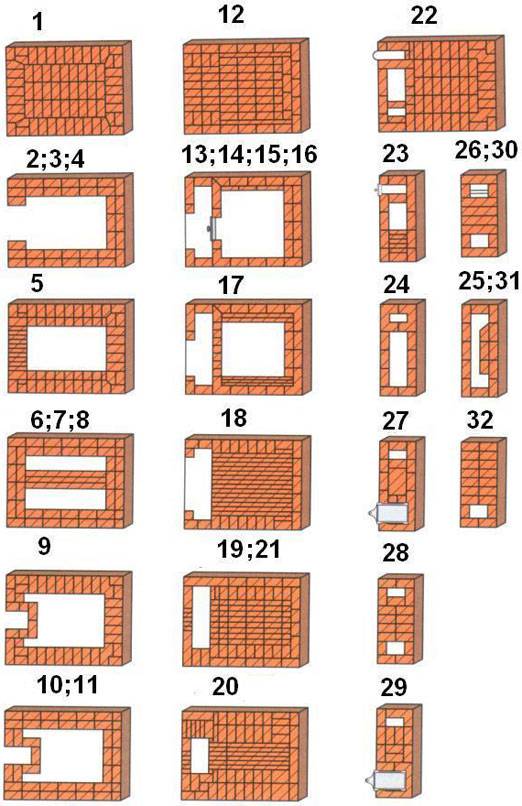
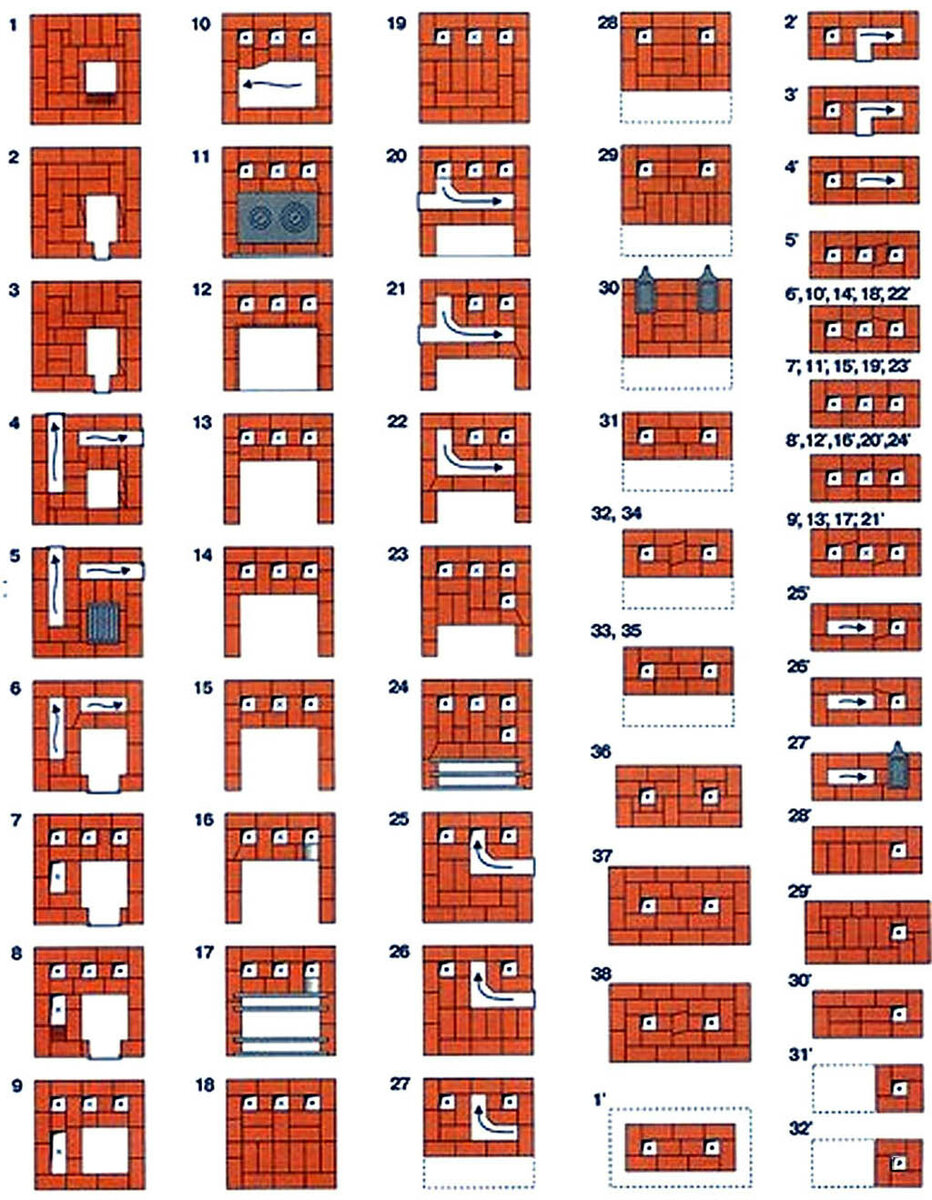
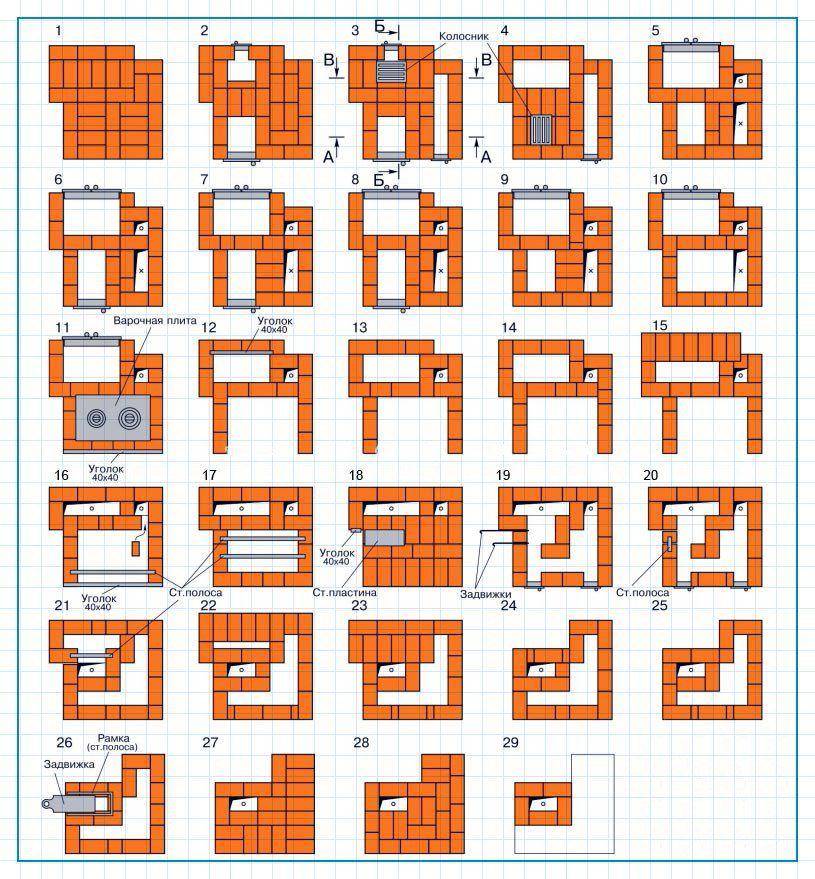
In order for the stove to work correctly, you must lay it out according to the scheme described below.
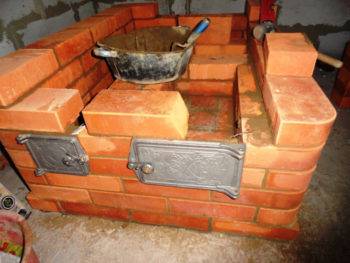
- The first 2 rads are solid, since they are the foundation. Lay them out with red brick (KK) horizontally.
- Row three you will already lay out the base for the vertical channels, the ash chamber with a door and the lower heating compartment. Carry out the laying of KK, use refractory products for laying out the blower.
- Row four continues the third. Lay out the blower with fireclay bricks (SHK), red - the rest of the parts. The second and third channels in the 3rd and 4th row must be connected. A similar method is used for laying a stove with a stove bench.
- Row five do from left to right.You complete the ash chamber and close the blower door. When installing the grate, keep in mind that under the influence of high temperatures, the material will begin to expand. Leave a small gap between it and the masonry (1.2-1.6 centimeters) and fill it with sand. Use the SHK for the ash pan, red for everything else.
- Row six: you are already starting to create a shopping mall and a door for it. Install the oven. To separate the TK and the oven, use the SHK. Everything else is done from QC. From the U-shaped channel, create 3 vertical ones.
- When laying out the 7th row of the ShK, a firebox is equipped.
- 8 row: close the vertical channel and continue to create TK.
- Row 9 is located at the top of the TC door. Bricks for this row need to be cut at the top and bottom, so that the gas passes better from the furnace into the chimney pipe.
- Creating row 10 is a little more difficult. Bricks need to be cut in the same way as in the previous case. TC and oven do not need to be separated. Lay out the row constantly adjust the level, place the hob on it. Remember to make a margin (1.2-1.6 cm) as the iron will expand. Lay a metal corner at least 4.5 * 4.5 centimeters flush with the outer wall of the stove.
- Laying out the 11th row, you will already begin to form the cooking chamber (VK), so along the entire length, lay the hole that appeared on the right with a brick. When creating a series, use QC. If you put a removable door, then the VK can perform the function of an oven.
- For the 12th row, take KK. It will combine the 2 left channels. 13 has the same order as the previous one, only the channel must be divided into 2 parts. 14 and 15 are laid out according to the same principle as the thirteenth.
- During laying out the 16th row, you need to block the VC with four corners. The masonry scheme is similar to the previous row.
- 17 row overlaps VK. In order for the steam to escape, you need to leave a hole equal to half the brick.
- When doing 18, lay a safety corner that will strengthen the drying chambers (CK).
- 19 row - the creation of an extract from the VC and the formation of two SCs.
- 20 and 21 rows are performed according to the same pattern.
- When performing 22 rows, the scheme of the previous rows is repeated, only the smaller SK needs to be covered with a metal plate.
- The 23rd row creates an SC, preparing a place for a valve on the VK hood.
- The 24th row combines channels 1 and 2, and the 25th row combines the VK hood and channel 3.
- In the 26th row of the SC, overlap with a corner and lay the overlap on it. Top cover with a mesh with fittings.
- Performing the 27th row, block the top of the stove, without touching only the 3rd vertical channel. Increase the masonry perimeter by four centimeters. On the 28th row, form a side and again increase the perimeter by four centimeters.
- 29 row returns the masonry to its original size.
- Laying out the 30th row, form a pipe, and make a hole for the valve in the oven. After you need to make a pipe of the desired size. Vertical masonry.
- The final stage is the laying out of the last rows.
Features of laying a brick oven with your own hands
What are the nuances you need to know before proceeding with the laying of the furnace?
The foundation for the furnace must be strong and solid. But at the same time, in no case should it be connected with the main foundation for the house.
The fact is that the house shrinks over time, which is reflected in the foundation, so it is very important to separate these two elements. With seasonal shifts of the soil and general shrinkage of the house, the design of the furnace may suffer.
The foundation must exceed the dimensions of the furnace by 15-20 cm on each side. It can be made of ordinary concrete, cement mortar or made of concrete blocks.
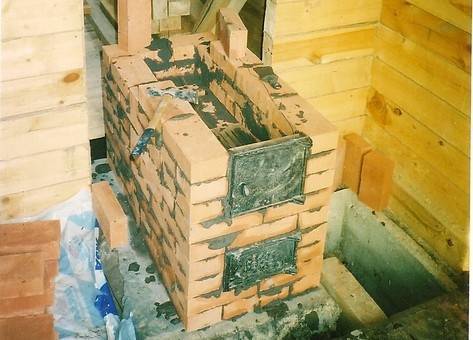
For laying the furnace, it is necessary to purchase 2 types of bricks: ordinary solid ceramic and fireclay (refractory), from which the firebox, smoke channels and all heated elements will be folded
The cost of such material is much higher than the price of ordinary red brick, so usually only those surfaces that will have direct contact with fire are laid from it.
All other elements are laid from red solid bricks, while using a solution based on red oven clay. The composition of such a solution must necessarily include heat-resistant cement. But between ceramic masonry and fireclay bricks, it is imperative to maintain a gap of 5 mm. When heated, fireclay bricks will expand. Therefore, in order to prevent deformation of the furnace structure during operation, this gap must be taken into account.
All purchased elements for the oven (grate, door, hob, oven, etc.) are set in accordance with the general scheme and purpose of the oven


It can be made of ordinary concrete, cement mortar or made of concrete blocks.
For laying the furnace, it is necessary to purchase 2 types of bricks: ordinary solid ceramic and fireclay (refractory), from which the firebox, smoke channels and all heated elements will be folded. The cost of such material is much higher than the price of ordinary red brick, so usually only those surfaces that will have direct contact with fire are laid from it.
All other elements are laid from solid red brick, while using a solution based on red oven clay. The composition of such a solution must necessarily include heat-resistant cement.But between ceramic masonry and fireclay bricks, it is imperative to maintain a gap of 5 mm. When heated, fireclay bricks will expand. Therefore, in order to prevent deformation of the furnace structure during operation, this gap must be taken into account.
All purchased elements for the oven (grate, door, hob, oven, etc.) are set in accordance with the general scheme and purpose of the oven.
Grate
When inserting the door of the combustion chamber or ash pan, it is necessary to tie it with annealed steel wire. In this case, one end of the wire is inserted into a specially designed hole, and the other end is twisted into a bundle and laid between the bricks, tightly clamped with mortar.
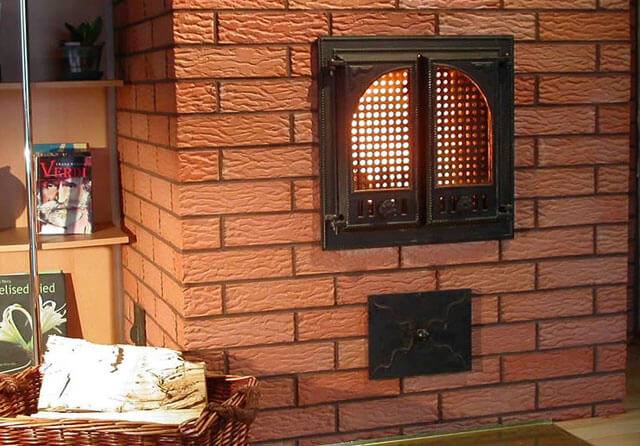
When installing a cast-iron firebox or cast-iron stove, it is imperative to lay an asbestos cord between the brick and the metal element to compensate for the different thermal expansion of materials.
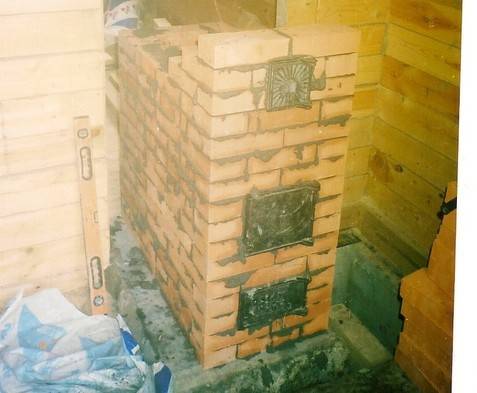
The chimney for the stove can be made of red ceramic bricks, or you can use a ceramic block chimney, which is purchased ready-made.
Facing is the final stage in the construction of a brick oven. To give a beautiful aesthetic appearance, the stove can be lined with red ceramic bricks, clinker (under wild stone), decorative tiles. This coating gives a unique authentic look to the stove, and also protects it from the negative effects of the environment.
Materials that will be needed for laying the furnace.
-
Red solid ceramic brick (M-150.)
M 150
- Chamotte (refractory) brick.
- Masonry mortar (sand, red oven clay).
- Foundation material (cement, graphite, sand).
- Ruberoid.
- Asbestos cord, galvanized wire.
- Boards for creating formwork.
- Reinforcing mesh.
- Grate.
- Cooking surface (stove).
- Ash pan and ash pan door (blew).
- Furnace door.
- Chimney flue.
- Chimney valve.
Tools that will be needed for laying the furnace:
- Building level.
- Owl shovel.
- Construction marker.
- Measuring tape (roulette).
- Construction slope.
- Goniometer.
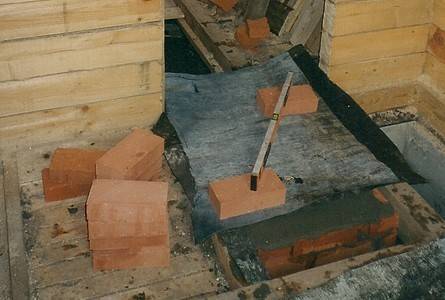
Construction of the furnace foundation
Before you fold the stove yourself in the country, you will need to lay the foundation first. It is arranged separately on the ground, not connected with the main foundation of the house.
We put the base of the furnace do it yourself step by step in the following sequence of operations:
- Preparation of concrete mortar brand M200. In a container for mortar, 3.5 buckets of sand and one bucket of cement are mixed. After diluting the dry mixture with water, thorough mixing is carried out until a slightly fluid homogeneous mass is formed. Crushed stone is poured into the resulting slurry in the amount of 5-6 buckets, after which it is brought to the state of a homogeneous thick solution. To make the concrete more plastic, it is allowed to add a little liquid soap or dishwashing liquid to it.
- Pit dig. For the foundation, you need to dig a pit 45-60 cm deep. Its dimensions on each side should be greater than the dimensions of the furnace. The bottom of the trench is rammed, and the side walls are reinforced with plank or plywood formwork. Next, a sand cushion 10-15 cm high is poured, and a rubble stone with a layer of 15-25 cm is poured on it. Sometimes the walls are reinforced not with formwork, but with pieces of roofing material.
- Solution pouring.At the bottom of the trench, a reinforcing harness is equipped, for which a reinforcing harness made of welded reinforcing bars or steel pipes is used. Concrete is poured in several portions. To achieve a good density, the solution is pierced to the bottom with a wooden lath or a piece of reinforcement: this allows the air that has accumulated inside to come out. The upper part of the base is reinforced with steel reinforcing mesh. On top of it, a finishing layer of concrete 2-4 cm thick is formed.
- Leveling and solidification of the foundation. A rule is used to level the poured concrete mortar. It is necessary to achieve strict horizontality of the upper surface of the base: it should be inferior to the level of the finished floor by 8-12 cm. After that, the foundation is covered with a film of polyethylene, leaving it in this position for about 7 days until the solution completely hardens.
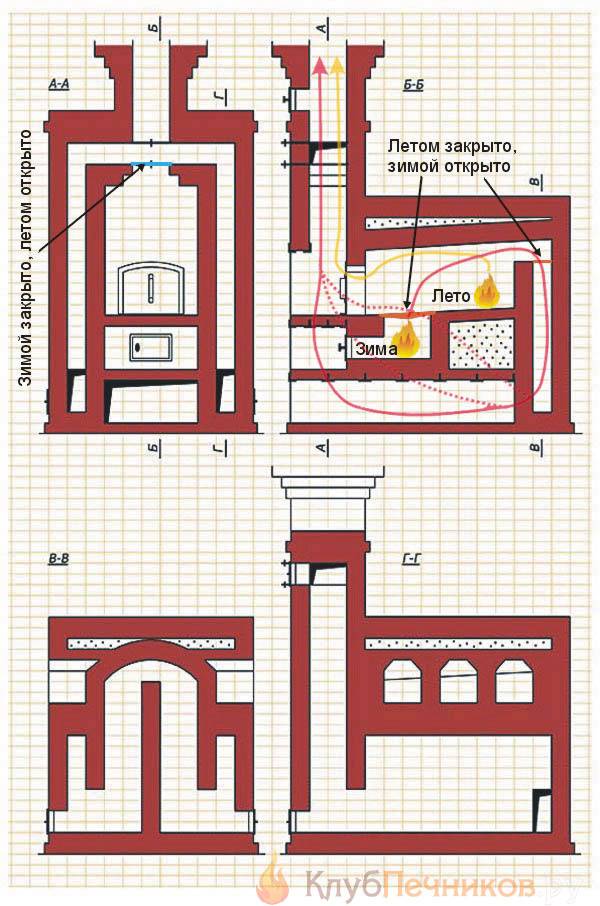
Stove with stove - multifunctional building
The plate is so useful, convenient and ergonomic that the construction of a structure without it simply loses its meaning. Perhaps that is why all modern modifications of the Russian stove have cast-iron stoves - with one, two or even three burners.
In fact, models with a stove do not contradict one of the main features of the Russian stove - they have two fireboxes. Just a small firebox and is responsible for heating the stove. At the same time, for simple furnaces, it has a separate chimney, connected at the top to the chimney of the crucible.
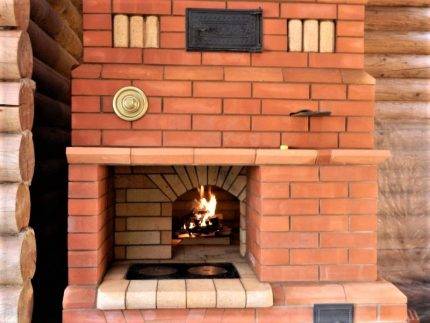 One of the popular options for the location of the stove is right in front of the mouth of the crucible. Heating is carried out independently of the large firebox, through the lower firebox
For more complex designs, there is the possibility of a “summer” and “winter” furnace: in the first case, a small furnace (firebox) operates autonomously, and in the second, it heats the walls and a large furnace.
There is a third option for the location of the firebox - in the main structure, but on the side or on the opposite side. Such a solution is not always acceptable - for example, if the oven needs to be placed in a corner. In this case, it is more convenient if both fireboxes are on the same side and are located one above the other.
 A successful engineering solution, in which a small furnace with a cast-iron stove is placed separately, but has a common wall with the main structure. Cons: Takes up more space
The advantages of the design with a hob are obvious:
- autonomous heating with a lower degree of heat transfer;
- fast process of heating cast iron and walls;
- cooking all kinds of dishes on the stove;
- the possibility of heating or storing food in a warm form;
- economical fuel consumption - firewood;
- simple care - cleaning the ash pan.
On the stove, when it is no longer hot, but has cooled down a bit, you can dry household items. For the same purpose, stoves are used - small recesses in the walls of the furnace, as well as a brick perimeter around the cast-iron surface.
For summer residents, a model with a flood is much more convenient, as it is used more often. A large firebox is usually used either in early spring or late autumn, when the cold season sets in and the entire furnace needs to be heated.
How to choose a seat
Before you make a stove, you need to choose a place for it. In order for the stove to be efficient, convenient and safe, it must be positioned as correctly as possible inside the home.Drawings of how to fold the oven with your own hands are freely available on numerous resources.
There are certain rules governing the placement of furnaces:
- The best place to install a heating stove is the central part of the house or the largest room. This will make heat transfer as efficient as possible, because. heated air will spread evenly throughout the house. Due to the massiveness of the body, natural zoning of the premises into separate local areas is carried out. The construction of a heating furnace near one of the outer walls will significantly reduce the heating efficiency: part of the heat will be wasted outside.
- The cooking oven is usually built on the street under a canopy, or in the kitchen, right next to the outer wall. Thanks to this arrangement, even in the summer, the room will not be very hot, because the heat will partially go outside. For the same reason, it is desirable to equip the chimney in the corner of the kitchen, between two outer walls.
- The heating and cooking stove has a specific location. That part of it, where the hob and oven are located, is mounted in the kitchen room. The chimney is made slightly offset inside the interior partitions between the kitchen and other rooms. A similar instruction on how to properly fold the oven with your own hands ensures the simultaneous cooking and heating of the house.
Conclusions and useful video on the topic
Video layout of the Russian stove with order:


The process of dismantling the old and building a new furnace:
One of the options for a Russian stove with order:
If you build a Russian stove correctly, you can immediately get an almost “eternal” heating device and excellent kitchen equipment for cooking.However, for this, the device must fully comply with the order, and the technology for laying bricks and mixing the mortar must comply with generally accepted standards.
And before you make a project of a Russian stove, it is better to consult with qualified stove-makers.
Please write your comments in the box below. Tell us how a Russian stove was built in your dacha or country house. Ask questions, share information useful for site visitors interested in the topic, post thematic photos.


