- Filling a crack with epoxy
- Rules for gluing plumbing
- What is needed for repair
- How to choose glue
- Homemade adhesive
- We do the final finishing
- How to glue at home
- What you need
- Surface preparation
- Unilateral damage
- Bilateral cracks
- Bonding technology
- Universal waterproof adhesive
- Epoxy resin
- Silicone sealant or liquid welding
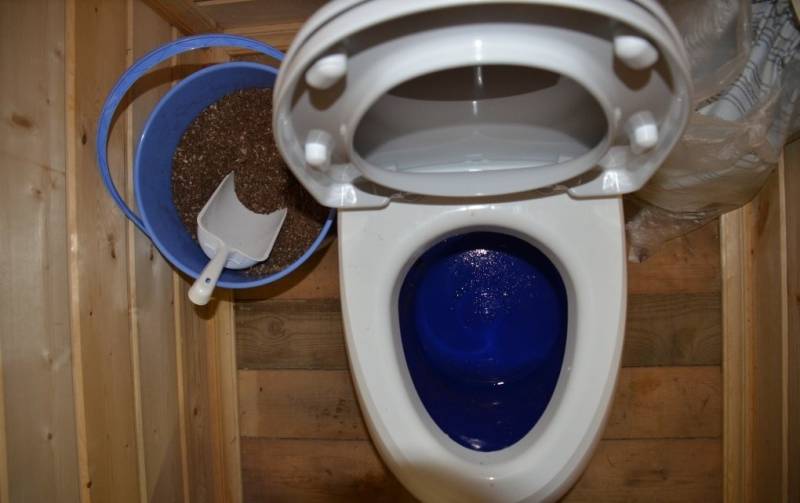
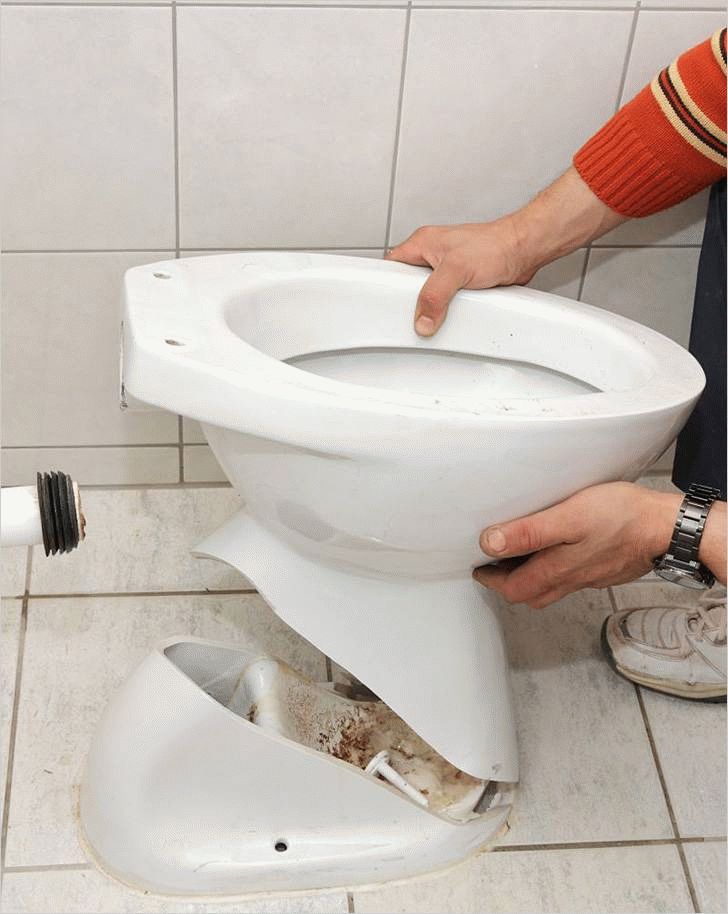
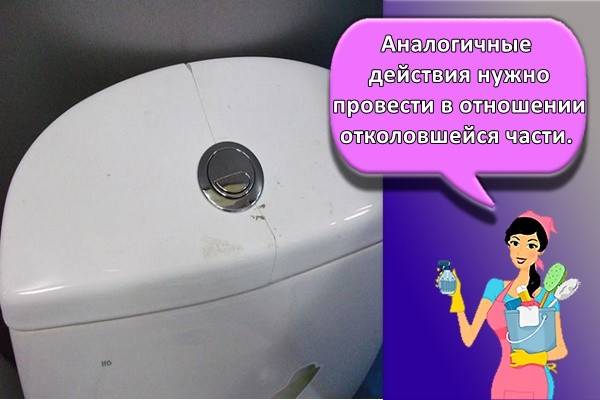
- Crack on the toilet: what to do?
- Ways to get rid of cracks
- Rules for gluing plumbing
- Stage # 1 - preparing the surface of the device
- Stage # 2 - gluing the seam
- Stage # 3 - final finishing
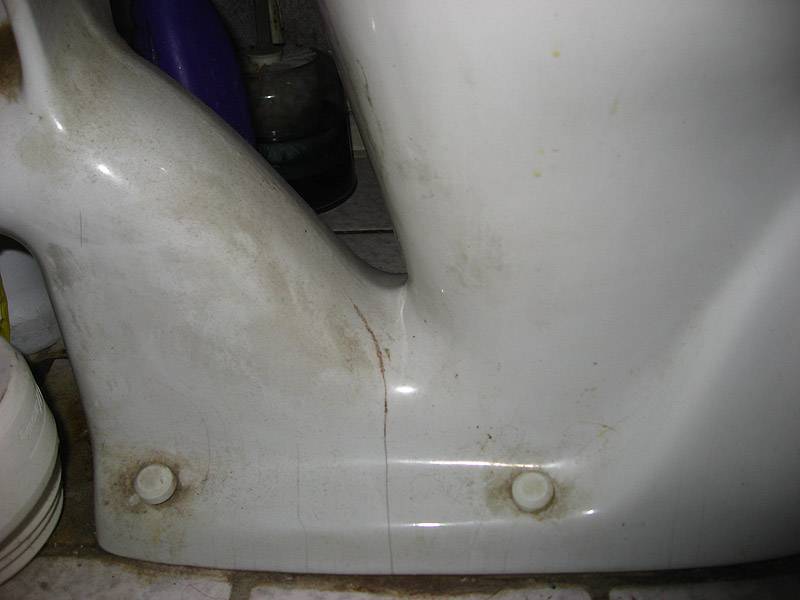
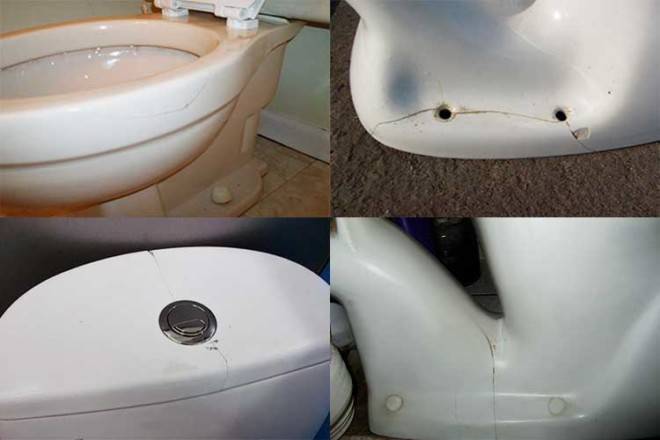
- What causes cracks
- Reasons for leakage
- Rubber clutch
- Cracked toilet outlet pipe
- How to fix small cracks on the toilet
- If other items are damaged
Filling a crack with epoxy
This method is great for a situation where an object has fallen into the toilet and damaged the ceramics. The crack turned out to be shallow, does not let water through and is not visible from the opposite side. All-purpose glue works too, but epoxy is better. More precisely, resin plus hardener:
Prepare both components and a container for mixing them.
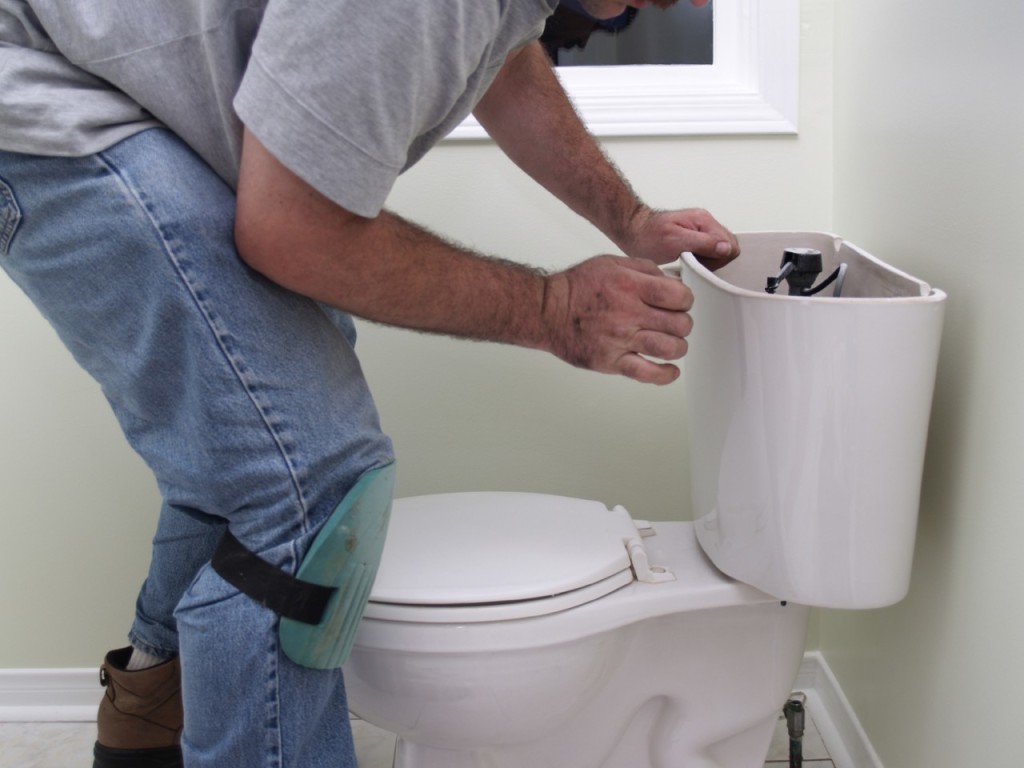
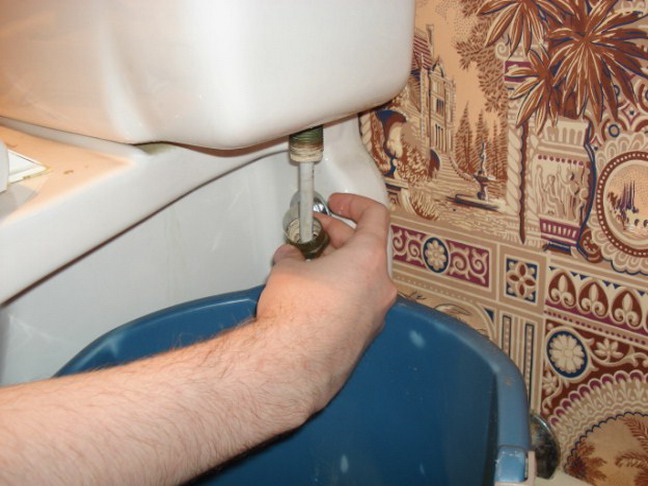
Shut off the water supply to the tank. Wipe and dry the surface thoroughly.
Degrease her.
Mix the two adhesive components, using the recommendations in the instructions for the substances.
Apply the mixture evenly on the desired surface.
Fix the place of gluing in any way. Even duct tape will do.
It is important that the parts to be glued are pressed against each other.
Epoxy resin
After the resin dries, it is better to grind the seam
This is important not only to improve the appearance of the toilet, but also from a practical necessity. Small seam irregularities will accumulate dirt
For grouting, use M20 or M40 sandpaper, and then felt.
Advice. A hair dryer or fan is great for quickly drying the surface.
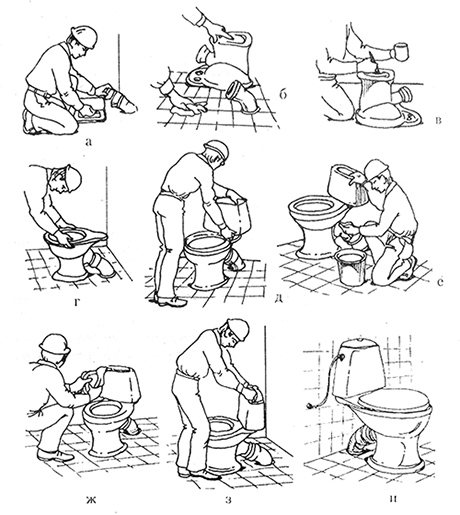
Rules for gluing plumbing
To properly repair plumbing must adhere to the following rules:
- To prepare the surface you will need: fine sandpaper, degreaser, spatula, building hair dryer, clean rags.
- A chip or crack is cleaned with sandpaper. The plane is wiped with a rag to remove dust. There is degreasing and drying with a hairdryer.
Stripping is carried out carefully so as not to remove the bulges, otherwise gluing will lead to the formation of voids.
A suitable adhesive composition is selected. Gluing is in progress. The excess glue is removed with a spatula.
If the damaged plane has a relief structure, then you will need to apply two layers of glue. Each layer must be thoroughly dried. Strong pressure is required, it will eliminate the formation of bubbles in the seam.
In order for the toilet to stick together well, to last longer, the glue is carefully selected.
The process of gluing a toilet bowl is quite simple. The main thing is to carefully and carefully perform all operations. The procedure is carried out in stages.
You should start with a cleanup.We very carefully and carefully clean the chipped or damaged surface of the device with sandpaper. Then wipe thoroughly, thereby freeing from adhering small particles. For better adhesion of the adhesive to the material, the base must be degreased. This can be done with gasoline or acetone. We evaporate all the moisture from the fat-free surface by heating it with a hairdryer. This preparatory procedure is carried out for cracks and chips of simple shapes.
Faults of complex shape must be handled very carefully. Otherwise, voids are formed after gluing, which reduce the reliability of the seam.
The instructions attached to the glue will help determine the sequence of actions. It must be read and followed by its provisions in the process of gluing.


Most often, the procedure is carried out as follows. The adhesive is applied to the surface, where it is left for a while to dry a little. Then the elements are pressed against each other with force. It should be noted that the result will depend on the force with which the parts were pressed. The larger it is, the stronger the seam will be. For reliable fixation of the elements, you can use an elastic tight tourniquet or a clamp.
If the seam is located inside the toilet, it requires reinforcement. We clean the dried seam again with a sandpaper, carefully degrease it and dry it with a hairdryer, after which we coat it with glue. On top we lay a strip of soft metal or thin plastic, which will act as an amplifier. Once again, dry the bonding area well.
Outside, the repaired damage is treated with grout, which is specially designed for tile joints. You can also use an epoxy based solution.Such compositions are available in various colors, you need to choose the most suitable tone.
What is needed for repair
The selection of glue for the toilet is a crucial moment on which the strength of the seam depends, the further use of plumbing.
How to choose glue
Surface bonding may be carried out in such a way that the seam is invisible. Silicate glue is often used, as it is resistant to water, temperature changes, a long period of operation, and prevents the spread of fire.
For the reliability of the seam, you can resort to the use of liquid nails. Ready-made adhesive mixtures are also purchased:
- BF-2 is a reddish viscous liquid containing an alcoholic solution of polyvinyl acetate with a complex of resins. Waterproof, fungus and mold do not form on the surface. The composition is flammable, for this reason it is necessary to function far from direct flame and thermal appliances, in a thoroughly ventilated room. Bonds ceramics, glass, plastics, etc.
- Unique - one-component adhesive in the composition with rubber, reinforcing additives. Field of application: bonding of ceramics, glass, leather, rubber, etc. mass of viscous beige color. The seam withstands temperature extremes from -40 to 70 degrees. Method of application: the surface of the toilet bowl is cleaned, the adhesive is applied in a thin layer, after 10 minutes the second layer is applied, after 10 minutes press the surfaces to be glued. The product is put into operation in half a day. The operating temperature should not be less than 10 degrees. The mixture is flammable, for this reason it is necessary to operate away from direct flame, thermal appliances, in a thoroughly ventilated area.
- Rapid - glue in the form of a solution of nitrocellulose with resins and organic diluents.Used for gluing leather, wood, porcelain. During operation, the planes are degreased, dried, a layer of glue is applied and dries up to 20 minutes, after which a second layer is applied, the planes are strongly pressed, fixed. Complete drying is achieved after two days.
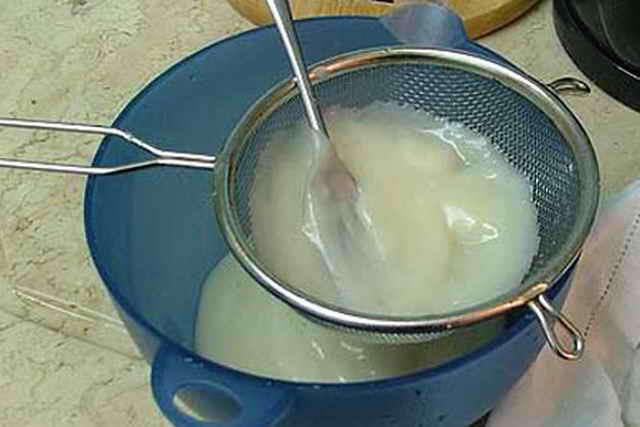
Homemade adhesive
For the purpose of gluing a toilet bowl or a toilet bowl, an adhesive mass is made independently. To do this, follow these recipes:
- Strong, but not easy to use, proportions: one part ground glass, two parts sand (previously sifted), six parts sodium silicate.
- Durable, but hardens quickly, for this reason it is prepared directly before use, applied to cleaned surfaces: one part lime, ten parts chalk, two and a half parts sodium silicate.
- Glue mixture: one part turpentine, two parts shellac. Mix well, melt on a slow flame, cool. The mass is divided into parts. Melt before use. It is applied in a thin layer on prepared surfaces, tightly pressed, fixed. If excess mixture appears through the seam, it must be wiped off immediately.
- Gypsum composition: gypsum is soaked in alum for a day. After it is dried, calcined, crushed. To prepare the glue, the dry mixture is diluted with clean water until a creamy mass is formed.
We do the final finishing
It may happen that the seam is inside the toilet. In this case, it must be strengthened. You need to let the seam dry, and then re-clean it using a sandpaper.Then you need to degrease well and dry the prepared surface with a hair dryer, and again coat it with adhesive.
An amplifier strip is laid on top of the glue layer (soft metal or thin plastic is used for this purpose). After that, again the place of gluing must be thoroughly dried.
This is followed by external treatment of the repaired damage with a grout specially designed for tile joints. For this purpose, it is also allowed to use a solution based on epoxy resin. Similar compositions can be purchased at hardware stores. They can be of different colors, so they are easily matched by tone.
How to glue at home
The difficulty in gluing the toilet bowl arises due to the fact that cracks and chips on the surface of faience and porcelain do not have a smooth texture. Because of this, the adhesive composition worsens the parts of a broken device. Therefore, this procedure often has to be carried out two or more times.
What you need
For gluing porcelain and faience products you will need:
- fine sandpaper;
- acetone (gasoline), which is needed to remove fat from the toilet;
- glue;
- scotch.
You will also need wipes to remove excess adhesive. Before proceeding with gluing, it is necessary to turn off the water supply and drain the tank.
Surface preparation
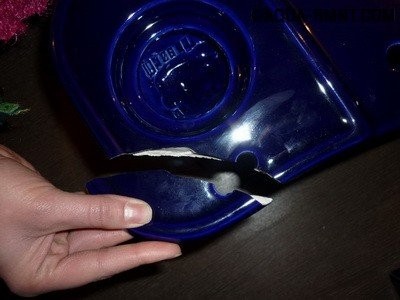
The procedure for preparing the surface for restoration work depends on the nature of the defect. This procedure will require more effort with deep cracks that lie on both sides of the tank.
Unilateral damage
In case of unilateral damage, cracks must first be cleaned of dirt (a brush with stiff bristles is suitable for this), and then wiped off grease using acetone or gasoline. Similar actions must be carried out in relation to the breakaway part.


Bilateral cracks
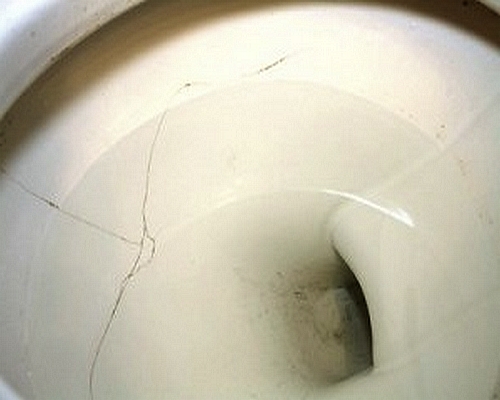
Before proceeding with cleaning the surface and gluing the tank, it is recommended to make a hole at the end of the crack using a thin ceramic drill. This is necessary in order to prevent further divergence of the defect and the split of plumbing. Then you need to expand the crack with the help of a grinder and process the internal surfaces according to the described algorithm. In the future, the damage site is sealed with a two-component epoxy resin.
Bonding technology
The procedure for gluing faience and porcelain cutlery depends on the size of the defect. The algorithm within which this procedure is carried out is the same for all the compositions used.
Universal waterproof adhesive
Adhesive compositions of this type are recommended to be used to eliminate defects in places that are not in constant contact with water:
- the junction of the tank and bowl;
- toilet rim;
- the outer side of the tank and others.
Gluing the tank is carried out in three stages. First, debris and other third-party particles are removed. Then the material is cleaned of fat. And after that, glue is applied and the broken fragment is pressed. The period during which the material must be held is indicated in the instructions for the adhesive.
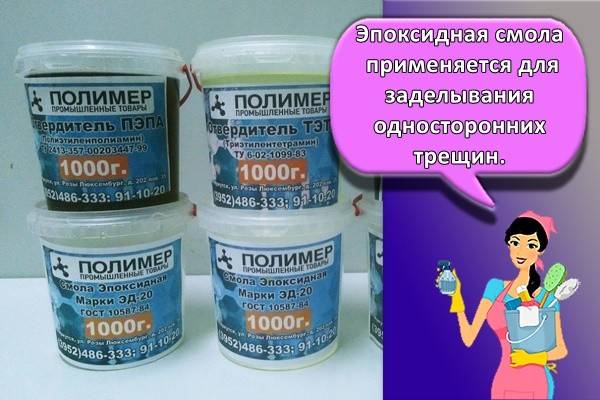
Epoxy resin
Epoxy resin is used for sealing one-sided cracks. This tool is better at eliminating defects than an all-purpose adhesive.To restore a damaged tank, you need to mix the two components of this tool (hardener and resin) and apply to the problem area. After that, you need to press the place of gluing. In this case, any tool is suitable, including scotch tape. After the resin has hardened, it is recommended to clean the place of gluing with fine sandpaper and felt.
Silicone sealant or liquid welding
Both tools are suitable for repairing small cracks and gluing broken fragments. Surface preparation for this case is carried out according to a similar algorithm. If a sealant is used, then first you need to impregnate the surfaces with silicone, removing the excess with a spatula, and then walk with a soapy hand, thereby smoothing the composition. This recovery option is convenient in that the tank can be used 20 minutes after the completion of the manipulations.

Liquid welding gives the same result as sealant. This tool must first be rolled out in your hands, and then applied to problem areas, tamping into the cracks. After the four hours required for the paste to harden, you need to sand the surface with sandpaper.
It is recommended to treat the surface with fine-grained sandpaper in each of the above cases. If the crack was large, then after sealing the gluing place should be painted over in the appropriate color. Otherwise, the area where the defect lay will stand out against the background of the rest of the tank.
Crack on the toilet: what to do?
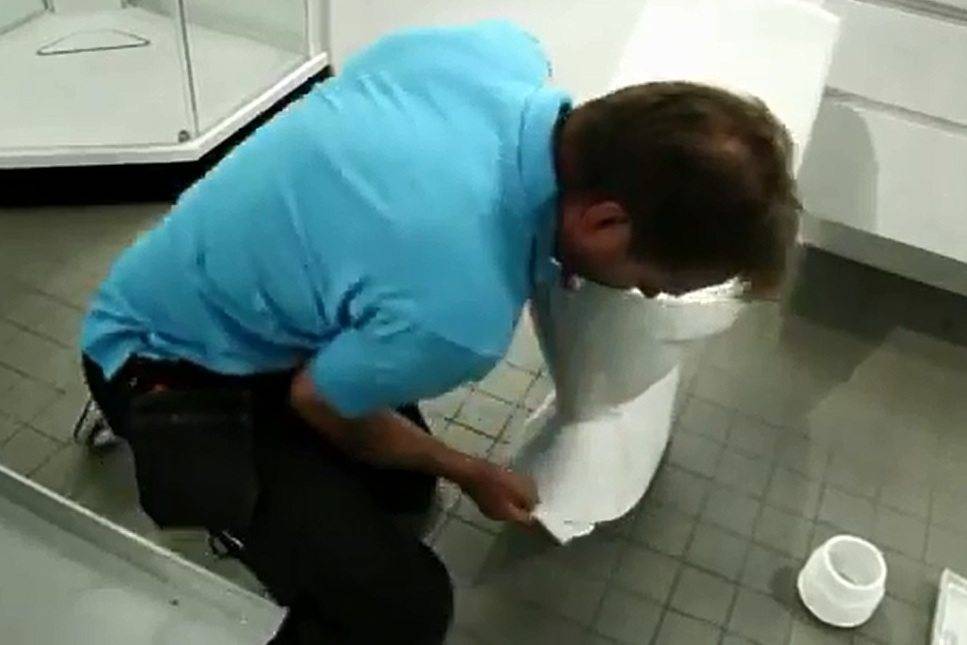
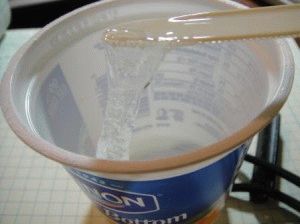
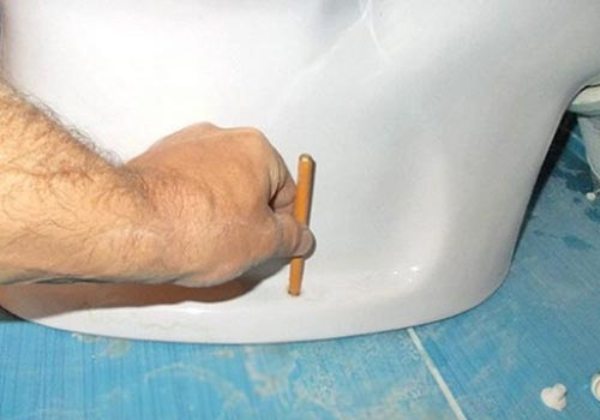
If your toilet has cracks, do not worry and run to the store for new equipment. This problem can be easily solved at the local level without resorting to large financial costs.To do this, carefully and carefully clean the chipped area with a sandpaper, wipe it with a dry cloth and degrease with acetone or gasoline.
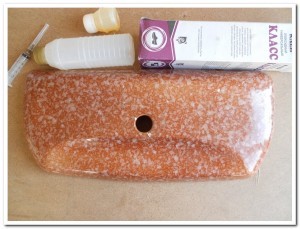 Photo 3. Everything you need to repair cracks and chips.
If the damage has complex relief faults, the algorithm for preparing for gluing is somewhat different. In this case, it is impossible to use the skin, it is best to blow the places of chips to get rid of microparticles with a hairdryer, and only then degrease and dry.
At the second stage, when you have already decided how to cover the toilet, it is recommended to follow the instructions that came with the adhesive used. But most often, glue is simply applied to the surface of the chips, allowed to dry a little, then the elements are connected. The bonding strength directly depends on the clamping force of the elements. A clamp or a tight tourniquet will give a reliable fixation.
The resulting seam requires reinforcement. After it dries, you need to clean it with sandpaper, thoroughly degrease it, dry it with a hairdryer and coat it with glue. Lay a thin plastic strip or foil on top and dry the gluing area well again. Next, treat the outside of the damage site with grout for tile joints or an epoxy-based mortar.
Ways to get rid of cracks
Of course, all the methods that are used to seal a crack cannot give a one hundred percent guarantee of getting rid of leaks, but they effectively help to temporarily solve the problem.
First, let's figure out how to repair cracks. In the modern world, there are many materials for these purposes.A small crack or chip can be glued with an adhesive that is designed specifically for ceramic surfaces. In addition, you can use cold welding or epoxy adhesive.


In the case when a part has broken off that is not involved in ensuring tightness, then absolutely any universal glue can be used. First of all, it is necessary to clean the damaged plane from all kinds of contaminants. Leave the faience alone for a while, let it dry properly. After that, it is worth degreasing the surfaces with acetone or gasoline. On the surface, apply glue in a small layer and press the broken fragment into the right place. Hold in this position for a while, which is necessary for the glue to dry completely.
Keep in mind during further use that your toilet is no longer new, and do not stress the adhesive joint to prevent further damage.
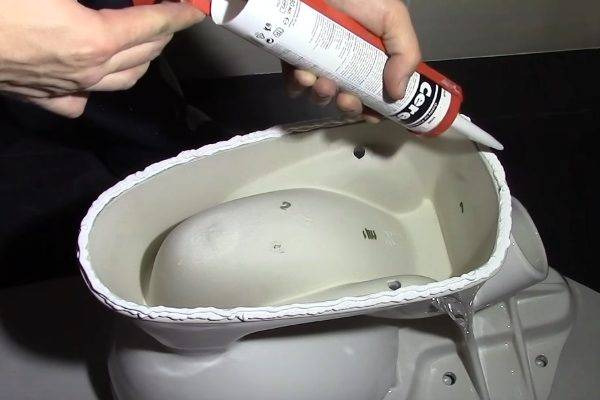
If it is necessary to seal the crack in the place where water accumulates, then it is best to use a two-component epoxy resin. First, prepare the resin, hardener and mix the components in a container convenient for you according to the manufacturer's instructions. Wipe all surfaces from dust and dirt, and wait for them to dry completely. Next, turn off the water. Degrease with gasoline or acetone. On the surfaces to be glued, apply the solution prepared in advance.
Epoxy resin for sealing cracks
Fix the chips in the right place, this can be done with adhesive tape pasted on the outer surface of the toilet bowl. After the resin is completely dry, sand down any visible seams.Walk, first of all, with sandpaper zero, after which it is worth applying felt. Do not lose sight of this stage, because in the future, various unpleasant contaminants will accumulate on these seams without treatment, which will be difficult to remove.
When a crack is visible on both sides of the toilet bowl, then the repair operations will be a little more difficult. Using a drill with a thin drill, which is designed specifically for tiles, it is necessary to drill two through small holes at the ends of the crack. Thanks to this technology, we will not allow the crack to become even larger.
Along the length of the crack, it is necessary to make a recess with the impeller, while avoiding overheating of the toilet bowl, which can lead to new damage, be very careful. Dilute epoxy with hardener in any container according to the manufacturer's instructions. In this recess, apply a layer of the solution prepared in advance
Be careful, remove all excess resin immediately, before it has time to harden. Otherwise, you will add yourself extra work, which is to grind surfaces.
When all the mortar in the recesses is dry, using sandpaper and then felt, sand all the seams so that they do not collect excess dust and dirt.
If your toilet is cracked in the base area, and there is no way to get there from the outside, then do not take any action, otherwise you will only make it worse. Many enterprising people in such cases tend to drown the base of the toilet bowl in concrete, but this does not lead to anything good in the end, because the neighbors from below begin to complain about the appearance of fungus in their apartment.Therefore, in this case, you still have to replace your toilet with a new one.
Now you know what causes cracks in earthenware, as well as all the recommendations that will help you prevent these troubles. Follow all of the above rules, and your toilet can serve you for many years. If the trouble did happen, you learned with what materials you can seal all the cracks and chips, as well as how this can be done.
Rules for gluing plumbing
The process of gluing a toilet bowl is quite simple. The main thing is to carefully and carefully perform all operations. The procedure is carried out in stages.
Stage # 1 - preparing the surface of the device
You should start with a cleanup. We very carefully and carefully clean the chipped or damaged surface of the device with sandpaper. Then wipe thoroughly, thereby freeing from adhering small particles. For better adhesion of the adhesive to the material, the base must be degreased. This can be done with gasoline or acetone. We evaporate all the moisture from the fat-free surface by heating it with a hairdryer. This preparatory procedure is carried out for cracks and chips of simple shapes.
If the damage has a complex fault relief, a slightly different algorithm is applied. Sanding can only harm such defects. In the process of work, it is easy to overcut the bulges, as a result of which voids form during gluing. Their presence adversely affects the strength of the finished seam.

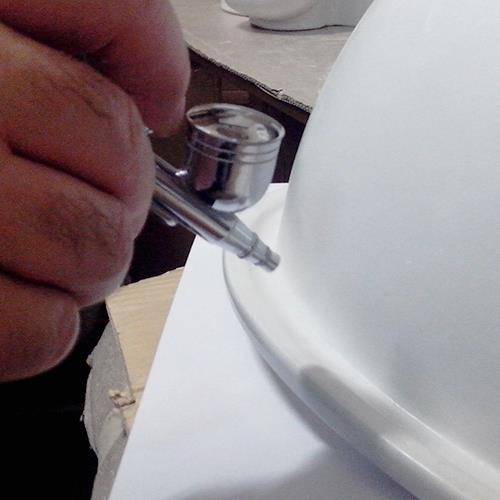


Faults of this form are processed very carefully and superficially. Small fragments are blown out with a hairdryer, after which the surface is thoroughly degreased and dried.
Faults of complex shape must be handled very carefully.Otherwise, voids are formed after gluing, which reduce the reliability of the seam.
Stage # 2 - gluing the seam
The instructions attached to the glue will help determine the sequence of actions. It must be read and followed by its provisions in the process of gluing.
Most often, the procedure is carried out as follows. The adhesive is applied to the surface, where it is left for a while to dry a little. Then the elements are pressed against each other with force. It should be noted that the result will depend on the force with which the parts were pressed. The larger it is, the stronger the seam will be. For reliable fixation of the elements, you can use an elastic tight tourniquet or a clamp.
Stage # 3 - final finishing
If the seam is located inside the toilet, it requires reinforcement. We clean the dried seam again with a sandpaper, carefully degrease it and dry it with a hairdryer, after which we coat it with glue. On top we lay a strip of soft metal or thin plastic, which will act as an amplifier. Once again, dry the bonding area well.
Outside, the repaired damage is treated with grout, which is specially designed for tile joints. You can also use an epoxy based solution. Such compositions are available in various colors, you need to choose the most suitable tone.
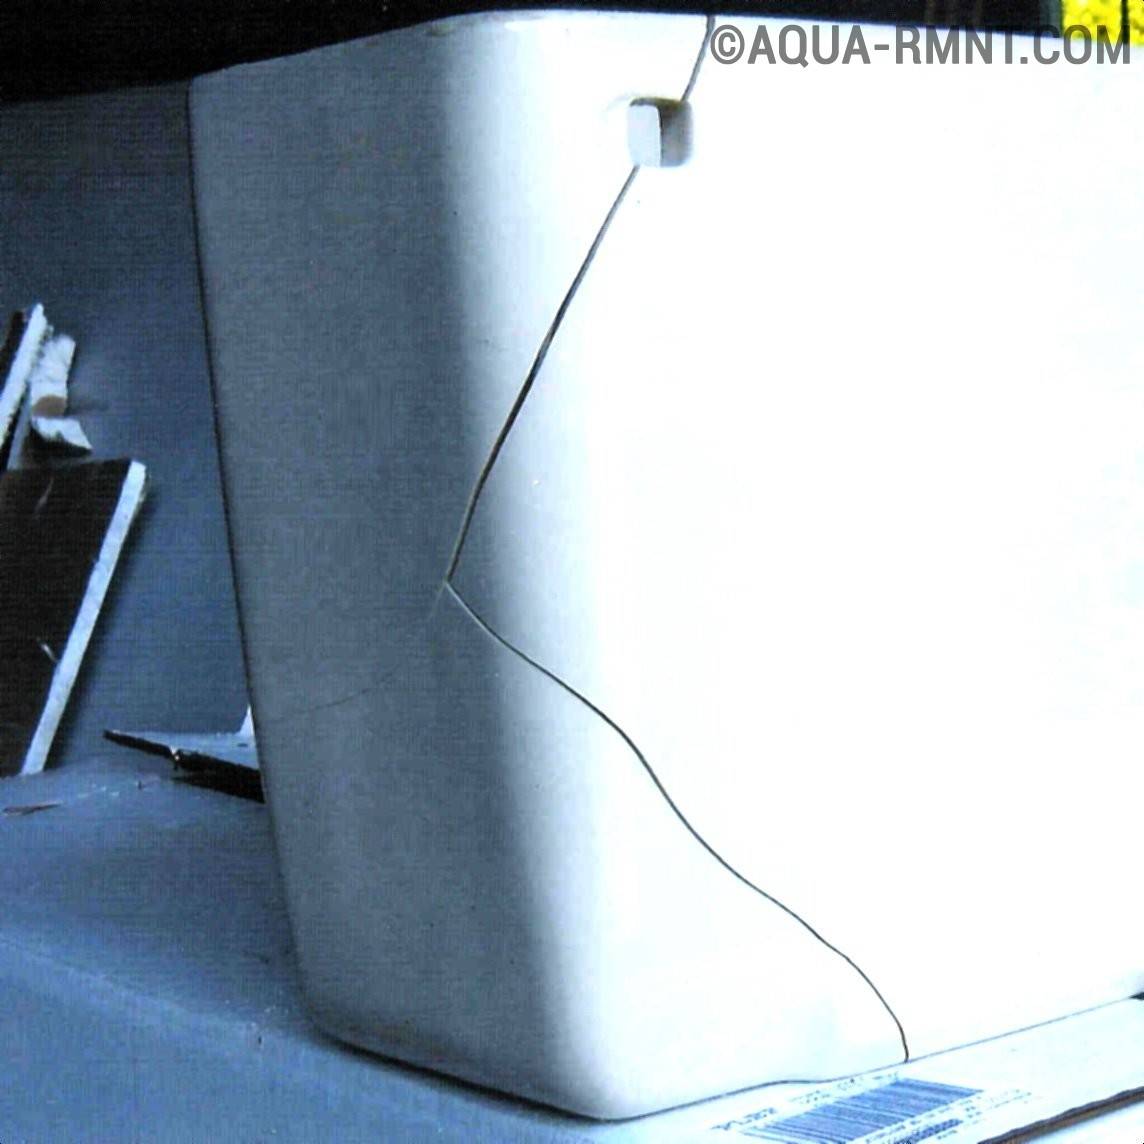
What causes cracks
A faience product can be damaged by accidentally dropping some hard object on it.Even without being heavy, the same phone in an aluminum case, or a metal bottle with deodorant, falling at an unfortunate angle, can provoke a crack.
Also, damage can occur due to sudden changes in temperature. If you pour boiling water into the toilet in an unheated bathroom, you can be sure of harming the plumbing. The product heats up sharply, the material expands unevenly - all this provokes the appearance of microcracks.
Another cause of damage to the plumbing fixture can be its incorrect installation. If the bolts that hold toilet on the floor, tighten unevenly or simply overtighten, the likelihood of cracks on the leg will increase.
This is interesting: Sewerage aerator - the principle of operation, types, installation instructions with video
Reasons for leakage
First of all, it is necessary to accurately determine the location of the leak. This is not easy, as you must first provide access to pipelines or connections. If it is found that the toilet is leaking at the junction with the sewer, it is necessary to carefully examine the area where the outlet is connected to the outlet of the sewer tee. This procedure should not be postponed, as the problem will not disappear by itself. It is necessary to remove all interfering objects, if possible, remove the lining around the release area. You will have to flush the water several times to make sure that it is the toilet that is flowing at the junction with the sewer. In order not to create unnecessary worries for yourself, you need to substitute some suitable dish under the connection area, into which water will drain. It will be useful to install additional lighting on the problem area in order to see the place of the leak.If the water does not flow strongly, but only occasionally drips, you can lay a newspaper under the junction of the outlet and the pipe. It will clearly show where the drops fall.
When it will be
determined exactly what is leaking
connecting the toilet to the sewer pipe, and not any other
area, it is necessary to establish the cause of the leakage. The most common sources
problems become:

- the appearance of a crack in the socket of the connecting
tee element; - dry rubber with cracks on the adapter;
- the appearance of a crack on the outlet element of the toilet bowl.
The appearance of cracks in the tee or
on the exhaust pipe signals the need to replace a defective element.
However, in both cases, difficulties can arise. Most often they appear
due to the difficulty of dismantling pipes or a faience bowl. In addition, the replacement
intermediate sewerage elements is not always possible. For example, if
the defective element will be the socket of the cast-iron fitting, disassemble or replace
it will be very difficult.
Rubber clutch
Often the reason why the toilet is leaking in place
connection with sewerage, covered in a state of rubber
adapter couplings. If it was made of poor quality rubber, or
just too old, the material dries out, loses its elasticity, cracks. To
Unfortunately, it is impossible to somehow predict such an outcome, since the qualitative
couplings serve more than 10 years without deformation or destruction


The only way
to detect emerging problems in time - periodically pay attention
to the outlet connection unit with a tee
Cracked toilet outlet pipe
The appearance of a crack in earthenware
bowl or exhaust pipe - a clear signal to replace the problematic
plumbing.This is evidence of an excessive load on the release, skew,
allowed during installation, other unacceptable influences. Often inexperienced
craftsmen stand on the bowl during repairs or other work, hoping for it
strength. This is undesirable, extremely dangerous behavior, as a split
earthenware has sharp cutting edges. You can seriously injure yourself about them, which will lead to
to hospitalization, long-term treatment. Crack behavior is not possible
predict - it may not change for years, or increase in a matter of
days. Faience reacts to temperature changes, so the crack is unstable,
can disperse very quickly.
In any case, if the toilet connection with
sewerage pipe, it is urgent to take measures to eliminate
defects. Having dealt with the cause of the leak, you must immediately proceed to it.
elimination.
How to fix small cracks on the toilet
Small chips and cracks do not impair the performance of the toilet bowl, but can significantly spoil its appearance. A simple cosmetic repair will mask the flaws and temporarily delay the large cash costs associated with the need to buy a toilet. If you want to learn how to seal a cracked toilet, it's worth having some silicone sealant and silicone thinner, a plastic spatula, soap, gasoline/alcohol, and a cotton napkin. First you need to clean and degrease the crack or chip. This can be done with a cloth soaked in gasoline or alcohol. Dry, clean surface is ready for processing.
To cover cracks, it is necessary to choose sanitary silicone - it is not afraid of detergents, it is resistant to water, air and ultraviolet radiation.In order for the sealant to carefully close all the cracks, it is necessary to iron the damaged surface with a soft spatula. While the sealant is not dry, it can be smoothed out. To do this, you need to run a soapy hand over the ceramics, polishing the silicone. The sealant hardens within 10-15 minutes. This is enough to treat all the cracks on the toilet. If excess silicone remains on the surface of the ceramic, it can be removed with a solvent. Hands are washed with warm soapy water.
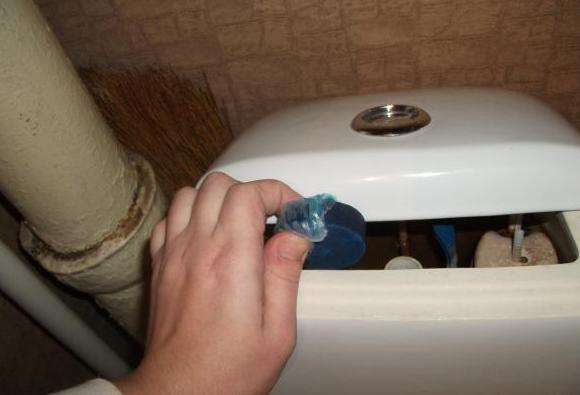
If other items are damaged
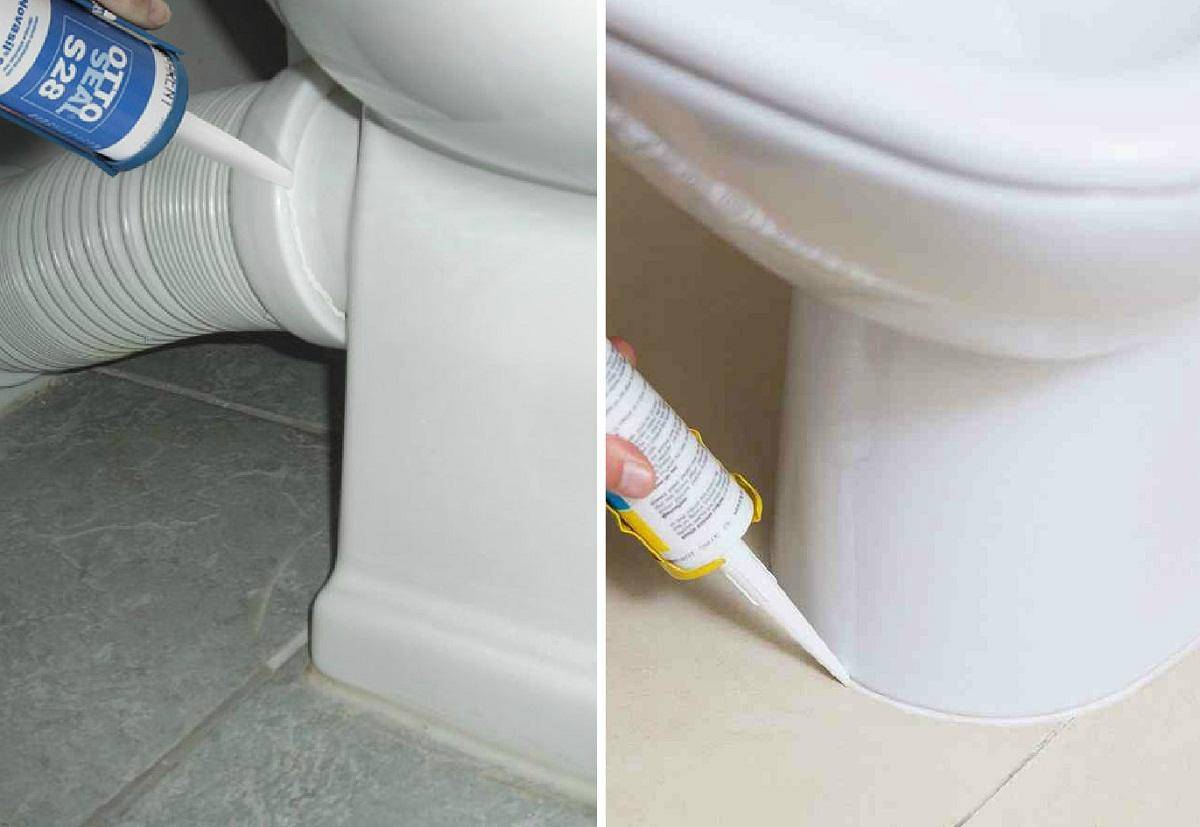
Often, it is not the toilet itself that is damaged, but one of the nearby parts - the corrugation. It is a tube that connects the toilet and sewer. If a crack forms in it, then water will run out onto the floor. Often this is discovered very late, because the damage is very small.
The situation can be corrected only by replacing the corrugations:
- Shut off the water.
- Remove the old corrugation, clean all the elements from mucus and dirt.
- Remove the old sealant with a knife, apply a new one.
- Connect a new corrugation to the toilet and sewer, apply sealant from the outside.
A simpler element, the seat, may also be damaged. It is worth listening to the advice of experienced people and abandoning repairs. After gluing, the seat can become uncomfortable to use and very unreliable.
Cracks or chips are a common problem for ceramic and porcelain toilets, which must be addressed. Each person can independently make repairs. The main thing is to purchase a high-quality adhesive solution and follow the instructions clearly.