- Types of ground loops
- Triangle - closed loop
- Linear
- What to do when replacing old wiring with TN-C grounding
- 2 schemes for manufacturing a ground loop in a private house
- Typical contour for ordinary soils from improvised means
- Industrial modular earthing switches for quick installation
- How to do the installation of the ground loop yourself?
- Choose a place
- Excavation
- Assembling the structure
- Entering the house
- Check and control
- How to do it right
- Procedure
- Entering the ground loop into the house
- Why you can not make separate grounding
- How to make grounding correctly in the apartment
- Choosing a grounding scheme
- TN-C-S diagram
- TT grounding
- DIY grounding device: step-by-step instructions
- Choosing a place for mounting the ground loop
- Excavation work
- Clogging of ground electrodes
- Welding
- backfilling
- Checking the ground loop
Types of ground loops
To quickly "drain" the current into the ground, the external subsystem redistributes it to several electrodes arranged in a certain order to increase the dissipation area. There are 2 main types of connection to the circuit.
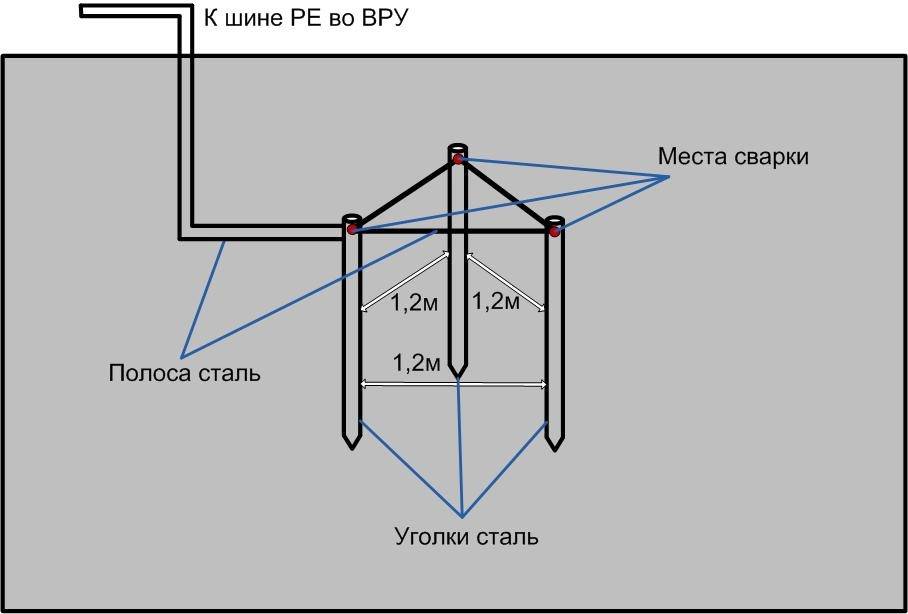
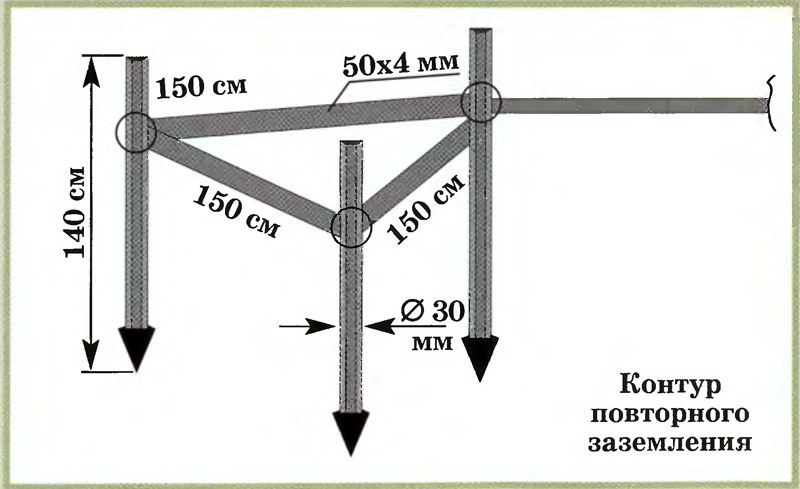
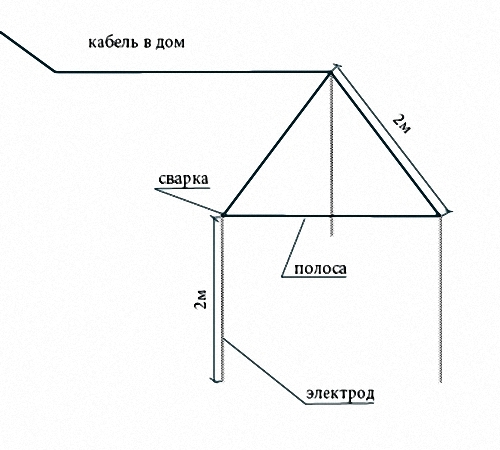
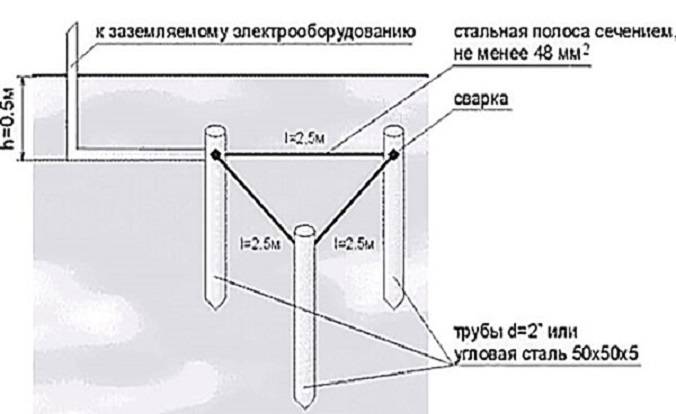
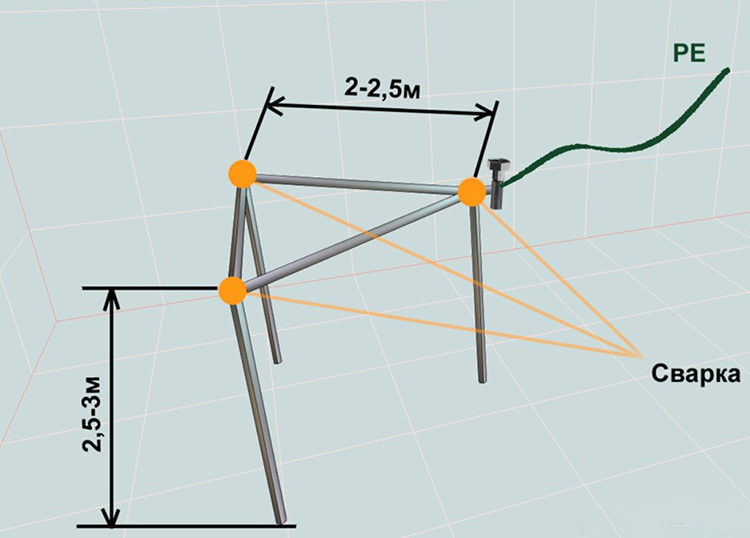
Triangle - closed loop
In this case, the current is drained using three pins. They are rigidly connected with iron strips, which become the edges of an isosceles triangle.Before you ground the house in this way, you need to understand the geometric proportions. The following rules apply:
- The number of pins, strips - three.
- The pins are mounted in the corners of the triangle.
- The length of each strip is equal to the length of the rod.
- The minimum depth of the entire structure is about 5 m.
The structure is assembled before the installation of grounding on the surface. The most reliable connection is welded. The tire is made from a strip of sufficient section.
Linear
This option is made up of several electrodes arranged in a line or in a semicircle. An open contour is used in cases where the area of \u200b\u200bthe site does not allow the formation of a closed geometric figure. The distance between the pins is selected within 1-1.5 depth. The disadvantage of this method is an increase in the number of electrodes.
These types are most often used in arranging the grounding of a private house. In principle, a closed loop can be formed in the form of a rectangle, polygon or circle, but more pins will be required. The main advantage of closed systems is the continuation of full operation when the bond between the electrodes is broken.
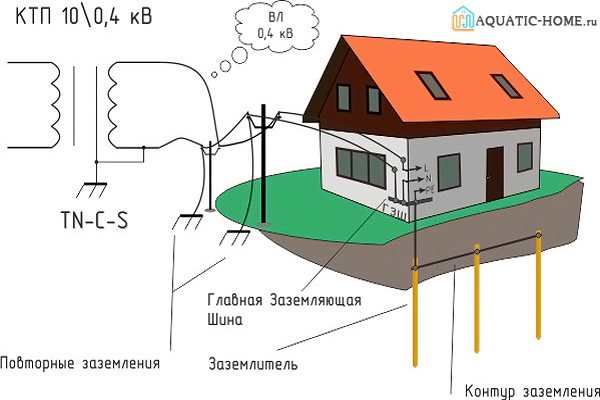
What to do when replacing old wiring with TN-C grounding
In most houses of the old housing stock, a two-wire power supply system was installed. Even if grounding was installed, it was carried out according to the TN-C scheme, which uses a single "neutral" conductor to perform two tasks - working (for the operation of electrical appliances and devices) and protective (to save electrical network equipment).
In fact, such a system reliably protects the electrical circuit as a whole, but leaves powered household appliances and their owners with little or no protection.In addition, in wet weather, such a connection can lead to voltage surges even with a protective shutdown - cases of fatal outcomes are known for similar reasons.

PEN conductor separation scheme
When building new houses, this system is not allowed; where it has been preserved, it is recommended, if possible, to cross the TN-C-S system (at the entrance to the building, the PEN wire is re-grounded, followed by separation into PE and N). In an emergency, the N conductor is disconnected from the network, saving household electrical appliances and their owners from problems.
2 schemes for manufacturing a ground loop in a private house
It is possible to start practical work on the ground only after the theoretical calculation of the assembled circuit is fully within the safety requirements laid down in the EMP.
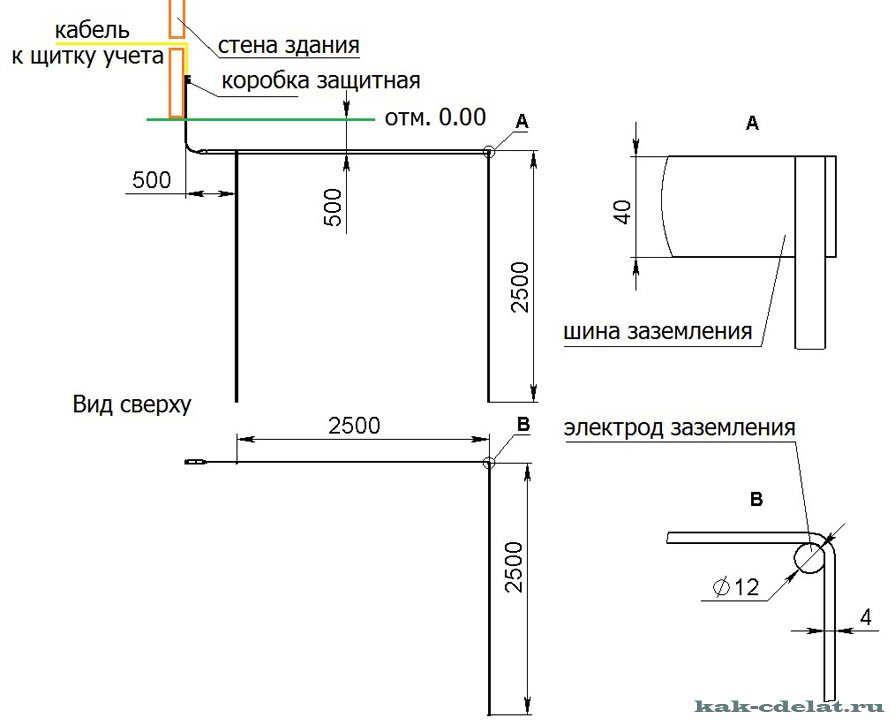
Typical contour for ordinary soils from improvised means
To assemble the grounding device you will need:
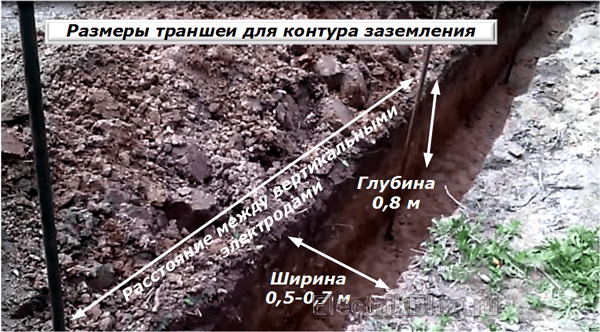
- Dig a ditch under the horizontal electrode to a depth of about 0.8 meters. Its width in the places where the vertical pins are driven in should ensure the convenience of working with welding electrodes.
- Drive vertical pins into the ground to the full depth, leaving only a dozen centimeters on the surface for mounting a horizontal strip.

In order not to break the top of the electrode with a sledgehammer, it is immediately protected with a safety cap. You can pre-weld a plate or a piece of a corner that prevents deformation.

Weld along the length of the horizontal ground electrode and weld it to the vertical electrodes. Welds must run along the entire perimeter of the surfaces to be joined.

Bring the strip to the basement of the building, fix it, weld a 10 mm bolt to it for fixing the grounding conductor, through which an electrical connection with the main ground bus will be created.
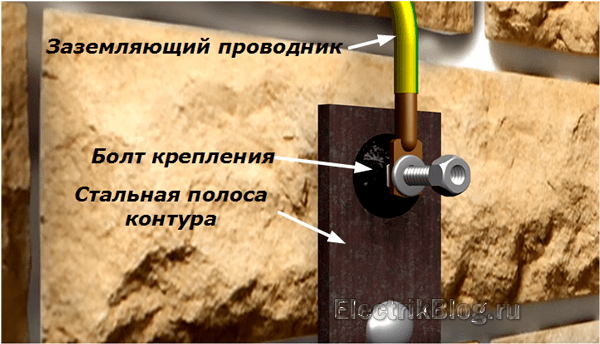
Connect the ground conductor to the bolted connection.
The PUE defines the standards for the use of a protective conductor from:
- steel with a cross section of 75 mm square (it is very problematic to connect the input shield to the GZSH);
- aluminum wire 16 sq mm (requires periodic compression during operation due to the high fluidity of the metal);
- copper section 10 square. This is the most acceptable mounting option to the circuit and GZSH.
Industrial modular earthing switches for quick installation
Special factory kits make it much easier to assemble and install the circuit, but their cost can be disappointing.
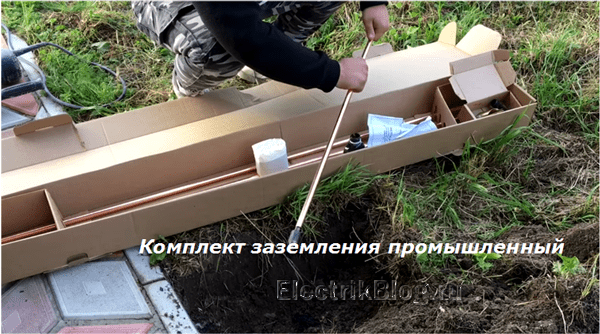
It usually uses one vertical steel electrode with a copper-plated prefabricated structure due to intermediate threaded adapters.
The length of one element is 1.5 meters. The serial connection of four links allows you to go deep by 6 m. You can drive into the ground even further, up to 30 meters.


But here it is very difficult to swing a sledgehammer. Such work is performed by a powerful puncher.
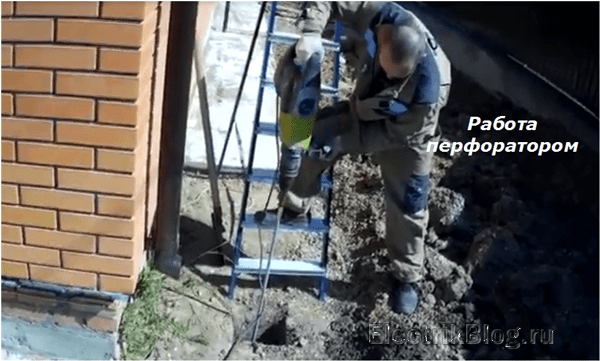
It is mounted on the top pin of the clogged electrode through a special crimp adapter for the grounding conductor.
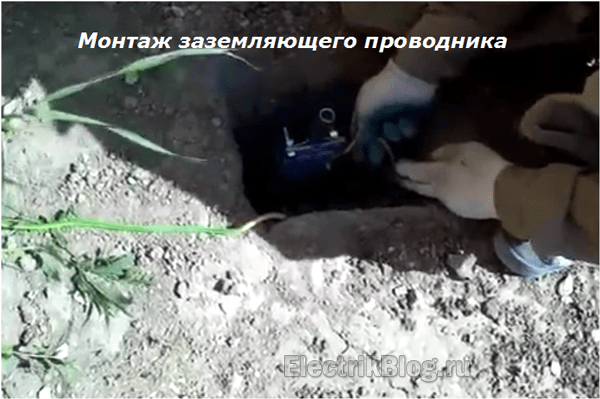
The contact point is protected with bituminous tape. In this form, it can be hidden in the soil.
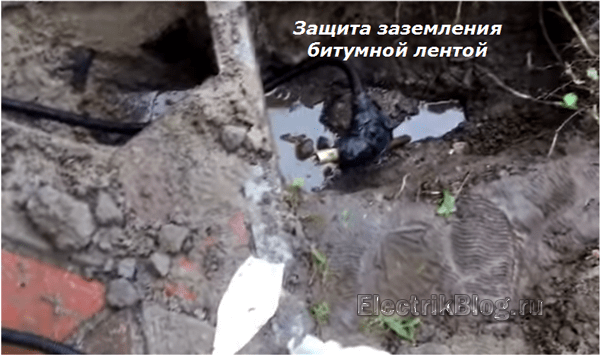
However, for routine inspections, it is better to do it just above the ground and place it in a protective box.
An example of how to make grounding in a private house with your own hands using this method is explained by the owner of Energosystems with his video.
Final tip
The end of the work should not be considered the completion of the installation and the connection of the ground conductor to the GZSH of the input shield, but the electrical checks of the assembled circuit.
They consist in measuring electrical resistance with special devices.This is the work of an electrical laboratory.
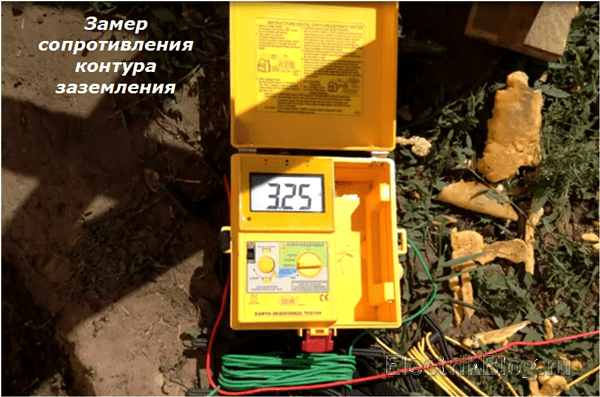
She will evaluate the resistance of the assembled grounding device and the nearest re-grounding. If they fit into the norm, then the issue is closed. You will receive a certified verification protocol.
In practice, there are cases when the theoretical calculation does not meet expectations, and the real rate is overestimated. You have to be ready for this.
The way out of this situation is simple: leave the trench in the area of the end electrode open and dig it further for driving in an additional vertical ground electrode.
It is connected by welding through the connecting strip to the main circuit. Then the resistance is measured again.
The laboratory performs its work for money. They allow you to evaluate the real state of the circuit, and not rely on chance.
I express my gratitude to the owner of the video Alex Zhuk for his channel "Lectures on Electrical Engineering". I propose to evaluate his work "Why do we need a ground loop."
How to do the installation of the ground loop yourself?
At do-it-yourself grounding device, installation of the circuit, it is necessary to develop a diagram, sketch, drawing. Next, choose a place and mark the site. You will need a tape measure of sufficient length. Next, earthworks are carried out and the structure is assembled. After that, it is buried, mounted, and then connected to the shield. Then the internal circuit (wiring around the house) is connected and tested using special electrical measuring instruments. The system does not require additional maintenance. It will last for decades if done right.


Choose a place
The shield is better to put in a special room.Usually this is a pantry, boiler room or closet.
It is important to exclude free access to children. The giving contour is placed at a distance from the perimeter of the building at least a meter
The maximum distance is 10 m. It is good when this is a place where people are not without special need. At the moment when the device extinguishes the current leakage, it is better if no one is there. Usually it is behind the house, in the territory of fenced beds, under decorative artificial plantings, alpine hills, etc.
Excavation
First you need to mark the site if a linear grounding scheme is used. Pegs are placed in places where the electrodes will be driven in. Now connect them with straight lines, pull the cord, which will serve as a guide for digging a trench. Its depth is from 30 to 50 centimeters. The width is about the same. The soil does not need to be removed. It will be required at the final stage of installation work before connecting the internal circuit. Waterproofing, filling is not required.
Assembling the structure
When the ground work is completed, it remains only to properly mount the circuit. Pull out the pegs and drive in the pins so that their ends protrude by 15-20 cm. The metal ties are cut to size. It makes sense to re-measure the distance between the pins. Control measurement will eliminate the error factor. Connections are welded by gas or electric welding. Now you can bury the trench, but only except for the entry point into the house, since it also needs to be made, attached, connected to the switchboard.
Entering the house
As a tire, materials are used, the properties of which are described earlier. The main thing is to securely fasten it to the contour. Now lead the other end through the wall to the control room. Make a hole in advance in the manner of a terminal so that bolting can be applied.When this work is completed, bury the last section of the trench and connect a bus splitter or a suitable core to the input. At this stage, it all depends on the type of grounding system of a private house chosen.
Check and control
After connecting the ground to the shield, you need to make sure that everything is done correctly. The control consists in checking the integrity of the circuits and the conductive capacity. By the way, if you want the circuit to work for sure, do not rush to dig in the trench at the previous stages. If a gap is detected, you will have to re-expose the metal structure and fix the problem. Or check the integrity in advance. But even after that, when the entire circuit is connected, it is necessary to double-check its performance.
take 100-150 W lamp. They are screwed into the cartridge, from which small wires depart. This will be the so-called "control". One wire is thrown on the phase, the other on the ground. If the installation is done correctly, the light will be bright. Flickering, faint light, interruption or lack of current indicates a problem. If the light is dim, check the connections, clean the contacts, tighten the bolts. Observe safety precautions. Do not carry out repairs without de-energizing the building.
How to do it right
Preparation for grounding in a private house
For proper installation at the site of protective grounding and its entry into the house, it is worth choosing the material and shape of the ground electrodes.
The structure is made of steel or copper metal elements:
- vertical rods from 16 mm;
- horizontal rods from 10 mm;
- steel products with a thickness of 4 mm;
- steel pipes with a diameter of 32 mm.
The shape of the earth electrode may be in the form of an equilateral triangle with pins-vertices. The second option is a line with 3 elements arranged exactly. The third way is a contour, in which the rods are hammered in 1 m increments and connected by metal ties.
Procedure
Ground preparation for laying the ground loop
Grounding installation should be considered using the example of a triangle. They work according to the following scheme:
- Make markings in the form of triangles with an indent from the beginning of the blind area to the installation site of at least 150 cm.
- Dig trenches in the form of a triangle. Sides - 300 cm, groove depth - 70 cm, width - from 50 to 60 cm.
- The top closer to the building is connected by a trench 50 cm deep.
- At the tips of the peaks, elements (round pin or corner) 3 m long are hammered.
- The ground electrode is lowered below the soil level by 50-60 cm. It rises 10 cm above the bottom surface.
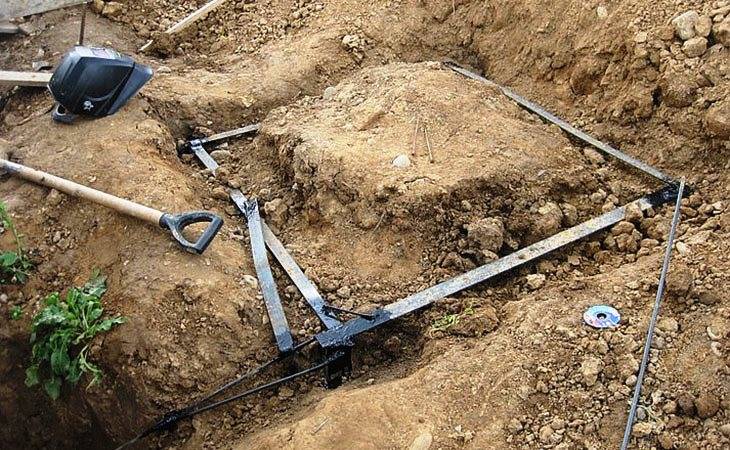
- Metal bonds are welded to the visible parts of the elements - strips of 40x4 mm.
- The triangle is brought to the house using metal strips or round conductors with a cross section of 10 to 16 mm2 and welded.
- Slag is removed from the connection points, the structure is coated with an anti-corrosion agent.
- They check the resistance (should be up to 4 ohms) and backfill the grooves with soil without large impurities. Each layer is rammed.
- At the entrance to the house, a bolt with an insulated copper conductor with a cross section of 4 mm2 is welded to the strip.
- Throw the ground into the shield. Connection is carried out on a special node, covered with a consistent composition.
- The earth is connected to each line, divorced around the house.
Entering the ground loop into the house
Entering the ground loop into the house
To enter the circuit into the house, it is worth using a steel strip 24x4 mm, copper wire with a cross section of 10 mm2, aluminum wire with a cross section of 16 mm2:
- Insulated conductors. A bolt should be welded onto the circuit, and a sleeve with a round non-contact pad should be put on the end of the conductor. Next, assemble the device by screwing a nut onto the bolt, a washer onto it, then a cable, a washer and tighten everything with a nut.
- Steel strip. A bus or conductor is brought into the room. To ensure accuracy of execution, a copper bus with small dimensions is carried out.
- Transition from a metal bus to a copper wire. Two bolts are welded onto the bus with a distance of 5-10 cm. A conductor is wrapped around the elements, the bolts are pressed with washers.
The latter method is more convenient for wiring through a wall.
Why you can not make separate grounding
The installation of separate groundings will not ensure the efficient operation of household appliances. Electric current can cause injury to a person. If the house has 2 or more outlets with separate grounds, the equipment may fail. The reason is the dependence of the resistance of the contours on the state of the soil in a separate area. A potential difference may appear between the structures, which will disable the equipment or cause electrical injury.
How to make grounding correctly in the apartment
To answer this question, you need to understand what kind of protection system is installed in your home.
As a rule, in old Soviet-built houses, the TN-C System was used, in which the zero protective and zero working conductors are combined into one PEN conductor, and they are combined throughout the system. You can recognize such a system by a two-wire cable, which is laid around the apartment and by a four-wire cable in a common shield.


To be honest, how to properly ground in an apartment in an old fund, then such a system only protects against a short circuit and the likelihood of an electric shock increases. Therefore, talking about protective grounding in this case is necessary with a certain degree of risk. There are several working options that reduce risks, but are not full protection, and are done at your own peril and risk.
In modern apartment buildings use the system TN-S, in which the N and PE conductors are divided into all the way from the substation to consumer. This system is the safest and preferred, but is only used in new electrical installations due to the high cost. Most houses now use the TN-C-S system, in which the N and PE conductors after the substation are connected into one PEN wire, and then, at the entrance to the building, they are separated.
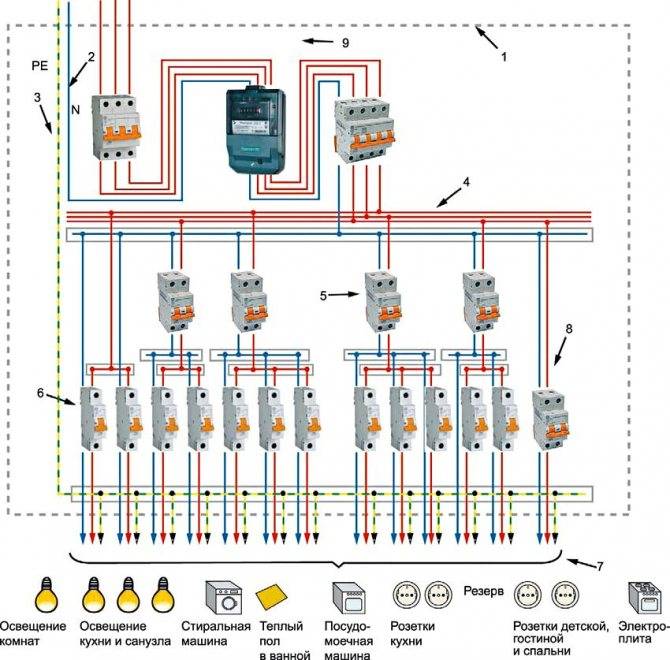
In this case, it is possible to organize protective grounding at the stage of electrical installation using three-wire wires, sockets with grounding and protective automation. When a phase hits the device case, the circuit breaker should work. When touching live parts, the RCD should work.
For electrical wiring, I advise you to choose a cable with three cores in double insulation, preferably VVG NG, for socket groups with a cross section of 3 by 2.5 for light groups 3 by 1.5. One end of the wire it starts under the free bolt of the switchboard busbar connected to the shield body, and the second one - to the “grounding” contact of the socket. Simultaneously with the assembly of the apartment electrical panel, check the connection of the ground wire in the common house panel.
Schematic diagram of a protective grounding in the bathroom can be represented as follows.
Choosing a grounding scheme
When organizing grounding for private house or country house plot use only 2 schemes.
 grounding schemes
Namely: TN-C-S or TT. Many houses in the private sector are suitable for two-core cable conductors that transmit a voltage of 220 volts, and four-core cables with a voltage of 380 volts may also be suitable.
If a 4-core cable is suitable, then in its design there is a core that is a protective conductor, that is, it is intended for grounding and zero. But such cables do not provide protection against electric shock in the event of an insulation breakdown. For this reason, almost all experienced electricians recommend replacing old two-core cables with new 3-core cables for 220 volts, and 4-core cables with 5-core ones to get a voltage of 380 volts.
The organization of obtaining electricity using three-core cables begins with the division of cores into neutral and conductor. Such a manipulation is carried out during the connection in the electrical panel before connecting to the meter. And depending on the separation method, one of 2 schemes is obtained.
This grounding method is recommended for connecting a boiler or water heater.
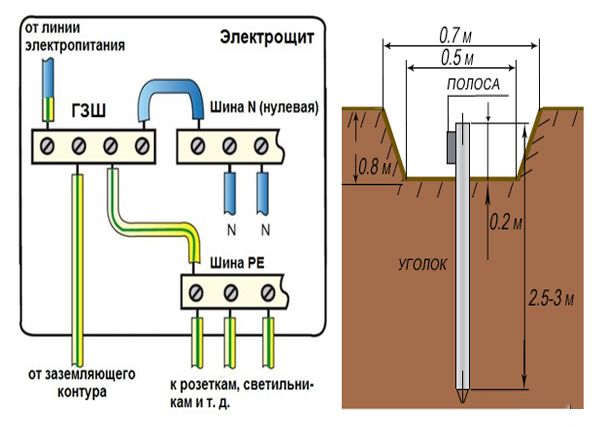
TN-C-S diagram

Having studied the material on how to properly make grounding in a country house and in a private house and choosing the presented scheme for organizing grounding, it is important to note that such a system requires the installation of an emergency shutdown device and difavtomatov. If such devices are not included in the circuit, grounding will not perform its functions.
Using this scheme, you need to know that the circuit needs to be connected, even the reinforcement of the foundation, so the tires for grounding must be taken with a large margin.
The organization of this circuit is carried out by dividing the cable into neutral and ground conductors, for this, 3 buses are needed, one of which will be ground, the other is dielectric and the third will perform a splitting function for connecting voltage.
The metal bus is fixed on the body of the switchboard, but with high-quality contact. To ensure high-quality contact, the paint is cleaned at the junction.
The dielectric bus is installed on the fixing rail of the machines, but it must be ensured that the wires do not intersect with each other.
The connection is made in this way:
- the conductor that comes from the line is wound up on the splitting bus;
- we also connect a wire with a ground loop to this bus;
- further from one connector, a jumper is placed on the earth bus with a copper wire;
- a jumper is made from the last unoccupied connector to the neutral conductor or neutral bus.
Thus, we connected the circuit according to the scheme in question, now you can connect the power cable
With such a connection, it is important to follow the technology and make sure that the core of zero and earth does not intersect
TT grounding

Connecting with a TT circuit is easier than the previous one. From the main electricity line, from the pole to the shield, only 2 cables fit. One of them is a phase, and the second is zero. The voltage conductor is used as a phase conductor, and the protective conductor is attached to the bus with a neutral conductor and is considered zero. Thus, a conductor is supplied to the ground bus from the designed circuit.


The disadvantage of this scheme is the fact that the circuit performs the function of protection, only for those devices that are intended for use with grounding.If there is equipment that is equipped with two-wire wires, then in the event of a breakdown of the insulation, the device will be energized.
Even if the instrument case is grounded with separate cables, voltage will remain on the case, for this reason, most people use the first circuit, as it is more reliable and safer.
DIY grounding device: step-by-step instructions

If you are wondering: “how to make grounding in the country?”, then the following tool will be required to complete this process:
- welding machine or inverter for welding rolled metal and outputting the circuit to the foundation of the building;
- angle grinder (grinder) for cutting metal into specified pieces;
- nut plugs for bolts with M12 or M14 nuts;
- bayonet and pick-up shovels for digging and digging trenches;
- a sledgehammer for driving electrodes into the ground;
- perforator for breaking stones that can be encountered when digging trenches.
To perform correctly and in accordance with regulatory requirements ground loop in a private house we need the following materials:
- Corner 50x50x5 - 9 m (3 segments of 3 meters each).
- Steel strip 40x4 (metal thickness 4 mm and product width 40 mm) - 12 m in case of one point of the ground electrode to the building foundation. If you want to make a ground loop throughout the foundation, add the total perimeter of the building to the specified amount and also take a margin for trimming.
- Bolt M12 (M14) with 2 washers and 2 nuts.
- Copper grounding. A grounding conductor of a 3-core cable or a PV-3 wire with a cross section of 6–10 mm² can be used.
After all the necessary materials and tools are available, you can proceed directly to the installation work, which is described in detail in the following chapters.
Choosing a place for mounting the ground loop
In most cases, it is recommended to mount the ground loop at a distance of 1 m from the foundation of the building in a place where it will be hidden from the human eye and which will be difficult for both people and animals to reach.
Such measures are necessary so that if the insulation in the wiring is damaged, the potential will go to the ground loop and step voltage may occur, which can lead to electrical injury.
Excavation work

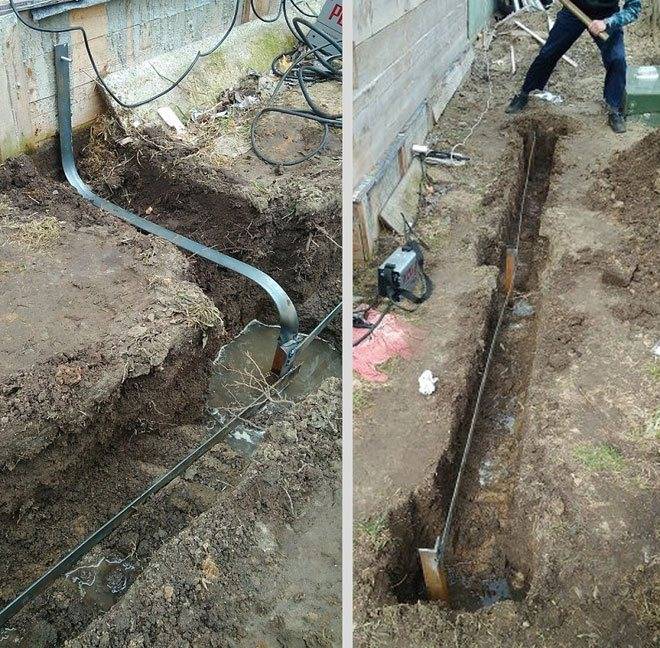
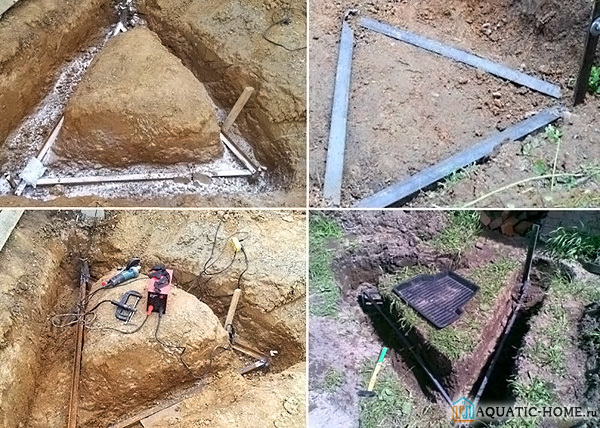
After a place has been chosen, markings have been made (under a triangle with sides of 3 m), the place for the strip with bolts to be placed on the foundation of the building has been determined, earthworks can begin.
To do this, it is necessary to remove a layer of earth of 30–50 cm along the perimeter of the marked triangle with sides of 3 m using a bayonet shovel. This is necessary in order to subsequently weld strip metal to the ground electrodes without any special difficulties.
It is also worth additionally digging a trench of the same depth to bring the strip to the building and bring it to the facade.
Clogging of ground electrodes
After preparing the trench you can start installation ground loop electrodes. To do this, first with the help of a grinder, it is necessary to sharpen the edges of a corner 50x50x5 or round steel with a diameter of 16 (18) mm².
Next, put them at the vertices of the resulting triangle and use a sledgehammer to hammer into the ground to a depth of 3 m
It is also important that the upper parts of the ground electrodes (electrodes) are at the level of the excavated trench so that a strip can be welded to them
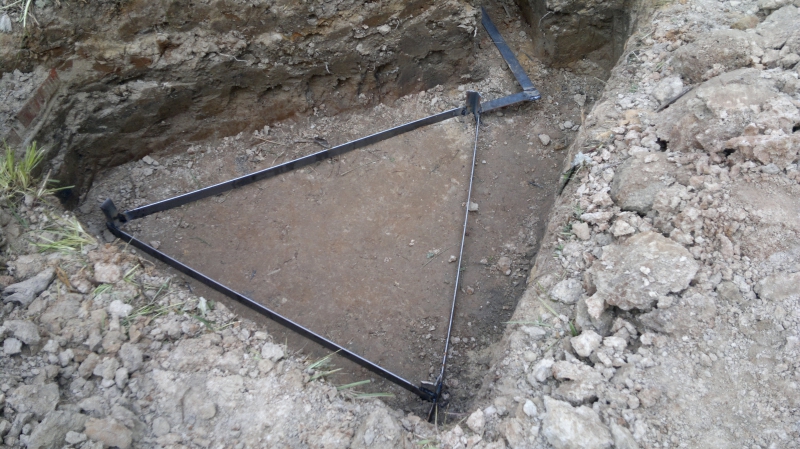
Welding

After the electrodes are clogged to the required depth using a steel strip 40x4 mm, it is necessary to weld the grounding conductors together and bring this strip to the foundation of the building where the grounding conductor of the house, cottage or cottage will be connected.
Where the strip will go to the foundation at a height of 0.3–1 mot of the earth, it is necessary to weld the M12 (M14) bolt to which the house grounding will be connected in the future.
backfilling

After all welding work has been completed, the resulting trench can be filled up. However, before that, it is recommended to fill the trench with brine in the proportion of 2-3 packs of salt per bucket of water.


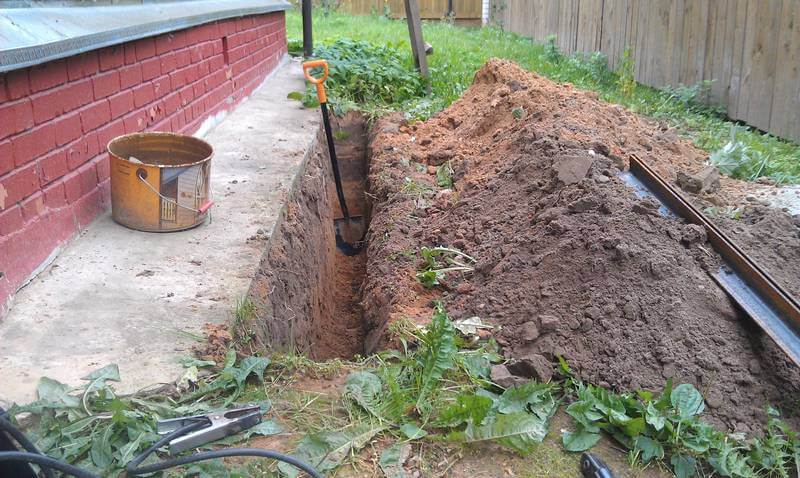


After the resulting soil must be well compacted.
Checking the ground loop
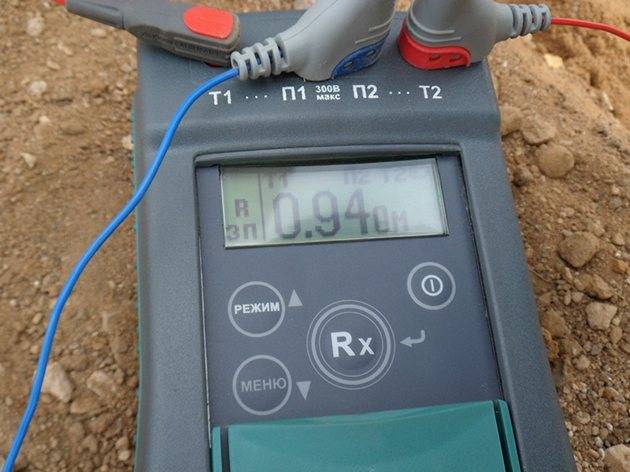
After completing all the installation work, the question arises "how to check the grounding in a private house?". For these purposes, of course, an ordinary multimeter is not suitable, since it has a very large error.
To perform this event, devices F4103-M1, Fluke 1630, 1620 ER pliers and so on are suitable.
However, these devices are very expensive, and if you do the grounding in the country with your own hands, then an ordinary 150–200 W light bulb will be enough for you to check the circuit. For this test, you need to connect one terminal of the bulb holder to the phase wire (usually brown) and the other to the ground loop.
If the light bulb shines brightly, everything is fine and the ground loop is fully functional, but if the light bulb shines dimly or does not emit a luminous flux at all, then the circuit is mounted incorrectly and you need to either check the welded joints or mount additional electrodes (which happens with low electrical conductivity of the soil).


