- How to ensure the outflow of air in the apartment
- Exhaust ventilation fan
- Kitchen hood for ventilation
- The principle of operation of the electric hood
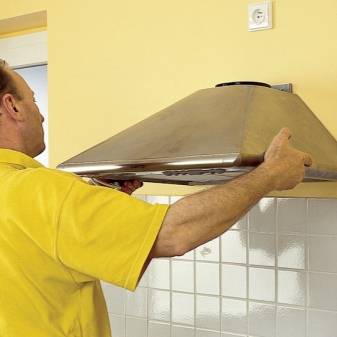
- How to hang a flow hood?
- What you need to consider for the organization of the hood in the home
- Installation rules
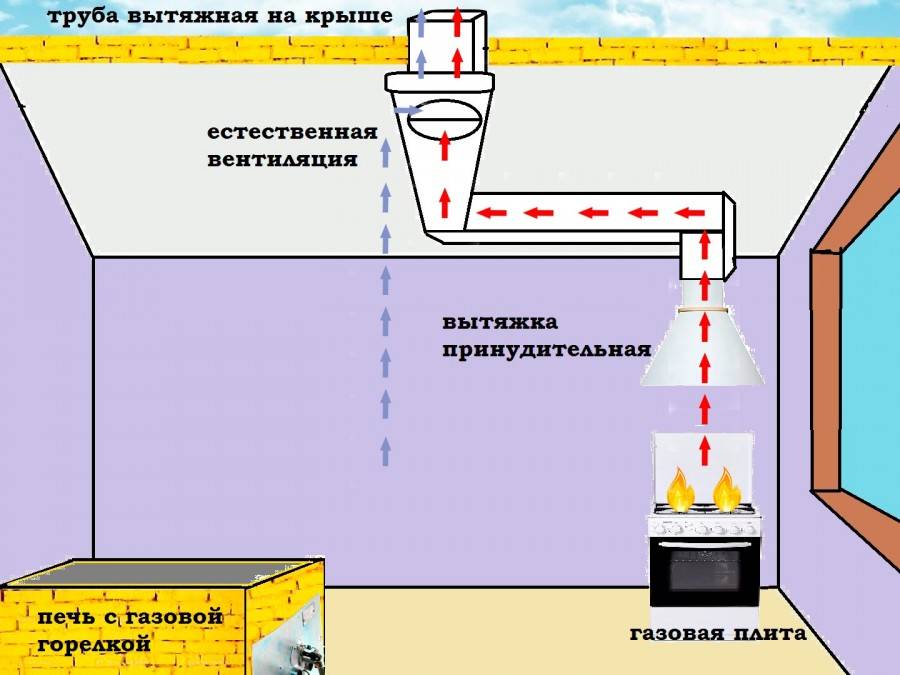
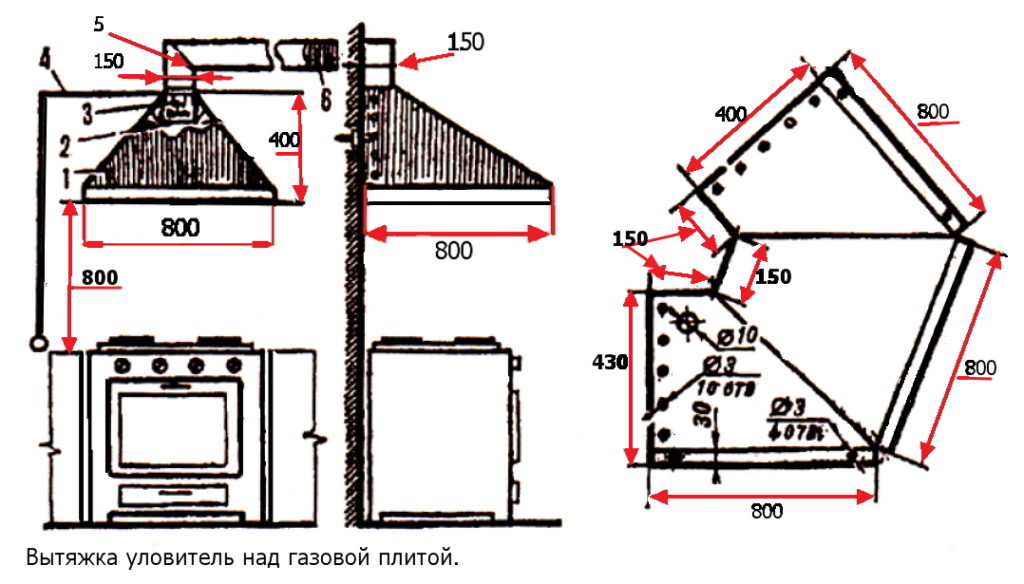
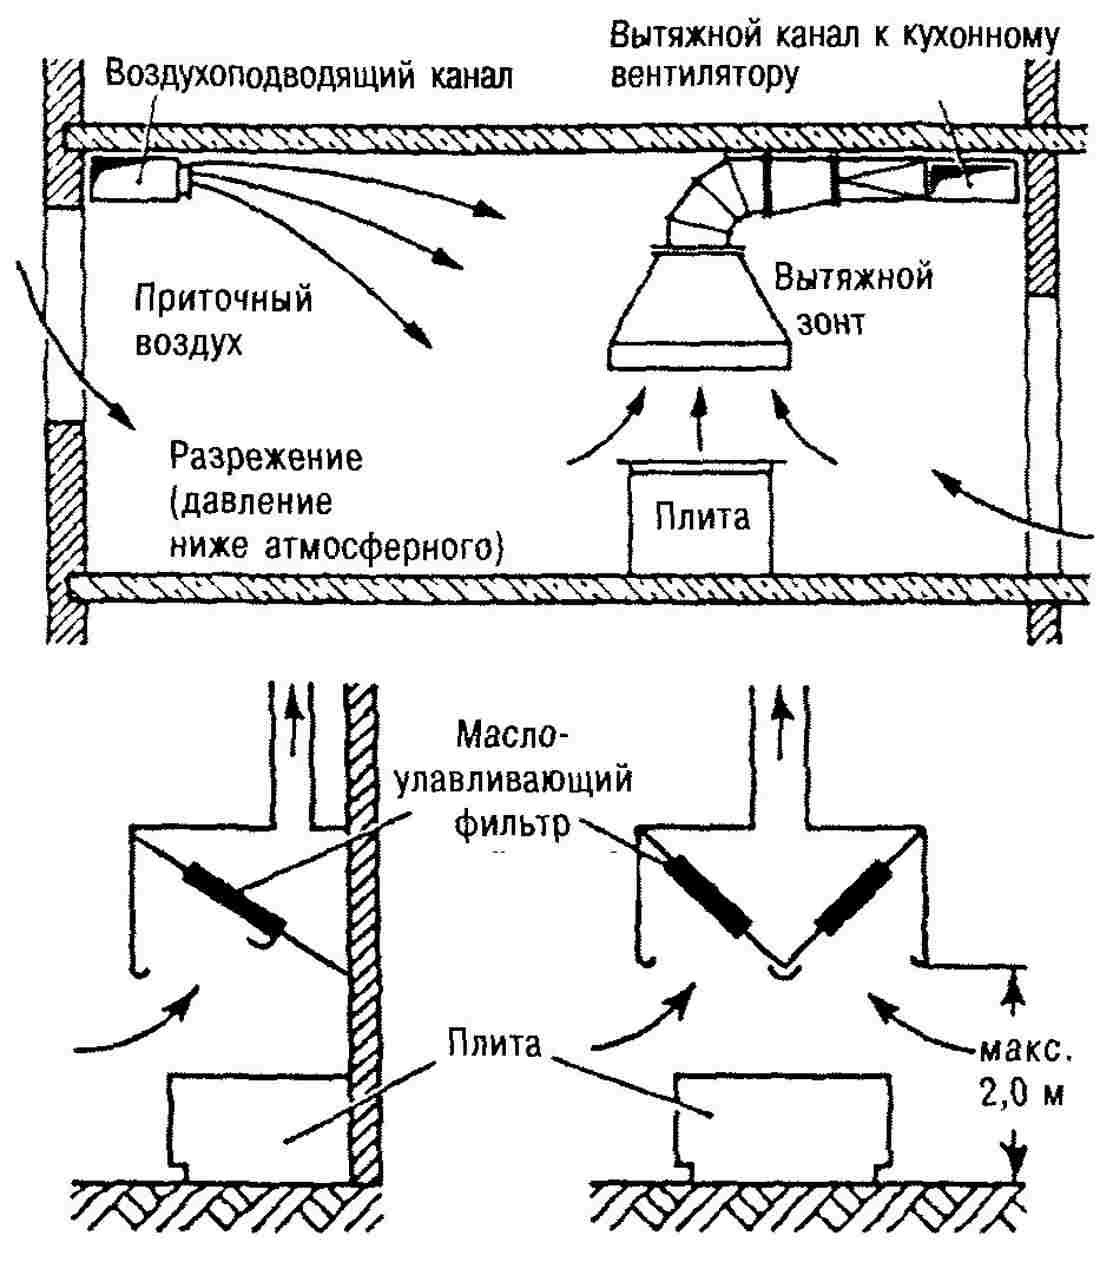
- Scheme of a kitchen hood
- Video - installation of a kitchen hood
- Installing the hood
- Training
- Installation
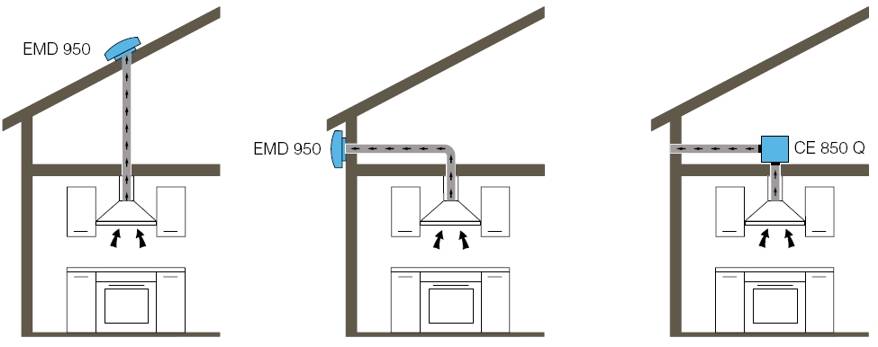
- Installation options for exhaust technology
- Used as filters
- How to connect the hood to electricity
- Mounting Features
- Distance from the gas stove to the hood
- Preparing the installation site
- Length and configuration of the duct
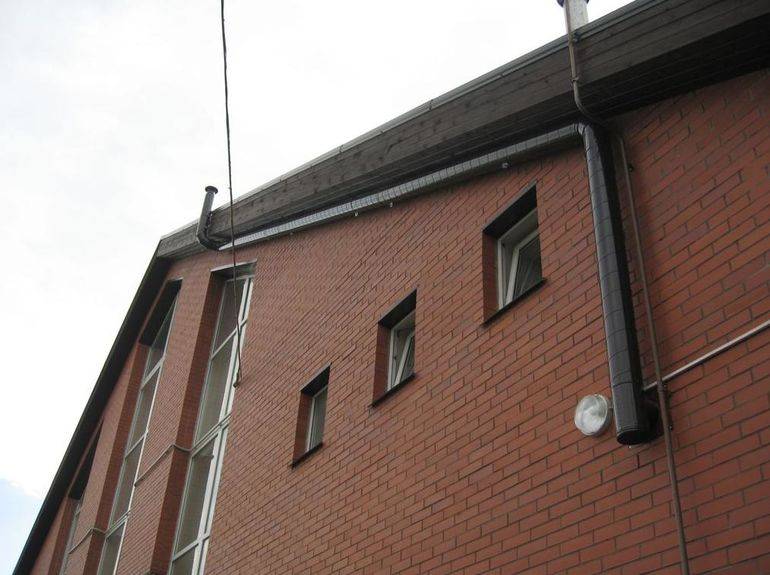
- Where and how to bring the air duct
- How to get outside
- So that the hood does not interfere with natural ventilation in the kitchen
How to ensure the outflow of air in the apartment
If the general house ventilation system in the kitchen does not work, you can organize the outflow of air on your own using mechanical draft.
Exhaust ventilation fan
A very simple and effective remedy when the exhaust ventilation system in the kitchen is not working. The fan can be used independently, as well as in addition to the kitchen hood. Many experts recommend installing a hood with air recirculation (a filter that cleans the air and feeds it back into the room) and a do-it-yourself fan at the outlet of the kitchen duct.
Usually, axial fans are used to properly organize the ventilation of the kitchen.
When choosing a model for ventilation of the kitchen in the apartment take into account the following parameters:
- power is determined by the formula: kitchen area * ceiling height * 10. Here 10 is the air exchange rate per hour;
- emitted noise - from 40 to 70 decibels;
- safety (working with hot air). There are models that can withstand up to 120 degrees;
- the presence of grease filters;
- presence of humidity sensors. Turns on and off automatically.
Before you properly ventilate the kitchen with an exhaust fan, you need to choose a place to install it. This could be a window, a vent in a load-bearing kitchen wall, or an air duct.
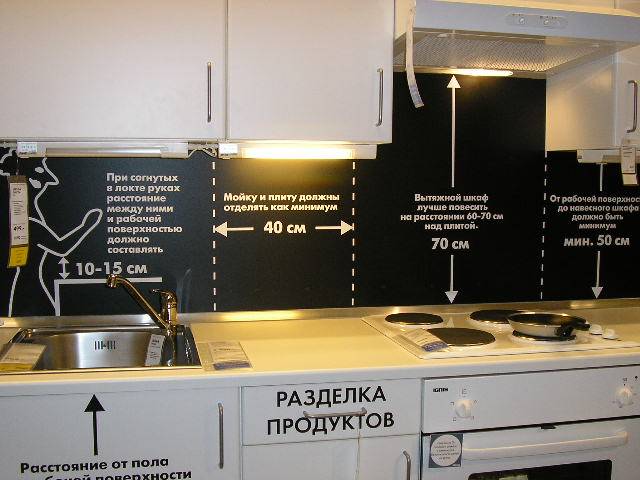
An example of installing kitchen ventilation mechanisms in the photo.
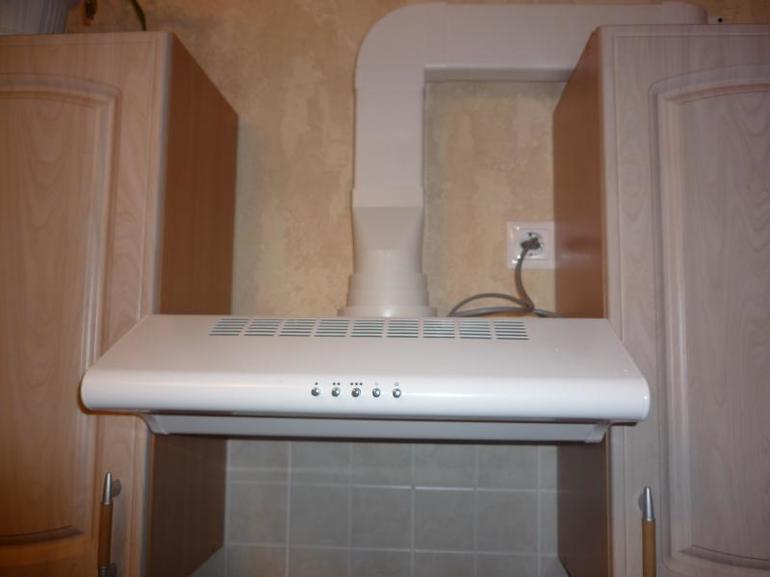
Kitchen hood for ventilation
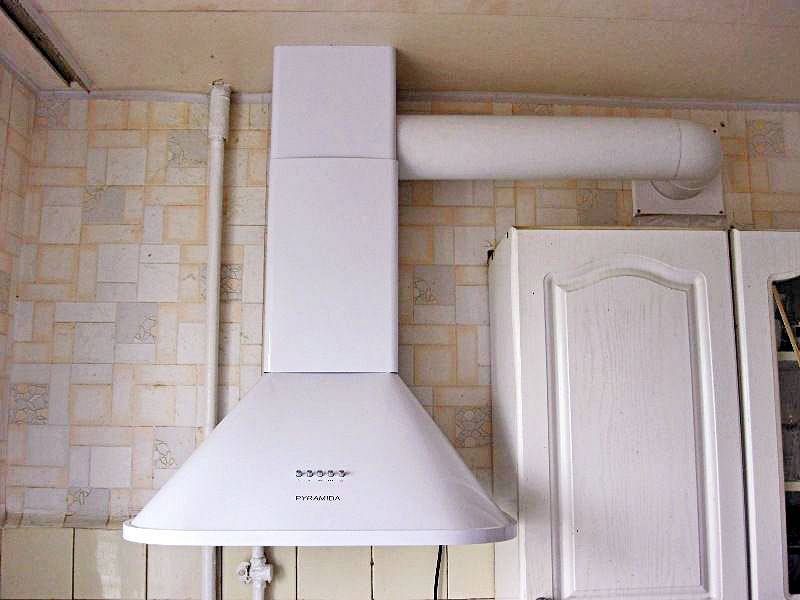
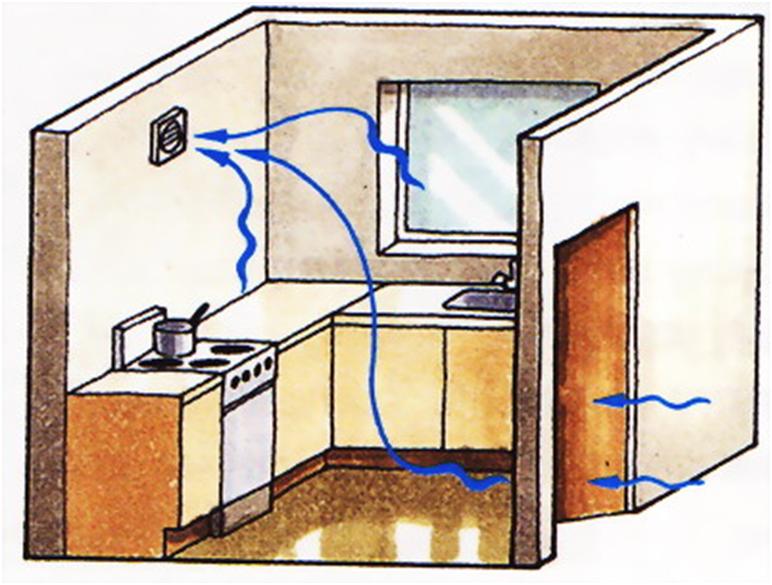
Most apartment owners resort to this method. It is really effective, as the hood is located directly above the hob and immediately evacuates fumes and odors. From the hood, the ventilation duct is released directly into the general house ventilation. And here you must definitely follow one rule:
When leading the pipe into the shaft, do not block the ventilation hole in the wall.
On sale there are special ventilation grilles with two outlets: for the natural movement of air and for the exhaust pipe. This is the correct decision.
Vapors and warm air in the room rise up, and in order to evacuate the steam cloud, it is necessary to leave the grate open. Through it, the exhaust air of residential premises is also removed.
By blocking the grate, you completely disrupt the work of natural ventilation.Employees of the gas service will point out this error and prescribe to correct it as soon as possible.
The weakest kitchen hoods operate with a capacity of 250 - 300 cubic meters of air per hour. The most powerful - 1200 cubic meters of air per hour. An overly powerful appliance in the kitchen can disrupt the air circulation in the general house ventilation scheme, which is designed for an average of 75 cubic meters of air per hour from one apartment. In the kitchen ventilation system, air is created to push “your” smells into neighboring apartments.
Therefore, the performance is calculated by the formula:
Multiply the area of the kitchen by 10.
But set too low, the hood can interfere with cooking and even melt from the temperature.
Optimal hood installation height - 55 - 56 cm above the stove.
In addition to the kitchen ventilation schemes described above, there are also supply and exhaust equipment that provides maximum comfort. But it is quite bulky and expensive, so it is usually not used when equipping the kitchens of apartment buildings.
Video about installation of a window inlet valve:
The principle of operation of the electric hood
First, let's remember what a hood is for and how it works. The purpose of any model of exhaust equipment designed to be installed above the stove is to clean the air from combustion products and odors that spread throughout the apartment during cooking.
As you know, during combustion, natural gas forms many substances harmful to the health of the human body, including a large amount of nitrogen, carbon dioxide, carbon monoxide, and various impurities.
The faster unnecessary elements are brought out, the cleaner and safer the air environment will be.In a small room with a low percentage of oxygen in the air, a person begins to quickly get tired and feel unwell.


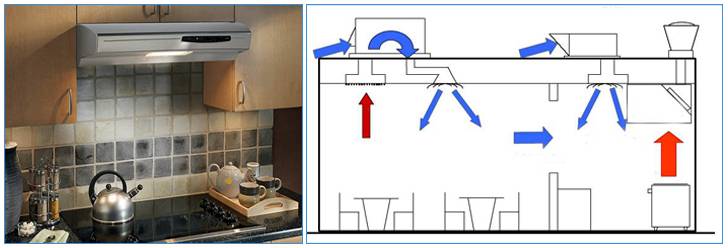
Electric hoods have long been an indispensable attribute of kitchen facilities. They are installed directly above a gas or electric stove, some models are equipped with an air duct to bring combustion products out.
Air purification occurs in two ways. Some models simply remove it from the room, others pass it through cleaning filters. It should be understood that the hood cannot fully ventilate the kitchen.
In order for the air to become truly fresh and healthy, it is necessary to establish forced ventilation. The simplest option for air access is regular ventilation by opening windows and vents.
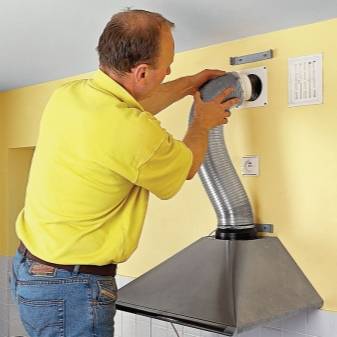
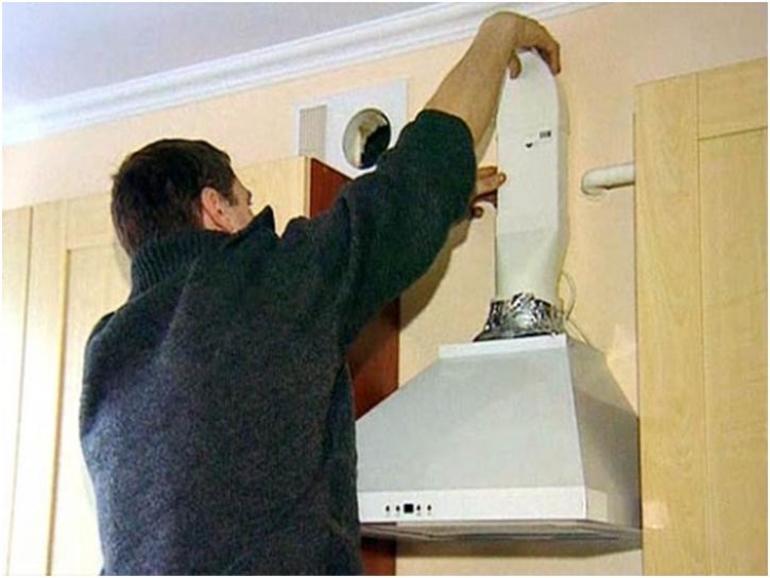
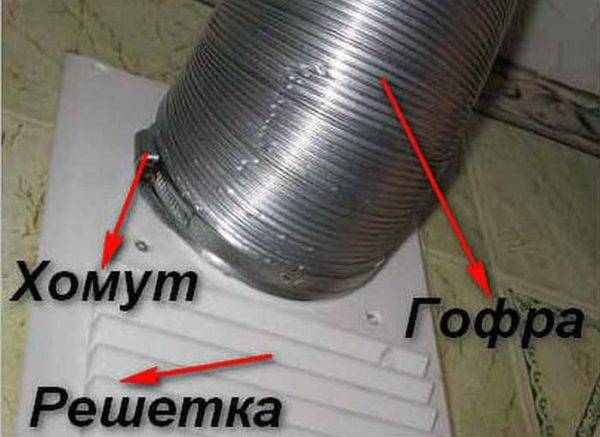
How to hang a flow hood?
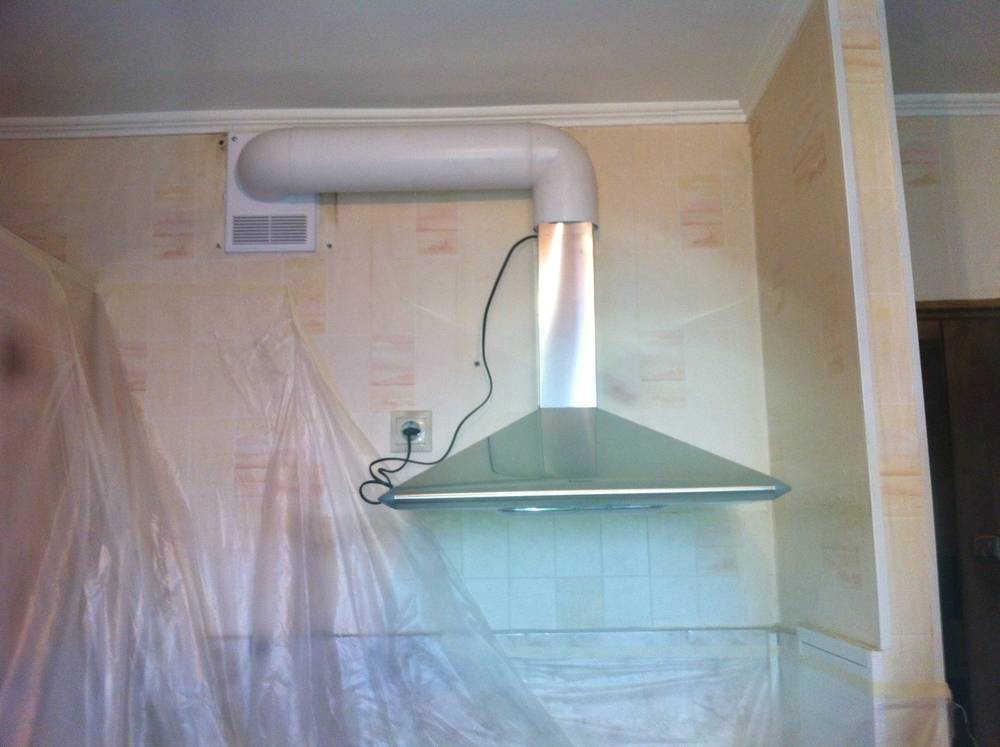
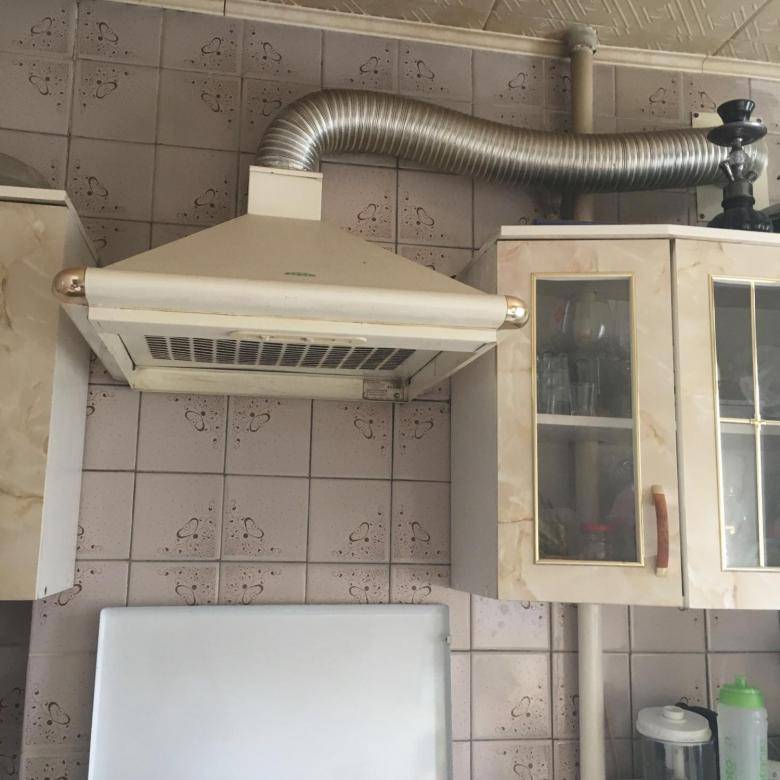
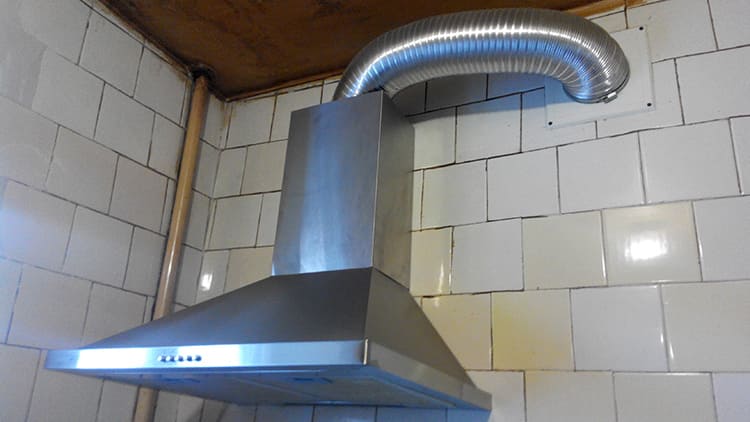
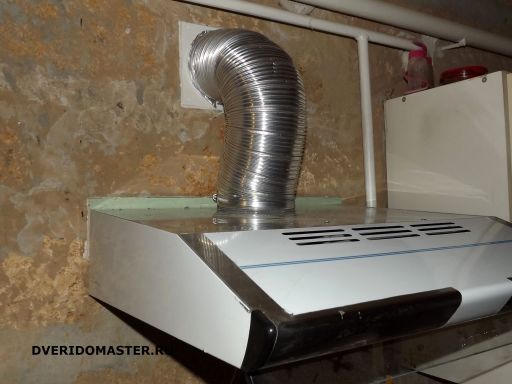
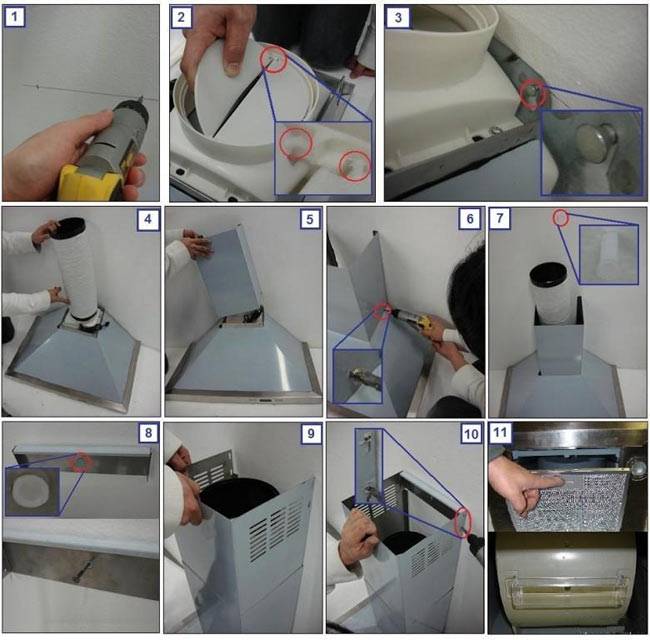
 If you have a flow type device, you must first install a corrugation for air outflow, and then hang the hood. The corrugation must be connected to the ventilation system or removed outside the house. When installing the outlet sleeve, make sure that there are no gaps at the junction with the exhaust hood and the ventilation pipe, and the corrugation is tightly fastened.
When installing a flow hood, users are faced with one problem - the unaesthetic appearance of the corrugations. A really long outlet sleeve can spoil any interior with its unsightliness. But there is a way out! Manufacturers of kitchen appliances offer special boxes that reliably hide all unsightly ventilation elements from prying eyes. Ventilation ducts will not only hide the corrugation, but also help decorate the kitchen thanks to various design solutions.
After installation, it is necessary to test the operation of the device.To do this, put a pot of boiling water on the stove and turn on the hood. If steam immediately enters the air intake, you did everything right and your kitchen is reliably protected from extraneous odors and excess moisture.
Service maintenance
For the full operation of the ventilation system in the kitchen, the hood must be serviced in a timely and correct manner. Failure to comply with maintenance standards can lead to a decrease in the efficiency of the device, and therefore to poor-quality air purification. Over time, without maintenance, the hood may even fail, which will entail additional costs.
At installation of a circulation hood on kitchen with a gas stove, you need to take care of the timely replacement of filters. The service life of the carbon filter is indicated in the instructions for the device. In these models, it is the carbon filter that is the main element of air purification, and if the components are not replaced in time, the device will simply cease to perform its functions.
The second rule of maintenance is to keep the instrument clean. Kitchens with a gas stove are characterized by increased air pollution from combustion products. The hood must be washed regularly, because grease and dirt constantly accumulate on its body. Failure to keep the unit hygienic can cause the air intakes to become clogged and the equipment to be inefficient.
Regularly check the pipe attachment points. When gaps appear, the efficiency of the device decreases. Also make sure that the corrugation is not twisted or pinched.
Which hood to choose for a gas stove is up to you.But remember that only if you follow the installation rules and maintenance recommendations, your ventilation will effectively clean the air in the kitchen for many years.
What you need to consider for the organization of the hood in the home
If you decide to install a hood in your home, extracting exhaust air outside, you may encounter some legal aspects of this process.
To equip the hood, it is necessary to make a hole through which air will escape, and also adjust the outlet of this air. Two questions arise: is it possible to make a through hole in the wall of an apartment building and is it allowed to remove dirty air outside the apartment?
If the diameter of the hole does not exceed 200 mm, then no permit is required for it. Such holes are allowed to be made for ventilation and air conditioning. However, it will not work to bring the hood into such a hole - according to the law, this can violate the comfort of neighbors, through whose window your exhaust air can go. Before installing the hood, it is necessary to design the exhaust duct and go through the approval procedure.
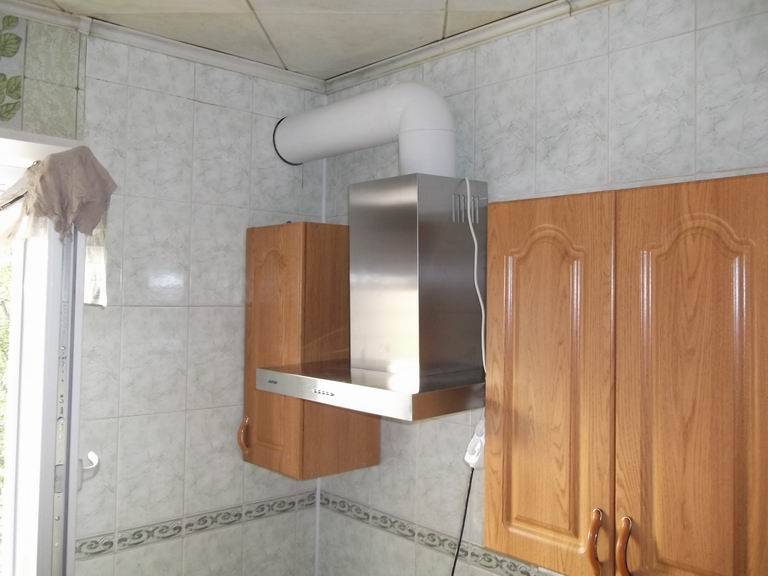
The simplest and most convenient option is a hood with an exhaust channel in the wall.
The video shows how to properly organize the exhaust channel:
Installation rules
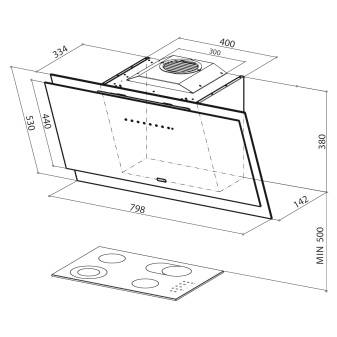
To properly install the hood in a private house or apartment, you need to know the rules and regulations by which this procedure is carried out. The most important factor to consider in the first place is the mounting height. household appliance over gas stove. According to the norms, the hood should not be lower than 80 cm from the hob, otherwise there is a high risk of damage to the outer shell of the appliance, and in the worst case, fire.According to GOST, there are such standards:
- the distance from the direct hood to the stove is at least 75 cm;
- if the hood is inclined, its lower edge must be at least 55 cm from the surface of the stove;
- in the case of direct exhaust, the air intake is located at a height of at least 65 cm above the gas stove.
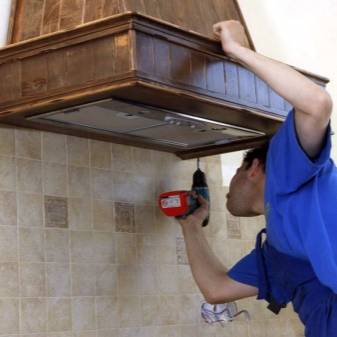
New household appliances are installed only after measurements have been made and the place of its future location has been outlined.
The device must hang exactly above the stove in order to absorb polluted air as quickly as possible, therefore it is worth checking the correct choice of the preliminary location for the device and, if necessary, adjusting it. The next step is to work on the exit to the ventilation. The location of the shaft should help in choosing the most convenient option for bringing the duct into it.
Once all the preparations have been completed, you can begin the installation of equipment. It is worth working carefully, not lifting the hood by decorative areas that can break. Depending on the type of device, it can be mounted on the ceiling, wall or inside furniture, so the fasteners are installed where the device will be screwed. After installing the main part, you need to put pipes leading to the ventilation. If the air outlet is led into the general house ventilation, then for work you need to purchase a corrugation or use a plastic air duct, also use an adapter, clamp, sealant and metallized tape.


When everything is assembled and checked according to the height standard from the stove, you can try to connect the device to the network and check its operation. The hood can work when plugged into an outlet or connected directly to a cable. You need to work with the electricity turned off, wearing gloves, connecting phase to phase and zero to zero.
How to choose a hood for the kitchen, see the following video.
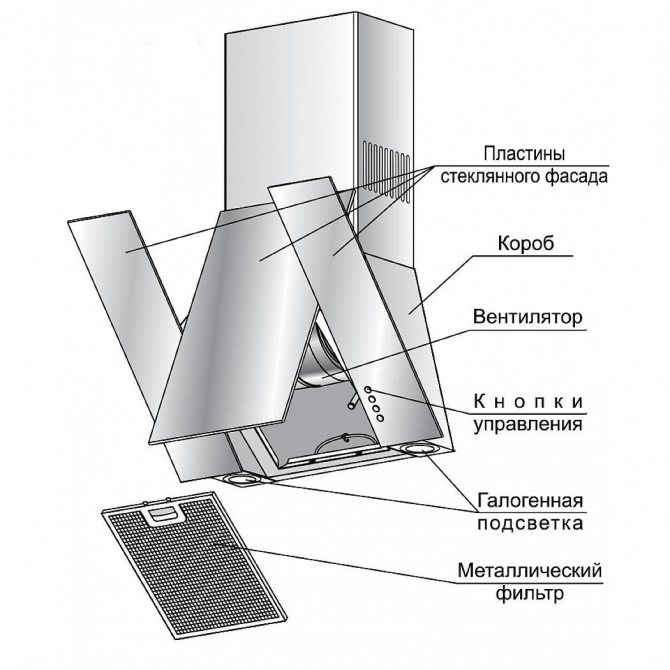
Scheme of a kitchen hood
In order to better understand what you are going to do, you first need to know the circuit of the device and the principle of its operation, otherwise nothing can be done normally. This is also necessary so that you can disassemble and then reassemble the hood yourself in the event of a breakdown or cleaning, which is desirable to do at least every six months to avoid possible fire.
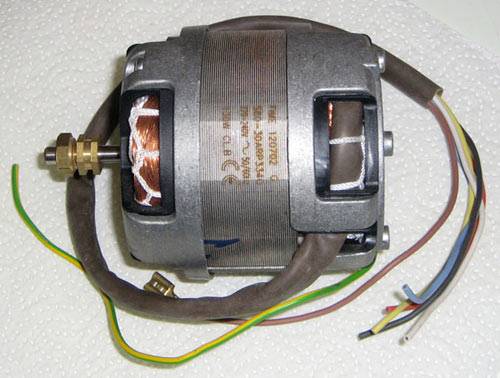
An important role in the hood is played by its engine or engines, as in some more powerful models they are installed in two. This is a kind of "heart" of the whole device, the power of the operating device depends on it. Most often, such engines have a power of 50 to 200 watts, their speed is from 1500 to 2000 per minute. The performance of the device depends on this, but do not forget that the more power, the more electricity the hood will consume, be sure to consider this
In addition, more powerful hoods will have a high noise level, this should also be paid attention to.
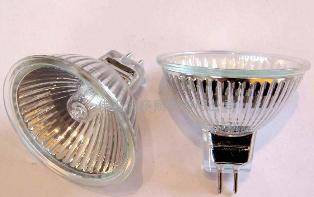
An important role in the energy consumption of the hood and its structure is played by the lamps installed in it and aimed at illuminating the stove or hob. Most often, LED or halogen lamps are installed. If you want to save on energy consumption in the future, then you should give preference to LED lamps, since halogen lamps consume virtually the same amount of energy as conventional incandescent lamps.
To connect the device to the network, a regular cord is used, most often its length is one and a half to two meters, if this is not enough for you, then you will have to use an extension cord.If you want to hide the cord and extension cord, then think it over in advance.

An important role in the structure of the hood is played by an anti-grease filter, which is literally “at the inlet” of the device and is visible above the hob. This filter is needed in order to trap unpleasant odors, as well as protect the engine and other parts from dirt and large impurities. This is a kind of metal mesh or dense perforated foil with several layers, ideally it should have an anti-corrosion coating.
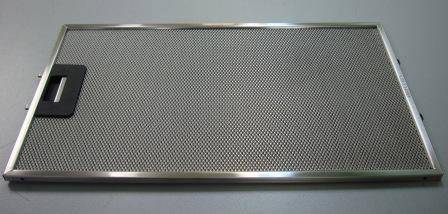
Some inexpensive models have so-called disposable filters, they are made of synthetic fabric, they will have to be changed very soon. They are inexpensive, but it is not very convenient, so it is better to give preference to the first option. It is necessary to clean the filters periodically, as they are covered with soot and grease, this can cause unpleasant odors and spoil the operation of the device.


Some more expensive models have charcoal filters, which are usually installed behind the hood motor. Such filters help to further purify the air, they contain microgranules of coal, which work on the same principle as filters for water purification. The disadvantage of such filters is that they need to be changed frequently, which is easy to do, but requires some skill. Dirty or old filters interfere with the normal operation of the hood in the kitchen.
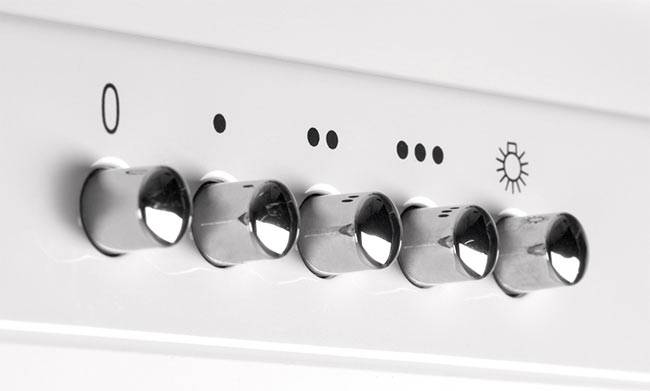
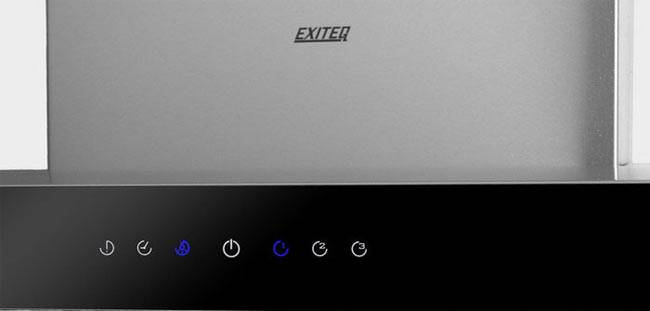
Hoods also have several types of controls that differ from each other, you need to choose the type that seems convenient for you, by and large they do not have any functional differences. Here are the main types of controls:
- Button control.It is the presence of conventional recessed buttons that are familiar to every person. Usually the buttons are located on the front panel of the hood, they are easily accessible. Such control is most often found in the cheapest models of the device, but at the same time it is also the most reliable.
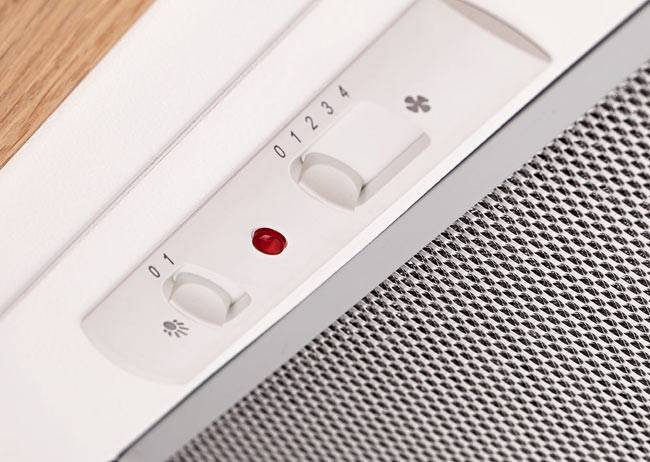
Slider control. Also an inexpensive type of control, which is found in many economical models. It works on the principle of a movable lever, it moves through the divisions, changing the power of the device and sometimes the lighting of the hob
Touch control. This control is the most popular, it is in most modern devices. Firstly, it looks very stylish, does not require special care and does not lose its presentation even after long-term operation. The touch panel is most often located on the front panel of the hood, it works at the slightest touch. In more expensive models, you can even set a specific program for the device. For example, with a sharp appearance of a strong odor, the motor starts to work in an enhanced mode, aimed at quickly eliminating an unpleasant odor, when a person approaches, an indicator light is activated that illuminates the surface.
Video - installation of a kitchen hood
Some of the more “smart” models also work without human intervention, they turn on and off automatically when an odor is detected or the stove is turned on / off.
Installing the hood
Training
 Before proceeding with the installation, choose the right place for the equipment - gas stove + hood. In the photo there is an electric stove - the recommendations are also relevant for gas facilities.
Before installing hood over gas stove, you must first prepare the room.
- Mark on the kitchen plan the location of all communications, as well as installed appliances, if the installation is carried out in an already operated room.
- The volatility of the hood assumes the presence of an outlet (but not above the stove!) With 220 V connected. A model with an automatic switch is preferable: it will always turn off in time in the event of a short circuit or fire. If the kitchen is not equipped with a grounded outlet, the rules for installing a hood over a gas stove require that a separate RCD (16 A) be provided in the electrical cabinet. Connect to the network a line of three wires "zero", phase, "ground" in yellow insulation with a green strip drawn along it.
- The value between the exhaust device (lower edge) and the surface of the stove (burner) is measured.
- The completeness of the package is checked for the presence of the necessary fasteners, hooks, dowels, etc.
- The place of fastening of the structure is marked.
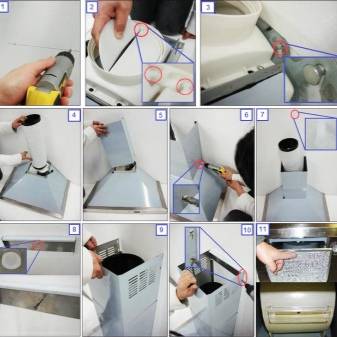
Installation
- air duct is assembled. It can be square or round. Standard version - size 130x130 mm It is better to choose a plastic construction with smooth internal surfaces. Its diameter should be the same along its entire length, correspond to the cross section of the ventilation hole and, preferably, have a check valve.
- Holes are drilled with a perforator for the hood clamps.
- Screws are screwed in.
- Using the level, the horizontal installation is checked.
- A hood is hung (without a box).
- Connects to an exhaust pipe connected to a duct.
- The hood is connected to an electrical outlet. If the cord is missing or short, an autonomous line is drawn from the shield or is diverted from the socket closest to the hood.It is strictly forbidden to make twists insulated with insulating tape at the places where the missing part of the cord is added.
- A test run of the technical device is carried out in all modes.
- During normal operation, the box is fixed at the final stage.
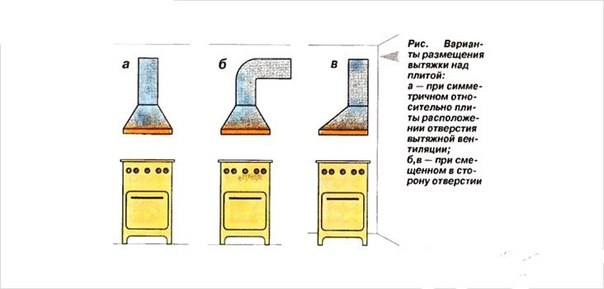
Installation options for exhaust technology
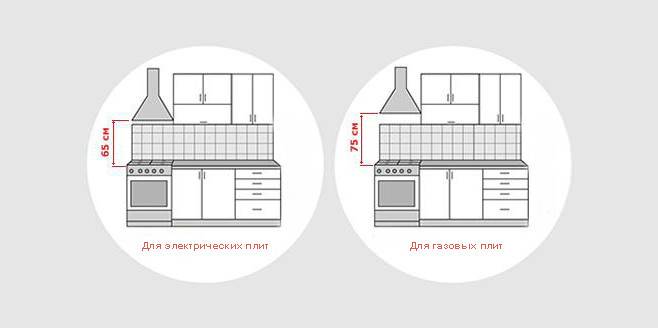 Comparative illustration: gas stove and electric
According to the installation version, exhaust devices are:
- built-in type - the entire installation is masked in a hanging cabinet;
- fireplace and dome type - the structures are fixed on the wall;
- island model - assembled on the ceiling;
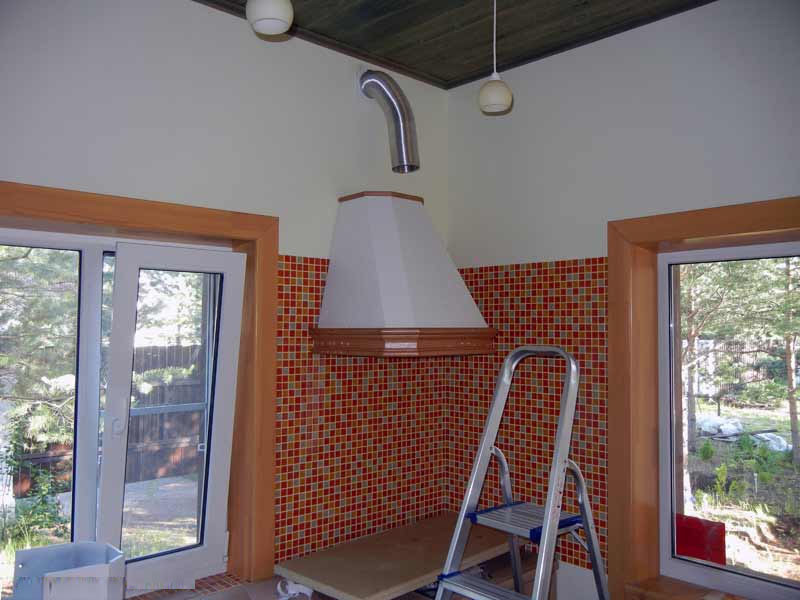
- corner hood - placed in the corner;
- flat model - involves two planes of fixation: behind - to the wall, from above - into the hanging cabinet.
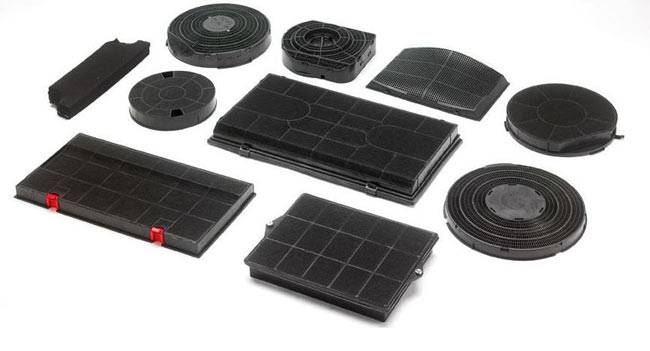
In any of the models, a certain type of filter elements is provided that absorb pungent odors, grease and other secretions.
Used as filters
- Grease traps - are installed only in kitchens with a ventilation shaft.
- Coal filters are elements of modern cleaning systems with a recirculation mode of operation.
Even with the observance of the rules for installing the exhaust system and operation, the efficiency of work will be underestimated if preventive maintenance is not carried out in time: clean surfaces, change filters. Thus, it is not difficult to create the conditions necessary for a safe and comfortable stay in the kitchen. For this, different methods are used. But it is the forced system with local exhaust above the stove that is considered the most optimal and common option.
How to connect the hood to electricity
Since the power consumption of kitchen hoods rarely exceeds 1 kW, they can be connected to ordinary sockets. It is desirable that they be grounded.This requirement must be met if you want the warranty to be valid.


If the wiring in the apartment is old, you can throw the ground or ground wire yourself. Just do not attach it to plumbing or heating pipes. This threatens the possibility of electrical injury or even death for you, members of your sichs or neighbors.
To reach the ground wire, on the shield, find a busbar with wires attached to it or a pipe to which a stranded wire is welded / screwed. You can also connect your own stranded wire to these devices (without discarding those that already exist). For it to work normally, the cross section must be 2.5 mm, the conductor is stranded copper, a non-combustible sheath is desirable.
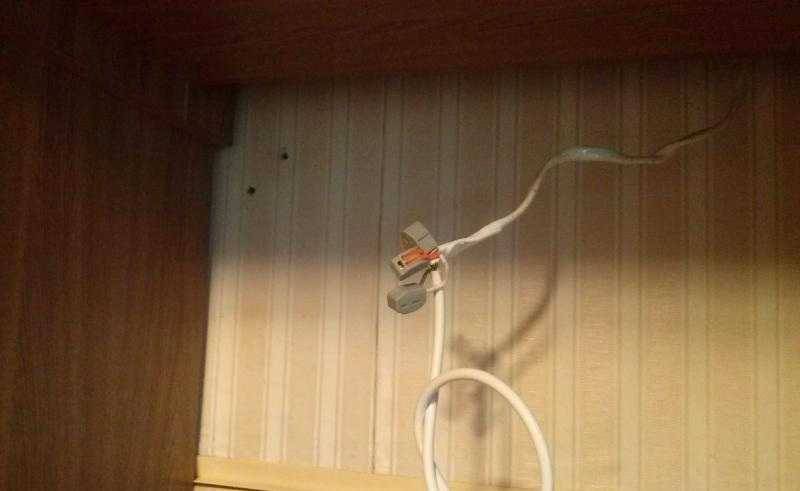
Connect the hood through the Vago terminal blocks
Some of the hoods come with a plug at the end. With the connection of such models, there are no questions - to the outlet and that's it. But there are models in which the cord ends with wires. This is not from the greed of the manufacturer, but for the consumer to decide for himself how best to connect the equipment. If you want, you can connect the plug. This option is not suitable - take the terminal block and connect through it. Another option is Wago terminal blocks. They need to take three pieces - according to the number of wires. In one terminal block, the same wires are connected from the hood and from the shield - phase to phase (here the colors can be different), zero (blue or blue) to zero, ground (yellow-green) to ground.
Mounting Features
Self-installation of the exhaust device is carried out taking into account the technical nuances that we will now analyze.
Distance from the gas stove to the hood
There are standards that determine the height of the installation. Under no circumstances should they be ignored. The distance varies from 750 to 850 mm. The minimum value will be justified in case of purchasing low-power equipment, models with high power can be placed higher. Do not lower the device below, unless it is authorized by the manufacturer.
The reason is that an open fire can rise quite high. It is possible to ignite the hood, especially if its filters have not been cleaned for a long time. Old fat that accumulates on the filter grille easily catches fire, it will be difficult to put it out. Even if ignition does not occur, the device lowered too low will heat up, which will not have the best effect on its life.
@ Instagram kitchen_room_design
The exhaust device must be raised above the stove to a safe distance / The reason is that an open fire can rise quite high.
Preparing the installation site
Particular attention should be paid to the place where it is planned to hang the structure. The strength of the wall must be checked, it may need to be strengthened
In small kitchens, gas pipes can make it difficult to fix the hood. It happens that they pass through the place of the future attachment. If possible, it is best to move the stove to another place, but this is not always the case.
There are two more solution to the problem. The first one is costly and troublesome. It involves the transfer of pipes, which is done by representatives of the gas company after a preliminary statement. The second is to place a wooden block under the mount, the thickness of which will be greater than the diameter of the pipe.In a wooden part, a cut is made under the pipe, after which it is securely fixed to the wall. The equipment is attached from above.
@ Instagram kitchen_room_design
If a gas pipes interfere installation of the hood, they are sometimes transferred to another place. Such work is done by representatives of the gas company after a preliminary application.
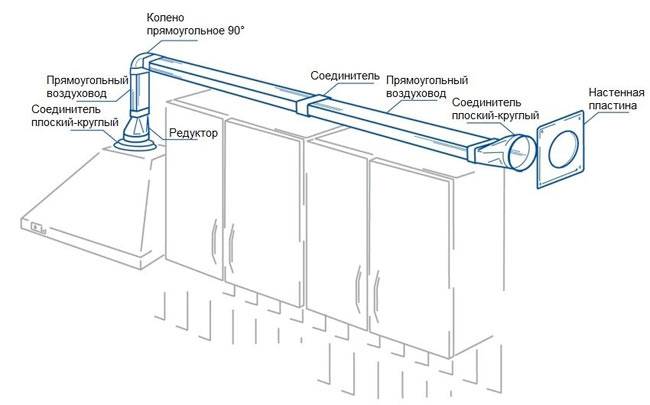
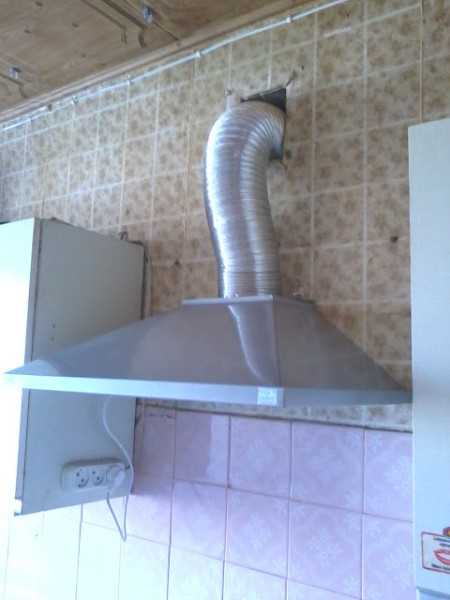
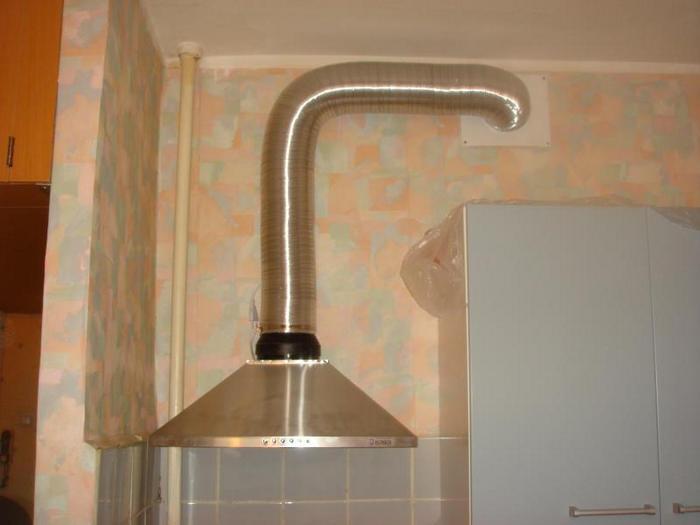
Length and configuration of the duct
It is best that its length is minimal, and the shape is the simplest. Standards developed for ventilation do not recommend choosing complex trajectories with turns. Each turn reduces the power of the product by 5-10%, as it reduces traction. The length of the channel is also important, because it affects the efficiency of the device. The higher it is, the worse the device works.
Air ducts can be selected different. The easiest way to install a metal corrugation, which is easily bent and takes the desired shape. However, the result is not very attractive in appearance. For this reason, the corrugation is covered with decorative overlays. Rigid plastic box includes straight parts and a set of adapters. They are more difficult to assemble, but such a channel looks aesthetically pleasing.
The ventilation shaft for the boiler, column and exhaust device cannot be shared. It should be arranged separately. Before installation, a check valve is installed on the vent, it is also called a clapperboard. When the draft is “overturned”, it will not allow the polluted air flow to return to the room. The easiest way is to put a factory-made assembly, but if you wish, you can assemble it yourself.
@instagram om_interiordesign
Unpresentable air ducts are covered with decorative boxes. For example, in a hard plastic box.They are more difficult to assemble, but such a channel looks aesthetically pleasing.
Where and how to bring the air duct
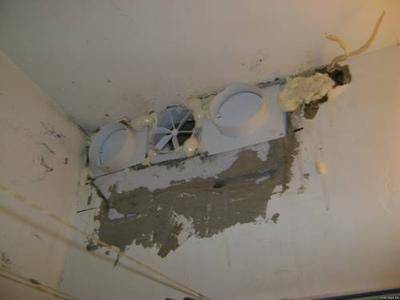
Most often, the duct from the hood in the kitchen is connected to the vent through which natural ventilation (due to draft) goes. This is wrong, since in this case most of the grille is closed by an air duct, and air exchange through the remaining available holes will be clearly insufficient.
significant portion ventilation grill is closed and ventilation in the apartment will be insufficient
Correctly connect the air duct to a separate ventilation duct. In this case, the same grate is installed on the hole as in the photo above.
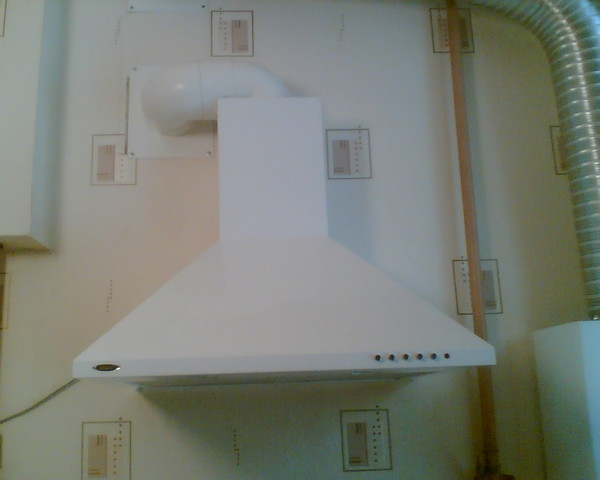


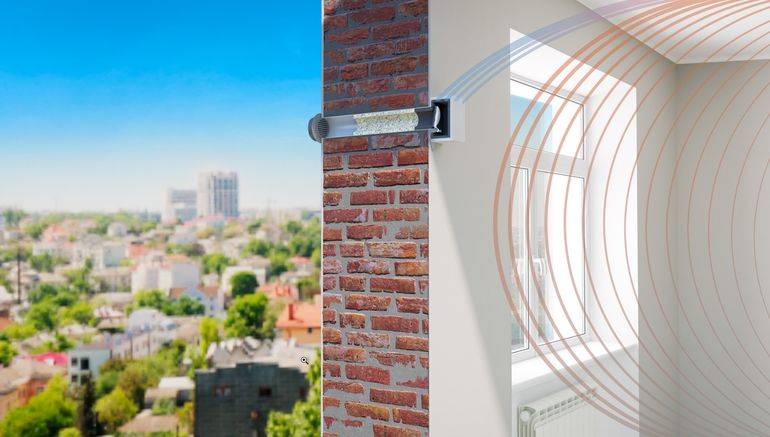
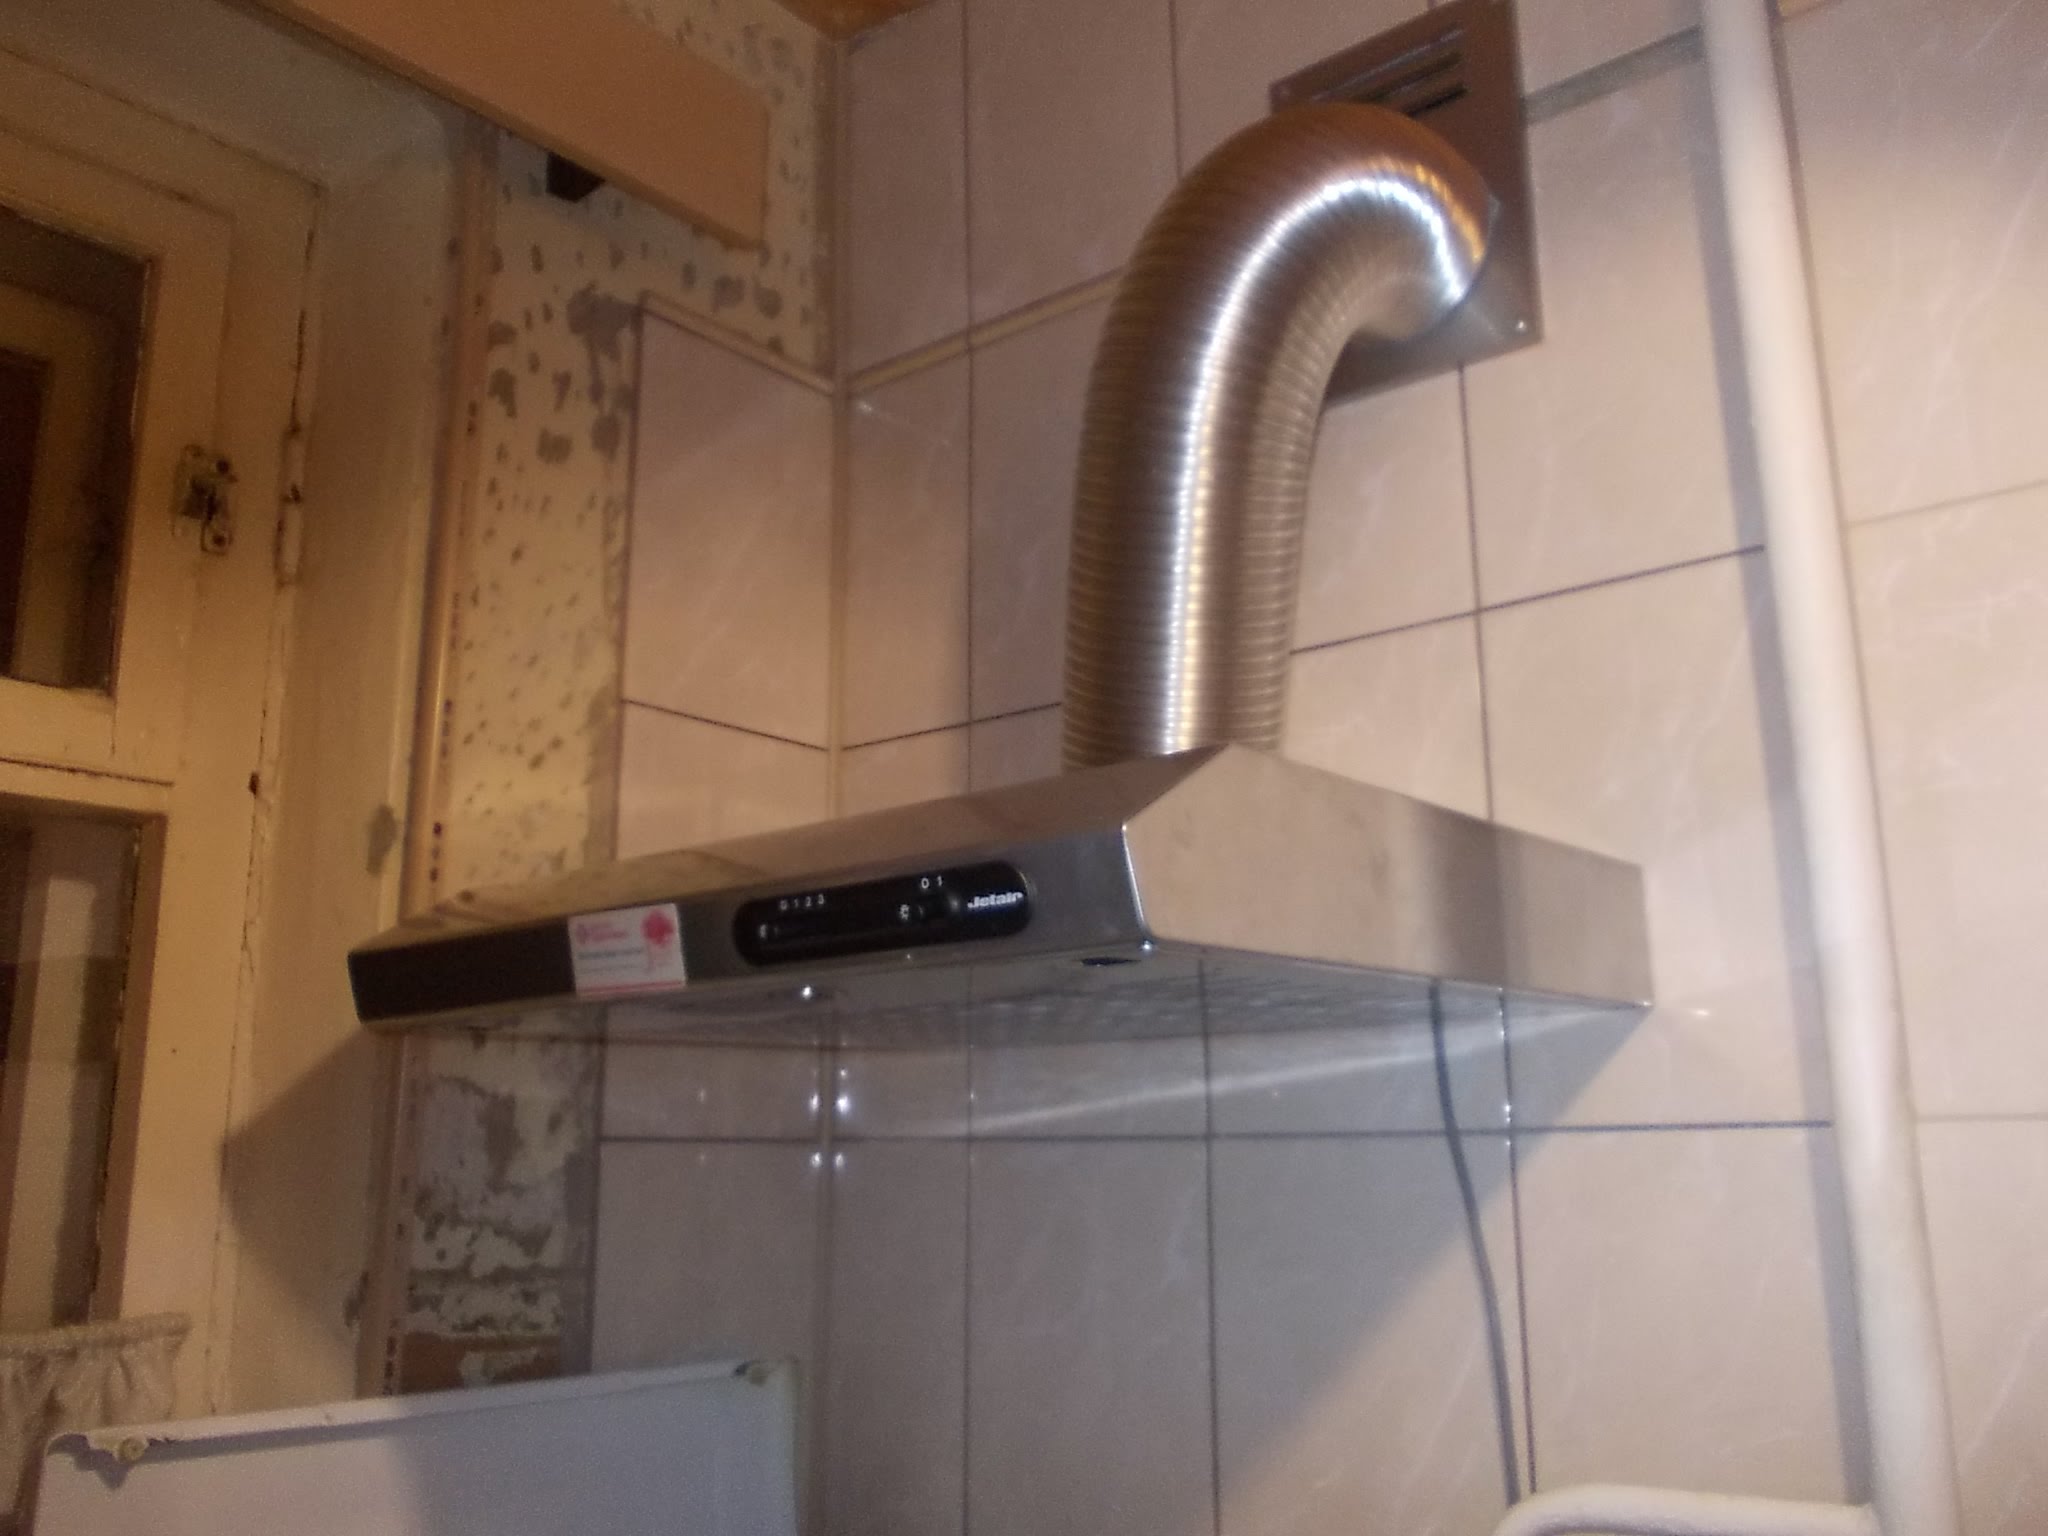
If there is no separate ventilation duct, but there is an outer wall nearby, you can bring the pipe outside by placing a grill on the outside. These are two ways to have normal ventilation and ensure the normal operation of the hood.
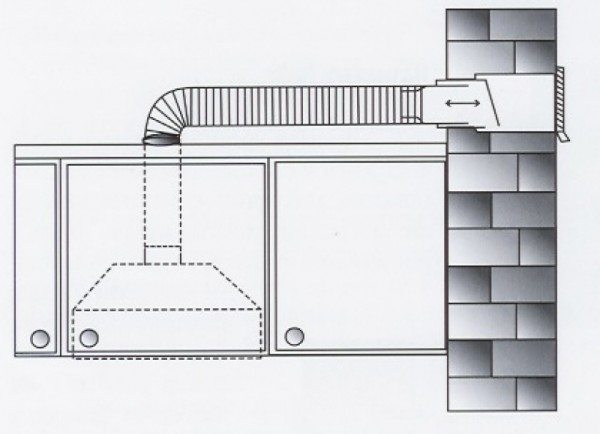
How to get outside
To install the hood and bring the duct into the wall, you need to make a hole in it. And this is the only difficulty. Further, an air duct is inserted into this hole, sealed with a solution. Outside, the hole is closed with a grate - so that debris does not get in, birds and small animals do not settle.
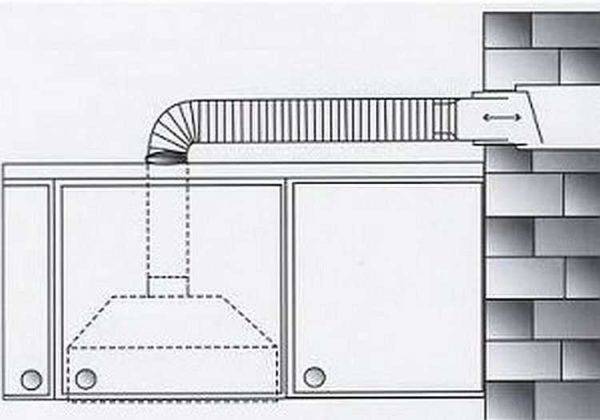
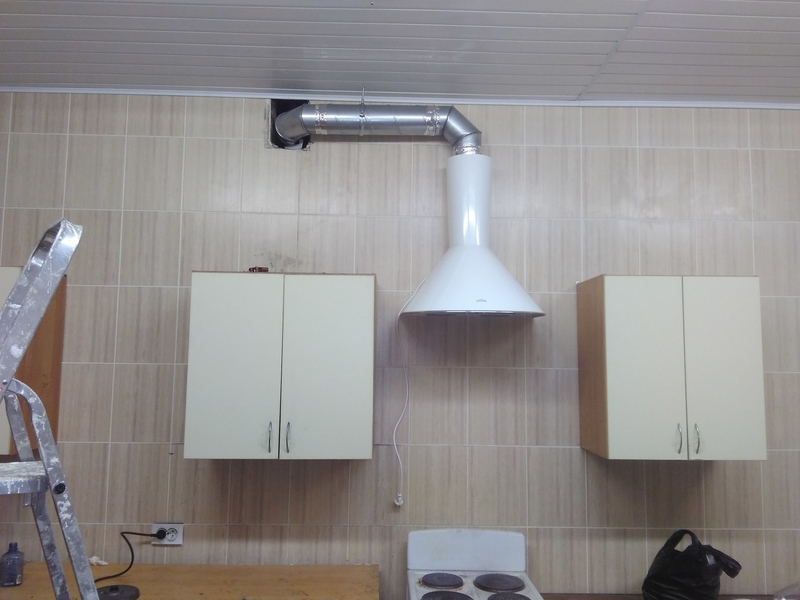
One example of installing a hood in a kitchen with air outlet through the wall
To prevent air from the street from blowing into the room, a check valve is installed (in the figure above it is indicated by an oblique line). By the way, it is desirable to put it when connecting air duct to the ventilation system - so that odors from the pipes do not enter the room.
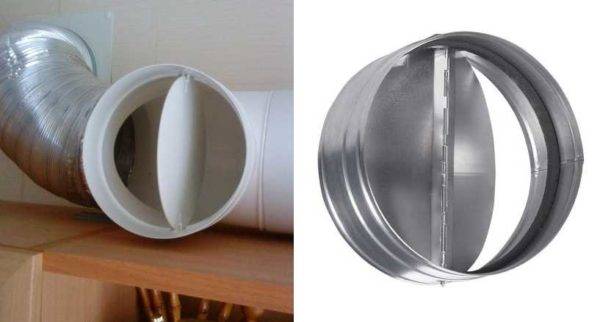
It looks like a non-return or anti-return damper for air ducts
The non-return or anti-return air valve is a lightweight plastic or metal plate.It is movably attached in two places to the pipe - at the top and bottom, the petals are supported by a slight spring. Bye extractor not working, the valve blocks the access of air from outside. When the hood is turned on, the air flow bends the plate forward, squeezing the spring. As soon as the hood is turned off, the plate returns to its place with the help of springs. If you install a hood without this valve, it may be too cold in the kitchen in winter - outside air will enter the room without any problems.
So that the hood does not interfere with natural ventilation in the kitchen
With the help of a tee and a non-return valve, by the way, you can install the hood so that it does not interfere with the natural ventilation in the kitchen. You will need a special ventilation grill for connecting hoods, a check valve and a tee. A tee is attached to the ventilation grill, an air duct from the hood is connected to its lower inlet, and a check valve is placed on the free outlet, only so that the petals are locked when air passes from the pipe (in the photo below).

Anti-return valve for normal natural ventilation in the kitchen
How does such a system work? When the hood is turned off, the check valve petals are bent, air from the kitchen enters the ventilation duct through the grill and the open outlet of the tee. When the hood is turned on, the air flow from it unfolds the valve plate, and the air goes into the ventilation system. When the hood is turned off, the springs again open access to air through the tee.
Outwardly, such a system does not look very attractive and it will have to be somehow masked. But this is the only way to connect the hood to the only existing ventilation outlet and not reduce air exchange.