- DIY step-by-step assembly and installation instructions
- Welding or carving
- pipe cutting
- Installation of supports
- loops
- Frame installation
- Fastening to supports
- Gate
- Features of the design of the gate from corrugated board
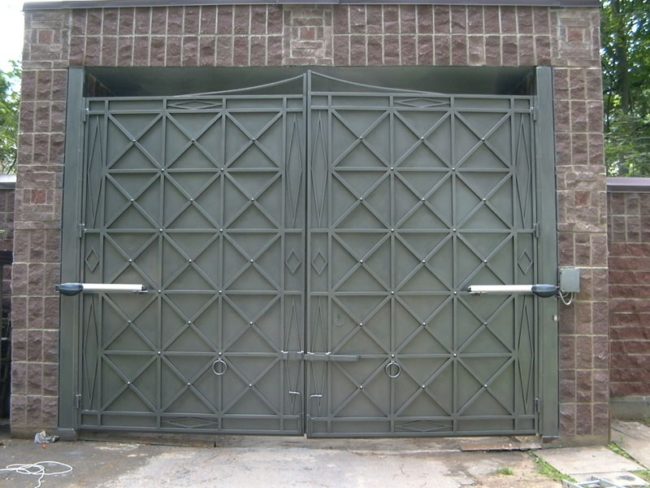
- swing gate
- Sliding gates
- Photo report on the manufacture and installation of the gate
- Making a gate from corrugated board with your own hands
- List of materials and tools
- Stages of manufacturing a swing gate
- Drawing of sliding gates from corrugated board
- Example
- Example
- The nuances of the device of different types of entrance gates
- Sliding gates
- Swing gates: types and design features
- Swing gate device
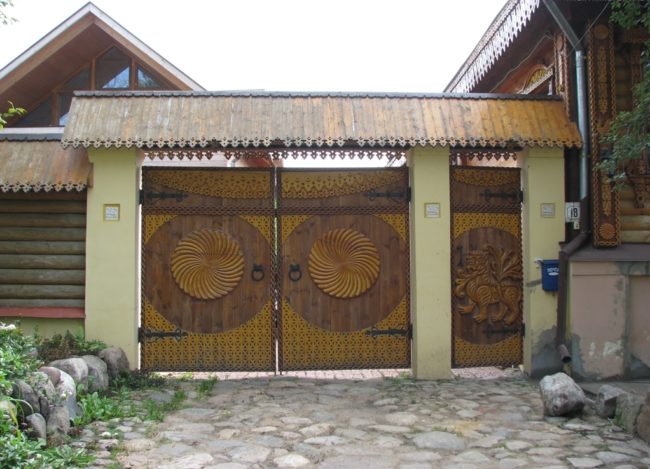
- Finishing and decoration
- Photo gallery: gate finishing options
- Photo gallery: swing gate options
- Step-by-step instruction
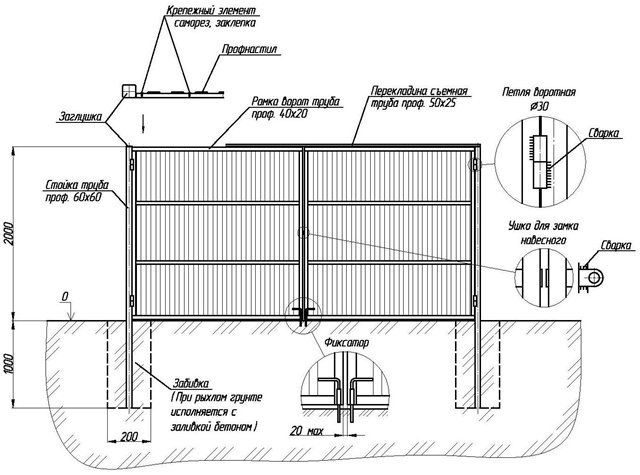
DIY step-by-step assembly and installation instructions
When the drawing and materials are prepared, you can begin work on the installation of the gate. You can learn more about how to install the gate step by step with your own hands by watching the video at the end of the article.
First, decide how you will build the structure: using welding or connecting the profile with a threaded method.
Welding or carving
If you do not know how to properly weld the gate, because you do not know how to handle welding, then you can assemble a structure from profile pipes using ordinary bolts and a drill.This is a more time-consuming process, but any householder can do it. In any case, it is better to use welding - if you do not know how to handle the machine, you can hire a qualified welder for this purpose.
pipe cutting
Cutting of blanks is carried out according to the drawing, using a grinder and a disc for cutting metal. In places of cuts, the metal profile must be cleaned with a grinder. Rust is removed the same way.
Installation of supports
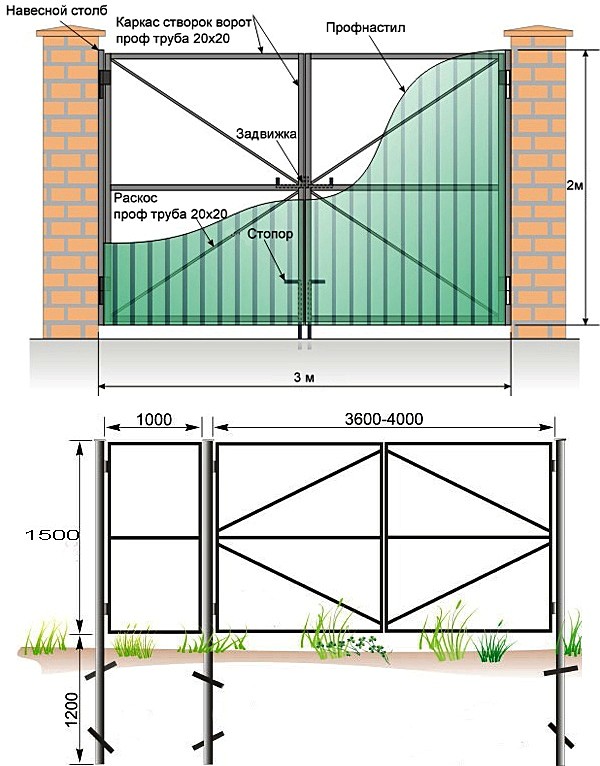
The location of the future gate is determined in advance, at the installation sites of the supports, holes are dug at least one meter deep and 10 centimeters wide. The height of the supporting pillars must correspond to the drawn up drawing and the height of the gate. Sand and gravel are poured inside the pits. Then the pillars are installed inside the pits, after which they are poured with concrete.
Using the drawing above, it can be understood that the support must be buried and concreted into the ground to a depth of 1 meter.
loops
Mounting hinges are pre-installed at the location provided on the drawings. The hinges are easiest to weld with a conventional welding machine, but if desired, they can be mounted using bolts. It is best to cook the hinges on the gate with third electrodes so as not to damage the details or the profile.
Frame installation
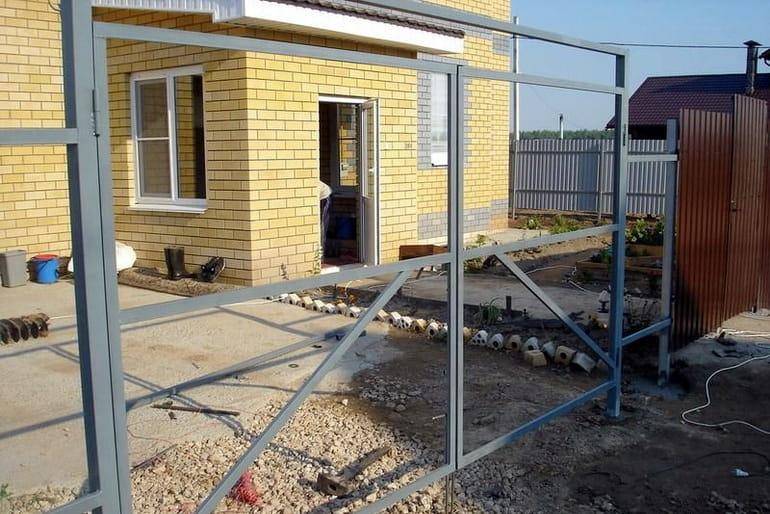
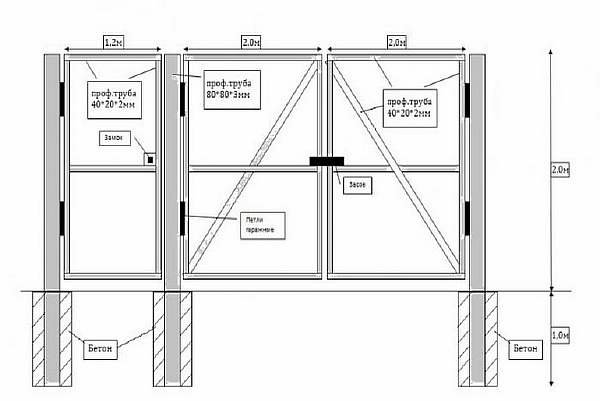
When the hinges are welded to the supports, you can start assembling the gate. Using the drawing above, it is necessary to properly fold the structure before welding on the ground. Each sash should be in the shape of a rectangle, while in the middle of each, horizontally to the ground, strips are installed to ensure the integrity of the structure. In order for the sashes to have the correct angles, a diagonal bar is installed.
All pipes used in the construction proposed by us for installation have a size of 2 meters.Thus, according to the drawing above, you will get two mirror doors, on each of which hinges are welded at a distance of 15 centimeters from the lower and upper corners. They will allow you to attach the frame to the supporting pillars.
Fastening to supports
The process of fastening to the supports is carried out manually. For work, several people will be needed: lifting the frame and controlling the process of attaching the frame with the help of hinges to the supporting pillars.
Gate
If you decide to install the gate also from profile pipes, then its manufacture, installation and fastening is carried out in exactly the same way. According to the drawing proposed by us, the gate has the same height, but three horizontal strips should have a shorter length - 1.2 meters. The assembly of the structure is also carried out on the ground, according to the figure.
Features of the design of the gate from corrugated board
Gates made of profiled flooring compare favorably with barriers made from other building materials. The undeniable advantages of a profiled flooring structure include:
- ease of installation and assembly;
- decorative (professional sheets are made in various colors and shades, so you can easily choose a material that will optimally complement the landscape design of the garden and the exterior of household structures);
- profitability of gates made of profiled sheet (the cost of the lining material is significantly lower, unlike forged elements or wood);
- functionality (gates made of profiled sheet can have a different control mode and design);
- durability and practicality.
According to the way of opening the gates from the profiled flooring are divided into the following types:
- Rollback.
- Swivel lifting.
- Swing.
- Sliding.
- Garage.
Let us consider in more detail the most popular types: retractable and swing.
swing gate
The gate smoothly closes and opens due to the fact that hinges with bearings are fixed on the gate posts. The gate with this type of gate, as a rule, is installed separately, but there may be exceptions when the entrance door is located in one of the wings.
Gates can be opened automatically or mechanically. Installation of an electric drive is usually used in areas of industrial importance, when vehicular traffic is very heavy.
It is possible to install a remote control of low power, since the mass of the corrugated board structure is quite low, the only exception is swing gates made of corrugated board with forged elements.
The main advantages of swing gates are their ease of do-it-yourself installation and accessibility, and the main disadvantage is the availability of free space for opening the leaves.
Sliding gates

go over the fence
The design of the structure creates additional opportunities for transport maneuvers (the size of sliding gates can be up to 12 m long) and the creation of traffic in several streams.
Another important advantage is that there are no guides in the opening. This makes it possible for cars of any height to pass freely.
In addition, in winter it is not necessary to clear the snow all the time for the normal opening of the wings, as is required in the case of swing structures.
As a rule, retractable structures are equipped with an automatic system, since it is rather difficult and inconvenient to open long sashes with your own hands.
The disadvantages of sliding gates from a profiled sheet include:
- Do-it-yourself manufacturing and installation of sliding gates will be more expensive than ordinary swing gates.
- Purchase of special accessories.
- The need for the construction and calculation of a capital foundation using a layer of reinforcement.
Photo report on the manufacture and installation of the gate
This is one of the options for how to make a gate from corrugated board hands. The technology is not the best, but not the worst: everything has been functioning without problems for the past six years.


Hinges are welded to the installed poles 80-80 mm, the counterparts are welded at the required distance on the vertical parts of the racks from the pipe 40 * 40 mm - on the right and left. We hang the racks on the hinges on the pole, put a layer of the required thickness between them and the poles and fix it with a clamp.
We hang the racks on the hinges welded on the poles
We measure the required height and cut off the excess, from above to the racks, not to the poles, we weld the cross member from the same pipe 40 * 40 mm
The quality of welding at this stage is unimportant. We are still grabbing the details, not caring about the thoroughness of the seam - then we will bring it to normal
The main thing is that everything is smooth and kept together. Therefore, we grab points in several places.
A crossbar is welded to the racks of the gate
In the same way, we grab the pipe along the bottom.
Welding the bottom pipe
We find the middle of the cross beams. Set aside 3 mm from the middle in both directions. We make clear marks. We measure the distance between the upper and lower beams, cut off two segments, weld them according to the marks (there should be a gap of 6 mm between the two vertical pipes).
We weld two vertical pipes in the middle with a gap of 6 mm
We measure the distance between the two posts of one half of the gate. They should be the same, but it is better to measure separately. Cut the pipes to the desired length and tack them at the desired height. If you need more crossbars, install them too.
Welded cross bars for increased rigidity
On the marked center with a grinder at the top and bottom, we make through cuts, dividing the gate into two halves. So very simply we got a gate that will open and close without any problems.
Separated halves of the gate
The frame of the gate leaves is ready. We remove it, lay it on a flat horizontal surface and weld the seams well
Here the quality of welding is already important, we monitor the fullness of the bath, we try not to burn holes. We clean the finished seams, primer, paint
Having laid the sash on a flat horizontal surface, we weld all the seams
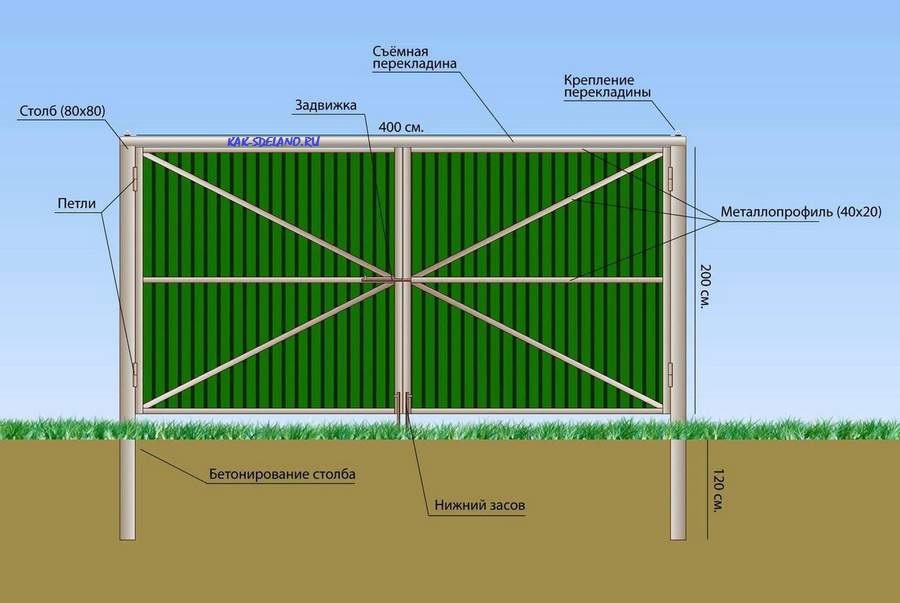
We proceed to the assembly of the support for fastening the profile sheet. To reduce the windage, it was cut into two parts, so that the sheet is not solid, but cut. For this we use a profiled pipe 20 * 20 mm. We cut it into segments of the desired length, so that it can be fixed along the inner perimeter.


We cut a pipe 20 * 20 mm and fasten along the inner perimeter
We expose them in the same plane with the outer part - the sheet will be screwed from the inside. We fasten on self-tapping screws, having previously drilled holes of the required diameter.
How to fasten the strips for the profiled sheet
This is how the finished gate frame looks like
We paint the finished frame - inside with light gray paint, outside - red-brown, to match the color of the corrugated board. We leave to dry.
Painted frame
We proceed to the installation of the profiled sheet on the gate.It is cut a little smaller than the main frame - there should be an indent around the perimeter by 2-3 mm. They are laid on prepared supports and fastened from the inside along the perimeter to self-tapping screws.
Installation of profiled sheet on the gate
You can take special ones, with hats and gaskets, but they put them on ordinary ones.
To save money, we used ordinary self-tapping screws for metal
We can say that the gate is ready.
Almost ready
It remains to install constipation. You can, of course, embed a lock and a handle, but the quality of inexpensive ones is very low, and taking expensive ones is currently an unaffordable luxury. Therefore, bolts were welded from the remains of pipes and fittings. They definitely work under any conditions.
Homemade bolts
One (upper) is mounted on self-tapping screws with a counterpart on the sashes, the two lower ones are attached to the uprights. Small holes were drilled in the ground in the right places, in which segments of round pipes were concreted, the diameter of which was larger than the diameter of the rod. The gate is made according to the same method, only a lock is embedded in it.
Do-it-yourself ready-made gates from corrugated board
With this manufacturing technology, the gate leaves are guaranteed to open and close. If there were some distortions when installing the pillars, they are taken into account. With a step-by-step presentation, the whole process does not look complicated, and indeed it is. If you weld all parts separately, the geometry must be perfect, and you also have to make sure that the pipe does not lead during welding. See several different technologies for making gates from corrugated board in the next section, which contains video tutorials.


From the profiled sheet, you can make sliding gates and equip them with automation.
Making a gate from corrugated board with your own hands
Since we will weld the gate to the existing supports, we will not have to concrete the posts, which will greatly facilitate and speed up the work.
List of materials and tools
To install a gate from a corrugated board, you will need a minimum of materials and only the most necessary tools:
- metal profile - sheet C21-1150 with a galvanized or polymer coating - working width 1 meter, length 2 or 2.2 meters;
- metal square pipe - section 40x24 mm;
- two metal door hinges (possibly polymeric) - ɸ30 mm;
- deadbolt and street mortise lock.
- gas or electric welding;
- Bulgarian;
- cutting and grinding wheel for metal;
- screwdriver and powerful drill;
- rivet gun;
- paint and brushes;
- plumb or building level, tape measure 5 meters;
- construction angle;
- Screwdriver Set.
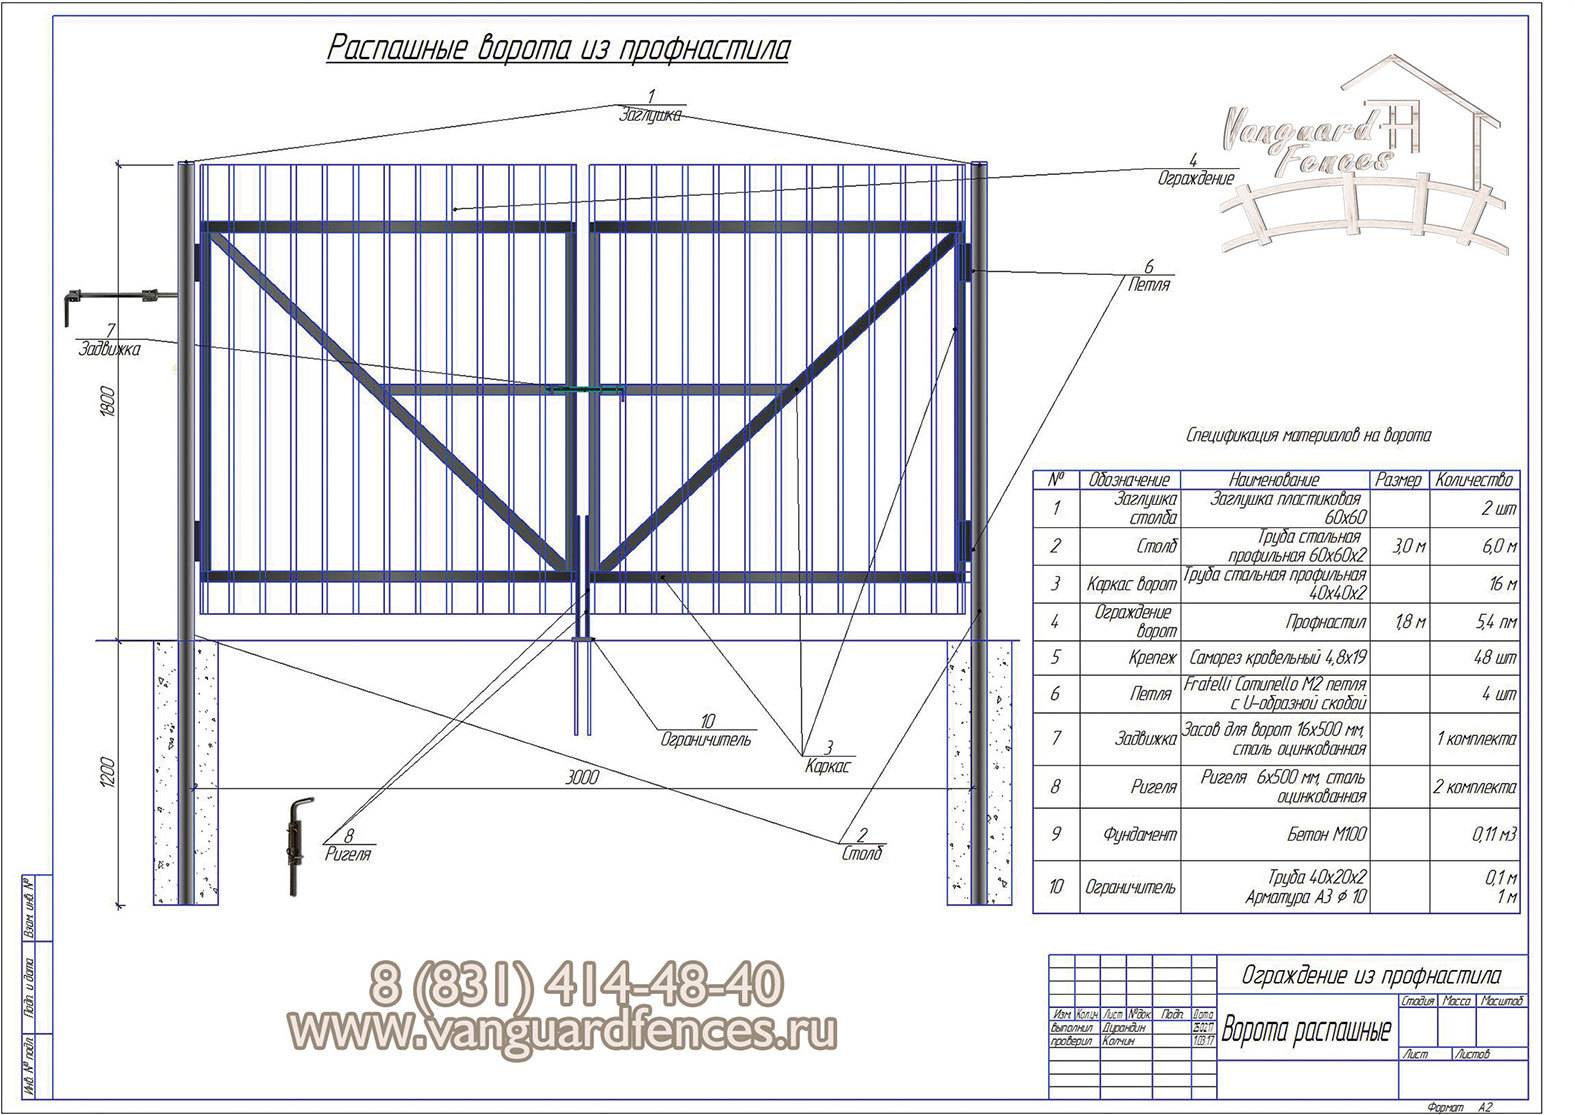
Stages of manufacturing a swing gate
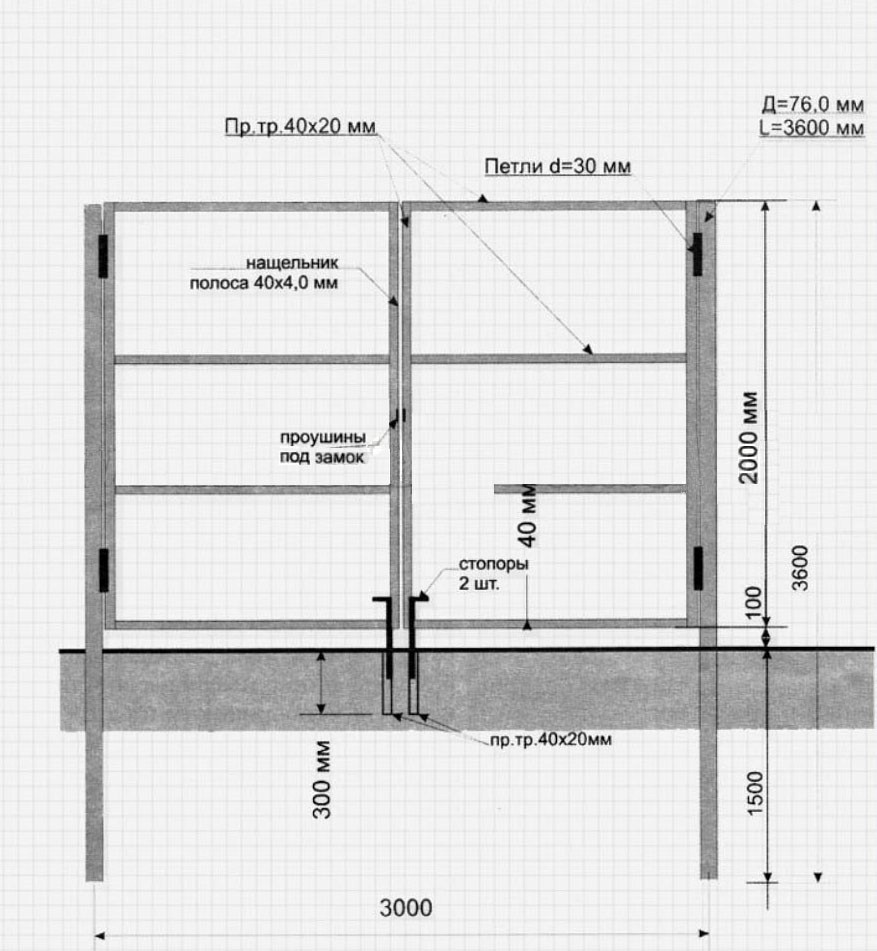
We present a method for constructing a swing gate made of metal pipes and metal profile sheathing directly on the support poles.
-
First, we mark the place where we will install the gate and make an opening in the fence of a certain width between two metal supports. In the future, we will weld pipes to them, which will form the frame of the gate. Choosing such a scheme, we will initially be sure that the finished gate will fit exactly in all respects. Then the problems that arise when welding the gate in another place will not appear.
-
We weld the preliminary frame of the fence in accordance with the measurements taken. The distance between the supports must be more than 1 meter in order to get a 1x2 meter gate. In order to avoid deformation and roll of the frame, we weld it to the support pillars in several places.
-
We weld the upper part of the hinges to the vertical rack of the frame.This is necessary in order to see at what level they should be.
-
To reinforce the pipe structure, we mount a crossbar in the middle from the same square pipe. All angles must be 90°.
-
We check them with a corner or level.
-
After we made sure that the frame turned out to be even and correct, we cut it off at the welding points and put it on a flat surface.
-
We cut off all the extra pieces with a grinder and boil all the seams again.
-
Then, using a grinder and a grinding wheel, we clean the joints.
-
After that, we clean the attachment points by welding the lower elements of the hinges on the supports themselves to remove rust.
- We weld the lower element of the upper loop, then hang the frame and weld the second part of the loop on top already in place. If the wicket frame is welded correctly, it will be free and easy to open and close.
- We remove the gate and weld the hinges more carefully, and then we clean all the seams. During welding, it is necessary to enclose an asbestos sheet or ordinary cardboard so that sparks and scale do not fall on the fence corrugated board.
-
We mark out a place for a mortise lock on the frame of the gate according to the drawing and cut it out with a grinder. The lock and handles are installed at a height of 80–90 cm from the ground.
-
We cut out the holes and fasten the striker of the lock with a screwdriver. We check the operation of the lock, the ease of opening and closing the gate. Then we paint the structure with a protective anti-corrosion paint.
-
We take corrugated board, previously cut to size, and using a drill and a rivet gun, we attach it to the frame of the gate. Alternatively, roofing screws can be used.
- If it is planned to install an overhead lock, which will be located on the inside of the wicket frame, we place the mounting holes for it on the crossbar of the frame. We drill holes in the profiled sheet using the “drilling along the contour” method, and then additionally process it with a cutter. To fix the lock in the cross member of the structure and the plate welded to it, using a drill with a drill and a special tap, we make a threaded hole for installing the screw.
- We install decorative overlays with handles on the lock.
- We make a limiter for the gate. To do this, we install a metal blank inside the opening, which we cut off from the pipe.
You can assemble such a gate with the help of a partner within a few hours.
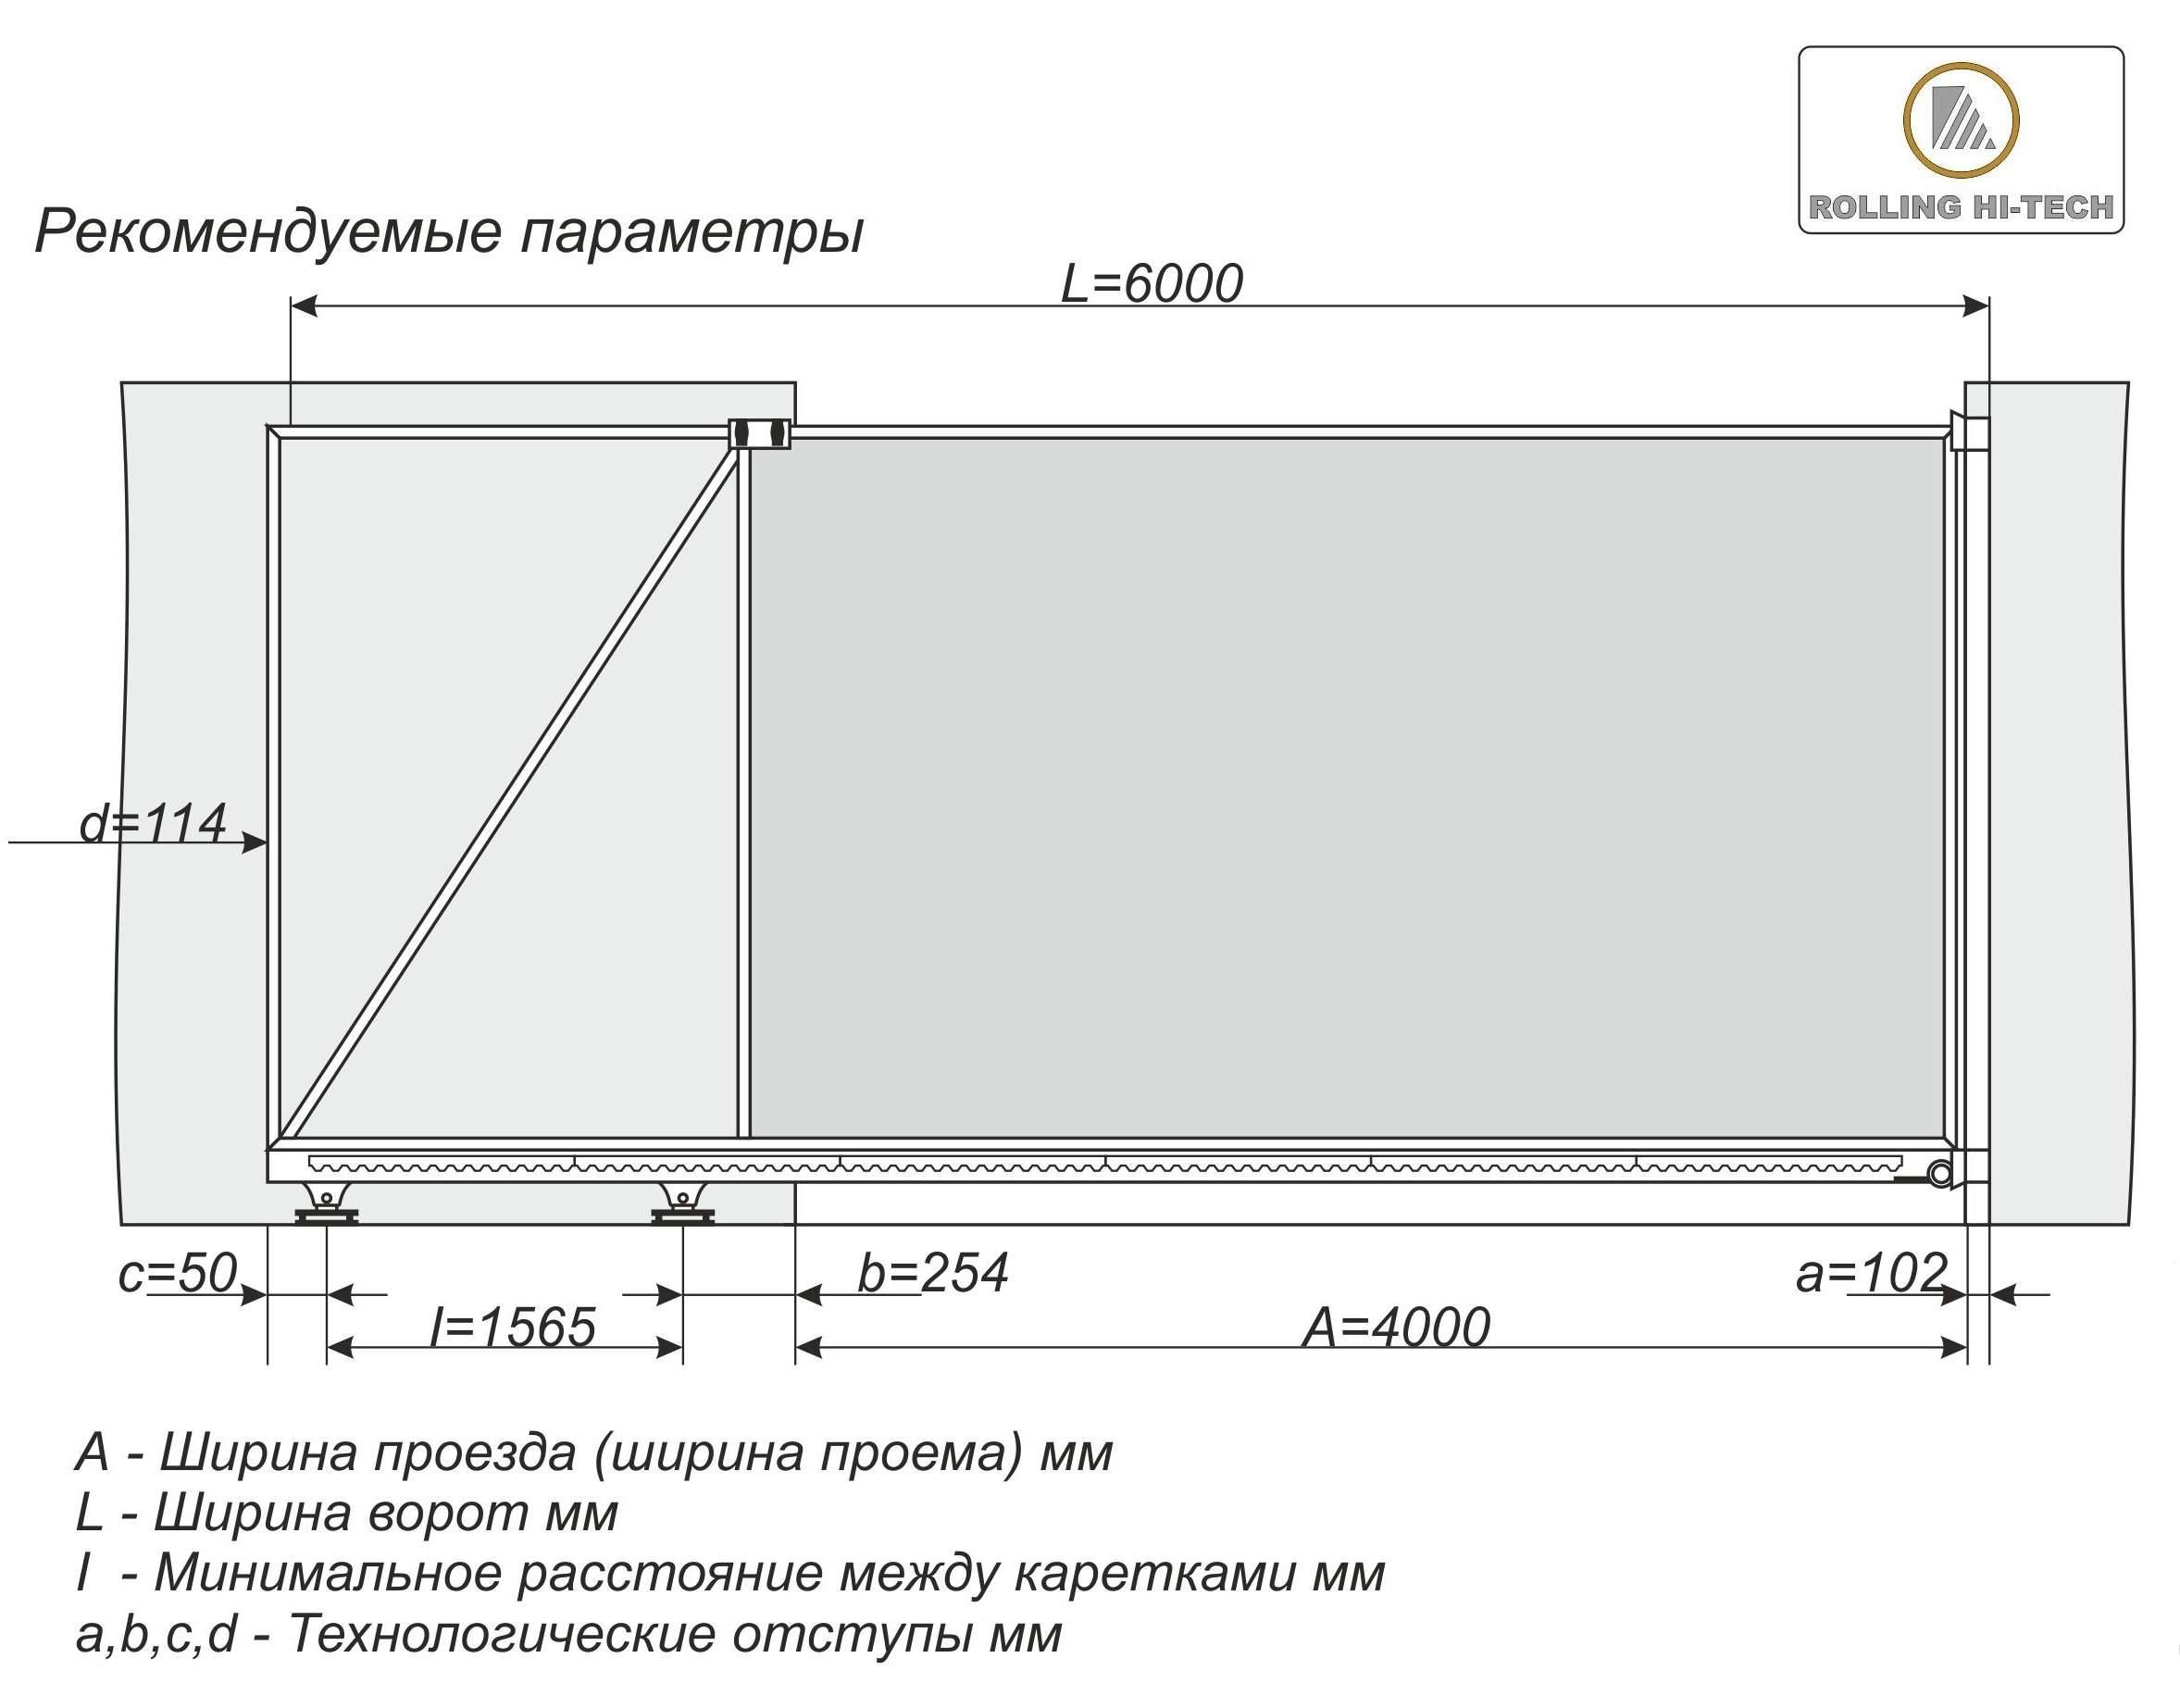
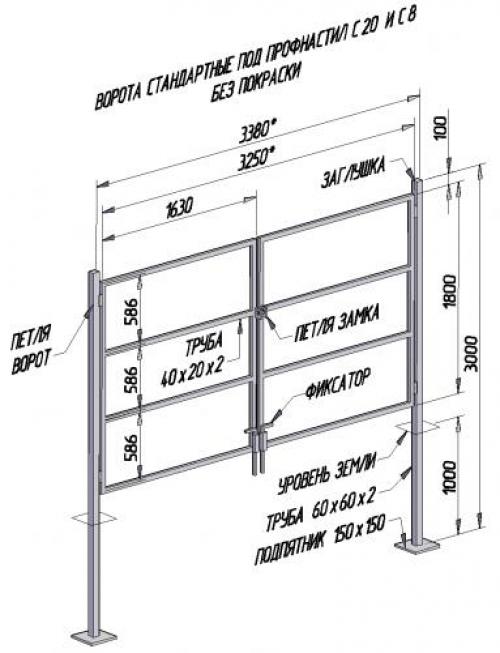
Drawing of sliding gates from corrugated board
Standard cantilever retractable metal profile gate consist of a sash that closes the passage, and a counterweight. The width of the sash is equal to the width of the passage, measured along the inside and increased by 200 mm - 100 mm on both sides is allocated to the overlap of the support. The width of the counterweight must be at least half the passage
This is very important because the counterweight bears all the load during the opening and closing of the gate. If it is made shorter, the gate will wedge, the guide will be deformed, and the roller carriages will wear out quickly.
Therefore, if you cannot take half of their width to the side of the gate to accommodate a counterweight, cantilever sliding gates from a profiled sheet are not your option.
Example
If the opening width is 3 meters, then the rectangular part of the gate should be 3.2 meters, counterweight - 1.5 meters, and the total width of the frame - 4.7 meters.
Sliding gates have two frames: bearing and auxiliary.
The load-bearing frame, as the name implies, bears the main load. These are all sides of the counterweight, as well as the outer sides of the sash. The supporting frame is made from a pipe 60×30 mm.
Auxiliary frame - this is the stiffeners for the structure, as well as pipes for fastening the corrugated board. This frame consists of an internal rectangle in the sash, horizontal and vertical stiffeners located approximately every meter. It is made from a profile 40×20 mm.
The last thing you need to know to create a drawing of a sliding gate from a profiled sheet is the shape of the counterweight. It can be triangular and rectangular, and it depends on the width of the opening and the total weight of the gate.
A triangular counterweight is made with an opening up to a width of 6 meters and with a weight up to 400 kg. The profiled sheet is a very light material, so the weight requirement is usually lowered, focusing only on the width of the passage. Even if we are talking about high gates, for example, blocking the entrance to a warehouse or workshop. Although you can calculate the weight to be sure.
To do this, you must first calculate the weight of the frame, taking into account that the steel profile pipe 60×30 mm with a wall 2 mm weighs 2.7 kg per linear meter, and the profile 40×20 with a wall 2 mm — 1.81 kg per running metre. Then you need to add the weight of the corrugated board to it - 4.5 kg on the 1 m² at thickness 0.45 mm.
Example
How much do sliding gates weigh? 4 meters from corrugated board of standard height in 2 meters. For them you need:
- 17.22 m pipes 60×30 mm (lower profile length - 6.2 m, top - 4.2 m, side - 2 m, hypotenuses as opposed to - 2.82 m);
- 22 m pipes 40×20 mm (length of the lower, upper and central profile - 4 m, two side and three stiffeners - 2 m);
- 16 m² profiled sheet for sewing the sash on both sides.
Therefore, the weight of the sliding gate 4 meters from corrugated board will be equal to:
where X - the desired gap between the slats. We get that the pitch should be approximately 67.3 mm.
Please note: the mass of the guide is not taken into account in the calculations, since, like the rollers, it is selected based on the weight of the frame. Using this method, you can easily calculate the approximate weight of the gate according to your dimensions.
But since there is not always time for this, we have already calculated the mass of sliding gates of common sizes for you and summarized it in a table
Using this method, you can easily calculate the weight of the gate according to your dimensions. But since there is not always time for this, we have already calculated the mass of sliding gates of common sizes for you and summarized it in a table.
| Width gate, m | Height gate, m | The weight, kg |
| 3 | 2 | 124 |
| 4 | 158 | |
| 5 | 193 | |
| 6 | 228 | |
| 3 | 3 | 164 |
| 4 | 209 | |
| 5 | 255 | |
| 6 | 300 |
As can be seen from the table, the weight of the sliding gate 5 meters from corrugated board, like sashes, with a width 6 meters, far from 400 kg even at height 3 meters. Therefore, feel free to make a triangular counterweight for any gate, including high ones.
Now that all the details of the future drawing are known, draw it or put your dimensions on the sample below. Apply dimensions taking into account the section of profile pipes.


In our example of a drawing of a sliding gate from a profiled sheet, there are no pillars - this is only a diagram of the gate itself. If you want to get a drawing of the entire entrance group, keep in mind that the foundation under the counterweight is always set to zero. Therefore, you must know the finish level before making such a drawing.And if you need sliding gates made of corrugated board with a gate, then it is better to place it on the side of the counterweight so as not to overload the roller carriages too much.
The nuances of the device of different types of entrance gates
According to the degree of openness of the canvas, the gates are divided into free, curtained and combined.
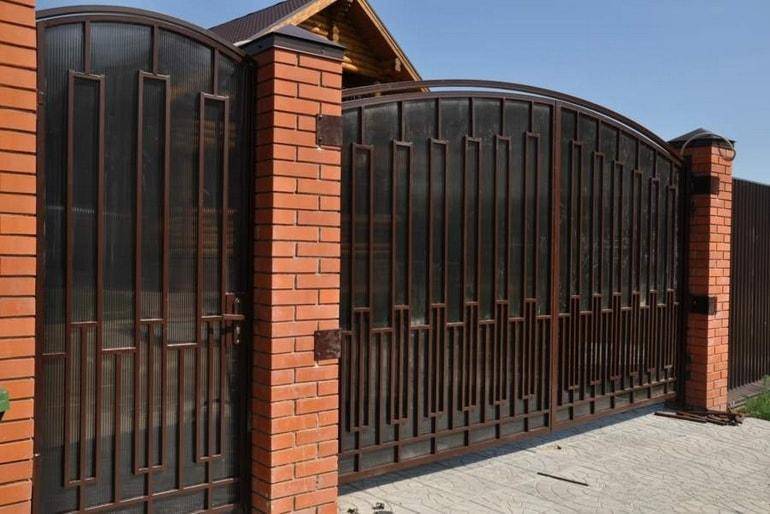
Deaf gates provide reliable protection from drafts and prying eyes. This option is the most popular. To make the fence attractive, an additional decor made of metal or wood is provided.
 The strength and reliability of the gate and the fence excludes the possibility of uninvited guests entering the private territory.
Free structures provide overlapping view of the site. In the manufacture of openwork fabrics, artistic forging is used, all elements are made in the same style. More simple designs are made of chain-link mesh or wooden picket fence. In the manufacture of translucent structures, polycarbonate is used.
 For the manufacture of the gate, the same material is used as is involved in the installation of the entire fence.
Combined entrance gates are made of different canvases, the bottom gate is deaf, and the upper part is decorated with forged elements.
It is important to consider the compatibility of two (or more) materials so that there are no problems during installation.
Sliding gates
After preparing the drawing, you need to stock up on the following:
- guide beam (its length is 1.6 of the total width of the opening, the thickness is selected according to the weight of the sash);
- 2 roller carriages;
- lower and upper catchers, as well as a special board (prevent the rocking of the structure);
- end roller, which makes the movement of the gate silent and reduces the load in the open state.
Dimensions are defined as follows:
- web width (together with a counterweight) - multiply the opening by 1.6;
- the height of the gate is not more than 200 cm (it is desirable that they protrude 100 mm above the fence);
- the length of one counterweight - the size of the opening is multiplied by 0.5.
The depth of the foundation is 1 meter. The metal channel in the prone position is fixed in the trench. Then the solution is poured.
The frame for the gate is constructed from tubes measuring 60 by 30 mm. For retaining jumpers use 40 by 20 mm. The material is cut in the same way as described earlier. Welding is carried out in the usual way.
Further:
- install internal spacers (crate);
- we sheathe the structure with corrugated board;
- we fix the rollers and traps;
- put the gate in place and check their performance.
Swing gates: types and design features
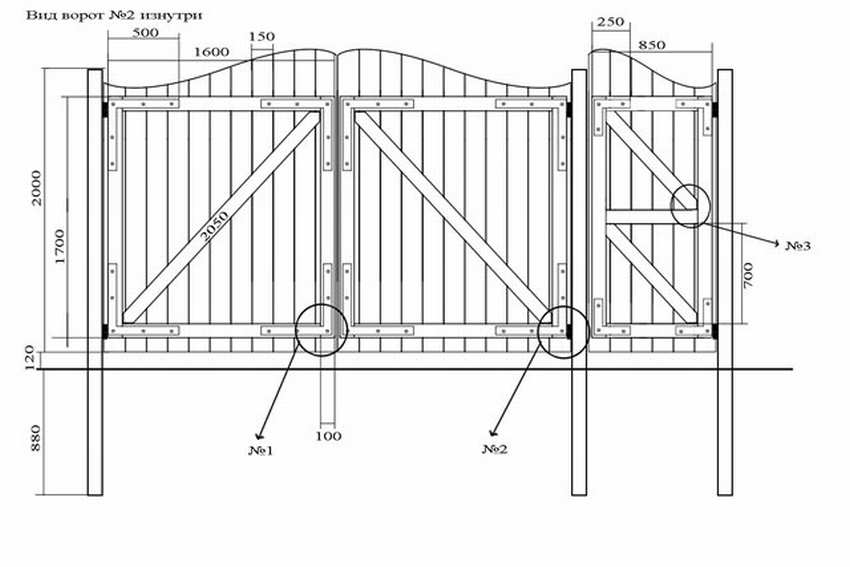
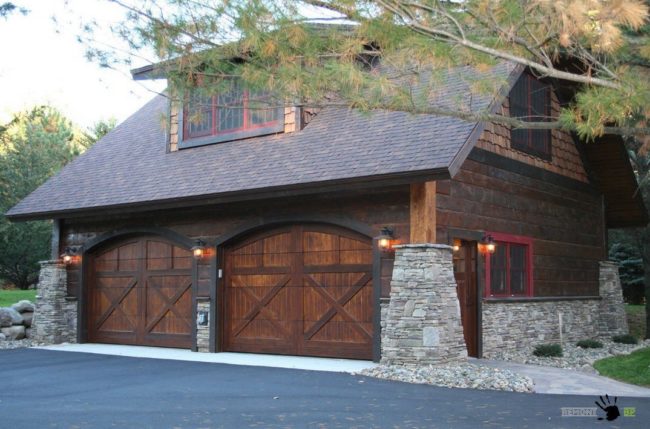
According to the design features, bisexual and single-leaf gates are distinguished. Often in garages, hangars and warehouses, a combined version is used - with two wings and a gate. So the territory and materials for the device of a separate entrance are significantly saved.

In garages, they usually put a gate with two wings and a gate
In most cases, we find structures made of metal sheets or wooden picket fences, and only in some public places (hospitals, government organizations and institutions, schools, kindergartens, etc.) - forged, tubular or lattice. They can also be mechanical or automatic.
-
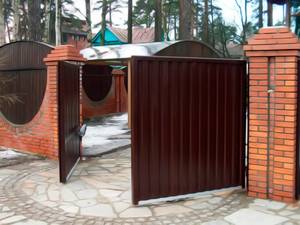
Metal gates can be made of corrugated board, aluminum (cheaper, but have a shorter service life) or steel sheets with a thickness of 1 to 5 mm.The latter are resistant to various damages, but are very heavy, so they require stronger support posts. Swing gates made of corrugated board are an excellent example of a reliable, durable and aesthetically attractive design that can be made in almost a few days from a minimum amount of material. The disadvantage of metal gates is susceptibility to corrosion with improper care.
-
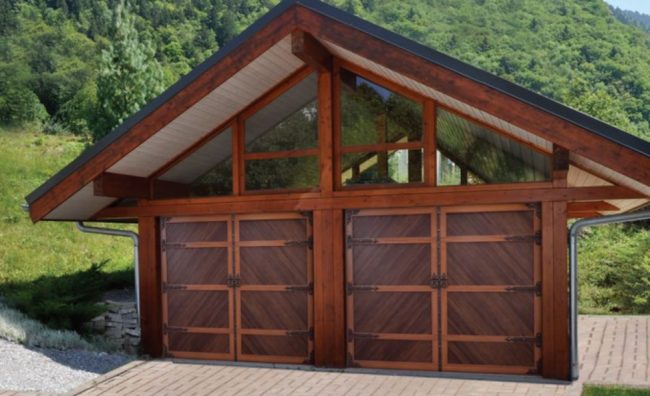
Wooden products are durable and reliable, have a great view. Their advantages are an acceptable price and long service life, and the disadvantages are a low degree of fire resistance and susceptibility to decay.
- Very often you can find a combined version - steel supports with metal doors, sheathed with wooden boards, which also serve as an additional element of strength.
-
Automatic swing gates with an electric drive simplify the process of opening and closing them, since this does not have to be done manually. The principle of operation of the electric drive consists in the operation of the gearbox, which sets in motion the lever that controls the swing gates. Typically, an automatic installation is equipped with a signal light, an electrical unit, photocells and the lock itself.
Electric drives in automatic designs are divided into three types:
-
Lever. They are equipped with a curved lever that sets the sashes in motion. This is a simple and inexpensive drive that meets all the requirements of strength and reliability. It allows you to open gates weighing about 1 ton.
-
Underground. They are quite difficult to install and maintain, so they are rarely used.
-
Linear. They give swing gates an aesthetic appearance due to the fact that the lever is tightly mounted to a metal or wooden leaf.They have a large power reserve, so they are more expensive than lever ones.
Swing gate device
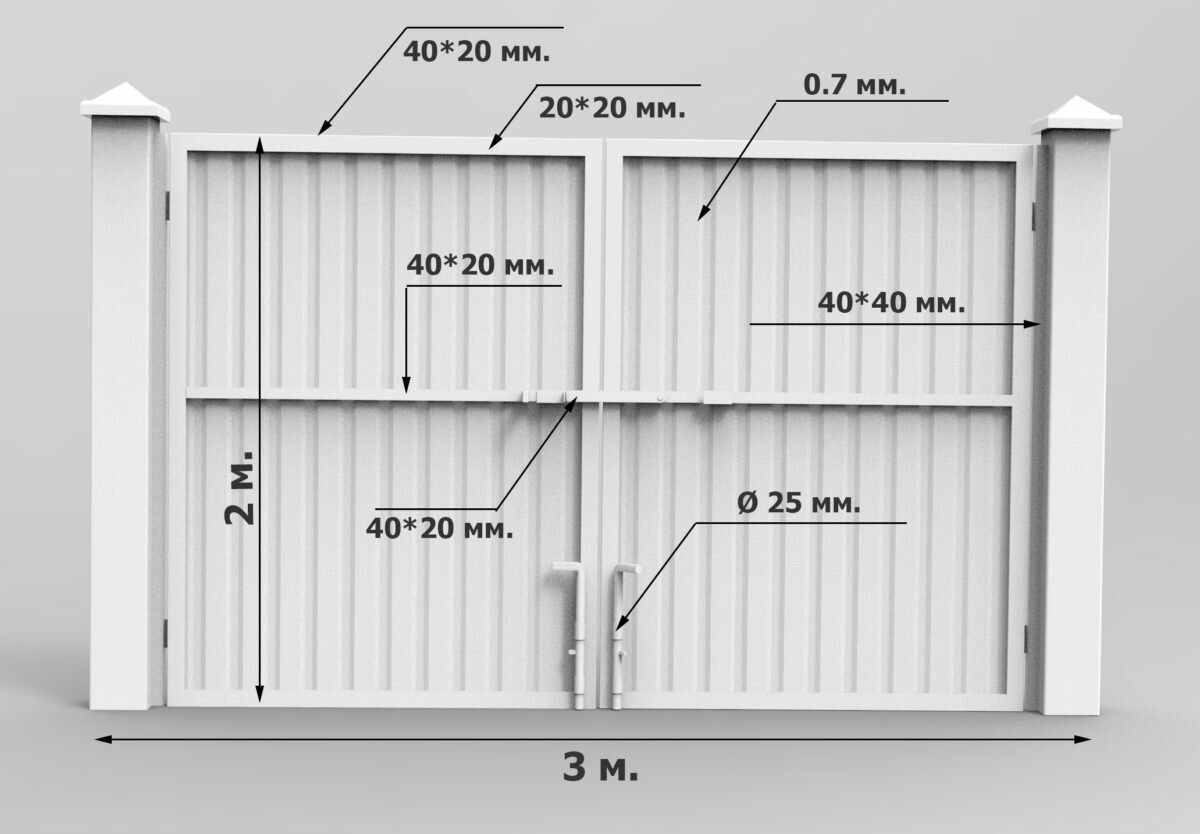
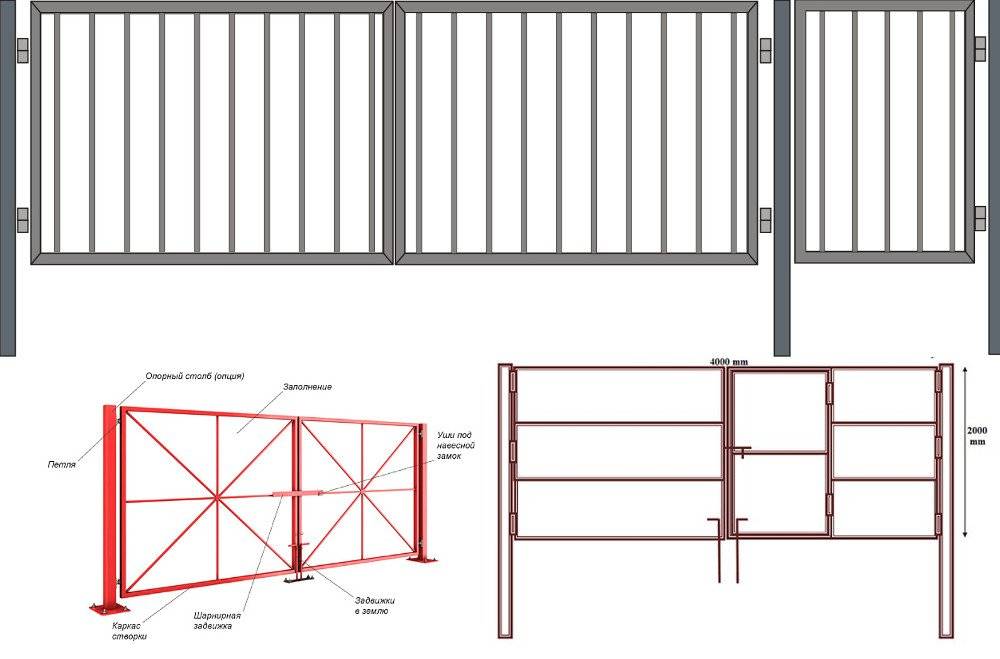
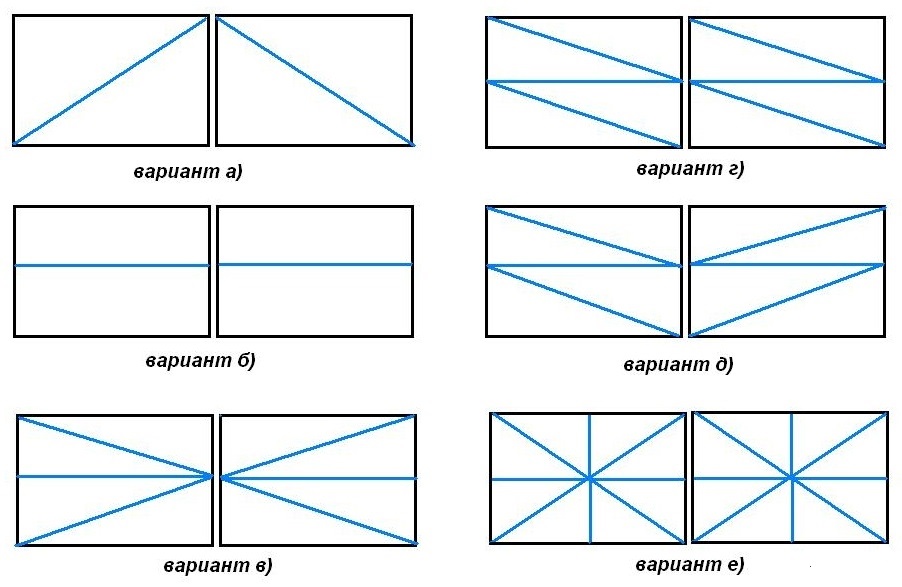
The design consists of a frame made of a round or square pipe of a certain diameter and section and sashes, each of which can have:
-
one or two veins horizontally to enhance the strength of the structure;
-
one horizontal and two diagonal stiffeners.
The optimal width of the gate is 3 meters. This distance is sufficient for the entry of any type of passenger car and even a truck. The height of the gate, excluding the rise above the ground, usually reaches 2 m.
Finishing and decoration
Finishing the gate can be very diverse. For this quality, many prefer the swing design. Finishing, first of all, depends on the main material of the paintings and the architecture of the building.
Metal gates are often coated with paint of one color or several colors, depending on the chosen design and the desired pattern.
Photo gallery: gate finishing options
Decorating with metal elements

Painting with paints
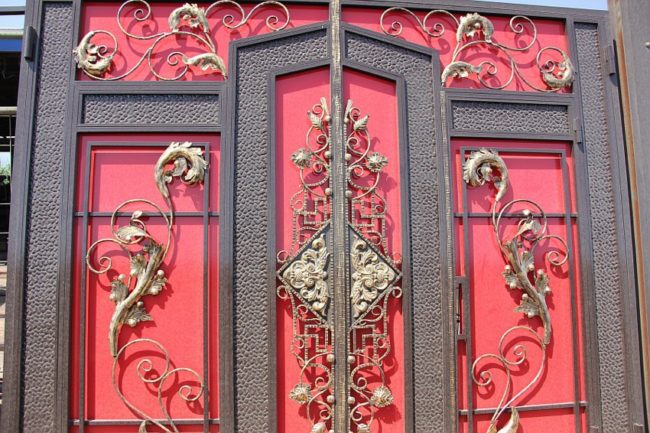
Forged elements decoration
In some cases, when it is necessary to achieve a unified style, metal gates are sheathed with wood. Wooden sheathing, in turn, is coated with paint or a protective compound that retains its natural color. As a decoration of the canvas, carved wooden or metal forged elements are used.

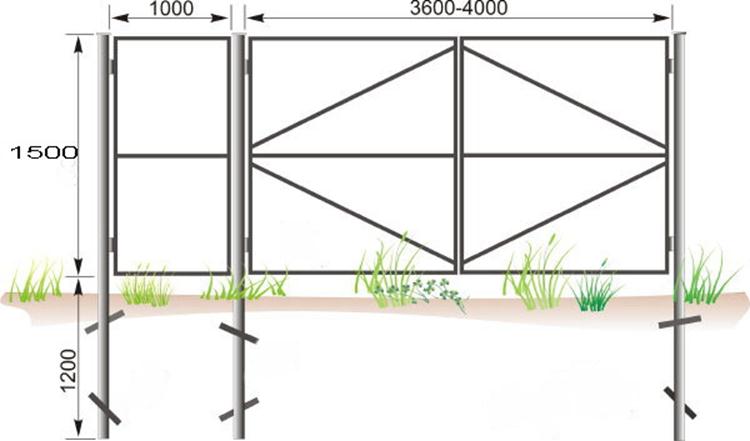


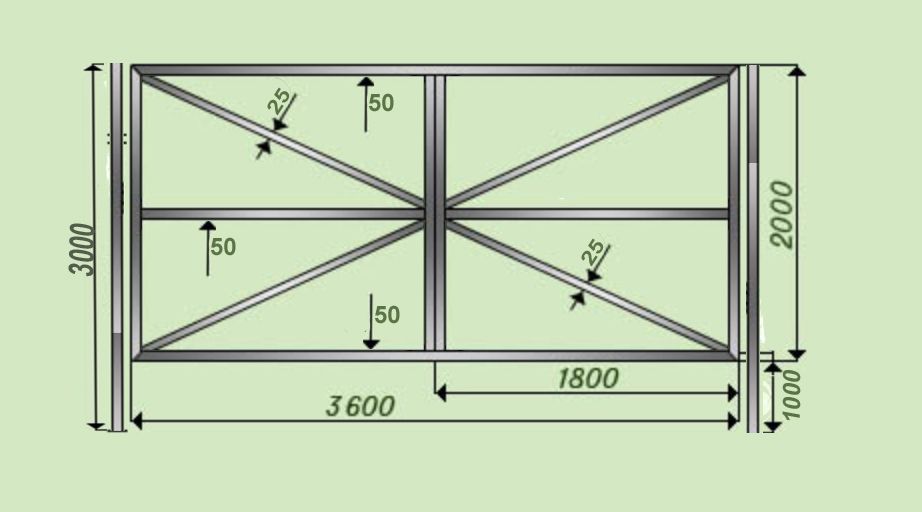
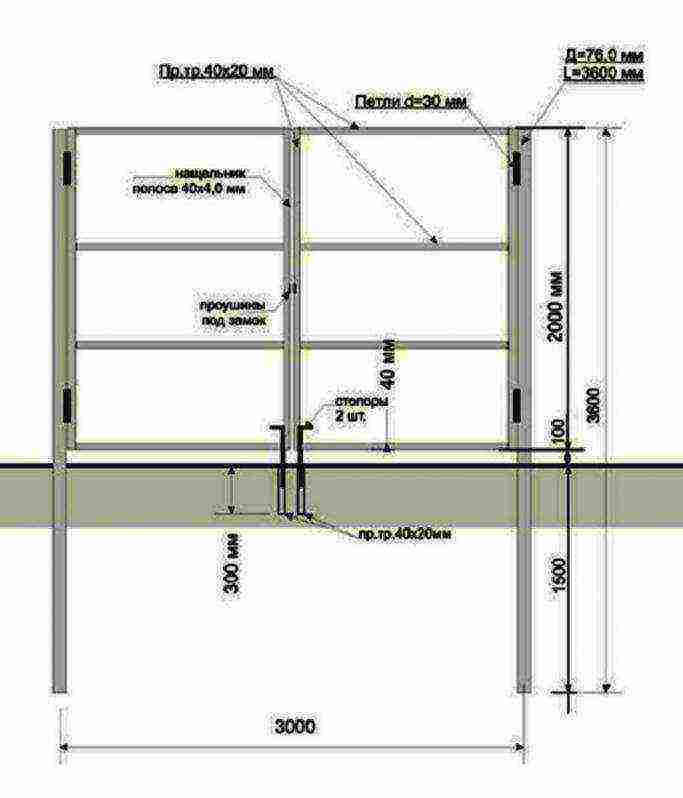


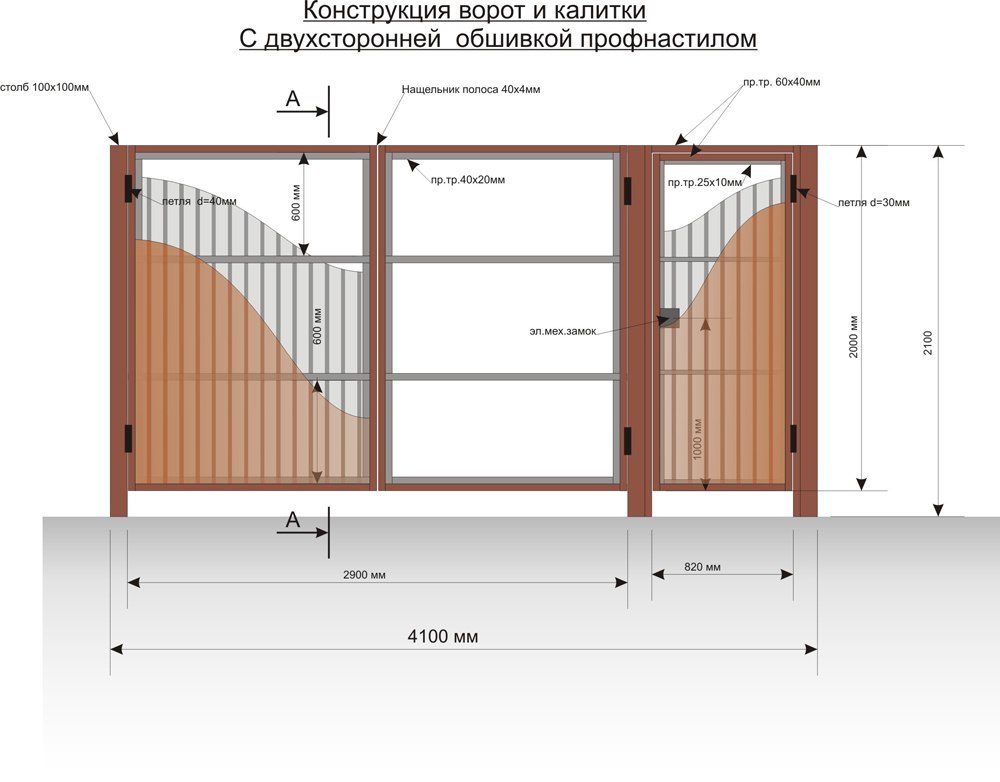
Photo gallery: swing gate options

Painting wooden elements in different colors
Use of wooden decorative elements
Combination of wood and forging
Carved wooden gate
It is important to remember that the coating of metal and wooden surfaces needs to be updated from time to time.With proper care, the gate will have a beautiful appearance and be used for a long time.
Step-by-step instruction
- For the manufacture of gate leaf frames, the corner is cut with a grinder into segments, according to the drawing.
- To properly weld the corners, prepare the conductor. On a flat platform, using a laser device, the corners of the future frame are marked.
- At the points of the vertices of the frame, corners (benchmarks) are driven in. The segments of the frame are laid out in the form of a rectangle, resting against the corners of the benchmarks.
- The laser corrects the horizontal position of the frame elements.
- Weld the corners into a single structure.
- The corners are covered with red lead.
- The frame is painted with enamel for outdoor use.
- The corrugated board is adjusted to the size of the frame opening.
- The profiled sheet is drilled together with the corner of the frame.
- Self-tapping screws are screwed into the holes using a drill with a wrench head.
- The transverse bar and braces are laid, and they are also attached to the corrugated board with self-tapping screws.
- In the same way collect the 2nd sash.
- The lower parts of the hinges are welded to the mortgages of the supporting pillars.
- The upper elements of the loops are welded to the side outer sides of the frames.
- The hinges are filled with grease.
- The sashes are hung on the hinges of the pillars.
- Attach the latch with locking loops.
- Install vertical stops.
This instruction is not a dogma. The owner of the house can make the frame differently and fix the corrugated board with rivets
It is important to control the verticality of the installation of the hinges in one plane, otherwise you can get distortions of the leaves of the leaves in the vertical plane, which will lead to a violation of the line of coincidence of the rotary elements with each other


