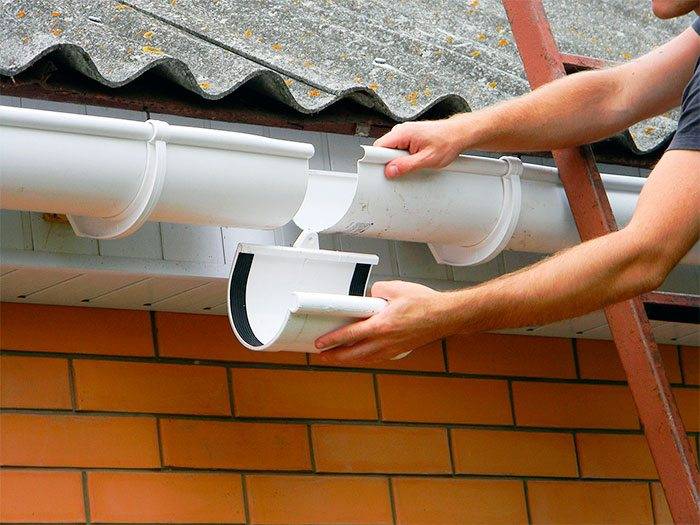
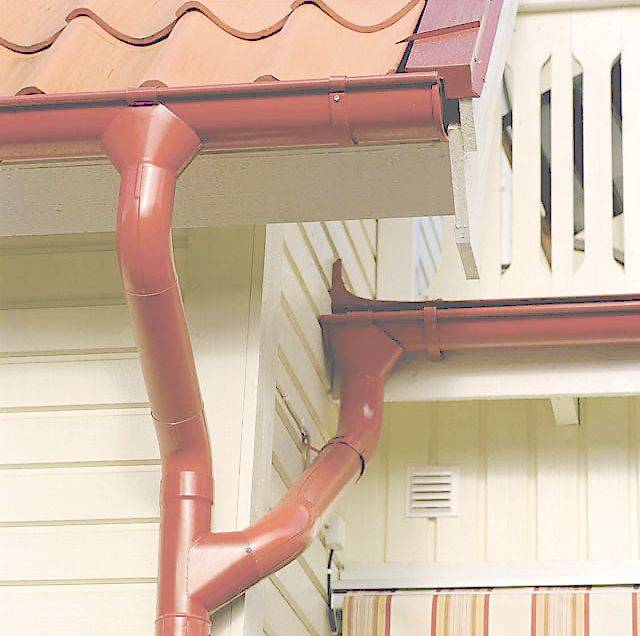
- How to make a gutter from the roof yourself
- Self-contained drainage from sewer pipes
- Design
- Installation steps
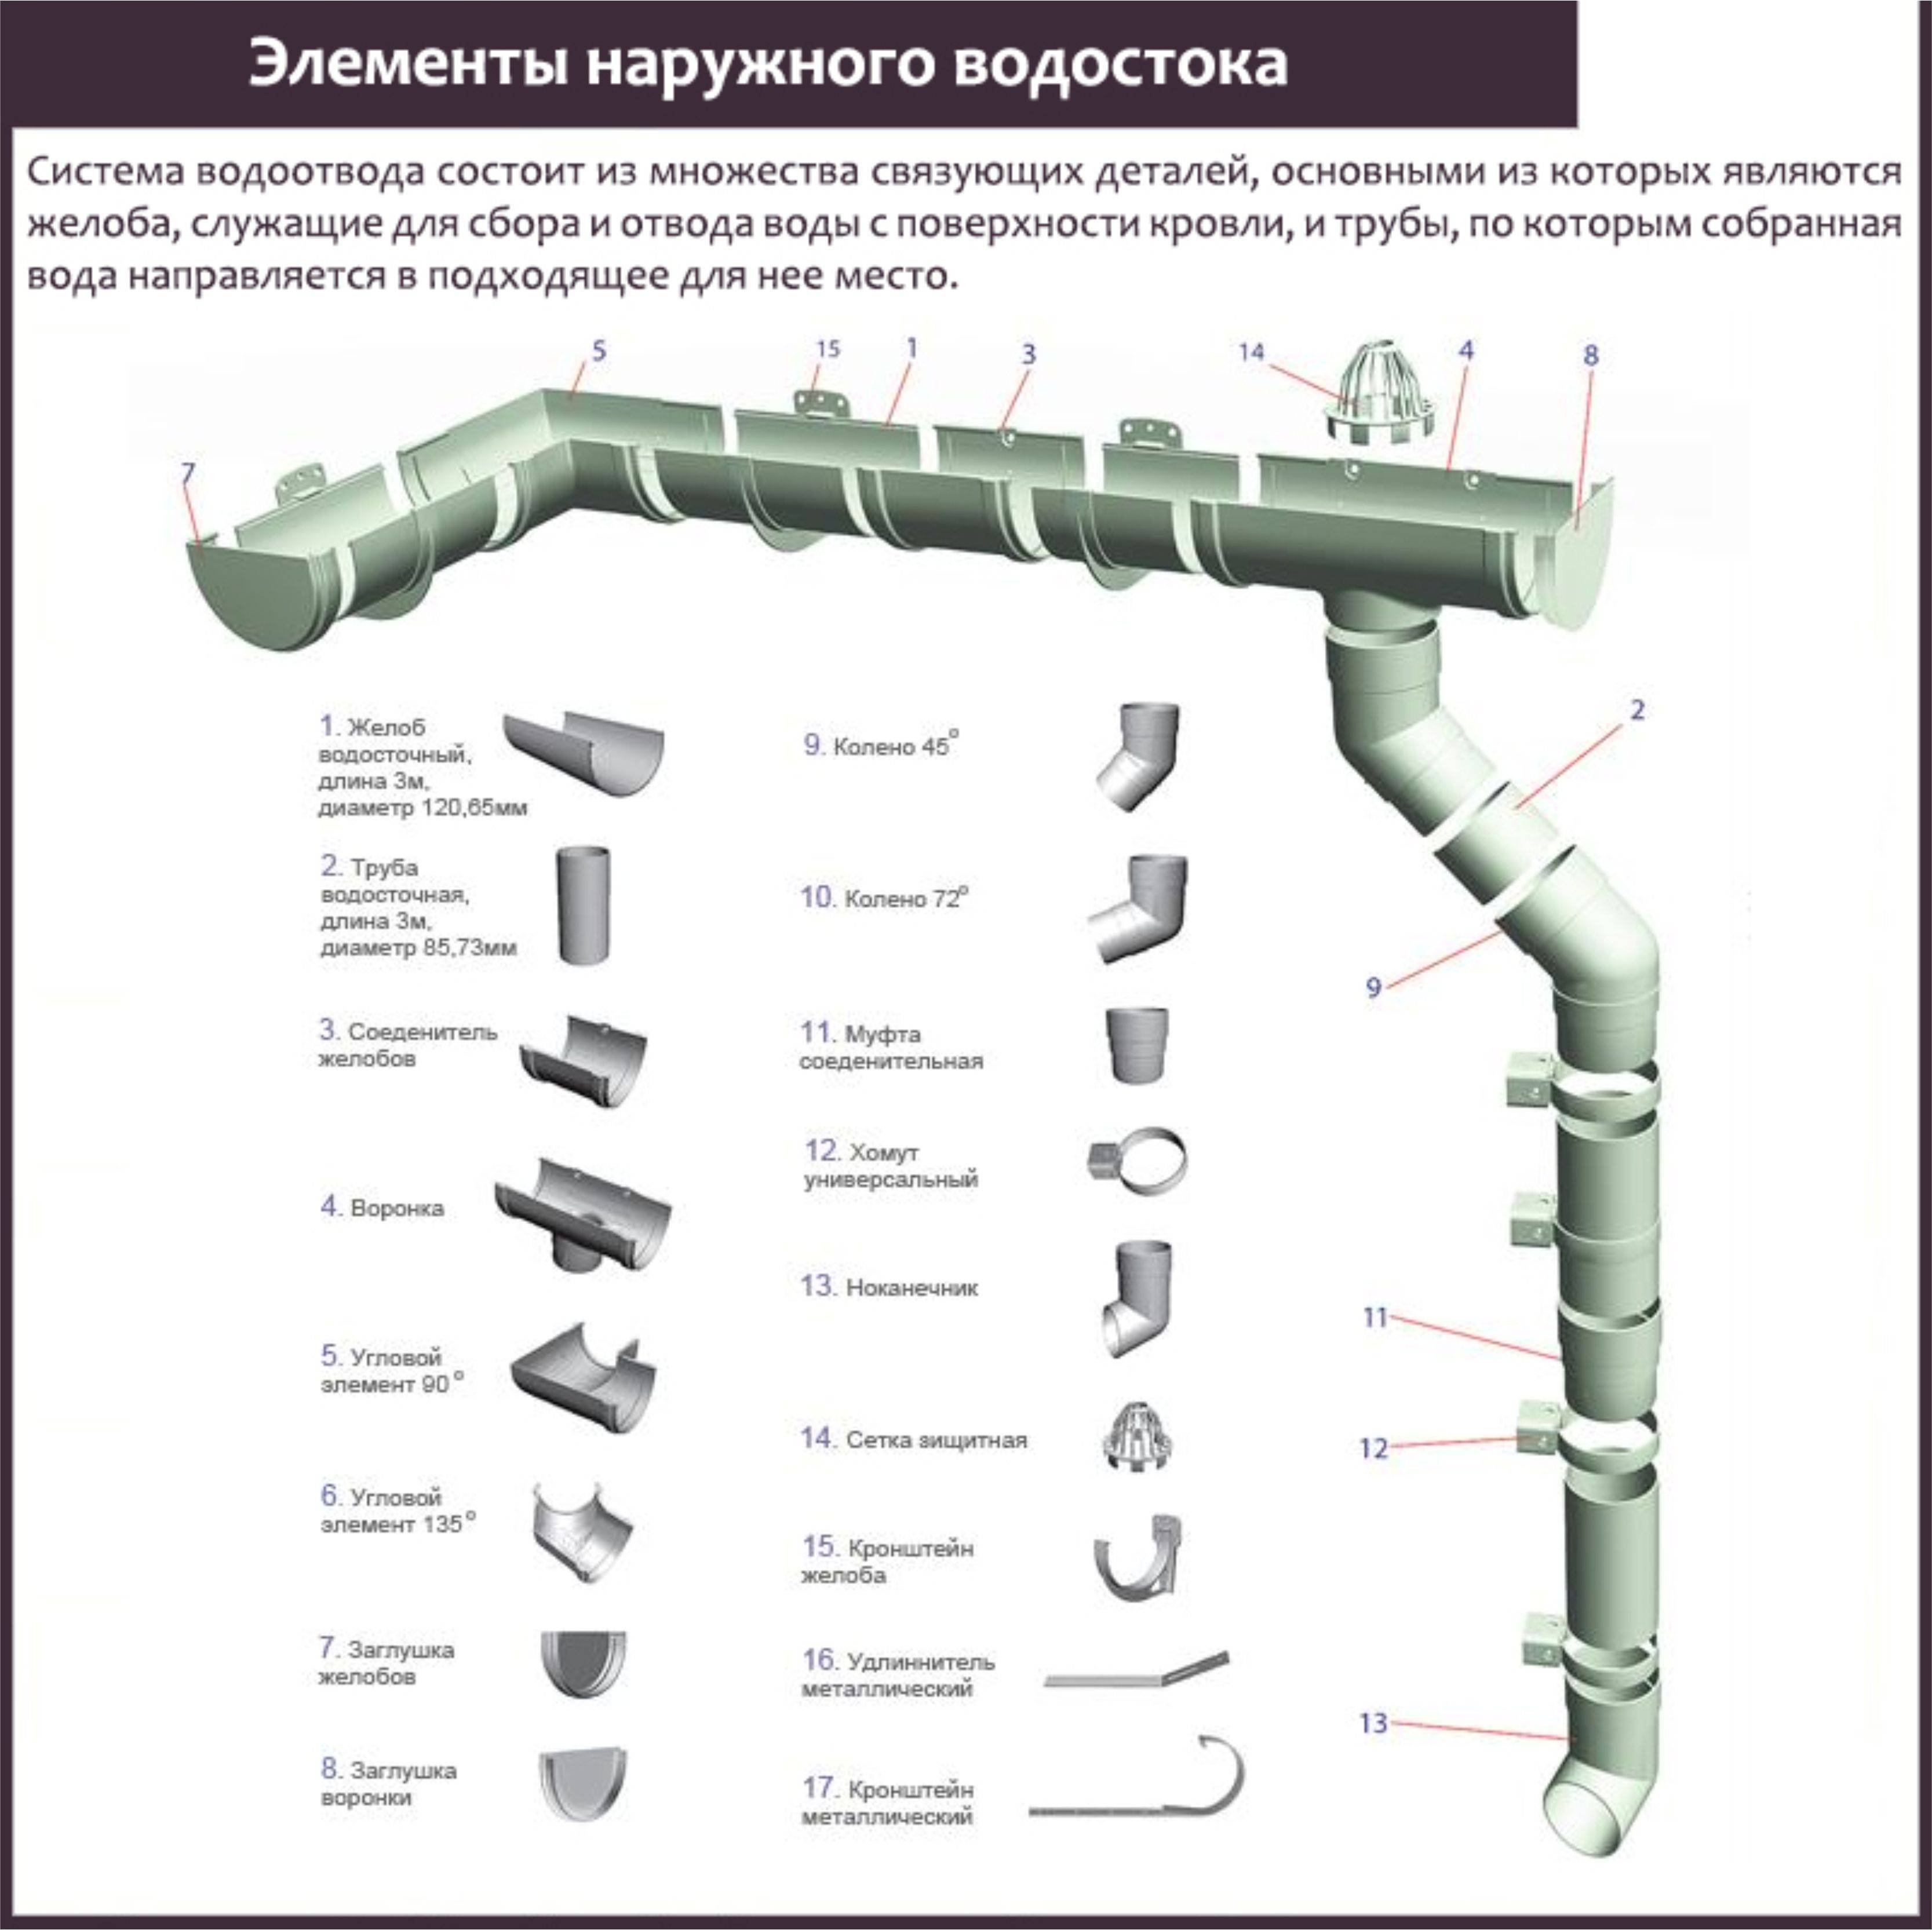
- Gutter elements
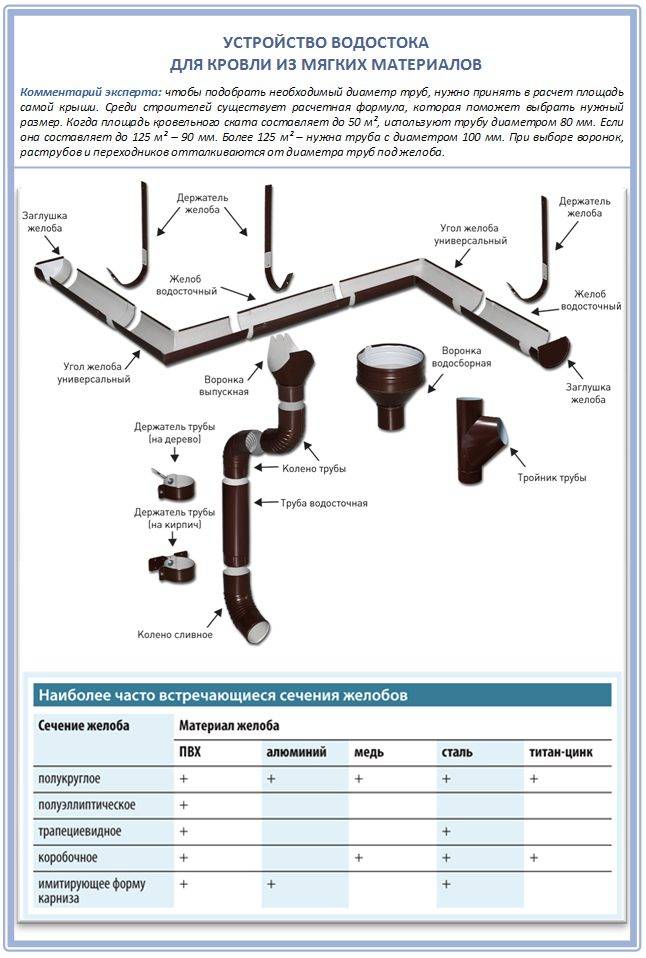
- Drainage from the roof for water - drainage device from pitched roofs
- 1. Draining water from the roof
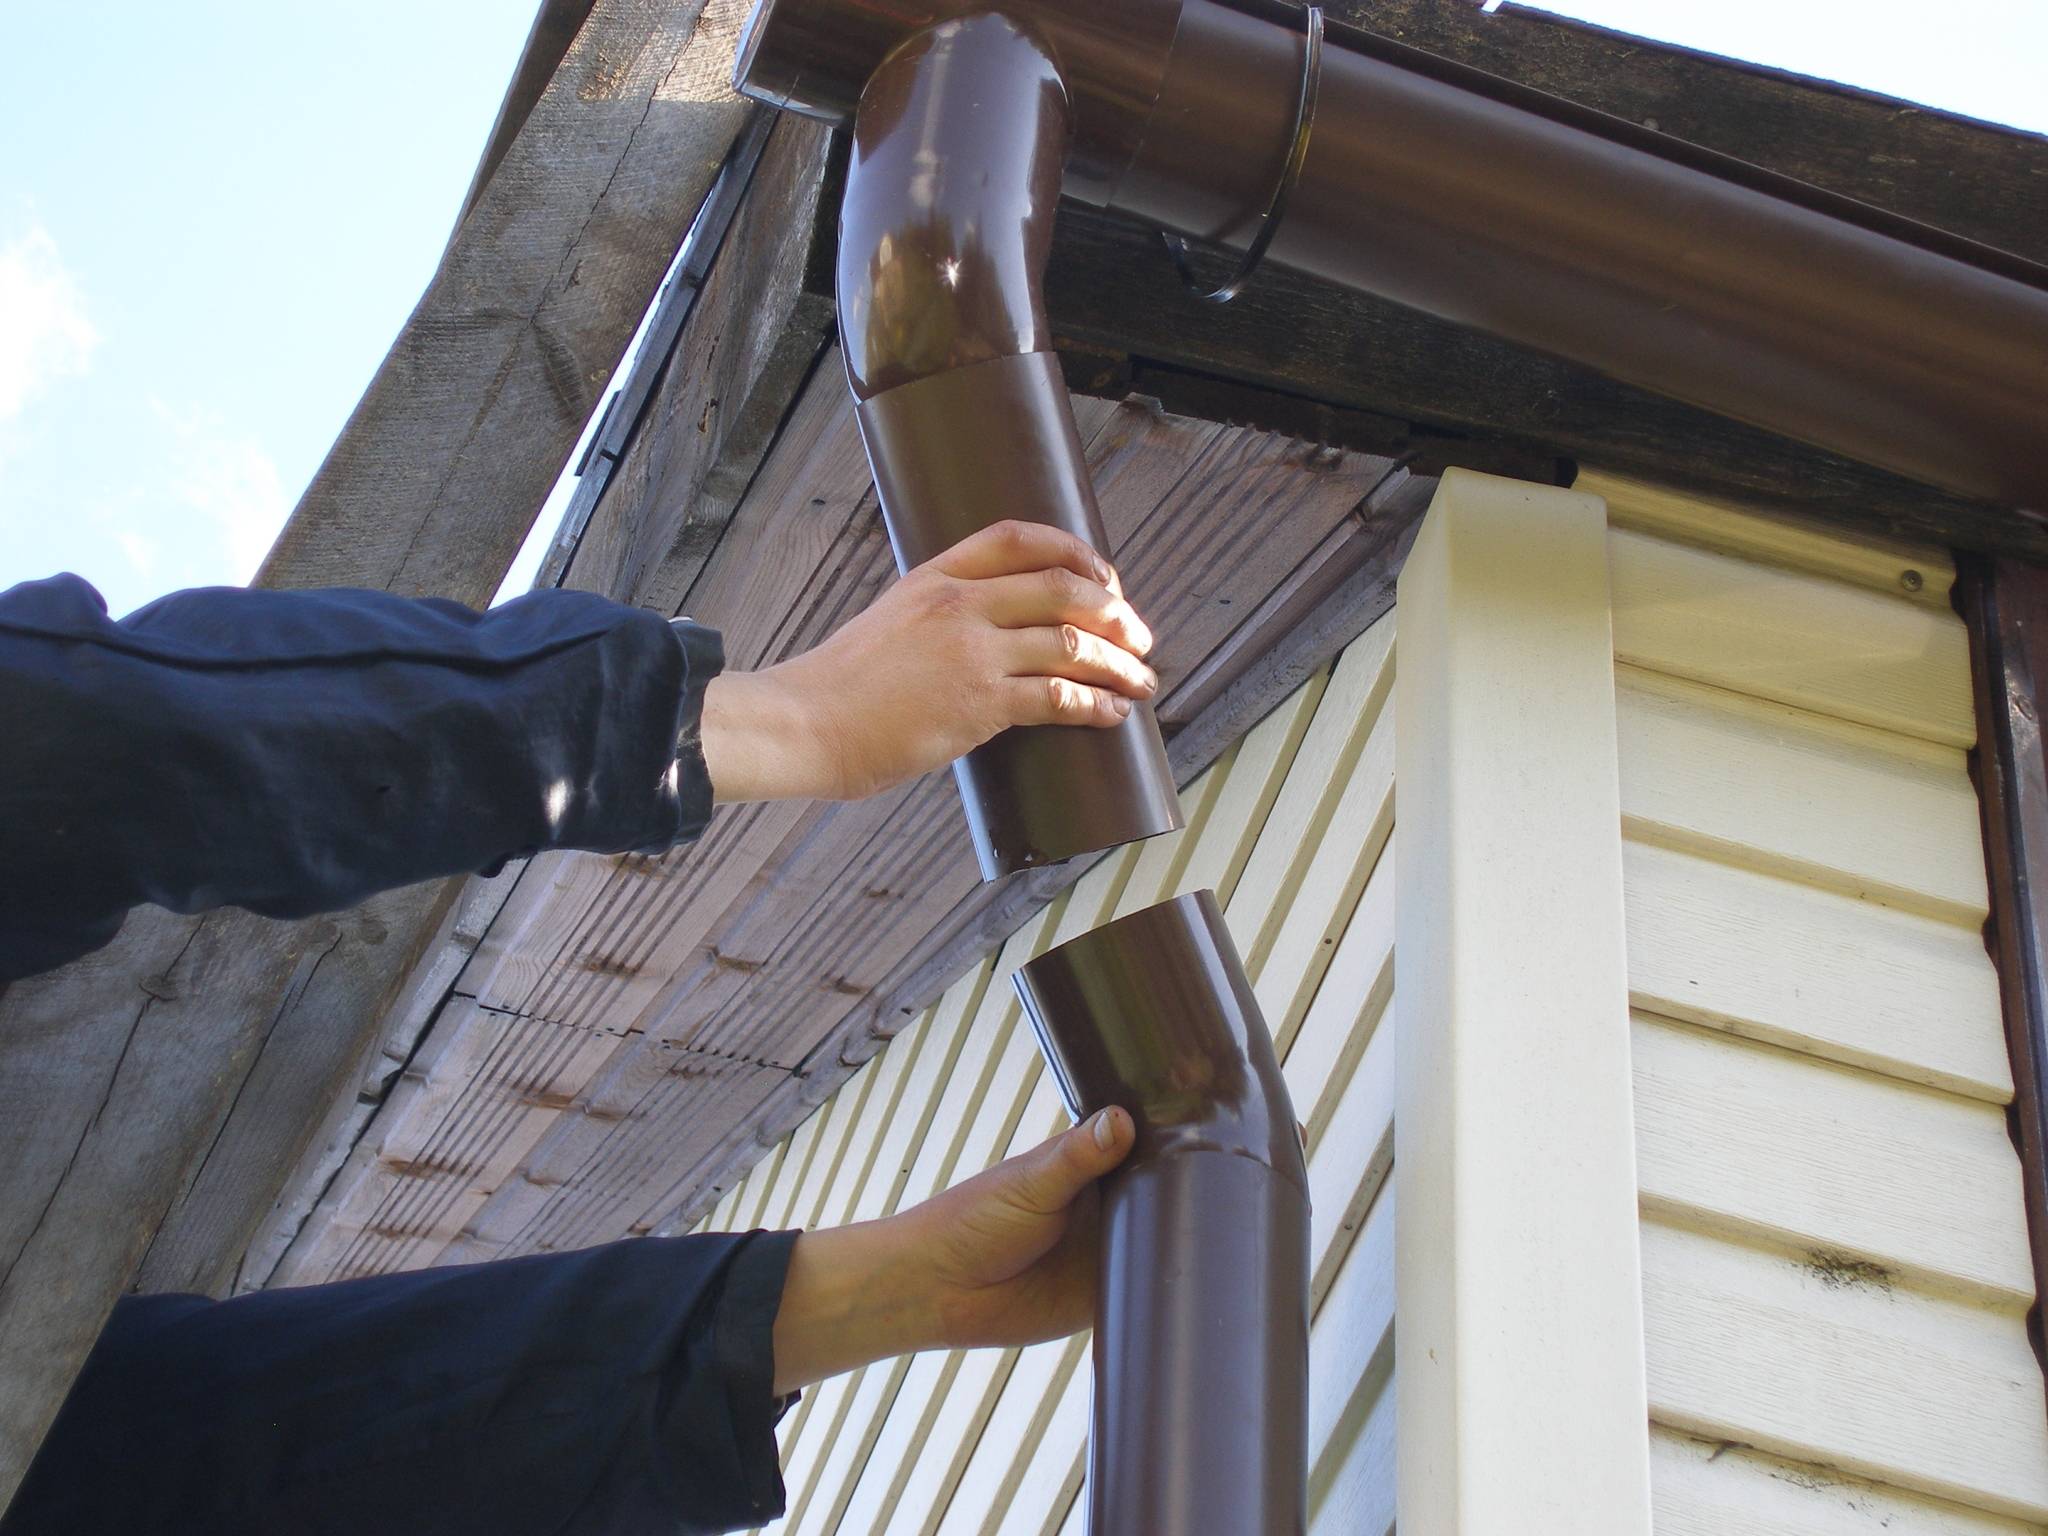
- 2. Place (node) adjoining the roof to the wall
- 3. Plumb roof
- 4. Components of the drainage system
- What does an unfinished drain look like?
- Installation Rules and Norms (SNiP)
- Features of the internal drain
- Structural elements of the drain
- Installation instructions for the drainage system
How to make a gutter from the roof yourself
Consider how to make a personal drain from plastic pipes, since this is the most simple and effective option. As practice has shown, the best materials for this business are plastic sewer and ventilation pipes.
To work, you will need the following tools:
- Bulgarian.
- Screwdriver or screwdriver.
- Roulette.
- Cord or thread.
- Self-tapping screws.
- Sandpaper.
- Level and plumb.
- Marker.
- Silicone sealant.
- Scaffolding or stairs.
And as materials you need to purchase:
- Plastic pipes with a diameter of 80, 90 or 110 mm, from which the gutters will be made. They are cut in half.
- Plastic pipes with a diameter of 50 mm, which will act as vertical drain pipes.
- Plastic fittings, which will be funnels, connecting the gutter and the vertical pipe.
- Corners and bends, thanks to which the gutters can go around the corners of the building, and change the direction of the vertical drain pipes to the desired location.
- Plastic plugs for pipes, which will also need to be cut in half.
- Plastic brackets and iron clamps.
First of all, you need to decide on the cross section of the pipes, which depends on the area of \u200b\u200bthe roof itself. There is a special calculation formula by which it is possible to determine the desired diameter. If the area of the roof slope is 50 m2 or less, then it is better to use pipes with a diameter of 80 mm. At a time when the area of \u200b\u200bthe roof slope is 125 m2 or less, then pipes of 90 mm are selected. And at a time when the area of \u200b\u200bthe roof slope is more than 125 m2, a pipe with a diameter of 110 mm is required.
Now let's make gutters - this is the most difficult job that requires accuracy and correct calculation. Pipes will be used as gutters, which must be dissolved in half in length. It will be easy to cut them, but to do it evenly is hard. From one pipe you will get two monotonous gutters. Here's what you need to do:
- Take a pipe of the desired diameter and place it on the boards. For ease of use, fix the pipe with a self-tapping screw to the board.
- At the very top, on the front side of the pipe, moving a couple of centimeters away, screw a self-tapping screw into it exactly in the middle. Do the same differently. It is not necessary to tighten the screws to the end.
- Stretch a thread between them. Make sure everything is even.
- Now mark the cut line on the pipe with a marker.
- Remove the thread and, focusing on the markup, start sawing the pipe with a grinder. For safety reasons, wear protective goggles.Make sure to cut the pipe evenly, as the non-specialized type of gutters will depend on this.
- It remains to be done exactly apart from this and from the opposite side of the pipe. Only now the pipe is fixed to the board in two places, because by sawing the pipe, you have made two separate parts of it.
- Depending on the number of gutters you need, cut all the pipes intended for this purpose.
- Using sandpaper, smooth out the cuts on the pipes.
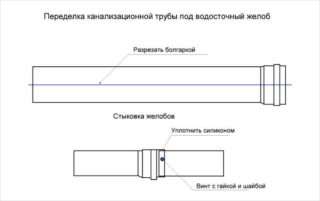
This is how it is possible to make gutters on your own, which will become the basis for the water drainage system. Now you just need to connect the elements of the gutters together, taking into account the desired length on each wall. Ready-made gutters will be connected to one another using self-tapping screws. Since these are sewer pipes, one end of which is wider, it is possible to connect them very simply;
- One gutter is inserted into the other with an overlap of 5-10 cm.
- Using a screwdriver or self-tapping screw, fix them together in three places: on the sides and below.
- The finished mount can be lubricated with silicone sealant in order to prevent water from flowing.
- In order to make corner gutters, you need to take a knee, and cut it in half according to the way you are already familiar with.
- At this stage, in places where vertical pipes will be placed, you must already insert a plastic fitting and fix it with self-tapping screws. Again, it is necessary to cover the junction with sealant.
It is possible to say that your roof drainage system is ready, it remains only to put everything together and install it in the intended place.
All stages are shown in detail in the material:
Self-contained drainage from sewer pipes
 Do-it-yourself ebbs from sewer pipes do not present any particular difficulties.It is worth starting work with the creation of a drawing of the future design.
Design
The drainage scheme will include the following elements:
- low tides;
- funnels;
- vertical riser pipes;
- brackets;
- clamps.
Calculation of the amount of required materials:
- The gutters will run around the entire perimeter of the roof. The fewer joints of parts along the length, the more reliable the design will become. Therefore, it is better to choose longer pipes. It is also worth considering that each element is cut in half.
- Vertical risers are installed at a distance of no more than 12 meters. If the length of the building is less, then the drains are arranged in the corners. Their length is equal to the height of the house.
- To divert water into storm sewers or trays, corner elements for risers will also be required. They are usually installed at the top and bottom of the structure.
- The number of brackets for gutters is calculated on the basis of an installation step of 50-60 cm. Additional elements are required at the junction of two ebb tides, at the installation sites of funnels, at the corners of the building.
- Vertical pipe holders fix the elements to the wall. They will need at least two pieces for each part of the riser.
- Funnels are mounted on each vertical drain.
The gutters will also require: plugs for dead ends, water overflow limiters, connectors, external and internal corner elements.
To work on the installation of a drainage system from sewer pipes with your own hands, you need the following tools:
- grinder or hacksaw for cutting plastic parts;
- building level and tape measure;
- screwdriver or screwdriver;
- file;
- rope;
- stairs.
After preparing all the materials and tools, they begin to install the drainage structure.
Installation steps
Prior to installation, it is necessary to determine the method of installation of the structure. Gutters can be fixed to rafters, eaves or roofing.


Gutters from sewer pipes are most often attached to rafters or eaves before laying roofing materials. If the drainage system is mounted in a finished building, then it is fixed to the roof. Also, this option is rational to use with a large distance from the edge of the roof to the walls of the house. Gutters are installed in such a way that one third of the width of the element is under the roof.
Stages of installation work:
- A gutter from a sewer pipe is made by longitudinal sawing of a plastic part. At the ends of the elements, solid sections are left for connection. The cut points must be sanded.
- First, corner elements are attached to the brackets. Fixing parts is carried out using self-tapping screws.
- A rope is stretched between the two corners as a level. It is required to check its slope.
- With a step of 50-60 cm, the remaining brackets are attached and the gutters are mounted. Between themselves, the elements are attached to glue or connectors are used. Joints must be sealed. Install plugs at the ends of the gutters.
- Drainage funnels are mounted on rubber gaskets.
- Next, clamps are fastened for vertical drain parts. They are located at a distance of 5-10 cm from the surface of the walls.
- Vertical structures are assembled and installed in holders.
The protection of drains from sewer pipes from debris is made of plastic nets. They are cut into strips and rolled into a cylinder. Its diameter should be slightly smaller than the gutters.Each element is fixed with a clamp or wire and placed in ebbs. The mesh also protects the details of the funnels.
Flat roofs do not require gutters. With this option, only catchment funnels and vertical risers are mounted. The roofing material must go to the base of the funnel. From above carry out protection from a grid.
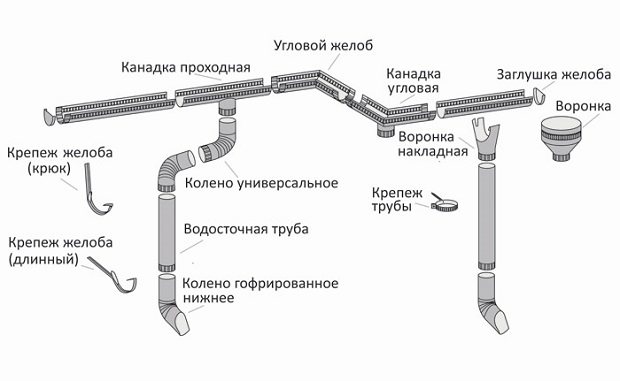
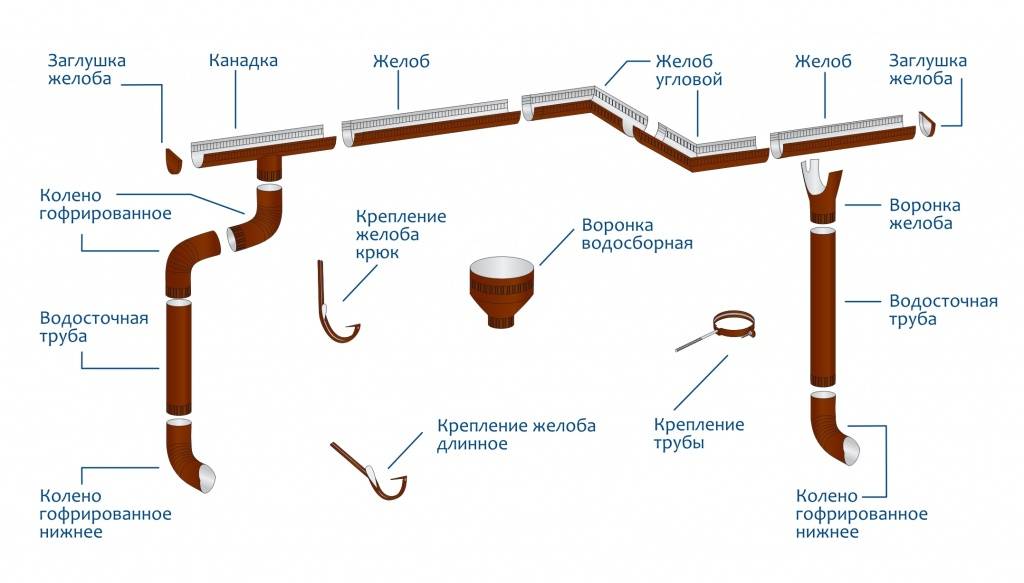
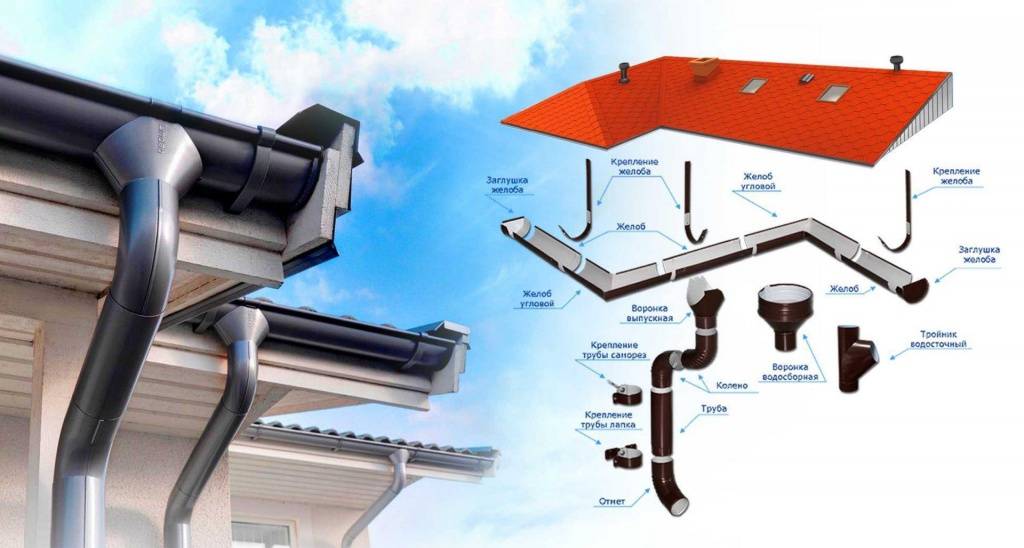
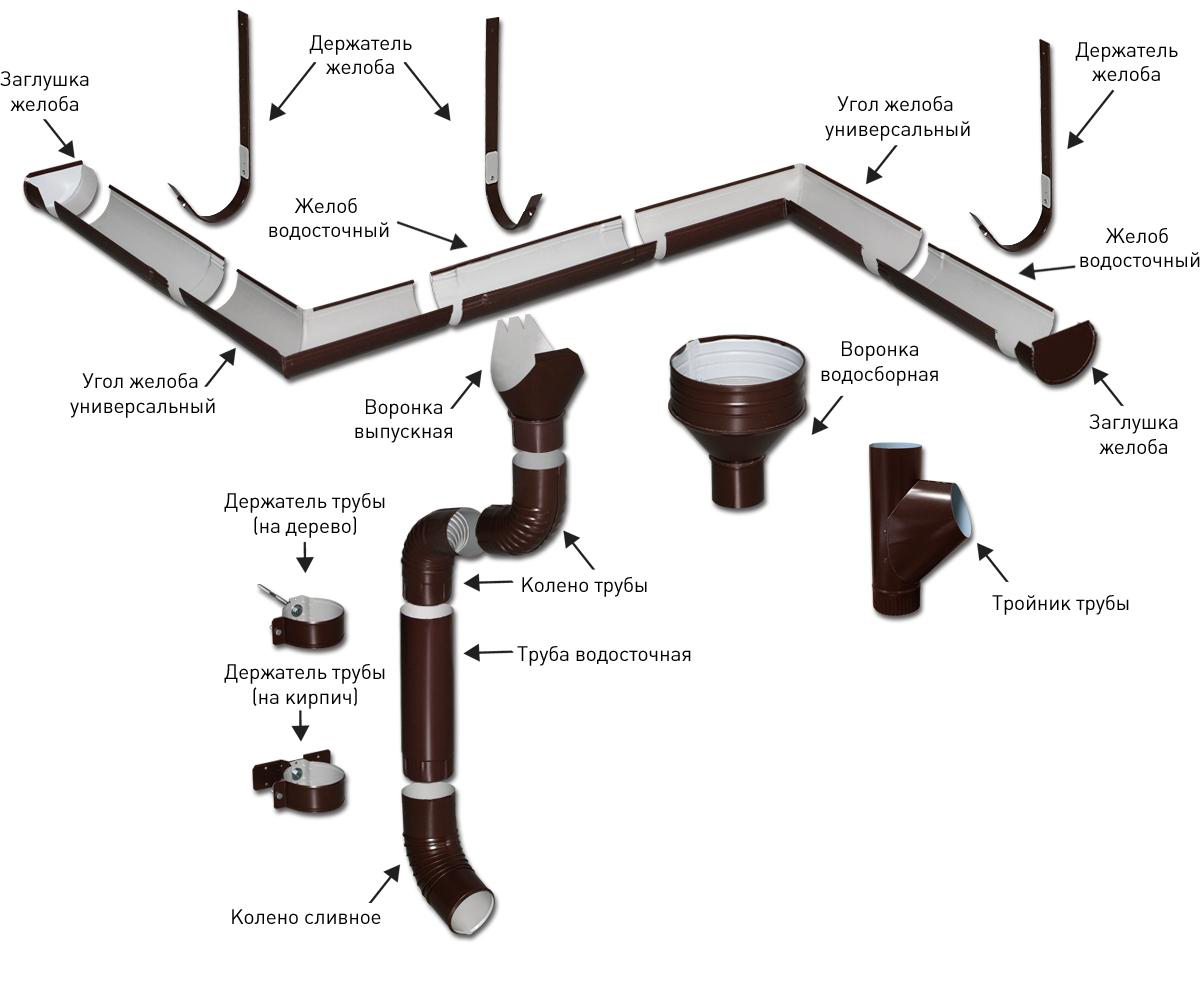
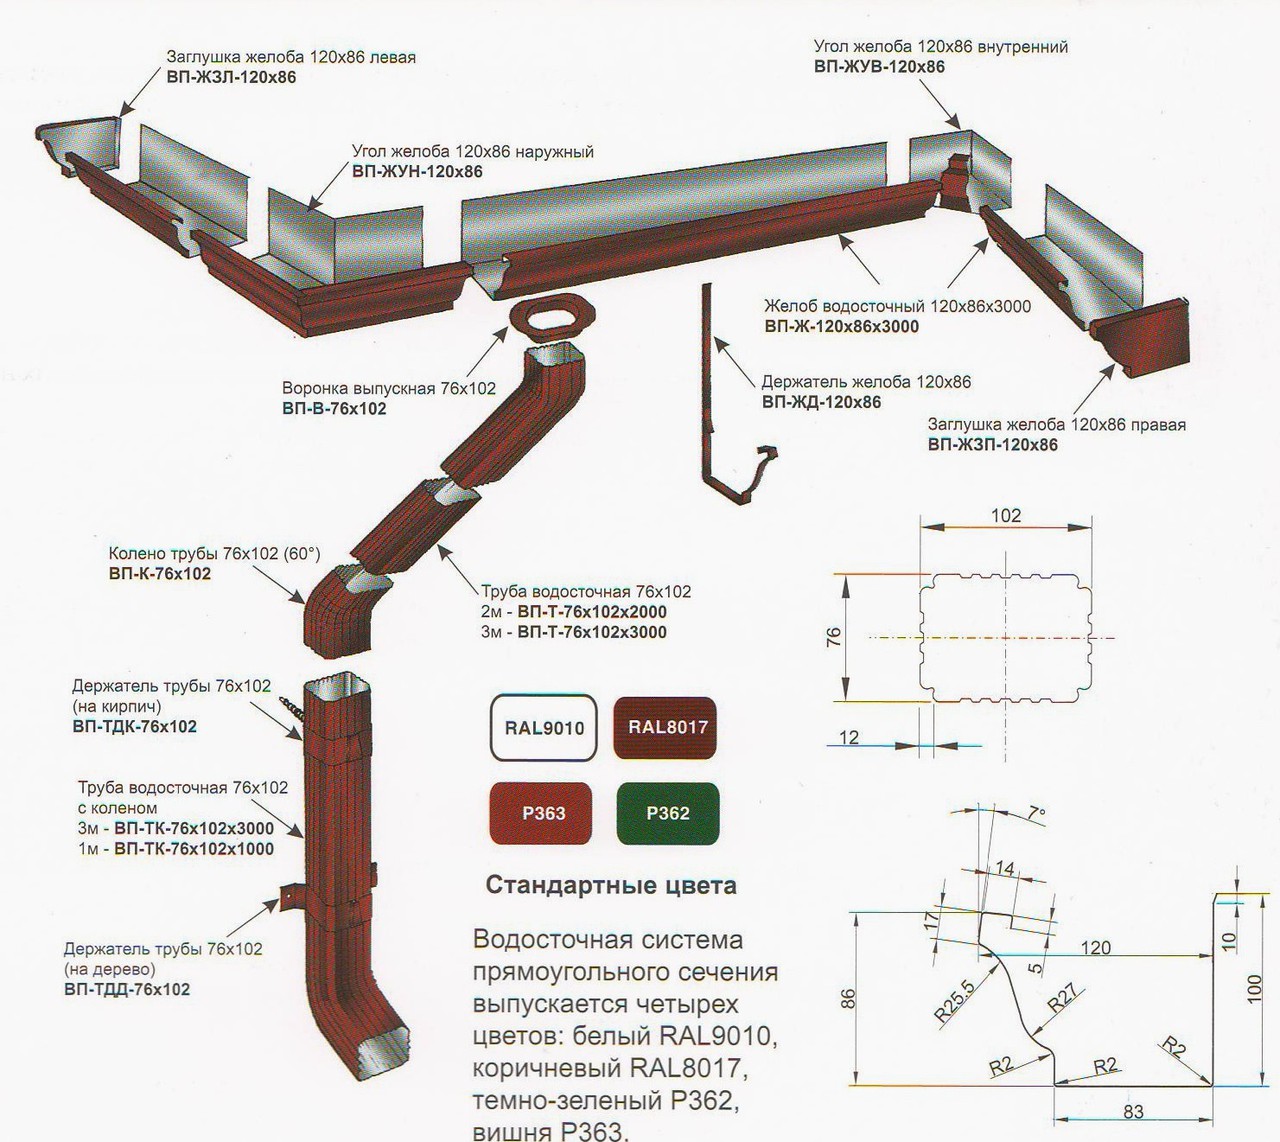
Gutter elements
Their list includes:
- Gutter. Designed to collect rain, melt water from the roof.
- Gutter plug. Attaches to ends. Directs water down the slope towards the funnel.
- Gutter connector. It is customary for them to connect the gutters to each other. Tightness is achieved by a rubber seal.
- universal angle. Changes the direction of water flow. You need to fix it on the inner, outer corners of the roof.
- Pipe elbow. It is often used to carefully bypass elements of the facade of buildings. Changes the direction of water flow through the pipe.
- Funnel. Works as a water inlet. Connects gutters to pipes. Redirects water from a catchment to a weir system.
- Drainpipe. Designed for vertical water flow.
- The coupling is connecting. Pipe fixing element. Responsible for compensating for thermal expansion.
- Drain. Drains water from the system into the soil.
- Universal clamp. Allows you to attach the pipe at the desired distance from the house.
- Metal, plastic brackets. Required for installation of a gutter on a roof eaves.
- Straight or side bracket extension. Used when you need to attach the gutter bracket to the rafters or roof slope.
- Adjustable angle. Suitable for right angles and up to 150 degrees.
- Clamp for fastening the pipe to the facade of the building.
- Protective grid. Prevents debris from entering the drainage structure.
- Rotary ebb of the cornice overhang for wall fastening.
The number and names of elements for different types of roofs may differ and be supplemented.
Drainage from the roof for water - drainage device from pitched roofs
Roofs on houses of old construction have a simple gable
roof structure. But, modern houses are equipped with more complex rafters.
systems. There are more slopes, they are adjacent to each other at different angles. it
requires a proper roof drain.
Therefore, we will consider step by step each of the elements.
1. Draining water from the roof
This point is important because water can get inside the house before reaching the drain. There are three areas of increased risk on the roof, as a result of which the roof of the house is leaking (and ways to fix the leak on the roof).
The junction of two slopes with the formation of an internal corner. If a private house has a roof, such as in the photo, then installation of a valley or a groove on the roof is necessary.
There are two types of valley:
Single overlap (lower valley).
Nuance. The choice of overlap is influenced by the material of the roof and the angle of inclination of the roof slope. With a high wave height of the roofing material (slate, metal tiles) and with a slope angle of more than 30 °, a single overlap is used. If the material is flat (bituminous tiles) and the angle is smaller - double overlap.


Double overlap (lower and upper valley).
Nuance. The design of the lower valley is very simple, so it
usually do it by hand. It's just a sheet of metal folded in half. But for
in order for it to perform its functions, you need to know how to install it correctly
lower valley. Competent installation is as follows: the bottom valley is attached
using clamps (the use of self-tapping screws is not allowed).
2.Place (node) adjoining the roof to the wall
In this case, a special junction bar is used
for the roof. Installation of the strip is carried out in the corner between the house and the roof.
The specifics of choosing a strip for adjoining
The photo shows three types of straps.
But only the bar "c" will ensure the tightness of the joint, due to
a small edge that winds up in a gash on the wall. Plank "a" does not have
rolling in general. At the bar "b" the lower rolling is external. This is the place with
which the bar will begin to rust.
Nuance. For a tight connection in a brick, you need to make
washed down and bring one edge of the bar there. The second lies freely on the roof.
3. Plumb roof
According to the rules for installing a drainage system, roofing material
should end in the middle of the gutter. Then water won't get out of it.
on the walls of the house.
However, this is not always possible. This may be due to
features of the roofing material (for example, the length of the metal tile is always
multiple of 350 mm, and the usual multiple of 1 pc.) or with a miscalculation during design
rafter system. In this case, an additional eaves bar is mounted.
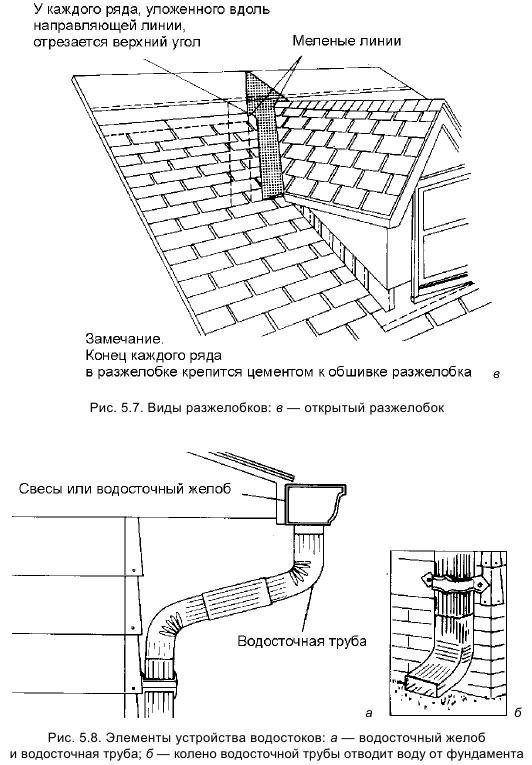
The second component of the system for draining water from the roof is a gutter
system.
Let's get acquainted with its main elements and see how
make your own drainage system.
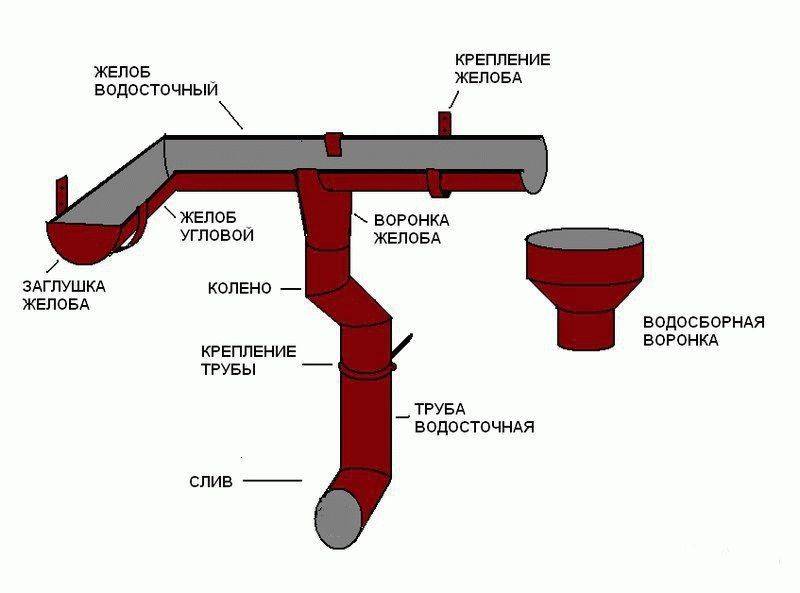
4. Components of the drainage system
Before proceeding with the manufacture of the ebb, you need to figure out what elements (components) are needed:
gutter. Serves for receiving water from slopes. Its diameter depends on the area of the slope;
funnel or drainpipe. Connects the gutter and pipe;
pipe.Discharges water into the drainage system or away from the foundation;
corners and turns. They allow you to bypass the house, protruding elements or install a pipe at the right distance from the wall;
plugs. Used in places where a funnel is not provided.


Advice. Plugs are installed in the highest place.
fasteners. For gutter and pipe.
Visually, the elements of the drainage system are shown in the diagram.
What does an unfinished drain look like?
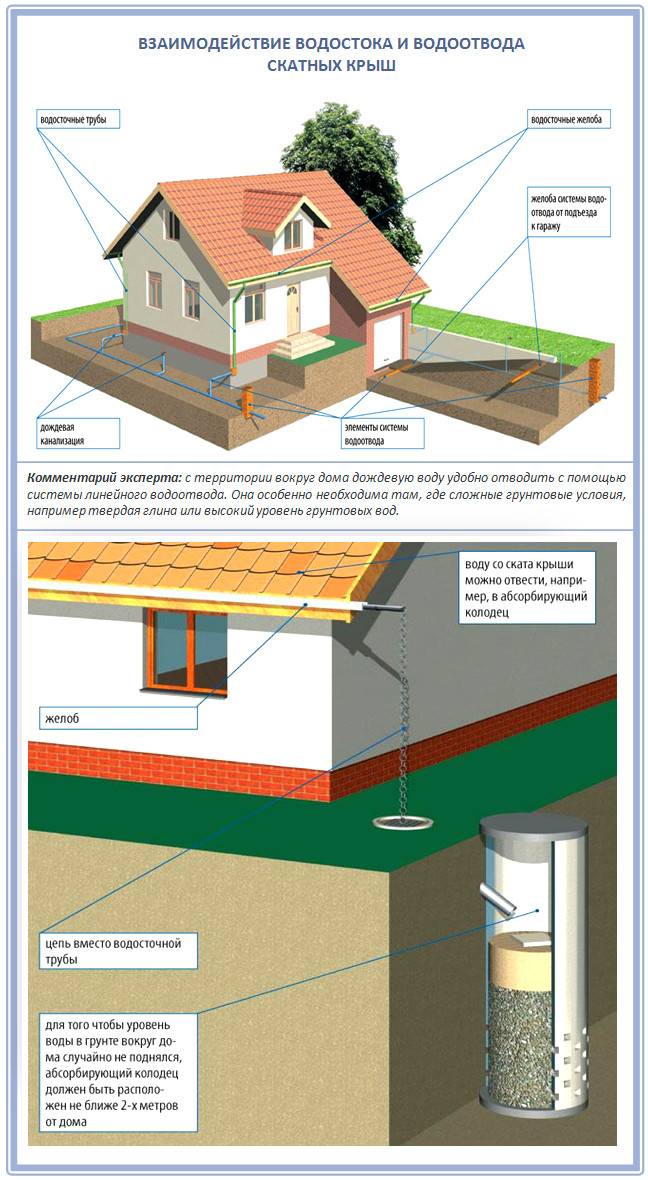
Due to the appropriate slope of the slope and the complete absence of additional structures, there is an uncontrolled runoff of liquid from the roof surface. The simplicity of construction and the minimal cost of its arrangement attract many homeowners. However, do not forget about the negative aspects that can affect the integrity of the roof, and indeed the entire building.
- An unorganized drain has a negative effect on the walls of the facade, accelerating their destruction. Therefore, in the process of their construction, an additional layer of waterproofing is required.
- Even in areas where there is minimal rainfall, water will penetrate into the foundation, worsening its condition and slowly destroying it. To avoid this, additional drainage underground should be arranged to remove excess moisture.
- Precipitation will also have an impact on the plinth.
Installation Rules and Norms (SNiP)
Organized internal drainage is a fairly popular way of drainage from roofs, because it can be organized regardless of the climatic conditions of the region.
Such a system includes several parts:
- a funnel into which flowing water enters;
- riser;
- outlet pipe;
- release.
Here are a few tips that will be helpful when installing this drainage system:
- It is necessary to divide the entire surface of the roof into sections.
- One drain pipe should go for every 200 square meters of roof space.
- It is necessary to observe the slope of the roof to the water intakes - it should be about 2%.
- Under the building, a collector must be built to collect water, which must also be connected to the main sewer.
- When installing the system, pipes of a certain diameter and length can be used. The diameters allowed are 10, 14 and 18 cm, and the length must be 70 or 138 cm.
- In order for the system to work stably all year round, all risers must be located in a heated area.
- The funnel must be built into the roof tightly so that water does not seep through the cracks.
Don't forget to regularly clean your drains.
Features of the internal drain
When mounting an internal drainage system, you must conditionally divide the entire plane into sectors. This is done because one drain can serve a surface of no more than 200 square meters, it simply cannot cope with a large volume and water will accumulate on the surface. Although a flat roof has such a name, its surface is arranged under a certain degree. This process is called creating a ramp. It can be created using a screed or heat-insulating materials.
Of course, the simplest and fastest option is a screed. To create the desired slope, concrete mortar is poured over the floor slabs, and when it hardens, subsequent layers of waterproofing are laid. Next, heat-insulating material is placed. It must be rigid, so of all possible products, it is best to use expanded polystyrene or foam glass.These two materials are not afraid to get wet and a thickness of 15 centimeters is enough for thermal insulation.
The final coating will be selected based on the functional purpose of the surface. If it is operated, then the following can be used as a protective layer: soil, bulk materials, paving slabs, etc. In the case where the surface is not capable of withstanding heavy loads, it is necessary to consider products with a lower mass, for example, bituminous, polymeric or sprayed materials.
The internal drainage system, although complex, includes simple devices, namely:
- Funnel and gutter to collect water from the roof surface and transfer it to the drain line;
- Risers, which are the main path for rainfall;
- A collector arranged in the ground with a system of pipes that drain water into a storm sewer.
To quickly remove precipitation from the roofing plane, it is necessary to use pipes with a diameter of 100-180 millimeters. The required pipe section can be determined based on the consideration of 1.5 square centimeters of the pipe section per 1 square meter of the roof surface. The length of one element should be in the range from 700 to 1400 centimeters.


When designing the placement of the drainage system, you should find an element from which heat will radiate all year round. As a rule, it is a chimney. By installing a drain near it, you will allow the internal system to remove precipitation even in the winter season.

IMPORTANT: If you live in a region with severe winters, then for the reliability of the drainage system, partial or complete heating of the roof is arranged
Structural elements of the drain
To date, experts are considering two types of water drainage systems from the roof - external and internal structures. The internal design of the drainage system is used on flat roofs, where the roofing material is given a certain slope towards the funnel, which acts as a rainwater receiver.
Through such a drain hole, water masses enter the drainpipes located inside the building or in specially equipped technical cavities.
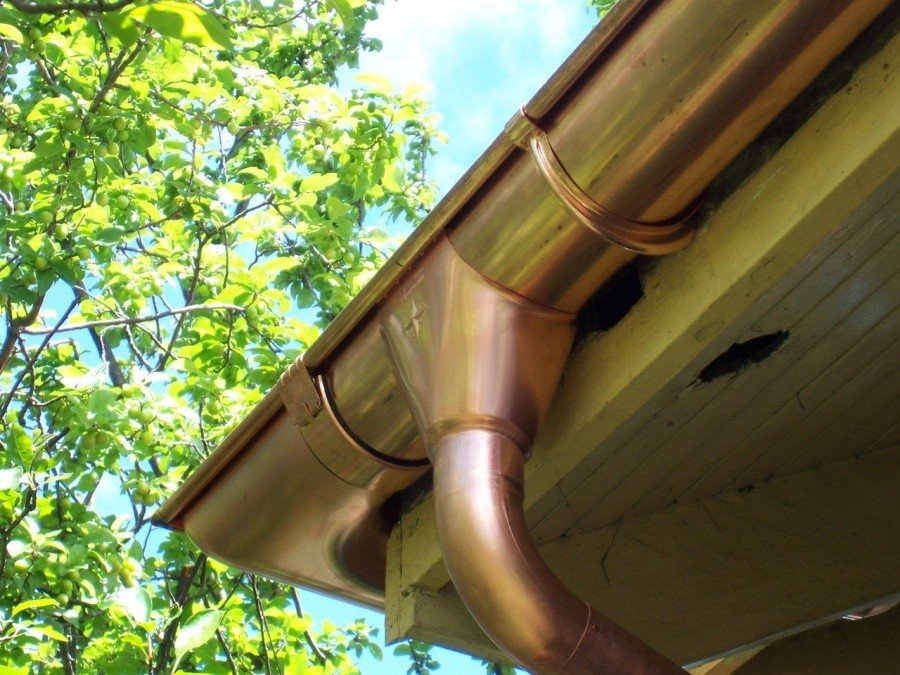
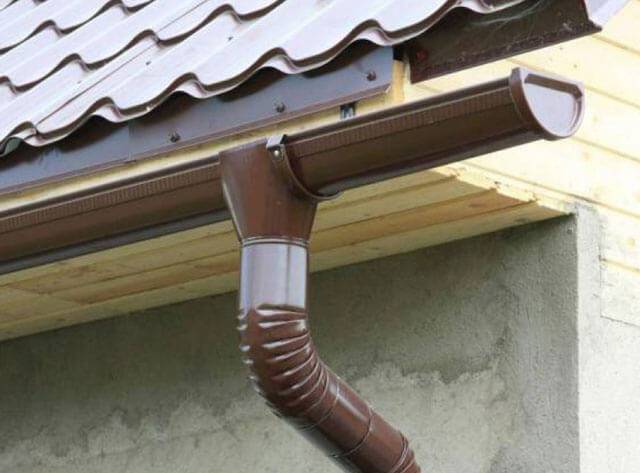
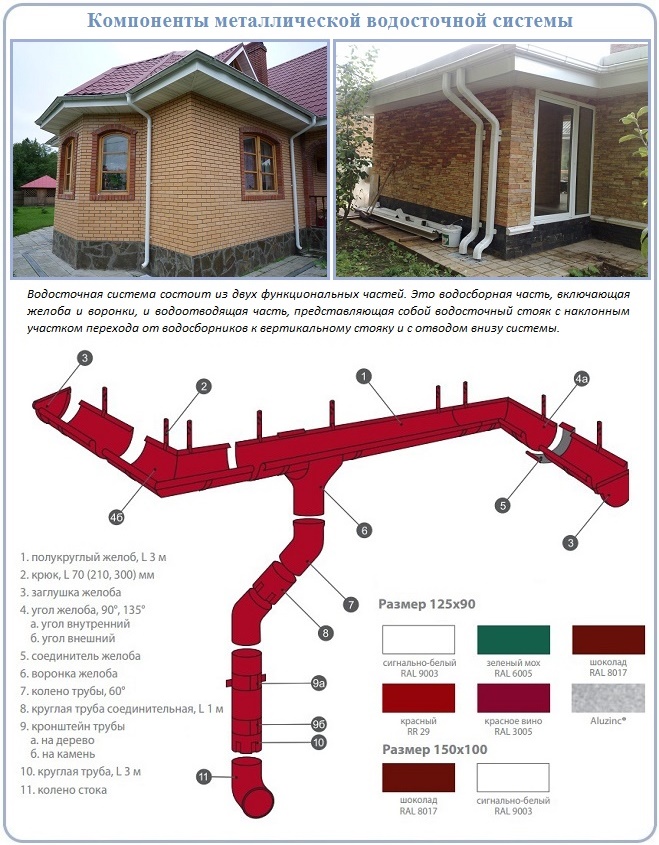
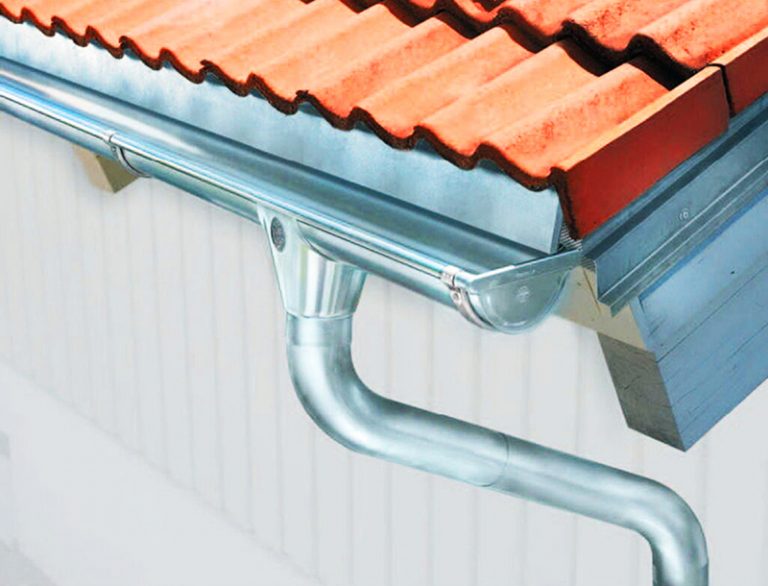
Under the external drain is meant a system mounted on the overhangs of a pitched roof structure. This type of storm water drainage has become the most widespread in most suburban buildings, and it is he who will be considered in detail. At the same time, the main elements of the external drainage system are the following components:
- Gutters, which are designed to collect storm water flowing from the roof of housing construction. Such products can differ in both shape and size, as well as the material used for their manufacture. After collecting the water, it is redirected through the gutters to the downpipes, directing the water flow to the main drain.
- Connecting elements for gutters. Structurally, the gutter is produced with a length of no more than 250 cm, and therefore, in the process of arranging a system for draining water from the roof, it is necessary to connect the individual elements to each other. For this, special connectors with a rubber gasket are used, which ensure the tightness of the junction, as well as compensation for the thermal expansion of the materials from which the gutters are made.
- Corner adapters for gutters, necessary for bypassing the drainage system at the internal corners of housing construction.Thanks to such structural elements, excellent hydrodynamics are ensured.
- Fasteners - brackets that are designed to securely fix the gutters to the roof of the building. Usually these are elements resembling hooks on which the gutter is suspended. Such products differ in their length and design.
- Funnels for gutters, with the help of which the water flow collected from the roof is redirected to downpipes. Such a structural element is mandatory for any sewage system and does not require additional sealing measures during installation.
- Gutter plugs are special elements designed to block the water flow at the edges of the gutters.
- Drainpipes, which are installed in order to drain water flows into a designated place or reservoir. Such a structural element is mounted directly under the funnel and securely fixed to the wall.
- A sewer and pipe elbow used to divert water to a certain distance from the blind area around housing construction. This design is designed to change the direction of laying the sewer pipe.
- Mounting clamps for fixing waste pipes. Such brackets are intended for fastening downpipes to the walls of a building.
In addition to the considered elements of the drain, protective caps can be used - special nets for gutters that prevent various debris in the form of leaves, branches and other foreign objects falling onto the roof from trees from entering the drain pipe.After all, everyone understands that a dirty drainage system will not be able to fully cope with the collection and drainage of rainwater.
Installation instructions for the drainage system
- Installation of the drainage system begins with the installation of hooks. Basically, they come in three types: short, adjustable and long. They can be attached to the bottom board of the batten, to the rafter or on top of the rafter. For each of the cases, different types of hooks are used.
- Calculate the angle of inclination of the hooks. The recommended slope must be 2-3 mm/m. Hooks are placed side by side, numbered and mark the fold line. Further, using a tool for bending the hooks, they are bent according to the markup.
- The installation of the first gutter hook is carried out in such a way that the distance between the imaginary extension of the roof and the outer side of the gutter is 20 - 25 mm.
- Hooks are mounted at a distance of 0.8 - 0.9 meters with an angle of inclination of 2-3 mm / m relative to the horizon. The installation starts from the edge of the eaves from where the slope relative to the horizon will go. The first and last hooks should be at a distance of 100 - 150 mm from the edge of the roof edge.
If the installation of hooks does not take place on the frontal board, but on the rafter or on the last bar of the batten, then grooves are made to align the surfaces of the hooks with the surface of the rafter or batten.
- If it is necessary to make a hole in the gutter for the funnel, then mark the desired place with a pencil and cut a hole with a hacksaw. With the help of pliers, the funnel is given the necessary shape, and the burrs are removed. The place where the metal is cut is treated with a special paint to prevent corrosion.
The funnel is first attached to the outer bend of the gutter, and the fixing clamps are clamped from the inside.Next, the plug is installed on the end of the gutter using a rubber hammer or manual pressing. The assembled structure is installed on the hooks by pressing on each hook.
If possible, elements such as: funnel, end caps and corners should be installed before the final installation of the gutter on the roof.!
- The connection of the gutters occurs with the help of connecting locks. To do this, a gap of 2-3 mm is left between the ends of the parts to be joined. Sealant is applied to the rubber gasket in the form of three lines: one is applied in the center, the rest on the sides. The back of the lock is attached to the inner sides of the gutters. Next, the lock is pressed towards the outside to ensure a snug fit of the gasket to the gutters. Snap the lock and fix it by bending the clamping terminals. Residues of sealant must be removed.
- When installing internal or external corner elements, between the ends to be joined, it is also necessary to make a gap of 2-3 mm and connect using clamping locks, as indicated in the instructions above.
- Installation of drains takes place in previously designated places. For fastening pipes to the walls, clamps are used, which are fixed with dowels. The distance between the clamps should not exceed two meters. The pipe must be at least 40 mm from the wall. Pipe cutting must be done with a hacksaw.
If it is necessary to connect two elbows, then measure the distance between the ends of the pipes. 100 mm is added to the obtained value (in this case, “a”) for the connecting pipe to enter the ends of the elbows (50 mm for each elbow).
The drain finish elbow is fixed to the pipe with rivets. The distance from the edge of the drain pipe to the ground must not exceed 300 mm.This completes the plumbing installation.
-


We bring to your attention a video that will help you understand all the nuances of installation.
This manual describes the main stages of installing a gutter with your own hands. In each specific case, it is necessary to ask the supplier for instructions, since each manufacturer has slightly different installation of gutters.


