- Tips & Tricks
- Installation and connection of equipment
- Methods for arranging winter plumbing
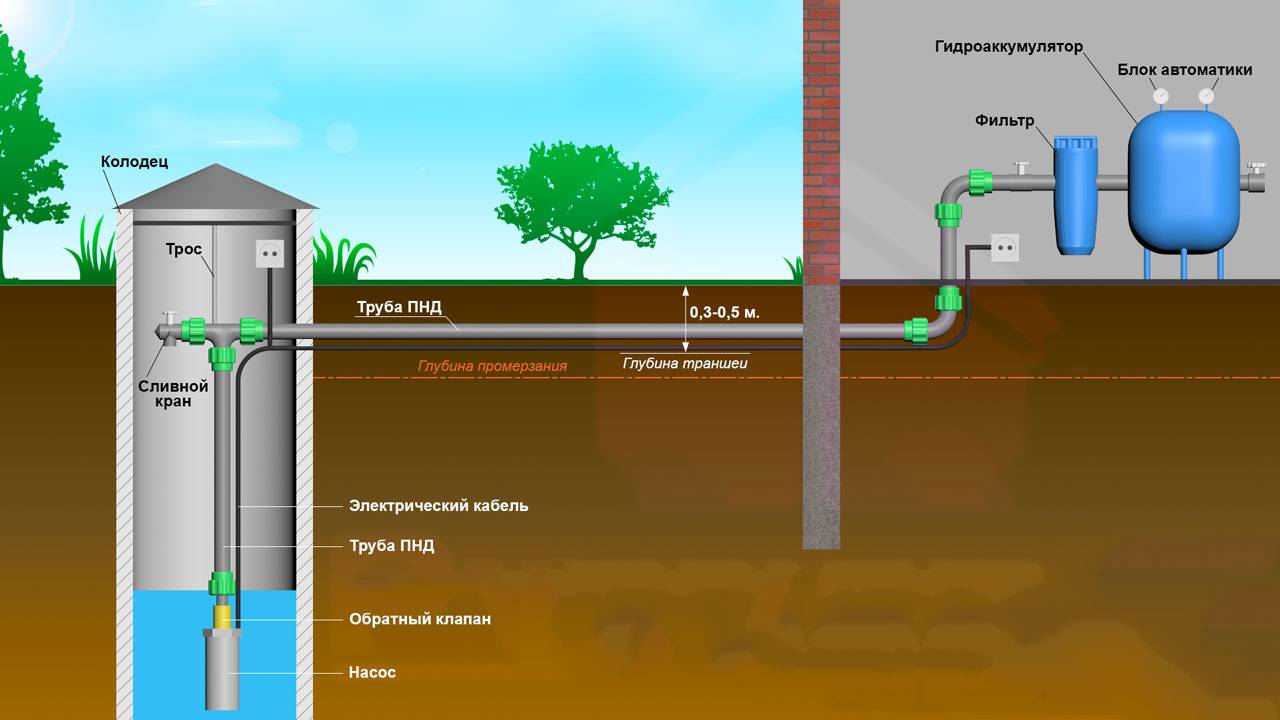
- Method number 1 - below the freezing depth
- Method number 2 - warming the water supply
- Connecting water supply from a well
- Connection Features
- Preparatory stages of work
- Work order
- The device of a typical plumbing system
- Pump selection
- Outdoor piping
- Preparatory work and installation steps
- Pipe bending
- How to manually bend pipes
Tips & Tricks
Uninterrupted water supply and good pressure can ensure long and efficient operation of various plumbing and household appliances.
In order for the water intake mechanism to be organized correctly, experts recommend:
- It is best to carry out water supply in the summer so that you can understand exactly where the source of water is. In addition, just in summer, the level of groundwater decreases as much as possible.
- When choosing a pump, it is best to choose devices where water sensors are already built in.
- To maintain a permanent high pressure in the plumbing system, too many corners and turns should be avoided during the laying of the pipeline.
- To carry out the installation of the pipeline from the well to the house, it is better to use a special type of food pipe with a certain marking.
- Before using the system, it is necessary to conduct a test run of the device. This will make it possible to check the system for faults and eliminate them without any serious consequences.
- The introduction of pipes into the building is best done through the walls using special "glasses" made of metal and plastic. Places where input is carried out must be insulated.
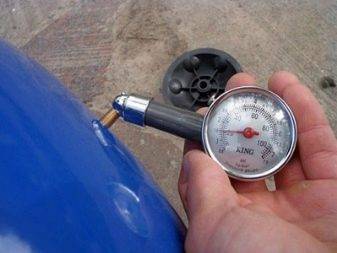
- For the operation of the water supply to be uninterrupted, it is necessary that the pressure in the hydraulic tank be 0.2 bar less than the lower limit in the entire water supply system.
- For the correct use of the collector, it is first necessary to install shut-off valves, as well as a tap to drain the water.
- To create a system that will be as efficient as possible, you should not save on consumables, because then it can still cause new costs and costs that will be even more than you would like.
Do-it-yourself water supply organization for a private house is a very important issue, which not only requires increased attention from the owner of the house, but also a clear understanding of how such a water supply mechanism works in general and what features various equipment components have.
Only high-quality materials and a clear understanding of the role of one or another element of the water supply system will make it possible to perform all the work clearly and efficiently, which in the end will provide a private house with drinking water in the shortest possible time and at a minimum cost of resources and money.
For information on how to make winter water supply from a well, see the video below.
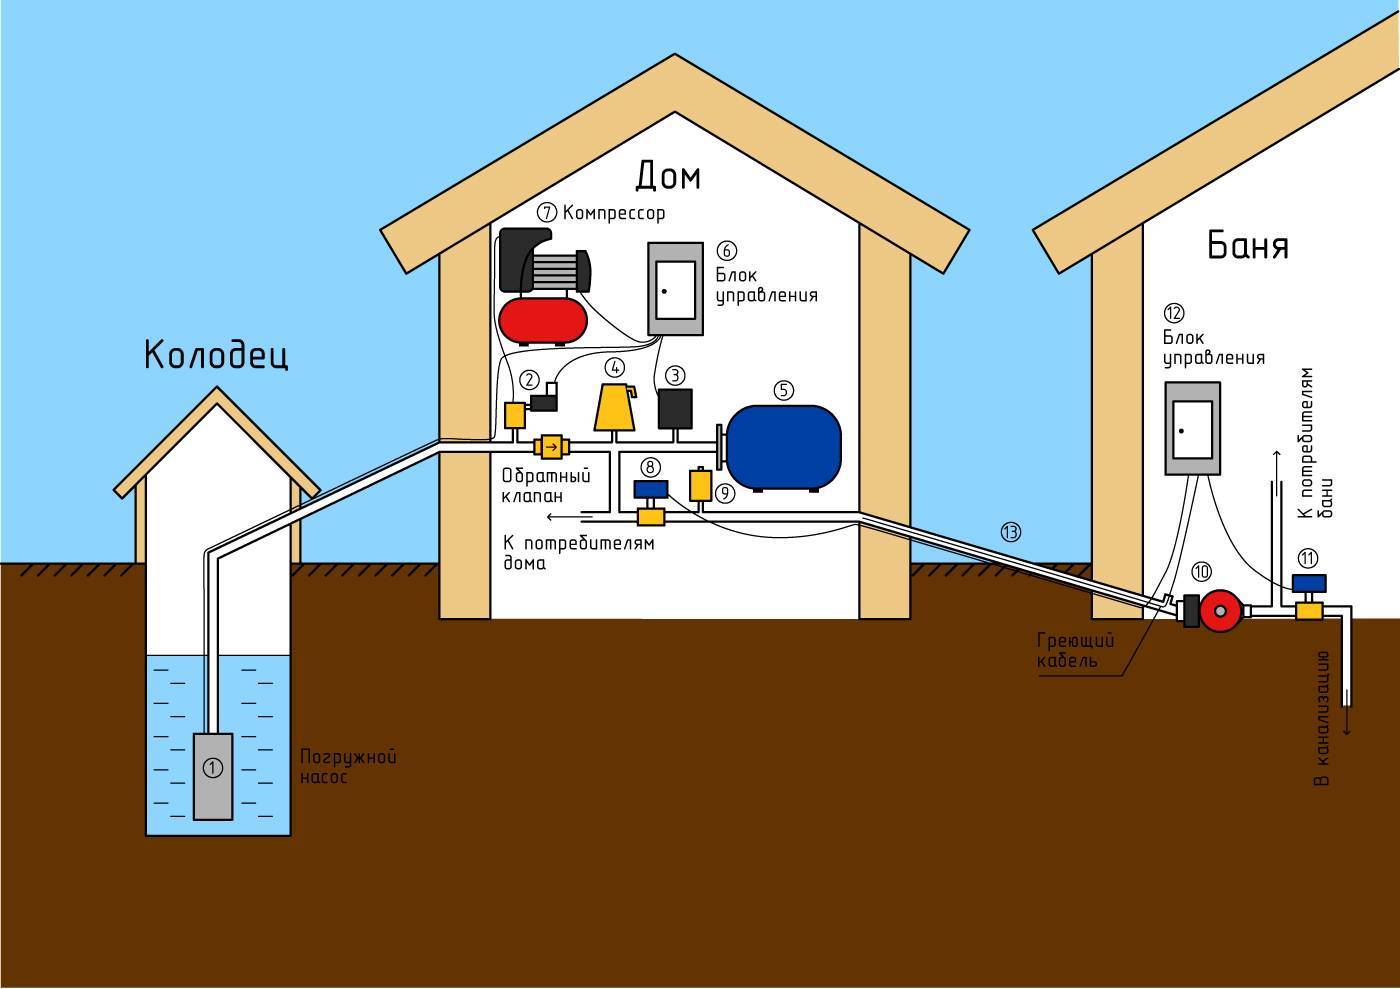
Installation and connection of equipment
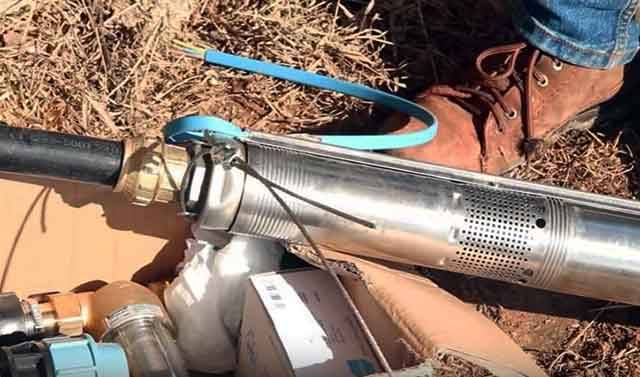
One of the most difficult moments is running a pipeline with a pump into a deep well
Here it is important to correctly connect the unit to the pipeline and securely fasten it to the cable. The installation technology is as follows:
- Unwind and spread the submersible section of the HDPE pipe on the ground. Connect its end to the pump nozzle through the compression fitting.
- Tie a cable to the lugs of the pump unit and fix it with a special clamp.
- Connect the cores of the supply cables with crimp sleeves and perform hermetic insulation with heat shrink tubes (they are put on the ends of the cut cable before joining).
- Tie the wiring to the pipe with plastic zip ties all the way through the vertical section.
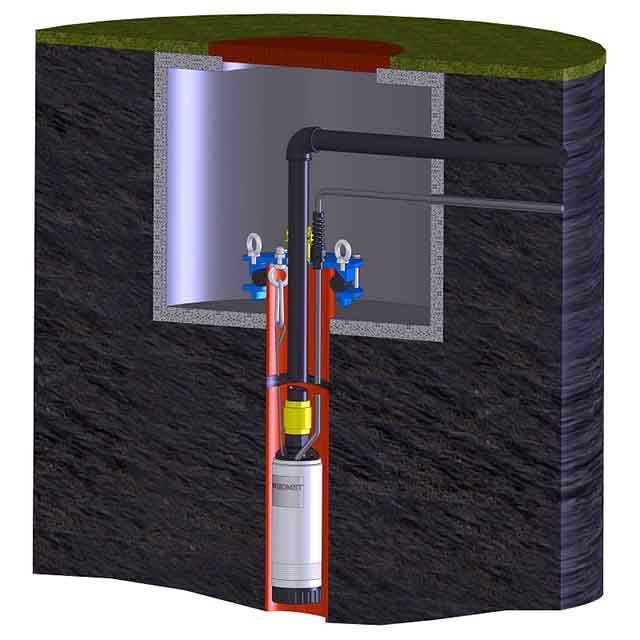
After tying the other end of the cable to the eye of the borehole head, lower the pump to the required depth. Make the descent carefully, without jerks, so as not to drop the unit. When finished, put the head on the casing. How to do this job correctly is shown in the video:
Mounting an individual water supply from a well is somewhat easier. To do this, it is enough to make a hole in the concrete ring at the level of the bottom of the trench and pass the pipe through it, then put a 90 ° elbow to connect the vertical section. So that the plastic does not rub against the concrete edges of the hole, it is advisable to mount an iron or plastic sleeve into it, sealing the opening with a construction mixture for pools. The organization of water intake is carried out in the same way as in the well.
Methods for arranging winter plumbing
For a water supply system that will perform its main function - water supply all year round, you must choose one of two options:
- Lay the water supply in such a way that the pipes run below the freezing depth of the soil.
- Lay pipes above the freezing horizon, but at the same time insulating them.
Both methods have their advantages and disadvantages. Let's consider them in more detail.

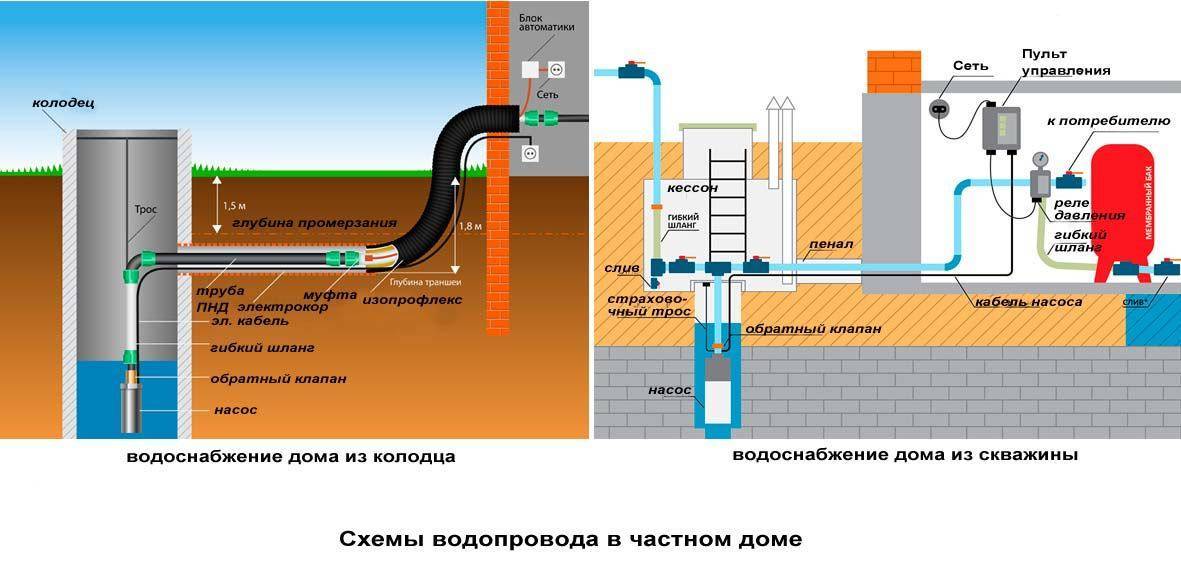
Method number 1 - below the freezing depth
This method is advisable to apply when the freezing depth is not more than 150 cm. In this case, the freezing depth value is determined based on data for the last 10 years.
It is also worth considering that very cold winters occasionally occur when the ground freezes below. Based on this, it becomes clear that pipes should be laid to a depth equal to the depth of soil freezing in the region plus 20 - 30 cm.
The water supply system begins with digging a trench of the required depth from the well to the entry point of the water supply into the house.
At the bottom of the trench, sand is poured with a layer of 10 cm and water pipes are laid. The trench is covered with earth, the soil at the place of filling is compacted.
Despite the fact that this is the easiest and most inexpensive way to create a winter water supply from a well, there is a problem with the choice of pipes: polyethylene pipes will not work here, because. will not withstand the mass of soil pressing from above, and metal pipes (steel) will corrode.
The problem can be solved by treating the pipes with an anti-corrosion compound before laying.
For laying pipelines at great depths, thick-walled polyethylene pipes can be used, but they must be laid in a protective corrugated casing
In addition to the problem with the choice of pipes, this method of arranging a winter water supply has several more disadvantages:
- when carrying out repair work, there is a need for a large amount of earthwork;
- difficulty in finding a damaged section of the pipeline;
- the likelihood of freezing and rupture of pipes in the water supply system in case of insufficient deepening of the water supply system.
In order to reduce the number of accidents on the water supply to a minimum, it is recommended to make as few pipe joints as possible, because. it is at the joints that leaks most often occur.
Also, when installing a winter water supply system below the level of seasonal freezing, it is necessary to carefully monitor the tightness at the junction of the water supply pipes to the well.
When laying the pipeline below the level of seasonal freezing, the trench is deepened by 20 - 30 cm to ensure the formation of a sand cushion of 15 cm and lay pipes at the required depth
Method number 2 - warming the water supply
With this method, the water supply is buried to a depth of 40-60 cm, but the pipes are laid insulated in the trench.
For the northern regions, it would be advisable to line the trench with bricks or cellular concrete blocks to increase heat conservation.
Of course, this will significantly increase the cost of building a winter water supply, but it gives a 100% guarantee against freezing.
From above, such a trench is covered with concrete slabs and covered with soil. Pipes for the installation of insulated water pipes are usually used the most common: low-pressure polymers and a suitable diameter.
What heater to use? There are two options here:
- rigid heat-saving shells made of foam plastic or extruded polystyrene foam (“shell”);
- soft heat-insulating materials (foamed polyethylene options, mineral and basalt wool with external water-repellent protection).
When choosing a heat-insulating material for pipes, it is necessary to pay attention not only to its cost and ease of use, but also to its physical properties. For example, mineral wool is an inexpensive and easy-to-install insulation, but it has high water-absorbing properties, which means that it must be used with a mandatory vapor barrier layer.
For example, mineral wool is an inexpensive and easy-to-install insulation, but it has high water-absorbing properties, which means that it must be used with a mandatory vapor barrier layer.
Basalt wool based on sedimentary rocks is a rather heavy insulation that cannot be used for pipes of small diameter.
The choice of insulation should be made based on local conditions: soil moisture, freezing depth, and also taking into account the diameter and type of pipes
To backfill a trench with insulated pipes, it is best to use not excavated soil, but crushed stone or expanded clay.
These materials have a lower coefficient of thermal conductivity than soil, and therefore will provide longer heat retention.
Connecting water supply from a well
This work can be done by hand. You just need to do everything correctly and follow the technology, this will be the key to success.


To complete the work, purchase the necessary materials in advance, while immediately taking into account both the slope and the number of turns. You need to take and correctly knee to perform turns.
Moreover, keep in mind that there will be waste, so calculate it qualitatively.
Connection Features
You must first decide what kind of water you need. The deeper the occurrence, the more expensive the structure will be.
So:
- The first layer of water lies at a depth of up to t meters. Only it will be suitable only for technical purposes. Normal water is about 10 meters deep;
- It should be noted that the water supply is completely dependent on the power of the pump. If he works at idle, then he will quickly become unusable. Therefore, it is imperative to make a sensor insert to determine the presence of water (see Water level sensor in the well for control). It will turn off the pump in time;
- You will also need to install a check valve, which will protect against draining water back into the system;
- After the pump, mechanical filters must be installed without fail. Be sure to install a mesh at the end that will protect against impurities from entering the water, and this, in turn, will ensure an uninterrupted supply of water;
- In the event of an emergency shutdown of water, a drain should be provided. This may also be needed;
- When connecting, it is better to install automation, which will ensure the supply of water even with drops in the network;
Preparatory stages of work
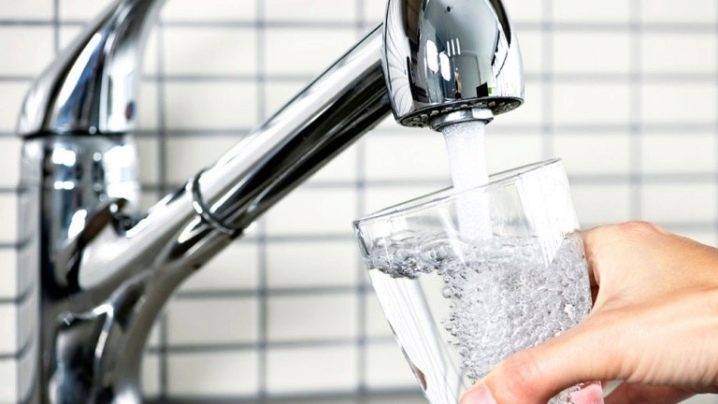
Before proceeding with the direct supply of water to the house, you need to check whether the water is suitable for drinking. Next, you will need to purchase a pipe of the right size, with which the house will be connected to the well itself. If it is too far from housing, then it is better to dig a new well nearby.
Work order
It should be said right away. That the joints of the pipes must be sealed quite well. There should be no leaks. The instruction is given for laying and heating cable.
If you do not use it, then you need to lay the pipe 20 cm deeper than the freezing of the soil. At the same time, it is necessary to carry out high-quality insulation of the entire system. Otherwise, it can simply tear when freezing.

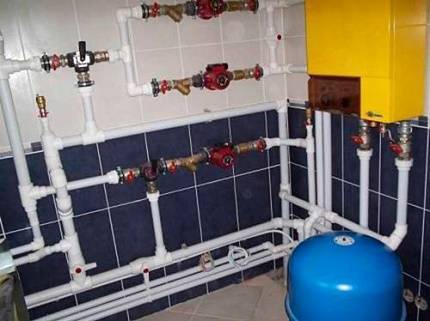
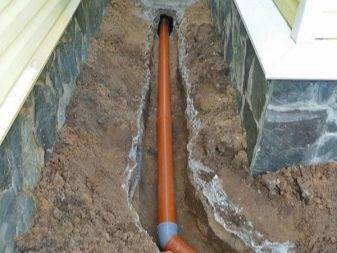
Scheme of correct connection and maintenance
So:
- It is necessary to take a shovel, for this you will need both a bayonet and a shovel, then dig a trench, the depth of which should correspond to 600 mm and a width of 250 mm. If the pipe does not correspond to the required size, then it will need to be increased, for this a branch pipe is used;
- We begin to lay the pipe in the trench. We bring one end to the house, the other - to a certain hole in the well. Then we proceed to laying the second pipe under the electric cable;
- We lay the electric cable in a pipe that was laid especially for it. The next step to protect pipes from freezing in the winter season will be their good insulation;
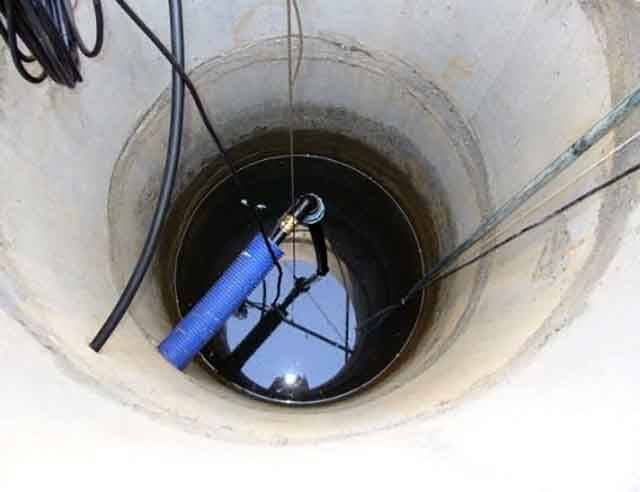
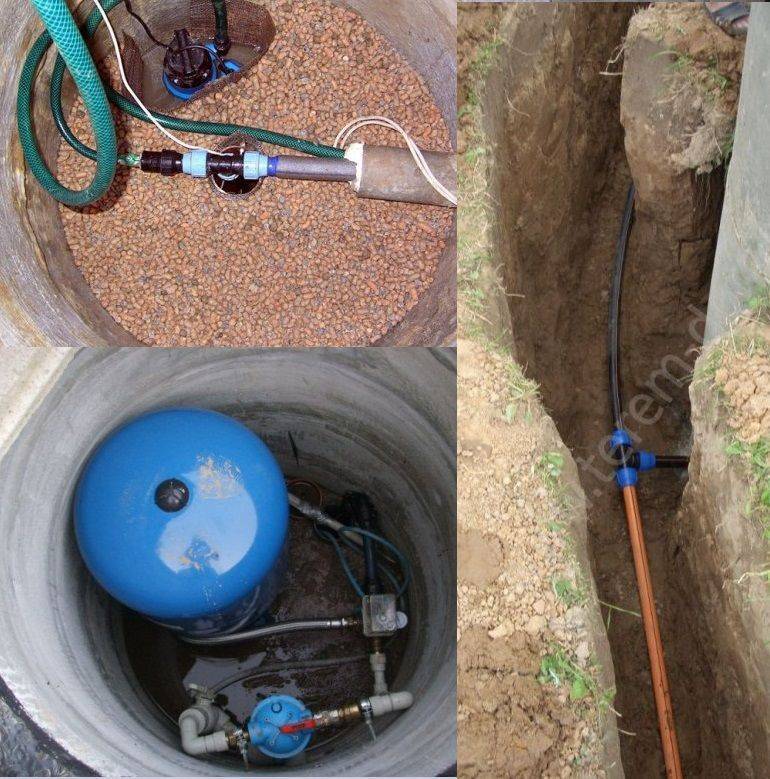
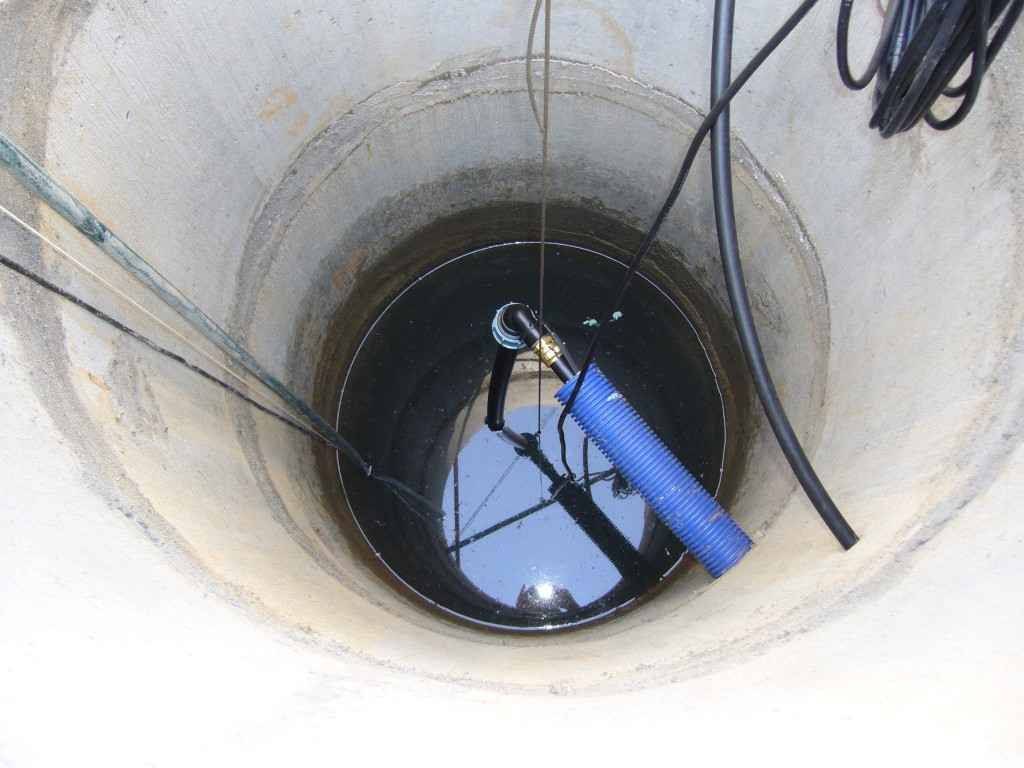
- We make the connection of the water pipe and the water pump necessary, this is done using a special hose, lower the pump into the well, while adjusting its height, you also need to check the water pressure, which should be normal.
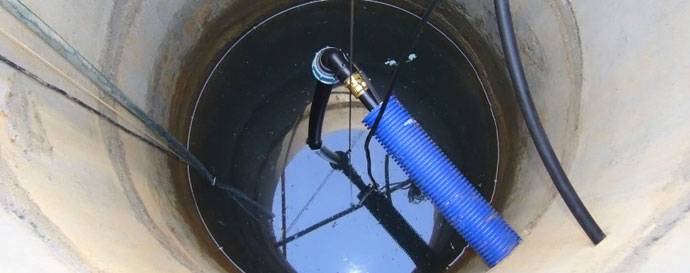
Photo of pump immersion in a well
Now we need to firmly fix the pump. This is done by fixing with wire. Dive phase completed. You can connect to the network.
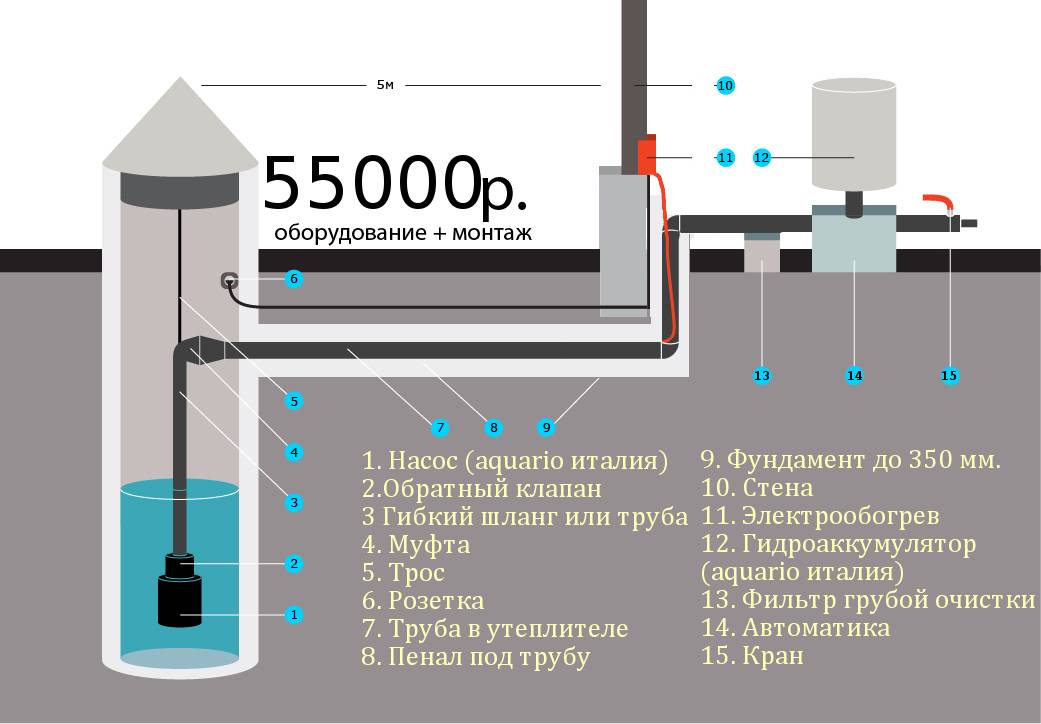
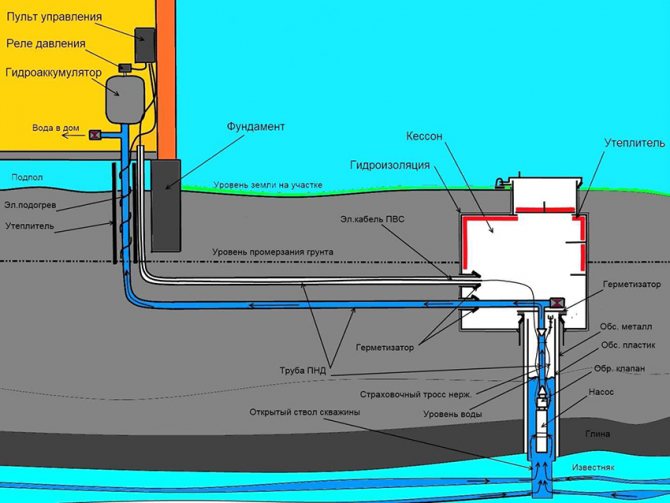
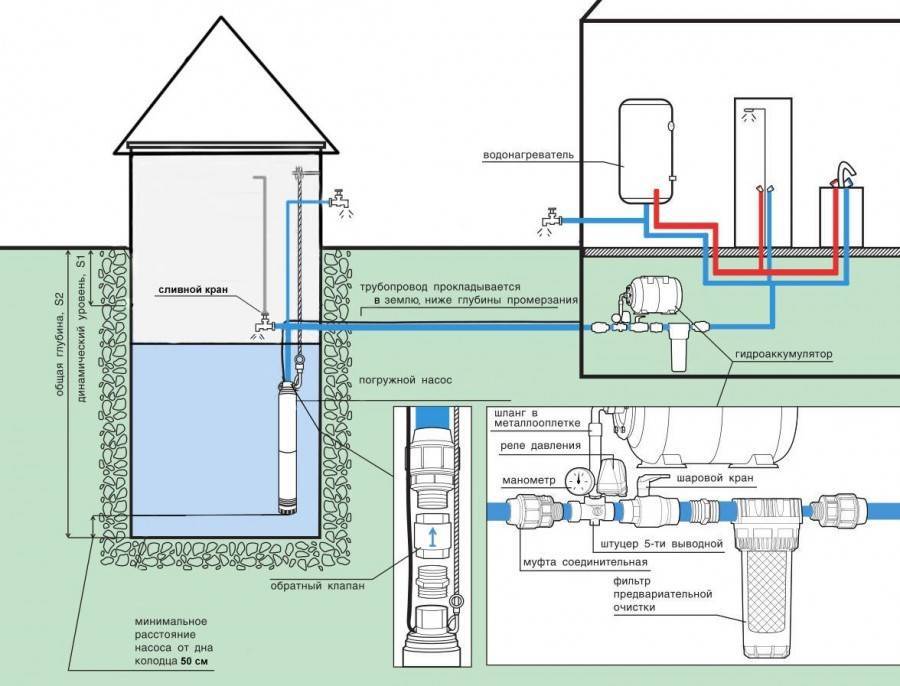
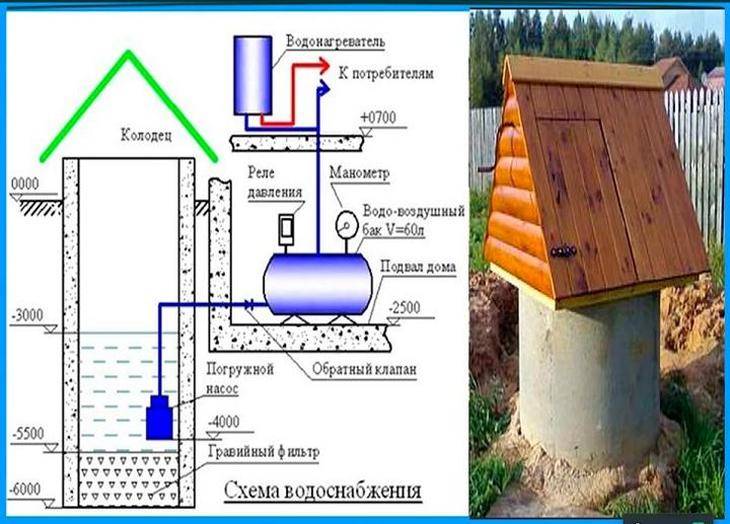
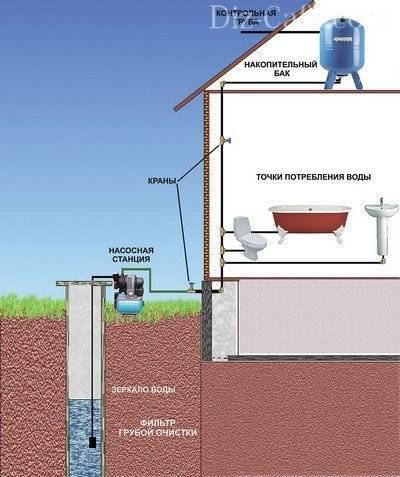
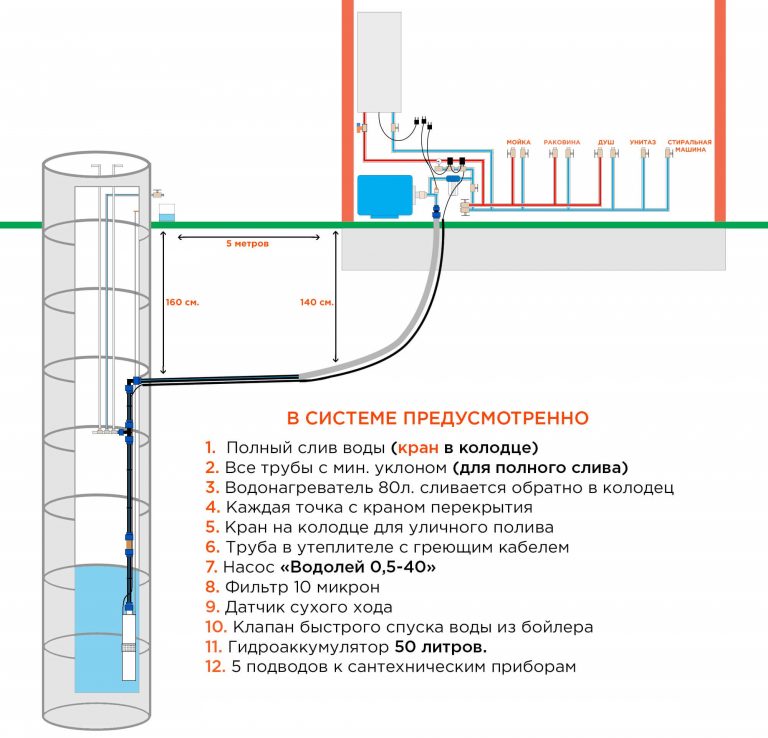
Turn on the pump and check its operation. 2 id="ustroystvo-tipovoy-vodoprovodnoy-sistemy">Typical plumbing system device
Water pump.
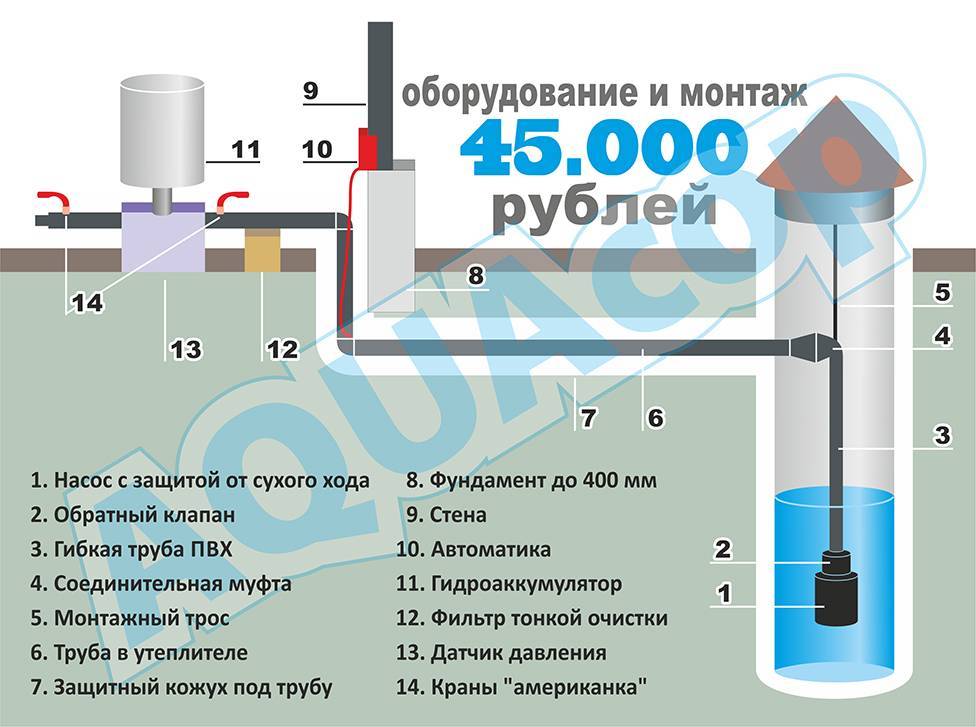
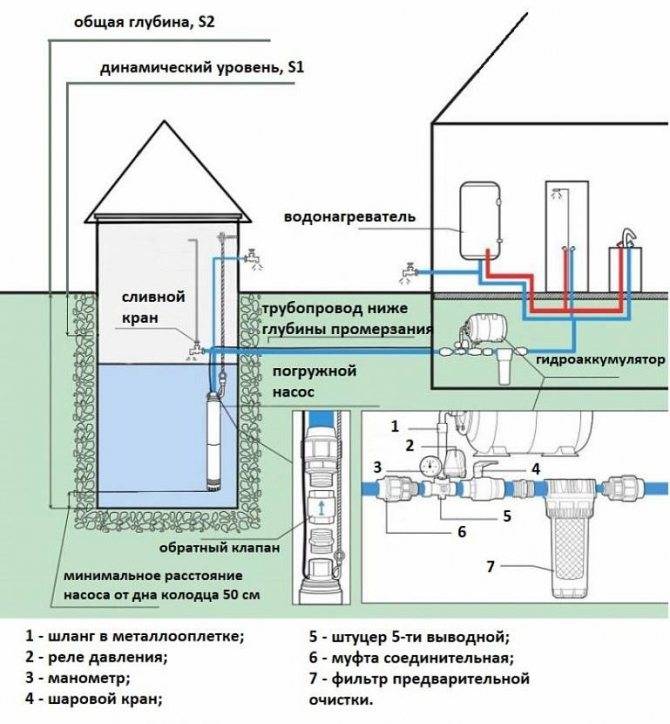
The composition of the plumbing system includes individual elements:
- water pump;
- pipes with shut-off and control valves;
- control devices, pressure adjustment - pressure gauge and relay;
- hydroaccumulating tank;
- drain device.
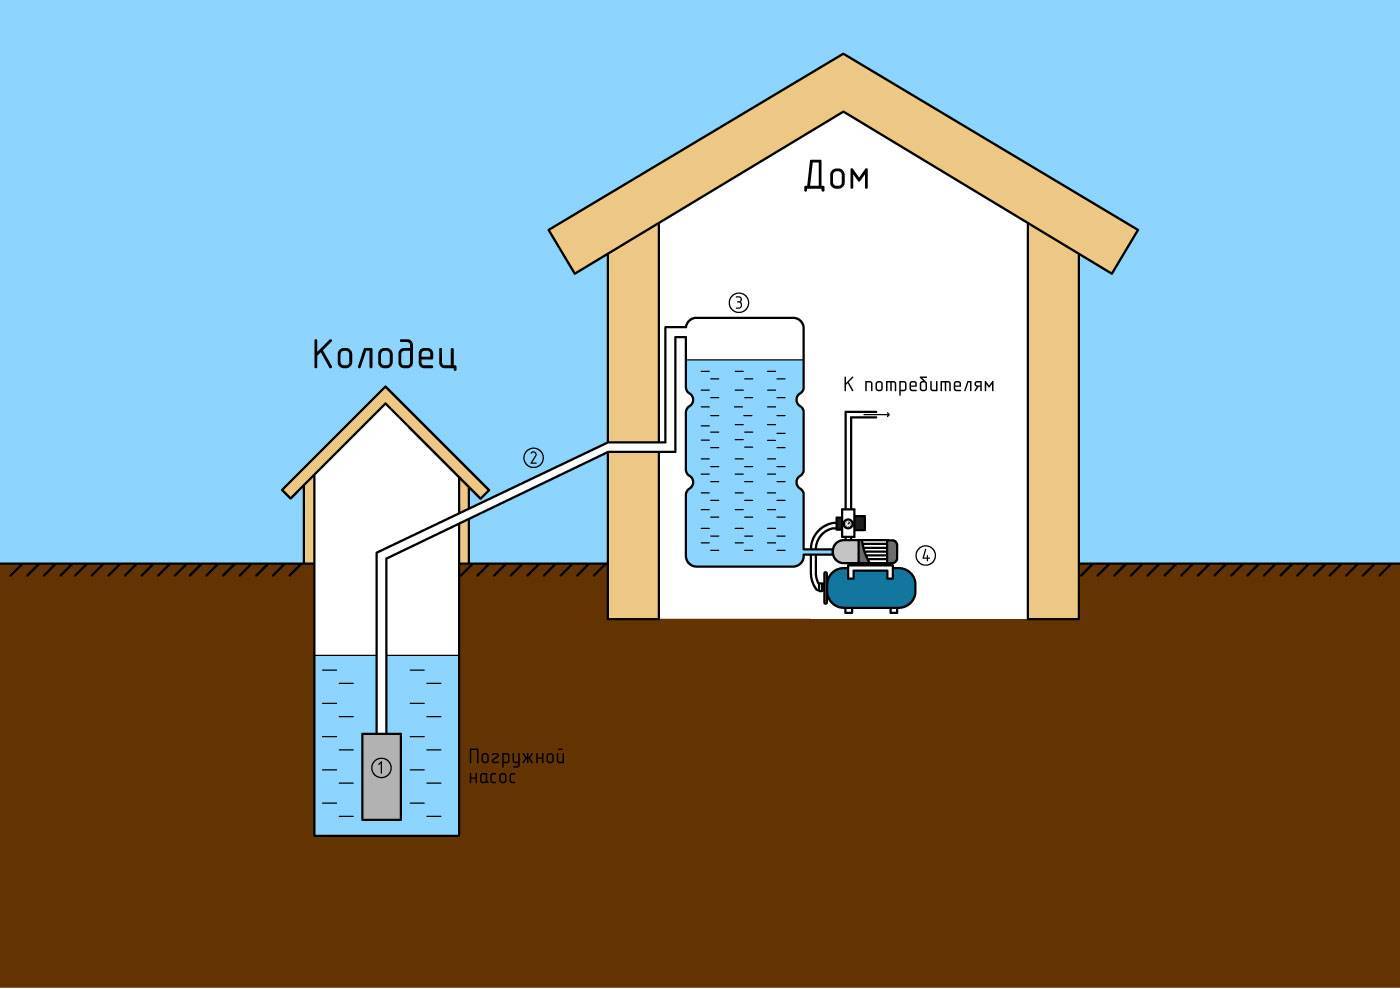
The scheme may include a storage tank, filtration devices, water heaters. In pumping stations, the main elements are not located separately, but are united by a common frame.
Pump selection
To choose a pump for a plumbing system, consider:
- depth of a well, well;
- consumed volume of liquid;
- source debit;
- water pressure.
In wells with a depth of more than 8 m, submersible pumps are lowered - centrifugal or vibration. They look like a long narrow cylinder. The working body of centrifugal pumps is the blades, which, when rotated, suck in water and push it into the pipeline. It is a reliable low noise and high performance design.


The vibration pump pumps liquid by constantly changing the position of the membrane. This is a detail that is sensitive to the purity of water - sand impurities disable it. The damage is fixed, but the repair is expensive.
On the street, valves made of cast iron, bronze or crane boxes are installed. In the premises - mixers that are not suitable for the street. Ball valves outdoors are undesirable. They react sensitively to temperature fluctuations, the case can collapse even during frost if there is some water left in it.
System pressure control.
For normal operation of the system, a constant pressure of 2.5-4.0 atm is maintained in it. Higher or lower is undesirable. These parameters are provided by a pressure switch and a hydraulic accumulator. They prevent water hammer, and when the upper threshold is exceeded, they turn off the pump.
It is more difficult to prepare a water tank for winter plumbing. It must be hidden indoors, for example in the attic.Reliable thermal insulation made of foam or mineral wool is required. A good cover is needed, otherwise small particles of insulation will enter the plumbing system.
Arrange sewerage.
In the country, it is necessary to build an independent sewerage system. The cesspool does not solve the problem - it does not meet sanitary standards, the relevant services may prohibit use.
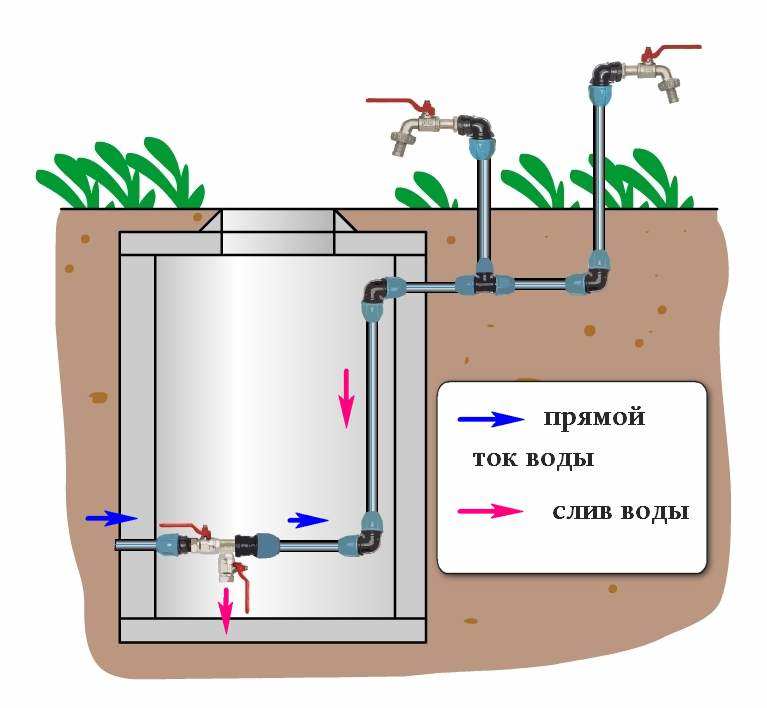
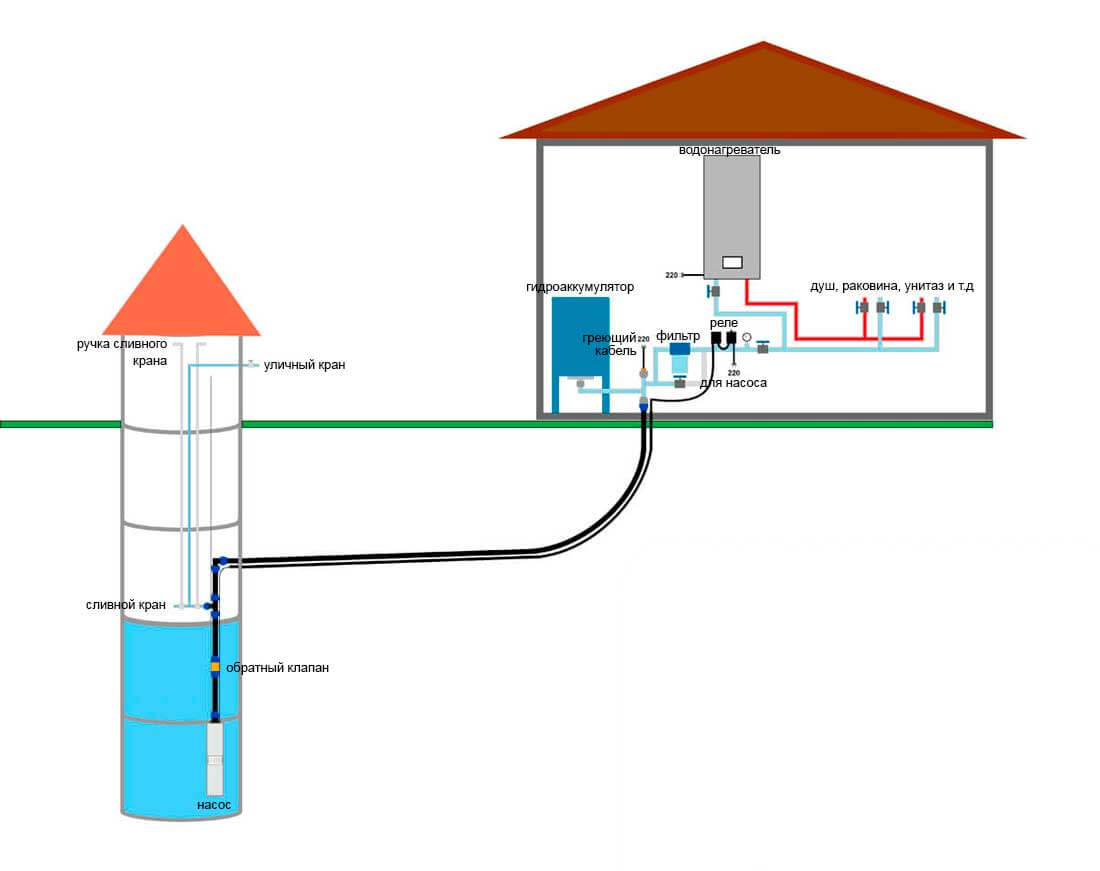
For repairs or when leaving for a long time, water is drained from the system. For this, a drain valve is used, which is installed at the lowest point after the pump. When the pump is turned off and the valve is opened, the water moves down the slope through the pipe back. In deep wells and wells, a bypass and a check valve are installed bypassing the main pipeline.
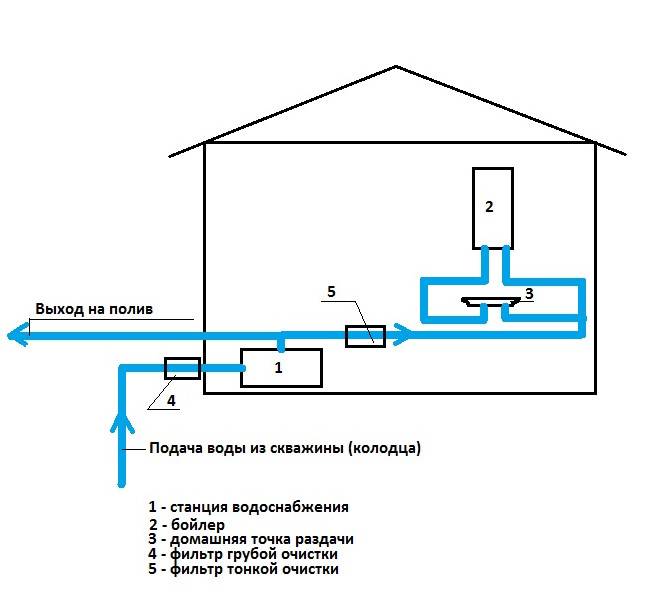
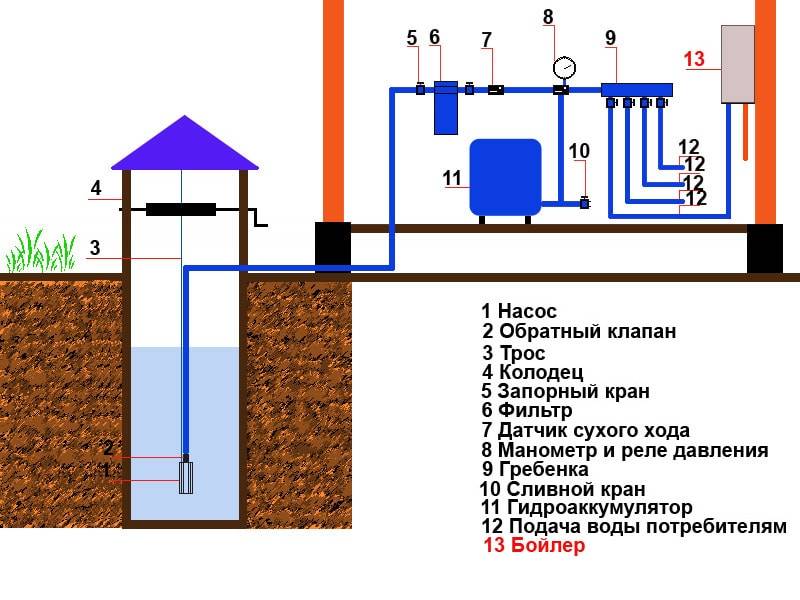
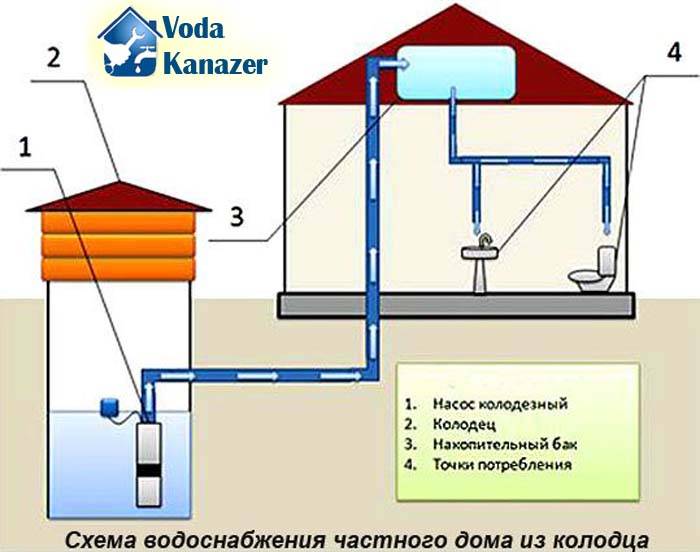
In a private house, a standard water supply scheme includes nodes and their components:
- pipes;
- pump and filters;
- pressure regulator;
- water accumulator;
- drain device.
In addition to the average set, this may include heating elements. It all depends on the complexity and functionality.
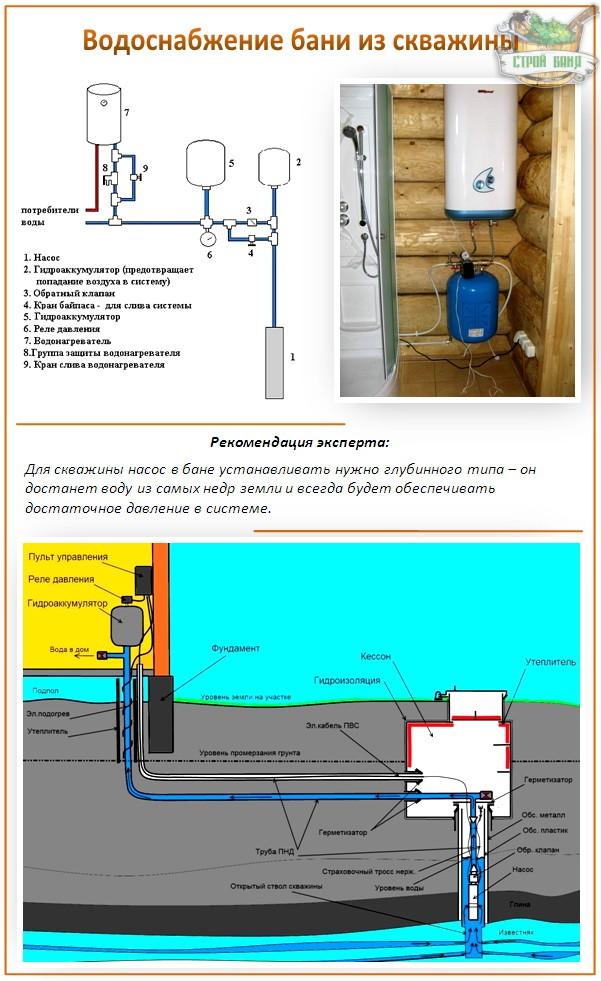
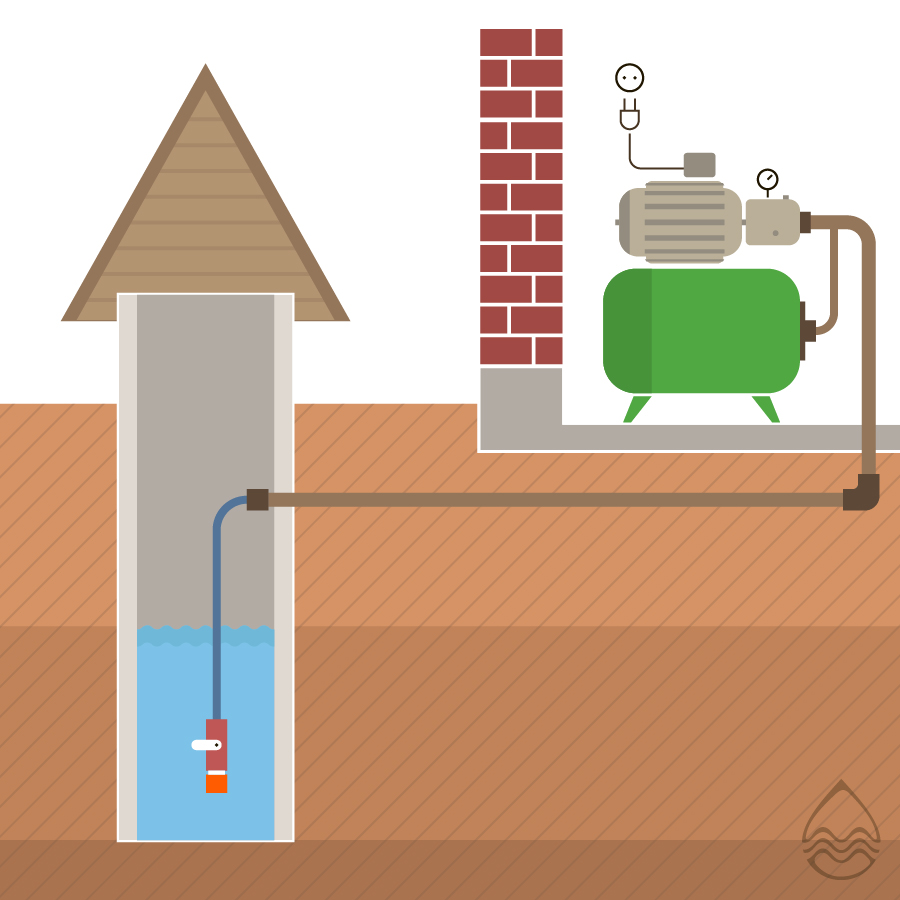
You will need a water pump to raise the water depth. It depends on the source of water intake (a simple well or a water well), the depth of occurrence, the required volume and productivity, and financial capabilities.
There are two types of deposits:
- Surface - makes it possible to pump water from a depth of up to 8 meters, located on the surface of the water surface or the earth.
- Deep - is able to pump water from a great depth, it works due to immersion in the aquatic environment. May be:
- Vibrating - act at the expense of the membrane, requires cleaning and frequent maintenance;
- Centrifugal - works due to the rotation of the blades, is reliable and has good performance.
The connection of the pump to the water supply, the quality and durability of operation will depend on the type chosen.
Both materials have their own individual differences:
- Polypropylene products cost more, require special equipment for connection, solder joints are distinguished by their strength and durability.
- Polyethylene pipes are cheap. However, they require expensive metal parts for connection, which cannot guarantee strong joints.
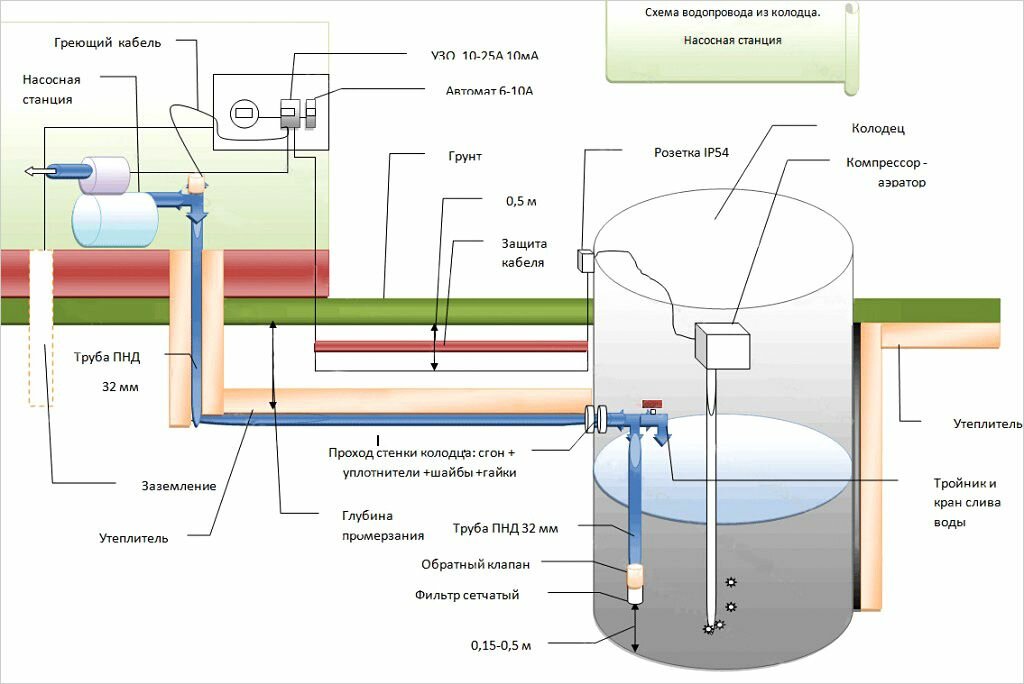
For winter construction, the pipeline is placed in a "cover" made of polypropylene, which protects against freezing. Under the cover, a heating cable runs parallel to the pipe, which maintains a positive temperature. Of course, it requires negligible energy costs.


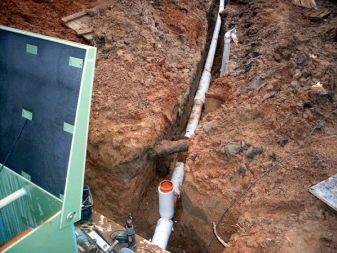
Outdoor piping
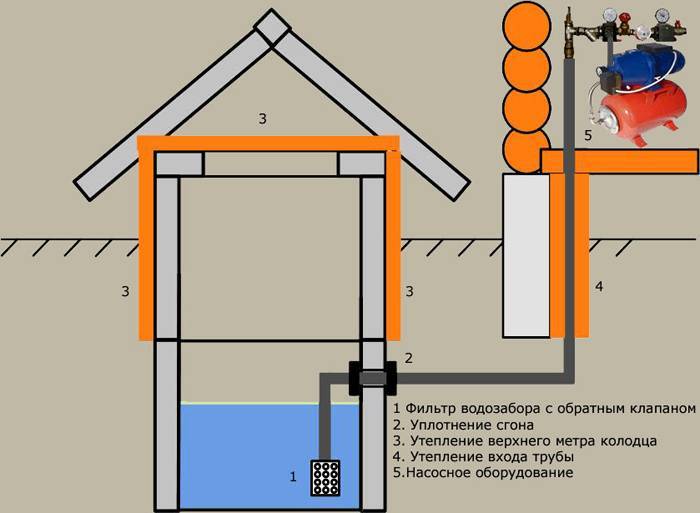
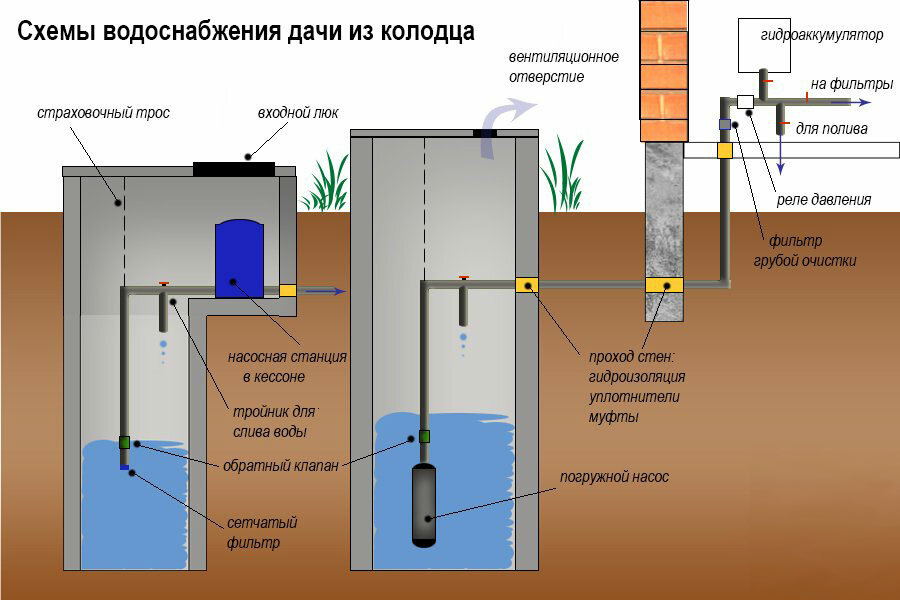
To enter the pipeline, a hole is punched in the wall of the well. The input should be well sealed after the laying of pipes and the complete completion of their installation. The input is connected to the well through an adapter, a pit or a caisson. Usually, the connection point should be located no higher than 1-1.5 m from the ground level.
Further work on the installation of water supply pipes is carried out in the same way for connecting to the well, and for the well:
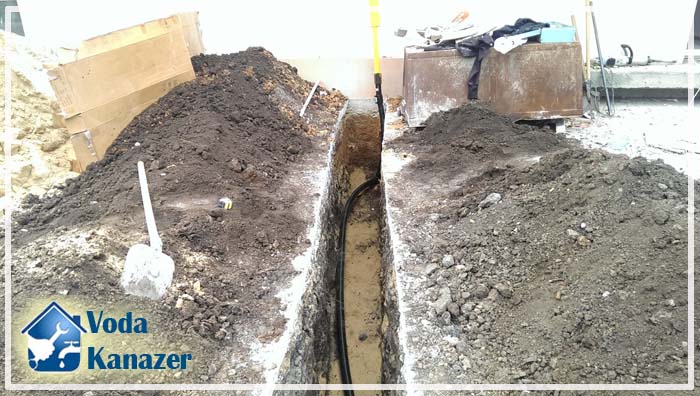
- First of all, it is necessary to dig a trench from the well to the walls of the house. In this case, the trench should be deepened 40-50 cm below the freezing level of the soil. An example installation diagram can be found online.
- Pipe wiring is carried out so that for each meter of length the excess is 15 cm. Therefore, they dig a trench with a slope. This will provide the necessary slope towards the intake structure.
- After digging the trench, its bottom is covered with sand to a height of 70-100 mm and rammed.
- Then all sections of the pipeline are laid and connected.
- After the pipes, the cable from the pump is laid in the trench.
- Before burying the trench, it is necessary to test the system at a pressure that is 1.5 times higher than the working one.
- If the system is functioning normally, the water supply can be buried. First, sand is poured to a height of 10 cm. The sand around the pipes should not be rammed too hard so as not to damage them. At the end, the trench is covered with soil.
If your dacha or country house is located in harsh climatic conditions, then the laying of pipes from a well or a well is carried out in a slightly different way. This option can also be used in mid-latitudes if you decide to arrange an input above the freezing level of the soil. Installation of external water supply pipes is carried out in the following order:
- The trench is dug to a depth of 60 cm.
- Its bottom is covered with a layer of expanded clay, slag or foam chips 150-200 mm high. The heater is rammed.
- Pipes must be insulated. To do this, a special insulation is wound around them and fixed with a corrugated casing. Also a good option for pipe insulation is the use of a heating cable. It is laid in a trench along with pipes.
- Then the pipes are covered with the same insulation from above to a height of up to 200 mm, it is slightly rammed.
- Further, the scheme of work is similar to the previous installation method. The system is checked, the trench is backfilled.
Preparatory work and installation steps
Pipes are not buried deep into the ground, as water is drained for the winter
The scheme of the water supply network on the plot will depend on which pipeline will be installed - permanent or collapsible.
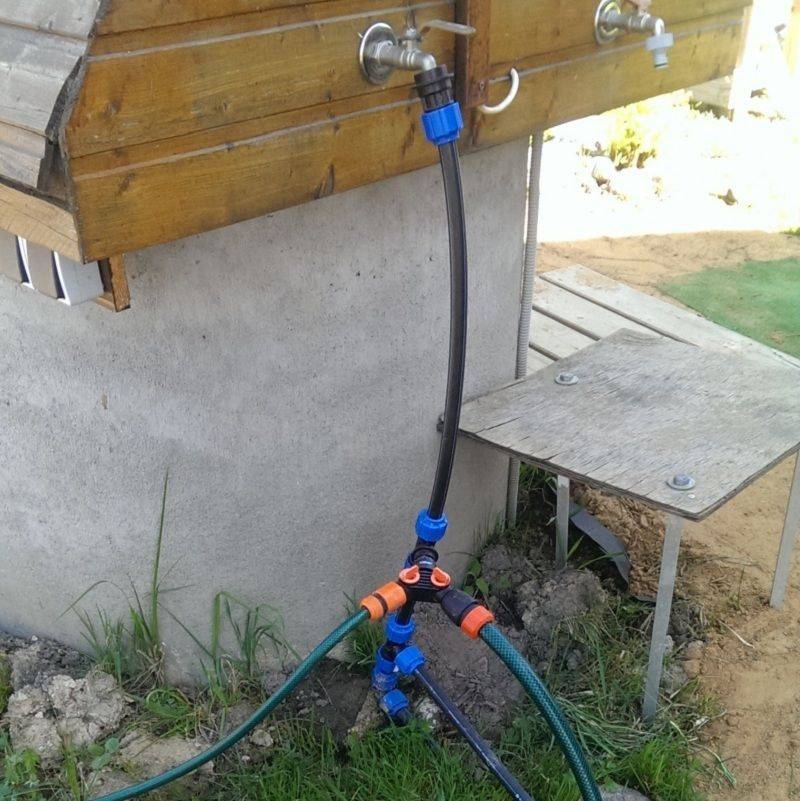
The latter option is much easier to make with your own hands. It consists of hoses that are made of silicone or plastic and connecting parts made of plastic, plastic or steel. Using special quality connections, you can create a dock that will not flow.
Most often, water pipes are made of polypropylene pipes, which are inclined relative to the source of water supply. The slope towards the drain valve should be approximately 8-15 degrees. If the water supply system is stationary, it is best to place it in shallow trenches, and bring several irrigation taps to the surface.
Before proceeding with the installation, you need to prepare a drawing to make it easier to calculate how much material will be needed. At this design stage, you need to calculate the number and size of pipes, other tools and materials.
After marking, you can start digging a trench. Its optimal depth is 0.4 meters, except when pipes are laid under the beds.
Watering can be done with an irrigation system or a hose. At the junction of the pipeline and the central line, a valve or an inlet valve is mounted. Pipes made of low-pressure polyethylene are connected to the inlet valve with a coupling. It is located on the outer and inner side - it depends on the location of the thread. After fixing the connection, a piece of pipe with a hose and a tee are mounted.
Pipe bending
When installing a summer water supply system in a country house, it is important to know in what ways pipes can be bent so as not to violate their integrity.
- To carry out the bend, you will need several plugs that are filled with sand.This method minimizes the chance of crack formation. Alternatively, wooden chopsticks can be used instead of plugs. Pipes are made of different strengths, therefore, it is difficult to say how much effort will have to be applied. The easiest bending method is to insert another one, but with a small section, into the pipe, find the stop and give it the desired shape, exerting a physical impact.
- Pipes of square shape and large diameter are bent with a burner and sand.
- For aluminum and steel pipes, you will also need a torch. The product is covered with sand and plugs are placed on both sides. The required area is heated red-hot and bent.
If used incorrectly, the burner can leave a hole in the building material, so it is recommended to move it aside regularly.
How to manually bend pipes
To independently bend pipes made of metal-plastic, you must strictly follow the following recommendations:
- Bend slowly and without sudden movements.
- To get the required angle of inclination, it is necessary to lay pieces of wire before bending.
- The larger the lever of the pipe put on the structure, the easier it is to bend it.
To bend polypropylene pipes, heat the required area with a hair dryer to 150 degrees. The segment with the thickest wall is bent. They also bend the building material without preheating, but then the maximum angle of inclination will be 8 degrees. Before filling the system with water, the pipes are checked for defects and damage.