- Preparatory stage
- Device and principle of operation
- Operating principle
- Difference from synchronous generator
- Connecting consumers
- About security
- Necessary tools and materials
- DIY wind turbine blades
- Step by step instructions for making
- Do-it-yourself principles for making blades for a wind generator
- Materials and tools
- Drawings and calculations
- Production from plastic pipes
- Making blades from billets of aluminum
- fiberglass screw
- How to make a blade out of wood?
- We make a windmill with our own hands
- Homemade wind generator: advantages and disadvantages
- Independent, almost cost-free, manufacture of wind turbines
- The essence of functioning
- Where to start and what is required?
- The legality of installing a wind turbine
- Who benefits?
- Summing up
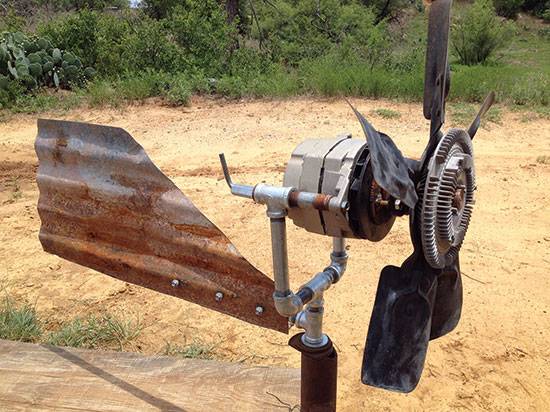
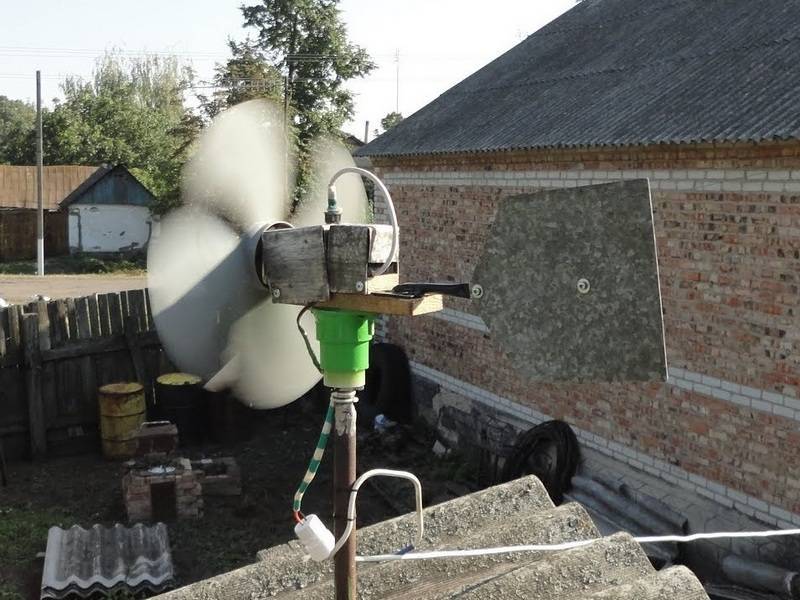
Preparatory stage
Before proceeding with the creation of a wind turbine, it is necessary to prepare and assemble all the constituent elements of the future design. Preparation begins with the choice of a car generator. It must have increased power, so the unit from a truck or bus is best suited. All other nodes are recommended to be taken from the same machine so as not to violate the completeness.First of all, this applies to the battery, relay and other parts.
Since consumers must be provided with alternating current, care must be taken in advance to purchase an inverter or other converter. The power of the inverter must match the power of the future wind generator.
- Generator
- Accumulator battery
- Battery Charging Relay
- Voltmeter
- blade material
- Bolts complete with nuts and washers
- Clamps for fastenings
Other details may be required, depending on the individual design features. Further, before making a windmill with your own hands from a car generator, you need to perform calculations that use the power of the generator and inverter, battery capacity and other parameters, including the number of consumers in the house. The calculation of power should be made depending on the pressure of the wind and the area of the blades that are affected by the wind. Typically, the installation starts at wind speed 2 m/s, and the maximum efficiency occurs at 10-12 m/s.
Of all the proposed formulas, it is recommended to use the simplest. To determine the power of the installation, it is necessary to multiply the screw area by a factor of 0.6. The resulting value is again multiplied by the wind speed raised to the third power. The final result is compared with potential needs. If there is enough power, then you can proceed with the installation of the installation. If the needs are not met, in this case, you can use several low-power wind turbines or a hybrid installation, consisting of which includes solar panels.
In most private houses, the average monthly electricity consumption is 360 kW, with an average load of 0.5 kW and a peak load of 5 kW. Thus, a wind generator with a power of 5 kW is required, capable of pulling the existing load. If the consumption exceeds the standard value or the wind is consistently weak, the installation will not be able to work normally under these conditions.
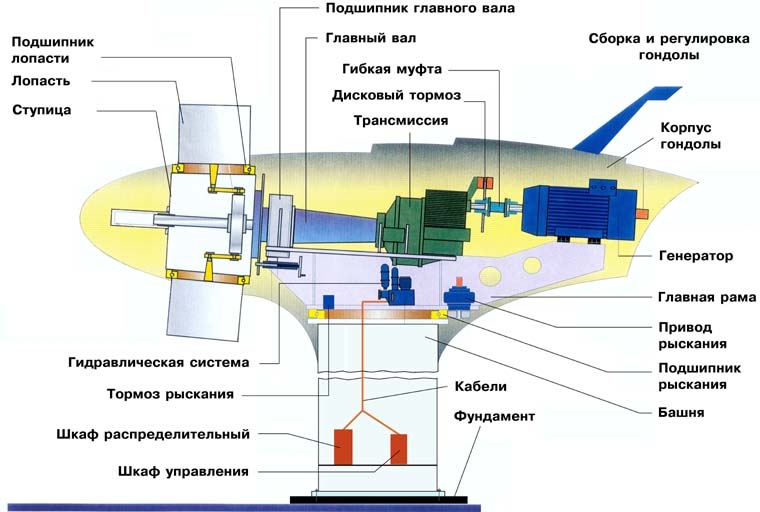
Device and principle of operation
A generator is an electrical machine that converts mechanical energy into electrical current. In most cases, a rotational type of magnetic field is used for this. The device consists of a relay, a rotating inductor, slip rings, a terminal, a sliding brush, a diode bridge, diodes, a slip ring, a stator, a rotor, bearings, a rotor shaft, a pulley, an impeller and a front cover. Often, the design includes a coil with an electromagnet, which generates energy.
 DIY generator
It is important to note that the generator is AC and DC. In the first case, eddy currents are not generated, the device can operate under extreme conditions and has a reduced weight.
In the second case, the generator does not need increased attention and has more resources.
There is an alternator synchronous and asynchronous. The first is a unit that works as a generator, where the number of rotations of the stator is equal to the rotor. The rotor generates a magnetic field and creates an EMF in the stator.
Note! The result is a permanent electric magnet.Of the advantages, the high stability of the generated voltage is noted, of the disadvantages is the current overload, since with an excessive load, the regulator increases the current in the rotor winding

The asynchronous apparatus consists of a squirrel-cage rotor and exactly the same stator as the previous model. At the moment of rotation of the rotor, the asynchronous generator induces an electric current and the magnetic field creates a sinusoidal voltage. Since it has no connection with the rotor, there is no possibility to artificially regulate the voltage and current. These parameters change under electrical load on the starter winding.
 Asynchronous apparatus device
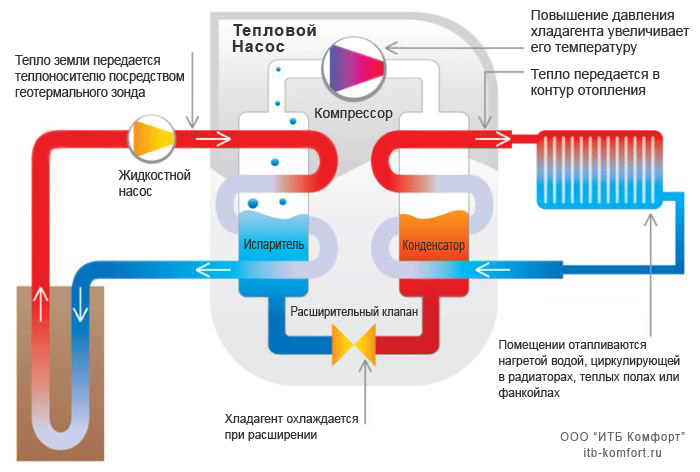
Operating principle
Any generator operates according to the electromagnetic inductive law, due to the induction of electric current in a closed loop by crossing a rotating magnetic field created using permanent magnets or windings. The electromotive force enters a closed circuit from the collector and the brush assembly along with the magnetic flux, the rotor rotates and generates voltage. Thanks to spring-loaded brushes, which are pressed against the plate collectors, an electric current is transmitted to the output terminals. Then it goes to the user's network and spreads through the electrical equipment.
 Principle of operation
Difference from synchronous generator
A synchronous gasoline generator is not overloaded due to transient conditions that are associated with starting under load from consumers of similar power. It is a source of reactive power, while asynchronous consumes it. The first is not afraid of overloads in the set mode thanks to the auto-regulation system through a connection that is inverse to the current with the voltage in the wire.The second has an artificially unregulated cohesion force of the electromagnetic rotor field.
Note! It is important to understand that the asynchronous variety is more popular due to its simple design, unpretentiousness, lack of need for qualified technical maintenance and comparative cheapness. It is set when: there are no high requirements for frequency with voltage; it is supposed to work the unit in a dusty place; there is no way to overpay for another variety
 Synchronous variety
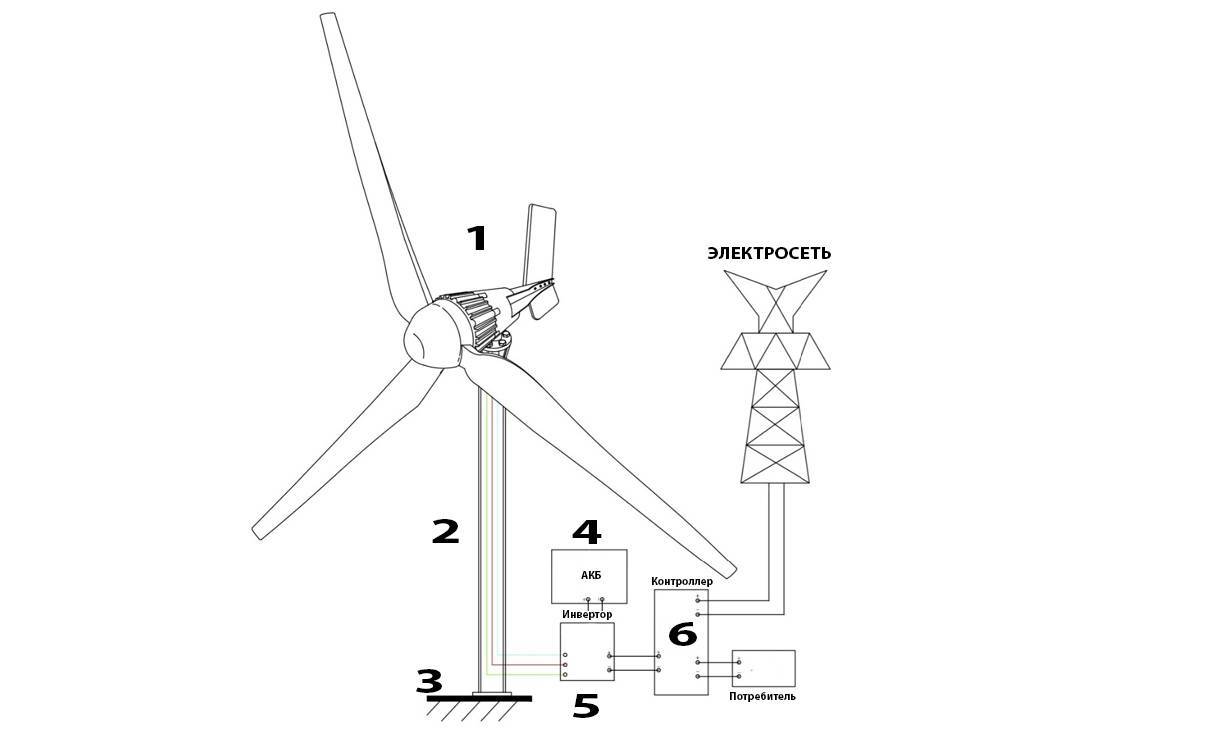
Connecting consumers
We have already managed to make a low-noise windmill, and quite powerful. It's time to connect the electronics to it. When assembling wind turbines with your own hands for 220V, you need to take care of purchasing inverter converters. The efficiency of these devices reaches 99%, so the losses in the conversion of the supplied DC into alternating current with voltage 220 volts will be the minimum. In total, the system will have three additional nodes:


- Battery pack - accumulates excess generated electricity for future use. These surpluses are used to feed consumers during periods of calm or at times when it blows very weakly;
- Charge controller - controls the charging current, extending the life of the batteries;
- Converter - converts direct current into alternating current.
A scheme is also possible when household appliances and lighting devices are installed in the house that can operate with a voltage of 12 or 24 Volts. In this case, the need for an inverter converter is eliminated.As for the power supply for cooking appliances, in order not to create an excessive load on the wind generator, we recommend using gas equipment powered by a liquefied gas cylinder.
About security
The safety issue of using a wind turbine is not an easy one. Windmill blades at high speeds and large sizes can cause serious injury, even death. In addition, high masts are dangerous when strong winds occur, as they can tip over on residential buildings, people who are nearby, damage property or buildings.
At the same time, most opponents of wind energy find problems in the wrong places. There are a lot of statements about the dangers of devices:
- presence of noise
- vibration
- flickering shadow contributing to neuropsychiatric disorders
- magnetic background
- interference with radio and television receivers
- intolerance to installations by animals, danger to birds
Most of these statements are the result of arguments contrived by opponents of autonomous power sources. They do exist, but the magnitude of the problems is so untrue that they simply don't deserve time to be discussed. If wind turbines pose a danger, then only for representatives of resource supply companies who do not want to lose customers.
However, powerful industrial installations used as part of large power plants can create inconvenience for residents, as proven in a US court. Windmills produced infrasound, which caused health problems among the Indians who lived on a reservation at a distance of 200 km.However, given the size and power of a private windmill, there is no need to talk about the harm from it.
Necessary tools and materials
To make a homemade windmill, you will need the following parts:
- rotor with blades;
- gearbox to control the speed of rotation of the rotor;
- gel or alkaline battery for powering electrical appliances;
- inverter for current transformation;
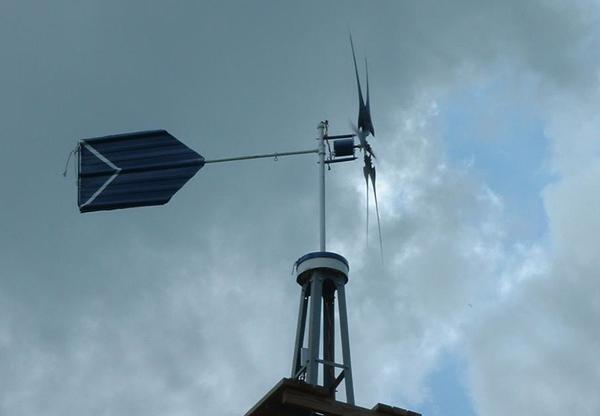
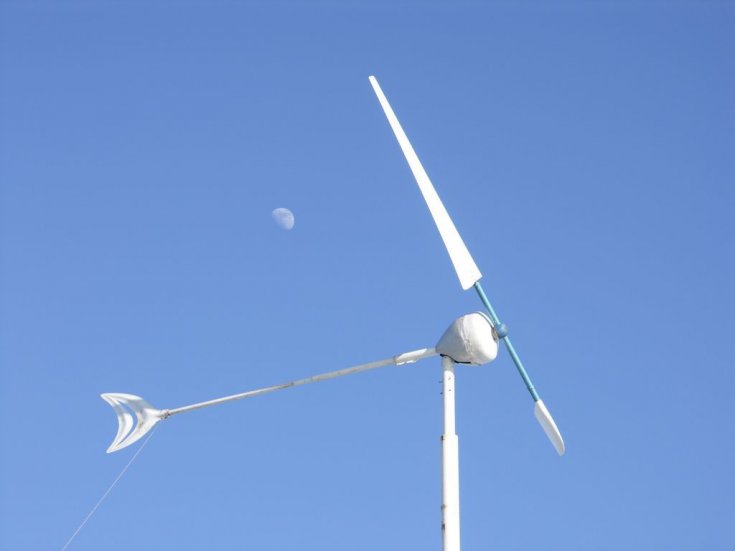
- tail section;
- mast.
The rotor with blades can be made independently, while the rest of the elements will probably have to be bought or assembled from the necessary parts. In addition, to assemble a homemade windmill, you will need the following tools and materials:
- saw on wood;
- metal scissors;
- hot glue;
- soldering iron;
- drill.
Be sure to need screws and bolts to connect the blades to the hub and to fasten the metal pipe to the wood.
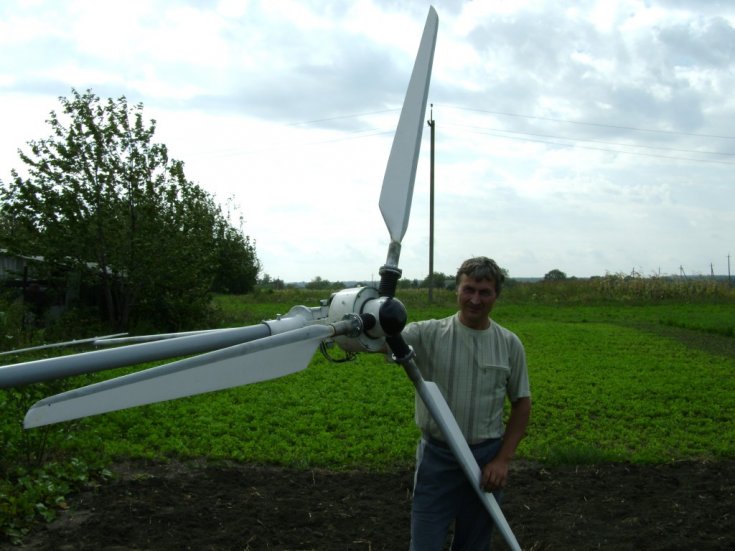
DIY wind turbine blades
When making the blades on your own, you should pay special attention to observing the shape of the products specified by the drawing. The blades can be winged or sail type. The second one is simpler to manufacture, but has a low efficiency, which makes it inefficient in home-made wind turbines, even of medium size.
The second one is simpler to manufacture, but has a low efficiency, which makes it inefficient in home-made wind turbines, even of medium size.
For making blades homemade wind generator suitable materials such as:
- plastic;
- wood;
- aluminum;
- fiberglass;
- polyvinyl chloride.
The device of the bladed part of the wind generator
If you choose polyvinyl chloride, then PVC pipes with a diameter of 160 mm or more are perfect for creating blades.Plastic and wood are less wear-resistant materials that, under the influence of precipitation and strong winds, will become unusable in a few years. The best option is aluminum: it is durable and lightweight, resistant to tearing and creases, immune to moisture and elevated temperatures.
Step by step instructions for making
When all the drawings have been drawn up, and the materials and tools have been prepared, you can begin to assemble the wind generator with your own hands, guided by the following order:
- Prepare concrete foundation. The depth of the pit and the volume of the concrete mixture is calculated based on the type of soil and climatic conditions. After pouring the foundation, it takes several weeks to gain the desired strength. Only after that it is possible to install a mast into it to a depth of 60-70 cm, securing it with braces.
- Place the prepared blades into the pipe, fasten them with screws and nuts to the hub on which the engine will be installed.
- Position the diode bridge next to the motor and secure it with self-tapping screws. Connect a wire from the motor to the positive diode bridge and the other wire to the negative bridge.
- Fasten the motor shaft, put the bushing on it and tighten it tightly counterclockwise.
- Balance the base of the tube with the motor and shaft attached to it and mark the balance point.
- Fix the base of the device with screws.
A wind generator can last much longer if you paint not only the blades, but the base, shaft and engine cover. To turn on the unit, you will need a set of wires, a charger, an ammeter and a battery.
Do-it-yourself principles for making blades for a wind generator
Often, the main difficulty is determining the optimal dimensions, since its performance depends on the length and shape of the wind turbine blades.
Materials and tools
The following materials form the basis:
- plywood or wood in another form;
- fiberglass sheets;
- rolled aluminum;
- PVC pipes, components for plastic pipelines.
 DIY wind turbine blades
Choose one type of what is available in the form of residues after repair, for example. For their subsequent processing, you will need a marker or pencil for drawing, a jigsaw, sandpaper, metal scissors, hacksaw.


Drawings and calculations
If we are talking about low-power generators, the performance of which does not exceed 50 watts, a screw is made for them according to the table below, it is he who is able to provide high speeds.
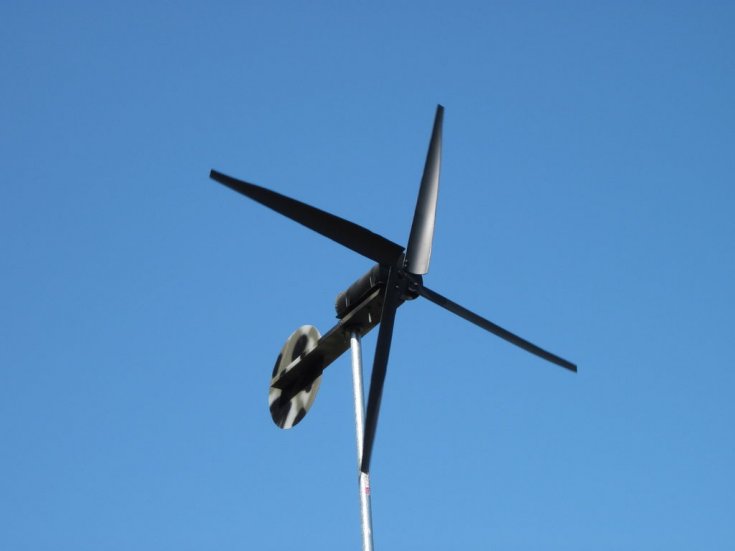
Next, a low-speed three-blade propeller is calculated, which has a high starting rate of breakaway. This part will fully serve high-speed generators, whose performance reaches 100 watts. The screw functions in tandem with stepper motors, low-voltage low-power motors, car generators with weak magnets.
From the point of view of aerodynamics, the propeller drawing should look like this:
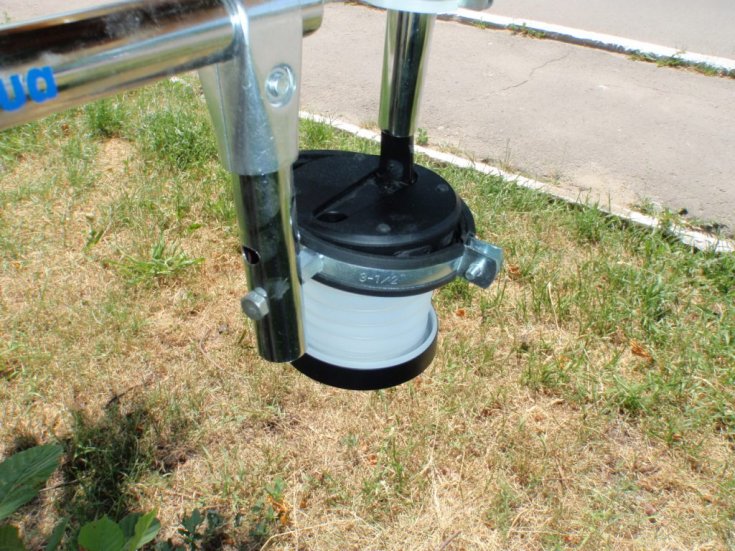
Production from plastic pipes
Sewer PVC pipes are considered the most convenient material; with a final screw diameter of up to 2 m, workpieces with a diameter of up to 160 mm are suitable. The material attracts with ease of processing, affordable cost, ubiquity and abundance of already developed drawings, diagrams
It is important to choose high-quality plastic to prevent cracking of the blades.
The most convenient product, which is a smooth gutter, it only needs to be cut in accordance with the drawing. The resource is not afraid of exposure to moisture and is undemanding in care, but can become brittle at sub-zero temperatures.
Making blades from billets of aluminum
Such screws are characterized by durability and reliability, they are resistant to external influences and are very durable. But keep in mind that they turn out to be heavier as a result, when compared with plastic ones, the wheel in this case is subjected to scrupulous balancing. Despite the fact that aluminum is considered quite malleable, working with metal requires the presence of convenient tools and minimal skills in handling them.
The form of material supply can complicate the process, since common aluminum sheet turns into blades only after giving the blanks a characteristic profile; for this purpose, a special template must first be created. Many novice designers first bend the metal along the mandrel, after which they move on to marking and cutting blanks.
 Blades made of billet aluminum
Aluminum blades show high resistance to loads, do not react to atmospheric phenomena and temperature changes.
fiberglass screw
It is preferred by experts, as the material is capricious and difficult to process. Sequencing:
- cut out a wooden template, rub it with mastic or wax - the coating should repel glue;
- first, one half of the workpiece is made - the template is smeared with a layer of epoxy, fiberglass is laid on top. The procedure is promptly repeated until the first layer has had time to dry. Thus, the workpiece receives the required thickness;
- perform the second half in a similar way;
- when the glue hardens, both halves can be connected with epoxy with careful grinding of the joints.
The end is equipped with a sleeve, through which the product is connected to the hub.
How to make a blade out of wood?
This is a difficult task due to the specific shape of the product, in addition, all the working elements of the screw should eventually turn out to be identical. The disadvantage of the solution also recognizes the need for subsequent protection of the workpiece from moisture, for this it is painted, impregnated with oil or drying oil.
Wood is not desirable as a material for a wind wheel, as it is prone to cracking, warping, and rotting. Due to the fact that it quickly gives and absorbs moisture, that is, it changes mass, the balance of the impeller is arbitrarily adjusted, this negatively affects the efficiency of the design.
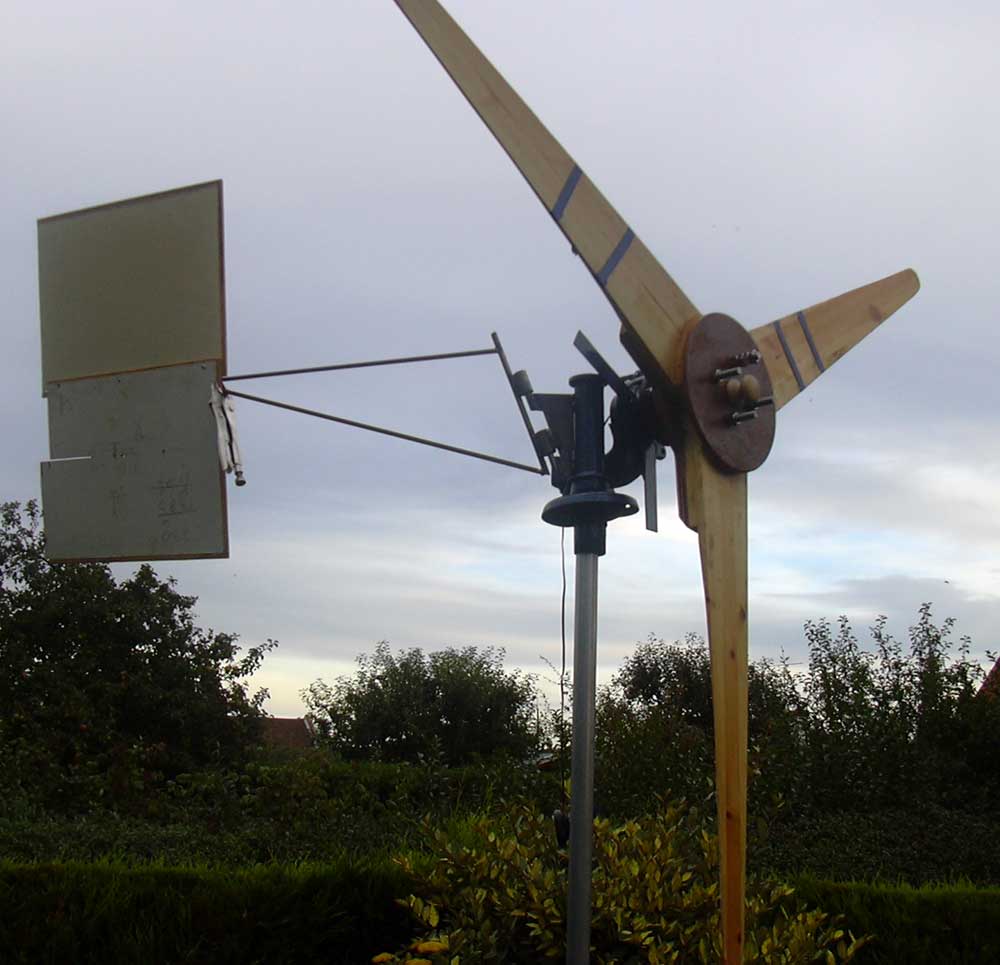
We make a windmill with our own hands
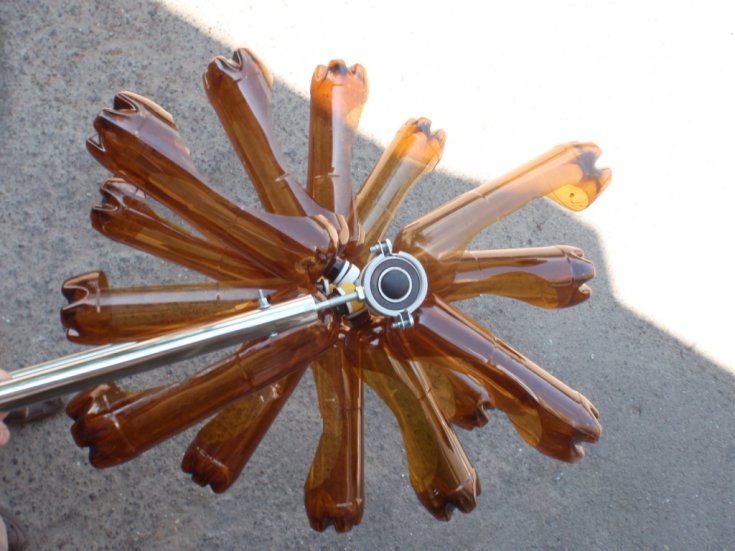
1. Wind turbine blades
The wind wheel is the most significant structural element of the device. It converts wind force into mechanical energy. Thus, the selection of all other elements depends on its structure.
The most common and effective types of blades are sail and vane. For the manufacture of the first option, it is necessary to fix a sheet of material on the axis, placing it at an angle to the wind flow. However, during rotational movements, such a blade will have significant aerodynamic resistance. In addition, it will increase with an increase in the attacking angle, which reduces the effectiveness of their functioning.
The second type of blades works with higher productivity - winged ones. In their outlines, they resemble the wing of an aircraft, and the costs of the friction force are reduced to a minimum. This type of wind turbine has a high energy utilization factor wind at low material costs.
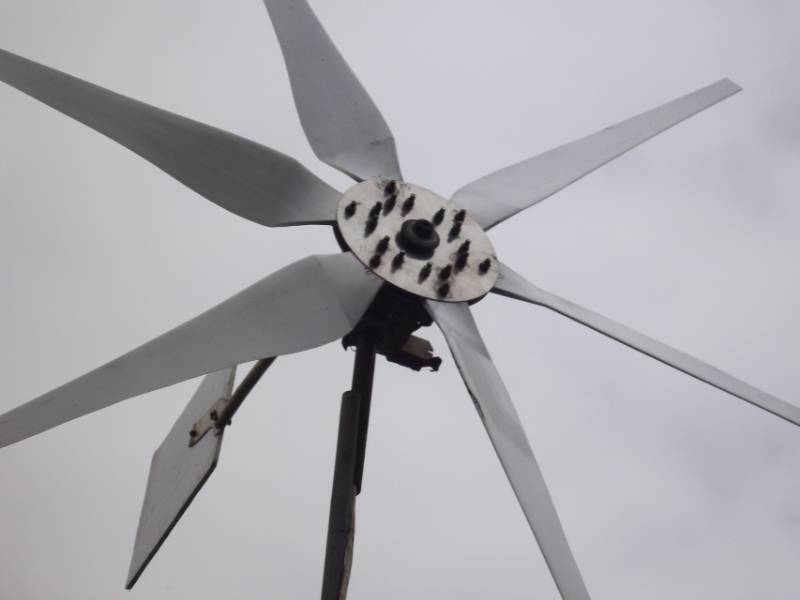
The blades can be made from plastic or plastic pipe as it will be more productive than wood. The most efficient is the wind wheel structure with a diameter of two meters and six blades.
2. Wind turbine generator
The most acceptable option for wind generating equipment is a converting asynchronous generating mechanism with alternating current. Its main advantages are low cost, ease of acquisition and breadth of distribution of models, the possibility of re-equipment and excellent operation at low speeds.


It can be transformed into a permanent magnet generator. Studies have shown that such a device can be operated at low speeds, but quickly loses efficiency at high speeds.
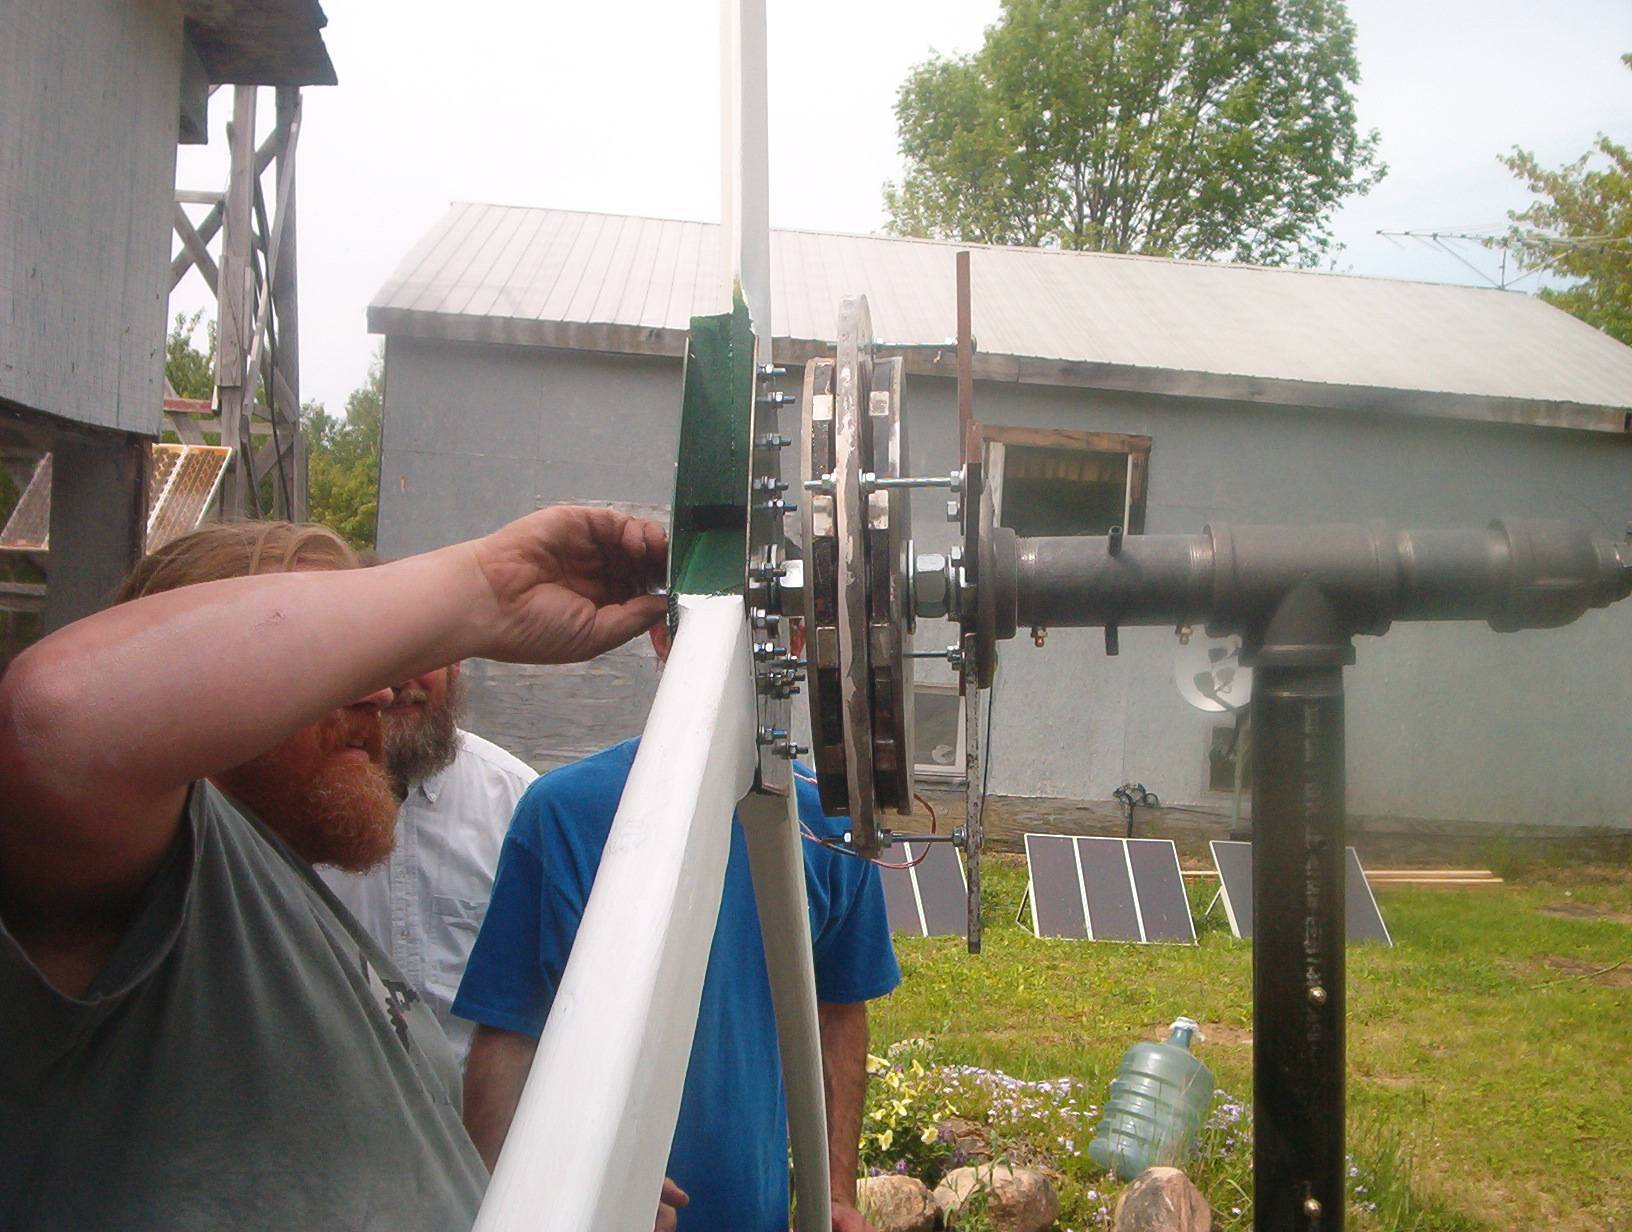
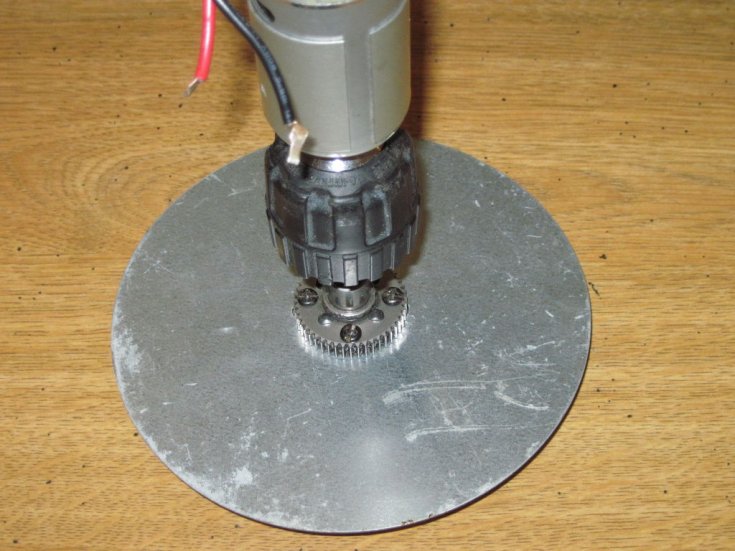
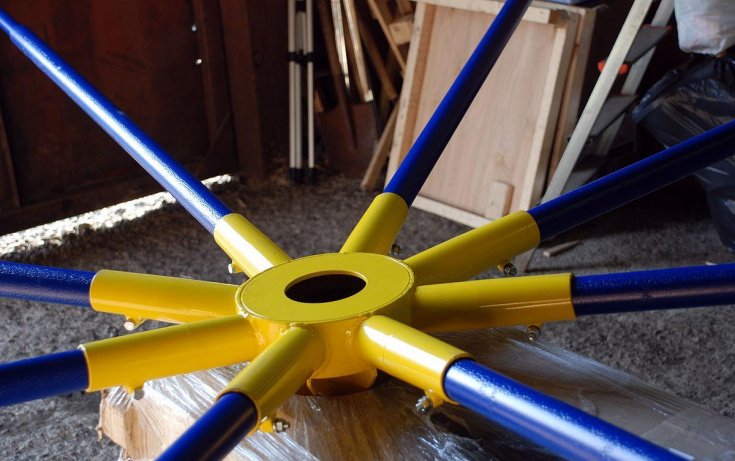
3. Wind turbine mount
To fix the blades to the casing of the generator, it is necessary to use the head of the wind turbine, which is a steel disk with a thickness of up to 10 mm. Six metal strips with holes are welded to it for attaching the blades to them. The disk itself is attached to the generating mechanism using bolts with locknuts.
Since the generating device is able to withstand maximum loads, including from gyroscopic forces, it must be firmly fixed.On the device, the generator is installed on one side, for this the shaft must be connected to the body, which looks like a steel element with threaded holes for screwing onto the generator axis of the same diameter.
For the production of a support frame for wind-generating equipment, on which all other elements will be placed, it is necessary to use a metal plate with a thickness of up to 10 mm or a piece of a beam of the same dimensions.
4. Wind turbine swivel
The rotary mechanism provides rotational movements of the windmill around a vertical axis. Thus, it makes it possible to turn the device in the direction of the wind. For its manufacture, it is better to use roller bearings, which more effectively perceive axial loads.
5. Current receiver
The pantograph functions to reduce the likelihood of twisting and breaking the wires coming from the generator on the windmill. It contains in its design a sleeve made of insulating material, contacts and brushes. To create protection from weather phenomena, the contact nodes of the current receiver must be closed.
Homemade wind generator: advantages and disadvantages
Installing a wind turbine may be necessary if electricity is not supplied to your site, there are constant interruptions in the power grid, or you want to save on electricity bills. The windmill can be purchased, or you can make your own.
A homemade wind generator has the following advantages:
- It allows you to save money on the purchase of a factory device, because the manufacture is most often made from improvised parts;
- Ideal for your needs and operating conditions, because you calculate the power of the device yourself, taking into account the density and strength of the wind in your area;
- It harmonizes better with the design of the house and landscape design, because the appearance of the windmill depends only on your imagination and skills.
The disadvantages of home-made devices include their unreliability and fragility: home-made products are often made from old engines from household appliances and cars, so they quickly fail. However, in order for the wind turbine to be efficient, it is necessary calculate correctly device power.
Independent, almost cost-free, manufacture of wind turbines
Step-by-step instructions: how to make a wind generator with your own hands from unusable car parts and a piece of plastic pipe:
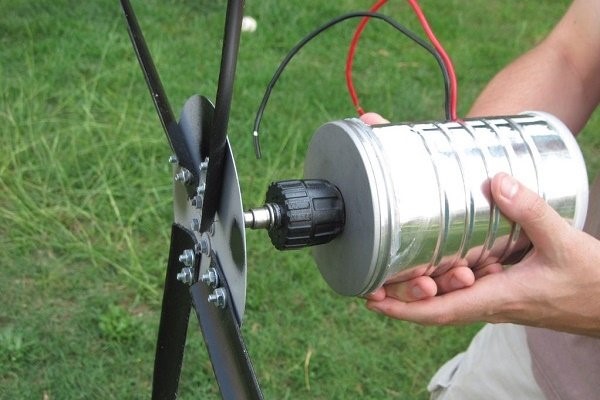
- Disassemble the car alternator.
- With a wire Ø 0.56 mm, make a 35 turn new winding of 36 stator coils.
- Assemble the generator, varnish and paint.
- In parallel, connect the wires of the generator, and bring 3 out.
- Weld bearings to the axis of rotation.
- Make the tail section of a galvanized steel sheet with a thickness of at least 0.4 cm.
- Fix the blades made of plastic pipe with screws.
- Assemble the wind generator and test it.


In order to avoid conflict with local authorities, it is necessary to find out if there are legal restrictions on the use of domestic wind turbines in the given region.

The essence of functioning
It is simple for such structures. The rotating rotor allows you to get a three-phase current. He, after passing the controller, recharges the battery.Further, thanks to the inverter, it is converted to a “state” suitable for use by household appliances - refrigerators, televisions, microwave ovens, washing machines and boilers, etc.
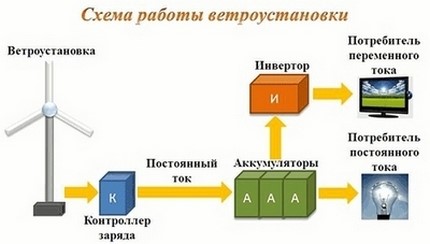
Some of it is accumulated, the rest is consumed by appliances.
The blades are subjected during rotation to three influences at once:
- lifting force;
- impulse;
- braking.
The last two try to overcome the braking force, make the flywheel rotate, due to which, the rotor creates a magnetic field in the stationary part of the generator, forcing current to flow through the wires.
Where to start and what is required?
In order to assemble a small asynchronous generator with your own hands, you will need the following structural details:
- Engine - you can make it yourself, but it is quite lengthy and laborious, so it's better to save time and take the engine from old non-working household appliances. The engine from the washing machine and drainage pumps are well suited.
- Stator - it is better to take a ready-made version, where the winding will already be located.
- Electric wires, as well as electrical tape.
- A transformer or rectifier is needed when the output electricity has a different power.
So, let's get to work, having previously performed several preparatory manipulations that allow us to calculate the power of the future generator:
- We connect the motor to the network to determine the rotation speed. To do this, you need to use a special device - a tachometer.
- We write down the obtained value and add 10% to it, the so-called compensatory value, which will prevent the engine from overheating during operation.
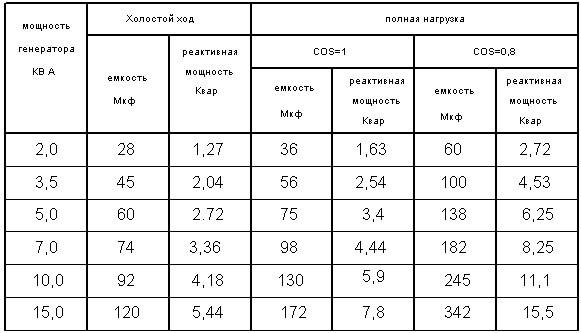
- We select capacitors, taking into account the required power.For convenience, the values can be taken from the table below.
Since the generator produces electricity, you need to take care of its grounding. Lack of grounding and poor insulation can cause not only rapid wear of the device, but also pose a danger to life.


The assembly process itself is extremely simple: we connect the capacitors to the engine in turn, guided by the indicated scheme. The diagram shows the sequence of connection, while the capacitance of each subsequent capacitor is similar to the previous one.
This is all that is needed to obtain a low-power generator capable of supplying electricity to an electric saw, grinder or circular saw.
This option for creating a generator is the simplest and most convenient, but it has its own nuances:
Firstly, you will have to constantly monitor the temperature of the engine, preventing it from overheating. Secondly, if the efficiency decreases in direct proportion to the duration of work, this is the norm. Therefore, from time to time, the generator must be allowed to rest, reducing its temperature to 40-45 ° C. Thirdly, the lack of automation will force the user to independently control all processes, periodically connecting measuring instruments to the generator (voltmeter, ammeter and tachometer)
Before assembling, it is important to choose the right equipment, having calculated its main indicators and characteristics. The drawing and diagram will greatly facilitate the work process
wood burning generator or a wind turbine can be assembled in a similar way, however, to obtain the desired output voltage, a sufficient amount of energy will be required.
The legality of installing a wind turbine
Alternative energy sources are the dream of any summer resident or homeowner whose site is located far from the central networks. However, when we receive bills for electricity consumed in a city apartment, and looking at the increased tariffs, we realize that a wind generator created for domestic needs would not hurt us.
After reading this article, perhaps you will make your dream come true.
A wind generator is an excellent solution for providing a suburban facility with electricity. Moreover, in some cases, its installation is the only possible way out.
In order not to waste money, effort and time, let's decide: are there any external circumstances that will create obstacles for us in the process of operating a wind turbine?
To provide electricity to a dacha or a small cottage, a small wind power plant is sufficient, the power of which will not exceed 1 kW. Such devices in Russia are equated to household products. Their installation does not require certificates, permits or any additional approvals.
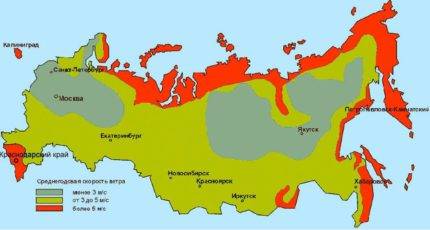
In order to determine the feasibility of installing a wind generator, it is necessary to find out the wind energy potential of a particular area (click to enlarge)
However, just in case, you should ask if there are any local regulations regarding individual power supply that could create obstacles in the installation and operation of this device.
Claims may arise from your neighbors if they experience inconvenience associated with the operation of the windmill. Remember that our rights end where other people's rights begin.
Therefore, when buying or self-manufacturing wind turbine for home You need to pay close attention to the following parameters:
Mast height. When assembling a wind turbine, it is necessary to take into account the restrictions on the height of individual buildings that exist in a number of countries of the world, as well as the location of your own site. Be aware that near bridges, airports and tunnels, buildings that are more than 15 meters high are prohibited.
Noise from gearbox and blades. The parameters of the generated noise can be set using a special device, after which the measurement results can be documented
It is important that they do not exceed the established noise standards.
Ether interference. Ideally, when creating a windmill, protection against tele-interference should be provided where your device can provide such trouble.
environmental claims. This organization can prevent you from operating the facility only if it interferes with the migration of migratory birds. But this is unlikely.
When creating and installing the device yourself, learn these points, and when buying a finished product, pay attention to the parameters that are in its passport. It is better to protect yourself in advance than to be upset later.
- The expediency of a windmill is justified primarily by a sufficiently high and stable wind pressure in the area;
- It is necessary to have a sufficiently large area, the useful area of \u200b\u200bwhich will not be significantly reduced due to the installation of the system;
- Due to the noise accompanying the work of the windmill, it is desirable that there be at least 200 m between the neighbors' housing and the installation;
- The steadily increasing cost of electricity convincingly argues in favor of a wind generator;
- The installation of a wind generator is possible only in areas whose authorities do not interfere, but rather encourage the use of green types of energy;
- If there are frequent interruptions in the construction area of the mini wind power plant, the installation minimizes the inconvenience;
- The owner of the system must be prepared for the fact that the funds invested in the finished product will not pay off immediately. The economic effect may become tangible in 10-15 years;
- If the payback of the system is not the last moment, you should think about building a mini power plant with your own hands.
Who benefits?
There are a lot of types of wind generators, and even more so subspecies. Which device should be installed in a particular area depends on the following factors:
- local wind speed
- device purpose
- estimated cost
Before installing the windmill directly, you need to think several times: will the costs pay off. First you need to determine the speed and direction of the wind in the area intended for installation.


You can get this information in two ways: measure yourself or contact the local weather service. The first option will require a portable station that can be rented or purchased.
The advantage of independent measurements is their accuracy, however, a full-fledged study will take at least one year. The data obtained from the weather service will have approximate values, but will not require equipment costs and time for additional calculations.
At values of about 4-5 m / s, the energy generated by an average power generator will be equal to 250 kWh per month. This is enough to provide electricity to a house for 3-4 people with heating and hot water. A windmill can generate up to 3 thousand kWh per year. The cost of installing such a wind generator is approximately 180 thousand rubles.
Creating your own installation is many times cheaper. At the same time, it is worth considering the constant increase in electricity tariffs. Thus, the wind turbine can be a good alternative source of electricity.
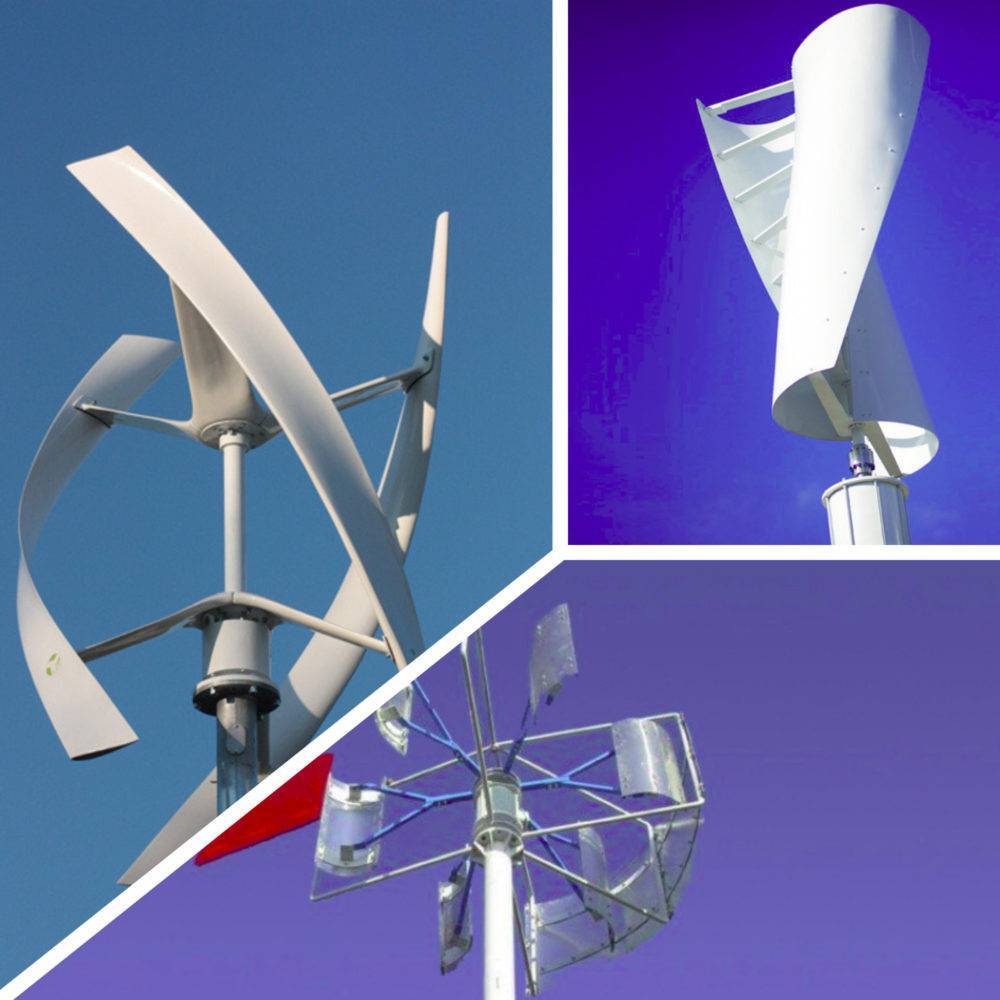
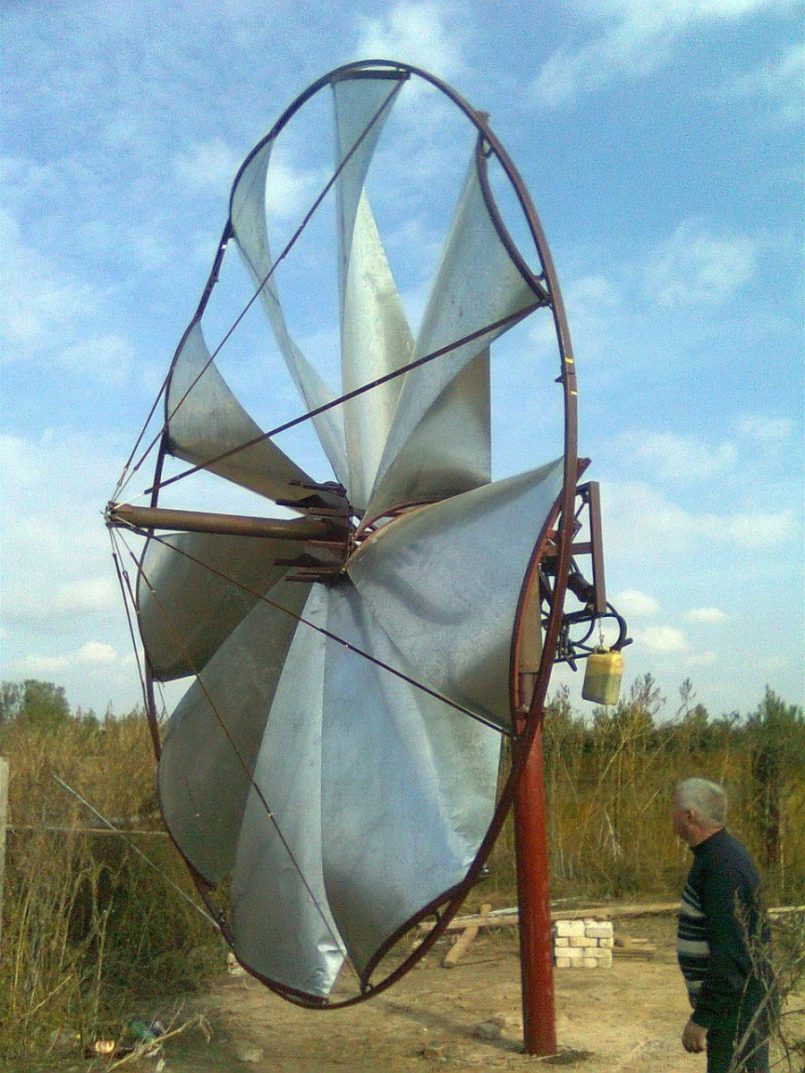
Summing up
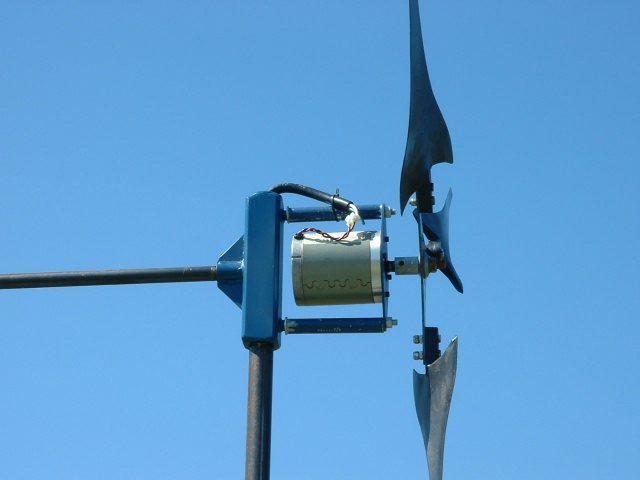
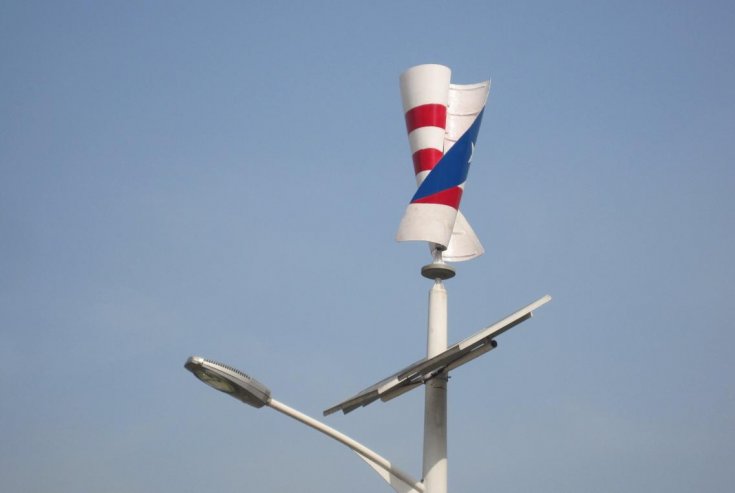
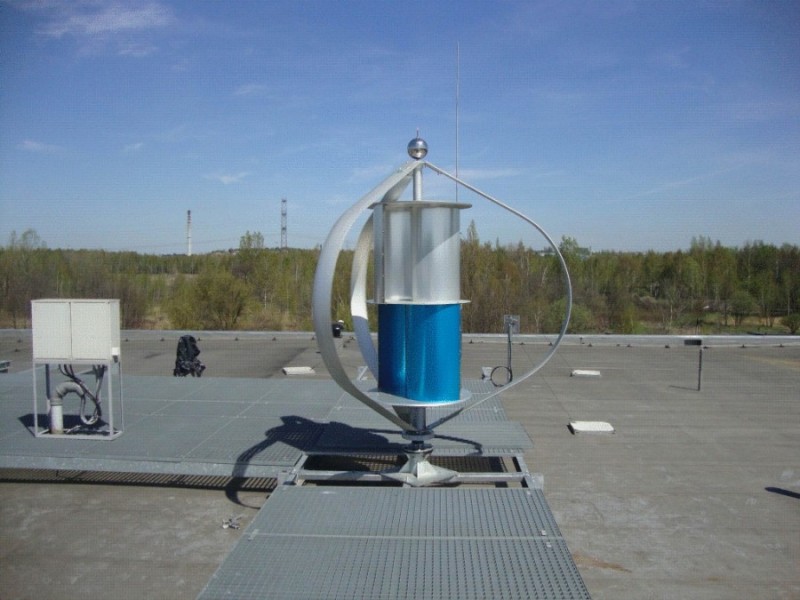
A vertical wind generator, which can be made according to the instructions above, can operate in fairly light wind and regardless of its direction. Its design is simplified due to the fact that it does not have a weather vane that turns the propeller of a horizontal wind generator downwind.
The main disadvantage of vertical axis wind turbines is low efficiency, but this is redeemed by a number of other advantages:
- Speed and ease of assembly;
- Absence of ultrasonic vibration typical for horizontal wind generators;
- Undemanding to maintenance;
- Sufficiently quiet operation, allowing you to install a vertical windmill almost anywhere.
Of course, a self-made windmill may not be able to withstand an excessively strong wind, which will be able to break the bucket. But this is not a problem, you just have to buy a new one or save the old one that has served its time somewhere in the barn.
In the video below you can see how household appliances are powered in the country. True, the wind generator here is not made from a bucket, but also with their own hands.