- Types of ventilation systems
- Hood in the bath: depending on which bath
- Extractor in the sauna
- In a log cabin
- In a foam block bath
- How to correctly calculate the dimensions of the system
- Kinds
- How to make ventilation with your own hands
- How to choose a ventilation scheme and places for products
- Tools and materials
- Step-by-step ventilation device technology
- Options for installing the system in different steam rooms
- In the frame
- In chopped
- In a brick
- In buildings without a foundation
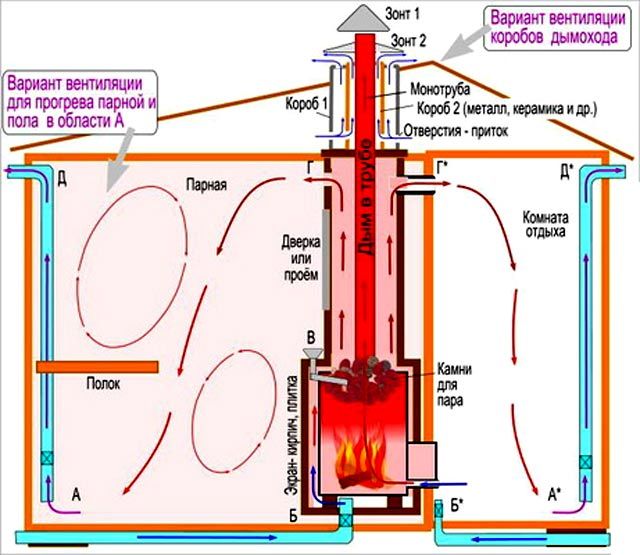
- Schemes and types of ventilation in the bath
- Ventilation schemes
- Ventilation building errors
Types of ventilation systems
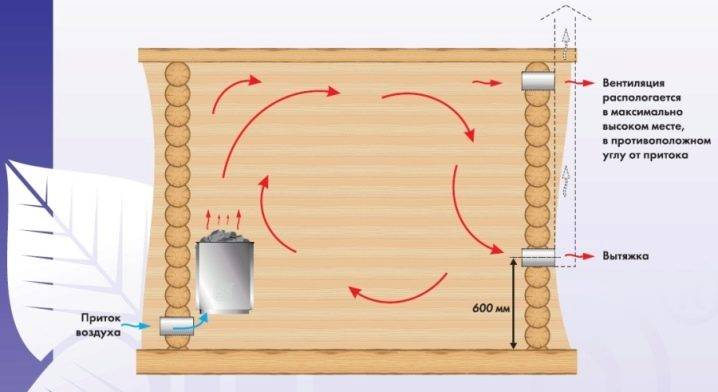
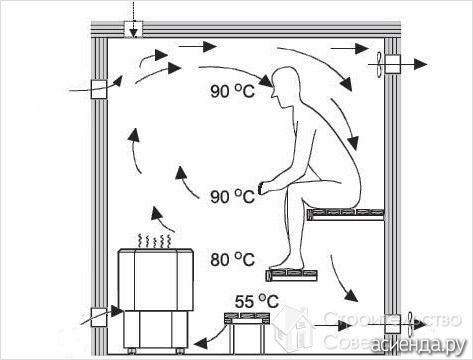
The ventilation device in the bath varies according to the design of the room and its total volume. Natural ventilation is based on the difference in temperature and pressure inside and outside. In order for it to work efficiently, the air inlet is organized near the stove, at a level of 25-35 cm from the floor. The outlet is made on opposite walls about 15-25 cm below the ceiling
But it is important to consider that such a scheme is not good enough for steam rooms, since it is relatively cold down there, and always hot upstairs.
The natural movement of air in such a situation is too difficult to organize, you will have to very carefully and accurately arrange the components of the ventilation system.A forced circuit does not always require the use of electronic control systems, with complex panels and so on. There are simpler options when ventilation windows, placed in a special way, are complemented by an exhaust fan. The combination of such components is especially effective when the bath is located inside the house, the windows are not placed inside the outer wall, but are connected to the exits by a long ventilation box. Duct fans must be selected very carefully, because the conditions for their operation in baths differ from the usual parameters.
The peculiarity of such devices lies in the increased waterproofing of electrical circuits and main mechanical parts, in adaptation to work at high temperatures without consequences for technology. The state of supply ventilation and its arrangement in each room is adapted to individual characteristics and to the type of bath. It follows that the time spent on calculations and thinking through the project is not wasted - it will save a lot of money and time, get the best result sooner.
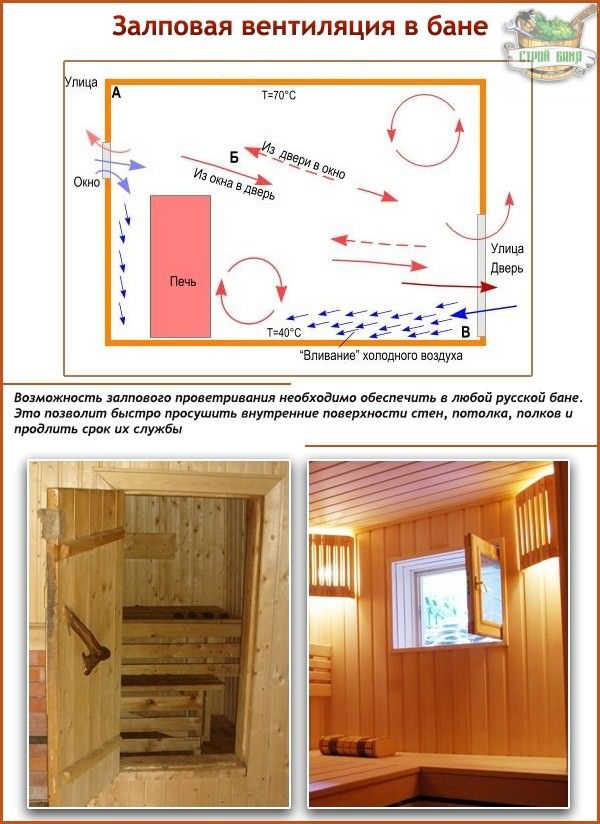
As already known, the bulk of the projects involve the location of the introductory windows near the furnaces, 0.25-0.35 m from the floor. With this design, the stove transfers heat to the air coming from outside, and a flow occurs that moves in the direction of the hood. Having overcome the entire distance, hot and street flows eventually cover the entire volume of the steam room, and the area where the upper shelf is located is heated the most.
In the second option, by installing an exhaust fan, it is possible to mount the inlet and outlet openings on the same wall. The air flow is directed first in the direction of the heating device.Having received a thermal impulse, it begins to rise towards the ceiling and moves in a wide arc that covers the entire room. This approach will be effective if the bath is built into the house and has only one outer wall, while there is no need to arrange a ventilation duct.
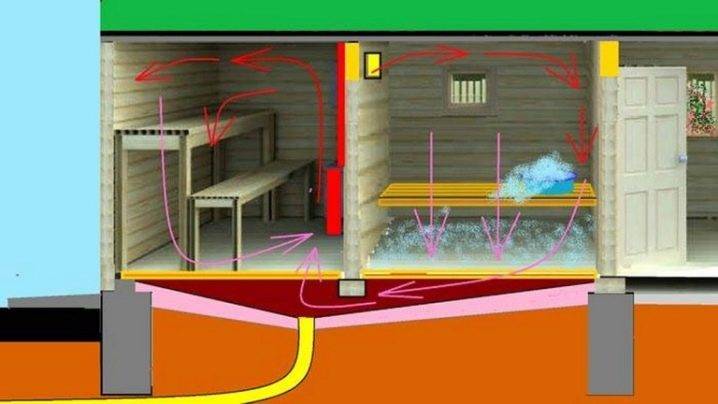
If a bath with a leaking floor is created, the introductory window is placed in the same place as in the first case, directly next to the stove. When the heated air gives off heat in the upper lobe of the steam room, it cools and descends to the floor, leaving through the holes in the flooring. This technique improves the evaporation of water accumulating below and allows you to delay the failure of the wooden floor. The hood is placed either in the next room, or in isolated channels that do not allow air to return to the steam room. The complexity of the flow path makes the use of a fan mandatory. This option is used very rarely, since it is not easy to calculate everything exactly, it is not easy to foresee the details properly.
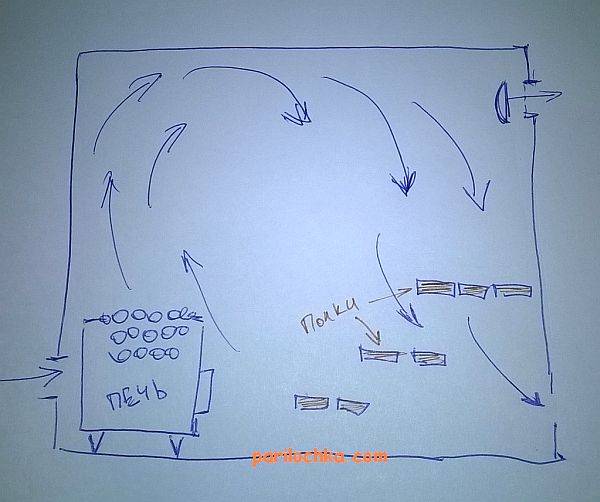
Another type provides for a continuously operating furnace, the blower hole of which replaces the hood. For the inflow, a window is made under the shelf opposite the furnace itself and at the same level. Cold air displaces the heated mass upwards, and when the heat-releasing parts of the flow descend, they go into the blower channel. There are even more complex systems when a pair of supply and a pair of outlet ventilation windows are placed (always with a forced circulation type). It is rather difficult to adjust complicated complexes, but their effectiveness is higher than in the simplest cases.
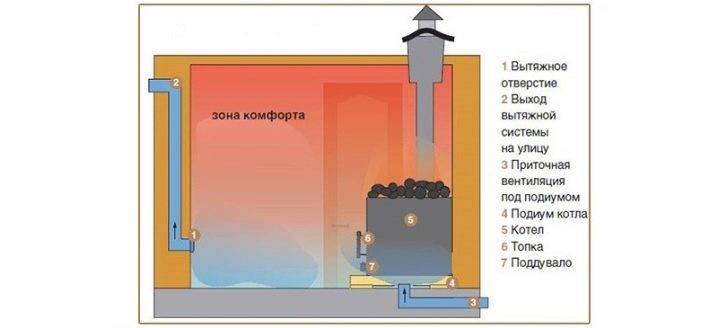
The Bastu system is the placement of supply openings (with adjustable valves) behind or below the furnace. The organization of vents under the stove is not required, although it is highly desirable.Through these openings, air from the underground part of the bath enters the room, which is connected to the external atmosphere by the foundation vents. When a bath is made in a previously finished room, you need to choose a room with a pair of external walls; when preparing the basement, choose an angle that meets the same requirements. The dimensions of the inlet and outlet are calculated according to the general rules.
Hood in the bath: depending on which bath
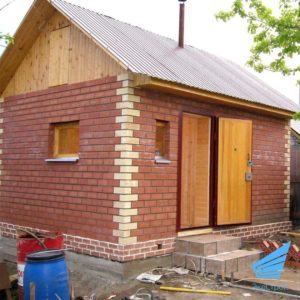
Baths are built from a variety of materials, each of which has its own specifics. This also affects the ventilation systems, which have their own characteristics in each case. We will talk about their differences in terms of organization below.


Extractor in the sauna
Sauna or Finnish bath is different from Russian a small amount of steam (this is almost a dry bath) and a high temperature (which can reach up to 130 degrees!). During your stay in the sauna, there is a clear rule regarding ventilation: the air must be changed at least 6-8 times per hour. And this requires good controllability of air flows, replacing exhaust air with fresh air less than every 10 minutes.
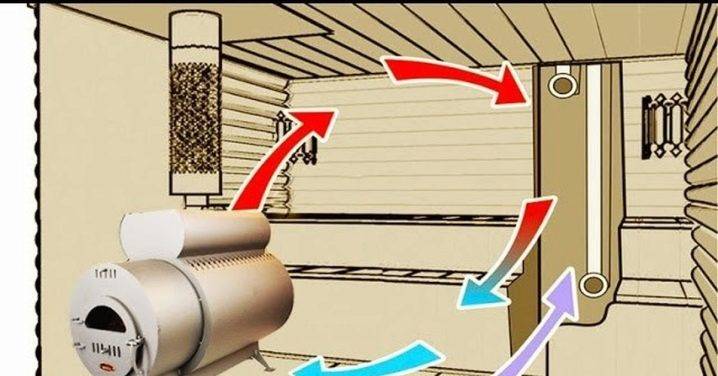
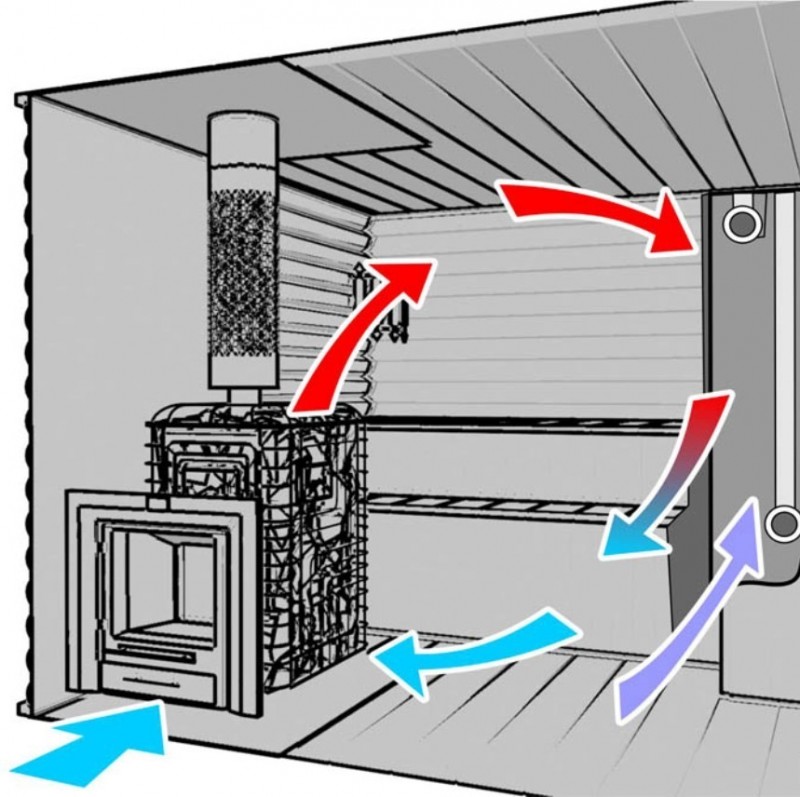
The ideal option for a sauna, as already mentioned in another article, would be bastu ventilation (convection type). Let us briefly repeat that it operates on the principle of an “inverted glass”:
- a ventilation duct, standing diagonally from the stove, takes in near-floor air;
- brings it out through the roof (wall);
- below, next to the stove, there is an inlet through which fresh air enters;
- the oven heats the oxygenated air, it rises and is distributed throughout the sauna.
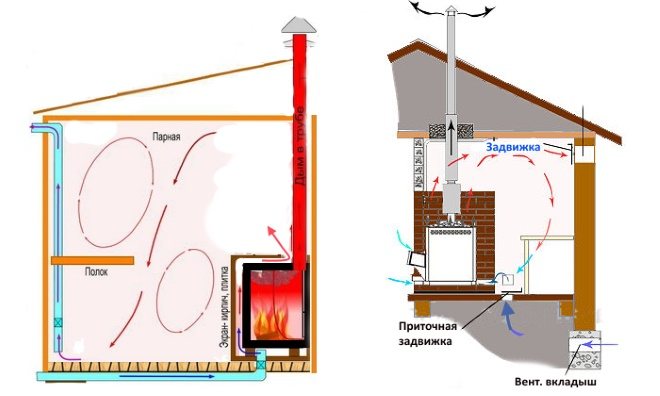
The regulation of flows is carried out using dampers that regulate the openness of the box and the inlet.An important point in this case is the constant operation of the furnace, because it is it that performs the function of a “pump”.
And even if the hood in the sauna is done according to a different scheme, the task will remain the same:
- controlled frequent air exchange;
- good heating of the incoming fresh air;
- inadmissibility of fast air currents (more than 0.3 m / s), i.e. drafts.
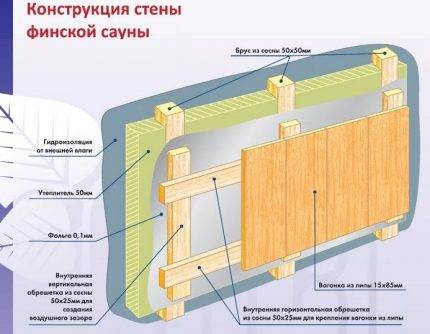
In a log cabin
The log house was invented long before the laws of physics on which natural ventilation is based took shape. Nevertheless, the builders of log baths actively used these laws so that the owners of the bath would not suffocate in the process of soaring, and the bath would stand for decades due to it. (Of course, an exhaust hood in a log cabin bath will not save it from a fire, but it may well from rot.) In the log house, air flow was provided by the lower rims, which were deliberately laid freely, that is, they had slots through which fresh air was “stretched” . In addition, the door to the steam room below did not fit snugly against the floor.
Depending on how exactly the log house was heated - “in black” or “in white” - it also depended on where the exhaust air went.
- In a heated "black" bathhouse, the stove does not work during the soaring process, so an open window or door was used for outflow.
- In the melted "white" bath, the outflow was carried out through the chimney. The oven was working.
In principle, nothing prevents organizing the ventilation of the log house in the traditional way today. But it is necessary to decide quickly, even at the construction stage. Because a more modern solution should already be included in the project. Alternatively, you can punch holes (supply and exhaust) directly to the street and provide them with plugs or dampers.One is next to the stove blower, the second is above the top shelf on the adjacent or opposite side. Or make two exhaust holes - one above, the other below the top shelf. Another option is to make blinds at the bottom of the steam room door, and an exhaust hole under the ceiling of the shower room.
IMPORTANT! If there is no desire to make an exit to the street, you can lay air ducts, but then you will have to install a forced ventilation system instead of a natural one.
In a foam block bath
A foam block bath is no exception to the rule that you need to think about ventilation when designing a bath. It's easier than hitting ready-made walls. In order to provide a bath of cellular concrete with sufficient air circulation, which will save the structure from excess moisture, it is necessary to lay pipe trimmings at the time of pouring the foundation formwork, which will then become air ducts.
For a bath that is not in a lowland and is not surrounded on all sides by buildings, two air vents are enough on opposite sides, otherwise they are made 4. Do not forget about the ventilation gaps between the walls and the insulation.
The roof must also be ventilated, receiving inflow from the roof overhangs and giving air through the raised ridge. In the premises, supply and exhaust openings are made according to one of the standard schemes.
In case of insufficient natural ventilation, it is recommended to install fans on the hood from the foam block bath.
How to correctly calculate the dimensions of the system
To calculate the required duct area, a well-known ratio is used: for each cubic meter of a ventilated room, a ventilation opening (both supply and exhaust) with an area of at least 24 cm2 is required.
Usually sewer polyethylene pipes with a diameter of 10 cm are used.Each such channel has a radius of 5 cm. The cross-sectional area of such an opening is 3.14 x 52 = 3.14 x 25 = 78.5 cm2.


Now you can find out how many cubes of the room are ventilated by one pipe hole with a diameter of 10 cm. To do this, the already calculated cross-sectional area must be divided by 24 cm2. The result is the following: 78.5 / 24 = 3.27 m3 of the room.
Let us have a bath with a steam room 2 m x 2 m and a dressing room 1 m x 2 m. The height of the premises is 2 m. The volume of the steam room is V = 2 m x 2 m x 2 m = 8 m3. Since one opening (both supply and exhaust) ventilates 3.27 m3, in this case you need 8 / 3.27 openings. Take their number equal to 3 pieces.
After creating a sketch, you can mark the location and drill three supply and exhaust holes. Then pipes are installed.
Kinds
High-quality ventilation of bath rooms extends the life of the steam room up to 50 years and even more. The variant of the ventilation system in each case is selected individually and is largely determined by the location of the building and the materials that were used in its construction. All the options for arranging ventilation developed to date, according to the basic principle of operation, are divided into natural, forced, and also combined.
Natural ventilation assumes that the change of air is carried out due to the unimpeded flow of flows from the outside, their mixing with the air layers of the steam rooms and the removal of the exhaust through special openings.
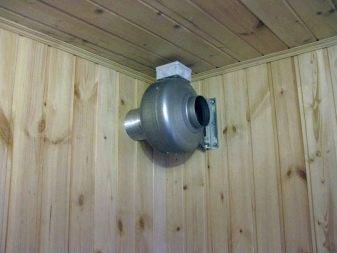
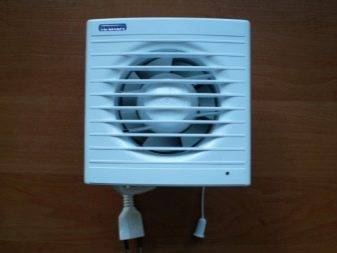
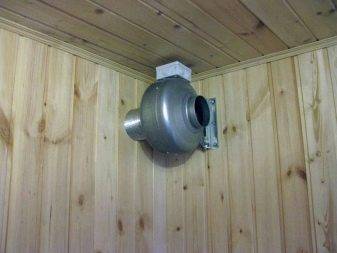
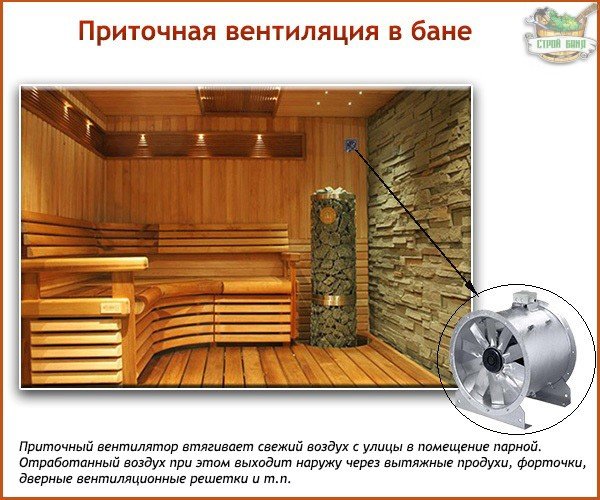
The forced system is based on the use of fans. As a rule, they are installed on the hood and much less often on the inflow.Typically, fans are installed not only in the steam room, but also in the washing room, as well as in the rest room.
The combined version, as the name implies, includes elements of natural and forced ventilation.
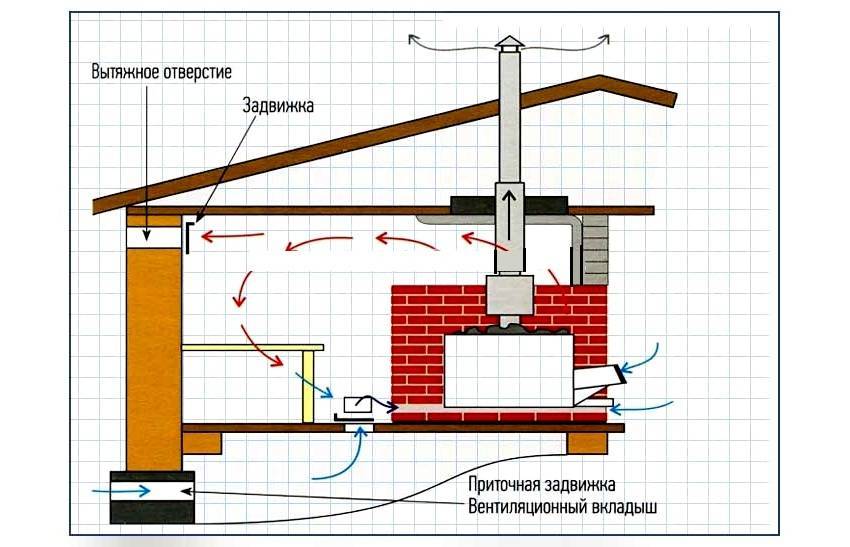
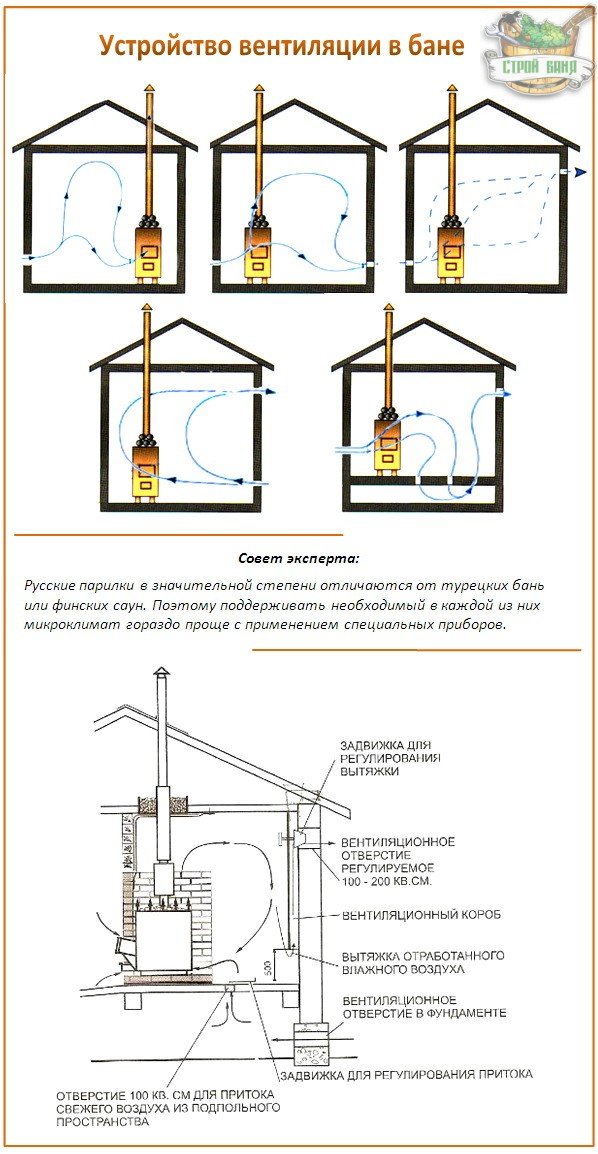
Among the popular schemes, “bastu” is the most common. It involves the formation of a small opening with an adjustable valve, which works for inflow and is usually located behind or below the furnace.
As additional elements, vents are equipped above the stove, which are controlled by a valve and a valve - it is through them that air enters from the outside through the vents from the underground. Usually the opening of such a box remains closed for some period, however, as soon as there is a need to reduce the level of humidity in the bath, both exhaust valves open. This scheme could be considered ideal if not for some of its limitations. Unfortunately, it is far from suitable in every case, therefore, in some situations, the installation of an exhaust system becomes a more preferable ventilation option - for this, a fan is attached to the bottom of the box. If you install it in the supply hole behind the stove, you can get a supply type of ventilation.

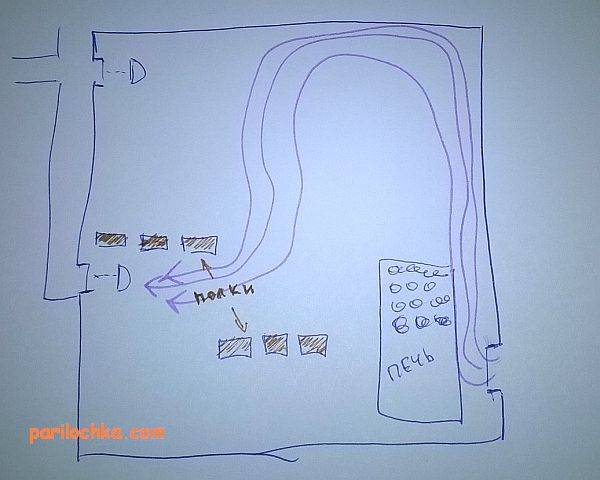
There is another scheme that is quite often used in steam rooms - with it, moist superheated air is removed from the steam room space through the upper and lower openings equipped with valves, and fresh air enters through vents in the floor under the firebox. From the outside of the building, such holes are interconnected by a special ventilation duct.Less often, an exhaust hood is installed in the baths, in which one single channel works for the entry of air jets and one for their removal, while both are equipped at the same height from the floor level: one is placed behind the stove, and the second is opposite on the opposite wall. This system requires mandatory installation of forced ventilation.
The most unsuccessful way involves arranging both inflow and exhaust on one side opposite the firebox. In such a system, fresh air coming from the street seeks its way to the stove and, during its movement, stumbles upon the legs of the steamers. This creates a draft, which significantly reduces the level of comfort from staying in the steam room. However, such an arrangement is also quite common when it is not technically possible to make holes from different sides of the room.
How to make ventilation with your own hands
Ventilation in the bath, the scheme and device are thought out at the construction stage. It is more convenient in practical terms and doing it yourself. But even if the site already has a bathhouse without an air exchange system, it will not be difficult for the user to form ventilation by choosing the best option.


Consider a method for arranging products, a phased do-it-yourself work technology.
How to choose a ventilation scheme and places for products
Before how to ventilate in the bath with your own hands, it is worth taking note of the general rules for the formation of products:
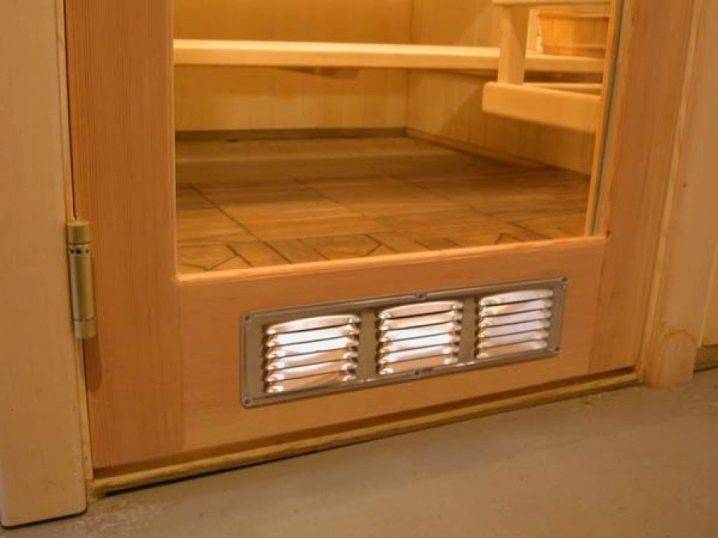
- To supply cold air, holes are cut no higher than 20 cm from the floor level. Exit openings are located as far as possible under the ceiling or on the ceiling surface.
- The farther the air is separated, the more efficiently the layers of air are mixed.
The formation of holes for cold air can be done in several zones:
- At the bottom of the door. In this case, there is no need to drill the walls of the bath, the lower crowns of the structure will not get wet. Minus - the doors are most often located opposite the shelves, a cold stream will blow on visitors.
- Under the shelf Reduced risk of cooling users, but there is difficulty accessing the grate.
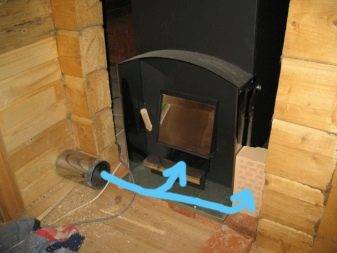
- Behind the oven. The best option for a bath. A cold jet enters the stove, warms up, disperses throughout the room - this eliminates the risk of drafts. Minus - there is not always a place behind the stove for mounting the grate. In addition, the zones are isolated with sheet iron and insulated, it is necessary to cut through all the layers and carefully seal them.
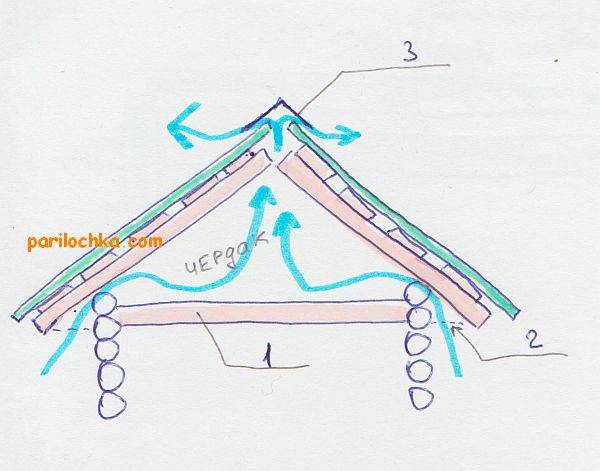
With an outlet for hot air, everything is simpler - it is cut through as much as possible under the ceiling. Air should be made on the ceiling only if the bath attic is open. Otherwise, the steam will settle on the upper crowns of the log house, soften the tree and have to repair the top of the building.
Tools and materials
The master will need the following set:
- drill;
- a set of drills for a drill;
- crowns for wood;
- bit;
- chisel;
- protective valves and grids;
- sealant;
- metal pipe with a cross section according to the size of the air;
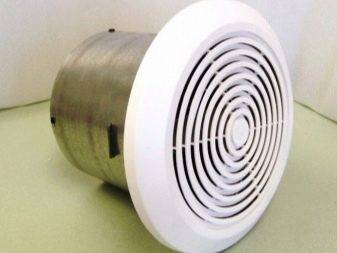
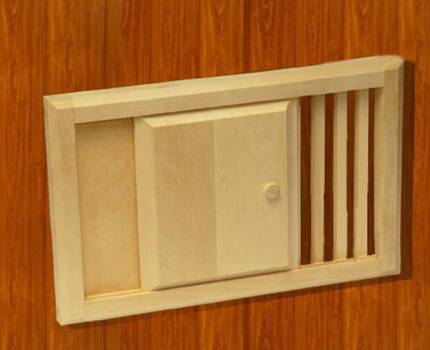
- grille with shutters or adjustable shutters.
Personal protective equipment will come in handy. To drill holes in brick walls, you need a hammer drill.
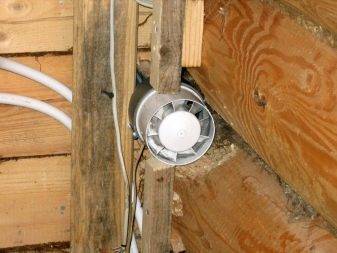
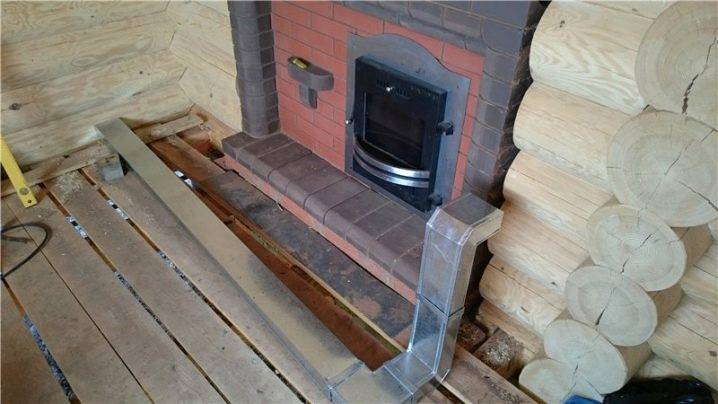
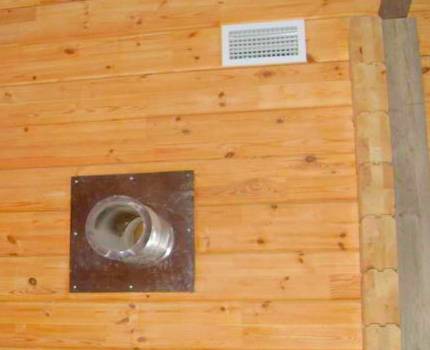
Step-by-step ventilation device technology
Consider a complex option with finished interior and exterior. Any shape of the products - round, square. The ventilation device in the bath begins with the markup.
The algorithm is this:
Determine the size and shape of the hole. Apply markings indoors.
Prepare a long drill for wood.The length of the drill should be longer than the wall, taking into account the decorative finish.
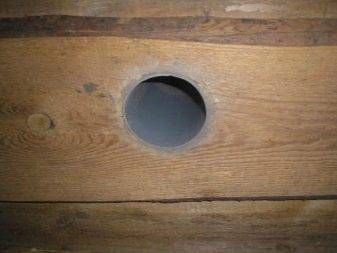
Drill one hole through the center of the vent circuit. The exit to the outside is the center of the air. Draw around the center the dimensions of the hole with an exact match to the parameters inside the steam room.
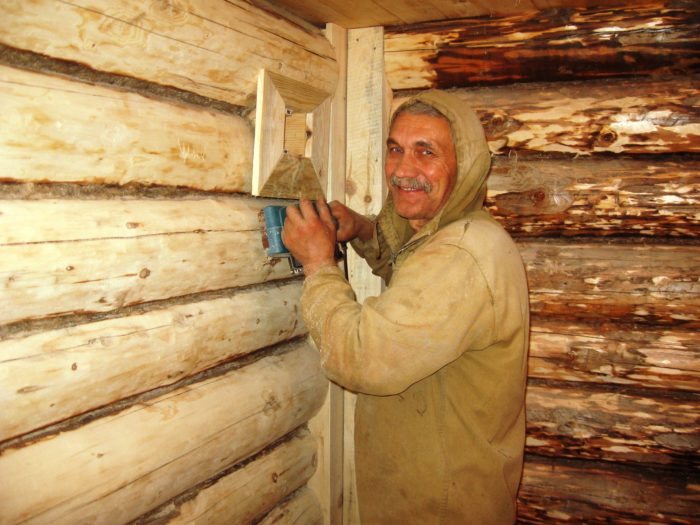
Remove trim. Repair supporting structures. Drill through holes with a minimum step along the contour of the vent. Keep the drill perpendicular to the plane.
Use a chisel and chisel to remove the jumpers between the holes. Cut half of the hole on the outside, half on the inside
It is not necessary to carefully level the opening, it is important to make it so that the air duct fits.
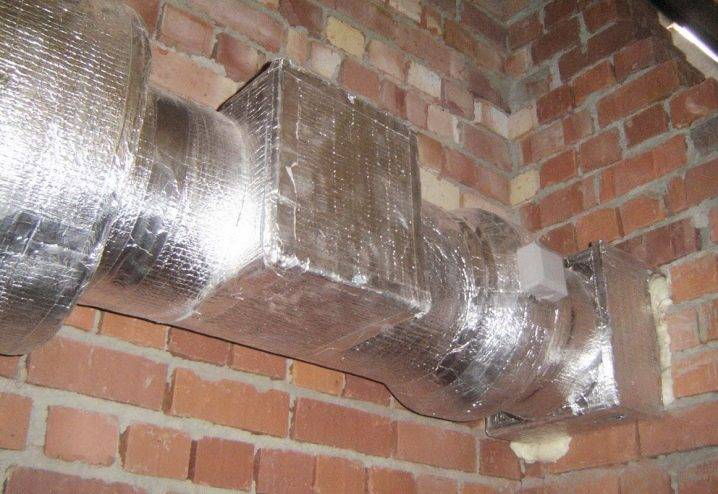
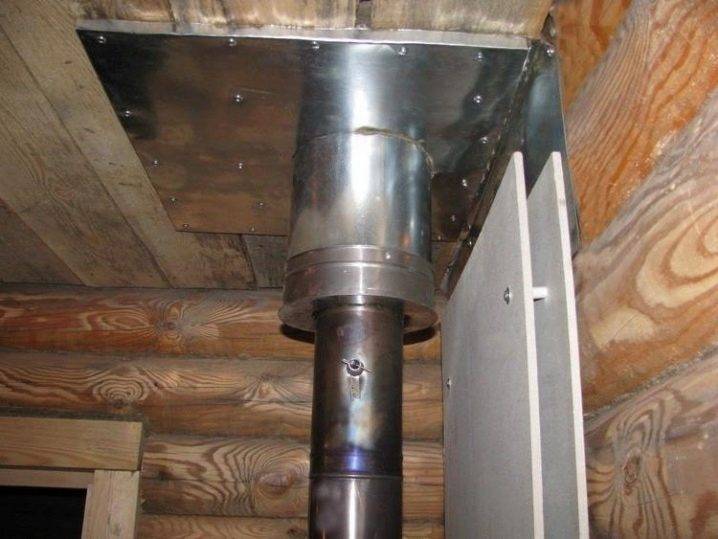
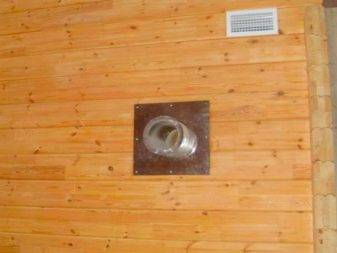
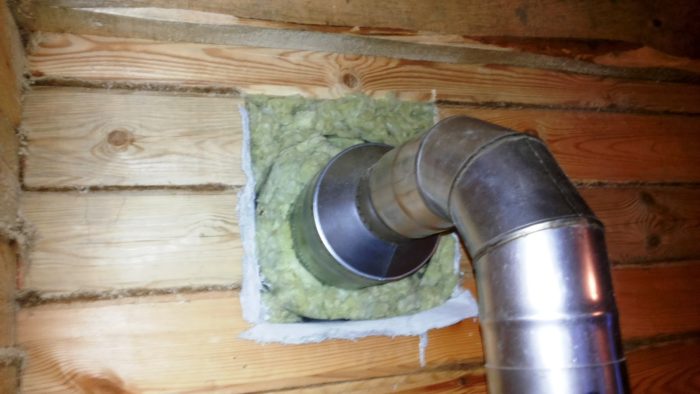
As soon as the air ducts are broken, the stage of installation of air ducts is performed. Exhaust and supply ventilation in the bath is equipped with plastic, metal pipes with a length equal to the passage.
Air duct installation:
- wrap the pipe with mineral wool;
- insert an element into the air;
- fix the position with mounting foam;
- foam the waterproofing between the wall and the sheathing;
- fasten the grids.
It remains to check the operation of the network. This is done with a burning log or other source of smoke - send a stream of smoke into the hole and see how the inflow and exhaust work.
Options for installing the system in different steam rooms
Baths are made from different materials using different technologies. At the same time, the difference in materials, the construction technology of the building depends on how the ventilation system of the premises will be equipped.
In the frame
 Frame houses, baths are very popular due to their reliability and durability. The most important thing is to make the correct calculation of the frame in order to avoid mistakes at a key stage of construction.
The ventilation system must be provided at the initial stage of frame assembly.Otherwise, you will have to drill holes in the finished walls, which will lead to additional problems.


In chopped
In the manufacture of a ventilation system, a number of nuances must be taken into account:
- Exhaust and supply systems are designed so that immediately after bathing procedures, all excess moisture is removed from the premises.
- If a fan is installed, the wiring to it must be carried out in special non-combustible casings so that in the event of a short circuit, the tree does not ignite.
- Wooden surfaces must be treated with special anti-rotting preparations.
Log cabins already have a natural ventilation system after construction, but this is not enough for a bath.
In a brick
 Brick baths are considered the most reliable, durable. Material advantages:
- withstands constant temperature changes;
- not subject to decay;
- has served for over 100 years.
Passages in the walls for ventilation can be made using special equipment.
In buildings without a foundation
Temporary or moving baths (on wheels) have built-in ventilation systems. If the bath is permanent, you need to build a foundation.
Schemes and types of ventilation in the bath
Fresh air should freely enter the room, and exhausted air should go back. There are several ways to move air in the bath room:
- Forced ventilation in the bath. To create an outflow and inflow of air masses, specialized technical means are used that fully control the process.
- Natural air draft. Such traction is possible not only on the basis of simple shutters and holes in the walls.For natural ventilation of the bath room, it is necessary to manufacture ventilation vents or build a bath complex from specialized breathable materials.
- Combined method. This method means the simultaneous use of both natural ventilation in the bath and a forced device for the movement of air masses. The simplest ventilation device in the bath is a fan and open valves on the ventilation ducts.
The correct microclimate in the bath is the correct operation of the ventilation system, which allows you to regulate: air humidity, thermoregulation and air circulation. The ventilation design scheme for bath complexes has a number of features:
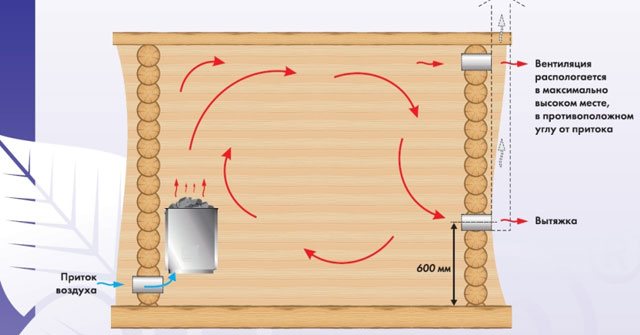
- The exhaust opening should be located a few tens of centimeters higher than what you plan to put in the supply air. This will allow the air to circulate properly, as cold air is much heavier than hot air.
- Do not install the ventilation valve on the ceiling. The ceiling warms up more slowly than other surfaces in the room.
- The correct location of the air supply fans is near the stove or a few centimeters from the floor.
- Proper ventilation in the bath meets the following principles: exhaust openings must be located on the other side of the room from the supply openings; valves must be installed in the openings of the hood.
Ventilation schemes
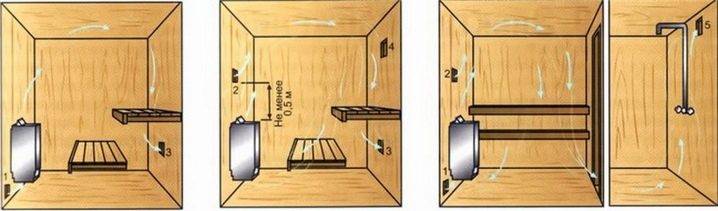
There are at least five working ventilation schemes that can be used in a steam room - choose a specific option based on the design features of your Russian bath.
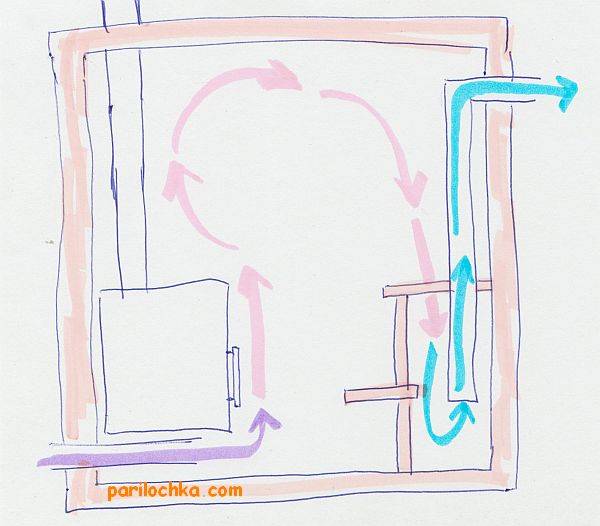
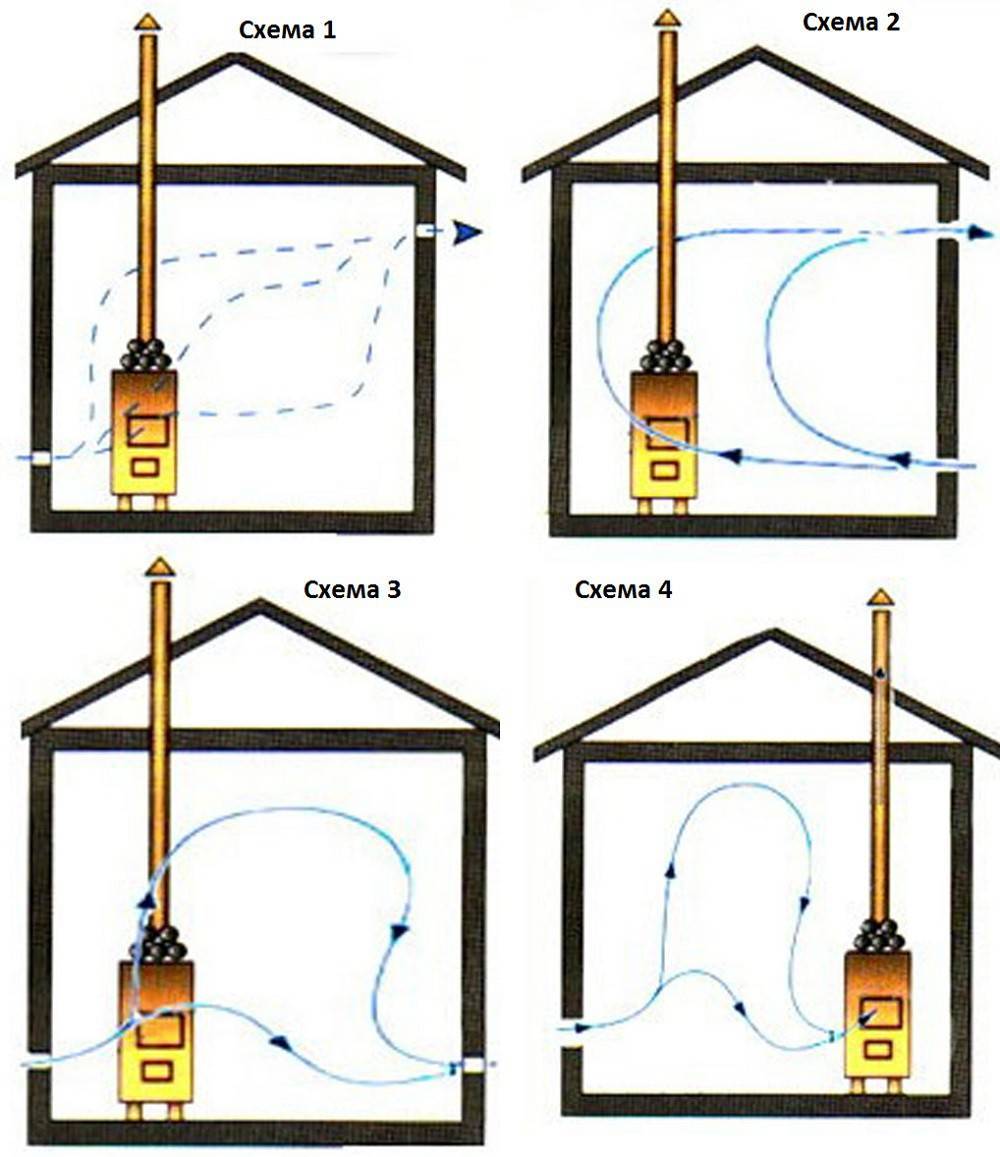
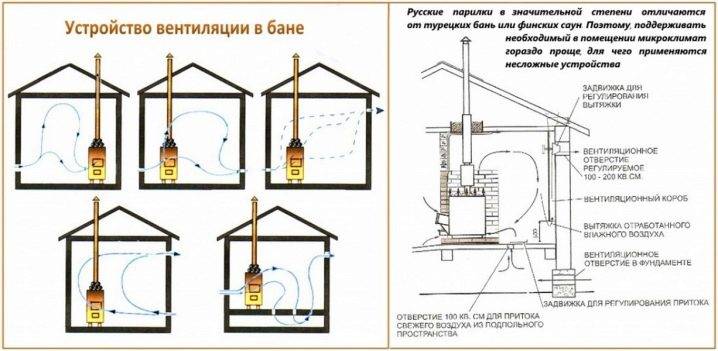
- The supply opening is behind the stove at a distance of 50 cm from the heater, and the exhaust opening is opposite, at a distance of 20 cm from the base of the floor.The air is removed forcibly - this is provided by a fan built into the lower opening.
- The supply opening is behind the heater at a distance of 30 cm from the floor base, the exhaust opening is at a distance of 20 cm from the floor on the opposite wall. The air is forced out - with the help of a fan. The main feature of the scheme is a very high rate of heating of fresh air.
Both openings - both flow and exhaust - are placed on one side directly opposite the stove, but at different levels: the first is at a distance of 30 cm from the base of the floor, the second is 20 cm from the ceiling. The system operates using a fan, which is mounted in the exhaust opening.
Advice. Such a scheme is suitable for baths with an internal placement of a steam room - when the room has only one external side.
- The supply hole is behind the stove at a height of 20 cm from the base of the floor. There is no exhaust opening - instead, a special leaking floor is provided: the exhaust air masses pass through its slots to the ventilation pipe. Such a system guarantees the performance of an additional function - prompt drying of the floor.
- The supply opening is opposite the stove at a distance of 20 cm from the base of the floor. The role of the exhaust hole is assigned to the blower. Such a scheme is only suitable for those baths where the heater operates continuously.
Ventilation building errors
If we take into account all the subtleties of the ventilation system, the result will please more than one decade. But, often inexperienced masters make annoying mistakes that directly affect the quality of the procedures and the mood of the guests in the sauna / bath.
The most common mistake is the layout of the duct laying scheme after construction is completed.This is the most unpleasant, because such work should be done at the very beginning. Then it will not only be convenient to mount everything, but it will also be easy to hide communications by decorating them.
 Excessive tightness of walls and floors can lead to the fact that they will soon require replacement
Secondly, excessive tightness of the room can serve by no means the best role. So, if there is no gap of at least 2-3 cm under the door, windows and holes for inflow, then in such a steam room you can suffocate. This is an extremely unfortunate option.
The third mistake made when arrangement of the ventilation system - making only an exhaust hole under the ceiling. It will provide a greenhouse effect when air exchange does not occur. To inhale a breath of fresh air, you have to open a window or door.
The exhaust and supply opening should be provided with a valve - it is convenient to use, and it can fit into any interior without violating the general concept
Fourthly, it is impossible to leave the inlet / outlet openings of air masses without a valve. Its presence will help to optimally regulate the indoor microclimate in any weather and outside temperature.
It is the valve that helps to clearly select a comfortable temperature and humidity, releasing excess hot air. With the valve closed, on the contrary, you can quickly heat up a well-ventilated room.


The presence of a protective grill on the inlet or outlet will protect against accidental entry of insects, birds and other living creatures into the steam room
The fifth mistake is placing the inlet and outlet valves at the same level opposite each other. With this scheme, one can observe drafts walking along the legs and a complete lack of mixing of air masses.The air coming from the street will not have time to heat up and mix into the steam mixture under the ceiling of the room.
The sixth mistake is the installation of complex, expensive ventilation systems. The equipment does not withstand sudden temperature changes for a long time and requires periodic repair and replacement of individual devices.
Complex systems are an expensive pleasure, especially if the steam room is used occasionally - a couple of times a year
Therefore, when choosing the optimal ventilation scheme, you should take into account the characteristics of your room, its dimensions, ceiling height
It is important not to forget about this even at the planning stage of construction work, so as not to overpay later


