- Peculiarities
- Instructions for self-calculation of air exchange
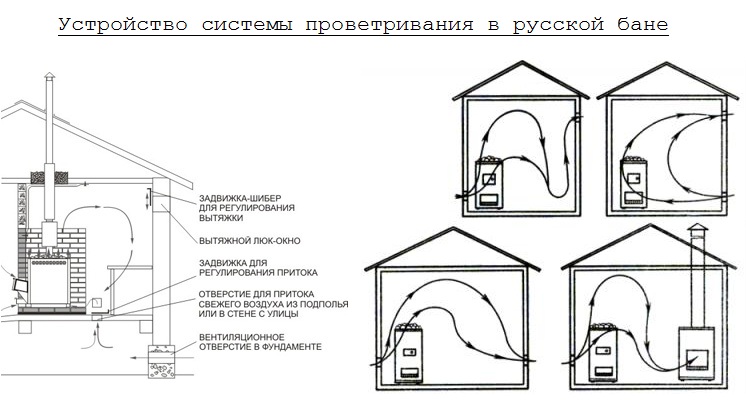
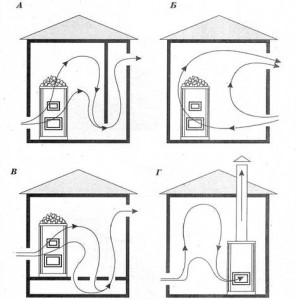
- Ways to arrange natural ventilation
- Ventilation through the chimney
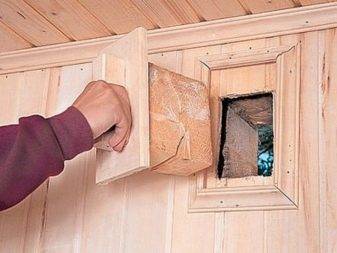
- Ventilation through vents
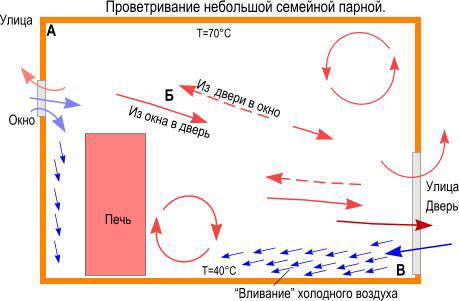
- Volley ventilation: proper ventilation in the steam room
- Ventilation system planning
- Bathroom ventilation system in a private house
- An integrated approach to the problem of condensate
- Floor insulation
- Ceiling insulation
- Wall insulation
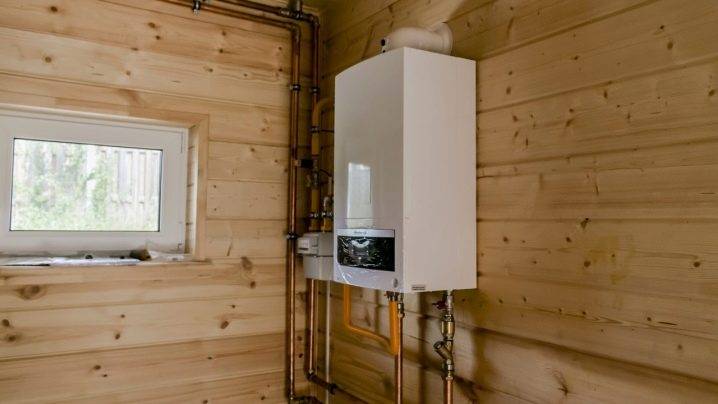
- Heating
- Why is there ventilation in the bath?
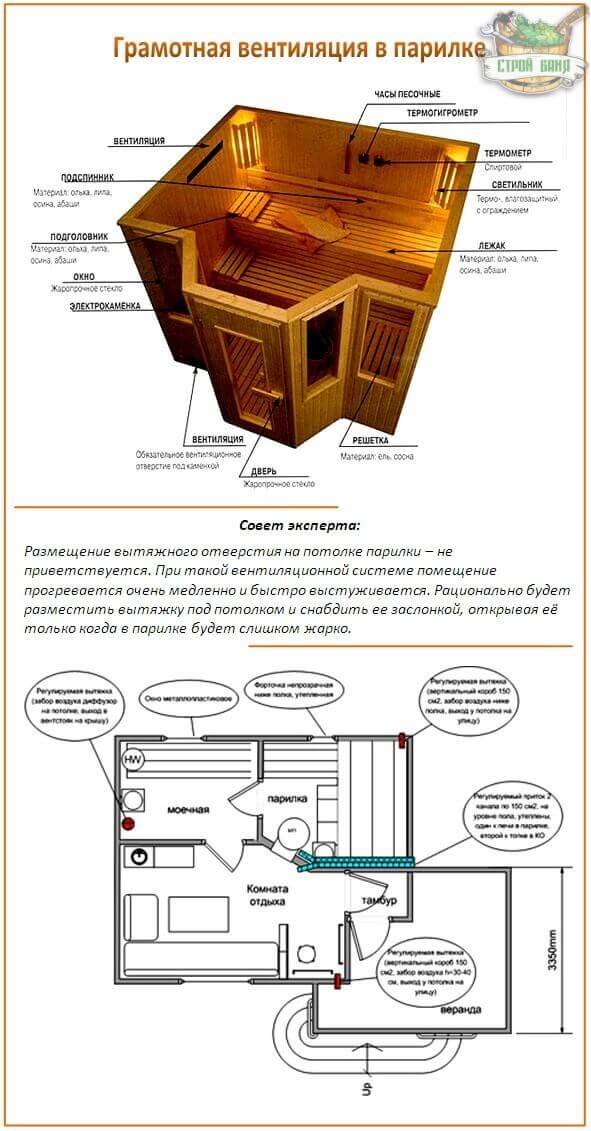
- Ventilation Tips
Peculiarities
Ventilation in the bath can be done in various ways.
Depends on her presence:
- distribution of heat flows inside;
- comfort and safety of washable;
- period of operation of the building.

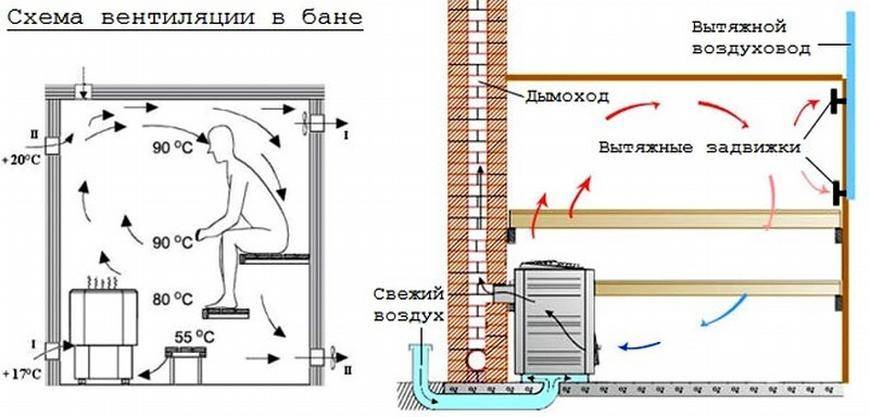
Water and steam are continuously concentrated there, the tree actively absorbs them. Even if you dry the building periodically, without establishing a constant movement of air, the effect will not be strong enough. In order to avoid dampness, it is required to create a pair of ventilation windows - one serves to bring in clean air from the outside, and the other helps to exit the heated one, which has absorbed a lot of water. Choosing the location of the openings, they change areas that are especially intensively ventilated. The use of a pair of outlets in the steam room and dressing room sometimes improves the orientation of the air flow in the required direction.
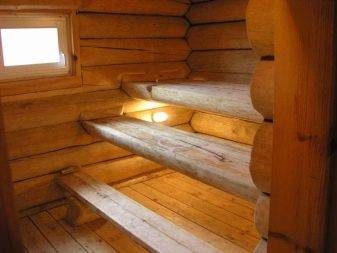
Of course, the size of each window and the ability to adjust the clearance are of great importance. They put valves that open fully or partially. The calculation of the volume of ventilation openings is repelled, first of all, from the area of \u200b\u200bthe bath rooms. If you make them too large, mold will never appear on the floor and in the sink, but the steam room will heat up for a very long time, and an unusually large amount of fuel or electrical energy will be consumed. Too narrow windows will not allow the air inside to cool or become dry.
All deviations from normal parameters are categorically unacceptable, which make it possible to exclude the occurrence of powerful temperature changes - this not only creates discomfort, but can also provoke health problems. It is impossible to completely eliminate the difference in the temperature of the flows; it is only necessary to limit their magnitude. Normal ventilation systems are formed during the construction of the bath, while making channels and preparing openings. Windows are mounted only after the decorative cladding of the building has been completed. Therefore, you will have to enter information about the arrangement of ventilation ducts into the bath project.
In most cases, the ventilation openings are made strictly the same. The outlet can be made larger than the inlet, but according to safety rules, it cannot be smaller than the first. For the same reasons, sometimes they resort to paired exit windows. As control elements, it is worth using not doors, but valves, when closing which it is impossible to preserve the gaps. When the steam room is heated for the first time, the shutters are closed 100% until the air reaches the desired temperature.
The use of elements with controlled position is also useful because the amount of air flow must be adjusted according to the season. When there are negative temperatures outside, even a very small trickle of air brings a lot of cold. Therefore, you should not open the ventilation windows completely. The cross sections of such windows should average 24 square meters. cm per 1 cu. m of internal volume. But these are only preliminary figures, and if in doubt about the result obtained, it is worth contacting qualified heat engineers for calculations.
It is categorically impossible to place ventilation windows at the same height or even directly opposite each other, since this will not allow all the air in the bath to be warmed up sufficiently. In addition, such a design will not allow the air masses to be evenly mixed, which means that it will be necessary to thoroughly calculate the accuracy of the location of the ventilation elements. Exhaust windows are recommended to be placed just below the ceiling, because the air immediately rushes up after heating.
Instructions for self-calculation of air exchange
For the calculation, an elementary formula is used:
That is, first you must calculate the volume of each room and find for it the required indicator of the volume of clean air (in calculations it is customary to denote Wpr, i.e. inflow) and a similar indicator of exhaust air (indicated as Wvt, outflow). In this case, multiplicity factors must be taken into account. The calculated values are rounded up - the last digit in the number must be 0 or 5.
Next, the summation of all Wpr is performed. A similar action is carried out for the found Wvt. The amounts received are compared.If the total value of Wpr exceeds the total indicator Wpr, it is necessary to increase the exhaust volume for rooms with a minimum air exchange value, if vice versa, increase the inflow by the missing value. That is, at the output, the sum of all Wpr should be equal to the total value of the found Wvt.
Table. Example of calculation of bath ventilation
Table. Example of calculation of bath ventilation
In the given example, the total value of Wpr is less than the sum of all found Wvt by an indicator equal to 110 m3. In order for the balance to be maintained as a result, it is necessary to ensure the flow of clean air in the missing amount. This can only be done in the waiting room. Thus, the value of 55 m3 for the dressing room, given in the table, must be replaced with an indicator of 165 m3. Then the balance will be struck.


Proceed to the calculation of the installed air ducts and drawing up the structure of the equipped ventilation system.
The ventilation system is designed in such a way that the air moves through the installed air ducts with the following speed indicators:
- ≤ 5 m/s in main channels and ≤3 m/s in existing branches - for mechanical ventilation systems;
- ≤ 1 m/s - for air exchanges operating according to the natural principle;
- 2 m/s - for natural air exchange directly in the steam room.
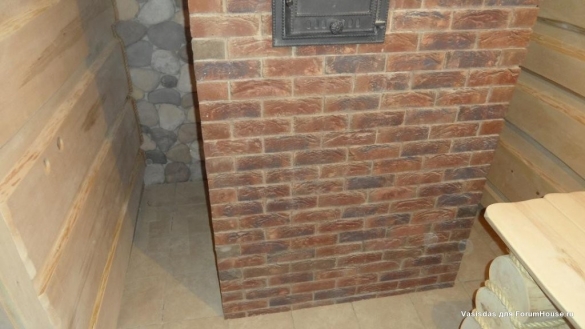
Ventilation valve behind the heater
When choosing a section of air ducts, consider the above indicators. As for the profile of the box / pipe, this moment is determined by the design features of the air exchange and the bath itself.For example, air ducts with a circular cross section are easier to install than their rectangular counterparts, and it is much easier to select the required connecting fittings for round air ducts.
The relationship between the diameter of the air ducts and other significant indicators is shown in the following tables.
Table. Parameters of circular ducts
Table. Rectangular air ducts
For example, we will work with round ducts. We select the necessary sections according to the corresponding table, focusing, at the same time, on the indicators of the table An example of calculating ventilation.
Estimated air consumption is 165 m3/hour. The air flow at this flow rate should not move faster than 5 m/s. In accordance with the table above for round ducts, we select the section according to the specified data. The tabular value closest to ours is 221 m3/h. Air duct cross section - 125 mm.
In the same order, we determine the optimal sections for all branches of the system in the serviced premises, remembering that in them the air flow should move at a speed not exceeding 3 m / s (in vestibules and closets - 1 m / s, in the steam room - 2 m / s). sec):
- steam room: calculated Ww is 60 m3 / h, which requires the installation of an air duct with a cross section of 125 mm;
- shower room - Ww is 50 m3 / h, air moves at a speed of 3 m / s, a 100 mm air duct is suitable;
- toilet - the indicators are similar to the shower room;
- pantry, vestibule, etc. - indicators (except for the speed of air movement) are similar to the shower and toilet.
For greater convenience, enter all the information received in the table. As an example, you can use the template below.
Table.Results of calculation and design of ventilation
Norms and rules
The cross-sectional area of the ventilation window is determined in accordance with the volume of the served room: 24 cm2 for every 1 m3.
It remains to figure out only the optimal height of the ventilation holes:
- for the influx of fresh air - an average of 25-30 cm above the floor (in the steam room - near the stove);
- for the outflow of exhaust air - about 15-20 cm below the ceiling, as a rule, on the wall opposite to the supply air.
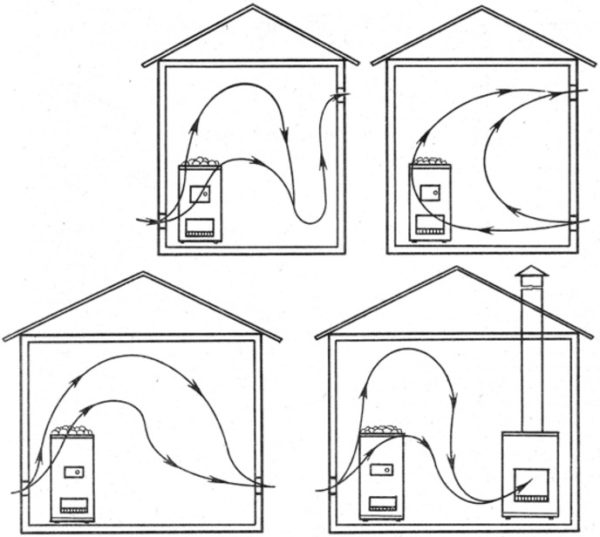
Ways to arrange natural ventilation
Dense and heavy cold air always goes down, and heated is displaced by it and rises up. This is how moving air flows arise in rooms with any heating device. But without an influx of fresh air, it does not renew itself, but simply moves.


If a hole is made in the lower part of the wall, air from the street will flow through it if its temperature there is lower than in the room. And through the hole at the top, it will stretch. This is natural ventilation.

Scheme of the movement of air masses in a heated room
This elementary law of physics is used when they think about how to make ventilation in the bath with their own hands without using any mechanisms. As a rule, natural ventilation without forced air intake is enough for a small bath. Unlike living quarters, where in summer it is as hot as outside, the temperature in the bathhouse is always higher.
But it is necessary to maintain a temperature comfortable for receiving procedures in it, and so that drafts do not form, and there is no sharp difference from heat on the shelf to cold on the floor.To do this, air flows must move along a certain trajectory, which is set by placing supply and exhaust openings in specific places.
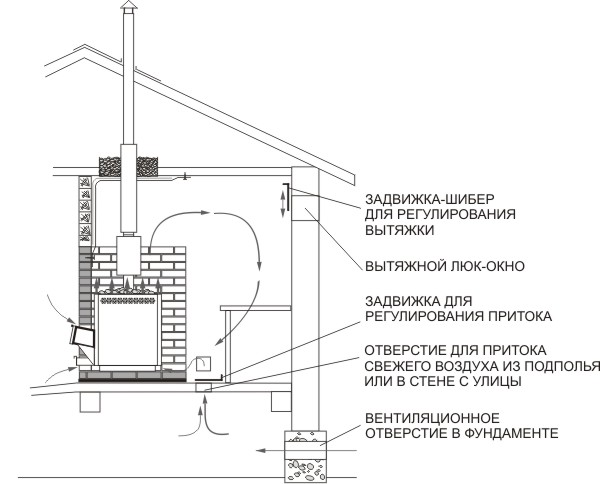
Ventilation through the chimney
The easiest way to solve the problem is how to make ventilation in the steam room if there is a furnace with a blower in it. It will serve to remove the exhaust air through the chimney, in which draft occurs during the combustion of the fuel. But this scheme will work only if there is an influx of air from the outside.

Open door to the steam room
Inflow can be provided in the following ways:
- from time to time slightly open the door to the steam room;
- make a small gap of 1 cm in the door or leave the same gap between the door and the floor;
- if the log cabin of the bath is not sheathed, such a gap can be left between the first crowns below the floor level, provided that the boards are not stacked tightly;
- make a special opening in the wall opposite the stove at a height of 20-30 cm from the floor.
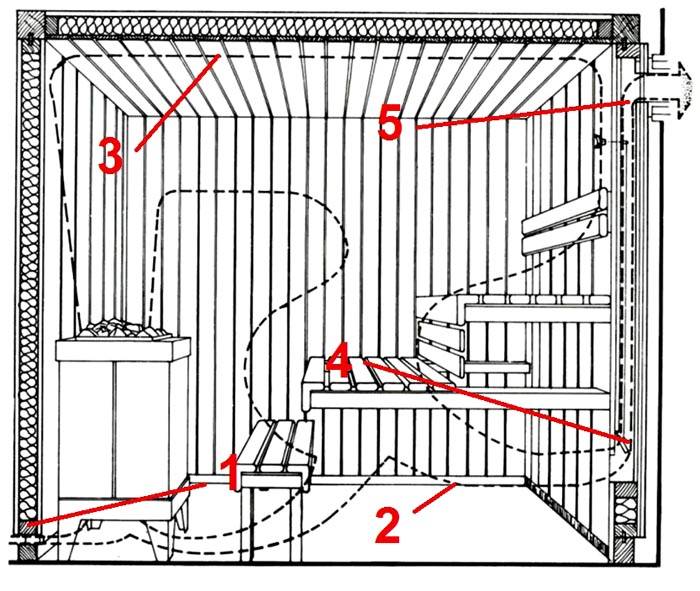
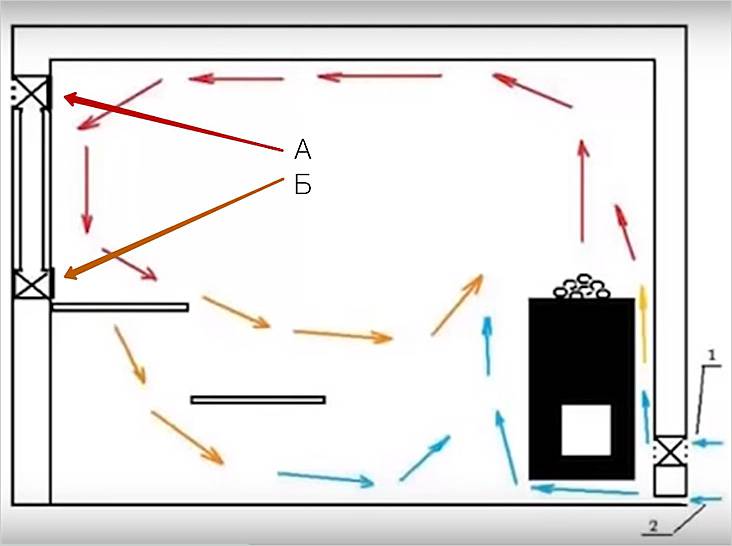
In any of these cases, the cold stream penetrating into the room moves to the heat source and displaces the air already heated by it upwards. When moving, it warms up the entire room, gradually cooling down and falling down. Here it is drawn into the blower and led out through the chimney to the street.

Air movement pattern
This method of how to make ventilation in a steam room is not the most reliable and efficient, since most of the fresh air is immediately drawn into the stove. Therefore, even during the construction of the bath, it is advisable to consider other options with the installation of products in the walls.
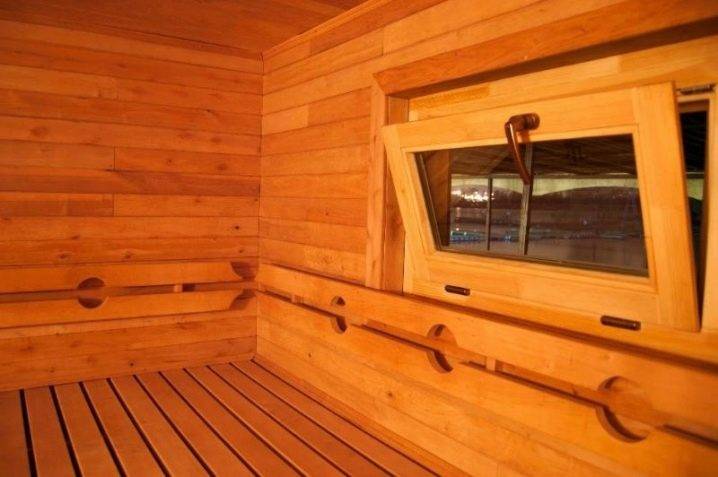
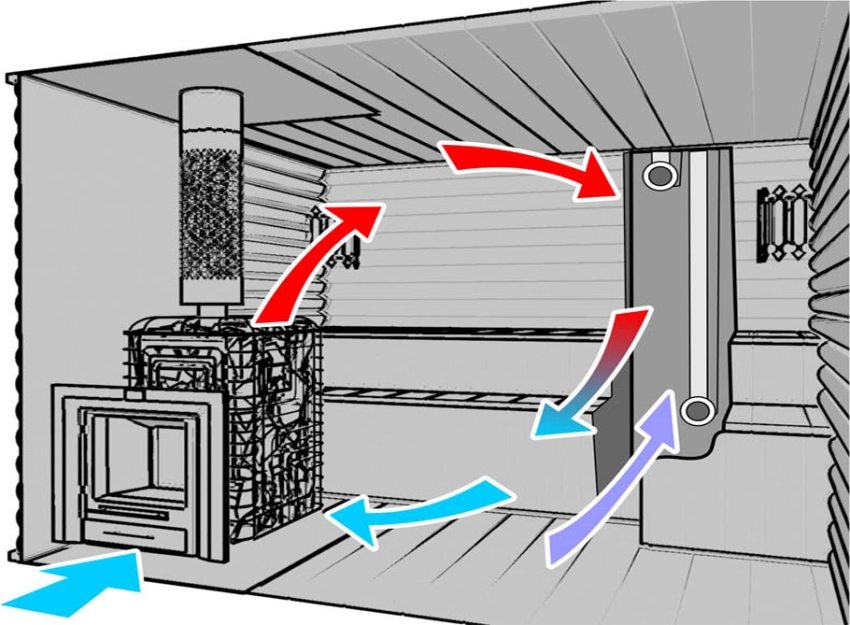
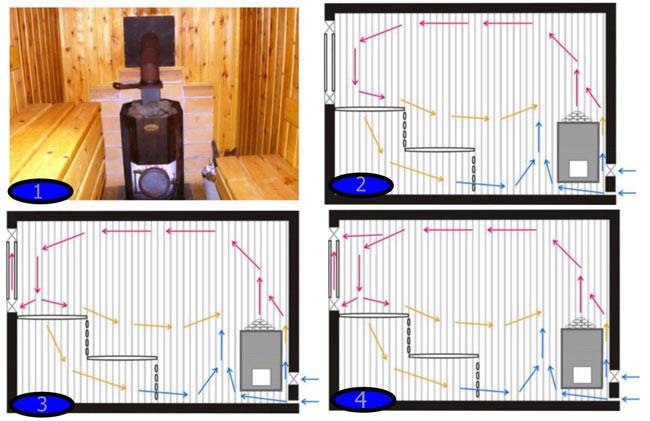
Ventilation through vents
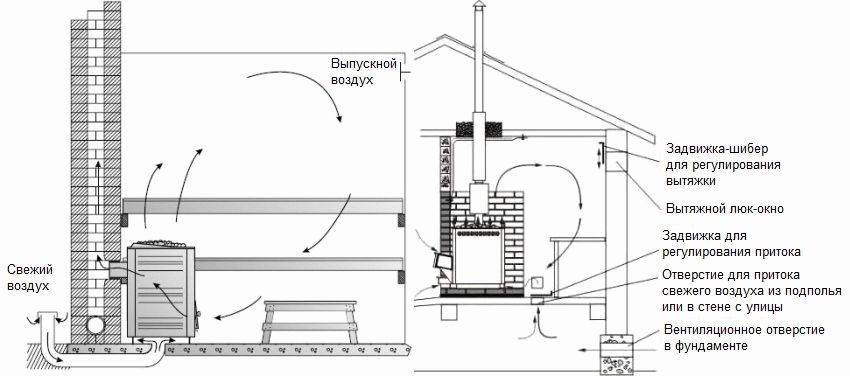
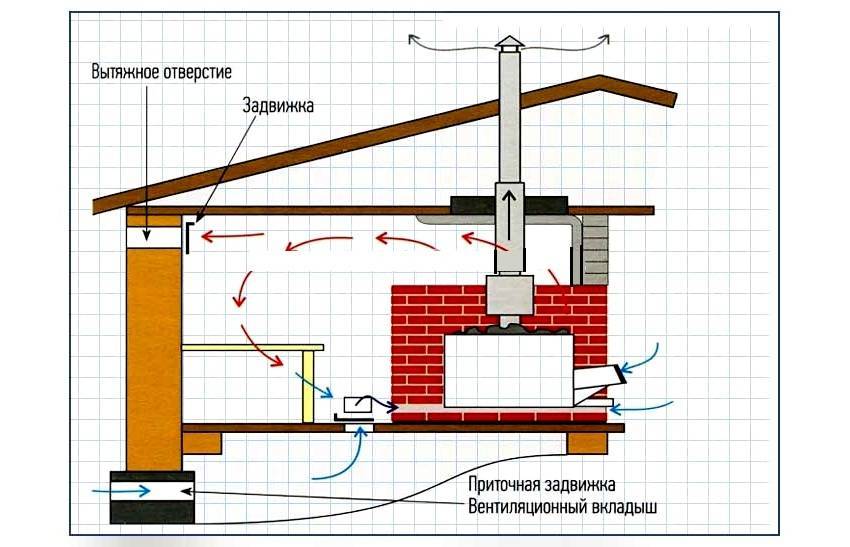
To ensure that air exchange does not depend on the operation of the furnace, special openings are arranged in the walls for the inflow and exhaust of air. It is guaranteed to work under the following conditions:
- the exhaust hole is placed under the ceiling of the bath - where heated air accumulates;
- the inlet should be located low above the floor on the opposite wall, the closer to the stove, the better so that the cold streams drawn in do not hit the legs;
- the optimal vertical distance between the products should be 150-200 cm;
- the cross section of the exhaust hole should be larger.

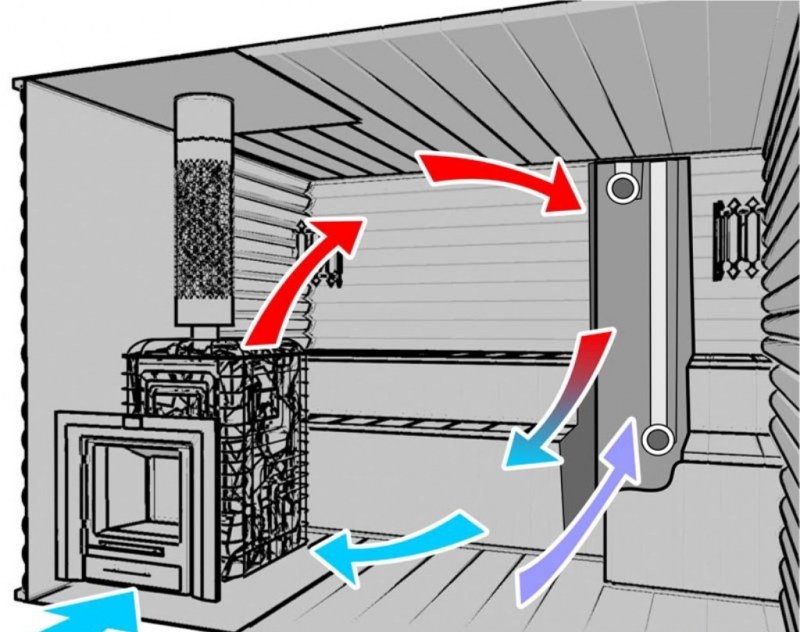
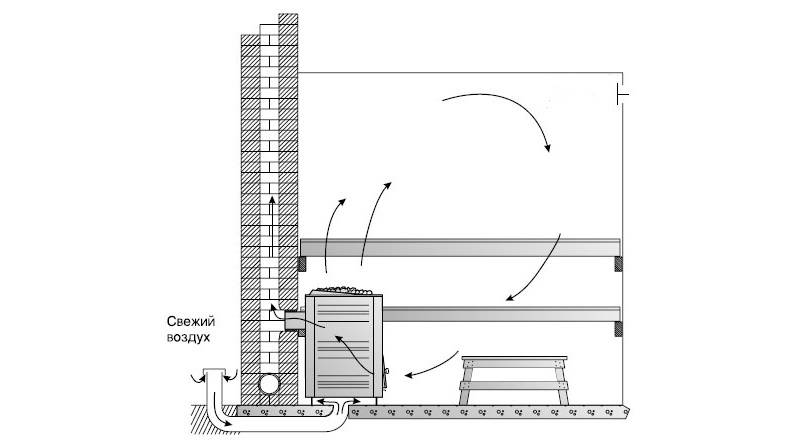
Cold air immediately enters the heating zone
The ideal location of the supply air is behind the furnace. Entering the room, it immediately begins to warm up, displacing the already hot air mass up and towards the hood. Therefore, cold streams and levels with noticeably different temperatures are not formed in the steam room.
If you want to know how to do it right ventilation in the bath and steam room, provide for this scheme at the design stage and before installing the furnace
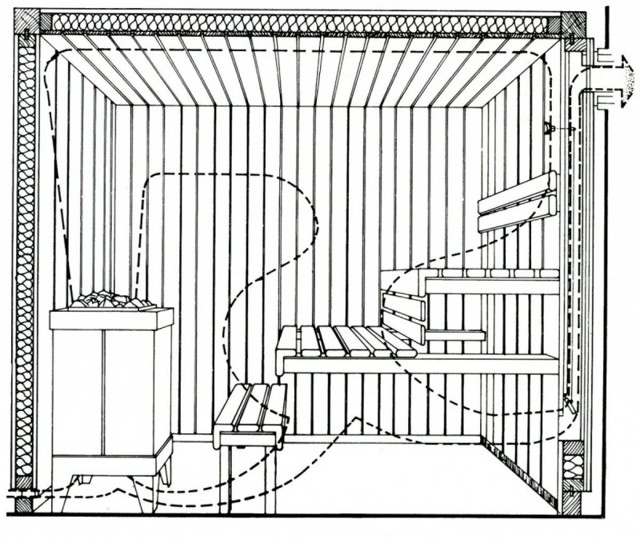
It is also important to make sure to make a difference in height between the ventilation holes. If they are approximately at the same level, this will lead to a draft and a rapid passage of fresh air in a straight line, without circulation in the room.

Natural ventilation extractor
In order to be able to regulate the ventilation or restrict access to the steam room for too frosty air, it is necessary to provide covers or valves for the air.
The advantage of natural ventilation is that it works without the use of devices that require mains power and can break down. Its installation and operation do not require large expenditures.


Volley ventilation: proper ventilation in the steam room
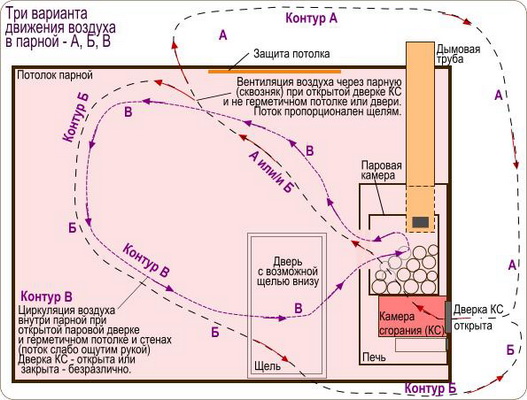
In a classic Russian bath, two ventilation schemes were commonly used:
- volley ventilation, providing a sufficient amount of air during soaring;
- ventilation to dry the steam room after use.
Volley ventilation is carried out through an open door and window. We emphasize: we are talking about a wet steam bath, not a sauna.
Building for myselfParticipant
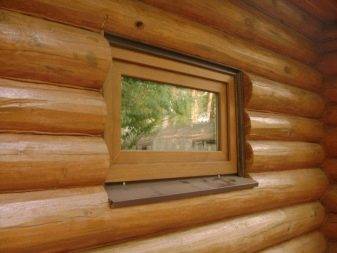
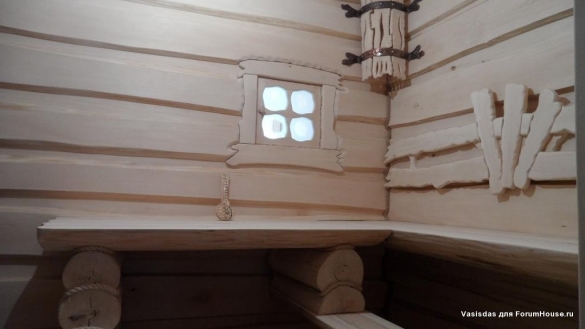
I had to quarrel with the customer and insist that in wall thickness 500 mm a window opening was cut.
To get air for breathing in the steam room, a window next to the shelf and a door to the dressing room are enough. The window and the door must be opened between visits while we are resting. Then we return to the steam room, close the window and the door and steam again.
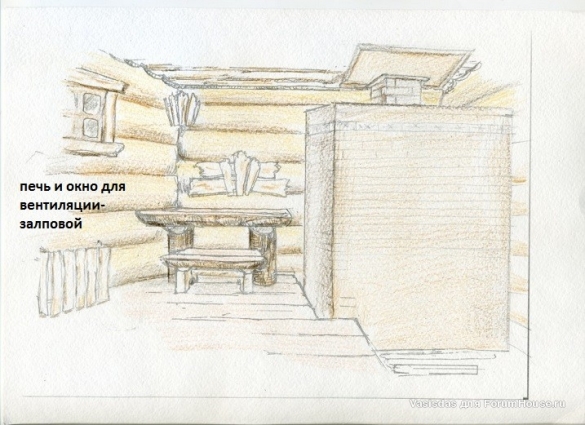
To dry the steam room, they make a small air in it (there are different options: some make it in the far corner under the ceiling, others, on the contrary, under the shelf). After using the bath, open:
- this little breeze
- a window in a washing or dressing room.
This creates a stream of air that ventilates the room and removes moisture from it.
To our user with the nickname Vasisdas.
The user with the nickname Nomadic has ventilation in the bathhouse as follows: the air inflow is under the furnace, the exit is diagonally under the ceiling. Usually everyone steams with a closed hood, but sometimes it is opened, “if the steamer is not extreme”, and in this case natural ventilation works.
When you want to refresh the air in the steam room after several visits, the hood opens, and a shock dose of boiling water splashes into the heater.
Nomad
All the old steam is blown out the hood window. After that, I wave the doors a little, creating an additional flow, put a new wormwood, close the window, and the steam room is as good as new, as if it had never been steamed there.
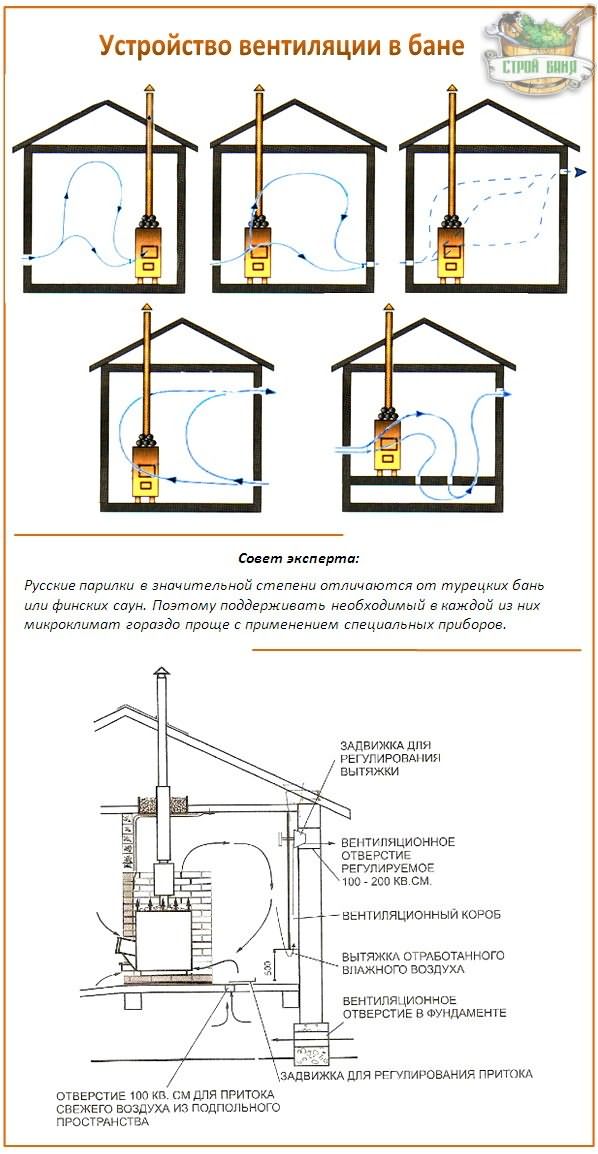
Ventilation system planning
- The hood is mounted during the construction of the bath. The specific channels to which they are connected are established. The windows are laid after the sheathing of the room.
- It is desirable to make special air duct openings of the same size. In some cases, 2 windows are installed, for better efficiency and safety.
- Ventilation openings must have either valves or doors.
- The calculation of the cross-sectional area of the hole is calculated based on the volume of the room.
- If you calculate everything incorrectly, the bathhouse will be cold.
- Windows cannot be installed at the same level and opposite each other.
- Windows must be made slightly lower than the ceiling.
Bathroom ventilation system in a private house
When equipping the ventilation system with your own hands in the bathroom, it must be borne in mind that during the use of the bathroom, excess humidity occurs there, condensation appears. Metal parts and elements on which condensate collects in the bathroom begin to rust.
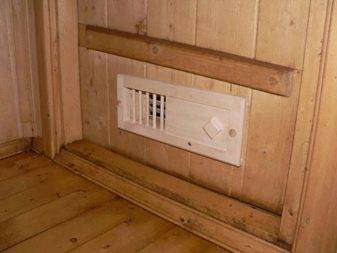
The bathroom ventilation scheme must be provided for in the project. It involves the installation of a ventilation shaft, the entrance to which from the side of the bath is closed with a grate. Supply air can enter the bathroom through open windows and a gap between the door and the floor. Natural ventilation will ensure optimal humidity and temperature in the bathroom.
On a note! If the bathroom is located on the second or third floor of the house, forced ventilation is used to eliminate moisture and condensation. This system uses a fan.
 Diagram of the movement of air flows inside the room.
The combined bathrooms and toilets use sewer ventilation in a private house.There are several options for installing ventilation pipes for such premises. One of them is to run a ventilation pipe along the wall of the house. Such a pipe will look like a drain pipe. The length of the ventilation pipe must be such that its beginning is higher than the roof covering. It is recommended to use a pipe diameter of 11 cm. Full and detailed instructions can be found in the video materials on installing ventilation in bathrooms.


An integrated approach to the problem of condensate
Drawing of the placement of ventilation holes in the dressing room
Possible drafts and additional sources of moisture, cold from the outside create problems inside the building. As a result, this method of solving the problem with condensate, how to make ventilation in the dressing room, will not help. It will take a whole range of work to eliminate this shortcoming.
Floor insulation
The ideal flooring option is tile. It seals all drafts from the underground space, and also prevents the penetration of moisture. For greater comfort, a warm floor system can be laid under it, but this will increase the cost of finishing and operation. Therefore, wooden coatings are most often equipped. The correct floor must be mounted in the following steps:
- Foundation ventilation. Prior to pouring, special holes (vents) are provided in the formwork along each wall of all rooms.
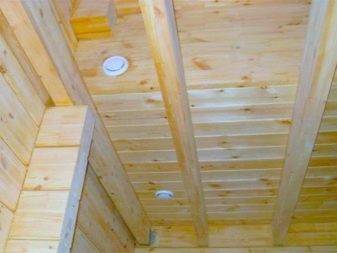
Ventilation of the underground space will ensure a healthy microclimate in the building and extend the life of the floor covering;
- Bars for the subfloor are stuffed on the logs, covered with waterproofing;
- A heater is installed between the bars.It should fit snugly against the wooden canvases. As a heater, mineral wool, polystyrene, expanded clay can be used. It all depends on the size of the budget;
- The next layer is waterproofing. The seams are sealed with metallic tape;
- Subfloor is installed.
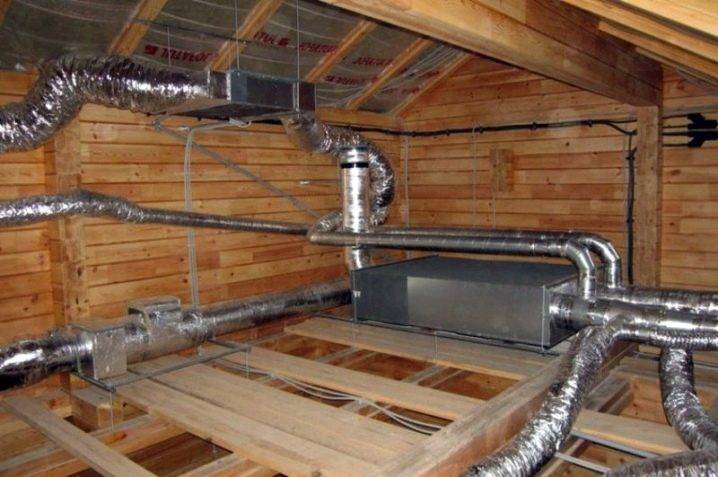
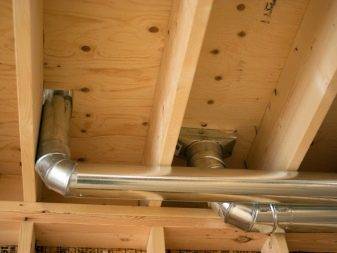
Often, part of the heating and ventilation ducts are laid in the underground space. With this scheme, communications are insulated and waterproofed.
Ceiling insulation
Perhaps this is the weakest point in the dressing room. It is on him that the effect of steam is most negatively affected.
Scheme of ceiling insulation in the dressing room
The warmer the ceiling, the less condensation will accumulate on it. The ideal filler option is expanded clay, which will replace both insulation and vapor barrier. But this is not always technically possible.
Therefore, a false ceiling is most popular:
- Guide bars are stuffed, a vapor barrier is laid;
- A heater is laid between the wooden profiles (mineral wool is recommended), sewn up with a reflector (foil film). The seams between the canvases are glued with metallic tape.
Wall insulation
It is carried out according to the same principle as the ceiling lining. For a brick bath, the facade is supposed to be insulated. And inside the arrangement of waterproofing.
Scheme of wall insulation in the dressing room and waterproofing devices
Wood is recommended as the finishing material for wall cladding. At the same time, it is not painted, varnished, treated with protective compounds: antiseptics and fire-fighting agents. Proper insulation with your own hands will significantly reduce the scale of condensation.
In this case, it is necessary to insulate the box. The door to the steam room is made smaller than the entrance.Thus, heat losses in both rooms are reduced.
Heating
The sharp difference between the steam room and the dressing room is the main reason for the appearance of condensate. Therefore, experienced craftsmen strive to create the optimal temperature regime in each room. To do this, the heater stove is used as a heat source.
There are several options:
- Related use. When the stove with one wall goes into the dressing room. The same option can be attributed when the firebox is located in the rest room, and the rest of the building is in the steam room;
- The construction of an additional partition between the steam room and the dressing room, or the placement of a washing room between these rooms;
-
The use of ventilation ducts coming out of the steam room for heating adjacent rooms.
Why is there ventilation in the bath?
In this case, the ventilation system in the bath is very important. But we will not expand too much, going into uninteresting long arguments, but instead we will get acquainted with one specific example.

A person in a bath, in fact, is in a room with just a huge amount of hot steam. And, of course, he inhales this vapor. But people, as we know, breathe oxygen, exhaling the notorious carbon dioxide instead. And if the air exchange is insufficient, then the steamer after a while will easily burn out.


For this reason, bath ventilation should turn out to be extremely effective and fully comply with all the stated requirements (we'll talk about them a little later). There are several types of ventilation system, and all of them will be discussed in this article. And if you familiarize yourself with their features, you can choose the most suitable option for yourself!
Ventilation Tips
The most effective of the many schemes is Bastu. It is quite simple to do it in both a new and an existing bath.
We offer two videos that describe in detail the structure of the Swedish system.
Here, the author installed a damper on the hood, but not on the inflow. It is not difficult to make it: it can be just a metal plate.
A complete review, an interesting scheme for warming up the dressing room.
The authors of these materials told in sufficient detail and showed the stages of creating a ventilation system. In both videos, comments are interesting, where you can find a rational grain for your existing or under construction bath.
A lot of controversy is caused by the distance from the lower edge of the hood to the floor. There are general recommendations, but since each bath and climate is individual, the distance indicated by someone cannot be a dogma. The ideal gap is determined empirically. To do this, a movable tube is put on the lower edge of the exhaust pipe.
Proper ventilation in the bath is a simple scheme with natural air movement. Fans in conditions of high humidity, temperature changes can fail at any time. A complex system with many air ducts is also unreliable.


