- Recommendations for the selection of materials
- Preparatory work and calculation of materials
- What kind of flooring is suitable for underfloor heating
- Underfloor heating base
- Making a water floor
- What you need to know
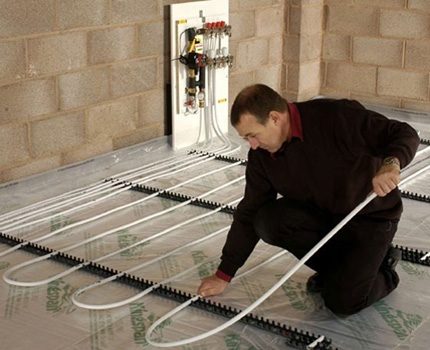
- Step-by-step guide to installing a water floor
- Floor insulation
- Electric floor based on a thermomat
- Principle of operation and construction
- Installation of thermal mats
- We prepare the base
- Design pros and cons
Recommendations for the selection of materials
Here is a list of equipment and building materials that will be used for the installation of a water heated floor:
- pipe with a diameter of 16 mm (internal passage - DN10) of estimated length;
- polymer insulation - foam plastic with a density of 35 kg / m³ or extruded polystyrene foam 30-40 kg / m³;
- damper tape made of polyethylene foam, you can take "Penofol" without foil 5 mm thick;
- mounting polyurethane foam;
- film 200 microns thick, adhesive tape for sizing;
- plastic staples or clamps + masonry mesh at the rate of 3 attachment points per 1 meter of pipe (interval 40 ... 50 cm);
- thermal insulation and protective covers for pipes crossing expansion joints;
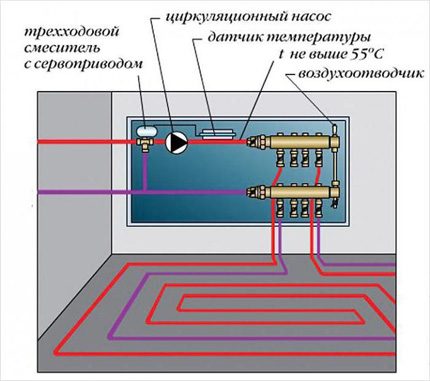
- a collector with the required number of outlets plus a circulation pump and a mixing valve;
- ready-made mortar for screed, plasticizer, sand, gravel.
Why you should not take mineral wool for thermal insulation of floors.Firstly, expensive high-density slabs of 135 kg / m³ will be needed, and secondly, the porous basalt fiber will have to be protected from above with an additional layer of film. And the last thing: it is inconvenient to attach pipelines to cotton wool - you will have to lay a metal mesh.
Explanation about the use of masonry welded wire mesh Ø4-5 mm. Remember: the building material does not reinforce the screed, but acts as a substrate for reliable fastening of pipes with plastic clamps when the “harpoons” do not hold well in the insulation.
Option of fastening pipelines to a grid of smooth steel wire
The thickness of thermal insulation is taken depending on the location of underfloor heating and the climate in the place of residence:
- Ceilings over heated rooms - 30 ... 50 mm.
- On the ground or above the basement, the southern regions - 50 ... 80 mm.
- The same, in the middle lane - 10 cm, in the north - 15 ... 20 cm.
In warm floors, 3 types of pipes with a diameter of 16 and 20 mm (Du10, Dn15) are used:
- from metal-plastic;
- from cross-linked polyethylene;
- metal - copper or corrugated stainless steel.
Pipelines made of polypropylene cannot be used in TP. Thick-walled polymer does not transfer heat well and elongates significantly when heated. Soldered joints, which will necessarily be inside the monolith, will not withstand the resulting stresses, deform and leak.
Usually metal-plastic pipes (left) or polyethylene pipes with an oxygen barrier (right) are laid under the screed
For beginners, we recommend using metal-plastic pipes for an independent installation of underfloor heating. The reasons:
- The material is easily bent with the help of a restrictive spring, after bending the pipe "remembers" the new shape. Cross-linked polyethylene tends to return to the original radius of the bay, so it is more difficult to mount it.
- Metal-plastic is cheaper than polyethylene pipelines (with equal quality of products).
- Copper is an expensive material, it is connected by soldering with heating of the joint with a burner. Quality work requires a lot of experience.
- Corrugation made of stainless steel is mounted without problems, but has increased hydraulic resistance.
For the successful selection and assembly of the manifold block, we suggest that you study a separate manual on this topic. What's the catch: the price of the comb depends on the method of temperature control and the mixing valve used - three-way or two-way. The cheapest option is RTL thermal heads that work without admixture and a separate pump. After reviewing the publication, you will definitely make the right choice of the underfloor heating control unit.
Homemade distribution block with RTL thermal heads that regulate the flow according to the return flow temperature
Preparatory work and calculation of materials
Such responsible work as the installation of a warm floor with your own hands should begin with the preparation of materials and planning. Strictly speaking, only specialists who have information about the level of heat leakage in a given room can make an accurate calculation. But for individual needs, approximate calculations are often used that satisfy the requirements.


First you need to draw a plan for the placement of pipes. The clearest and most obvious thing will be a diagram drawn on paper in a cage, on which a warm floor can be calculated based on the quadrature of the room. Each cell will correspond to a step - the distance between the pipes.
For the temperate zone:
- With good insulation of the house and windows, the distance between adjacent turns of the pipe can be made 15-20 cm;
- If the walls are not insulated, 10-15 cm.
- In spacious rooms, where some of the walls are cold and some are warm, they take a variable step: near the cold walls, the distance between adjacent turns of pipes is small, and as they approach warm walls, they increase it.
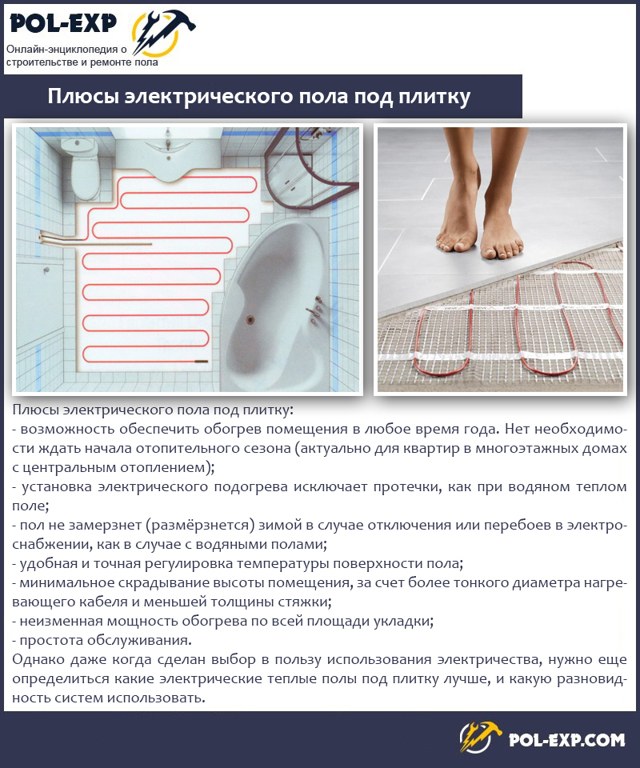
What kind of flooring is suitable for underfloor heating
A big mistake is made by those who plan to lay parquet or thick wood flooring on a warm floor. Wood does not conduct heat well and will prevent the room from heating up. The efficiency of such heating may even be lower than that of a radiator, and heating costs may be too high.
The ideal flooring for underfloor heating is stone, ceramic or porcelain tiles. When heated, it will keep warm perfectly, and this is the best option for the kitchen or bathroom. In rooms where the floor is warm, children are very fond of playing, and it is more pleasant to walk barefoot there than on wooden parquet.
A slightly worse flooring option, but more suitable for a guest room or bedroom, is linoleum and laminate. These materials transmit heat well and will not reduce the efficiency of water heating. In this case, the laminate should be chosen with a minimum thickness, and linoleum - without an insulating substrate.
Important!
When heated, many synthetic materials can release harmful fumes. Therefore, floor coverings with chemical components must necessarily have a manufacturer's mark on the possibility of their use in residential premises on a warm floor.
Underfloor heating base
If we are talking about a house with concrete floors, then the most affordable common option is a concrete screed with water heating.The same method is used for the first (basement) floors of private cottages, if the base of the floor is on a sand cushion, which is located directly on the ground.


In houses with wooden floors, this option is not applicable. Wooden floor beams simply cannot withstand the enormous weight of the concrete screed, no matter how thin it may be. In this case, a lightweight version of the underfloor heating is used, which will be discussed in a separate section.
Do-it-yourself installation of a warm floor begins with the preparation of the base. The basis for creating a warm floor should be flat, without protrusions and depressions. The maximum allowable difference is 5 mm. If the depth of surface defects reaches 1-2 cm, then it will be necessary to fill and level a thin layer of granite screenings (fine crushed stone) with a grain size of up to 5 mm. On top of the leveling layer, you will have to lay a film and, when laying thermal insulation, walk on wooden boards. Otherwise, the leveling layer itself will become a source of irregularities.
Making a water floor
Making a warm water floor in the bathroom with your own hands is a more difficult task, but why not try to cope with it ... We have to assemble a structure from pipes and connect them to a source of hot water. Metal-plastic and polyethylene pipes are suitable for the pipeline. Both materials are flexible and have low hydraulic resistance.
What you need to know
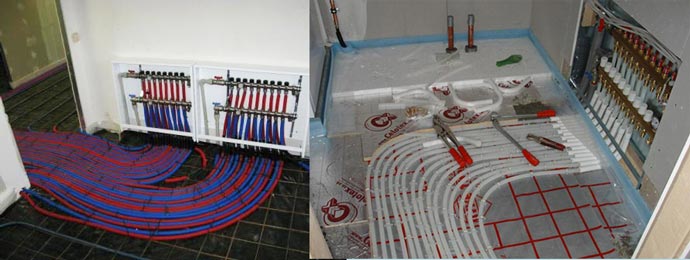
One heating circuit can cover an area of up to 20 square meters. meters, which is enough for a bathroom, but if the floor is planned to be divided into autonomous zones, then water must be supplied to them through a distribution manifold.
The collector must be with flow regulators. With the same water supply to circuits of different lengths, they will heat unevenly. A longer circuit will heat up worse. Moreover, the flow of water in it can even stop due to strong resistance. To eliminate these troubles, flow regulators in the manifold are used.
A number of strict conditions in order to proceed with the installation:
- The presence of a closed type heating system using a circulation pump.
- A double-circuit boiler must have a power reserve.
- All work is carried out with the heating system completely turned off.
Pipes must be freed from the coolant.
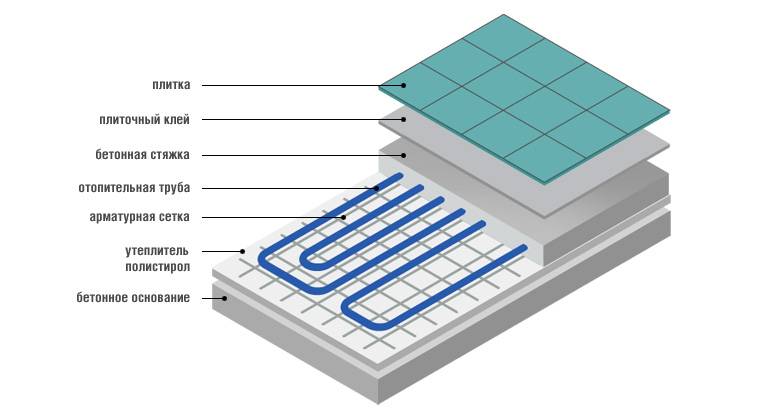
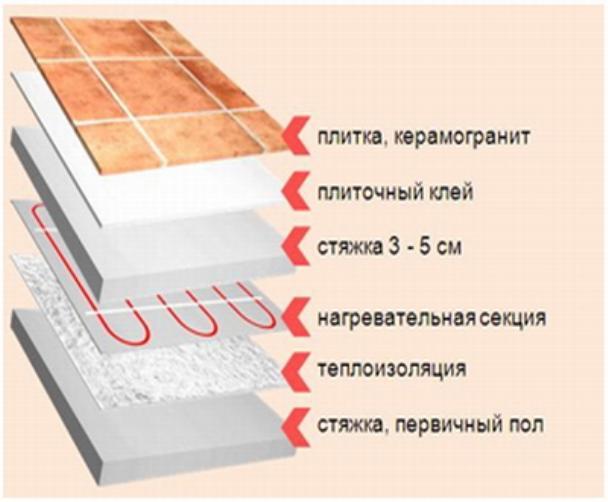
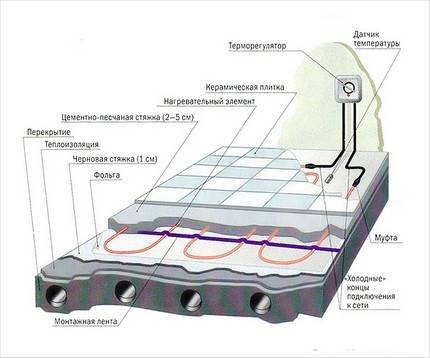
In the thickness of the warm floor, it is possible to distinguish the mandatory functional layers:
- base;
- hydro and thermal insulation;
- pipeline from durable pipes;
- concrete screed or gypsum fiber;
- decorative flooring.
In wooden houses, you can also make a water floor, but you should worry about reliable waterproofing. It needs to be made in several layers, only in this way the wooden base of the floor will last for many years without repair.


Step-by-step guide to installing a water floor
The construction of a water system is a cycle that includes standard types of work.
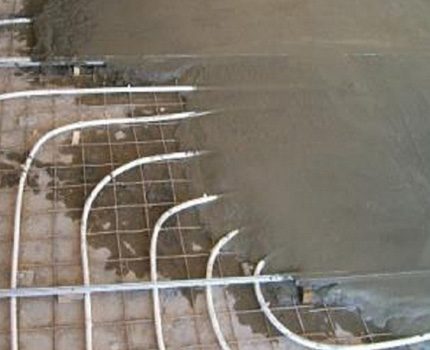
The final layer of the screed dries for 5-7 days - the same as the rough one. After complete drying, you can proceed to finish the floor and lay the floor tiles.
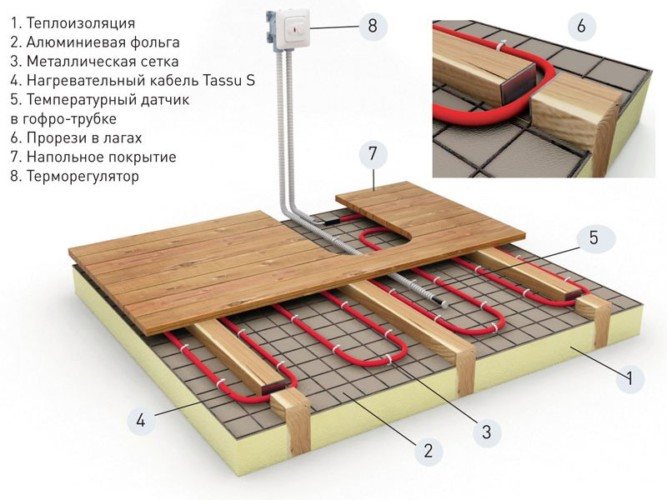
Floor insulation
In order to direct heat flows upwards in the room, it will be necessary to carry out thermal insulation of the floor, for which you can use heaters up to 4 mm thick, you can additionally lay a foil coating to reflect heat waves.
If the work is carried out in a private house and we are not talking about a room above an unheated basement, then thermal insulation issues can be neglected, since all the heat produced will remain in the house, however, it will spread in different directions. But in order to guarantee the desired performance in a particular room, you can not do without thermal insulation.
The best material for thermal insulation will be penofol, equipped with a special self-adhesive layer and a foil coating. Installation of insulation must be carried out with a 5-8 cm approach to the walls, the excess after completion of work is simply cut with a paint knife.
The damper tape, laid on top of the heat-insulating material along the perimeter of the wall, will serve as a compensator when heated.
The cable can be laid directly on the insulation, but it is recommended to use a special metal mesh, which excludes direct contact between them.
Electric floor based on a thermomat
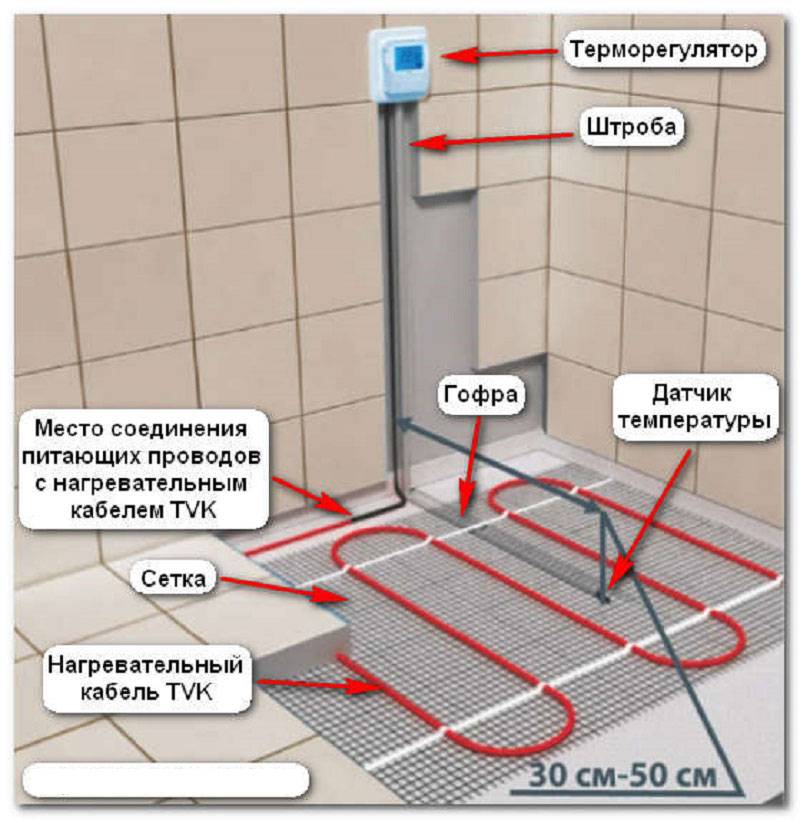
For the production of thermomats, a cable no thicker than 45 mm is used. It is fixed on a fiberglass mesh 0.5 m wide. The cable has a core shielded and protected by an outer sheath. For residential applications, double-core heating mats are used due to their significantly lower levels of electromagnetic radiation.

If a tile is chosen as a finishing coating, instead of a concrete solution, an adhesive for this type of material, specially designed for underfloor heating, is poured over the cable
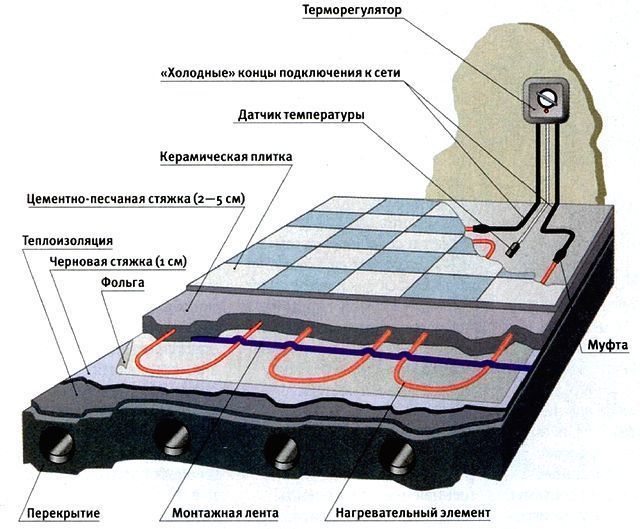
Principle of operation and construction
The heating mat includes 2 elements: the thermomat itself with a cable and a corrugation. A sensor is inserted inside it, and it protects it from moisture and aggressive influences.If the adhesive layer is so thin that it cannot completely close the corrugation, a moisture-resistant sensor must be used.
The thermostat is complete with a remote temperature sensor, mounting boxes, wires are purchased additionally. When choosing the first element, the maximum energy consumption is taken into account. The cross section of the wires is selected, focusing on the power of the system and the material of manufacture.


If the cable needs to be wrapped, then the mesh is cut. The cable itself cannot be cut or shortened. During installation, it should be at the top, a grid is attached to the floor using adhesive tape or staples
The installation process is extremely simple, because. thermomat is a completely ready-to-install product. There is no need to fix the heating cable, and the uniformity of laying is ensured by the design itself. Its cost is higher than that of a cable floor, but it has a lot of advantages, including faster heating of the surface.
Installation of thermal mats
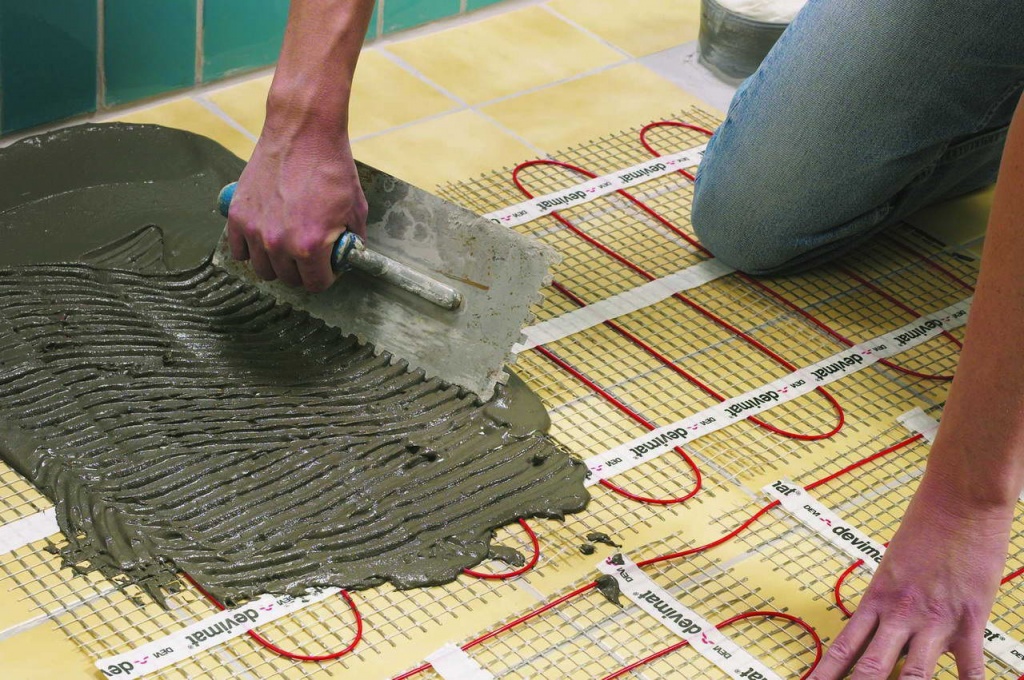
Before laying out the thermal mat, the floor is covered with a primer layer. This will increase the adhesion of the adhesive to the concrete surface. Usually the glue is applied directly to the mat, but if it is a damp room, then after applying and drying a thin layer of glue, it is covered with waterproofing, and then again with glue.
In order not to violate the integrity of the cable and evenly apply the binder, it is necessary to distribute the adhesive composition with a plastic comb. Tiles are laid on the glue and leveled.
Tile plus adhesive should add up to 20 mm, although some manufacturers recommend a minimum of 50 mm. This is explained by the fact that with such a thickness of the layer, heat is distributed more evenly.
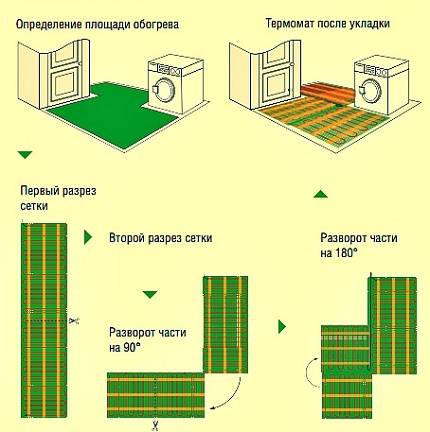
The photo shows the sequence of laying a warm floor from thermal mats under tiles, starting from choosing a place (1) to laying tiles (7). Installation is simplified if the room has a rectangular shape.
In accordance with the PUE, it is imperative to install a protective shutdown that guarantees safety and a circuit breaker. If the system is installed in a bathroom, the thermostat should be moved to an adjacent dry room.
We prepare the base
The purpose of the preliminary work is to level the surface of the base, lay the pillow and make a rough screed. The preparation of the soil base is carried out as follows:
- Level the ground over the entire floor plane and measure the height from the bottom of the pit to the top of the threshold. In the recess should fit a layer of sand 10 cm, footing 4-5 cm, thermal insulation 80 ... 200 mm (depending on climate) and a full screed 8 ... 10 cm, at least 60 mm. So, the smallest depth of the pit will be 10 + 4 + 8 + 6 = 28 cm, the optimal one is 32 cm.
- Dig a pit to the required depth and tamp the earth. Mark the heights on the walls and pour 100 mm of sand, mixed with gravel. Seal the pillow.
- Prepare M100 concrete by mixing 4.5 parts of sand with one part of M400 cement and adding 7 parts of crushed stone.
- After installing the beacons, fill in the draft base 4-5 cm and let the concrete harden for 4-7 days, depending on the ambient temperature.
The preparation of the concrete floor consists in cleaning the dust and sealing the gaps between the slabs. If there is a clear difference in height along the plane, prepare a gartsovka - a leveling dry mixture of Portland cement with sand in a ratio of 1: 8. How to properly put the insulation on the garzovka, look at the video:
Design pros and cons
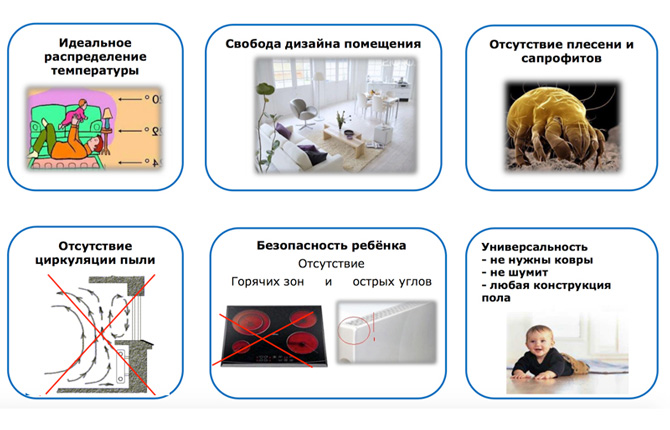
The entire heating system is located under the floor covering, so its manufacture must be approached responsibly. Water heated floor has the following advantages:
- economic feasibility - thermal energy is distributed more efficiently, and there are no unnecessary losses;
- the ability to adjust the temperature mode (the system can be equipped with an electronic automatic control unit that will adjust depending on the conditions in the room);
- comfort - both the floor and the air in the room warm up;
- the possibility of self-installation of the system (in this case, it is necessary to observe the technology of laying pipes, to make the correct calculation of the structure).
As for the disadvantages of a water-heated floor, they are:
- reduction in the useful volume of the room by 7-12 cm;
- high cost of the floor;
- special requirements for flooring (not every material can last for a long time under conditions of periodic heating).
The disadvantages are not critical for water heated floors, so this design is still relevant today.


