- What heater can be purchased
- Tramp TRG-037
- Pathfinder Dixon 2.3
- Gas heat exchangers of the Pathfinder series
- Do-it-yourself heat exchanger for a winter tent
- Preparation of heat exchange pipes
- Case assembly
- Work with the electrical part
- The best factory heat exchangers
- How to make gas heaters for summer cottages
- What should be a gas heater
- Types of gas heaters
- How to make a heater
- We assemble a heat lamp with our own hands
- Operating procedure
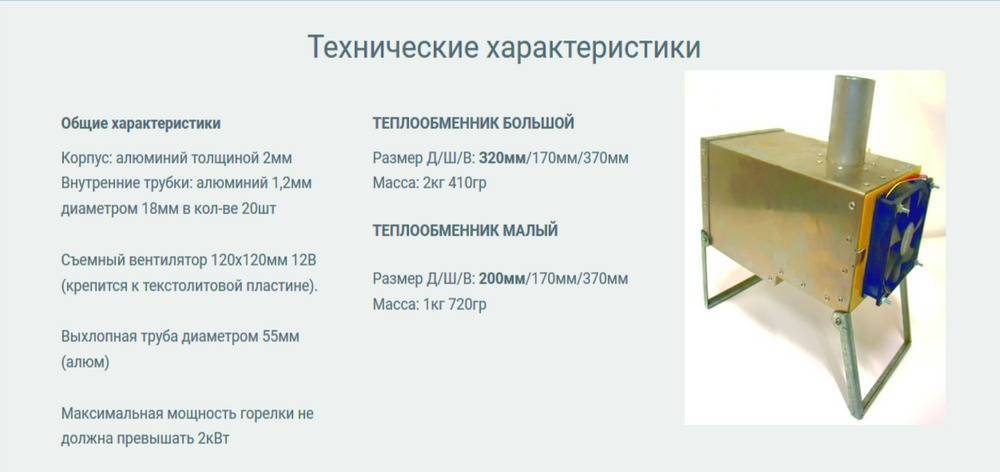
- Characteristics of heat exchanger for tent
- Step by step instructions on how to do it yourself
- Advantages of heat exchangers for winter tents
- spark extinguishing
- Making a system with your own hands
- Types of homemade heating units
- Dimensions and characteristics of the stove for the tent
- Homemade potbelly stove
- wood chipper
What heater can be purchased
Here are some models of heat exchangers that are popular in the tourist equipment market.
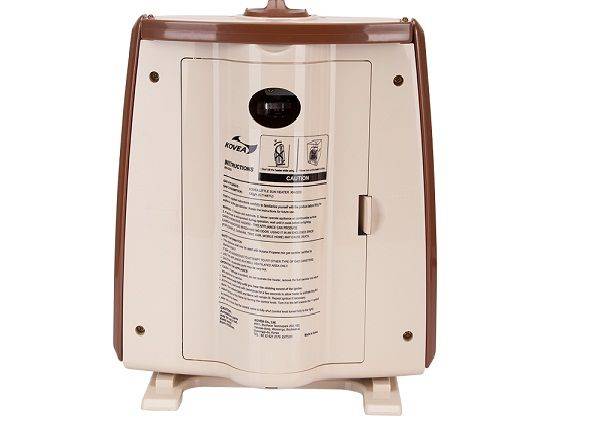
Model Kovea Littl san made in South Korea are recommended for use in tents.
The design uses several new technological solutions that increase the efficiency of the device. A ceramic emitter and a heater plate for a gas cylinder are used. The primary heating of the room is carried out in forced mode, then the device is switched to economical mode.Power supply from a collet gas cylinder.
Tramp TRG-037
The Tramp TRG-037 gas portable heater is designed for heating enclosed spaces such as camping tents, trailers, car interiors and the like. Output power is about 1.3 kW, gas consumption is about 100g/1 hour of operation.
Recommended for use in well ventilated areas.
Pathfinder Dixon 2.3
Equipped with a ceramic radiating surface with a heating temperature of up to 900 degrees. In this case, the gas consumption is 0.068 cubic meters per hour. The weight of the burner is 1 kilogram. Power - 2.3 kW. Heated area up to 12 square meters.
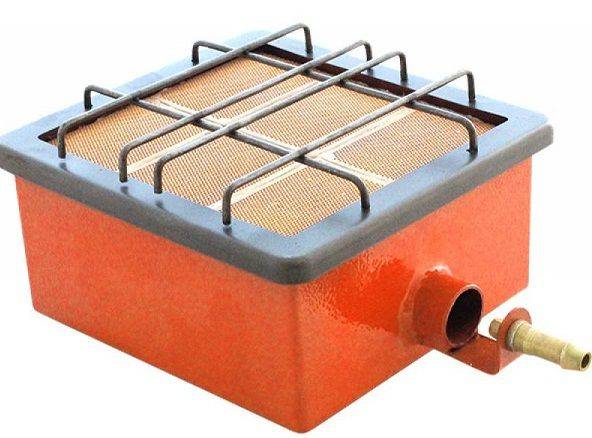
The compact heater Pathfinder Dixon 2.3 was created specifically for the conditions of Russia.
Gas heat exchangers of the Pathfinder series
Portable gas heat exchangers of the Pathfinder series are manufactured in Russia, taking into account all its climatic features. The product uses innovative technologies that can significantly improve weight characteristics (370 grams) and energy consumption - 50-110 grams per hour. The heat exchanger complex effectively heats an area of up to 20 square meters.
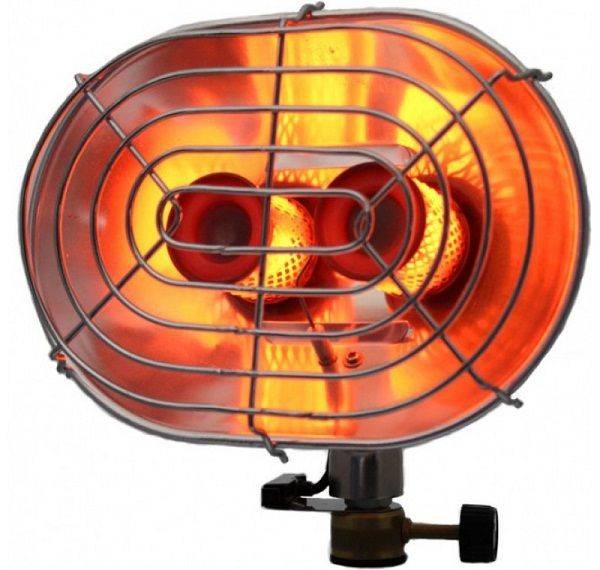
The device is ideal for use in tents, tents, as well as in domestic premises without heating, even in winter.
Do-it-yourself heat exchanger for a winter tent
Making a heat exchanger for a tent with your own hands is not difficult. Metal costs will be minimal, homemade will be more profitable than its factory counterparts. In the manufacture of homemade products, some fantastic accuracy in observing the dimensions is not required - this is not a double-circuit boiler, but the simplest home-made heat exchanger in a tent for relaxing and fishing in cold winter conditions.
It is best to make a heat exchanger for a winter tent from stainless steel and aluminum tubes. If neither is available, find any thin-walled metal pipe with a diameter of about 20 mm and sheet iron 1 mm thick. You will also need a welding machine and a drill with a metal drill of a suitable diameter. Assembly will not take you much time, installation can be done in just a day.

All sizes are rather advisory, you can easily change something specifically for your needs.
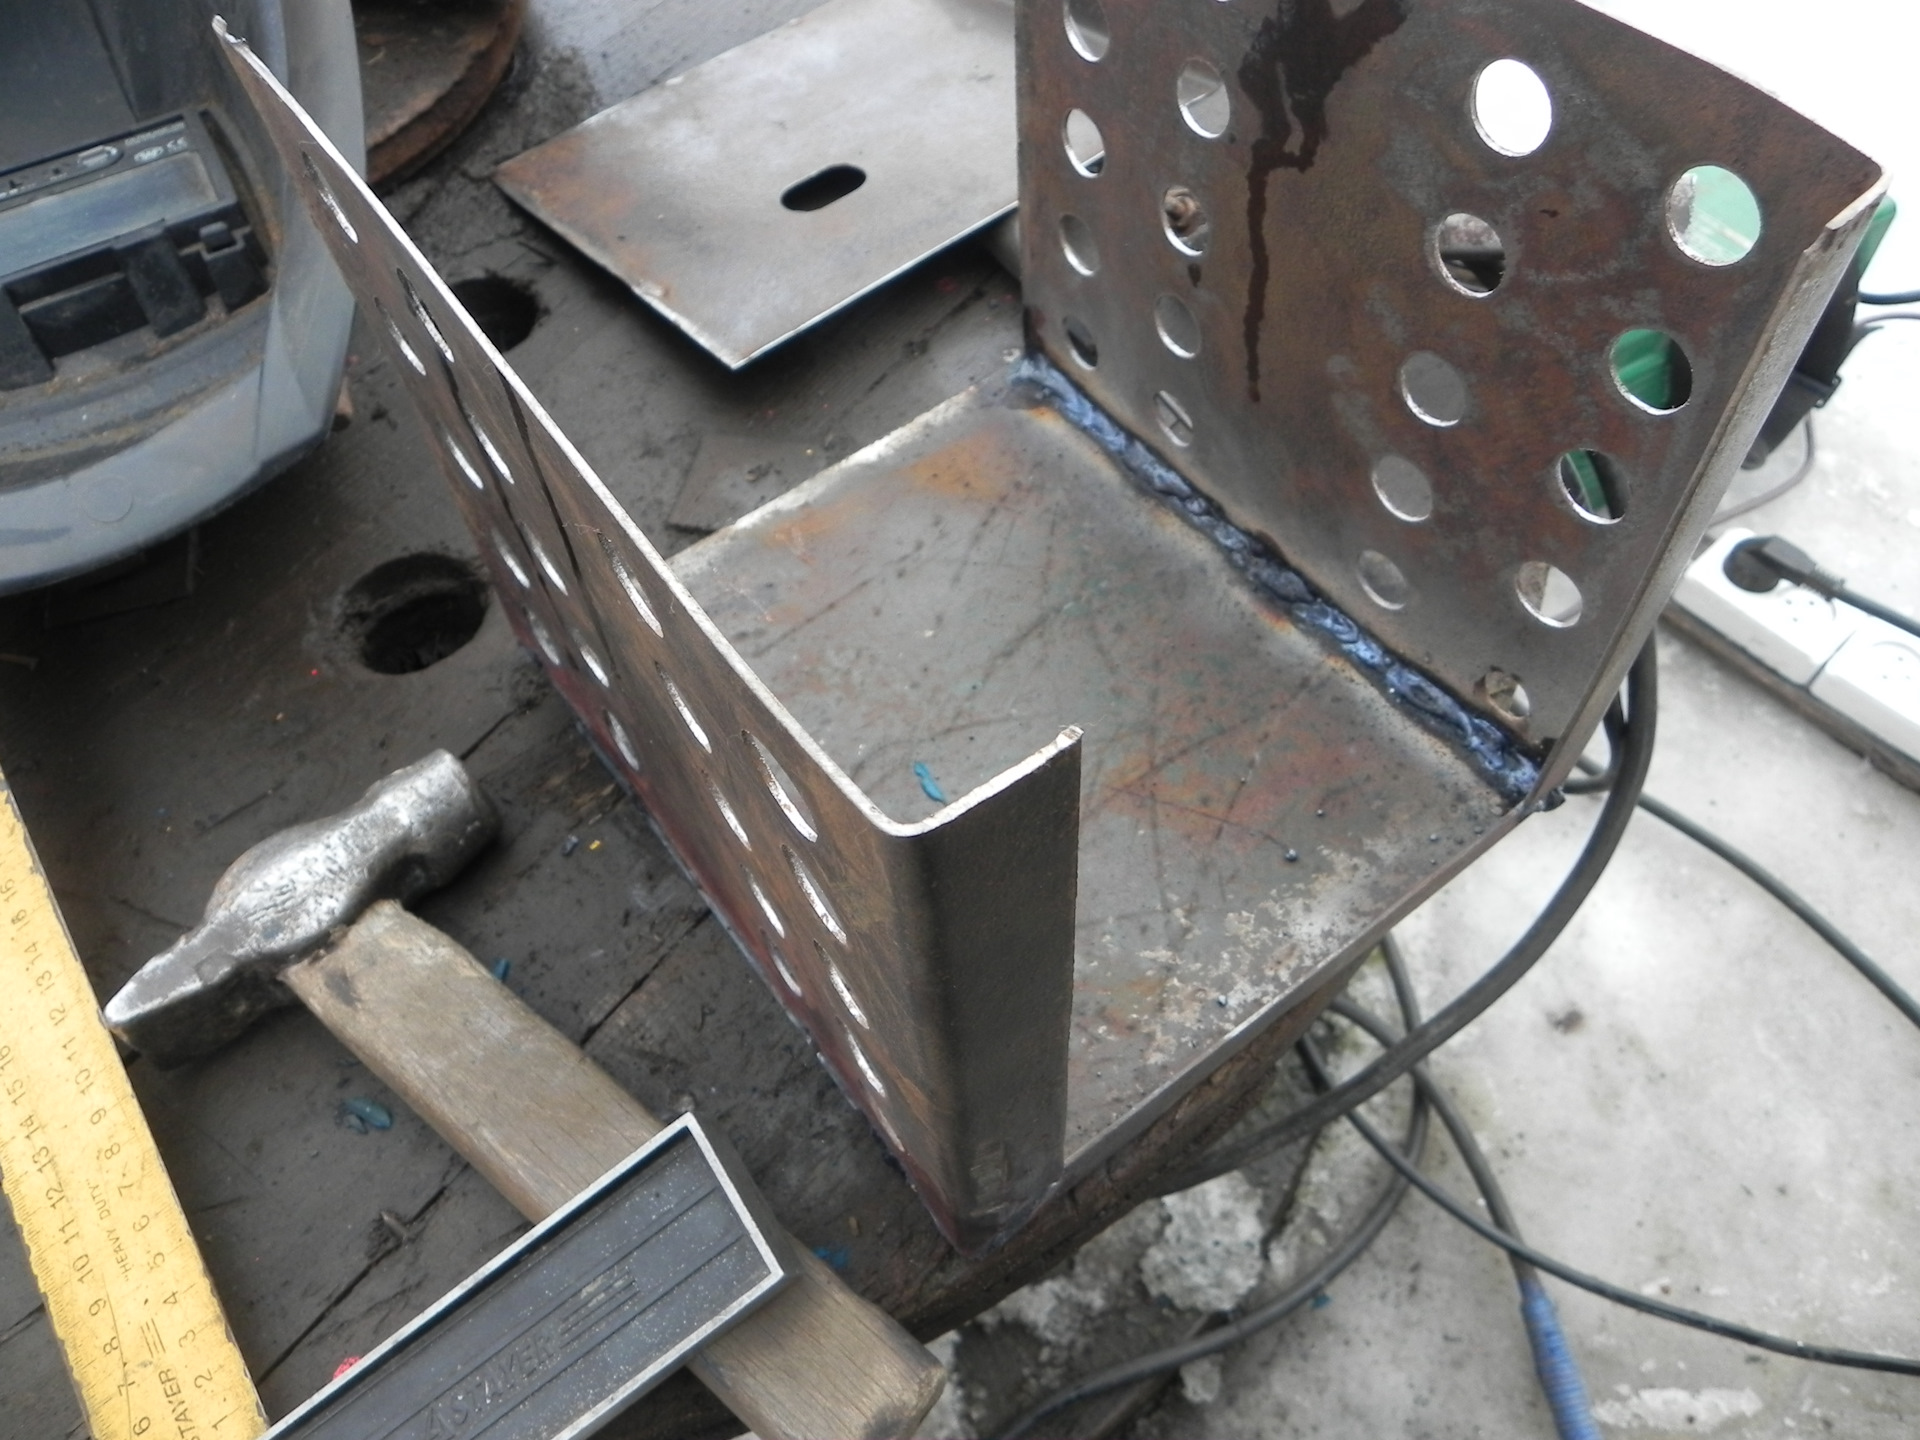
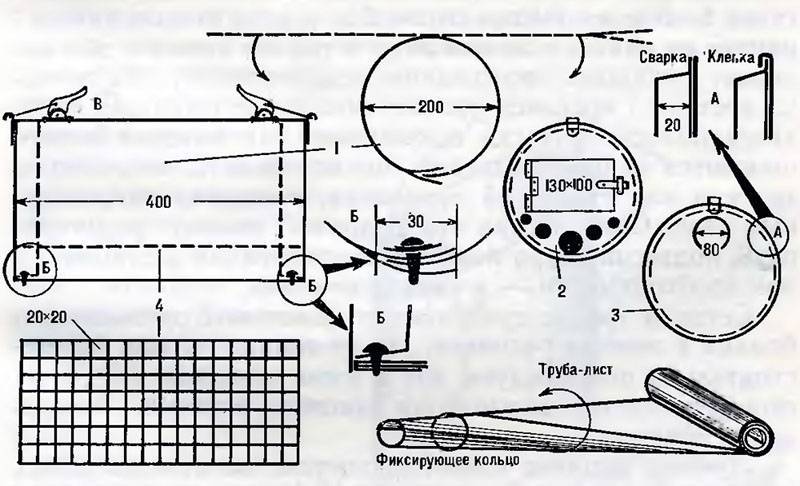
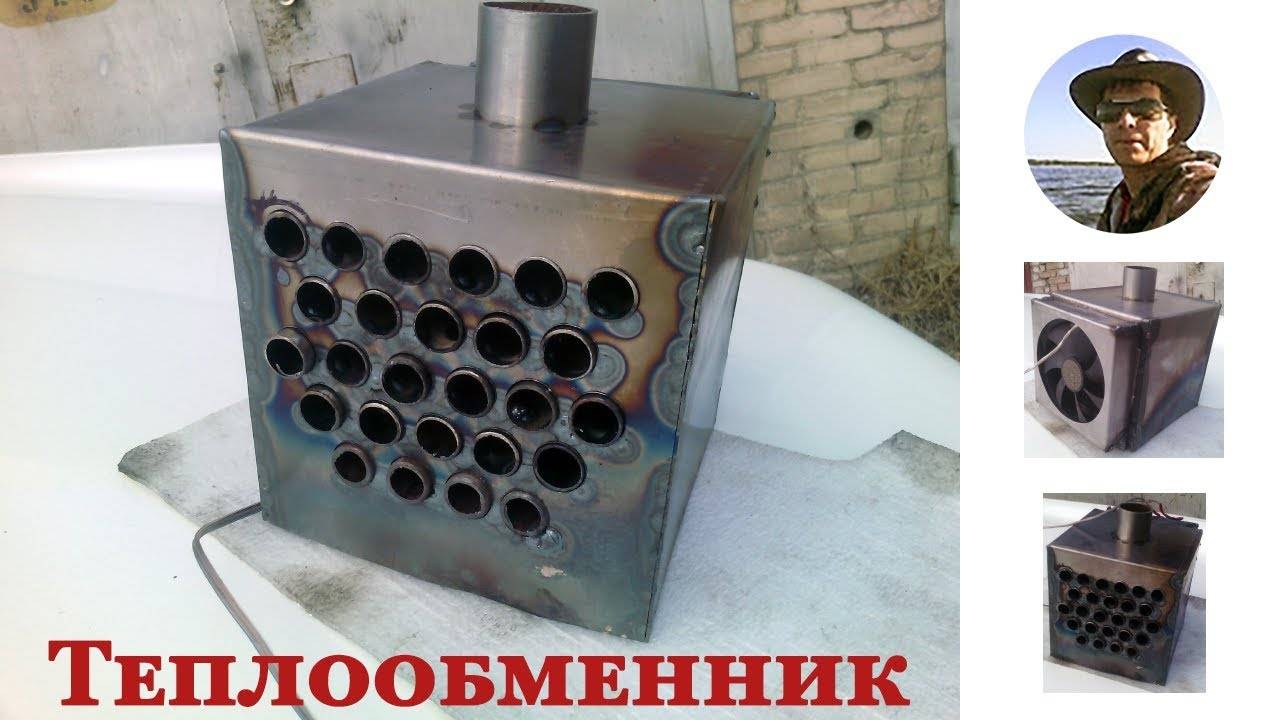
Preparation of heat exchange pipes
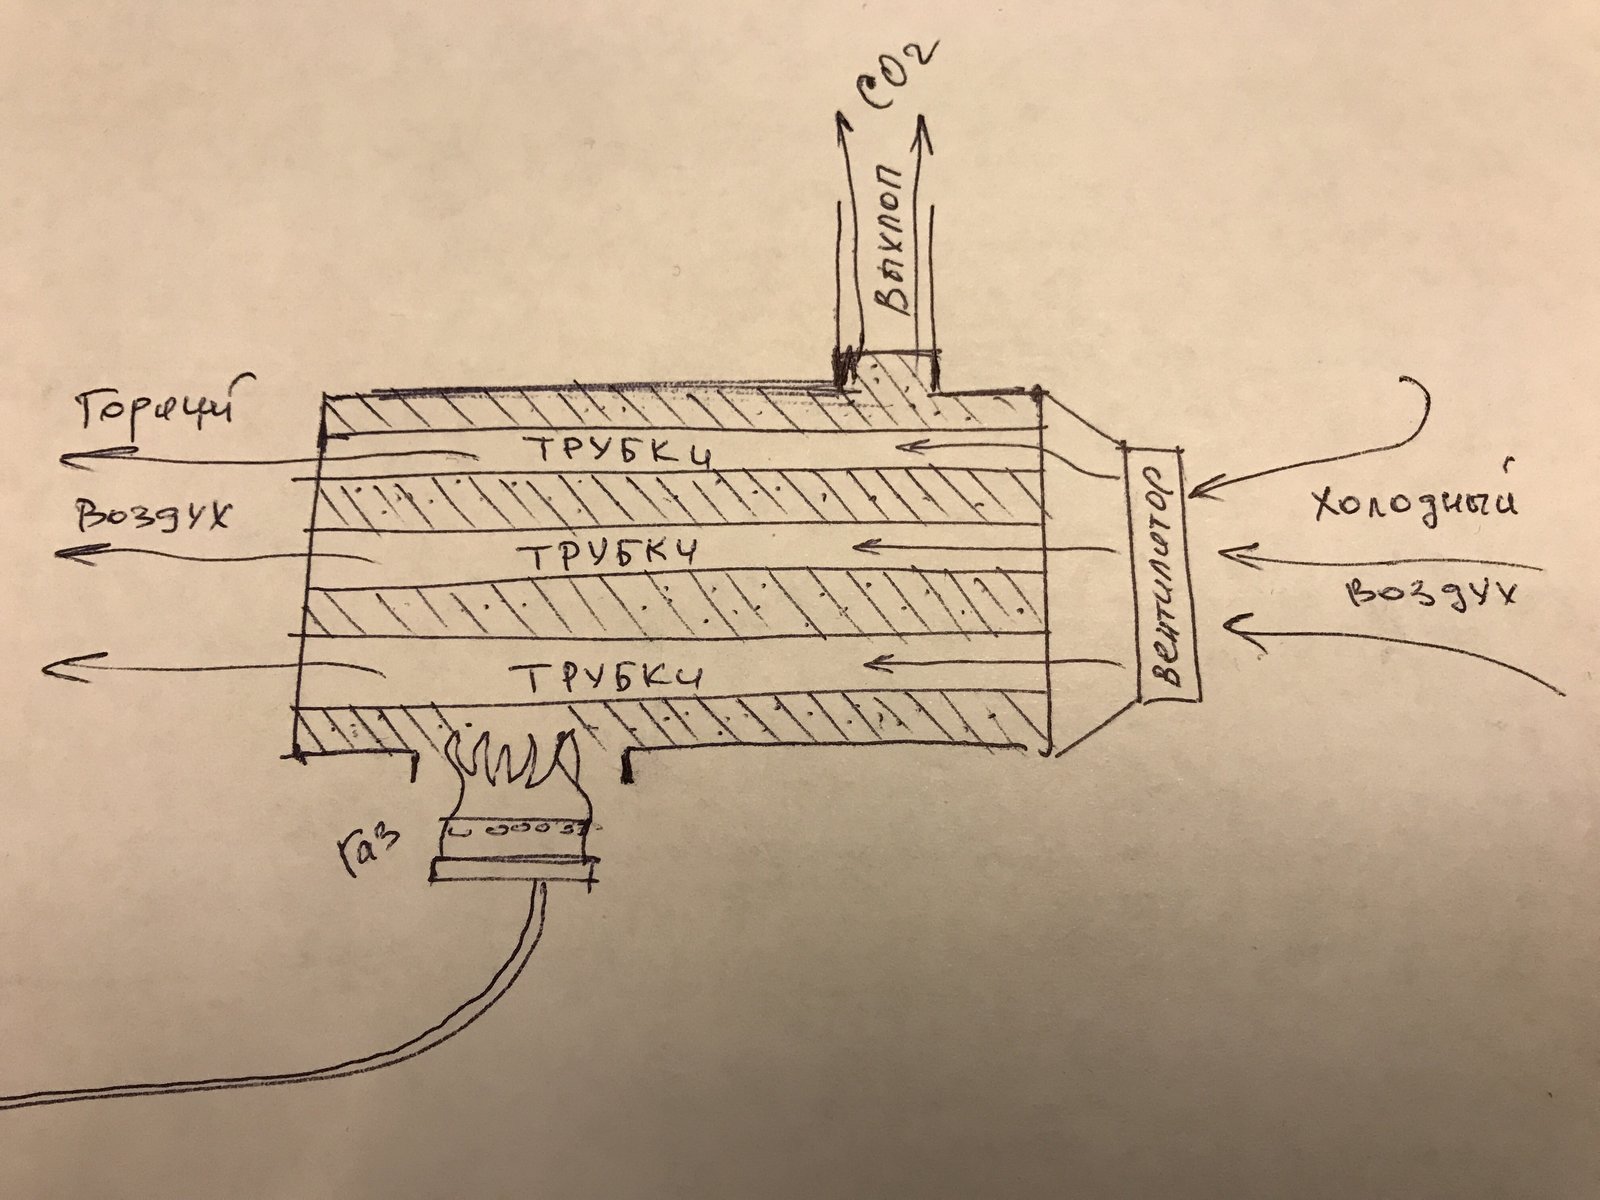
Our first task is to build the heat exchanger itself in the image and likeness of its fire-tube counterpart. To do this, you need to take two rectangular cuts of sheet metal and mark holes in it for heat exchange tubes. We recommend making three rows in a checkerboard pattern - five tubes in the top and bottom rows, four tubes in the middle row. The most difficult task is to weld the tubes on both sides to two sheets of metal.
Case assembly
Next, we assemble the body from four more segments. In the upper part we make a hole for the chimney. It must be thought out so that the chimney can be easily removed. We weld the top cover to our heat exchanger, weld the side covers on the sides. It is too early to try to heat the winter tent - you need to make legs.
It is best if the legs are folding, but you can do without it. Make them from thin metal rods (wire), measuring their length, do not forget to take into account the height of the stove / burner used. Accordingly, the lower part of our heat exchanger for a winter tent is not continuous - there is a cutout in which the inner tubes are visible.It is through this cutout that flame and heat will penetrate into our unit.

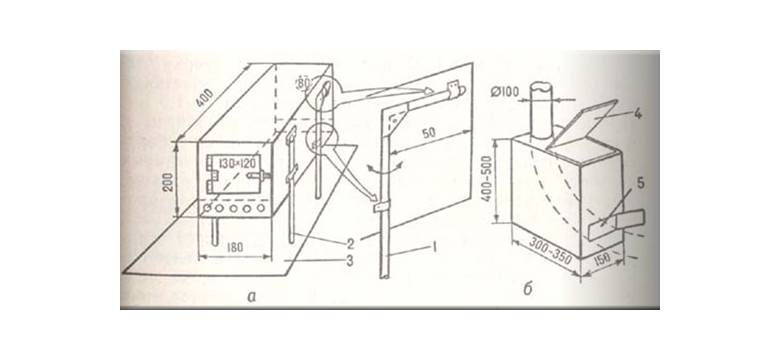

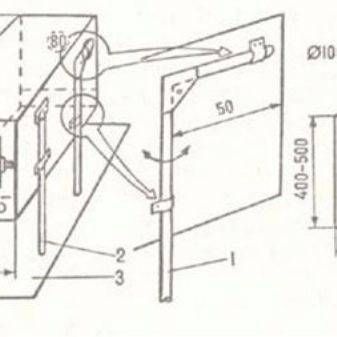


Work with the electrical part
A good fan is required to operate the heat exchanger for a winter tent. We recommend taking a powerful cooler with a diameter of 120 mm from a desktop computer. Such coolers have good throughput and minimal noise level. We weld suitable fasteners to the back of our heat exchanger, fasten the fan, solder long conductors to connect to the battery (ShVVP 2x0.75 is suitable).
Now everything is ready to start the heat exchanger. We place it in a winter tent, connect the chimney and bring it outside, place the stove / burner from below. We connect the gas cylinder, set fire to the gas, turn on the cooler and wait for it to warm up. Until the metal burns, an unpleasant odor is possible. After 10-15 minutes, our unit will enter the operating mode - adjust the air temperature by adjusting the stove / burner.
Buy a ready-made heat exchanger for a winter tent or assemble a homemade product - it's up to you. But a home-made solution is cheaper, and in terms of reliability it is not inferior to factory counterparts.
The best factory heat exchangers
This equipment appeared on the fishing market relatively recently, so you will not see a wide variety in stores. But from what they offer, you can choose a device that meets all the requirements of harsh winter fishing. We list the most popular models:
-
SIBTERMO ST-4.5 is a product of Omsk masters, which is now called a bestseller. The heat exchanger is made of aluminum alloy, which has good thermal conductivity. Due to the natural convention, it is able to heat not only a winter tent, but also a small living space.Absolutely harmless to health, exhaust gases are removed outside. Air supply is carried out by three fans operating from 12V voltage. The case of the device is covered with heat-resistant paint. The kit includes an infrared gas burner, but pipes and a gas cylinder will have to be purchased separately. The total weight of the device is 7.4 kg. SIBTERMO ST-4.5 costs a little more than $200, but the price justifies itself. Especially when fishing at extremely low temperatures.
-
DRY WATER is an excellent stainless steel heat exchanger with aluminum tubes inside, which provide good heat transfer. Equipped with a fan with the ability to adjust the power (there is a dimmer), the maximum number of revolutions per minute is 3100. The fan is protected from overheating by a special barrier curtain. The outlet pipe of the device is located in the lower part of the body, which significantly increases the efficiency due to the retention of hot gases. The developers recommend using a 2.3 kW infrared burner for this heat exchanger. It is not included in the kit, so DRY WAY is half the price of the model described above. If we add a small weight (only 2.9 kg), reliability, durability and ease of operation to the affordable price, then we can safely say that this is one of the best options.
-
DESNA BM is another good device with one, but a large cooler that provides air circulation in the tent. This device can operate in two modes: automatic and turbo. The power source is a 12-volt battery or a set of batteries. The heat exchanger starts up simply, you just need to install it above the burner, put the chimney, connect the fan, light the burner and check the draft.When starting up for the first time, it is necessary to ensure good ventilation, as extraneous odors are possible. After half an hour of work, they will disappear. It is believed that the efficiency of this heat exchanger is higher than that of most competitors. That is, it quickly heats the air to a high temperature, but at the same time, unfortunately, it heats up itself. Accidentally touching a body heated to 130 degrees will cause severe burns. It is strictly forbidden to install such a device near flammable materials. And after turning off the gas burner, it cools down for a long time, even if you leave the fan on at full power.
And the listed factory heat exchangers for winter fishing, and those that were not included in the list, cope with their task in approximately the same way. Therefore, when choosing, in addition to the ability to “produce” warm, dry air (the level of thermal radiation), it is worth considering other characteristics of the apparatus. For example, its dimensions and weight. It should not be too heavy, take up a lot of space and interfere with the fishing process.
How to make gas heaters for summer cottages
Popular among the owners of suburban areas, electric heaters consume, unfortunately, quite a lot of energy. The operation of their dacha owners in most cases is very expensive. As an alternative to such devices, however, much cheaper gas heaters can be used.
You can make such equipment for your country house, if you wish, with your own hands. There are several technologies for the manufacture of gas heaters. In principle, it will be relatively easy to make such devices for giving yourself.But self-assembled equipment of this type, of course, must fully meet certain safety requirements and be easy to use.
What should be a gas heater
A high-quality and safe heating device of this type can only be considered if:
- the elements responsible for the gas supply are factory-made;
- its design implements simple methods of activation / deactivation;
- The device is not overly complex.
In many cases, gas heaters, among other things, are equipped with chimneys responsible for the removal of combustion products. Such additions are not used only when assembling a very low power device used to heat small rooms.
Types of gas heaters
Equipment of this type can be installed in country houses:
The first type of country gas heaters is connected either to centralized highways or standard large cylinders. Mobile devices of this type can, if necessary, be transferred from room to room or, for example, from home to a barn, garage, greenhouse. Such heaters are connected to small cylinders.
How to make a heater
The manufacture of this type of device is a relatively simple procedure. If desired, with your own hands you can make both a mobile gas heater and a stationary one. But most often they make their own, of course, still portable gas heaters.
Subsequently, such a device can be used not only directly in the country, in a garage or barn, but, for example, even in a tent for fishing or hunting.It is not difficult to make a gas heater with your own hands, including using various kinds of improvised materials. For example, for this purpose, you can adapt:
- collet balloon;
- gas mobile flat stove;
- pipe and gas burner.
In all these cases, the heater will eventually turn out to be quite reliable and, of course, inexpensive.
We assemble a heat lamp with our own hands
What you need:
- Pots ceramic (flower) trapezoidal with an outer diameter of the bottom 50, 100 and 150 mm, 1 pc. In this case, the smaller pot should be about 25 mm lower than the large one.
- Threaded stud with a diameter of 6-12 mm. It must pass through the holes of each pot. If necessary, drill the holes to the desired diameter with a drill on the tile.
- Washers for a hairpin with an outer diameter equal to the inner diameter of the bottom of the smallest pot - 20 pcs. Nuts 7-8 pcs.
- Frame, hanger or stand of any shape that meets the technical requirements (conditions) described below.
- Optionally - fireplace sealant or non-combustible (paronite) gaskets.
Operating procedure
1. We install the stud in the hole of the largest pot and screw the nut on the outside.


2. We put several washers on the stud inside the pot, fix it with nuts if necessary.
3. Install the middle pot on the hairpin.
Attention! The outer edges of the smaller pots should be inside the dome of the larger ones at a depth of 20-25 mm. 4. We fix the middle pot with washers and nuts
We fix the middle pot with washers and nuts
4. We fix the middle pot with washers and nuts.
5. We expose and fix a small pot.
6. The edges of all three domes should go inward in steps of 20-25 mm. We adjust the landing depth by adding washers and nuts.
7.If the distance from one bottom to the other is noticeably large, we fill it with washers apart - this will give a greater thermal conductivity of the rod.
8. We install the structure above the candle so that the pin shaft is located strictly above the flame at a height of 30-50 mm.
9. Further adjustment is made empirically based on observations.
Use of gaskets and sealants. Praising ceramics, we tactfully bypassed its most inconvenient drawback - fragility (causticity). Even a solid brick crumbles when it falls on concrete, what to say, and flower pots
When assembling the lamp, you should very carefully tighten the nuts - it is worth pulling a little and the wall will burst. There is also a risk of accidental splitting during operation or at the time of carrying. The hard metal of the stud crumbles ceramics and can split
To soften their contact, use sealant or non-flammable gaskets
The hard metal of the stud crumbles the ceramic and can crack it. To soften their contact, use sealant or non-flammable gaskets.


Characteristics of heat exchanger for tent
There is a wide variety of stoves for tourist tents. With all their advantages, most designs have a number of disadvantages: first of all, they do not remove combustion products to the external environment, and in addition, many of these heaters provide heat with moisture. The heat exchanger is deprived of such shortcomings - a lightweight device of small dimensions that can safely heat a tourist tent or other room.
Unlike many other portable stoves, the heat exchanger vents the combustion products to the outside so there is no need to open the tent for fresh air while losing precious heat. To ensure the exit of combustion products in the upper part of the tent, there must be a hatch. Like any other device, heat exchangers have both advantages and disadvantages.
- The first to be highlighted are:
- heating the tent does not take much time;
- the device gives dry heat (no moisture release);
- the thermal energy released by the burner, in a larger amount, in comparison with heaters of other types, is spent specifically for heating the room, and not for other purposes - to put it simply, the device has a high efficiency;
- can work with gas burners of any type;
- compact dimensions.
- It should be said about the minuses characteristic of heaters of this type:
- despite its compact size, the device still requires some amount of space;
- power supply is required;
- a high-quality chimney and its removal from the tent is required.
Summing up, it is worth saying that this type of heater is an ideal option for outdoor enthusiasts who have the opportunity to take additional devices and related gadgets with them. That is, the heat exchanger should be chosen, first of all, by autotourists (fishermen, hunters, etc.).
Step by step instructions on how to do it yourself
You can make a heat exchanger yourself with your own hands, production costs will be minimal, while the unit itself will not be inferior to factory counterparts in terms of its performance characteristics.
To assemble the heat exchanger you will need:
- aluminum and steel tubes;
- welding machine;
- drill for metal.
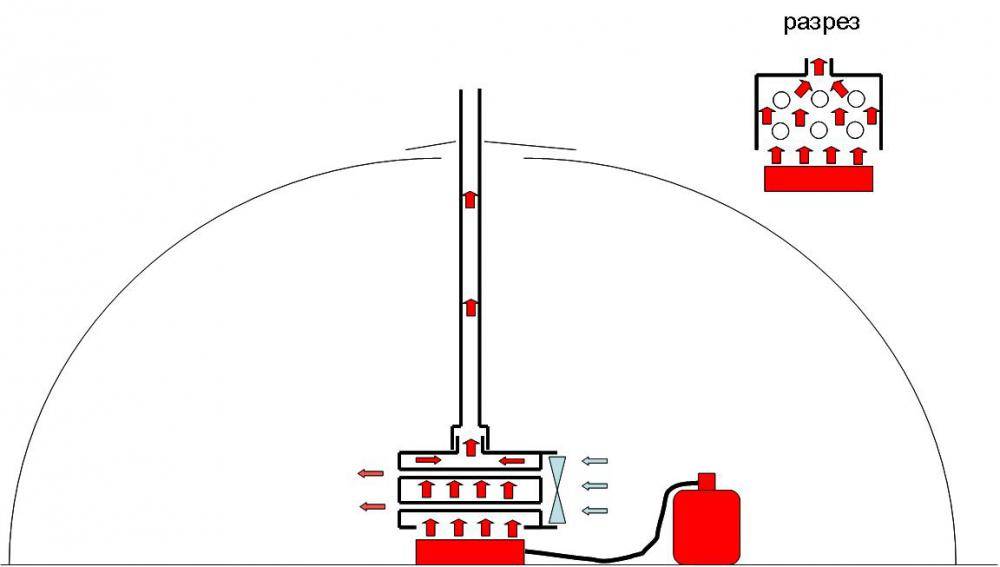
On the diagram you can see the most popular design for a heat exchanger, which is easy to make at home.
Expert opinion
Knipovich Nikolai Mikhailovich
Zoologist, hydrobiologist
I am a professional fisherman.
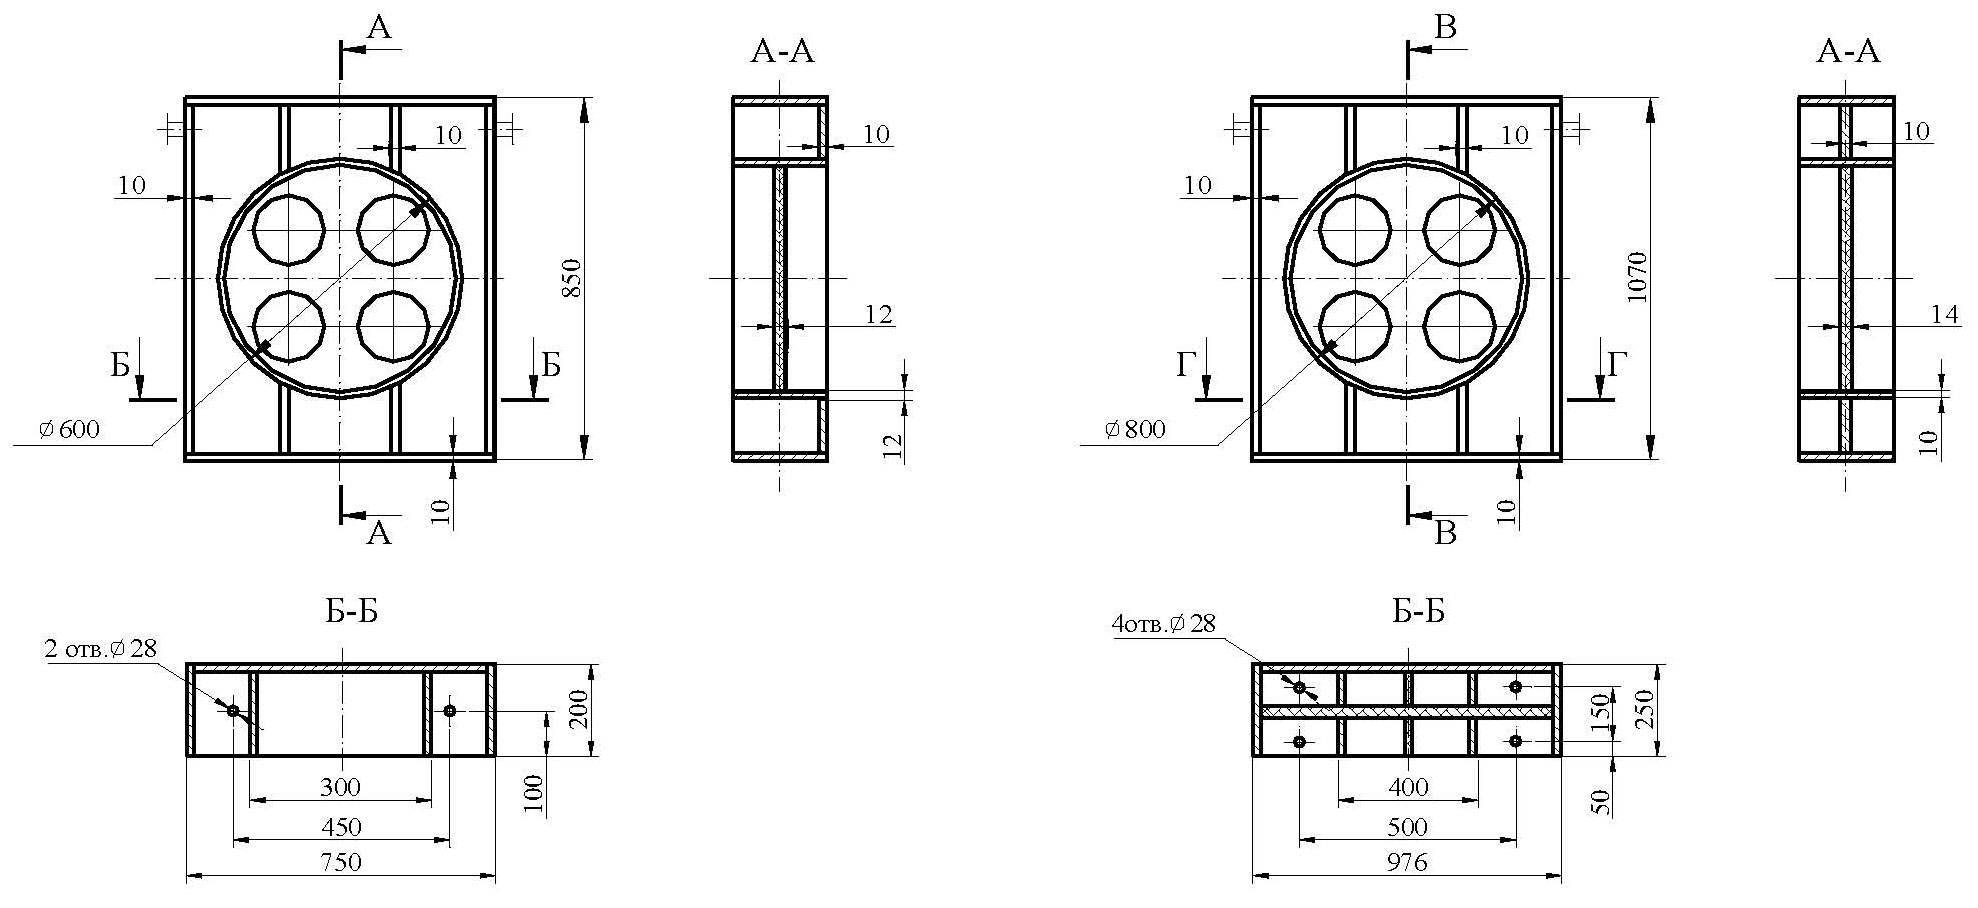
Important! All dimensions shown are recommended and you can change them depending on the expected characteristics of the device. The assembly process according to the drawing includes the following steps:
The assembly process according to the drawing includes the following steps:
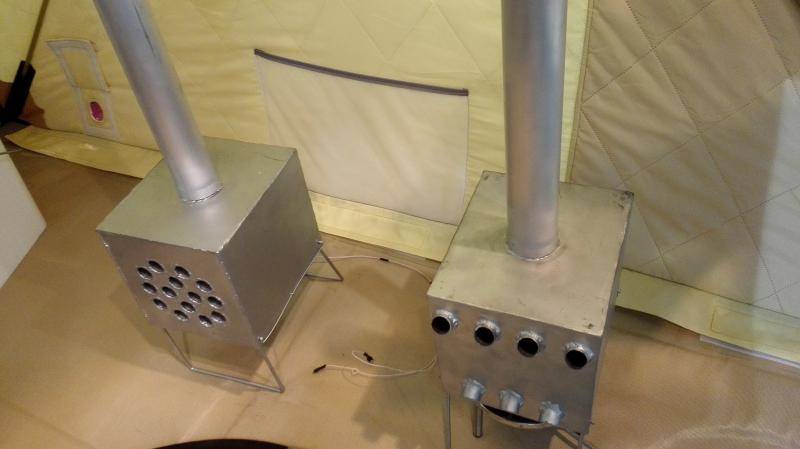
Installation of heat exchange pipes between two sheets of aluminum or stainless steel. It is desirable to arrange the tubes in a checkerboard pattern, it will be enough to make five tubes in the upper and lower corners, as well as 4 tubes in the middle row. Welding is easiest to do with a welding machine.
The heat exchanger body is assembled from four pieces of metal. Keep in mind that in the upper part there should be a special hole for connecting a pipe for the removal of combustion products, legs are welded in the lower part of the body for stability.
For a better exchange of warm air inside the tent, it is advisable to equip the heat exchanger with a fan
You can use any cooler from a computer, please note that to power the fan, you will need to additionally purchase a battery of suitable capacity.
Checking the health of the equipment. If at the first start you feel an unpleasant metallic smell, do not panic, the metal should burn out
After 2-3 starts, the smell will disappear.
A home-made device can be used with gas burners or equipped like a furnace with an additional chamber for loading dry fuel.
Advantages of heat exchangers for winter tents
Let's see how good these devices are:
- Accelerated heating of the inner space of the tent;
- No excess moisture;
- More efficient absorption of heat generated by the burner;
- Compatible with any type of gas burners;
- Compact design;
- Built-in chimneys to remove combustion products.
There are also disadvantages:
- Takes up free space;
- Requires power;
- Requires a good chimney and its output outside the tent space.
Heat exchangers are ideal for travelers and ice fishing enthusiasts who have the ability to carry a large number of auxiliary devices and accessories with them - for example, in a car.
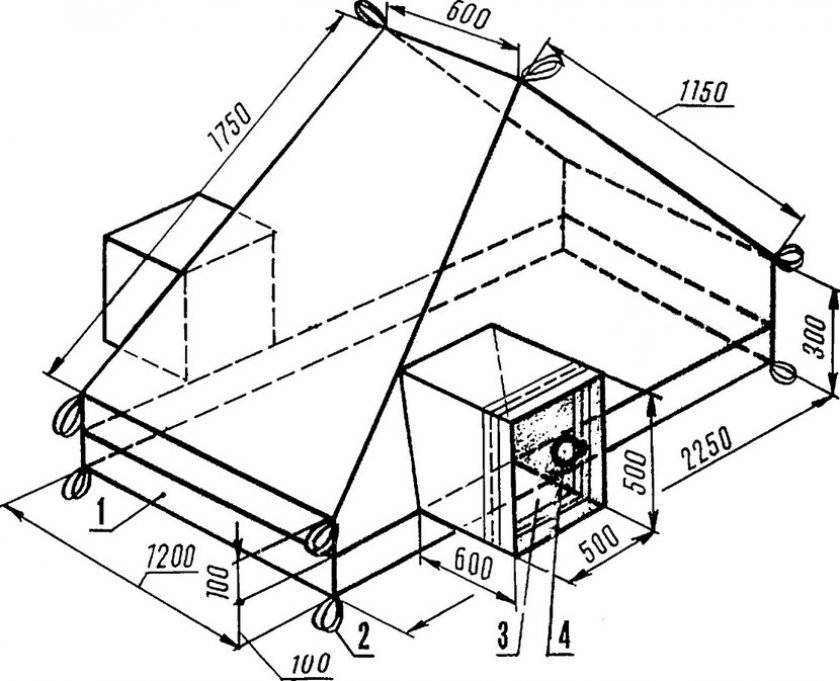
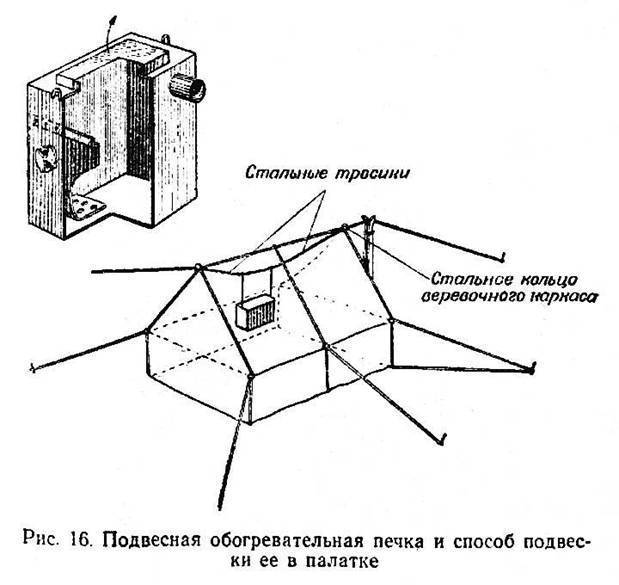
spark extinguishing
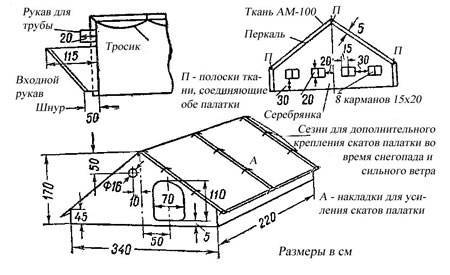
Any tent has a hole for a hot chimney (chimney). In addition, the area around the furnace is always protected with a refractory mat in case of hot coals escaping. Some tent manufacturers recommend rolling the base of the tent and placing it directly on the ground.


Not only hot carbon dioxide rises through the chimney pipe from the furnace, but also sparks. If the pipe is short, then they can get on the roof of the tent and cause a fire. To prevent this from happening, the chimney pipe is made long so that it contains at least 2–2.5 m. While the spark flies along this path, it will have time to go out. Therefore, the chimney acts as a spark arrester.
Also, safety precautions mean that all objects that can catch fire should be kept away from a working stove. Another danger is carbon monoxide. It should go straight into the chimney. And the tent itself should be designed so that clean air regularly enters it.
Making a system with your own hands
Making a heat exchanger for fishing with your own hands is much easier than it seems at first glance. And although some anglers believe that it is wiser to purchase a ready-made inexpensive design, craftsmen do not give up, continuing to produce a wide variety of designs with unique working properties and work efficiency.
This is not surprising, because this approach is justified by many reasons:
- The angler can save financial savings. A homemade heater is much cheaper than store models. And if we are talking about residents of remote settlements who simply cannot get to a specialized outlet where there is professional equipment for hunting and fishing, then, of course, you have to start working on your own.
- By making a heat exchanger with your own hands, you can give it a certain set of functionality. In this case, you can simply upgrade the purchased model or try to create a design from scratch.
- If you make a system at home from improvised means, this will greatly expand your capabilities and allow you to gain new skills. By the way, many craftsmen practically cannot imagine their life without constant experiments in the workshop.
Types of homemade heating units
Currently, anglers use several options for heating a tent:
- "Stove heating". Solid fuel units have always been popular, especially when it comes to those who like to build something with their own hands.However, the indicators of safety and operational convenience do not always correspond to the desired ones, so the angler needs to constantly be on duty at such a design. Yes, and collecting firewood in the dark is impossible, which makes you bring a certain supply of solid fuel with you to the reservoir. At the same time, too much heat release often leads to icing of the tent and other unpleasant consequences.
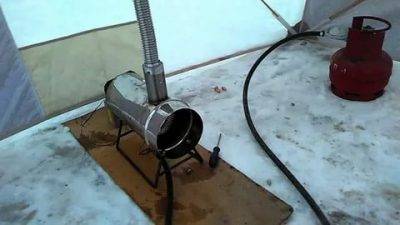
- Gas heat exchanger. It is considered a more reasonable and convenient means of heating. Using it, you lose the need to equip a smoke exhaust system, which is mandatory in the previous case. In addition, these burners are safe and compact.
Beginners who want to know how to make a do-it-yourself heat exchanger for fishing should prepare the following materials and components:
- A gas burner that supports the ability to manually adjust the gas supply.
- Small gas bottle.
- Oxygen hose from 50 centimeters long.
- Ceramic infrared heating element that matches the dimensions of the burner taken earlier.
First of all, you need to remove the nozzles from the burner and leave only the tap and tube. Then the hose should be put on the tube and fitting of the burner, but the fuel must remain in a gaseous state, so the cylinder is kept standing up.
Naturally, a lot of other designs and solutions are offered on fishing forums, but this option is the most popular, especially among outdoor enthusiasts in the cold season.
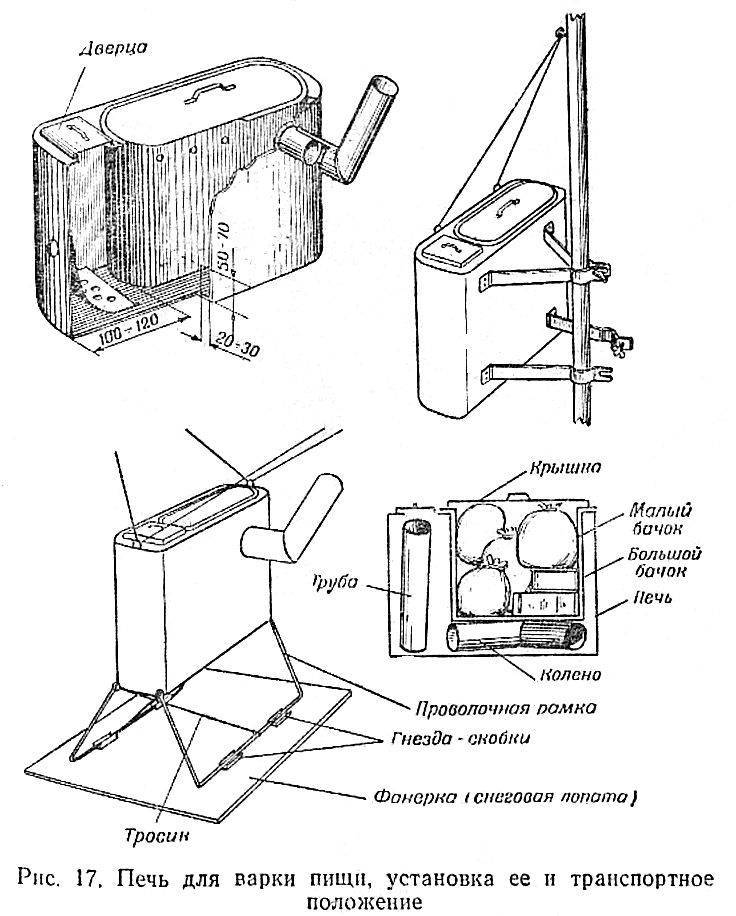
Dimensions and characteristics of the stove for the tent
Furnaces come in a variety of sizes and configurations. In order not to make mistakes in the calculations, you need to know exactly 3 main factors:
- the size of the tent to be heated;
- the total load capacity of the equipment together with the furnace;
- route duration.
Important! It is forbidden to leave a working stove at night when no one is watching the fire. If you want to leave it on, schedule hours of duty for someone to keep an eye on the flames and keep the air flowing clean.
Approximate dimensions for a camping or ice fishing stove would be as follows:
Approximate dimensions for a camping or ice fishing stove would be as follows:
- pipe diameter - about 86 mm;
- body size (furnace) - 25 × 25 × 50 cm;
- furnace volume - 30 l;
- the number of pipes for the chimney - 3;
- pipe length - 50–70 cm;
- pipe with a bend - 1 pc.;
- approximate weight is 5 kg.
 Of course, when making a stove with your own hands, your dimensions may be different. The main thing is to worry about the performance of the structure after assembly.
Homemade potbelly stove
At the beginning of the 20th century, a potbelly stove was called a metal wood-burning stove, which was installed indoors. The combustion products were discharged through the chimney through the window. The camping stove has the same principle of operation, only it has a more compact size. Fuel in both cases are chips, sawdust, small pieces of wood. The average temperature of the side surface reaches 100-150 degrees, which you need to remember when you are cooking.


Important! If there are problems welding galvanized steel sheets, sand the areas to be welded. Removing the galvanized layer will allow seams to be made, but will somewhat reduce the useful life of the product, since it will be more susceptible to corrosion.
Instructions for making a furnace:
Instructions for making a furnace:
- Consider a model. Draw a drawing or diagram, providing the exact dimensions of the finished product.Mark the metal sheet and pipes with a marker where you want to make cuts in the metal.
- In the upper part, make a hole in diameter that matches the pipe that will become the chimney.
- Cut the pipe into several pieces so that they can be folded inside the stove when transporting. At one end, make cuts and bend the resulting petals inward. This will allow you to insert one end of the chimney into the other.

wood chipper
A wood chipper is a small stove that you can take with you on a summer or autumn hike for 2 people. It is a small cylinder. In its lower part there is a grate, on the side there is an opening for supplying air and maintaining combustion. A grate is installed on top, on which a container of food is placed.
Did you know? It is believed that the heat transfer of a round or oval furnace is higher than that of a square one. But tourists will not be able to use the cylinder-shaped model for cooking.
A hole is also made on the side into which fuel will be thrown. As such, cones, chips, small branches are used. The stove can be equipped with legs that provide a gap between the lower grate and the ground. The legs also guarantee stability and allow the burnt ash to spill out freely.
Wood chips can be made of rectangular, cylindrical, triangular and any other design. The main thing is to determine if it is needed on a particular trip, since it is too small for cooking for more than 3 people. And of course, it is not suitable for winter heating of the tent.
Learn also about the features of a gas stove for a tent.
But the simplest version of this design is a tin can.Holes are made along the perimeter in the lower part through which air will move. A pair of holes is punched in the lower part for pouring ash. Fuel is applied inside the structure, and a grate is installed on its surface, on which a kettle or kettle is placed.


