- Description of drawings
- Assembly process
- DIY hallway furniture
- Practicality
- Individuality
- Required Tools
- Corner cupboard
- Deciding on the type
- Cabinet for plywood dolls
- Purpose
- Finishing and lighting
- Drafting
- How to choose the right plywood for the job
- Parts manufacturing
- Assembly - the main stage in the manufacture of a cabinet with your own hands from chipboard
- Design Features
- How to make a wardrobe from plywood
- Product decoration
- Beautiful handmade examples
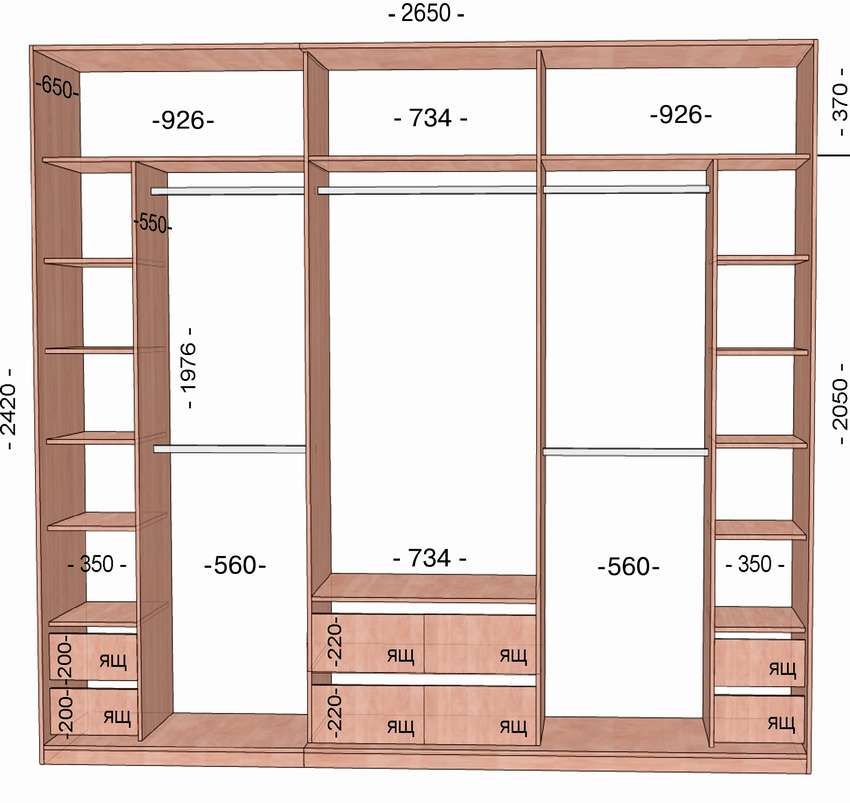
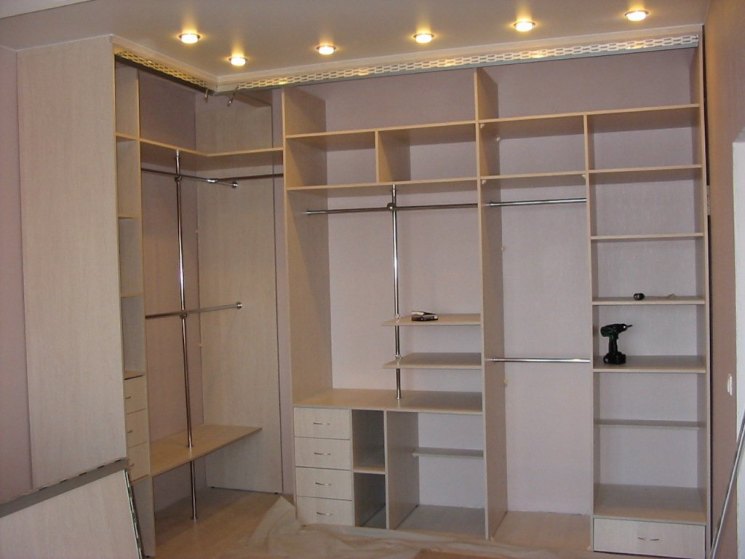
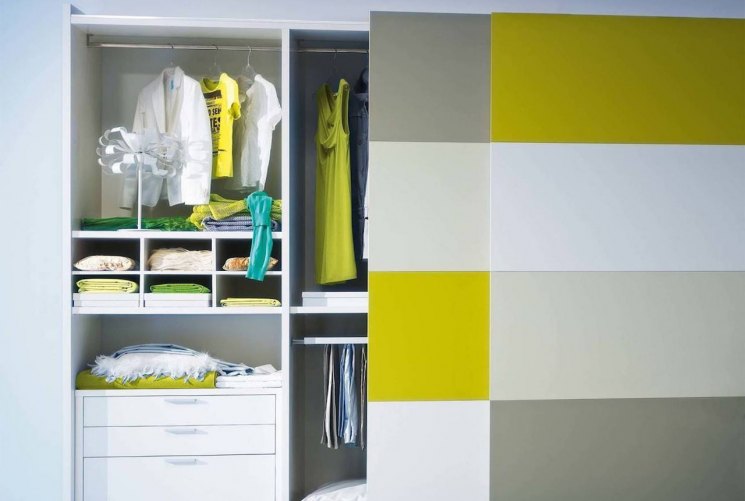
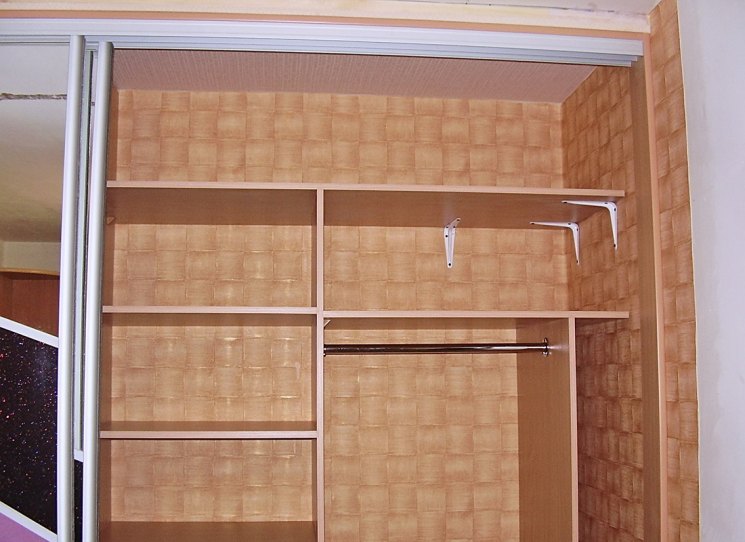
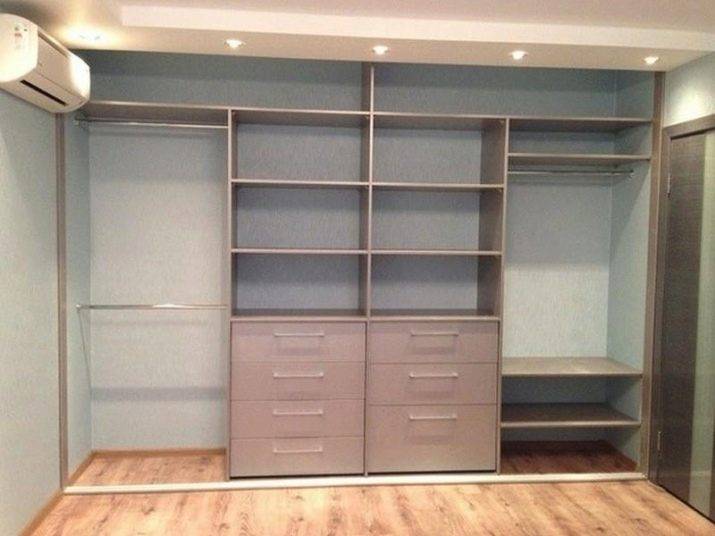
- How to distribute shelves?
- Kinds
- Computer desk
- Gluing technology
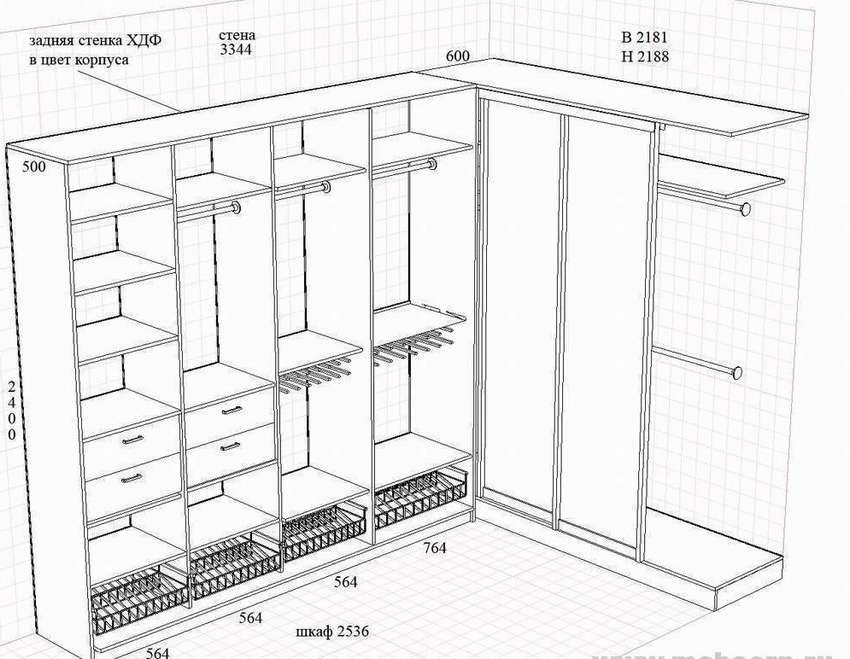
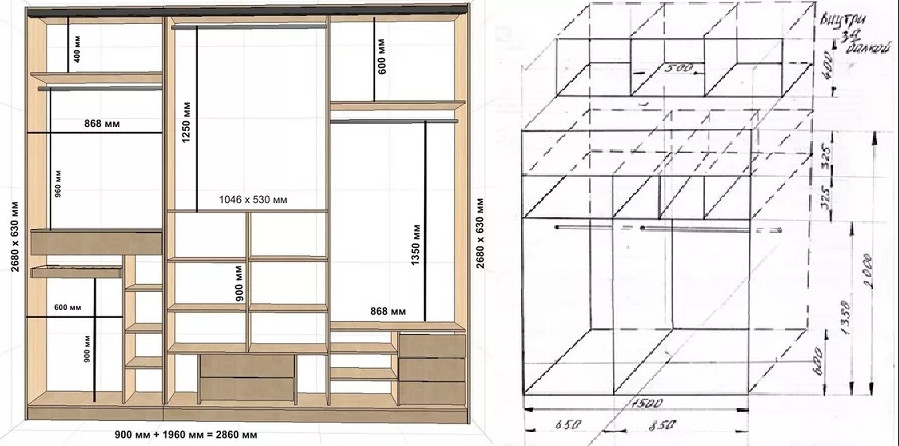
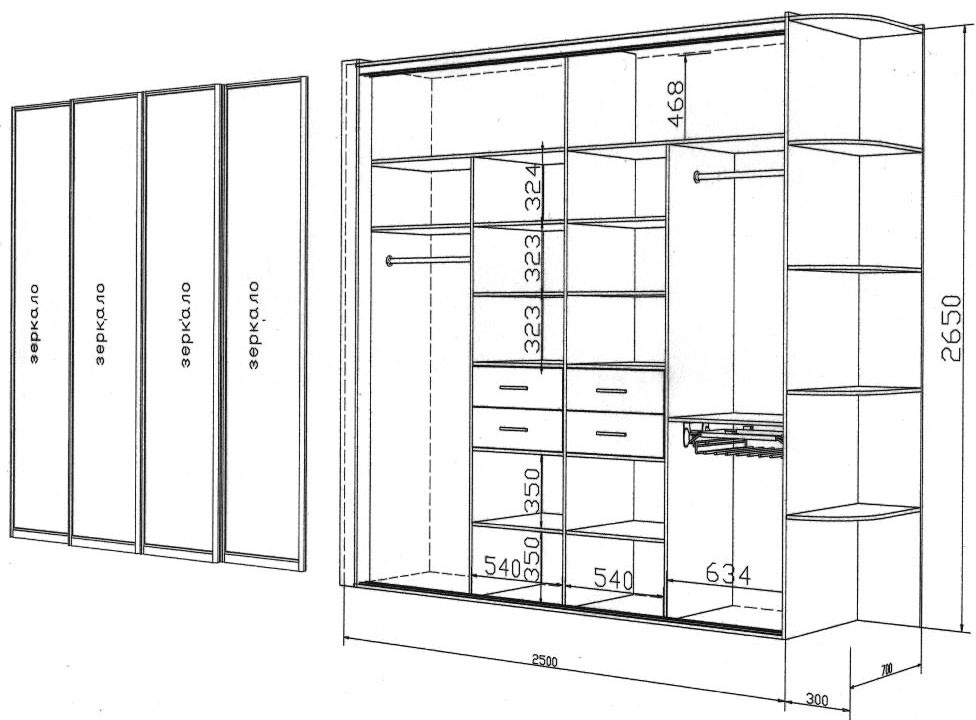
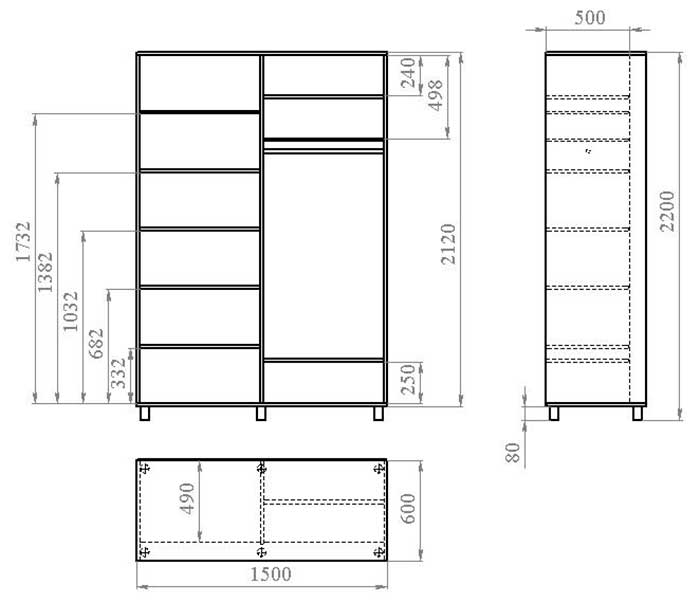
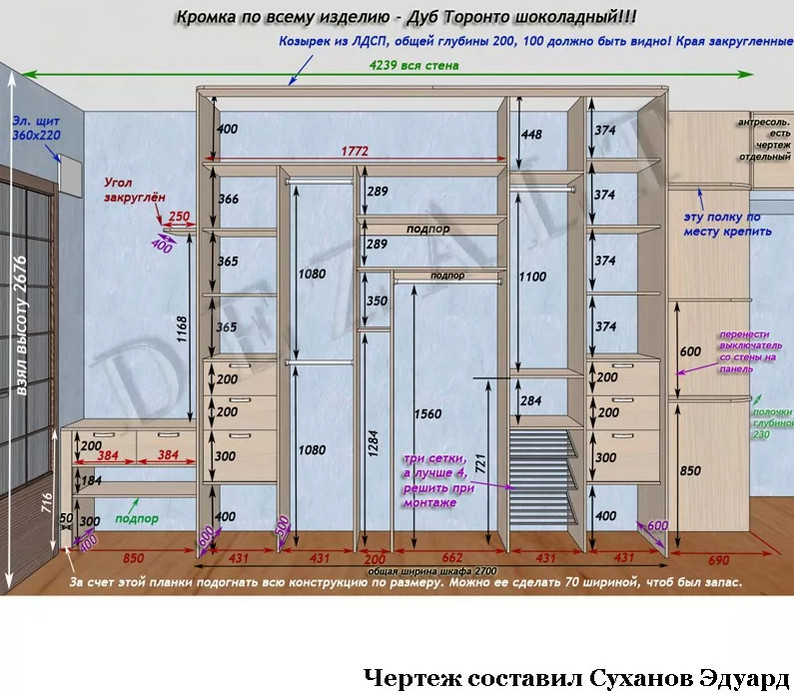
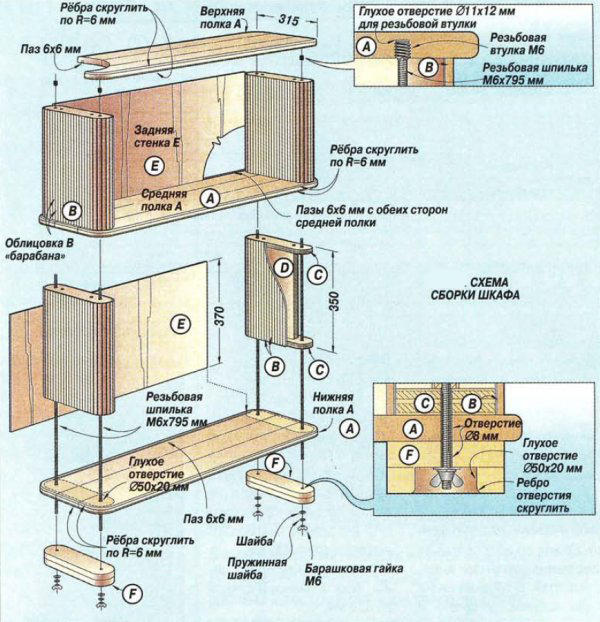
Description of drawings
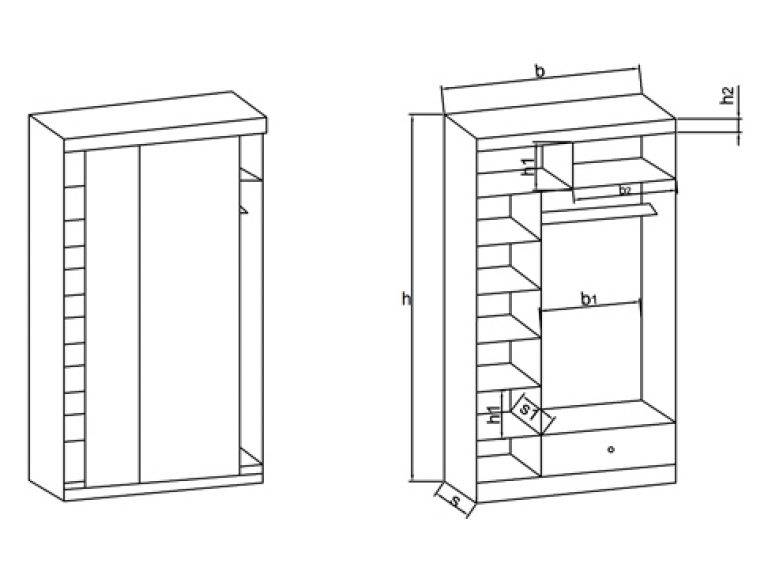
Before starting the assembly of any piece of furniture, it is necessary to create a certain scheme in the form of a drawing. The dimensions should be carefully verified, with the obligatory indication of all the parameters of both the outside and inside the structure, while be sure to indicate the thickness of each partition.
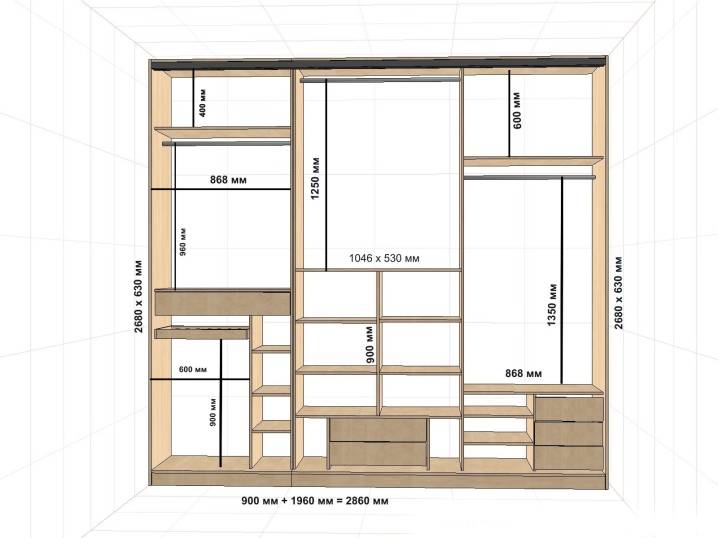
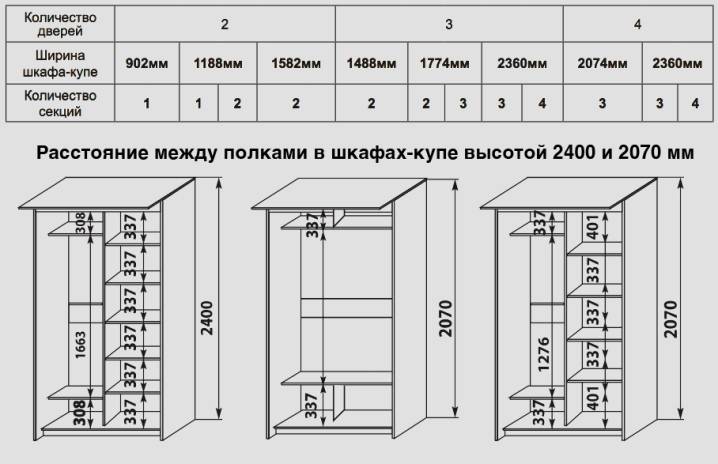
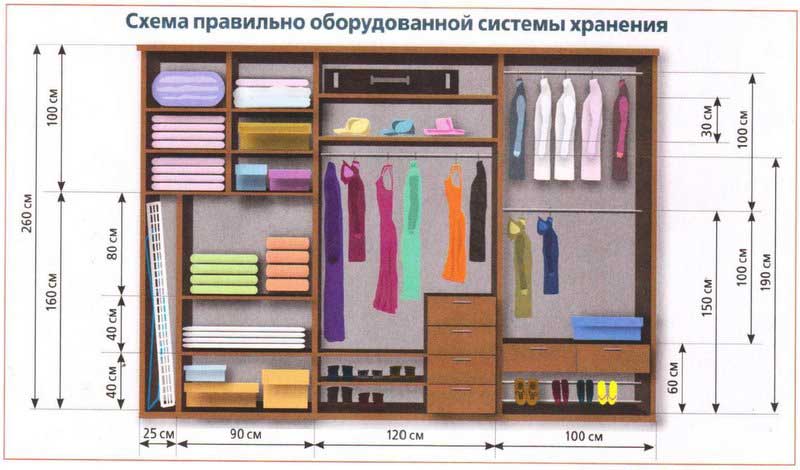
When drawing up a drawing, it is important to observe certain size standards in advance: for example, it is recommended to leave the optimal distance between the shelves at 30-40 cm, and the depth of the drawer should be no more than 50-55 cm
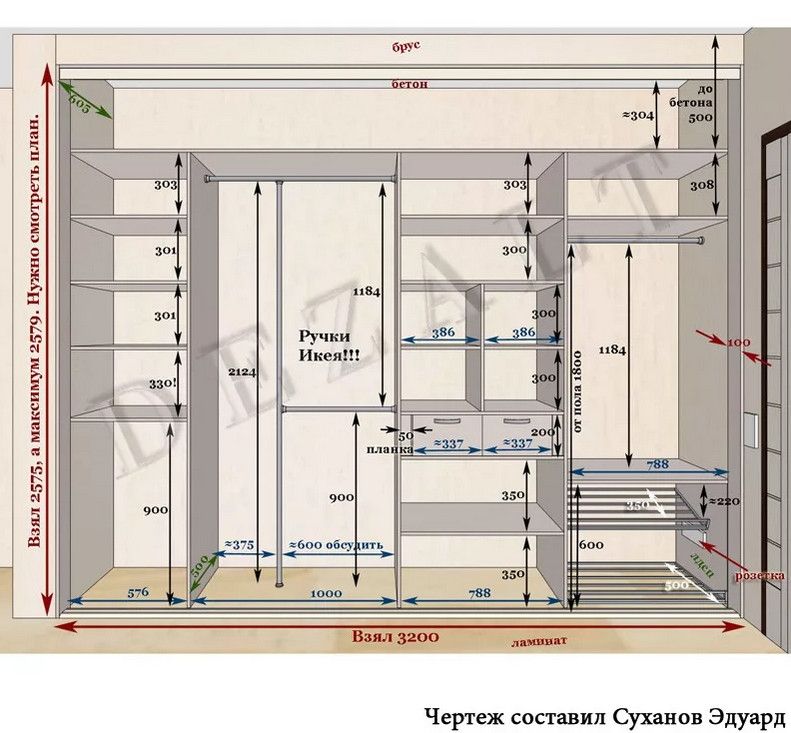
Before creating a drawing, it is necessary to determine the main characteristics that the future wardrobe will have:
- height, width and depth;
- the height of the mezzanines, if they are planned;
- how many doors, drawers and other departments will be in the closet;
- what filling is planned: boxes, crossbars, shelves, etc.
After that, a sketch of the future cabinet is drawn. If you have experience and the ability to draw, you can make a drawing yourself, simply using a piece of paper. There is also a simple solution for those who are not good at drawing: special computer programs, in which it will be enough just to enter certain data, and the computer will produce a ready-made full-fledged drawing. The quality and accuracy of such a drawing is so high that with its help you can safely begin to assemble the cabinet yourself.
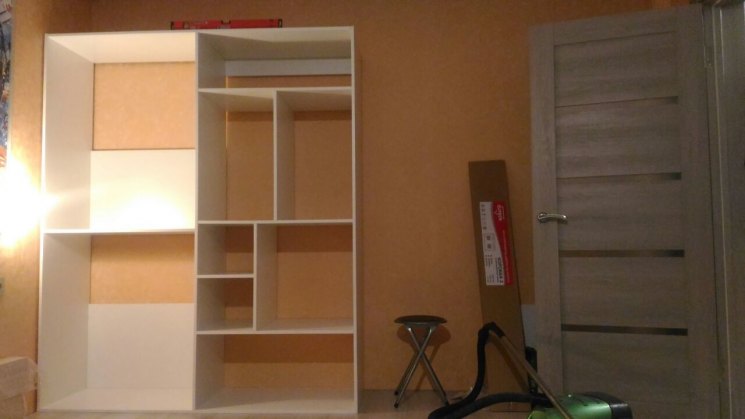
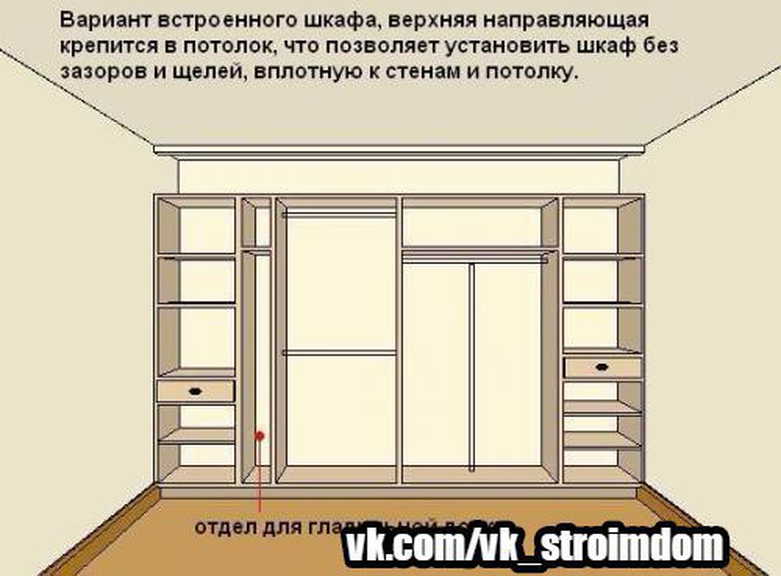
The following is a small guide with which you can independently make a small built-in wardrobe at home, placed in a small niche in the hallway.
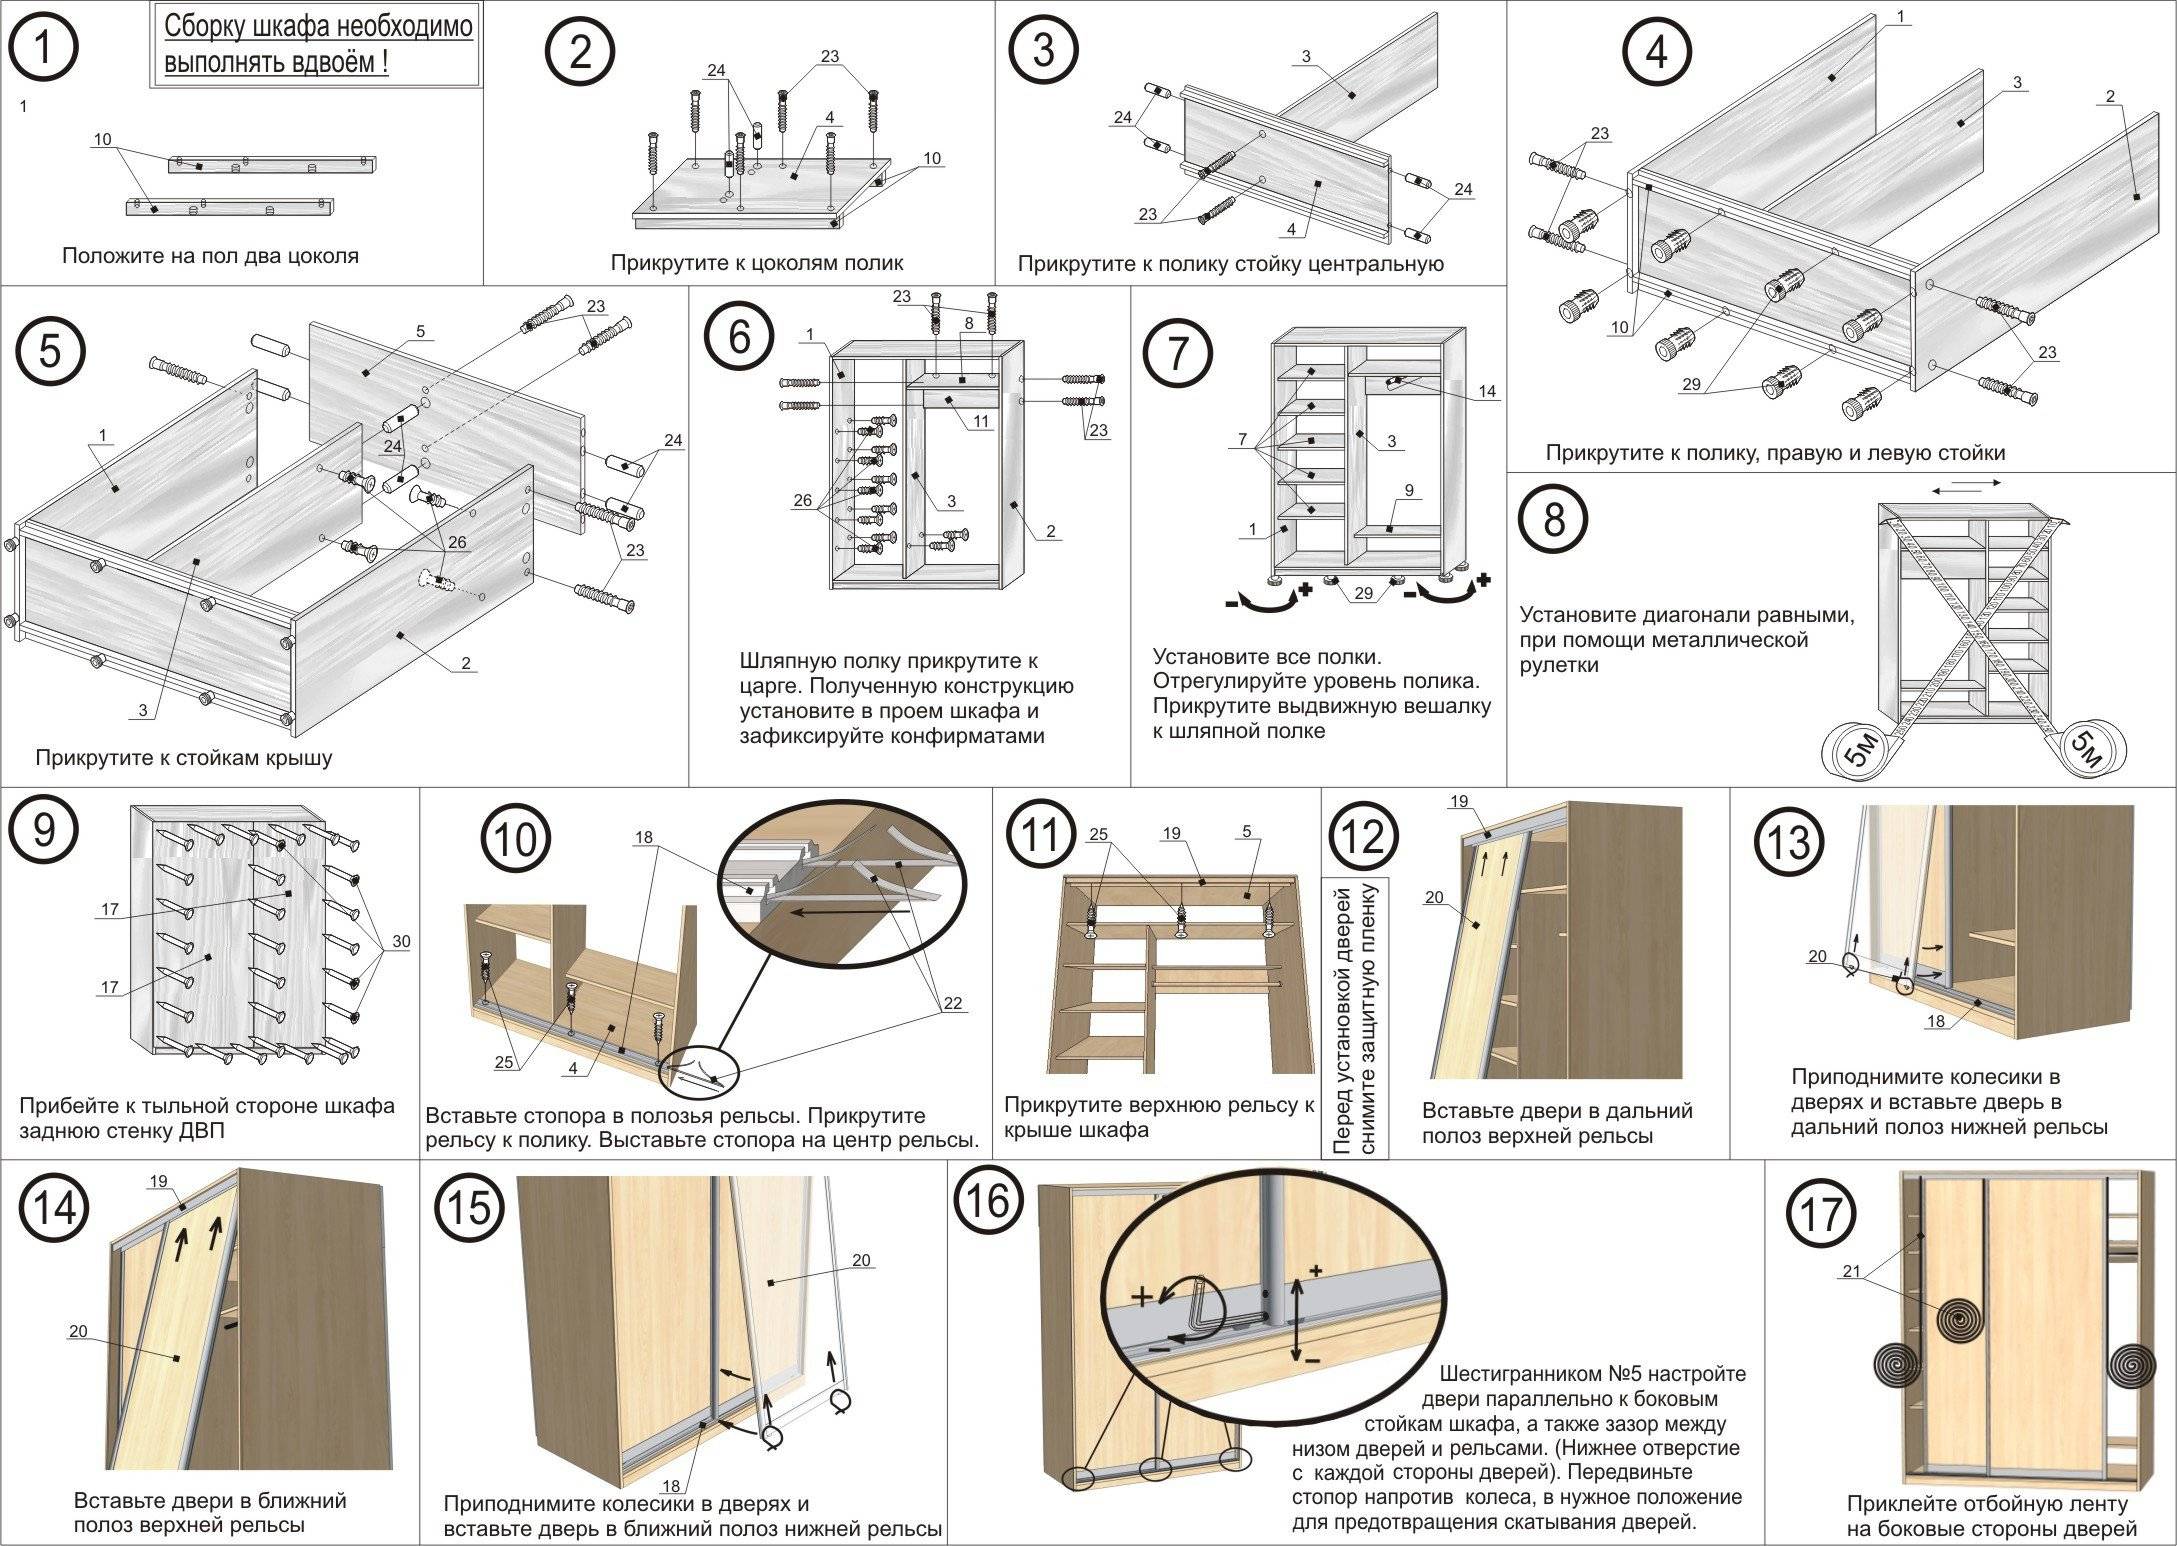
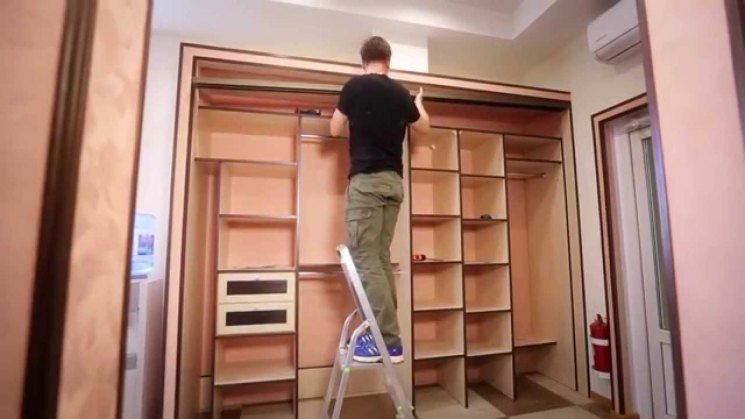
Assembly process
First of all, you need a drawing or diagram of the cabinet you like. If there is no ready-made drawing, you can search on the Internet or make it yourself if you have experience. You should immediately decide what the cabinet will be made of - chipboard or plywood, maybe even solid wood, decide on its color scheme.

A convenient approach is to break the cabinet into several separate parts, which are subsequently twisted together. According to the drawing, the sheet is cut into parts, and it is preferable to do this in some cabinet furniture workshop.
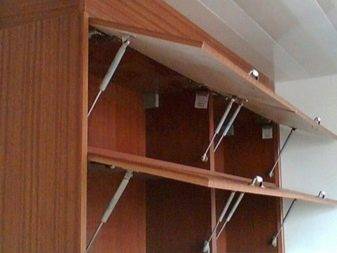
Having decided on the mechanism for opening and closing the doors, the appropriate fittings are purchased. There are a lot of mechanisms - hinged doors, compartments, opening up.

The floors in the rooms are not always perfectly flat, and a skew forms between the doors.It is eliminated by adjusting the installation canopies, and in the compartment system - by selecting the height of the wheels used in the wardrobe.

The cabinet made of laminated chipboard is assembled on confirmations, the heads of which are hidden with decorative rivets. The ends of the parts are pasted over with a tape-edge. There is an option for a groove, which is made using a cutter, or without a groove, glued with a hot iron.
For shelves in such cabinets, shelf holders are provided that are inserted into holes in the cabinet walls. Handles and accessories are attached to the screws or glue last.
Although it is easy to assemble a cabinet made of laminated chipboard, and it will cost relatively cheaply, it is much inferior in quality to a plywood cabinet both in terms of strength and moisture resistance. It is more difficult and longer to assemble a plywood cabinet, and it is advisable to pre-treat the plywood with stain and varnish, but the result is worth it.

In addition to the usual stain, you can use the option of artificial aging of the material, decoupage, craquelure - a home-made cabinet treated in this way will fit well into the interior design, and in the photo look like a product in the Art Nouveau style of the 19th century.

Solid wood is even better processed than plywood, and the texture of the blockboard is richer than that of plywood, and the strength is also higher. The downside is that the joiner's plate, even from pine, is not cheap.


There are options for softwood slabs, veneered with oak - the best material for creating furniture. There is only one question about choosing such a material - how much does it cost? In addition to this minus, it is possible to note the durability, reliability, strength, moisture resistance and environmental friendliness of the joinery as a bold plus.
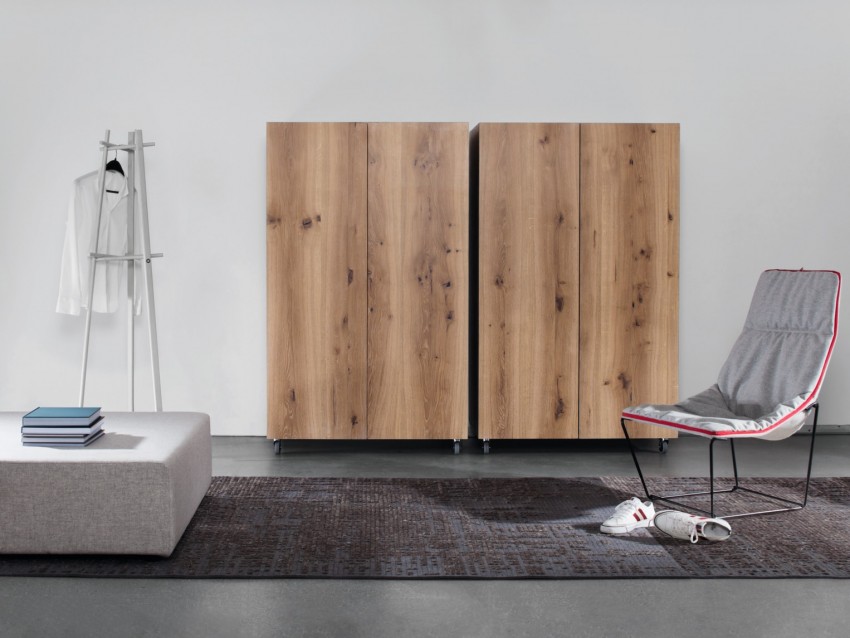
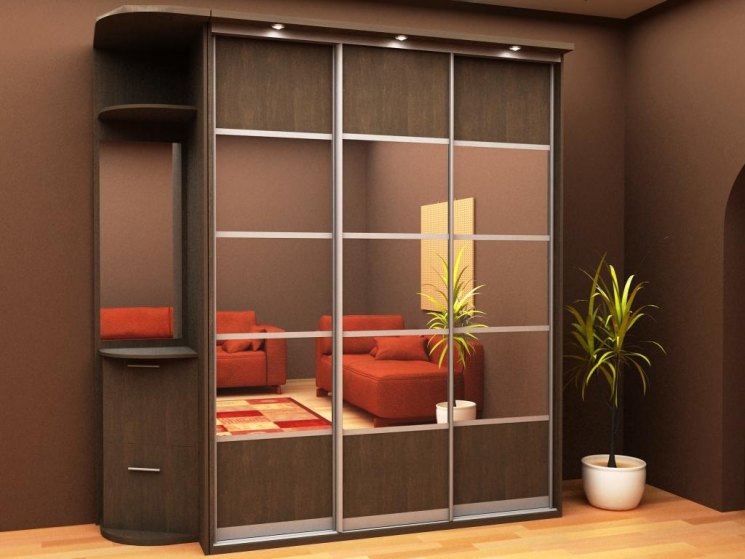
DIY hallway furniture
With the help of the right project, even a small area can be transformed, and the hallway will look organic and roomy.
The design of this room should be combined with the interior of the entire apartment. It is permissible to choose a different decor or floor covering different from other rooms, but the stylistic direction should be the same.
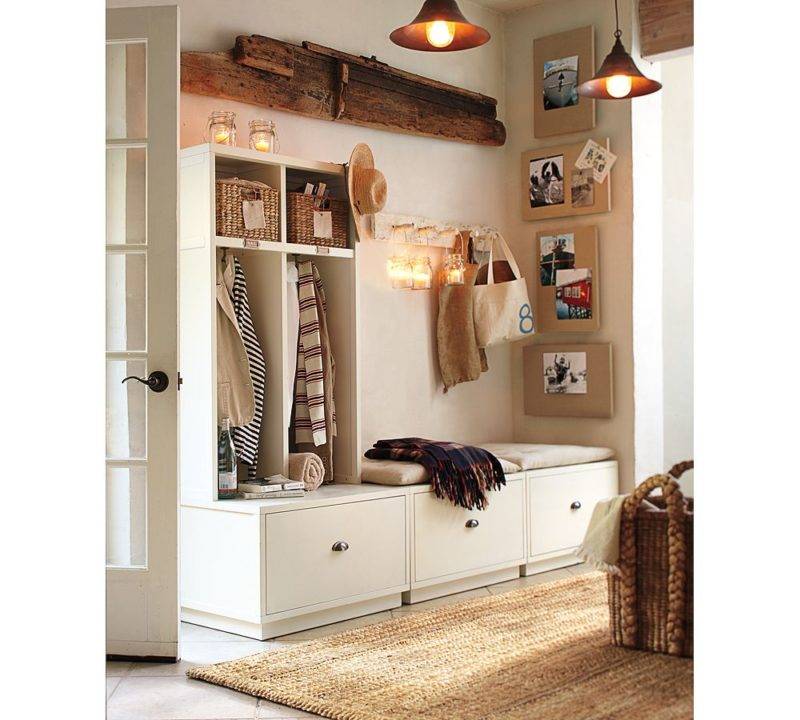
Practicality
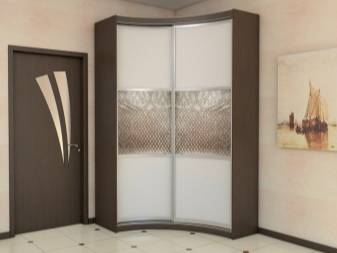
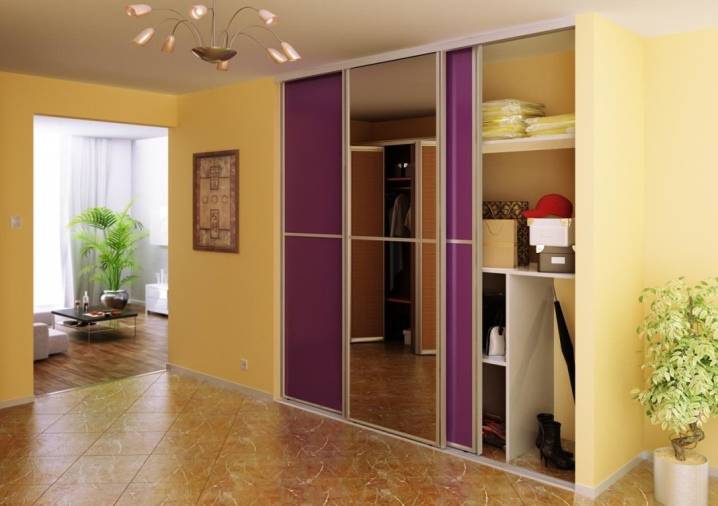
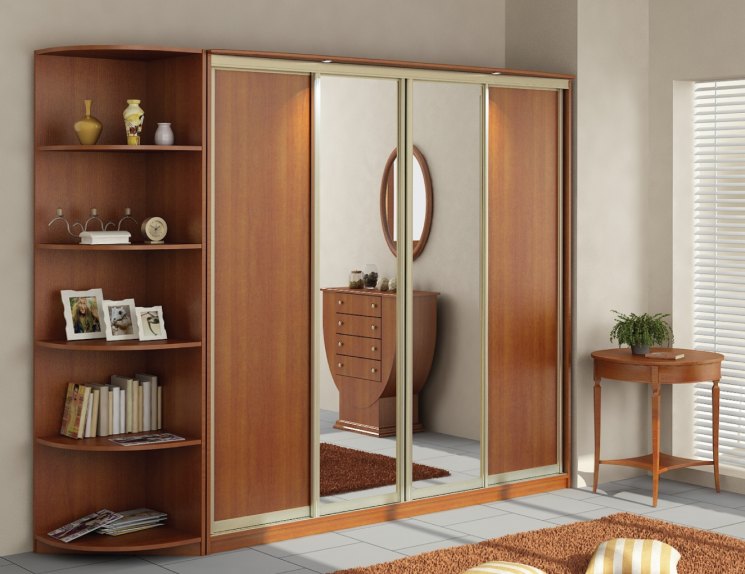
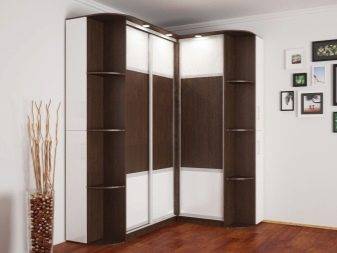
A compromise between capacity and external beauty is a corner cabinet. It looks small, but has a lot of depth, so it's roomy.
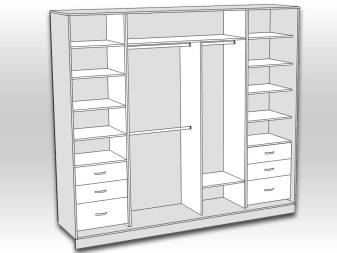
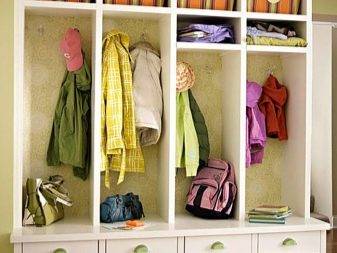
In the presence of a large family, it is necessary to think over a place for the things of each inhabitant of the apartment.
The entrance hall is a room into which dirt is carried from the street. Therefore, you should not do it in bright colors, it will quickly get dirty. And such things as: umbrellas, strollers, bicycles, it is undesirable to carry deep into the apartment, it is worth providing a storage system for them in the corridor.
Individuality
Everything that is done by hand, including furniture, is always the embodiment of your ideas and desires. You can decorate the hallway with decor to your taste and give it personality. Such furniture will be one of a kind, and not mass-produced at the factory, and guests will be surprised at its exclusivity.
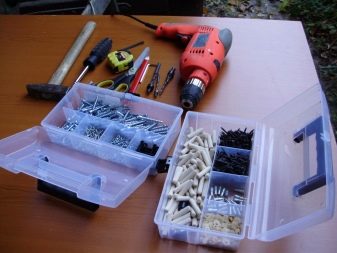
Required Tools
You don't have to spend a lot of money to buy the necessary tools.
In order to mount the cabinet, you must have a standard set of tools:
- special fastener for parts;
- electric screwdriver;
- rubber mallet;
- hex key;
- construction knife;
- screwdriver standard;
- stationery knife;

- drills of different sizes;
- electric drill;
- awl;
- paper with fine-grained sandpaper;
- construction pencil;
- square;
- for measurements you need a tape measure.
It is impossible to correctly guess which construction tool you will need to assemble furniture. It all depends on the complexity of the project.

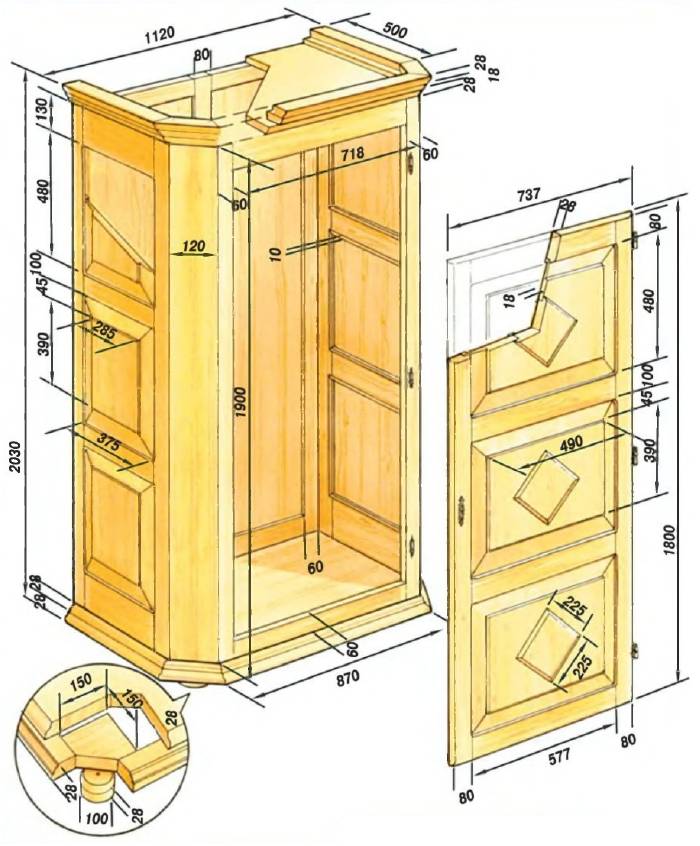
Corner cupboard
How to make a corner cabinet with your own hands? This question is relevant for owners of small apartments, where every square centimeter of area counts.
Corner wardrobes have a number of advantages:
- ergonomics;
- space saving;
- capacity;
- compactness.
The corner cabinet can be of two forms:
- beveled trapezoid;
- rectangular with diagonally and perpendicularly located facades.
There are many design solutions for both types. There is no point in listing them all.
As for manufacturing, the process consists of the same steps as the process of creating a built-in structure.
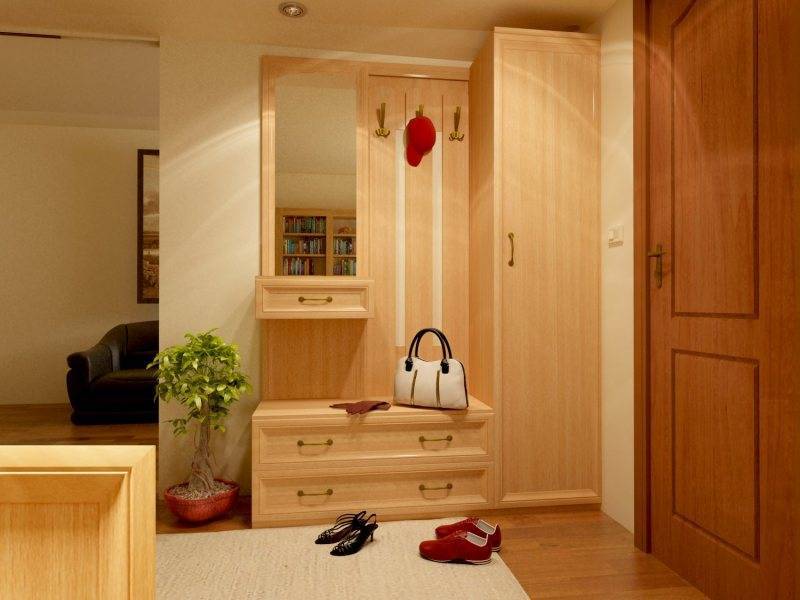
Deciding on the type
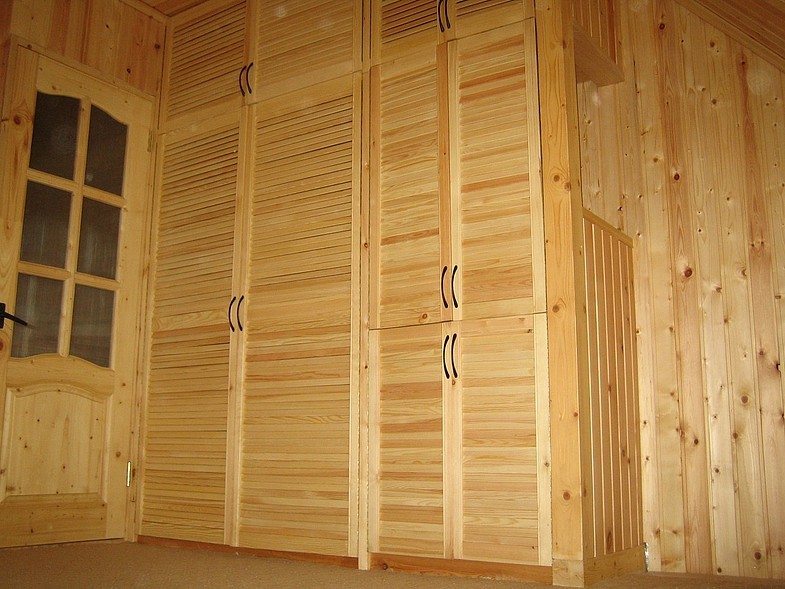
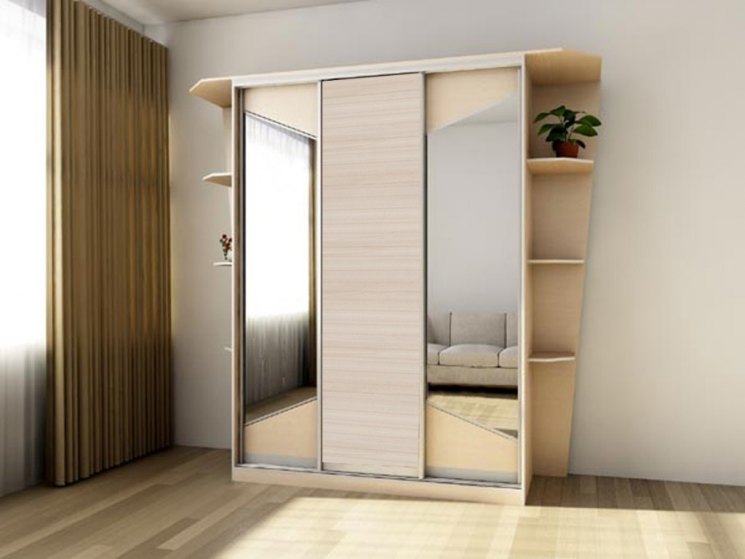
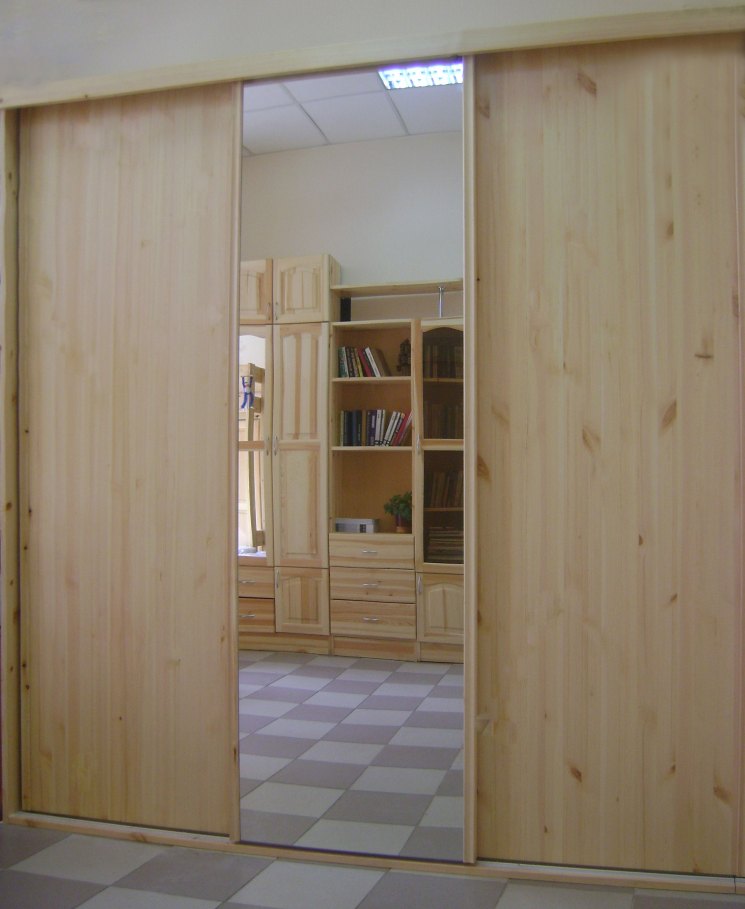
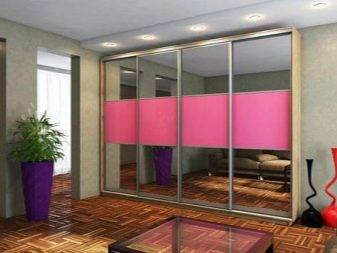
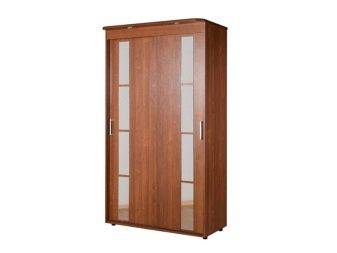
If you design the installation of a wardrobe in the hallway, it is important to take into account the fact that in many apartments it is small, rectangular in shape. Unlike the hinged doors of a conventional wardrobe, sliding compartment doors will save space in the best possible way.
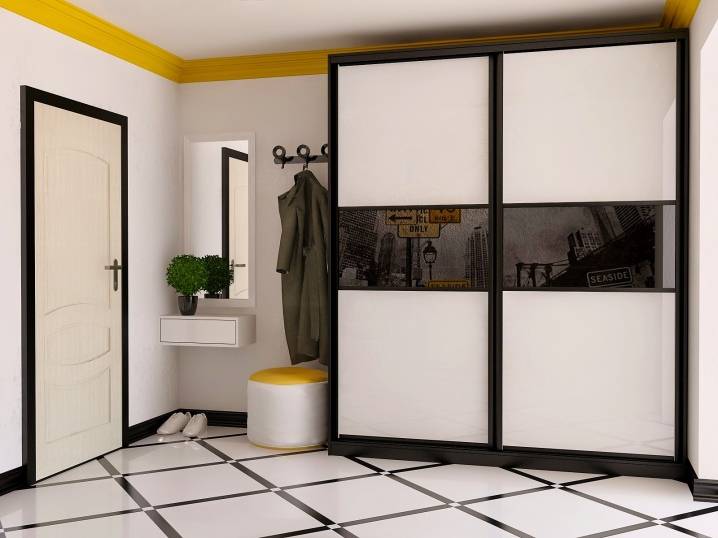
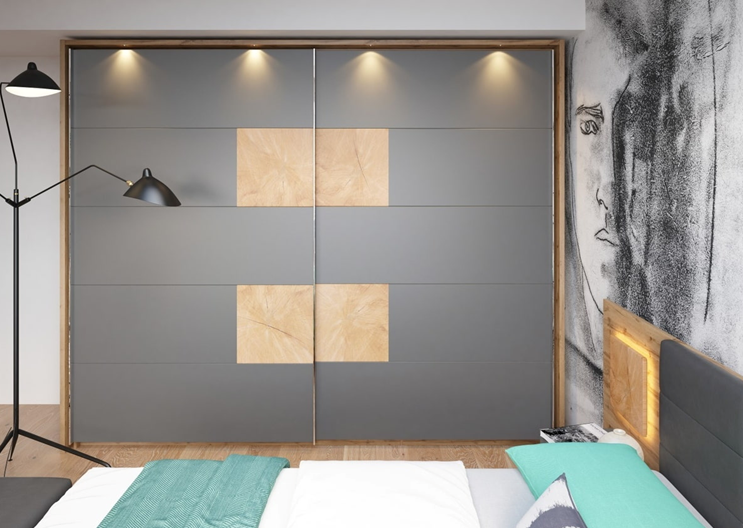
Saving free space is important in any room, not only in the corridor, but also in the bedroom, which should always remain a zone of comfortable rest and order. If the height, at the same time, is made up to the ceiling, the usually empty space will be used with maximum benefit.
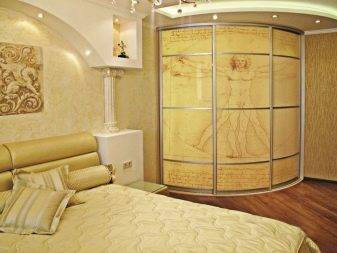
In the corner zone of the dwelling, depending on the characteristics of its total area, an unusual and roomy radius wardrobe can be placed. Corner placement is advantageous in that a piece of furniture installed in this way will accommodate much more things than with another option.


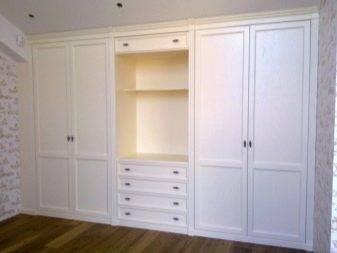
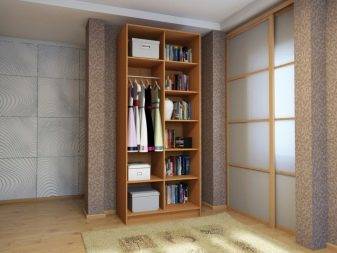
A built-in closet can be installed if there is a niche or pantry in the room. It will be functional, comfortable and aesthetically pleasing. In addition, it is much easier to make a closet from a closet on your own than to make it completely: there are already walls, a ceiling and interior space. The main task is to decide on the filling of such a cabinet, to correctly plan the dimensions, drawing and course of action.
Cabinet for plywood dolls
This is a rather difficult master class. It is desirable to have experience working with wood. Thick plywood is not suitable for a miniature Barbie cabinet. A small child may be injured when playing with such furniture. Therefore, to assemble a puppet plywood cabinet, take a sheet with a thickness of 3 or 4 mm.
Before starting work, prepare a diagram with the parameters of the future wardrobe.
Measure the length of the doll's clothes. The section containing the hanger bar must be at least 3cm taller than the dolls' outfits.
Leave 1 cm under the legs. Adding all the numbers, you get the optimal height.
In the same way, calculate the depth of the chiffonier. Measure the width of your doll's largest dress and add another 1 cm.
After you have recorded all the dimensions, transfer the drawing from paper to a sheet of plywood. On the side parts, you still need to draw the grooves where the shelves will be inserted.
Now you can start cutting. For this, construction scissors, a jigsaw or a miniature hacksaw are suitable. It all depends on the width and thickness of the plywood.
Carefully cut grooves to connect the shelves to the cabinet walls. If they do not match each other, you will have to finish or redo the details.
After all the elements are cut out, they need to be sanded well so that there are no burrs left.
Treat this procedure with special attention, because your child is at risk of getting a splinter.
When the preparatory work is completed, you can start assembling. Connect the side panels to the top and bottom plane
Glue the elements for additional fixation.
After assembling the frame, install and glue the shelves inside.
Wait for the glue to dry.
Hang the doors on special hinges so that they can be opened.
Take thin paper and roll it into a tight tube.
Cut the tubes into even small baubles. These will be the legs that need to be put on the glue.
Decorate the resulting blank: paint it in any color you like or use stickers.
Top can be varnished. Ask your daughter for advice - children have a rich imagination.
Invite your child to choose door handles. You can also put drawers in the closet so that the shelves do not look empty.
To make a hanger, twist a regular A4 sheet into a tight roll with a tube. Thoroughly coat the inside of the tube with glue and leave to harden. After the straw has dried, cut to the size of the cabinet, leaving small protrusions for gluing. Paint it the color of the cabinet filling.
Purpose
A closet for children's things is not just a place to store them. The presence of this element in the baby's room will help to accustom the child to order from childhood. By collecting toys and putting them in their places after the game, the baby will learn how to properly handle things.
With the help of such a storage, you can sort all the children's things, while it is easy to organize them.So the baby does not have to pour everything on the floor at once, he will only get what he needs. With the help of a special storage for toys in the room, it will be easier to keep order. No need to arrange toys in free corners, they will all be in a certain area.
Finishing and lighting
At the final stage, when the cabinet is fully assembled, it is necessary
carry out its interior and exterior decoration, which includes several
events:
- All
the caps of the screws used in the assembly process are slightly twisted and
slightly recessed into the canvas of the cabinet. Their places are masked with putty. - All
the details of the cabinet are covered with a primer, and subsequently with the selected paint. not bad
the use of stain and varnish is considered an option, but each person has
your preference, be guided by your taste and compliance with the interior. - Treatment
sashes are carried out before the hanging process. - If a
there is such a need, then the manufactured cabinet is completed with elements
lighting. It can be spotlights or LED bulbs,
characterized by economical energy consumption and durability.
As you can see, the manufacturing process is quite simple,
if you follow the suggested instructions. Do-it-yourself wardrobe installed in
any of the rooms will be an excellent alternative to purchased models, for more
expensive price.
Drafting
You don't need to be an engineer to create furniture drawings. This is within the power of every person. Initially, decide what kind of cabinet you need. Perhaps it is classic, or maybe a closet? Absolutely all the details of the future object are drawn on paper, parameters are written above them.
 First you need to decide what type of cabinet you will do.
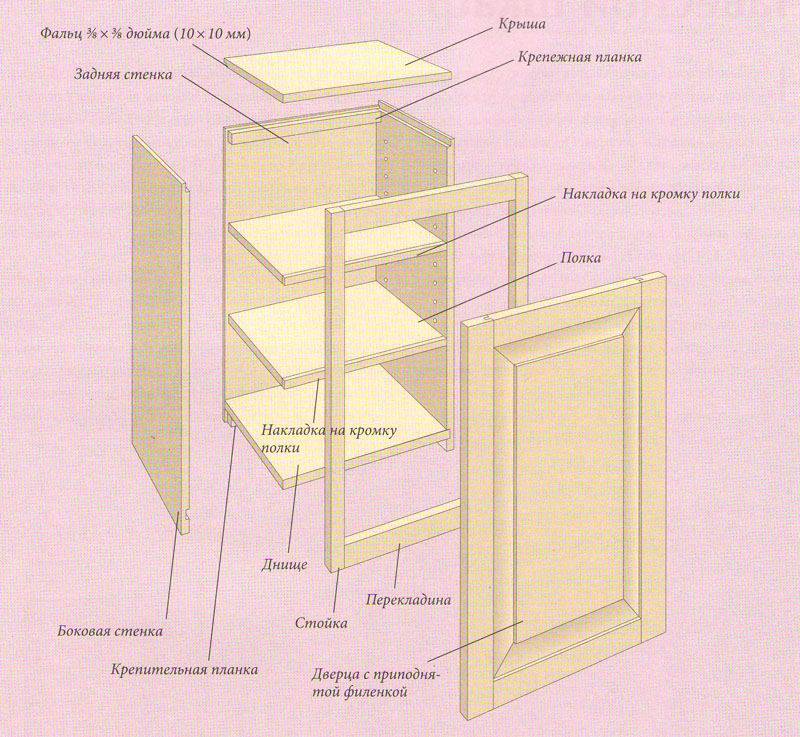
An example is the list of necessary measurements for one door furniture:
- Back wall and side panels.
- Bottom and shelves.
- Door and lid.
- Planks for fastening.
- Rack under the door.
- Edge pad.
 You will need to make certain measurements.
Based on this list, you can find out what needs to be added in the case of 2 or more doors. In addition, consider at this stage convenient zoning inside the furniture. And location. If this is a hallway, it is worth considering the fact of convenience for placing accessories, umbrellas and shoes there. If this is a bedroom - the convenience of placing dresses, shirts and bedding in it.
 The closet for the hallway will be different from the furniture in the bedroom or other rooms.
How to choose the right plywood for the job
Plywood is a natural material, composed of several layers of wood and impregnated with glue, used to create furniture items. Some manufacturers suggest considering sheets that are resistant to moisture and water. Any tree is deformed from these 2 factors; for such types of plywood, which has resistance to them, a special type of glue is used.
 Plywood consists of sheets of natural wood impregnated with glue.
Slightly soluble glue can be of different brands and this becomes the determining factor in the types of plywood. There are 3 of them: FC, FBS and FSF. The first type is best for working with furniture and creating interior details. The remaining two cannot be used in these cases, they are used in auto, aircraft and shipbuilding, as well as in the construction business.
The parameters used in the work on the cabinet, sheets are selected with different thicknesses depending on the location and purpose of the destination.The case will be strong if you use a plywood sheet equal to 18 mm. The facade is used a small width up to 12 mm.
If a wall cabinet is provided, then it is better to use plywood 6 mm in it, no more
It is important to take into account the different dimensions of the width of the wood in order to balance the dimensions and weight of the structure.
 For wall cabinets, thinner sheets are used.
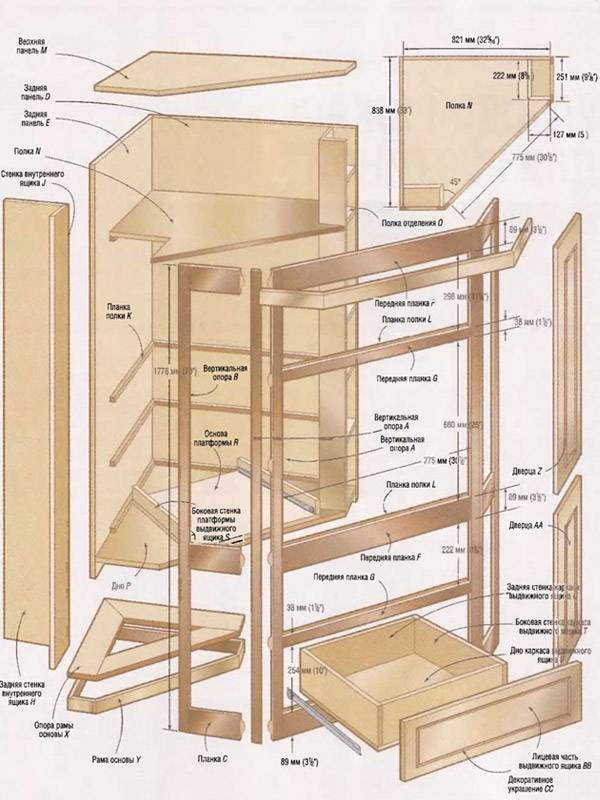
Parts manufacturing
At this stage, you will need to figure out not only how to make a cabinet with your own hands, but also with the intermediate stages, in the form of creating details for its design. To do this, you need to start marking chipboard sheets. During this process, do not forget to make a margin for the saw stroke, which takes up to three and a half millimeters.


The best option is to order sheets in a store or some kind of workshop. In this case, you will need to pay a little extra, but at the same time, professionals will cut the sheets for you, and they will do it quickly and accurately. It is better to save your time at this stage. All cut sheets will need to be covered with an edge. If you have a well-developed project, there will be no problems with this, because you already know which part will look where.
Assembly - the main stage in the manufacture of a cabinet with your own hands from chipboard
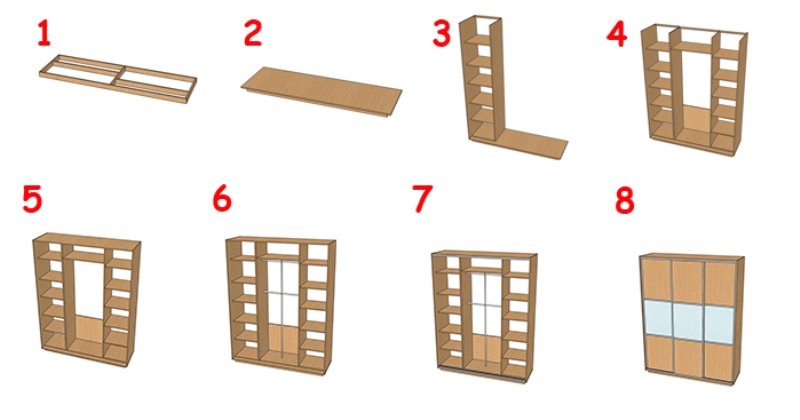
After all the necessary elements and accessories are ready, you can begin to assemble the structure itself. It is carried out in the following order:
- Using a drill and special drills for confirmation, we prepare holes for docking joints. All openings must be taken into account: for shelves, hangers, partitions, etc.
- We connect together the bottom, sides and top of the cabinet. To do this, it is enough to arm yourself with a screwdriver and screws.First of all, we lay the lower part, then alternately attach the side walls to it and lay the upper partition on the U-shaped structure.
- At the base of the cabinet, we install fixtures for shelves, hooks and other elements. The correctness of their installation can be checked with a level. Opposite fasteners must be placed strictly horizontally.
- At the very end, hinged doors for the cabinet are fastened. Before installation, it is better to mount the handles, because in the future it will be more difficult to do.
The last step is to polish the appearance of the cabinet. A decorative edge is glued along all cut edges of chipboard plates. All confirmations are hidden under special plugs, the color of which matches the design of the entire structure. Also, if desired, you can install mirrors, lighting and other functional or decorative elements.
The resulting cabinet, with a responsible approach to its manufacture, will have a sufficiently high strength and stability. But most importantly, it will be a unique element of your interior, which fits perfectly into the dimensions of the room. At the same time, the price of such furniture is much lower than the cost of similar models in the store.
Design Features
In the width of the door panels, it is necessary to take into account overlap gaps, overlapping of the gap in the closed position. 10 mm will be enough.
On the drawing it will look like this:
- opening width + 20 mm;
- in case of using three leaves + 30 mm;


Dimensions are not basic, you can change them within the allowable range.
The height is calculated from the dimensions of the fittings that you will use + working clearances for normal sliding.

Top rails are usually made in the form of gutters, and are closed on the outside with decor, this will give you the opportunity to adjust the dimensions in height. Hardware sets for compartment doors can be easily purchased at furniture stores.
How to make a wardrobe from plywood
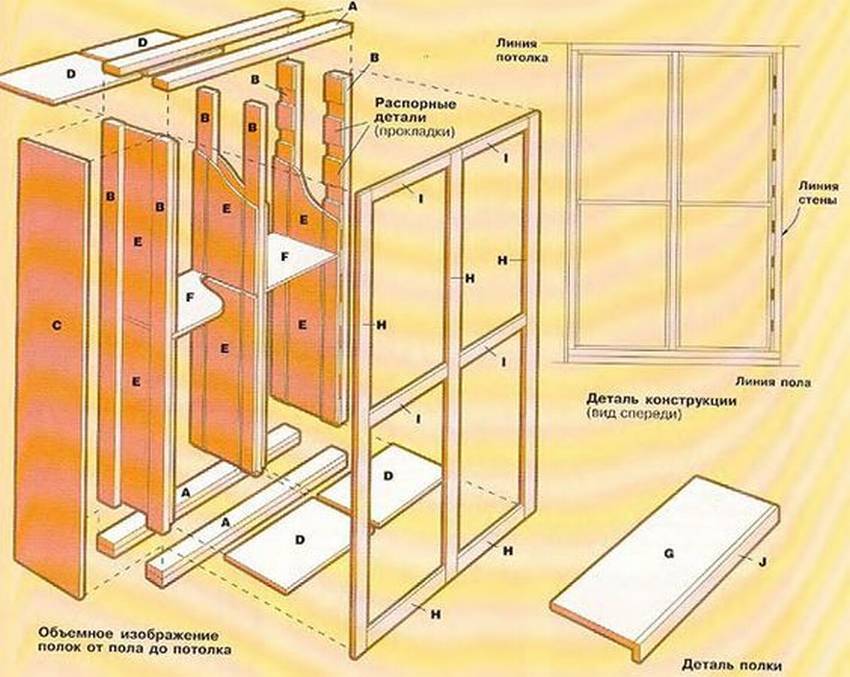
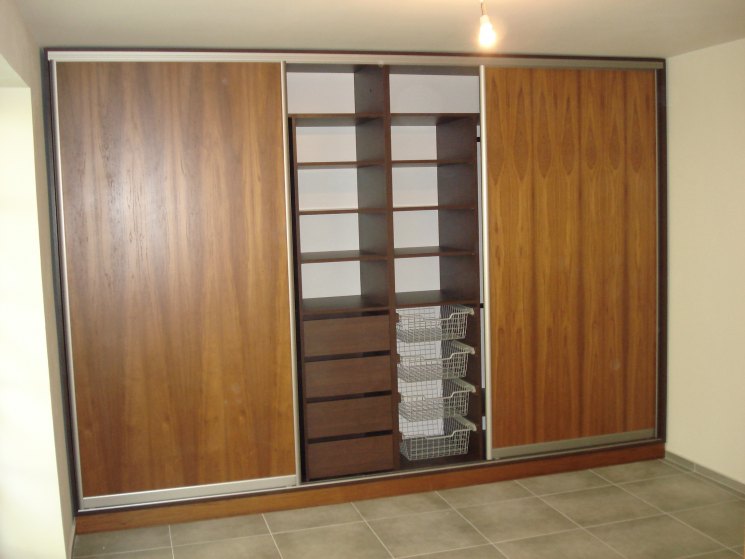
This type of product is made much easier, since coupes are different. In some of them, the expenditure of effort, time and materials will be spent on creating only the insides of shelves, bedside tables. This is also characteristic of a frameless type sliding wardrobe built from plywood with your own hands, it can also be made. To work on this type and others, you also cannot skip all the preparatory steps, including the creation of drawings.
It is easier to make a sliding wardrobe if it is a built-in option.
In addition, there are frame products that will be built into a niche in the future. The preparation is similar. High-quality and accurate preparation for the start of work is the key to success. The work is started from the bottom, these are cutouts for the plinth. Side rails should be anchored to the wall with dowels or metal corners. Small nails cover the front edges of the vertical supports.
 Sliding wardrobes have their own production technology.
At the end of work with vertical parts, a wooden shield is superimposed on top. It, as a rule, protrudes slightly beyond the dimensions of the racks. The door system is attached from above, and from below it will be installed after the doors are aligned in parallel.
Product decoration
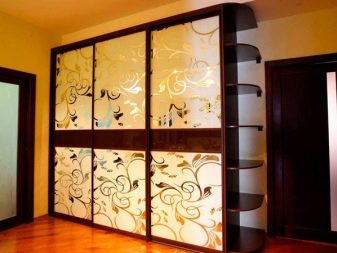
Decor in this case is possible on the facade, that is, on the doors. Plywood can be made with a photo print, this decor is applicable to all types of canvases. It could be film. And also, mirror inserts, or painting. This is all done in the period before installation in the right place.
 You can decorate the door with mirror or other inserts.
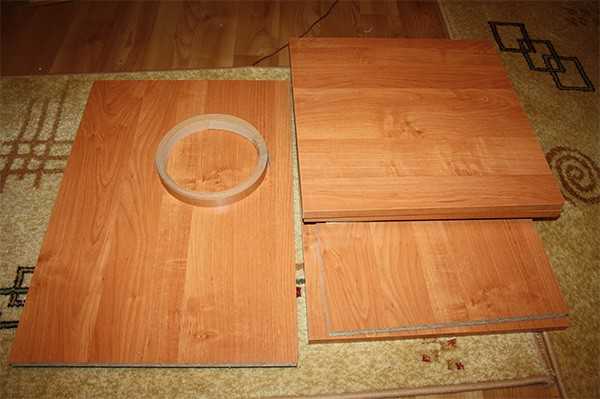
Often in the case of plywood furniture, the appearance can be spoiled by multilayer ends. In order to repair them and save the appearance of the product, use the following materials:
- Adhesive tape in wood color.
- U-shaped profiles made of aluminum or plastic.
- Paint.
 You can mask the ends in different ways.
Beautiful handmade examples
Until recently, plywood was not used to create many things. But, its simplicity and elegance, combined with practicality, won the hearts and hands of the masters. Today there are a lot of beautiful plywood cabinets. They are lightweight, which does not burden the design of the room.


 Plywood furniture gives lightness to the room.
In each of the selected designs, you can see plywood furniture, and it will be appropriate. The lightness of the material contributes to the creation of various forms. Therefore, it is easy to work with her.
 Plywood is an easy-to-work material, so you can create any furniture from it.
Based on the above text, the conclusion suggests itself that even a beginner can do his own work on a plywood cabinet. All work is done step by step. Starting with the preparatory work and ending with the final touches and design. Some of the elements will not be superfluous to order from the masters, we include doors for wardrobes to such an order.
How to distribute shelves?
If you are making a bookcase, the shelves can be spaced a little apart. You can mark this distance on the frame using a book of the most common format. So the books will definitely stand as they should.

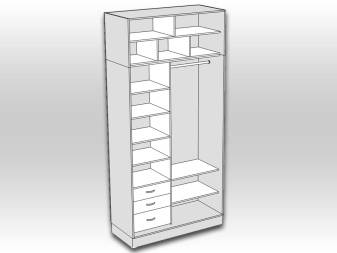
If you make a wardrobe with your own hands, then the shelves should be at an average distance from each other so that a sufficient number of stacks of clothes can fit on them, and one section of the wardrobe can be made without shelves at all and then clothes can be placed there on hangers.

If you are making a shoe cabinet, then the shelves should be made very close to each other, focusing on the average height of your shoes. This will help save space and not make the cabinet unnecessarily large.

Kinds
Before you get started, you need to decide what kind of cabinet you need. Depending on the location, there are two main types:
- Built-in models, the main advantage of which is the presence of a floor, ceiling and some walls. This condition significantly reduces the cost of the project. Such options are convenient, since they can be adjusted to any existing niche: recesses in the walls, space under the stairs. Oddly enough, this is also a disadvantage of built-in models, since they are built for a specific place and changes are no longer implied. Among other things, the curvature of the load-bearing surfaces greatly affects the quality of the cabinets, so they must be leveled before starting the project.
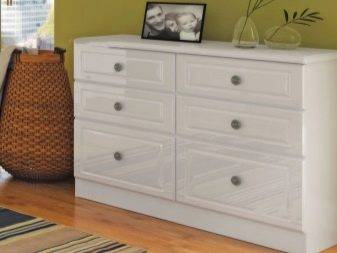
- Cabinet freestanding cabinets are a classic option. Models can be used in any type of premises. Dismantling and transfer from place to place is possible. Also, curved walls, floor or ceiling will not affect the installation. Among the disadvantages, one can note the high consumption of materials, compared with built-in modifications, and the associated increased cost.However, with proper selection of components, the cost can be reduced.
- Partially embedded models are a cross between the first two options.
Depending on the type of doors, cabinets are classified as follows:
- Wardrobe with sliding doors and rigid frame. Two subspecies can be distinguished: with a roller door movement mechanism and with a monorail. After appearing on the market, such options have gained popularity with a variety of models, designs, and internal content. In addition, the advantages are multifunctionality, saving space in the room.
- Models with hinged doors. Long service life is the main plus of such options. As well as practicality and durability.
- Lift door options.
- Open, doorless cabinets.
Designers also divide cabinets according to the way they are assembled and style. The style is diverse: folklore, hi-tech, baroque, empire, modern, rococo.
In terms of equipment, the following models can be distinguished:
Standard options are typical for large industries, are made according to standard sizes, without frills. Practical and functional furniture. Most often used for offices.
- Serial production is a mass option. Represents the release of products in one line, with certain characteristics within the same concept.
- Modular wardrobes have always been popular. Their advantages are mobility and functionality. Such structures can be divided into separate sections, easily dismantled, rearranged, combined with each other.
If we consider cabinets in shape, then the most common options are:
- Linear, in other words, straight.
- Angular (depending on the shape of the angle L or U shaped).
- Round.Rounded side or front panels.
- Rectangular.
Depending on the number of doors, there are double-leaf, single-leaf, three-leaf or open without doors. Of course, combined options are also popular.
The most important characteristic of cabinets is functional. Only after making a decision on the purpose of the structure, all of the above classifications are taken into account. According to the purpose of use, cabinets are:
- For clothes. This includes wardrobes, wardrobes, which are characterized by hangers for dresses, suits, ties, trouser holders.
- For storing things. Here you can note the cabinets for bed linen, chests of drawers.
- Book. Use various modifications from open to combined.
- In the hallway These models are characterized by shelves for shoes and hats, hangers, hooks, holders for umbrellas, a mirror, built-in sections for outerwear.
- For kitchen. Often, these cabinets are equipped with specific mesh or pull-out shelves for kitchen utensils and utensils, hooks for towels and other small items.
Computer desk
An example of furniture from a furniture board assembled by oneself can be a table for working at a computer. To install this multifunctional, compact product, you will need:
- 3 shields with dimensions 2000x600x18 mm;
- 3 - 2000x400x18 mm;
- 2 - 2000x200x18 mm;
- edged board 12x120 mm;
- plywood in 6 mm;
- dowels.
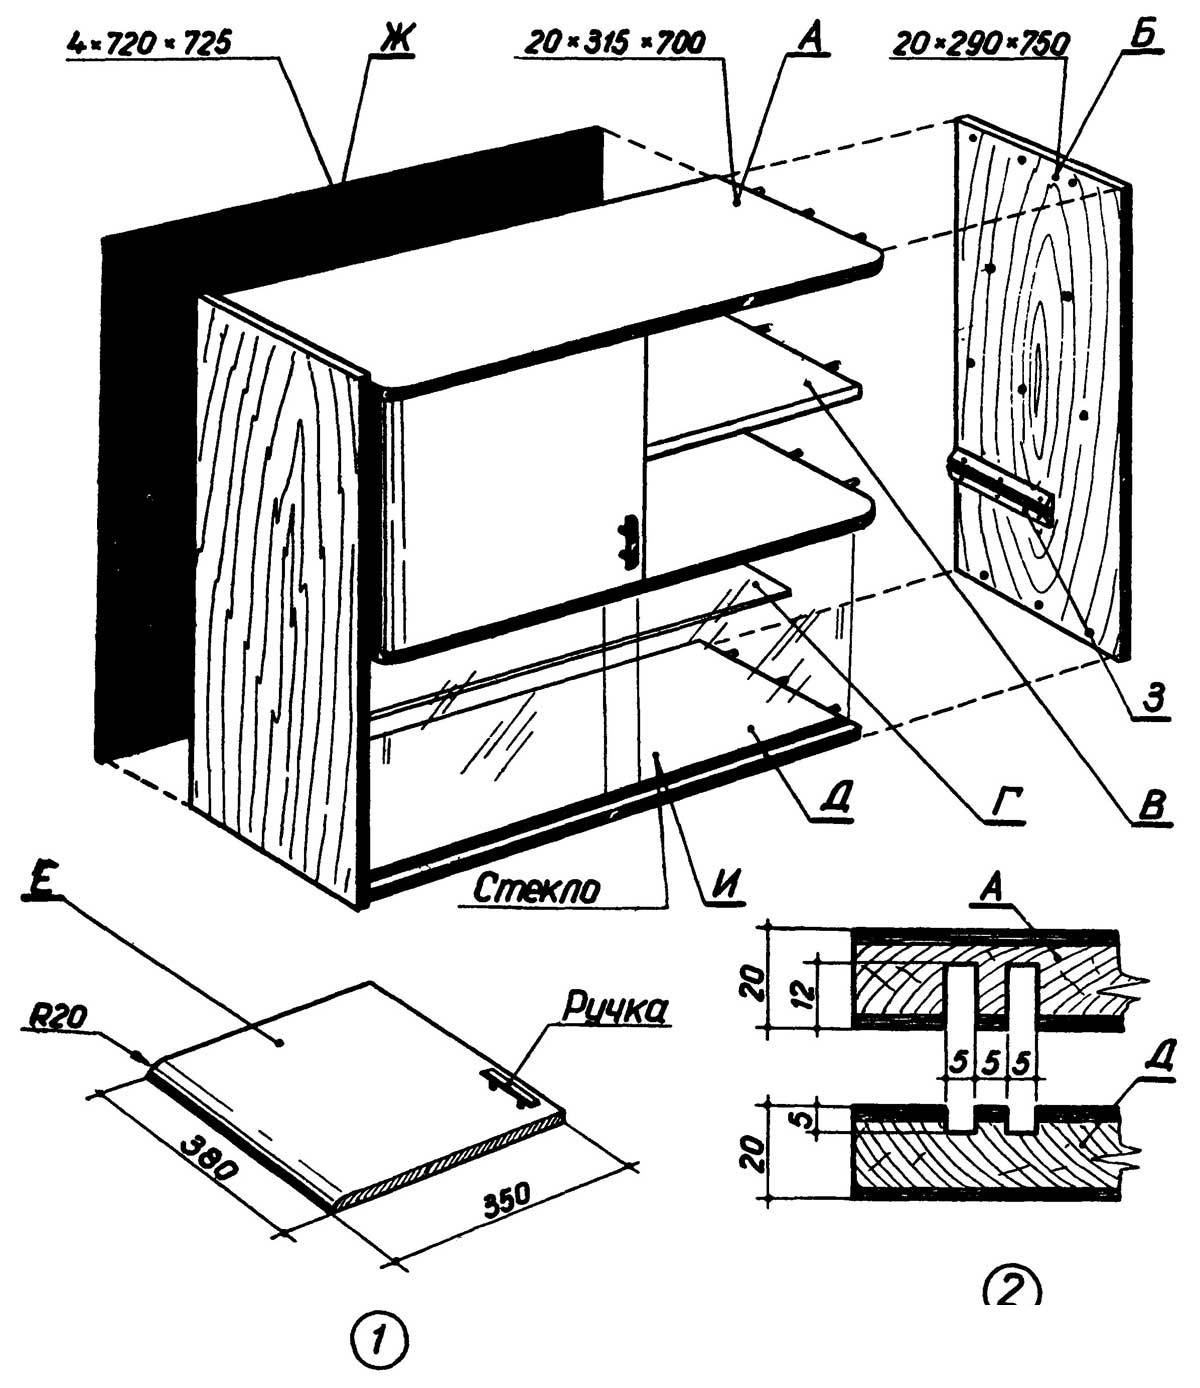
Rice. 7. You can assemble a computer desk of any size from furniture panels. Choose the color, number of shelves and drawers at your discretion.


Rice. 8. Computer desk: assembly diagram with dimensions
First of all, we draw up drawings, take measurements, then proceed to the direct manufacture of the table:
- We cut a large shield on the countertop, side walls, bottom and top of the cabinet.
- We plan the corners of the sidewalls of the upper outer part, give them smoothness.
- In the sidewall that will fit snugly against the wall, we make a recess for the plinth (5x5 mm).
- In the center of the side inside the vertical wall, to achieve the required rigidity, we install a transverse panel. We fix on self-tapping screws.
- We cut sharp corners and make recesses for the plinth in a niche, which is intended for the system unit.
- We carry out a frame for shelves placed above the table.
- We attach the frame to the already connected parts.
- We cut the middle shield for the top shelf, a small shield will go to the middle partition connected to the tabletop.
- From a small shield we make a shelf with a jumper and place it above the cabinet.
- We make drawers. The walls are made from edged boards, the bottom is made from a sheet of plywood. We connect everything with screws.
- We install ball or roller mechanisms for drawers and countertop shelves.
- We cut out the tabletop for the keyboard from a shield 40 cm wide. Trimmings can be useful for decorating drawers from the outside.
- All products are disassembled.
- Table elements are processed by a grinding machine.
- All components are covered with 2 layers of varnish.
- After it dries, the final assembly of the entire table is performed.
- We install handles and decorative elements.
Gluing technology
To minimize warping during shrinkage, we select and lay boards next to each other with an optimally similar arrangement of annual rings. We mark them in any noticeable way, for example, by drawing a figure. Then, it will help not to waste time looking for the right lamella (non-jointed blank). The ends of the blanks before gluing must be planed off.
Further procedure:
- Fold the slats into a pack, coat the ends with glue (blanks placed in a plastic bag stick together more slowly).
- We tighten the glued wood with large clamps. You can use a waima (a device assembled from scraps of blanks). The tightening moment is achieved by wedges hammered between the stop and the end face of the lamella. Or clamp boards between metal shelving brackets. The principle is the same - grip along the edges is done using wooden bars and wedges.
- Thorough drying of the spliced fabric. To make the surface even and smooth, we plan the shield, grind it and remove excess glue.
Rice. 4. Lamella joining
Rice. 5. Connecting wooden elements


