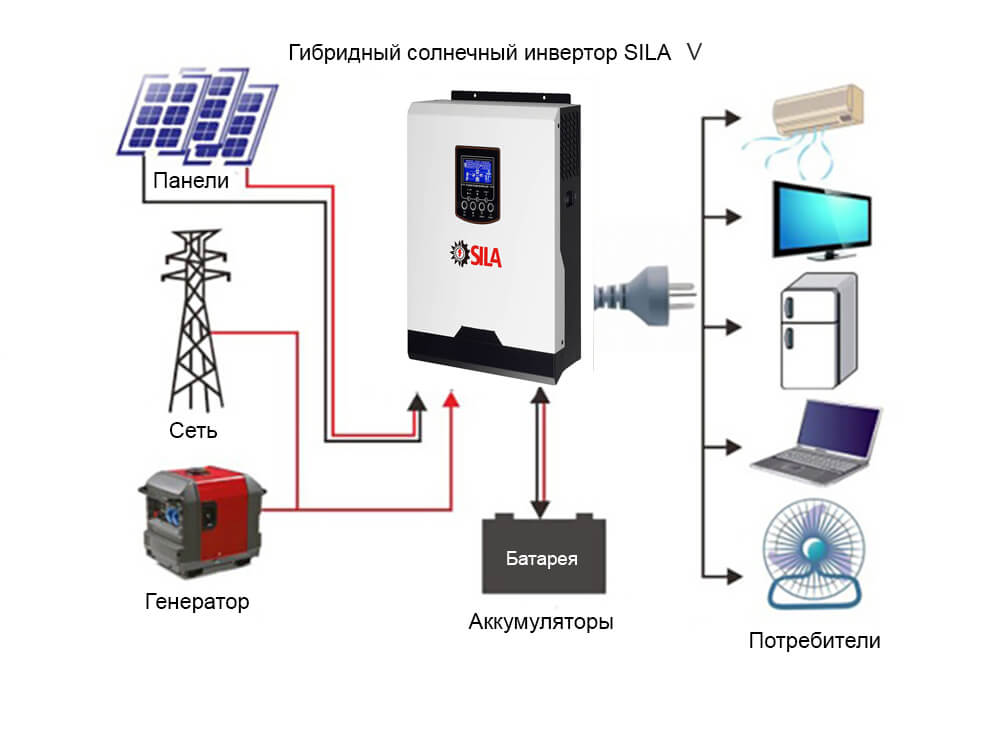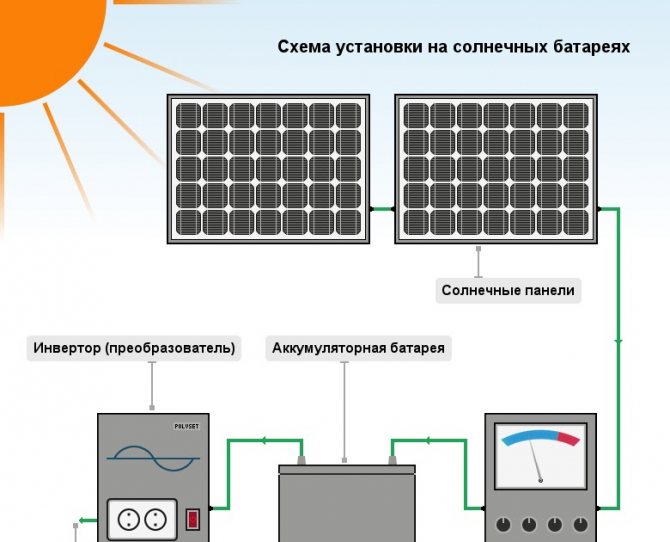
- Scheme of the device of a solar power plant
- Assembly of photocells
- Varieties
- Silicon
- Film
- amorphous
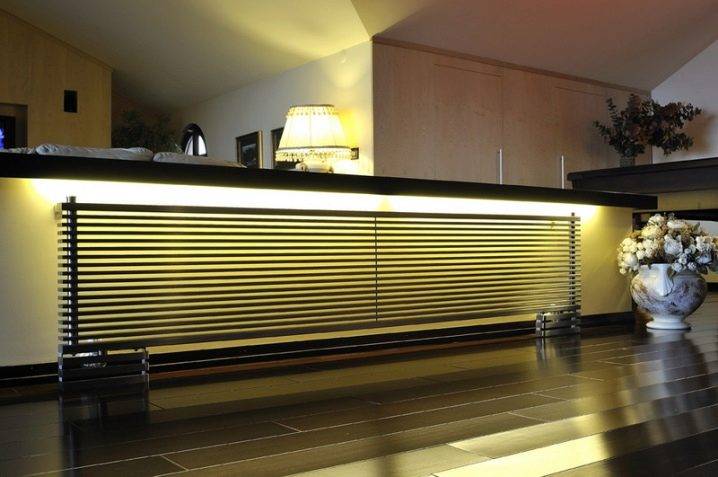
- How to properly install a solar panel
- Installation
- Which photovoltaic cells are best suited for a solar panel and where can I find them
- Is it possible to replace photovoltaic plates with something else
- Other video instructions
- Components of a solar battery
- Cooking plates
- How to make a solar battery yourself
- First stage (layout)
- Second stage (sorting, tire preparation and soldering)
- Stage three (assembly, cell soldering)
- Fourth stage (frame)
- Fifth stage (protective top layer)
- Sixth stage
- Seventh stage (sealing)
- Stage eight
- Stages of installation work
- What accessories are needed and where to buy them
- DIY solar battery from improvised means and materials at home
- From diodes
- From transistors
- From aluminum cans
- How to connect plates
Scheme of the device of a solar power plant
Consider how the solar system for a country house is arranged and works. Its main purpose is to convert solar energy into 220 V electricity, which is the main power source for household electrical appliances.
The main parts that make up the SES:
- Batteries (panels) that convert solar radiation into DC current.
- Battery charge controller.
- Battery pack.
- An inverter that converts the battery voltage to 220 V.
The design of the battery is thought out in such a way that allows the equipment to operate in various weather conditions, at temperatures from -35ºС to +80ºС.
It turns out that properly installed solar panels will work with the same performance both in winter and summer, but on one condition - in clear weather, when the sun gives off the maximum amount of heat. On a cloudy day, performance drops sharply.
The efficiency of solar power plants in the middle latitudes is great, but not enough to fully provide electricity to large houses. More often, the solar system is considered as an additional or backup source of electricity.
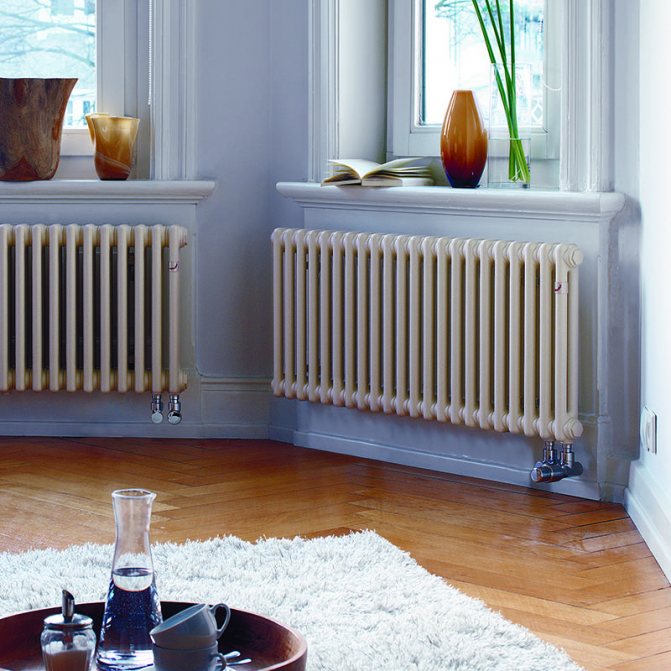
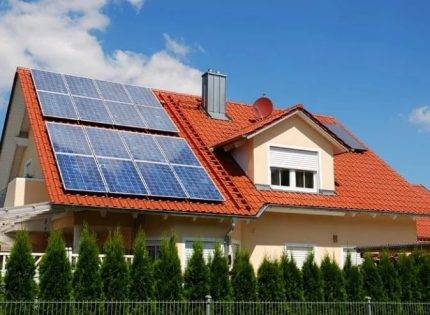
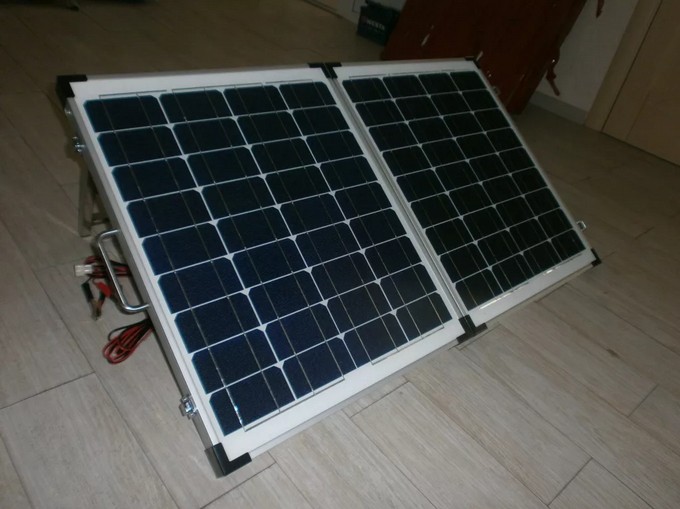
The weight of one 300 W battery is 20 kg. Most often, the panels are mounted on the roof, facade or special racks installed next to the house. Necessary conditions: turn of the plane towards the sun and optimal inclination (on average 45 ° to the earth's surface), providing a perpendicular fall of the sun's rays.
If possible, install a tracker that tracks the movement of the sun and regulates the position of the panels.
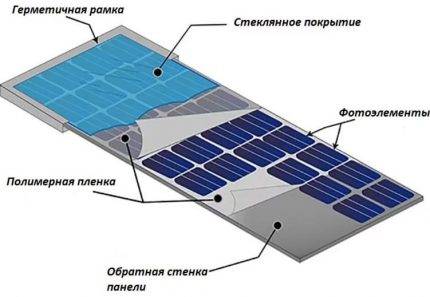
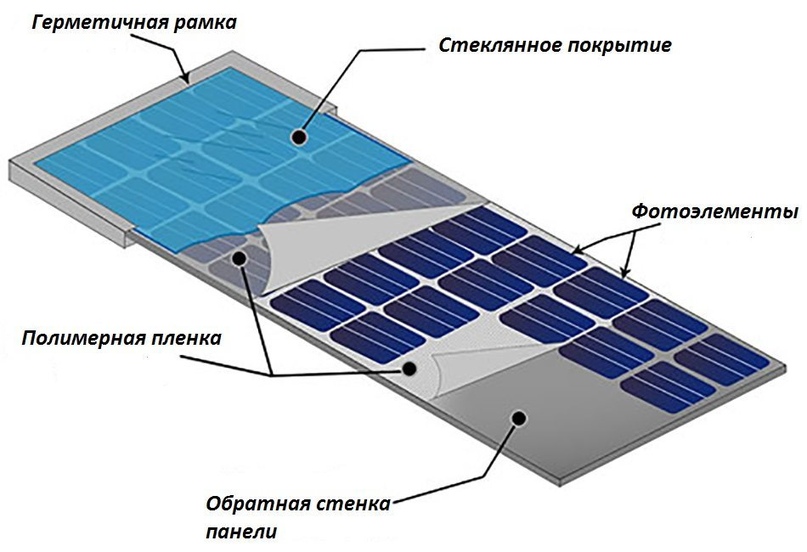
The upper plane of the batteries is protected by tempered shockproof glass, which easily withstands hail or heavy snow drifts. However, it is necessary to monitor the integrity of the coating, otherwise damaged silicon wafers (photocells) will stop working.
The controller performs how many functions. In addition to the main one - automatic adjustment of the battery charge, the controller regulates the supply of energy from solar panels, thereby protecting the battery from complete discharge.
When fully charged, the controller automatically disconnects the battery from the system. Modern devices are equipped with a control panel with a display showing battery voltage.
For home-made solar systems, the best choice is gel batteries, which have a period of uninterrupted operation of 10-12 years. After 10 years of operation, their capacity decreases by about 15-25%. These are maintenance-free and absolutely safe devices that do not emit harmful substances.
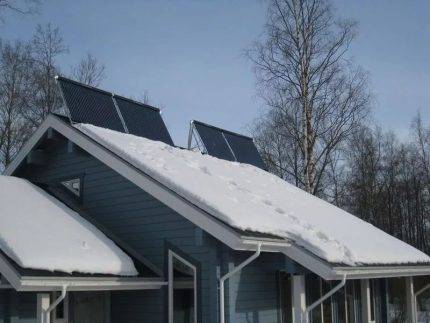
In winter or in cloudy weather, the panels also continue to work (if they are regularly cleared of snow), but energy production is reduced by 5-10 times
The task of the inverters is to convert the DC voltage from the battery into an AC voltage of 220 V. They differ in such technical characteristics as the power and quality of the voltage received. Sinus equipment is able to serve the most "capricious" devices in terms of current quality - compressors, consumer electronics.
Overview of household SES:
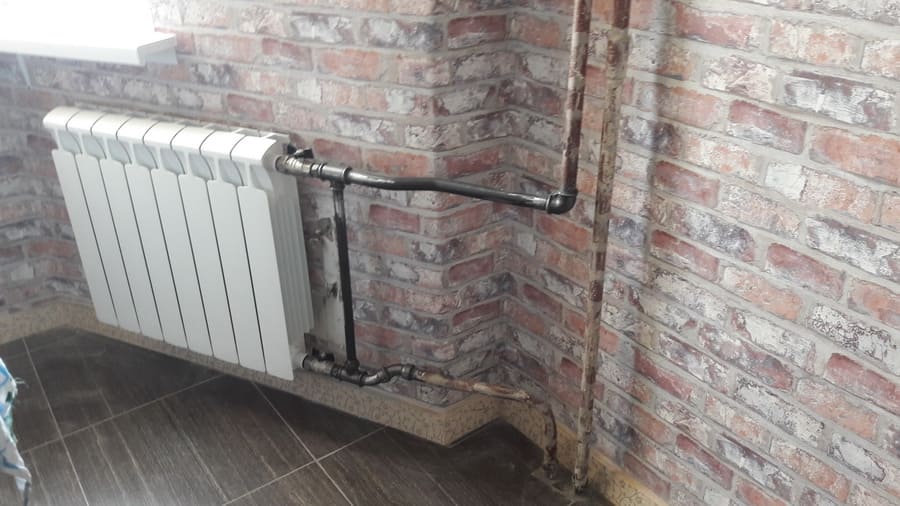
It is worth knowing that household power plants are capable of servicing a constantly working refrigerator, a periodically launched submersible pump, a TV, and a lighting system. To provide energy for the operation of a boiler or even a microwave oven, more powerful and very expensive equipment will be required.
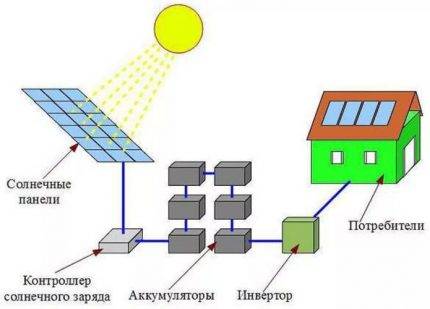
The simplest scheme of a solar power plant, including the main components. Each of them performs its own function, without which the operation of the SES is impossible.
There are other, more complex schemes for assembling solar power plants, but this solution is universal and most in demand in everyday life.
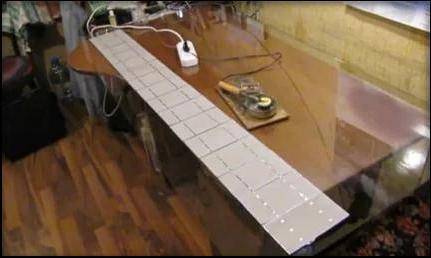
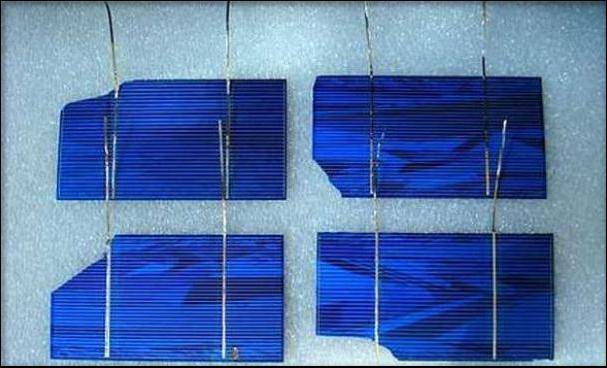
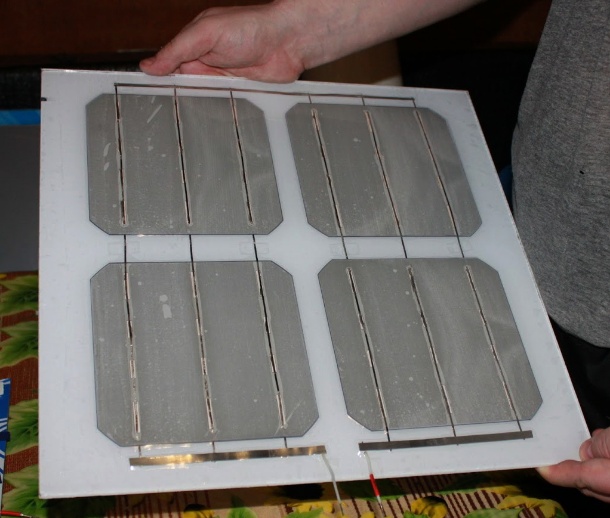
Assembly of photocells
Elements carefully laid out on the basis
It is important to keep the distance between them at 3-5 mm.You can use crosses for the installation of tiles
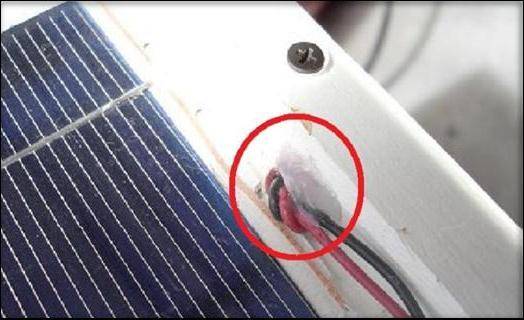
It is necessary to prepare for soldering - bring the contacts in order. Positive on one side, negative on the other.
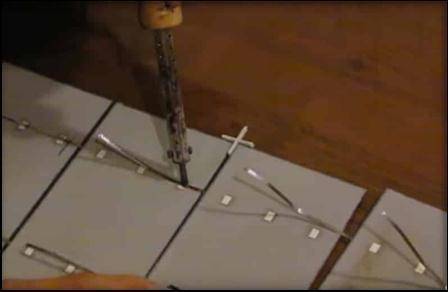
The contacts on the panels may already be ready and secured in place. If this is not the case, you will have to cook and solder them yourself.
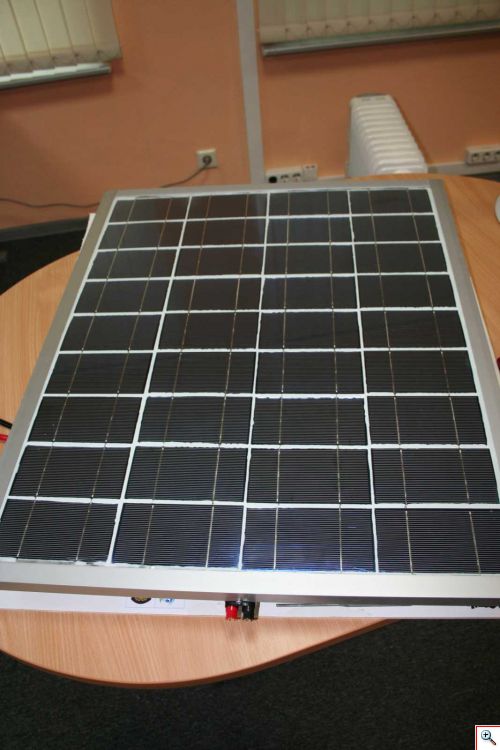
A homemade solar battery is made from crystalline elements. This is a rather fragile material, so it is necessary to work with them with special care.
The manufacture of solar panels requires special attention. In order to solder the solar plates correctly and without damaging them, careful handling of the parts is necessary. Correctly choose the soldering iron itself with a permissible power - 24 / 36 watts.


When all the plates are soldered, the circuit must be supplemented with p / p diodes from self-discharge (charge controller) and an speaker cable at the output for connection.
Fix all panel elements with your own hands with a sealant.
Now all the elements are picked up and stacked inside the frame.
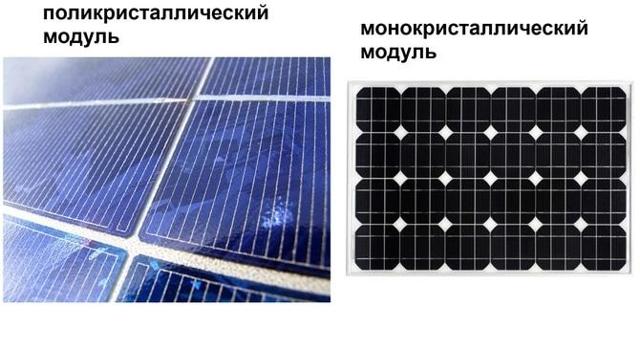
Varieties
Solar panels are divided into the following types.
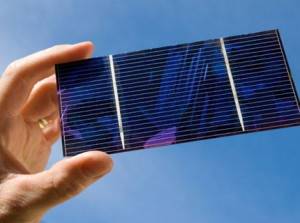
Silicon
Silicon is the most popular battery material.
Silicon batteries are also divided into:
- Monocrystalline: These batteries use very pure silicon.
- Polycrystalline (cheaper than monocrystalline): Polycrystals are obtained by gradual cooling of silicon.
Film
Such batteries are divided into the following types:
- Based on cadmium telluride (efficiency 10%): cadmium has a high light absorption coefficient, which makes it possible to use it in the production of batteries.
- Based on copper selenide - indium: the efficiency is higher than the previous ones.
- Polymer.
Solar batteries from polymers have begun to be manufactured relatively recently, usually furellenes, polyphenylene, etc. are used for this. Polymer films are very thin, about 100 nm. Despite the efficiency of 5%, polymer batteries have their advantages: cheap material, environmental friendliness, elasticity.
amorphous
The efficiency of amorphous batteries is 5%. Such panels are made of silane (silicon hydrogen) on the principle of film batteries, so they can be attributed to both silicon and film batteries. Amorphous batteries are elastic, generate electricity even in bad weather, absorb light better than other panels.
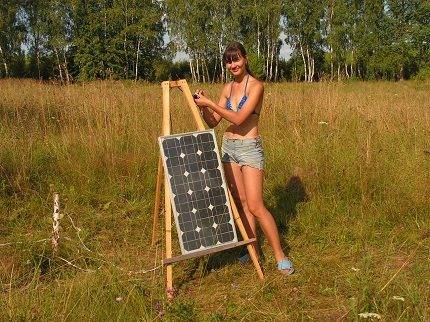
How to properly install a solar panel
You need to start by choosing a place for installing and connecting a solar battery. First, decide on the area - batteries can be bulky and you need to have enough space. Secondly, the degree of illumination of the installation site is important, the more, the better - in this case, the solar system will be as efficient as possible. A good choice may be the roof, walls, facade of a private house, the territory adjacent to it, the balcony of an apartment building.

When installing solar panels, it is necessary to observe the correct angle of inclination relative to the horizon and the orientation of the solar structure - the light-absorbing front (or facade) surface of the panels should be directed to the south. The maximum return of the solar panel gives when the rays of light fall at an angle of 90º. Therefore, depending on your region and climatic conditions, consider such an arrangement of solar panels so that the angle of incidence of light is optimal for the maximum time during daylight hours.Perhaps, for more efficient operation of the solar battery, the angle of inclination will have to be changed periodically, depending on the season or weather. If you are installing a solar panel on the roof of a house, it is preferable that the angle of inclination be around 45º. At smaller angles, solar panels are installed on additional special structures that help to ensure the desired angle of inclination, system rigidity and stability.
To install and mount the solar battery, special fasteners are used, including rails, to which the panel itself is attached. The solar array must be fixed at least four points during installation with clamps or bolts along the outer long side of the aluminum frame. It is preferable to use the special mounting holes/seats provided in the design.
If the solar panels are connected to each other in a chain, make sure that they are located in the same plane and at the same angle - so their work will be more efficient. If you are installing solar panels on a site adjacent to the house, choose an open and as unshaded place as possible, without trees, bushes or any structures that can cast a shadow. Also, do not forget about the air circulation between the installation surface and the ground - you need to raise the panels at least half a meter from the ground.
When properly installed, the performance of solar panels will be the same both in winter and in summer, but only in clear and sunny weather (in winter it is sometimes even more efficient due to the lack of overheating).The design of solar batteries is thought out so that all equipment can work in different climatic conditions and withstand temperatures from +80ºС to -35ºС.
Installation
 It is necessary to mount the battery in the place of maximum illumination by sunlight. The panels can be mounted on the roof of the house, on a rigid or swivel bracket.
The front of the solar panel should face south or southwest at an angle of 40 to 60 degrees. During installation, external factors must be taken into account. Panels should not be obstructed by trees and other objects, dirt should not get on them.
A few tips to help save money and time when making solar panels:
- It is better to buy photocells with small defects. They also work, only they do not have such a beautiful appearance. New elements are very expensive, the assembly of a solar battery will not be economically justified. If there is no particular hurry, it is better to order plates on eBay, it will cost even less. With shipment and China, you need to be more careful - there is a high probability of receiving defective parts.
- Photocells need to be bought with a small margin, there is a high probability of their breakdown during installation, especially if there is no experience in assembling such structures.
- If the elements are not yet in use, they should be hidden in a safe place to avoid breakage of fragile parts. You can not stack the plates in large stacks - they can burst.
- At the first assembly, a template should be made on which the locations of the plates will be marked before assembly. This makes it easier to measure the distance between elements before soldering.
- It is necessary to solder with a low-power soldering iron, and in no case apply force when soldering.
- It is more convenient to use aluminum corners to assemble the case, the wooden structure is less reliable. As a sheet on the back of the elements, it is better to use plexiglass or other similar material and is more reliable than painted plywood and looks aesthetically pleasing.
- Photovoltaic panels should be located in places where sunlight will be maximum throughout the daylight hours.
Which photovoltaic cells are best suited for a solar panel and where can I find them
Homemade solar panels will always be one step behind their factory counterparts, and for several reasons. Firstly, well-known manufacturers carefully select photocells, weeding out cells with unstable or reduced parameters. Secondly, in the manufacture of solar batteries, special glass is used with increased light transmission and reduced reflectivity - it is almost impossible to find this on sale. And thirdly, before proceeding to serial production, all parameters of industrial designs are tested using mathematical models. As a result, the effect of cell heating on the battery efficiency is minimized, the heat removal system is improved, the optimal cross section of the connecting busbars is found, ways to reduce the degradation rate of photocells, etc. are studied. It is impossible to solve such problems without an equipped laboratory and appropriate qualifications.
The low cost of homemade solar panels allows you to build a plant that allows you to completely abandon the services of energy companies
Nevertheless, do-it-yourself solar panels show good performance results and are not so far behind industrial counterparts.As for the price, here we have a gain of more than two times, that is, at the same cost, homemade products will give twice as much electricity.
Considering all of the above, a picture emerges of which solar cells are suitable for our conditions. Film ones disappear due to lack of sale, and amorphous ones due to a short service life and low efficiency. Cells of crystalline silicon remain. I must say that in the first home-made device it is better to use cheaper "polycrystals". And only after running the technology and having “filled your hand”, you should switch to single-crystal cells.


Cheap substandard photovoltaic cells are suitable for running in technologies - as well as high-quality devices, they can be bought on foreign trading floors
As for the question of where to get inexpensive solar cells, they can be found on foreign trading platforms such as Taobao, Ebay, Aliexpress, Amazon, etc. There they are sold both in the form of individual photocells of various sizes and performance, and ready-made kits for assembling solar panels any power.
Is it possible to replace photovoltaic plates with something else
It is rare that a home master does not have a treasured box with old radio components. But diodes and transistors from old receivers and TVs are still the same semiconductors with p-n junctions, which, when illuminated by sunlight, generate current. Taking advantage of these properties and connecting several semiconductor devices, you can make a real solar battery.
For the manufacture of a low-power solar battery, you can use the old element base of semiconductor devices
The attentive reader will immediately ask what the catch is.Why pay for factory-made mono- or polycrystalline cells, if you can use what lies literally under your feet. As always, the devil is in the details. The fact is that the most powerful germanium transistors make it possible to obtain a voltage of no more than 0.2 V in the bright sun at a current strength measured in microamps. In order to achieve the parameters that a flat silicon photocell produces, you will need several tens or even hundreds of semiconductors. A battery made from old radio components is only good for charging an LED camping lantern or a small mobile phone battery. For the implementation of larger projects, purchased solar cells are indispensable.
Other video instructions
Ecology of consumption. Science and technology: Everyone knows that the solar battery converts the energy of the sun into electrical energy. And there is a whole industry for the production of such elements in huge factories. I suggest that you make your own solar panel from readily available materials.
Everyone knows that the solar battery converts the energy of the sun into electrical energy. And there is a whole industry for the production of such elements in huge factories. I suggest that you make your own solar panel from readily available materials.
Components of a solar battery
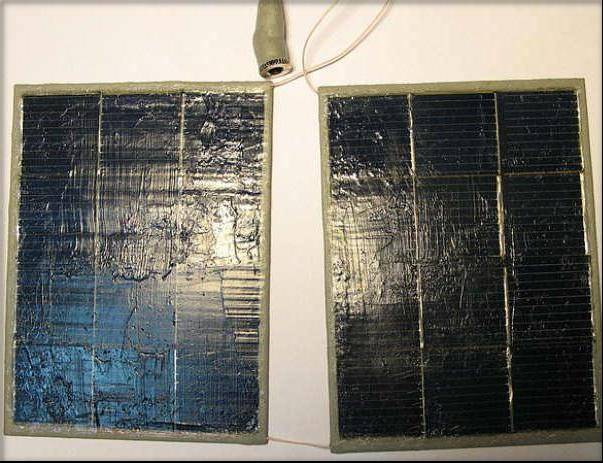
The main element of our solar battery will be two copper plates. After all, as you know, copper oxide was the first element in which scientists discovered the photoelectric effect.
So, for the successful implementation of our modest project, you will need:
1. Copper sheet.In fact, we don’t need a whole sheet, but small square (or rectangular) pieces of 5 cm are enough.
2. A pair of crocodile clips.
3. Microammeter (to understand the magnitude of the generated current).
4. Electric stove. It is necessary in order to oxidize one of our plates.
5. Transparent container. An ordinary plastic bottle from mineral water is quite suitable.
6. Table salt.
7. Ordinary hot water.
8. A small piece of sandpaper to clean our copper plates from oxide film.
Once everything you need is prepared, you can proceed to the most important stage.
Cooking plates
So, first of all, we take one plate and wash it to remove all fats from its surface. After that, using sandpaper, we clean off the oxide film and put the already cleaned bar on the switched on electric burner.
After that, we turn it on and observe how it heats up and changes our plate with you.
As soon as the copper plate is completely black, hold it for at least another forty minutes on a hot stove. After that, turn off the stove and wait until your “roasted” copper has completely cooled down.
Due to the fact that the cooling rate of the copper plate and the oxide film will be different, most of the black coating will go away on its own.
After the plate has cooled down, take it and carefully wash off the black film under water.
Important. In this case, do not tear off the remaining black areas or bend them in any way.
This is to ensure that the copper layer remains intact.
After that, we take our plates and carefully place them in the prepared container, and attach our crocodiles with soldered wires to the edges.Moreover, we connect an untouched piece of copper with a minus, and a processed one with a plus.


Then we prepare a saline solution, namely, we dissolve a few tablespoons of salt in water and pour this liquid into a container.
Now we check the performance of our design with you by connecting to a microammeter.
As you can see the setup is quite working. In the shade, the microammeter showed approximately 20 μA. But in the sun, the device went off scale. Therefore, I can only say that in the sun such an installation clearly produces more than 100 μA.
Of course, you won’t even be able to light a light bulb from such an installation, but by making such an installation with your child, you can stir up his interest in studying, for example, physics. published
If you have any questions on this topic, ask them to specialists and readers of our project.
The use of solar energy to meet the needs of life in the 21st century is a topical issue not only for corporations, but also for the population. Now the use of solar panels to produce ecological electricity attracts many people with its affordability, autonomy, inexhaustibility and minimal investment. Now these phenomena are so familiar and ordinary that they have long been firmly established in our everyday life.
This source of electricity is used for lighting, the operation of household electrical appliances and heating. Solar-powered street lamps are used throughout the city, in summer cottages and country cottages.
How to make a solar battery yourself
Let's go further. To save the family budget, you can try make your own solar panels. To do this, prepare goggles, face protection, gloves and boots, as we will be dealing with flammable chemicals and sharp materials (plexiglass, glass).
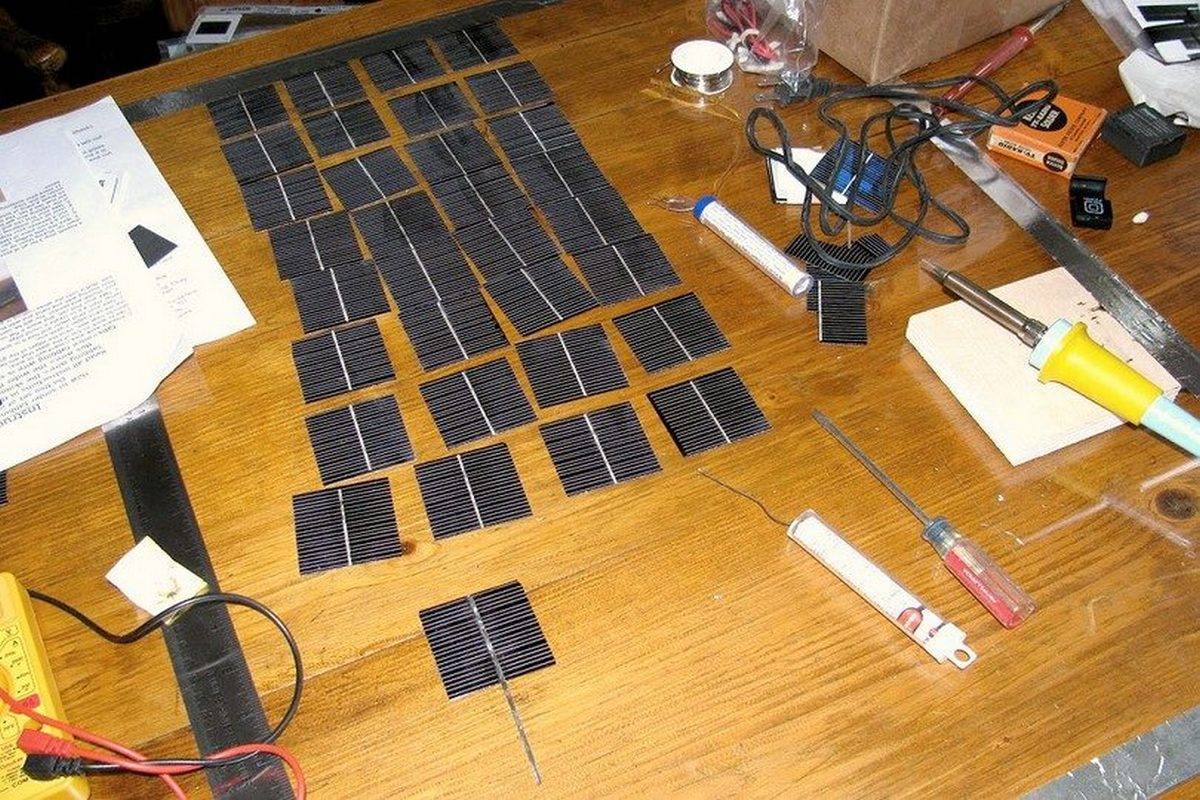
First stage (layout)
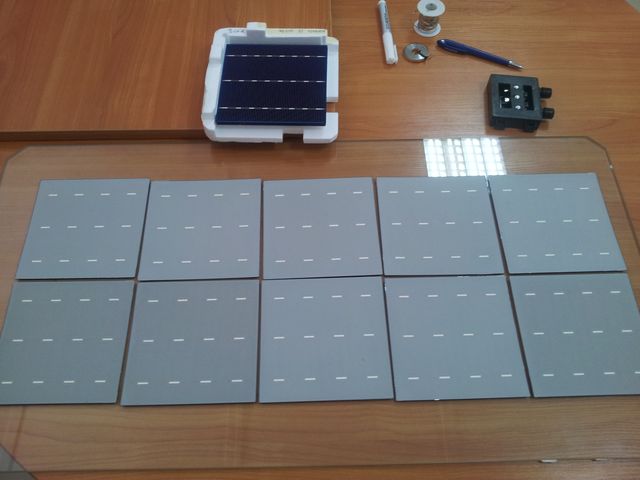
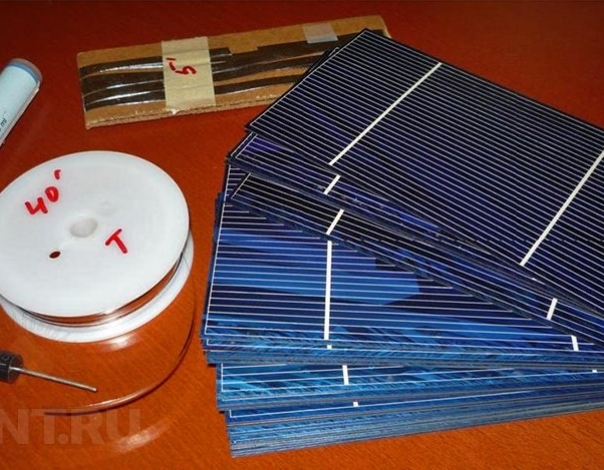
So, we have a set of 40 solar cells, the size of each of which is 13.6 x 11 cm. Let's assemble on our table or other flat surface, a whole set of polycrystalline photocells (plates, Solar Plate). In total, we will have 3 tracks of plates (it will turn out to be 39 elements, and we will have 1 of the set as a spare).
 These solar segments are ordered directly from China, through the well-known Aliexpress
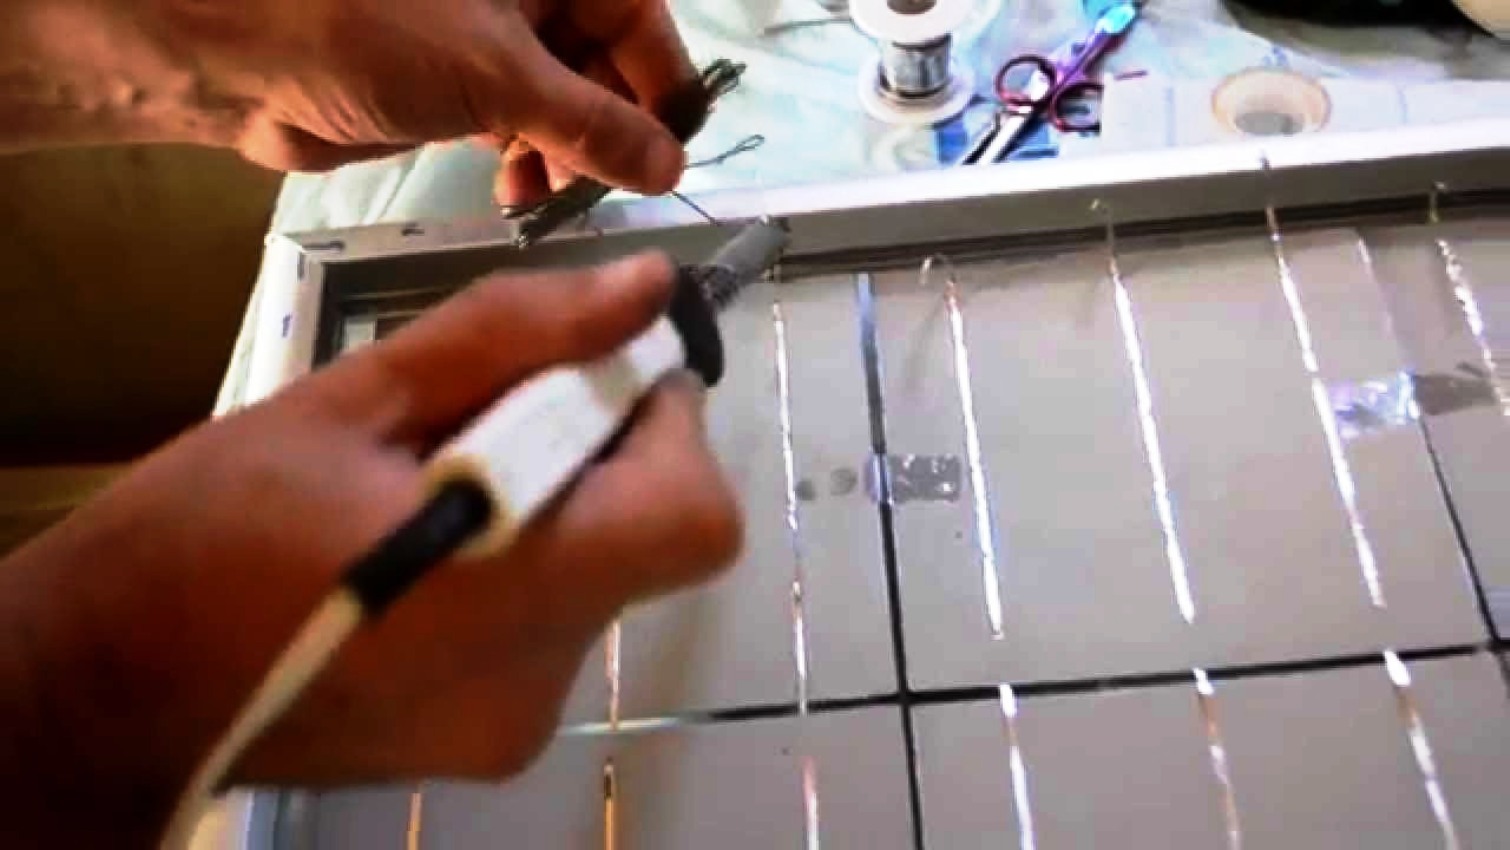
Second stage (sorting, tire preparation and soldering)
The elements need to be sorted by the tester (because
in case there is a defective zero plate in the circuit, it will take energy instead of generating), while handling them very carefully
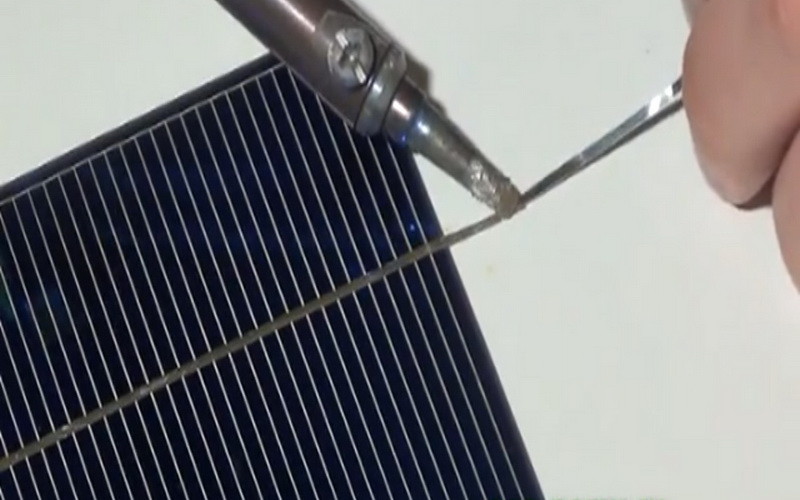
We solder tin conductors to the photocells.
 Soldering photocells
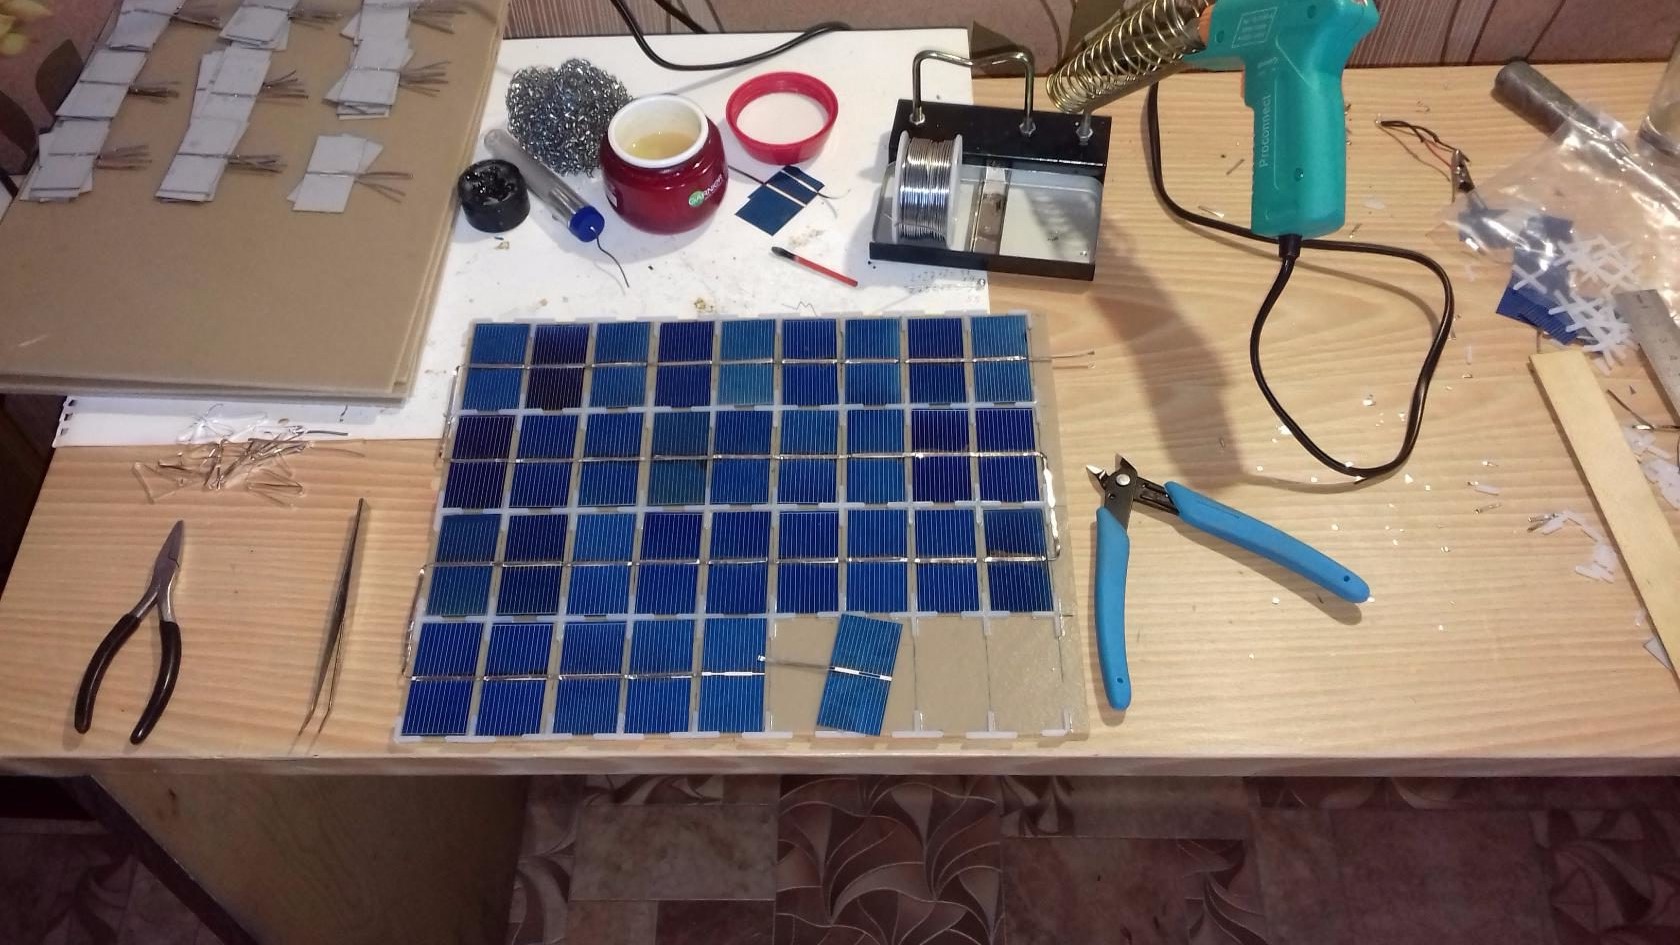
Stage three (assembly, cell soldering)
All cells are interconnected according to the electrical circuit. Moreover, regardless of the type of connection, be sure to install a shunt diode on the “positive” terminal. The most optimal and frequently used option for assembling this circuit is Schottky diodes - they provide the correct calculation of the size of solar panels for the house and prevent the battery from discharging at night.
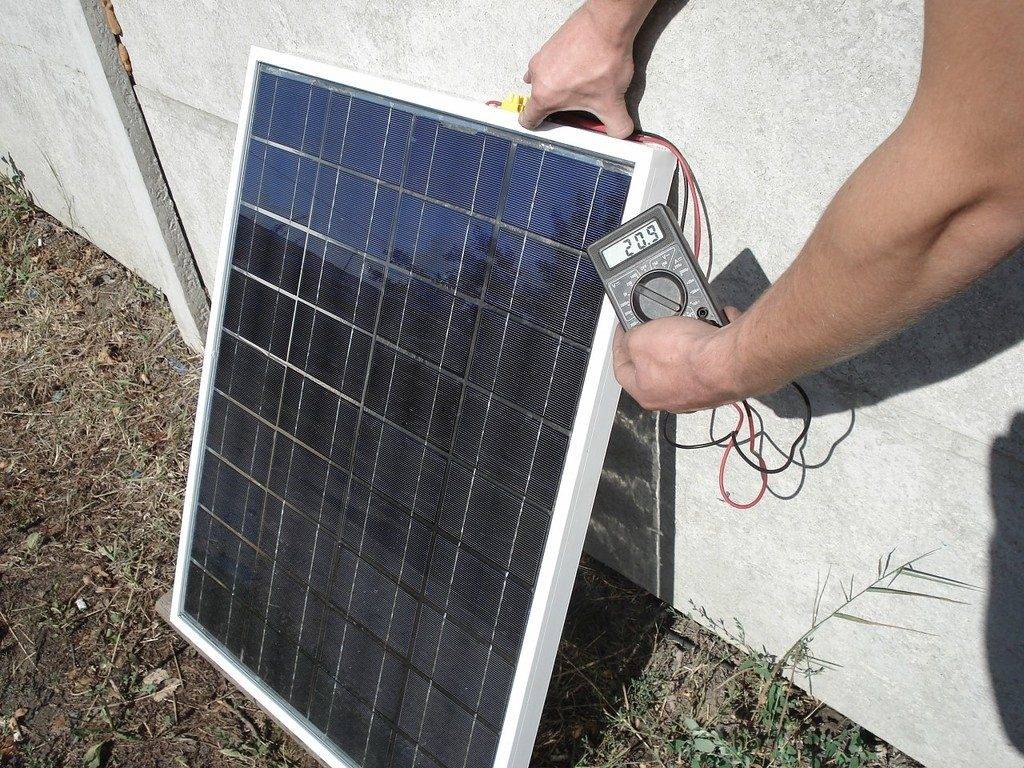
The functionality of the soldered cells must be checked in a sunny place. If they function as they should, then you can proceed to the next step.
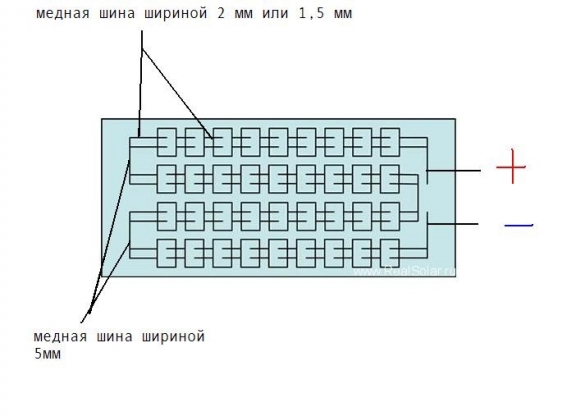 Connection diagram of photocells for assembling a solar panel (in this case, 4 tracks, in our example - 3)
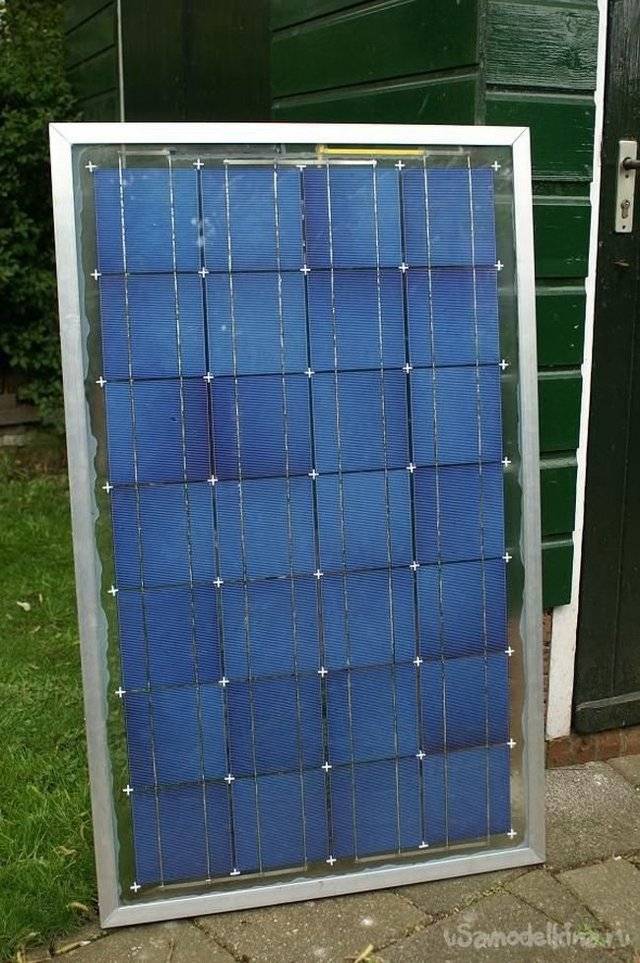
Fourth stage (frame)
At the fourth stage, we begin to assemble the frame.Here we need aluminum corners with not wide shelves and bolts. We sweep silicone sealant on the inner edges of the rails. It is not recommended to make a wooden frame - because. our panel will be exposed to climatic conditions, sometimes harsh.
Fifth stage (protective top layer)
On top of this layer we place the prepared sheet of transparent material, in my case it is polycarbonate. For reliability, the sheet is firmly pressed to the adhesive contour. But be careful while doing this.
Sixth stage
When the sealant dries, you can tighten the frame with polycarbonate bolts. Next, we place photocells with conductors along the inner transparent plane. The gap between each two cells is 5 mm (it is better to make a markup first).
Seventh stage (sealing)
We thoroughly fix the photo cells and seal the panel so that it serves us on the roof for many years. Mounting silicone, which is applied to each element, will help us with this. We close the device with the back panel. When the silicone tightly seizes, we seal the entire structure completely so that the panels are tightly adjacent to each other.
Remember - no matter what changes you make to the design, it should not let moisture in to the photocells.
Stage eight
You can connect a homemade solar battery in two known ways - in series or in parallel. In the second case, the terminals of both modules are connected according to the principle: plus with plus, minus with minus. From any module we take the terminals (+) and (-). We bring out the ends for connection to the battery or to the charge controller.
If you need to connect three modules into one system, the actions will be as follows: we connect the similar terminals of all three modules, then we output the ends (+) and (-).In the first connection method, it is necessary to connect the terminal (+) of the first module to the terminal (-) of the second. The remaining ends are output for connection with a battery or with a controller.
 Scheme of connecting solar panels to the circuit of the entire system
Finally, I want to remind you once again that you will need to assemble a solar panel for your home with your own hands:
- photocells;
- Schottky diodes;
- high power copper wires;
- a set of conductors;
- soldering equipment;
- aluminum corners;
- fixing bolts;
- silicone sealant;
- a sheet of polycarbonate or other transparent material;
- saw;
- clamps;
- Screwdriver Set.
And in conclusion, let's watch a video of a home master who successfully assembled and demonstrated the assembly of homemade solar panels with his own hands:
Share
- 76
shared
Stages of installation work
So, before installing panels on the roof of a residential building yourself, you must make sure of the following:
- The roof is able to withstand the weight of the frame structure and the battery itself, which you are going to install.
- Nearby objects will not cast a shadow on the surface of the batteries. Firstly, an insufficient amount of solar energy will reduce the efficiency of devices, and secondly, some panels will not work at all if a shadow falls on at least a small part of the surface. And, thirdly, the solar battery can generally fail in this case due to the so-called "stray currents".
- Gusts of wind will not be a threat to the autonomous system (the installed structure should not be a sailboat).
-
You can easily take care of the surface of solar panels (clean them from dirt, clean off snow, etc.).
Based on all these points, you first need to choose the right place for yourself where it is better to install the system on the roof of the house. It should be immediately noted that the system should be located on the south side of the building, since it is this area that accounts for the maximum amount of solar energy per daylight hours.


After you decide exactly where the panels (or collectors) will be placed, you need to move on to assembling the frame structure and installing it on the roof. Be sure to use only metal corners and profiles. It is not recommended to make a frame from a bar, because. it will lose its strength properties faster. It is best to use a square profile 25 * 25 mm or a corner, but at this stage everything is purely individual - if you decide to install a large area solar panel, the profile section should be an order of magnitude larger.
Special attention should be paid to the angle of inclination of the panels to the horizon plane, in other words, to the earth's surface. For each region, the conditions are slightly different, but usually in the spring it is recommended to install solar panels at an angle of 45 degrees, and closer to autumn 70-75
That is why you need to think about the design of the frame in advance so that you can manually choose at what angle to install the system under the sun. Usually the frame is made in the form of a triangular prism and is attached to the roof with bolts.
We immediately draw your attention to the fact that on a flat roof or on the ground it is not necessary to carry out horizontal installation of panels. In winter, you will have to constantly remove snow from the surface, otherwise the system will not work.
Another equally important requirement is that there must be air space between the roof and the solar battery (relevant if you decide to install the panel without a frame on a flexible or metal tile). If there is no air space, heat dissipation will worsen, which can further damage the system in a short period of time! The exception is roofs made of slate or ondulin, which, thanks to the wavy structure of the roofing material, will independently provide air entry
Well, the last important point of installation - solar panels must be mounted in a horizontal position (long side along the house). If this rule is neglected, uneven heating of the upper and lower areas of the panel may occur, which will significantly reduce the efficiency of using an autonomous power supply system or heating a private house.
You can install the power supply system of the site on the masts and the wall in this video:
That's all I wanted to tell you about how to install solar panels for your home with your own hands! We hope that the provided instruction with photo reports and video tutorials was interesting and useful for you!
Also read:
- How to pay less for electricity legally
- How to choose solar panels for your home
- How to make a LED spotlight with your own hands
- Solar panels connection diagrams
What accessories are needed and where to buy them
The main detail is a solar photopanel. Silicon wafers are usually bought online with delivery from China or the USA. This is due to the high price of domestically produced components.
The cost of domestic plates is so high that it is more profitable to order on Ebay.As for marriage, for 100 plates only 2-4 are unusable. If you order Chinese plates, then the risks are higher, because. the quality leaves much to be desired. The advantage is only in the price.
The finished panel is much more convenient to use, but also three times more expensive, so it’s better to be puzzled by the search for components and assemble the device yourself
Other components can be purchased at any electrical supply store. You will also need tin solder, a frame, glass, film, tape, and a marking pencil.
When buying accessories, you should pay attention to the manufacturer's warranty. Usually it is 10 years, in some cases up to 20.
Choosing the right battery is also important. Saving on it often turns into trouble: during the charging of the device, hydrogen can be released, which is fraught with an explosion
DIY solar battery from improvised means and materials at home
Despite the fact that we live in a modern and rapidly developing world, the purchase and installation of solar panels remains the lot of wealthy people. The cost of one panel, which will produce only 100 watts, varies from 6 to 8 thousand rubles. This is not counting the fact that it will be necessary to buy capacitors, batteries, a charge controller, a network inverter, a converter and other things separately. But if you do not have a lot of funds, but want to switch to an environmentally friendly source of energy, then we have good news for you - a solar battery can be assembled at home. And if you follow all the recommendations, its efficiency will be no worse than that of the commercially assembled version. In this part, we will look at the step-by-step assembly


We will also pay attention to the materials from which solar panels can be assembled.
From diodes
This is one of the most budgetary materials. If you are going to make a solar battery for your home from diodes, then remember that with the help of these components only small solar panels are assembled that can power any minor gadgets. Diodes D223B are best suited. These are Soviet-style diodes, which are good because they have a glass case, due to their size they have a high mounting density and have a nice price.
Then we prepare the surface for the future placement of the diodes. It can be a wooden plank or any other surface. It is required to make holes in it throughout its entire area. Between the holes it will be necessary to observe a distance of 2 to 4 mm.
After we take our diodes and insert them with aluminum tails into these holes. After that, the tails need to be bent in relation to each other and soldered so that when they receive solar energy, they distribute electricity into one “system”.
Our primitive glass diode solar cell is ready. At the output, it can provide energy of a couple of volts, which is a good indicator for a handicraft assembly.
From transistors
This option will already be more serious than the diode one, but it is still an example of a harsh manual assembly.
In order to make a solar battery from transistors, you will first need the transistors themselves. Fortunately, they can be bought in almost any market or in electronics stores.
After purchase, you will need to cut off the cover of the transistor. Under the lid hides the most important and necessary element for us - a semiconductor crystal.
Next, we prepare the frame of our solar battery.You can use both wood and plastic. Plastic would certainly be better. We drill holes in it for the outputs of transistors.
Then we insert them into the frame and solder them between each other, observing the norms of “input-output”.
At the output, such a battery can provide enough power to carry out work, for example, a calculator or a small diode light bulb. Again, such a solar panel is assembled purely for fun and does not represent a serious “power supply” element.
From aluminum cans
This option is already more serious than the first two. This is also an incredibly cheap and efficient way to get energy. The only thing is that at the output it will be much more than in the variants of diodes and transistors, and it will not be electrical, but thermal. All you need is a large number of aluminum cans and a case. Wood body works well. In the case, the front part must be covered with plexiglass. Without it, the battery will not work effectively.
Then, using tools, three holes are punched in the bottom of each jar. At the top, in turn, a star-shaped cut is made. The free ends are bent outward, which is necessary in order for improved turbulence of the heated air to occur.
After these manipulations, the banks are folded into longitudinal lines (pipes) into the body of our battery.
Then a layer of insulation (mineral wool) is laid between the pipes and the walls/rear wall. Then the collector is closed with transparent cellular polycarbonate.
How to connect plates
To properly connect the plates, you need to know some principles:
- To increase the voltage at home, when soldering the plates, you need to know that in order to increase the voltage, they must be connected in series, and in order to increase the current strength, in parallel.
- The gap between the silicon wafers should be 5 mm on each side. This is necessary because when heated, the plates can expand.
- Each converter has two tracks: on the one hand they will have a “plus”, on the other - a “minus”. By connecting all the parts in series into a single circuit.
- Conductors from the last components of the circuit must be brought to a common bus.
When all soldering work is completed, you can check the output voltage with a multimeter. It should be 18-19V to provide a small house with electricity.