- Do-it-yourself drip irrigation to give at no cost: do it yourself from medical droppers
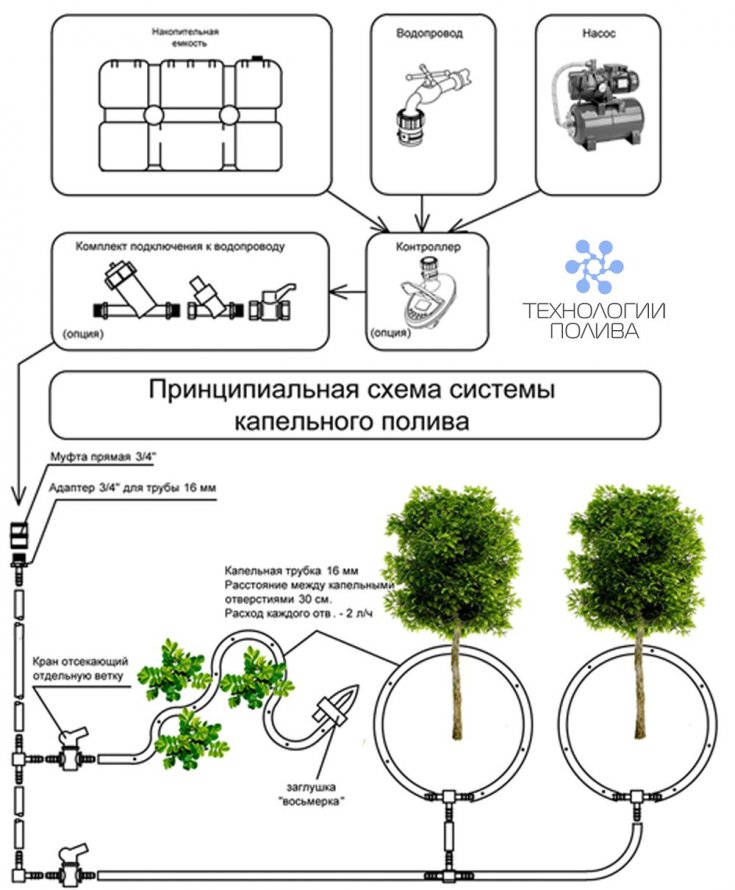
- System assembly. Main stages of work
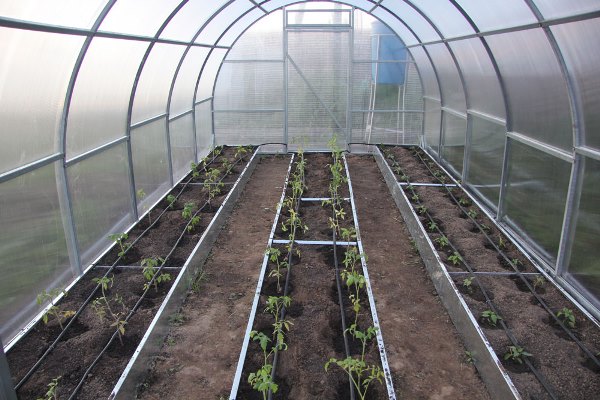
- Do-it-yourself installation of a drip irrigation system for a greenhouse
- How to equip your own spot irrigation in a greenhouse
- Where is drip irrigation used?
- Pros and cons of drip irrigation
- What is the best drip irrigation system
- Advantages
- Flaws
- Do-it-yourself installation of a drip irrigation system from a water supply system in a country house (with video)
- Cons of using auto fuel from personal practice
- Drip irrigation tips
Do-it-yourself drip irrigation to give at no cost: do it yourself from medical droppers
Another economical option is to install a drip irrigation system from medical droppers. It is rational to arrange it in areas with different varieties of crops, which should be watered in different quantities. This procedure becomes possible due to the fact that the droppers are equipped with special control wheels that allow you to select the required intensity of fluid intake. The disadvantage of such a system is the rapid clogging of droppers, which requires periodic flushing.
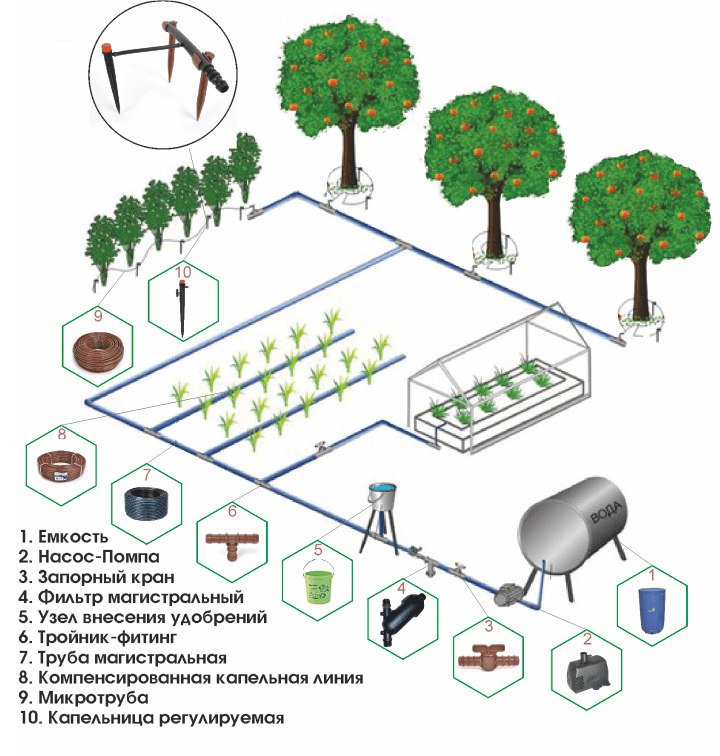
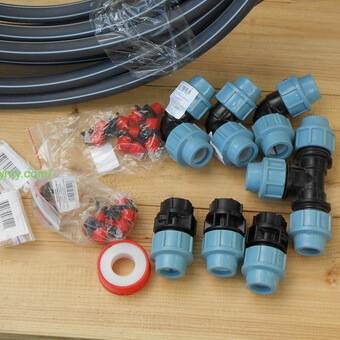
To create a drip irrigation system with your own hands, you should prepare:
- medical disposable droppers;
- hoses for distribution to the beds of water;
- connecting and shut-off valves for droppers and hoses.
Irrigating plants with medical drips is a simple and economical option.
Before installing such a device, a drip irrigation scheme should be displayed on a piece of paper, which is performed based on the location of the beds where irrigation should be provided. Based on this, surface wiring of the supply pipes is carried out on the site. To do this, you can use polyethylene or rubber products. The connection of all elements is carried out using tees. A plug must be installed at the end of each hose.
The system can be connected from a centralized water supply or from a storage tank located at a certain height. Also in this case, you can create automatic watering by setting a timer or controller at the beginning of the system. A hole is made in the distribution pipes opposite each plant, where the plastic end of the dropper is inserted. Tubes of elements are bred under each bush.
This is interesting: The project of a combined bathroom - we explain in detail
System assembly. Main stages of work
Assembly diagram
Doing drip irrigation in a greenhouse with your own hands is not difficult:
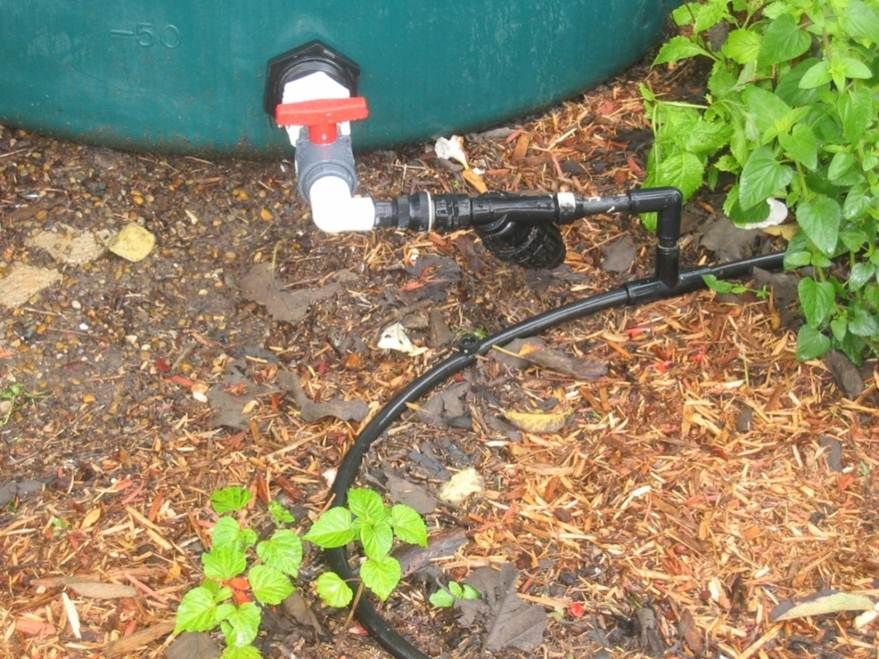
1To install the system, you will need a 100-200-liter barrel, which is raised to a height of about 1-2 meters. If there is a cover, holes are prepared in it for air to enter. If there is no lid, it is better to cover the container with gauze.
2 To insert the hose at the very bottom of the barrel, a hole is prepared with a tap-tip installed in it.
3 Each of the tubes or hoses is laid with a slight slope of 5 cm for each meter of length. They are fixed on small pegs stuck in the ground.
4 Too long pipelines should not be pulled - they will need very large containers. It is much more profitable and more convenient to use several independent systems.
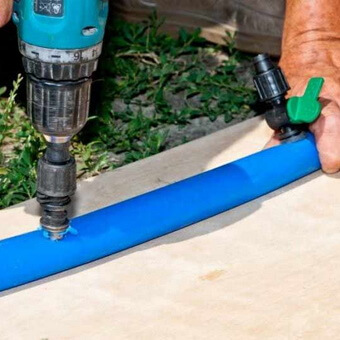
5PVC pipes are cut with a hacksaw, pipe cutter or miter saw. To obtain tight joints, the cut angle must be accurate and equal to 90 degrees. Therefore, it is better to clamp the pipes in a vise.
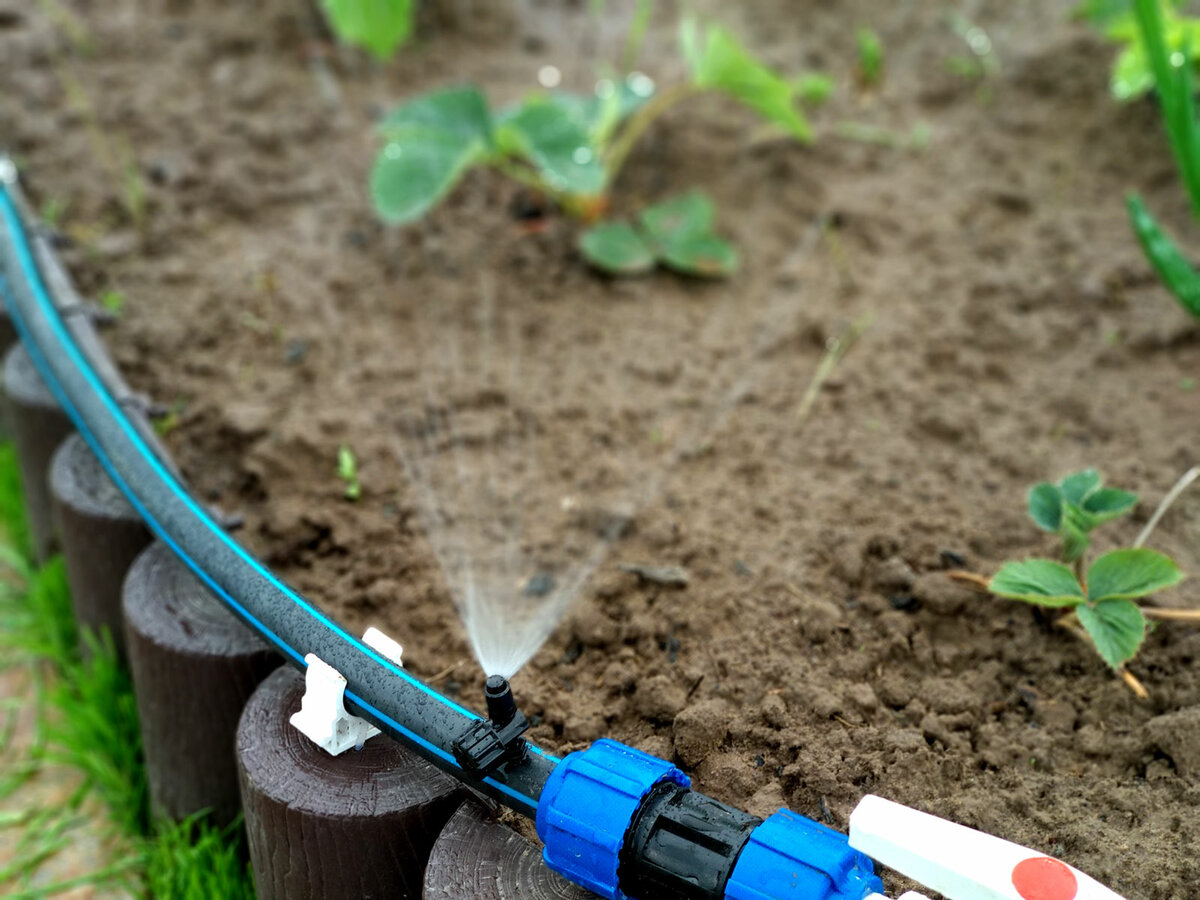
6 Small 2 mm holes must be made in hoses or plastic main pipes. In a simple do-it-yourself drip irrigation system in a greenhouse, droppers can be replaced with pieces of ordinary wire, along which drops of water will descend and be supplied to the plant.
7 You can make holes in the hose with an awl or a nail held by pliers. In PVC pipes, it is more convenient to make them with a small-diameter wood drill.
8 When using the pipeline in the form of finished tapes, they are carefully laid out over the site
Pulling and dragging them to avoid damage is strictly prohibited.
9Pay attention to the markings on the tape in the form of colored lines. Sprinklers are located on this side
It is necessary to lay the system with colored lines up.
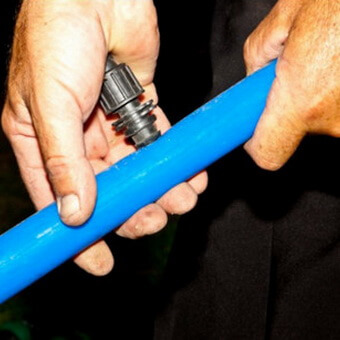
10Next, the main main hose is fixed with a clamp. A plug in the form of a wooden plug is inserted into its outlet (spout) hole.
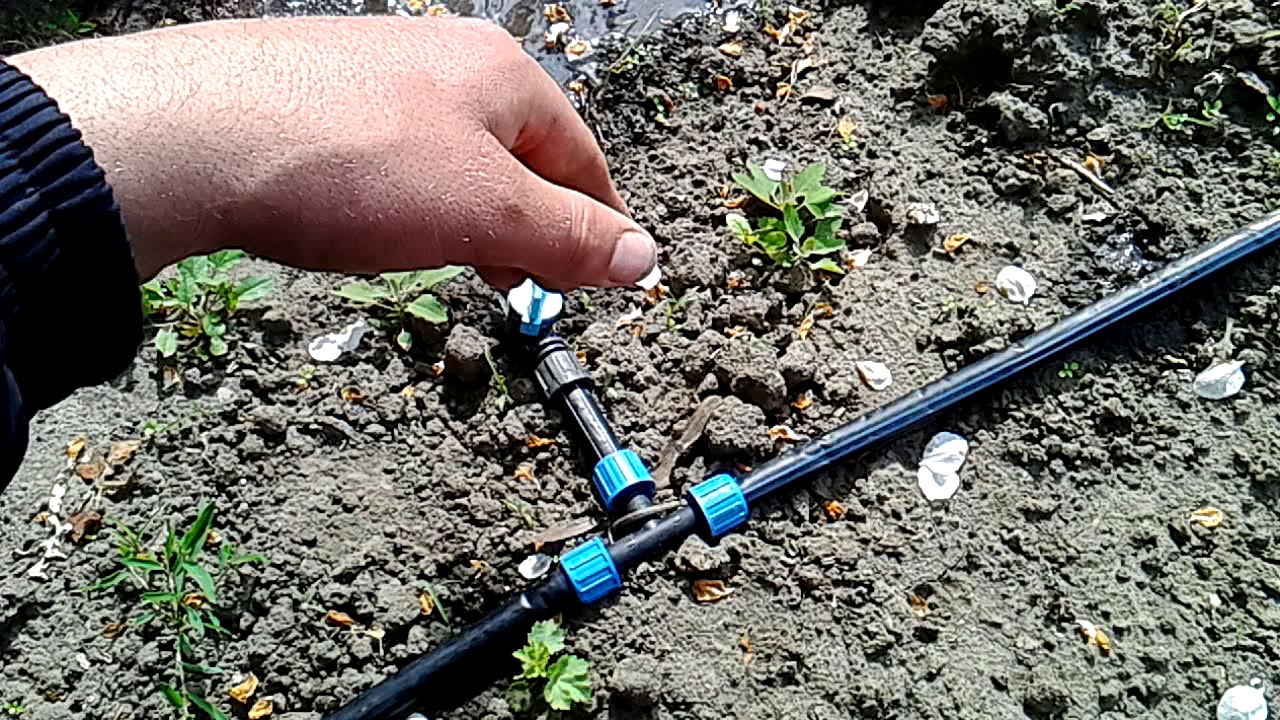
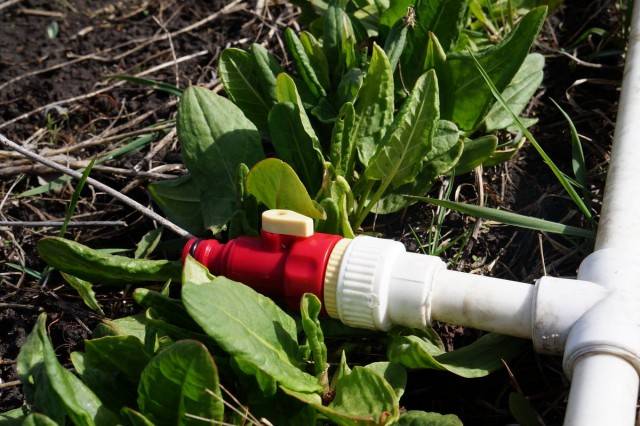
11 When connecting taps, fittings (tees and adapters), fum-tape or tow will be needed for perfect sealing of joints.
12Before inserting the plug, the system must be flushed from plastic chips that enter the pipes when drilling.
13The last step is to check the system.After starting the water, it is necessary to ensure that water reaches each, including the last dropper in the garden. The soil near them should be evenly moistened.
When installing drip irrigation, adapters, tees and droppers must be inserted with force, rather tight. A hair dryer will help simplify the process. The heated holes will expand under the influence of heat, and the work will go faster.
How to make a greenhouse with your own hands: for seedlings, cucumbers, tomatoes, peppers and other plants. From polycarbonate, window frames, plastic pipes (75 Photos & Videos) + Reviews
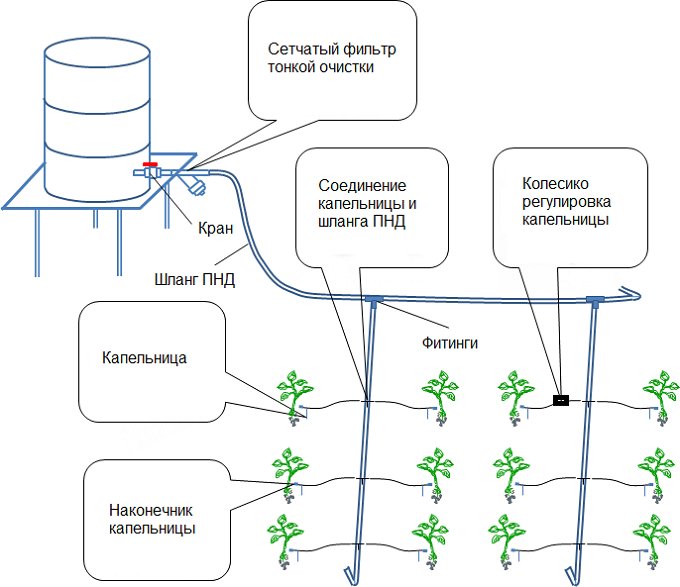
Do-it-yourself installation of a drip irrigation system for a greenhouse
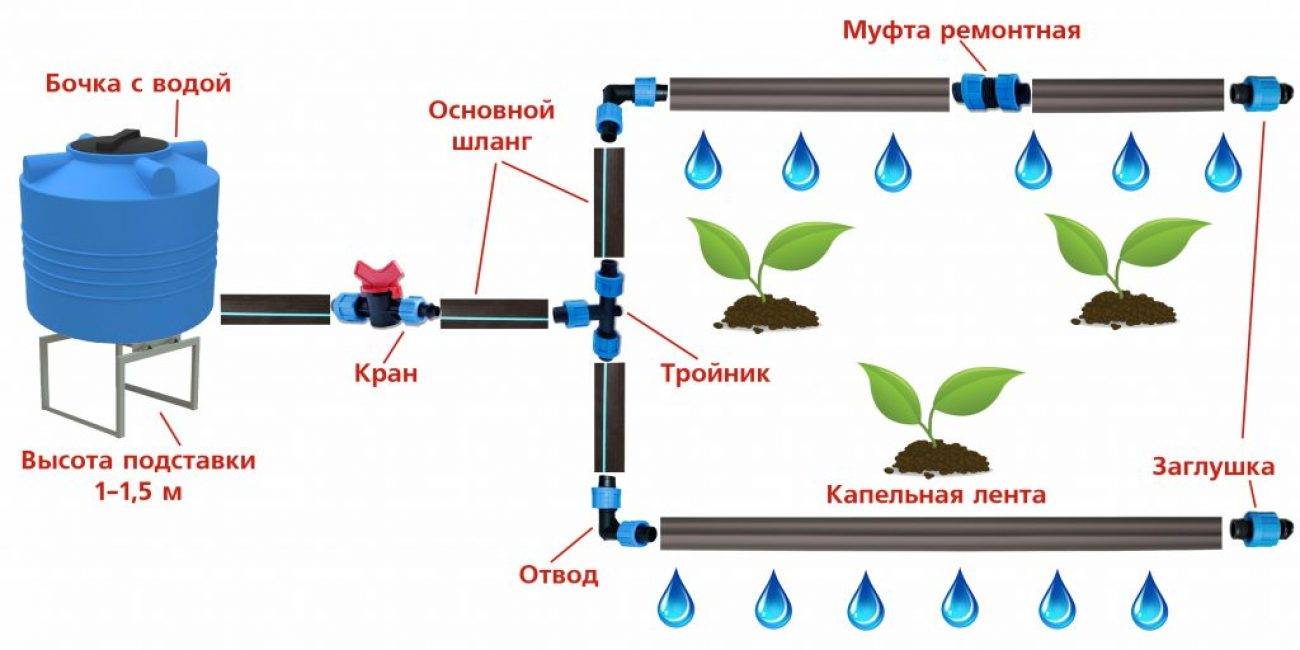
Do-it-yourself drip irrigation in a greenhouse begins with the installation of a barrel. It should be placed at a height of at least 1.5 m. This requires the construction of a metal or wooden stand. If the container has a lid, it must be provided with mini-holes for oxygen to enter. If there is no lid, the tank can be covered with gauze.

![[instruction] how to organize drip irrigation](https://fix.housecope.com/wp-content/uploads/9/f/f/9ffa1774dac5c521d55e0d3036c0a109.jpg)


The water in the tank can be heated in two ways: under the influence of direct sunlight and with the help of a heating element located in the barrel. The latter option is used if the process of pumping water into the tank comes from a well or well.
 If you install a container of a sufficiently large volume, it can be used to irrigate not only the greenhouse, but also other beds.
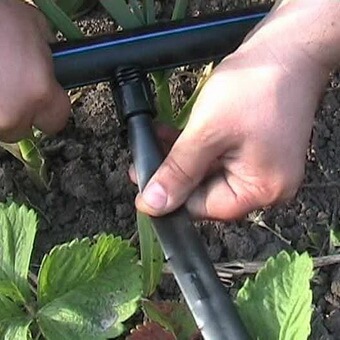
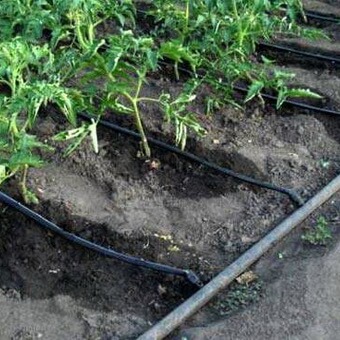
A hole is made in the tank for the installation of a ball valve, which is mounted using a coupling and a seal. After the tap, a coarse filter is installed to protect the system from clogging. Next, you need to connect the main pipeline using branching fittings.With the help of tees, PVC outlet pipes of a smaller diameter than the main one are mounted. In them, first, using an awl or a nail, holes should be made for installing droppers, which are inserted through a rubber seal.
If drip tapes are used, then holes are made in the main pipeline for their connection using start fittings. A line is displayed on the tape that indicates the location of the sprinklers, so the system is laid with a colored line up. A plug is installed at the end of each branch. For reliable sealing of all connections, fum-tape or tow should be used. The installation sequence can be viewed on the video of drip irrigation in the greenhouse with your own hands.
On a note! When organizing a drip irrigation system, factory external droppers can be replaced with medical ones.
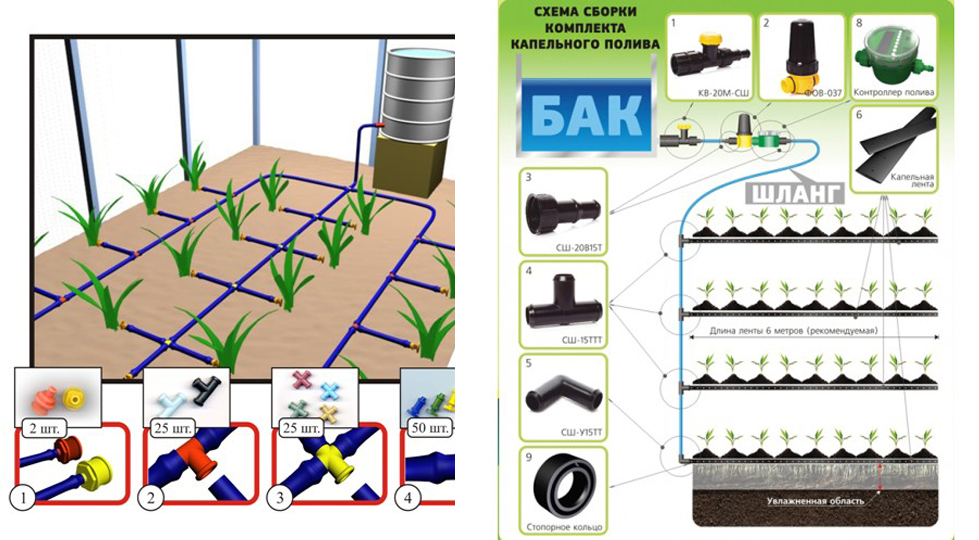
 A set of necessary accessories for the installation of a drip irrigation system.
The final step is to check the system. After water is supplied, it must be ensured that it evenly flows to each dropper, which will contribute to uniform soil moisture. When installing an irrigation system in a greenhouse with your own hands, you can provide a feeding unit, which consists of an injector, a hose and a filter. Such an installation is essential for the implementation of plant nutrition in the greenhouse. This device can be purchased at the store or do it yourself. The principle of operation of the mechanism is based on mixing fertilizer with water.
How to equip your own spot irrigation in a greenhouse
Drip irrigation in a greenhouse is a little more difficult to install than equipping an entire vegetable garden. Therefore, it would be better for a greenhouse to do surface drip irrigation.
Installation:
- Purchase a pvc garden hose. Its diameter should be 3-8 mm.
- Attach filters to it.
- For a container of water, ordinary buckets are suitable. Make a hole in the bottom of each.
- We tighten the spout with a standard stopper. It can also be sealed with a thin rubber band.
Such an irrigation system is very convenient if you are in the country on weekends. It folds freely and also unfolds.
In the photo below you can see the automatic watering scheme of the greenhouse.
And here is an example of a simplified design without connecting elements:

That's all we have. We tried to consider the most common home-made designs for irrigation. Which one to choose depends on your preference. Or maybe you think that it is better to buy an irrigation system in an online store - it's up to you.


And we wish you a rich harvest in your beds!
Where is drip irrigation used?
The drip system is designed for watering plants planted in an ordinary way. These are not only agricultural crops, but also flowers, trees and grapes. It is very convenient to irrigate greenhouses and greenhouses in this way. Drip irrigation is not suitable for wetting lawns. It is impossible to water a large area with tubes. In this case sprinklers are used.
Efficiency and ease of use allows you to take care of even a large garden or berry garden, without spending a lot of money on watering and effort for its implementation. Proper application allows you to achieve impressive results, which is very difficult to achieve with ordinary spraying.
Advice. The effectiveness of drip irrigation is increased if the root circle is mulched with straw or other organic matter.
Pros and cons of drip irrigation
Each irrigation system, including drip, has certain advantages and disadvantages. They must be taken into account when choosing a method of watering the garden.
In addition, a wide variety of irrigation systems complicates the final choice a bit. We will help you decide whether this method of irrigation is right for you, objectively evaluating its pros and cons.
What is the best drip irrigation system
All drip irrigation systems are divided into several types according to the method of use. Depending on the area of the site and the type of crops, the method of introducing water into the soil is also selected.
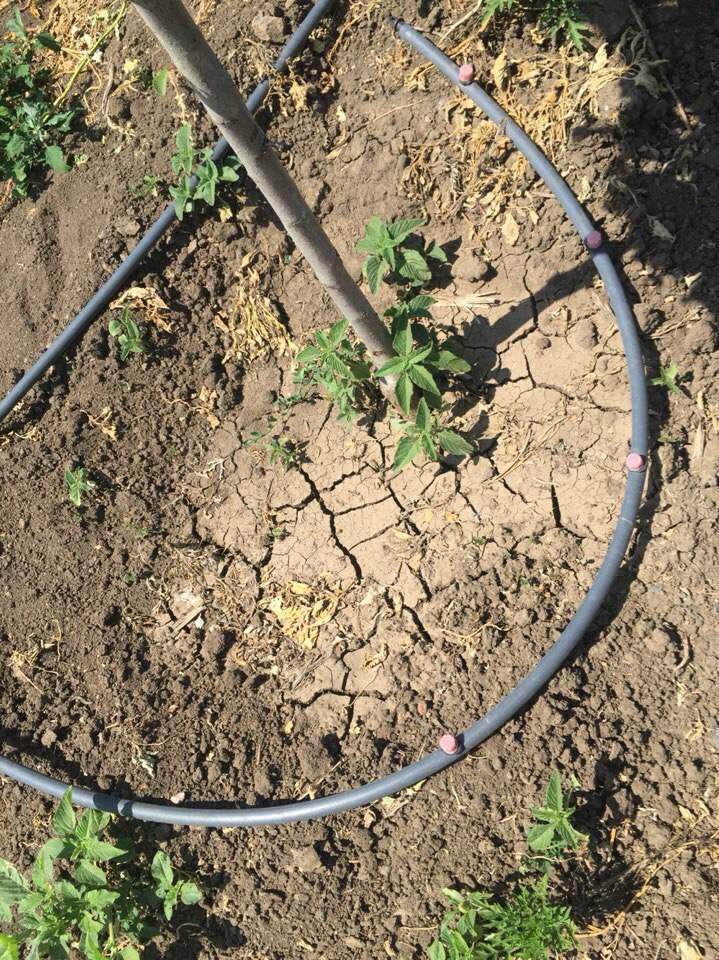
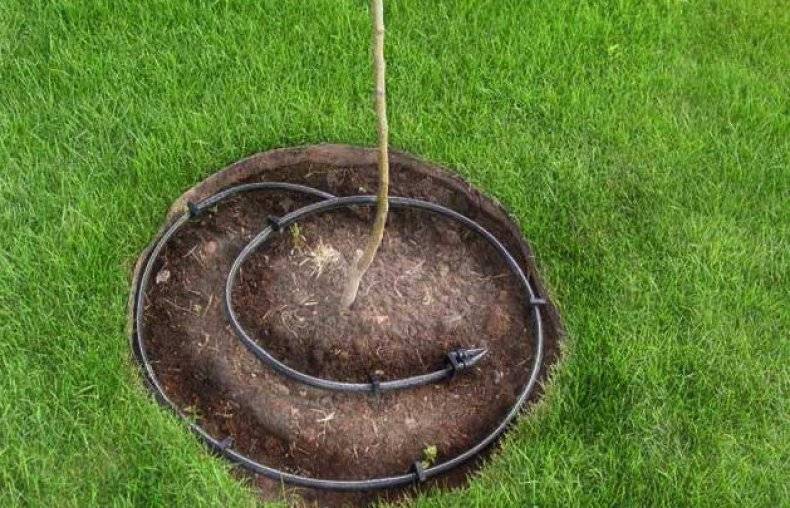
An irrigation system with separate drippers is more suitable for small gardens with young trees and small greenhouses. Small tubes with droppers lead to each plant. Since this process is quite laborious, it is not suitable for large areas.
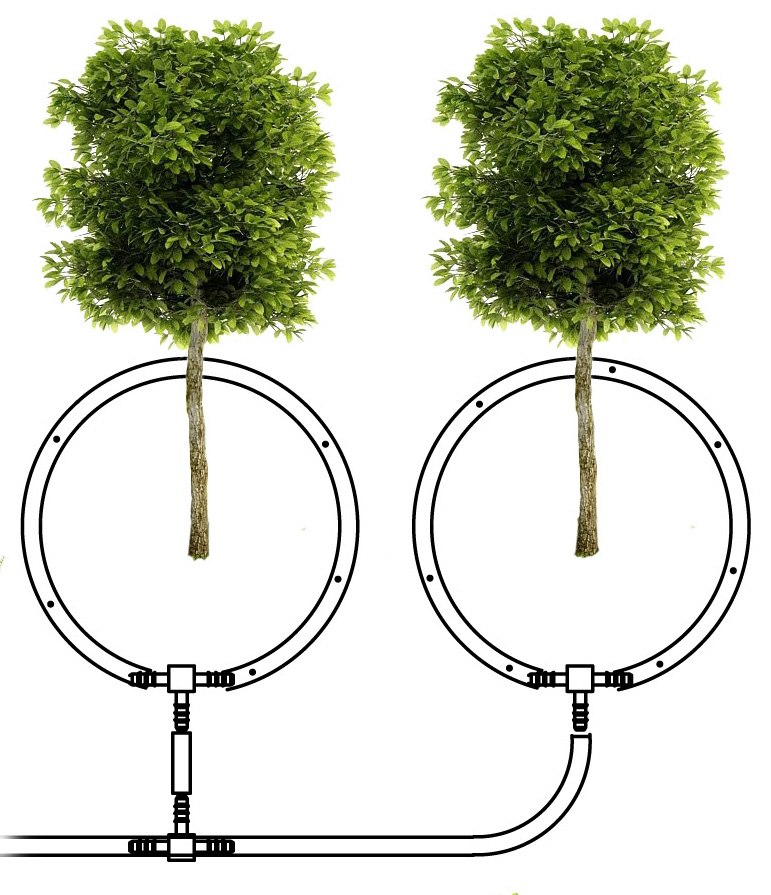
Designs with tubes or hoses running parallel or around trees work great for large areas. All that needs to be done is to position the hoses and pipes correctly and connect them to the main tank.
In addition, there is homemade drip irrigation from plastic bottles. In this case, the bottles are attached to a common base and are located near young trees or bushes. Holes are made in the lid of the bottle, and the bottom is cut off a little. When there is a need for watering, water is simply poured into the bottle and it begins to drip evenly into the ground through the holes in the lid.
From the video you will learn how to do the installation yourself.
Advantages
Among the main advantages of drip irrigation can be identified significant savings in water and labor.It is enough to do the installation once and connect the system, and the water will flow automatically or with minimal human intervention.
In addition, this method of introducing moisture into the soil significantly increases the yield and reduces the growth of weeds, since moisture goes directly to the roots. Since moisture is supplied directly under the root, the risk of diseases caused by excessive moisture is eliminated.

![[instruction] how to organize drip irrigation](https://fix.housecope.com/wp-content/uploads/b/3/d/b3d6a8d0766e2ece5596680fcdbda601.jpeg)


Flaws
Despite a large number of advantages, this method also has several disadvantages.
First of all, it is worth highlighting the rather high cost of the finished system. However, such an investment is absolutely justified in terms of yield and water savings in the future.
Some novice farmers have problems installing the system. Indeed, for arranging irrigation, you need to correctly place the site and calculate the number and length of hoses. If you cannot do it yourself, you can always use the services of professionals to help arrange watering.
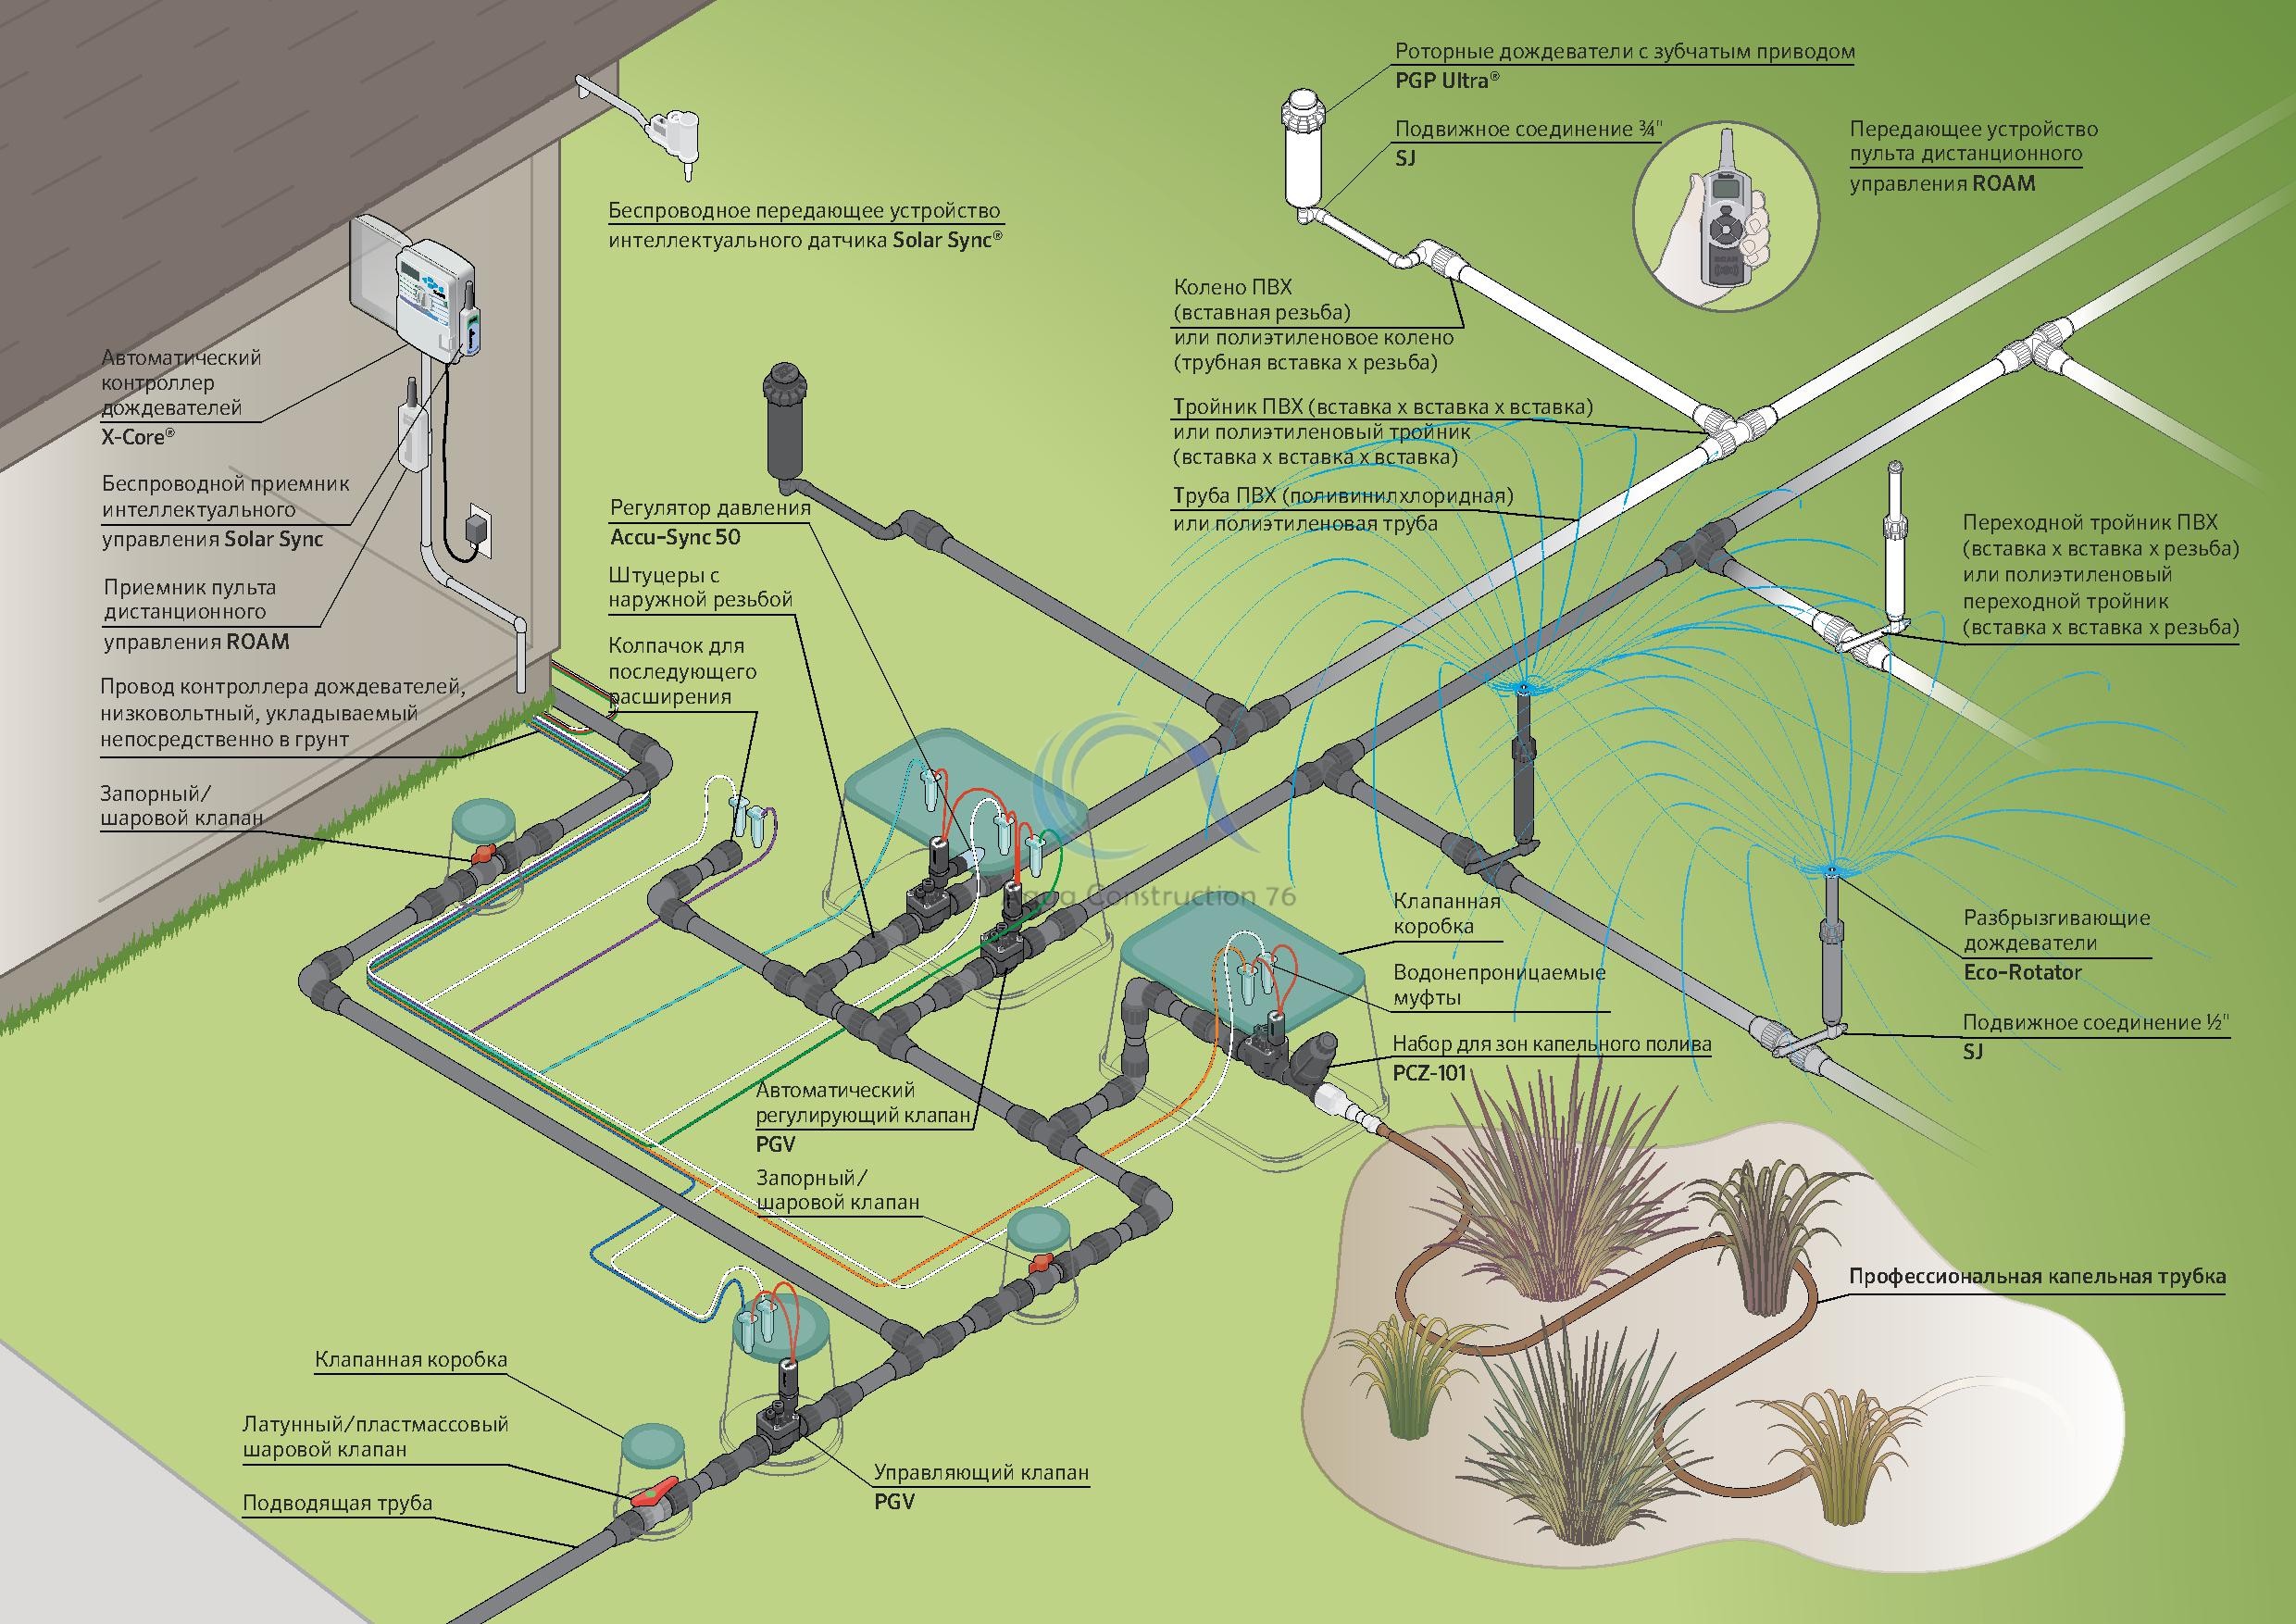
Do-it-yourself installation of a drip irrigation system from a water supply system in a country house (with video)
This system can be used both outdoors and in greenhouses. For the installation of such drip irrigation, you need plumbing.
Watering plants can be carried out at a specified frequency, since the system, in addition to the subsystem responsible for watering, will include others - stopping and resuming watering in case of rain, as well as emergency shutdown.
The irrigation subsystem is the main one in the system, as it is needed for periodic irrigation of plants. It consists of a large tank with an automatically tilting bucket.
Bucket for drip irrigation from do-it-yourself plumbing serves to accumulate water needed to charge and start the siphon. The control tap ensures the required frequency of watering the plants with water, which, when accumulated, is heated by the sun. Also on the tank there is a tap for manual draining of water.
The tank should be installed on a stand, at a height of at least 1 m from the ground surface. It can be of any shape, metal or plastic. The volume of the tank depends on the volume of water that is required to irrigate a certain area. A row of pins should be attached to the top edge of the tank, onto which the springs and lid are then put on.

The pipeline network in the automatic irrigation system is needed to distribute and spray water over the beds.
A balancing weight is attached to the rear wall of the bucket, which must rotate freely on the axle.
The position of the axis of rotation and the center of gravity of the bucket must be selected so that its upper edge is in a horizontal position when filling.
After filling, the bucket should tip over and then return to its original position already empty.
Watch a video of installing drip irrigation from a water supply system at a summer cottage:


Cons of using auto fuel from personal practice
I would like to start with the most important disadvantage - financial costs. At the very beginning of the installation of the system, you will need to invest money. Of course, the automatic watering system, fortunately, does not equate to the “cost of an aircraft”, nevertheless, we had to fork out for the purchase of equipment.
And in the future, drip tapes will need to be changed periodically, as well as, if necessary, to replace individual components (for example, our submersible pump burned out three years later).And the cost of electricity, in the case of a pump, should also not be forgotten.
In addition, woodlice and slugs are more bred on wet beds, and the bear also prefers places where it is humid.
Another difficulty is that the regimen set for the week is not always optimal. After all, the weather can change dramatically, it will rain, and we are in the city and will not change the timer settings. The system, despite the presence of dampness, will turn on properly and continue to water the beds. But, of course, if there is a rain sensor, this problem disappears.
Another significant disadvantage is the possibility of technical problems. One day, the electronic timer failed for unknown reasons, and our garden was continuously watered day after day around the clock. Fortunately, the neighbors noticed something was wrong, and we were forced to urgently go to the country to set the correct settings.
Also, due to the fact that in our case, water is supplied to the system from a well, it turns out to be very cold, and watering with ice water is not the best option for plants. In addition, this is connected with the fact that when fertilizing, you still have to fertilize, watering the garden from a bucket.
But summer residents who have automatic watering from multicube containers are much more fortunate in this regard, because the water there has time to warm up, and if necessary, top dressing, fertilizer can be diluted directly in the tank.
And the last small minus is the need for care. With buckets and watering cans, everything is much simpler. Roughly speaking, they can not even be washed, but with an automatic watering system, this will not work. If you don't have a filter, drip tapes will clog up from time to time, greatly reducing their lifespan.And if there is a filter, then the filter itself will have to be washed.
In some cases, such an event has to be done during the season, but at the end of the season, flushing and drying the entire automatic irrigation system is required.
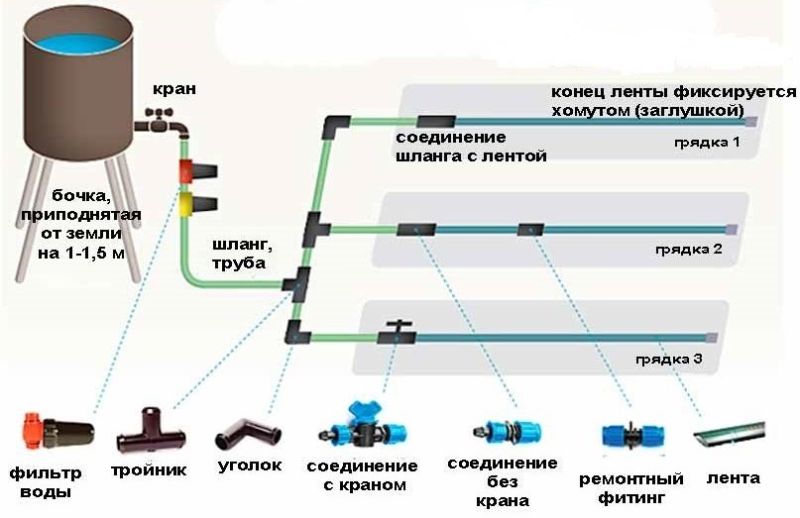
 Opposite each bed there is a tee, on which couplings with internal threads are installed. Ludmila Svetlitskaya
Drip irrigation tips
To understand how to make drip irrigation in a greenhouse as efficient as possible, the following tips will help you:
- before installation, draw a detailed diagram of the room, indicating its size and location of plants;
- choose the right type of hose;
- consider how the water tanks will be located. What volume will be optimal for your site, how the container will be filled, how pipelines will be laid, and where the fittings will be located;
- if possible, it is best to use rainwater for irrigation;
- the water tank must have at least a hundred-liter volume, regardless of the size of the greenhouse;
- calculate what spare parts and system elements you will need, and in what quantity.