- Operation features
- Calculation of basic parameters (with drawings and dimensions)
- Pipe
- Screen
- bedding
- Chimney
- Photo gallery: diagrams for a potbelly stove for a garage
- Chimney Care
- warm brick
- Do-it-yourself step-by-step instructions for making a potbelly stove for a garage
- Classic stove-stove
- Tools
- Mounting diagram
- Floor preparation
- Work Tips
- Connecting the chimney to the potbelly stove
- Types of chimney pipes
- Chimney manufacturing process
Operation features
During the operation of a homemade potbelly stove, it is very important to follow certain rules. This is necessary not only for the safety of its use, but also for a long service life. Those rules are:
Those rules are:
- it is necessary to maintain a safe distance between the walls of the furnace itself and the walls of the room (a distance of 50 cm is considered ideal);
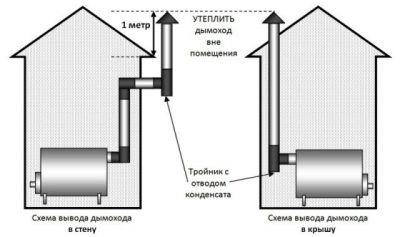
- the chimney must be taken out to the street, in no case should it be paired with the garage ventilation system (very often this desire arises when the stove is installed in the basement of the garage), since this is the only way to guarantee sufficient draft for full combustion;
- places where the pipe is brought out into the street must be insulated with asbestos or other non-combustible material;
- you can increase the efficiency of the potbelly stove by insulating the room itself;
- next to the potbelly stove, it is necessary to install a box of sand and a fire extinguisher, as this is required by fire safety rules.
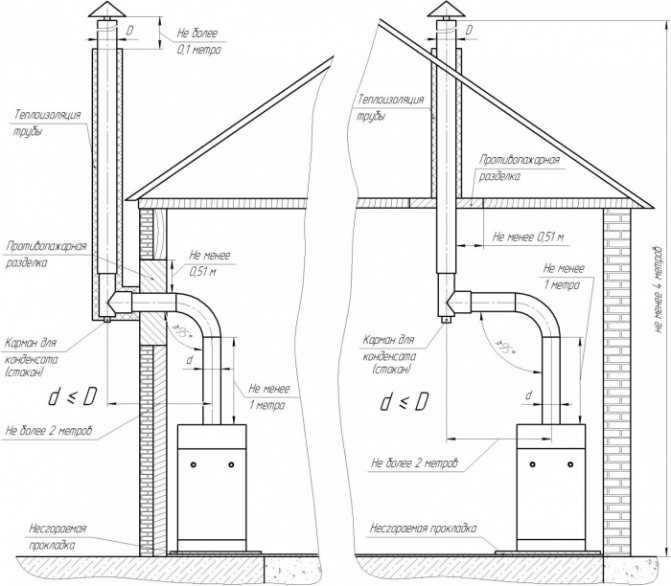
Calculation of basic parameters (with drawings and dimensions)
The high efficiency of a potbelly stove can only be obtained if all the main design parameters are correctly calculated.
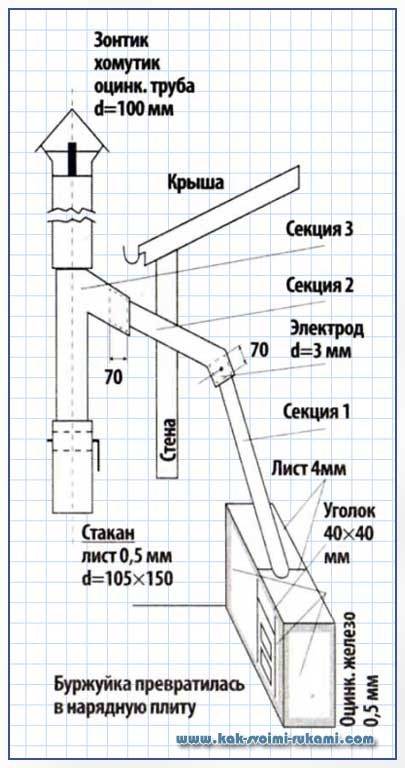
Pipe
In this case, the diameter of this element is very important. The throughput of the chimney should be less than the performance of the furnace furnace, which is the main distinguishing feature of the potbelly stove. This will allow warm air not to immediately leave the stove, but to linger in it and heat the surrounding air.
It is very important to make an accurate calculation for her. The diameter should be 2.7 times the volume of the firebox. In this case, the diameter is determined in millimeters, and the volume of the furnace in liters
For example, the volume of the furnace part is 40 liters, which means that the diameter of the chimney should be about 106 mm
In this case, the diameter is determined in millimeters, and the volume of the furnace in liters. For example, the volume of the furnace part is 40 liters, which means that the diameter of the chimney should be about 106 mm.
If the stove provides for the installation of grates, then the height of the furnace is considered without taking into account the volume of this part, that is, from the top of the grate.
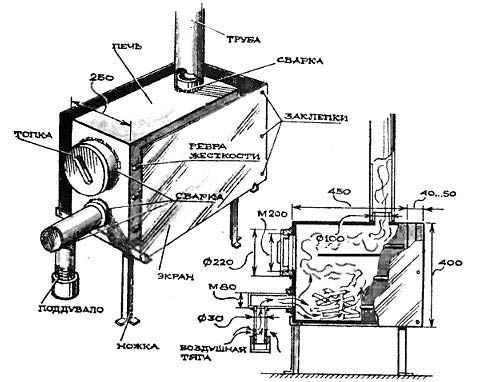
Screen
It is very important to make the hot gases not cool down, but completely burn out. In addition, the fuel must be burned by partial pyrolysis, which requires an extremely high temperature. A metal screen, which is located on three sides of the stove, will help to achieve a similar effect.
You need to put it at a distance of 50–70 mm from the walls of the stove, so that most of the heat will return to the stove.This movement of air will give the necessary heat, and protect against fire.
A metal screen, which is located on three sides of the stove, will help to achieve a similar effect. You need to put it at a distance of 50–70 mm from the walls of the stove, so that most of the heat will return to the stove. This movement of air will give the necessary heat, and protect against fire.
The screen of a potbelly stove made of red brick is able to accumulate heat
bedding
She must be. There are two reasons for this:
- part of the heat is radiated downward;
- the floor on which the stove stands is heated, which means there is a risk of fire.
The litter solves two of these problems at once. It can be used as a metal sheet with an extension of 350 mm (ideally 600 mm) beyond the contour of the furnace itself. There are also more modern materials that do an excellent job with this task, for example, a sheet of asbestos or kaolin cardboard, at least 6 mm thick.
Asbestos sheet can be used for bedding under a potbelly stove
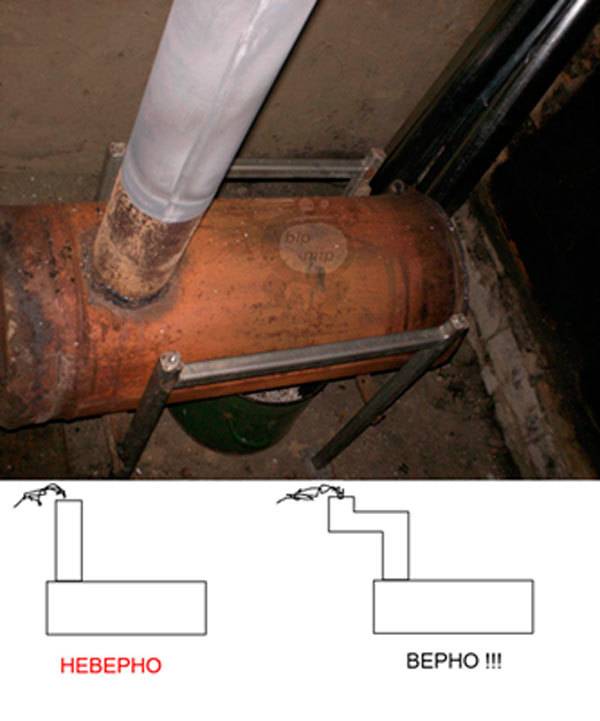
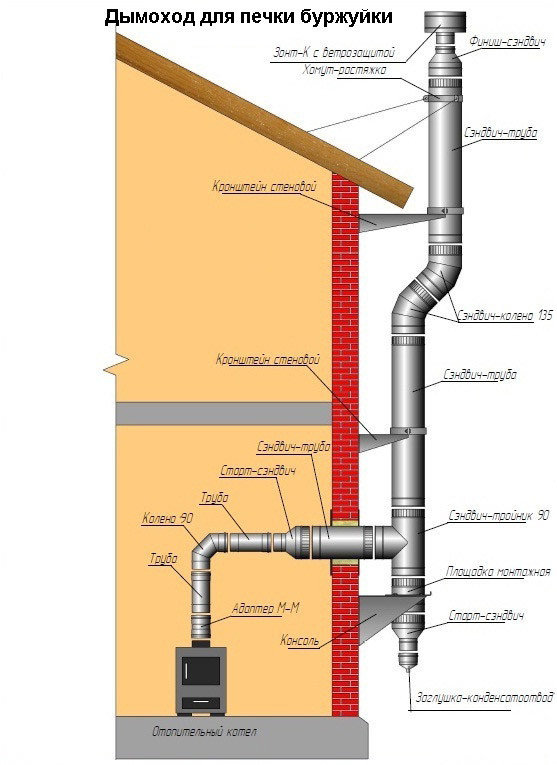
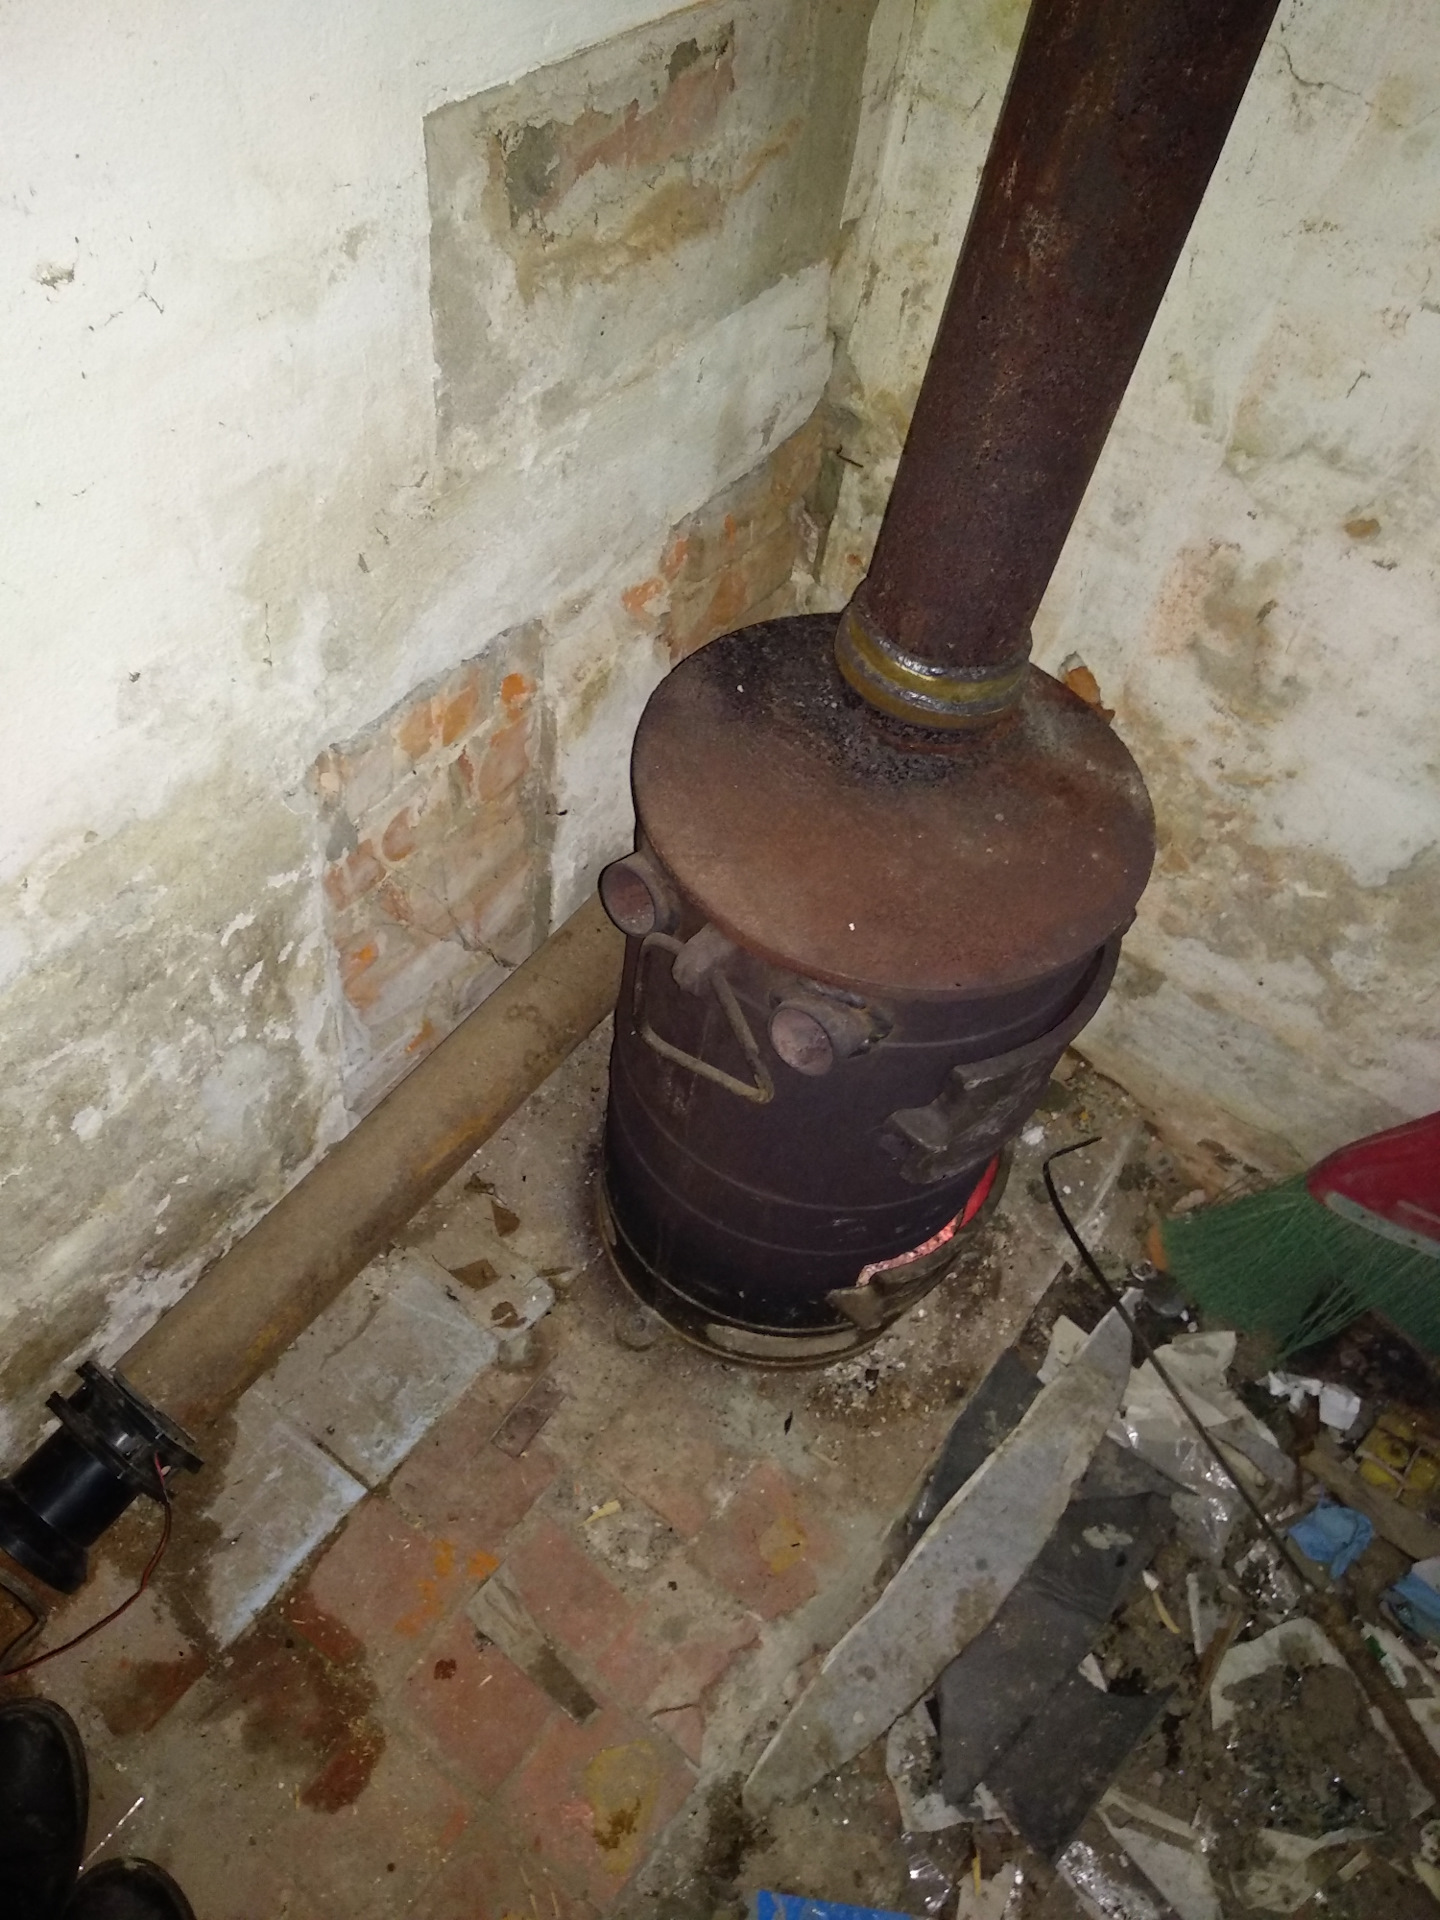
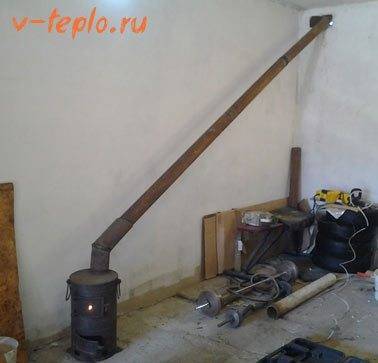
Chimney
Despite all the calculations, gases sometimes go into the chimney not completely burned out. Therefore, it must be done in a special way. The chimney consists of:
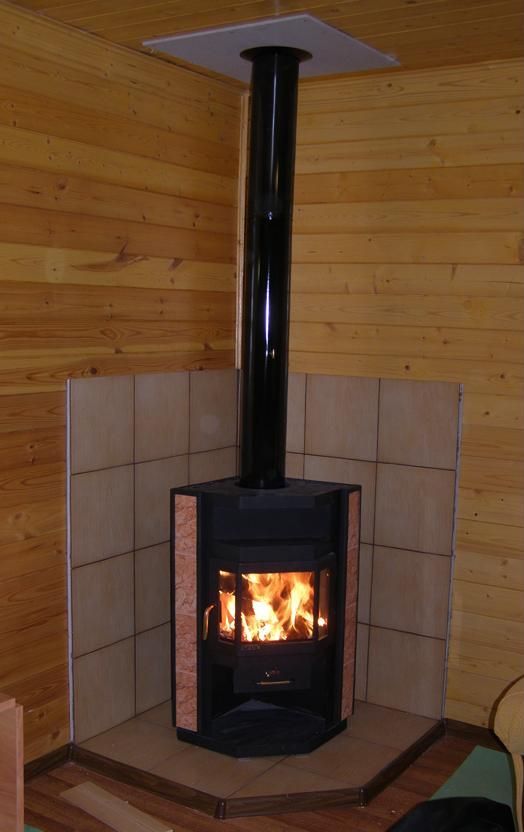
- vertical part (1–1.2 m), which is recommended to be wrapped with heat-insulating material;
- burs (slightly inclined part or completely horizontal), 2.5–4.5 m long, which should be 1.2 m from the ceiling, which is not protected by heat-resistant materials, from the floor - by 2.2 m.
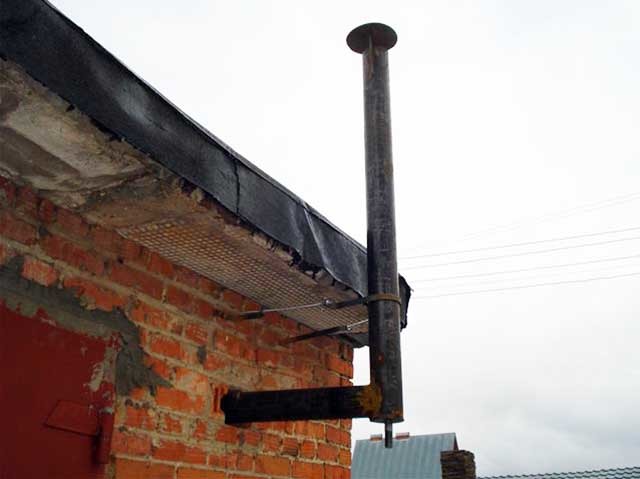
The chimney must be brought outside
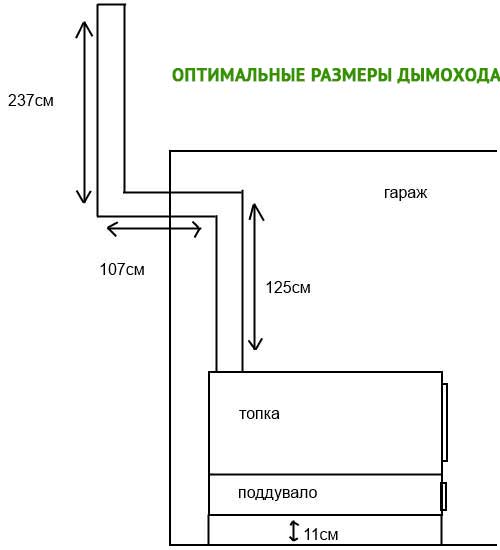
Photo gallery: diagrams for a potbelly stove for a garage
All exact measurements must be indicated on the diagram. The chimney must necessarily be brought out to the street. The potbelly stove can be round or square. The volume of the furnace depends on the presence of grates. The scheme of the potbelly stove depends on the material used
Chimney Care
First of all, good care of the smoke exhaust pipe from the potbelly stove ensures the safety of people and property in the room.
It also gives an equally important property - good heat transfer from the chimney and traction. And in order for the chimney to faithfully serve the entire period allotted to it, at least once every six months it is necessary to conduct a visual inspection of the chimney. The metal should not show signs of burning, corrosion, it should not burn through, crack or rust.
The metal should not show signs of burning, corrosion, it should not burn through, crack or rust.
The presence of one of these defects is a signal of the need to urgently replace the damaged area: smoke will enter the room through the cracks, which, at least, will negatively affect the health of the people in it. In addition, burning through and cracking in certain places, the metal of the chimney can give slack, and the entire pipe will soon simply collapse.


Folk cleaning methods will come in handy here - you can use the method of cleaning the chimney with potato skins. It is strictly forbidden to use an original, but dangerous way to raise the temperature to the limit so that the soot burns out and fly out: high temperatures not only contribute to the rapid wear of thin metal, but can also easily provoke a fire.
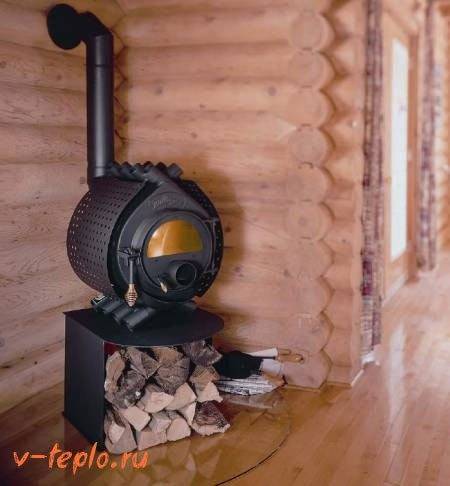
Potbelly stove - the best option for those who need a portable and convenient stove
And the only problem - the construction of the chimney - is no longer a problem! It turns out that making a high-quality and efficient chimney for a potbelly stove is quite easy, it is only important to follow the technology. A ready-made chimney does not require increased attention, only regular, but rare care, for which it will pay back with years of good work! So that at the stove-potbelly stove always had good traction, and there was no smoke in the room, it is necessary to take preventive measures that will help keep the chimney in order
In order for the stove-potbelly stove to always have good draft, and there is no smoke in the room, it is necessary to carry out preventive measures that will help keep the chimney in order.
Any chimney requires periodic preventive maintenance:
In order for the pipe to be clean from soot deposits, it is necessary to periodically add chemicals specially designed to loosen carbon deposits to the burned firewood. For the same purposes, aspen firewood is also used, which helps to clean the internal walls. To clean the pipe with their help, only aspen firewood is used for preventive fireboxes. It is desirable that they do not burn out quickly, but smolder for the maximum possible time in the furnace. To create such conditions, the draft is artificially reduced by closing the blower after the firewood flares up well. Annually carry out mechanical cleaning of the pipe from carbon deposits and rust. To do this, you can use a special cleaning brush with a load.
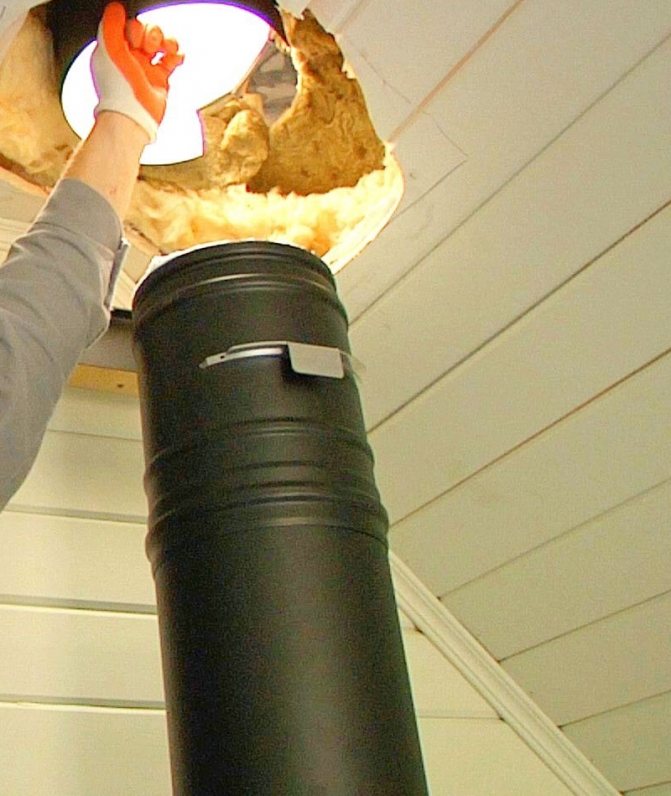
After each cleaning, be sure to revise the surface, carefully lowering the light bulb into the chimney.This is necessary in order to detect burnouts or cracks in time.
Since any chimney must be of the highest reliability, and all segments must perfectly match each other when joined to seal them, it is recommended to install parts made exclusively at a professional level. It must be remembered that the ingress of carbon monoxide into the room from poorly sealed seams or burnt holes is, without exaggeration, a mortal danger.
Tags: potbelly stove, cottage, chimney
warm brick
A potbelly stove on wood, coal and other types of fuel can significantly increase its efficiency. To do this, it is enough to build a screen of baked clay bricks around it with your own hands. If you look closely at the drawings of such a mini-building, you can see that the bricks are laid at a short distance from the walls of the stove (about 10-15 cm), and if desired, around the chimney.
Brick screen for potbelly stove
Bricks need a foundation. Do you want the masonry to last a long time? Then pour the base at a time to form a monolith. The material for the foundation is better to take concrete, which should be reinforced with steel reinforcement with your own hands. It is desirable to make a reinforcement layer at a distance of approximately 5 cm from the surface of the concrete pad.
Ventilation holes are made at the bottom and top of the brickwork, which will ensure the movement of air (heated masses will go up, cold air flows from below). Ventilation also prolongs the life of the metal walls of the potbelly stove, postponing the moment of their burnout due to cooling by circulating air.
Bricks laid around the stove accumulate heat, and then give it away for a long time, warming the air in the room even after the potbelly stove goes out. In addition, brickwork additionally protects the objects surrounding the stove from fire.
If desired, the stove can be completely laid out of brick. Such a structure is beneficial in that it will last for many years without additional effort on the part of the owner. However, there are also certain disadvantages. The disadvantages of this option include the following:


- the process of laying out such a stove is quite laborious and is suitable only for those people who have experience in masonry with their own hands;
- a brick potbelly stove is quite expensive, as it requires the use of refractory materials, including fireclay bricks and special clay for mortar.
Whatever the method of making a miniature stove or a potbelly stove with your own hands, you make them according to a drawing or by eye, the main thing is that at the output you get an effective heater, and in an expanded configuration also a hob for cooking. Look around for suitable materials (barrels, sheet metal, etc.) and go to your own homemade stove or even a potbelly fireplace!
How to make a wood splitter with your own hands? How to install a sandwich chimney with your own hands It is not difficult to build a chimney for a boiler with your own hands Do-it-yourself metal stove How to make a smokehouse yourself at home or in the country
Do-it-yourself step-by-step instructions for making a potbelly stove for a garage
The method of manufacturing a potbelly stove depends on its shape and the material used.
Classic stove-stove
For the manufacture of such a design, it is necessary to have certain skills in working with a welding machine. All work consists of several steps:
- Make 5 blanks from sheet metal.
Blanks need to be cut from sheet metal
- Weld the sides to the bottom. Make sure that they are located strictly vertically relative to each other, which will help the use of a level or building square.
- Weld the back wall.
- The internal space is conditionally divided into three parts: smoke circulation, furnace part and ash pan. In the last two, install a grate. To do this, at a height of 10-15 cm, you need to weld the corners over the entire length. For the grate itself, it is recommended to use thick sheet steel 25–30 mm wide, from which strips must be cut. The distance between the plates should be 5 cm. The rods themselves must be welded to two rods, which give the lattice rigidity.
- From above, it is necessary to weld two metal rods that are needed to locate the reflector (a sheet that separates the furnace and smoke circulation), the reflector must be positioned in such a way that a channel for smoke is formed.
Grid-irons and a potbelly stove are not obligatory elements
- Weld the lid of the potbelly stove, not forgetting the hole for the pipe. Cut and weld the top jumper. Do the same with the narrower part.
- Make a door. It is recommended to do it over the entire width of the stove so that the grate and reflector can be removed without problems during cleaning and repair. Do not forget that the door must be equipped with a handle, latch and curtains.
- Install the structure on legs, which can be made from a metal pipe with a diameter of 2-3 cm. They should not be made too high. 8-10 cm will be enough.If desired, they can be equipped with bolts, which will allow you to adjust the height.
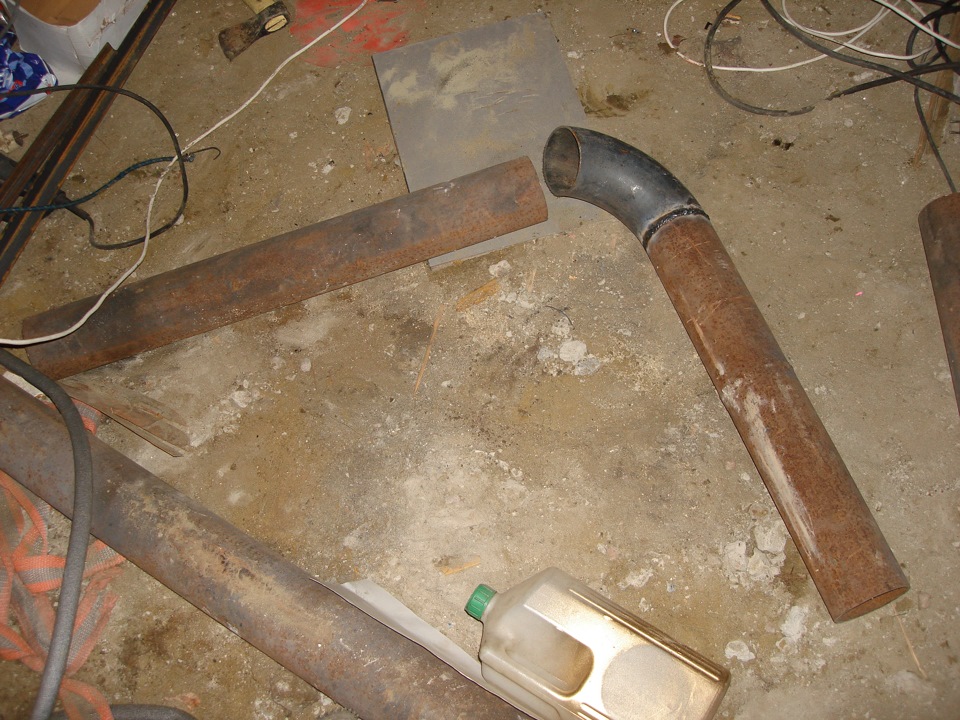
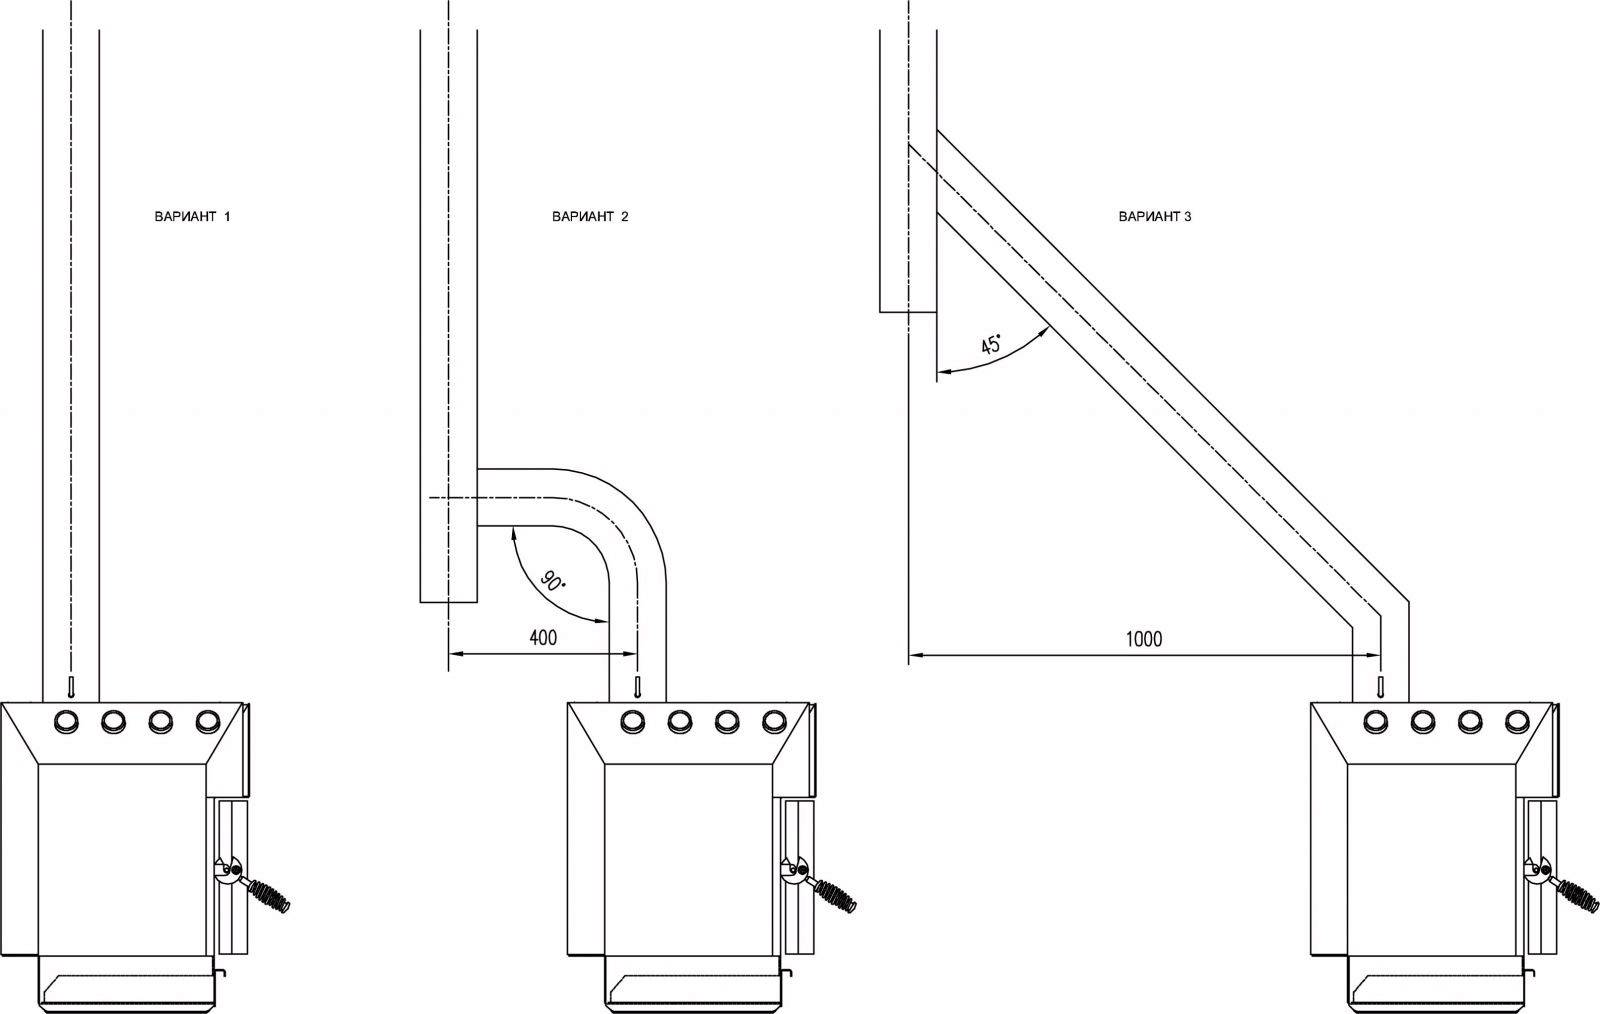
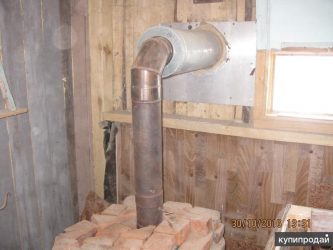
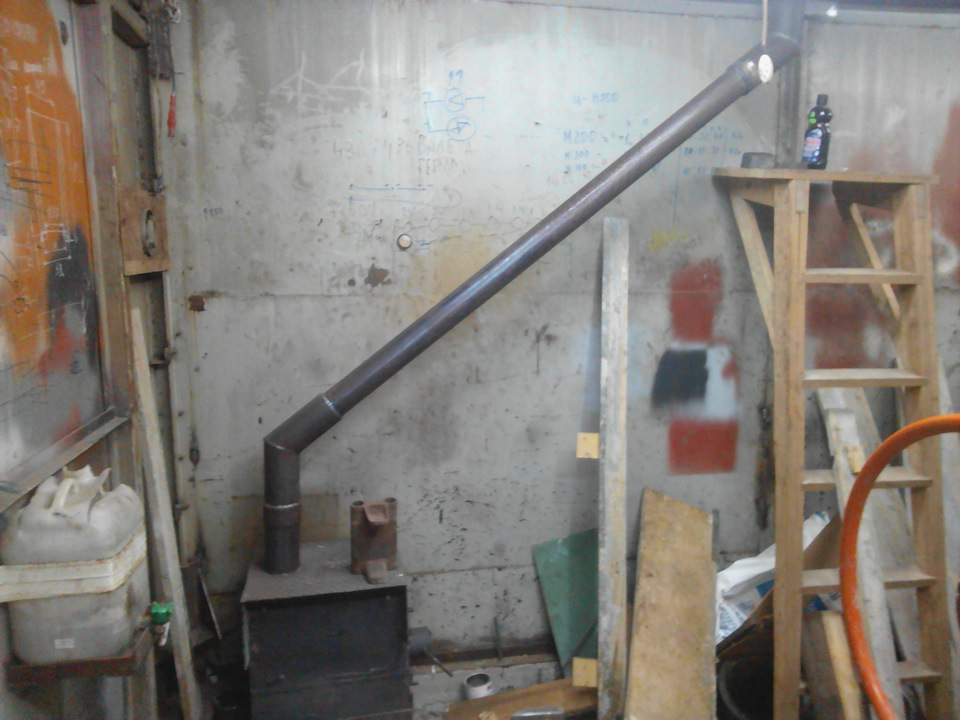
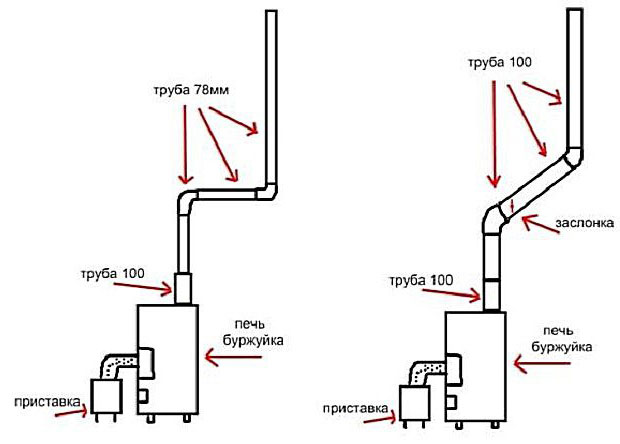
- Make a chimney from a pipe with a diameter of 15–18 cm. To output it, you need to make a hole in the wall of the appropriate size. The pipe consists of three parts, which are connected to each other at an angle of 45°.
The pipe must not have horizontal parts
- At the lower end of the chimney it is necessary to make a rotating damper. It can also be made from sheet metal, but the diameter should be slightly smaller than the hole in the pipe. It is also necessary to provide a handle that would move this damper.
- You need to fix the pipe on a sleeve measuring 15–20 cm, which is welded through the hole to the top cover.
- Install the stove, adjust its height.
When using sheet metal, you can make a potbelly stove of any size
Tools
You will only need cutting tools: a grinder, a jigsaw, a knife. All work is carried out manually and does not require special devices.
Mounting diagram
There are several types of chimneys, the most suitable type of construction is selected on an individual basis.
Mounting methods
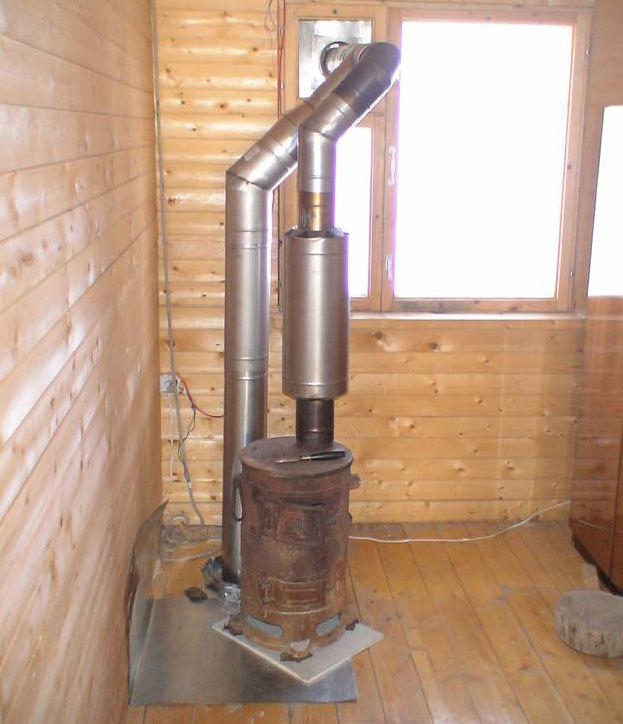
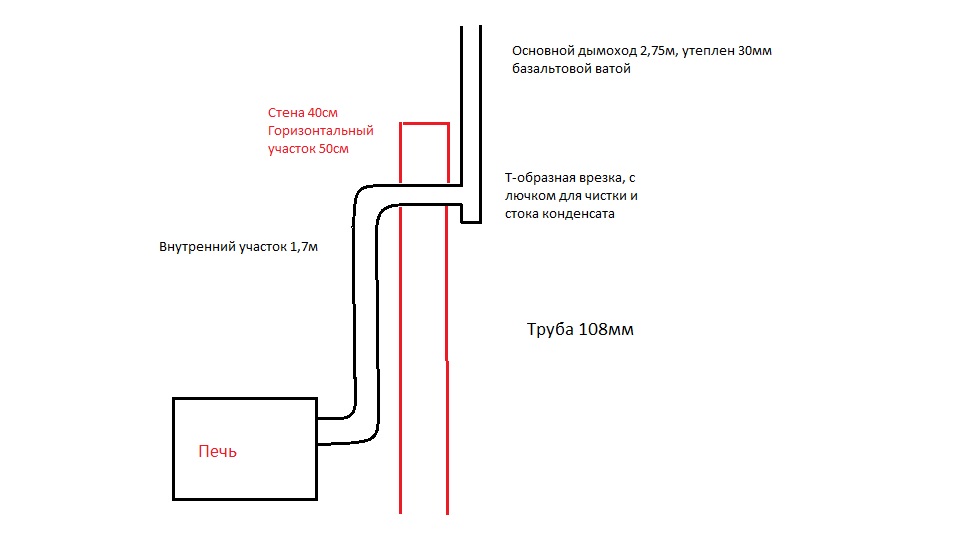
It is important to take into account the collection of condensate in the system, so it is necessary to have a plug, a condensate trap and a tank to collect condensate. If the potbelly stove is installed through the wall from the pipeline located on the street, then it would be advisable to bring the chimney through the window so that you do not have to prepare a hole for the pipeline in the ceiling
If the potbelly stove is installed through the wall from the pipeline located on the street, then it would be advisable to bring the chimney through the window so that you do not have to prepare a hole for the pipeline in the ceiling.
The outer part of the chimney is insulated with thermal insulation, covered with a protective material. A fungus is installed at the end of the pipe, which will protect the chimney from debris, rain, various small animals and foreign objects.
Floor preparation
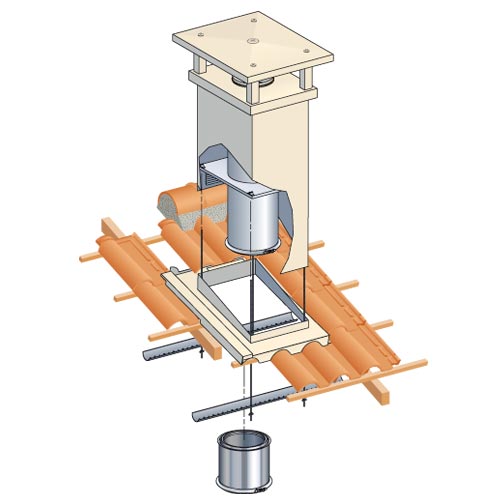
Chimney pipe for potbelly stove most often it is installed in such a way that it passes through the ceiling, therefore, before starting the installation and fixing the pipeline structure, it is necessary to make a hole for it in the ceiling: using a jigsaw or other cutting tool, having a diameter suitable for the passage of a glass for the knee of the internal chimney.
Hole example for flue pipe

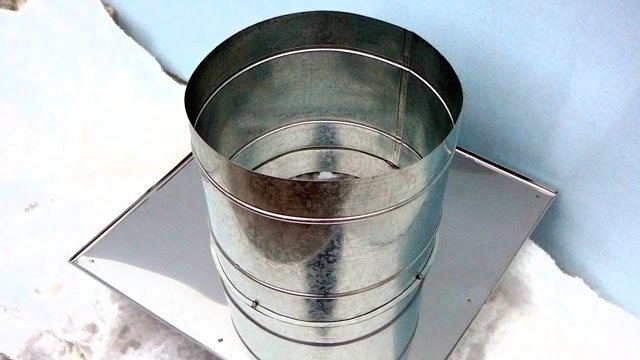
Passing glass
The passage glass is installed in the hole before the chimney for the potbelly stove is assembled. The cup diameter should be selected according to the diameter of the inner pipe, although sometimes the joint is made before chimney passage through the ceiling
It should be understood that it is important to firmly fix the glass - it serves as a fixative. But besides it, the pipeline must also be attached to the surface of the wall
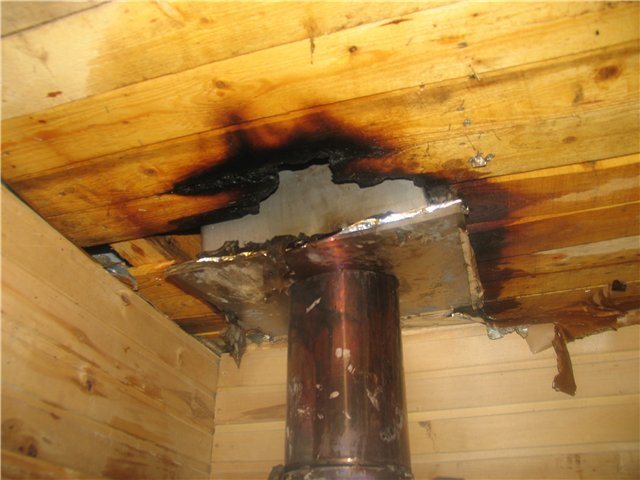
Improper installation can result in
If there are flammable materials, insulation or wooden parts in the ceiling, then they must be removed so that they do not come into contact with the through-hole glass.
After the pipe has been inserted, the whole thing must be sealed with refractory material, such as heat-resistant sealant or special refractory wool.
The following stages of work in the photo:
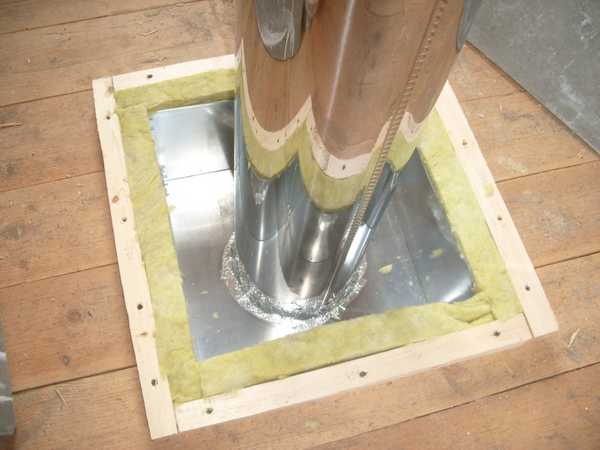
Sealing
Conclusion of the pipe to the roof
Roof work
At the last stage, you need to put a deflector on the pipe
Work Tips
- The pipes used in the construction are located exclusively in a vertical position; for their fixation, it is best to use special brackets, with dimensions corresponding to the knees of the system. In order to save money, you can make brackets yourself using a metal corner.
- All connections must be treated with a sealant so that there are no holes through which smoke can escape into the air of the room. There is a large selection of sealants on the market that are suitable for sealing the seams of the pipeline for smoke exit:
- High temperature sealants;
- Heat-resistant sealants;
- heat-resistant sealants;
- Heat resistant sealants;
High-temperature and heat-resistant sealants are used to seal places that reach temperatures of 350 degrees Celsius. Since the chimney for a potbelly stove heats up to higher temperatures, these types of sealants are only suitable for parts outside the piping system.


Heat-resistant and heat-resistant polymers withstand enormous temperatures, up to 1500 degrees Celsius - they are the most suitable choice for a potbelly chimney.
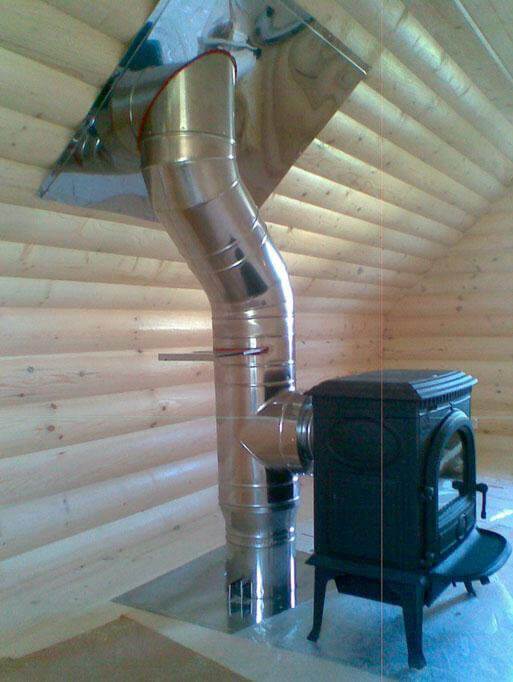
Connecting the chimney to the potbelly stove
The chimney coming out of the potbelly stove, called internal, is joined to the street, external pipeline, in the attic or in the under-roofing part of the roof. The beginning of the internal chimney is a segment coming out of the stove pipe, which is joined by an elbow to the ceiling.
When installing an internal chimney, it is important to correctly connect the pipe to the potbelly stove nozzle - because if this is done incorrectly, smoke may escape into the room air, which will make it impossible to properly functioning of the heating system. Expert opinion
Expert opinion
Pavel Kruglov
Baker with 25 years of experience
The chimney is connected to the potbelly stove using a heat-resistant seal and a special clamp
It is important to make a completely sealed structure, since any breakthrough of gases can lead to poisoning of those inside the room.
Chimney connected to stove
Types of chimney pipes
Various materials are used for the manufacture of a smoke exhaust pipe.
Initially, depending on the material of manufacture, there are 2 options:
- Take finished pipes manufactured at the factory;
- Make pipes from stainless steel sheets or other sheet metal.
The cheapest way is to make pipes yourself
Here, the undoubted advantage is that the pipe will be of the desired diameter, which is especially important for home-made stoves
The second advantage of homemade pipes is the cost. For their manufacture, you can use improvised material, or purchase metal sheets with a thickness of 0.6 mm or more. And better in 1 mm.
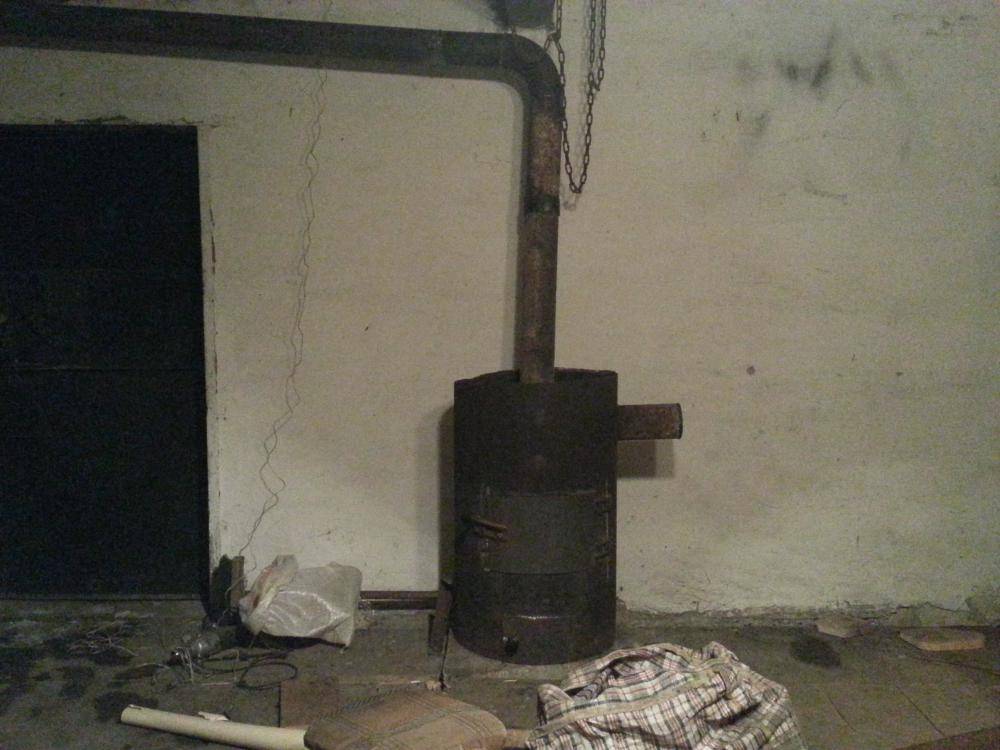
An elementary option for assembling a chimney for a potbelly stove involves the use of finished steel pipes and a corner element. A smoke channel is assembled from them and welded to a homemade stove:
- A branch pipe is welded to the top of the stove, built from a used gas cylinder. The inner diameter of the pipe must be equal to the outer diameter of the pipe installed in it
- According to the design dimensions, a smoke channel is assembled. The assembly uses a 108 mm pipe and an elbow, the components in the example are connected by welding
- An assembled chimney is installed on the stove-potbelly stove. Through a hole in the wall, connect the outer part of the pipe and weld it to the main
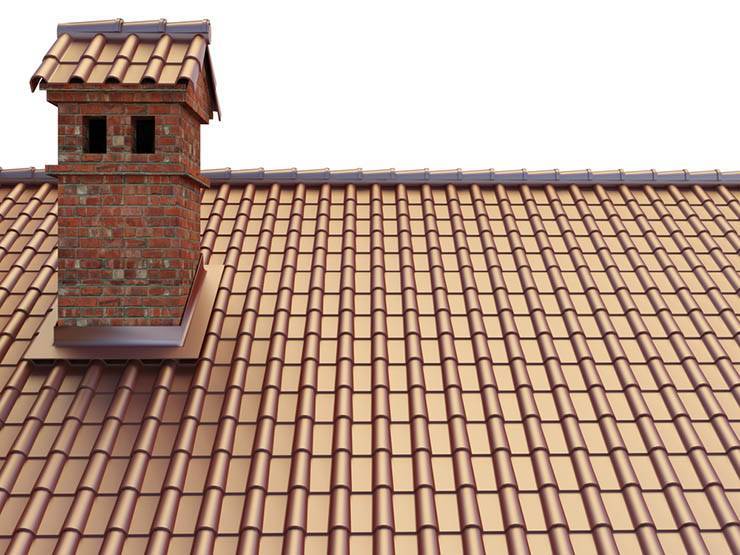
The outer part of the pipe is assembled from separate links, taking into account the standard height. The pipe must be at least 50 cm above the roof, located near tall buildings or trees.


Step 2: Assembling the smoke channel
Step 3: Taking the chimney out of the potbelly stove
Step 4: Construction of the outer part of the pipe
Among the most common materials are the following:
In addition to these options, the market offers many other products. So, you can find pipes made of heat-resistant glass, from which it is quite possible to build an exotic chimney. But this is done extremely rarely - skill is needed to install and connect individual structural elements to each other.
Quite often it happens that the chimney pipe heats up to incredibly high temperatures.
This entails a danger, since the risk of fire increases several times!
In order to minimize it, first of all, you need to isolate all combustible elements nearby.
Next, the insulation is laid around the chimney pipe.
This must be done without fail, because without a high-quality thermal insulation layer around the chimney, you risk your life and health every day.
So, let's look at the main causes of the problem:
- The chimney is made of a single-walled metal pipe without a heat insulator, which is completely unacceptable.It is mandatory to replace single-layer chimney sections with sandwich pipes, or simply supplement them with a heat-insulating layer;
- There may be errors in the design of the sandwich pipe. It should be remembered that this design is installed in such a way that the condensate formed inside cannot get on the outer surface of the chimney.
Pipes for the chimney system can be made by hand or purchased at a specialized store. The main advantage of hand-made pipes is low cost. In addition, it becomes possible to make a pipe of the required diameter, which is perfect for any home-made stove.
For manufacturing, you need a metal sheet with a thickness of 0.6-1 mm. A sheet of metal is folded into a tube and fastened along the seam, using rivets and heat-resistant sealant. However, it is much easier to purchase a finished product. Chimney pipes made of various materials are on the market:
- become;
- bricks;
- ceramics;
- vermiculite;
- asbestos cement.
You should not opt for inexpensive asbestos-cement pipes, since asbestos-cement is not intended for use at temperatures above 300 ° C. A pipe made of this material is very heavy, which will cause inconvenience when assembling the system. In addition, the asbestos-cement product absorbs condensate, due to which the functionality of the chimney may be impaired.
The construction of a brick chimney will entail significant costs. Make the correct laying of the chimney for do-it-yourself potbelly stoves - very problematic, so you need to contact the experts. The brick structure has a considerable weight, which will require additional reinforcement of the foundation.
For the device of a potbelly stove, metal pipes are best suited stainless steel or alloy steel. Metal products have a number of advantages:
- light weight;
- ease of assembly;
- long service life.
Chimney manufacturing process
To increase the reliability of the vertical channel and provide it with a long service life, alloy steel should be chosen as the material for its manufacture. This is due to the fact that this metal is resistant to corrosion and oxidation.
Work on the creation of a chimney involves the following steps:
- Take care of the workpiece from the metal pipe. In some cases, the use of a plastic product is allowed if its walls are of sufficient thickness. The outer diameter of such a pipe should be 2 cm less than the inner section of the pipe intended for installation, and the length should be 2 cm longer.
- Calculate the required workpiece size, where sheet metal is used as the starting material. In this case, the length is arbitrary within the dimensions of the room and the stove itself, and the width is defined as a circumference plus 3 cm.
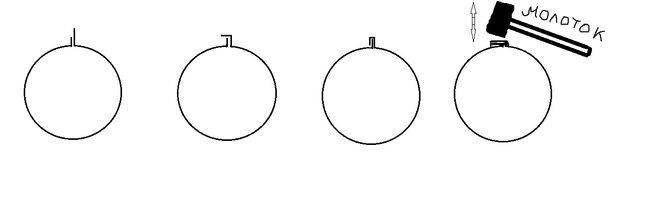
- Using a mallet, make sure that the cut blank goes around the prepared pipe.
- Bend the edges of the part along its entire length, observing a bend of 1 cm on one side and 2 cm on the other. The corresponding allowance was left at the second step of the chimney manufacturing.
- Create a seam. To do this, the edge of 2 cm must be bent in half so that it lies on the margin line equal to 1 cm. When such a connection of the edges is made, all that remains is to bend the entire seam so that it adjoins the pipe.
When connecting the parts, stress should be avoided on the cylindrical product, as this can cause the edges to pop out. It is optimal if they are pulled together under tension to each other.


- For a reliable connection, before bending the tongue and tapping the seam, it is advisable to coat it along the entire length with a special sealant or use fire-retardant tape for this purpose.
- As a result, the process of joining pipes becomes more complicated. Although this can be corrected by making longitudinal cuts on one cylindrical product with a step of 2 cm, followed by fitting the pipe into the pipe and tightening the junction with a clamp, the width of which should exceed the length of the notch. At the final stage, the joint can be treated with a sealant.


