- How to make a do-it-yourself tile shower tray
- Filling the screed
- Ladder installation
- The erection of the side
- Filling the screed inside the pallet
- Waterproofing
- Facing
- materials
- What materials will be needed for work?
- The choice of materials for the manufacture of pallets
- Tools and materials
- Pallet marking
- side height
- Edge width
- Shower drains
- Pallet design options
- barrier-free type
- Brick shower tray
- Materials and tools
- Ladder installation and brick laying
- Finishing screed
- Decorative cladding
- What else is required for work?
- Types of pallets, their advantages and disadvantages
- Isn't it better to do it yourself? We study the pallet device
- Brick pallet
- Preparation for the construction of a homemade stationary box
- The scheme of the shower in the bathroom
- Tools
- Pallet device
- How to mount a pallet with your own hands
- Types of drains for draining - which one to choose?
- Execution of work
- Dismantling (preparation)
- Waterproofing
- Sewerage
- Conclusions and useful video on the topic
How to make a do-it-yourself tile shower tray
For those people who do not know how to make a pallet for soul with your own hands, we suggest that you familiarize yourself with the technology of this process, as well as the features of each operation.
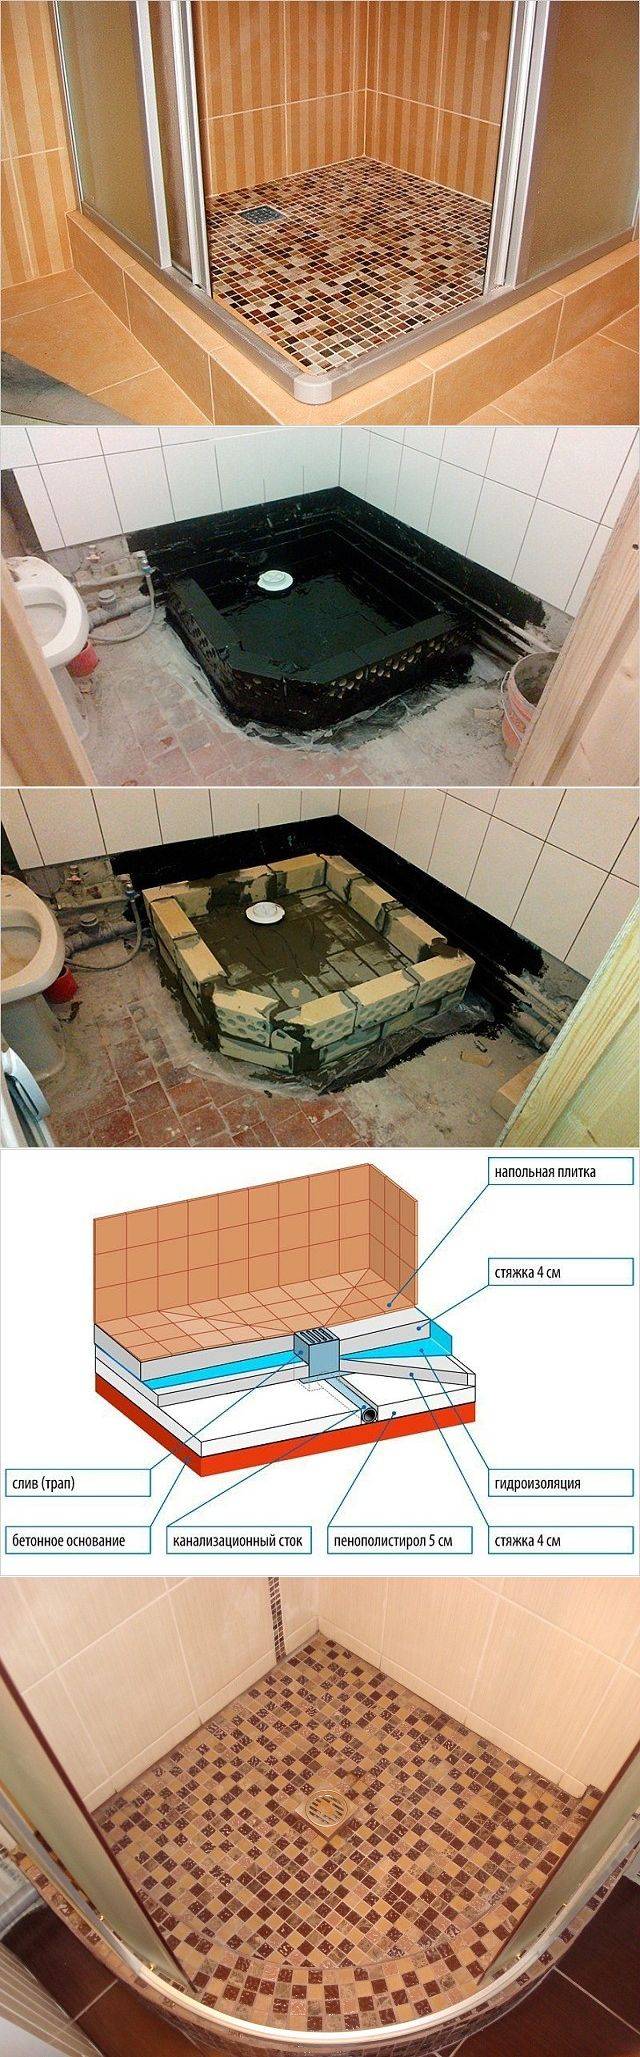
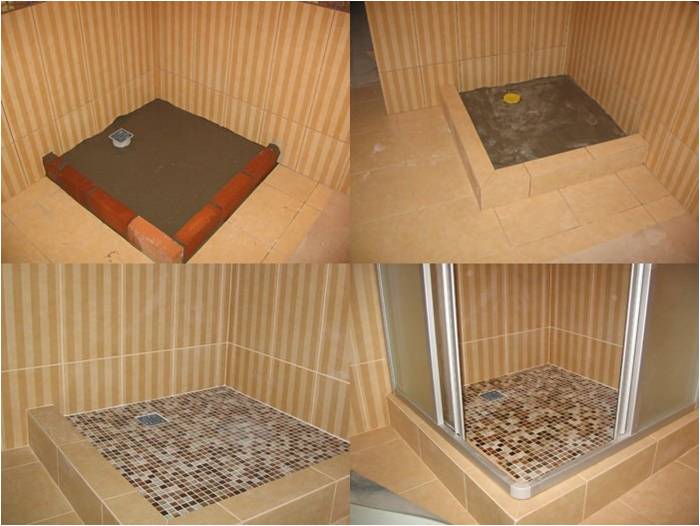
The main stages of manufacture and installations tile shower tray:
- Screed filling.
- Ladder installation.
- The erection of the side of the pallet.
- Filling the screed inside the pallet.
- Waterproofing.
- Facing.
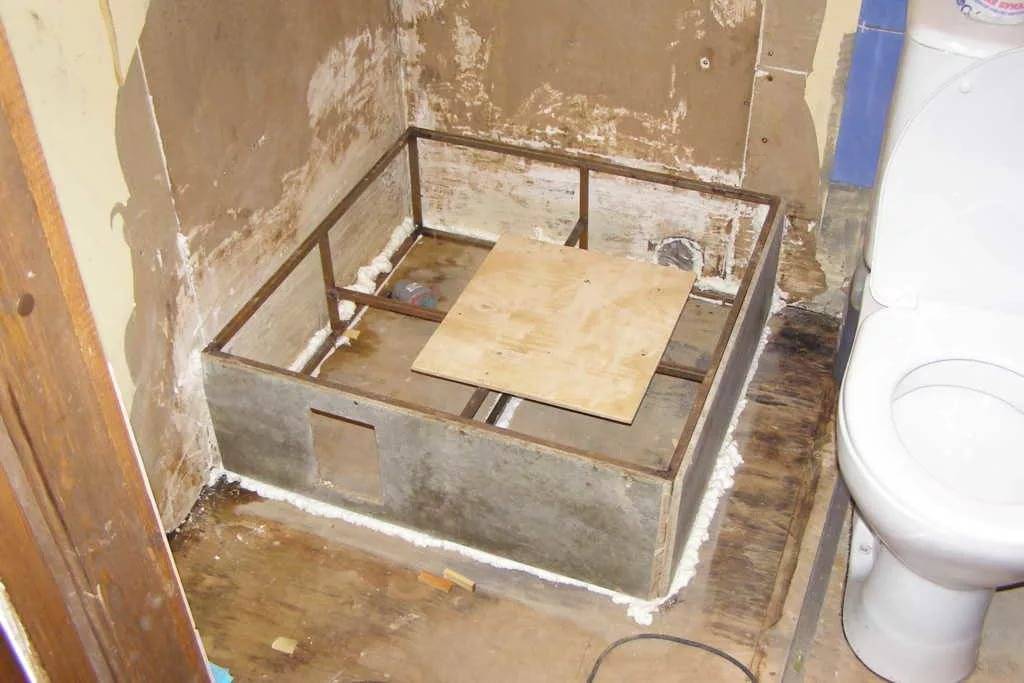
Filling the screed
The manufacture of the pallet should begin with preparatory operations, during which the existing base must be brought into the appropriate state. First of all, it is necessary to dismantle the old plumbing and tiles, and then check the quality of the rough screed. If an empty sound comes out when tapping the floor, then it is better to remove the old coating, and instead fill in a layer of a new screed, on which the shower tray will be installed.
After that, two coats of primer should be applied to the floor. Now you can start waterproofing. If a liquid mastic was chosen for these purposes, then this material must be applied to the floor, as well as to the walls (up to 400 mm in height). All corners, as well as the joints of the floor and walls, should be especially carefully processed.
After the mastic has hardened, you can start pouring the rough screed onto the floor, this operation should be performed only if the old rough screed is completely dismantled. If you want your bathroom to be warm and comfortable, you can install an underfloor heating system.
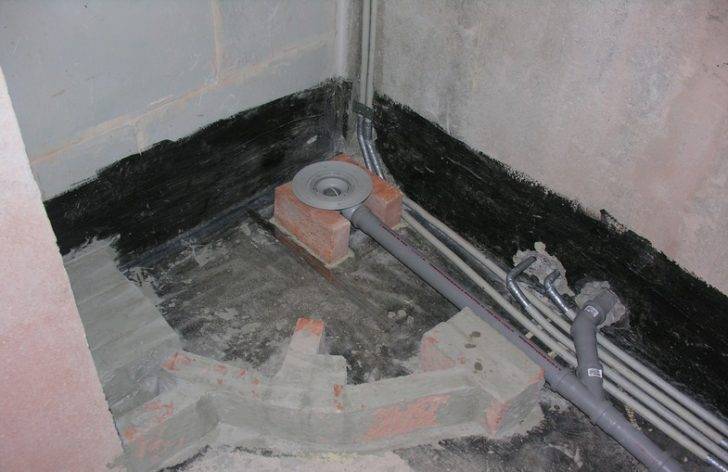
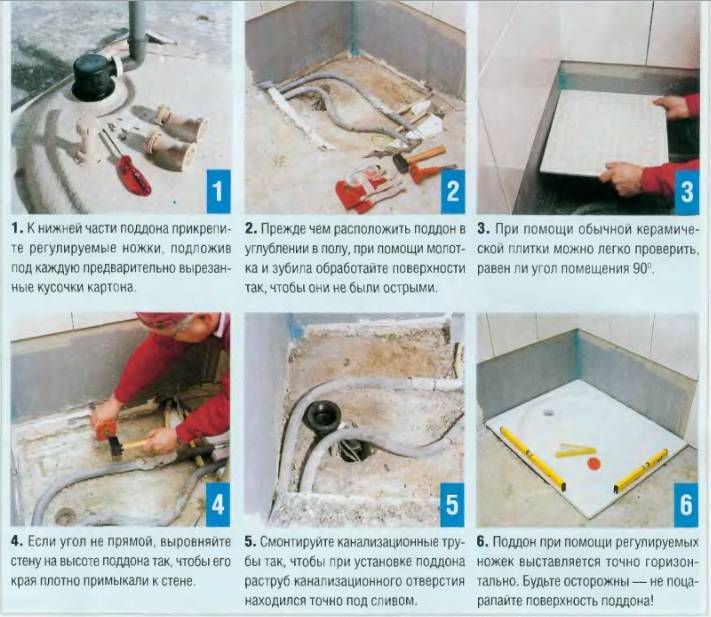
Ladder installation
After the screed poured onto the floor hardens, you can proceed with the installation of the trap. A sewer pipe must be connected to the installation site of the shower tray. So that water does not stagnate in the pan during water procedures, the pipe must be supplied with a certain slope, you can check the slope using a level. Then, under the prepared ladder, you can lay a brick, giving the structure the required height, and fix it with plaster or alabaster.
Ladder installation
When the applied mixtures harden well, it is recommended to test the pan for tightness. To do this, you need to pour some water inside and check how quickly it drains into the sewer pipe, as well as how dry all the joints remain. If you find the slightest leak, do not delay fixing this problem.
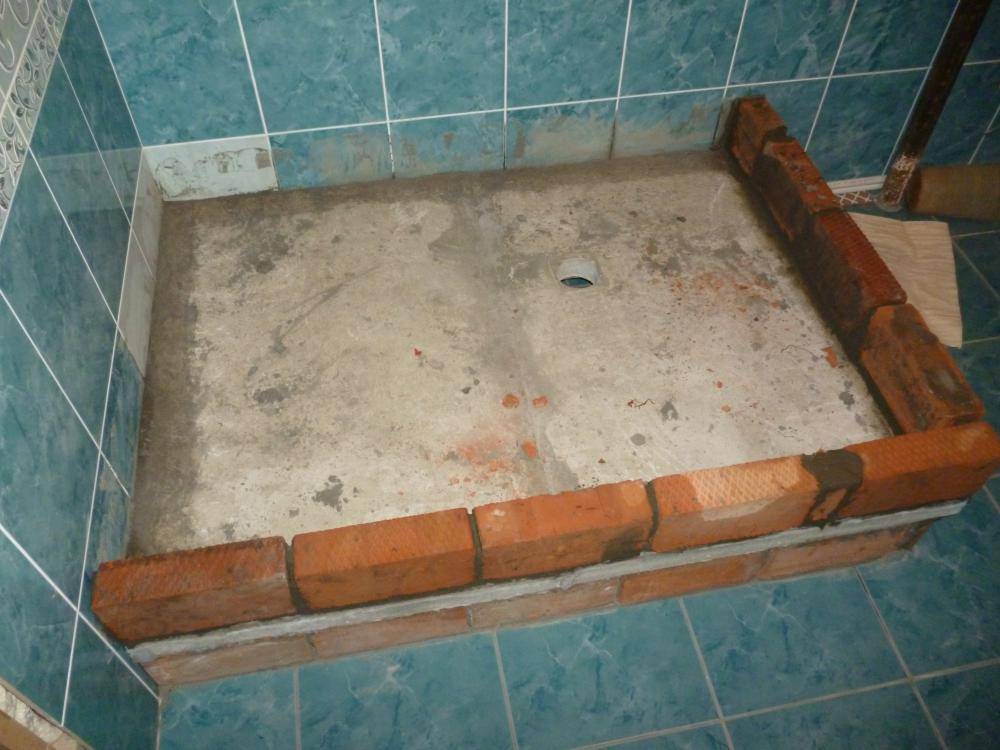
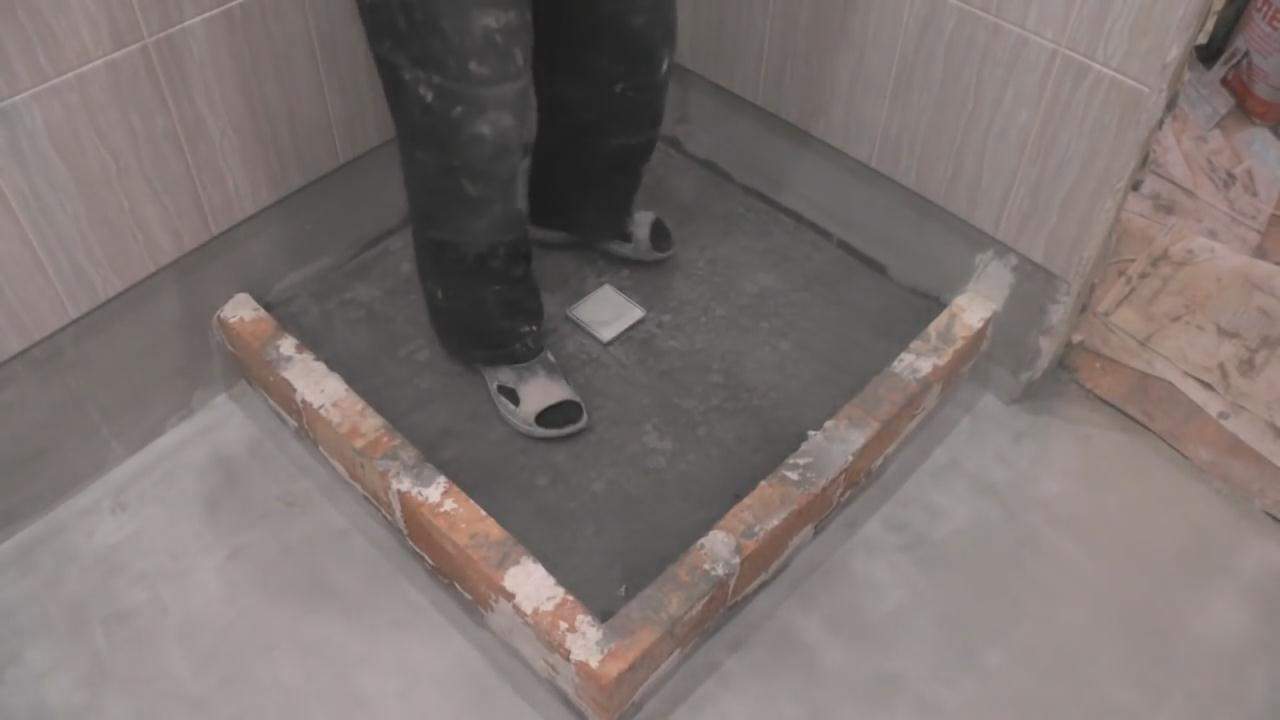
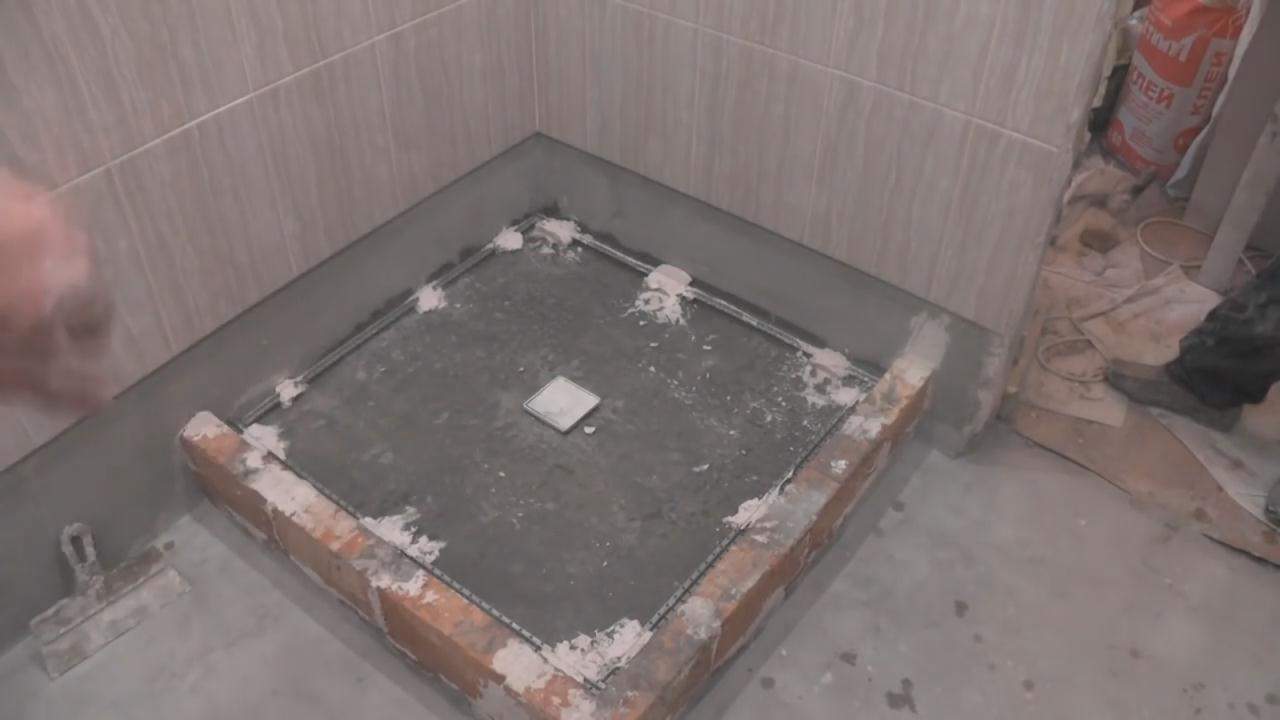
The erection of the side
For the manufacture of the side, you can use an ordinary brick. The pallet can have the shape of a square or a rectangle, if desired, you can give it a bend. It is necessary to lay the brick taking into account the chosen configuration, so that the side repeats the shape of the future pallet.
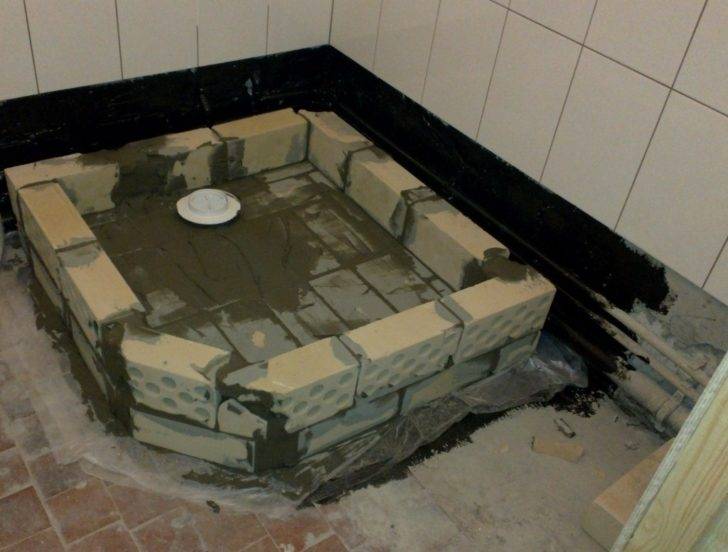
Building a brick wall
Before proceeding with the laying of bricks, it is recommended to make markings on the floor, which will help to make a side of the desired shape. Now you can start preparing the cement-sand mortar and laying the bricks. The side should be higher than the ladder, but it should not be made too high, just a few centimeters is enough.
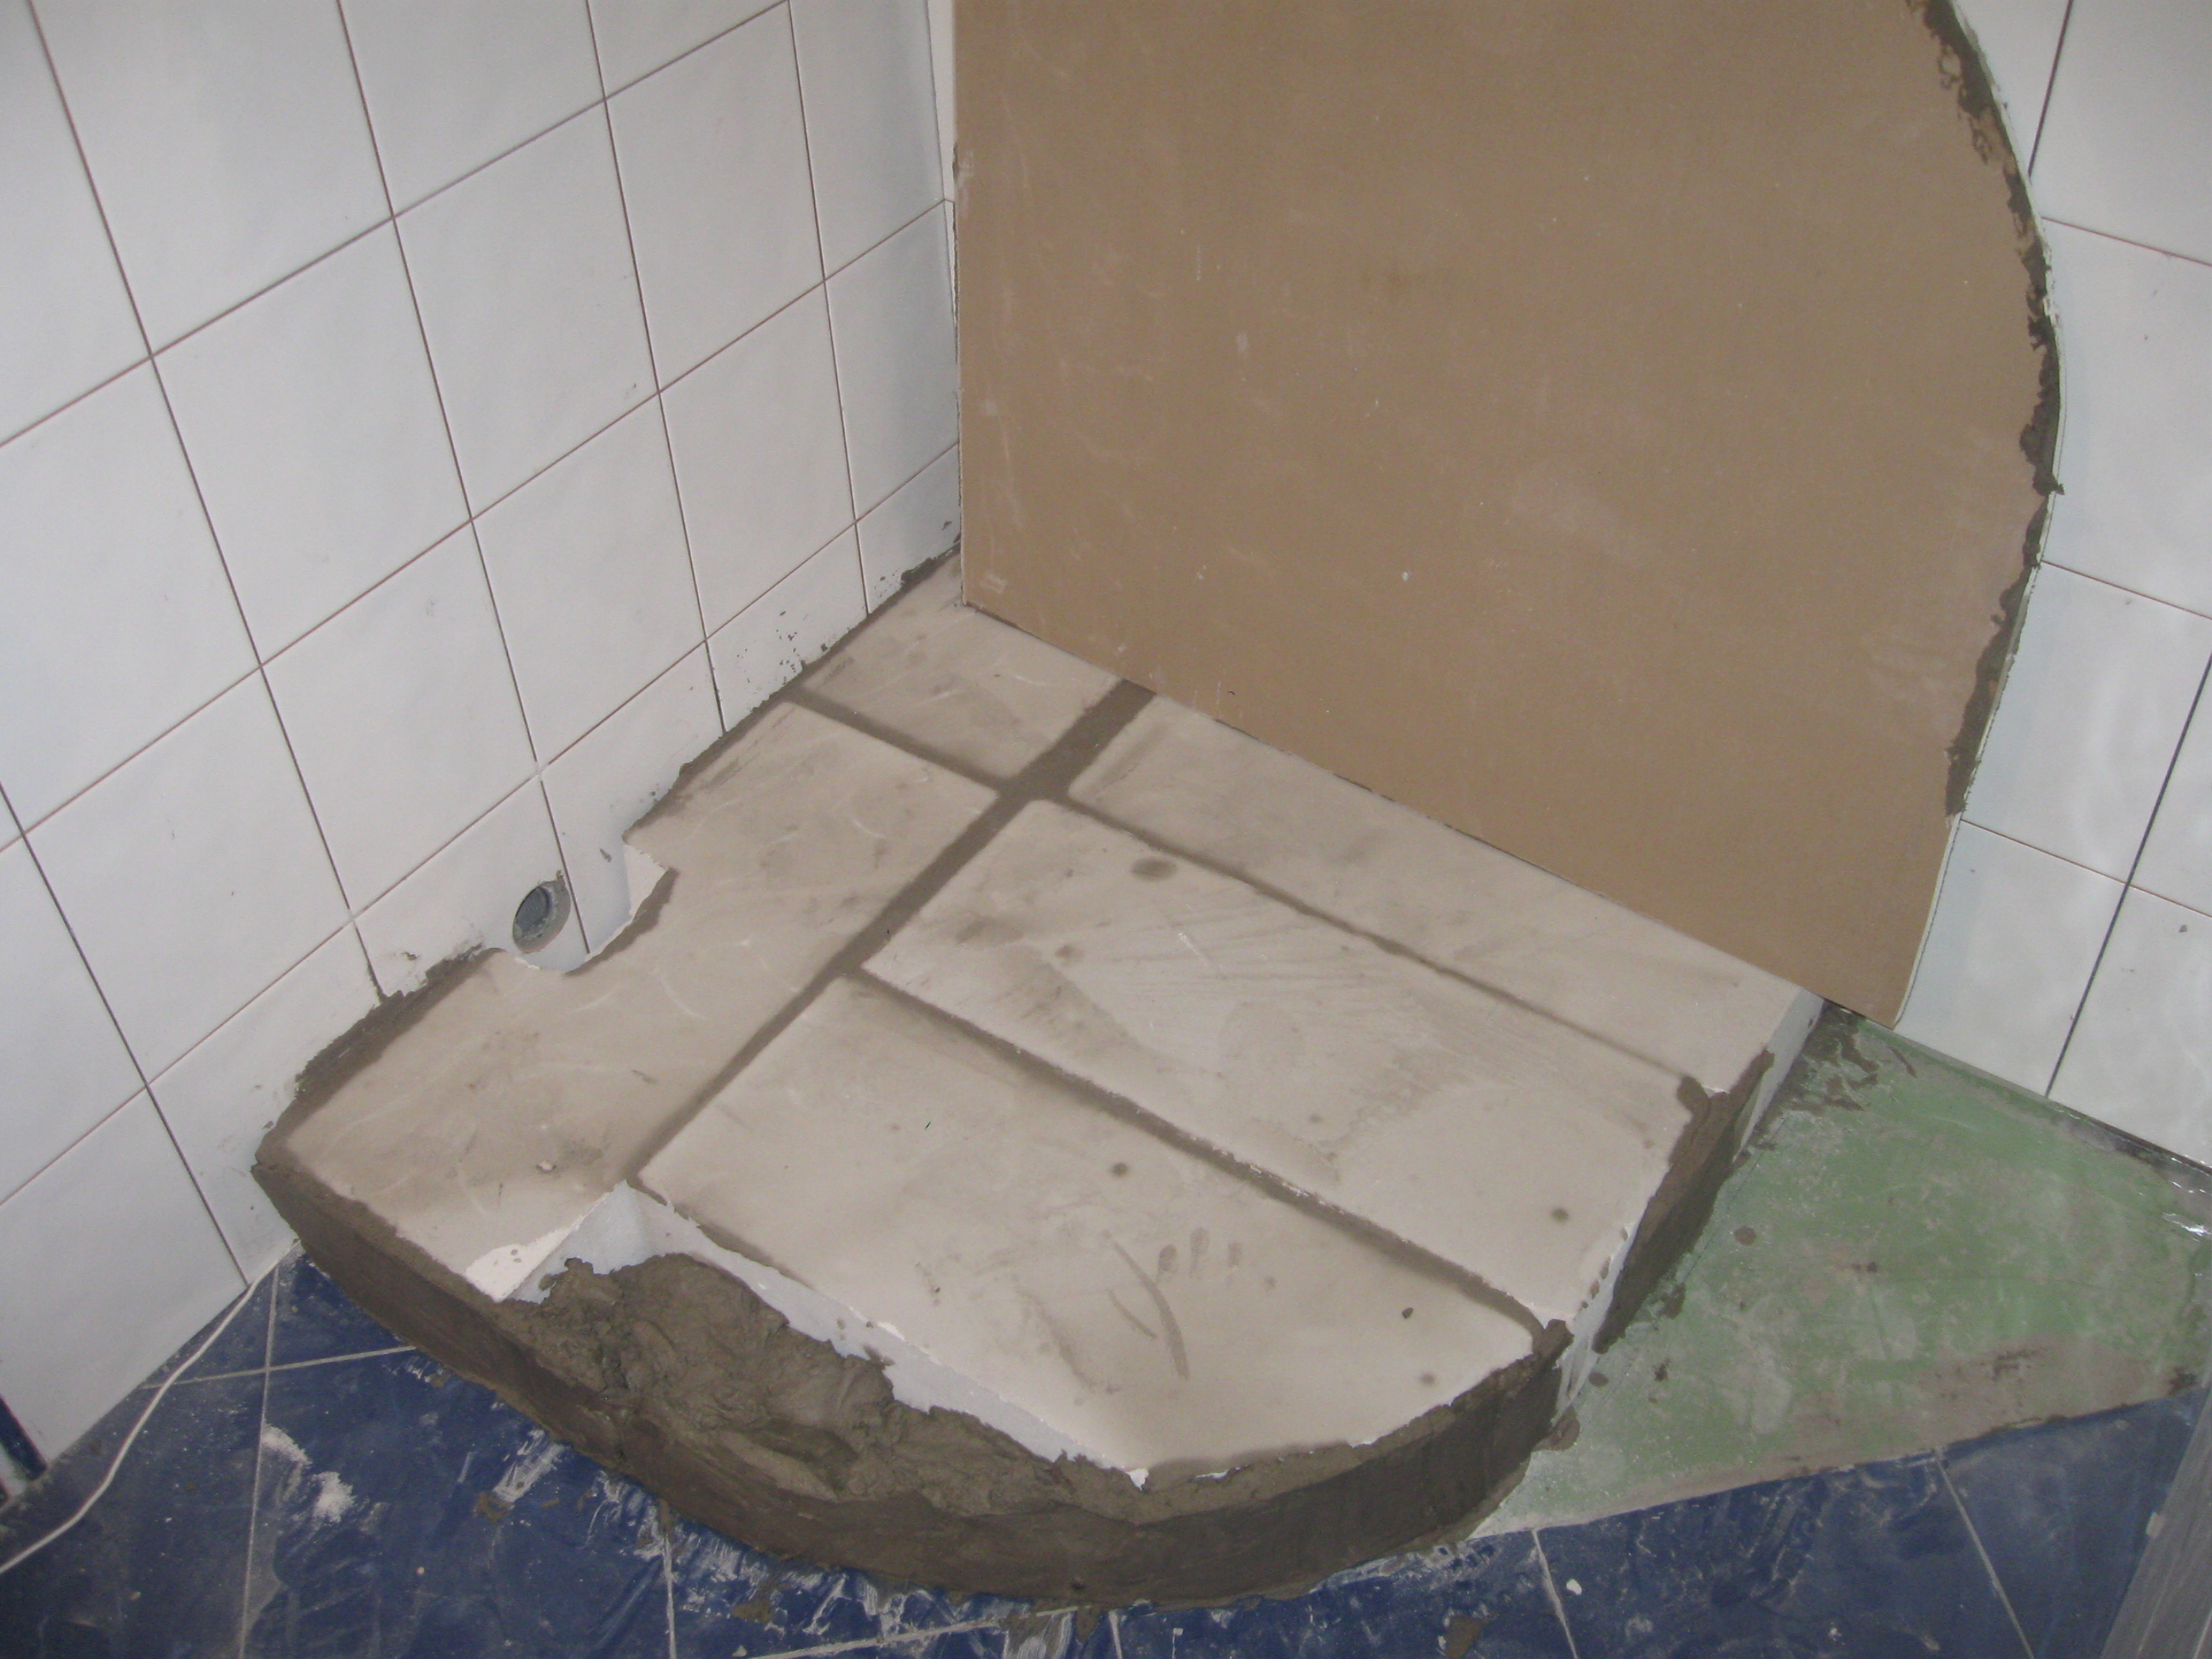
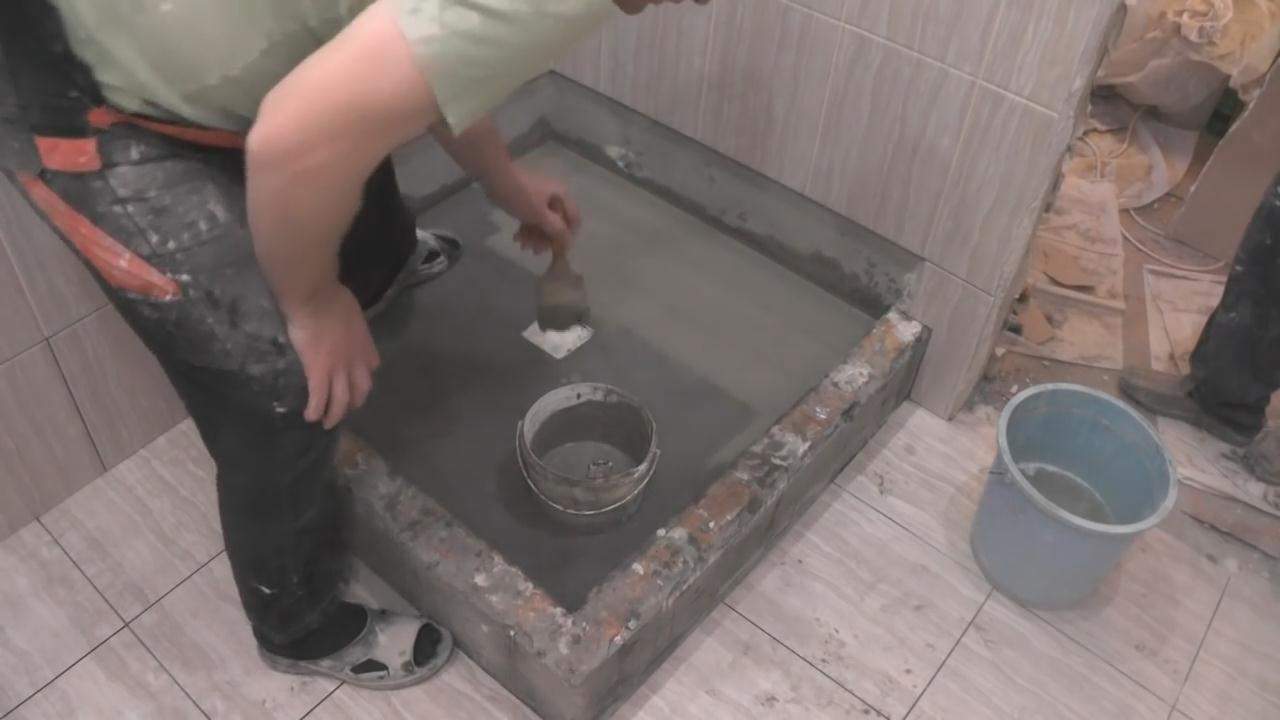
Filling the screed inside the pallet
Now it's time to start filling the final straps inside the pallet For shower. To improve the quality of the solution, it is necessary to add a little liquid glass or other water-repellent components to it.
Be sure to place beacons before pouring. Do not forget that the screed should have a slight slope, this can also be controlled using beacons.
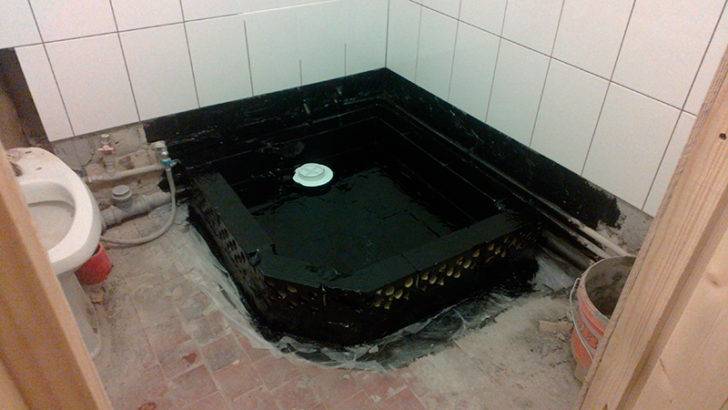
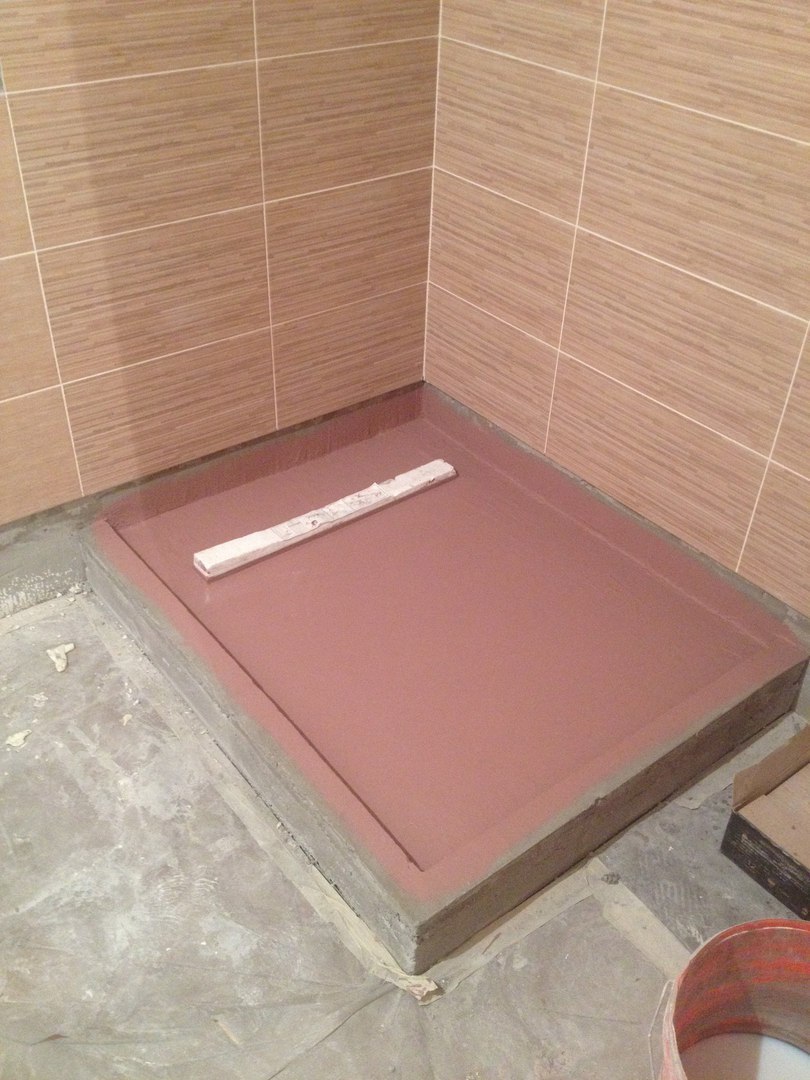
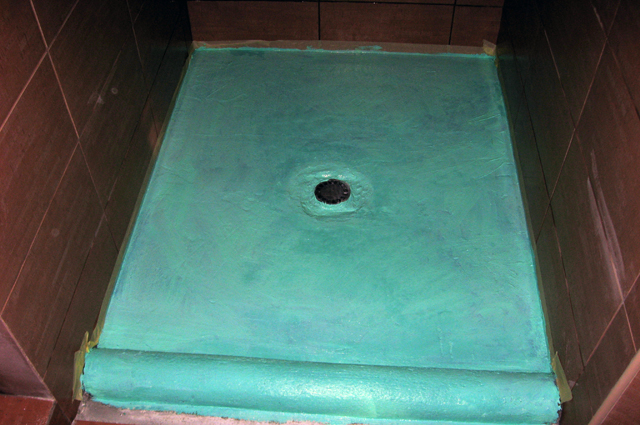
Waterproofing
After the screed has dried, you can proceed to the final waterproofing. Coat the dried screed and brick sides with mastic, this will prevent moisture from getting inside.The waterproofing mastic must be applied very carefully, and its layer should not be too thick, since after that it will be possible to proceed to the final stage of work.
Final waterproofing
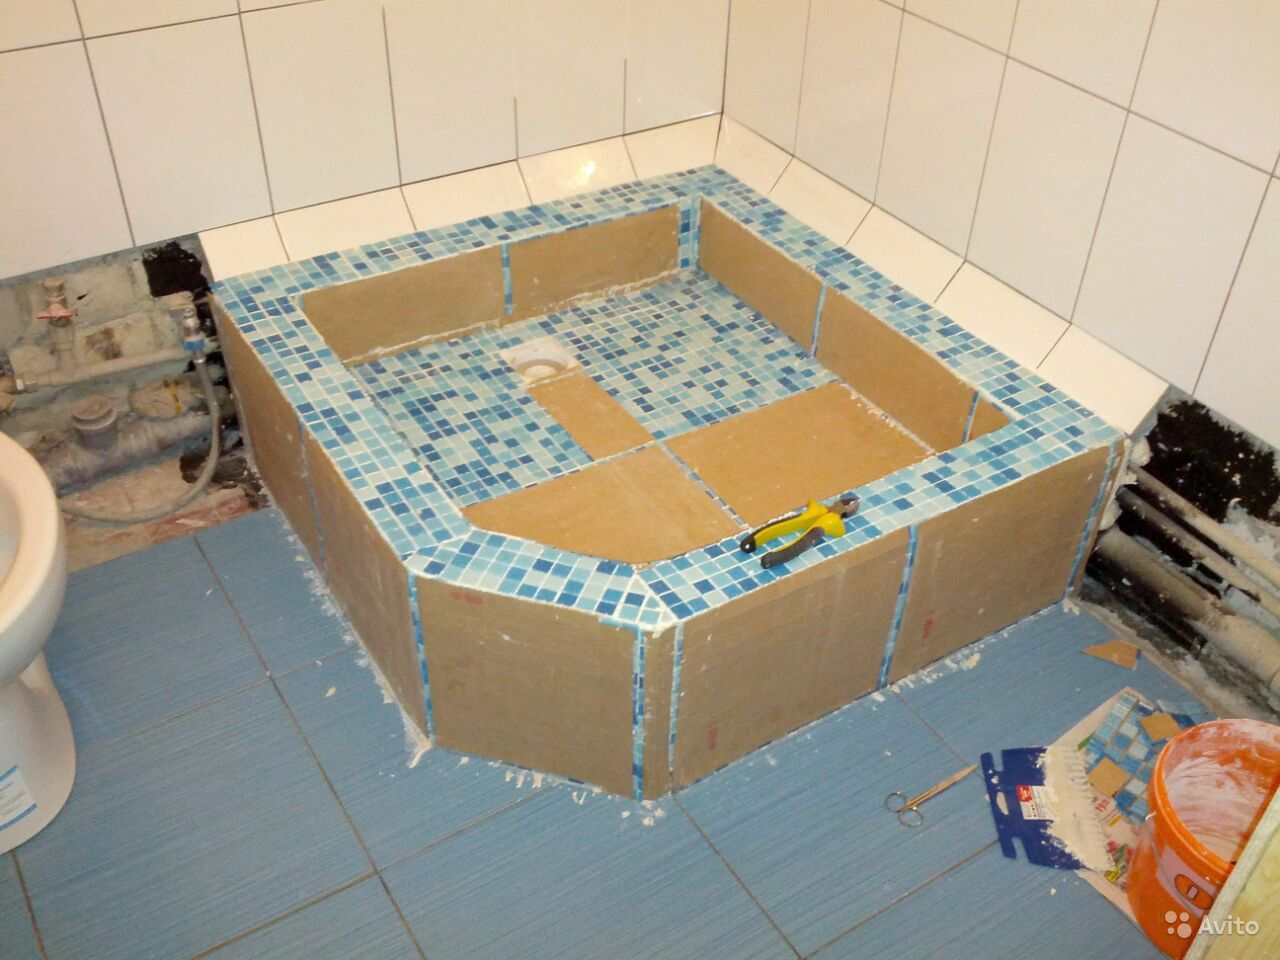
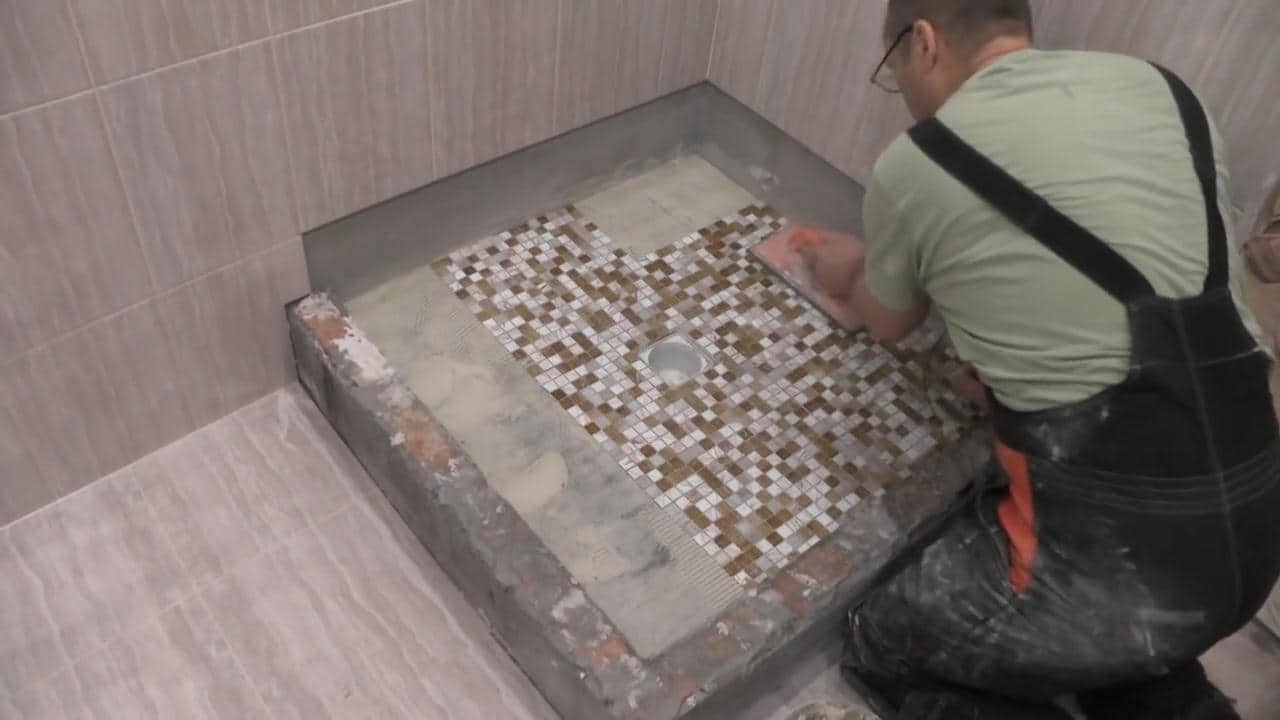
Facing
When all the preparatory work has already been completed, you can do the facing work. Choose the tile and the way it is placed so that there are as few swatches as possible, then the work will be easier, and the cladding will look much more beautiful.
Facing work must begin from the floor, and then move on to the sides of the structure. Tiles should be laid on the walls in a vertical direction, clearly level, making sure that the rows are even. Lastly, lay the top of the side.
Final tiling
Now you know how to install a tile shower tray. As you can see, there is nothing supernatural in this.
materials
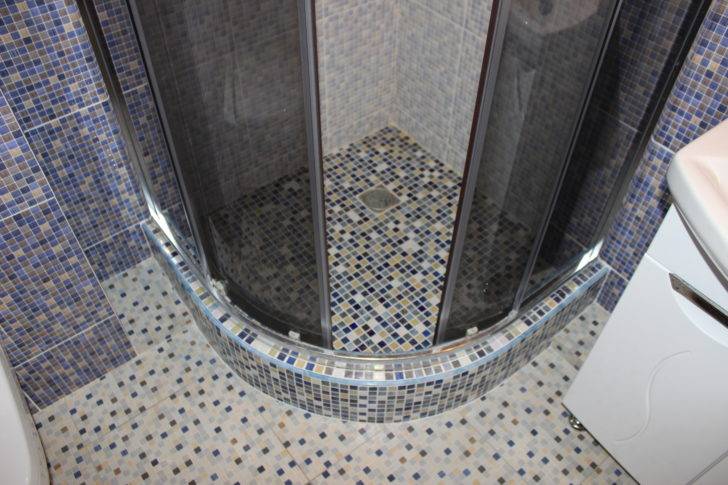
make a pallet for shower cabin do-it-yourself is a great solution for those who want to save money and not be limited to the store assortment. You can design just such a shower that fits perfectly into a particular bathroom both in size and design. That is why it is necessary to choose materials, make drawings and mount responsibly so that the design has served you for more than one year. The most common material for cladding a finished structure is ceramic tile or mosaic. This is understandable: tiles are easy to work with, reliable and easy to clean.
What materials will be needed for work?
- Sand and cement - for pouring the base.
- Brick, concrete blocks or expanded clay concrete - to lay out the sides.
- Metal mesh - for reinforcement.
- Thermal insulation film - for insulation.
- Water-repellent mixtures - for sealing joints and seams.
- Tools: grinder, drill, level, tape measure, spatula and brush.
- The drain that you will be connecting to the sewer.
- The mixture with which you will level the walls.
- Hydrophobic tile adhesive.
- Grout for seams.
- Spacers for tile joints.
- Tile.
Instagram @aquanet_msk
Instagram @aquanet_msk
Instagram @aquanet_msk
The choice of materials for the manufacture of pallets
The most elementary way in the construction of a hydromassage box will be the use of finished products. Manufacturers offer a wide range of pallets made from different materials: cast iron, steel, ceramics, artificial stone, acrylic mixtures, wood, plastic. But the use of factory models with a seat does not suit everyone, not only because of the standard forms, but also the lack of author's design.


With the independent construction of the pallet, the choice of building materials for the base is not diverse. It can be either a cement screed or brickwork. In the first option, when pouring concrete, a standard cement-sand mixture with the addition of plasticizers is used. In the second - red, ceramic brick, which is not afraid of moisture.
An important role is played by the waterproofing of the room, on which its integrity and the absence of foreign odors depend. There is a wide variety of insulation materials - from penetrating to rolled
It is also worth paying special attention to the drain system, choose the most suitable ladder

Unlike the building materials used to prepare the base, the choice of decorative finishes is richer. Mosaic, natural, artificial stone, ceramic tiles, plaster, paint can be used here.Such an assortment will allow you to give the shower cabin any design that matches the design of the room.
Tools and materials
The first stage in the independent creation of a shower cabin is the preparation of the tool. Materials are also selected based on the design features of the shower cabin. General for all designs are:
- sewer pipes with bends and sealing rubber bands;
- waterproofing;
- profiles, fasteners, hardware, etc.
To create a fence, you can use drywall, concrete blocks, brick, acrylic glass or plastic panels. From concrete blocks or bricks, you can lay out the walls of a booth with a makeshift pallet. For a purchased pallet, it is better to use fences made of plastic panels, acrylic or polycarbonate.

To create a pallet, you can use brick, expanded clay concrete blocks. Plastic is used to create a pallet shape when pouring cement-sand mortar. When building a fence made of brick or concrete blocks, you may need:
- Master OK;
- a hammer;
- drill with a nozzle for mixing the solution.
level to determine the required slope.
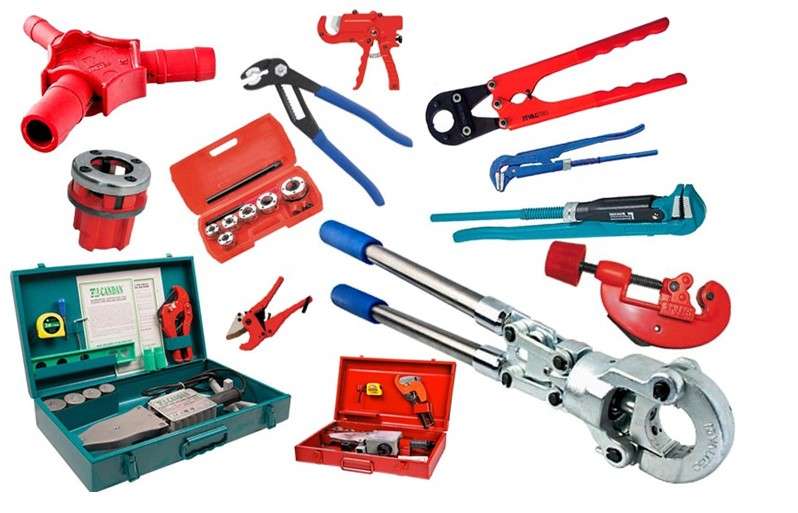
To work with plastic pipes, you must have:
- specialized soldering iron;
- pipe cutting tool (hacksaw or special knife);
- drill or screwdriver with a set of bits and heads.
For the rest of the work you will need:
- tool for applying sealant (gun);
- roulette;
- building corner.
We should not forget that a homemade brick or concrete pallet requires finishing work. The material most often used is ceramic tiles, which will need to be cut.Namely, therefore, for such work, a tile cutter should be prepared.
When installing a factory acrylic pallet, the most necessary tools are screwdrivers (a screwdriver with a set of bits), liquid nails or sealant. To work with glass plates, you need a high-quality glass cutter, a place for cutting and skills to perform this work.
Pallet marking
In the construction of a shower, including a shower tray, the correct layout is of the utmost importance. This is due to the further lining of the pallet with tiles or mosaics.
The marking must be carried out in such a way as to minimize trimming tiles in the area of the pallet. This means that the pallet must be marked out so that an integer number of tiles or mosaic sheets can be laid on the bottom of the pallet.
To do this, use the method of dry layout. A pallet is “assembled” from bricks and tiles according to the meth, the tiles are laid out with seams and the dimensions are fixed. Let's not forget the drain. It also needs to be assembled with this markup.
Note: Sewer drain pipes (D50mm) must have a minimum slope of 1%
It is important that the drain element, called grate fastener, hit the edge of the tile to minimize undercuts. All this is adjusted during markup (dry layout)
If the size of the ladder does not fit into the dimensions of the tile, then strive for this option, a photo of the tie-in of the ladder grate.
side height
The height of the sides of a brick pallet does not have to be associated with the dimensions of the tiles for facing the pallet. Here, binding to the size of the brick is appropriate.
- The minimum height of a brick shower tray without insulation is 120 mm (in the base);
- Reasonable height of a brick shower tray with insulation 185 mm (in the base) in increments of 65 mm;
- If the shower is planned to be made at the level of the entire floor and the floor in the entire bathroom is already flooded, and the sewerage (ladder) is already hidden in the screed, the height of the shower tray can be reduced to 65 mm (in the base).
Edge width
The width of the sides of the pallet should be related to the dimensions of the tile for the cladding. It is better to lay the whole tile on top of the side and not cut it. Let's stop here.
The dimensions of the red brick are 120 × 65 × 250 mm. When laying the pallet in one brick, the base edge for tiles will be 12 cm wide. When laying the pallet in half a brick, the base edge for tiles is 6.5 cm. Plus to the base 2 cm for the thickness of the tiles on the walls of the side and the thickness of the adhesive. We get that for the side of the pallet you need a tile with a size of 14-15 cm or 8.5-9 cm.


Finding tiles with dimensions of 15 cm and 8.5 cm is not difficult. This will facilitate the work on lining the side of the pallet, and significantly improve its appearance, in the most visible place.
two photos of different work
Of course, you can ignore the selection of tile sizes and cut the existing tile to any width of the rim. The main thing is to cut carefully, you can use the cutting method (undercut at 45˚) or install end caps on the edge of the tiles
Shower drains
Ladders provide collection and removal of sewage, prevent the penetration of odors from the sewer into the room. They differ from the siphon in the possibility of disassembly and cleaning without dismantling the device. Some designs are equipped with a check valve that prevents the return of wastewater when the collector pipe is clogged.
The design of the plumbing device is more complex than that of the siphon. Consists of several parts:
- corps;
- necks;
- water seal;
- insulating collar;
- clamping flange;
- grating to protect against large debris.
Water flows through the ladder at a rate of 40-90 l / min, clearing itself of large particles or hair. The removable glass can be easily pulled out and dirt removed.
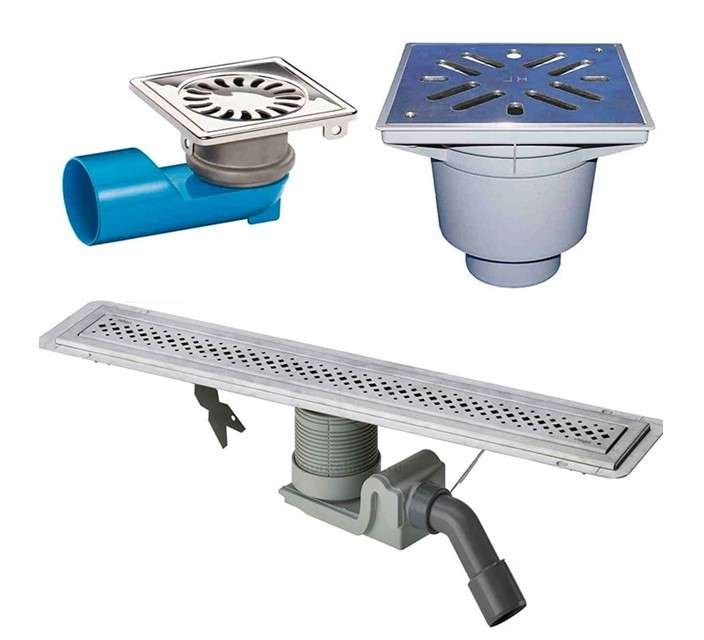
Types of ladders
The water seal is made in two versions - “dry” without water or “wet” with liquid. Some ladders are equipped with two barriers at once. For connection to the sewer network, the device is equipped with a drain pipe.
To equip the shower tray with your own hands, the ladder is selected according to the characteristics:
- Device height. When connected to a pipe, this parameter is used to calculate the required slope of the drain to the sewer.
- Number of outputs. If the shower is the last in a series of plumbing fixtures, it is connected to the line with one outlet pipe. At an intermediate location - two.
- The presence of a check valve. It is desirable that the ladder has protection against flooding by sewer water in emergency situations. Especially if the pallet is located below the floor level, or the shower is in the basement.
- Decorative. The visible part of the ladder is a grate. Its function is to protect the device from blockage. However, it can decorate the shower tray. Lots of options. Manufacturers produce even absolutely imperceptible designs that create the effect of water that has disappeared “to nowhere”.
For shower equipment, standard drains are used that collect water at one point, or trays extended along the pallet. Such devices are characterized by high throughput.
Pallet design options
There are two types - barrier-free and elevated. The first option is ideal for families with children and the elderly. Since it is completely flat, getting in and out of the shower is a breeze.In order for the floor to remain at the same level, you need to think over the connection to the sewer in advance. If this is neglected, the floor will need to be poured additionally.
barrier-free type
The base is made of concrete or brick, communications will pass through it. A monolithic model must be insulated as best as possible, and the joints should be treated with a water-repellent solution. Otherwise, there is a high risk of flooding the neighbors.
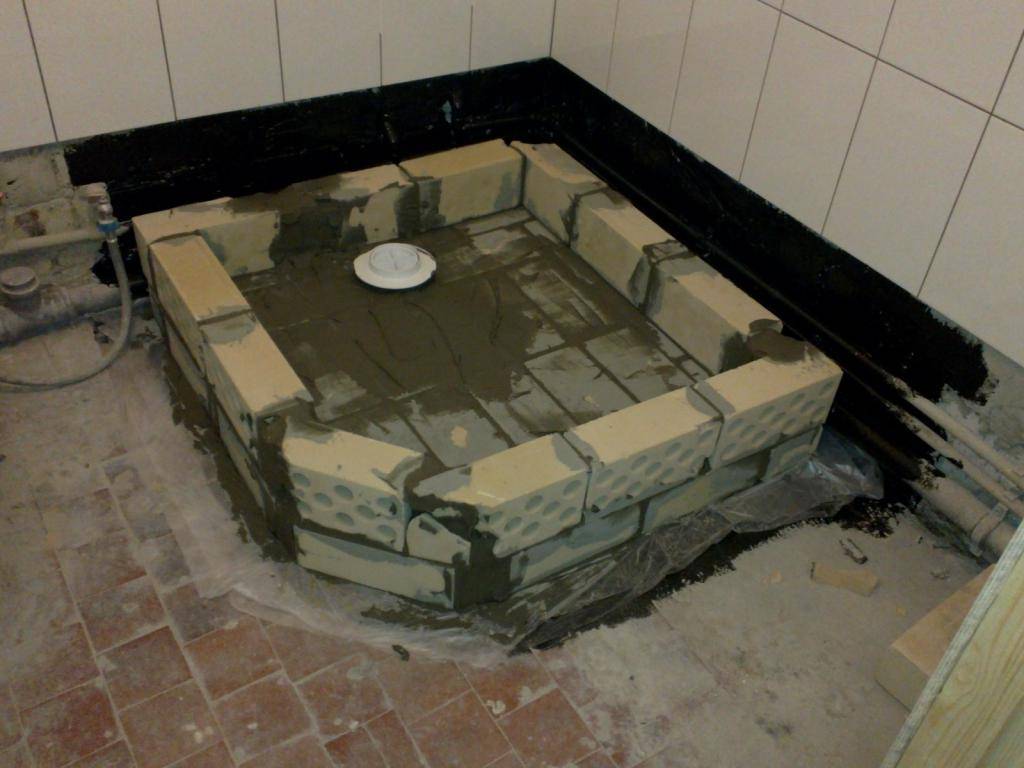
Brick shower tray
Brick construction is slightly different from deep concrete. The general technology consists in preparing the base, performing waterproofing, installing a drain system, building walls from moisture-resistant ceramic bricks, and laying the final cladding.
The ideal option would be to install a booth in a new house. During repair work, you will have to perform all the same preparatory measures as in the first case. After that, you need to make calculations, prepare everything you need.
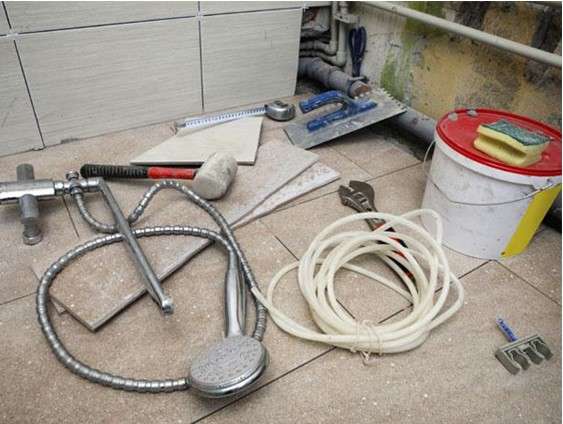
Materials and tools
Any work begins with the collection of the necessary materials. This process is very important, it allows you to subsequently save time, not be distracted by the search for missing components. To perform the installation of a brick pallet, you will need the following tools:
- container and shovel for mixing the solution;
- measuring instruments, beacons, level, rope;
- spatula, trowel;
- brushes, rollers;
- rubber and standard hammer;
- as a rule, grout;
- drill with a special nozzle.
Materials used:
- red solid brick;
- a set for organizing a drain;
- cement brand M 500, sand, water;
- reinforcing mesh;
- waterproofing;
- tile adhesive, crosses for leveling tiles.
Ladder installation and brick laying
Before starting work, the parameters of the future structure are calculated.After the concrete base is covered with a layer of waterproofing and a primer, they proceed to install and fix the ladder, as well as the outlet pipes, with the obligatory observance of an inclination angle of 3 °. Fixing the drain system is carried out by analogy with a concrete pallet.
Having completed the preparatory work, they begin laying the first row along the intended line, while the bricks are laid in a checkerboard pattern with the reverse side, connecting them to the floor and to each other with cement mortar. The second row is laid in the same way, but taking into account the sides, which are raised to the required height. To regulate it, the brick can be laid out on a spoon.
In the place where the drain pipes and the ladder pass, the trimmed material is laid, and the voids are filled with a solution. To obtain the desired size of a brick, it can be split or sawn. Laying building materials can be done not only on a cement-sand mixture, but also on tile adhesive, which is easier to work with.
Finishing screed
The finishing layer of the cement-sand mixture is poured after the masonry mortar has set. Here, the level is also beaten off at a certain angle towards the location of the drain, the twine is pulled, beacons are installed to level the flooded surface.
Next, the solution is mixed with the addition of liquid glass, the screed is poured. After that, it is leveled, covered with the final layer of waterproofing. At the final stage, it remains only to decorate the structure.


Decorative cladding
Design can be done using different materials. How and with what to decorate the podium, everyone decides on their own.The most popular finishes are ceramic tiles, decorative mosaics, natural stone.
Mosaic tiles begin to be laid from any angle at the bottom of the pallet. First, a tile adhesive is applied to the plane with a notched trowel, on which a mosaic sheet is placed. After the bottom is laid, proceed to the sides. When the glue dries, the mosaic is treated with a waterproof grout.
The surface lined with polished pebbles looks interesting. Usually it is sold in boxes, pasted on a grid. Laying it is done by analogy with tiles. To finish the sides and corners, you will have to separate small stones from the grid. The solution must also be applied with a notched trowel, but in a thicker layer. After laying, a beautiful natural stone is pressed with a grater.
What else is required for work?
When all the necessary tools for work have already been assembled and a diagram of the future pallet has been drawn, you can begin to purchase building and consumables.
So, during construction you can not do without:
- Floor drain or drain system.
- Bricks. In the case of solid concrete pouring, it will be necessary to stock up on formwork boards. In the case of erecting a side of a pallet in the shape of an ideal quarter of a circle, it is better to make the formwork from fiberboard.
- Mayakov.
- Waterproofing material for the bathroom and roller for its application.
- Bitumen, roofing felt or dense polyethylene film - depending on preference.
- Expanded polystyrene - if insulation is required.
- Sand and cement M400, or universal mixture M150, or M200.
- Plasticizers and hydrophobic moisture-repellent additives.
- Metal mesh for reinforcing the screed, if its width does not exceed 10 cm.
- Reinforcement, if the side is reinforced concrete, and not made of brick.
- Waterproof tile adhesive and crosses.
- Tiles or mosaic tiles, always non-slip varieties.
When everything is ready, you can safely proceed to the construction of the shower tray.
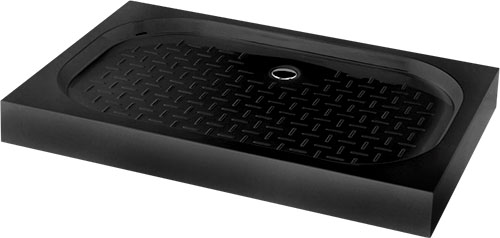
Types of pallets, their advantages and disadvantages
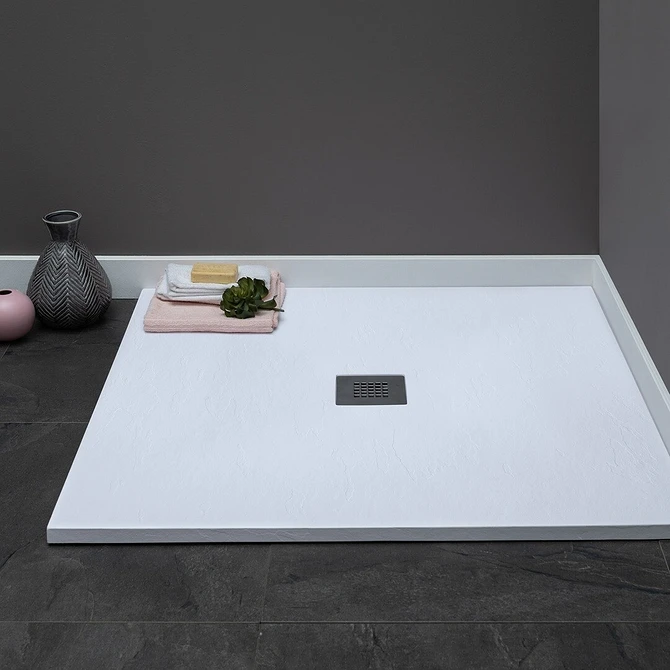
The tray serves as the base of the shower cabin and is necessary so that the floor in the bathroom does not rot. Now hardware stores offer a number of finished products, but each has both pros and cons.
The advantage of acrylic pallets is the ease and ease of installation, and a significant disadvantage is the fact that they must be operated with great care - they are easily subjected to mechanical stress and may turn yellow over time.

Acrylic pallet
Pallets made of marble or ceramics are considered the most durable, but the price of such products is an order of magnitude higher.
Pallet cast from artificial marble
Cast iron pallets are excellently used, but become unusable at the slightest chip or crack in the enamel - such a base will quickly rust and get dirty, in addition, with improper installation and insufficient sound insulation, an increased noise level can be observed in the bathroom.
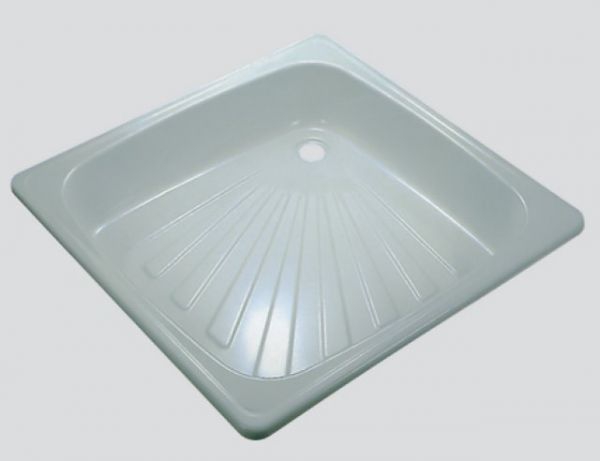
Cast iron pallets
Factory pallets can be made in the form of a square (0.8x0.8 m, 0.9x0.9 m, 1x1 m, 1.2x1.2 m), an oval or a rectangle (1x1.5 m, 0.9x1.2 m , 0.8x1.2 m). By location, pallets are angular and universal. In height, deep and low are distinguished, and the height of their sides will also be appropriate.
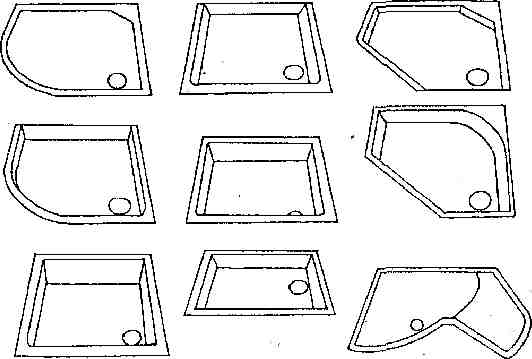
Types of shower trays
But even with such a variety of shapes, sometimes it is very difficult to find a pallet suitable for a particular bathroom. In this case, there is a great alternative - to create a pallet yourself.At cost, this may turn out to be a little more expensive than mounting, say, an acrylic base for a booth, but all the investment will be justified.
Brick pallet with ceramic tiles
In addition, a do-it-yourself pallet has an undeniable number of advantages:
Isn't it better to do it yourself? We study the pallet device
On sale there is a huge selection of shower trays, which manufacturers make from a variety of materials. The pallet device for all models is the same. This is a shallow container equipped with a device for draining water, designed for comfortable use of the shower. In most cases, the tank is equipped with legs or has a special shape that allows you to mount a drain ladder in the lower part and lead the sewer pipe into a common collector. The choice of the shape and material of the container depends on the room in which it will be used, the qualifications of the master who will install the pallet, as well as the financial capabilities of the buyer.


The easiest way to make your own shower enclosure is to use a factory-made shower tray. And if the choice of the shape of the pallet is determined based on the parameters of the bathroom space and its design, then other criteria may affect the choice of the material of the pallet:
Acrylic pallets have a fairly high strength, durability and are not subject to corrosion. It is easy to give this material any shape, which is what manufacturers use. However, the material is easily deformed under dynamic loads and is very light.
Acrylic pallets are lightweight and easily deformed
Shower trays made of iron are more rigid and resistant to deformation, but are subject to corrosion.In addition, thin metal has the property of vibrating and making a loud noise under the influence of water jets, which may not please some owners. In addition, the choice of metal pallet shapes is much poorer.
The iron pallet is easy to mount, but has increased noise
The walls of cast iron shower trays are thicker and therefore vibrate much less than metal ones, but they still make noise. Cast iron is durable and corrosion resistant. However, the enamel that is used as a pallet cover is prone to chipping, and therefore the aesthetic appearance of the pallet and its functionality can be easily lost.
Cast iron pallets are heavy, durable and do not corrode
Pallets made of artificial stone, like ceramic pallets, have significant advantages over all of the listed materials. They are durable, do not rust, the manufacturer can give these materials any color and shape, which makes it easier to choose. Their disadvantages are the high price and the need for special skills from the master for high-quality installation. These materials are easily damaged and split at the installation stage.
Artificial stone pallets are fragile and can be difficult to install
However, the use of a factory pallet provides not only advantages, there are also disadvantages. In many cases, it makes sense for the home craftsman to put in a little more effort and build a homemade pallet. This is justified in cases where the owner of an apartment or house is ready to expend his efforts to use one of the following advantages of a homemade pallet:
- Production of a pallet that fully fits into the author's design of the bathroom.The shower tray can be made from materials that are used in the decoration of the environment, in the color scheme of the bathroom and in the shape that most closely matches the design.
- Making a homemade pallet is justified when the dimensions of the bathroom require the use of a special shape or dimensions of the pallet. This happens, for example, in houses of old construction, in which the bathroom area has a minimum size, while the bathroom is combined.
- Saving money. In many cases, the cost of making a homemade pallet is much lower than the cost of a purchased one.
The disadvantages of home-made pallet manufacturing include the need to invest significant personal labor, the availability of the necessary tools and skills, or the willingness to pay for the labor of employees. However, no difficulties prevent home craftsmen from creating an interior in accordance with their own taste and needs.
Brick pallet
The second way is to fill the pallet with bricks. Bricks are laid inside the pallet and fastened together with cement mortar.
Another commonly used material is polystyrene foam. You need to cut out two sheets of a suitable shape and put them to the left and right of the drainpipe. Then fill with screed.
Important!
If the floor was originally uneven, a self-levelling floor compound should be used over the screed. It will make the surface even.
Before gluing the finishing material, a thin layer of screed will need to be laid on top of this mixture.
Preparation for the construction of a homemade stationary box
A stationary shower cabin is installed if you plan to finish the room, after all construction work. In this case, the sewer wiring depends on how the plumbing fixtures in the room are located.
Important! If the shower is put in place of the bathroom, then it is advisable to install it closer to the sewer riser
The scheme of the shower in the bathroom
- cabin guards and front door;
- type of construction, form, which depend on the location in the house / apartment;
- design and type of entrance door;
- pallet selection (height, quality, material of manufacture, ergonomics);
- drainage equipment, connection to sewerage and water supply;
- a device for supplying and supplying water;
- installation of all parts of the structure.
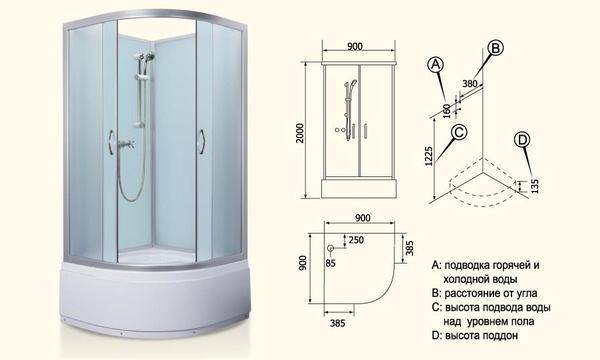
Photo 1. Scheme of a shower cabin. Before installation, it is recommended to calculate all the necessary measurements.
As for the pallet, the option is possible with or without a pallet. It all depends on the purpose of use. For example, a tall acrylic tray can make up for the lack of a bathtub. A tray with low sides only collects water so that it does not fall on the floor.
showers cabins without pallet convenient in that they are covered with tiles, which are less slippery, and therefore safer. In addition, everyone can show building skills and choose the size and shape of the floor that will fit into the interior of the room.


Tools
- Level;
- pencil and tape measure;
- trowel for mortar and glue;
- spatulas for grouting;
- roller and brush;
- construction mixer for mixing mortar.
In addition, plumbing parts are needed to equip the shower drain: pipes, drain or siphon.
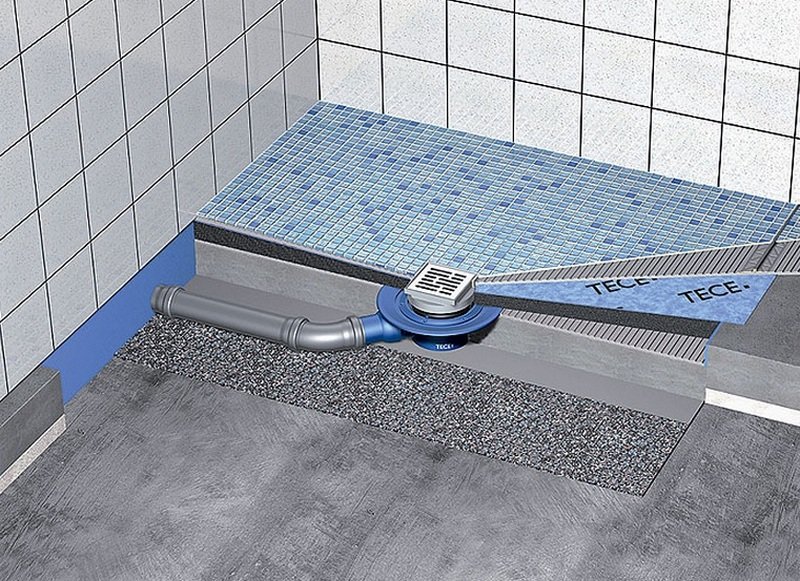
Pallet device
The arrangement of a shower tray depends on its type (brick, concrete), the presence of a layer of insulation, and a warm floor system. Consider, for example, a standard design device:
- concrete base;
- Coating waterproofing of the base;
- A layer of insulation from expanded polystyrene boards;
- Ladder, sewer pipes, built into the insulation;
- Pasting waterproofing;
- Concrete screed;
- tile adhesive;
- Mosaic, ceramic tiles.
The shower drain can be installed in two main ways: poured with concrete along with the base or over the finished floor. In the first option, the outlet pipes are below the level of the floor covering and are not visible, in the second case they will have to be masked. In this case, it must be taken into account that the drain device has a minimum height of 6-7 cm. It is also required to observe a pipe slope of 1 cm per meter towards the outlet of the riser. Accordingly, the level of the floor after embedding will rise significantly.
How to mount a pallet with your own hands
If you decide to make the bottom of the shower cabin with your own hands, then a moisture-resistant brick is selected as the basis.
Installed plumbing and water supply.
A waterproofing layer is laid.
- The place of installation is treated with mastic and film.
- Brick sides are lined up using a moisture-resistant mortar. In height, they should be higher than the ledge of the drain drain. Its level determines the height of the homemade pallet. Vertically, the line of the sides corresponds to the walls of the cabin.
- The inner part of the bottom is poured with a self-leveling concrete mixture. Its layer is 6-8 cm. This creates a slope towards the drain hole so that water leaves.
- The dried structure is treated with a primer, mastic.
- The last layer for coating is a mixture of cement and adhesive for ceramic tiles.
- Dry construction is processed with sandpaper.
- Moisture resistant material for cladding is selected. Mosaic is recommended. It will help hide the unevenness of the bottom.
If a structure of great height is erected, then steps for the cabin are constructed.
Types of drains for draining - which one to choose?
It is possible to organize a drain in a box in two ways: using channels or ladders. The first option includes a drainage tray, a sectional grate, a drain pipe. Products are made from ceramics, plastic, metal. We will dwell on the second type in more detail, because often the channel drain is referred to as its variety.
Ladder - sanitary equipment designed to collect and drain drain water from a shower cabin to plumbing communications. In addition, it performs a number of useful functions: it prevents the penetration of foreign odors, filters the liquid, and allows you to clean the sewer without any problems.
The product has the following structure:
- stainless steel grate;
- grating to delay hair;
- rubber compressor;
- sealing flange and ring;
- protective cover for installation work;
- odor lock;
- frame;
- one outlet pipe or two - in through models.
Ladders are made of cast iron, high-strength plastic, stainless steel. Finished products may differ in many ways:
- By type of construction: horizontal, vertical.
- According to the installation method: point, wall, corner, built-in.
- By type of shutter: hydraulic, dry, mechanical, with a check valve.
- By the number of outputs: one-, two-channel.
- Height - depends on the type of pallet.
- By the presence of additional elements and decor of the lattice.
Execution of work
General remark. Each stage of work on a concrete, cement base is carried out with preliminary priming with a deep penetration acrylic primer or a floor primer. Priming of complex surfaces (old tiles) is carried out not with an acrylic primer, but with Betonokontakt primer.
Dismantling (preparation)
The place for shower tray installation made of brick, must be cleaned of old equipment, old ceramic tiles on the floor knocked down. If there is an old metlakh tile on the floor, you can leave it, the main thing is that it holds firmly.
All construction work (walls, screed, wall plastering) in the bathroom must either be done or carried out in parallel.
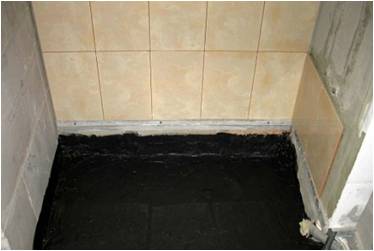
Waterproofing
The place where the shower will stand must be covered with a layer of waterproofing material. Modern liquid one-component waterproofing compositions are easy to use and are applied with a simple brush, as when painting.
If the walls of the bathtub were plastered and the floor of the bathroom was made of concrete, then it is better to replace the latex (rubber) waterproofing liquid with a two-component cement-based waterproofing mixture. It is applied like putty, with a spatula.
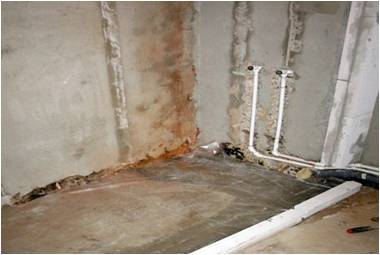
Sewerage
The drainage of the pallet drain must be done prior to the construction of the pallet. It is more comfortable. Sewer pipes must be laid at a slope (min. 1%) and must be fixed in this position.
Conclusions and useful video on the topic
The whole process of building a shower tray is presented in the following video:
As you can see, the construction process is not particularly complicated. The main thing is to develop a project and not be too lazy to bring it to mind. Well, the tools.If they are available at home or they can be borrowed from a neighbor, in a word, you don’t have to spend money on buying them.
The entire construction of the pallet will cost the owner several times cheaper than the cost of the same acrylic pallet of dubious production, which, most likely, will have to be thrown into the trash in a year and a half.
The resulting shower tray with a tile finish, made with your own hands, and even if somewhat imperfect in some ways, will always faithfully last not years, but decades.
Please leave it in the box below. Ask questions and publish photos on the topic of the article. Tell us about how you built a shower tray with your own hands or one of your friends.


