- Brick or metal?
- Traditional Russian ovens
- With a bed
- with stove
- With water box
- Russian "teplushka" with a stove bench 127 x 166 cm
- What are the principles for determining the place of installation
- The main stages and important features of laying the furnace
- Brick oven projects examples
- Furnace for giving
- Scheme with ordering, ordinal instruction
- Russian stove
- How to build a long burning stove
- An even simpler version of the stove
- Advantages of the simplest furnace designs
- How to choose a device?
- For residential building
- For cottage heating
- Instrument preparation
- Preparatory work
- Location selection
- Masonry tools
- Necessary materials
- Brick selection
- Foundation
- Masonry mortar
- Clay Quality Check
- Types of furnaces
- How to choose a place for the oven
- Operation and maintenance of Dutch ovens, cleaning
Brick or metal?
If the room is planned to be heated only with a stove, then a brick one is better - it gives off heat to the room longer and cools down more slowly. It needs to install a strong foundation that holds the structure.
Photo 3. Ready-made simple stove for heating the cottage. Additionally equipped with a cooking surface.
A metal stove is suitable when the house already has heating or the room is used only from time to time and it needs to be quickly warmed up.The metal furnace is lightweight and does not require the installation of a foundation.
The choice of one or another type of furnace depends on the conditions where it is planned to use it.
Traditional Russian ovens
Despite all the variety of devices of Russian stoves, there are several of their main types.
With a bed
In the Russian hut on stoves in the cold season, heated sleeping places were arranged. While the thermal insulation of the walls was not reliable, they tried to make such beds as high as possible, where warm air was collected under the ceiling. On the floor you had to climb a ladder. They accommodated from 2 to 6 people.
Traditional Russian oven with stove bench
Later, the design of the buildings improved. The beds were attached to the stoves on the side, passing inside the smoke channel for heating. The height from the floor did not exceed 0.5 m.
with stove
If a heated bench is not attached to the stove, a cast-iron stove is placed above the firebox. It acts as a cooking surface. Covered burners (usually two) are factory cast in the stove. If necessary, the lid can be removed and installed in the opening of the cauldron with food.
With water box
A heating box for water with a collapsible tap is built directly into the masonry. As an option, a metal riveted or welded case is mounted, where a box with water is inserted.
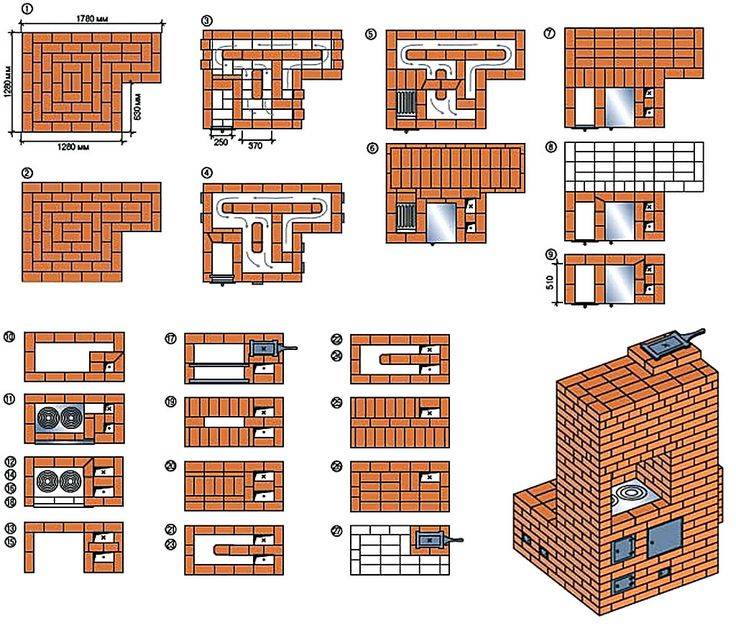
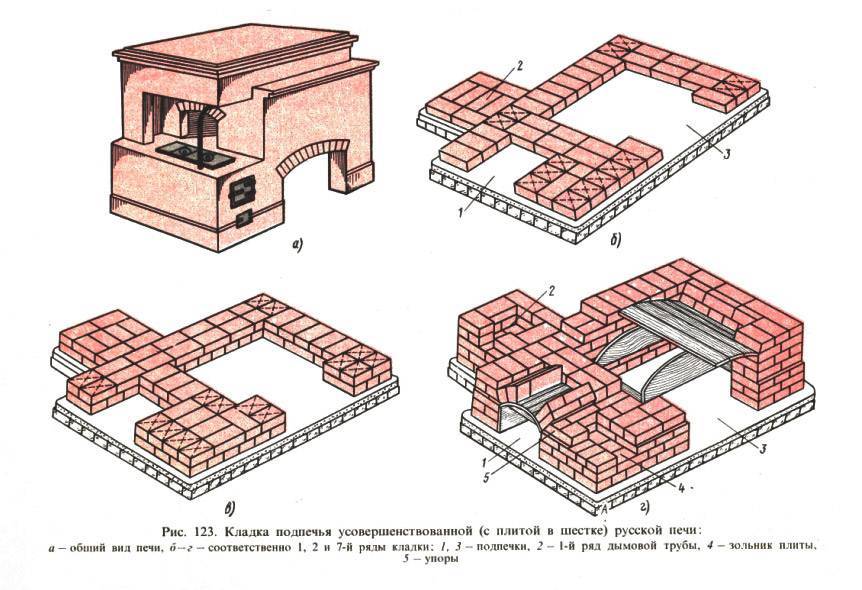
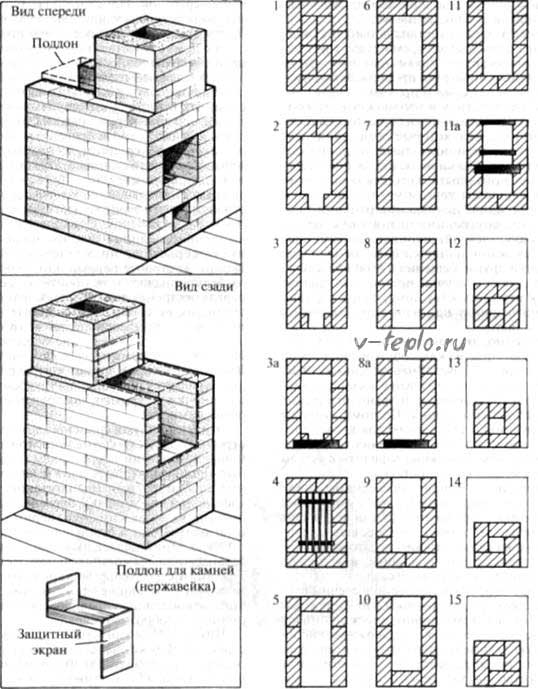
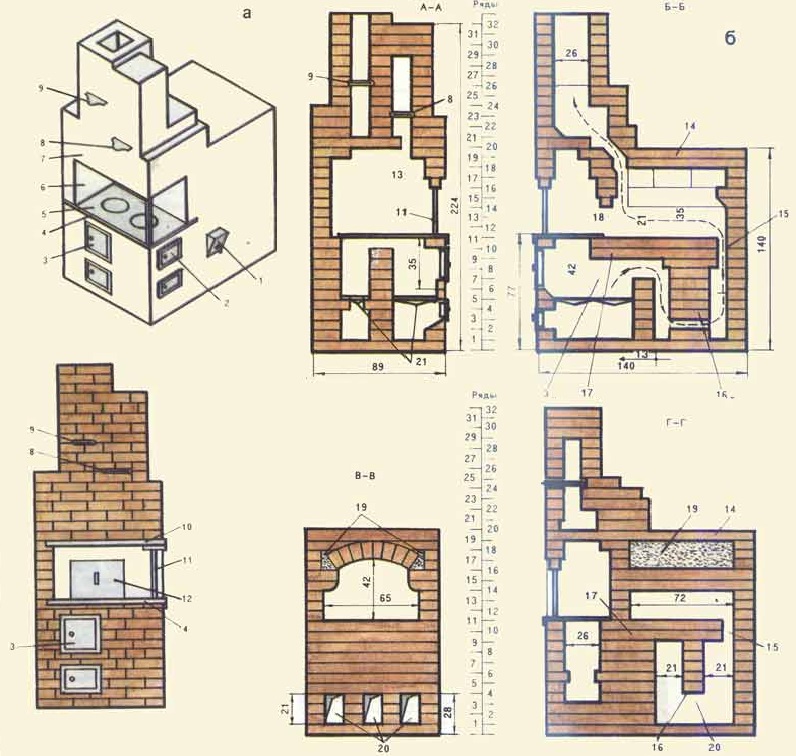
Russian "teplushka" with a stove bench 127 x 166 cm
The device and principle of operation of this stove are similar to the previous heat source. The difference is in size, power and some design features. 3 modes are also available here - winter, summer and a firebox in Russian. The heat output is 4.5 kW, the heated area is 45-50 m².
In winter mode, firewood can be burned on the grate of the crucible or in the firebox - the gases will still go through the lower passages and warm up the entire stove
The size of the furnace in plan is 1270 x 1660 mm plus 10 cm for the foundation ledge. The height of the frontal part is 210 cm, the beds are 147 cm. A set of materials for construction:
- refractory bricks SHA-8 - 26 pcs.;
- red solid brick - 995 pcs. (the chimney is not included in the specified quantity);
- fireclay block type ShB-94 - 1 pc.;
- the main door, installed in the mouth - 41 x 25 cm;
- ash pan door 14 x 25 cm, furnace door - 21 x 25 cm;
- 2 grate grates with dimensions 240 x 415 and 220 x 325 mm;
- stove 71 x 41 cm (2 burners);
- chimney damper type ZV-5, size 260 x 240 x 455 mm;
- 2 gate valves 130 x 250 mm;
- sheet steel 2 mm thick;
- galvanized reinforcing mesh - 1.5 lm (cell 30 x 30, wire 1 mm in diameter);
- template for forming an arch, radius - 322.5, length - 645 mm;
- circled under the arch of the main furnace with a radius of 60, a length of 77 cm;
- corrugated packaging cardboard, kaolin wool.
It looks like a big "Teplushka" with a capacity of 4.5 kW
Preparatory work - the device of a reliable foundation. Keep in mind that after pouring the foundation, the formwork can be removed after 3-4 days (during the warm period), and the furnace can be built only after 2 weeks. The base area is covered with waterproofing - a roofing material folded in half.
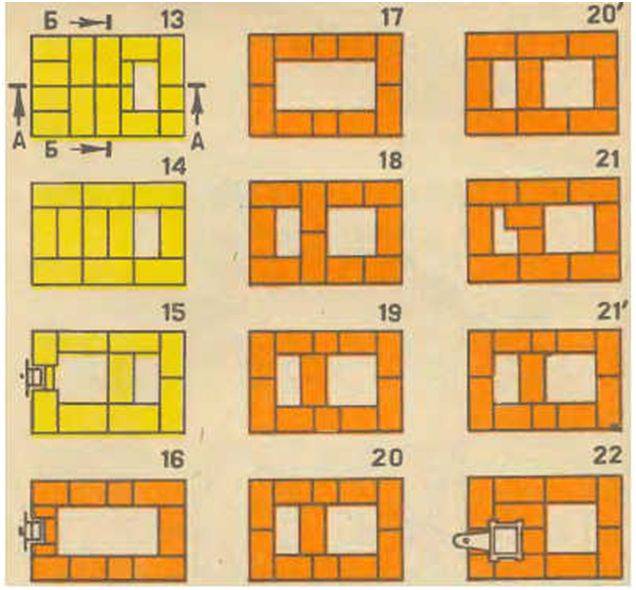
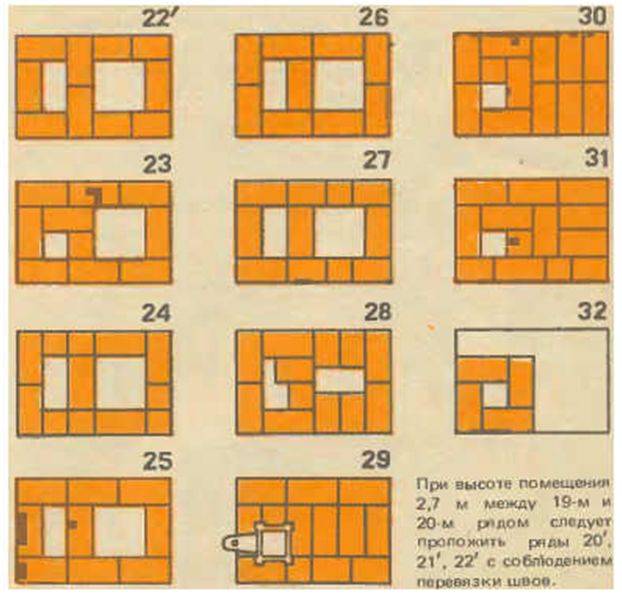
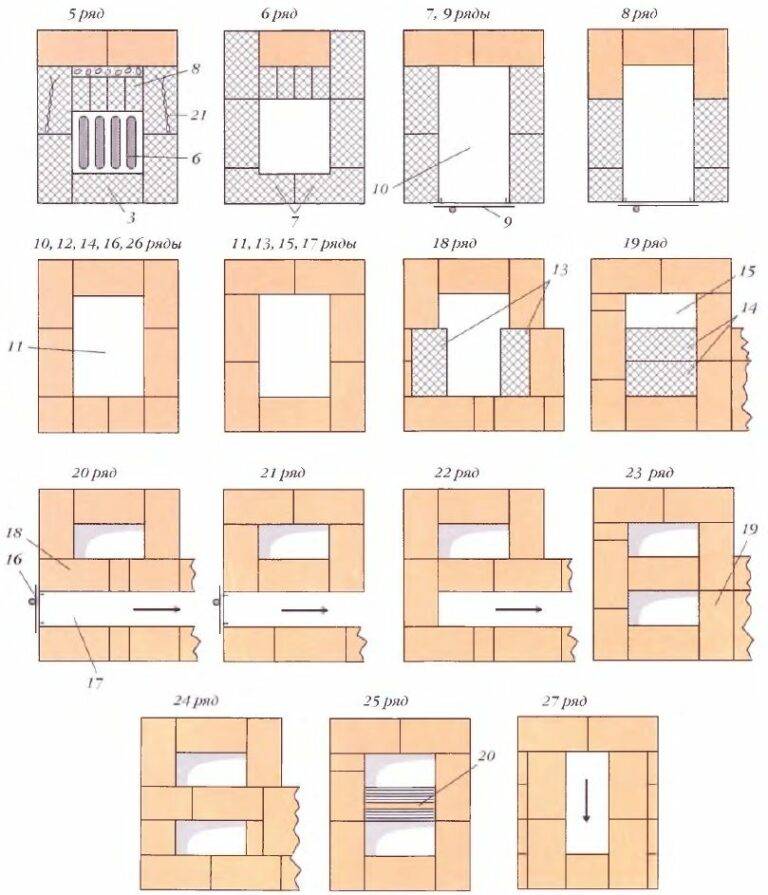
How to properly lay out the full-size "Teplushka":
- Row No. 1 is solid, consists of 65 ceramic bricks. On the second tier, we begin to form the walls of the furnace and support posts, put the door of the ash chamber. We set 8 stones on a poke without mortar and cut them to the height of the 3rd row. We do not connect with the rest of the masonry - these will be cleaning hatches.
- We put the third tier according to the scheme, on the 4th we block the ash pan. On the 5th row, we begin to build the walls of the firebox from refractory, insert a grate 415 x 240 mm.
- We continue to lay rows 6 and 7 according to the scheme, fireclay stones are placed on the edge. After the formation of the 7th tier, we mount the firebox door and the summer valve, installed vertically. 8-9 rows are built according to the orders.
- On the 10th tier, we block the underflow, cover the upper ends of the refractory bricks with kaolin wool. The front part of the chamber must be covered with a fireclay block SHB-94 or similar. We begin to reinforce the walls of the furnace with galvanized wire mesh, then we arrange a second overlap of red bricks (row 11).
- On the finished 11th tier, we insert the stove and grates of the main chamber - the crucible. We make level No. 12 according to the order and mount a large door. Then we lay out the 13th tier and the arch, using the circle.
- We build rows 14-17 according to the drawings, raising the outer walls of the furnace, the smoke channel and the front partition of the crucible. Next, we put an arched vault R = 60 cm from wedge bricks. Tiers 18, 19 continue to build according to the schemes.
- With the twentieth row, we block the front arch and raise the outer walls higher. We fill the void above the arch with a solution of clay and sand. After drying, we build tier 21 - the plane of the couch.
- Tiers 22-32 make up the front section of the stove, where the hailo is combined with a side flue. We line up the rows according to the schemes, at the 24th level we put 2 valves, on the 29th level there is a sheet of metal that covers the stove.
Step-by-step instructions for the construction of a Russian multifunctional stove will be given by an expert in his video:
What are the principles for determining the place of installation
It should be understood that the question of where the stove should be located in the house is extremely important and responsible, therefore, it is worthwhile to approach the search for an answer to it with special care.
The principles for locating are as follows:
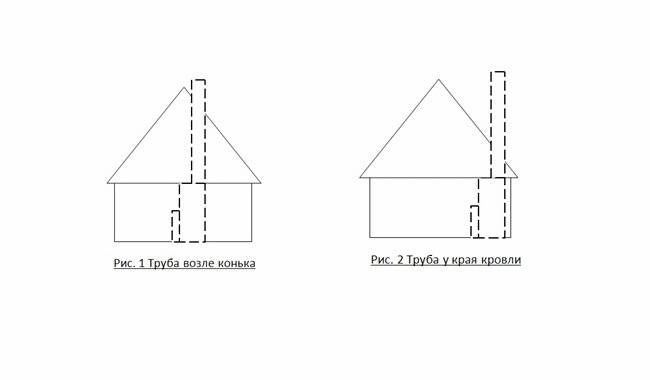
- Any stove should be located as close as possible to the central part of the house so that the outer chimney does not go far from the ridge.
- The correct location of the device will be if other communications are not carried out under it, for example, water supply.
- When installing two furnaces in one zone, it is still better to design a foundation for each in order to protect yourself from the rapid destruction of products.
In addition, it should be clearly understood that one design must heat at least two rooms, otherwise its installation will not be appropriate.
The main stages and important features of laying the furnace
From the moment the foundation is poured to the start of construction, 3-4 weeks should pass. During this time, the base will gain the necessary strength and be able to withstand the weight of a brick oven. The work in question requires maximum responsibility and concentration on the part of the performer. Any mistakes can lead to irreparable consequences, so tune in to work in advance and allocate enough time to complete it.
DIY brick oven
The laying of the furnace is carried out in several stages.
First stage. Lay out the ash pan and the lower part of the first cap from the brick. Carry out masonry using the previously discussed sand-clay solution.


Second phase. Install the ash pan door into the masonry. Use galvanized wire to fix the door.
Install the ash pan door into the masonry
Third stage. Install a grate above the ash pan chamber.
Install a grate above the ash pan chamber
Fourth stage. Mount the firebox. Surround the inside of this compartment with refractory bricks. Bricks lay out "on edge". At this stage, you need to use a special masonry mortar. It is prepared in the same way as the standard one, but instead of simple clay, refractory clay is taken, i.e. fireclay. Secure the combustion chamber door with a steel plate and the wire you already know.
Fifth stage. Continue the standard laying until you reach the 12th row. Having reached this row, close the combustion chamber and evenly lay the tiles with burners. This plate must be made of cast iron. Check the evenness of the laying using the building level.
Sixth stage. Lay out the first cap. It is built in the left edge of the stove. At the same stage, a canal for the summer course is being equipped.
Seventh stage. Install the stove and lay out the walls of the cooking compartment. Keep the calculation of the lower cap mentioned earlier.
Eighth stage. Install a gate valve for the mentioned summer run channel. This valve is located in the inner corner of the brewing compartment.
Ninth stage. Lead the laying to the 20th row. Having reached this row, close the cooking compartment and the first hood. Be sure to leave in the solid masonry the required number of openings for the summer run and the lifting channel, as well as the vents of the cooking compartment. Place bricks on steel corners - this way you will ensure higher strength and reliability of the stove.
Tenth stage. Close the portal of the brewing compartment with hinged fireplace doors. It is better that the doors have heat-resistant glass inserts.This solution will allow you to monitor the process of burning fuel and admire the flame.
Eleventh stage. Install cleaning doors for easy soot removal. For installation, choose a place to which it will be easiest for you to get to.
Twelfth stage. Lay out the walls of the cap almost to the top edge of the wall opening. At the top, block the stove with a couple of rows of bricks. Fill the gap between the top of the stove and the jumper with mineral wool. This will provide additional thermal insulation and slightly increase the heating efficiency.
Thirteenth stage. Lay a decorative band around the upper perimeter of the unit.
Fourteenth stage. Proceed to the device of the chimney pipe. It is better that the chimney was brick. This design will last much longer than the same metal or asbestos pipes.
In the end, all you have to do is lay out the chimney to the end and, if desired, finish the exterior of the stove. The easiest option is plastering. Otherwise, be guided by your own preferences and available budget.
Thus, laying the stove, although not a simple event, but it is quite possible to do it yourself. It is enough to simply understand the technology and follow the instructions in everything. Remember, the materials for work should be of the highest quality. And the schemes of furnaces tested over the years will allow you to independently build a unit that will heat your house for many years without any problems and complaints.
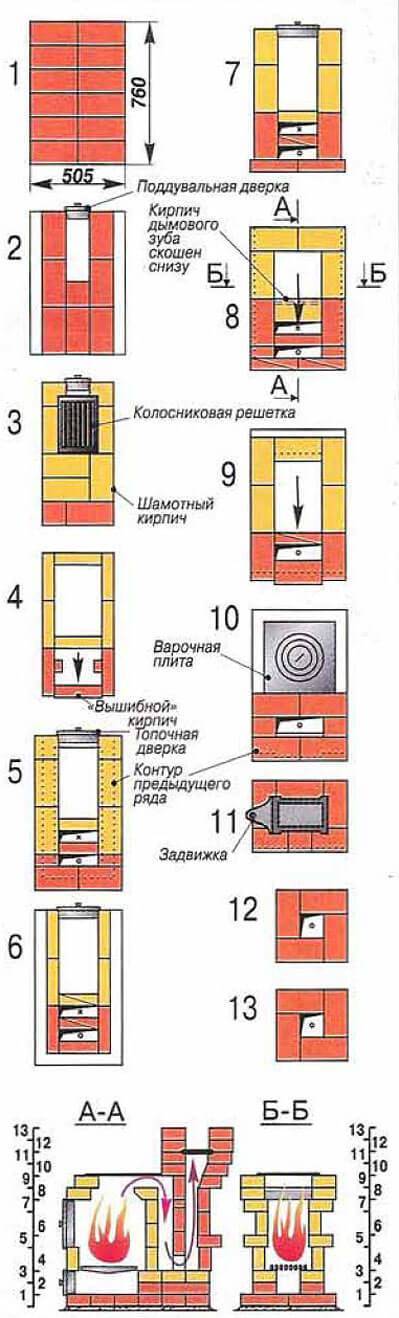
Brick oven projects examples
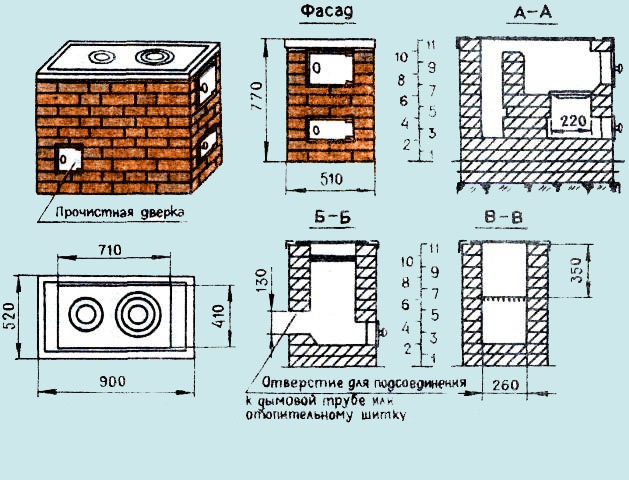
Furnace for giving
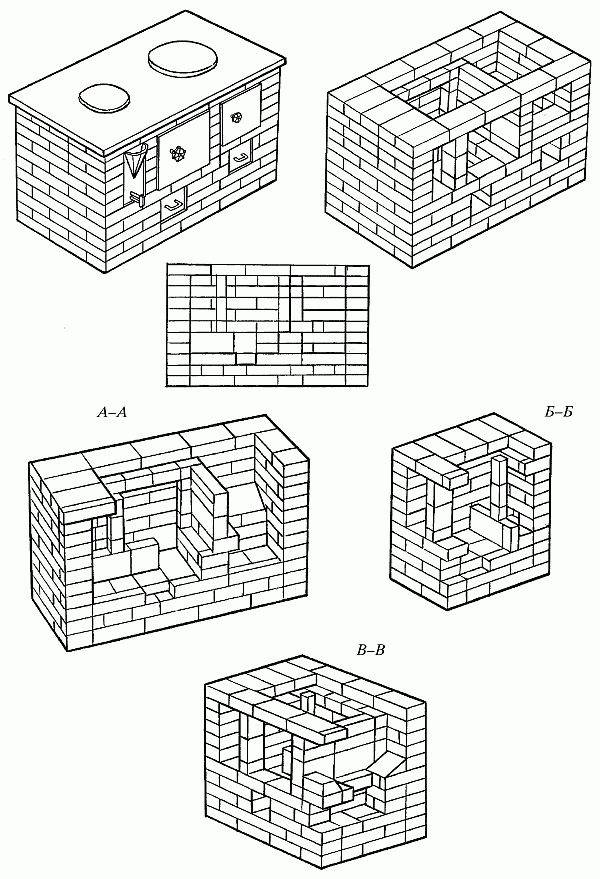
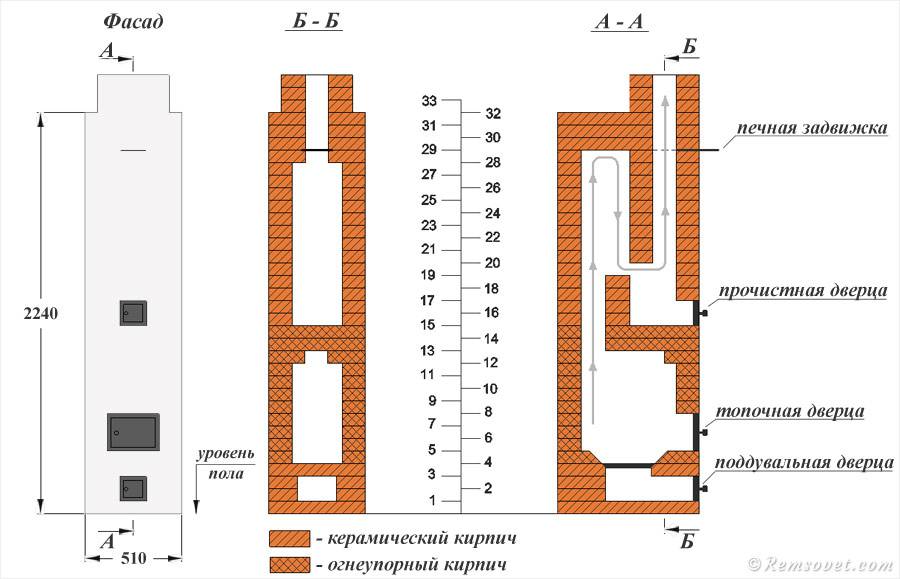
The average size of a country house is about 15-20 square meters. With a consumption of only 280 bricks, you can build a small stove, 2 by 3 meters in size and with a heat capacity coefficient of 1.90 kW.As mentioned earlier, the furnace part is made of refractory bricks, and the whole body is built of ceramic red.
The figure shows the project of the furnace in the context
Such a simple option can easily be made of bricks with their own hands by every beginner, without even making mistakes.
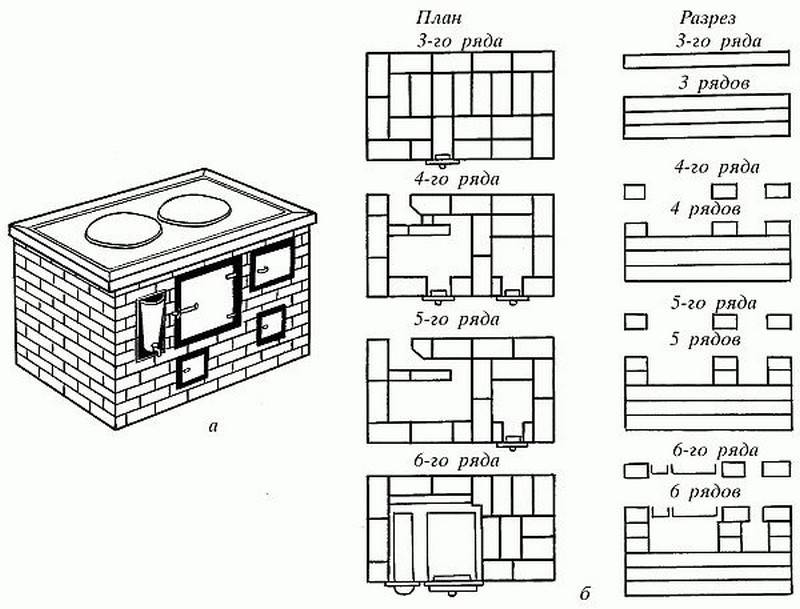
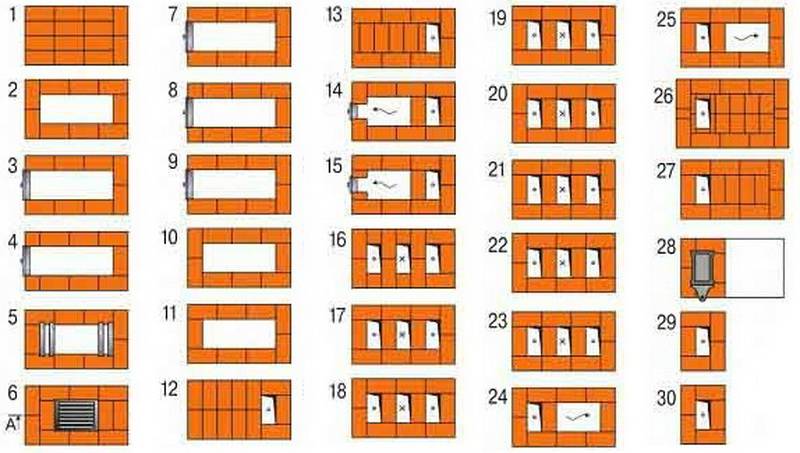
Scheme with ordering, ordinal instruction
Despite the small dimensions and light weight, it still requires the construction of a separate foundation. The foundation must also withstand the pressure of the chimney.
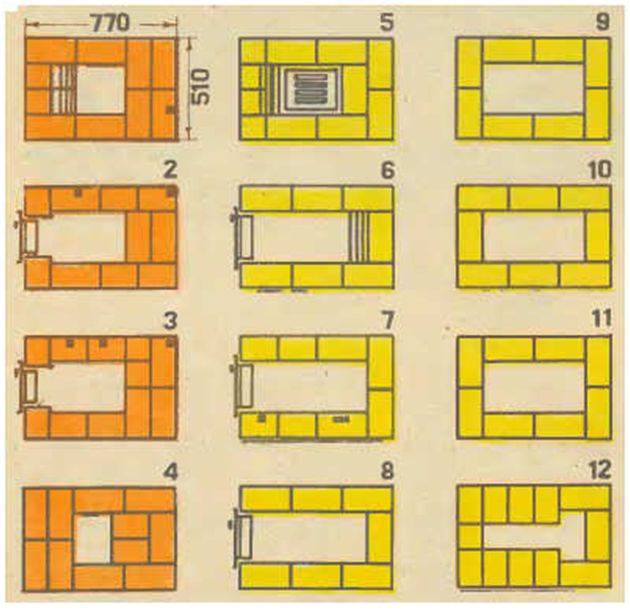
The thickness of the joint for masonry should be standard 8-10 mm., while the thickness of the joint between refractory bricks should be half as much.
It is better not to change the drawing if you do not have your experience.
For such a furnace, the chimney is laid in a brick floor.
Material Quantity:
You will need about 210 pieces of ordinary brick, about 75 pieces of fireclay. The clay solution will take about 70 liters. Sand 0.4 cu. m. One grate, door for furnace, blower and cleaning. Two smoke dampers. Sheet of metal for the foundation. For waterproofing about 3 meters of roofing material.

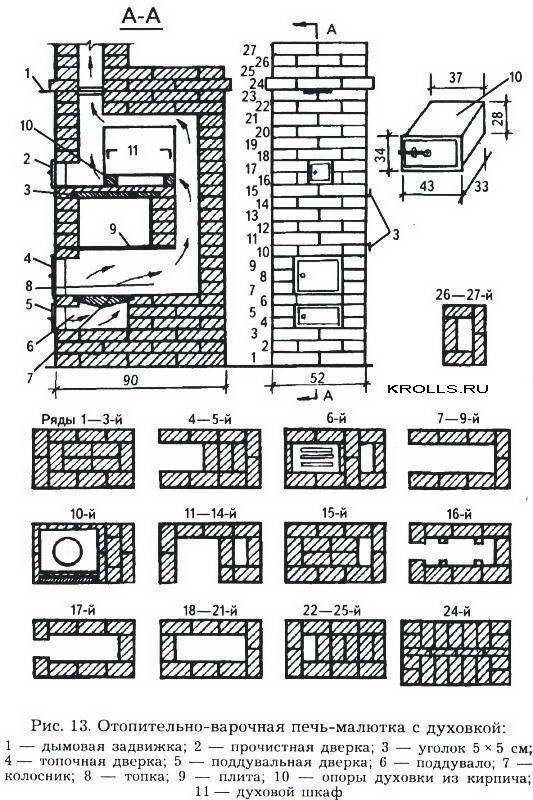

The number of bricks is approximate, as there will be a certain percentage of brick battle.
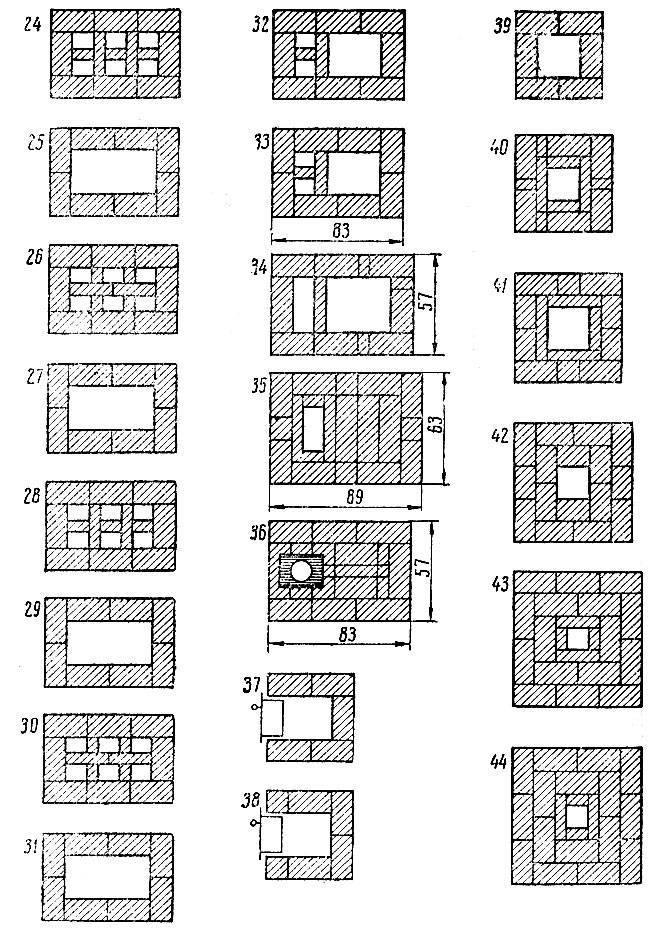
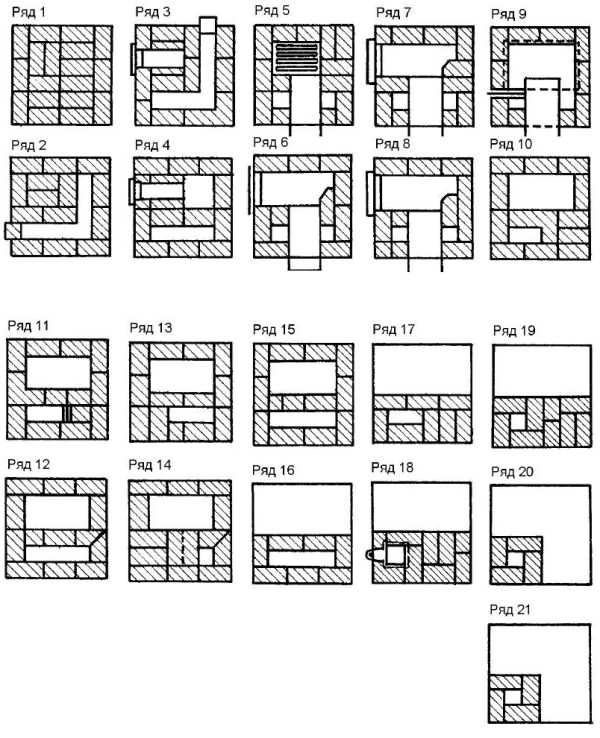
Russian stove
Such a furnace has an efficiency of 80 percent. She has a beautiful appearance. On such an oven you can cook food and there is a stove bench in its design. Laying and erection schemes are quite simple. Its main disadvantage is the design feature, due to which it heats only the upper part of the room. But in our country, it is still popular.
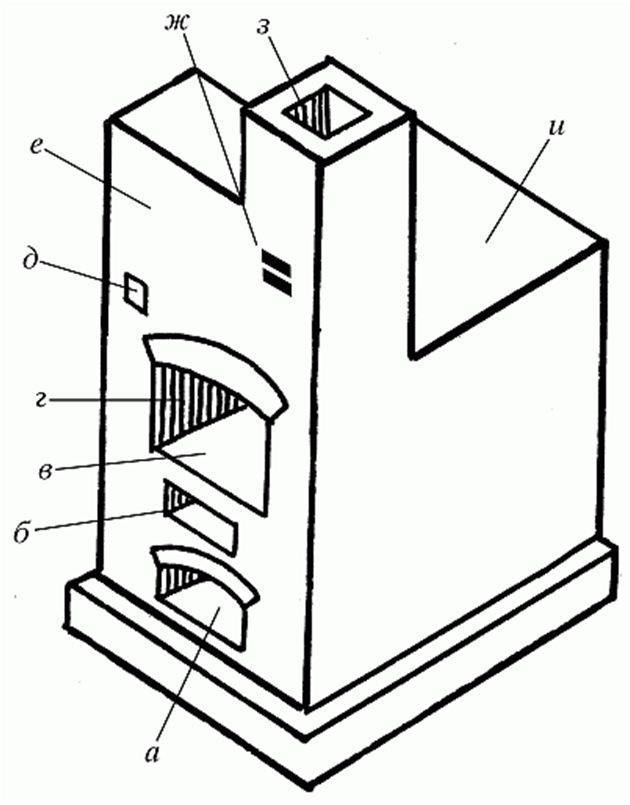
What does it consist of:
- A) the ward part;
- B) niche;
- B) six;
- D) bugle;
- D) stuffy part;
- E) shield;
- G) valve;
- H) chimney pipe;
- I) Repainting the crucible.
Large, small and medium-sized furnaces are built according to their size. Consider a small one, measuring 1270 by 650 by 2380 mm.
Necessary materials:
Brick red about 1620 pieces. The clay solution will take about 1000 liters. From steel, a plug measuring 430 by 340, a valve measuring 300 by 300 (two pieces), a samovar, measuring 140 by 140 (one).

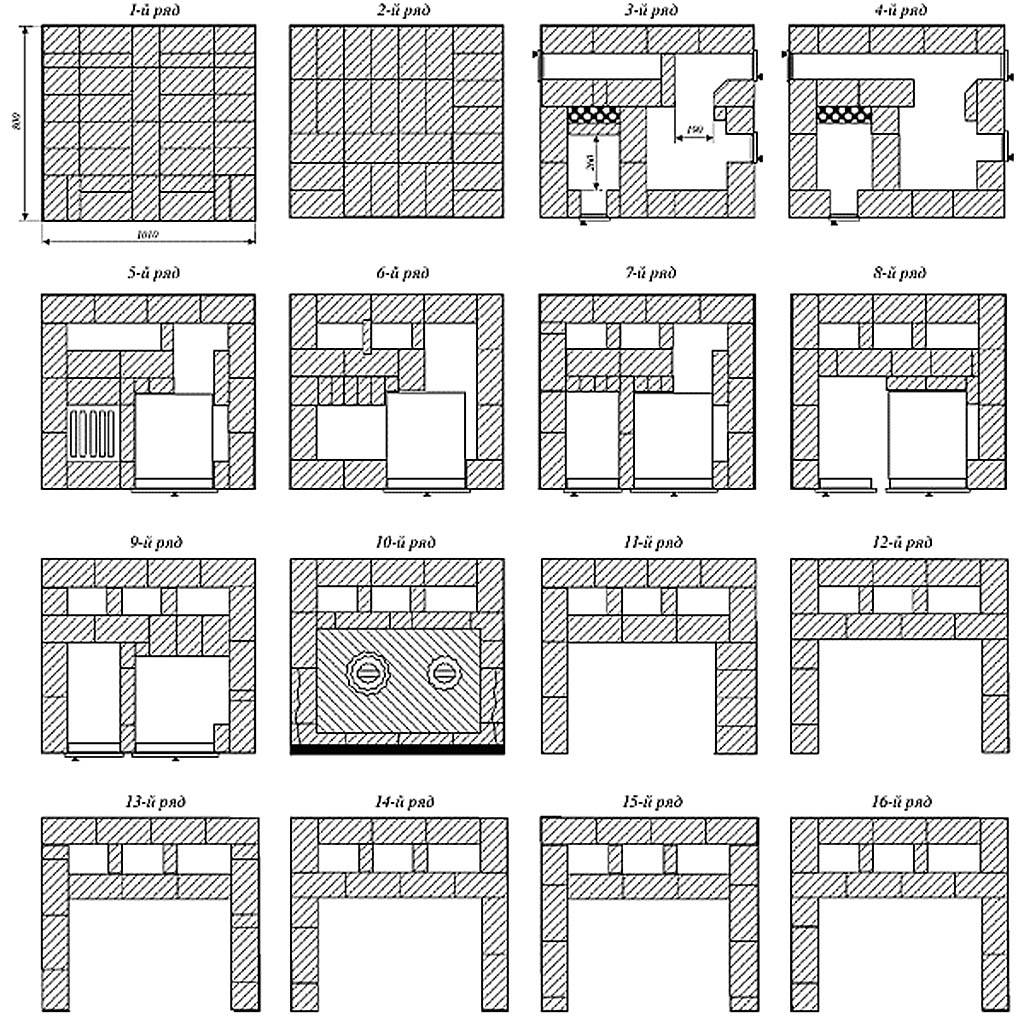
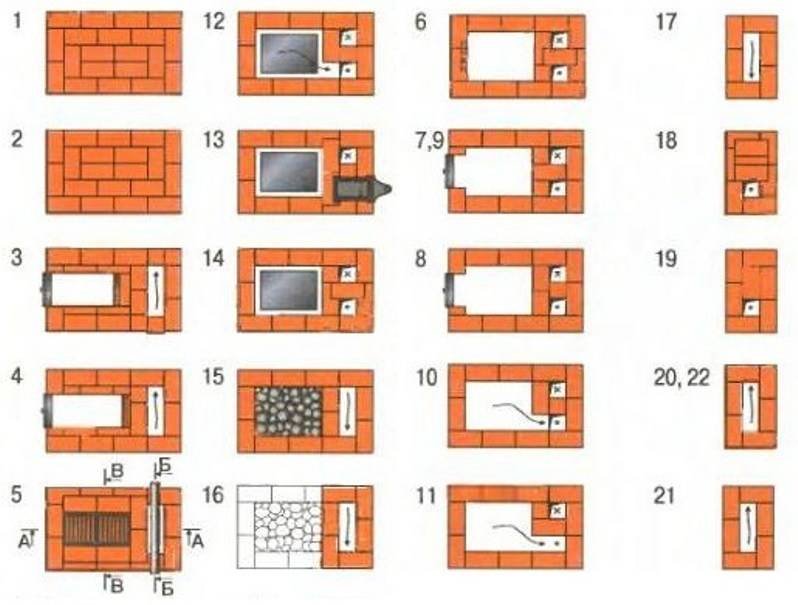
Order of the Russian stove:
Row No. 1 is laid out from solid ceramic bricks, on lime mortar with the addition of cement. There is a formation of the ward part;
Row number 2 to number 4 is laid out well. All sutures are tied. On the one hand, they leave room for baking;
Rows No. 5 to No. 7 erect a vault over the oven;
Row No. 8 to No. 10 a lock is being erected for the vault;
Row number 11 lay out a cold stove. Sand is poured into the remaining space between the stove and the stove;
Row number 12 is laid out "under". It is made from a special brick;
Row No. 13 the beginning of the cooking chamber;
Row No. 14 to 16 are done in the same way as the previous one;
Row No. 17 set the vaults of the mouths;
Row No. 18 laying the walls of the furnace;
Row No. 19 of the wall of the vault;
Row No. 20 with the help of halves of bricks narrow the hole above the hearth;
Row No. 21 align the walls;
Row No. 22 stage of alignment and reduction of the pre-pipe part;
Row No. 23 lay out a samovar;
Rows from No. 24 to No. 32 installation of view valves;
Row No. 32 chimney masonry. In a Russian stove, a chimney is laid in 2 bricks.
Some features can be seen in Fig.

Before you start laying furnaces, you should try to lay out at least one without mortar in order to understand the essence of the schemes. But with effort and patience, everyone can make a stove with their own hands.


How to build a long burning stove
Quite a few owners of homes with stove heating would be interested in converting their brick stove so that it works in a long-burning mode. However, this cannot be done at home.
The fact is that in order to work in this mode, the tightness of the furnace must be ensured, in which smoke with a high concentration of carbon monoxide will be collected. These gases must not be allowed to enter the room. At the same time, for smoldering, it is necessary to minimize the flow of air, which can be done using the blower door, but this is very inconvenient.
To some extent, smoldering of fuel can be achieved in a Russian or Dutch oven. However, this is not safe, so it is still better to opt for a stove that retains heat for a long time. Alternatively, you can buy a factory-made long-burning metal stove, which, by the way, will be cheaper than building a brick stove for a house with your own hands according to the drawings. Yes, and their efficiency will not be lower.
If you still decide to build a brick oven yourself, weigh all the arguments and decide on the design. Then you will need to find an order with a description of the masonry and purchase consumables
Please note that furnace work requires certain skills.
Before laying the stove, it is necessary to pour a powerful foundation, and its dimensions should exceed the body of the stove by 10-15 cm on each side. You can use concrete mortar with reinforcing mesh, rubble stone or concrete blocks. Remember that the stove foundation should not be connected to the main foundation of the house, otherwise the stove or chimney may burst during interseasonal ground shifts.
The body of the furnace is laid out from two types of bricks - solid and fireclay. Refractory fireclay bricks are used for laying especially hot places - a combustion chamber and smoke channels. For adhesion of refractory bricks, a solution based on fireclay clay or with the addition of fireclay powder is used.
Please note that to compensate for the difference in thermal expansion between refractory and ceramic bricks, a gap of 5 mm is left.
All factory parts - views, grates, doors, dampers, hob - must be installed in the places provided for by the scheme. For the strength of fastening the door, a calcined wire 30-40 cm long is threaded into it and walled up in masonry. As for the grate and cast-iron plate, grooves are made under them in bricks, taking into account gaps to the metal of 5 mm for thermal expansion and laying a cord or asbestos fabric.
The last element of the furnace is the chimney. It can be made of ceramic bricks or you can purchase a ready-made block chimney. Factory products are not only durable, but also resistant to condensate containing carbonic acid, do not clog for a long time and provide good traction.
The finishing of the finished furnace is made at the discretion of the owners. You can use clinker, ceramic tiles or finishing stone. This will give the stove a finished and attractive look, as well as protect it from moisture and dust, which will extend its life.
Not only its durability, but also the safety of residents will depend on how responsibly and competently you approach the choice of stove design and its manufacture. Be that as it may, a wood-burning brick oven always fills the house with living warmth and brings coziness and comfort.
An even simpler version of the stove
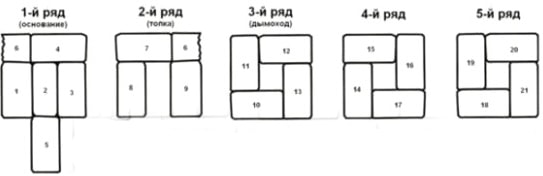
If the previous option seemed complicated to someone (although it is not), you can offer an extremely simplified heating design. This oven with your own hands can be laid out in just an hour, even if the hands are generally far from being called golden.
Figure 4. The simplest version of a brick oven
The principle of operation of the structure is simple. Solid fuel burns below, here it settles under the influence of its own mass. Temperature differences create a thrust that carries hot air currents upward. At the same time, firewood burns almost without residue - the smoke is minimal.
For masonry, you only need two dozen whole bricks and two halves. The stove consists of five rows. The design is so simple that it makes no sense to describe the order. The procedure is clearly shown in the illustration.
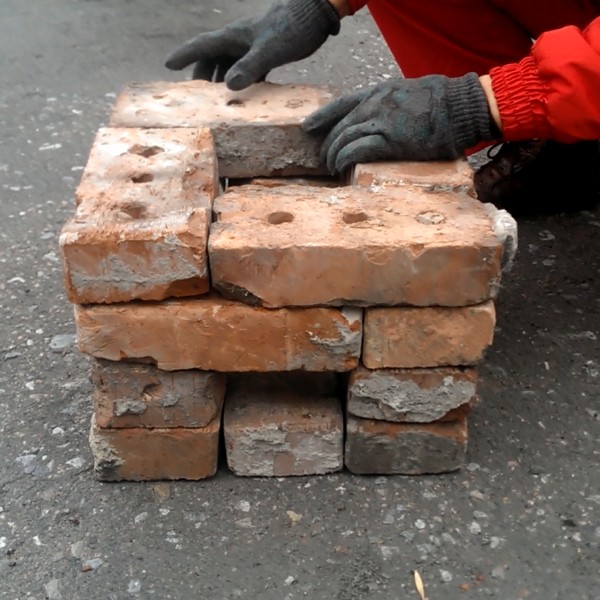

For those who want an intermediate option, we can recommend a slightly more complicated option.
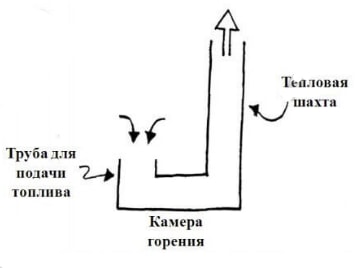
Figure 9. L-shaped stove
The creation of this design will also require 20-30 bricks. This option can be mastered by yourself in a couple of hours, if the skills of a bricklayer are completely absent. The construction will obey the specialist in a matter of minutes.


Advantages of the simplest furnace designs
- very high installation speed - from a day to several minutes;
- does not require a foundation; the stove can be folded anywhere; and if you do not use a binder mixture, the stove comes out collapsible and easily moves;
- as fuel - everything that burns: logs, branches, cones, corn stalks, leaves, chipboard, furniture remnants, etc.;
- fuel consumption is several times less than, for example, in the case of a potbelly stove;
- the simplest option - without the use of clay - allows you to get more heat transfer than from a fire; therefore, such constructions are a godsend for those who do not want to constantly maintain a fire on a hike;
- almost complete absence of smoke - fuel burns with a minimum of waste;
- the temperature of the bricks reaches 1000 degrees - good heating and fast cooking are provided.
How to choose a device?
For residential building
A village house with permanent residence needs a simple brick building for heating, because if the brick constantly freezes due to irregular use, for example, as in a country house, the building will quickly begin to collapse. And for domestic needs, even a small stove will provide comfort and coziness, retaining heat for a long time, while a metal device cools down quickly after burning firewood.
For cottage heating
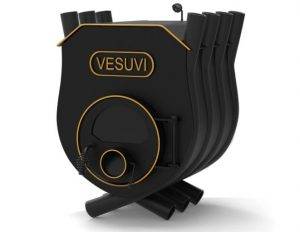
If the site is visited periodically, and there is a need to quickly heat the room, in this case it is recommended to install a calorific metal furnace-buleryan. It can be homemade or bought ready-made. The power of such a device is enough to quickly heat a small room, in addition, a metal wood-burning stove is small, narrow, it can be placed in any convenient place.
If the country house is a frame house that does not retain heat well, in this case, brick rough is better suited for the room. These are narrow, light, square structures that are easy to make on your own, which is a significant plus. If the floor is strong, you do not need to make a foundation to build a homemade heating device.The power of the structure is limited - up to 12 kW, but if the room needs to be heated periodically in winter, this option is best suited. Also in country houses a gas stove is used. It is much easier to operate, and does not require special care.
Instrument preparation
In order to perform bricklaying, you will need the following tools:
- rectangular and acute-angled sledgehammer;
- tamper made of metal or wood;
- stitching for concave and convex seams;
- combined trowel;
- spatula for working with mortar and trowel;
- measuring devices: a rule made of wood or aluminum, a plumb line, a level, a tape measure, a folding ruler, a square.
In addition, guide racks are needed, which will be mounted in the house for the duration of the work. This is required in order for the brickwork to be even. It is impossible to correct skewed corners, so it is better to take care of their correctness in advance. Racks are installed in a strictly vertical position, horizontal bars are attached to them or, even better, wooden formwork.
Preparatory work
Before you start building a Russian stove, you should make sure that everything you need is available.
Location selection
A lot depends on the choice of a place to build a furnace. It is necessary to maintain a gap to the walls of combustible material of 30-40 cm or provide their protective sheathing with asbestos. Gaps will also be required for access to the outer walls of the stove for the purpose of their inspection and repair.
For a heavy unit weighing several tons, you need a solid foundation (foundation), protected from ground moisture.A place is provided in advance where the chimney will pass through the ceiling and roof ceilings. There should not be a ridge or rafters.
Masonry tools
The main working tools of the stove:
- a narrow trowel (trowel) for laying the mortar and stripping the excess from the seams;
- hammer-pick for giving a solid brick the required shape;
- building level and plumb.
To mix the solution, you need a shovel and a container.
stove-maker's tool
Now cutting bricks into a wedge, removing corners and grinding the cladding is done with a hand-held power tool (grinder) with diamond wheels. This greatly simplifies the work of the master.
Necessary materials
The main materials for building a reliable hearth: brick and refractory mortar
Their quality is given close attention. You will also need: cast iron for doors, dampers, gate valves, grates and a cooking stove
Brick selection
The correct selection of bricks for work is a key factor in the efficiency of heat transfer and the long service life of the future hearth. Therefore, it makes sense to purchase only the first grade red clay brick of the M150-M200 brand. Hollow material for oven masonry is unsuitable.
Not suitable for such work and bricks with obvious traces of marriage:
- non-compliance with the standard (230x125x65 mm), to which all standard orders are oriented;
- with traces of overburning, warping, shape and surface defects;
- with shells after the release of gases;
- having cracks and scuffs from cutting.
Special grades of top quality bricks, called hearth bricks, are sold individually and are ideal for laying stoves.
Foundation
The base of a heavy furnace is arranged on a concrete foundation, which is cast on a compacted crushed stone cushion in a pit up to half a meter deep.Horizontal waterproofing from groundwater is performed from 2 layers of roofing material on bituminous mastic.
Masonry mortar
The requirements for a solution suitable for furnace work are seriously different from the usual ones.
The material is required:
- resistance to high temperatures;
- coefficient of thermal expansion, as close as possible to that of masonry bricks.
Refractory mixture for laying furnaces
Since the quality of the clay plays a leading role here, it is better to buy a ready-made dry mix at a hardware store.
Clay Quality Check
The suitability of clay for masonry can be checked in a folk way. From the solution, make a spherical lump the size of a child's fist and slowly squeeze between two planks. If the clay is of high quality, the lump will crack only after being compressed to half the size. Skinny bad clay does not deform at all, and medium-quality material will burst after being compressed by about a third.
Types of furnaces
In the past, houses were built “from the stove”, that is, it was installed first, and then walls and ceilings were erected. These days, it is not necessary to do this, but it is desirable, especially when it is planned to position the stove in such a way that it heats several rooms at once.


The most common types of ovens are Russian, Swedish and Dutch. At the same time, the Russian one must be erected before the construction of the house begins, besides, it requires a separate foundation. In general, any kiln with 500 or more bricks needs a foundation that is separate from the base of the building. Easier with Dutch and Swedish ovens. They are compact, can be mounted in an already built building and do not need an additional foundation.
There is another wood-burning stove - bell-type.Its advantage is the efficiency, which reaches 70% compared to 50% for other types of furnaces. The disadvantage of such a furnace is a complex device, which is why it is almost impossible to assemble it with your own hands. Also, the stove cannot be equipped with a hob - the design is intended exclusively for space heating.
How to choose a place for the oven
The stove can be installed in different places in the room, but its most optimal location would be to build it into the walls between adjacent rooms. In this case, with a small area of \u200b\u200bthe house, one heating structure can be dispensed with if the heat-releasing surface is proportional to the size of the rooms into which they go.
It is very important to correctly determine the place of construction of a brick oven
It is not recommended to install the stove near the outer wall of the house, as it will dry out much faster, and, in fact, it is useless to “heat the street”.
The place chosen for the construction must be well measured and take into account some points:
The height of the ceiling of the room is important, since the brick oven must fit well into the space in its height.
The foundation for the furnace must be 110 ÷ 120 mm larger than its base, and for it it is also necessary to provide a suitable size area.
The chimney pipe, when laid up, should not stumble on the floor beams and on the rafter legs of the roof structure.
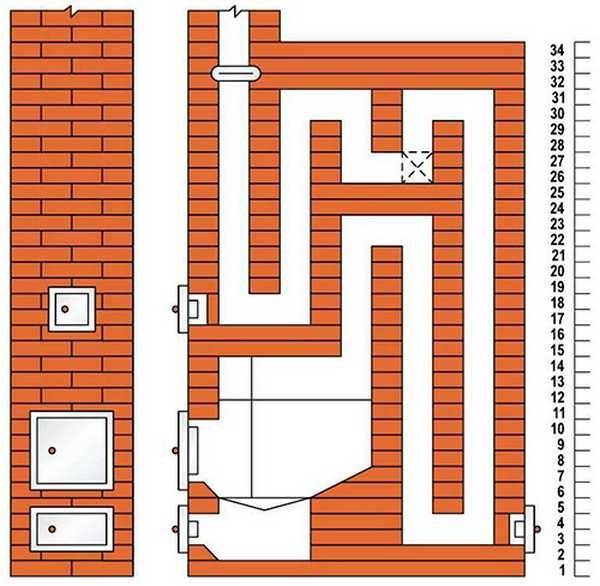
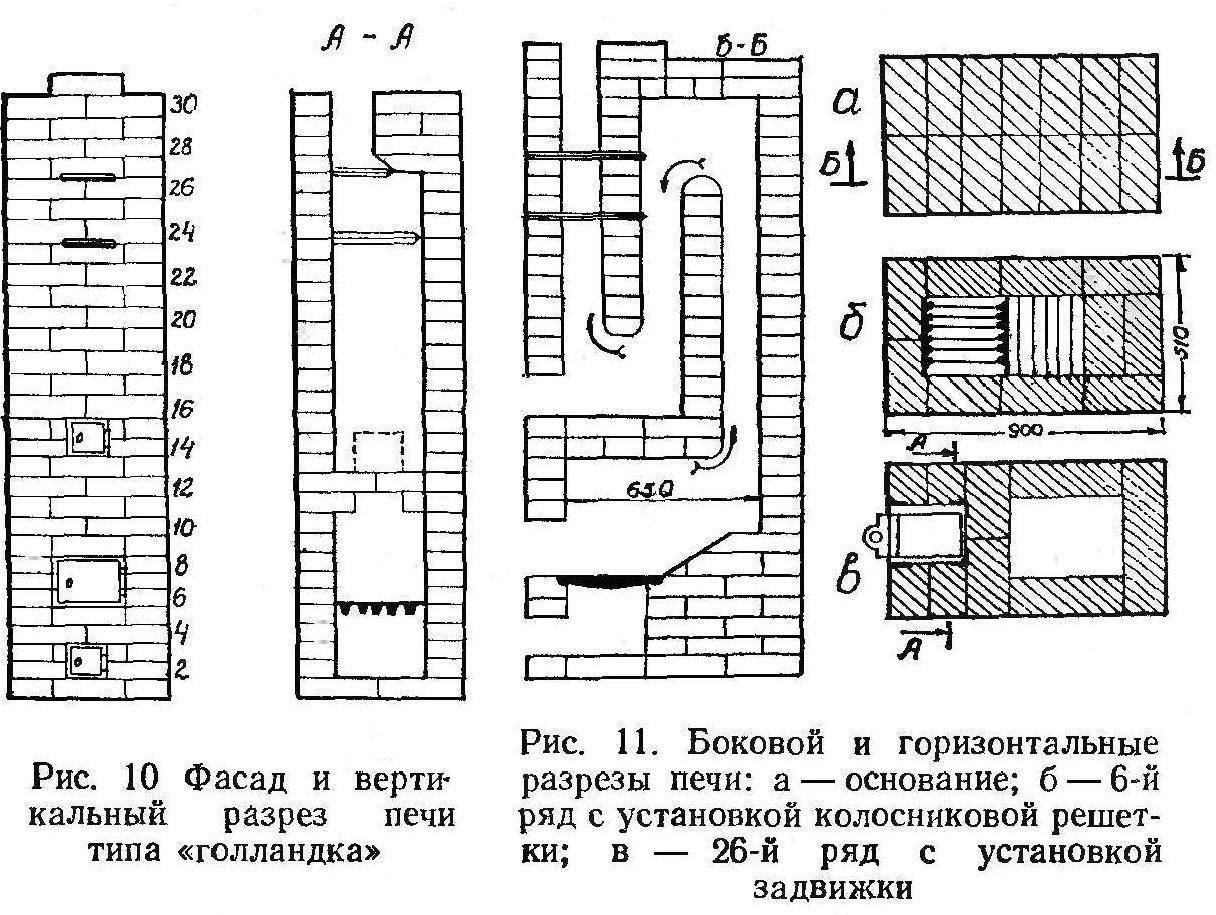
Operation and maintenance of Dutch ovens, cleaning
If you do not take coal into account, then dry birch firewood has always been considered the best fuel for solid fuel stoves, and the Dutch woman is no exception in this matter.Experienced stove-makers advise every tenth furnace to be fired with aspen logs with a moisture content of not more than 5%, since this helps to clean the channels and chimney of the furnace from soot.
There is no better fuel for a Dutch woman than dry birch firewood.
The intensity of combustion is regulated by means of a blower door and a chimney damper. Black smoke at the outlet of the pipe indicates that the Dutch woman has switched to gas generator mode. Since this occurs with a lack of oxygen, supplying additional air to the combustion zone will help eliminate this phenomenon. To do this, the blower door is slightly opened. If the flame rages with might and main in the fuel chamber, and the stove starts to hum, then this indicates excessive traction. In this case, part of the hot gases will simply fly out into the pipe, not having time to give up their heat to the walls of the heater. It must be remembered that the mode of operation of Dutch wood-burning heat generators is unhurried burning, almost smoldering. To reduce the intensity of the flame, it is enough to cover the air supply a little. Remember that a properly adjusted mode will save up to 25% of fuel.
Gallanka cleaning is carried out once a season. To do this, open the doors or brick plugs of the cleaning channels, after which the carbon deposits are scraped off the walls with brushes and spatulas with long handles and removed with a narrow metal scoop. Some "bright heads" recommend burning the chimney with flammable substances - acetone, gasoline, kerosene, etc. This is not recommended, since the ignition of soot and its release from the chimney can lead to a fire.You should also not listen to the advice of some "experts" who recommend burning naphthalene tablets to clean the channels. Firstly, the effectiveness of this method is extremely low, and secondly, this substance, when burned, forms the strongest carcinogen, the inhalation of which can be harmful to health. It is not for nothing that the profession of a chimney sweep was so popular in Europe of the last century - the manual method of cleaning chimneys and furnace channels is still considered the most effective and safe.


