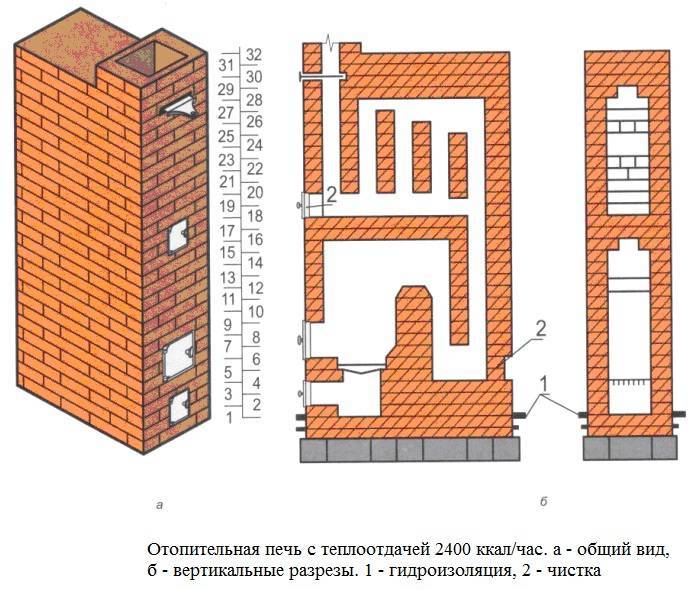
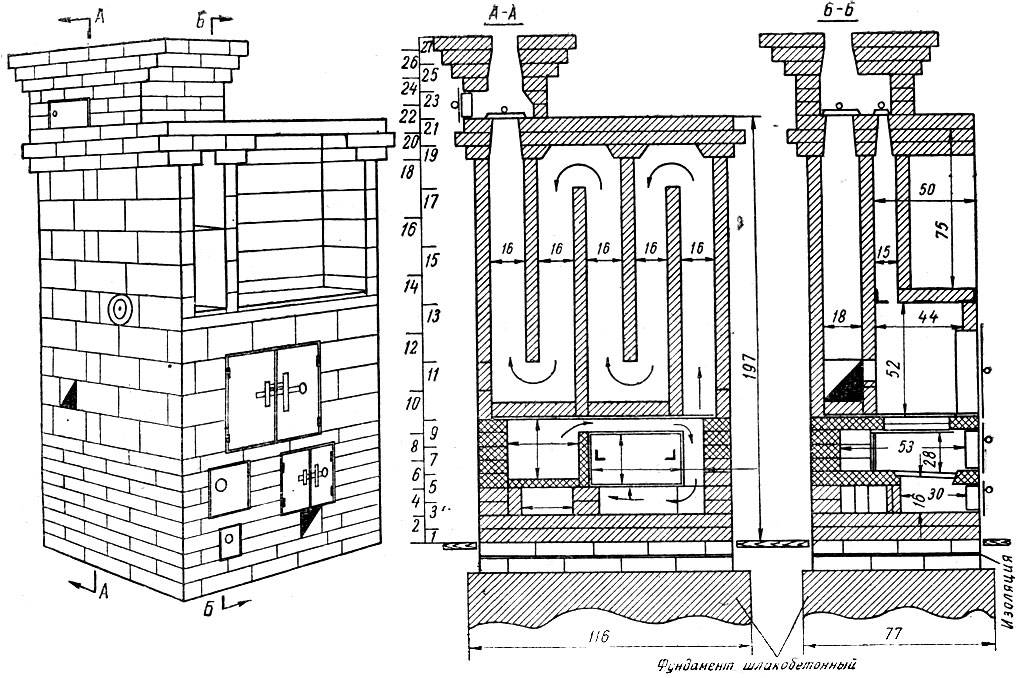
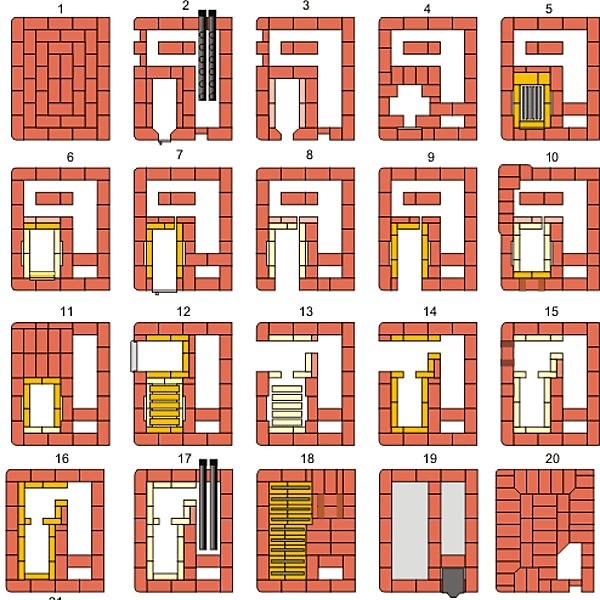
- Stage 4. Masonry
- ordering
- Rules to know when building a chimney
- Choosing the type of solid fuel boiler
- Types of solid fuel for heating boilers in the photo
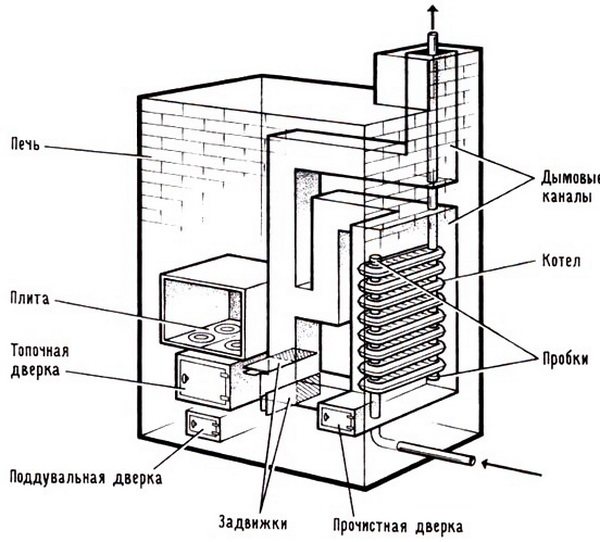
- Assembling the heating unit
- Main joints
- Furnace compartment
- Lower body
- Blower valve design
- Furnace masonry
- Solution preparation
- Prices for refractory mortar for stoves and fireplaces
- Preliminary preparation of the foundation
- ordering
- Preparatory work
- Operation features
- Furnace cleaning and repair
- Bricklaying
- Masonry technology
- Kuznetsov oven, video
- Do-it-yourself sequence of operations
Stage 4. Masonry
First, the base of the structure is covered with two layers of roofing material. Next, a 5-centimeter layer of river sand is poured. The sand is leveled, checked for horizontality, and then sprinkled with a small amount of water.
Upon completion of the preparatory work, you can proceed directly to the masonry.
ordering
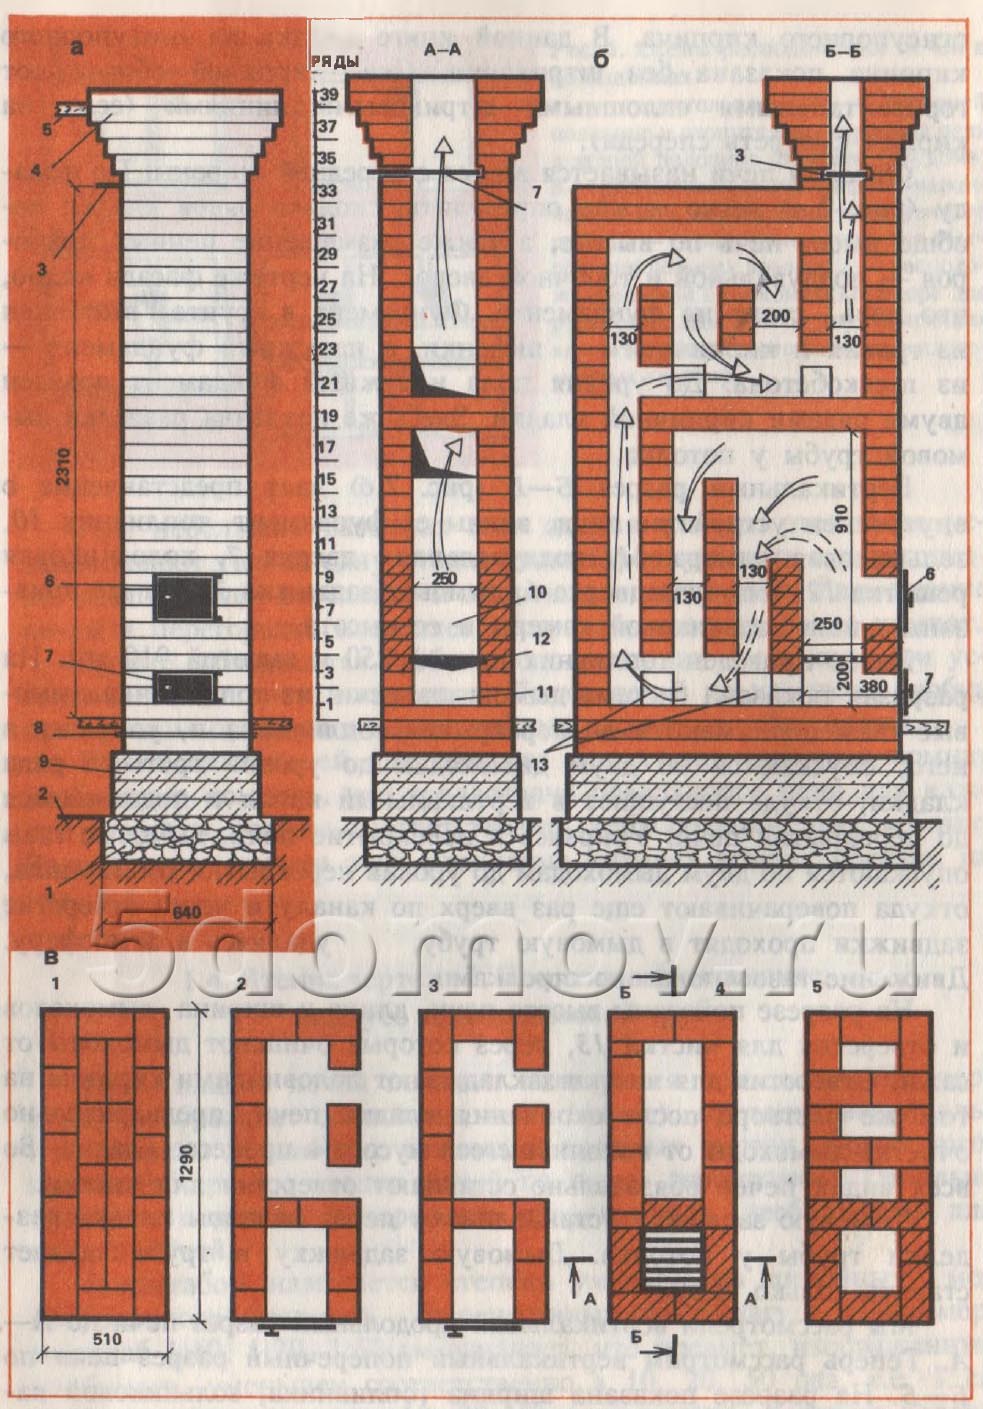
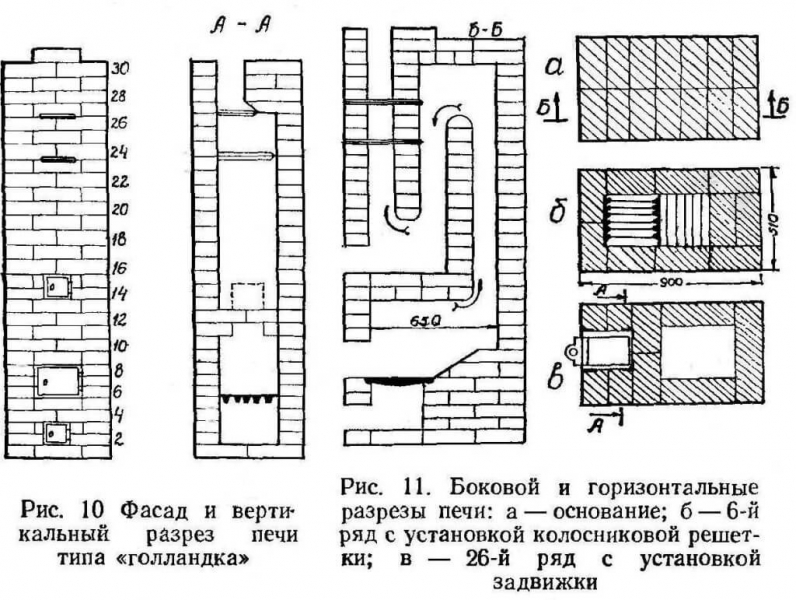
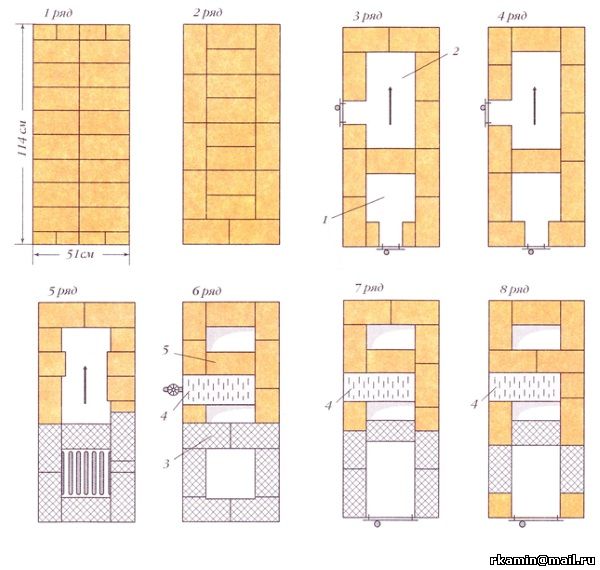
Row number 1. The first row is laid "dry", without mortar. This will require twelve bricks - they are laid, checked by the mounting level, and only after that they are covered with a slight layer of mortar.
masonry
Row No. 2,3.The bricks are laid flat, this time on the mortar (then they need to be laid out “on edge” up to the top of the firebox).
Row No. 4,5. Fireclay bricks are used, often yellow. In parallel, a lining is formed for the partition of the chimney channel. The rear wall is laid out of "knock-out" brick laid "dry".
Also at this stage, you need to install the door for the firebox. It is advisable to wrap it with asbestos, although recently this material has been quite difficult to find. Alternatively, any other non-combustible material can be used. To fix the door, steel wire is used, which is inserted into the masonry joints.
Row No. 6,7. Here everything is done in the same way as in the fourth row. The order may change somewhat even before the top of the door, but in this case it all depends on the height of the future structure. Upon completion of the binding of the door (often this happens when laying the seventh row), the bricks are again laid out flat. The dressing is monitored all the time, the horizontality and location of each corner of the furnace are periodically checked.

Level check
Row number 8. It differs in that a beveled brick is installed above the combustion chamber. Such a trick will allow you to use the stove as a fireplace after opening the firebox. This row completely covers the furnace.

Firebox
Firebox
Row number 9. The brick is moved back (about 1/2 of the width). On top of the ninth row, some non-combustible material is laid (for example, an asbestos cord), on which a hob is installed (if it is provided for by the design).

Laying the seal for the hob
Row number 10. Next, a base is erected under the chimney.If a Dutch woman of light modification is being built, then it is better to use a metal pipe as a chimney, since the brick structure will be too heavy.
Row number 11. At this stage, a valve is inserted, previously sealed with asbestos. In parallel, a joint is formed between the structure and the chimney. It is characteristic that the laying here should be done in ¼ bricks.


masonry
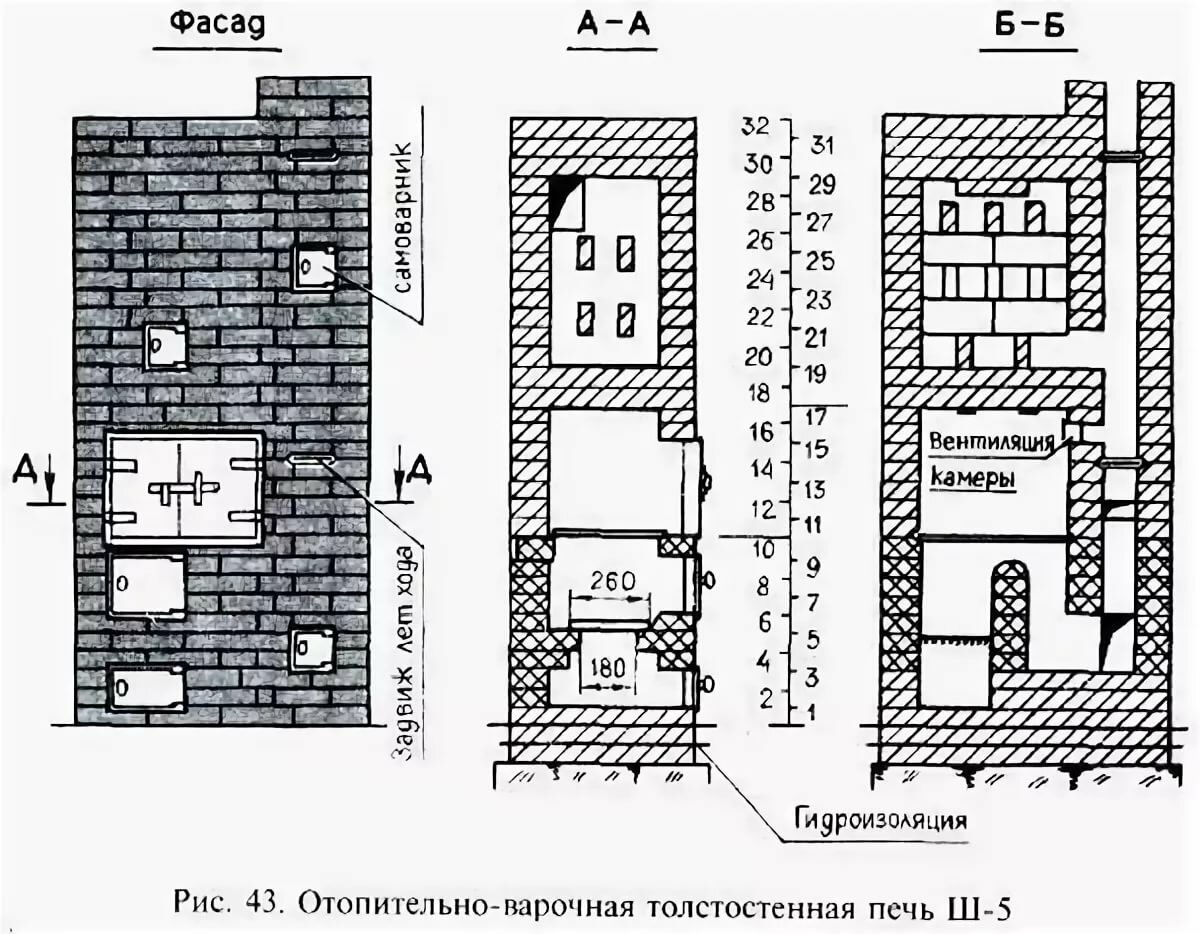
Rules to know when building a chimney
Diagram of a brick chimney.
The design for solid fuel boilers is made together with the walls of a private house. These elements are constructed according to a single principle, and it does not matter whether the channels will be used as ventilation or smoke channels. Under the chimney, you will definitely need to build a base. The base device can be made of brick or concrete.
In all cases, a draft foundation is prepared. During the design process, it must be taken into account that its height should be at least 30 cm, and the width should be such that the base structure extends beyond the chimney device by 15 cm or more. If the chimney is made as an element of the outer wall, then you need to know that the lower part of the chimney base must be placed at the lower level of the wall base.
Particular attention in the process of constructing chimney structures should be paid to the quality of tightness. To make a durable brick chimney, you will need to follow the rules. Laying the material should be done so that the seams overlap with the elements of the next row.
In most cases, the same mixture is used as for the construction of the bearing walls of the structure.
Laying the material should be done so that the seams overlap with the elements of the next row. In most cases, the same mixture is used as for the construction of the load-bearing walls of the structure.
In the process of manufacturing a chimney for a solid fuel boiler, it must be taken into account that its inner base must be smooth.
Therefore, when performing construction work, you need to use a template. The walls between the elements should be at least half a brick thick. For ventilation elements, the thickness of the partition should be 2 times less.
At the end, you need to make a headband. The extreme parts of the element should protrude beyond the structure by 10 cm or more. Ventilation duct outlets must be created under the head, in most cases 2 walls are used, which are placed one opposite the other. This placement method will prevent air from blowing in.
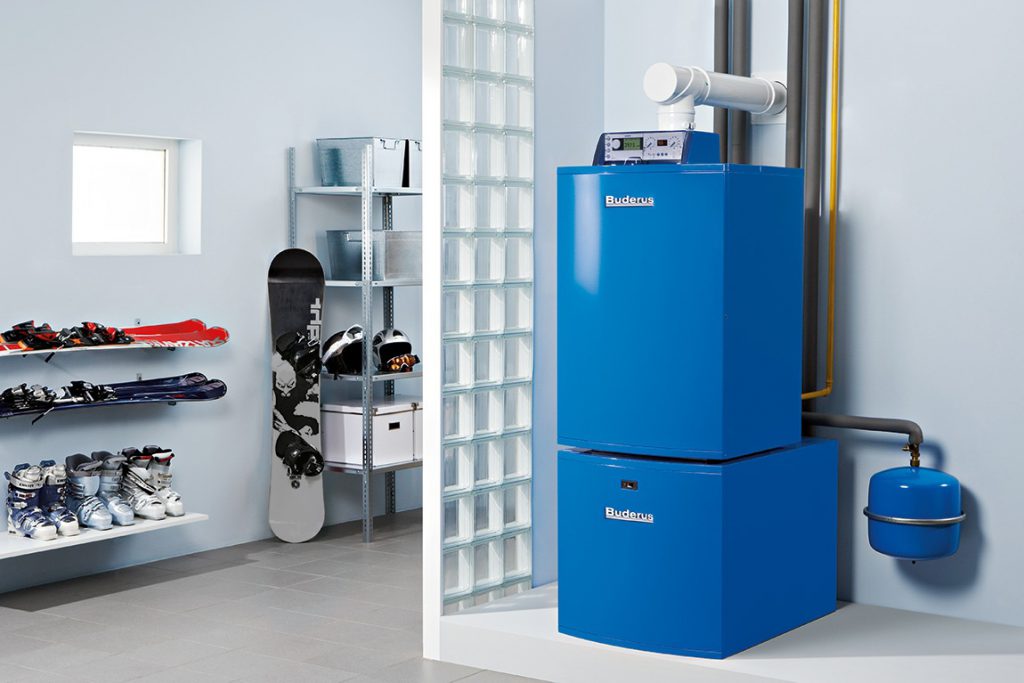
Choosing the type of solid fuel boiler
How to understand which boiler will be optimal for servicing a particular heating system? Obviously, it is necessary to determine the type of fuel, the required power of the unit and the features of its design, the installation process and subsequent operation, as well as the features of the connected heating system.
Among the materials that can be used as solid fuels, the most widely used are:
- coal;
- peat briquettes;
- pellets;
- firewood;
- sawdust and other combustible production waste.
Types of solid fuel for heating boilers in the photo
In order to increase the profitability and efficiency of the heating system, it is possible to manufacture a universal unit that can work with various types of fuel.
The choice of the type and design of the heating boiler directly depends on what kind of fuel you are going to use, the required performance of the heating system, as well as the place where it will be installed. The following modifications of solid fuel heating units are suitable for self-production:
Equipped with a steel or cast iron heat exchanger, they can be used for both heating and hot water supply. The efficiency of such boilers is about 85%.
Pyrolysis
They provide separate combustion of fuel and the volatile gases emitted at the same time, due to which the efficiency and, consequently, the economy of the heating system are significantly increased.
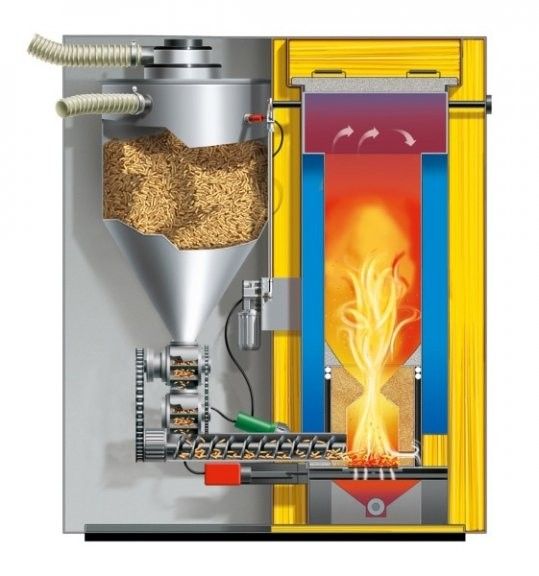
Pellet
The efficiency of this type of heating boilers reaches 90%. Their main advantage is a high degree of automation of work processes, and the disadvantage is the complexity of the design.
long burning
They are able to work continuously throughout the entire heating season, requiring fuel to be loaded once every few days, which distinguishes them favorably from classic solid fuel boilers.
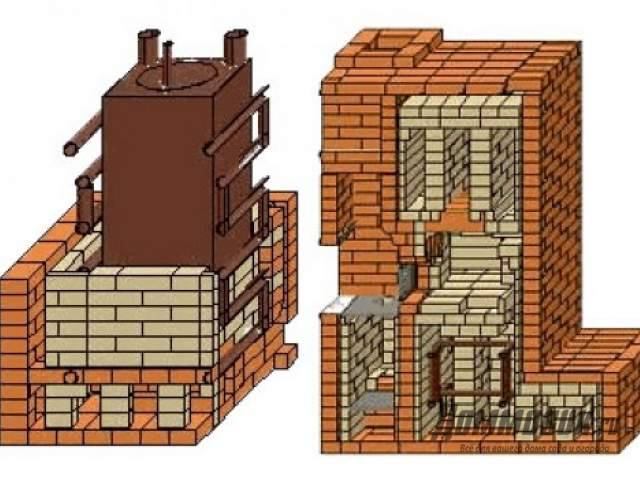
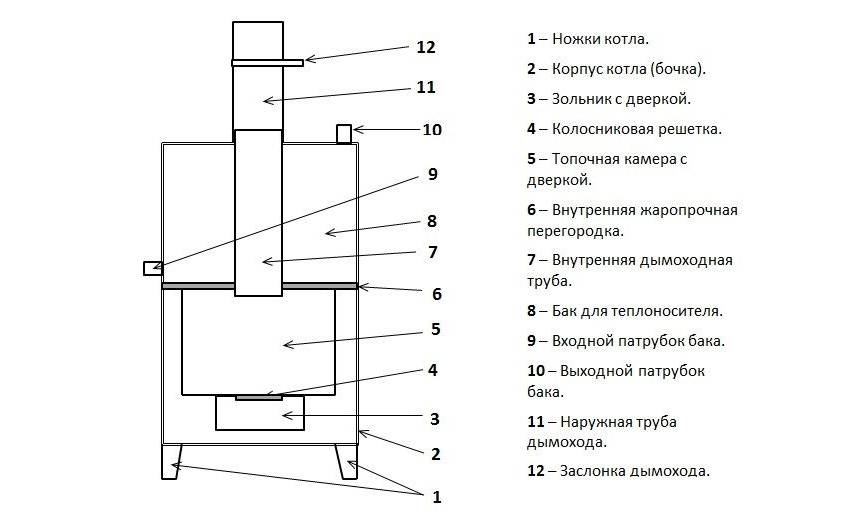
Assembling the heating unit
After cutting the parts, assembly is carried out, welding is carried out in two stages: the base with the furnace compartment is assembled, the water jacket with the water pipe system is welded in parallel. At the second stage, the welded parts are connected into one whole, fixed with welding seams. It is necessary to do with at least two assistants, the weight of the parts is large. Details of operations are visible in the photo.


Main joints
The assembly of parts, a water jacket, a water pipe system, a combustion chamber must be done by a semi-automatic welding machine using high-quality wire. Allows you to create a smooth, high-quality seam. Semi-automatic is very convenient to work in narrow, cramped places. The seams must be doubled.
Furnace compartment
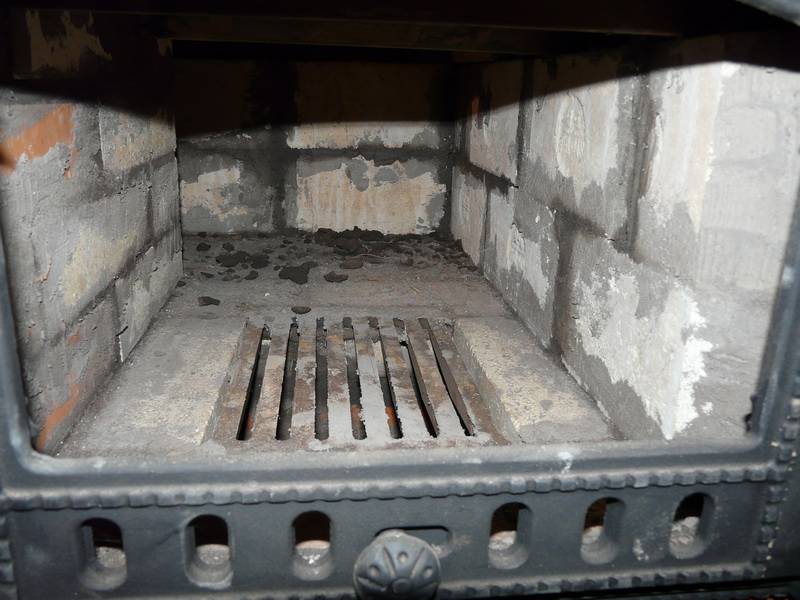
The fuel burns in the combustion chamber, the released thermal energy is transferred to the water in the surrounding jacket. Weld carefully using double seams. A grate is placed at the very bottom of the furnace. You can buy a ready-made firebox, make it yourself. Reinforcement is taken, at least 20-30 mm thick, cut into segments with a grinder, welded. In the furnace, the resulting grate is installed on stops welded around the perimeter from a steel corner.
Lower body
In the lower part of the body there is a blower door, an ash pan, a bottom, and supports attached to it. The blower door is cut out with a grinder, a drill, hung into the prepared housing opening on steel hinges, not forgetting to fasten the sealing asbestos cord around the perimeter. In the closed position, the door is held by a latch, any of the structures available to the master.
Ash pan - a box made of sheet steel, which is completely removed through the blower, allows you to quickly clean the ash. The supports must be made from segments of a thick-walled pipe with a diameter of 5-7 cm, about 3-6 cm long. You need to weld with high quality, at an equal distance from the edges of the bottom - the weight of the device will rest on them (together with water - at least 250-300 kg).
Blower valve design
The blower valve, called the gate valve, can be made independently, purchased separately in finished form.When deciding on self-production, you need to focus on the size. You will need a steel corner, a rectangular piece of steel, 5-8 mm thick. It is necessary to cut a series of vertical slots in increments of 2-3 cm. The slots are cut in the blower door. The welded corners will hold the gate plate, allow it to be moved in a horizontal plane by 3-5 cm. By changing the size of the slots, it will be possible to regulate the flow of oxygen into the furnace, the intensity of burning wood, coal.
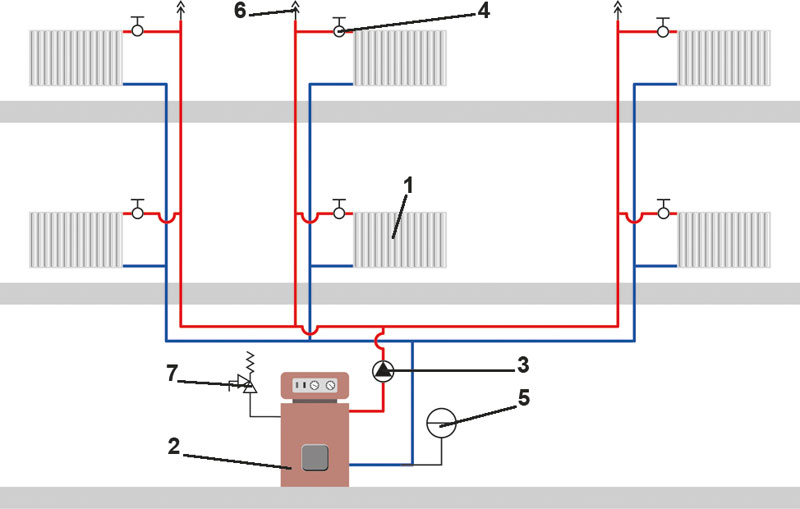
 Water pipe system
Furnace masonry
Before proceeding with laying, you need to prepare a solution and perform a few simple steps to prepare the foundation.
Solution preparation
Sift the sand and break up large pieces of clay. Crushed clay also needs to be sieved. The mesh from the armored bed will perfectly cope with the functions of the sieve. If this is not available, use a simple sieve with cells of the same size.
Soak the clay in water for a few hours. Drain excess water not absorbed by the clay.
Let the clay swell and mix it with sand in equal amounts. Add about 1/8 of pure water to the same mixture. Keep the calculation in accordance with the received volume sand-clay mixture.
Prices for refractory mortar for stoves and fireplaces
Refractory mortar for stoves and fireplaces
Preliminary preparation of the foundation
Cover the frozen foundation with waterproofing material. Roofing material will do. You can also use hydroisol or other material with similar properties.
Waterproofing
ordering
ordering
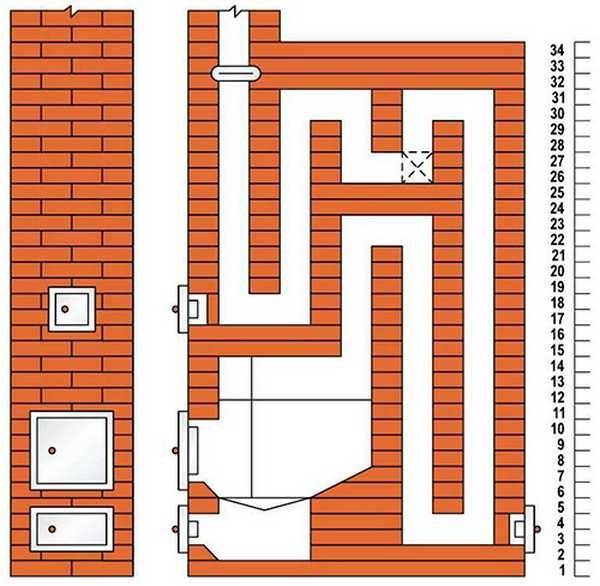
Let's start laying.
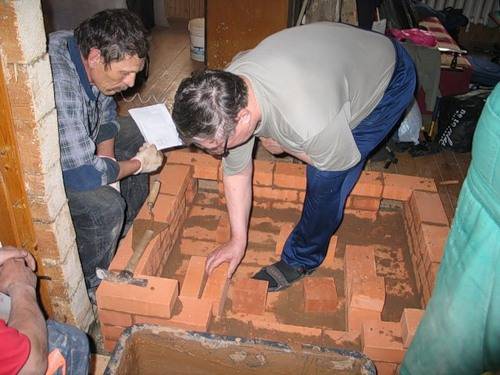
We lay the first row. It will consist of 12 bricks. We make sure that the masonry is even with the help of a level, and only after that we fill the surface of the base with clay mortar.
Example of laying bricks on insulation
Install the blower door. Pre-wrap it with asbestos cord. We use steel wire to fasten the door. We insert the wire into the box and twist it 2 times. We make a cut in the upper edge of the brick. We insert a wire into it, bend it and weave it with masonry.
Lay out the second row in order.
Laying the stoveBe sure to pull the plumb lines so that the stove is strictly vertical
The third and next rows, marked in order in yellow, are laid out from refractory bricks.
Between the 3rd and 4th rows we lay a grate with dimensions of 200 x 300 mm.
The grate is laid
We put the bricks of the fourth row on the edge. The diagram contains bricks marked in red. On them we lay the internal partition in the chimney. We make the back brick “knock-out”, i.e. lay it down without mortar. In the future, we will be able to take out such a brick and clean the furnace. A convenient solution that eliminates the need to install a door.


Furnace masonry Furnace masonry
Install the combustion chamber door. The recommendations are the same as in the case of the blower door.
Installation of the furnace door. The photo shows how to insert and twist the wire - latchInstallation of the furnace door
The fifth row is laid out similarly to the previous one. Bricks are laid flat.
In the 6th row, we lay out the bricks on the edge. We work in order.
Dutch masonry
In the 7th row, we lay the bricks flat everywhere except for the back wall - we lay it out “on edge”. In all the following rows, we lay the bricks flat.
Dutch masonryFurnace door
On the eighth row, we close the firebox door. We mow the internal refractory bricks above the combustion chamber. This will allow us, if desired, to use the stove as a fireplace. This is visible on the diagram.
Dutch masonryDutch masonryStove overlapStove overlap
The ninth row is shifted back. On top of it we lay asbestos cardboard, and after that - a cast-iron hob, if necessary. The joints between the slab and the brick are filled with asbestos cord.
On the 10th row, we begin to lay out the base for the chimney. The continuation of the structure will be metal.
We lay out the 11th row and install the valve. We pre-wrap the valve with asbestos cord.
Construction of a Dutch woman Construction of a Dutch woman Construction of a Dutch woman Construction of a Dutch woman
When laying the 12th row, we make out the joint between the metal pipe and the chimney. We bring the chimney out of the house through the roof. We cover the intersections with mineral wool or other heat-insulating material. The height of the structure is determined individually. It should rise at least 50 cm above the highest point of the roof.
Construction of a Dutch woman Construction of a Dutch woman Construction of a stove Construction of a stove Construction of a stove Construction of a stove Construction of a stove
Do the finishing of the Dutch at your discretion. It can be whitewashed, beautifully tiled or tiled, or completely left without decor - the bricks look so beautiful.
The finished oven must be allowed to dry for at least 2 weeks. Do not close the firebox door. Only after the specified time in the furnace it will be possible to build a full-fledged fire. Before taking the Dutchwoman into permanent operation, burn some paper in the firebox to check the draft. The smoke must go through the chimney.
Now you know how to build a Dutch oven yourself.Follow the instructions given and you'll be fine.
Pre-furnace steel sheet
Successful work!
Preparatory work
Furnaces with a volume of up to 500 bricks can be laid without a foundation, if only the floors in the room are strong enough (capable of bearing a load of up to 250 kg / m2). A small Dutch country stove with a hob, the construction of which we will consider in detail further, satisfies this condition.


But if the floor in the room clearly does not have the required strength, then it must also be installed on a reinforced concrete foundation.
Scheme of the foundation for a heavy furnace
Its depth is usually 400-600 mm, and the edges should extend beyond the outline of the furnace by at least 100 mm on each side. It is impossible to connect the structure with the foundation of the building - due to various shrinkage, skew may occur.
After pouring the foundation, it must be ironed - sprinkled with cement.
Foundation poured with concrete
When the concrete is ripe - it takes about 1 month, it needs to be covered with two layers of waterproofing (roofing material or roofing felt), after which it will be possible to start building the furnace.
Foundation waterproofing
Before proceeding directly to the installation of bricks in place, you need to prepare a clay-sand mortar. The correct ratio of sand and clay depends on the fat content of the latter. To define it, proceed as follows:
- After soaking the clay for a day, stir it to a dough state, after which 5 portions of the solution are prepared with different sand content: 10, 25, 50, 75 and 100% of the volume of clay.
- Having twisted a 30-cm sausage with a diameter of 10-15 mm from each portion, it is wrapped around a blank with a diameter of 40-50 mm and left to dry at room temperature for 2 weeks.
One way to determine the quality of clay
In the presence of:
- fine mesh cracks or their complete absence, the solution is considered suitable for any part of the furnace;
- large cracks, but not exceeding 2 mm in depth: the solution is suitable for furnace elements with a temperature not exceeding 300 degrees;
- deeper cracks and gaps, the solution is considered unsuitable.
Having determined the optimal ratio of sand and clay, prepare a solution in the required volume. Clay is also soaked for a day, only after that it is still rubbed through a sieve. The sand is sieved and washed. The finished solution should have the consistency of sour cream.
Operation features
A characteristic feature of Dutch ovens is the increased length of the chimney channels. It is because of this that the furnace works so well for heat transfer. But at the same time, with such a gas duct arrangement, the likelihood of carbon monoxide penetration into the living space increases.
To prevent this from happening, it is important to observe the correct mode of the furnace: the heating temperature of the body should not exceed 60o Celsius
Furnace cleaning and repair
In order for the Dutch woman to work without surprises, it is necessary to monitor her technical condition:
- daily clean the furnace and blower from the ashes;
- once a year, carry out preventive cleaning of the chimney;
- once every 4-5 years, carry out an audit of the internal and external walls, if cracks are found, eliminate them.
Every person can build a Dutch oven on their own without outside help.Following the described recommendations and following the ordering schemes, the heating unit can be easily folded in 1 week.
Bricklaying
After the foundation has hardened, you can proceed to laying bricks, but before that you need to prepare a clay mixture for work. We take clay and carefully sift it from lumps and stones. You need to do this carefully, you can even more than once. Then fill the clay with water for several hours. The clay should be well saturated, drain the excess. Add sand in a ratio of 1:1 and fill in 1/8 of the water (of the resulting volume).


 Scheme: bricklaying
The following is a step-by-step instruction for laying out a Dutch type furnace structure:
- We lay a layer of waterproofing on a frozen base, then sprinkle it a little with sand.
- We lay out flat the 1st row of bricks moistened with water (there is a small distance between the elements). We put cement mortar on top of them. It will gradually fill the pre-prepared space between the brick elements.
- We put the 2nd and 3rd rows flat on the solution. The remaining rows, starting from the 3rd and ending with the row that joins the firebox door, are placed on edge.
- Starting from the 4th / 5th row (depending on the design features of the furnace), we use refractory bricks for masonry. We put the back of the oven without using mortar. These are the so-called "knock-out bricks". They are removable, which makes it easy to clean the chimney during operation of the stove.
- We install the firebox door by wrapping it with non-combustible material (for example, asbestos). We fix it at the brick seams with a flexible wire.
- Duplicate the scheme of the 4th row to the top of the door. After that, we lay the bricks flat again. We focus somewhere on the 7th row (we still lay out the back of the row on the edge).We carefully control the horizontal laying and angles.
- In the 8th row (above the firebox) we lay out the corner brick. Thanks to this laying scheme, it is possible to use the stove as a fireplace.
- In the ninth row, we shift the brick a little back. We lay non-combustible material on top: we will install a stove for cooking on it in the future. We check the seams and joints of cast iron with brick - they must be completely sealed.
If you are not sure that you can do the job, consult with professionals
- We lay out the base for the chimney in the tenth row. If the stove is planned to be small or medium in size, then the function of the chimney will be performed by a metal pipe.
- 11th row - we put a valve with a non-combustible sealant. We form the joint of the furnace and the chimney pipe - we use a masonry in a quarter.
- We close the joints with the floor with special skirting boards. We whitewash the furnace structure, paint it or veneer it with glazed tiles to your taste. We leave the finished structure for a couple of weeks until completely dry.
On this, the process of creating a Dutch oven can be considered complete.
Advice. During the laying of the structure, lower each brick into the water for a couple of seconds. This will avoid excessive absorption of moisture from the solution.
As you can see, the Dutch oven is a rather useful and original design in the house. Moreover, it is quite possible to cope with its construction with your own hands. Build with pleasure!
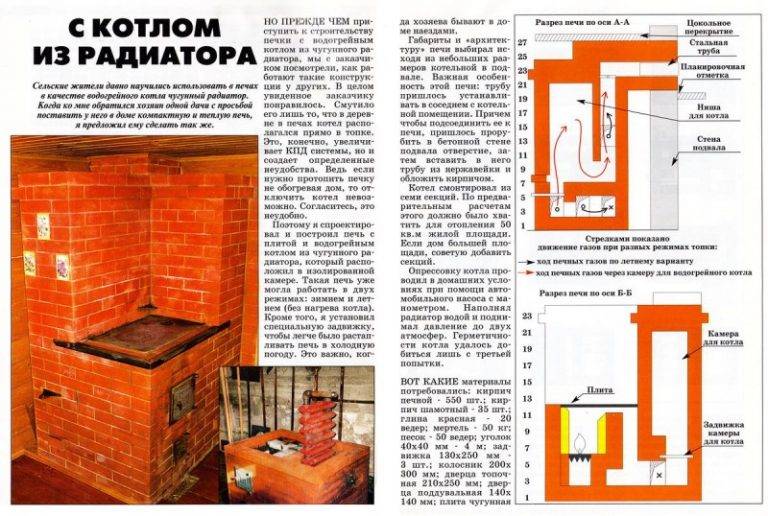
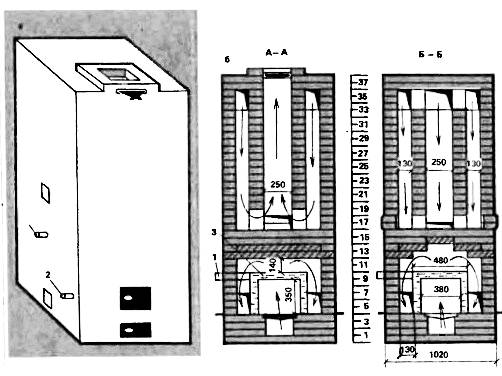
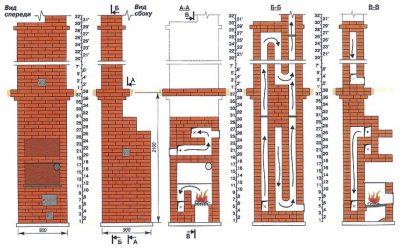
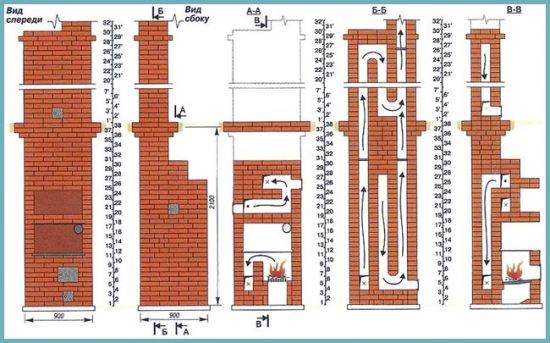
Masonry technology
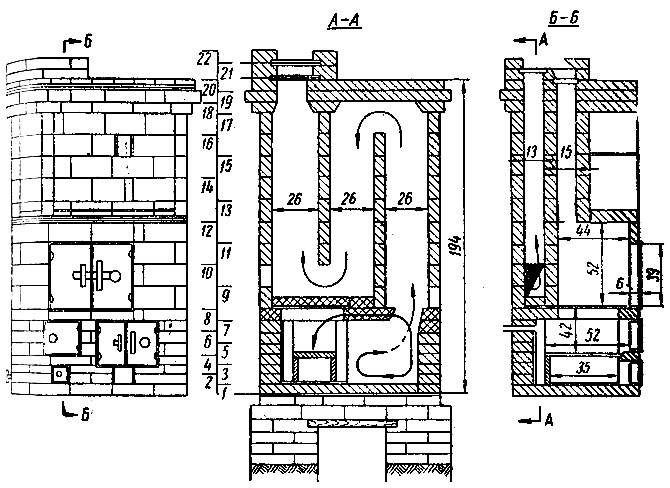
Before you start laying the stove with your own hands, you need to choose a scheme and draw a plan with your own hands, it is better to use ready-made proven schemes.An example of such a furnace is the Kuznetsov furnace with a heating register built into the smoke channel on one side of the furnace.
Kuznetsov oven, video
For laying such a stove in a private house with your own hands, you will need materials:
- foundation concrete;
- solid red brick;
- refractory fireclay brick;
- masonry mortar or its components: clay, clean dry sand, clean water;
- metal pipes to make a heat exchanger.
You also need to buy ready-made elements: grates, doors, dampers, gates, roof penetrations. The price of these elements is usually quite high, so you need to calculate in advance what exactly is needed.
Required tool:
- trowels and trowel;
- rubber mallet;
- grinder with a circle for bricks;
- levels, plumb lines, twine;
- roulette.
Do-it-yourself sequence of operations
-
- The position of the future furnace is marked and the foundation reinforced with a bar is poured 5 cm below the level of the finished floor. It should not come into contact with the foundation of a private house.
- After the foundation has completely dried, according to the ordering scheme and the drawing, two rows of red solid brick masonry are laid out on an ordinary cement masonry mortar, their purpose is to even out possible irregularities in the foundation and lay the foundation of the furnace.
- The next rows are placed on the clay masonry mortar according to the chosen scheme, observing the dressing indicated on it. The solution is made from pre-soaked red clay, quarry sand and clean cold water. The optimal ratio of clay and sand is determined empirically.
Properly prepared masonry mortar should not be too plastic or crumbly.You can check it like this: roll a ball the size of a tennis ball out of the solution and drop it from a height of 1 m onto a flat surface. It should be slightly deformed, covered with small cracks, but not crumble.
-
- The thickness of the seams between the rows of bricks is no more than 5 mm. The smaller the seams, the more homogeneous the furnace structure and the better the heat transfer. Jointing is carried out immediately as the masonry.
- The doors are installed as follows: an asbestos sheet in the form of a strip is placed on the previous row of bricks at the place where the door is installed, and a door is placed on it. In the holes in the corners of the frame, an annealed wire with a length of at least 40 cm each is inserted in advance. This wire is fixed between the rows of masonry. If this is not done, sooner or later the solution will crumble, and the door will fall out. Lay several rows, all the time checking the position of the door by level. An asbestos strip is also laid on top of the door and a brick is laid on top.
- The furnace is lined with fireclay bricks. Red ceramic is not suitable for these purposes - it will crack over time, and the roof may collapse. In the diagrams, fireclay bricks are usually indicated in yellow.
- Under the hob in the brick, grooves are made for the thickness of the plate. This is done to reduce heat loss and prevent smoke. The plate is placed on the solution.
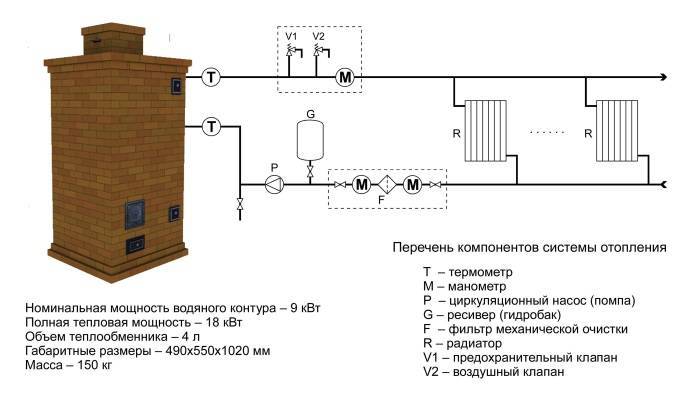
- A self-made heat exchanger is installed in the smoke channel during the laying process at the stage of laying the row through which the lower fitting exits. It is mounted in the combustion chamber when laying the bottom row of the furnace. There must be a gap of at least 5-7 mm between the heat exchanger and the brick.
- In the smoke channel with a heat exchanger, it is imperative to provide cleaning doors, since soot will settle on the register, which will worsen its heating.The number of doors should allow access for cleaning to any part of the heat exchanger.
- The upper part of the smoke channel is equipped with a damper or gate. The chimney itself can be either brick, or you can buy and install a sandwich chimney. In this case, you must follow the rules for the passage of the pipe through the roof, and make fluff on brick pipes.
The distance from heated metal elements to combustible structures must be at least 25 cm! Passages through the floors are insulated with basalt fiber or other non-combustible materials!
- After the oven has dried, it is gently heated, without overheating, several times. They check the draft, the stability of burning firewood, the absence of smoke leaks. After that, you can mount an external heating circuit and pour water into the system. The oven is ready for use.