- Advantages and disadvantages of a potbelly stove for a garage
- Advantages and disadvantages of a potbelly stove
- Features of the operation of the stove with a water jacket
- Furnace cleaning and repair
- Video: garage stove and chimney cleaning
- Methods to increase efficiency
- Chimney change
- Masonry around the brick screen stove
- Improving heat transfer with fuel
- Sandbox
- Alteration of the design
- Using an additional coolant
- Assembling a potbelly stove with chimneys
- Preparation of materials
- Various types of potbelly stove
- Pedigree with history
- How to do it yourself?
- Rectangular oven
- From a gas bottle
- Working furnace
- Operation features
- Bourgeois schemes
- Chimney Requirements
- Readers find these materials useful:
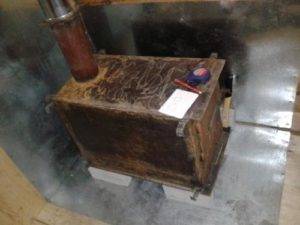
- How to make a potbelly stove with your own hands
- The main models of homemade bourgeois
- How to make a potbelly stove for working out with your own hands
- Design
- The principle of operation of the device
- Tips & Tricks
- Types of bourgeois
- Bourgeois schemes
Advantages and disadvantages of a potbelly stove for a garage
A potbelly stove is rightfully considered the most practical way of heating in winter. This is a small design that is practically portable, capable of heat any room, regardless of the temperature outside and other climatic conditions. This is its main advantage.However, in modern conditions, a potbelly stove is used exclusively for heating outbuildings, for example, a garage. And this is due to a large number of disadvantages:
- the stove cools quickly, which means that in order to maintain a constant temperature in the room, it must always be on;
- uneconomical for the same reason;
- fire hazard, so when installing it, care must be taken to protect the nearby wall and floor.
However, its omnivorousness allows you to save a little on the purchase of fuel, especially considering the almost 100% efficiency of such a device.
The potbelly stove has a special design, thanks to which it is possible get high efficiency
Advantages and disadvantages of a potbelly stove
Models of these heaters are different, but all have certain advantages:
- quickly melt and warm the room;
- sufficiently high efficiency;
- heat is distributed evenly throughout the room;
- can be bought at a relatively low cost;
- most of these products have a hob;
- operation is cheaper than using electrical appliances or wood-burning stoves.
The disadvantages of all models are also common:
- the room is warm only when the potbelly stove is heated;
- fuel must be added constantly;
- a high chimney is required, which must be cleaned frequently.
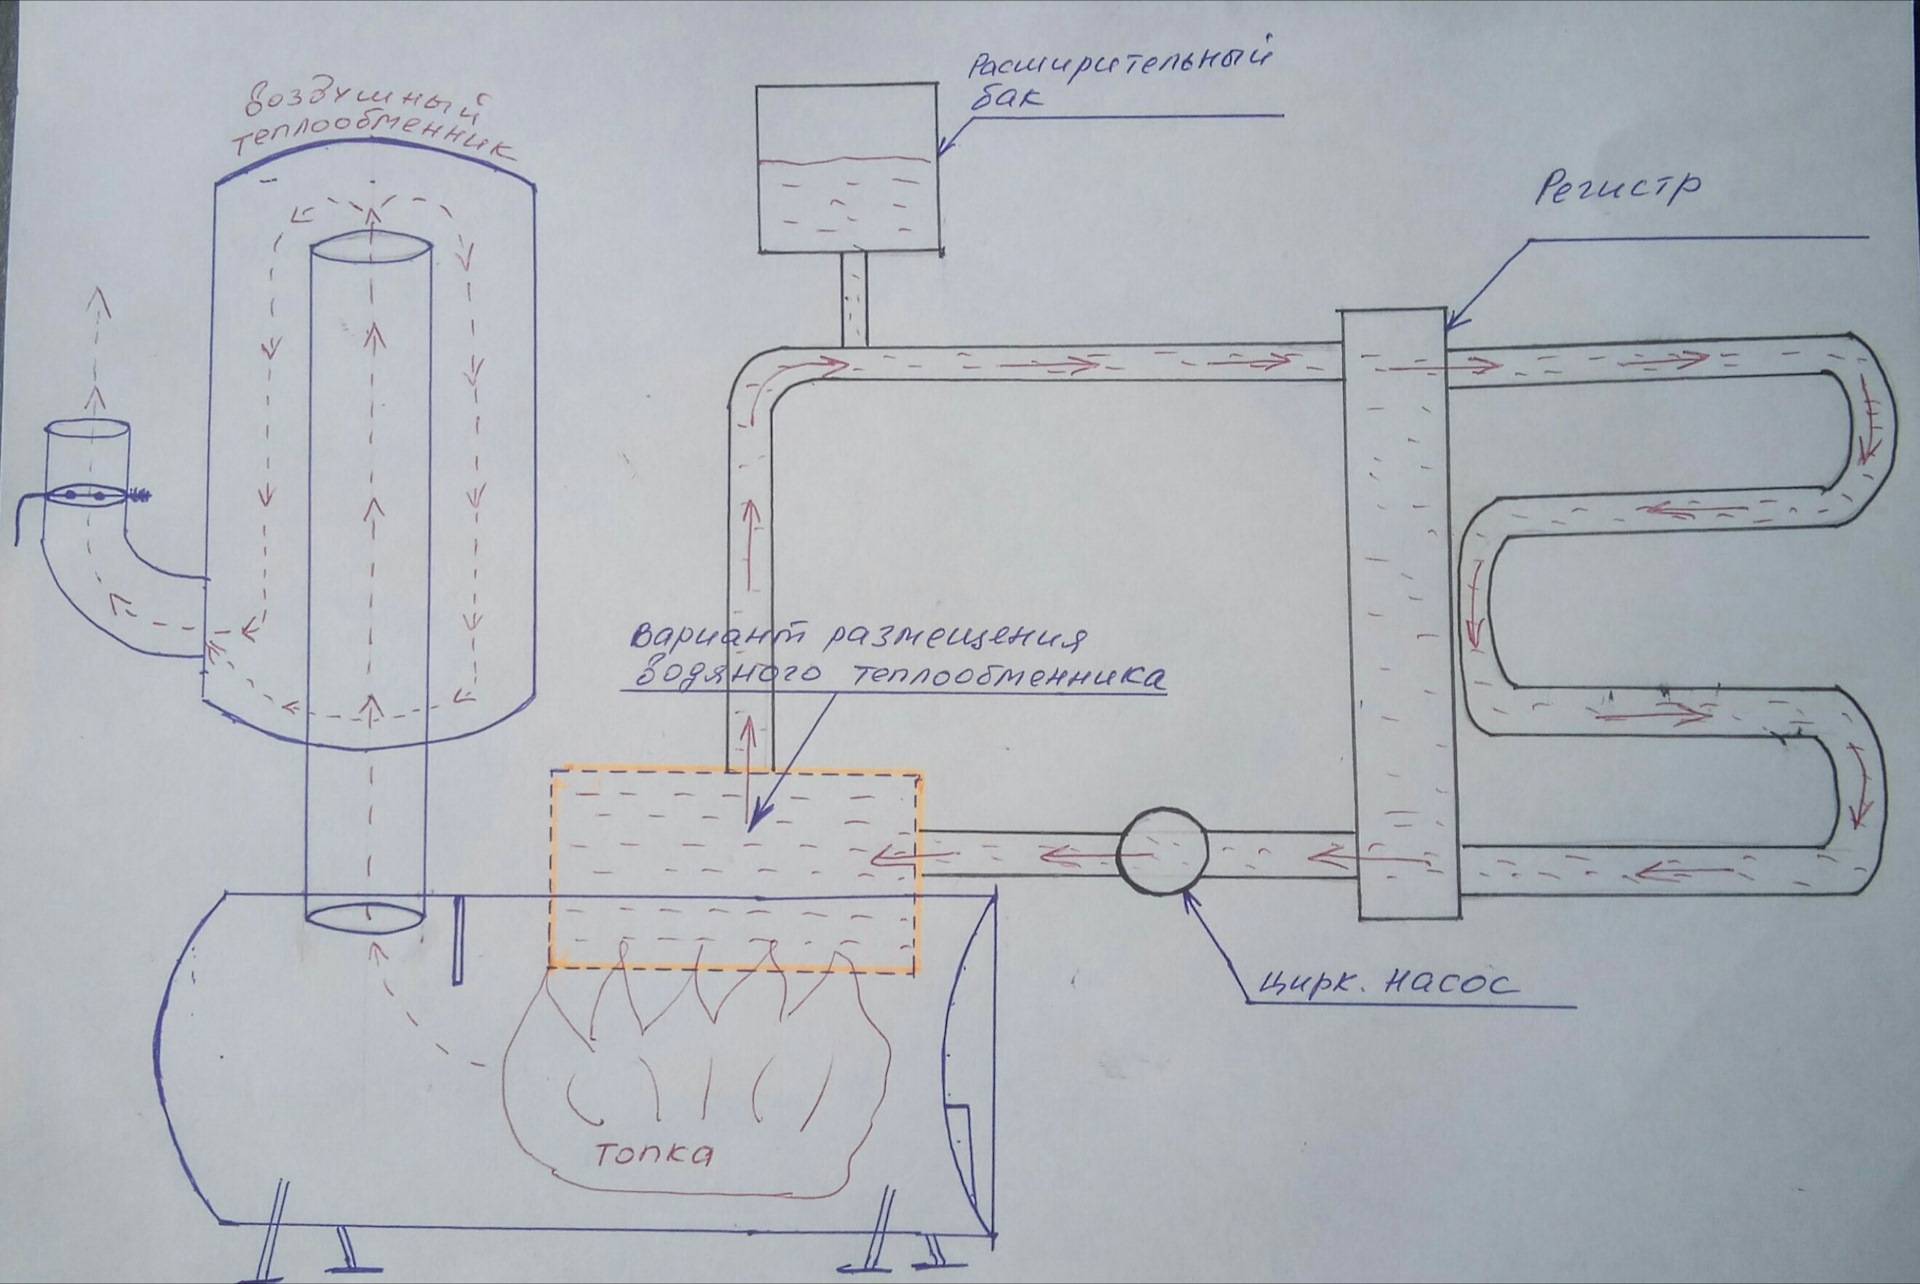
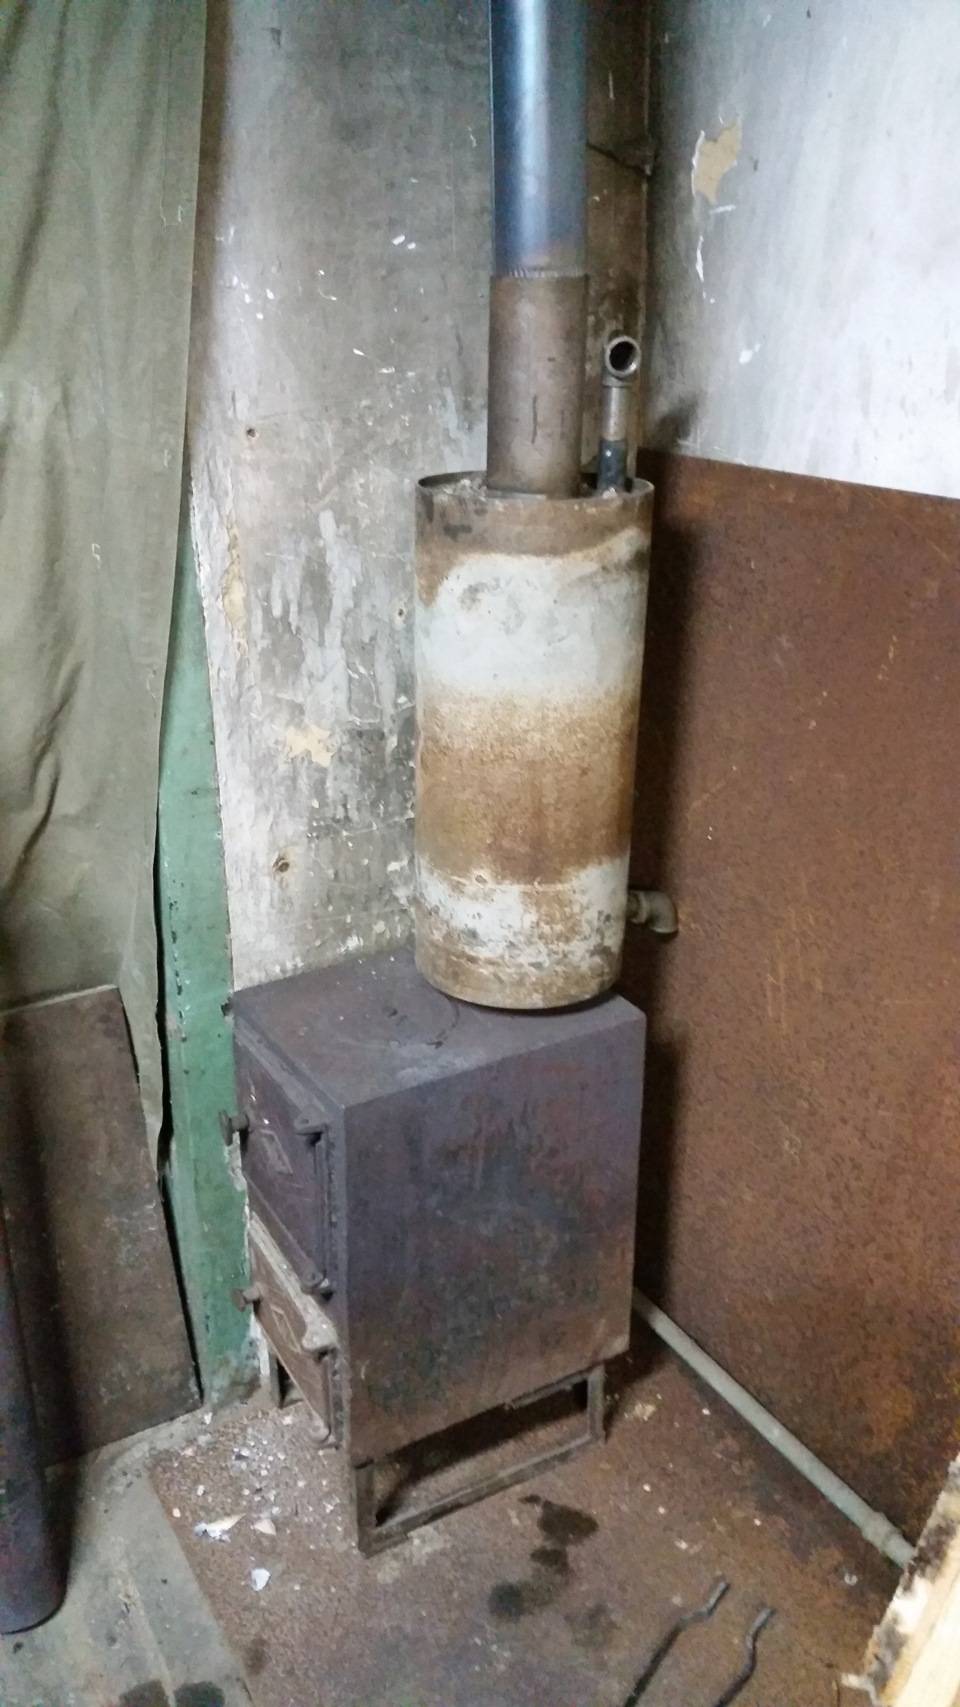
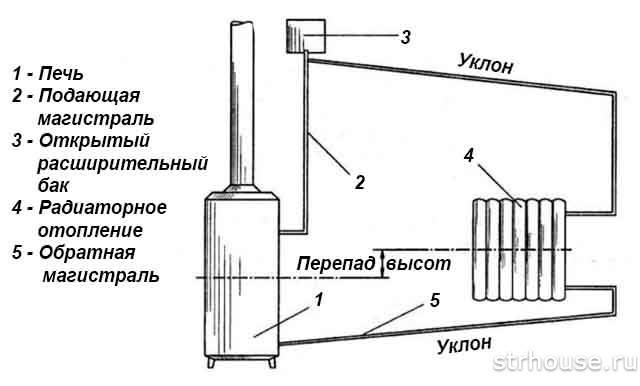
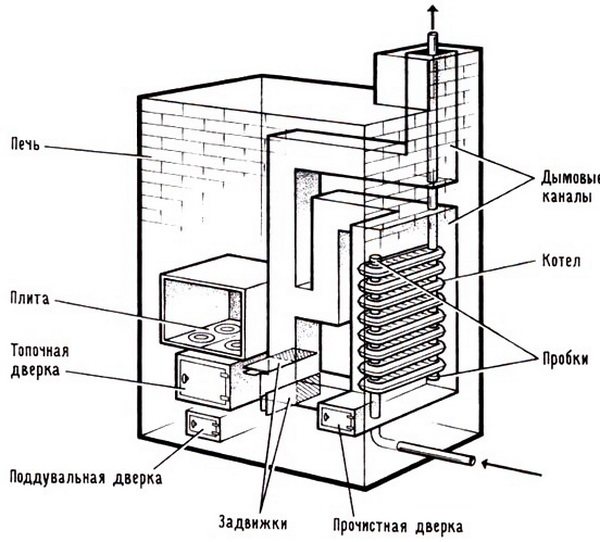
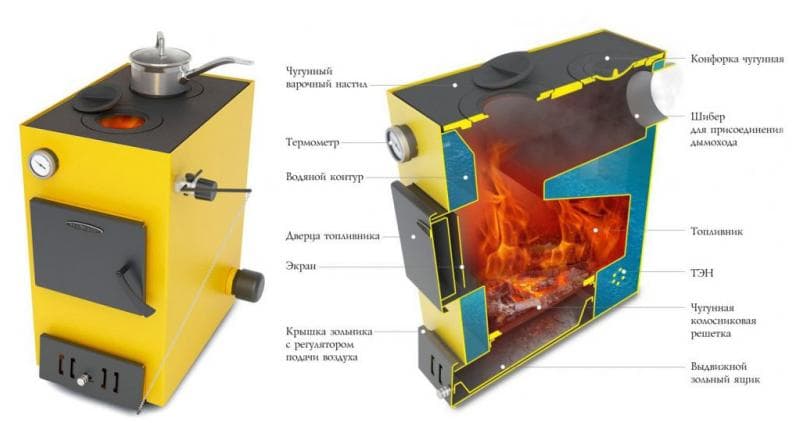
Features of the operation of the stove with a water jacket
- It is advisable to install a temperature and pressure sensor in the hydraulic system.
- It is necessary to regulate the draft in the grate and in the chimney.
- The water circuit in both types of heat exchangers must be equipped with an expansion tank.
- The main-type water system needs a circulation pump installed on the return line, i.e. on the bottom tube.
- A device with a capacitive tank needs a circulation pump if the diameter of the outlets is less than 75 mm.
- It is necessary to provide a place for draining water.
- You can not heat the stove without water - the heat exchanger can burn out.
- After use, the water must be drained.
The change in temperature in the heat exchanger occurs due to the burning rate of the furnace. The heat passes into radiation, the water is heated in the chimney, and after another half an hour in the pipes. The system is inertial due to the high heat capacity of water, so a large supply of fuel is needed.
The potbelly stove is a flammable structure, it is necessary to start and place a fire extinguisher and a hook next to it.
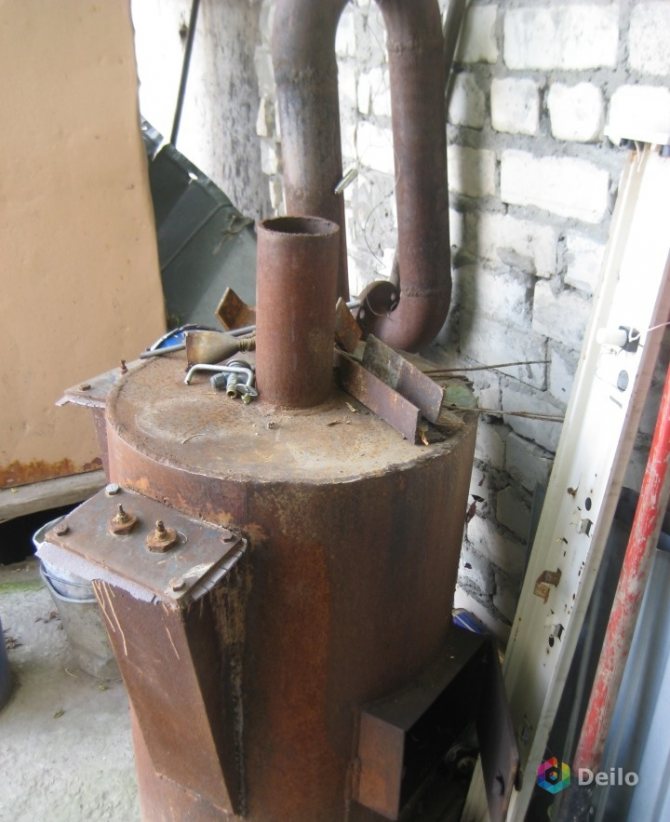
Furnace cleaning and repair
With regular use, cleaning the chimney is necessary. The appearance of a soot layer of 2-3 mm reduces traction and reduces heat transfer. You can disassemble the chimney and clean it with a brush, but this is time consuming and not always possible. If the potbelly stove is operated daily, then the chimney should be cleaned with fire:
- Once a week, heat the stove with aspen wood. Aspen has a high combustion temperature, which burns soot in the chimney. Apply little by little, after the main ignition;
-
after kindling the fire, add well-dried potato peelings along with firewood. One backfill requires about half a bucket. It is enough to do this once or twice a week and the chimney will be clean of soot. This method will not work if the chimney is already overgrown with a layer of soot of 1-2 cm, in which case cleaning will only soften the soot, and you will have to clean it off the pipe walls with a ruff or a metal scraper;
Burning potato peels along with firewood protects chimney from the formation of soot deposits
-
use special firewood or pellets that are added to the firebox during combustion.The most famous tool is the “chimney sweep log”. It is burned along with firewood about once every six months. It is best to put it on hot coals left after the furnace has been fired. A distinctive feature of this product is that it continues to act for two weeks after application, gradually softening the soot on the pipe walls.
The log burns in the oven in about 1.5 hours and then acts for two weeks, softening and removing soot from the walls of the chimney
The main activities for the repair of the furnace are:
- Pipe repair. The chimney pipe is the weakest point of the potbelly stove. If it burns out, it needs to be changed.
- Heat exchanger repair. The main heat exchanger can be removed by unsoldering it from the furnace body. But the capacitive circuit will have to be welded again in a few years.
- Elimination of defects in the furnace body. If a wall or back surface burns out, a metal patch is usually welded onto this area. Slots can be welded with scraps of metal rods.
All operations are quite simple and understandable, so servicing the potbelly stove will not cause big problems.
Video: potbelly stove for garage and chimney cleaning
For the third hundred years, the oven invented by Benjamin Franklin has been serving us. It is still easy to manufacture and unpretentious in work. A potbelly stove with a water jacket is not only for heating and cooking. This is hot water in the house, in the garden, in the garage, in a warehouse or at a construction site. New technologies have given this stove relevance in our days.
(0 votes, average: 0 out of 5)
Methods to increase efficiency
There are several ways to increase the efficiency of a potbelly stove in the garage and stop freezing. They are complex to varying degrees, from a sandbox to a redesigned design.All of them are produced without serious financial costs, and improvised means are used for their implementation. Consider each method to increase the efficiency of the potbelly stove separately.
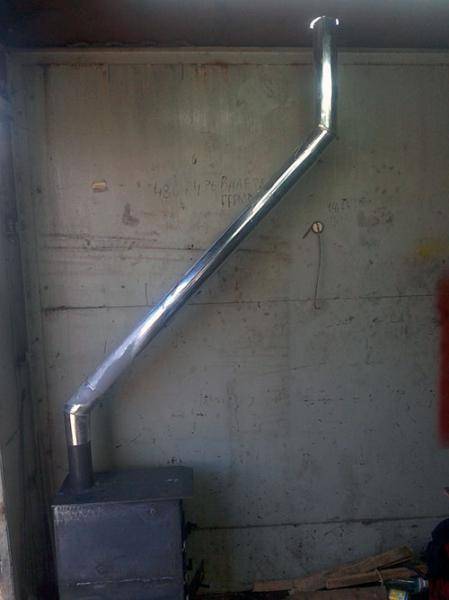
Chimney change
The efficiency of the potbelly stove is directly affected by the shape of the chimney. In order for heat transfer not to suffer, the design of the pipe must meet certain parameters.
The pipe must be vertical. The use of angles with an inclination of not more than 45 degrees is allowed. If the conditions force you to cut 90-degree corners, then you should try to use them as little as possible.
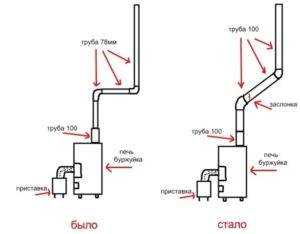
Angle 90, change to 45
Make your chimney taller
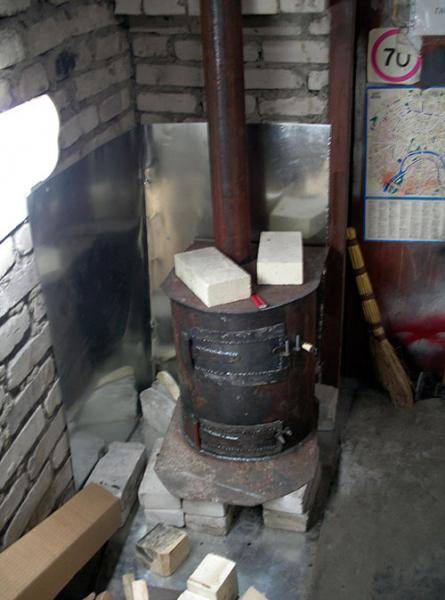
Masonry around the brick screen stove
Brickwork around the device allows you to keep warm and protect yourself and others from contact with hot metal. Properly laid masonry increases heat transfer by about a quarter. When the potbelly stove is heated, the brickwork heats up. After the fuel burns out, it will continue to share the collected heat. Experts advise laying bricks not close, but 30 centimeters from the walls of the furnace.


To lay out the screen, you will need a couple of dozen heat-resistant bricks:
- the screen is laid out on clay mortar;
- the first row is laid out according to the intended markup;
- in the second row, ventilation gaps are made half the size of a brick;
- the brick is laid out in accordance with the predetermined shape and size for the opening;
- a strip of steel is attached to the last row for additional fixation.
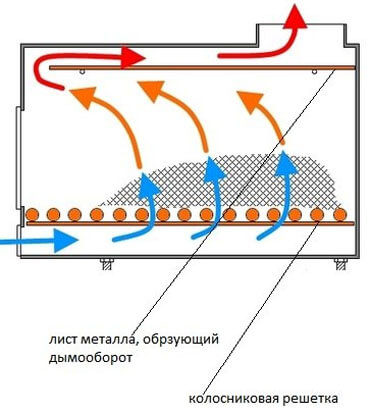
Improving heat transfer with fuel
A metal stove is heated in different ways: from firewood to sawdust with small debris. To improve heat transfer in a potbelly stove, compressed sawdust, briquetted production waste and coal are used.
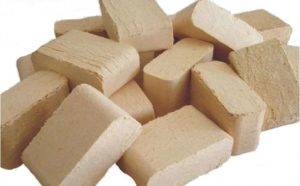
- Compressed sawdust burns out much more slowly - one load is enough for long hours of smoldering.
- Briquettes are made from shavings and wood waste. The pressed composition allows them to smolder for a long time, because they cannot flare up. Briquettes smolder evenly and for a long time, increasing the heat transfer of the potbelly stove.
It is also worth evaluating the traction force. This can be done by looking the color of the flame. If there is little air, then the flame turns red and dark stripes appear; if there is too much oxygen, the flames become bright white. The draft, and with it the efficiency of the stove, is normal when the flame is golden-orange. For better traction, you can blow the potbelly stove with a conventional fan.
Sandbox
If there is absolutely no desire to re-equip your stove, finish building something or experiment with different types of fuel, there is the simplest and most economical method. A box is placed on the potbelly stove, in which two buckets of sand are placed.
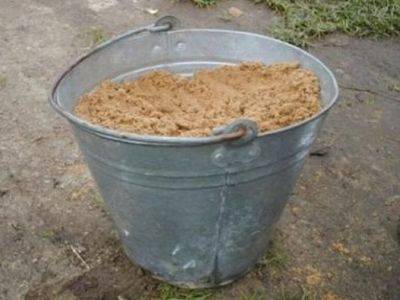
Place 2 of these buckets in a box on top of the oven.
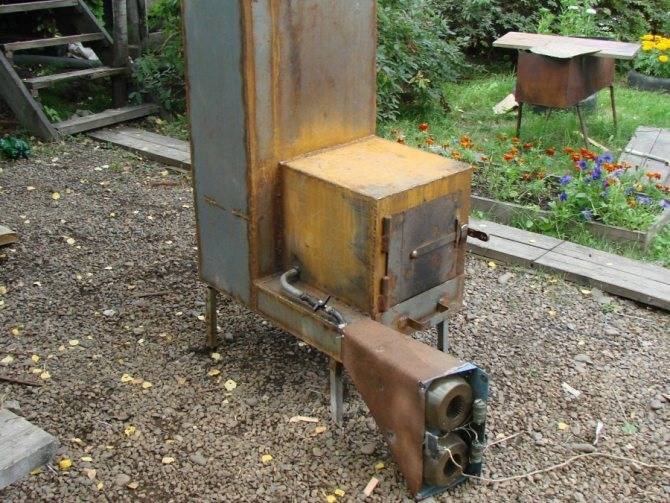
Alteration of the design
Steel corners welded on the sides reinforce the device itself and increase the temperature of the furnace. Also for these purposes, metal side screens are screwed.
Craftsmen attach sheets of iron 6 centimeters from the walls of the furnace. This is done so that the heat energy is transferred using convection, due to which air moves between the installed plates and the potbelly stove body.
Install protective metal screens
To prevent the heat energy from disappearing so soon, you can use a metal cassette. This is a cylindrical object welded from a sheet of steel.It is called a cassette because it is inserted into the combustion chamber. A little firewood is loaded into the cassette, turned over and put in a potbelly stove so that the firewood itself gradually falls onto heated coals and lights up. While the firewood that is already in the firebox is burning, the remaining in the cassette are dried and light up after the first layers.
Using an additional coolant
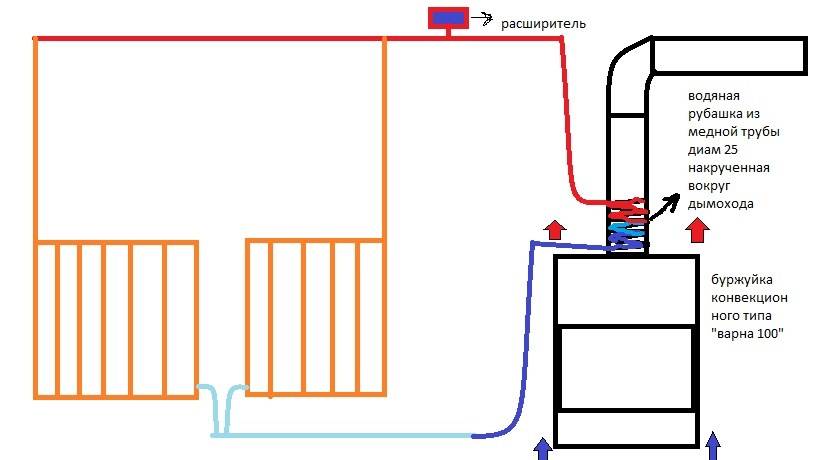
The stoves are supplemented with water tanks and so-called water jackets in order to use them as an additional coolant and save energy.
The water jacket is arranged as follows. The U-shaped tank, in which the water is heated, is mounted in the body. Two branch pipes branch off from the tank: for supply and processing. The tank itself is fed by a tie-in into the pipeline.
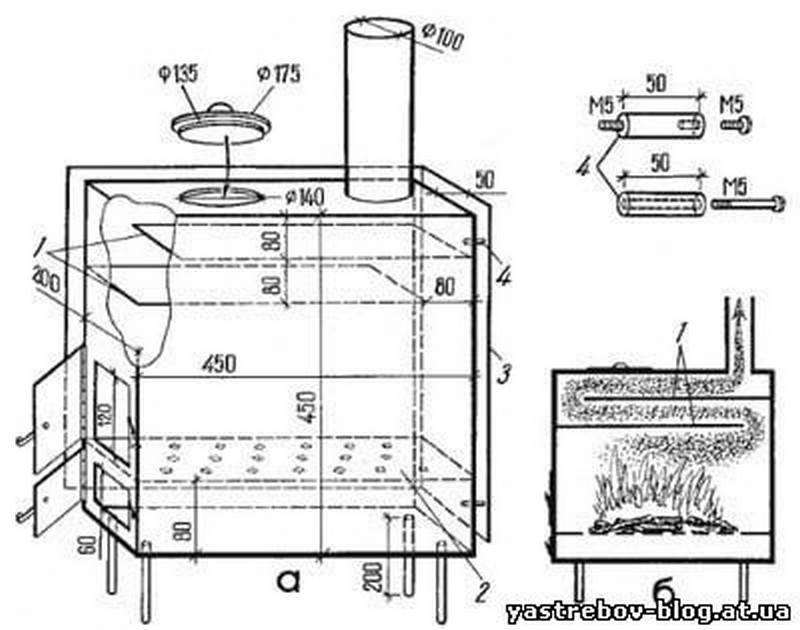
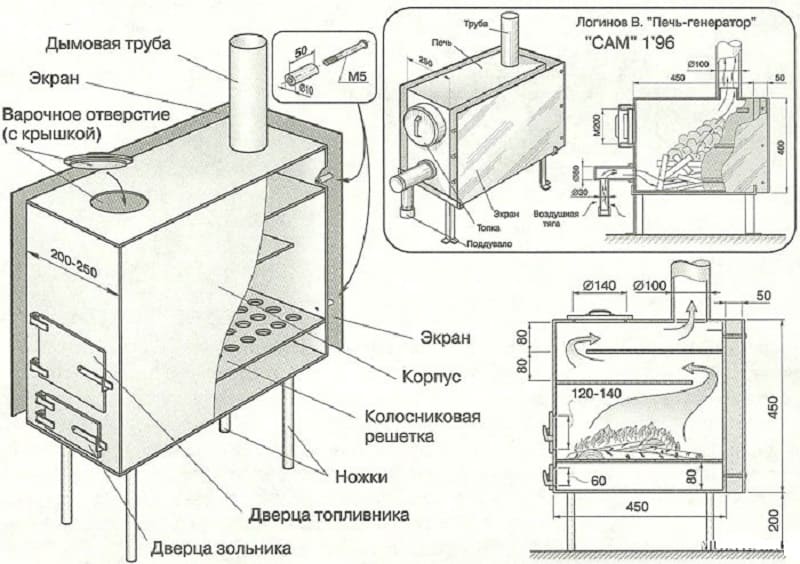
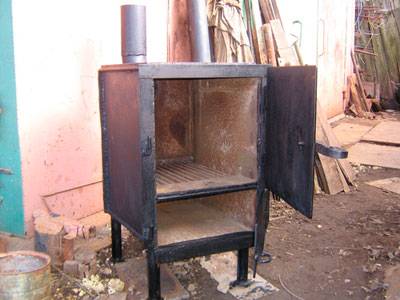
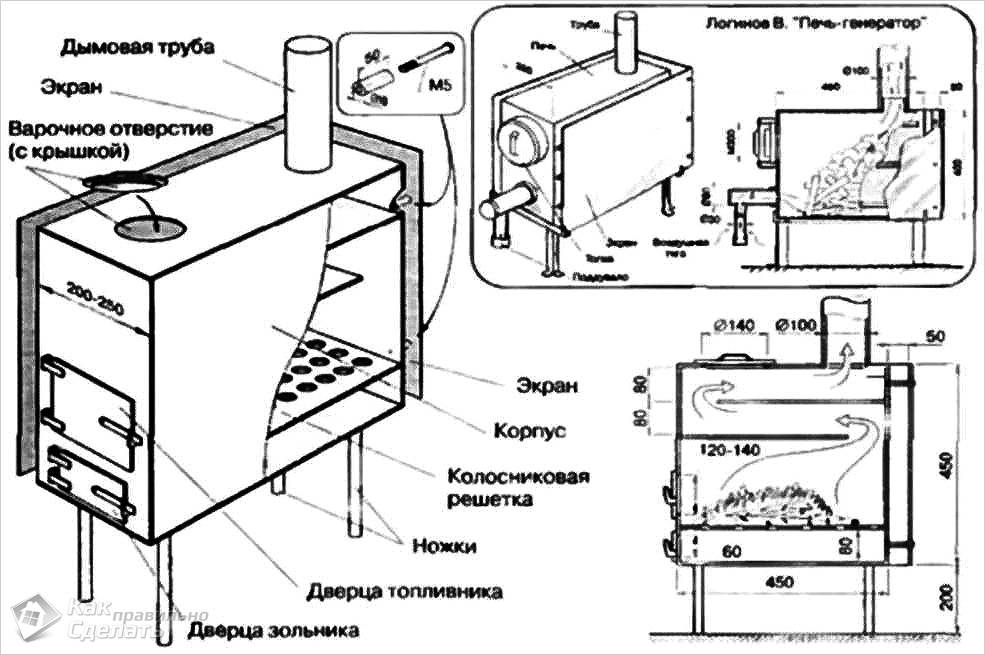
Assembling a potbelly stove with chimneys
Slow oven burning with your own hands - options and methodsTo assemble it you will need:
- sheet metal;
- metal bars and corners;
- welding machine plus electrodes;
- roulette;
- grinder with circles;
- pipes.
Do-it-yourself potbelly stove with smoke turns consists of:
- furnace compartment;
- ash pan;
- smoke circulation;
- smoke exhaust pipe;
- legs serving as a base;
- grate;
- doors;
The assembly workflow is as follows:
- They make a drawing of the furnace, according to which markings are applied to the sheets of metal.
- Bulgarian cut blanks.
- Sheets of metal are joined in the form of a rectangular container. From the inside, corners are welded to the side walls to accommodate the grate, which is made from bars.
- Inside the furnace, to ensure smoke circulation, a sheet of metal is welded in width with the bottom of the furnace, and slightly shorter in length.
- They make doors for the blower and fuel tabs.From thin metal strips, handles are welded to them.
- The legs are cut from metal corners.
- A hole is made in the upper part of the unit and a smoke exhaust pipe is welded with a damper made of a bar and a sheet of metal having a circular cross section.
A skillfully made do-it-yourself potbelly stove is shown in the video:
Preparation of materials
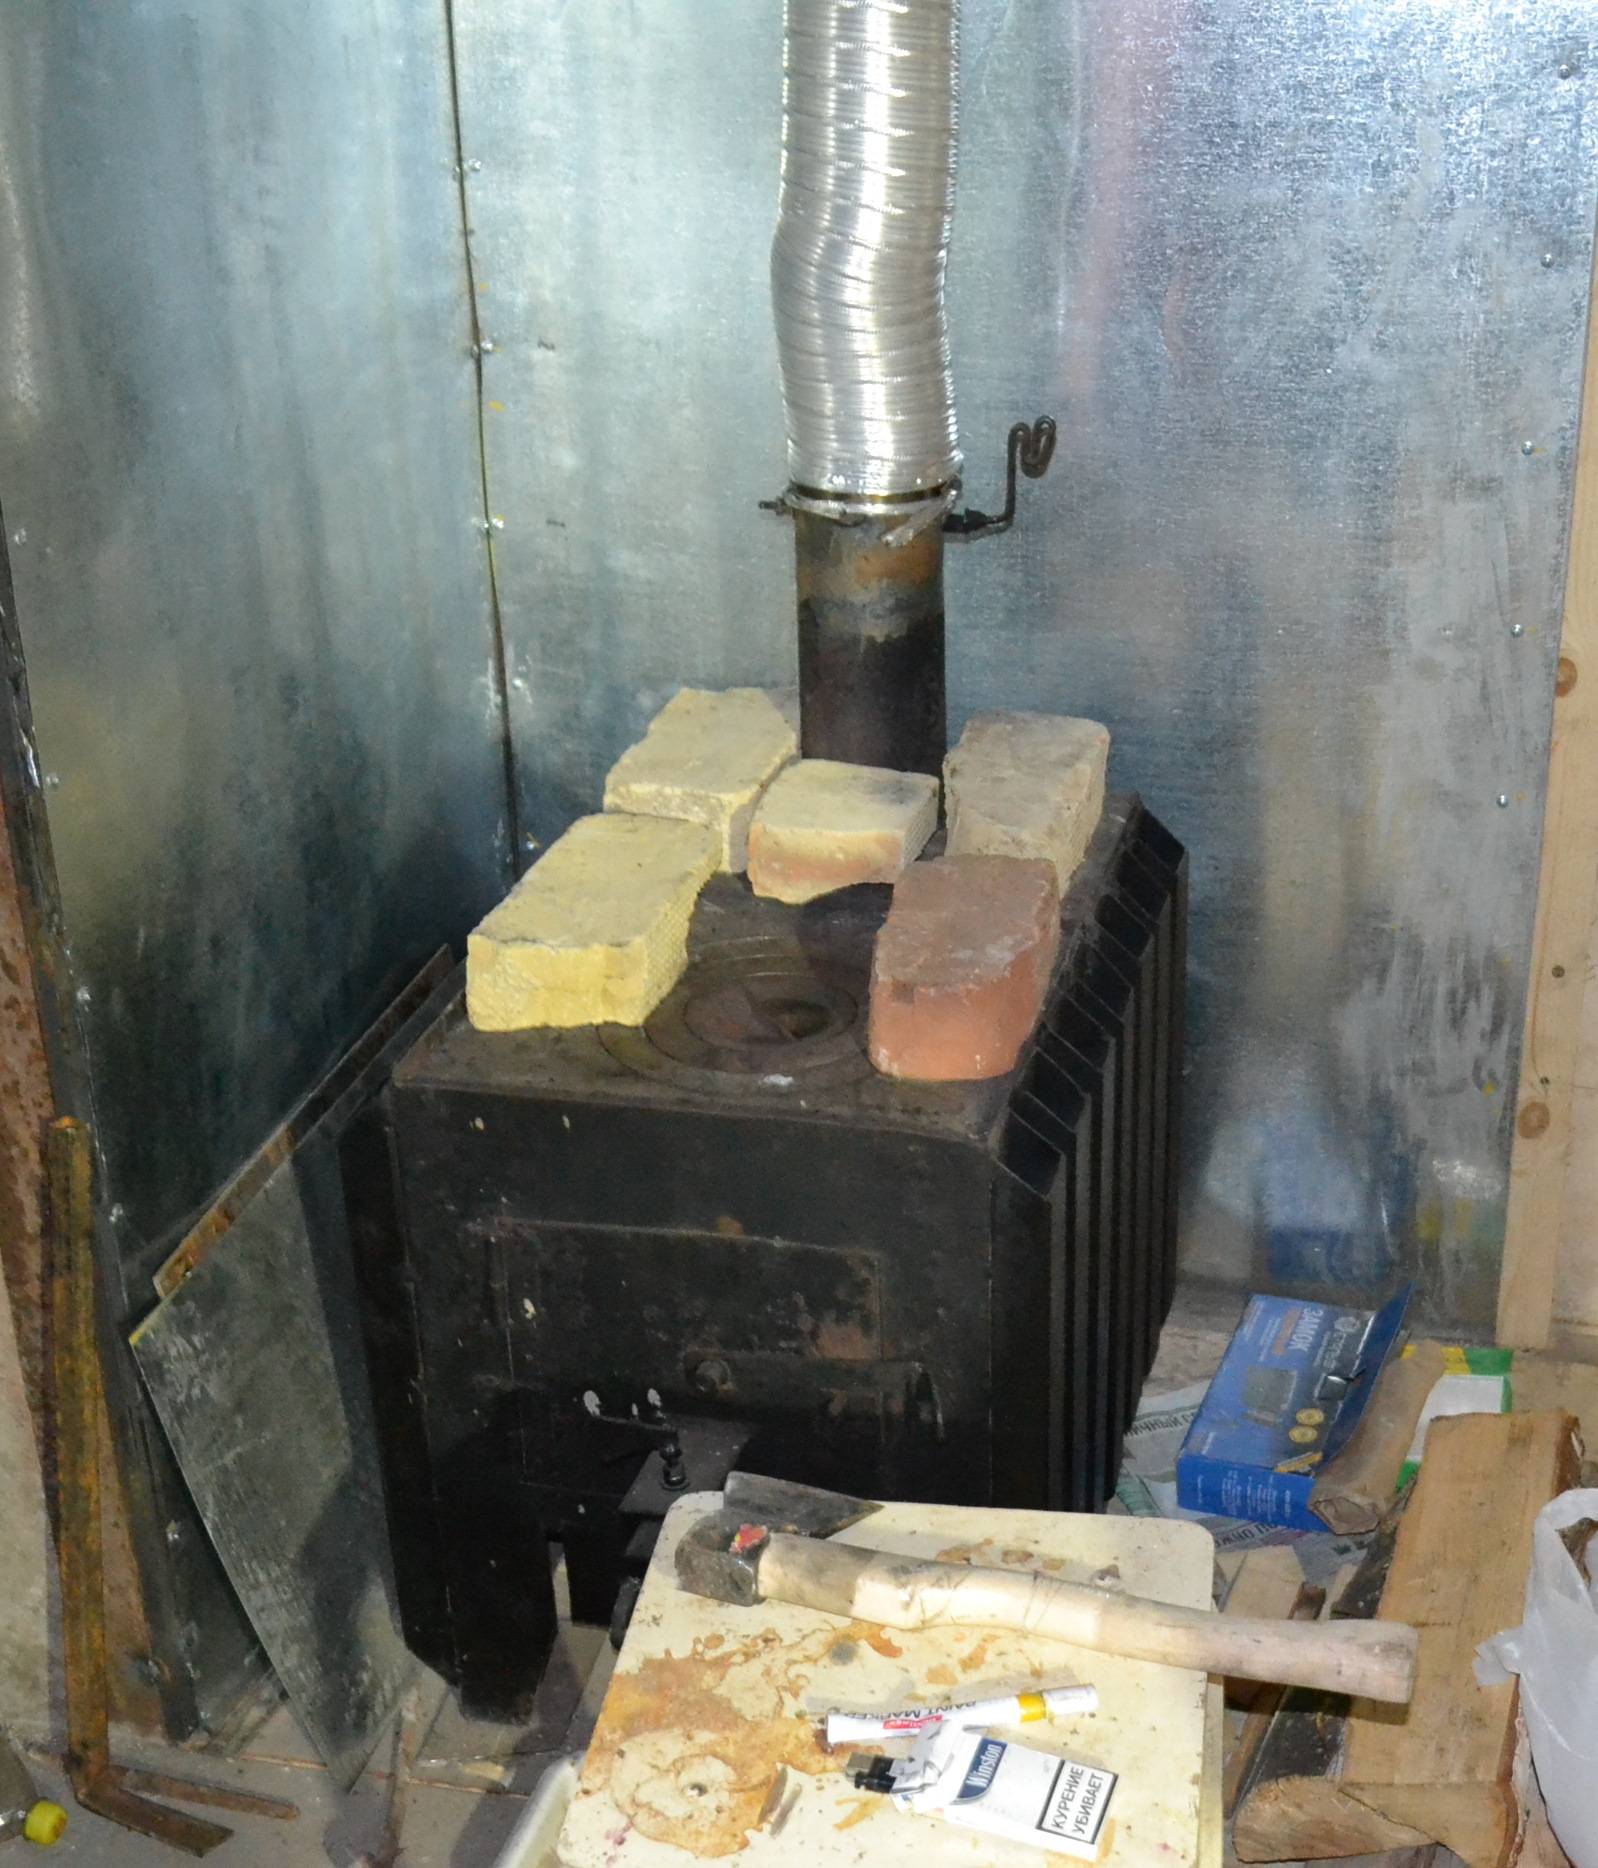
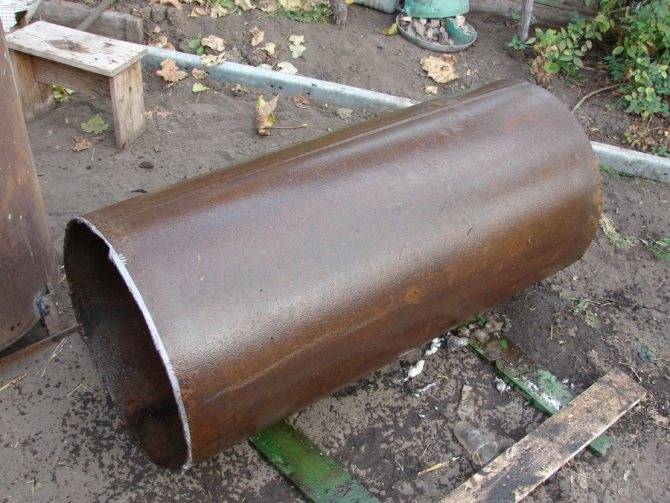
A potbelly stove with a water circuit is made from metal sheets or an old barrel, the wall thickness of which is at least 5 mm. To make a chimney with your own hands, you need to prepare a pipe with a minimum diameter of 12 cm, and with not less than 3 mm. Such indicators of the pipe will be enough to withstand the temperature of the gases.
For convenient operation, you need to make a special box in which ash will be collected. It is inserted into the blower. As a result, it will not be necessary to use a poker, it will be enough just to free the box.
Before you start assembling the oven, you also need to prepare the necessary tools:
- grinder;
- welding machine;
- metal brush;
- pliers;
- normal hammer.
Various types of potbelly stove
The design of the furnace is quite primitive. It consists of basic elements - a container with a door, an ash pan area and a chimney.
It is recommended to use a container made of cast iron or steel. The difference between the cast-iron construction is the ability to withstand any fuel, but such metal cannot be cooled sharply.
There are various ideas on how to make a potbelly stove. The most common designs have the following features:
- Built-in hob;
- Pyrolysis type furnace;
- Casing for additional heat dissipation.
Since the main type of stove manufacturing is home-made assembly, the frame is made from various metal barrels, cylinders, and boxes. There are different options from which you can make a potbelly stove with your own hands.


Pedigree with history
The stove-potbelly stove was invented by the bourgeoisie who were not finished with the revolution; in the terminology of the victorious proletariat - "former". Only not speculators-exploiters. Even in the years of the Stolypin upsurge before the World War, they transferred their capital to the offshores of that time, and when the Brusilov breakthrough (“Cossacks in five crossings from Berlin!”), With the gentle but strong assistance of the agents of the tsarina and Grishka Rasputin, choked, they massively rushed to Paris, London, Brooklyn.
The remaining "former" were mostly highly qualified specialists in various industries and deeply decent people. For this, the proletarians complained about them no more than Polygraph Polygraphich Sharikov - Professor Preobrazhensky. They used it, but under war communism, food and fuel were allocated only according to a mandate signed personally by Lenin.
Fortunately, students and younger colleagues of a suitable origin did not let the “former” die. There is a very truthful episode in the film about A. N. Tupolev: the future great aircraft designer, and then still a student, saws for firewood with another future great aviator - N. N. Polikarpov - in the apartment of the father of aerodynamics N. E Zhukovsky, a tree stolen in the park , and immediately the potbelly stove bursts with heat.
But the potbelly stove was invented not by aviators, but by heat engineers. Russia has long been famous for its stove business. The foreigners who visited it, as one, admired the perfection of Russian stoves, Olearius and Casanova, and climbed into them to examine the device.Casanova writes in her memoirs: "The skill of the Russians in building stoves surpasses the skill of the Venetians in building artificial reservoirs." From the lips of a Venetian, this is extraordinary praise.
From here it immediately becomes clear that the voracity of bourgeois women is simply a consequence of improper design and / or operation. You can't steal a tree or a fence just like that, the Cheka does not doze off right up to the execution on the spot. The stove had to be created in such a way that the Viennese headset was enough for at least the winter. And in heat engineering and other sciences necessary for the furnace business, the “former” knew a lot.
Modern potbelly stove in artistic performance
With the beginning of the New Economic Policy and the rise of the USSR, the attitude towards the “former”, at least at the top, changed radically. But the potbelly stove did not disappear as unnecessary. Even under Lenin, workers began to distribute land plots in the suburbs under, as they said then, suburban gardens. Which are nothing else than the present dachas. And the potbelly stove, economical, elementary simple and unpretentious, just fit for the dacha. In what capacity is it most used today.
It was then that the industrial production of stoves-bourgeois was started. True, not for the working class, but for the defenders of the revolution - the Red Army. At the same time, its design was brought to full perfection, and it turned out to be so successful that artistically designed potbelly stoves were exported in considerable quantities, delivering currency to the USSR, bypassing the then sanctions.
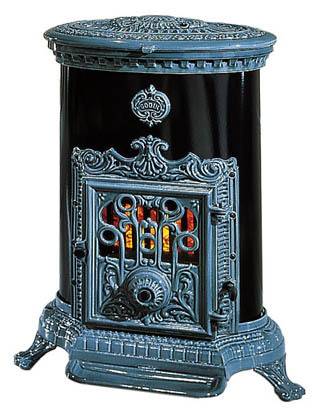
Far from the homeland, the potbelly stove did not go unnoticed by the local bourgeoisie. The Finns were the first to start its industrial production abroad, back in the 20s. And now Canadian, Swedish, Finnish potbelly stoves are holding confidently on the stove market, see fig. on right.First of all, thanks to the very moderate price and ease of use compared to comparable stoves of other designs.
How to do it yourself?
Manufacturing options:
Rectangular oven
It is a metal box, you can independently weld the structure of steel sheets. For a rectangular potbelly stove, an old automobile tank, a box will fit perfectly.
Usually, this form is chosen when it is necessary to cook food on the stove.
On a capacious platform, you can immediately put 2 large pots or containers for heating water.
The manufacturing principle is simple: doors are built to cover the blower and the combustion chamber, a hole is made for the chimney, combustion products must leave the room in a timely manner, otherwise you can inhale carbon monoxide.
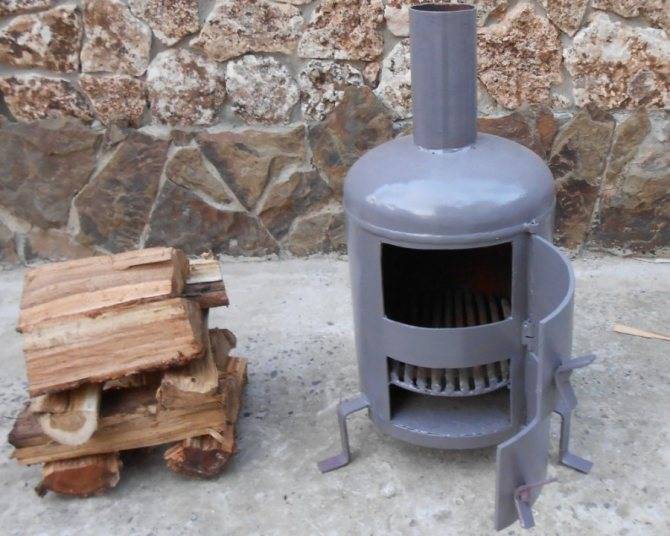
From a gas bottle
The most common type of potbelly stove. The cylinders have thick walls, the furnace is durable, mobile, fireproof.
First, a drawing is drawn, markings are made. Door for combustion chamber will be located in the center of the balloon. It blew in the same plane, only 10-12 cm lower.
Instruction:
- We take a grinder, cut out both doors, draw a closed line between them.
- We cut the balloon into 2 parts along the line.
- At the bottom we weld a grate - a blower.
- We install the grate, weld both parts again.
- For the valve, we make a hole in a radius of 10 cm.
- For the hood, we insert a hole into the pipe, by welding we weld objects.
- A simple stove from a cylinder is ready, you can use it, throw in fuel and check its operation.
For cooking on the top of the stove, the design is slightly different:
- The top of the balloon is cut off.
- The rods are inserted and welded inside.
- A hole for the pipe is cut out on the top side. You can heat and cook food at the same time.
- A hole is welded, a valve is screwed in, a comfortable handle is adjusted.
- You can also make a stove from a pipe, a barrel. The barrel or pipe must be selected according to the diameter.
- At the bottom of the pipe barrel, cut 2 holes for the firebox and ash pan.
- Make doors.
- Frame the holes with metal strips.
- Under the furnace door at a distance of 10 - 12 cm inside the barrel, weld brackets at the corners, a grate will lie on them, weld it first from any fittings.
When making a furnace from a pipe, weld the bottom of it, as well as a part on top:
- Weld 4 legs at the bottom to the bottom.
- Cut a hole on the surface, weld a pipe to it, this will be a chimney.
- Weld the hinges to the previously cut holes, install the doors. Also, mark and attach a hook so that the doors lock tightly.
- For the aesthetics of the construction, process all welding seams, clean them 10. Paint the outside of the device with heat-resistant paint. Whatever a factory product, you can sell or successfully use it yourself.
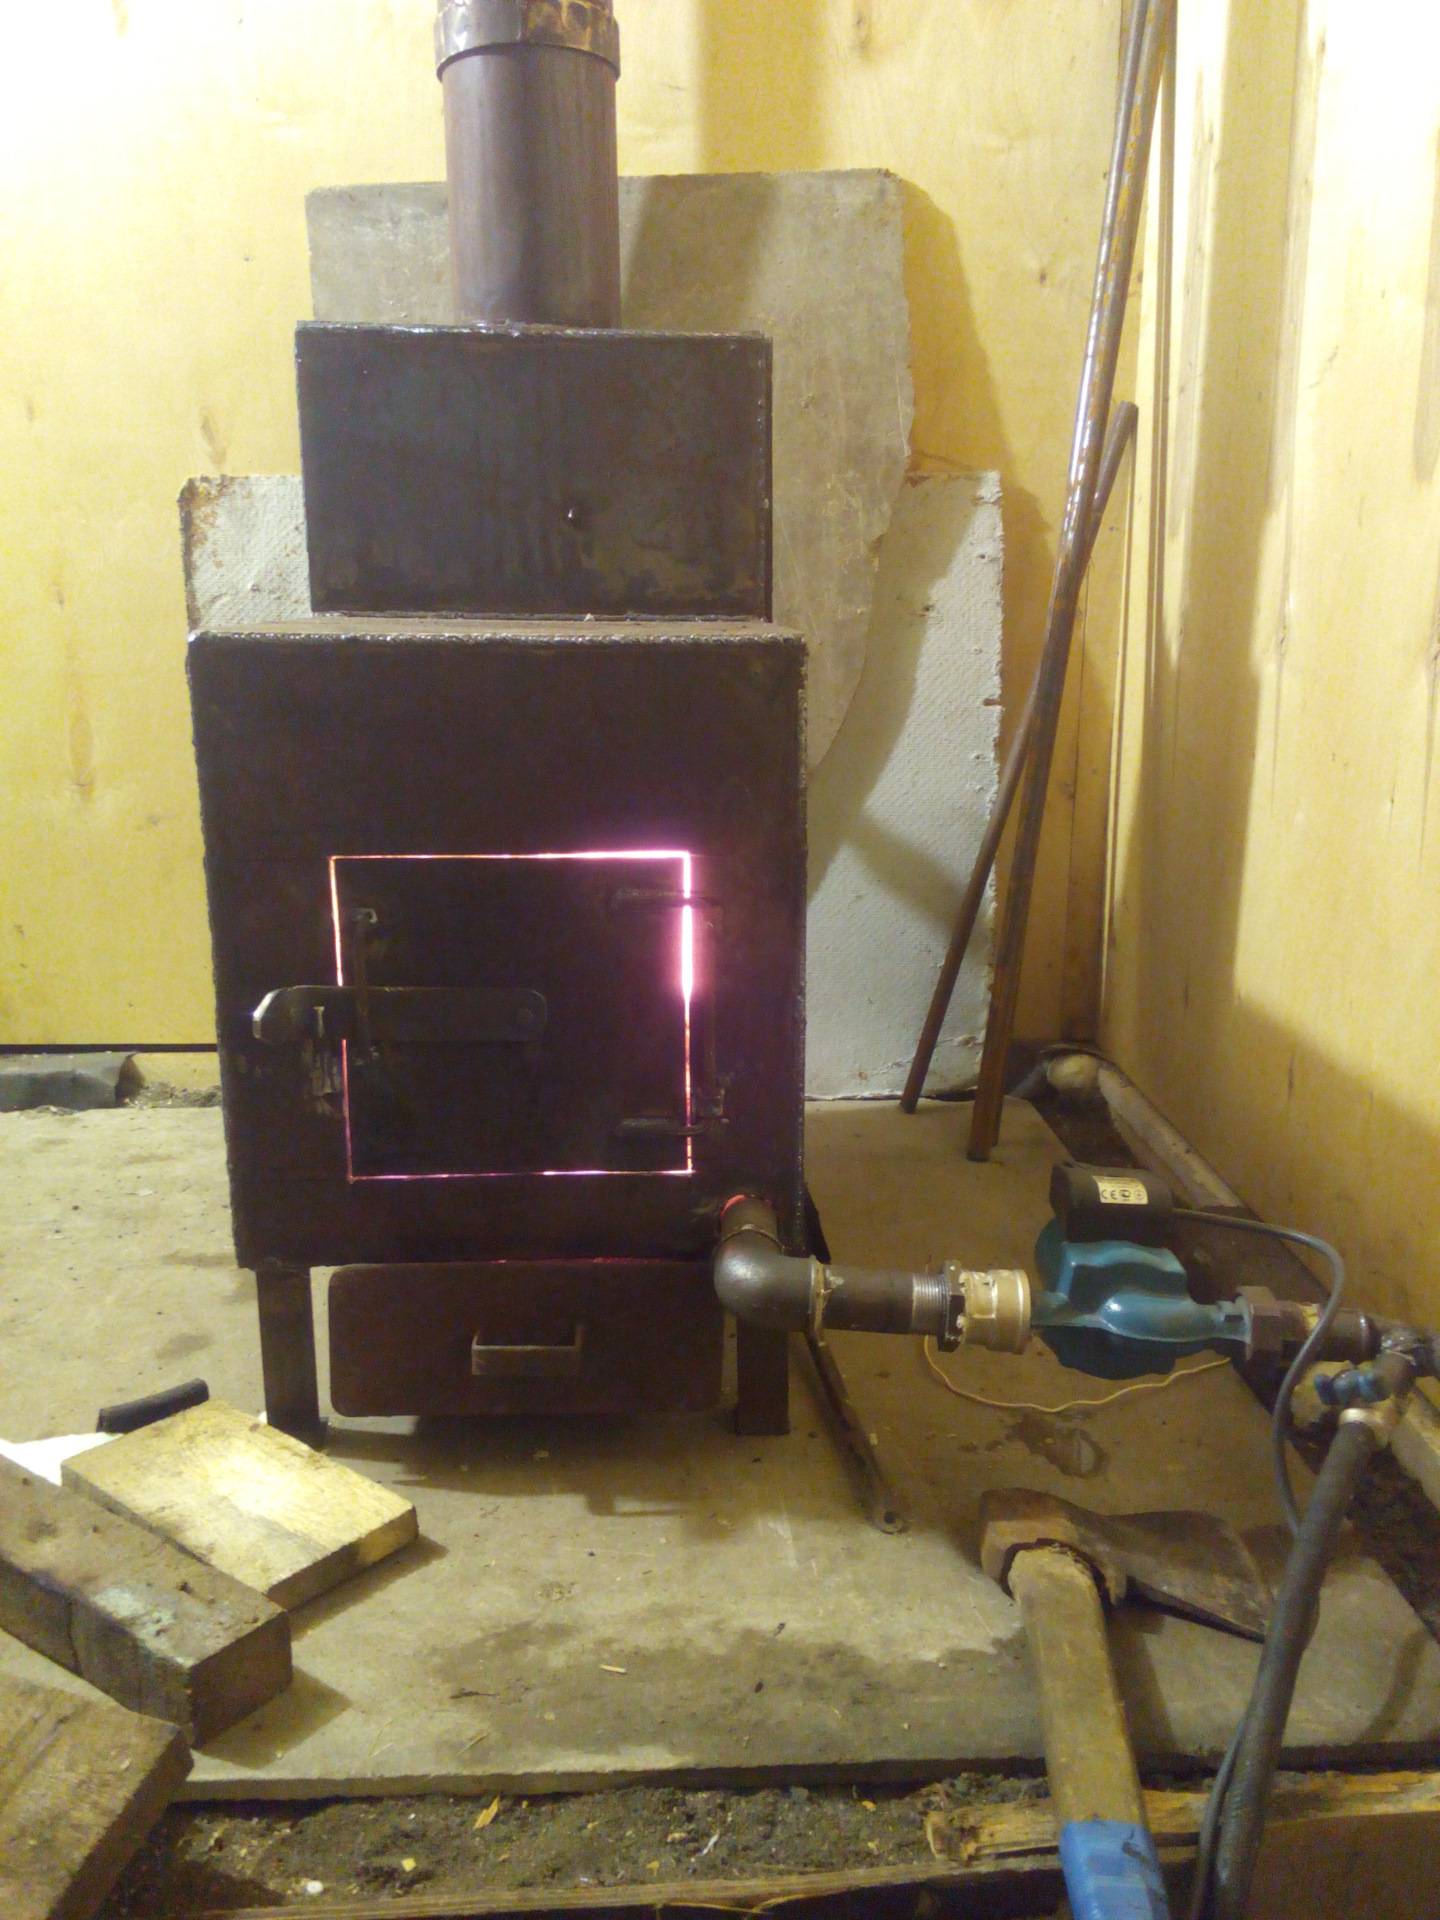
Working furnace
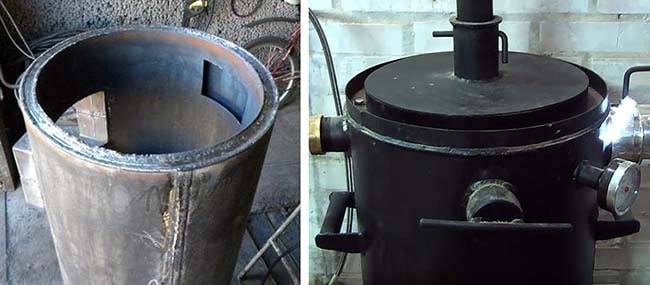
The option is distinguished by a specific smell, which during the combustion of fuel will be emitted by oil mining, even in the presence of an exhaust hood.
Instruction:
- To make this model, select sheet material with a thickness of at least 4 mm, a chimney pipe, and individual small structural elements.
- Make accurate markings of all elements on the sheet, having previously drawn a drawing.
- Cut all the elements with a grinder, clean the edges of the parts. Drill round holes in the pipe.
- At the top of the tank, cut a hole for the pipe with an offset from the center to the left.
- Offset to the right on the circle, drill a hole for the connecting pipe.
- It turned out 2 circles, weld them to the pipe, the thickness of the upper tank will depend on its segment.
- Decorate the part of the stove from below in the same way, but now cut the hole right in the center of the indicated circle.
- Cut a second hole next to it, fix the sliding cover on it.
- Weld 4 legs to the bottom plane.
- Clean the seams after welding, paint the surface with high temperature resistant paint.
- Connect the chimney to the oven. The mining will be poured into the lower part of the tank, after the paper is ignited, the sliding cover closes, and the mining starts to burn. Oxygen will penetrate through the holes, mining will burn intensively.
Operation features
Expert opinion
Pavel Kruglov
Baker with 25 years of experience
The operation of such a stove is similar to a conventional brick stove. It doesn't retain heat very well though. Therefore, handmade stove stove made of bricks will have to be flooded again within 4-6 hours after the last coals have burned out.


This indicates the unprofitability of using such a design for permanent heating. However, for heating a garage, a summer house, etc. periodically, it may well be used.
Such a furnace only works on solid fuel. This is another disadvantage.
At the same time, the design is simple to manufacture and operate. This is what makes her popular.
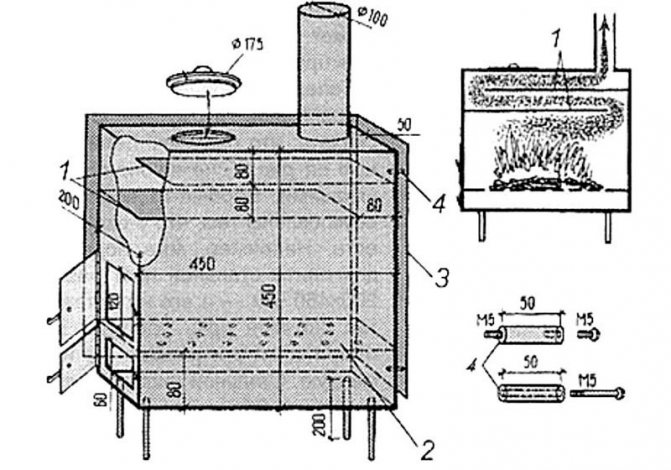
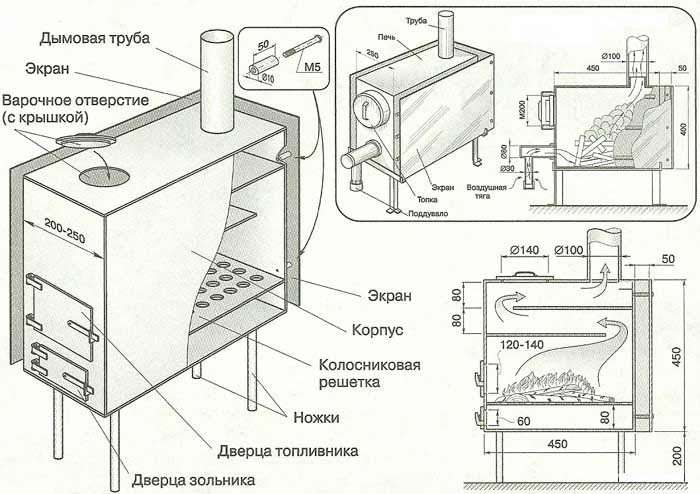
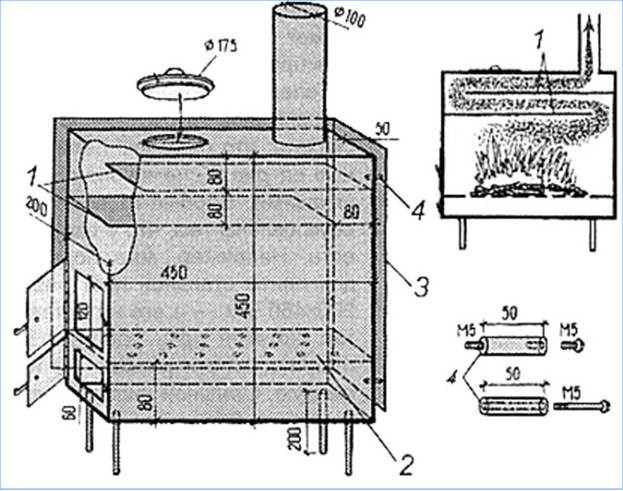
Bourgeois schemes
Use under certain conditions is not possible without prepared drawings.There are basic criteria, for example, a rectangular heater is more efficient than products made of oval materials. Potbelly stove schemes will help you make your own device for heating various rooms
It is important to choose the optimal size, loading features, in small rooms, so there is no space
Drawing for assembling a potbelly stove
The sizes of bourgeoisie are considered optimal in the range of 80x40x40 centimeters. The stove significantly increases its performance due to the presence of partitions in front of the chimney. When changing dimensions, it is possible to change only the width, access to other parameters will lead to a loss of efficiency, power of the furnace.
Chimney Requirements
You can mount a metal chimney for a stove with your own hands, the main thing is to do it right, otherwise, due to incorrect calculations, it will increase load on the heating system, there will be smoke in the room, etc.
We have previously written about chimney materials and recommended bookmarking the article.
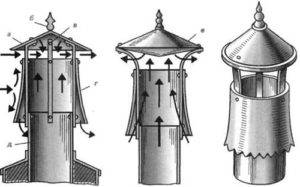
The first thing you should pay attention to when buying a chimney is its shape. Masters recommend the use of cylindrical pipes, they are better than others for the removal of exhaust gases and smoke. Most often, steel pipes are used to equip the chimney of the furnace.
Compared to a brick chimney, they are much easier to lay.
Most often, steel pipes are used to equip the chimney of the furnace. Compared to a brick chimney, they are much easier to lay.
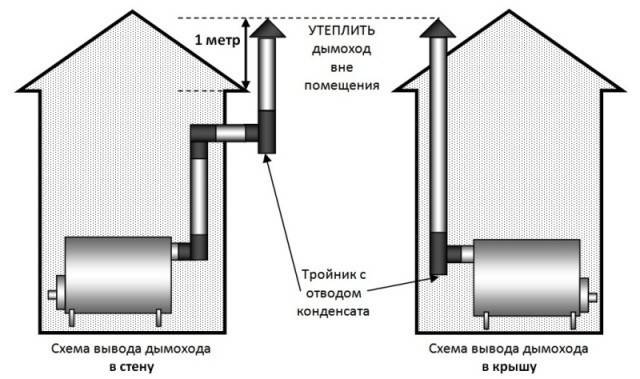
The size of the chimney directly depends on the size of the heating structure (stove). To correctly determine the height of the structure, you need to seek help from documents on building codes.Errors in the calculations lead to a decrease in traction and the appearance of traces of soot in the room. In order not to be mistaken with the diameter and length of the pipes, you can use a suitable ready-made project with dimensions from the Internet.
The table shows the recommended dimensions of the furnace in centimeters for a chimney height of 5-10 meters
Basic requirements for metal chimneys:
- Pipes must be well insulated.
- Before installing the chimney, you need to make the right calculations and prepare a project.
We advise you to study the material on installing a heat exchanger on a chimney with your own hands on our website.
Compliance with these rules will allow the chimney to function without such consequences as smoke in the room, soot settling, carbon monoxide, etc.
Parts for a metal chimney (pipes, elbow, tees, fittings, etc.) can be purchased from specialized stores. If there are no skills in the construction business, you can always turn to professionals.
Readers find these materials useful:
Special requirements for the installation and operation of chimneys in garages are associated with the need to ensure fire safety.
When connecting and testing the chimney of a garage potbelly stove, pay attention to the following points:
- Effective functioning of natural ventilation or the presence of a forced air supply system in the garage room. This is necessary for uninterrupted combustion of fuel in a potbelly stove, for the combustion of which air must enter the furnace through an ajar blower.
- The absence of objects prone to ignition near the chimney and the body of the heating device.The possibility of ignition as a result of an increase in temperature during testing and further operation of the furnace should be excluded.
- Location of storage areas for flammable liquids, fuels and oils. They should be at a sufficient distance from the stove-potbelly stove.
How to make a potbelly stove with your own hands
First of all, it is necessary to formulate the concept of "potbelly stove". As it was customary initially, this is a thermal unit made of metal for the use of solid fuel. As a rule, firewood is used. To remove furnace gases, a metal pipe is installed, which is led out through a wall or window.


The advantage of this design is the rapid heating of the walls, followed by heat transfer to the surrounding space. The disadvantage is that when the supply of firewood to the furnace is stopped, the stove cools down quickly, and you have to add more wood to keep the temperature in the room. During the night, several such operations have to be performed.
Potbelly stoves can be of various purposes
The main models of homemade bourgeois
According to its principles, a potbelly stove is practically no different from models of a special solid fuel device. This is a specific variation of a very simple fireplace category stove. There are also special models that are equipped with cooking hobs and special bath devices.
Material used for execution stoves Often a potbelly stove is made of quality steel, but in some cases cast iron can be used. With different types of metal, elements made of natural stone are often used.If cast iron is used, then you should count on low heat capacity parameters, it is very difficult to find it and it is not easy to cook it. Many people prefer steel for this very reason, it is much easier in the process. At the same time, the thicker the material, the longer it will last. If you plan to make a device for rare use, for example, for emergencies with a heating system, then make it from simple iron, which has a thickness of 1 mm. In the process of manufacturing the furnace, the entire style may well be used factory. This applies to elements such as grates, necessary doors, burners and valves. Many craftsmen make them with their own hands using steel.
The shape and material for the case If you want to make a potbelly stove using drawings or photos, you must use the method of cutting a metal sheet.
- In addition, elements such as:
- Molded profiles;
- Square tube;
- Special corners;
- fittings;
- Rod.
 All this is required to make a rectangular furnace body. Due to the presence of special planes, the body will have ideal ergonomic properties. In other words, the potbelly stove will be as stable as possible, it is easy to handle and veneer. The stove can be easily and simply docked with a variety of structures, objects and details.
As a basis, various case products made of metal, boxes can be used. Often these are elements of a cylindrical shape, for example, large-diameter pipes, cans, gas cylinders.
In the process of making a furnace with your own hands, you will definitely need to use welding
If the metal is not very thick, the furnace can be made using bolts, screws and a drill. Regardless of the model chosen, it is important to use drawings as a basis for manufacturing, because. despite the relative simplicity, it is required to follow certain instructions for the implementation of the heating means.
How to make a potbelly stove for working out with your own hands
For clarity, consider the main stages of manufacturing a potbelly stove.
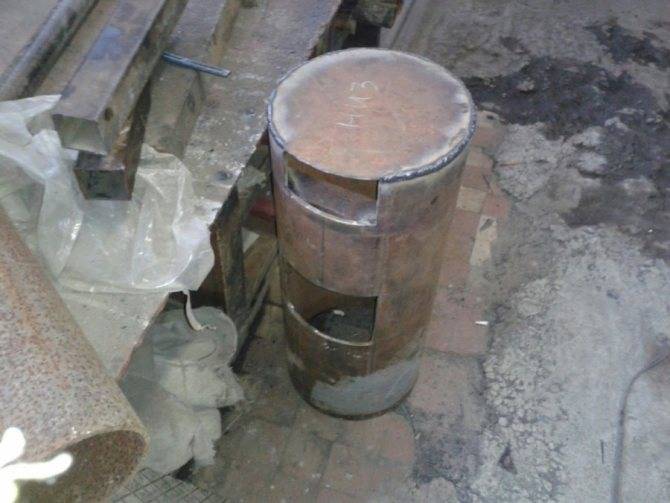
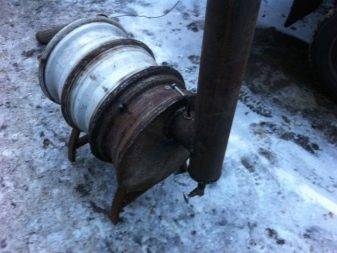
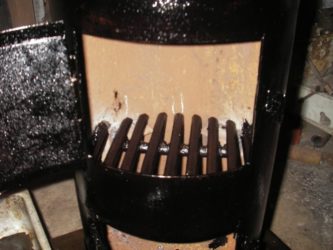
1. Formation of combustion chambers. To do this, the prepared steel strips are bent into a ring and fixed with clamps. Weld the ring joint. The clamps are released after the weld has cooled.
2. Circles are cut out of sheet metal according to the diameter of the rings. Technological holes are made in the circles for the connecting pipe, the chimney pipe and the cover for the fuel loading hole.
3. Prepared rings are welded with circles. Thus, the fuel combustion chambers are formed. You need to check the tightness of the welds. It is better to make the lower combustion chamber (where mining is loaded) collapsible. This will simplify the maintenance of the oven in case it needs to be cleaned.
4. In the upper combustion chamber, a technological partition made of metal of the same thickness as the main structure is equipped.
5. For ease of assembly, first assemble the upper combustion chamber. It is equipped with a chimney pipe and a connecting pipe with drilled holes.
6. The lower combustion chamber is welded to the free end of the connecting pipe.
7. The final stage. Legs are welded to the lower combustion chamber, having previously leveled the furnace on a flat surface. Weld the support bar from the corner. The bar is installed between the combustion chambers.It provides rigidity and stability of the whole structure. If desired, the potbelly stove is painted with heat-resistant paint.
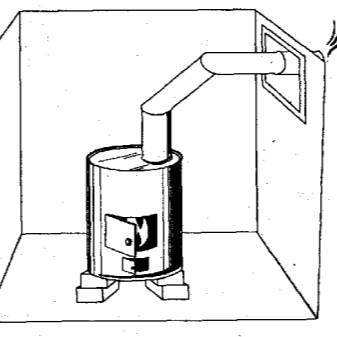
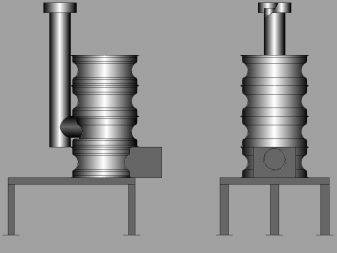
Design
The device of the stove-potbelly stove is extremely simple. For such the furnace does not require the construction of a foundation, there are no great difficulties with the arrangement of the chimney system. The standard potbelly stove system consists of the stove itself, which is an iron box with an opening door, and a pipe that goes outside.
To increase the efficiency of the furnace, it is worth increasing the heat-conducting surface area. For this purpose, it is best to make a heat exchanger.
Slightly less popular are potbelly stoves with a water circuit, which include radiator batteries in their device.
And for most garage owners, a stove made using rims is very popular.
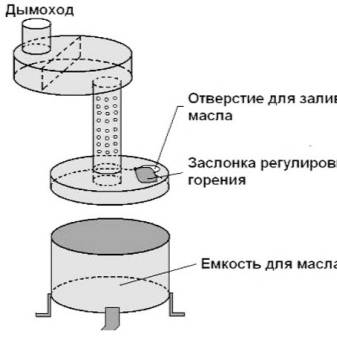
The principle of operation of the device
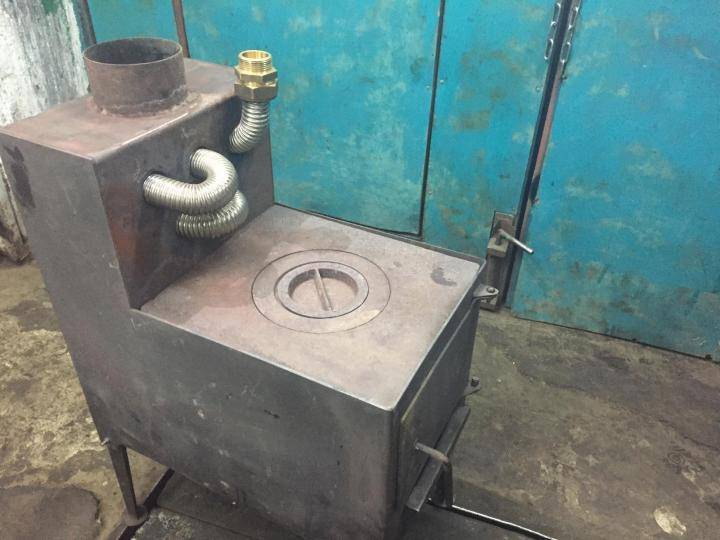
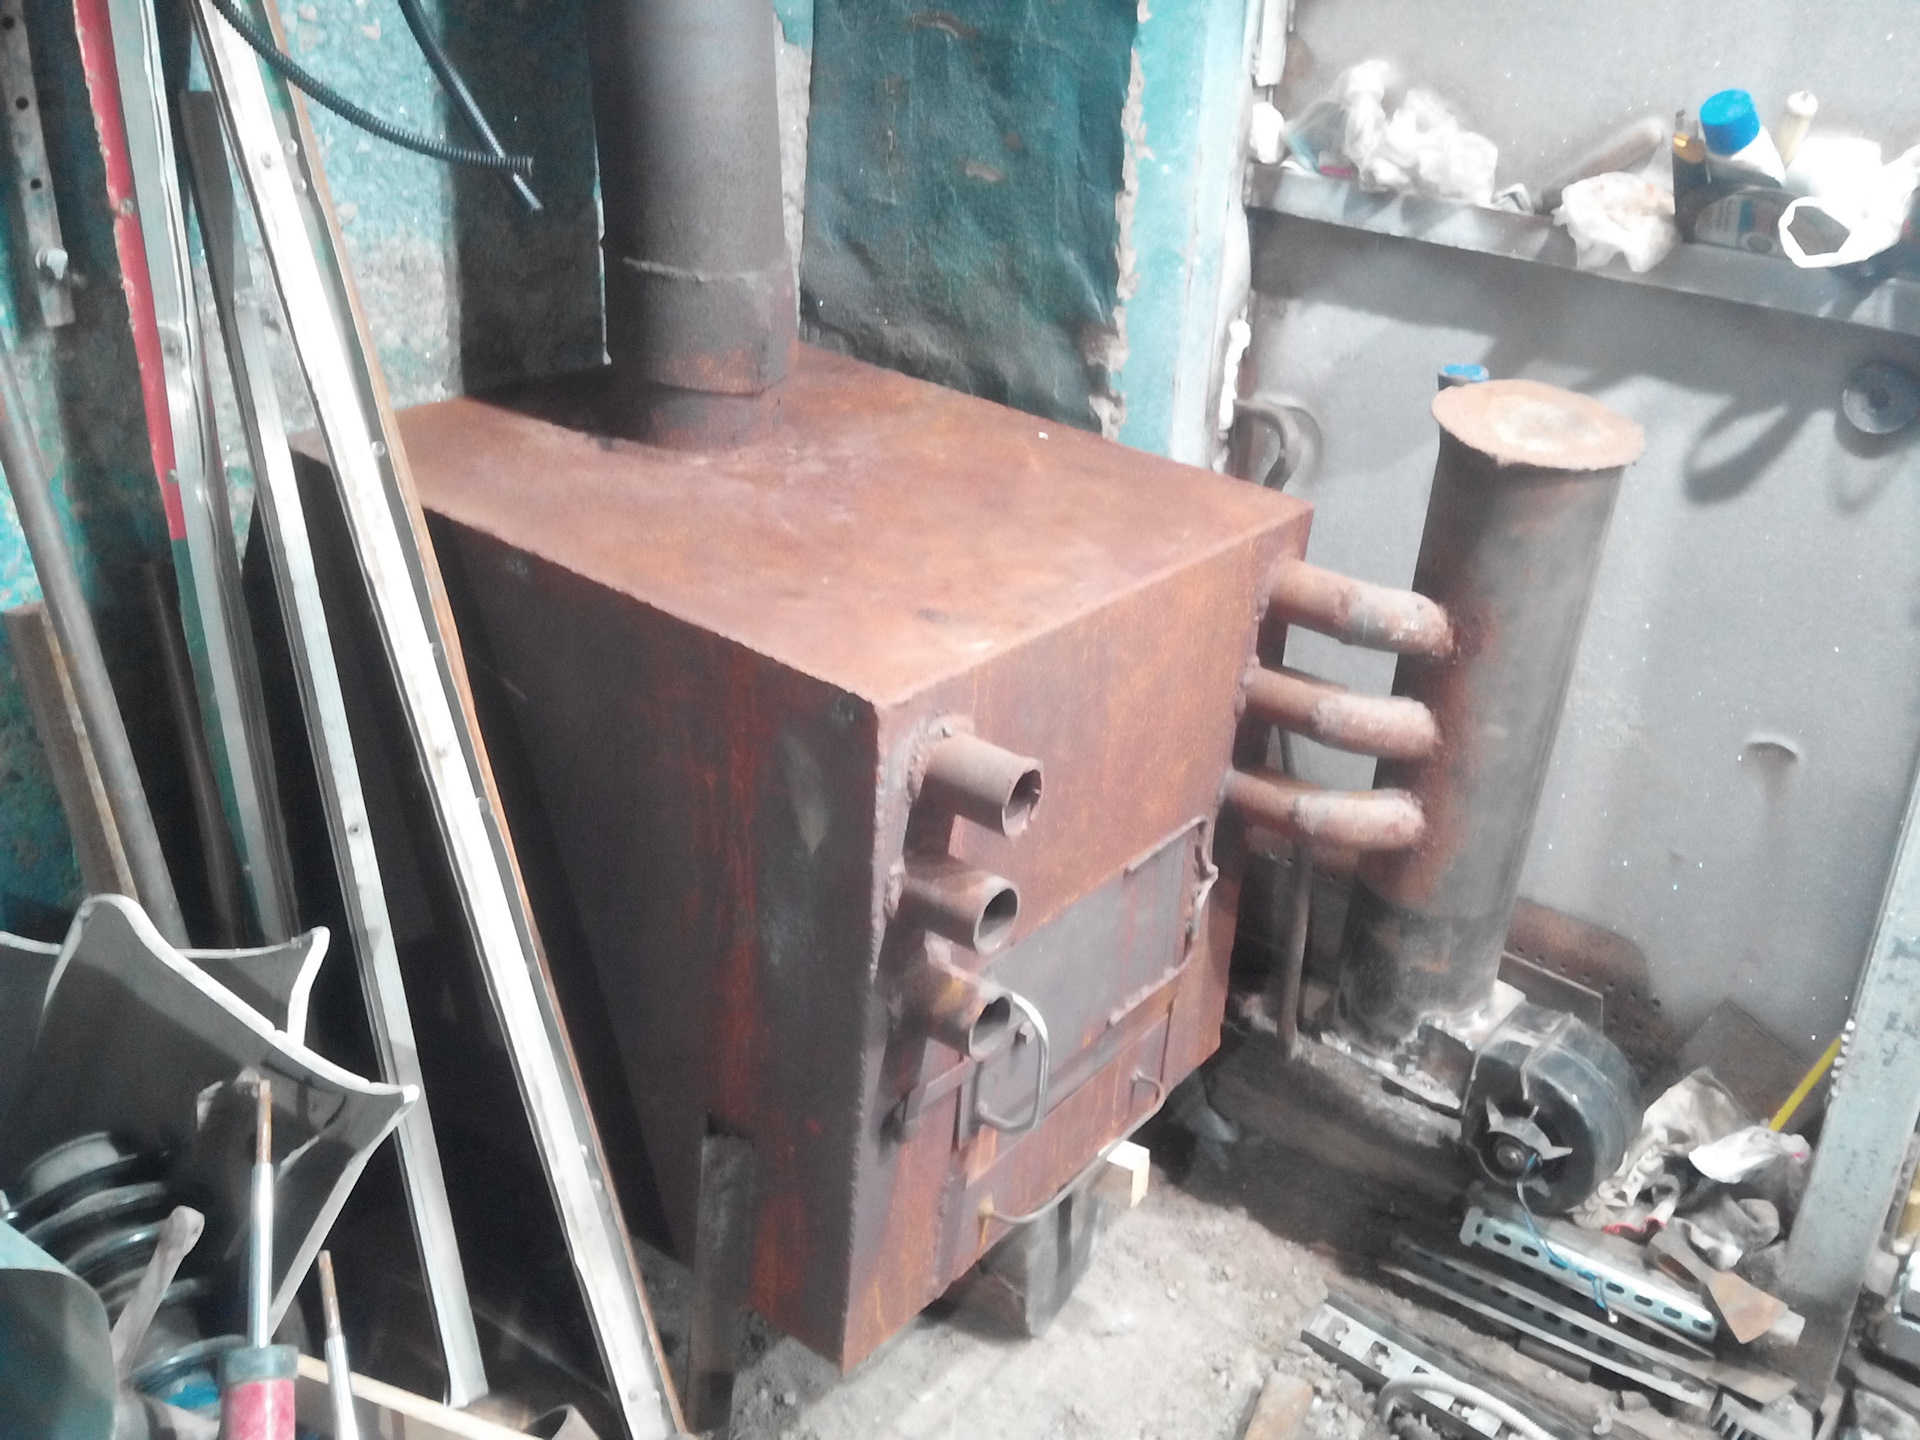
Combustion of fuel in a potbelly stove during processing occurs in two main stages. Initially, the filled oil burns in the tank, after which the gases are mixed with air, enter the second chamber, where they are burned and provide the maximum possible heating efficiency of the room. At the same time, fuel consumption is significantly reduced, and the need to constantly refuel the unit disappears.
A properly assembled potbelly stove in oil will consist of two separate compartments. The first chamber is a small tank where used oil is poured. Combustion of fuel occurs at a relatively low temperature. Above is an afterburner, where the resulting gas is mixed with air and burns at a temperature of about 800 degrees.The metal walls of the potbelly stove heat up, and thick metal effectively retains heat, quickly heating a small room.


In this video you will learn useful information in the manufacture of potbelly stoves:
Tips & Tricks
Experienced craftsmen advise installing a potbelly stove in the corner of the garage, and leading the chimney to the opposite side. Thus, maximum heat transfer is achieved. To prevent heat from escaping with smoke, the pipe must be pulled at an angle of 30 degrees. If possible, it is recommended to avoid horizontal straight sections.
The location of the chimney must be stepped. The fewer straight horizontal sections, the better.
A metal sheet is placed under the furnace. Installing a potbelly stove in a garage requires a supply ventilation and an exhaust system.
A homemade potbelly stove will be a practical addition to any garage. Thanks to the function of uniform heat distribution, you can install the stove anywhere, but experts recommend mounting the heater in a corner.
Types of bourgeois
Potbelly stoves are made of cast iron and stainless steel. The design of the furnace is a hopper with a firebox door, in some models - an ash pan and a chimney pipe.
Varieties:
- oven with hob for cooking;
- oven with hob, oven and burners;
- furnace-heater - having a casing around its body, the furnace-heater is able to effectively increase heat transfer. Air is sucked in in the space between the stove and its casing in the lower zone, rises, heats up against the walls of the furnace and exits in the upper zone from under the cover or through holes in it. The low temperature of the casing creates a safe surface for humans, which will not burn you.The casing can be steel and ceramic.
- gas generating furnace - a steel structure coated with heat-resistant paint, consisting of two combustion chambers: the lower one is a gasification chamber; top - afterburner chamber.
Bourgeois schemes
Use under certain conditions is not possible without prepared drawings. There are basic criteria, for example, a rectangular heater is more efficient than products made of oval materials. Potbelly stove schemes will help you make your own device for heating various rooms
It is important to choose the optimal size, loading features, in small rooms, so there is no space

Drawing for assembling a potbelly stove
The sizes of bourgeoisie are considered optimal in the range of 80x40x40 centimeters. The stove significantly increases its performance due to the presence of partitions in front of the chimney. When changing dimensions, it is possible to change only the width, access to other parameters will lead to a loss of efficiency, power of the furnace.


