- Varieties of designs
- Varieties of stoves depending on location: vertical model
- Barrel stove: features of a horizontal model
- The process of building a chimney
- Safety rules and design measurements
- Installation of all elements of the system
- How can a stove be used in a garden plot from a barrel with your own hands
- can stove
- Ordering a brick oven for a garage
- Interesting potbelly stove with stone masonry
- Installation rules
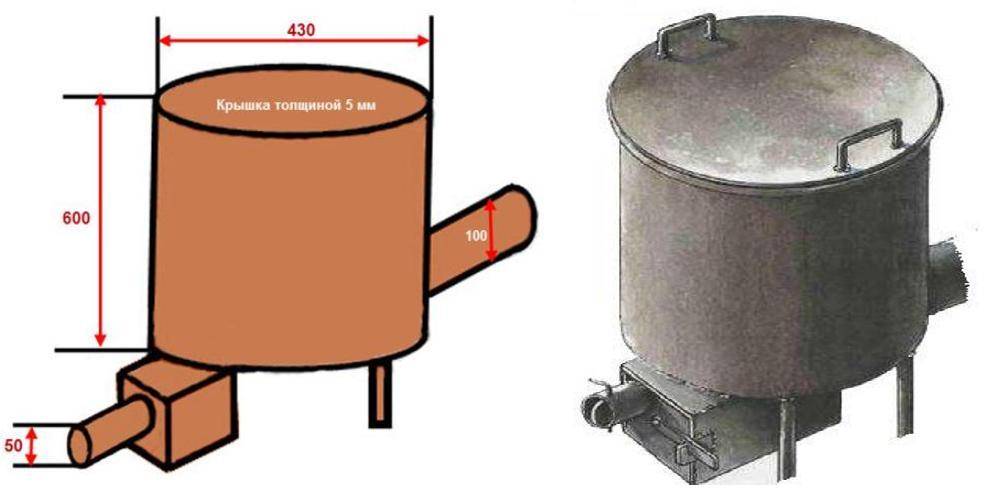
- Classic - a stove from one barrel. Drawing
- The principle of operation of a potbelly stove from a barrel
- Potbelly stove with smoke
- Required materials and tools:
- Assembling a potbelly stove with chimneys
- High thermal conductivity of a potbelly stove - minus or plus
- Conclusion
Varieties of designs
Many designs of potbelly stoves for the garage have been invented, so it is not difficult to choose the appropriate option based on the available material. The drawing is compiled independently, taking into account the characteristics of the room, or they are taken ready-made from the Internet. The design, depending on the size of the garage, is made horizontal or vertical.
The classic potbelly stove is made of sheet iron. The easiest way is to make a stove from an iron barrel, but the service life of the structure is short, as thin walls quickly burn out. The option of a gas cylinder or pipe will last much longer due to the greater thickness of the metal.Simple designs for garages are made from old rims and iron cans.
Varieties of stoves depending on location: vertical model
Depending on the plane in which the metal tank will be located, two types of home-made bourgeois stoves are distinguished: vertical and horizontal. Each of these types of heating devices has its own advantages and disadvantages.
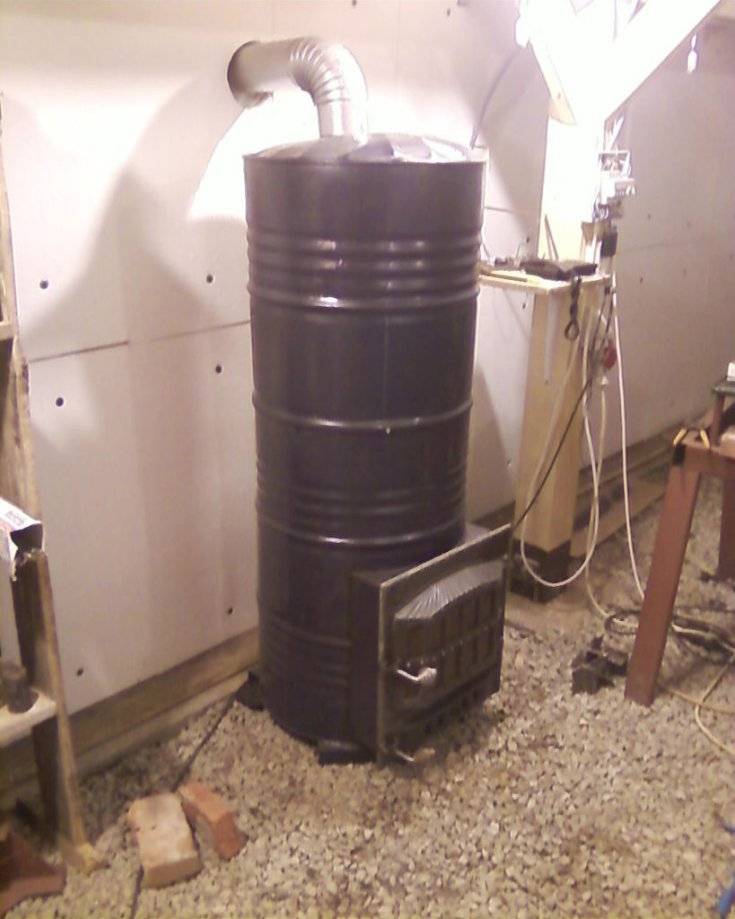
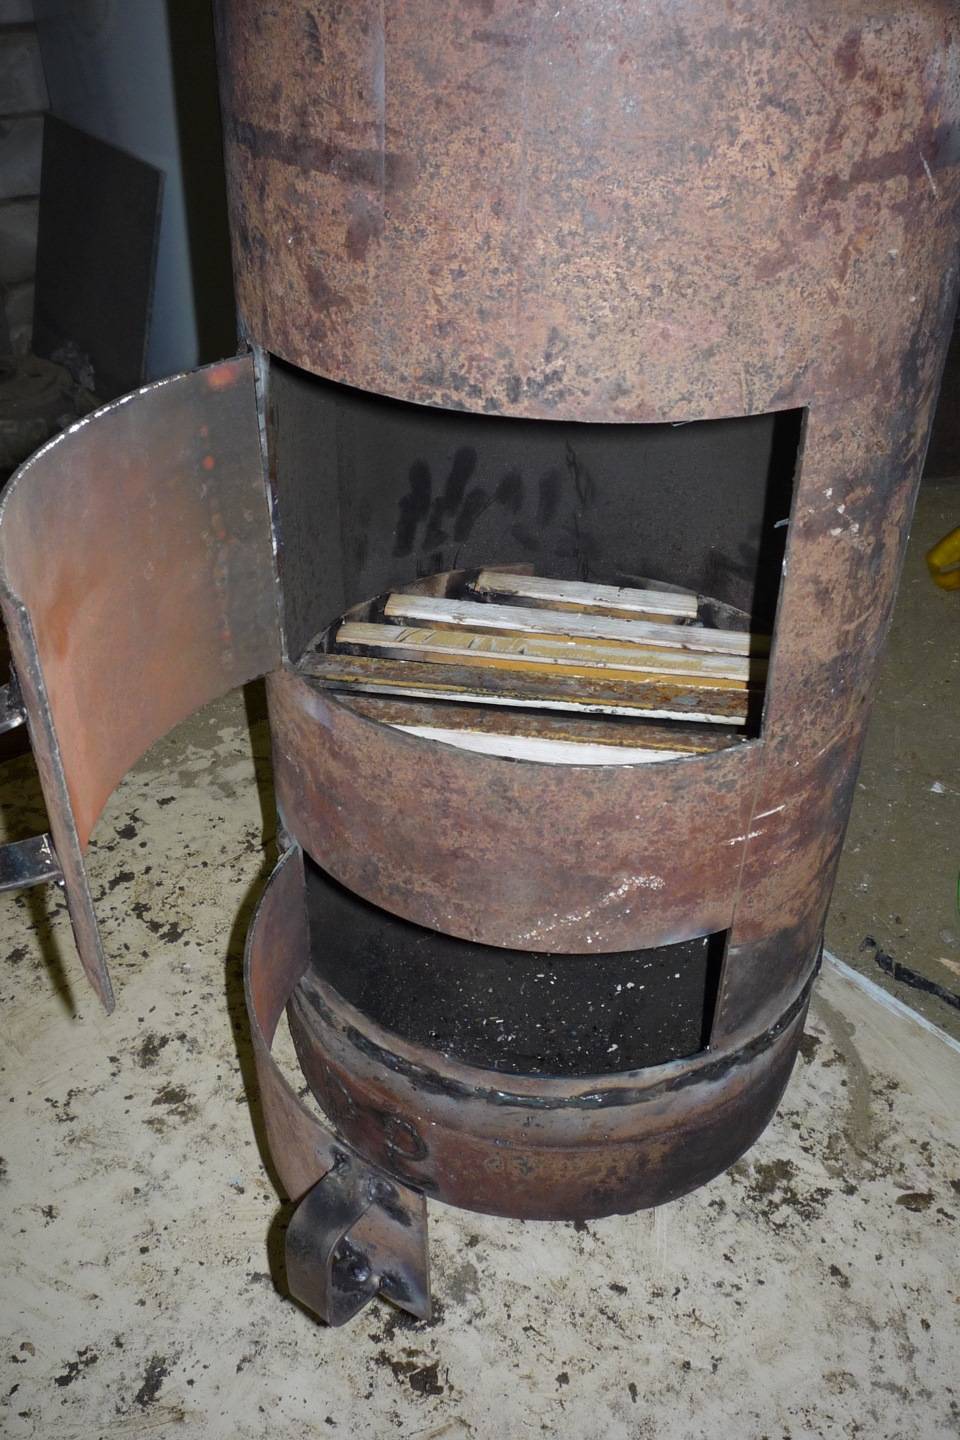
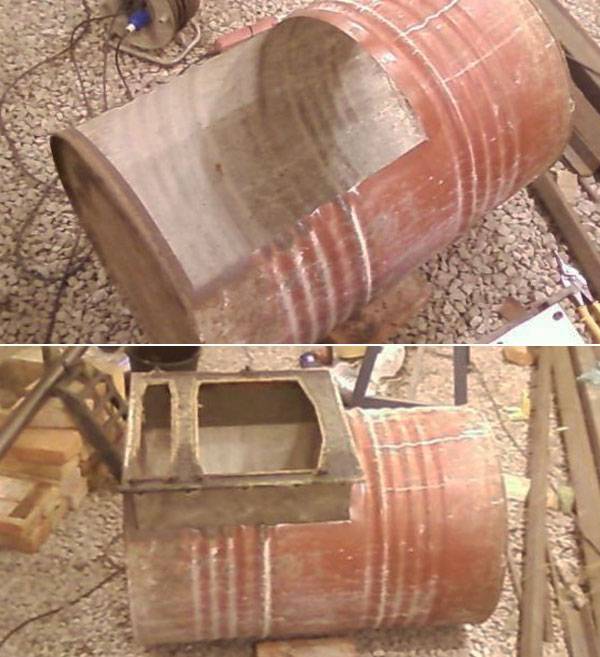
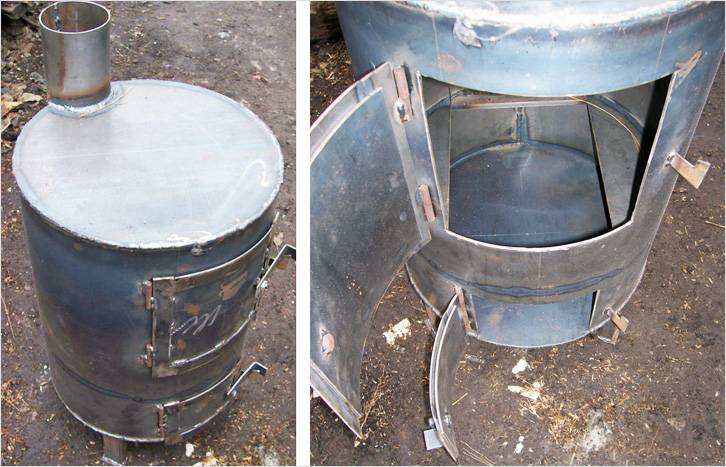
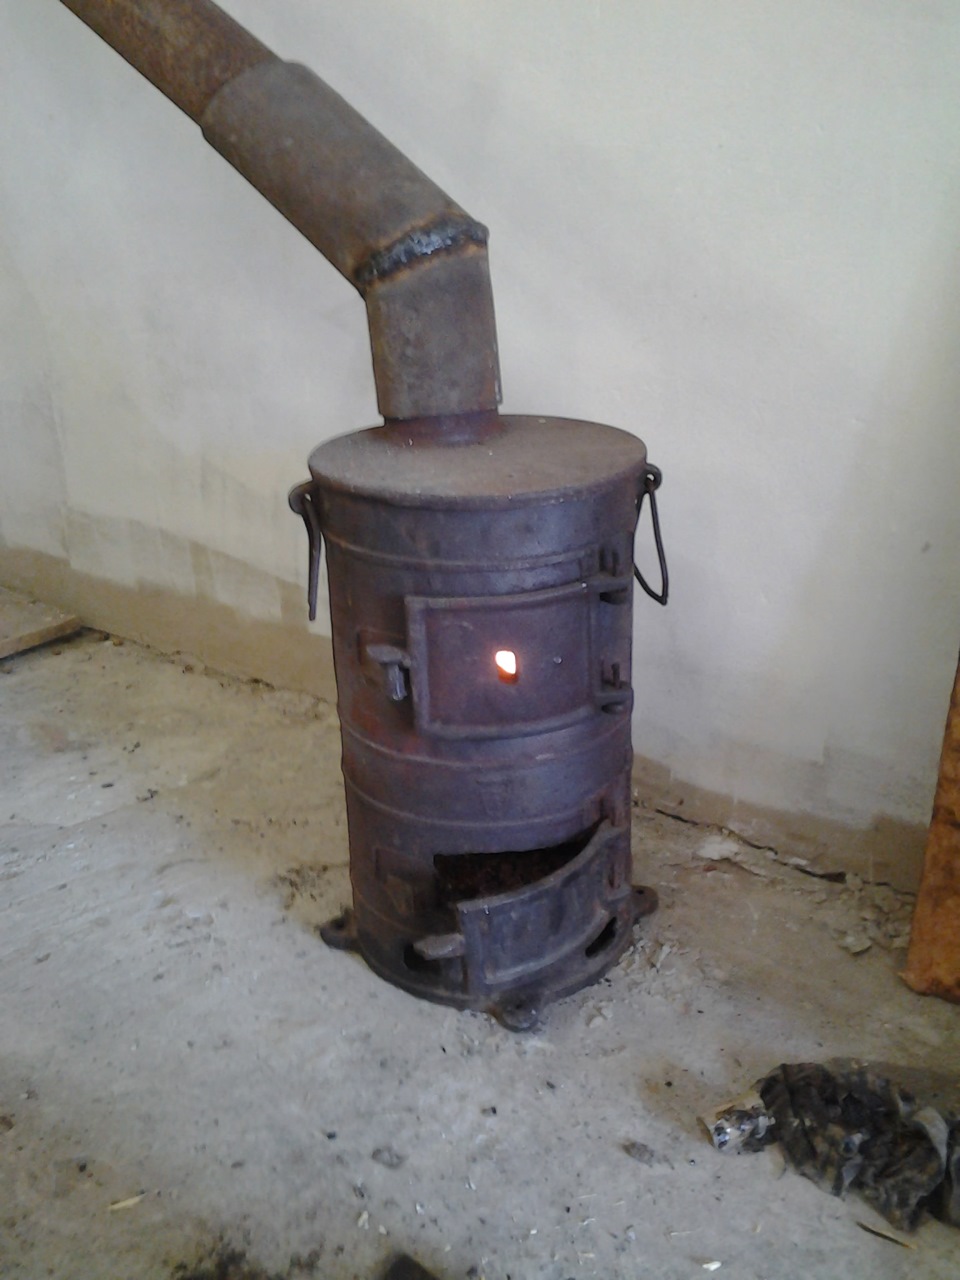
The furnace from a vertical type barrel is not installed on the floor, but on legs. To complete the door, you will need to cut the side of the tank and provide it with hinges
It is important to remember that the hinges must be fixed to the barrel and the door not from the inside, but from its outer part.
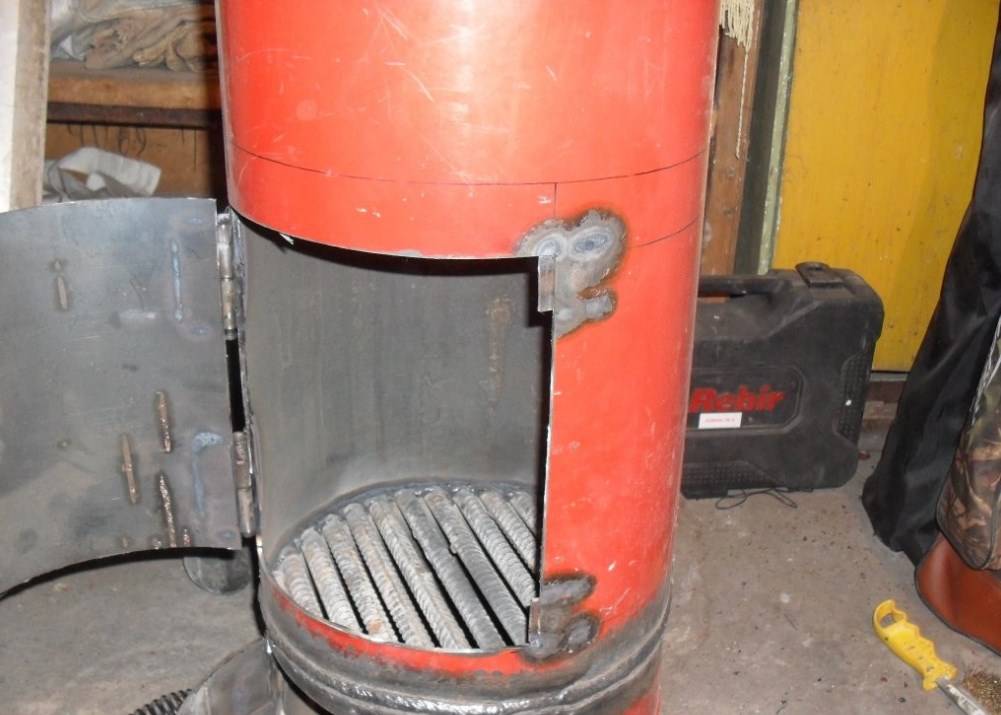
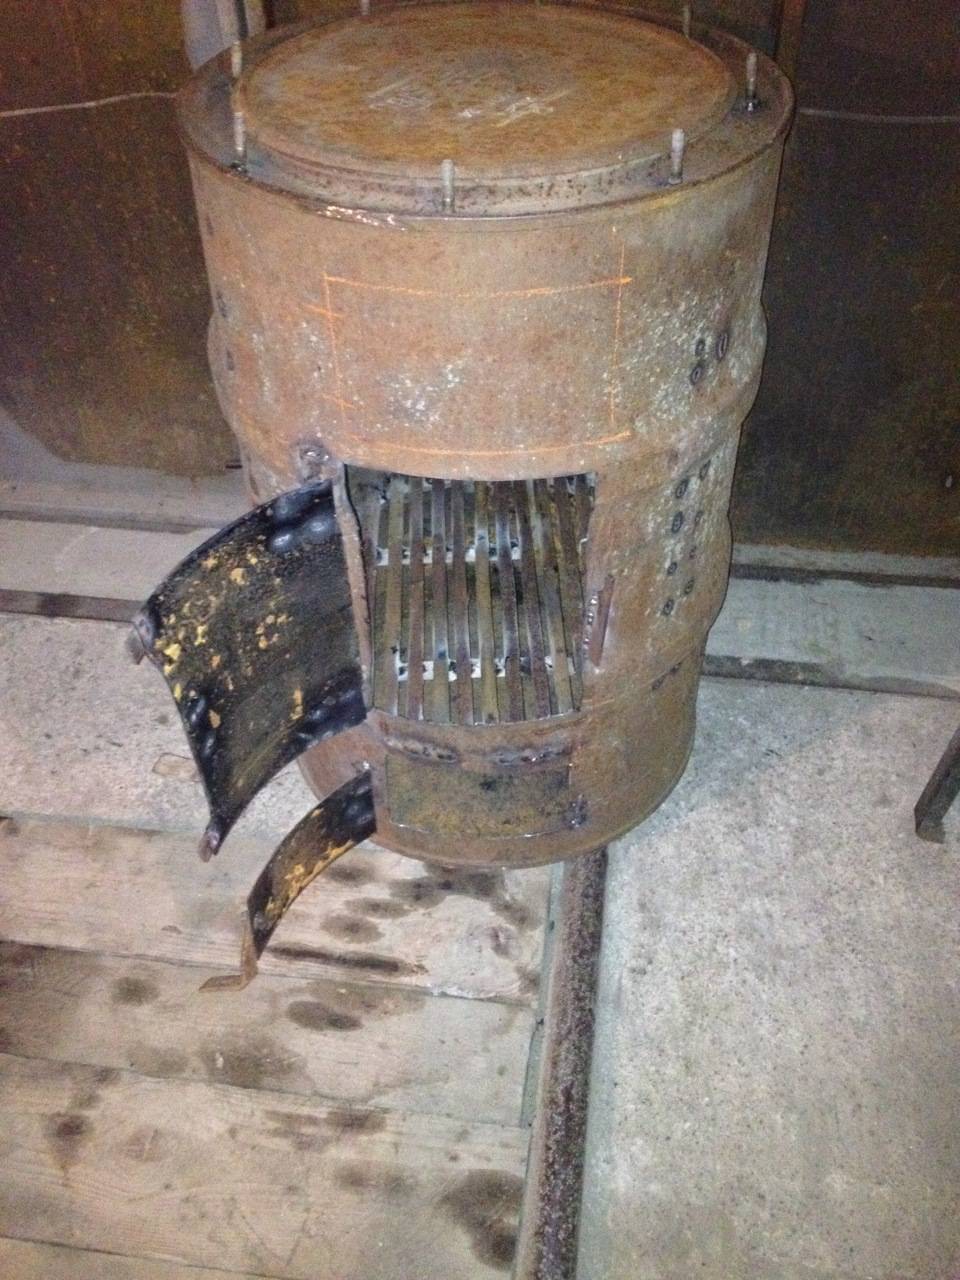
A mandatory element of this design is a perforated metal plate, which is called a grate. To fix such a lattice, you can use the usual corners. In order to make a blower, you will need to prepare a metal pipe with a slide gate. The wall thickness of the metal must be sufficient, otherwise the structure will quickly burn out.

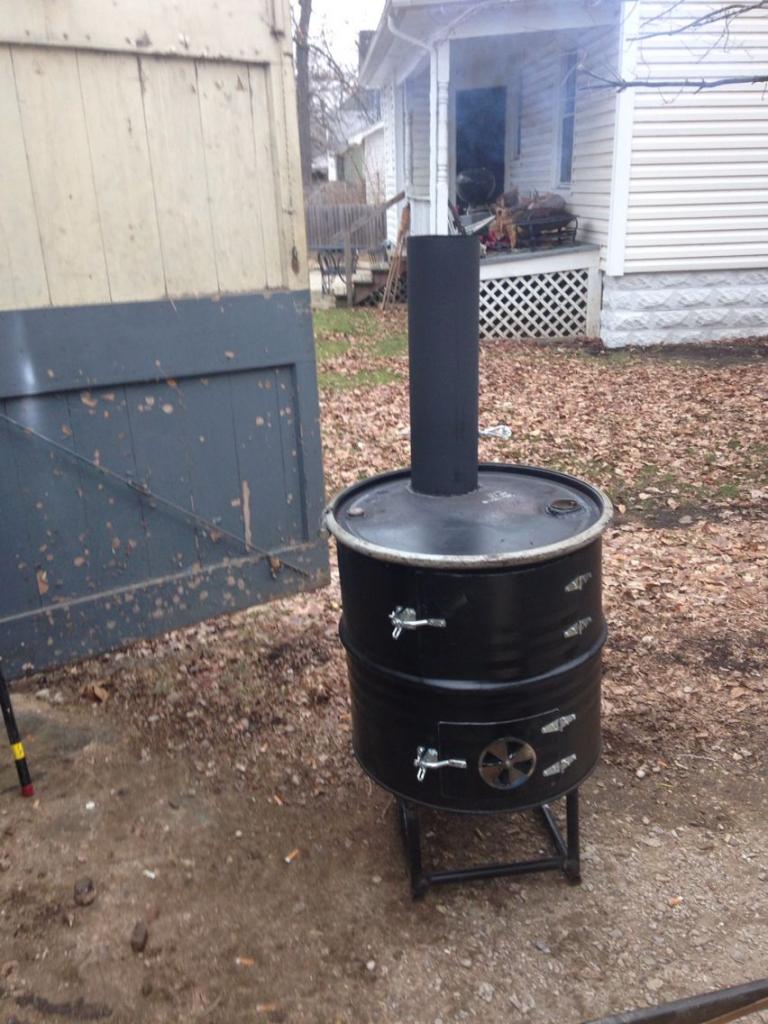
A vertical-type barrel stove is always installed not on the floor, but on legs
The damper for a long-burning wood-burning stove located in a vertical plane is fixed on special bolts. When igniting the fuel inside the tank, the blower should be opened to the limit.
In the upper part of the canister, it is necessary to make a hole in the shape of a circle. It will be needed in order to connect a chimney structure to a homemade stove. Docking of a pipe with a metal surface is carried out using welding equipment.
The function of the grate is to protect the bottom of the canister from burning out, as well as to retain thermal energy.Thus, this element is necessary when installing a home-made long-burning stove.
Before starting the assembly, it is recommended to draw up an individual drawing of the device. It should be as detailed as possible, contain a drawing of the future unit and its individual components, and also indicate their dimensions.

To complete the door, you will need to cut the side of the tank and provide it with hinges
Design features are determined depending on the purpose of the device and the place where it will be located. If you wish, you can download a ready-made drawing of a potbelly stove on the Internet. However, in this case, it is necessary not to make a mistake with its volume.
The vertical variety of a home-made heating device is easy to assemble. You can find application for such a unit both in a private house and in the country. The firewood used to kindle a heating device of this type is selected depending on the dimensions of the firebox.
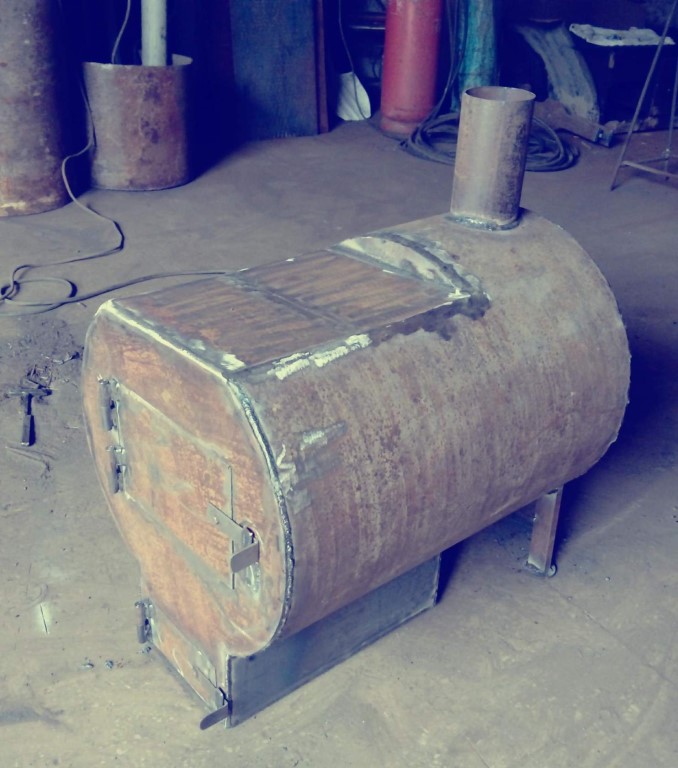
Barrel stove: features of a horizontal model
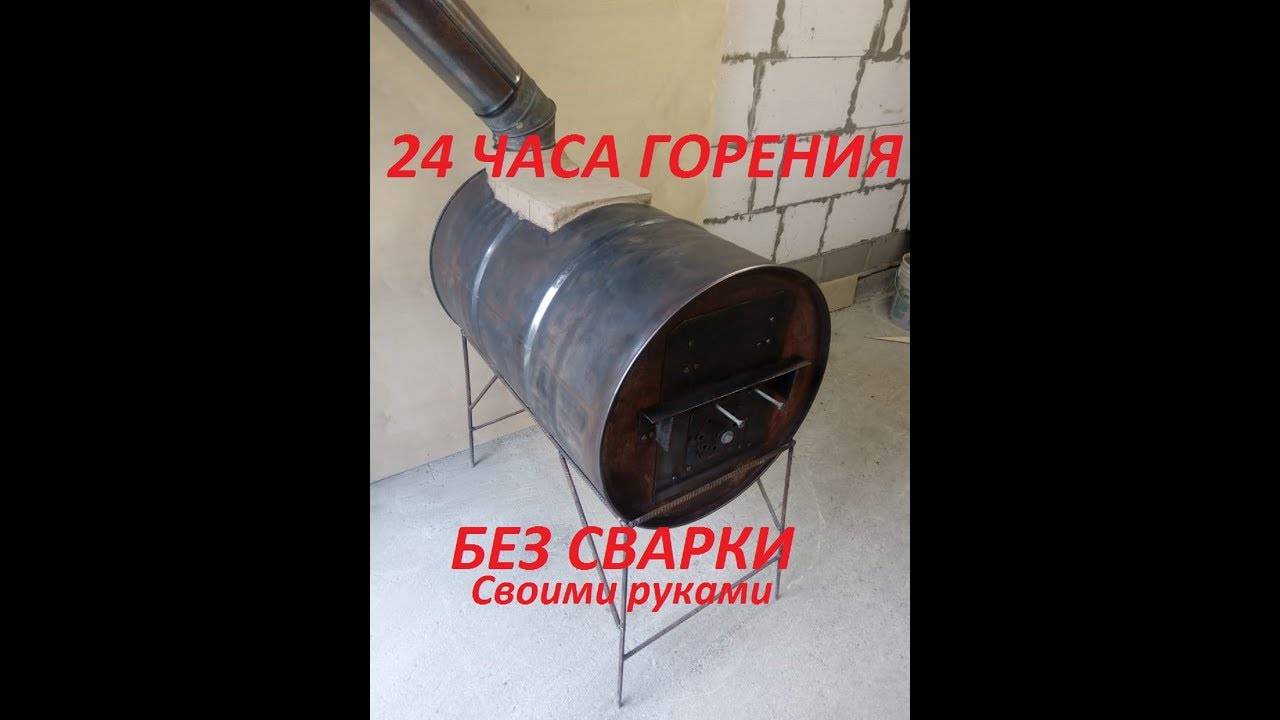
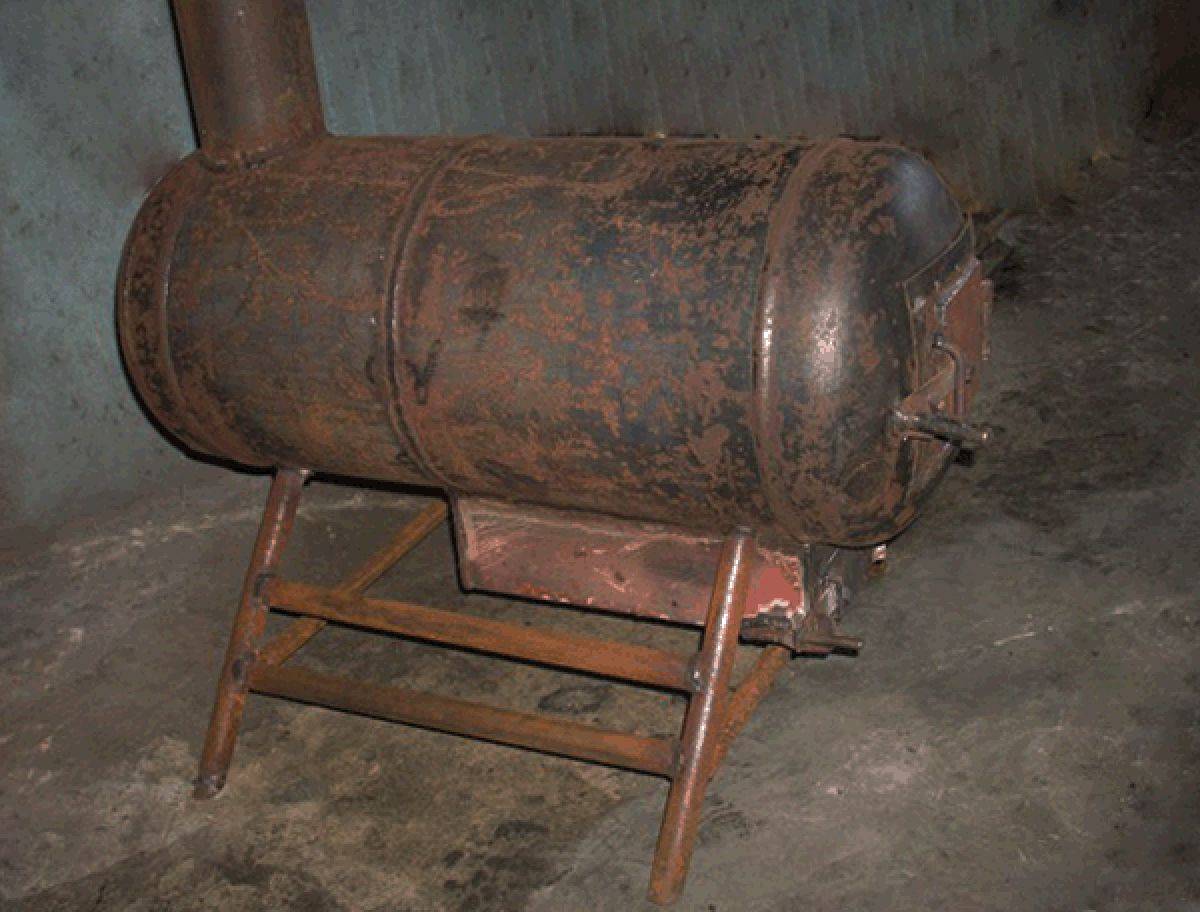
From a barrel, which has a volume of 200 liters, it is also possible to make a heating device located in a horizontal plane. In this case, it is also necessary to prepare a supporting structure. Its height is calculated taking into account individual operational features. When choosing this indicator, first of all, you need to focus on the dimensions of the room in which the home-made heater will be installed.
In the drawing of the furnace, it is necessary to take into account the features of its location. The assembly of this design takes place in an almost identical way, as in the case of a vertical heater. Let us consider in more detail the process of self-manufacturing a potbelly stove from a metal canister.

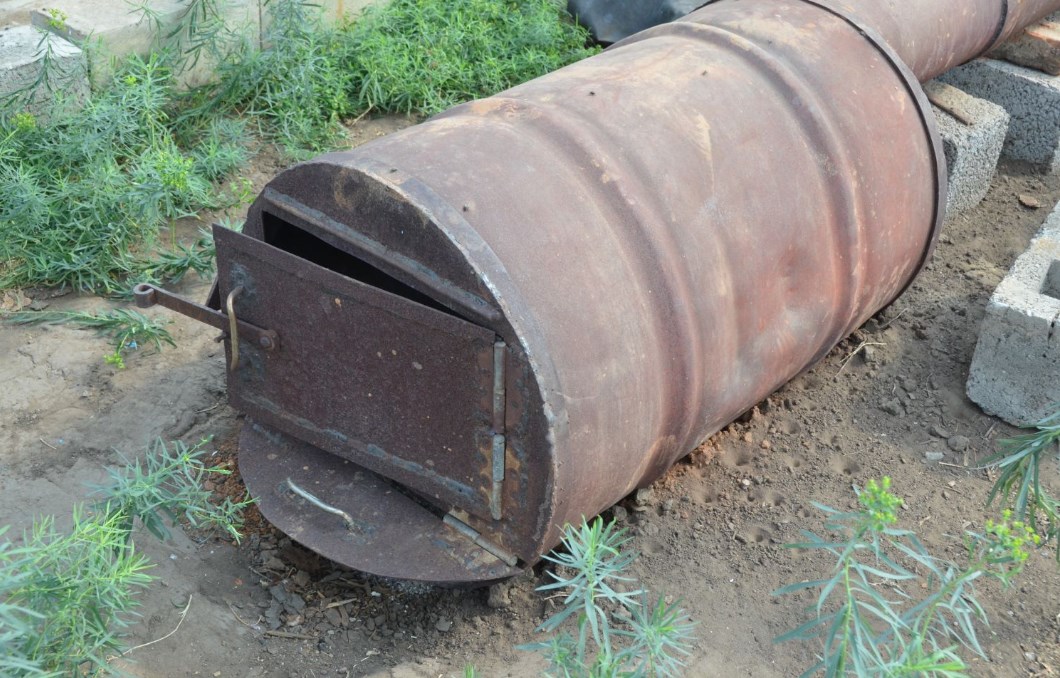
From a barrel with a volume of 200 l, it is possible to make a heating device located in a horizontal plane
A hole must be made in the bottom of the tank, which will be used to remove the ash. At the same time, you need to understand that its parameters should not be too large. Next, you need to make an ash pan. As a material for this element, an ordinary metal sheet of the appropriate thickness is used. Then it should be docked with the bottom of the heater. For this, it is customary to use welding equipment.


When arranging the ash pan, it is necessary to provide a viewing window through which this compartment will be cleaned. Next, the installation of the chimney structure is carried out. In this case, there are two common options for the location of the pipe - on the back wall or in the upper part.
A long-burning potbelly stove, located in a horizontal plane, can be used not only for garage space heating, basements and outbuildings, but also for cooking. To do this, it is equipped with a special hob. Such a device is mobile, so it can be taken out to nature.

A barrel of 200 liters is installed horizontally on the surface, in the prone position
The process of building a chimney
The complexity of the process of erecting a chimney for a potbelly stove in the country directly depends on the location of the stove in the room. For example, leading a pipe through a window is much easier than making a hole for a chimney in the roof. In this regard, before installing a potbelly stove, the design features of the building should be taken into account.
Safety rules and design measurements
If the installation of the stove is planned outdoors, then the chimney device will not cause great difficulties, the main thing is to choose a suitable place
It is important to remember that the stove structure should be located away from flammable objects and outdoor activities.
The construction of a chimney in a room will require knowledge of safety rules that will help to avoid a fire. The material from which the pipe is made must have increased heat resistance and easily withstand temperatures above 1 thousand degrees. If it is planned to install a potbelly stove near walls sheathed with clapboard or plastic, then the part of the wall located in close proximity to the stove is sheathed with refractory material.
Do not forget to determine the size of the pipe
The hole through which the chimney will enter the ceiling must also be made with non-combustible materials, since the entire structure becomes very hot during operation of the stove. For these purposes, a special glass is used to prevent contact of the hot pipe with the edges of the hole. If more than one potbelly stove is installed in the building, then a separate chimney system is made for each of them.
After calculating the diameter of the pipe for the potbelly stove, you will need to calculate the total length of the pipeline, but first you need to accurately determine the location of the stove in the room. Then determine the specific place where the chimney will be brought out. When measuring the length of the pipeline outdoors, it must be taken into account that the height of the pipe above the ridge should be equal to 1.3-1.7 meters.
In the room itself, it is more difficult to carry out installation work
Installation of all elements of the system
Installing a stove installed outdoors is not difficult.To assemble the system, you will need a pipe of the required diameter, which is put on the pipe extending from the potbelly stove. The pipe must be put on the nozzle, and not inserted into it. Otherwise, smoke will seep out at the junction of the nodes. The procedure for installing a chimney system in a room is much more complicated and consists of several stages:
- a piece of pipe is securely attached to the furnace nozzle;
- the pipeline is extended using connecting elbows;
- the chimney is passed through the passage glass and led to the roof or outside the wall;
- all connecting nodes are securely fixed.
The section of the pipeline located on the street must be insulated with heat-resistant material. During the operation of the potbelly stove, condensate inevitably accumulates on it. To get rid of the condensate accumulated in the system, a tee is installed on the outer section of the pipeline, equipped with a faucet to drain the liquid. In the place where the horizontal and vertical pipelines are connected, an inspection window is made to facilitate cleaning of the chimney.
The final stage is to check the functionality of the chimney system. If it was possible to correctly make a chimney for a potbelly stove, then after igniting the stove, the necessary draft will be created and the smoke will be quickly removed outside. During combustion, care must be taken to ensure that smoke does not seep into the junctions of the nodes. If a smoke leak is detected, the connections must be sealed with a heat-resistant sealant.
How can a stove be used in a garden plot from a barrel with your own hands
The kindling of the furnace is carried out as follows:
- Dry solid fuel is tightly packed into an empty cylinder to such a height that the upper plane of the piston is below the lower boundary of the chimney opening. Wet firewood should not be allowed, which can slow down the movement of the piston during the combustion process.
- Put chips, a rag or paper sprinkled with diesel fuel or kerosene on top, close the lid with a piston.
- Fully open the shutter, set fire to the rolled paper and throw it into the pipe. When the firewood flares up well, close the damper, setting the minimum gap for air to enter.
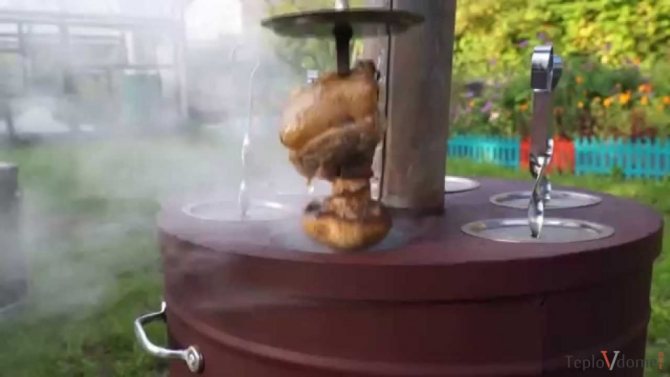
Cooking barbecue on a homemade stove
On a household plot, a stove from a 200l barrel can be used to heat greenhouses, kindle a bathhouse or burn garbage.
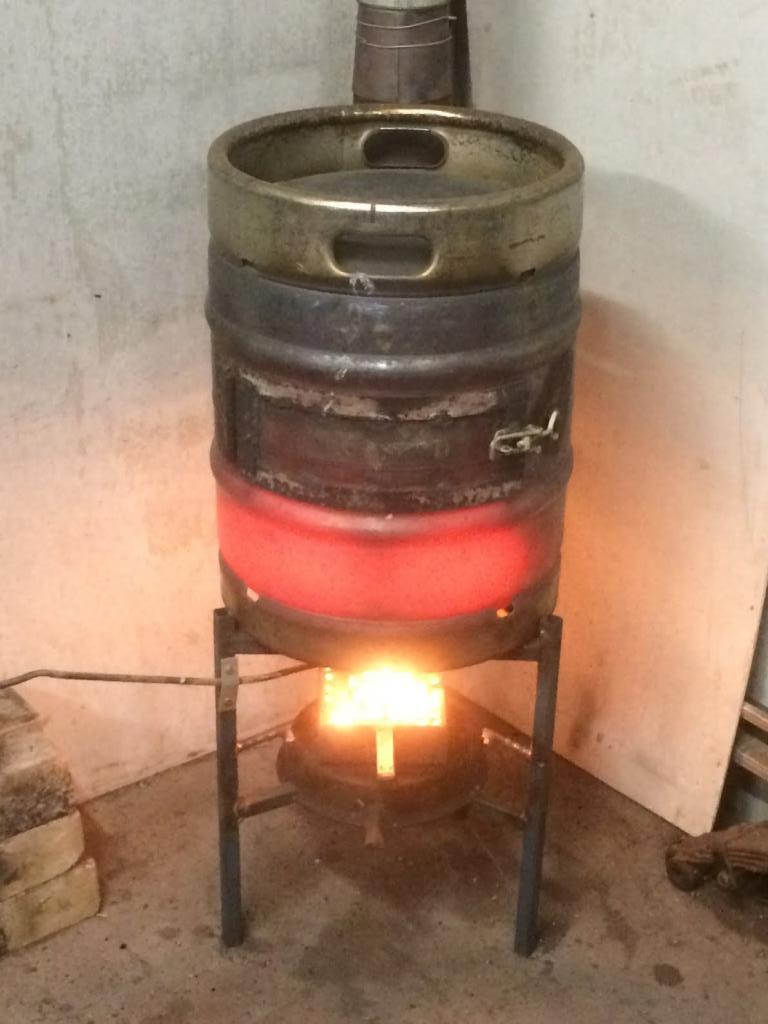
can stove
A can or barrel is often used as the capacity of the furnace. The idea is quite popular, because it works, there is almost no need to make the case. It is possible to cut and weld the remaining structural elements (door, legs, chimney) in a few hours.


Assembly steps
- For the blower, make a hole under the neck.
- It is necessary to make a hole in the bottom of the can for the chimney pipe.
- The design of the grate should be either serpentine or in the form of a lattice of reinforcement so that it easily enters the container of the can without using unnecessary fasteners.
- All dimensions of the structure can be viewed on the drawing. The finished oven is installed on bricks, or metal legs are welded.


Due to its compactness, such an oven can be installed in a small room. It is not rational to heat a room with a lot of fuel for a long time. It is also necessary to ensure that during the combustion process, burning coals do not fall out of the furnace.
Ordering a brick oven for a garage
Brick ovens give softer heat, but until they heat up themselves, they will not heat the garage. If you are going to heat daily, this option is good. If the garage will be heated periodically, it is better to make a metal stove - it is long and dreary to disperse a frozen brick stove, and it will start heating in two hours.
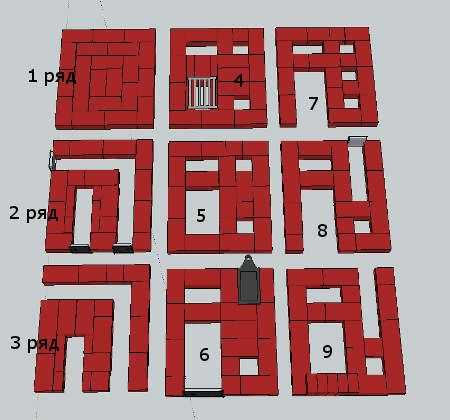
For those who decide to put a brick oven in the garage, we will lay out the order of a small (relatively) oven with a heating panel and a hob (just in case).
Image of the furnace and the necessary materials
A stove made of solid ceramic bricks (not burnt). Without taking into account the battle, 290 pieces are required. Laying is carried out on a clay mortar, the thickness of the seams is about 0.5-1.8 cm.
A separate foundation is needed for this furnace - the mass will be under 500 kg. Its dimensions are larger than the dimensions of the oven by 15-20 cm.
Ordering a brick oven for a garage
Furnace lining is desirable (laying fireclay bricks on fireclay mortar). Bricks are undermined for furnace casting. The dimensions of the bed for the grate, stove and doors should be larger than the dimensions of the casting. The gap is necessary to compensate for thermal expansion and also for laying a heat-insulating layer around the doors. This will reduce the formation of cracks next to them (due to different thermal expansion).
Asbestos cord has traditionally been used as a heat-insulating material. If you don't want to deal with asbestos, you can cut mineral wool cardboard into strips. Only it must withstand very high temperatures - up to 1200 ° C (minimum 850 ° C).
Installed in the 6th row, the valve allows you to switch the furnace into winter and summer modes.This is convenient in the off-season, when full power is not required, but it is already damp.
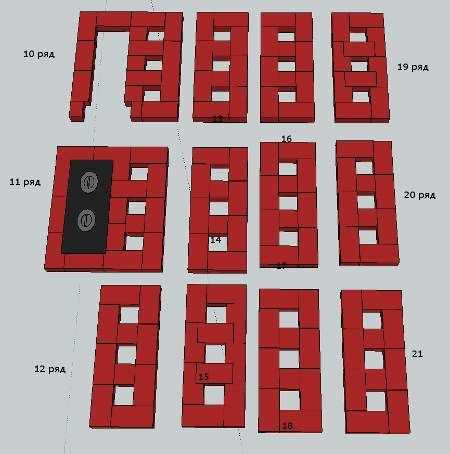
Masonry continuation
The height of the furnace can be increased by repeating the 14th and 15th rows.
Continuation of the formation of the heating shield
The process of pre-laying the furnace without mortar (recommended in order to pick up bricks and understand what's what), see the video.


Interesting potbelly stove with stone masonry
A barrel of 200 liters can serve as the basis for another interesting stove - with masonry inside. To assemble it you will need:
- the barrel itself;
- thick metal wire or fittings;
- large rounded river stones;
- chimney pipes.
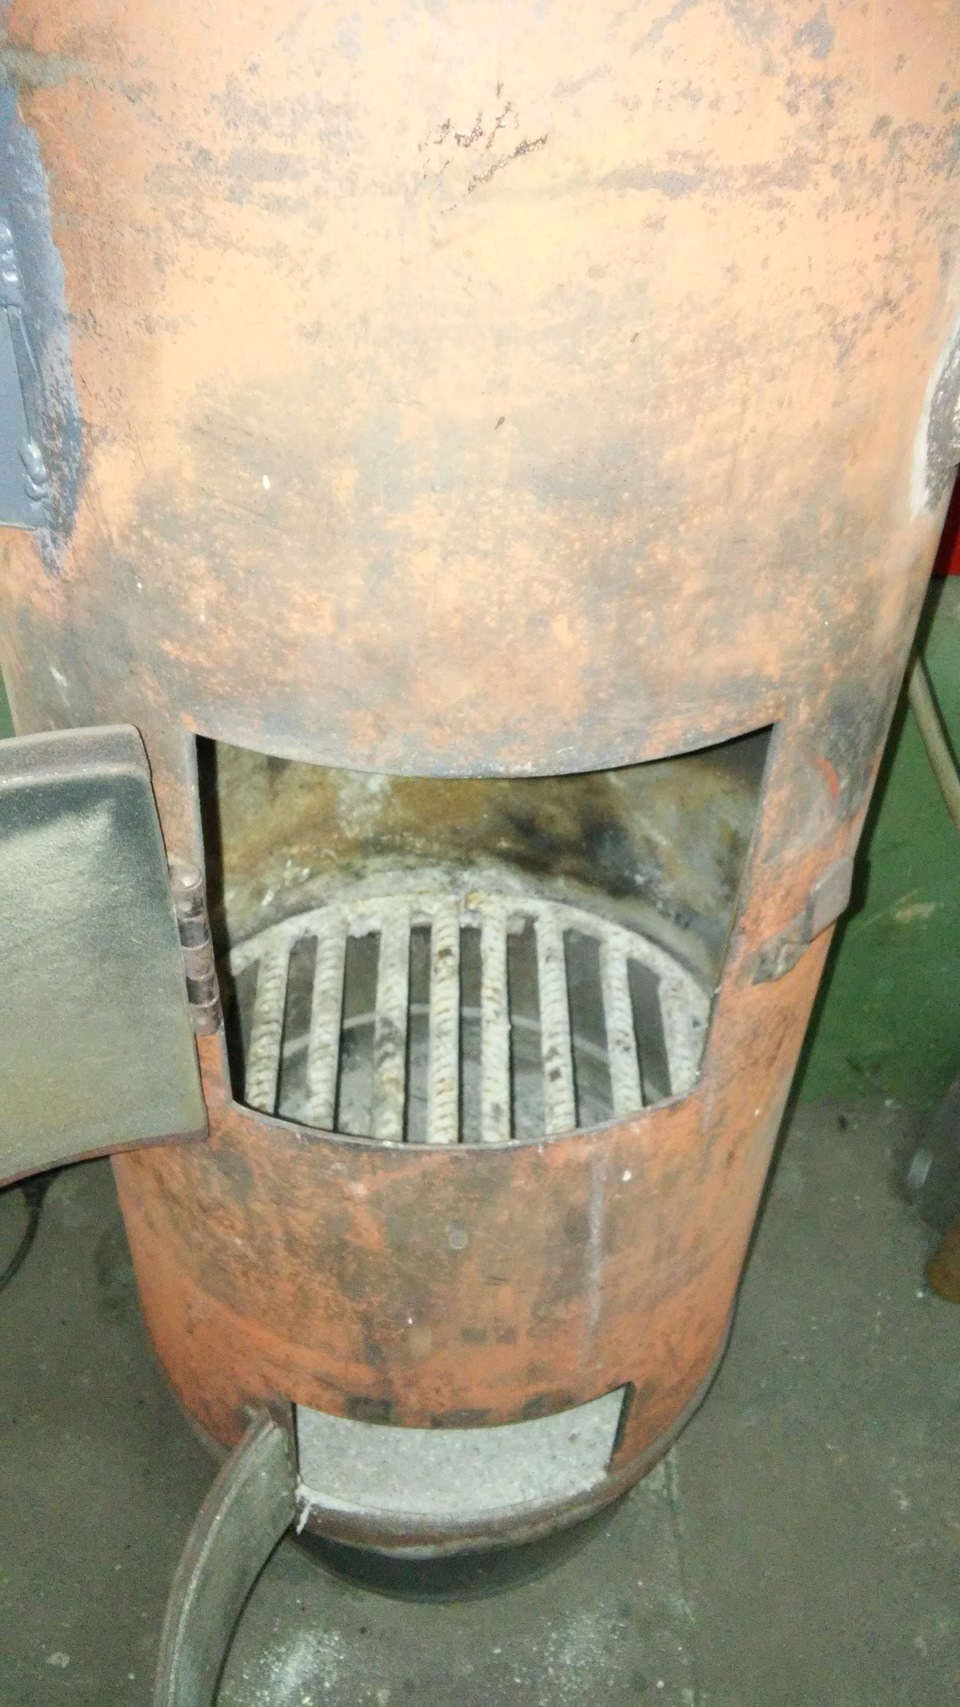
There is no ash pan in such a stove, so there will be some difficulties with cleaning. We immediately recommend that you make the firebox door at a level with the bottom of the barrel - it is more convenient to rake out the ashes. We make a kind of grate from reinforcement or thick metal wire. Only here it will fulfill a different role - it will support the masonry.
To assemble the stove, it is necessary to cut off the top cover from a 200-liter barrel and equip it with a pipe for connecting the chimney. In the lower part we cut out a door for laying firewood with a height of 150-200 mm. We fix a grate at a height of 250 mm, on which we pile stones to the top
Please note that it is precisely large stones that are needed so that combustion products pass quietly in the space between them
The stove will need a solid non-combustible base with a metal sheet in front of the firebox - it will be quite weighty, so the legs must be strong or absent altogether. The barrel is placed on the base before stones are placed in it. Otherwise, you won't be able to move it later.After installing the stove in a regular place, weld the cover and connect the chimney - you can start kindling. To improve traction, it is recommended to drill several holes with a drill with a diameter of 4-5 mm - air will be sucked through them.
Installation rules
Like all heaters, potbelly stoves must be treated responsibly during their operation and the safety rules must be strictly observed:
- do not leave ovens unattended, for minors, or people who do not have experience in using such devices;
- place stoves at a safe distance from furniture, interior items, at least 1 meter;
- during the heating of the furnace, do not overload the furnace;
- for the furnace, use only oil purified from water inclusions;
- do not block the chimney during the furnace;
- do not leave any objects on the surface of the oven to dry, even after it has gone out.
Classic - a stove from one barrel. Drawing

Manufacturing progress.
First, remove the top of the barrel, then cut through the sidewall for the door.

We take welding and attach the door of the future stove. We measure 200 mm from the bottom and put the grate.
Under the ash pan, it is desirable to install another door for traction control.
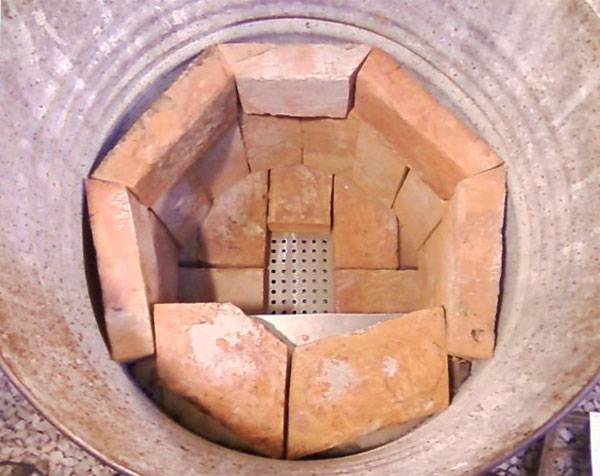
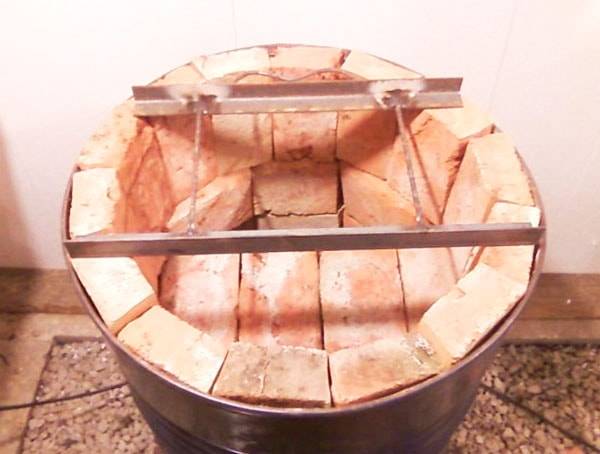
You will need refractory bricks to protect the walls. We lay them out from the inside.
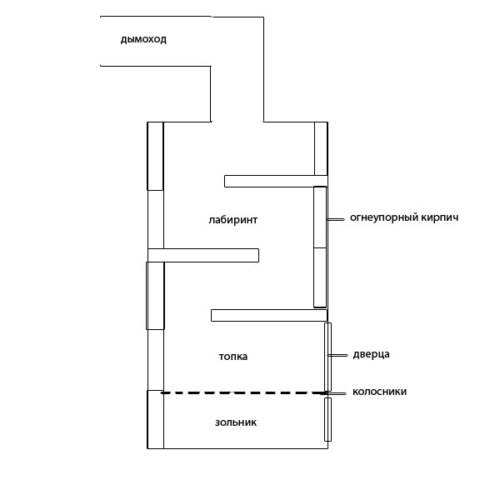
For chimney bricks, we install the structure, as in the figure below.
Bricks are laid out on the furnace mortar. The composition of the furnace solution is 1 part clay to 2 parts sand, the mixture is kneaded with a minimum amount of water to a very thick consistency.


The thickness of the joints for masonry should not exceed 5 mm.
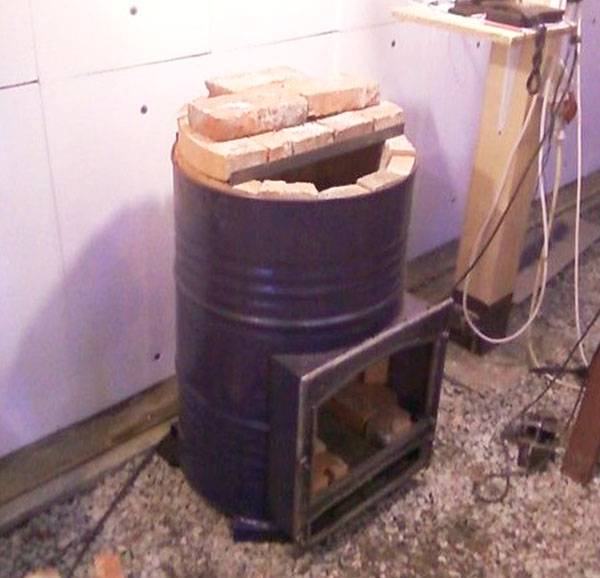
To increase the heat transfer of the furnace, you can install another barrel on top. Under the chimney, you need to make a hole in the barrel and weld a piece of pipe under the chimney.
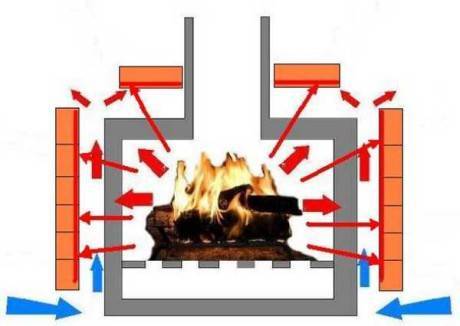
The principle of operation of a potbelly stove from a barrel
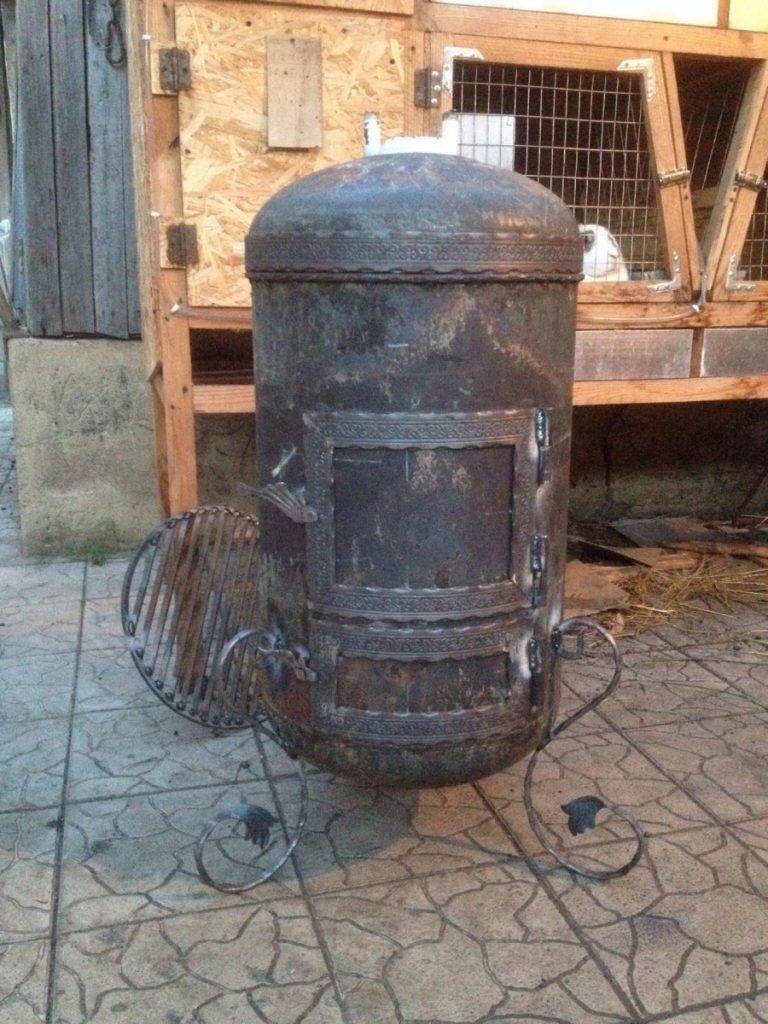
A potbelly stove from barrels is very similar to the type of potbelly stoves that we imagine perfectly well. However, it does not have serial production. Such a structure is purely the creation of self-taught masters. Among other things, the modernized stove has a round shape and looks like a metal stove "Slobozhanka".
The appearance of the simplest potbelly stove from a barrel, however, has a large number of disadvantages
The main difference between them is the option of fuel combustion. Wood sawdust is used as it for the following reasons:
- if you heat a potbelly stove with this fuel, then it will be quite economical due to the low cost of this type of fuel;
- Sawdust, which was previously compressed, burns out for quite a long time. One load may be enough for 6-10 hours for such a design.
It is quite obvious that a potbelly stove from a 200-liter barrel looks good. Such a stove usually has a diameter of 600 mm. A hexagon, which has sides of 314 mm, can easily fit into this circle. This makes it practically no different in technology from conventional furnace appliances. The efficiency in such stoves, as a rule, does not exceed 15% (We have previously written how to increase the efficiency of a fireplace or stove and recommended bookmarking the article.). If a screen is used to increase it, then such a stove does not last long and goes out of service after about one season.
Read the article on how to make an economical potbelly stove with your own hands and get answers to your questions.
The main reason for this efficiency comes not only from a fairly thin metal, but mainly from the height of the barrel of 850 mm.Approximately 1.3–1.5 times less than the depth, the height of the firebox in potbelly stoves made from a barrel should be located. In the case when the blower is made high and the grate rises, then the lower part, as practice shows, will take the heat and give it to the air, thereby violating all the correct gas dynamics. In this case, there are only two options:
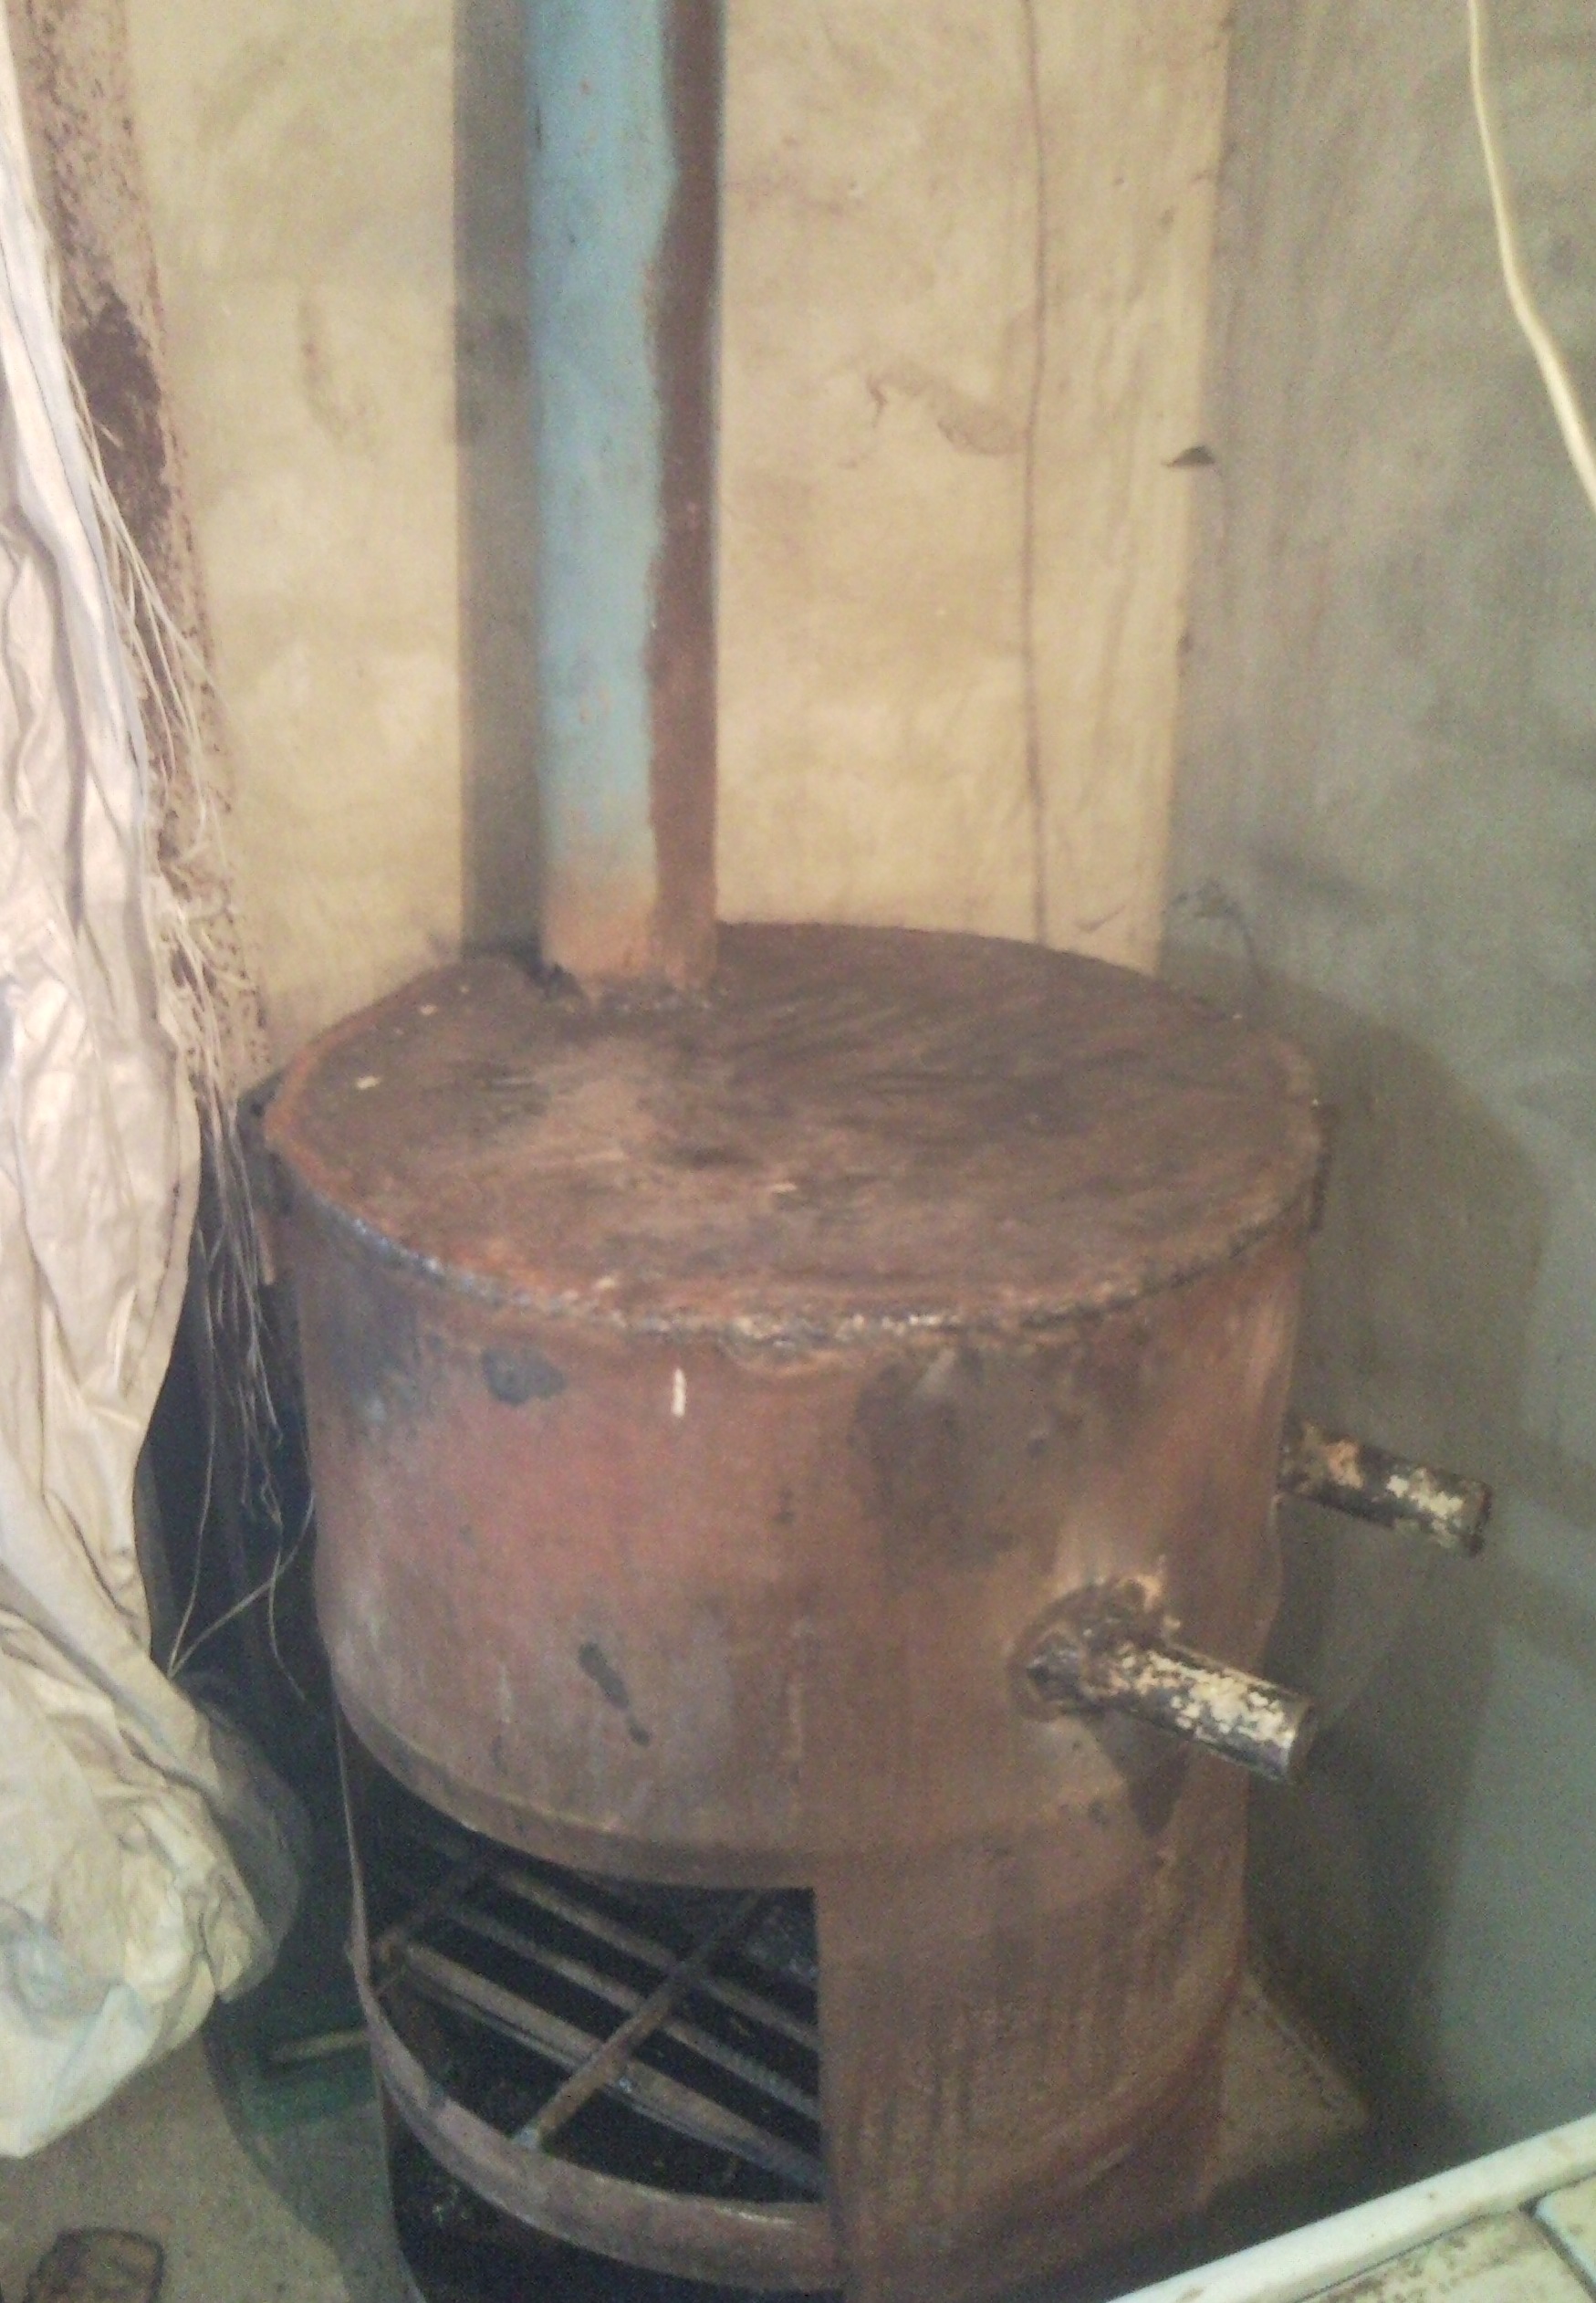
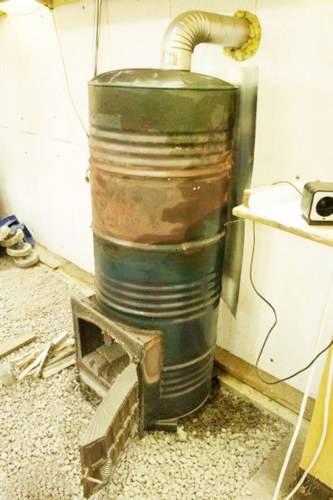
You can wall up the barrel to the middle of the height in a brick. This can be seen in photo 3.
The potbelly stove of their barrel, immured in a brick
It is also possible to equip a refractory-lined oven at the top of the oven. And run a chimney through it.
In both cases, the work will become more complicated. The service life of this furnace does not exceed five years, but the efficiency cannot be raised above 20%.
Potbelly stove with smoke
This is a rectangular furnace with minimal fuel consumption and the ability to control the intensity of combustion. The structure (furnace body) is assembled from metal sheets by welding.
Required materials and tools:
- welding machine complete with electrodes;
- grinder and circles for cutting metal;
- roulette;
- metal corners;
- metal bars for the grate;
- pipeline;
- sheet metal.
The furnace consists of the following departments: furnace, smoke circulation, ashpit, outlet pipeline. Additional elements: doors with canopies and hecks, grate, metal legs, valve on the pipeline to reduce heat loss.
Assembling a potbelly stove with chimneys
- We make a drawing of the future furnace.
- According to the dimensions indicated on the drawing, we make markings on sheet metal and cut out blanks for the future firebox with a grinder.
-
We join sheets of metal, forming a rectangle. Inside (on the side walls of the furnace) we weld metal corners on which the grate will be laid.
-
The grate is made from a set of longitudinal and transverse metal bars of the same length, connected by welding. The cells must be of sufficient size to hold fuel on them and free passage of combustion products through the grate. The grate itself does not need to be welded to the body of the firebox, then it can be pulled out while the furnace is being cleaned from ash and ash.
-
At the next stage of work, it is necessary to weld a sheet of metal inside the furnace, which forms a smoke circuit. The size of this sheet of metal should correspond in width to the bottom of the furnace, and be slightly smaller in length.
-
After the inside of the furnace is ready, it is necessary to make a blower door and a door for putting fuel into the furnace. We make the doors in such a way that it is convenient to clean the oven and remove the grate. To make canopies, we use a metal bar and a tube of a suitable size. We cut them with a grinder and weld them to the walls of the furnace and to the doors, respectively, then insert the free section of the rod into the tube. For the convenience of using the doors, we make handles from thin strips of metal and attach them by welding. We make the valves in the form of a long curved strip of metal and, accordingly, a hook for which it will cling.
-
- The legs of the furnace can be made all-welded from metal corners or adjustable. To be able to adjust the length of the legs, you will need nuts and metal threaded rods of appropriate thickness. Due to this technique, the potbelly stove will stand steadily even on uneven surfaces.And also, with the help of such legs, it is convenient to disconnect the oven from the pipe and carry out maintenance or replacement of any parts.
-
Outlet pipeline with damper. For the damper itself, you will need a metal bar of small diameter and a sheet of metal of circular cross section, with a diameter slightly smaller than the diameter of the pipe. We drill two holes in the pipe, insert a rod into them, bend its outer part for convenience, and install and weld a metal circle inside the pipe. Thus, when the bar is rotated, the circle will also rotate accordingly, changing the gap and reducing heat loss from the furnace to the atmosphere.
- In the upper part of the furnace, we cut a hole corresponding to the diameter of the outlet pipe and weld it hermetically.


There can be two or three smoke turns in a potbelly stove. And in order to reduce heat loss from metal walls to the atmosphere, the furnace is lined with refractory bricks from the outside or a reflective metal screen is installed with a layer of heat-insulating material, for example, asbestos sheet.
To kindle a fire in the oven, newspapers, sawdust, small dry logs are placed on the grate and the newspapers are set on fire with matches. When the logs flare up, larger firewood is added to the stove. Do not open the firebox and blower doors at the same time. The regulation of draft and intensity of combustion occurs by changing the gap in the pipe (valve) and through the blower.
High thermal conductivity of a potbelly stove - minus or plus
The most significant advantage of a potbelly stove is its high thermal conductivity, which ensures quick heating. This characteristic also acts as the main drawback, since it not only warms up quickly, but also cools down quickly.
This is a common "disease" of all heating devices made of metal.
You can solve the problem of rapid cooling. To do this, it is enough to overlay the resulting structure with a brick. This material, unlike metal, is an excellent accumulator of thermal energy. True, this design will require a longer firebox to heat the room. Burning time and fuel consumption are successfully reduced by installing a brick screen equipped with ventilation holes. Such systems are universally installed in baths.
It is most rational to install a brick screen at a certain distance from the furnace walls. In this case, the heat radiated by the furnace is used as efficiently as possible.
Conclusion
A brick potbelly stove made of bricks can be made independently. Such a furnace increases efficiency from 50-60% to 70-75%. However, it is still not cost-effective enough to fully replace stove heating. Although it is more efficient than iron, it retains heat, but for permanent use it requires the connection of a heating shield.
As a temporary source of heat, a do-it-yourself brick potbelly stove made in a garage or greenhouse justifies itself.
The design can be further improved by facing with metal. This will increase the service life, protect the furnace from damage.


