- 2 Design features of modern devices for the ventilation system
- Materials, markings, dimensions
- What is indicated in the label
- Dimensions of check valves for water
- How to check
- Purpose of the device
- Making and installing a non-return valve with your own hands
- Necessary tools and materials
- Work progress
- Rules for installation and operation of the device
- Wiring diagram
- Ventilation units with built-in non-return valves
- Exhaust fans with non-return valve
- Ventilation grill with check valve: device and purpose
- Check valve tees and their applications
- The use of a non-return valve on the hood
- How to design a check valve
- The process of creating a check valve with your own hands
- Options for working connection diagrams
- Features and purpose
2 Design features of modern devices for the ventilation system
Check valve ventilation is very common today. In terms of functionality, such systems are much better than communications in which the adjustment of the air flow is carried out manually. Check valves can be found on the market in four different designs. Each type has positive and negative features, which should be remembered when choosing a device for your ventilation system.
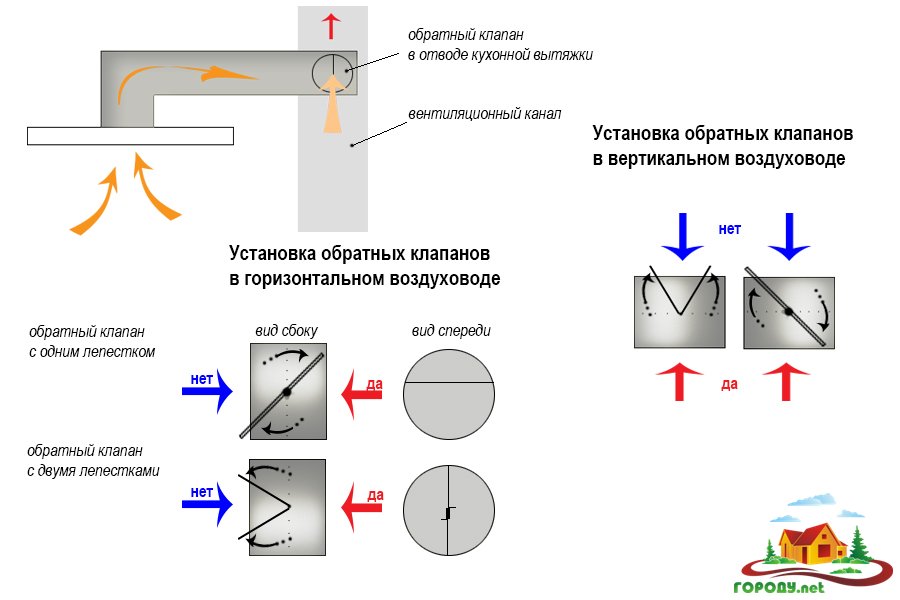
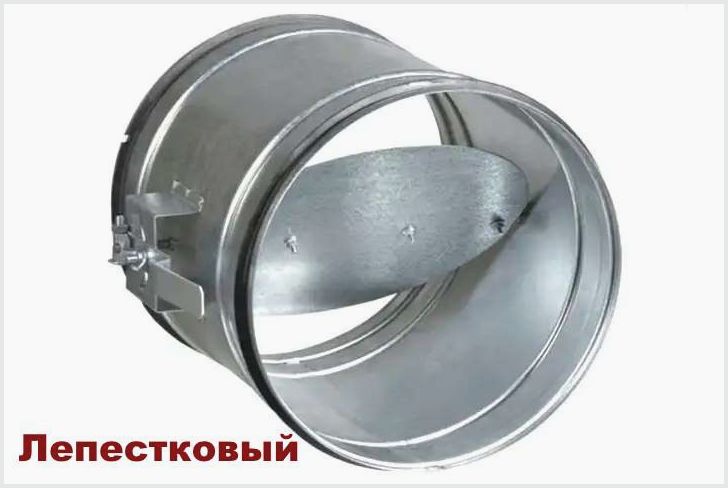
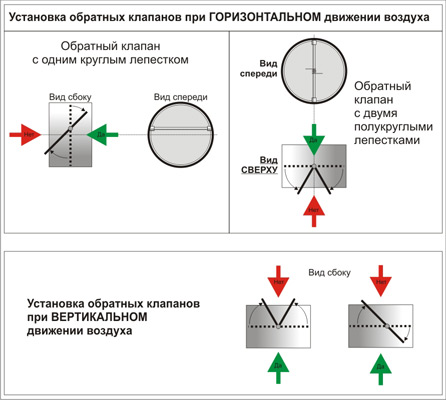
The first type of valve is a single leaf gravitational action. The air flow that enters the ventilation system from the premises acts on the valve, opens its shutter and is removed into the exhaust part of the communication. If there is no air movement from the apartment, as well as when the air flows back from the ventilation to the apartment, the flap on the valve will be closed.
This type of valve can be used in natural ventilation systems. When properly installed, the valve will require minimal airflow to open - the resistance of the valve to open is very low. According to the design, such single-leaf devices are of two types. In one of them, the axis on which the shutter is fixed is installed with an offset relative to the middle of the air channel, in the other, a counterweight is installed inside or outside.
Since such devices close under the influence of gravity, they require a perfectly level installation in the system for their normal operation. For installation strictly vertically or horizontally, it is necessary to use a level. Otherwise, the valve may not close tightly, which means that it will not be able to fully protect the interior from back draft.

Each type of ventilation damper has a slightly different principle of operation.
The second type of protective devices are double-leaf with springs. Such a valve is called a "butterfly" because it has two curtains that fold under high pressure from the side of the apartment and close due to springs when there is no pressure. They are much easier to install than gravity ones - they can be placed in ventilation ducts at any angle.
Butterfly valves can only be used for forced ventilation systems with exhaust. Before buying and installing a butterfly, you need to check the sensitivity of its curtains - the ability to open under air pressure, which is typical for the system in which the device is planned to be mounted. In some modern products, the sensitivity of the flaps and springs can be adjusted.
Another type of product designed to prevent back draft is special blinds installed on the ventilation grille. Blinds work on the gravitational principle, like single-leaf dampers, the difference between them is only in the number and size of the shutters. A large number of small sashes make it possible to install such compact devices in the external elements of the system.
There are blinds on the market in standard sizes, corresponding to the size of the ducts for hoods and openings for natural ventilation. You can find grilles with shutters that are equipped with springs or membranes, however, such design solutions are considered unreliable, the grilles will not function well at low temperatures if they are installed outdoors.
The last common type of check valve is the flexible diaphragm. In this device, a flexible plate is installed, which can be bent under the influence of air flow. When properly installed, the membrane will open the vent in one direction of airflow and close in the opposite direction.
When buying a membrane, you need to take into account the amount of reverse thrust in the ventilation duct. If there is a possibility of deformation of the flexible membrane by air currents, it is necessary to buy membranes with additional stiffening ribs.When installing a conventional membrane in a system with a strong "return", there is a high probability of damage to the valve and the termination of its normal functioning, due to which unpleasant odors and other evidence of improper ventilation will appear in the apartment.
Materials, markings, dimensions
The check valve for water is made of stainless steel, brass, large sizes of cast iron. For household networks, they usually take brass - not too expensive and durable. Stainless steel is certainly better, but it is usually not the body that fails, but the locking element. That's his choice and should be approached carefully.
For plastic plumbing systems, check valves are made from the same material. They are polypropylene, plastic (for HDPE and PVD). The latter can be welded / glued or threaded. You can, of course, solder adapters to brass, put a brass valve, then again an adapter from brass to PPR or plastic. But such a node is more expensive. And the more connection points, the lower the reliability of the system.
For plastic and polypropylene systems there are non-return valves made of the same material
The material of the locking element is brass, stainless steel or plastic. Here, by the way, it's hard to say which is better. Steel and brass are more durable, but if a grain of sand gets between the edge of the disk and the body, the valve jams and it is not always possible to return it to work. Plastic wears out faster, but it does not wedge. In this regard, it is more reliable. No wonder some manufacturers of pumping stations put check valves with plastic discs. And as a rule, everything works for 5-8 years without failures. Then the check valve begins to "poison" and it is changed.
What is indicated in the label
A few words about the marking of the check valve.It states:
- Type of
- Conditional pass
- Nominal pressure
-
GOST according to which it is made. For Russia, this is GOST 27477-87, but not only domestic products are on the market.
Conditional pass is designated as DU or DN. When choosing this parameter, it is necessary to focus on other fittings or the diameter of the pipeline. They must match. For example, you will install a water check valve after a submersible pump, and a filter to it. All three components must have the same nominal size. For example, all should be written DN 32 or DN 32.
A few words about conditional pressure. This is the pressure in the system at which the valves remain operational. You need to take it exactly no less than your working pressure. In the case of apartments - no less than a test one. According to the standard, it exceeds the working one by 50%, and in real conditions it can be much higher. The pressure for your home can be obtained from the management company or plumbers.
What else to pay attention to
Each product must come with a passport or description. It indicates the temperature of the working environment. Not all valves can work with hot water or in a heating system. In addition, it indicates in what position they can work. Some should only stand horizontally, others only vertically. There are also universal ones, for example, disk ones. Therefore, they are popular.


The opening pressure characterizes the “sensitivity” of the valve. For private networks, it rarely matters. Unless on the supply lines close to the critical length.
Also pay attention to the connecting thread - it can be internal or external. Choose based on ease of installation
Do not forget about the arrow that indicates the direction of water movement.
Dimensions of check valves for water
The size of the check valve for water is calculated according to the nominal bore and they are released for everything - even the smallest or largest pipeline diameters. The smallest is DN 10 (10 mm nominal bore), the largest is DN 400. They are of the same size as all other shutoff valves: taps, valves, spurs, etc. Another "size" can be attributed conditional pressure. The lowest is 0.25 MPa, the highest is 250 MPa.
Each company produces check valves for water in several sizes.
This does not mean that any of the valves will be in any variant. The most popular sizes are up to DN 40. Then there are the main ones, and they are usually purchased by enterprises. You won't find them in retail stores.
And yet, please note that for different companies with the same conditional passage, the external dimensions of the device may differ. Length is clear
Here the chamber in which the locking plate is located can be larger or smaller. The chamber diameters also differ. But the difference in the area of the connecting thread can only be due to the wall thickness. For private houses, this is not so scary. Here the maximum working pressure is 4-6 atm. And for high-rise buildings it can be critical.
How to check
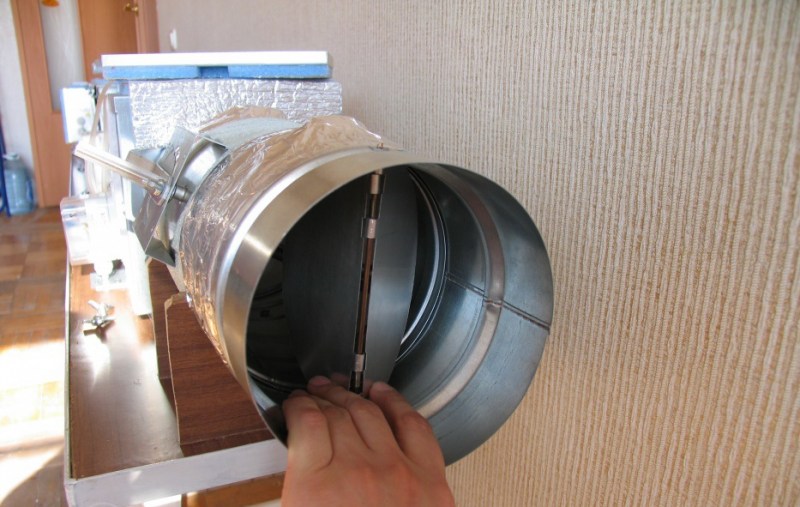
The easiest way to test a check valve is to blow into it in the direction that is blocking it. Air must not pass. Generally. No way. Also try pressing the plate. The rod should move smoothly. No clicks, friction, distortions.
How to test a non-return valve: blow into it and check for smoothness
Purpose of the device
The need for installation is explained by the fact that a modern apartment is a completely sealed room due to the fact that PVC windows do not allow air inflow when closed. It is not always convenient to open them for ventilation, since too much cold air enters in winter.
In this regard, several difficulties arise at once:
- an excess of exhaled carbon dioxide accumulates in the room;
- chronic lack of oxygen leads to stuffiness, stale air and often to heaviness in the head;
- moisture quickly accumulates in a closed space; systematic waterlogging of the air leads to the formation of mold on the walls and products.
The supply valve, mounted in the wall, is convenient in that it creates a uniform and constant weak inflow, which essentially replaces the need to use the window in the cold season.
The valve is designed for use in any residential and commercial premises. Its use is especially relevant:
- if a lot of people live in the apartment, especially small children;
- if there are often many people in the room;
- if the apartment has pets and / or plants that constantly need fresh air.
The need for additional ventilation increases if the house is old, since in this case the natural ventilation system, which was installed during construction, most likely does not function or does not work efficiently enough.
Making and installing a non-return valve with your own hands
Although the market offers a large selection of varieties of devices for solving various problems, some people decide to make their own valve. To do this, you will need to purchase individual elements of the future product and means of fastening.


Necessary tools and materials
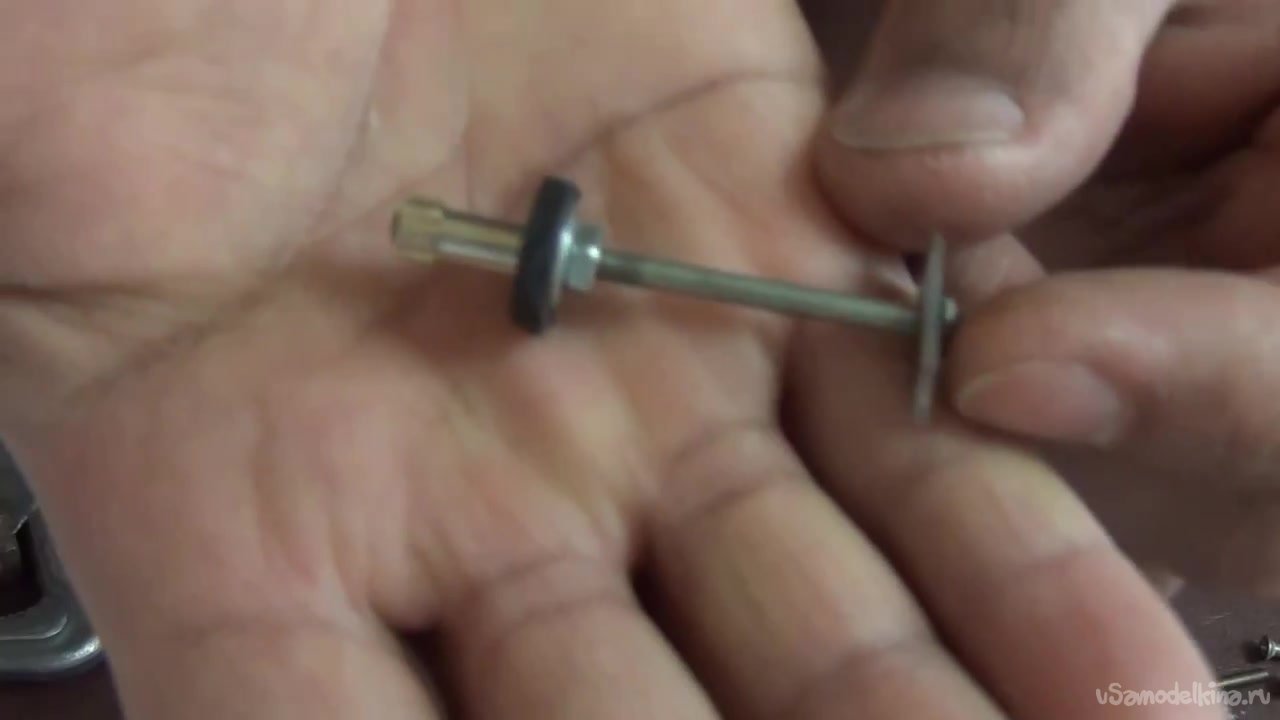
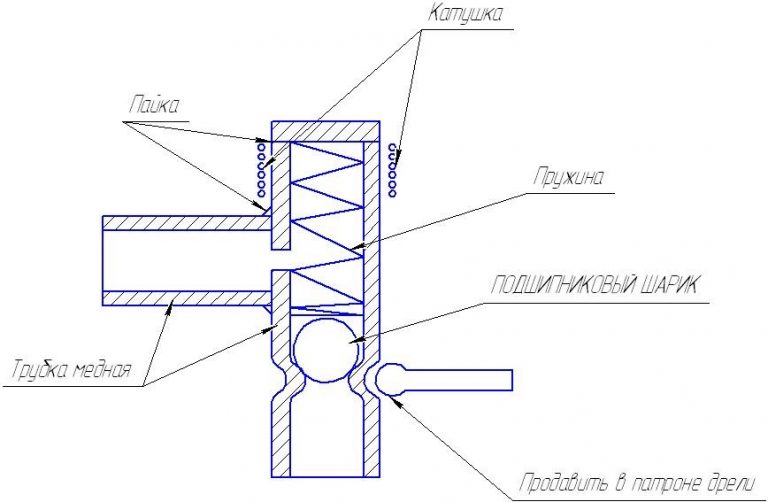
To independently make ball-type valves for water, you must prepare the necessary materials in advance:
- Tee with internal thread.
- For the valve seat, you need to take a coupling with an external thread.
- Stainless steel spring. It should fit freely into the hole.
- Cork. It will serve as a plug for the entire device and support for the spring.
- Steel ball, the diameter of which is slightly less than the nominal diameter of the tee.
- FUM tape.
Work progress
When all the materials are ready, you can begin the process of assembling the product. To do this, you can use the instructions below:
- First of all, a coupling is screwed into the tee, which will serve as a saddle for the gate element. It is necessary to screw in until the coupling closes the side hole of the tee by about 2 mm. This is necessary so that the ball does not jump out into the side passage.
- Through the opposite hole, first insert the ball, and then the spring.
- Spend a plug of the hole through which the spring was inserted. This is done with a screw plug using a sealing tape.
- Such a home-made device will allow water to pass into the side hole due to the fact that the direct flow will put pressure on the ball and on the spring, and in the absence of flow, the ball clogs the passage, returning to its original position under the action of the spring.
When making the device yourself, it is recommended to properly adjust the spring. It should not deviate when the pressure in the system is low, and not be too tight so as not to interfere with the normal flow of fluid.
Rules for installation and operation of the device
There are a number of rules and recommendations that must be followed during installation work:
- With the help of a valve, turn off the water supply completely or only at the installation site.
- Devices in which the working element comes to the closed position due to gravity should be mounted in a horizontal position. On vertical lines, such devices will only work if the water moves through the pipeline from the bottom up. All other types of valves can be mounted on both horizontal and vertical pipes.
- The arrow on the body of the device must match the direction of water movement.
- It is recommended to install a strainer in front of the device, which will trap debris present in the liquid.
- In order to be able to diagnose the condition of the device in the future, a pressure gauge can be fixed at the outlet of the device.
- It is not recommended to destroy the paintwork on the instrument case, as it performs a protective function.
Wiring diagram
In heating and water supply systems, the choice of the location of the valve is determined by those areas where the flow of water or coolant is required in only one direction, and the hydraulic features of the system can lead to fluid flow in the opposite direction. These shut-off valves should be installed in accordance with all requirements of regulatory documents. There are the following connection schemes:
- If there are several pumps in the system installed in parallel to each other, then the valve should be mounted on the connecting pipe of each pump. This is done so that the water does not flow in the opposite direction through the failed pump.
- If heat flow sensors or water consumption meters are installed in the system, then a valve should be installed on their nozzles. The absence of a shutter can cause water to flow backward through the meters, which will lead to incorrect operation of these devices and incorrect readings.
- In heating systems with a common heat supply center, the device must be installed in the mixing units on the jumper. If this is not done, then the coolant can go from the supply pipe to the return pipe, bypassing the heating system.
- In the heating system, the valve is installed in the section through which the coolant flows from the heating device to the heating device, if there is a possibility of a pressure drop in this area. This will help prevent the backflow of water from the pipeline when the pressure drops in the external network. In this case, on the return section, it is necessary to install a pressure reducer operating on the principle of "to itself".
Connection diagram.
Ventilation units with built-in non-return valves
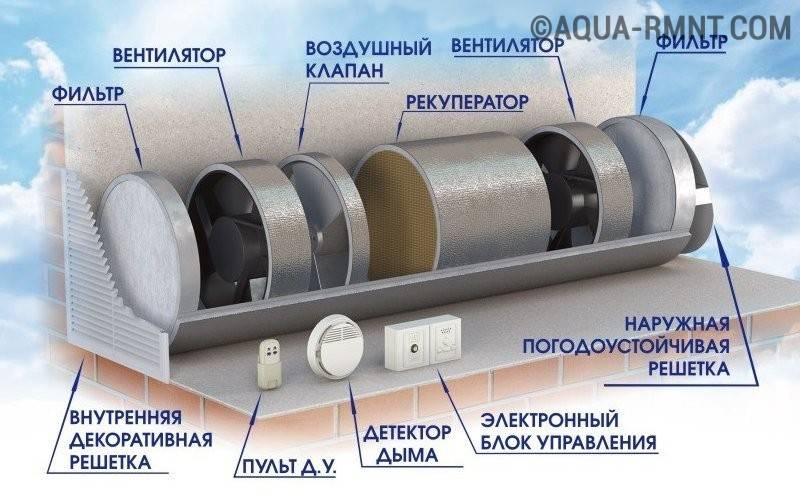
The anti-return valve can be an integral part of many devices for natural and forced ventilation. Let's look at a few examples.
Exhaust fans with non-return valve
New models of exhaust fans with non-return valve can operate almost silently due to the design features using vibration-dampening liners.Small bearings of the device are treated with "eternal" lubrication, which does not need periodic renewal. All body parts are made of durable durable plastic, which is not afraid of high temperatures or humidity. The minimum warranty period for exhaust fans with a check valve is three years.
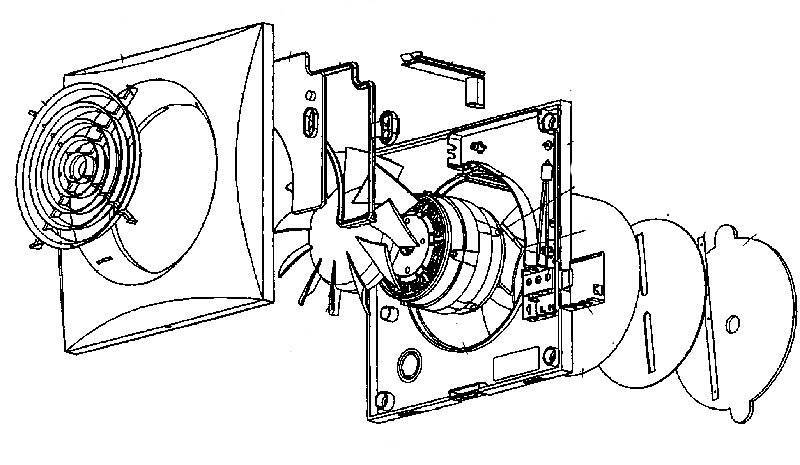 Fan device diagram
Three types of valves can be installed in fans:
- with manual or automatic control;
- on springs;
- mechanical (changing the direction of the petals by air pressure).
The most common devices are springs. The springs return the flaps of the petals to the closed state as soon as the fan stops working.
When choosing a fan, pay attention to the dimensions of the ventilation outlet. What you should pay attention to when buying a device:
What you should pay attention to when buying a device:
- fan power;
- check valve shape;
- noise level;
- level of energy consumption;
- decor.
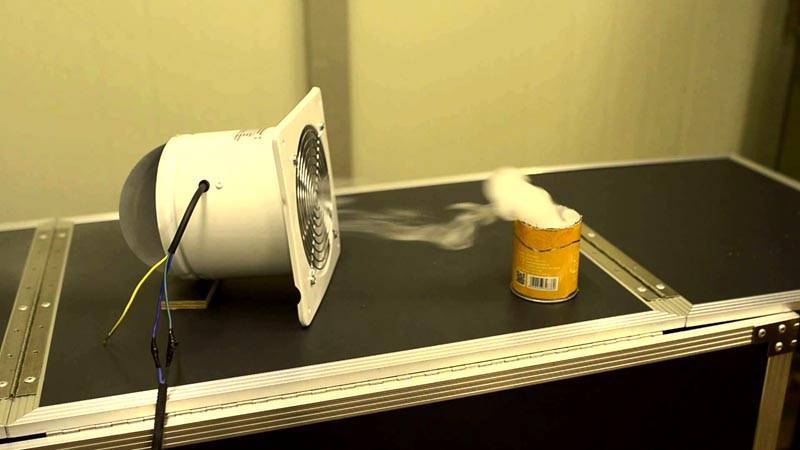 For exhaust in the bathroom, a power factor of 6 is used - that is, the atmosphere in the room must be updated 6 times per hour
Fans can be overhead or in-duct. Intra-channel are inserted into the opening of the air shaft. The farther you install the device into the shaft, the lower the noise level in the room. For small mines, overhead models are used; they are fixed to the wall at the vent.
The exhaust fan can be equipped with a timer and motion sensor. It is very convenient, there is no need to control the device with a switch.
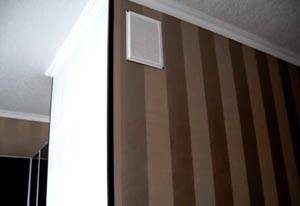
Ventilation grill with check valve: device and purpose
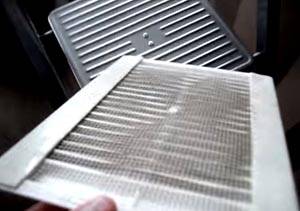
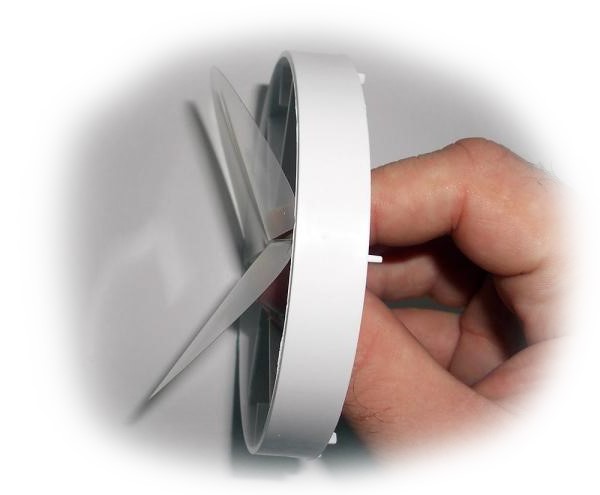
This is a very simple design, consisting of a decorative grille, a flange and the petal itself. Ventilation grilles with valves can be round, rectangular or square. For domestic purposes, these products are made of durable plastic.
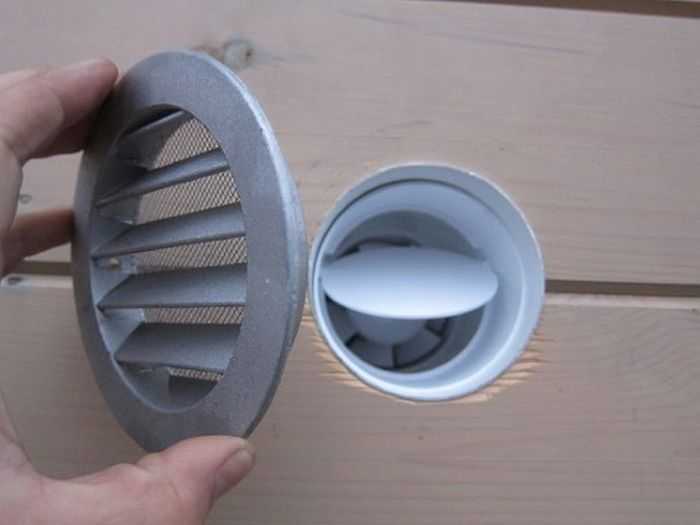


 If the conventional grille allows airflow in both directions, the anti-return device blocks the incoming airflow.
In addition to blocking incoming air flows, such devices are equipped with mosquito nets to protect against insects and noise-absorbing pads.
Ventilation devices of this type are most often used in private homes, where the entire ventilation system is combined at one point on the roof and the air in it is forcibly pumped out using a small electric motor. In this case, such grilles are installed in each room of the house.
Check valve tees and their applications
Tees for ventilation with a check valve are used as an independent device for ventilation, and complete with an exhaust hood. They are not used very often, there is an opinion that for natural ventilation it is enough just to install a conventional anti-return device.
 It looks like a tee for ventilation
Exhaust tees with a check valve are often used when connecting a solid fuel boiler. Such a device not only ensures the exit of combustion products into the exhaust pipe, but also the renewal of the air in the room.
The use of a non-return valve on the hood
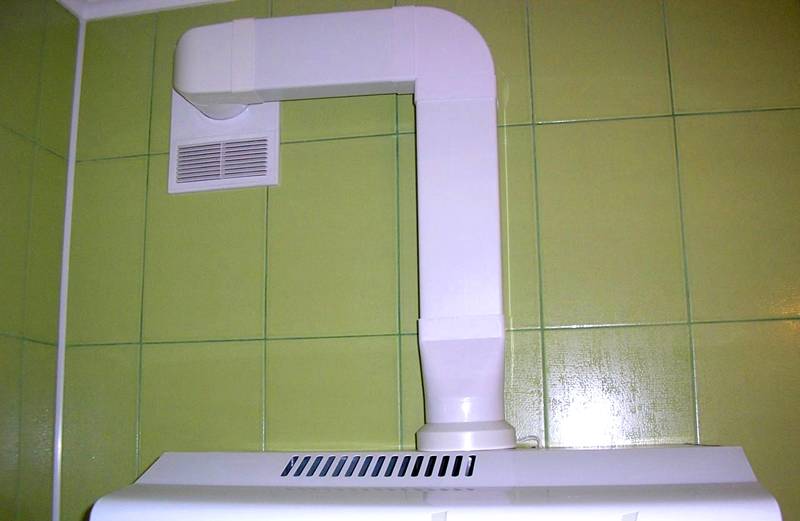
Returning to the topic of ventilation in the kitchen, let's talk again about what it is - a non-return valve for the hood? We have already written about the device of this device, but how to install it and use it correctly?
There are two options: without a tee or with a tee.
In the first case, two grids are inserted into the ventilation hole, suitable for connecting the corrugated hose. An exhaust hood is connected to one of the gratings, and an anti-return design is connected to the second. When the hood is turned on, the valve will prevent air from the ventilation from entering the room. And when the hood is turned off, natural air exchange will work.
 This method will allow you to use not only a corrugated hose to connect a kitchen umbrella, but also a rectangular ventilation duct, which has excellent aerodynamic properties and an attractive design.
The second option for connecting a check valve for the hood involves the use of a tee already known to you. One outlet of the tee is directed to the ventilation shaft. The second is connected to the corrugated sleeve of the hood, and an anti-return device is mounted on the third outlet. Such a hood with a check valve works in the same way as the first one, it just looks different.
 Hood with tee
How to design a check valve
To build a check valve, you will need to buy a grate, a polymer film and fasteners. Also, to create a device, it is better to purchase a sealant. The simplest design option is a membrane action valve. It is easy to construct with your own hands.
The design is protected from condensation on the front panel of the supply air regulator. It has an automatic pressure-throttling system for excess supply air.The amount and direction of fresh air flow is determined by the front panel, which has a mechanism for changing the opening angle. The front panel grill opens at the top edge and directs the airflow up and down to ensure comfortable air distribution even when used in underfloor heating. The filter is mounted in a cylindrical filter basket, additionally protected against interference from water.
The check valve is made in the following sequence:
- Measure the dimensions of the ventilation hole, and then cut the grille. It should have dimensions exceeding the dimensions of the vent by 2 cm.
- If there is plastic for the workpiece, the grate can be made using a file.
- Its surface must be smooth. This will ensure a tight fit of the membranes.
- To fix 2 squares of the film on 2 sides of the grate, such a procedure is performed using a sealant.
- Use a drill to make holes in the grate - fasteners will subsequently be placed in them.
- Place the grate in the vent and screw it on.
Such a device will work effectively both in the case of natural ventilation and forced ventilation. It will be especially useful to install a check valve if there are some problems with ventilation. This will keep the room fresh air, eliminating the appearance of unpleasant odors.
The valve is equipped with a damping tube designed for direct wall mounting. Each sewer system must have a ventilated and ventilated part.Unpleasant and unsafe odors coming out of sanitary utensils, sewer approaches approaching during a drain, water being sucked out of water gates, slow drainage to the sewer, accumulation of contaminants in sewer lines are just some of the signs of improper aeration of internal sewer pipes.
Internal sewerage in a facility works correctly if all atmospheric pressure is present in all drains. Any violation of this balance leads to the failure of the entire sewerage system in the building. To ensure the smooth and correct functioning of the entire system in a building, proper ventilation must be provided and designed based on applicable standards and regulations. The ends of the sewer pipes must lead out of the building and must be located where sewage and pipeline gas leaving the sewer system will not enter the building.
The process of creating a check valve with your own hands
| A photo | Step-by-step algorithm of actions with comments |
|---|---|
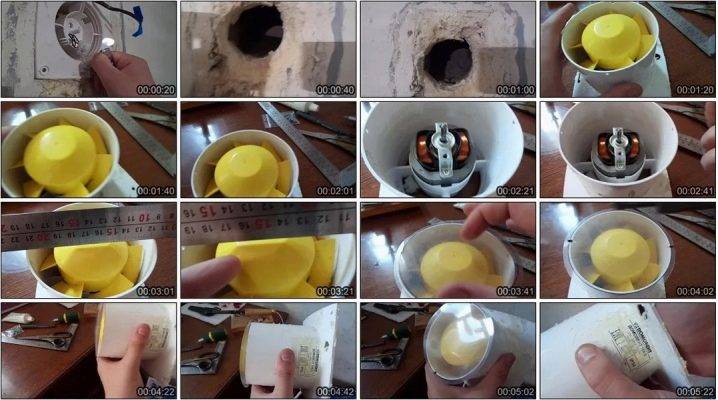
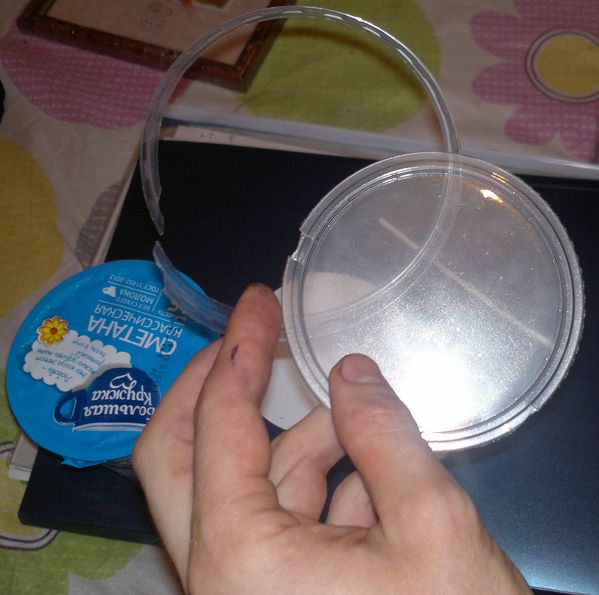
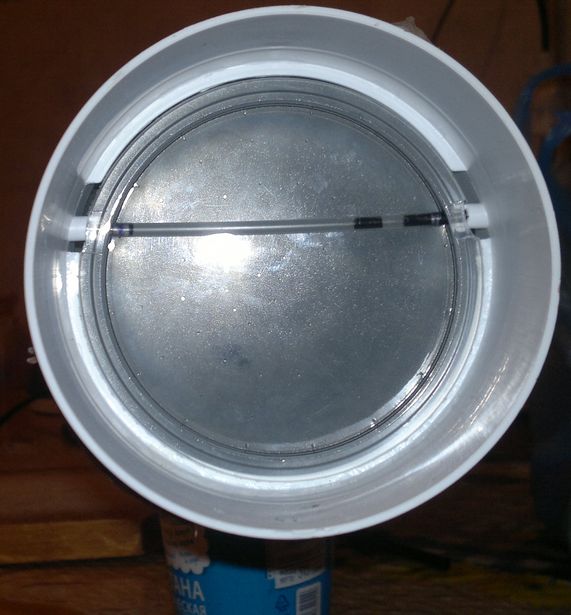
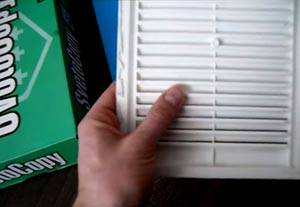
 | The author of the project is going to install a homemade check valve in a 125 mm wide channel under a standard plastic grate. Installation of a forced fan is not planned. It was decided to use improvised materials to save money. The need for modernization arose due to the ingress of unpleasant odors from neighboring premises located on other floors of the house. |
 | This cover can be removed without any difficulty. It is fixed on strips of adhesive tape (with two sticky sides). Over time, they ceased to fulfill their functions, so more reliable means will be used for a new fixation. |
 | After removing the tape and dirt, it turned out to be a good basis for creating the necessary structure. |
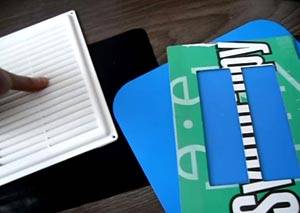
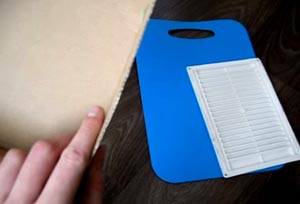 | For the valve frame, cardboard, thin plywood, a sheet of plastic are suitable. In this case, an empty packaging from writing paper was used. The corrugated cover has the necessary strength. An additional advantage, dampening of sound vibrations is not useful here. But it can be used when creating a design with a fan. |
 | In order not to damage the workpiece, use a soft lining. |
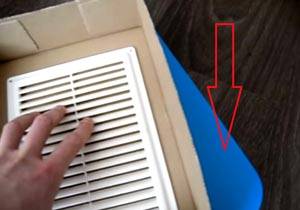
 | The contour of the lattice is outlined with a pencil, a rectangle is cut out of the lid along the marked lines. |
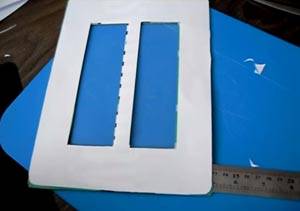
 | Next, measure the width and height of the vent. It turned out 125 x 170 mm. |
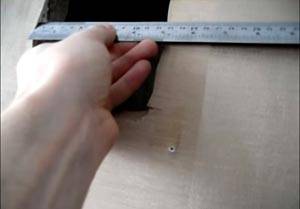
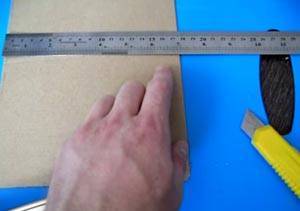 | With the help of a ruler and a pencil, the detail is drawn in the center of the rectangle. Distances from opposite edges to its perimeter should be the same. |
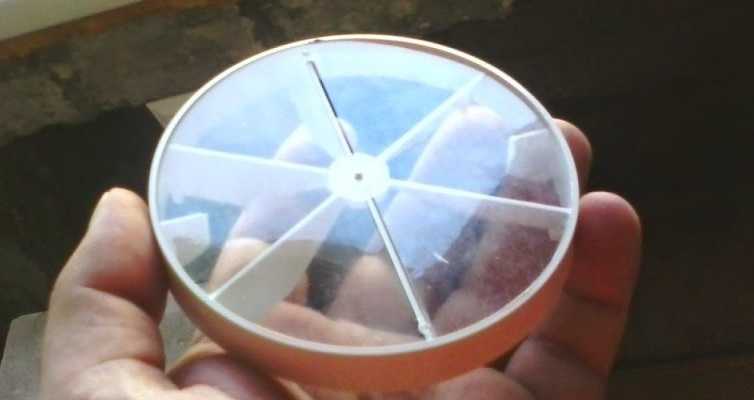
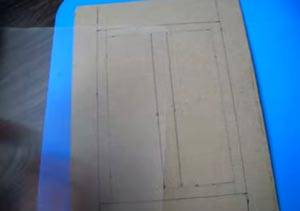 | In the central part, a vertical jumper 10-15 mm wide is set aside. It is useful for attaching the valve, which can be made from a suitable piece of thick polymer film. The author used the upper part of a standard clerical folder (binder). |
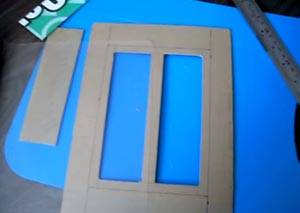 | Cut out the center pieces first. |
 | Next, the valve flaps are created. They should converge in the closed state in the middle of the central jumper. If less rigid plastic is used, install an additional horizontal support bar in each hole. |
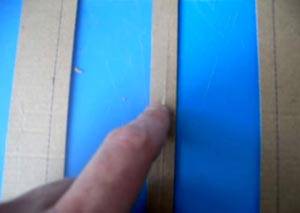
 | The valves are attached to the side of the frame with adhesive tape. Check the strength of the fasteners and the functioning of the mechanism. |
 | The multi-colored surface of the box will be visible through the cracks. |
 | To eliminate this drawback, the workpiece is pasted over with white paper. |
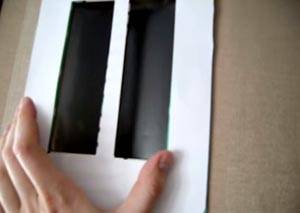 | With the help of a practical experiment, you can check the functionality of the check valve for ventilation with your own hands. It is necessary to make sure that the petals move freely, reliably block the access of air when closed. |
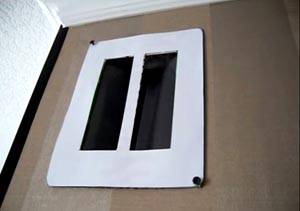 | To increase the duration of the tests, the valve is mounted on self-tapping screws without completely tightening them. The locations of the holes are marked in accordance with the lattice parameters. If everything is in order, it is installed from above, attached with screws to the wall along with the valve. |
Options for working connection diagrams
Heating systems are very diverse and the presence of a check valve is not necessary in all. Consider several cases when its installation is necessary. First of all, a check valve must be installed on each of the individual circuits in a closed circuit, provided that they are equipped with circulation pumps.
Some craftsmen strongly recommend installing a spring-type check valve in front of the inlet pipe of the only circulation pump in a single-circuit system. They motivate their advice by the fact that in this way pumping equipment can be protected from water hammer.
This is in no way true. Firstly, the installation of a check valve in a single-circuit system is hardly justified. Secondly, it is always installed after the circulation pump, otherwise the use of the device loses all meaning.
If two or more boilers are included in the heating circuit, the occurrence of parasitic flows is inevitable. Therefore, the connection of a non-return valve is mandatory.
For multi-circuit systems, the presence of a reverse-acting shut-off device is vital. For example, when two boilers are used for heating, electric and solid fuel, or any others.


When one of the circulation pumps is turned off, the pressure in the pipeline will inevitably change and a so-called parasitic flow will appear, which will move in a small circle, which threatens trouble. Here it is impossible to do without shutoff valves.
A similar situation occurs when using an indirect heating boiler. Especially if the equipment has a separate pump, if there is no buffer tank, hydraulic arrow or distribution manifold.
Here, too, there is a high probability of a parasitic flow, to cut off which a check valve is needed, which is used specifically for arranging a branch with a boiler.
The use of shut-off valves is also mandatory in systems with a bypass. Such schemes are usually used when converting a scheme from gravitational fluid circulation to forced circulation.
In this case, the valve is placed on the bypass in parallel with the circulation pumping equipment. It is assumed that the main mode of operation will be forced. But when the pump is turned off due to a lack of electricity or a breakdown, the system will automatically switch to natural circulation.
When arranging bypass units for heating circuits, the use of check valves is considered mandatory. The figure shows one of the possible options for connecting the bypass
This will happen as follows: the pump stops supplying the coolant, the check valve actuator stops under pressure and closes.
Then the convection movement of the liquid along the main line resumes. This process will continue until the pump starts. In addition, experts suggest installing a check valve on the make-up pipeline. This is optional, but highly desirable, as it avoids emptying the heating system for a variety of reasons.
For example, the owner opened a valve on the make-up pipeline to increase the pressure in the system. If, due to an unpleasant coincidence, the water supply is cut off at this moment, the coolant will simply squeeze out the remnants of cold water and go into the pipeline. As a result, the heating system will remain without liquid, the pressure in it will drop sharply and the boiler will stop.
In the schemes described above, it is important to use the right valves. To cut off parasitic flows between adjacent circuits, it is advisable to install disk or petal devices
In this case, the hydraulic resistance will be less for the latter option, which must be taken into account when choosing.
In heating systems with natural circulation of the coolant, the use of spring check valves is impractical. Only paddle rotators can be installed here
For the arrangement of the bypass assembly, it is preferable to choose a ball valve. This is due to the fact that it gives almost zero resistance. A disc-type valve can be installed on the make-up pipeline. It should be a model designed for a fairly high working pressure.
Thus, the non-return valve may not be installed in all heating systems.It is necessarily used when arranging all types of bypasses for boilers and radiators, as well as at branching points of pipelines.
Features and purpose
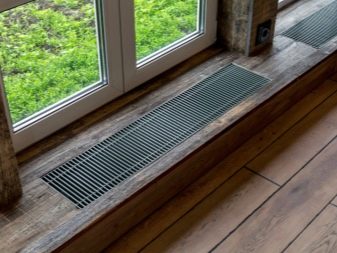
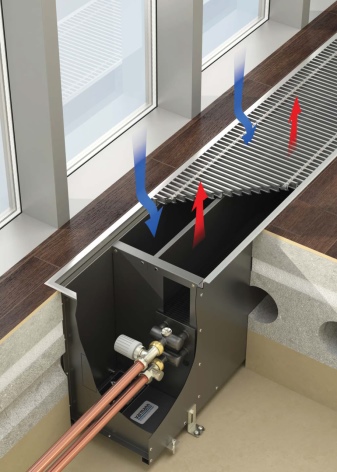
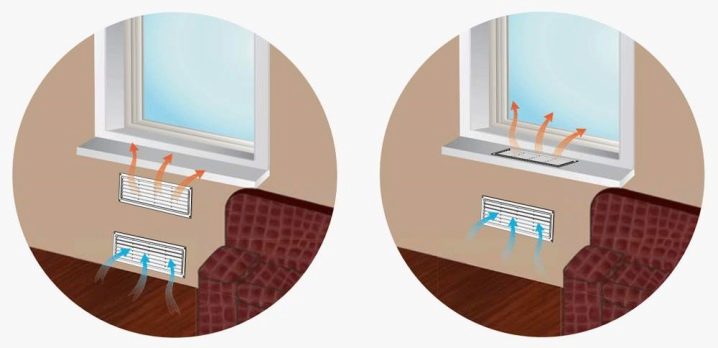
According to building codes, radiators should be mounted directly under the window sills. Thanks to this, not only the air in the rooms warms up, but also protection against condensation on the windows is provided. To do this, the design of the batteries should protrude slightly forward in relation to the window sills.
However, these requirements are not always met. In recent years, metal-plastic windows have been massively installed. Often, sealed window structures are mounted, and window sills cover radiators, preventing the movement of air flows. This causes condensation to form on the windows.

Other causes of condensation on windows can be:
- high temperatures in the room;
- improper installation of window structures;
- high thermal conductivity of double-glazed windows;
- lack of ventilation in the room.
Many modern double-glazed windows provide a tight fit, as a result of which air circulation is disturbed. Therefore, condensation can appear at the corners of windows, which is a favorable environment for the development of mold and harmful microorganisms.
Installation of ventilation grilles provides the required air exchange, which eliminates the appearance of condensate. They can be mounted on various types of window sills (plastic, stone or wood). At the same time, warm air from the batteries will rise, passing through the bars to the windows. The cooled air will descend and also pass through the grilles, which will ensure the ventilation of the air in the room.


Modern standards for the construction of multi-storey buildings take into account the possibility of including ventilation grilles in the project. But in most existing buildings, you have to deal with the installation of gratings yourself. In this case, it is necessary to choose the right place where they will be attached.
It should be borne in mind that convection grilles are considered an element of the interior.
Therefore, when choosing a product, it is recommended to pay attention to its appearance.
Of great importance is the color of the gratings. Usually it is selected in such a way that it matches the color of the double-glazed windows. The most common are white designs. Steel grills are often painted in gold or silver tones to create an original design.
Lattices made of wood are rarely painted. Usually wooden surfaces are coated with a special varnish. It protects the material from negative external influences. It must be remembered that some varnishes and paints can release toxic substances when heated. Therefore, you should choose a paint that will be resistant to high temperatures.
Thanks to the gratings, an ideal microclimate is established in the room. Air circulation allows you to get the optimal values \u200b\u200bof humidity and heat. In addition to improving indoor air ventilation and the possibility of decorating window sills, the main advantages of ventilation grilles include ease of installation and maintenance.
When choosing a lattice, it is worth considering its length. It is recommended to choose a product whose length will match the length of the radiator. In this case, the ventilation structure itself can be implemented as a single element or it can have several gratings of small length mounted in series in the window sill.If you install an insufficiently long grill on only one side of the window sill, then condensation will still appear on the opposite side of the window.
In addition to the length, an important characteristic of the grating is its cross section. It determines the area of the holes for the circulation of air flows.
The optimal cross section will be a value from 0.42 to 0.6, which will be an effective tool for combating condensate on windows. The larger the cross section, the more air the grate will be able to pass through.
However, in some cases, large holes will not be the best option. If you plan to put various things on the windowsill, then it is better to choose grates with small holes, otherwise various small objects may fall into them.
Sometimes gratings need to be replaced (if they become unusable). It is also recommended to ensure that there are not many pots of indoor flowers on the windows. This is due to the fact that regular watering leads to the accumulation of condensate on the windows.