- Pros and cons of induction devices for heating water
- Efficient infrared emitter
- We make an oil heater with our own hands
- Idea No. 1 - Compact model for local heating
- Basic requirements for a homemade heater
- Principles of snake bending
- Step by step assembly diagrams
- oil battery
- Mini Garage Heater
- Infrared panel for heating
- Types of heaters
- Oil
- Vapor drop
- candle
- Infrared (IR)
- Other types
- Advantages of homemade devices
- Water heating
- Water heating system
- How to do it quickly and cheaply?
- Advantages and disadvantages
- Film infrared heater
- Basic requirements for a homemade heater
- Conclusions and useful video on the topic
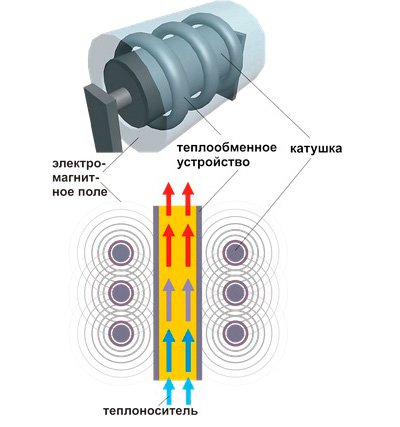
Pros and cons of induction devices for heating water
The device has a fairly simple design and does not require special documents allowing the use and installation. The induction water heater has a high degree of efficiency and optimum reliability for the user. When using it as a boiler for heating, you don’t even need to install a pump, since water flows through the pipes due to convection (when heated, the liquid practically turns into steam).
Also, the device has a number of advantages, which distinguishes it from other types of water heaters. So, induction heater:
- much cheaper than their counterparts, such a device can be easily assembled independently;
- completely silent (although the coil vibrates during operation, this vibration is not noticeable to a person);
- vibrates during operation, due to which dirt and scale do not stick to its walls, and therefore does not need to be cleaned;
- has a heat generator that can be easily sealed due to the principle of operation: the coolant is inside the heating element and the energy is transferred to the heater through an electromagnetic field, no contacts are needed; therefore, sealing gum, seals and other elements that can quickly deteriorate or leak will not be needed;
- there is simply nothing to break in the heat generator, since the water is heated by an ordinary pipe, which is unable to deteriorate or burn out, unlike a heating element;
Despite the huge number of advantages, the induction water heater has a number of disadvantages:
- the first and most painful for the owners is the electricity bill; the device cannot be called economical, so you have to pay a decent amount of time for its use;
- secondly, the device gets very hot and heats up not only itself, but also the surrounding space, so it is better not to touch the body of the heat generator during its operation;
- thirdly, the device has an extremely high efficiency and heat dissipation, therefore, when using it, be sure to install a temperature sensor, otherwise the system may explode.
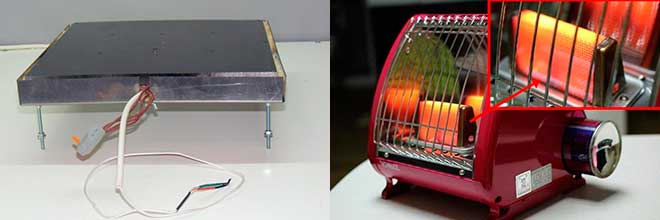
Efficient infrared emitter
Any infrared emitter that is used to heat a room is distinguished by its efficiency and high efficiency. All this is achieved thanks to the unique principle of operation. Waves in the infrared spectrum do not interact with the air, but increase the surface temperature of objects in the room.
Those subsequently transfer heat energy to the air. Thus, the maximum of radiant energy transforms into thermal energy. It is precisely because of the high efficiency and efficiency, and also because of the low cost of structural elements, that infrared heaters are increasingly being made independently by ordinary people.
IR emitter based on graphite dust. Homemade room heaters,
Epoxy adhesive.
operating in the infrared spectrum, can be made from the following elements:
- powdered graphite;
- epoxy adhesive;
- two pieces of transparent plastic or glass of the same size;
- wire with a plug;
- copper terminals;
- thermostat (optional)
- wooden frame, commensurate with pieces of plastic;
- tassel.
crushed graphite.
First, prepare the work surface. For this, two pieces of glass of the same size are taken, for example, 1 m by 1 m. The material is cleaned of contaminants: paint residue, greasy hand marks. This is where alcohol comes in handy. After drying, the surfaces proceed to the preparation of the heating element.
The heating element here is graphite dust. It is a conductor of electric current with high resistance. When connected to the mains, graphite dust will begin to heat up. Having gained a sufficient temperature, it will begin to emit infrared waves and we get a do-it-yourself IR heater for the house.But first, our conductor needs to be fixed on the work surface. To do this, mix the carbon powder with the adhesive until a homogeneous mass is formed.
Homemade room heater.
Using a brush, we make paths from a mixture of graphite and epoxy onto the surface of previously cleaned glasses. This is done in a zigzag pattern. The loops of each zigzag should not reach the edge of the glass by 5 cm, while the strip ends and begins graphite should on one side. In this case, it is not necessary to make indents from the edge of the glass. Terminals for connecting electricity will be attached to these places.
We put the glasses on top of each other with those sides on which graphite is applied, and fasten them with glue. For greater reliability, the resulting workpiece is placed in a wooden frame. Copper terminals and a wire are attached to the exit points of the graphite conductor on different sides of the glass to connect the device to the mains. Next, home-made heaters for the room must be dried for 1 day. You can connect a thermostat in a chain. This will simplify the operation of the equipment.
What are the advantages of the resulting device? It is made from improvised means, and therefore, it has a low cost. It heats up no higher than 60 ° C, and therefore it is impossible to burn yourself on its surface. The glass surface can be decorated at your discretion with a film with a variety of patterns, which will not violate the integrity of the interior composition. Do you want to make homemade gas heaters for your home? The video will help solve this problem.
Film infrared heating device. For full heating of a medium-sized room, it is recommended to use ready-made film materials capable of emitting IR waves.They are present in abundance in today's market.
Required structural elements:
- IR film 500 mm by 1250 mm (two sheets); Homemade film heater for the apartment.
- foil, foamed, self-adhesive polystyrene;
- decorative corner;
- two-core wire with a plug;
- polymer adhesive for wall tiles;
- decorative material, preferably natural fabric;
- decorative corners 15 cm by 15 cm.
Preparing the wall surface for a home-made heater for an apartment begins with fixing the thermal insulation. Its thickness should be at least 5 cm. To do this, the protective film is removed from the self-adhesive layer and the polystyrene is attached to the surface with the foil up. In this case, the material must be pressed tightly against the wall. An hour after the end of work, you can proceed to the next step.
Sheets of IR film are interconnected in series. Glue is applied to the back of the material with a spatula. All this is attached to the previously mounted polystyrene. It will take 2 hours to securely fix the heater. Next, a cord with a plug and a thermostat are attached to the film. The final step is decoration. To do this, the prepared fabric is attached over the film using decorative corners.
We make an oil heater with our own hands
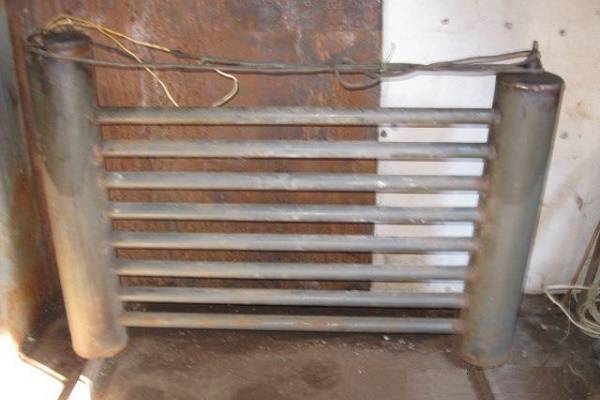
Homemade register with heating element and air vent.
Firstly, the container for the future radiator must be absolutely sealed. Otherwise, the coolant will flow out, which will lead to overheating of the heating element (heater). Therefore, you need to master some techniques for proper metal welding. We talked about them in an article about welding pipes for heating.


Secondly, mineral oil should act as a coolant here, if possible, transformer oil. It should fill the tank of the heater by 85%. The rest of the space is left under the air. It is necessary to prevent water hammer. Thirdly, in the case of using a cast-iron tank for a heater, a steel heating element is used. For a stainless steel tank, a copper heating element is suitable. Magnesium anodes cannot be used in this system.
Use a sketch.
Source materials:
- old, cast-iron radiator or steel pipes with a diameter of 15 cm, pipes with a diameter of 7 cm;
- heating element;
- transformer oil;
- thermostat;
- two-core cord with a plug at the end;
- pump up to 2.5 kW.
You will have to work with a welding machine, a drill, a set of drills and electrodes. Pliers will come in handy. Making an oil heater
Ten is inserted into the lower end.
do-it-yourself apartments begin with the preparation of the tank. If an old, cast-iron battery was taken, it must be disassembled into sections and thoroughly cleaned from dirt and rust, be sure to degrease the inner surface. If you need a heater with increased power, then a welded structure is prepared from prepared pipes, where pipes of larger diameter are located horizontally.
Pipes of smaller diameter are jumpers between the main ones. The coolant will circulate through them. It must be remembered that in the lower pipe it is necessary to set aside a hole for mounting the heating element. If there are several heating elements, they are located on opposite sides of the tank and should not touch. Leave a hole for the pump. The heating element is securely fixed with bolts.A hole for it can be made with a grinder or autogenous.
If a do-it-yourself heater for a room turns out to be voluminous and natural circulation of the coolant in it is impossible, they resort to using a pump. It is located at the bottom of the equipment. The pump must not come into contact with the heating element.
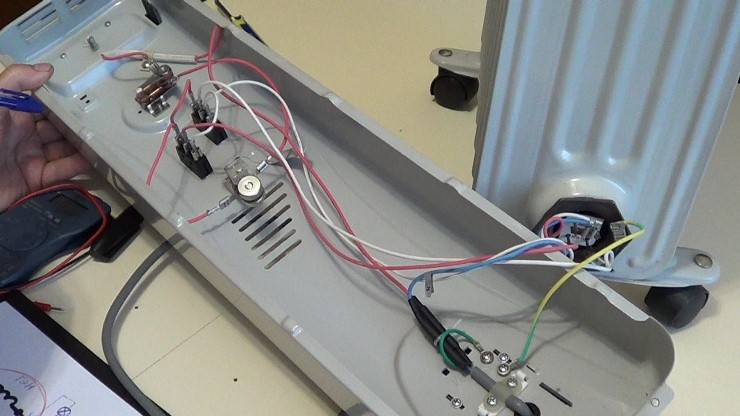
After the installation of structural elements, the equipment is checked for tightness. If the result is satisfactory, then the coolant is poured. The drain hole is securely sealed with a stopper. The equipment is connected to the mains in parallel. The scheme is supplemented with a bimetallic thermostat from an ordinary iron. Before the first start-up, the installation is grounded. Homemade oil heaters for the home: the video will explain in detail about them device and installation rules:
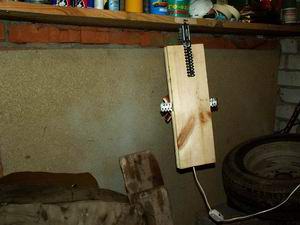
Idea No. 1 - Compact model for local heating
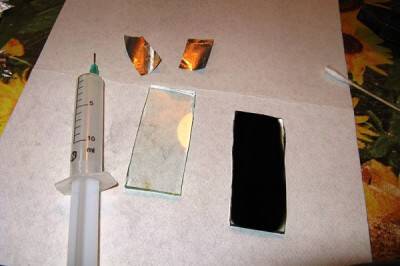
The easiest way to make an electric heater is this one. To get started, prepare the following materials:
- 2 identical rectangular glasses, each with an area of \u200b\u200babout 25 cm2 (for example, 4 * 6 cm in size);
- a piece of aluminum foil, the width of which is not greater than the width of the glasses;
- cable for connecting an electric heater (copper, two-wire, with a plug);
- paraffin candle;
- epoxy adhesive;
- sharp scissors;
- pliers;
- wooden block;
- sealant;
- several ear sticks;
- clean rag.
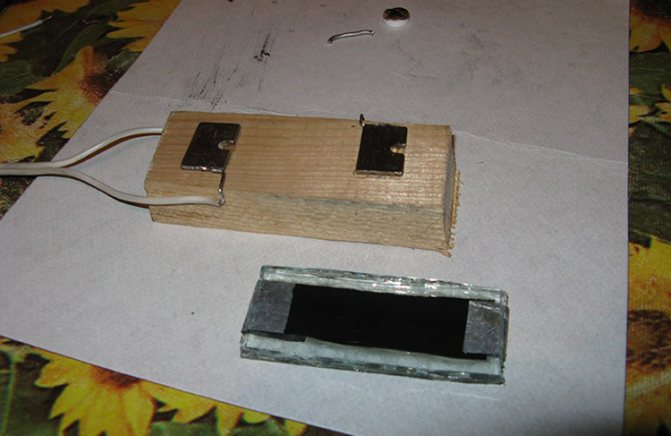
As you can see, the materials for assembling a homemade electric heater are not at all scarce, and most importantly, everything can be at hand. So, you can make a small electric heater with your own hands according to the following step-by-step instructions:
- Thoroughly wipe the glass with a cloth from dirt and dust.
- Using pliers, gently grab the glass by the edge and burn one of the sides with a candle.The soot should evenly cover the entire surface. Similarly, you need to burn one of the sides of the second glass. In order for carbon deposits to settle on the surface better, it is recommended to cool the glass before assembling the electric heater.
- After the glass blanks have cooled, carefully clean the edges with the help of ear sticks no more than 5 mm around the entire perimeter.
- Cut out two strips of foil, exactly the same width as the smoked area on the glass.
- Apply glue to the glass over the entire burnt surface (it is conductive).
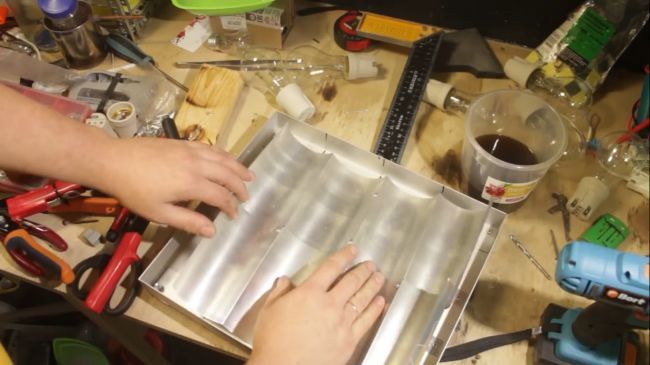
-
Lay the pieces of foil as shown in the photo below. Then apply glue to the other half and connect them.
- Then seal all connections.
- Using a tester, independently measure the resistance of a homemade heater. After that, calculate its power using the formula: P \u003d I2 * R. We talked about how to use a multimeter in the corresponding article. If the power does not exceed the allowable values, proceed to the completion of the assembly. If the power is too high, you need to redo the heating element - make the layer of soot thicker (the resistance will become less).
- Glue the ends of the foil to one side.
-
Make a stand out of a bar by installing contact pads connected to an electrical cord on it.
Using this technology, you can make an electric mini heater with your own hands. The maximum heating temperature will be about 40o, which will be quite enough for local heating. However, for heating a room, such homemade products will, of course, be small, so below we will provide more efficient options for homemade electric heaters.
Basic requirements for a homemade heater
Any type of heating equipment for the home, regardless of design features and manufacturing complexity, must meet the basic requirements:
- Ease and availability of assembly.
- Safety and reliability in operation.
- Economy in energy consumption.
- High performance and working power.
- Affordable cost of structural elements and materials.
- Ergonomics and ease of transport.
- Durability and practicality.

Among the existing heaters, the most efficient and productive are: infrared, quartz and ceramic emitters, electric convector.
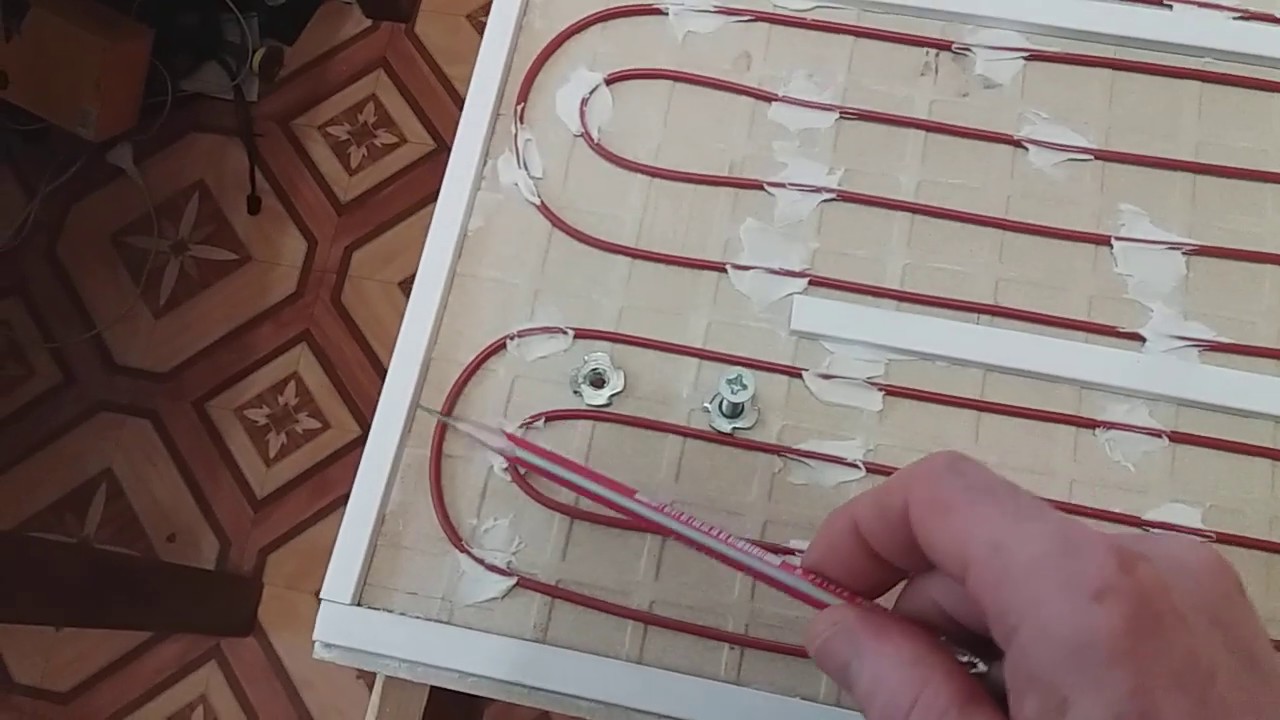
Principles of snake bending
It is necessary to be based on such a scheme according to the type of battery
The plates are cut according to the parameters of the glass. They remove contaminants. Ears are attached to one lining. Their parameters: 2.5 x 5 cm. The basis of such a film is copper foil. It is glued on with superglue. The ear comes into the lining by 5 mm. Sticks out 2 cm.
The formation of the snake must be done on a special template. A minimum of 5 cm is allocated for tails. Bitten nail ends are used. They are polished to roundness.


The wire is wound onto the template. Be sure to anneal to fix the shape.
A voltage of 5-6 V is applied to the snake. When the material has a radiance with a cherry tint, the thread should cool completely. This operation is repeated 3-4 times.
A plywood strip is superimposed on the snake. The snake is pressed with fingers. Slowly, the tails that were wound on the nails are unwound (the nail parameter is 2mm). Each tail needs to be straightened, shaped. 25% of the coil is retained on the nail. The rest is cut flush with the extreme side of the template.And the rest of the tail of 5 mm should be cleaned, a sharp knife is used.
The snake is carefully removed from the mandrel, mounted on the substrate. The conclusions are in contact with the lamellas. You need to remove the snake with two knives. The blades are inserted from the outside under the bends of the branches on the nails (in 1 mm)
Then a sinuous heating thread is carefully pulled up and lifted. The snake is located on the substrate, slightly bent. The conclusions are in the center of the lamellae
The conclusions are in the center of the lamellae.
Nichrome is soldered to copper. The soldering agent is a conductive paste. Liquid solder (1 drop) is dripped onto a clean contact. Through a piece of polyethylene, this area is pressed down with a weight. When the paste becomes hard, the weight and polyethylene are removed.
Next comes the work on the emitter. Silicone sealant is pressed onto the center of the snake with a layer of 1.5 mm. Then the operation is repeated, but the layer is already 3-4 mm. The sealant fills the contour of the substrate. Indentation from the edges - 5 mm.
Glass is placed carefully. Pressed down. It must be tight
Next - waiting for the silicone to dry. It's about a week
It should be tight. Next - waiting for the silicone to dry. It's about a week.
Then the excess sealant is removed with a razor. Sealant flows from the lamellas are also eliminated.
Step by step assembly diagrams
The choice of an economical and effective option is given enough time so that later you do not have to be disappointed. Do-it-yourself assembly of an electric heater is not so complicated that a novice master could not handle it. The assembly principle of almost all structures is similar, therefore, having mastered the manufacture of one device, it is easy to switch to another.
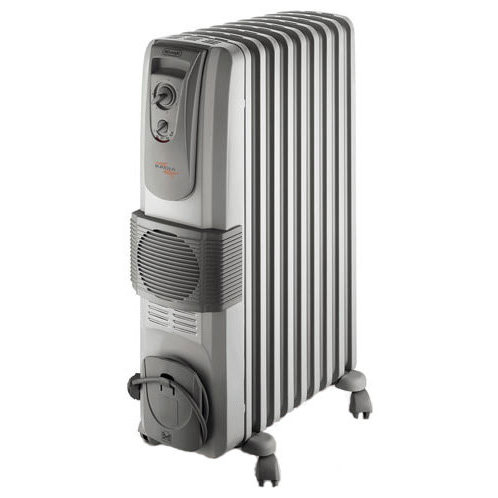
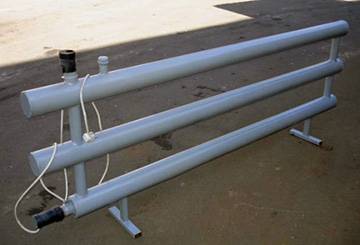
oil battery
Oil heaters are very popular. Their principle of operation is very simple: the oil inside the pipes is heated by a heating element inserted inside. Such a device is very simple to manufacture, has good efficiency and safety indicators.
 Making your own oil heater is easy, you just need to follow the instructions
They do it like this:
- They take a heating element (power - 1 kW) and an electrical wire with a plug for an outlet. Some craftsmen install a thermal relay for automatic control. It is also purchased in the store.
- The body is being prepared. An old water heating battery or a car radiator will do for this. You can weld the body of the apparatus from pipes yourself, if you have the skills of a welder.
- Two holes are made in the body: at the bottom - for inserting a heating element, at the top - for filling oil and replacing it.
- Insert the heating element into the lower part of the body and seal the attachment point well.
- Oil is poured at the rate of 85% of the internal volume of the housing.
- Connect control and automation devices, well isolate electrical connections.
Infrared heater hands;
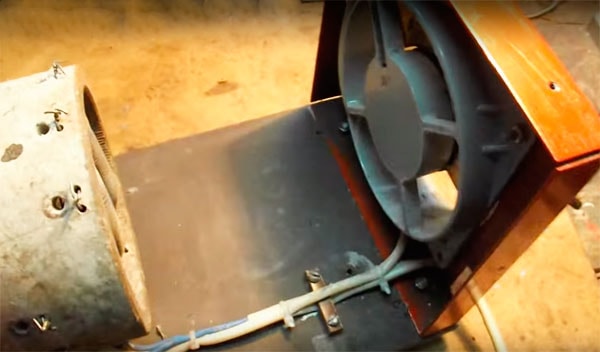
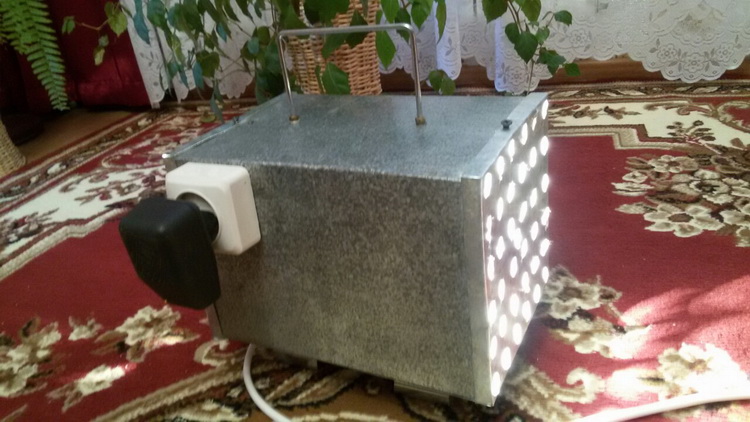
3 id="mini-obogrevatel-dlya-garazha">Mini garage heater
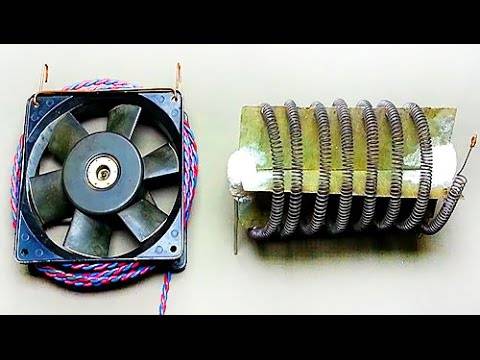
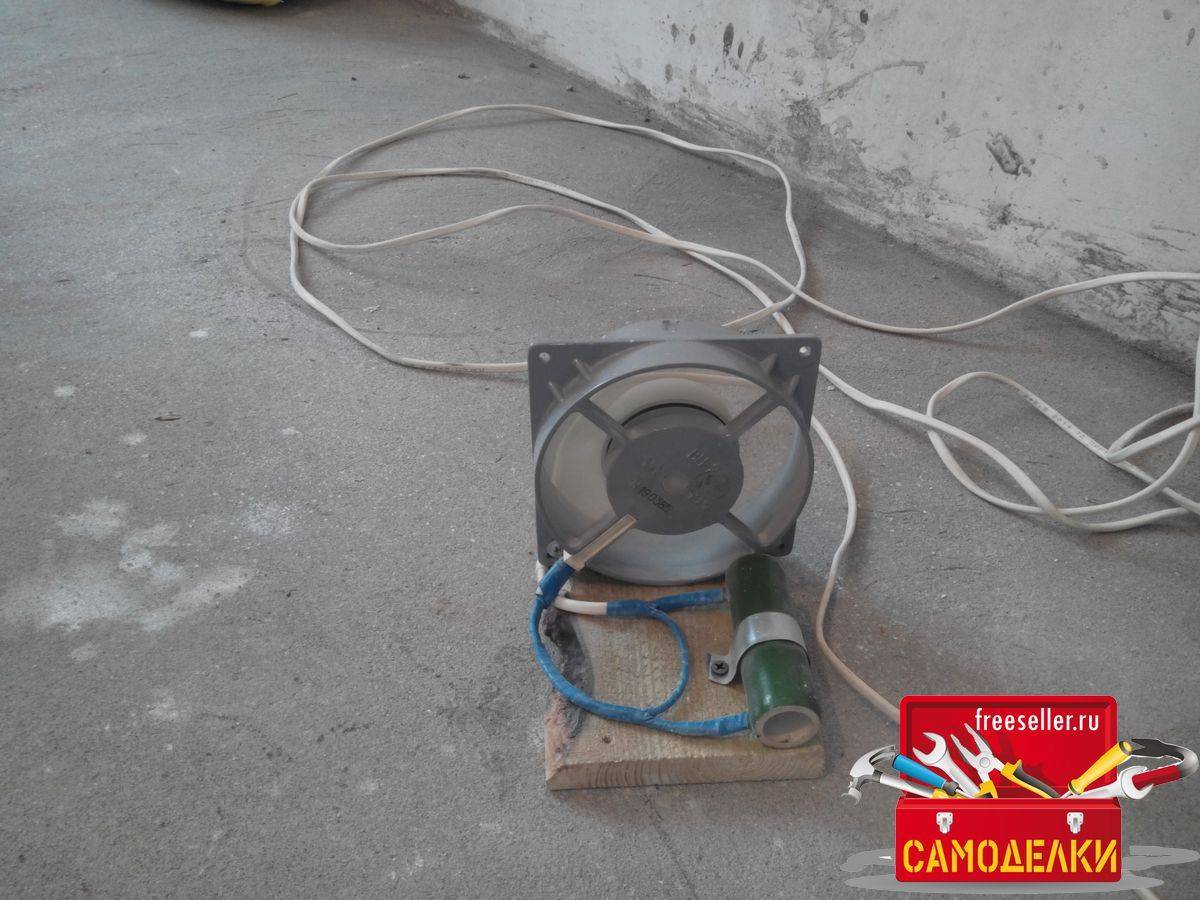
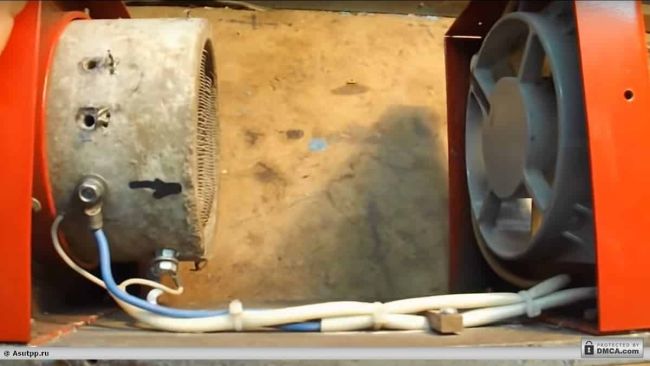
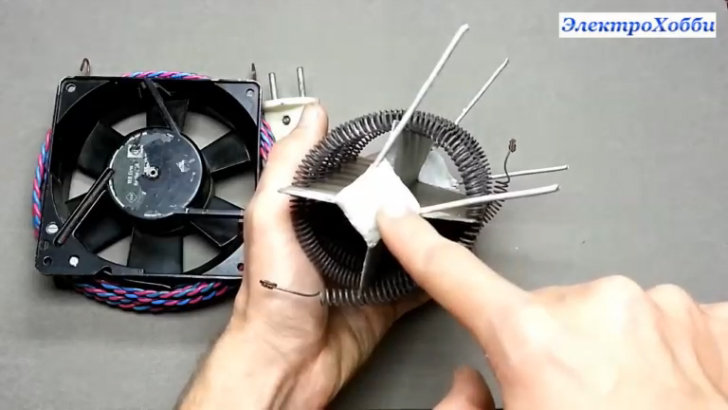
Sometimes a very compact heater is required for certain purposes. In such situations, a mini fan heater made from an ordinary tin can can help out.
To make it, do the following steps:
- They prepare a large can of coffee or other products, a fan from a computer, a 12 W transformer, 1 mm nichrome wire, a diode rectifier.
- A frame is cut out of the textolite according to the diameter of the can and two small holes are made in it to tension the incandescent spiral.
- Insert the ends of the nichrome spiral into the holes and solder them to the stripped electrical wiring. For variability of modes and reliability, several spirals are connected in parallel and a power regulator is installed.
- Assemble the electrical equipment of the heater. Solder well and isolate all connections.
- Mount the fan inside the can with bolts and a bracket.
- The electrical wires are well fixed so that they do not overheat and do not fall into the cavity of the fan when the heater is moved.
- For air access, about 30 holes are drilled in the bottom of the jar.
- For safety, a metal grill or a lid with holes is put on in front.
- For stability, a special stand is made of thick wire.
- Connect to the network and check the device.
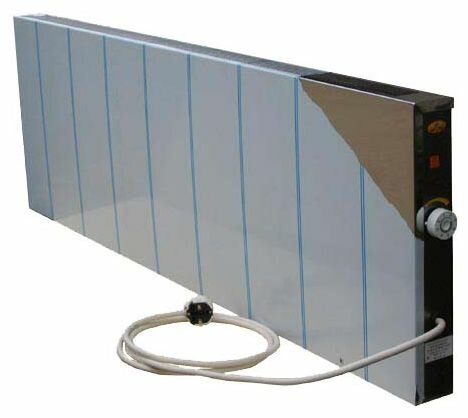
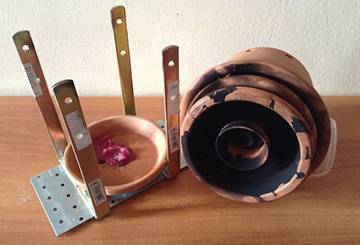
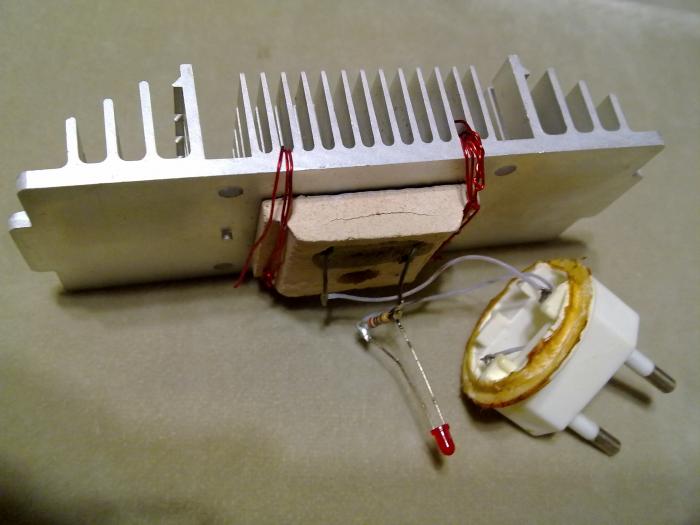
Infrared panel for heating
Recently, infrared ceramic heaters have become increasingly popular. It is much more difficult to make such a device with your own hands if you do not buy ready-made thermal panels, but it is quite possible.


 You can make a similar modern infrared heater at home
To do this, do the following:
- Materials are prepared: fine graphite powder, epoxy glue, 2 metal-plastic or ceramic plates of 1 m² each, 2 copper terminals, wooden blanks for the frame, electrical wires and a switch, there may be a power regulator with a more complex version.
- Draw on both plates a mirror arrangement of spirals on the inside. The distance from the edge is about 20 mm, between the turns and the terminals - at least 10 mm.
- Graphite is mixed with epoxy resin 1 to 2.
- Lay the plates with the pattern on the table, smooth side down.
- A mixture of graphite and glue is applied in a thin layer according to the scheme.
- One of the sheets is placed on top of the second sheet, with the smooth side facing you. Hold them tightly to each other.
- Insert the terminals in the pre-designated output points.
- Let dry.
- Connect electrical wires and check operation.
- Make a wooden frame for stability.
- Equip the device with a thermostat.
DIY homemade heater;
2 id="vidy-obogrevateley">Types of heaters
A home craftsman who wants to acquire a home-made "heater" can be offered several options to choose from:
Oil
 It is a container equipped with a tubular electric heater (TEH) and filled with oil.
The main element of the heating element is a spiral made of nichrome or other material with high electrical resistance, which, when an electric current is passed through it, begins to heat up. The spiral is placed in a copper tube filled with sand.
The oil removes heat from the heating element, distributes it over the surface of the case and, in addition, serves as a heat accumulator (after a power outage, the device continues to heat the surrounding air for some time).
Vapor drop
In its design, a vapor-drop heater is very similar to an oil heater, only water vapor is used as a medium that distributes heat. It is formed from a small amount of water that is poured into the body.
This solution provides two significant advantages:
- When freezing, the vapor-drop heater will not burst, since water occupies only a small part of its volume.
- Steam is an extremely capacious heat accumulator.More precisely, not so much steam as the process of evaporation: it is during the transition from a liquid state to a gaseous state that water accumulates a large amount of thermal energy, which is returned when steam condenses on the walls of the heater.
Having given off heat to the body of the device, the condensed steam in the form of water flows into the lower part, where the heating element is installed. The power of the heating element and the volume of water are selected in such a way that the steam pressure does not break the heater.
Due to the fact that the body of the device is hermetically sealed, its walls from the inside from high humidity do not rust.
candle
 The flame of a candle, as you know, emits not only light, but also a certain amount of heat.
Only it usually disappears under the ceiling in the form of convective air currents and there it is “smeared” over the entire area of the room.
Why not install a heat trap above the candle? We will talk about what it is in the next section.
Infrared (IR)
Any substance with a temperature other than absolute zero emits "thermal" electromagnetic waves, which are called infrared.
The intensity of this radiation is directly dependent on the temperature of the substance. Water and oil radiators also propagate IR waves, but in very small amounts, since their surface is relatively cold.
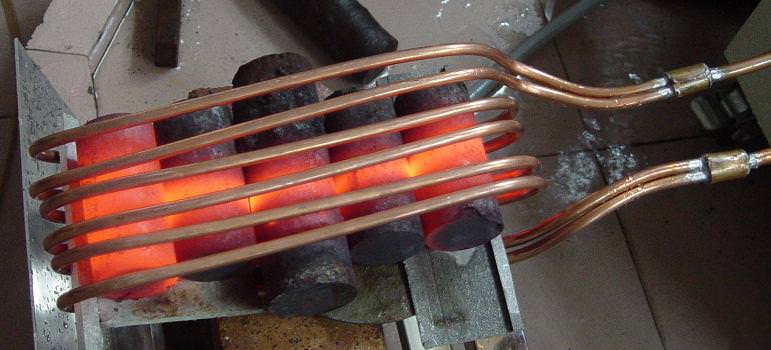
To turn a metal object into an IR emitter, it is enough to heat it up to the red glow temperature. If, however, special materials are used, such as graphite, then sufficiently tangible "thermal" waves can be achieved even at relatively low temperatures.
Knowing these subtleties will help us make an IR heater with our own hands, which will give us heat directly, that is, without the participation of air as an intermediary.
Other types
Since electricity is not available everywhere, constructions that run on gas or solid fuels have the right to life. The latter include potbelly stoves.
Advantages of homemade devices
Home-made appliances for heating a city apartment, a country house or a summer residence have significant advantages over factory products. They are as follows:
- Possibility of manufacturing from affordable and cheap materials, which leads to a reduction in the cost of the finished device.
- Simple and compact design that can be used in a variety of environments.
- Ease of use and transportation.
- High efficiency with silent operation of structural elements.
- Self build quality.
Today, infrared heaters are available for self-manufacturing, which are the safest and most efficient in operation. If more powerful equipment is required, then you can assemble an oil cooler, an alcohol heater, a heat gun, a battery and gas device.


Water heating
The principle of operation of the system is based on the circulation of heated water in a closed circuit from the boiler, pipes and heating batteries. The boiler generates heat, heats water, it, usually with the help of a pump, is sent through pipes to the batteries, and they heat the room.
Among the indisputable advantages of water heating, it should be noted:
- long service life.Under the condition of high-quality installation and careful operation, the system will regularly serve for decades;
- reliability. In the event of a failure of pipes or batteries, they are replaced without any problems with their own hands;
- environmental friendliness and high safety performance.
Despite its many strengths, water heating is rarely used in garages. The equipment of such a system requires serious financial costs. Most often, such heating is used in cases where the garage is located next to the house or in garage cooperatives, provided that several garages are connected to the boiler and other related units.
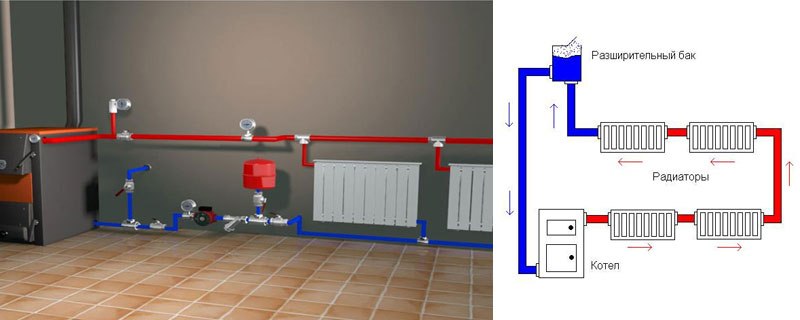
System diagram water heating
Water heating is best used in solid garages made of solid concrete blocks and bricks. It is recommended to refrain from arranging such a system in buildings made of metal profiles and other light materials.
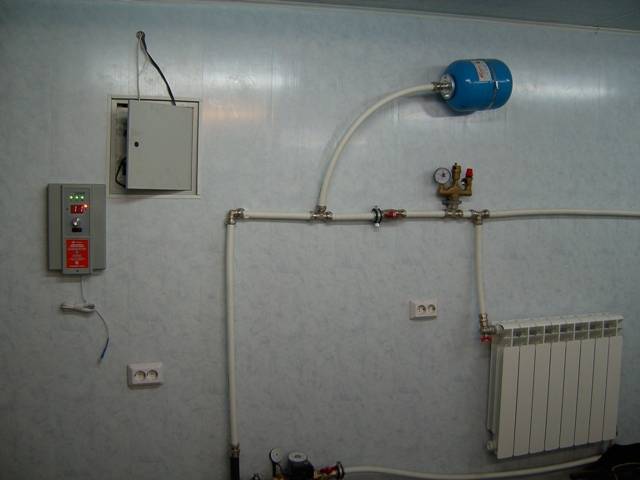
Water heating system
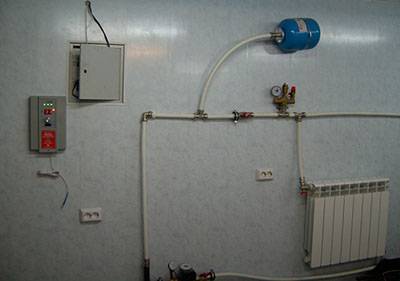
The principle of operation of any water circuit is based on the transfer of thermal energy from a boiler or furnace to heating radiators. The liquid is moved by a pump or by convection.
It consists of the following elements:
- heat exchanger for heating water;
- main pipes;
- circulation pumps;
- metal batteries or registers;
- expansion tank;
- pressure valve, drain cocks and filter.
Softened water or antifreeze based on ethylene glycol is used as a heat carrier.
How to do it quickly and cheaply?
It is not difficult to make a water heating system for a garage with your own hands. To do this, you will need to calculate the required battery power for the garage and the heat transfer of the heating element. For water heating installations use:
- electric heating elements;
- electric boiler or solid fuel boiler;
- potbelly stove with a heat exchanger in the furnace;
- waste oil furnace;
- economizer on the stove chimney.
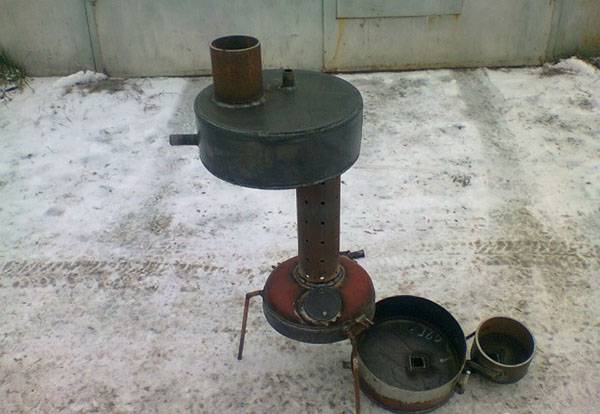
Photo 1. A waste oil stove is well suited for a garage water heating system.
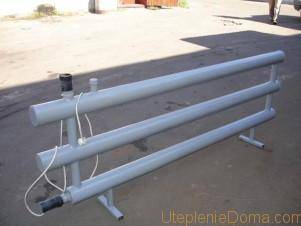
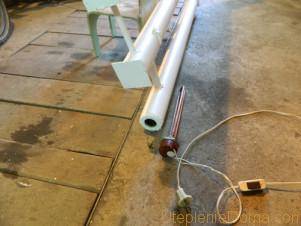
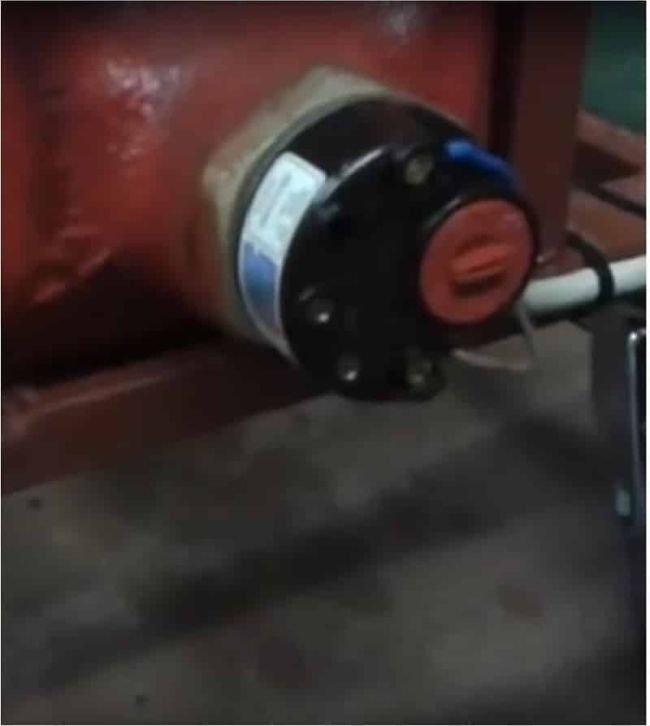
The simplest electric boiler for a garage is easy, cheap and quick to make from a pipe with a diameter of 100-150 mm, placed vertically. A heating element and two pipes for water are installed inside.
Having chosen a place for the boiler or furnace in the garage, they begin to lay pipes to the radiators. It is better to take pipes from polypropylene (metal-plastic) - they do not rust, they are easy to install and connect. Radiators in the garage are placed on the walls, leaving a small gap for air circulation. At the highest point, a valve is inserted to bleed air.
A single-circuit system will work without an additional pump, due to thermal convection. A more complex circuit will require a circulation pump. The expansion tank will prevent air from entering the system when the fluid level drops due to natural evaporation.
Attention! It is not recommended to use open systems with antifreeze in the garage due to harmful ethylene glycol fumes.
Advantages and disadvantages
Advantages of garage water heating:
- comfortable constant temperature;
- retains heat for a long time after turning off;
- lack of ash, dust and dirt;
- ease of use and the ability to automatically turn on;
- the use of antifreeze makes the system year-round.
Minuses:
- water freezes in winter and destroys pipes and radiators;
- the likelihood of a leak;
- complexity of installation and sealing of the circuit;
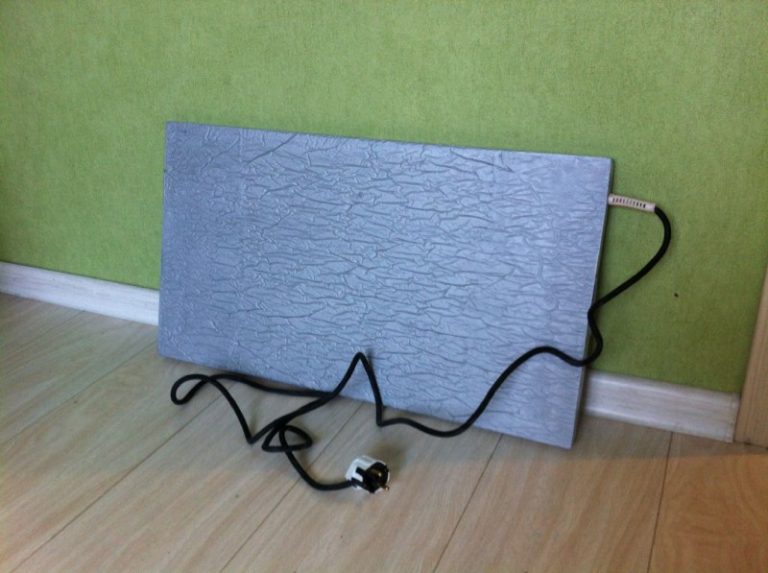
Film infrared heater
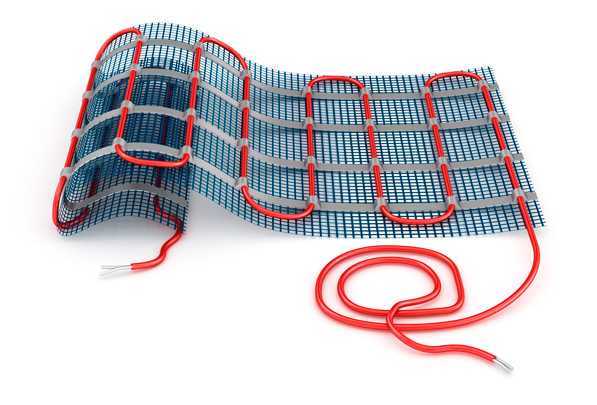
Film materials that emit IR waves can be bought, they are on sale.The choice is great, but manufacturers do not always care about the safety of their products
Pay attention to the composition of the infrared film and refuse to buy it if you see lead in the instructions. It is extremely hazardous to health!
Important: the "correct" IR film is always accompanied by a quality certificate. To make an IR heater, you will need the following materials and tools:
To make an IR heater, you will need the following materials and tools:
- 2 sheets of IR film 500 mm by 1250 mm;
- polystyrene (foamed, foil, self-adhesive);
- decorative corner;
- wire with a plug (two-core);
- thermostat;
- polymer glue;
- decorative material (ideally natural fabric);
- decorative corners 150 mm by 150 mm.
- It is necessary to strengthen the thermal insulation on the wall. The thickness of the foamed polystyrene must be at least 5 cm. After removing the protective film, the board must be pressed against the wall with a self-adhesive layer. In this case, the surface with the foil will be directed into the room.
- You can proceed to the next stage of work only after an hour - let the glue set properly.
- It is necessary to sequentially connect sheets of IR film to each other.
- Apply glue to the back of the film using a spatula or brush.
- Attach the IR film to the polystyrene and leave for 2 hours.
- Attach an electrical cord with a plug and a thermostat to the structure.
- Decorate the heater with a piece of natural fabric and decorative corners.


Basic requirements for a homemade heater
Any type of heating equipment for the home, regardless of design features and manufacturing complexity, must meet the basic requirements:
- Ease and availability of assembly.
- Safety and reliability in operation.
- Economy in energy consumption.
- High performance and working power.
- Affordable cost of structural elements and materials.
- Ergonomics and ease of transport.
- Durability and practicality.

Among the existing heaters, the most efficient and productive are: infrared, quartz and ceramic emitters, electric convector.
Conclusions and useful video on the topic
Gas heater from a tin can:
Homemade infrared gas heater:
Anyone can assemble a gas heater according to the considered schemes at home. It is only necessary to follow the safety precautions and not neglect the instructions for putting the devices into operation. If you assemble the heater yourself, you can save money. In addition, the efficiency and performance of such devices is not inferior to store-bought ones.
If you intend to heat a small room or tent, as well as take the device on trips and hikes, then it is better to make a heater from gas burner or gas stove. They are more compact, take up less space and are easy to transport. Gas heaters are suitable for heating larger rooms, they generate more heat and require an electrical connection for the fan to operate.