- Interesting design ideas
- Which is better to install a wardrobe on the balcony: plastic or wooden
- How to make a wardrobe from plywood
- Product decoration
- Beautiful handmade examples
- How to place?
- in a niche
- Part of the room
- Pantry
- In the room
- Progress
- Features of built-in wardrobes
- Pros and cons of using chipboard for making furniture
- Edge
- materials
- Making wardrobe
- Necessary materials and tools
- How to get started?
- Types of structures
- Closet
- Wooden beam construction
- Built-in furniture made of chipboard
- Plasterboard cabinet
- Instructions for making a cabinet
- Site preparation
- markup
- Making cabinet racks
- Installation of horizontal rails
- Shelf manufacturing
- Where to start building a closet
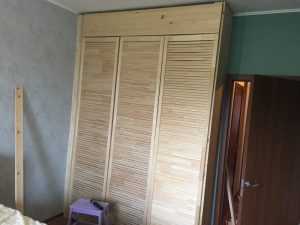
Interesting design ideas
Original ideas will help to decorate a “boring” design, allowing you to also complete the style in the interior. Thus, to achieve harmony indoors, you can use several outstanding techniques.
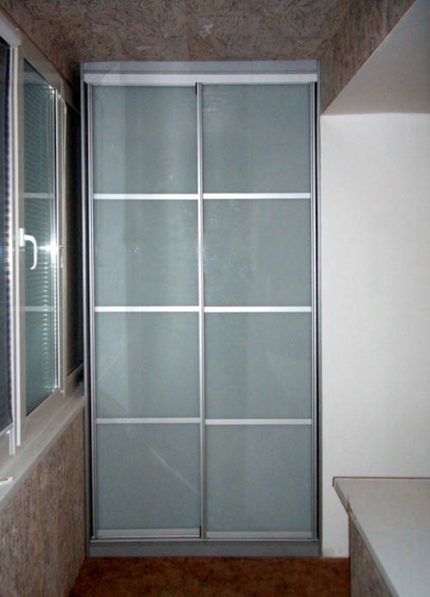 Frosted glass inserts. If the contents of the furniture are filled with small items, then it would be ideal to build doors with frosted glass. Such an element will give the room a certain airiness, diluting the monotony of the balcony cladding
Mirrors placed on furniture doors will help to achieve an illusory increase in space. In this case, a closet with sliding doors equipped with built-in full-height mirrors would be an ideal option.
Decorative shelves. It is not necessary to close such a design with doors, because a cardboard box can be placed inside each shelf. If you wish, you can decorate the shelves with indoor flowers, figurines and other decor items.
Which is better to install a wardrobe on the balcony: plastic or wooden
It is better to purchase material for the manufacture of the cabinet after the balcony is fully equipped, and the facades are selected depending on the overall design style. In this case, it will turn out to create a holistic space and a single interior. For example, if the balcony is lined with clapboard, it is also better to make the facades plastic.
A wooden cabinet always looks expensive and attractive, but keep in mind that all solid wood parts must undergo special treatment against pests and be covered with fire-fighting agents.
It should also be taken into account that wood is a whimsical material that does not like too dry or humid air. Nevertheless, a do-it-yourself wooden cabinet will be reliable and will last a long time.

A wooden cabinet not only looks expensive and attractive, but is also distinguished by its reliability.
A wardrobe on a plastic balcony will cost several times cheaper, because the material itself is not as expensive as wood. But if the tree can be used both to create a facade and for the manufacture of body parts, then plastic is recommended to be used only for cladding.If you make plastic shelves, they will not be able to withstand heavy loads. The main advantage of lining the cabinet with clapboard is the ability to choose any color and design of the facade, which will competently complement the interior of the balcony.
After completing the facades, you need to select the material for interior equipment and create a frame. Before you make shelves and a frame in the closet, you need to know what you plan to store in it: the heavier the contents, the stronger the material should be.
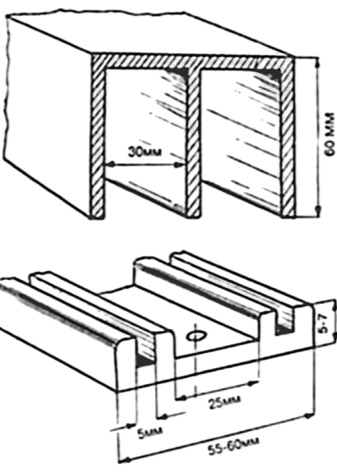
The optimal material for creating a frame is a wooden beam with a section of at least 40x40 mm. If there is no suitable timber option, it is allowed to use a metal profile instead, which is subsequently sheathed with panels or any other material that matches the interior of the room. In addition to plastic sheathing, you can also choose wooden lining, the main thing is that its thickness is at least 0.8 cm.

Materials and facades for the wardrobe on the balcony are selected depending on the style of the room.
Some owners, in order to reduce the cost of construction, make cabinets from chipboard with their own hands. You need to understand that chipboard with strong humidity or temperature changes can quickly lose its appearance, and the material is not durable. If you choose to make chipboard, you need to make sure that all corners are well laminated, because otherwise moisture will penetrate inside and the part may swell and change shape.
Sheets with a thickness of at least 10 mm will serve the longest. Entirely fulfill plywood cabinet do-it-yourself is not considered correct due to low strength, but using the material to create the back wall will be justified and the cheapest option.
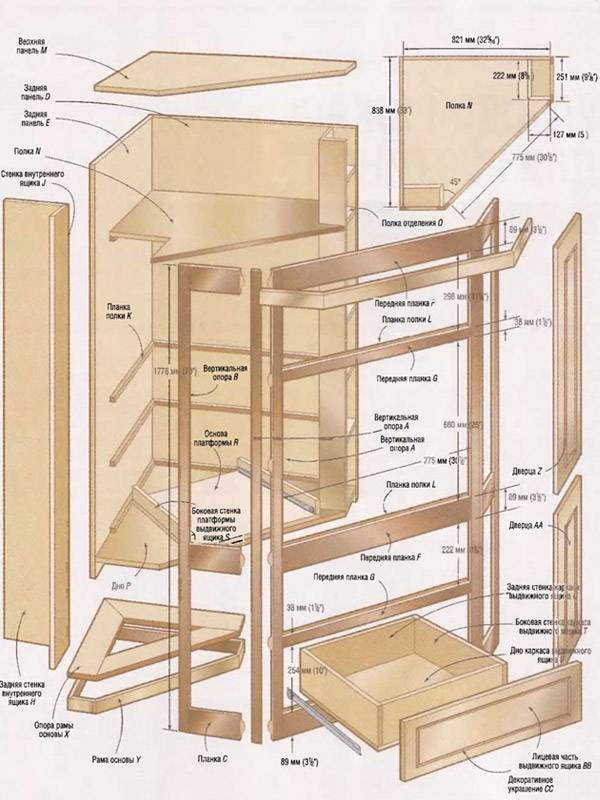
How to make a wardrobe from plywood
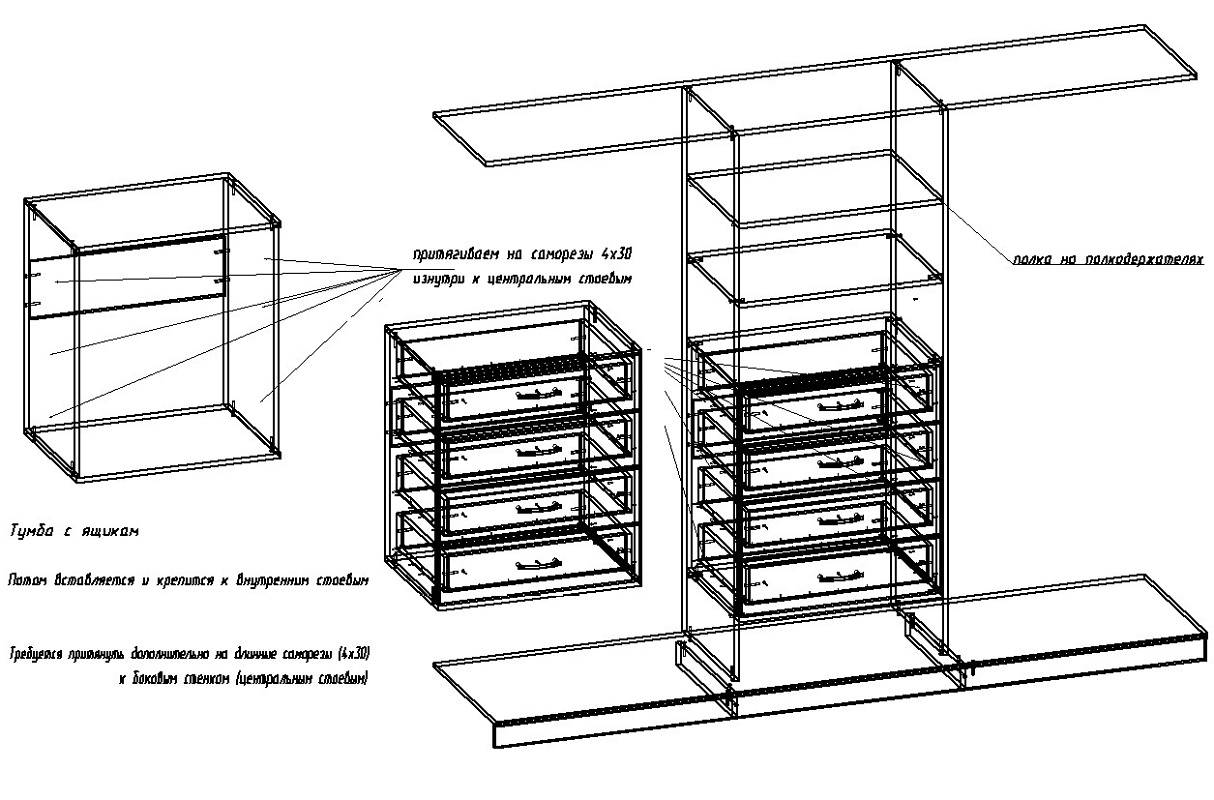
This type of product is made much easier, since coupes are different. In some of them, the expenditure of effort, time and materials will be spent on creating only the insides of shelves, bedside tables. This is also characteristic of a frameless type sliding wardrobe built from plywood with your own hands, it can also be made. To work on this type and others, you also cannot skip all the preparatory steps, including the creation of drawings.
It is easier to make a sliding wardrobe if it is a built-in option.
In addition, there are frame products that will be built into a niche in the future. The preparation is similar. High-quality and accurate preparation for the start of work is the key to success. The work is started from the bottom, these are cutouts for the plinth. Racks on the sides must be fixed to the wall with dowels or metal corners. Small nails cover the front edges of the vertical supports.
Sliding wardrobes have their own production technology.
At the end of work with vertical parts, a wooden shield is superimposed on top. It, as a rule, protrudes slightly beyond the dimensions of the racks. The door system is attached from above, and from below it will be installed after the doors are aligned in parallel.
Product decoration
Decor in this case is possible on the facade, that is, on the doors. Plywood can be made with a photo print, this decor is applicable to all types of canvases. It could be film. And also, mirror inserts, or painting. This is all done in the period before installation in the right place.
You can decorate the door with mirror or other inserts.
Often in the case of plywood furniture, the appearance can be spoiled by multilayer ends.In order to repair them and save the appearance of the product, use the following materials:
- Adhesive tape in wood color.
- U-shaped profiles made of aluminum or plastic.
- Paint.
You can mask the ends in different ways.
Beautiful handmade examples
Until recently, plywood was not used to create many things. But, its simplicity and elegance, combined with practicality, won the hearts and hands of the masters. Today there are a lot of beautiful plywood cabinets. They are lightweight, which does not burden the design of the room.


Plywood furniture gives lightness to the room.
In each of the selected designs, you can see plywood furniture, and it will be appropriate. The lightness of the material contributes to the creation of various forms. Therefore, it is easy to work with her.
Plywood is an easy-to-work material, so you can create any furniture from it.
Based on the above text, the conclusion suggests itself that even a beginner can do his own work on a plywood cabinet. All work is done step by step. Starting with the preparatory work and ending with the final touches and design. Some of the elements will not be superfluous to order from the masters, we include doors for wardrobes to such an order.
How to place?
The closet is the most bulky element of the interior in the room. There are such options for their location, which will allow you to "hide" and not clutter up the space.
in a niche
If the apartment has natural niches, then this will greatly facilitate the task. The cabinet is simply built into them.Niches can be created artificially, which will allow not only to install storage structures in them, but also other interior elements: a fireplace, a TV.
Part of the room
If the area allows, then you can fence off a piece of the room and organize a wardrobe in it. At the same time, it is better to choose the darkest corner of the room so that the room remains bright.
Pantry
In private houses, there are always different pantries. Sometimes they are found in city apartments. If the owner wishes, the wardrobe can be perfectly hidden in the pantry. At the same time, the efforts for its design are minimal, since the functions of the body are performed by the walls of the room. It is enough to organize the internal content.
In the room
The standard options for installing cabinets in a room are as follows:
Wall to wall, floor to ceiling. Creates the effect of a solid wall. The design of facades with mirror surfaces will visually expand the space. When choosing doors of wall color, you can achieve the effect of "disappearing".
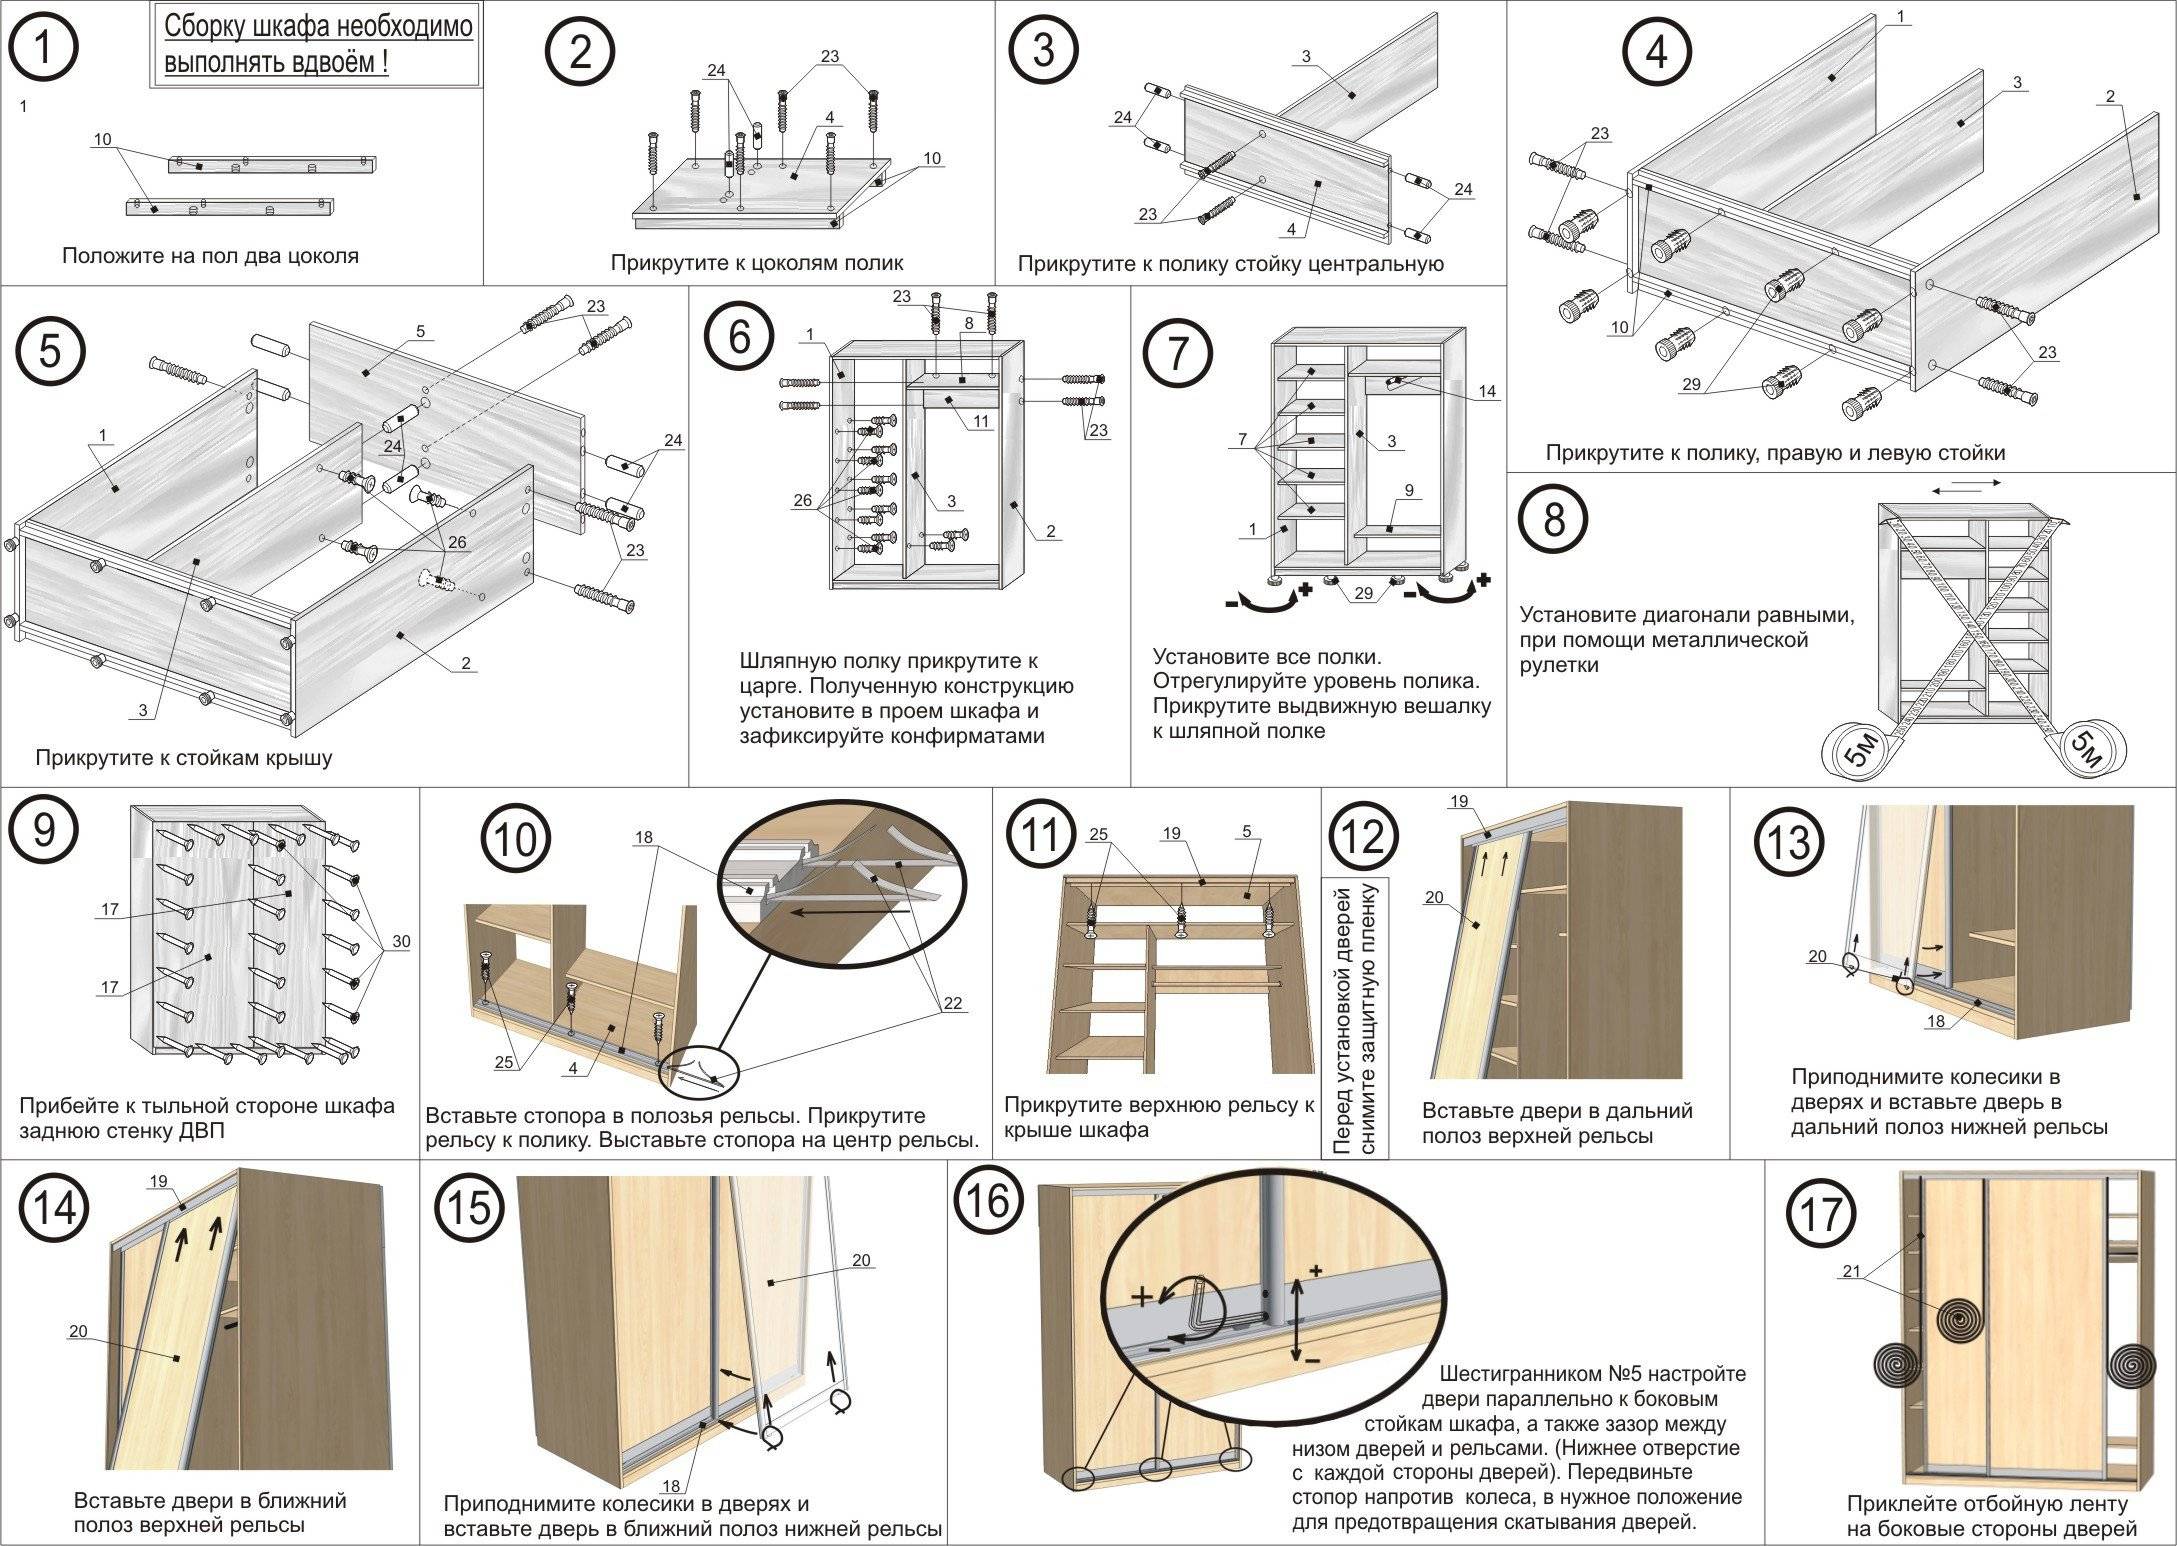
Progress
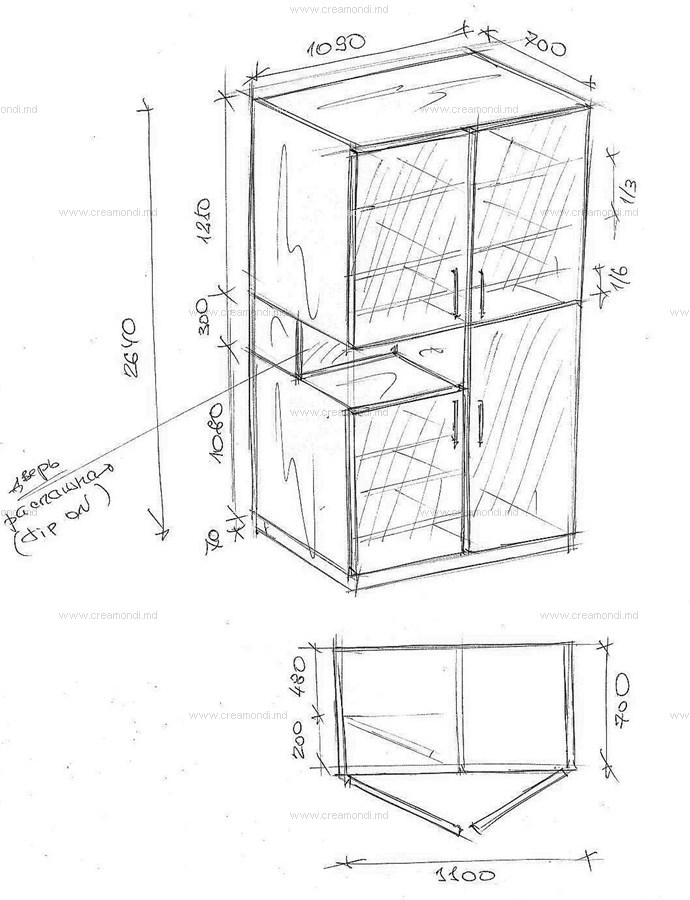
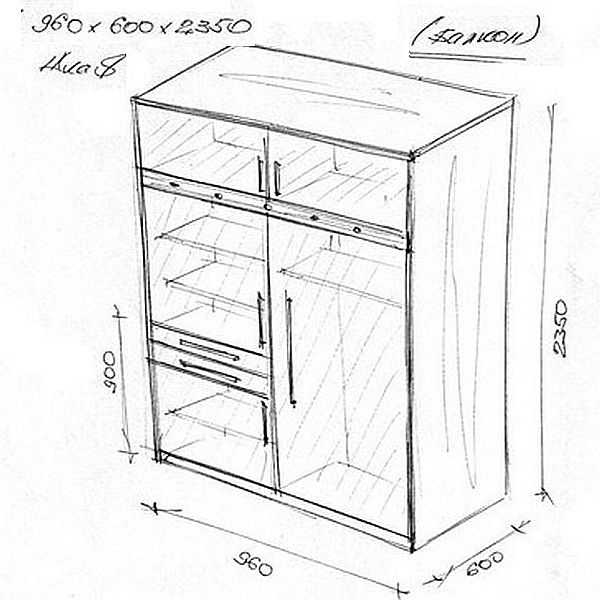
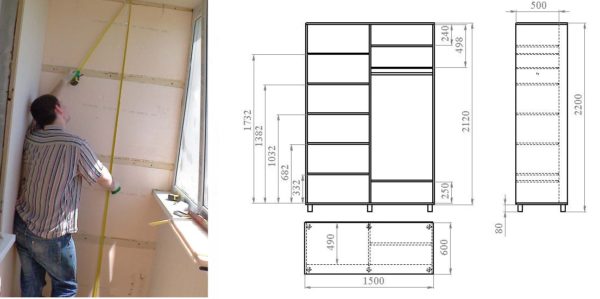
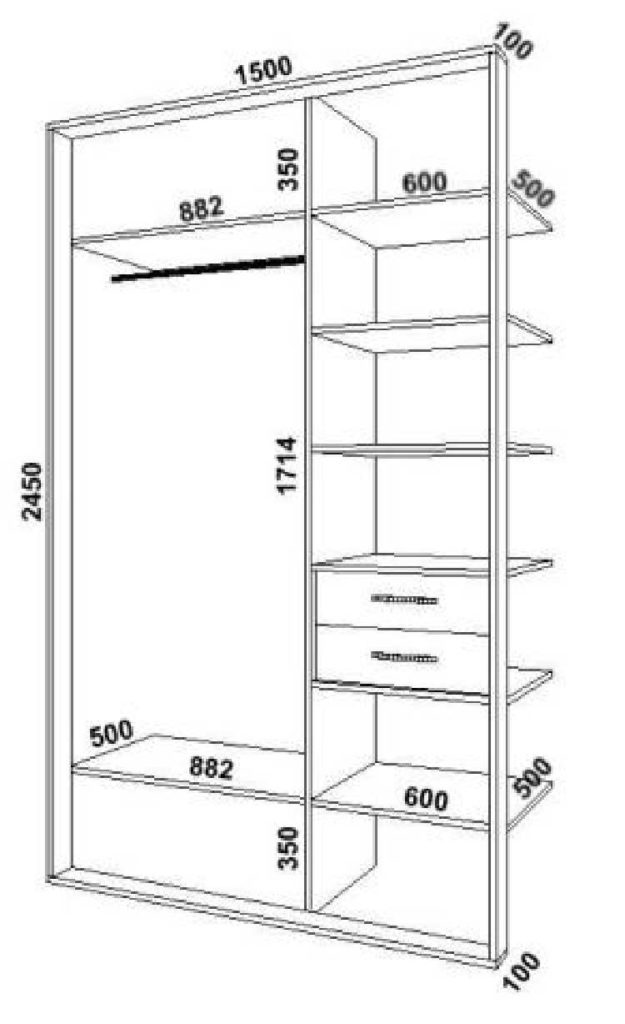
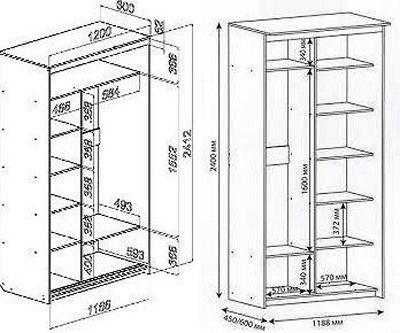
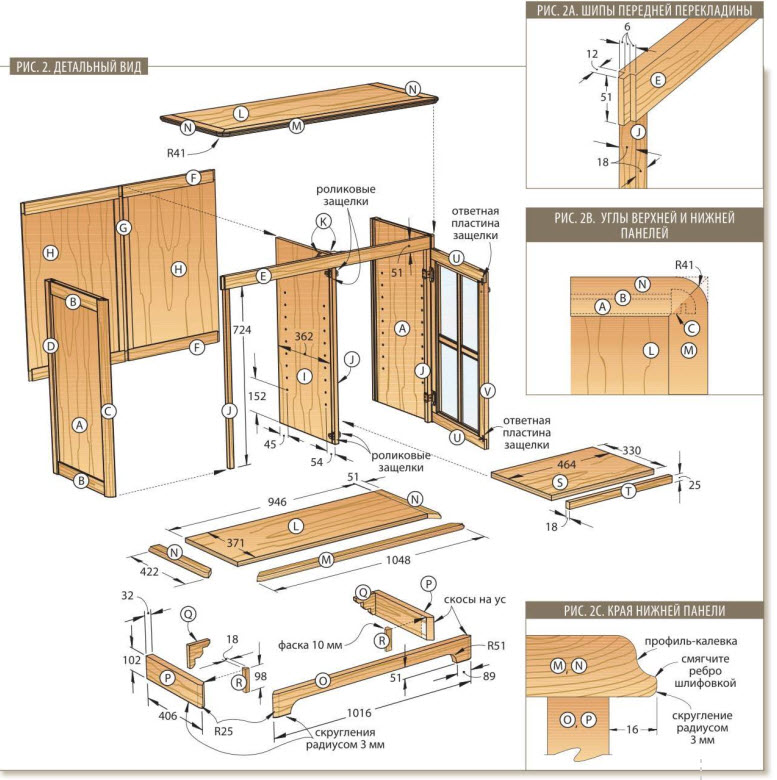
First of all, measurements are taken and a drawing of the future cabinet is built. The final result depends on a correctly drawn up drawing, so approach it with all seriousness.

Making cabinet doors with your own hands is not difficult, the main thing is to correctly calculate the dimensions. If its vertical height is less than the height of the opening, the door will not completely close it, and if more, it will not fit. Finding the horizontal dimension, we must not forget about the fasteners: they will add a few millimeters to it. The width of the doors should be ~3 mm less than the opening.

Now you need to mark the placement of the mounting bolts on the sawn parts and drill all the holes.

The assembly begins with the installation of the bottom and attaching the walls to it. Make sure that the assembled cabinet fits into the allotted space and that other furniture will not interfere with the opening of the doors. If you are making a wardrobe, guides are installed at this stage.

The location of drawers and shelves is outlined, shelf holders and guides are installed. They must be strictly parallel so that they do not skew.

It is time to install the upper shelves and roof. A gap of ~ 7 cm is left between the ceiling and the roof for the installation of confirmations. Fasteners are made by hand, finally tightened with a ratchet.


The side shelves are attached to 4 confirmations (two on each side), in some cases dowels (small wooden cylinders) are used. One end of the dowel is inserted into the wall of the cabinet, a shelf is put on the other.

The last step is to install the doors. Before installation, attach the handles with an outward bend. For sliding doors, the correct installation of the mechanism is especially important. Don't rush, be careful.

It's time for the finishing touches. Treat the cuts with a decorative film, decorate the facade. Put mirrors, interior lighting and other elements.

Features of built-in wardrobes
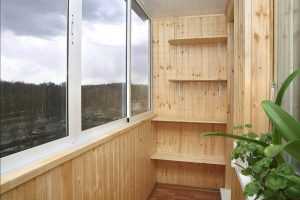
Such models are considered the preferred option for limited balcony space.
Advantages of built-in wardrobes:
- Furniture completely occupies the space allocated to it from ceiling to floor. This allows you to store more of the items you need.
- Side and rear panels are not installed if they are located near the walls of the balcony. The exception is the places overlooking the glazed part.
- The cabinet is made according to the size of the balcony, so the situation with unsuitable sizes is completely excluded.
Of the shortcomings, the impossibility of rearranging furniture is noted. To transfer the built-in wardrobe from the balcony, you need to completely disassemble the structure.
Pros and cons of using chipboard for making furniture
The advantages of laminated chipboard include the following:
- Low cost.
- Easy processing.
- The ability to cut a part of any shape.
- The presence of a safe edge on the ends.
- The ability to create furniture with rounded corners, which is especially true for children's furniture.
- Excellent operational properties: mechanical, thermal, chemical resistance, moisture resistance.
- Preservation of operational properties throughout the life of the furniture.
- Wide range of colors.
- Easy care, the possibility of daily wet processing.
The laminating layer protects the plates from the negative effects of moisture, which makes it possible to make furniture from them for rooms with high humidity.
Kitchen set made of laminated chipboard
The disadvantages of laminated chipboard include the fact that they contain formaldehyde, however, the laminating layer and the sealed edge on the ends of the furniture completely neutralize the ingress of harmful substances into the environment. The edge also protects the boards from moisture, which can cause them to swell.
Edge
As noted earlier, any chipboard part must have an edge that will protect the material from moisture and the environment from the harmful effects of formaldehyde. Having a product drawing in hand, you can order sawing and edging in a specialized company with special equipment. In the future, you can assemble the finished product yourself.
Melamine edge
Table 1. Varieties of edges
| Edge type | Description |
|---|---|
| Melamine | Budget option is not very good quality.Using an iron, you can glue it yourself. |
| PVC | Such an edge is fixed with the help of special equipment in the process of cutting individual parts. It is made with a thickness of 0.4 mm and 2. A thin edge is made on invisible ends, and a thicker one on the outside, where more serious impacts are possible. |
| T-shaped mortise | A rare type of edge in use, which has a T-shaped section and is fixed in a groove on the cut. |
| U-shaped consignment note | A significant disadvantage is that the edges protruding by several millimeters are vulnerable to contamination. The advantage is the ability to hide a poorly executed cut. |
materials
The most common materials for the manufacture of cabinet bodies are as follows:
- Drywall. If a complex configuration is expected, then it is better to choose this option. Any shape can be bent from the GKL, since it is not afraid of deformation.
- MDF. From furniture panels that do not require cladding, rigid frames are made that do not require bending. The plate is characterized by a high density, unlike chipboard, which makes it more durable. The fittings sit better inside, the probability of chips when cutting the plates is low. A conditional disadvantage is a large mass. At a cost, the material is affordable, but more expensive than chipboard.
- Chipboard or chipboard. For cutting sheets, it is better to use the services of a workshop. At home, the quality of saw cuts can be disappointing due to the lack of necessary woodworking tools. From chipboard, you can perform various complex elements if you have the skills and the necessary machines. Chipboard is distinguished by a laminated layer that protects the sheet from external influences, and the user from formaldehyde.In addition, the laminate is good for decorative purposes, as it imitates various coatings.
- Plywood. The material has a low cost. The service life of plywood products depends on the thickness of the sheet, the quality of gluing, and the climate in the room. In any case, it is unsuitable for large structures of large mass, since it will bend under its own weight.
- Whole boards. When choosing, it is better to use wood that is easy to process. Cabinets made of wood species such as maple, ash, acacia, mountain ash, walnut, oak will outlive their creators many times over. It should be borne in mind that the cost of the project in this case increases significantly.
- Old boards. Recently, vintage style is gaining popularity. It allows you to give a second life to old things.
Materials for the execution of facades are of no small importance:
The tape is convenient in every sense. For the facade, you can use the same materials as for the body, glued with a decorative coating. A wide range of films makes it possible to create vivid images, decorate a wardrobe in the style of an existing interior. In addition, it is easy to care for.


Making wardrobe
The sliding door system saves space and makes efficient use of niches and recesses. In preparation for the creation of a cabinet, the same operations are performed as in the manufacture of other pieces of furniture: they carry out measuring work, draw a diagram, determine the exact number and size of parts. The manufacture of the frame, its sheathing and the installation of shelves are also done in a similar way.

There are three options for installing door panels:
- top guide. The solution is highly durable.In this case, the profile is located at the top;
- bottom guide. Easy to implement system. When choosing rollers, take into account that they will take on the maximum load;
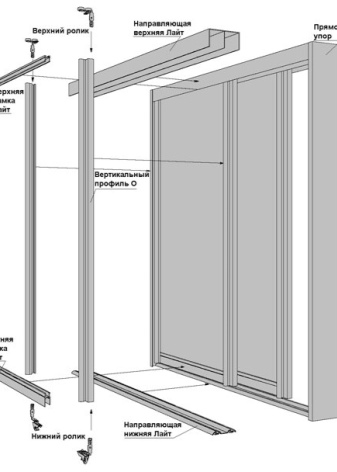
Door leafs are attached to the selected system, after which finishing work is carried out. When raw materials have been used, they are sanded, laminated or covered with decorative paper.
A more detailed process of manufacturing a wardrobe on the balcony can be viewed in the following video:
Necessary materials and tools
For the manufacture of furniture with your own hands, different materials can be used:
- Natural tree. This is a traditional option for a classic interior. Do-it-yourself wooden cabinets have a lot of advantages. They are outwardly attractive, created from environmentally friendly material, can withstand significant loads. The complexity of this option lies in the need to cover the cabinet with varnish or paint, which is not easy to do in an apartment.
- Chipboard. The most common material. Differs in low cost and durability, allows to receive different types of a design. Almost all furniture fittings are made for it, so a do-it-yourself cabinet made of chipboard is the simplest and most attractive option.
- Plywood. Requires high-quality material with upper layers of birch, beech or valuable species (walnut, oak, ash). It turns out very strong, strong furniture. Do-it-yourself plywood cabinets are made using the same technology as the assembly of furniture from chipboard. Only the decoration creates a problem - it is difficult to paint or varnish in an apartment. In addition, getting high-quality plywood from good veneer is quite problematic.
- MDF. This is a modern modification of fiberboard.It is believed that MDF is able to easily absorb and release moisture without losing its performance. In practice, this is very far from the truth. The main advantage of the material can be considered resistance to stress, it crumbles less and shows high mechanical qualities.
The most popular option is chipboard. In addition, you can purchase laminated chipboard (LDSP), which does not require finishing. The master himself will only need to cut the material, paste over the ends with an edge and connect them in the right order. Such ease of assembly, combined with factory quality, has made chipboard furniture very popular.
 natural wood
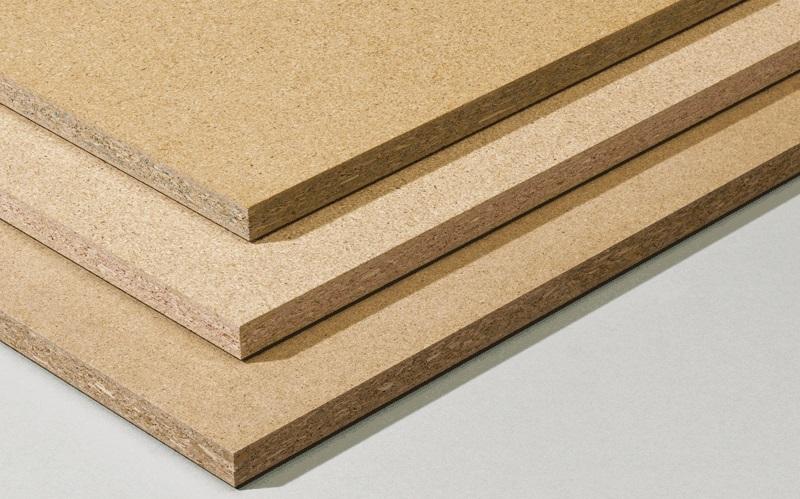 Chipboard
 chipboard
 Plywood
 MDF
MDF
You will need the following tools:
- circular saw or jigsaw;
- electric drill with a set of drills;
- ruler, square, tape measure;
- pencil;
- screwdriver with a set of bits, a screwdriver;
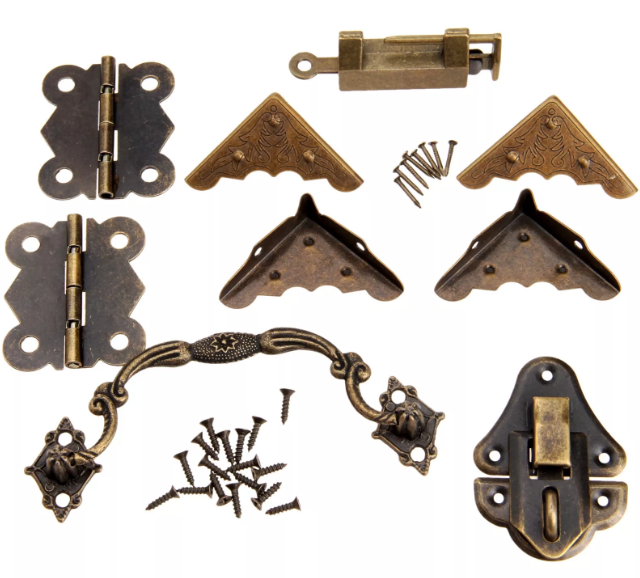
- accessories set: couplers, hinges, handles, supports, hooks and rods.
Many use ready-made sheathing as a raw material for a wooden product. For example, in this way you can make a cabinet out of lining with your own hands. The material is pre-processed and allows you to get the original filling of the planes. The disadvantage is large volumes of sanding and finishing, creating a lot of dust and a strong smell of paints and varnishes. Other options that will suit the taste of the master can be used. It should be noted that the manufacture of furniture from improvised materials will require a lot of effort during processing.
 Circular Saw
 Electric jigsaw
 Electric drill with a set of drills
 Measuring tools
 screwdriver
 furniture fittings
How to get started?
The initial stage of self-manufacturing of the cabinet is design.
It needs to be taken seriously, for this you need:
- Determine the location of the future location of the structure. This depends on the size and quantity of materials needed.
- You should decide what shape the cabinet is planned to be built: straight, corner, built-in, and so on.
- Sketch out sketches of the exterior and interior content. Determine in advance how many sections, boxes, shelves will be. Fix the desired number of doors, sliding and hinged elements. Determine the order of the location of hooks, hangers, holders. Even the need to install a decorative facade should be decided at this stage.
- Choose a material, determine the color of the product, comparing all the parameters with the style of the interior. If necessary, decide what texture the façade should have. Identify a company that produces furniture fittings, based on expert reviews.
After that, various measurements are performed and calculations are made. It must be understood that calculating the dimensions does not mean measuring the width and length of the cabinet. At the same time, it is necessary to measure the distance between the shelves, the width of the sections. All dimensions are transferred to the drawing for clarity.
The scheme should be clear and take into account all the desired parameters. If it is difficult to perform such a drawing yourself, then you will have to turn to specialists.
Types of structures
There are several suitable solutions. They differ in materials, manufacturing complexity, price category.
Closet
Finished models are not always suitable for installation on a balcony. Due to the monolithic massive construction and standard dimensions, the installation of the cabinet can be too complicated, if not impossible at all.
- too much depth of the finished product,
- the impossibility of manual adjustment "in place",
- inappropriate height or width - there are gaps and empty space around the furniture that could be used to good use,
- the complexity of the installation of the structure - it is unrealistic to deploy large cabinets on a narrow balcony or loggia.
low cost of standard products - the price is much more pleasant than when making to order.
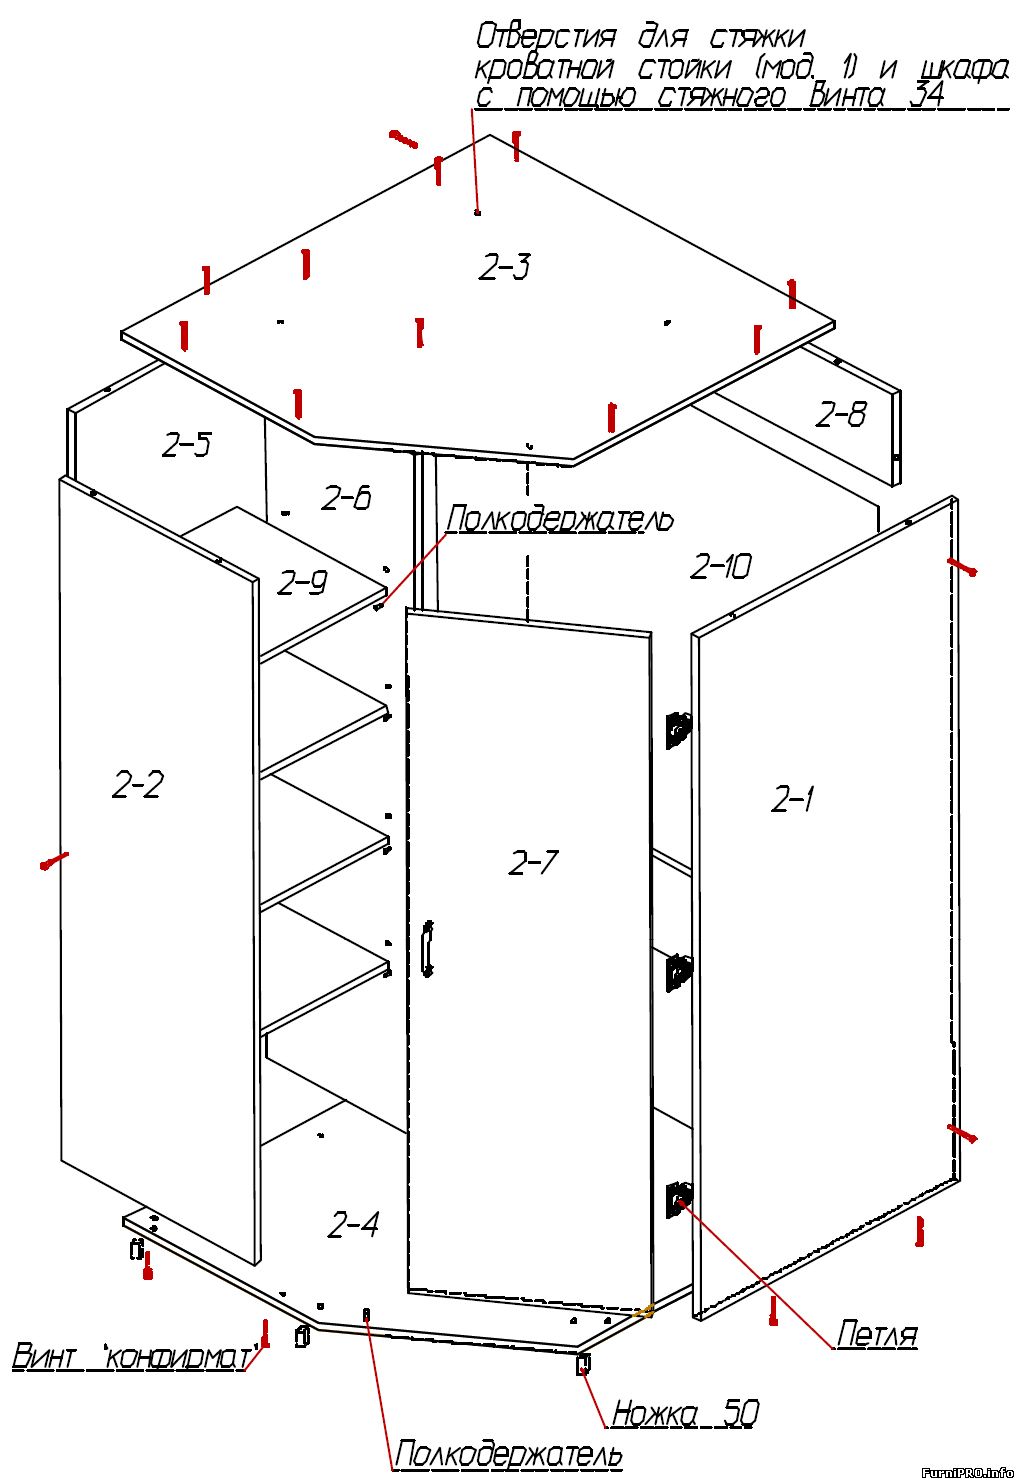
Provided that the wardrobe is assembled from two independent parts, this is an excellent option for arranging a balcony. This design is established in three stages:
The first element of the cabinet is brought onto the balcony and unfolded.
Then the second part is installed - it is brought into a narrow room and simply moved to the already installed module.
Both parts are fixed to each other with furniture ties, sliding doors are inserted that completely cover the middle side of the two parts. The result is a full-fledged one-piece wardrobe.


Spectacular mirror doors look spectacular on the balcony, visually expanding the space, and glass facades with glossy doors.
Wooden beam construction
This option is the most common among those who love and know how to make furniture with their own hands. An inexpensive wooden beam serves as a reliable support for the case of a balcony cabinet. Advantages:
- budget cost,
- the possibility of cutting furniture elements directly at the installation site,
- making the most of the space,
- reliable durable construction.
The locker made of timber has only one drawback - it is not quite an attractive look. You can compensate for the minus with beautiful facades made of more presentable materials: solid wood, laminated chipboard, glass.
From a wooden beam
Built-in furniture made of chipboard
Any built-in wardrobe clearly fits into the opening, successfully bypassing all the ledges and niches. The only condition for trouble-free installation is scrupulous measurements. Pros:
- aesthetic appeal;
- variability in the design of sliding and hinged facades, with the possibility
- the use of almost all existing furniture and building materials: chipboard, glass, mirror, MDF, solid wood, plastic, lining, roller shutters;
- the possibility of manufacturing furniture independently or under the order;
- average price category.
A significant drawback of laminated chipboard is poor resistance to moisture and temperature changes. Install such furniture exclusively on glazed loggias, balconies. Also, chipboard “feels” great on heated loggias.
Built-in wardrobes made of laminated chipboard and a locker with hinged facades
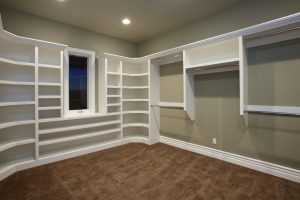
Plasterboard cabinet
The arrangement of a balcony or a niche on the loggia can be planned even at the repair stage. In this case, a win-win option is plasterboard shelves covered with doors.
Advantages:
- full merging with the interior;
- the possibility of manufacturing any shape: broken lines, semicircular shelves, triangular cabinets;
- installation with your own hands or with the help of specialists - at the choice of the owner,
- affordable price;
- use of every free corner of space.
- installation requires some professional training;
- after the installation of drywall, a fine lining of all structural elements is necessary;
- the use of special fittings for fixing external doors.
Instructions for making a cabinet
It is probably more correct to deal with some of the nuances, since the list of technological operations and their alternation largely depend on the chosen option for balcony furniture.
Site preparation
In the area where it is planned to place the cabinet, if the balcony has not yet been finished from the inside, it is necessary to clean all surfaces (wall, stove) with high quality and inspect
Pay special attention to mold and mildew. If there are any signs of them, you should start processing this segment.
Otherwise, they will safely move to wood with all the consequences. Significant defects (cracks, crevices, chips) are eliminated immediately, using a mortar or putty composition.
markup
Having a hand-drawn drawing, or at least a sketch of a cabinet, this is easy to do. First of all, the places for attaching the racks are outlined. Everything else depends on how well the frame is located and assembled on the balcony.
It is advisable to immediately decide on the "pedestal". Installing a cabinet on a bare stove is undesirable. The reason is the same - dampness. A good option is to lay a piece of p / e film (or linoleum remaining after repair), and on top - a fragment of the OSV plate. It practically does not absorb moisture, and the strength is sufficient to withstand the weight of the cabinet along with the contents.
We should not forget about the ceiling. If a cabinet scheme is chosen for the entire height of the balcony, then it is desirable to fix the upper ends of the racks on the stove. On it, the crossbars of the frame are also “fastened”. In this case, the markup is from top to bottom. That is, first fixation points are determined on the slab above the balcony, and then they are projected onto its floor with the help of a plumb line.
What to consider:
- After the markup is completed, it is advisable to check all the same type lines on different surfaces for matches in size. Some deviations in the line drawing are inevitable, and therefore everything should be corrected. Otherwise, the correct cabinet geometry cannot be achieved.
- If the rear wall as such is not provided (it will come out cheaper), then it is desirable to correlate the location of the frame rails with the shelves. Here on them the last and fasten. This is more convenient than later specifically stuffing additional bars.
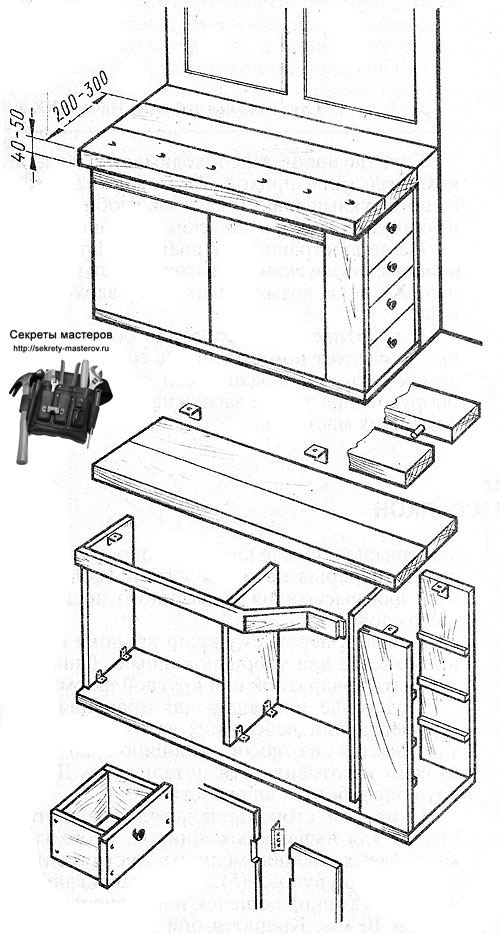
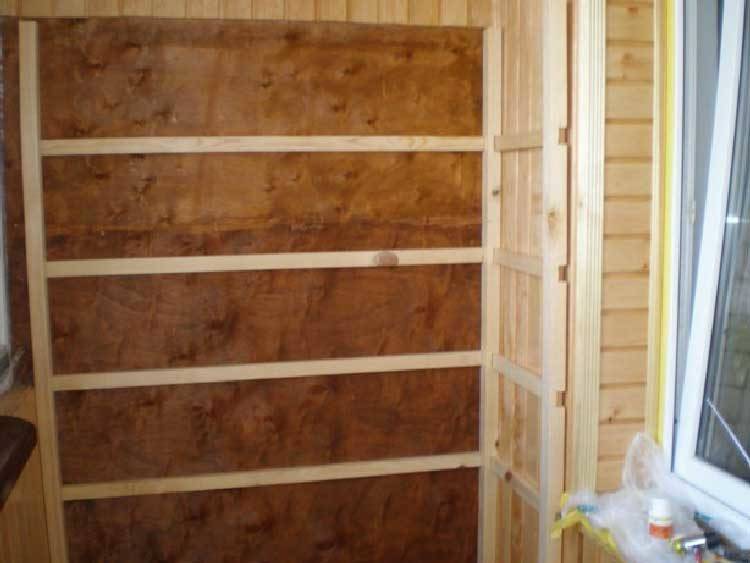
Making cabinet racks
Here it is short - at first only one is needed. After checking it in place, it can serve as a model by which the rest are made. The argument is simple - it's better to ruin one if something is wrong than to redo everything later and waste lumber. After they are fully fitted, processed, they can be fixed in place.

Installation of horizontal rails
All the same. But how best to make connections, it's worth figuring out. In this case, the traditional "furniture" technology (thorn groove or notch) is hardly suitable. It is enough to fix the jumpers on the wall, and additionally fasten them with metal elements to the racks. The same corner. It is much easier to do it yourself.


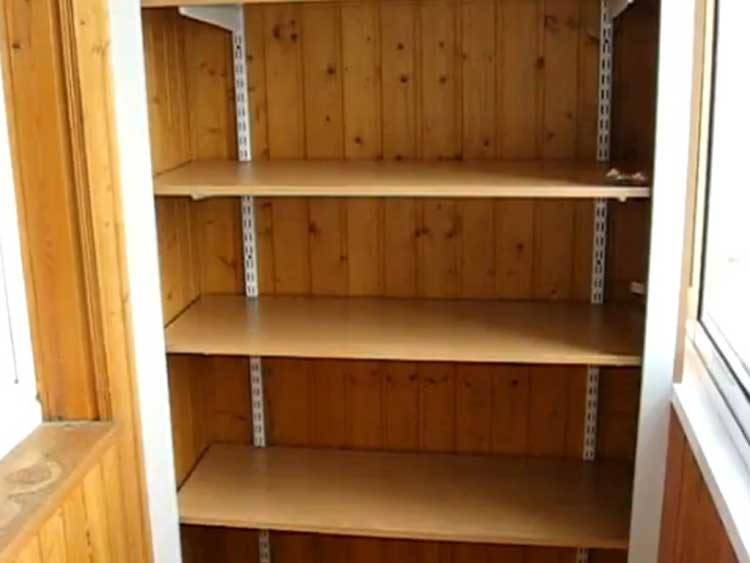
Shelf manufacturing
From the point of view of expediency, it is desirable to make them removable. In this case, the wardrobe on the balcony will be universal, since, if necessary, the dimensions of the compartments inside it can be easily changed. It is enough to either simply remove one of the shelves, or reinstall it. But for this, additional guides (supports) should immediately be provided.
Ways of fastening door leaves, external design of the cabinet - all this is determined independently. By the way, the order of its assembly on the balcony is the same. Having a drawing in hand, installation is not difficult. The main recommendations are outlined, examples of cabinets are given. Everything else is up to you, reader. Watch, think, evaluate and decide.
Good luck in arranging the balcony, home masters!
Where to start building a closet
A lot has been written about how to make a closet.
But the preparatory work is often not given attention.
And the process of preparing for the construction of the structure includes:
- Measurement of room parameters for cabinet drawing.
- Creation of a drawing taking into account the dimensions and wishes in appearance.
- An optional moment, but still: creating a cardboard layout (it helps a lot).
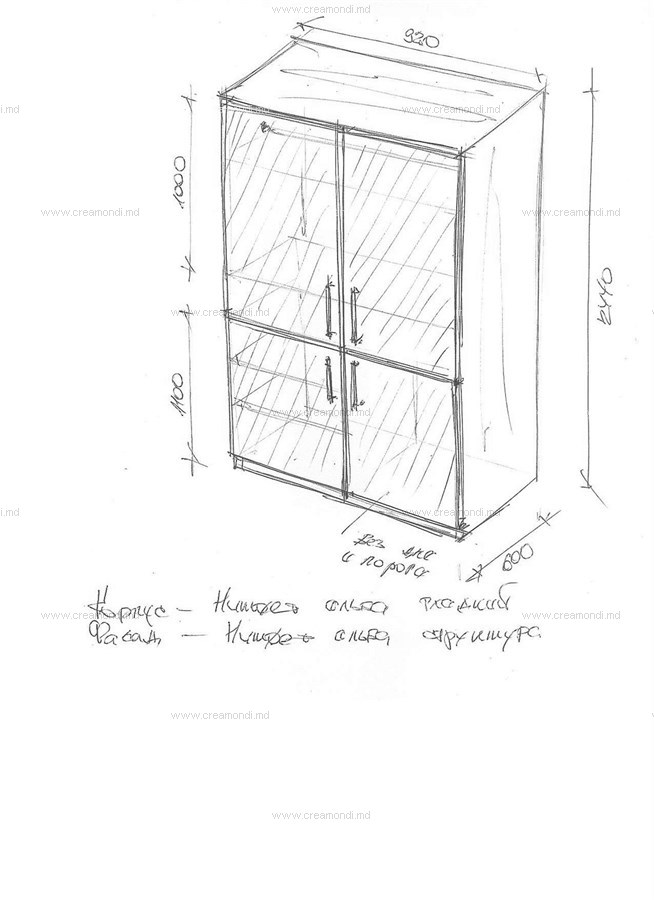
- The drawing should show how many shelves are in the cabinet, what are the height and width of the shelves, etc.
- Definition of materials.
As for the material - laminated chipboard leads the list of the most used. If you order this material, you can include in the order the cut of the laminate according to the drawing. That is, you submit your drawing, dimensions to the company, and they will cut the laminate themselves. For many, this is a good option if there are no conditions for self-cutting.
Related article: Air vents (vents) for ventilation of the foundation - are they needed or not?
For building a closet do-it-yourself balcony need drawings


