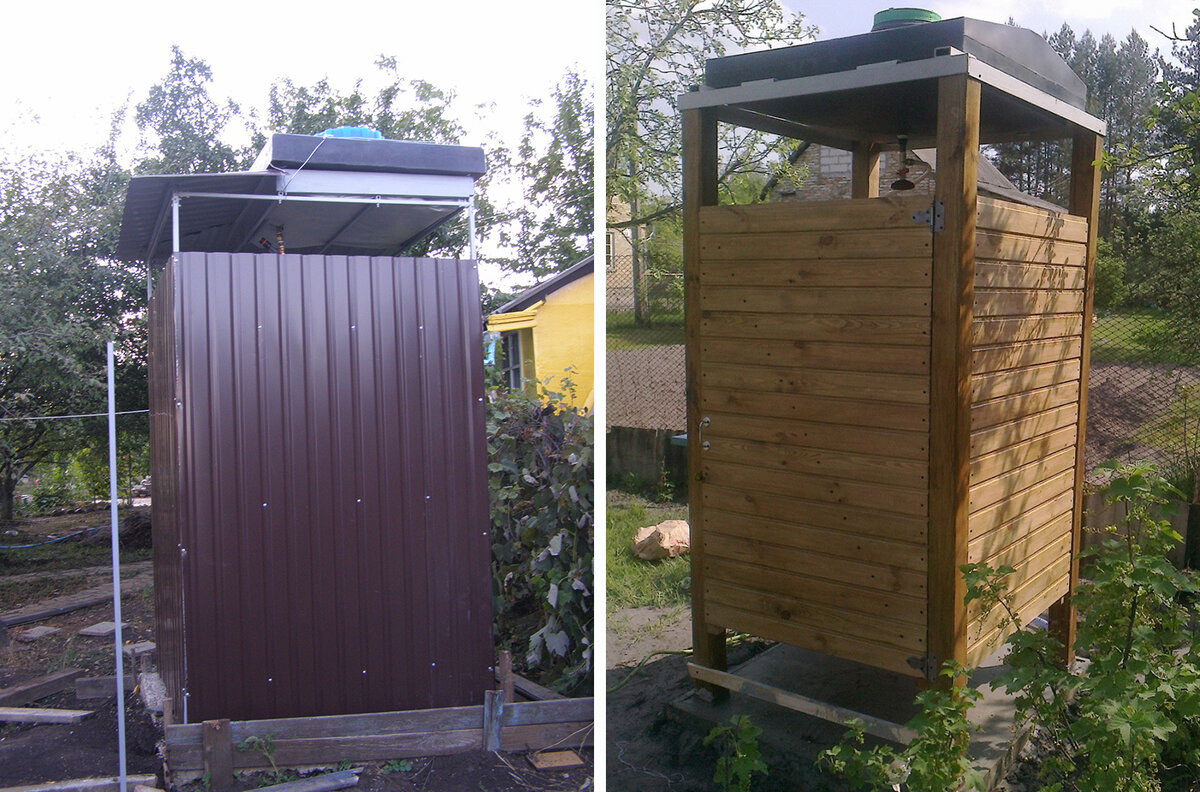
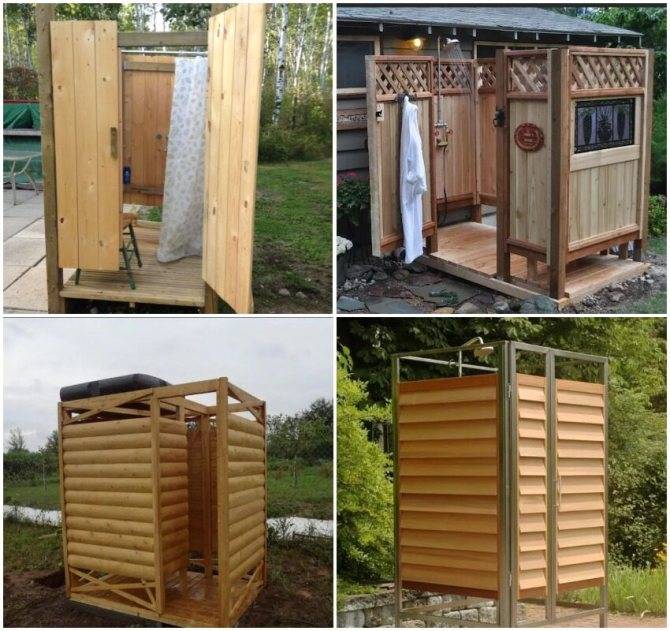
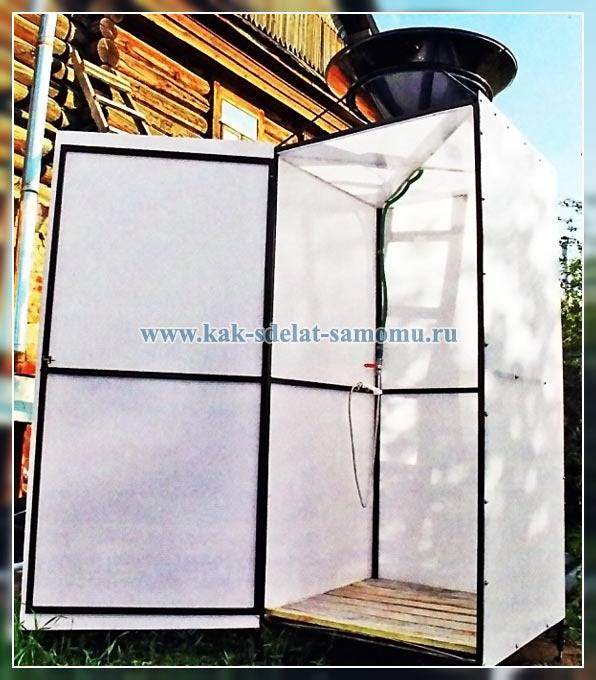
- 6. Polycarbonate shower enclosure
- Choosing a place on the site and arranging a base for an outdoor shower
- wooden frame
- Design, drawings and dimensions of a summer shower from a profile pipe
- Foundation for outdoor shower
- How to organize a system that fills the tank with water automatically
- Shower for the lazy in 15 minutes
- Pros and cons of a summer shower
- Tray base and drain
- Waterproofing
- Water connection
- Sewer connection
- Shower decoration
- 4. The simplest ways to organize a summer shower
- Summer shower insulation
- Location selection
- Tank
- We build a summer shower in the country with our own hands
- Choosing a place to install a summer shower
- Choosing a water storage tank
- Preparatory work
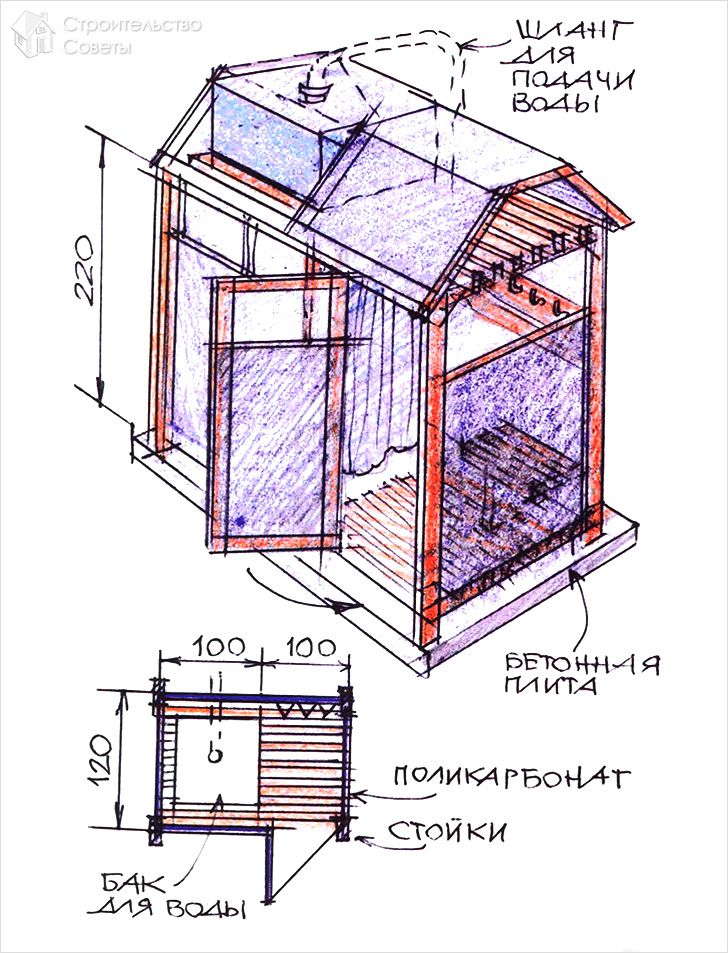
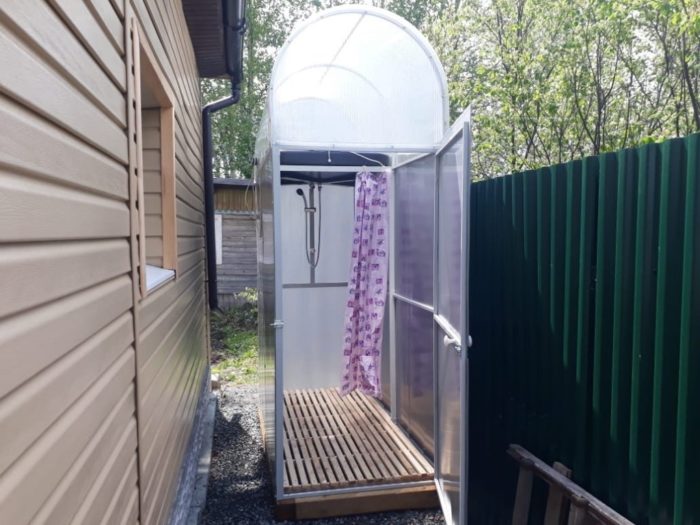
6. Polycarbonate shower enclosure
Polycarbonate is commonly used to create greenhouses. Therefore, for many, this material is associated with the greenhouse effect, and, consequently, with inconvenience. This opinion is erroneous. To create showers, there is a special, opaque type of polycarbonate. The most durable will be the building, which is made of metal profiles. Working with them is no more difficult than with wooden beams. A profile pipe with a cross section of 40 × 20 mm and a wall thickness of 2 mm is suitable for the construction of a frame. You will also need a steel corner 50 × 50 mm.The number of profiles is determined depending on the area of the future shower. The only thing to consider when cutting is that the racks should be 10-15 cm larger than the estimated shower height. This is necessary so that you can concrete them and not lose in height. The work plan will look like this:
- The assembly of the frame must be carried out on a flat surface. Two side drains and two overlapping crossbeams are laid on the ground. The level checks their straightness. By welding, the parts are connected to each other. The second wall is assembled in the same way.
- Finished structures after welding must be installed vertically at the required distance from each other and connected to each other by two transverse profiles. Keep a 90 degree angle between the walls. It is necessary to fasten the transverse strips only on one side, on the other the door will be welded.
- After the frame is assembled, a hole of the required size is dug. The top layer of soil with a depth of 10-15 cm is removed, the concrete screed is leveled and poured. As soon as the screed is poured and leveled, it is necessary to install the assembled frame on top so that the posts, which were originally longer, are immersed in concrete. The level checks the verticality of the installed structure and adjusts if necessary. If the length of the legs exceeded the height of the concrete screed, it is necessary to hammer them into the ground until they are completely immersed.
- To collect water, a special steel pallet can be installed or drain ditches can be provided during concreting.
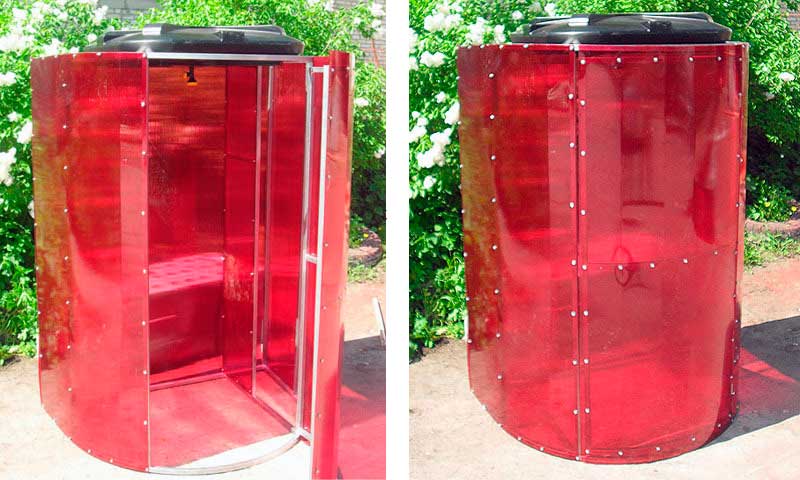
- For this design, it is better to use flat-shaped plastic water tanks. They are easy to install and, moreover, they will eliminate the need for arranging the roof.
- Separately, you need to weld the door frame and weld the hinges to the frame. It is more convenient to immediately sheathe the door separately from the walls.
- Sheathing the walls, fasten the polycarbonate directly to the profiles using self-tapping screws.
The color range of polycarbonate, which is used for sheathing shower enclosures, is very diverse. Therefore, the design can turn out to be very attractive. The care of this material is very simple, and in the evening it will protect you from the cool wind.
Choosing a place on the site and arranging a base for an outdoor shower
When constructing a summer shower in the country, special attention is paid to the choice of location. It is worth considering some factors:
- Water should warm up well. Therefore, the structure is mounted in a sunny place. Trees and buildings will cast a shadow on the cabin, which will negatively affect solar heating.
- When choosing a place, it is worth considering your preferences. So, the structure can be placed near the house, in the garden or near the pool, if there is one on the site.
- It is better to install a shower cabin on a flat area, near which there is a place for water discharge. Otherwise, you will have to do complex wiring.
- The structure should be located near the house.
To make the right choice, you need to carefully inspect your site. It is also worth considering the features of the construction of the soul. First of all, this concerns the need to build a base for the cabin.

It makes sense to install an outdoor shower only in an open sunny place
The foundation for an outdoor shower is arranged when it comes to a stationary structure that has significant weight. First of all, this applies to buildings made of bricks, blocks and other materials. A popular option is the arrangement tiled foundation, which will simultaneously serve as the floor in the cabin. The build process looks like this:
- Marking and cleaning of the place from thickets and debris.
- The pit breaks out. If we are talking about the construction of a brick cabin, then a pit 15 cm deep will be enough.
- A sand cushion no more than 5 cm high is laid on the bottom. It is carefully compacted.
- Concrete is being poured. The surface must be carefully leveled to avoid the need for floor screeding.
Also, for the construction of a summer shower, you can use a columnar and strip foundation. In the first case, with the help of a drill, holes are made with a depth of 1 m, into which further installation of support pillars. If hollow pipes are used for this, then they are poured with concrete mortar.
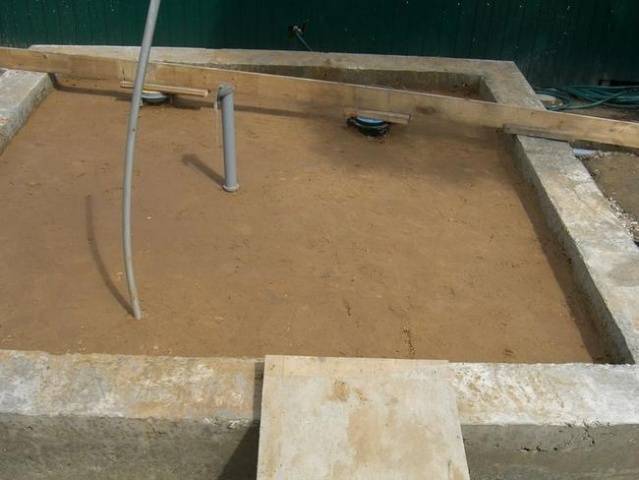
The foundation must provide drain holes and water supply
As for the strip foundation, here we are talking about a shallow structure. For the arrangement, you need a trench 40 cm deep and 20 cm wide. When pouring, reinforcement is performed with several reinforcement bars. This will give the structure durability and strength.
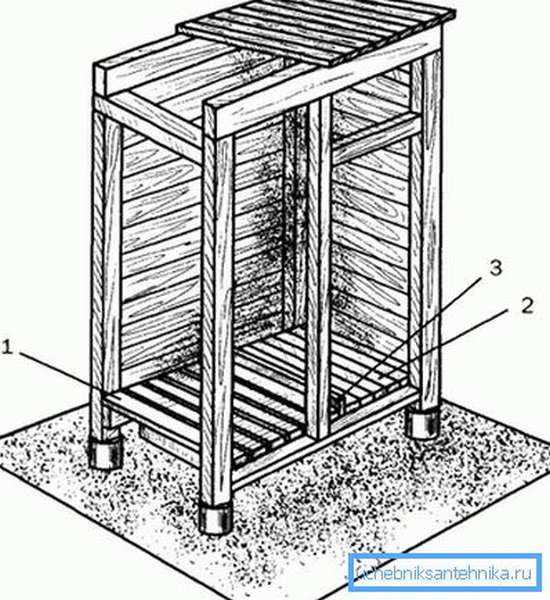
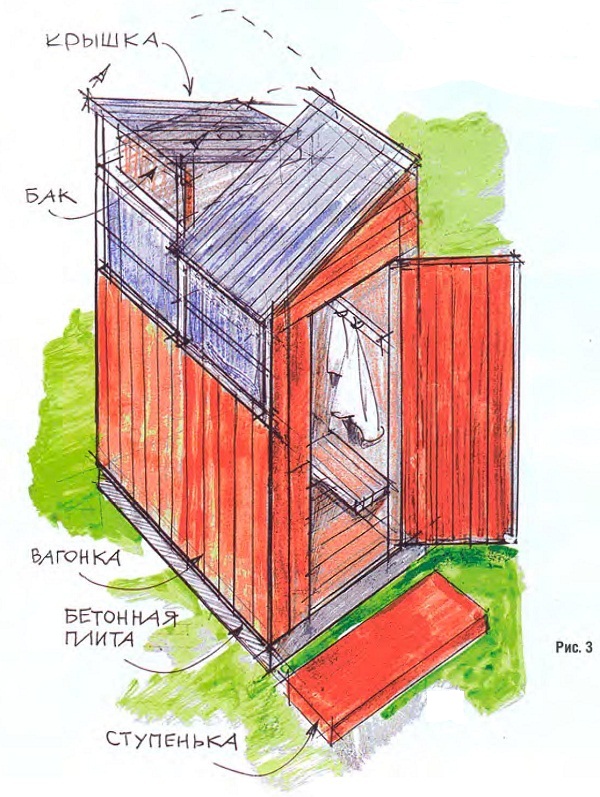
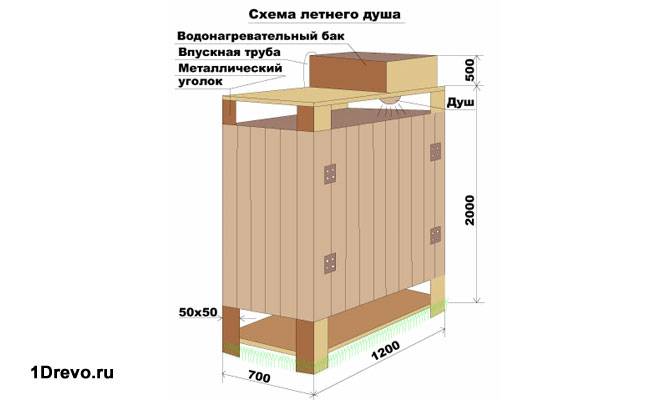
wooden frame

For the manufacture of summer soul from tree size 1x2 meters you will need:
- beam with a section of 100x100mm;
- beam with a section of 40x40mm;
- board 40x100mm;
- metal galvanized corner 40x40mm;
- wood screws;
- dowel with a diameter of 20mm;
- PVA glue;
- concrete blocks 400x200x200;
- hydroisol;
- biosecurity or paint on wood;
- colored polycarbonate;
- crushed stone;
- sand.
Place for installation we choose a summer shower in an open area with access to sunlight. We make markings for a 2x1 meter design, divide it into two parts.
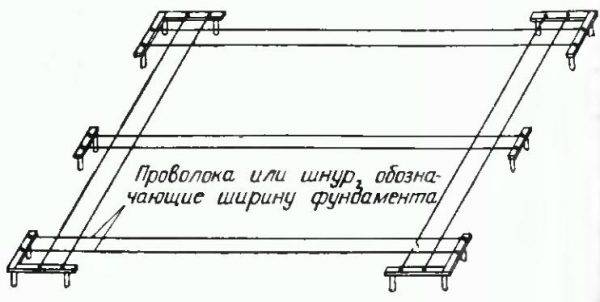 Markup scheme
On the right side, we dig a hole 1x1 meter in size, 40-50 cm deep, pour crushed stone into it.
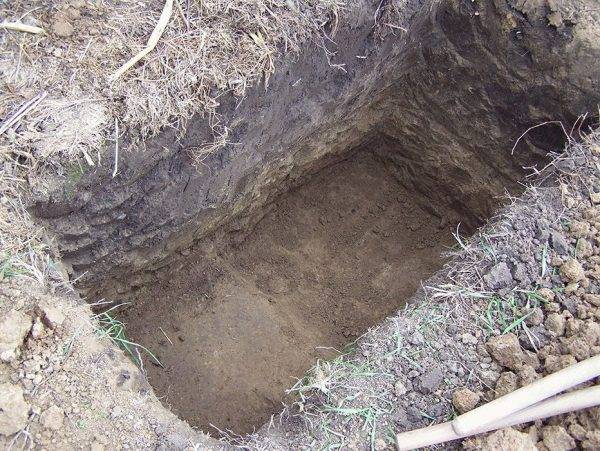
This is done so that the water goes into the ground, and does not remain on the surface, in the form of a puddle.
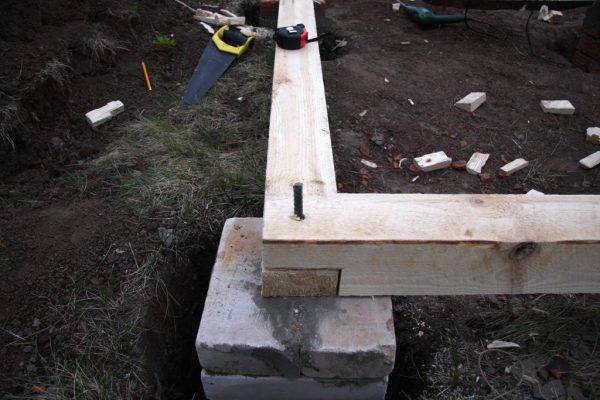
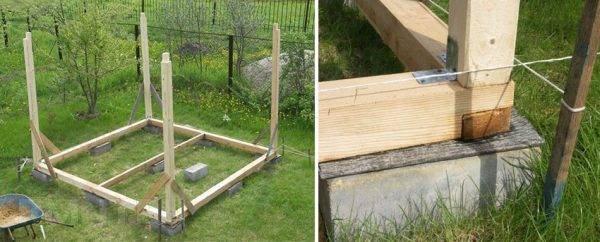
The foundation of a summer shower for a summer residence. We mark the installation site of six support blocks. They should be installed at the corners and in the middle of the perimeter at a distance of 1 meter from the corners. Under each block we dig a hole 30 cm deep, fall asleep at the bottom and compact 10 cm of sand.
This is necessary so that the blocks do not “walk” much when the temperature drops, especially in heaving soils.
In the remaining recess, we vertically install the blocks, sprinkle the sides with sand.
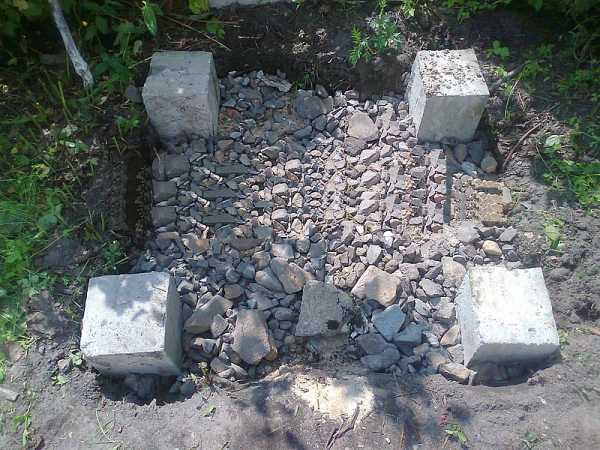
The blocks must be at the same height. Use a level and a board to check. We lay a waterproofing layer on top of the blocks, this will protect the tree from moisture and decay.
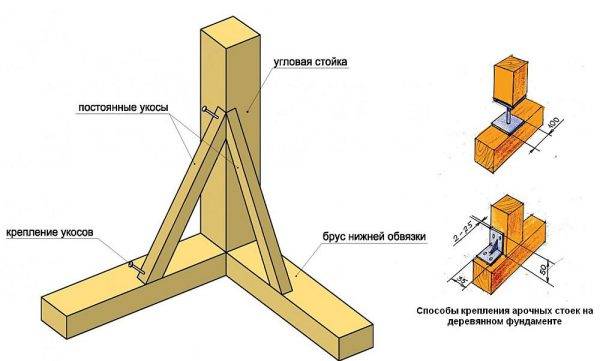
summer frame do-it-yourself soul for giving wood is also easy to make. We cut the beam to size. It should turn out: 6 pieces of 2.5 meters, 4 pieces of 2 meters, 6 pieces of 1 meter. On the blanks we make undercuts and holes for the dowels, as shown in the photo.


 Connection in the bottom harness
Assembling the bottom trim
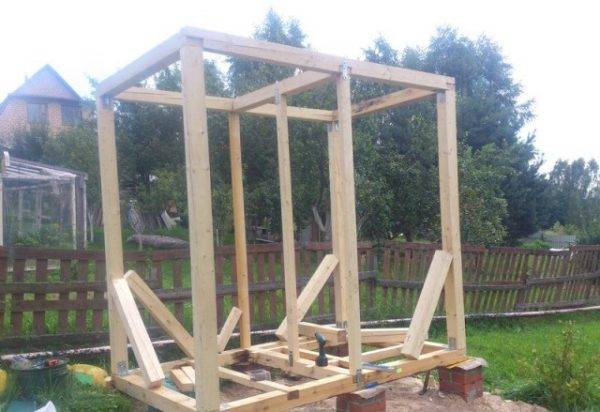
We expose racks

For fixing, we use temporary supports.
We complete the frame with the upper strapping, similarly with the bottom.
Next, install two boxes under the door
Floor. For the floor, we use an edged board with a section of 40x100 mm, cut into a length of 1 meter. It must first be processed with a planer. We fasten the planed blanks with nails to the beam of the lower trim.
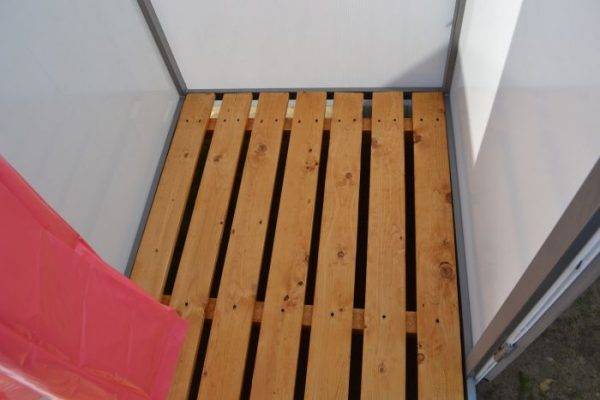
Between the boards we make a gap of 1-2 cm for draining water and ventilation.
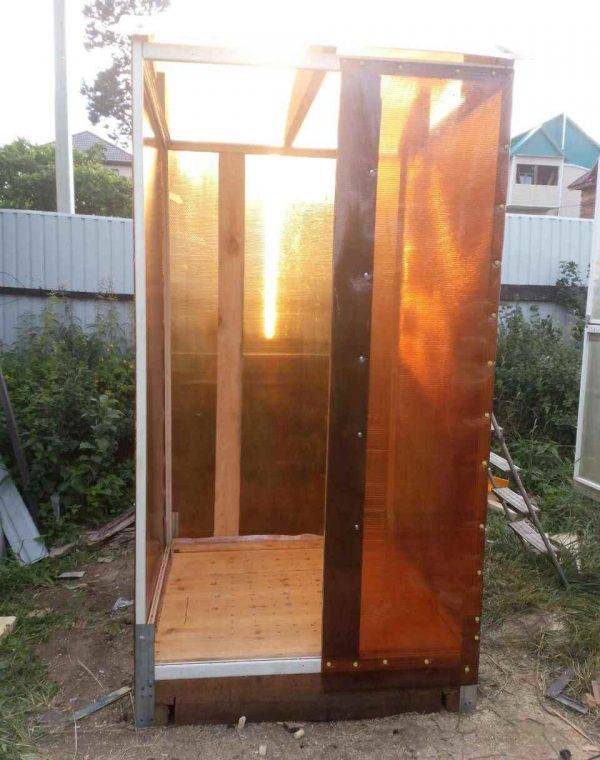
Sheathing.We produce wall, roof and door sheathing with colored polycarbonate, having previously cut the sheets to size. Although it is not transparent, it transmits light well and you do not need to connect electricity for lighting. We fasten the sheets with wood screws with rubber washers.
Polycarbonate fixation scheme
All wood blanks are recommended to be painted in advance, before installation, with quick-drying paint in the color of polycarbonate.
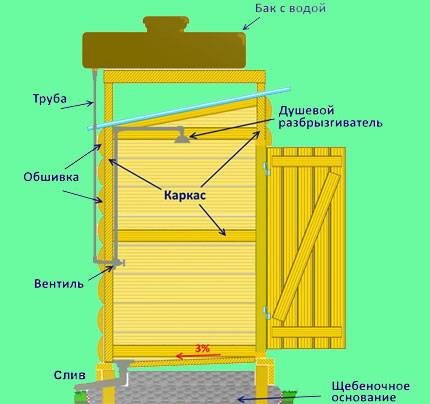
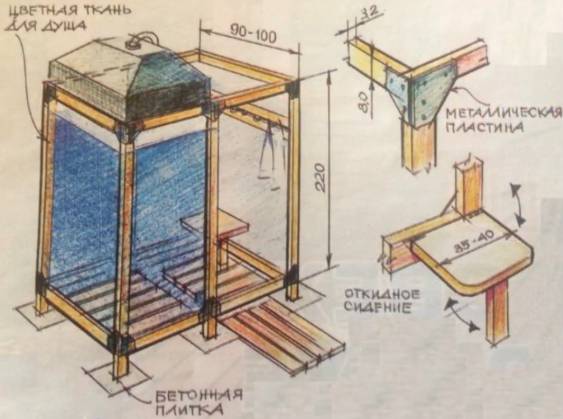
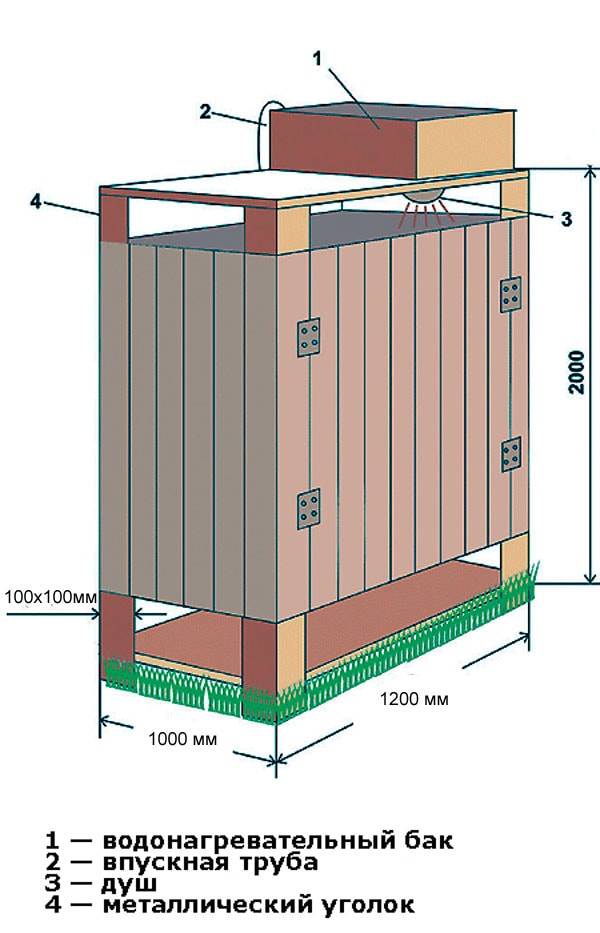
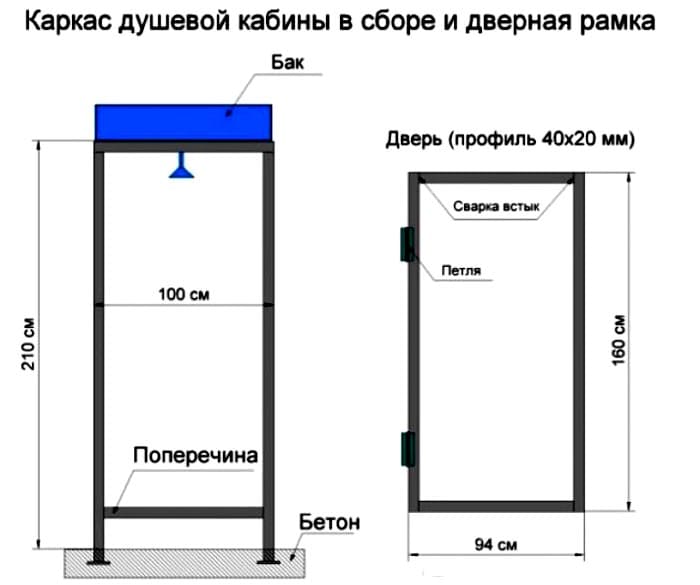
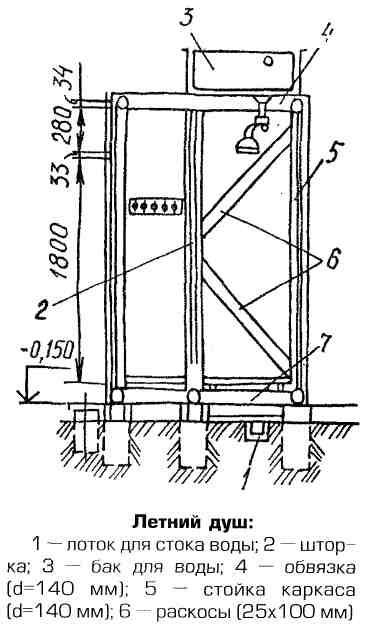
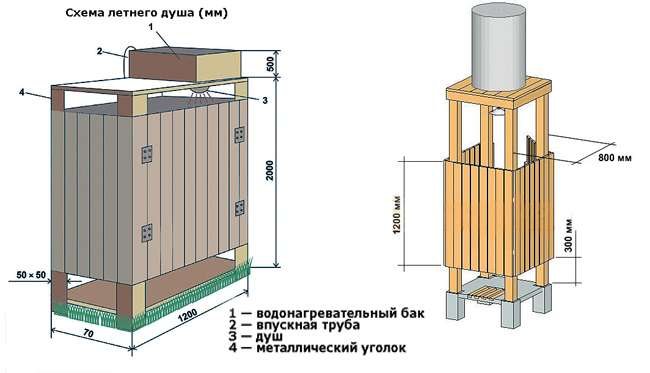
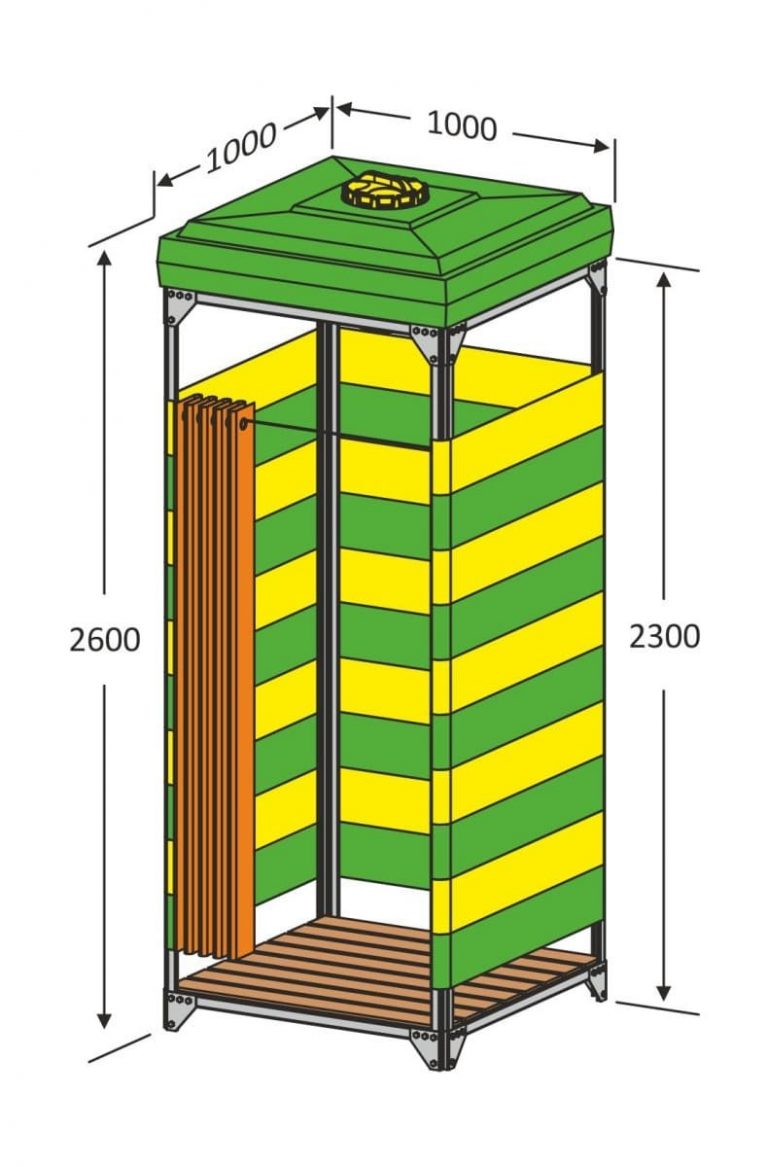
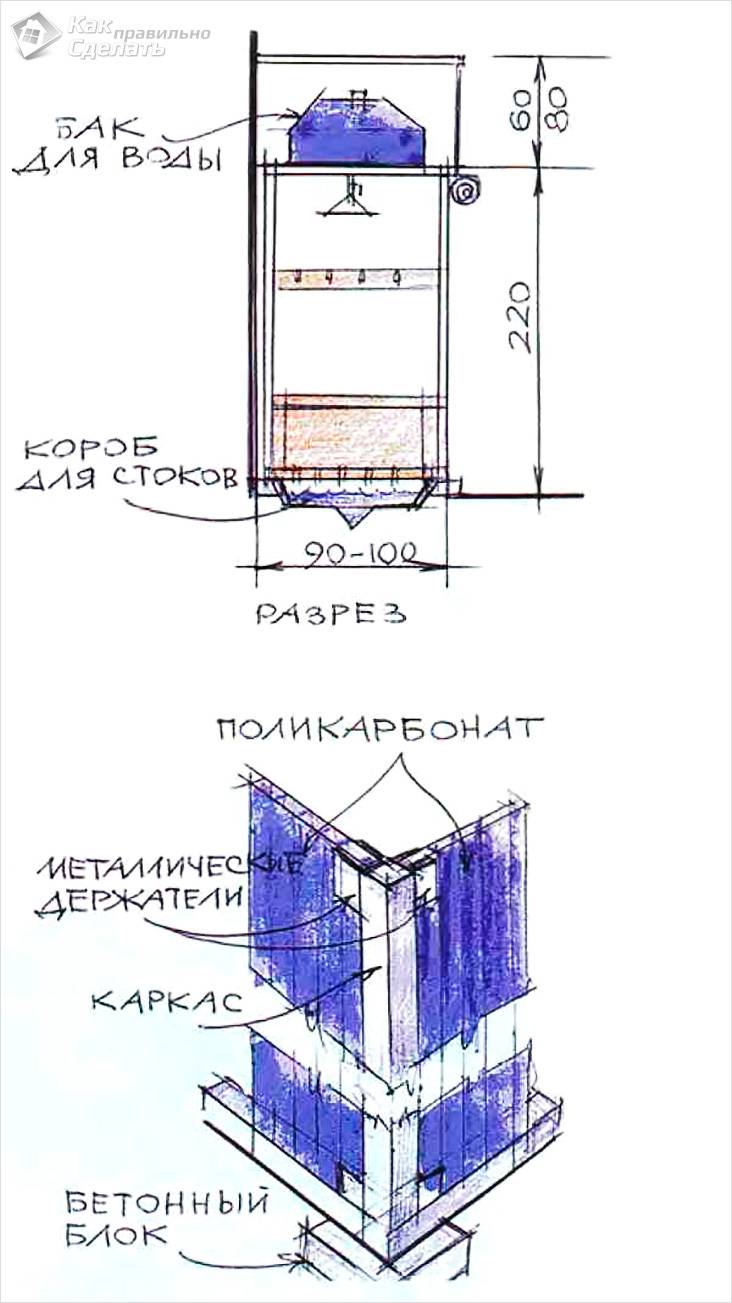
Design, drawings and dimensions of a summer shower from a profile pipe
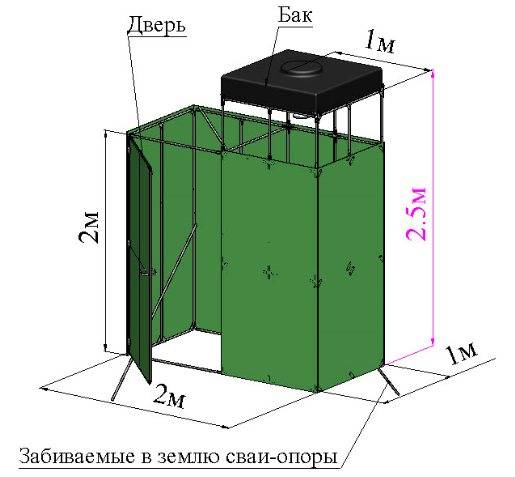
shower out profile pipe for bolts according to the drawings can be made even by a novice master. The average dimensions of the structure are 1000 * 1000 * 2200 mm. Such dimensions create comfortable conditions for hygiene procedures. You can increase the width if you wish, but you should not reduce it. You need to focus on the area of \u200b\u200bthe site. If there is not enough space, it is better to stay on a compact cabin, if there is enough space, you can choose a larger design.
Important! The height of a country shower from a profile pipe of 2200 mm is optimal - you need to take into account the fall of the watering can from the ceiling and the dimensions of the pallet.
The scheme of a country shower from a profile pipe includes all the necessary measurements. It is best to work according to the drawings.
For a shower cabin, it is imperative to provide a high-quality foundation
The optimal type of foundation is supporting, on reinforced concrete slabs, columnar. The floors are made of shield, without insulation, the walls too. Be sure to equip the roof - a prefabricated panel made of zinc-coated steel or any other is suitable.


Foundation for outdoor shower
The capital frame shower is placed on a stable foundation. Most often, pile (columnar) is used for these purposes.Much less often, a strip foundation or a solid shallow screed is used under the booth - they are more laborious, less ventilated and are more suitable for a brick shower.
So, for piles, make a rectangular marking on the selected area, which must first be well leveled. Then, with a garden drill, dig holes 1-1.5 m deep in the corners of the site.
Take metal or asbestos-cement pipes with a diameter of 9-10 cm as supports. You can also buy screw piles with special caps for quick construction. Screw piles or dig pipes into the ground so that they rise about 30 cm above the horizon and are at the same level. For wider booths, 6 supports may be needed.
When working with pipes, periodically after adding the earth, carefully tamp everything with a bar with a small section, while for greater reliability, the pipes can also be poured with concrete. Attach metal caps to the ends of the pipes with mounting holes timber or make holes for bolts under the timber.
Another good alternative is to use a suitable formwork to pour 4-6 concrete columns at the corners of the site and, if necessary, in the middle of the wide sides. It will even make it easier to mount the frame.
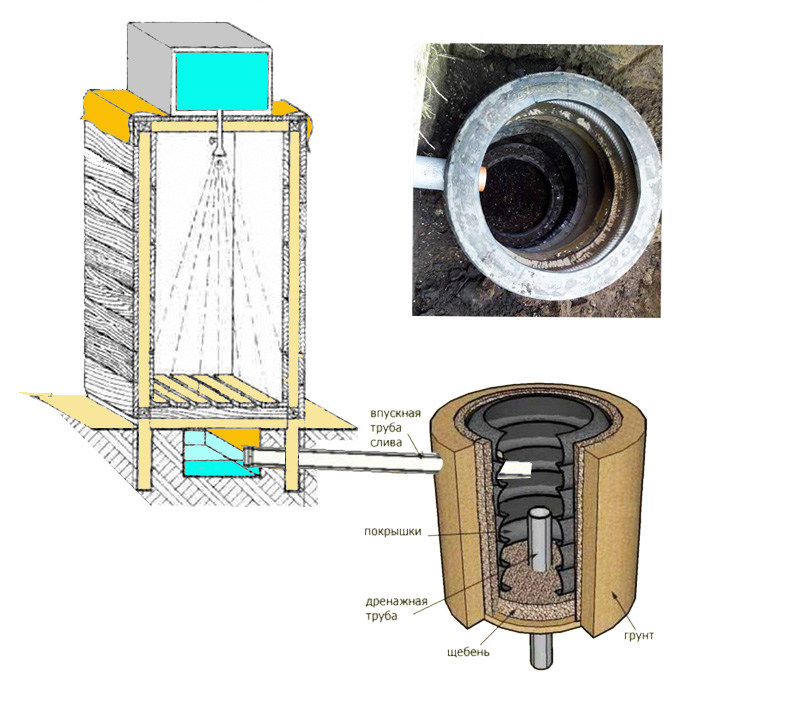
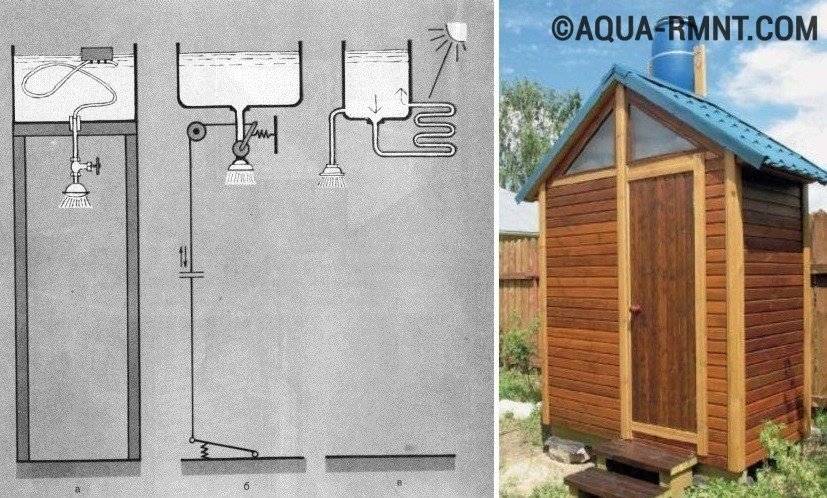
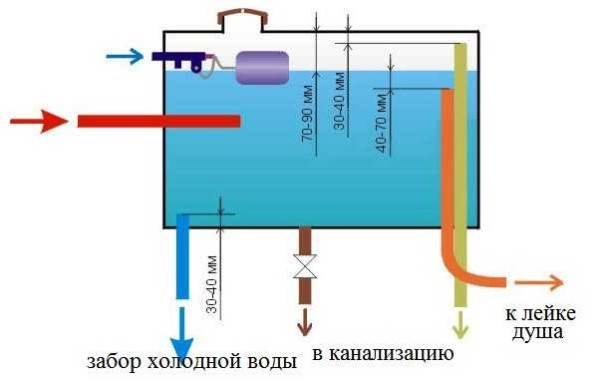
How to organize a system that fills the tank with water automatically
Most summer residents have a desire to swim in the soul after excavation. The procedure has a positive effect on human health. Of course, you can buy a shower ready-made. But this will increase construction costs.
It is cheaper to make a shower on your own, without the help of specialists. The water must flow at a certain slope. Don't forget to waterproof your shower.With the help of a waterproofing film, you can prevent the appearance of an unpleasant odor. To do this, you need to lay a special grid. The recommended depth of the drain pit is 2 m.
To save heat, it is necessary to install a polycarbonate roof on top of the tank. It will create a greenhouse effect. A mandatory element of the tank is a sensor that informs the user about the water level. In the absence of water, they can burn out. Therefore, this parameter must be constantly monitored. To equip the floor in the shower, it is necessary to install a drain pipe.
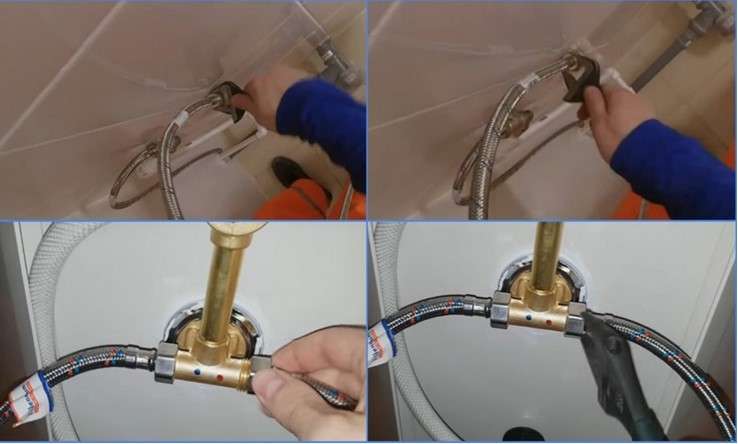
What if there is no running water in the house? To fill the tank you have to carry water in buckets. This is way too labor intensive. Before building a shower, think about the water supply. If you have running water, you can fill the tank quickly enough. Just open the faucet and wait until the container is filled to a certain level.
Advanced home owners have come up with a scheme that automates this process. This can be done using the float system. It is imperative to provide for the installation of a system that is designed to drain excess water. According to the law of physics, the top is the warmest water. Therefore, water intake is carried out from above. At the bottom of the tank, you can install a hose for draining water into the sewer.
Shower for the lazy in 15 minutes
If it is not possible to weld a metal frame or twist a wooden frame for a booth, there is an interesting way out. Consider what and how you can make a shower in the country with your own hands, if only the simplest materials are available. This option is also suitable for summer holidays in the forest.

To create a shower you need:
- 5 l plastic bottle;
- shower curtain or plastic wrap;
- fishing line;
- hose and spout from a watering can;
- adhesive tape.
It is important to choose a place for the shower, which will there are 3 trees nearby, they will act as a frame
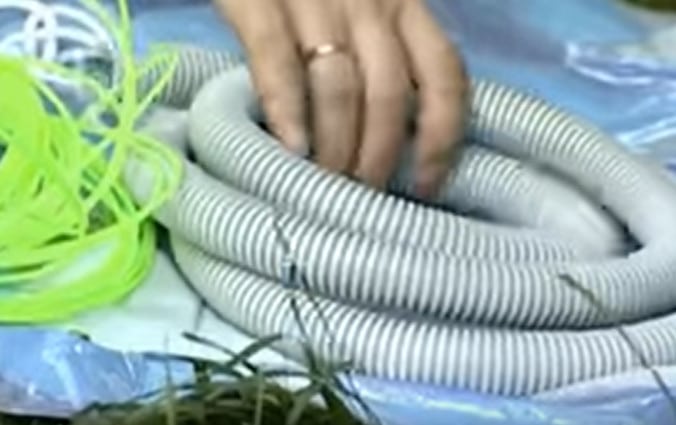
You need to start doing a shower with a water tank. To do this, cut a hole in the bottle cap and insert the hose. It can be wrapped with adhesive tape, attach a watering can.
Screw on the cap, attach the bottle to the tree, and throw the hose over the bottle so that the water does not pour out just like that.

It remains only to wrap the trees with fishing line, hang a curtain or film. The shower is ready.

The water in the bottle will heat up quickly from the sun's rays, as its volume is small. The downside is that this amount of water is only enough for 1 person.


Pros and cons of a summer shower
Today, for arranging a summer cottage and at home, a summer shower of various designs is used. Each of them has its own advantages and disadvantages. This should be taken into account when choosing a design. Popular options include:
-
Film shower. The design consists of metal and wooden elements, which are tightened with a film. The disadvantage of such a soul is its fragility. As for the pros, here you can highlight the ease of installation and mobility. If desired, it can be easily rearranged from one place to another. Often, metal corners are used for construction.
- Frame construction. The shower is a stable and monolithic product that has a long service life. The design is well ventilated, and the water heats up quickly. It is easy to apply and also comes off quickly. As for the shortcomings, it is worth highlighting the vulnerability from negative environmental factors. During operation, the design loses its attractive appearance.
One of the most durable solutions is a polycarbonate outdoor shower.
So, after analyzing all this, we can note several main advantages of a summer shower:
- profitability;
- ease of installation;
- practicality.
As for the shortcomings, among them one can distinguish the limitation of use. The fact is that in such structures water heating is most often carried out from solar energy. Therefore, they cannot be operated in the cold season or in bad weather.
Tray base and drain
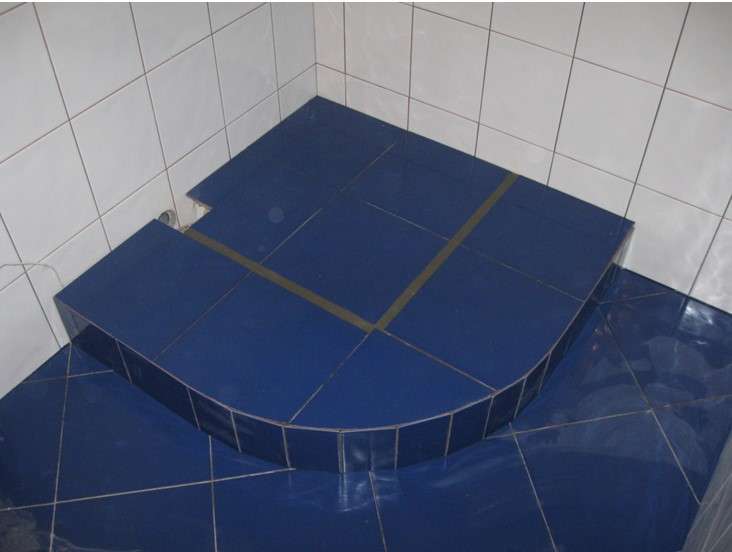
The pallet is the most important part of the structure under construction. It can be bought at any specialized plumbing store or made independently from improvised materials, namely:
- bricks;
- monolithic concrete screed;
- expanded clay concrete blocks.

Brick pallet and expanded clay concrete blocks is quite simple to build, subject to the acquisition of good quality material. A monolithic screed is a more complex structure that requires knowledge of the proper arrangement of the “sex pie”.
Waterproofing
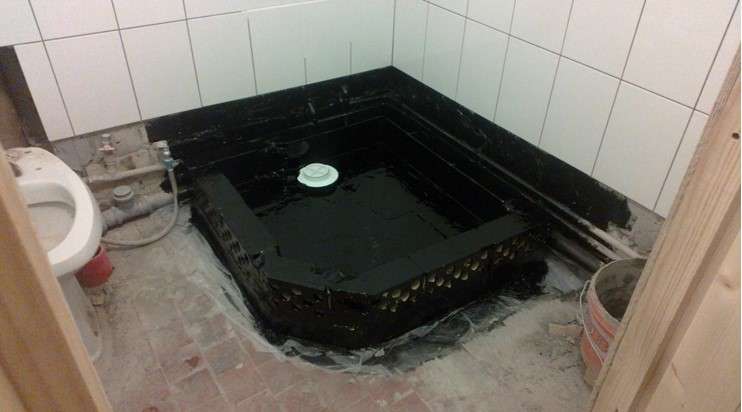
Proper waterproofing of the shower will avoid such unpleasant phenomena as leaks, dampness, the appearance of fungal infections, and the reproduction of mold colonies. A competent approach to this procedure provides for the implementation of waterproofing work not only in the booth, but in the entire area of \u200b\u200bthe bathroom. The most vulnerable areas are areas that are in direct contact with water.
They should be given the most attention

Cabin waterproofing is carried out with roll, penetrating or bituminous materials.Moreover, penetrating impregnations are used only for structures made on the basis of concrete or sand-cement materials. The booth area is completely isolated according to the scheme.
Roll insulators are applied to the floor surface with an overlap on the wall of at least 200 mm. We recommend that you familiarize yourself with the thematic video on the waterproofing of the shower stall:
Water connection
The main mistake that beginners make is immuring communications in the wall. The thing is that no material, be it metal or reinforced polypropylene, is guaranteed against leaks, especially in the places of soldering and joining of bends. A competent approach to the supply of plumbing to the shower cabin involves laying pipes in a special niche, which will be hidden by a plasterboard cover decorated with finishing material.
To reduce heat loss, the niche is insulated with mineral wool heat insulators or cellulose insulation. The ends of the pipeline are removed from the niche and cut to the desired length. They are threaded or threaded fittings are screwed for fastening with mixer flanges.
Sewer connection
The first thing they do when creating a shower cabin on their own is freeing up space. This process involves getting rid of the old bathroom. After that, the drain is installed and connected to the sewer system. The important points in this process are: the correct installation of a sewer pipeline with a slope of 3 ° to ensure the normal discharge of wastewater; the tie-in of the outlet from the drain in the horizontal plane must be made at a minimum angle to the sewer pipe.
When using corrugated pipes as bends, they can be bent up to 120°. However, in order to prevent clogging of the outlet pipeline during operation of the booth, the number of bends should be minimized and even more so, turns with negative angles should be avoided.
Shower decoration
So, the main part of the work is done, now let's look at how to finish the frame shower with your own hands. Start work to be guided from the acquisition and installation of the tank.
The latter can be mounted in two ways:
- Specifically, on the racks of the booth and the harness - in this case, the tank does a dual function, since it also helps with the roof of the booth. to emphasize that such tanks can be bought in specialized stores. Indeed, the size of the frame in this case should correspond to the size of the tank.
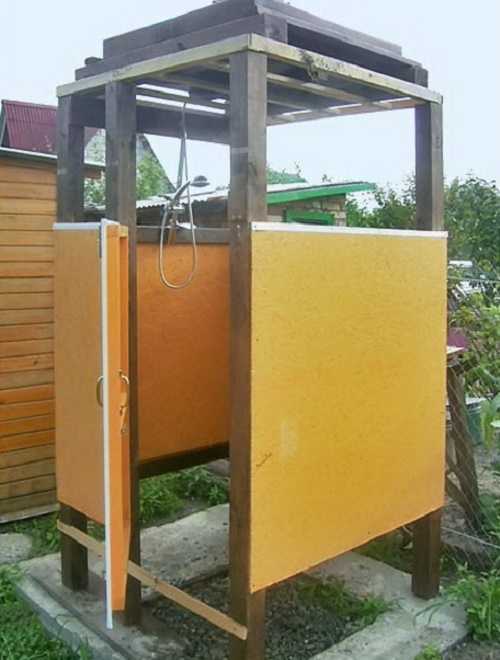
- On the roof of the cabin - this option is more versatile, since it allows you to install a container of any shape, but you must first complete the roof. To do this, it is possible to use boards or corrugated board.
At the end of the installation of the tank, go to sheathe the frame.
If the base is wooden, then it is possible to use as a sheathing:
- boards;
- Lining;
- chipboard, etc.
If the structure is iron, then it can be sheathed with the following materials:
- Decking;
- polycarbonate;
- Plexiglas, etc.
Since the price of all materials is different, the choice depends on the budget that is planned for the construction of the shower, and your own preferences and the surrounding exterior of the summer cottage.
The plating process is not difficult. The only thing is that you first need to cut the material, after which you fix it on the racks with self-tapping screws.


At this stage, in most cases, a door is installed, which is a frame made of the same material as the frame. The frame is sheathed separately, after which it is attached to the booth with the help of canopies.
At the end of the work, it is imperative to make a wooden lattice pallet. It will be comfortable to stand on it during bathing, along with this, all the gaps between the boards will allow water to drain onto the cement pad and then go into the drain pit.
Here is a do-it-yourself frame shower in the country house and built. Now it remains only to fill the tank with water and check it in action.
4. The simplest ways to organize a summer shower
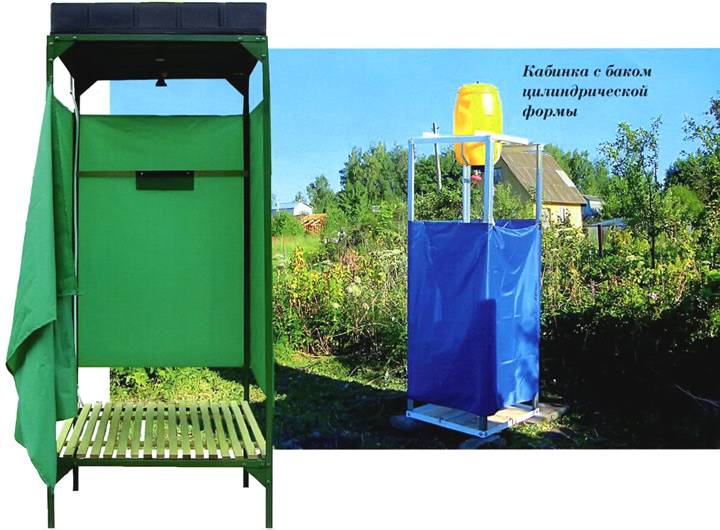
It happens that the summer cottage is visited very rarely, and then, not for work, but more for recreation. In this case, the shower can be the simplest designs that you can even bring with you.
- Portable shower. This design looks like a large heating pad and is made of the same material. After filling the container with water, it is twisted with a special nozzle, at the end of which there is a mini-watering can. At the opposite end there is a loop for which it is convenient to hang the container on a tree or a hook. By placing the container in a well-lit place, the water will heat up very quickly. The volume of such a "shower" is 10-15 liters. This entails restrictions on the duration of the reception of water procedures and the number of people who can use it. But it is a very convenient and inexpensive option for one person.
- Shower rack - is an iron pipe on legs, which is equipped with a shower head and a hole for connecting a hose.Such a rack is convenient in that it can be placed in any convenient place and, if necessary, brought into a utility room for storage. Its disadvantage is the lack of a water tank. That is, if there is no warm water and normal pressure in the system on the site, then you will have to take a cold shower.
- Use of the shower system. The shower rack is a metal bar to which the overhead shower and faucet are attached. In order not to bother with the arrangement of a special room for its placement, many attach the shower system directly to the wall of the house or outbuilding. For this, water is drawn out of the wall. The wall of the building is protected from moisture. You can veneer it with tiles, siding or other materials that are available. For convenience, you can separate the space with a curtain, and place a wooden pallet or rubber mat on the floor.
Keep in mind that this is an option for rare use. At the time when you will not be in the country, the system can be removed, and the outlet closed with a special plug.
All of the above types of showers are good because they do not require the arrangement of a foundation and a drain. But the disadvantage is obvious - the possibility of their use depends entirely on weather conditions.
Summer shower insulation
Why insulate a simple summer shower if it is used in the warm season? The fact is that carrying out thermal insulation work will significantly extend lifespan of this structure. The main thing is to competently conduct insulation around the perimeter. For this use:
Mineral wool.This is an environmentally friendly material that is very easy to install. The mats are laid in the frame, after which it is sheathed from the inside. To prevent moisture from entering the material, it is covered with an impervious film.

Shower frame prepared for installation of insulation
Glass wool. If desired, it can be used for insulation soul in the garden
Of course, when working with it, you need to be careful, and carefully adhere to installation instructions.
Waterproof foam. It is a modern material that is optimally suited for warming an outdoor shower
To do this, it is enough to use plates with a thickness of 5 cm. They fit into the frame, on top of which the interior walls are finished.
Location selection
When choosing a place for a shower from a profile pipe consideration should be given to the location of trees, water sources, and how the water will drain. You should place the booth away from plants and trees, as they will block out sunlight or may wither if the drain goes into the ground.
Also, you should not make a booth close to the house, as it can also block the light, because of which the water will not warm up well, and also if the drain goes into the ground, the foundation will be washed away by the drain.
The shower room should be placed next to the walls of the house only when the water will not be supplied from the tank, but also from the water pipes that come from the house. If heating is not required, then this option may be suitable.
The cabin should not be placed in lowlands, as this will make it difficult for water to drain. It is best to place the shower on a hill or a flat surface.If you plant plants near the structure that love moisture, but do not dry out from the soap solution entering the soil, this will create an additional source of moisture absorption.

An example of a properly positioned summer shower
Tank
Tanks for showers are heated and without it.
For a container with an electric heater, a cable supply must be provided. Cabins equipped with heated tanks can be placed anywhere in the cottage and always use warm water, regardless of the whims of the weather. Their disadvantages are high price, additional electricity costs, the need for cable supply and increased safety requirements.
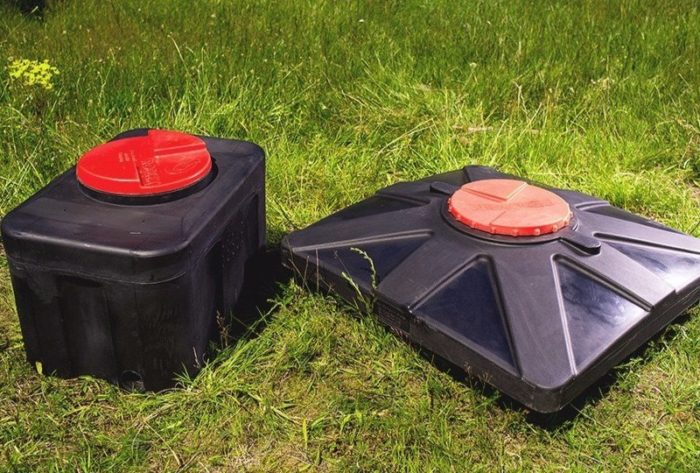
Tanks without heating are much cheaper, they are absolutely safe, but a shower with such a capacity is placed only in a sunny place. It is better to take not a barrel, but a rectangular black tank, of small height and with a flat bottom, as much as possible corresponding to the area of the top of the booth. So the water will heat up more evenly and faster, and the load on the frame will be distributed evenly. If the tank is too high, a float intake can be provided to "scoop" water from the warm top layer.
Choose a container of such a size that the volume of warm water is enough for everyone (daily rate is 40 liters of water per person). In addition, the volume of any tank should not exceed 200 liters, otherwise there will be a risk of deformation of the shower stall.
As for the material, you can choose a metal (stainless steel) or plastic tank. The first ones are heavier, more expensive, but their service life is much longer, they are not afraid of damage. The second ones are comfortable, lightweight, cheaper, but not as strong and can smell in strong sun.
Fasten the tank to the top of the booth using bars or wide belts, nailing them. For ordinary containers, you can still build a separate small “greenhouse” frame at the top, covering it with a transparent film so that the water heats up faster and cools down more slowly.
Fill the container manually (not very convenient), using a pump or according to the most popular scheme - through a rubber hose or a plastic tube from a water tap. It is advisable to install a special valve that will shut off the water in a timely manner after filling the container.
At the bottom of the tank, provide an opening for a pipe with a tap and a watering can, which is sealed with rubber inserts. It is better to buy all the parts in one set (watering can, different nuts, squeegee, faucet, silicone gaskets and washers).


That's all the main points on the construction of a capital frame summer shower. As you can see, any economic person who is friends with tools will cope with this work.
We wish you successful construction and pleasant swimming!
Nikolai Prilutsky,
We build a summer shower in the country with our own hands
A home master without experience and skills can make a shower in the country with his own hands. Advantages of the design - cost-effectiveness, practicality, ease of installation. Among the shortcomings, the limited use is noted due to the heating of the liquid by means of solar energy. The minus is eliminated by installing heating elements.
Choosing a place to install a summer shower
The construction of the shower begins with the definition of the installation area.
The following nuances are taken into account:
- Illumination of the site. If nothing blocks the structure, the water in the barrel will heat up faster, mold will not form inside the cabin.
- Convenience. The structure is not placed next to the toilet or compost pit.Most often it is located near the house, the pool.
- The evenness of the landscape, the proximity of the water supply system and the drain.
Choosing a water storage tank
Professional recommendations:
- Metal containers warm up faster in the sun, they are easily equipped with branch pipes and outlets. Plastic lasts longer, does not rust, has a low weight.
- Tanks are painted dark to speed up heating.
- The structure is sealed. Branch pipes and branches are constructed from narrow tubes. If they take an iron barrel, they build a lid so that debris and dust do not get inside.
Preparatory work
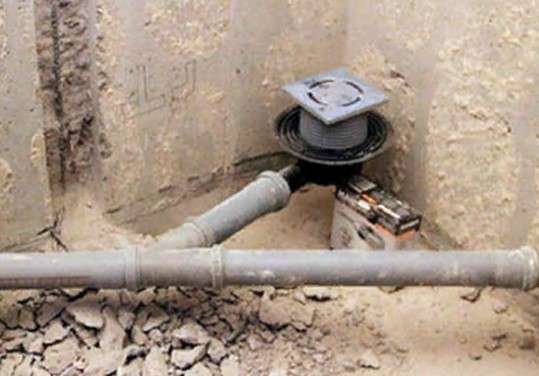
Build a shower in the country with their own hands begin with the arrangement drainage pit or water outlet system.
In the first case, they dig a hole, 0.6 m deep, with sides of 1 m. In the presence of sandy soil, the water will leave well, but there is a risk of constant landslides. Therefore, the walls are reinforced with a mounting grid, flat slate, or a wooden box-cladding is built. The last option is not rational, in 3-5 years it will rot, you will need to remove the old boards and mount a new structure.
The bottom of the pit is covered with gravel, broken bricks. Drainage will increase moisture absorption and the shower will always be dry.

For a more aesthetic appearance, broken bricks and gravel are recommended to be replaced with special designer pebbles, which are used to form paths in the garden.
The second option is the arrangement of the drain system in a nearby dug hole. To do this, the frame of the shower cabin is placed on posts, a pit 15-20 cm deep is equipped below, and it is covered with drainage. In this case, the pit should be with a slight slope to the side, where a gutter is mounted, along which water will flow into a hole dug nearby or under bushes.