- gas horn
- Forge
- Heating a workpiece in a forge
- How the device works
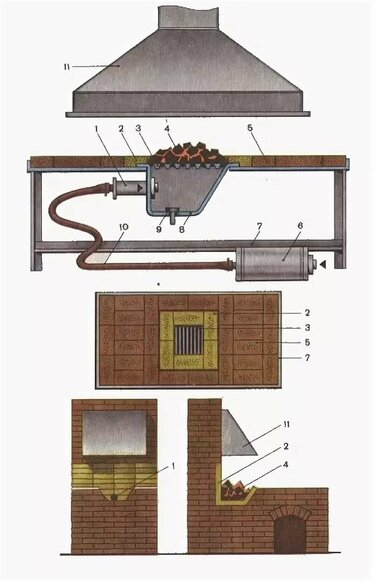
- Closed model of a gas forge
- Features of a household blacksmith forge
- Wall framing
- Burner adjustment
- Burner hole
- The design of the gas supply channel in the burner
- Principle of operation
- Principle of operation
- Helpful Hints
- Burner design
- A little about the use of the forge
- Closed forges
- solid fuel forge
- Individual design
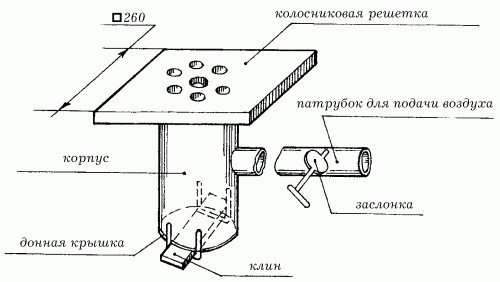
- Main parts
- Conclusions and useful video on the topic
gas horn
Also, household gas contains particles of silicon, sulfur and phosphorus, which can adversely affect the metal. For example, sulfur will only spoil steel on contact, changing its performance advantages into disadvantages. And this can lead to significant financial losses.
Considering the above, a home-made gas forging furnace can operate on household gas only if it is previously cleaned of sulfur. To do this, the gas must be passed through a container with naphthalene, which will take in all the excess. It is also desirable to forge on blue fuel only decorative elements, and not parts that will be subjected to heavy loads in the future.
Forge
Creative decorators often want to use handmade metal parts in their decorations. You can make such elements in the forge, having the necessary skills and materials.
Pretty thin sheet metal can be minted, bent and stamped even without heating. However, a thick workpiece can only be machined at high temperatures. And only blacksmiths can make something out of carbon steel.
If there is a hearth in the workshop, as well as an anvil, you can ignore the thickness of the workpiece. When heated to a thousand degrees, such a metal will bend, flatten and forge like plasticine. The most important thing in this work is a properly built forge, capable of heating the metal to the desired temperature.
It may not be possible for everyone to make such a horn with their own hands, but for a person familiar with the device and the principle of operation of this device, this should not be difficult. Experienced blacksmith craftsmen claim that the simplest forge can be made from 6 bricks.
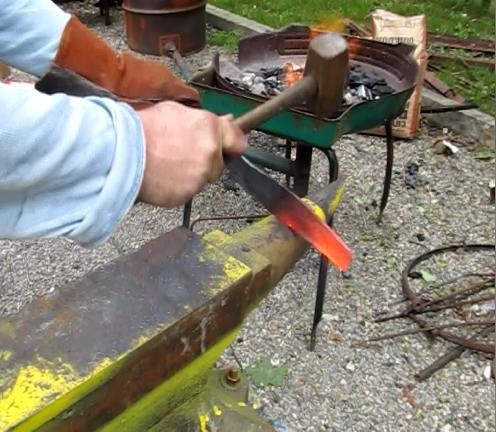
Heating a workpiece in a forge
Two main and only properties are required from a forging furnace: to give a very high temperature, up to 1200 - 1500 ° C and the ability to maintain the desired temperature for a certain time. In other words, we need a strong and even heat.
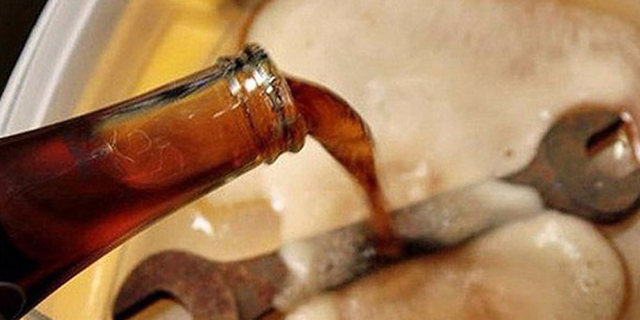
At what temperature can metals be forged, that is, they begin to be ductile? This is different for all metals and alloys. But a visual sign that the metal part has heated up to the desired temperature is also common - this is the orange color of the part.
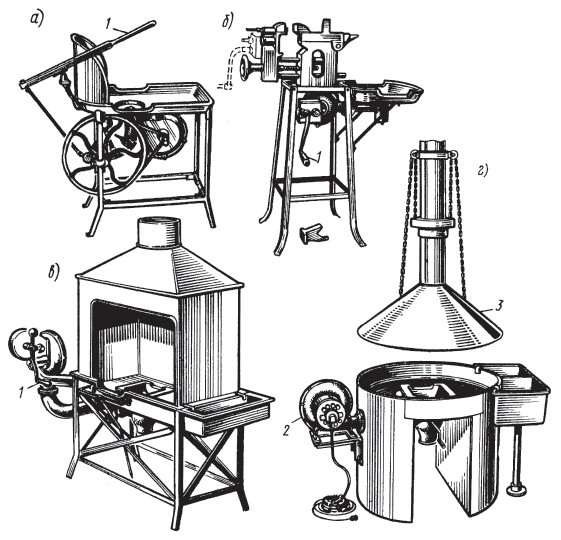
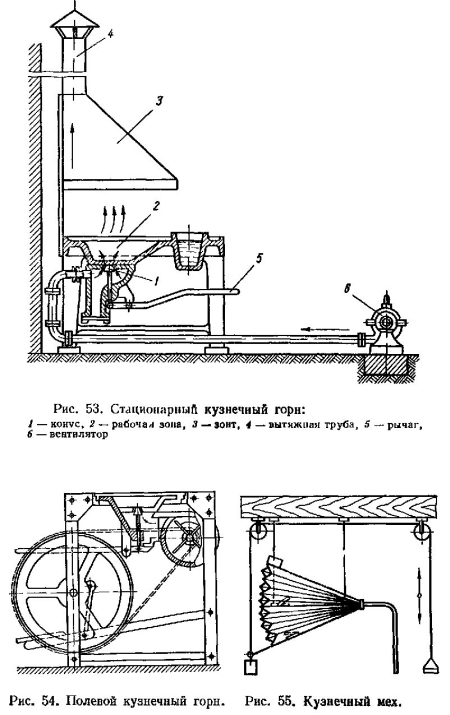
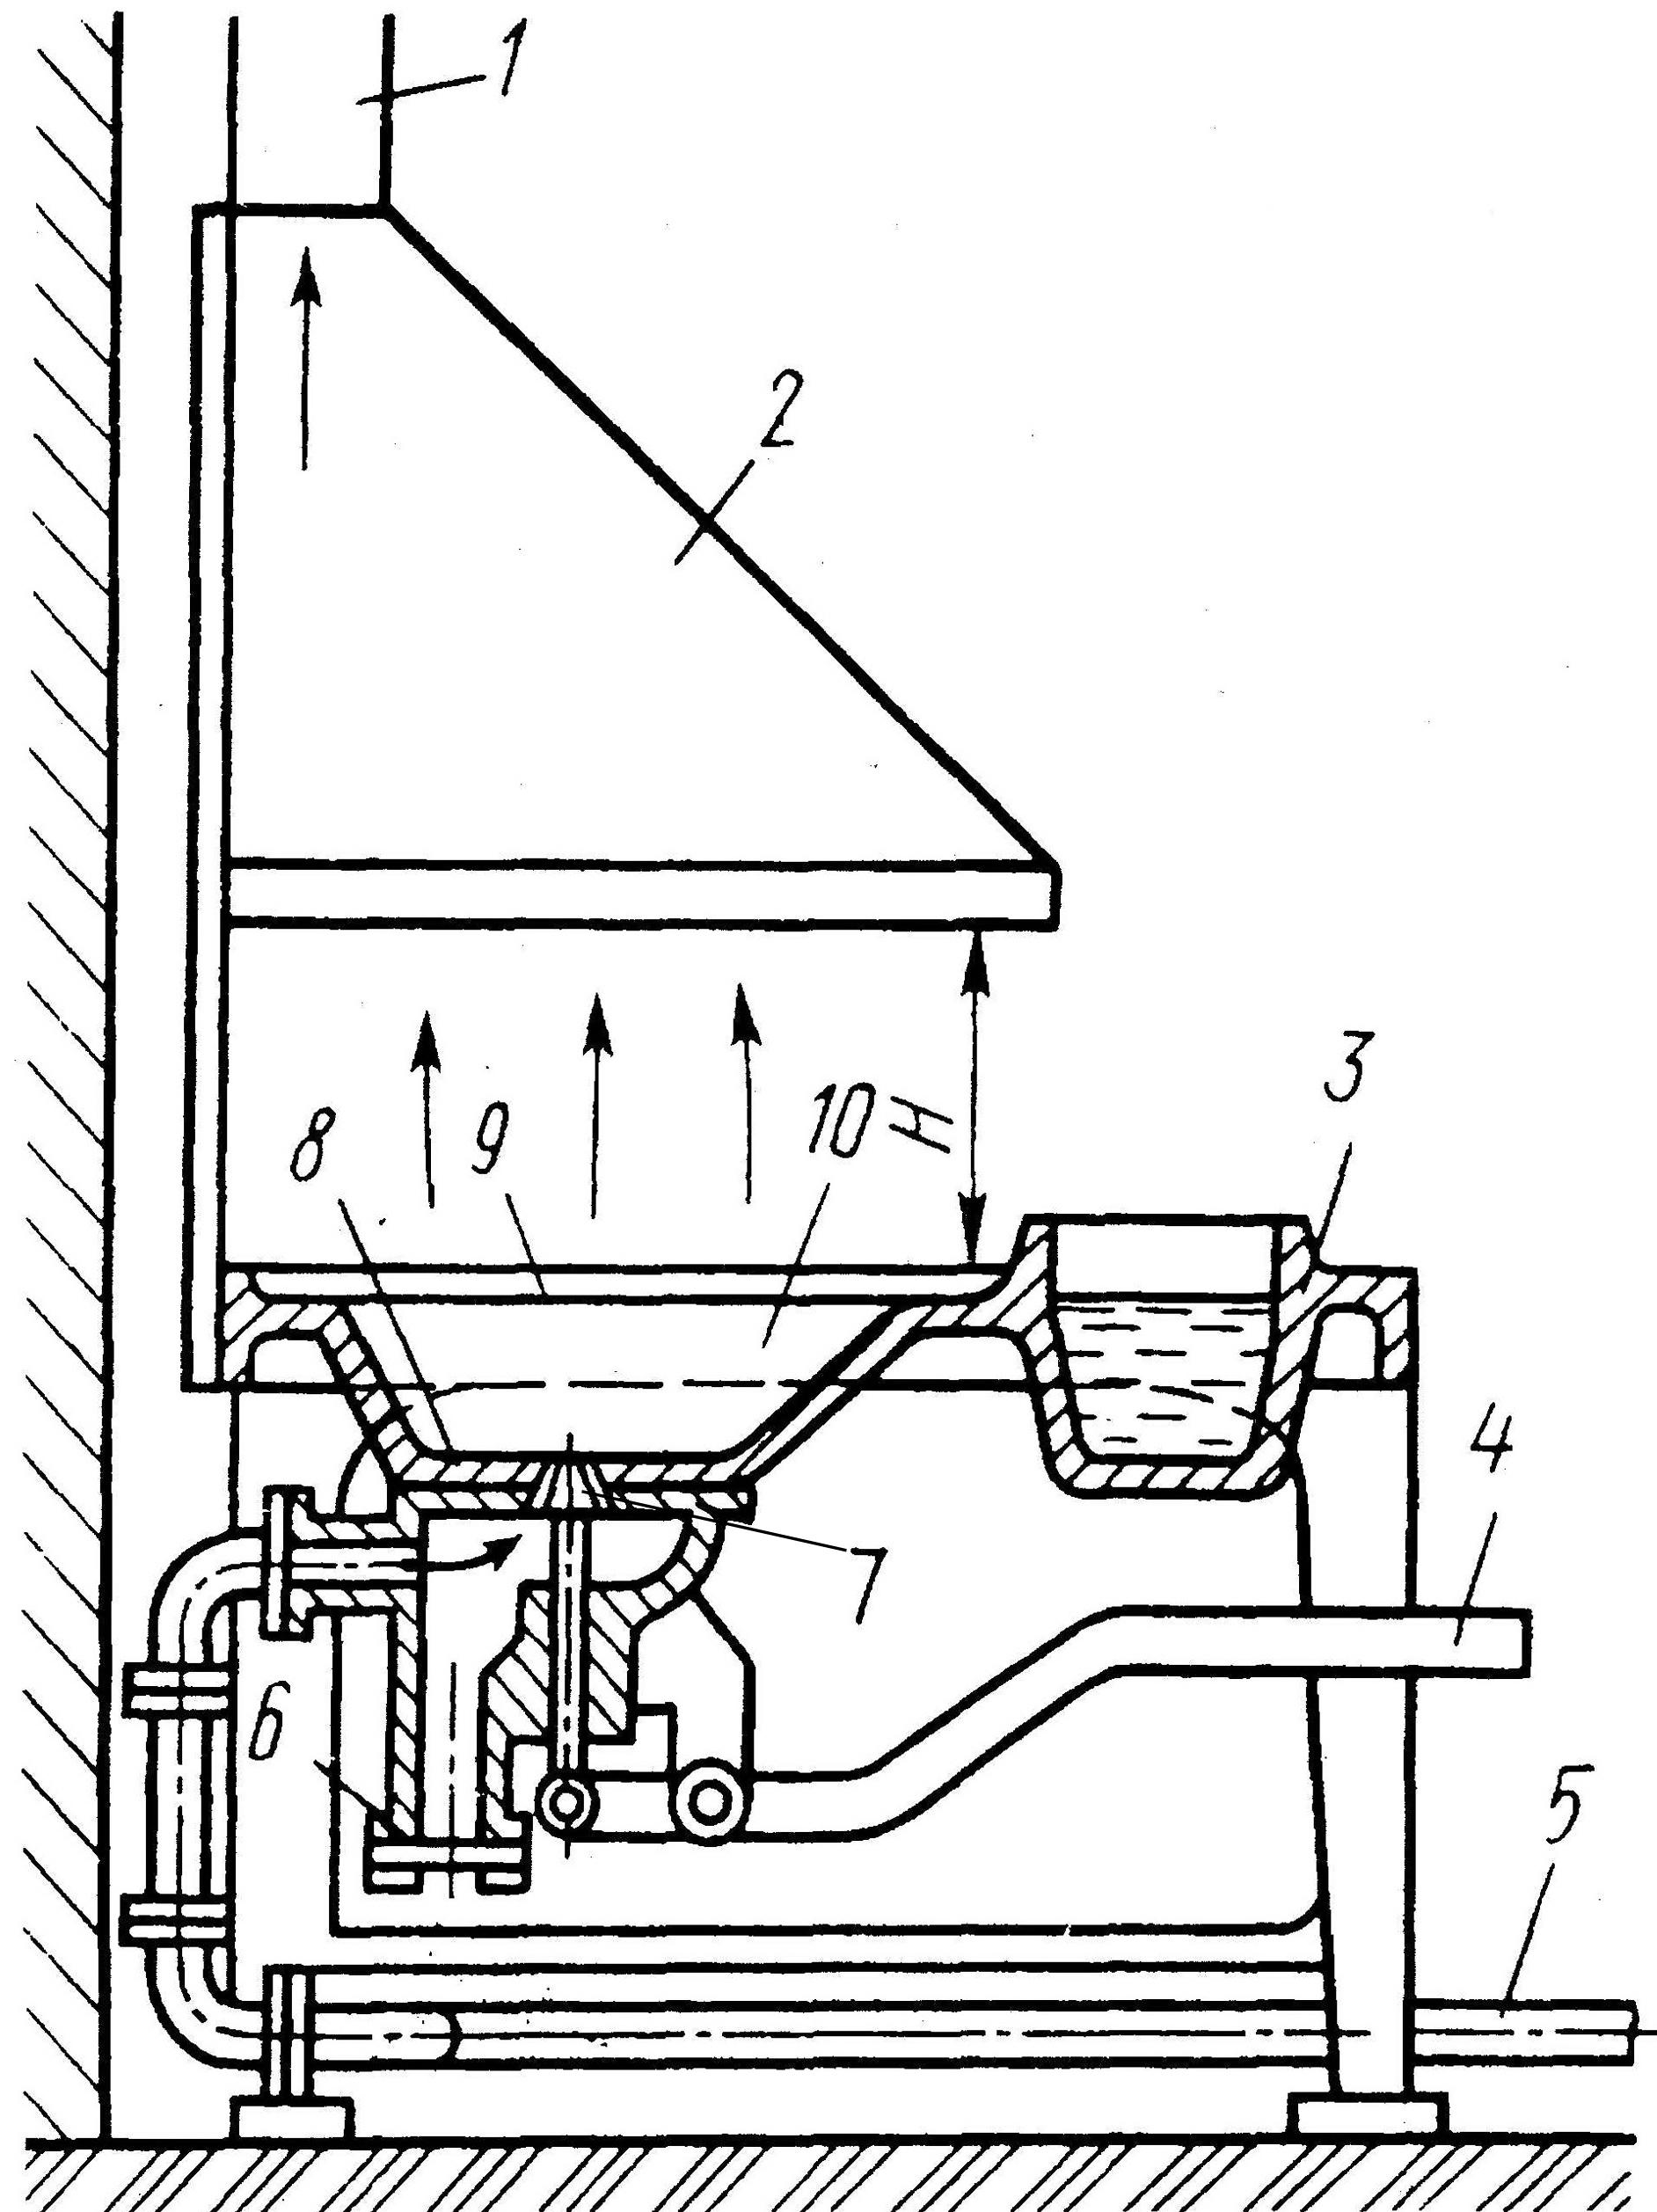
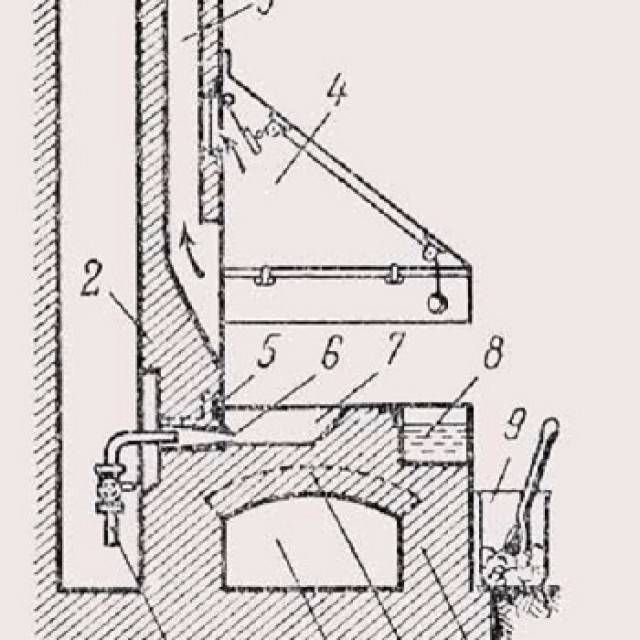
 Drawing of a blacksmith's forge.
The only metal that behaves rather meanly and does not change its color when heated is aluminum. It is not the lightest metal to forge and weld in principle, with aluminum there are many special requirements to be aware of and apply.
So the lack of an orange color while it is already heated for forging is a significant factor that makes it difficult to work with this capricious metal and its alloys. After all, you can't overheat. Underheating is also no good.
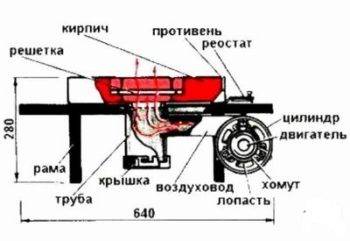
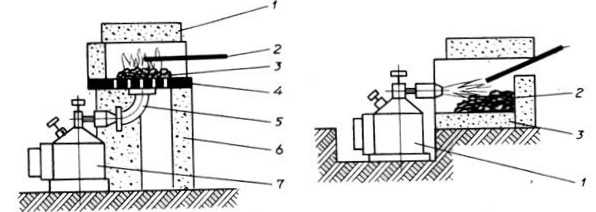
How the device works
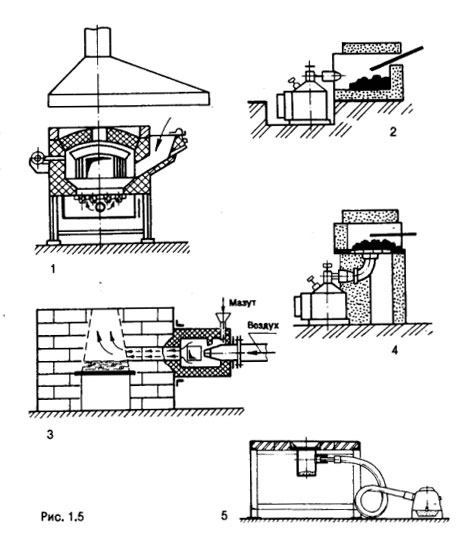
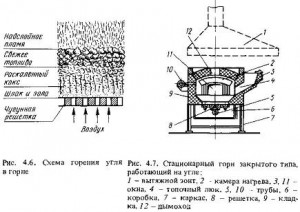
Before you build a forge, you need to decide on its type. The closed-type forge has a chamber for heating the workpiece. This model is considered the most economical in terms of fuel consumption. But in this case, the blanks are limited in size.


In the open-type forge forge, fuel is poured from above onto the grate, and an air stream is supplied from below. The preheated workpiece is placed on the fuel. This makes it possible to heat large workpieces.
In order to be able to build a home-made forge without losing its quality of work and at the same time save money, you should understand the principle of its functioning. The device is based on a significant increase in temperature due to the chemical method of burning carbon.
This process gives a high energy yield and has been used for smelting various metals for many centuries. In order for the cupola furnace to prevent the material from burning out, a little less oxygen should be supplied to it than is necessary for complete oxidation, otherwise the products will be too fragile, and, accordingly, they will last only a few years.
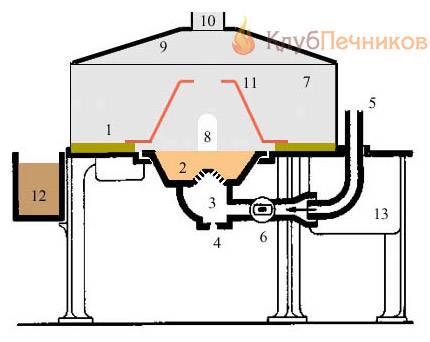
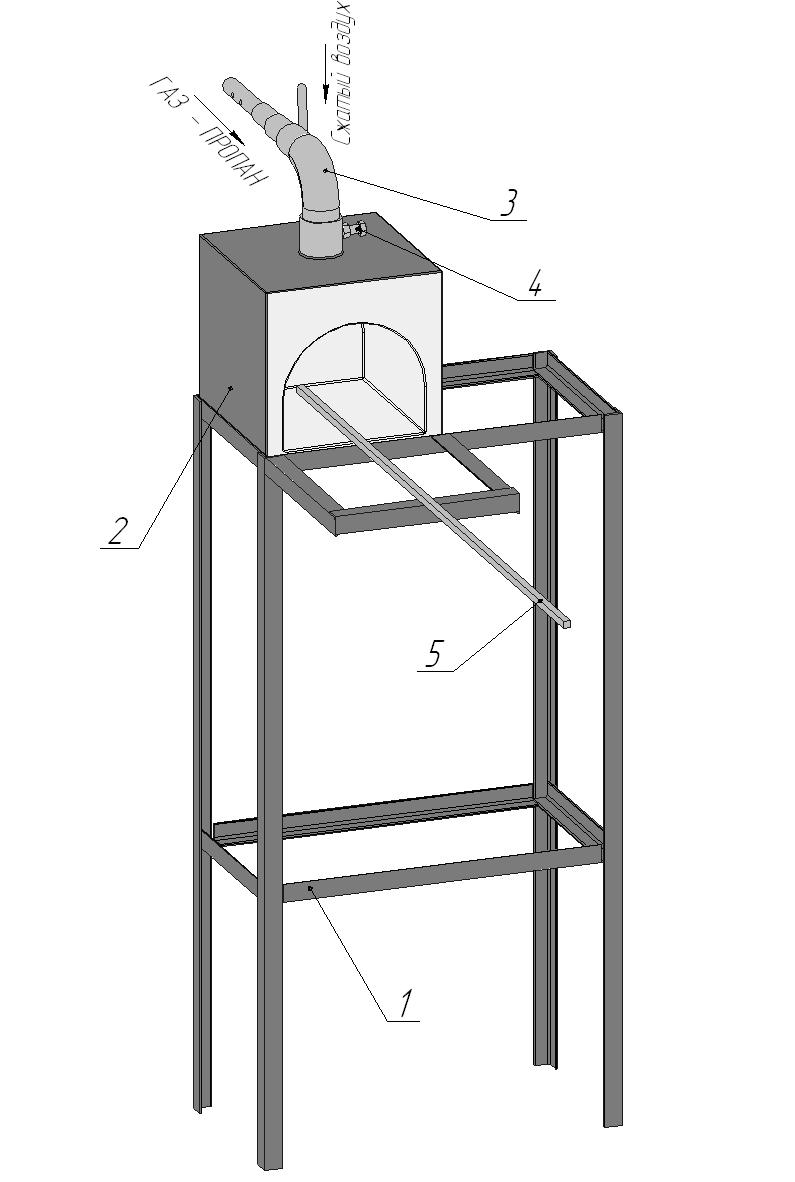
Closed model of a gas forge
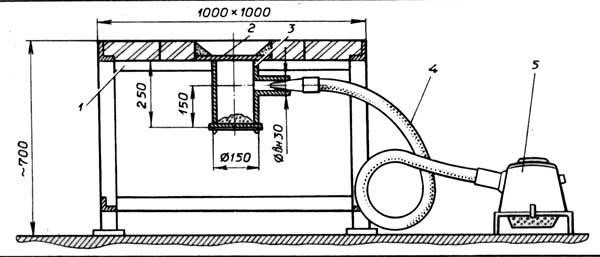
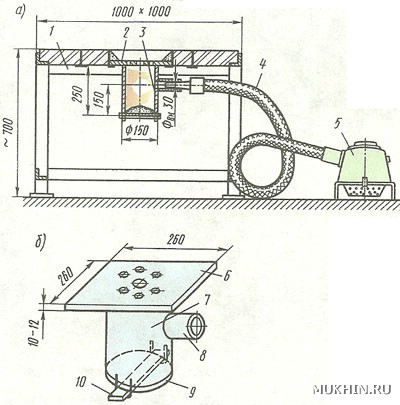
The main difference from the open variety is that such a horn is clad in a body, usually in the form of a cube, and there is a forced draft. The body is usually made of refractory bricks with a metal cover that turns into a hood. The dimensions of the closed hearths are small, for home use it does not exceed 80x100cm. A door will need to be inserted into the front panel.
A hole for mounting a gas burner is provided in the side wall. An important condition is the installation of a forced exhaust (with a 30x30cm channel), for this they often use engines from an old vacuum cleaner, a car heating stove, etc.
Features of a household blacksmith forge
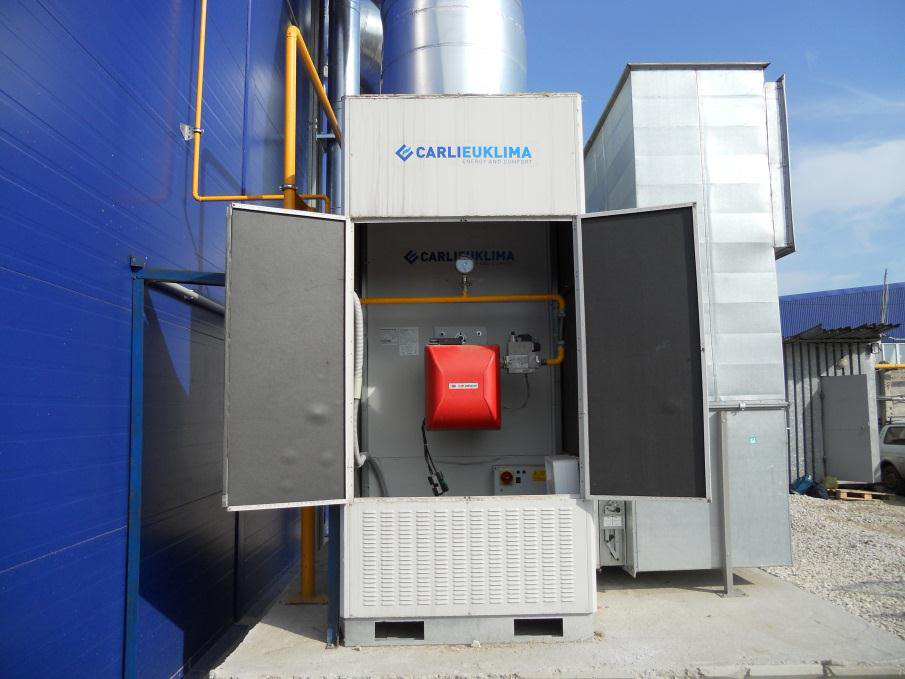
Due to the high cost of melting plants, not every user can buy such equipment for special purposes. For domestic needs, it is not difficult to assemble a gas forge with your own hands, provided that the shape, power and structure of the pressurization system are correctly determined. A simple household forge for artistic forging or casting from non-ferrous metal can be assembled from several fireclay bricks and sheet steel.
Making a horn at home for working with ferrous metal is not difficult. The simplest design can be made from a metal container, in the side of which it is necessary to make a hole for a gas burner. The fuel supply system can be assembled from a piece of pipe and a coupling; long bolts are suitable for the supporting structure under the tank. The lining of the gas chamber is carried out by filling a solution of alabaster or gypsum, sand and water.
The horn must be equipped with a protective cover, a ceramic tube or a suitable bottle. After lining and drilling a gas supply hole, the device is installed in a convenient place, but at a distance from flammable materials. The advantages of the design include the ability to move the furnace, adjust the degree of heating of the workpiece, which is especially convenient when working with different forging materials.
Wall framing
This forge will turn out to be small in size, its internal dimensions are only 12 x 18 x 24 cm. But for my work this is quite enough. Due to the small size, only three bricks were needed for the walls, and I only had to weld metal corners in the corners.
Burner adjustment
Attention! Subsequent work is fire and explosion hazard, because
carried out with an open fire and combustible gas - propane. They must be carried out with strict observance of the fire safety standards and the following requirements:
- all work should be carried out in a well-ventilated area;
- remove (reliably de-energize) all spark-producing equipment;
- the workplace must be prepared for work: everything superfluous should be removed not only from the workbench, but also from the floor, providing free passageways in case of force majeure;
- prepare:
- primary means of fire extinguishing combustible gas;
- medical first aid kit.
The burner flame is adjusted in the following sequence:
- open the valve on the fuel source, supply gas to the burner and light it;
- gradually move the nozzle tube towards the overlap of the four air inlets and achieve stable combustion.Additionally, the burner flame should be adjusted by changing the gas supply. Having received the flame of the desired intensity and shape, the position of the tube and nozzle should be fixed with a clamp screw (in the figure - 4).
Such a burner will work steadily and give an even flame, sufficient to heat small parts to the required temperature.
This is interesting: We open a blacksmith shop with manual equipment for artistic forging: briefly and clearly
Burner hole
Determine the location where the burner will enter. Many people like it when the entrance is located at the top, and the flame is directed downwards. And some prefer to have multiple burners. I choose an economical approach, and I also like when what I do looks good. Therefore, I like the one burner at the back of the hearth with the flame pointing upwards the most. Place bricks on the bottom and draw a circle where you chose the location of the burner. Make a lot of holes around the perimeter of the drawn circle with a concrete drill. First, do not drill the holes completely and, after making a circle, continue again, adding side-to-side movements to break through the brick and unite adjacent holes. If you do not rush, then the cutout can turn out to be relatively even. Trace a hole on the metal bottom, and cut it out with a gas (plasma) torch.


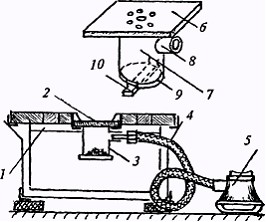


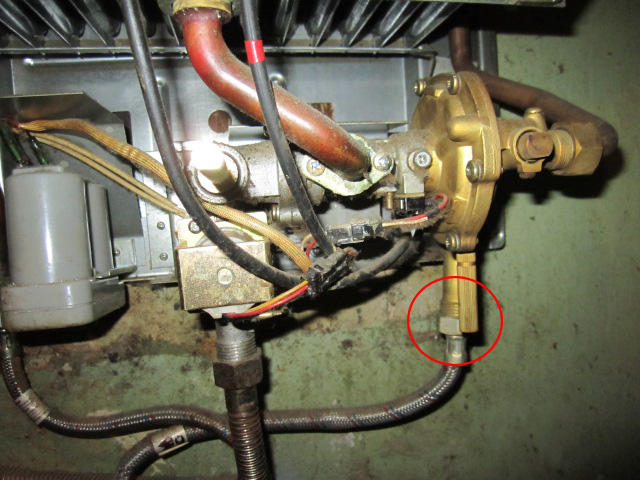
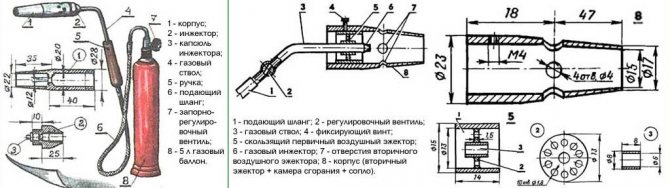
The design of the gas supply channel in the burner
The gas supply channel is a copper or brass tube of the following sizes:
- outer diameter 6 mm;
- wall thickness not less than 1 mm.
Installed on this tube:
- on the one hand - a gas valve with a hose that goes to the gas source (main pipeline, cylinder, etc.);
- on the other hand, a nipple from a stove is mounted. In doing so, you must do the following:
- sharpen the working part of the nipple on the cone;
- cut the M5 thread inside the pipe and wrap the nipple into it (it already has a regular M5 external thread).
Principle of operation
The principle of operation of the hearth is based on the chemical combustion reaction of carbon, which, when reacted with oxygen, forms carbon dioxide with the release of heat. In addition, metal recovery occurs, which is a very important aspect for the formation of homogeneous high-strength parts.
To maintain the optimum level of combustion and temperature, air ducts and air chambers are installed inside the fuel chamber, which forcibly pump pure oxygen. Due to this, it is possible to obtain temperatures above +1000°C, which are unattainable with conventional combustion of solid fuels (coal or wood).
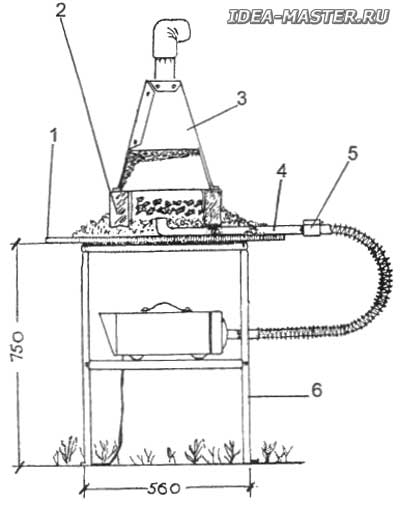
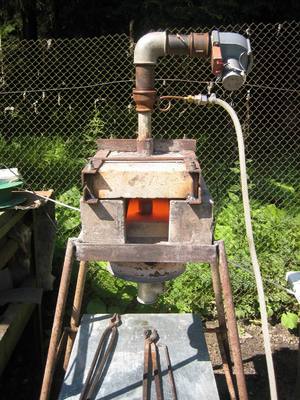
What does a do-it-yourself gas forge look like
At the same time, according to the blowing technology, the volume of air is selected so that oxygen is constantly a little lacking for the oxidation reaction to proceed. In other words, it is necessary to choose such an operating mode in order to prevent the combustion of the metal.
The residence time of the melted part in the hearth should also be limited, since in the atmosphere of carbon dioxide the metal will react with it and form a high-strength alloy with increased brittleness. These negative consequences can be avoided by introducing additional oxygen into the chamber in such an amount that carbon dioxide has time to completely react.
Principle of operation
The principle of operation of the hearth is based on the chemical combustion reaction of carbon, which, when reacted with oxygen, forms carbon dioxide with the release of heat. In addition, metal recovery occurs, which is a very important aspect for the formation of homogeneous high-strength parts.
To maintain the optimum level of combustion and temperature, air ducts and air chambers are installed inside the fuel chamber, which forcibly pump pure oxygen. Due to this, it is possible to obtain temperatures above +1000°C, which are unattainable with conventional combustion of solid fuels (coal or wood).
At the same time, according to the blowing technology, the volume of air is selected so that oxygen is constantly a little lacking for the oxidation reaction to proceed. In other words, it is necessary to choose such an operating mode in order to prevent the combustion of the metal.
The residence time of the melted part in the hearth should also be limited, since in the atmosphere of carbon dioxide the metal will react with it and form a high-strength alloy with increased brittleness. These negative consequences can be avoided by introducing additional oxygen into the chamber in such an amount that carbon dioxide has time to completely react.
Helpful Hints
- Cutting a small hole in the back wall of the forge will improve ventilation. In addition, such a cutout allows you to heat up metal workpieces of great length.
- The forge is placed on a special metal stand or table, which makes working with it more convenient. The height is selected by the master individually.
- If a blacksmith shop works with blanks of different sizes and shapes, then it is advisable to install several furnaces of different sizes at once.They are placed close to each other, and gas and air are supplied with flexible hoses. This design solution allows you to quickly reconnect the burners.
- Shut-off valves must be located on each gas pipeline. For this purpose, conventional valves are most often used - they provide smoother adjustment, unlike ball valves.
The main thing in creating a forge with your own hands is to imagine the principle of operation, choose the right materials and observe safety precautions. Such equipment is created by craftsmen based on personal preferences, wishes and requirements, which provides a wide scope for activity.
Burner design
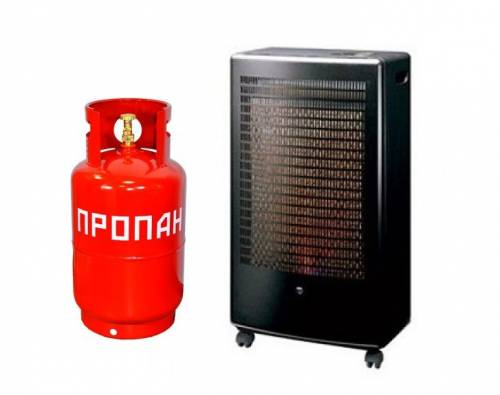
A standard homemade burner functions in this way. Under pressure, gas is supplied from a cylinder through a special hose. The most commonly used gas is propane. The volume of supplied gas is changed by a regulating working valve located on the cylinder. Therefore, the installation of an additional reduction gear is not required.


The shut-off valve is located behind the main valve and is attached to the gas cylinder. It is used to open or close the gas supply. All other adjustments (length and intensity of the flame) of the burner itself are carried out using the so-called working tap. The supply gas hose, through which gas is supplied, is connected to a special nozzle. It ends with a nipple. It allows you to set the size (length) and intensity (speed) of the flame. The nipple together with the tube is placed in a special insert (metal cup). It is in it that the creation of a combustible mixture occurs, that is, the enrichment of propane with atmospheric oxygen.The created combustible mixture under pressure enters through the nozzle into the combustion area. To ensure a continuous combustion process, special holes are structurally provided in the nozzle. They perform the function of additional ventilation.
Based on such a standard scheme, you can develop your own design. It will consist of the following elements:
- body (usually it is made of metal);
- a gearbox that is mounted on a cylinder (a ready-made device is used);
- nozzles (made independently);
- fuel supply regulator (optional);
- head (the shape is selected based on the tasks to be solved).
The body of the burner is made in the form of a glass. The material used is ordinary steel. This form allows you to provide reliable protection against possible blowing out of the working flame. The handle is attached to the body. It can be made from various materials. The most important thing is that it provides convenience during work. Previous experience shows that the most optimal length for such a handle is in the range of 70 to 80 centimeters.
Gas burner device
A wooden holder is attached to the top. A gas supply hose is placed in its body. This allows you to give the structure a certain strength. Flame length can be adjusted in two ways. With the help of a reducer located on the gas cylinder and a valve mounted on the tube. Ignition of the gas mixture is carried out thanks to a special nozzle.
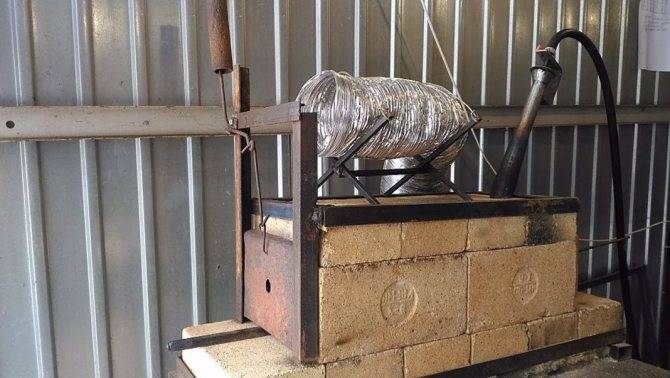
A little about the use of the forge
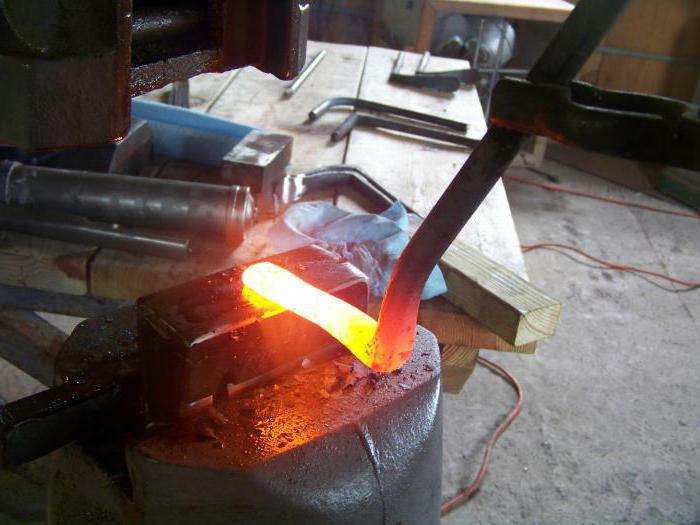
I used it for forging and casting. It melts aluminum and other non-ferrous metals in seconds. It turned out to cast some parts using foam molds in sand and clay molds. He melted aluminum cans in a special crucible.The molten metal was then cast into sand and plaster moulds.
It is well suited for forging knives or some small metal products. About the manufacture of knives from files will be discussed in my next article.
One of the photos shows a heated forging, however, the color rendition is not at all the same. Due to the bright sun, it is impossible to determine the temperature of the workpiece by color. Therefore, earlier in the forges there was twilight. Here is a video of the forge working.
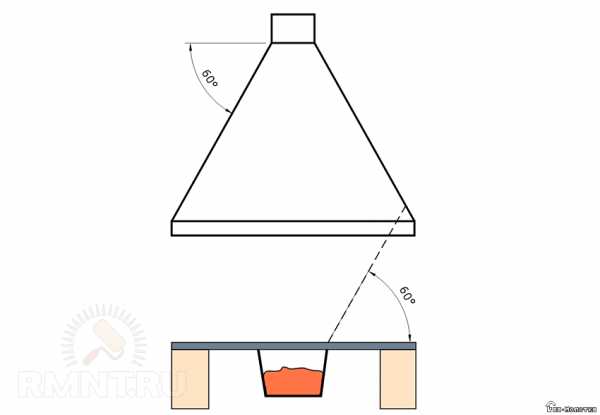
Closed forges
The designs of closed forge gas furnaces differ, as we have already said, primarily in the type of thrust. It is carried out forcibly through an umbrella installed above the mountain with the help of a fan. Any suitable design is used as a fan: from car “stove” assemblies to old household vacuum cleaners. On the latter, however, you still have to install a damper to adjust the intensity of the air flow. By the way, this option, according to some experts, is preferable, as it provides better ventilation of the room.
We bring to your attention several options for the designs of gas forge forges that you can build with your own hands.
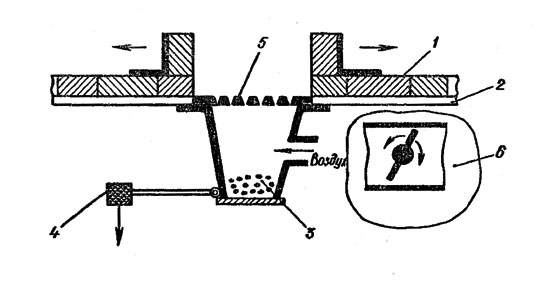
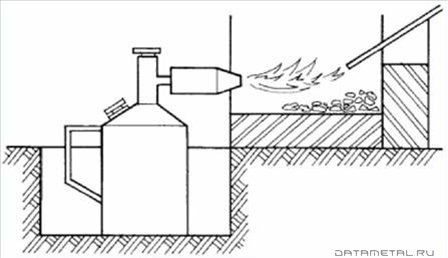
solid fuel forge
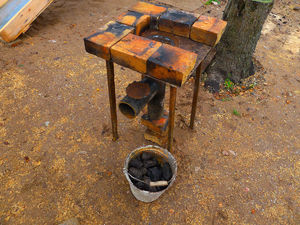 If it is necessary to use the hearth for a single use, it is possible to build a hearth directly on the ground, after digging a shallow hole, the walls of which are lined with refractory bricks. Such a brick is perfect for heating metal using solid fuel. An alternative material is a thick steel plate (at least 5 mm). In such a hearth, you will also need to install a grate of grates (steel or cast iron will serve as the material).Instead of a grate, you can install a steel pipe for air supply:


- The end of the pipe must be tightly welded.
- In the combustion zone, cut slotted grooves with a grinder (through them the air will disperse the heat).
- Place the pipe in the center of the finished structure.
In order to make the forge mobile and simple, it is necessary to weld a metal frame and a steel tabletop. An interesting solution would be to use a used one as such a tabletop. old gas stove. The oven in it will serve to accommodate the source of inflation, and the lower section is convenient for placing tools and appliances in it.
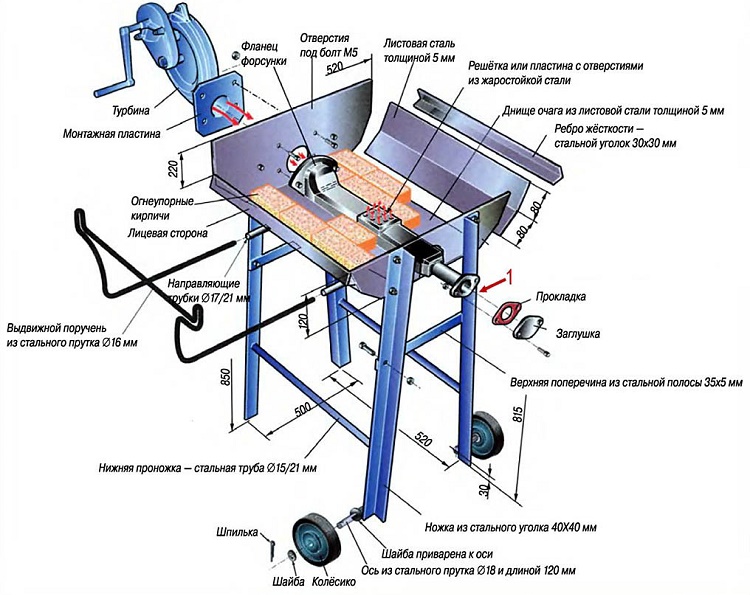
Individual design
Stationary models of the forge should be made taking into account the anthropometric data of the master. This is necessary to ensure maximum comfort during forging, because a red-hot piece of iron weighing several kilograms poses a serious danger to the master and others. The most important thing in the process of work is to ensure maximum safety and comfort.
To correctly determine the size of the workplace, the help of a second person is needed. So, the height is measured from the floor to the elbow bend of the master, whose arm is in a relaxed position, and the legs are shoulder-width apart. To the resulting figure, you need to add another 5 cm, which will become the optimal height for the workplace.
The shape of the table is best square for the work of one master, for activities with an assistant, you can also make a rectangular one. In the case of a square shape, the length of a side is determined by determining the diagonal. To do this, the assistant needs to measure the length from the belly of the master to the end of the largest ticks in the outstretched hand. Another 10 cm is added to the resulting number and half of the diagonal is obtained.Further, if desired, you can simply multiply the result by 1.414 or determine the length of the entire diagonal and solve the equation from the school program C2 = a2 + a2, where C is the resulting diagonal, and is the side of the table.
Main parts
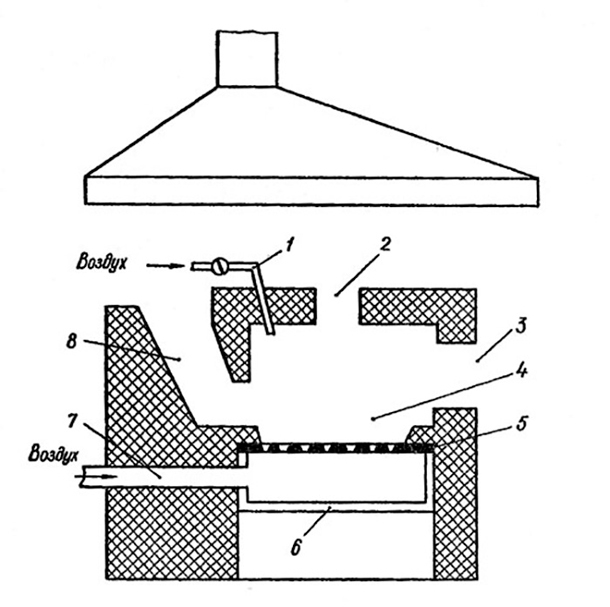
The mechanism of the blacksmith's forge is quite simple. By design, the hearth resembles a furnace with three partitions and one open side. Its main function is to maintain the highest possible temperature inside.
The device of the forge of its own assembly differs little from production devices.
The classic design should have:
- refractory table;
- hearth with grate;
- device camera;
- umbrella;
- air chamber, valve and drainage;
- chimney;
- hardening bath;
- opening for feeding blanks;
- air duct for oxygen supply;
- gas chamber;
- the furnace is removable.
Conclusions and useful video on the topic
The injection burner developed by Alexander Kuznetsov is especially popular. In this video clip, he tells what the structure consists of and how to assemble it:
An example of the operation of an injection burner:
Properly designed and handcrafted to exacting specifications, an injection burner will become a reliable assistant for a long time. This device will replace costly factory-made tools. With it, you can solve many everyday problems without resorting to the help of professionals.
Do you want to talk about how you assembled an injection torch for blacksmithing with your own hands? Do you have useful information on the topic of the article? Please leave comments in the block form below, ask questions, post photos.