- What will be needed?
- Criteria
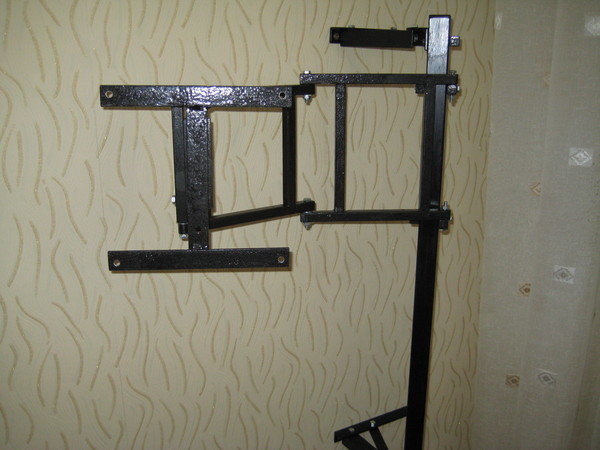
- We make a bracket with our own hands
- The main types of TV mounts
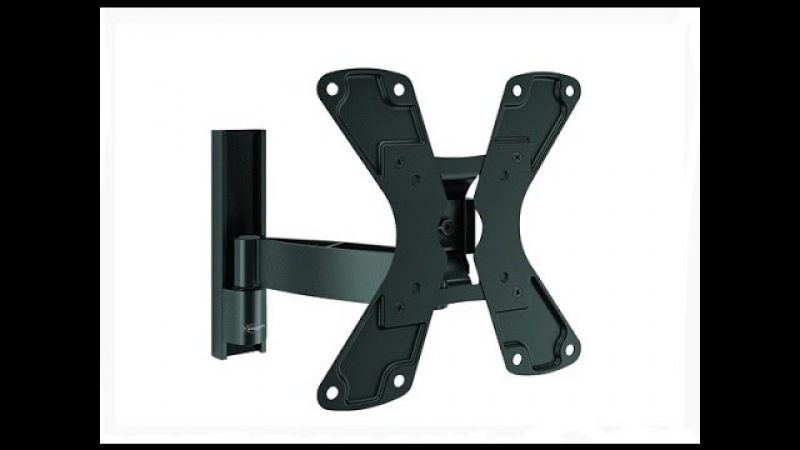
- Wall mount TV swivel retractable
- Tilt-and-swivel type TV bracket
- Corner TV Wall Mount
- The choice of materials for the manufacture of the bracket
- What for?
- Make your own bracket
- Option # 2 - homemade potbelly stove
- And finally, the most complex digital TV antenna that you can make yourself
- Beer cans (from Pepsi-Cola are also suitable)
- LCD monitor
- What can the bracket be made from?
- Recommendations
- Homemade Design Options: General Principles
- "Eight", she is a rhombus, she is also a "Z" shaped
- bracket
- Types of brackets
- 2 Fixed wall bracket structures
- Types of brackets
What will be needed?
Before you start assembling and installing, you need to correctly sort all the tasks in order of importance, then select the appropriate material. First of all, it will depend on a number of key components:
- the amount you expect;
- design reliability;
- mass of the television receiver;
- fastening method;
- the material from which the walls are made.
There are a sufficient number of ways to assemble the holder.The choice depends solely on your imagination. If you want, you can design an original design, decorating the style of the room even with this insignificant element.
The main options will require you to have tools and materials that are preferable to stock up in advance.
- Metal corners. To do this, you can use ordinary plates bent at an angle of 90 degrees.
- Bracket handle. It can be made movable for unhindered change of position. It must also be made of strong metal, which is able to withstand the load from the TV.
- Wooden slab from a solid board or chipboard, fiberboard, chipboard panels. It is used for the most durable fixation of the TV case to the mount.
- Specialized fixings to the wall.
- Self-tapping screws, bolts, dowels.
- Electric drill.
- Perforator.
- Drills for wood and iron.
In addition, it is necessary to calculate the size of the location area and the proposed structure. In the option when there will be a movable mount, you should also consider the space for its unhindered movement. To make the assembly easier, it is recommended to draw a drawing with exact parameters for yourself on paper, so that you can then navigate along it.

Criteria
Before you start making an old TV with your own hands, you need to consider the decision for several important criteria. On which the smoothness of the picture, image quality and color saturation of the frame depend. These factors include:
- signal response time;
- viewing angle (for most modern screens it is extremely small; and if the viewing angle is not respected, the image becomes cloudy or darkened);
- room illumination (sensitive sensors of computer displays require rather poor lighting in the room, otherwise the picture on the screen will look pale);
- the depth of dark tones (which, unfortunately, is extremely low for personal computer monitors and is not able to convey the full depth of black in the frame of a television film);
- contrast level (significantly different between these two types of devices; not maintaining the correct contrast settings can cause great harm to the eyes of the beholder).
We make a bracket with our own hands
If you are not going to change its position during the operation of the TV set, then you can make a simple and inexpensive TV mount on the wall with your own hands.
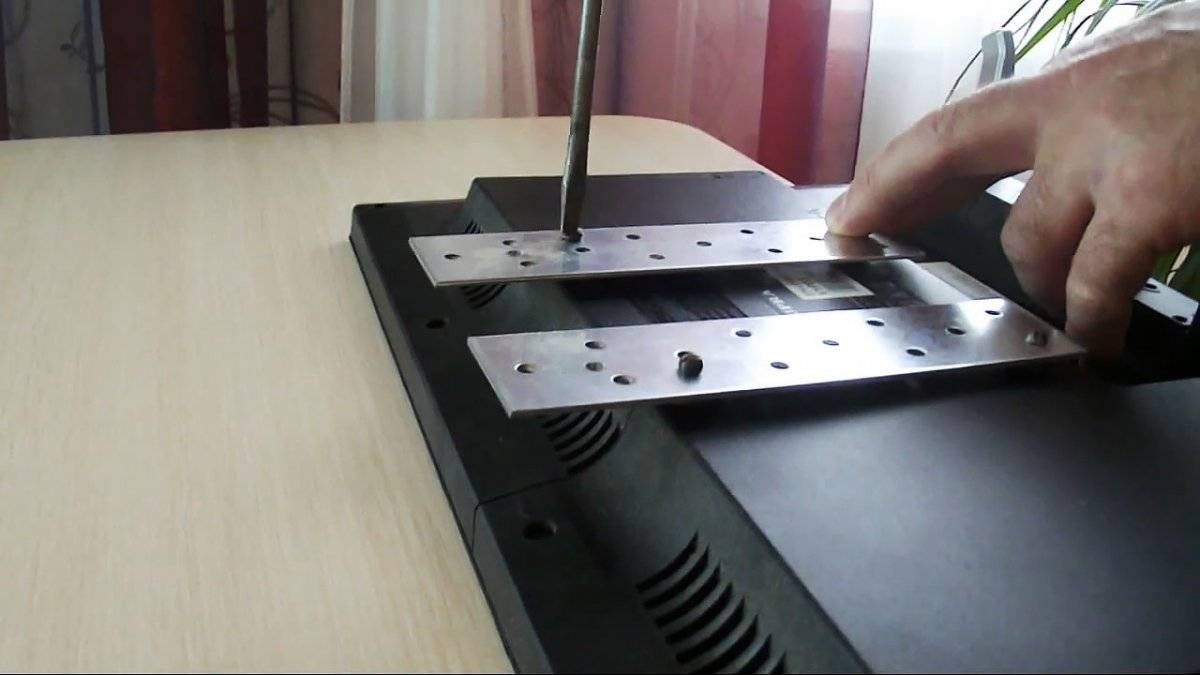
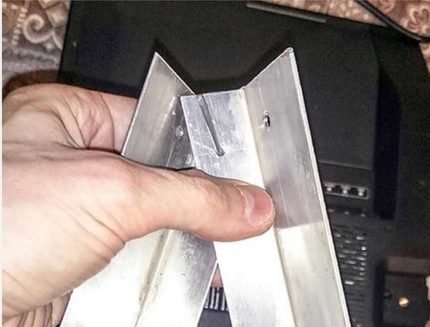
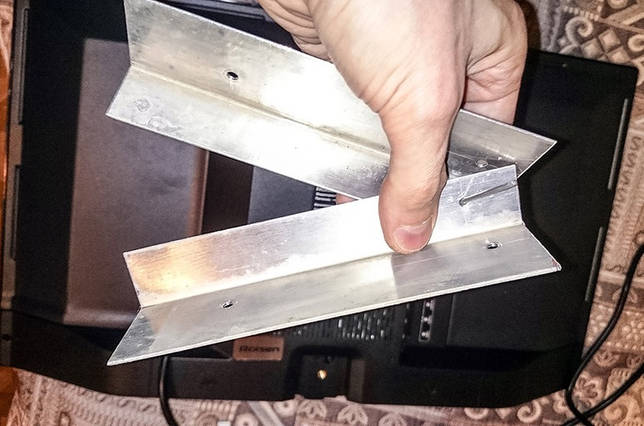
To mount a device with a 32 or 42 inch screen, you will need to prepare 4 aluminum or steel corners (to be used in the manufacture of a TV bracket) and 1 spoke from a bicycle. It is recommended to use an aluminum corner, as it is easier to handle. The dimensions of the segments are not important, the main thing is that the holes on the body of the device and on the corner match.
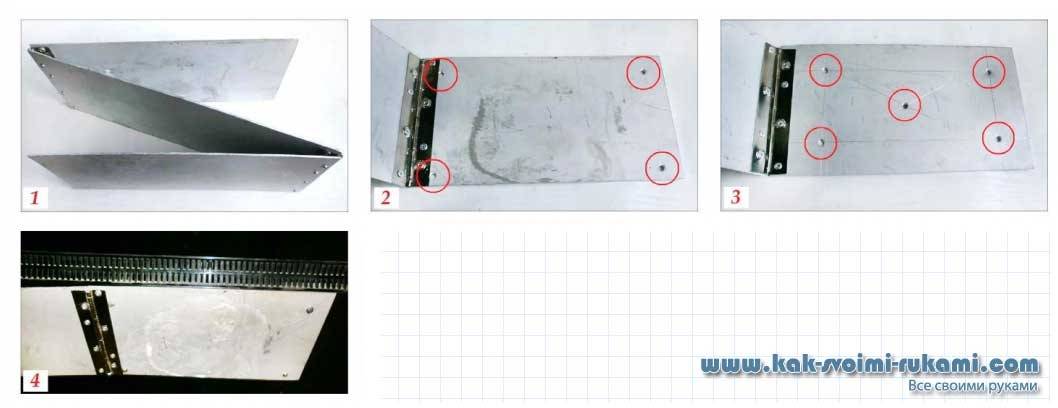
Make 2 holes in the details for attaching to the unit, and in the upper part - one at a time, for the knitting needle. Attach the finished parts to the body of the TV receiver (using M4 screws). The rest of the pair of parts should be mounted on the wall.
First, you need to drill 2 holes in them for fastening to the wall (or more, depending on the size of the diagonal of the device and its weight) and one hole in the upper part of the part for inserting the knitting needle.
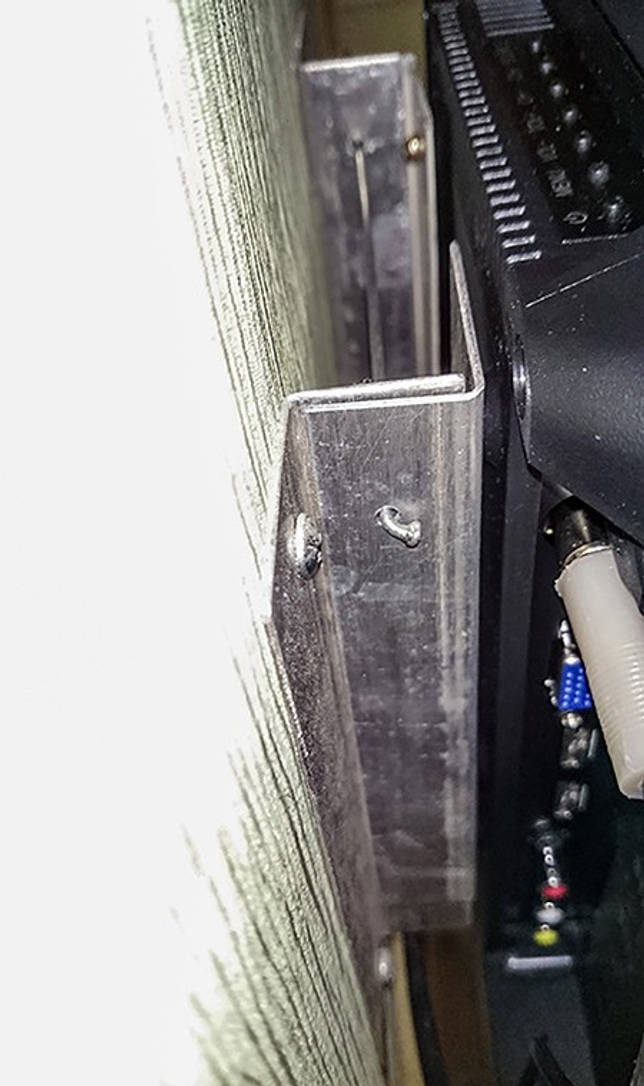
After that, markings are made on the wall through the holes made.All holes in 4 parts must be located strictly opposite each other in order to avoid distortion of the device after installation.
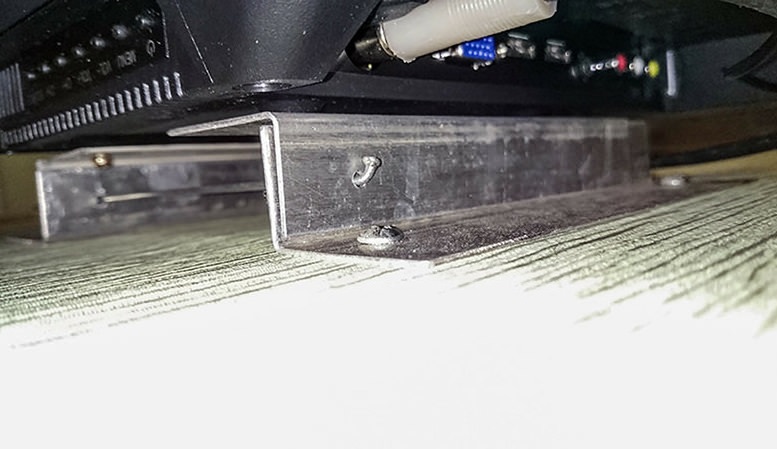
The distance between the corners should be slightly less than between the same parts on the unit, so that the latter wrap around the wall corners from the outside (when placing TV mounts on the wall, it is recommended to use a building level to accurately position the parts horizontally)
.Now you can hang the TV on the wall. To do this, you need to lift your 42 inch unit and align the mounts as shown in the figure, after which you need to insert the spoke.
If there is no knitting needle, it can be replaced with a nail with a hat. For heavier machines, use thicker nails, eg 100 mm long. At this stage, mounting the TV on the wall with your own hands is finished.
Before attaching the TV to the wall, you need to determine the width of the corners.

It should be such as to ensure normal ventilation between the wall and the TV receiver. Otherwise, your 42 inch TV will overheat, which will affect its lifespan. All wires, electrical and antenna, can be hidden in the cable channel.


The main types of TV mounts
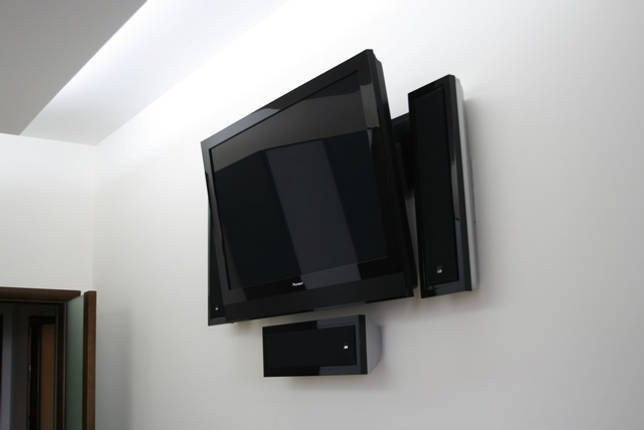
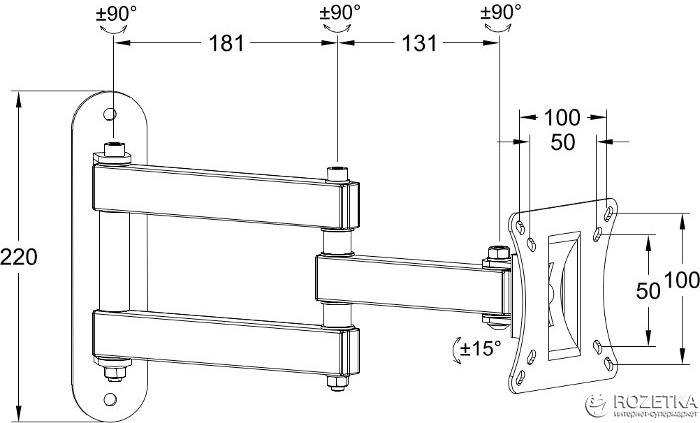
Wall mount TV swivel retractable
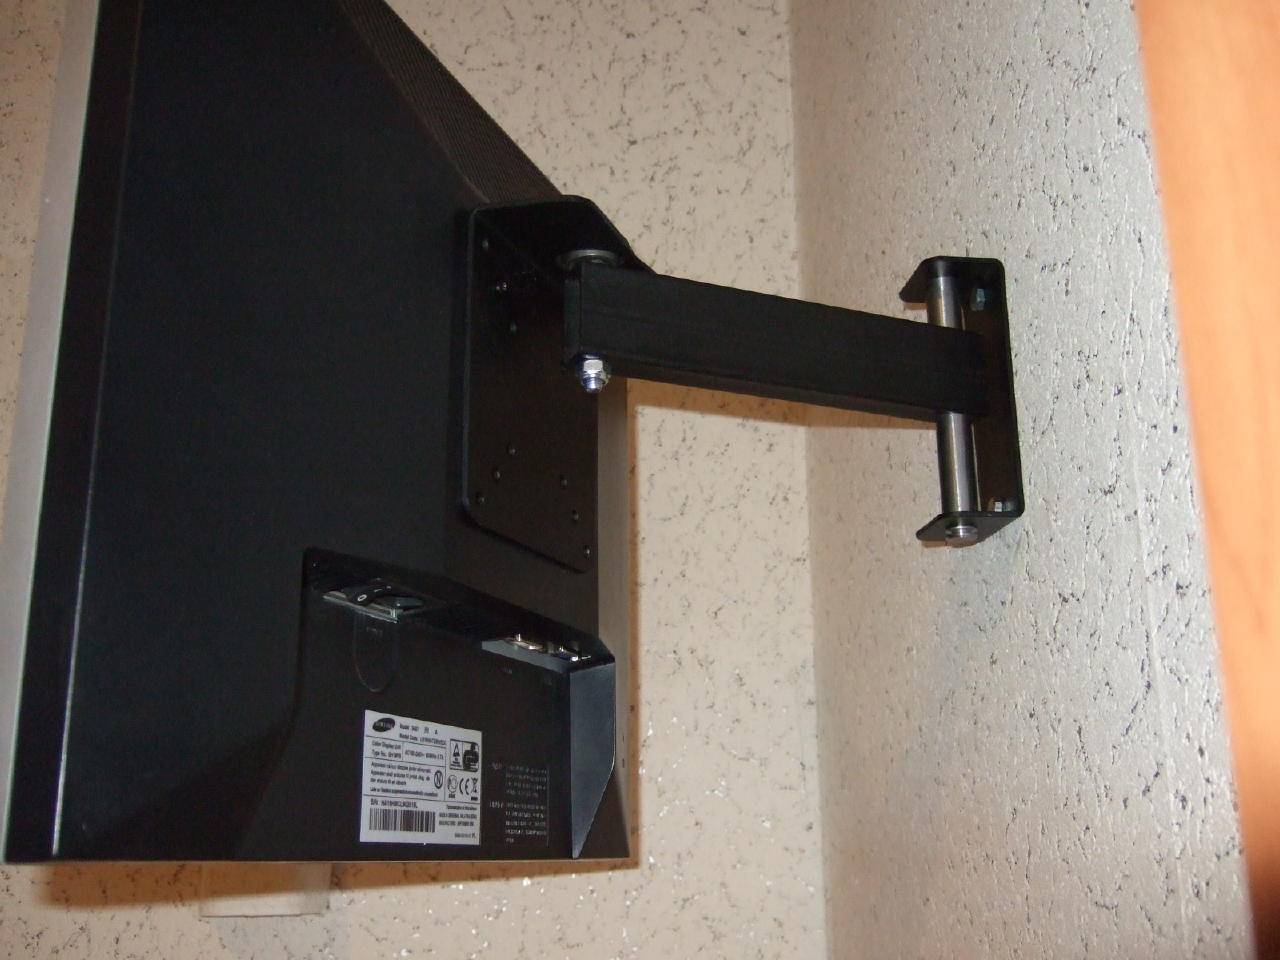
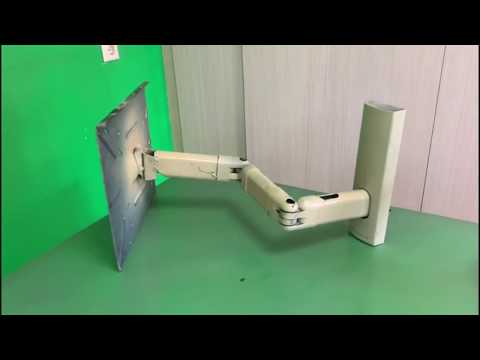
The swivel and slide TV wall mount is the most convenient to use. It provides the maximum number of degrees of freedom for a flat screen.
Thanks to this mount, the TV panel can be fixed in any position. In addition, the TV itself can:
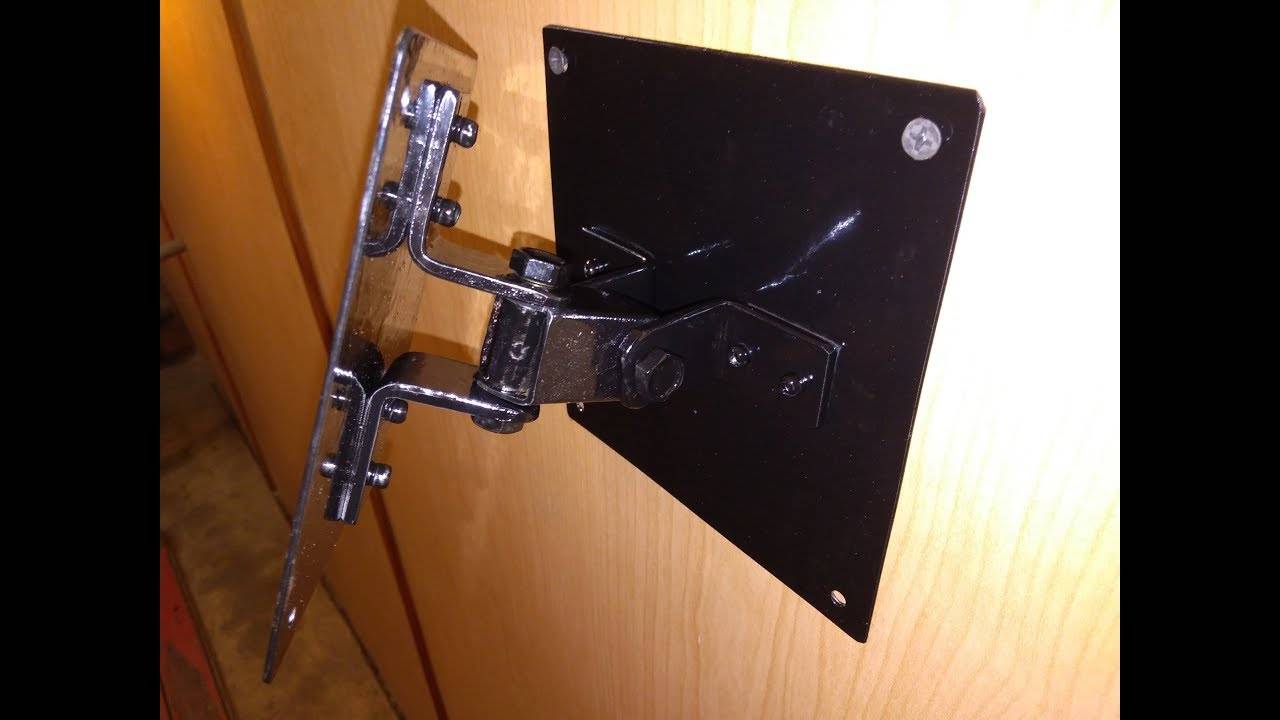
Tilt-and-swivel type TV bracket
This type of fastening allows you to adjust the angle of the panel and change its position.In whatever room the panel is located, the tilt-and-swivel TV bracket will allow you to adjust the image plane vertically or horizontally for comfortable viewing.
Table 2. Advantages and disadvantages of tilt-and-turn brackets
| The ability to comfortably adjust the screen | Difficulties during installation work |
| Quick selection of the most comfortable position for viewing the screen anywhere in the room | Large distance between wall and panel |
| Allows you to install the LCD panel in the corner and residential areas with a non-standard layout | High selling price. The mount has different weight limits for the panels |
Corner TV Wall Mount
Corner brackets allow you to install TV panels in the corners of rooms and any type of premises. Their design is in many ways reminiscent of rotary-sliding devices.
The TV can be mounted on one wall, and with this unit you can view the screen from various positions in the room. Such models allow you to remove the panel and go about your business without fear of hurting the device. This is especially useful in confined spaces.
The choice of materials for the manufacture of the bracket
So, for the manufacture of a swivel bracket on which to install the TV, we need:
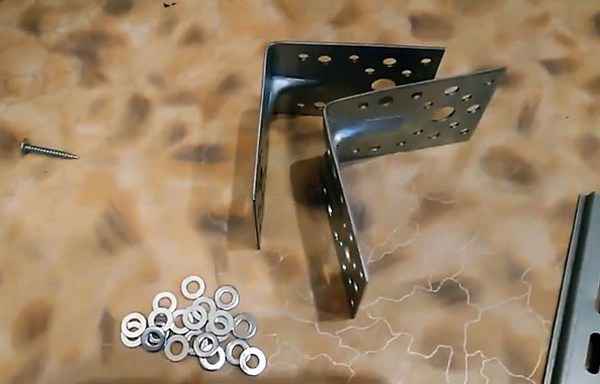
Two perforated corners with ribs
This is very important, since the corners for making the bracket should not bend;
Several nuts, screws and washers M6;
Aerosol paint.
Particular attention when choosing mounting angles should be paid to their thickness. For the manufacture of the bracket, it is recommended to use corners with a thickness of at least 2 mm
Just as mentioned above, stiffeners must be present at the corners.
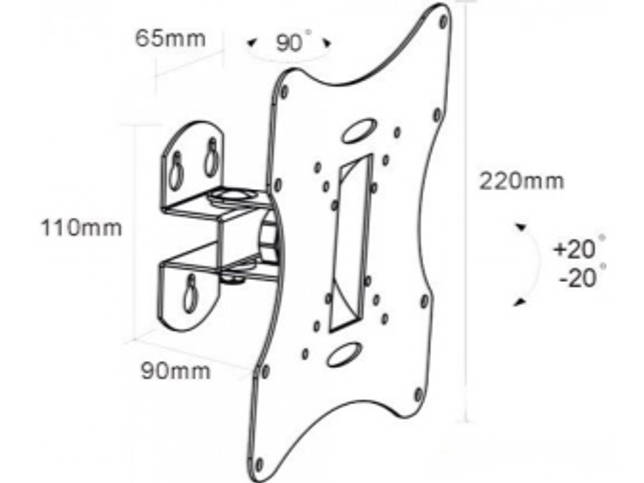
The size of the corners depends on the dimensions and weight of the TV. At the same time, the wider the corners are, the better and more reliable the homemade bracket will be. To install a small TV, the width of the corners for the manufacture of the bracket must be at least 65 mm, for larger TVs, at least 100 mm.
What for?
Every person reading this article is probably already wondering with surprise about who and for what purposes may need to make a TV from a monitor with their own hands. After all, the era of scarcity is gone forever, in any city there are at least a dozen stores selling all kinds of electronics for every color and taste. Why suffer and make great efforts to make one thing out of two good things separately, and even of dubious quality?
There are several fairly logical answers to such questions.
First, it's just interesting. Despite the fact that the need to do something with our own hands has disappeared in our time, there are still many people who are nostalgic for the times of the Soviet Union, when they had to solder, tin and saw out almost everything themselves - from electric guitars to speakers. There is a bag with details, there is a set of tools. Everything, further think and do it yourself.
Secondly, not everyone has the opportunity to purchase a new expensive monitor for watching TV. But in the closet, perhaps, there is an old computer screen and several boards that will allow you to make a pretty good TV with your own hands.
Thirdly, such operations significantly develop the brain and help to simply kill time with benefit. The result is obvious: an interesting homemade product hangs in the garage, and the time was spent with interest, and I kind of learned something for myself, and even got a lot of pleasure from work!
Make your own bracket
There are many ways to mount the TV on the wall with your own hands. Let's consider one of them. To make your own wall mount for a 32/42 inch TV, you will need:
- 4 metal corners;
- a bicycle knitting needle or a large-headed nail;
- plastic dowels;
- drill;
- plastic box for wires;
- building level.
To make a reliable DIY TV mount, choose the right materials for fasteners and corners. Aluminum corners will be easier to work with. Decide on the width of their sides. The corners will set the distance separating the fixture from the wall. This distance must be sufficient for normal ventilation of the rear wall of the appliance. If the device is poorly ventilated, the device will inevitably overheat and quickly fail.
Choose stronger dowels to ensure the most reliable mounting for the TV on the wall. If something goes wrong, the gimbal will collapse along with the TV set.


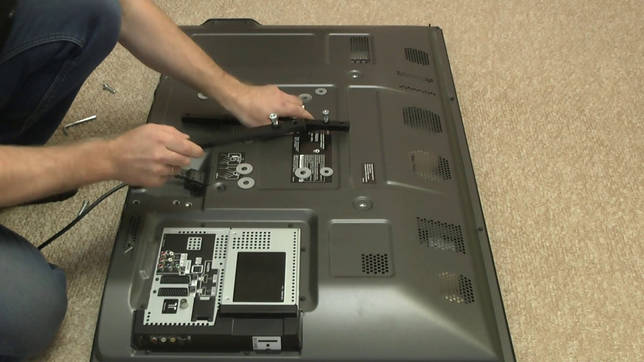
The process of mounting the TV on the wall:
- Drill 2 holes on two corners for mounting to the TV. Make sure that the location of the holes matches the desired locations on the back of the machine. The length of the corners is not as significant as the width. The main thing is that the length is enough to make the necessary holes.Make sure that all the holes you make are located strictly opposite each other, otherwise the device will hang crookedly.
- In the upper part of the corners, which is perpendicular to the side of the attachment to the TV, make one hole for the bicycle spoke.
- When these corners are ready, fix them to the TV unit with screws. You can put TV mounts on M4 screws.
- Take another pair of corners. Make holes in them for mounting the TV on the wall, at least two. Calculate the optimal number of holes based on the weight of the device. For heavy devices, more holes will be needed, otherwise a homemade TV bracket will not withstand the load.
- Drill holes for a bicycle spoke on the other side of the corners, at the top.
- Make a mark on the wall using the holes in the corners. The distance between the corners should be slightly less than between the parts fixed on the back of the device. The corners on the panel should cover the wall corners from the outer sides.
- To place the parts on the wall more evenly, use the building level. If the markings are not straight enough, the TV will fall off the bracket. Perhaps the wall will also be damaged.
- Plastic dowels come in handy to secure the aluminum corners to the wall.
- Raise the appliance to the level of the corners and align the fasteners.
- Thread the bike spoke through the holes. Remember that these holes must be at the same level relative to each other. The needle can be replaced with thick nails, the length of which is approximately 100 mm. To prevent the nails from jumping off the bracket, they need to have a hat with a diameter greater than the size of the holes.
- Fix fastener.
Similar working principle:
A PVC box is needed to safely remove the wires from the TV into it. How do I remove the TV from this type of wall mount? Bend back the tops of the nails, gently supporting the expensive appliance from the bottom or sides.
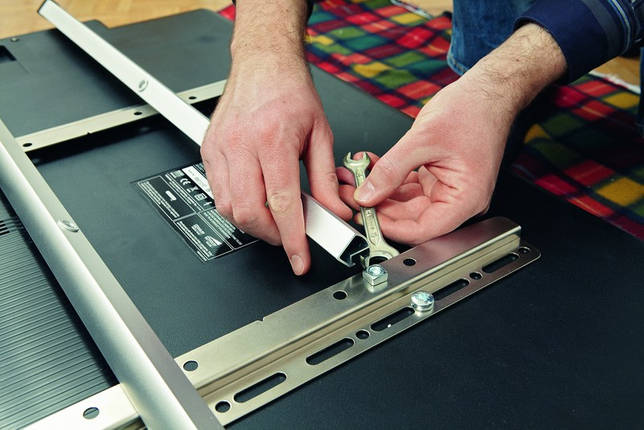
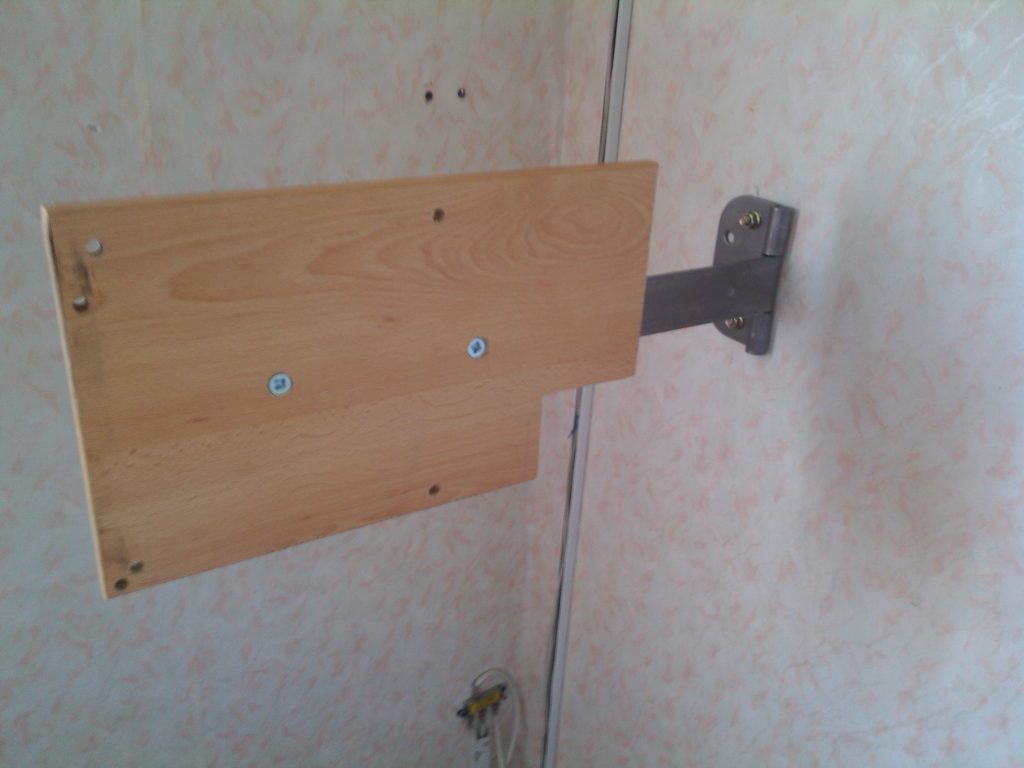
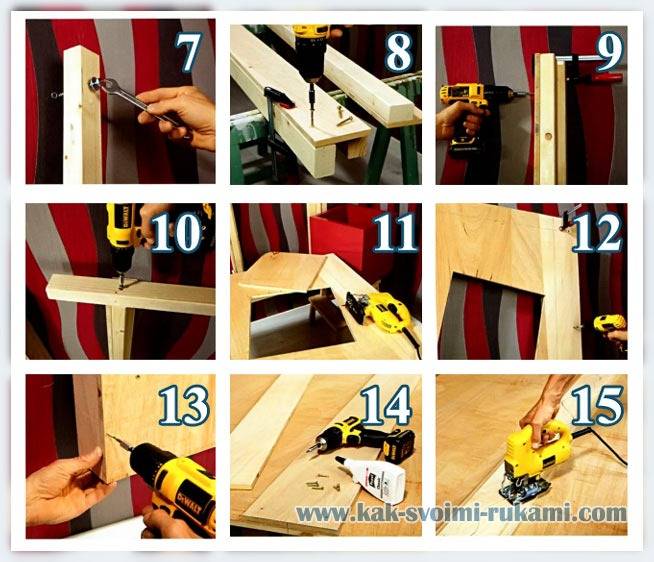
Another method for assembling a TV bracket with your own hands, on a wooden rail and 4 hanging hooks:
- Take a wooden rail with a cross section of 3 to 10 cm. Divide it into 2 equal segments corresponding to the width of the device. If you need to set the slope when mounting the TV on the wall, make the bottom rail thinner by one and a half centimeters.
- Take 4 self-tapping screws with ring heads. Screw 2 screws into the ends of the rails, not too close to the edges.
- Use a drill to make holes in the rails for fastening to the device. Fix the wooden planks to the device.
- Mark the wall. It will need to make holes for the rings at the ends of the screws.
- Drill the required holes.
- Fix the hanging hooks in the holes.
- How to hang a TV on the wall with a wall bracket of your own making? Lift the device and put the rings on the hooks. The wall mount for your device is ready.
How to remove the TV from the wall bracket? Just lift the device so that the hooks pop out of the rings.
Option # 2 - homemade potbelly stove
It is easiest to make a do-it-yourself oven for a garage from metal, that is, to make an ordinary potbelly stove. To do this, use sheet metal, a metal pipe or a barrel. It is easier to make a cubic unit from a metal sheet, and, of course, a cylindrical potbelly stove will turn out from a pipe or barrel. The thickness of the metal in any case must be at least 5 mm.A metal pipe suitable for making a potbelly stove should be wide enough, at least 300 mm in diameter.
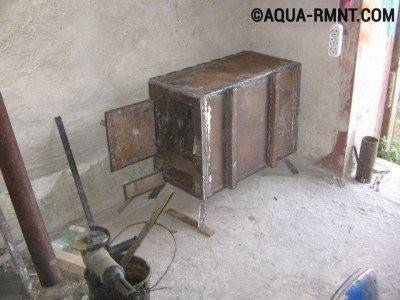
To make a potbelly stove for a garage with your own hands, you will need sheet metal or a suitable metal container, as well as a corner, pipes and other materials
It is preferable to organize the outlet of the chimney from above, but sometimes it is more convenient to do it from the back wall. In the latter case, care must be taken that the slope of the chimney is at least 30 degrees. For efficient removal of exhaust gases, it is preferable to use a metal pipe with a diameter of 120 mm or more. At the first meters, the chimney should be thick enough - 2-3 mm. Thinner material with constant heating will quickly burn out.
Directly under the firebox, a place should be arranged for the removal of ash. To do this, use a horizontal metal plate with slots. The size of the slots depends on the size of the potbelly stove and the type of fuel. For a small charcoal and small wood stove, the slots should be 10-12 mm, and for a large wood-burning stove, cuts should be made at least 40 mm.
A removable box is installed under the partition, which is periodically cleaned as ash accumulates. For the box, a three-millimeter sheet steel is used. To increase the efficiency of the potbelly stove, metal plates 5 mm thick are welded perpendicular to its sides. Thus, the area of contact of air with the heating unit increases and the room heats up faster.
When cutting sheet metal, the thickness of the material itself, as well as the thickness of the grinder disk, should be taken into account. An interesting version of the manufacture of potbelly stoves from gas cylinders is presented in the video:
And finally, the most complex digital TV antenna that you can make yourself
The log-periodic scheme allows you to get the maximum gain without additional circuits.
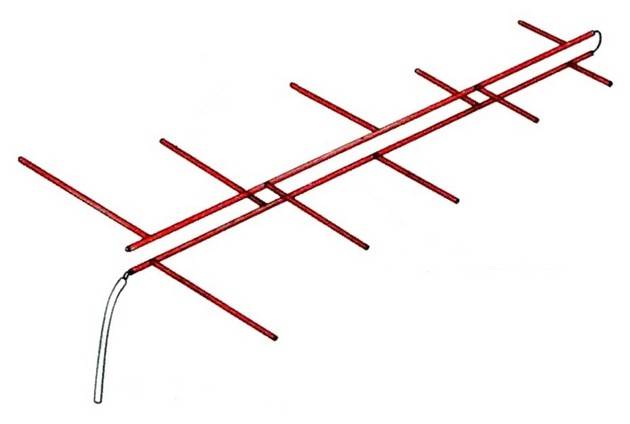
The principle of operation of the design: in the direction of the signal source, there are two conductive tires, on which perpendicular vibrators are installed in strict sequence. Their length and distance between them are calculated according to a strict algorithm. An error of 2-5% will lead to a complete inoperability of the system. But a properly assembled antenna will receive an analog and digital signal with the highest quality.
Can be used with a screen that helps to amplify a weak signal.
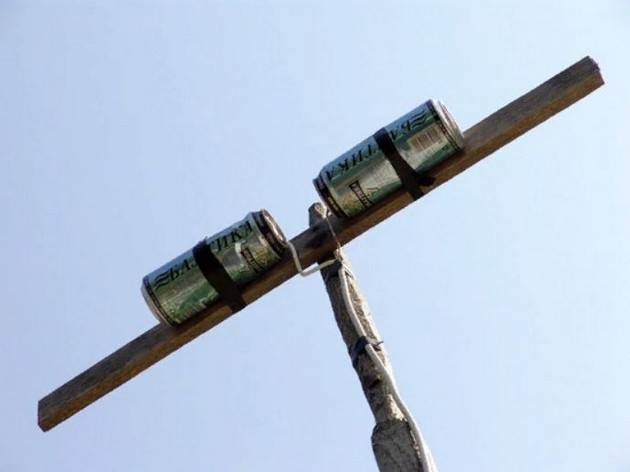
Beer cans (from Pepsi-Cola are also suitable)
Why is this material so popular?
firstly, the missing dimensions of the segments are compensated by a large receiving area: if you turn the can into a plane, you get a standard sheet;
secondly, aluminum has excellent conductivity, slightly falling short of copper: accordingly, resistance losses will be minimal;
thirdly, the aerodynamic shape reduces windage (which is especially important when placed on the street), and the lightness of the design does not require particularly strong fastening;
and, finally, it is an affordable and absolutely free raw material, moreover, lacquered aluminum perfectly resists the influence of moisture.
Despite the relatively high reception quality, this design does not have a high intrinsic gain. Connecting a standard amplifier may have no effect, due to the complexity of selecting coefficients.
Necessary materials:
- Two identical liter cans of beer, washed and dried. In extreme cases, you can use a half-liter, but the reception range will be reduced.
- Antenna cable RK-75 of the required length (a design with a wiring length of more than 10 meters will most likely not provide reliable reception).
- Antenna plug that matches your TV.
- Bracket for fastening made of dielectric for fastening cans: a wooden block, clothes hangers, a plastic pipe (metal-plastic will not work).
- Fasteners: electrical tape, adhesive tape, or plastic clamps.
- Soldering iron, standard solder, flux for aluminum soldering.
- Knife, side cutters, sandpaper.
It makes no sense to paint the formulas for calculating the sizes for the reception frequency; anyway, it will not be possible to change the sizes of the segments. The DIY beer can antenna has been repeatedly tested in various conditions, so let's just use the finished sample.


We cut the antenna cable. There will be a plug at one end, we open the other end in such a way that from central vein to the screen wound into a bundle was at least 100 mm. So that the “bare” braid is not exposed to corrosion, it can be hidden in heat-shrinkable cambric.
We clean the areas for soldering the cable: on the upper ends of the cans. Fine sandpaper is fine for this.
Each end of the wire is folded into a ring 3-5 mm in diameter, and carefully soldered. Then we fasten the resulting terminal to the bank using a galvanized self-tapping screw. After that, we clean the joints with a flux and solder, until the solder “sticks” normally.
We fix the banks (from the point of view of the theory of radio reception, now these are symmetrical vibrators) in such a way that there is exactly 75 mm between the ends with the cable. This is the optimal gap for receiving analog and digital television.
An important step: setting the product for optimal TV signal reception. Most likely, you know the direction to the tower of the broadcasting center. If not, Yandex cards will help you. Find a TV center, your home, and spend a virtual straight line. If you do not want to mess with the azimuth (this is impossible without a compass), determine the direction landmark in the line of sight. For example, a boiler room pipe or another object. For reliable reception, the home television antenna is located strictly perpendicular to the vector on the tower, and horizontally.
If the signal is received confidently, you are lucky the first time. At a considerable distance from the transmitter, you can catch the reflected signal. Even a simple antenna made from cans requires proper orientation in space (although this is not a satellite dish). In an area of poor reception, all-wave technology can suddenly "shoot" in any direction.
Do-it-yourself "beer" decimeter antenna allows you to confidently catch analog channels. And how to do antenna for digital TV? No additional secrets. Digital broadcasting is carried out in the same range. If you have a DVB-T2 tuner, you can tune in to one or two multiplexes and receive a free set of Russian channels on beer cans.
Typical diagram in the illustration:

However, in order to solder and set up such a device yourself, elementary knowledge in radio engineering is required. Still, it is easier to buy a ready-made device, especially since you have already saved on the antenna.
LCD monitor
Modern man more and more feels himself a part of the future, a part of constantly moving progress, therefore those things that until recently seemed to him novelties and a “miracle of technology” no longer matter today. This fate befell vinyl records, floppy disks, CDs and DVDs. And now the time has come for desktop computers. And this is not surprising. Who needs old bulky personal computers when so many different companies are releasing ultra-new, thin and light laptops, tablets and smartphones with wide screens, as well as laptops and netbooks.
Most advanced users have long been part of the "mobile community", moving from computers to new and modern gadgets. However, given the mentality of the common people, it is safe to say that not only were old PCs not ruthlessly thrown into the trash, but, most likely, they were carefully cleaned, packed, and are now stored in pantries.
From an old monitor, you can make an excellent do-it-yourself TV, which, if you do all the necessary work with high quality, can last for many, many years.
However, before you start creating a new device from several old ones, you need to purchase a few more parts:
TV tuner;
- splitter, as well as a cord for connecting multi-channel digital television;
- antenna;
cable for mounting the antenna.
After acquiring all the above parts, you just need to connect all the devices together. Since the connectors in them are different, it is simply impossible to make a mistake during installation.If the TV does not turn on, do-it-yourself repairs will be much cheaper and easier, since spare parts for a computer are much easier to find on sale than outdated mechanisms for a TV set. This will also significantly affect the popularity of a home-made device among the poor.
What can the bracket be made from?
Before proceeding with the assembly and installation, it is necessary to correctly prioritize and select the appropriate material. First of all, it will depend on several main components:
- The cost you are expecting.
- Structural strength.
- TV weight.
- Mounting method.
- The material from which the walls are made.

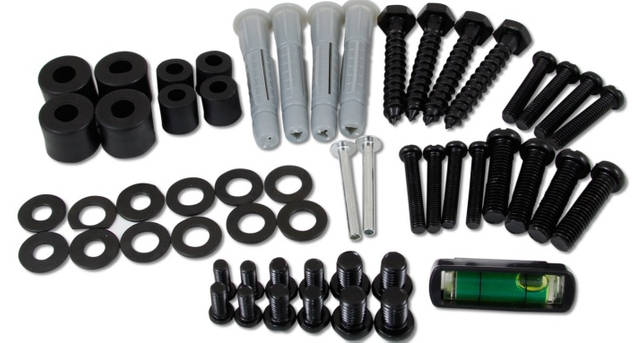
The main methods will require you to use the following tools and materials, which are best prepared in advance:
- metal corners. To do this, you can use conventional right-angled plates.
- Handle bracket holder. It can be made movable for free position change. It must also be made of durable metal that can withstand the weight of the screen.
- Wooden panel from a solid board or chipboard, fiberboard, chipboard. It is used for more reliable fixation of the body of equipment to the mount.
- Special wall mounts.
- Dowels, bolts, screws.
- Drill.
- Perforator.
- Drills for wood and metal.
It is also important to calculate the dimensions of the location and the intended design. In the case when the mount is movable, it is also worth considering a place for its free movement.
Recommendations
In the process, some useful tips may come in handy:
- it is recommended to strictly observe all dimensions in the prepared drawings, otherwise even an insignificant deviation will not allow a high-quality construction to be made;
- be sure to take into account the weight of the equipment that will stand on the rack;
- no need to rush to cut the prepared material, such an operation should be done carefully using a new file for a more perfect cut;
- for the manufacture of racks, you should try to choose high-quality material;
- it is advisable to purchase accessories that are not cheap so as not to spoil the appearance of the finished product;
- if the design provides for guide parts, you should choose silent ball options.

Having a rich imagination and perseverance, it is quite possible to build a beautiful and practical design for a TV.
Learn how to make a TV stand below.
Homemade Design Options: General Principles
Depending on the distance between your TV receiver and the transmitting antenna of the TV center, the signal level will change. Another negative factor affecting the quality of television wave propagation is the presence of obstacles. Ideal reception occurs with a line of sight between the two antennas. That is, you can see the mast of the television center, even with binoculars. If there are buildings or tall trees in the way of the TV signal, there will be no reliable reception. However, waves reflected from other objects can be received using a TV antenna amplifier. If even weak waves do not “break through” to your house at all, you will have to make a mast. The network of TV and radio broadcasting stations is located in such a way that you can catch a signal in any settlement.


- Indoor antenna.Operates without an amplifier in relative proximity to the transmission mast. If a television center is visible from your window, some of the channels can be caught literally on a piece of wire. How to make a TV antenna with your own hands, see the illustration. The quality of workmanship in such conditions affects only the aesthetic component. But if you live on the 1-3 floor, and even surrounded by concrete boxes of a residential microdistrict, a simple design will not work. An indoor antenna, especially a DIY one, will require a signal amplifier.
The advantage of this design is that there is no need for weather protection.
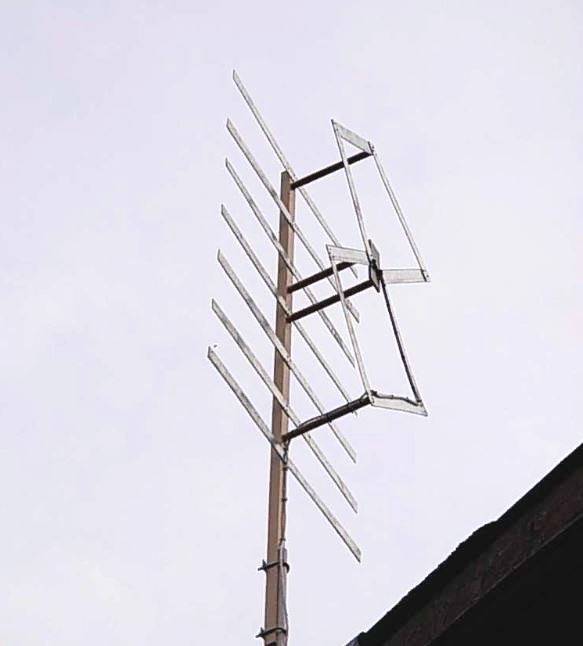
- An outdoor TV antenna may look exactly the same as an indoor one. In this case, a prerequisite is high strength (so that the wind does not change the geometry), and protection of the contact group from corrosion. It is located, as a rule, in the immediate vicinity of the window (in high-rise buildings) or on the roof of a private household. The connecting cable is relatively short, so an amplifier is not required for reliable digital or analog signal reception. With the exception of the case when the transmitting center is far away. The design is available for maintenance and repair, this is an indisputable plus of close placement.
- Outdoor antenna for long range TV. As a rule, this is a rather bulky design with a screen and additional elements that amplify a weak signal. An electronic amplifier is welcome, but with a well-executed design, it may not be needed. Unless to compensate for a long cable (it will definitely have losses).Such devices are mounted on the roofs of high-rise buildings or on masts in private households. The fastening must be strong, otherwise the wind can easily destroy the structure.
- The type of antenna is selected based on the characteristics of the reception, and the wind load in the region. For example, the Kharchenko antenna (the most popular homemade option) should not have a high windage. It may be necessary to choose another, more complex project.
Next, consider examples of making antennas at home using improvised materials, from simple to complex.
"Eight", she is a rhombus, she is also a "Z" shaped
Perhaps the most popular design for do-it-yourselfers. This fairly powerful Kharchenko antenna confidently receives meter and decimeter frequencies in analog and digital format. When the question arises: “How to make an antenna with your own hands?”, This option is first of all assumed.
What is its advantage? With compact dimensions, in most cases no amplifier is required. Unless you want to receive a signal on the 1-3 floor in a densely built-up microdistrict, where dozens of high-rise buildings are located between you and the television center.
How to make a homemade antenna without complex calculations? For a typical broadcasting grid, there is a basic rhombus shoulder size: 140 mm. Distance between wire connection points: 10–15 mm.
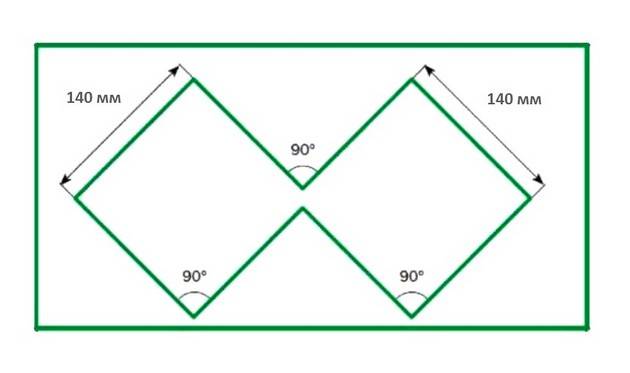
Antenna Kharchenko with such dimensions falls just in the middle of a typical broadcast range. If you need to capture other channels (in some regions, the grid can operate at non-standard frequencies), you can make a wire structure in several rows.The illustration shows a drawing from the magazine "Radio" 50 years ago.
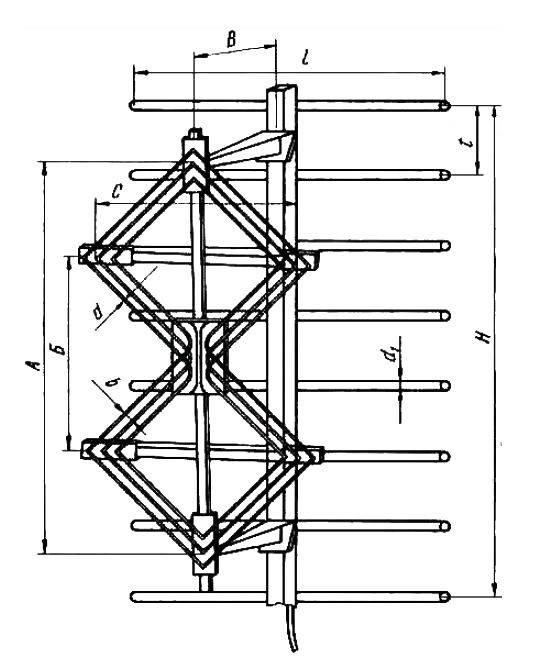
Then the meter range was accepted, and the antennas had corresponding gigantic dimensions. They were made of wire to reduce windage. This manufacturing technique requires patience and a large amount of material. Modern "homemade" prefer a copper tube or an aluminum plate.
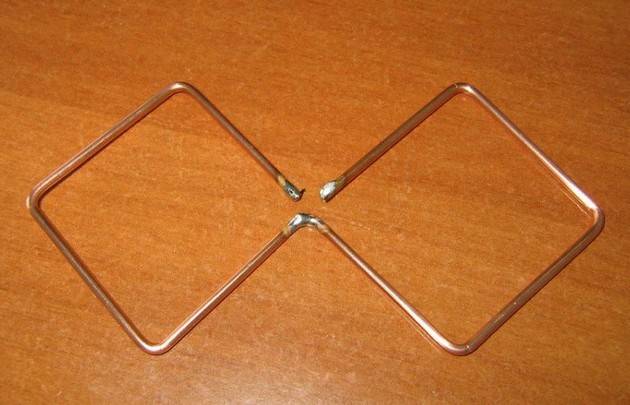
To make an indoor antenna using this technology, a piece of wire is enough. The device is hung in a window opening (in the direction of the television center) and there is no need to worry that it will be blown by the wind. You can make several diamonds, while the reception range will be significantly expanded. An ideal option for digital television, which you can do with your own hands in the country or in a private house.

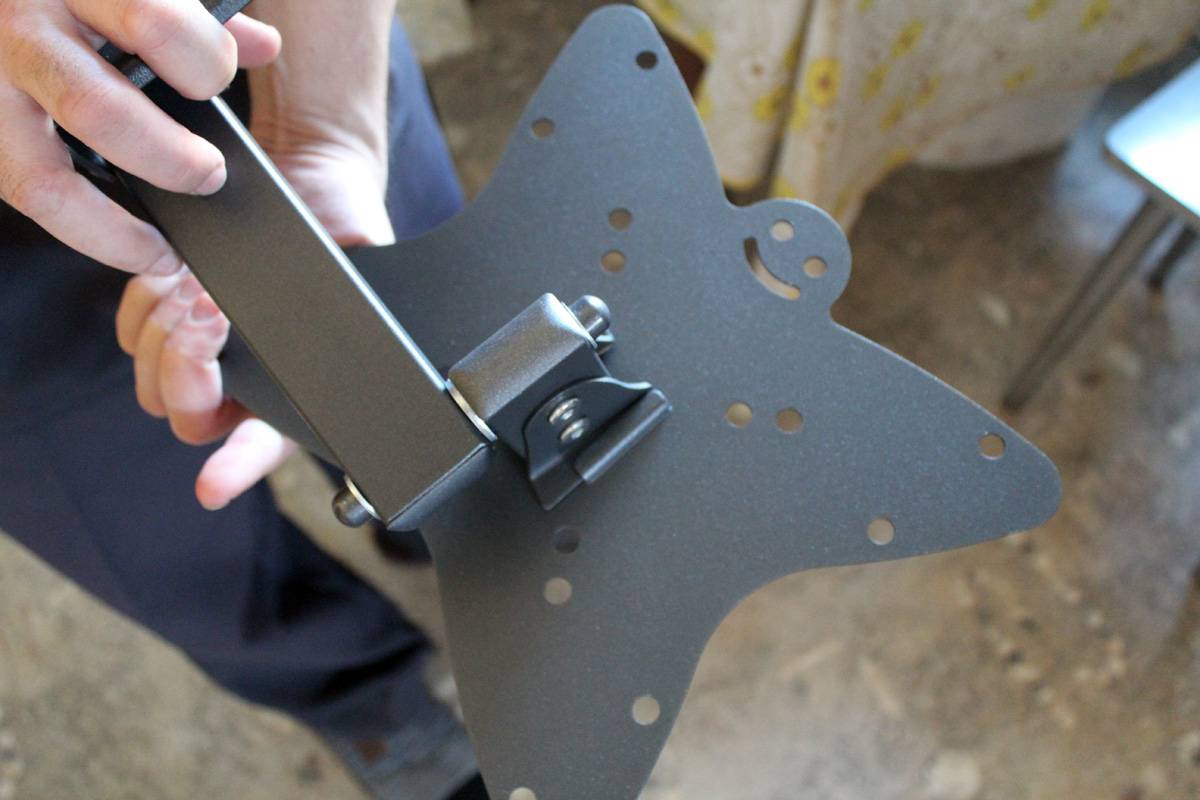
bracket
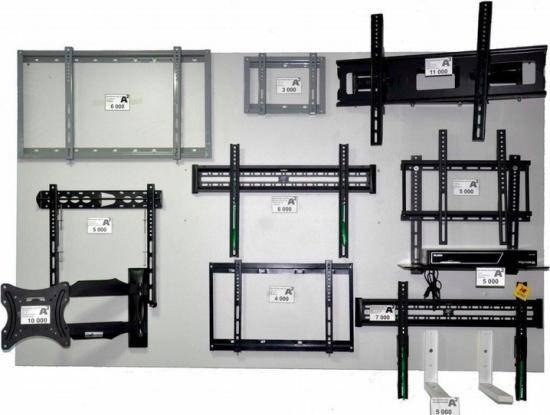
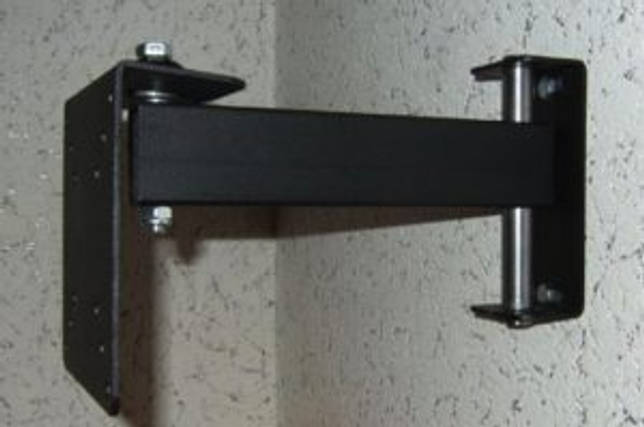
No matter how much we want to, but on our knees we will not be able to make a movable bracket from scratch with our own hands, for the reason that there are a lot of moving parts in it. Fixed is a completely different matter. It can be a structure that is attached to the wall with screws. These mounting holes are designed by the manufacturer for a fairly large load, so they will withstand the TV set. Here is the easiest wall-mounting option that this colorful uncle offers.
Therefore, there are no problems. The main thing is to choose the right place, and what the mount will be depends on the area of \u200b\u200bthe room and on the model.
Show your imagination, watch less TV shows and breathe fresh air.
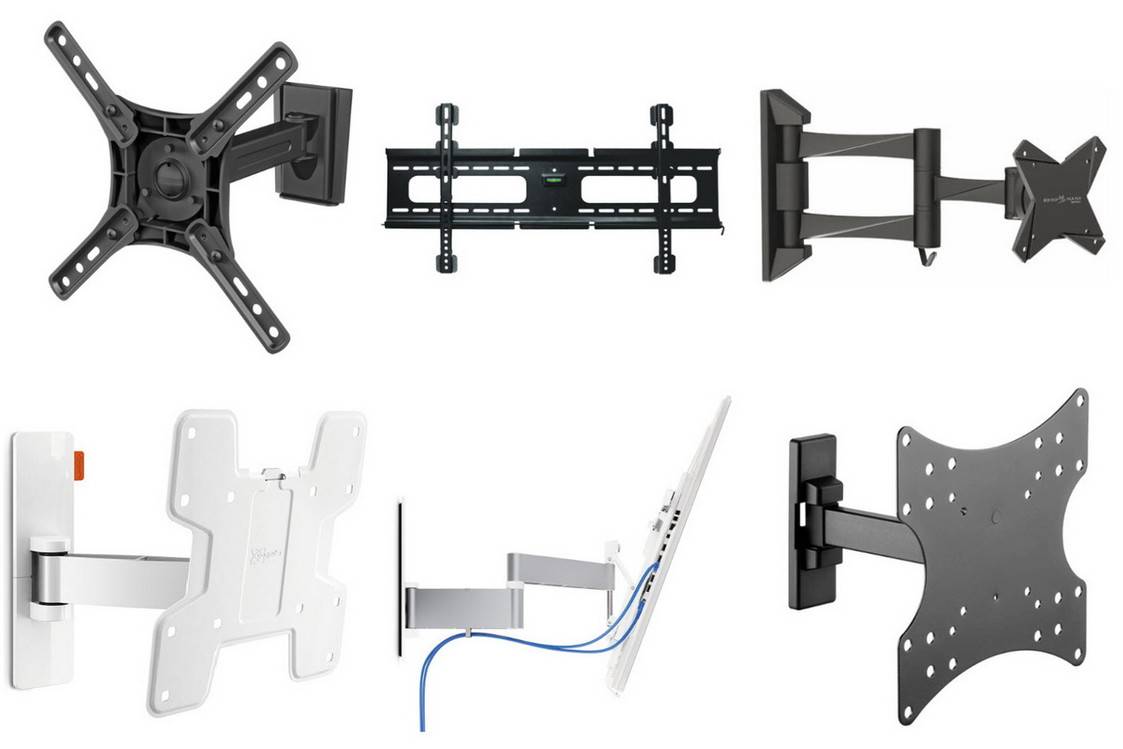
Types of brackets
An important point when creating a mount will be the choice of model. Depending on what goal you are pursuing, you can choose a variety of options. Their classification is extensive and includes several characteristics.
By type of construction:
- Placement along the wall.
- The options taken away from the wall at right angles suggest perpendicular placement of the TV. Convenient for installation above the bed.
- Main part fixed to the wall.
- A movable knob that allows you to change the position of the screen when you turn it.
 By choice of material:
- Durable tree.
- Metal bases.
- Combined models.
The classification shows that the choice is really very large, this will allow you to accurately select the appropriate option. The most important thing is the task that this device must perform. First of all, it must securely fix the equipment and keep it on the wall for comfortable viewing. If necessary, you can install additional details for beauty and convenience.
2 Fixed wall bracket structures
Consider the option of making a fastener made of wood. Main materials:
- two wooden planks;
- self-tapping screws with a ring;
- hooks and plastic dowels.
We take two planks of hardwood, they have the best quality. The length of the slats should exceed the length of the back wall of the flat-screen TV housing by 10-15 centimeters. To ensure that the screen tilts at a slight angle, we take the upper bar slightly thicker than the lower one. We fasten two self-tapping screws with a ring to the upper edge of each of the planks.


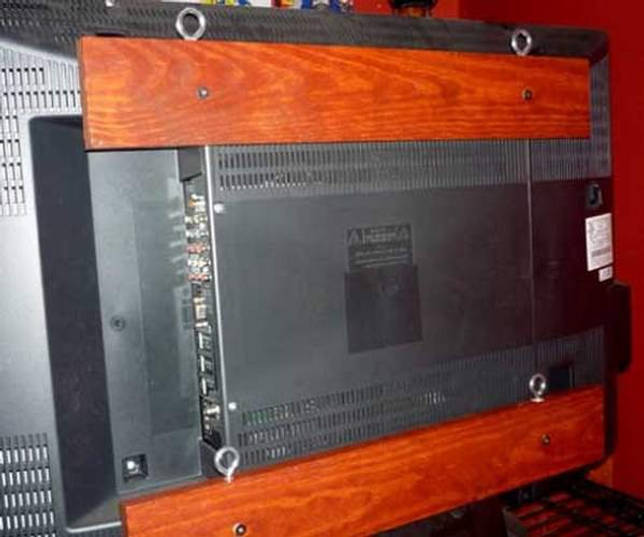
With the help of bolts, which we twist into special holes, we fix the strips on the back wall of the TV. One bar on the top and one on the bottom. Between the rings we measure the distances horizontally and vertically, and transfer them to the wall. We get attachment points. We drill holes in them, install dowels with hooks and hang the product on them.
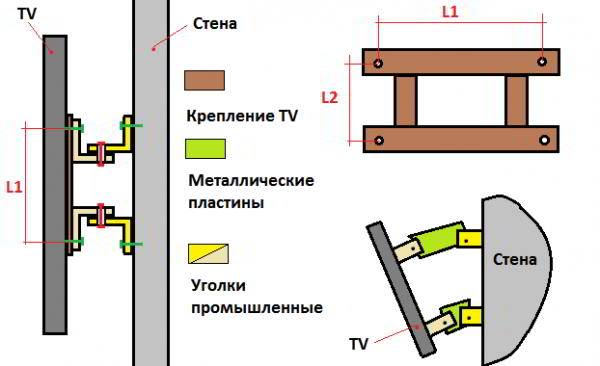
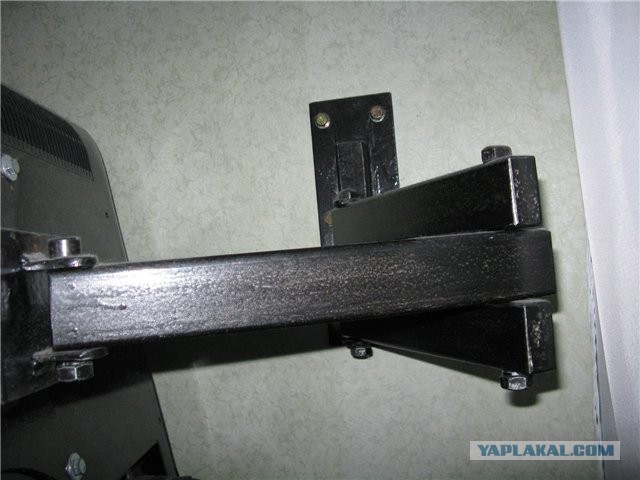
Consider another simple option for making a fixed wall bracket. We will install a small diagonal product on aluminum corners and a bicycle spoke. Steel corners can also be taken, but since the loads on the fastening are insignificant, and steel is difficult to process, aluminum is preferable.
Main materials:
- four aluminum corners;
- one bicycle spoke 2 mm thick;
- bolts, screws, plastic dowels.
The installation location of the flat TV, the size of the dowels and holes are selected individually, taking into account its size. We fasten two corners with two holes drilled on each to the back cover with bolts. The other two - on the wall with screws. To do this, we apply them to the wall and mark the holes for the dowels on the wall with a pencil. Fasteners are best done with plastic dowels. To connect the corners to each other in the upper side of each of them, we drill one hole.
It is desirable that one pair go inside the other, so we make the distance between the corners fixed on the wall a couple of millimeters smaller than the distance between the corners on the TV. Having attached them in place, we apply the TV to the wall. We expose the holes drilled in the upper side plane of each corner in one line, and thread a bicycle knitting needle through them.
The spoke holds the product in a vertical plane, and the corners inserted into each other prevent its involuntary displacement in the horizontal plane. If the TV needs to be removed from the wall, then we take out the spoke and the connection is disengaged.
Despite its small diameter, the heat-treated bicycle spoke can easily support the weight of smaller models.But for heavier ones, larger diameter studs are needed!
Types of brackets
Bracket for Samsung, LG or any other TV, you need to choose based on your needs. It can be of different designs.
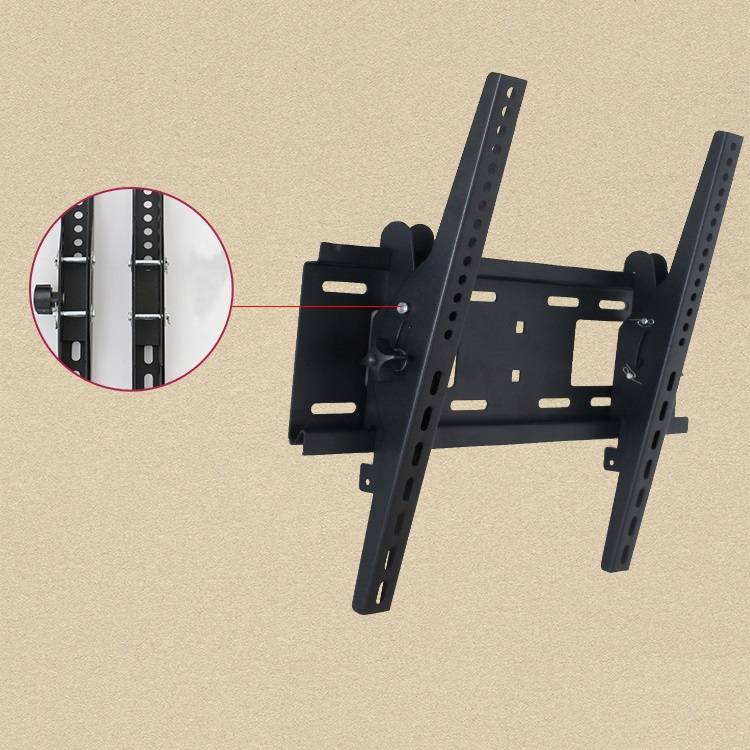
- Fixed. Allows you to securely fix the device, but without the possibility of its rotation or tilt. This TV mount has a minimum of holes and is easy to install.
Inclined. Often used when mounting a television set high above eye level. To ensure comfortable viewing of TV, the mount allows you to tilt the panel at the desired angle.
Tilt-swivel. This mount is very convenient if you plan to mount the TV on the wall under the ceiling. Due to the rotary mechanism, TV viewing is possible from anywhere in the room.


