- Which way is better
- The use of decorative overlays for heating pipes
- Making a drywall box
- Overview of materials
- Drywall
- Plastic panels
- Blinds
- Homemade or ready-made box
- Recommendations of a specialist for sheathing the frame of the box with PVC panels
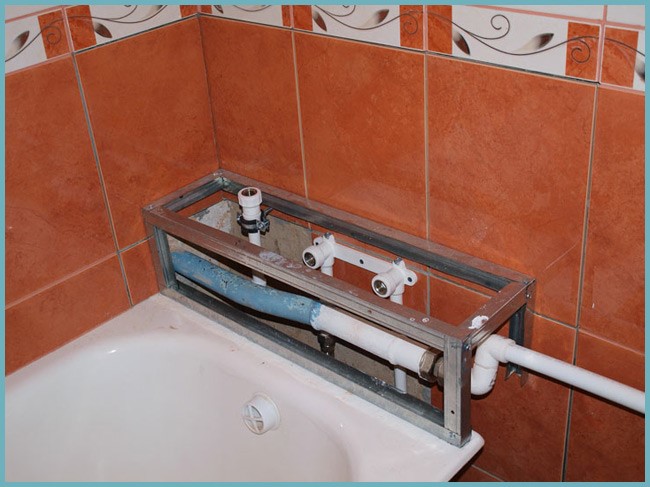
- Mounting methods
- Production of a drywall box. Drywall box trim
- Advantages and disadvantages of a protective box
- Masking horizontally laid pipes
- Preparation of tools and materials
- What is the best way for a small toilet?
- Ways to mask the riser
Which way is better
When choosing a method for masking plumbing pipelines, one must not forget that they must remain freely accessible.

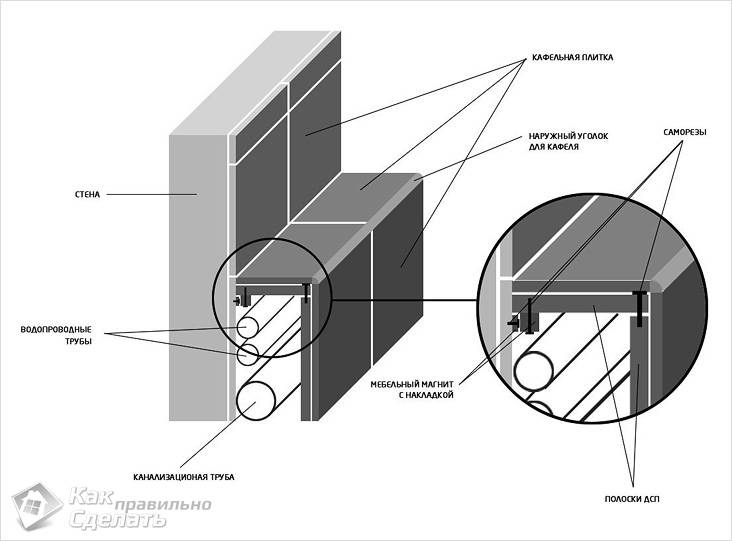
If the pipes are recessed into a wall that is tiled, then in the event of an emergency, you will have to partially disassemble the tile in order to find a leak. And therefore, the best way to close the wiring of pipelines without mounting it into the wall is the construction of easily erected structures from two parts of chipboard or plywood, tightly knocked together.
You can also install plasterboard and plastic boxes, roller shutters, accordion doors, sliding structures with PVC, plywood, laminated sheets.To more accurately determine the best method in each individual case, one should proceed from the location of communications, requirements, design and budget.
The use of decorative overlays for heating pipes
When carrying out a major overhaul, neat polypropylene pipes are installed in place of old, obsolete steel utilities. or plastic pipes. But, even having an attractive appearance, they are not always able to harmoniously fit into the interior of a modern living space. And here, in order to make them less noticeable or, conversely, to give them the missing notes of sophistication and leave them in sight, you can use decorative overlays for heating pipes.
Decorative outlets are made from a variety of materials, but wood looks best
Currently, there are several varieties of products of this type on sale. However, many home craftsmen opt for the so-called sockets. And there are reasons for this.
When laying the floor covering, it is necessary to solve the problem of the gap that occurs where it is adjacent to the pipe. Such a gap does not seem to interfere, but it does not look the best.
If a laminate is used as a floor covering, leaving a gap of up to 10 mm is simply necessary. Thus, you will form a space, the volume of which will be sufficient to accommodate this material during its thermal expansion. Therefore, it is recommended to close the gap using a special device that can hide a cosmetic defect without compromising the functionality of the floor covering. At the same time, decorative rings for heating pipes, commonly referred to as sockets, will become the optimal and universal solution.This product is simply put on the pipe, after which it is inserted into the slot and snaps into place.
Decorative overlays must be installed so that the place where communications enter the ceiling looks aesthetically pleasing
The main advantages of decorative sockets for heating pipes include:
- aesthetic appeal;
- ease of installation;
- acceptable price;
- a wide variety of standard sizes;
- a variety of textures that imitate the surface of natural wood, and color designs;
- versatility. Sockets can be used with various types of coatings.
No less attention deserves the relevance of the use of decorative caps for heating pipes. This is due to the peculiarities of the scheme for transporting the coolant through engineering communications, which directly determines the method of connecting radiators. Most of these products in modern design are designed for 4 options: one-sided, diagonal, saddle and bottom connection. That is, at each of the corners of the batteries there is one hole, but not all 4 are involved, but only 2 - one for the input of the coolant, and the other for its output. Obviously, the remaining "unemployed" two of them must be closed. In this case, decorative caps will come to the rescue. These products differ not only in color, but also in shape. A metal plug can be the simplest spherical or even with a protruding part resembling an autumn oak leaf. But corks made of polymeric materials can only be called decor with a big stretch. Such stubs are for the most part strictly functional.


By closing the heating pipes, you ennoble your home and get a harmonious interior.
Home | With your own hands | How to mount a decorative pipe box
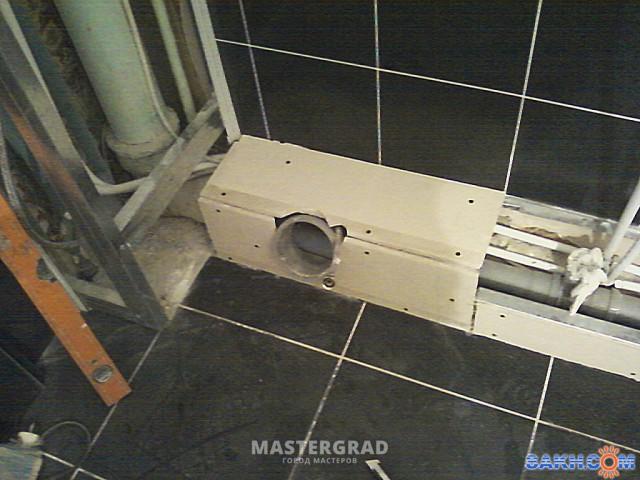
Making a drywall box
 Box manufacturing scheme
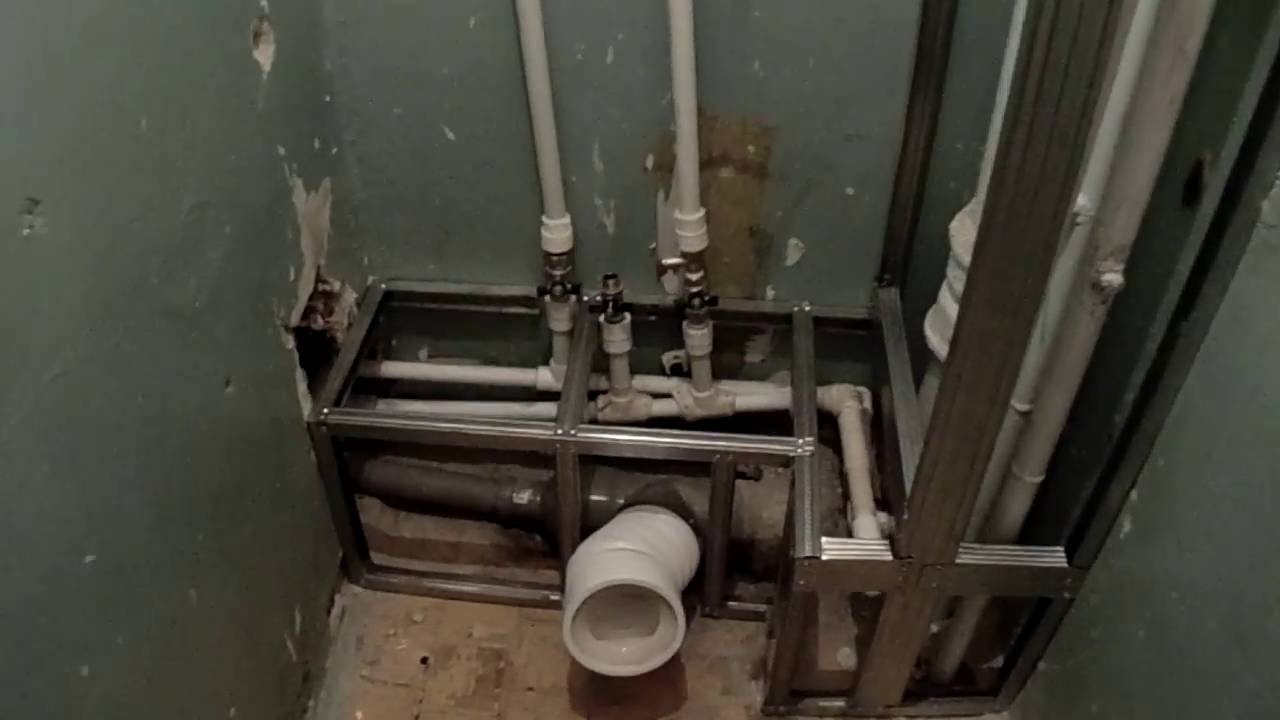
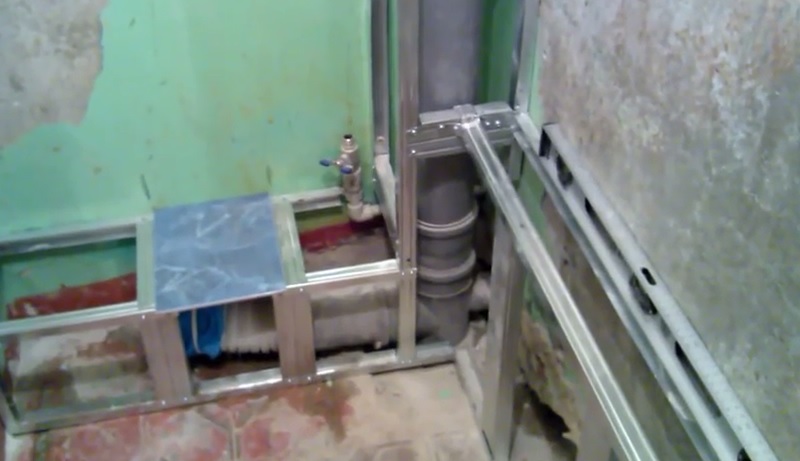
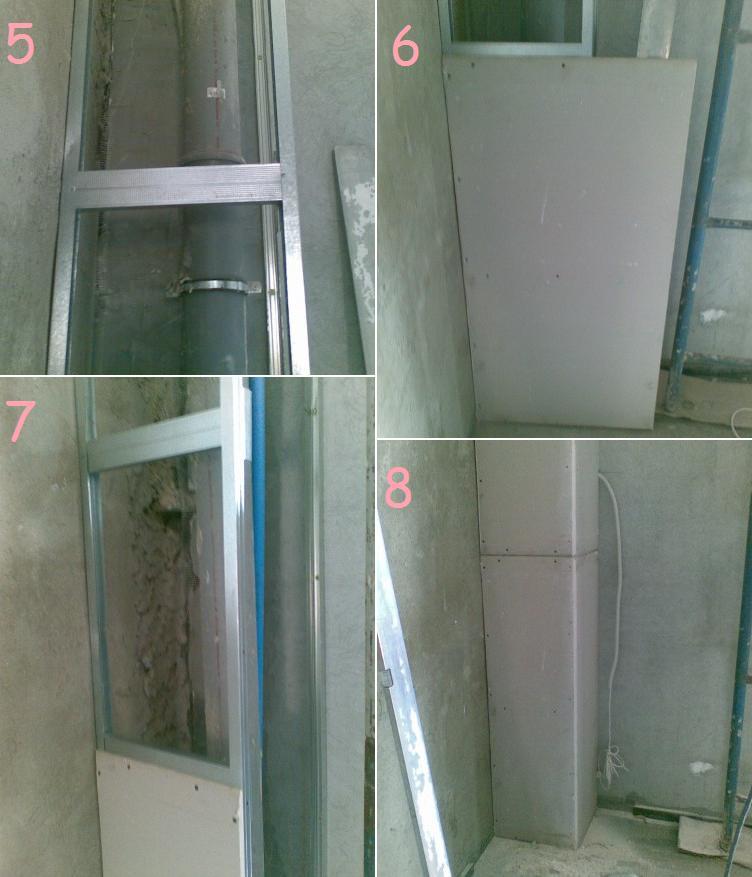
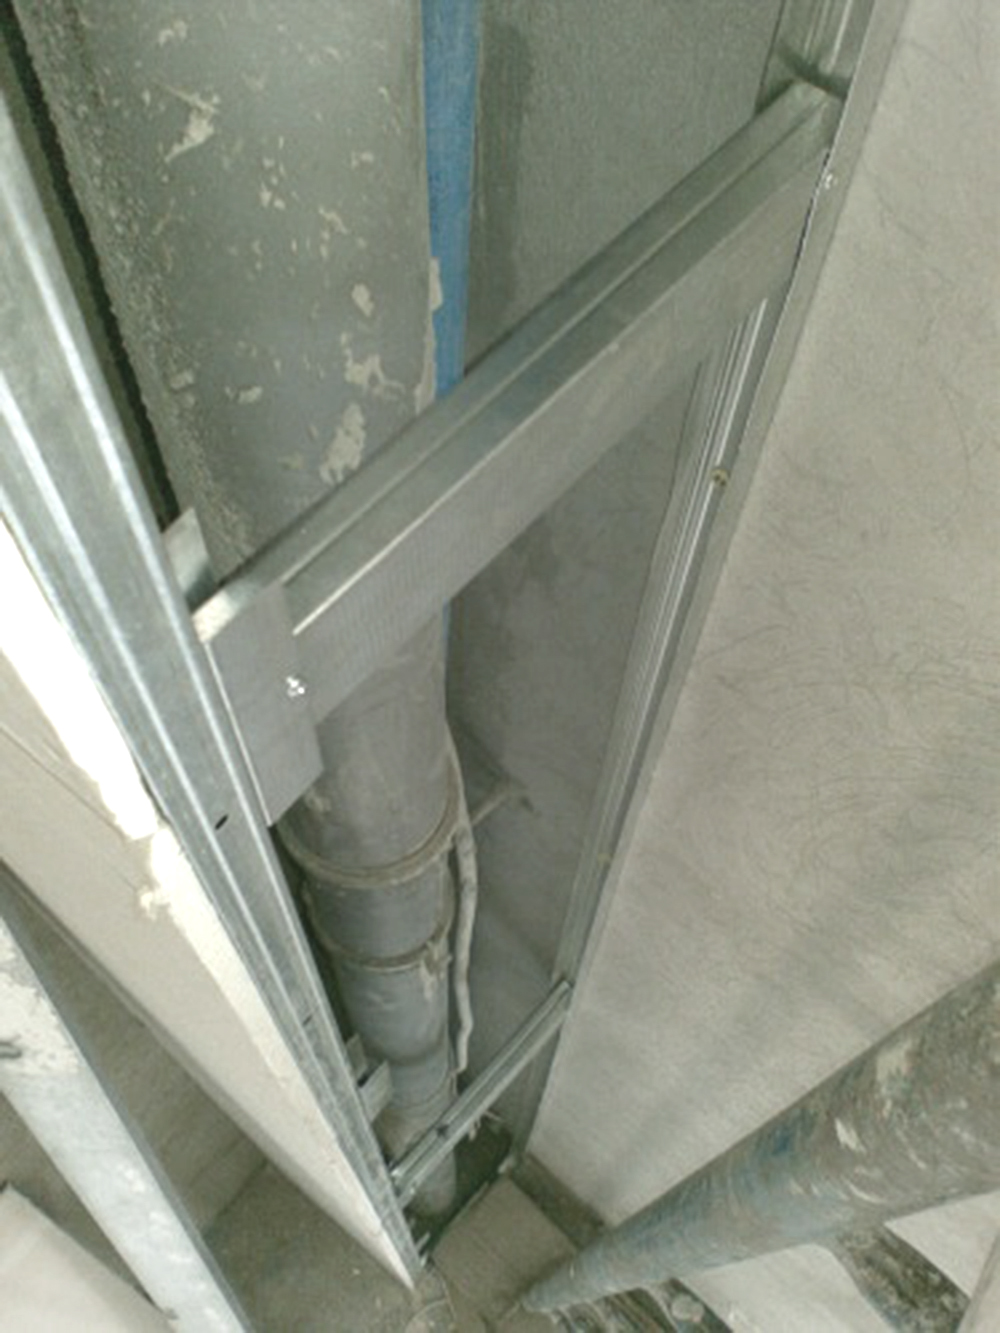
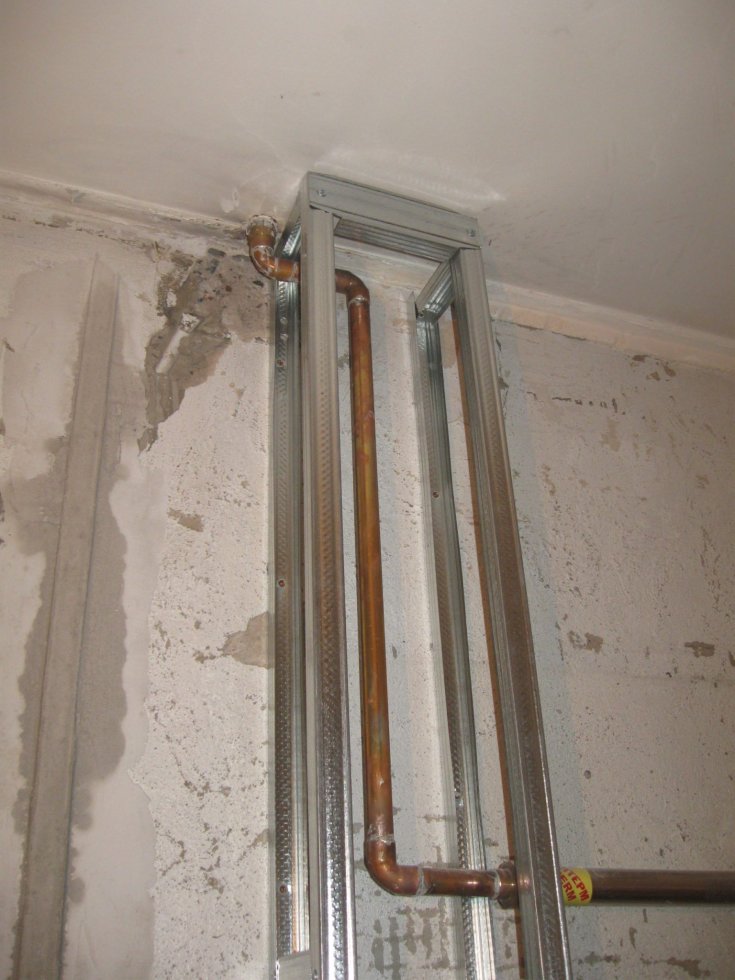
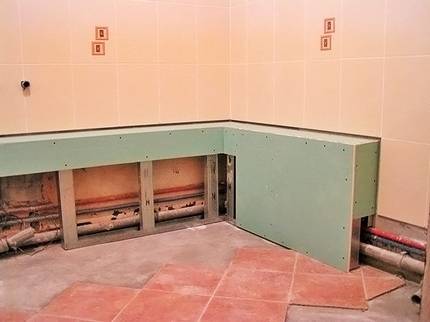
- To begin with, we take a tape measure in our hands and take measurements of all the directions we need. What and how do we measure? If the pipes in the bathroom run vertically, then we also measure the profile in height. In this case, we install it vertically, attaching it to the walls with dowels parallel to the pipes.
- Then we measure the transverse pieces of the profile in width and set them across as spacers. We connect, as already mentioned above, using metal screws.
- wooden frame We install the box as close as possible to the pipes in order to win more usable territory in the bathroom, but do not forget that there should still be a small distance between them.
- By analogy, in the case of laying pipes horizontally, we lay the profile parallel to the pipes, but already fastening it to the floor (also with dowels). Next, jumpers are also placed, but already vertical. Jumpers are best placed infrequently.
So, the profile frame is made.
- Now with a tape measure we measure the length and width of the drywall we need.
- Having measured, we cut off the necessary pieces from the main sheet and fasten them to the frame. In order not to confuse anything, it is better to write down the dimensions in a notebook indicating the attachment points.
- If somewhere the drywall protrudes slightly beyond the edges, you can cut it with a knife special for this purpose or use an emery cloth.
Overview of materials
Many materials can be used to hide sewer pipes or water mains. For example, blinds that cover a niche in the wall. Plastic panels or drywall can be used to sew up a box in which engineering communications will pass. On the network you can find photos of various options for using these materials.
Drywall
The most commonly used method is sewing pipes into a drywall box. Detailed video installation instructions for the box can be found at the end of the article. This material has many advantages:
- If necessary, the structure can be dismantled.
- It is quite easy to carry out installation work. First you need to build a frame of timber or profiles. Then sheathe everything with drywall.
- It is an environmentally friendly material that is harmless to humans and animals. It does not emit harmful substances even when heated.
- With the help of drywall, you can get a flat and smooth surface, which is suitable not only for laying ceramic tiles, but also for wallpapering, as well as painting.
The only downside to using drywall is that if the pipes are replaced or repaired, you will have to completely dismantle it and then rebuild it.
Plastic panels
Sheathing the same box as under drywall can be done with plastic panels. This material has its advantages:
Methods for hiding pipes in the bathroom
- These products are very easily and quickly mounted on a frame made of timber or guide profiles.
- The material is safe for humans.
- If the box is sealed with plastic panels, then they are much easier and faster to dismantle in the event of an accident than drywall. In this case, after the repair work, the product can be installed in the old place.
- Impressive service life with preservation of original appearance.
- Such material is not afraid of moisture. It is easy to clean and is resistant to mold and insect damage.
- On sale there are many options for colors and textures of this material, so you can easily choose a product that matches the style and color of your interior. There are also covers with photo printing and various geometric prints.
- After you sheathe the box with plastic panels, you do not need to do any finishing, because the panels have a decorative coating.
The only drawback is that this material may not harmonize well with tiled wall cladding.
Blinds
The easiest and most affordable option how to hide pipes in the toilet, it is the use of blinds. It is suitable for bathrooms of small dimensions, in which all pipes are on the same wall or in a separate niche. Blinds provide the following benefits:


- They do not require difficult installation - no need to make a box or frame, just fix the fasteners on the ceiling. Thus, you can quickly and easily close the wall where sewer pipes and water communications pass.
- This product allows you to save free space in the room.
- Depending on the size of the blinds, you can close the wall partially or completely.
- To gain access to pipes or water meters, you just need to lift the blinds.
- A wide range of colors and textures, as well as blinds with photo printing will make it easier to choose the right product for the color and style of the interior.
- Due to the fact that an impressive section of the wall will be closed, shelves for storing household chemicals and various household equipment can be installed behind the blinds.
There are almost no drawbacks to blinds, it is important to choose products from high-quality material that will not change its color during operation.It is also important to consider that the product should be easy to wash and not absorb odors.
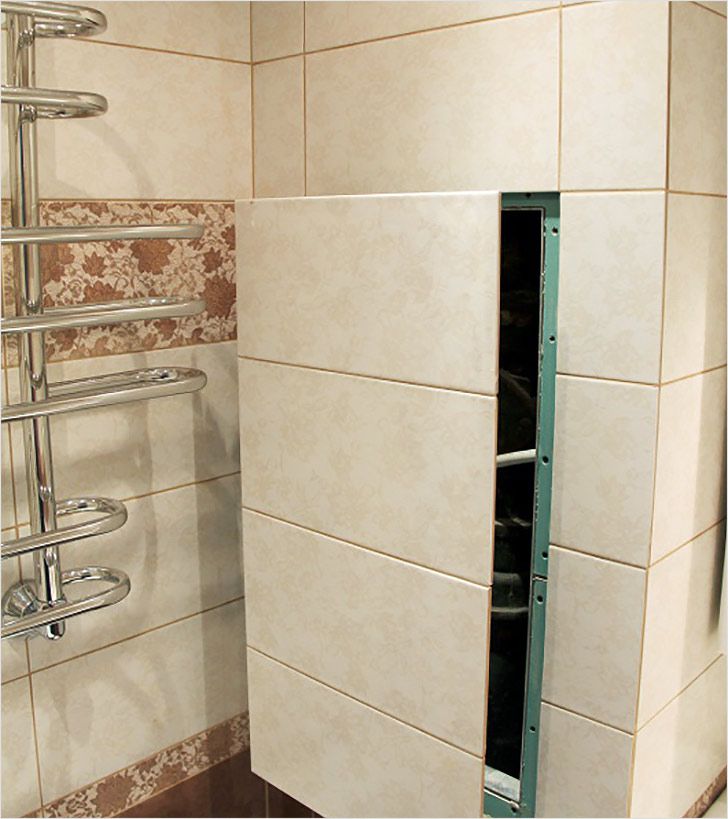
Homemade or ready-made box
To close the pipes in the toilet, you can use a ready-made or home-made removable box. This option also has its advantages:
- The finished product remains only to be installed (see photo below).
- If the finished design is not suitable due to the characteristics of the room, then you can make such a box yourself. Its manufacture and installation will also not cause problems.
- Due to the fact that the design is removable, at any time there is access to engineering networks.
The main disadvantage is that this is a rather large product, which may not be suitable for your small space. Also, the price of the structure will be slightly more than the manufacture of a non-removable drywall box in the manner described above. There may also be problems with connecting the toilet if using a ready-made box. Types of sewer pipes for internal use
Recommendations of a specialist for sheathing the frame of the box with PVC panels
After installing the starting profile, in order to avoid deformation, it is necessary to fix it with fleas on the guide profile. On the plastic panel, you need to measure the desired size, then cut it off with a sharp knife. In the start profile, the first panel is fixed, while the other is attached to the corner profile.
For connection it is necessary to use bugs or fleas. The second side of the box is assembled according to the same principle. On the last panel, you need to fix the start profile. Using silicone, you will ensure ease of dismantling when an emergency arises.In those places where it is necessary to provide unhindered access to the elements of the pipeline, it is necessary to cut inspection holes. Special hatches are installed using silicone sealant.
Mounting methods
What materials can be used, we figured out. It remains to understand how to close the pipes in the toilet using these materials. First, let's look at how to make a frame for plasterboard or plastic panels. We carry out work in several stages (see video at the end of the article):
- First you need to mark the future frame on the walls of the room.
- After that, according to the marking, longitudinal guides are attached from a bar with a section of 20x30 mm or a special profile for drywall. We fix the guides to the wall with dowels and self-tapping screws.
- After that, we install transverse bars or profiles. Fasten with screws to the already installed guides. The pitch of the transverse elements is usually 30-50 cm. At the same time, do not forget that we will need to install inspection hatches. Usually they are mounted in the place where meters, valves are installed, or where there is an inspection hole for cleaning the sewer. The place for the future hatch must be further strengthened with bars or profiles (at the same time, it is worth adhering to the dimensions of the hatch).
- At this stage, you can start sewing the box with drywall sheets or plastic panels. We fix drywall with self-tapping screws to the box, and for fixing plastic panels we use special plastic guides and corner elements. Leave a hole for the hatch.
- If panels were used, now you can install an inspection hatch.
- If the installation of the box was carried out using drywall, then we carry out its finishing with ceramic tiles, wallpaper or painting. And only after that we mount the hatch.
There are several options for the box device:
- In the form of a solid false wall. This option is suitable for small toilets where the pipes are concentrated on one wall behind the toilet. Also, this method is applicable when installing a hanging toilet bowl, since it is possible to hide the supporting frame of a sanitary appliance behind it. The only drawback of a false wall is that in this case access to the pipes is limited and in the event of an accident, the entire wall will have to be dismantled.
- If all pipes and risers are collected in one corner of the room, then it is better to make a square box, behind which all communications will be hidden. Do not forget to make a hatch at the installation site of meters and valves.
- An oblique false wall is made if thinner pipes extend from a group of risers, which must also be hidden. In this case, it is not advisable to make a flat false wall, since it will take up a lot of usable area of the room. In this case, a slightly beveled structure is performed along the wall along which the pipes from the risers pass.
- If you don’t know how to hide the pipes in the toilet, where communications pass in such a way that in order to hide them, you have to fence off almost half of the room, then you can use a multi-level box. In this case, the pipes are closed with a box only up to a certain height, and not for the entire room.
If you plan to use blinds, then the fasteners for them are mounted on the ceiling.At the same time, the blinds themselves can cover the wall completely (from wall to wall) or partially. The second option is used when the pipes are in a niche located on the back wall. The height of the blinds may also differ depending on the features of the laying of communications. So, the louvered structure can be the entire height of the room or only as long as the pipes are laid.
Video instructions for installing a drywall box in the toilet:


Production of a drywall box. Drywall box trim
Let's consider in more detail making a drywall box.
<-
- After that, we measure the transverse pieces of the profile in width and install them across as spacers. We connect, as already mentioned above, using metal screws.
- Already fastening to the floor (also with dowels), by analogy, in the case of laying pipes horizontally, we lay the profile parallel to the pipes. Jumpers are best placed infrequently. Next, jumpers are also placed, but already vertical.
- First of all, we take a tape measure in our hands and measure all the directions we need. What and how do we measure? If pipes in the bathroom go vertically, then we also measure the profile in height. Fastening it to the walls with dowels parallel to the pipes, in this case we install it vertically.
- Wooden frame We install the box as close as possible to the pipes in order to win more usable territory in the bathroom room, but do not forget that there should still be a small distance between them.
_
Horizontal - geod. line of equal heights on the map. (GOST 22268-76)
Profile - windows.profile detail of a sash, frame, strapping of a leaf made of any material or combination of materials (profiled wooden detail, polyvinyl chloride profile, metal profile (including combined, with a thermal insert). (GOST 23166-99); - window structures extrusion method, with a given shape and dimensions of the section (GOST 30673-99)
Spacer - a rigid mounting device that does not have its own stability, works only in compression and is designed to keep two structural elements from moving inward. (GOST 24259-80)
Analogy - similarity of signs, phenomena, tendencies; a method of analysis and forecasting used to extrapolate the knowledge obtained in the study of an object to the state of the same object (process) in the future period, provided that its initial characteristics cannot undergo significant changes.
So, the profile frame is made.
- If somewhere the drywall does not protrude very much beyond the edges, you can cut it with a knife special for this purpose or use an emery cloth.
- Now we measure the length and width of the drywall we need with a tape measure.
- Having measured, we cut off the necessary pieces from the main sheet and fasten them to the frame. It is better to write down the dimensions in a notebook indicating the attachment points so as not to confuse anything.
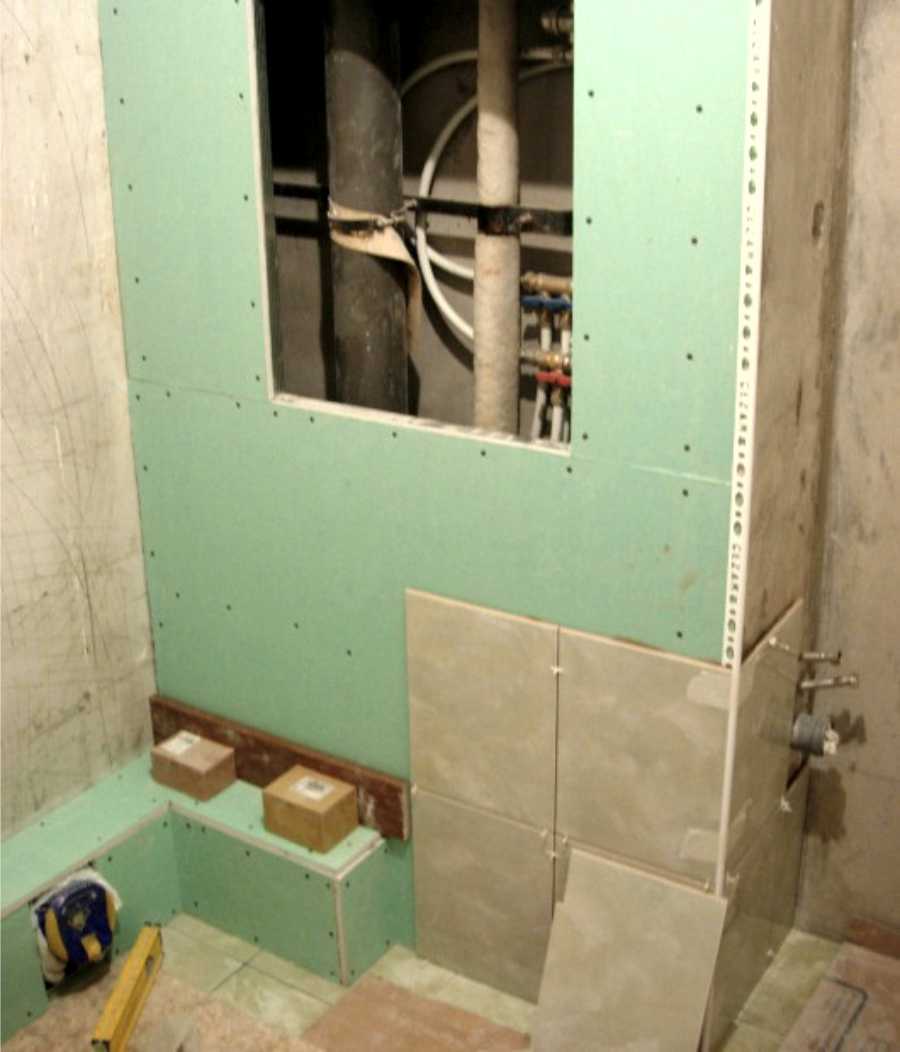
Now let's consider drywall box trim.
<-
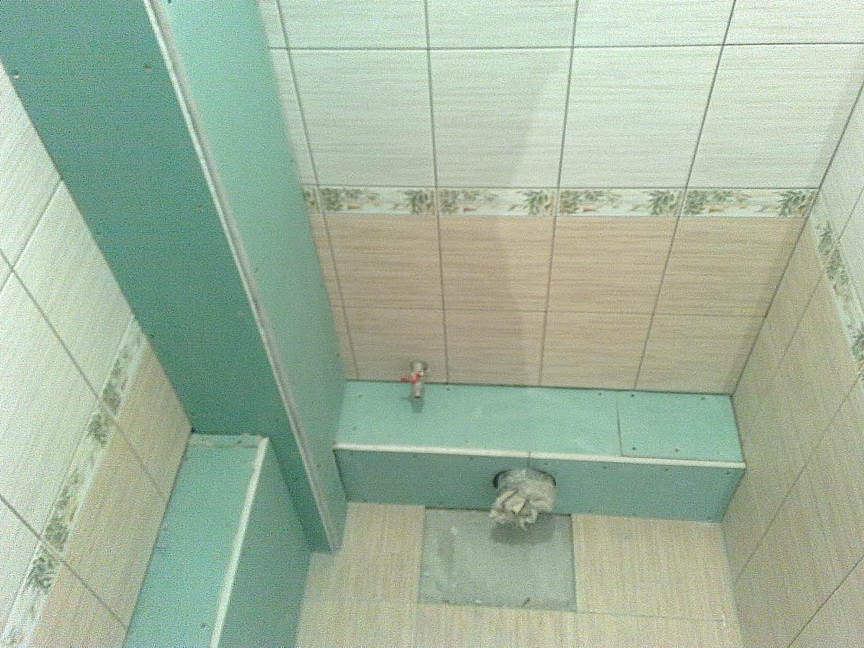
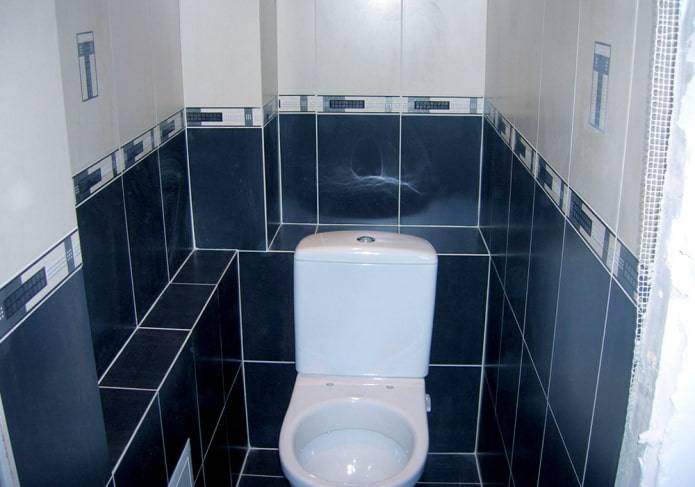
In the future, after the drywall has been securely fixed, you can proceed to its exterior finish. Next, we select the tiles to our taste, with which we will finish the walls in the bathroom. To do this, you first need to strengthen the seams with a reinforcing mesh for drywall.So that the box does not stand out, it can be tiled with tiles with the same dimensions and the same color. Well, it can be said that box andfrom drywall for the bathroom is ready.
Advantages and disadvantages of a protective box
The presence of a box that closes pipelines has its pros and cons. The advantages should include:
- Ability to hide unattractive pipelines from view.
- The decoration of the room is carried out in the same style, there are no unnecessary elements in sight.
- Communications are protected from accidental damage, mechanical impact and other unwanted contacts.
- The tightness of the box allows you to protect the room from the ingress of sewer gases.
- The surface of the walls and the box is easily and efficiently cleaned of dirt, treated with detergents and disinfectants.
The disadvantages include:
- Access to pipelines is difficult.
- Repair work becomes impossible without dismantling the box.
- The occurrence of leaks, cracks, and other deficiencies in the water supply or sewage system become visible only at a late stage, when considerable damage has been caused to the premises or neighbors from below.
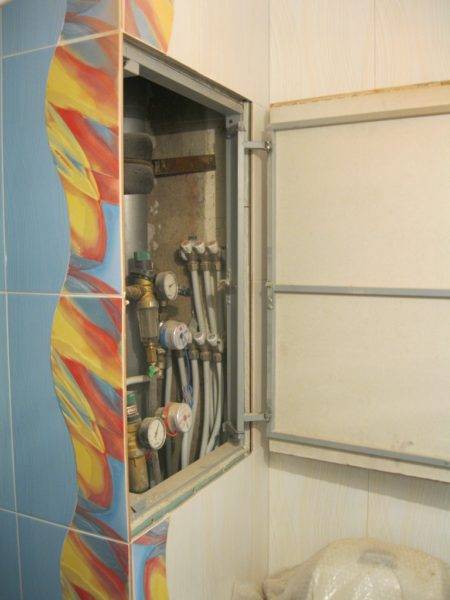 Inspection hatch in a box
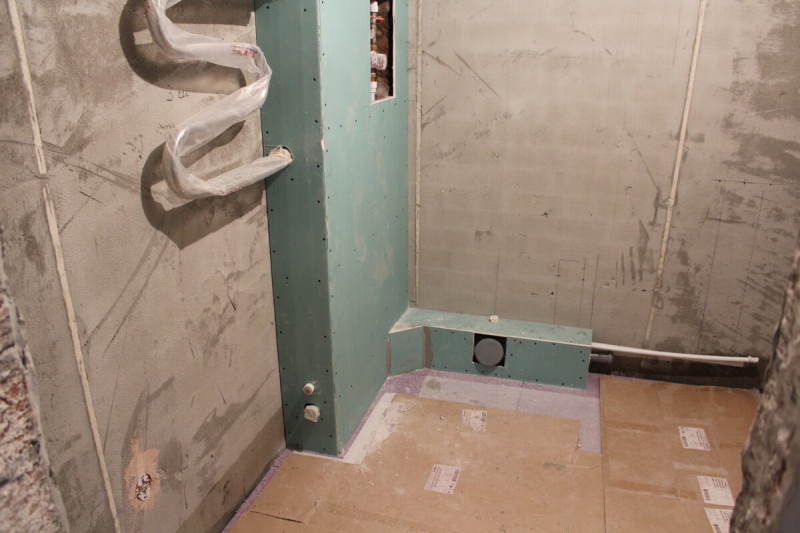
Masking horizontally laid pipes
The easiest way to close horizontal communications in a toilet or bathroom is by building a box lined with chipboard, plywood or plastic. To create such a design, markings are made on opposite sections of the wall.


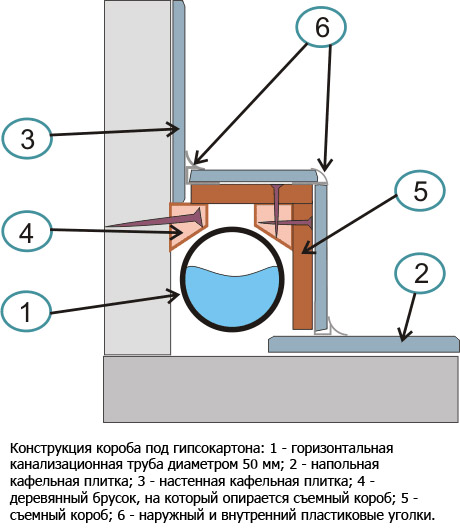


When determining the length of the indent, they are guided by the most protruding points along the entire length of the pipeline, including its most distant sections
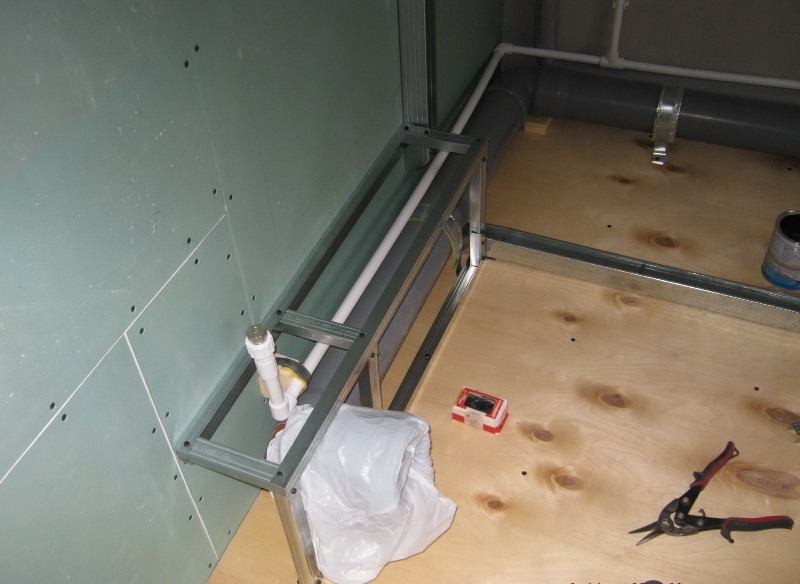
A guide profile is attached along the marking line with the help of self-tapping screws.Jumpers are inserted into it, maintaining an equidistant distance of 60 cm. Pre-cut blanks are attached to the assembled frame.
If desired, you can build a removable structure. To do this, in accordance with the height and width of the pipes, boards are cut to create a vertical and horizontal plane. They are fastened together with a perpendicular "corner". The assembled structure is simply placed above the pipe location.
In addition to the above options for masking pipes in bathrooms, there are original options:
Preparation of tools and materials
Like all other rooms in your home, the bathroom should look attractive. The pipe box in the room can be made of different materials - it can be drywall, plastic or wood. However, before starting work, you should take care of the availability of some tools, among them:
- roulette;
- hammer drill;
- construction knife;
- plumb;
- building corner;
- a hammer;
- bubble level.
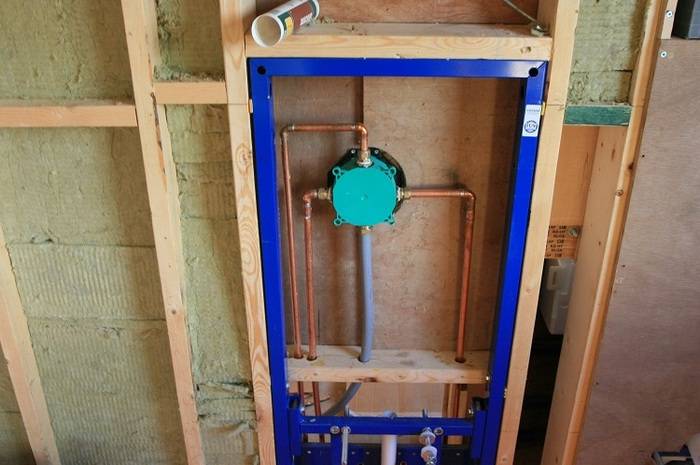
To make the boxes, a standard sheet of drywall with dimensions of 2500x1200 mm will be quite enough. Thickness can range from 9 to 12.5 mm. It is better to purchase a moisture-resistant material, because the sewer riser and water pipes are covered with perspiration, so the humidity will be significant.
The frame can be made of square wooden bars with a side of 40 or 50 mm. An alternative solution is a galvanized profile designed to work with drywall. The latter option is more practical, because the profile does not require special training, and it is much easier to install it.
What is the best way for a small toilet?
To build a complex overall partition in the bathroom, you will need a lot of material and free space, which means that the method is not suitable for a cramped toilet. Boxes that follow the curves of plumbing units are considered the best solution: they not only mask pipes, but also serve as additional shelves for hygiene items. Various blinds also save usable space: unlike swing doors, they take up less space.
To minimize the loss of bathroom space, you can use the hidden installation of pipes. This option is suitable for small toilets. It is implemented at the initial stage of repair and only after the complete replacement of communications with modern ones. For flush mounting, pipes made of copper or plastic are used: they are sewn directly into the wall or floor. Strobes are made using a puncher and a grinder in accordance with the number and diameter of pipes. This decision requires a lot of money and certain skills. We should not forget about the holes for access to the counters.
Ways to mask the riser
So how can you close the riser in the bathroom? You can do this in a variety of ways:
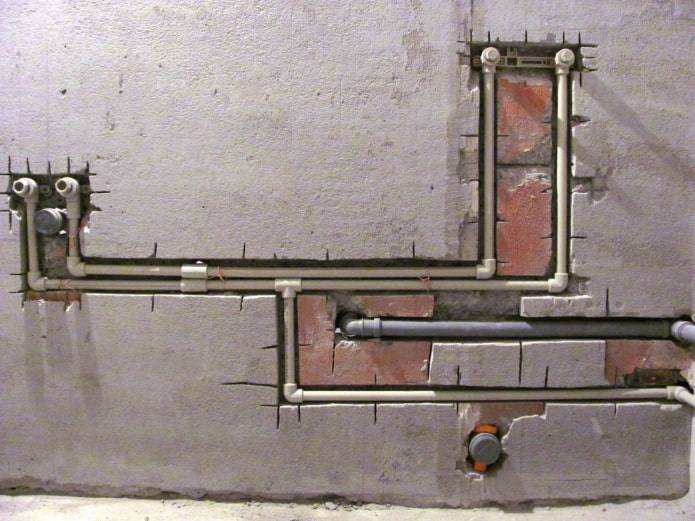
- Wall disguise. In this way, you can hide the riser only at the stage of its installation. And the work is very difficult and time-consuming, be prepared for this. First you need to draw up and transfer to the wall the layout of all communications. Then, using a perforator, recesses should be made that slightly exceed the diameter of the pipes. Next, pipes are laid in the strobes. Then it is desirable to close the entire surface with plasterboard, chipboard, plywood or PVC panels to make a kind of false wall. Filling the recesses with concrete is not recommended; in case of breakdowns and dismantling, you can severely damage the riser.
- Cupboard. Yes, you can hide the riser in the closet. Moreover, you can both purchase a finished piece of furniture with a missing back wall and slots in the shelves, or make it yourself from the usual one. You will need to dismantle the back. Then, using a crown and a drill, make holes in the shelves of the diameter corresponding to the pipes. This method will not only hide the riser, but also provide additional space for storing products or hygiene items.
- The box is the most common way to mask communications. It is convenient in that you can purchase a finished design of the desired size in a plumbing store. It is easy to install, so its installation will not be difficult. In addition, there are different options for shapes and configurations: triangular, rounded, rectangular boxes, as well as those consisting of one or more levels.
- Plasterboard partition. To mount it, you must first install a solid frame, which is usually made of galvanized profiles. Although some use wooden beams, this material requires additional treatment with moisture-proof and antifungal agents. Further, the plasterboard sheets themselves are attached to the frame with the help of self-tapping screws, and it is advisable to use moisture resistant ones, since the humidity in the bathroom is significantly increased. The next step is finishing. You can use different materials, but PVC panels and ceramic tiles will be the most practical and preferred.
- Plastic panel construction. Plastic panels are practical, inexpensive, moisture resistant, lightweight and relatively easy to install, as they have convenient joints.But the only drawback of using them is the complete lack of sound insulation, any sounds will penetrate through them. If that doesn't bother you, then get to work. First, install the frame, which can be made in the same way as for a plasterboard partition. But in this case, it is desirable to use a metal profile. Install plastic panels on it. The joints can be masked with corners.
- Roller shutters will allow not only to hide all communications from the eyes, but also to leave unhindered access to them. At any time, you can move the shutter to, for example, open or close a valve or troubleshoot problems. Rolleta are established in guides. At the same time, the riser itself should be located in a recess so that it does not interfere with the movement of the shutter. And along the edges of such a recess, the frame of the future structure is just mounted. Currently, you can purchase special roller shutters designed for bathrooms and toilets. They not only play the role of camouflage, but also perform hydro and noise insulation functions, as they are equipped with an additional internal coating.


