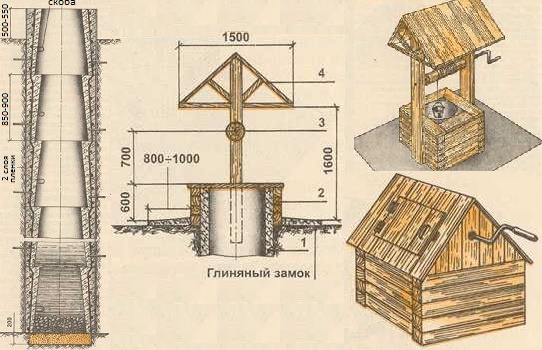
- Arrangement of a clay castle
- Location selection
- Stage five. We equip the well
- Safety measures during work
- Digging methods
- Alternate installation of rings
- Installation of rings after reaching the aquifer
- Well construction methods
- Step-by-step instructions for making a house for a well
- Well gate
- Do-it-yourself door to the house
- Installation of roofing material
- The device of sewer wells made of concrete
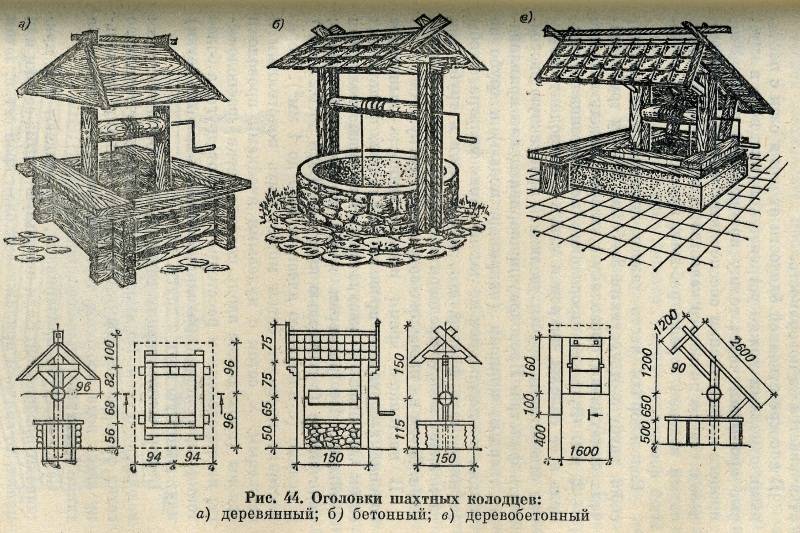
- Well device and types
- How to make a structure from a cover and a canopy
- What materials are used
- wooden lid
- The final stage of work
- Conclusions and useful video on the topic
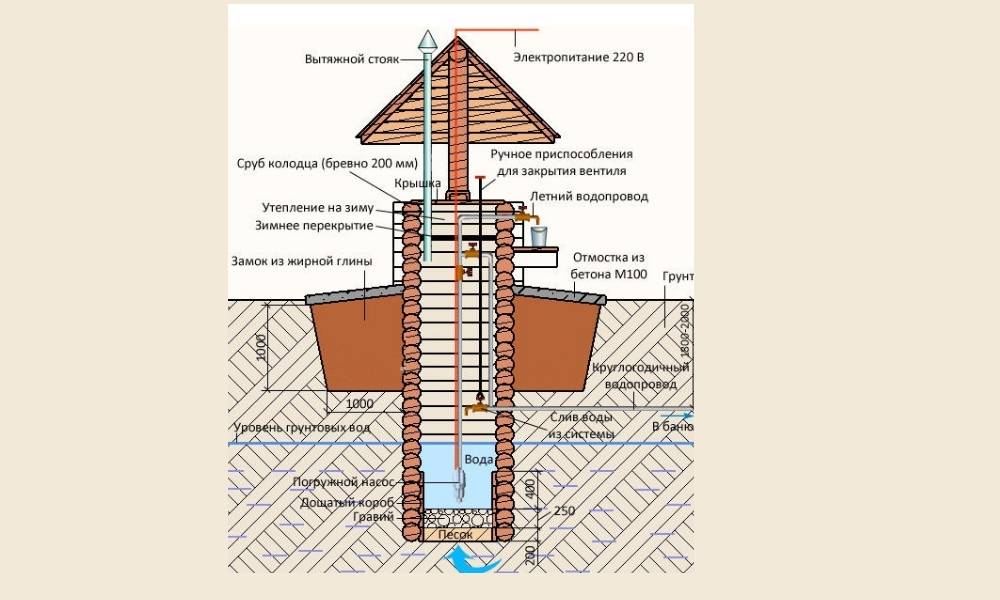
Arrangement of a clay castle
In order for the water in the well to be always clean in the future, it must, among other things, be protected from surface water. To do this, you should equip a clay castle. They make it using this technology:
- clay is diluted with a small amount of water and infused for several days;
- add to the resulting plastic mass of 20% lime;
- around the log house or the upper concrete ring of the well, they dig a pit with a depth of 180 cm;
- lay the clay mass in the pit in layers of 5-10 cm;
- from above they equip a clay blind area;
- crushed stone is poured over the clay, and then earth.
It is advisable to additionally wrap the concrete ring with roofing felt or plastic wrap before arranging the castle.
Location selection
The best option is to order a geological examination of the site. Even if you dig a well in the country yourself, the costs are proportional to its depth. This means that it is necessary to determine where the depth of the aquifers is minimal. If the budget does not allow for the employment of geologists, the construction of wells should not be done at random.

To determine the location for digging, there are the following methods:
Biological
Pay attention to what plant crops grow on the site. Plants that grow on their own
Having determined what kind of grass or shrub it is, you can determine by the type of rhizome how deep the well needs to be made in order to get to the water.
Geolocation. Since ancient times, people with a vine could determine how deep aquifers lie. Now, metal frames and pendulums are used instead of vines. Passing through the territory of the allotment, they monitor their behavior, and if the frames intersect, and the pendulum begins to deviate, then the construction of the well must be done in this place.
Exploration drilling. This method allows you to obtain reliable information about the depth of groundwater. The method is also applicable for cases when it is necessary to drill a well. The only drawback is the need to attract specialized teams and the use of special equipment.
To build a well, it is necessary to initially determine for what purpose the water is extracted. At different depths, it has different qualities. Some layers provide summer residents with industrial water for irrigation, others are clean sources that provide drinking water.
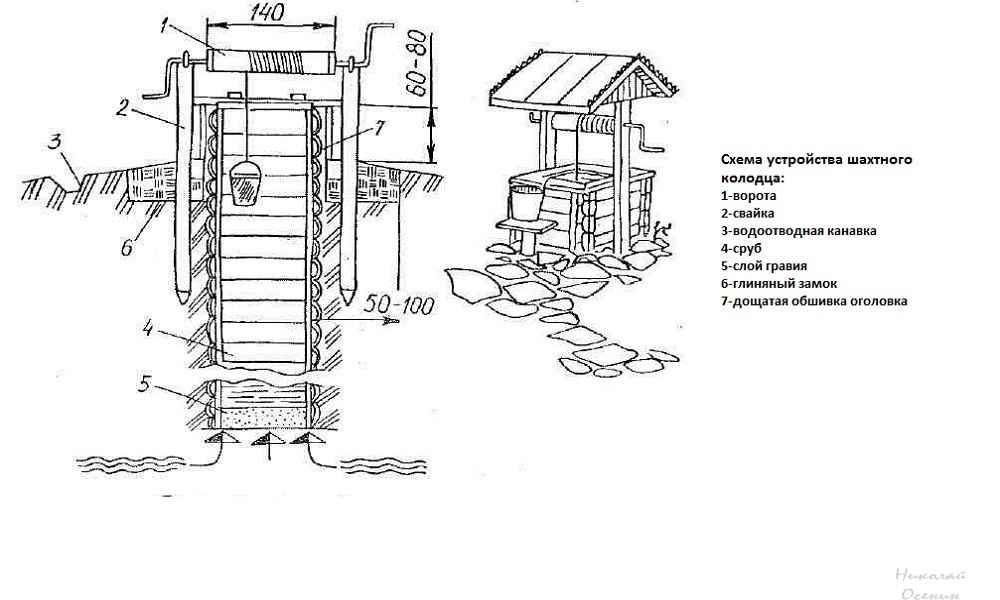
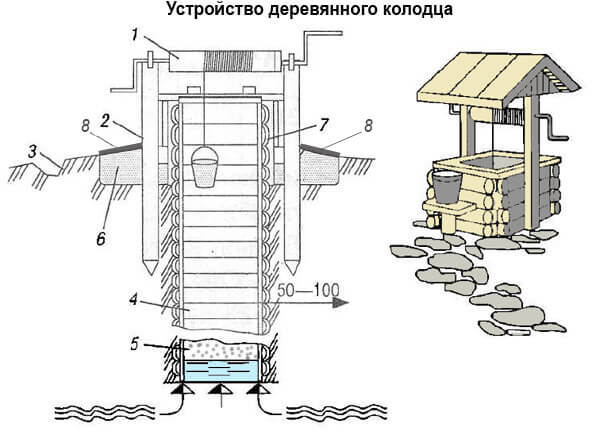
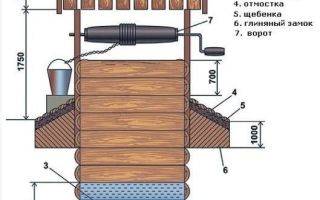
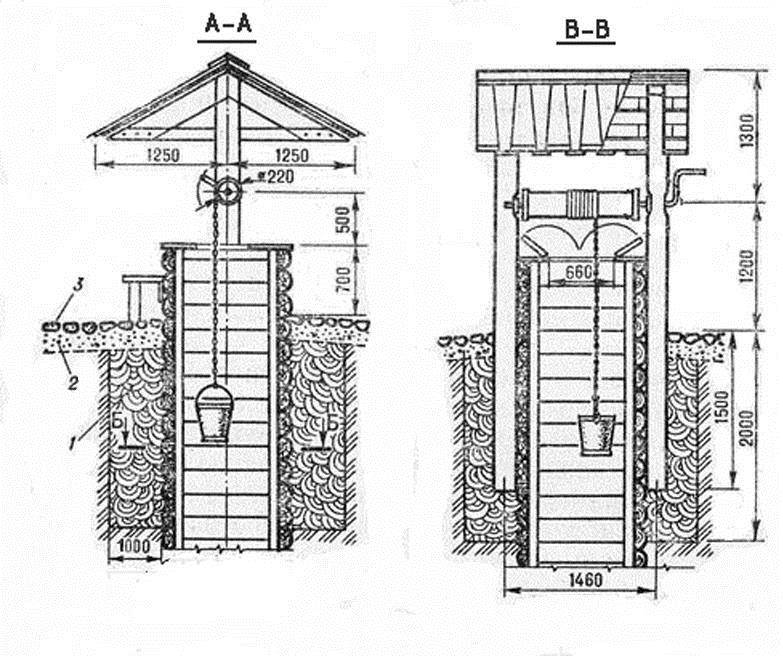
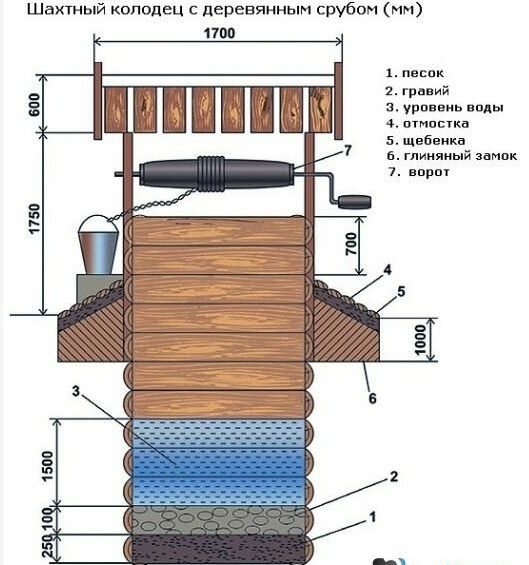
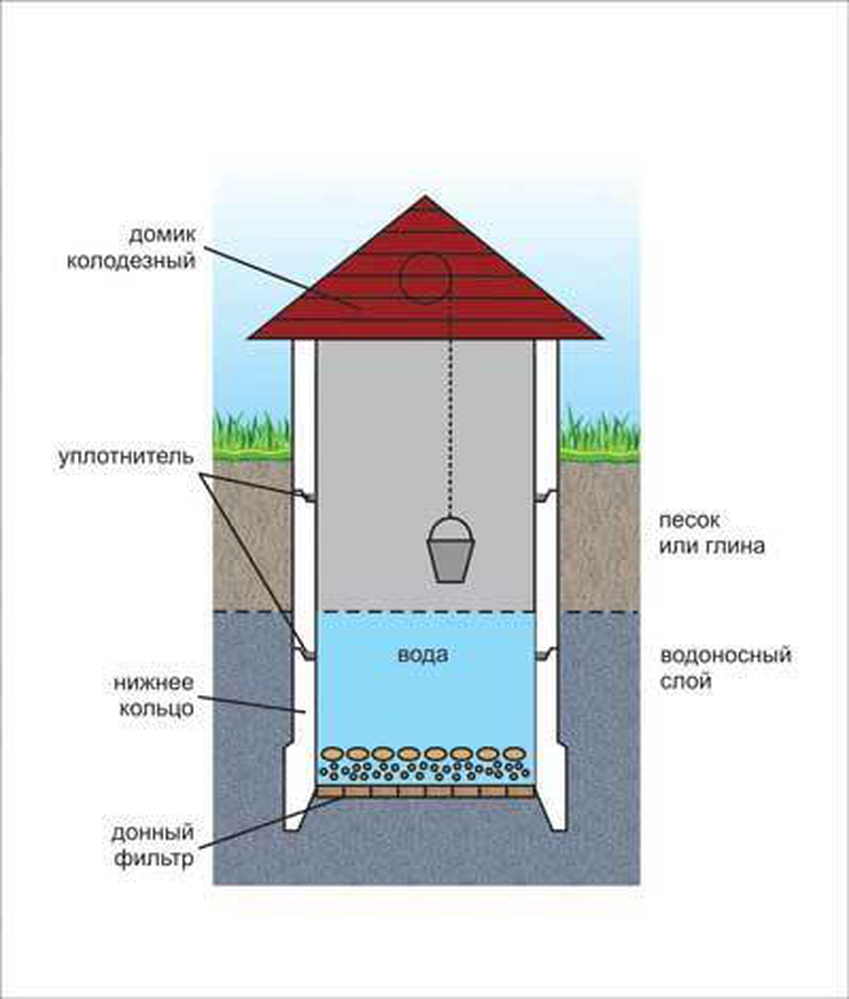
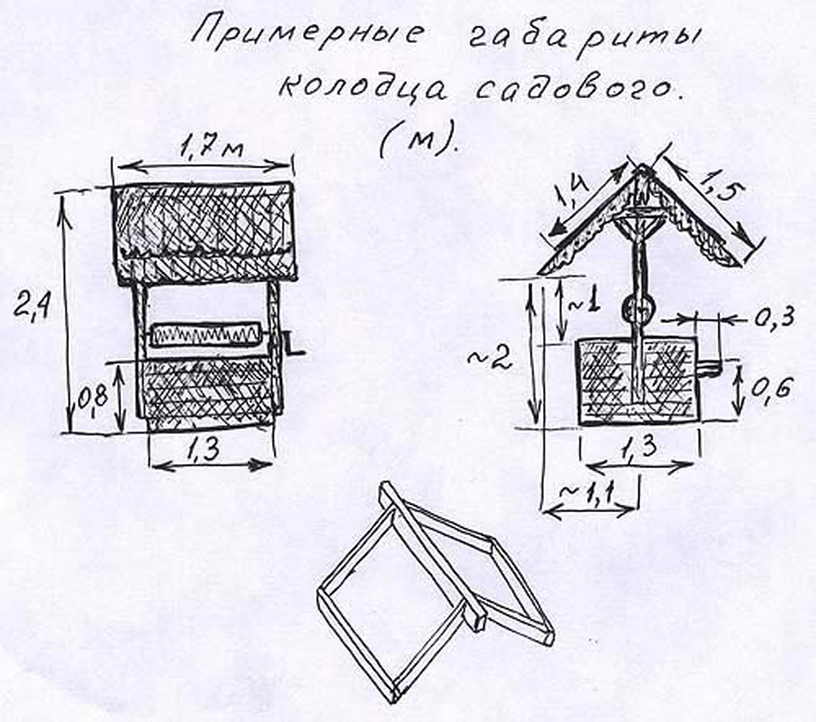
Stage five. We equip the well
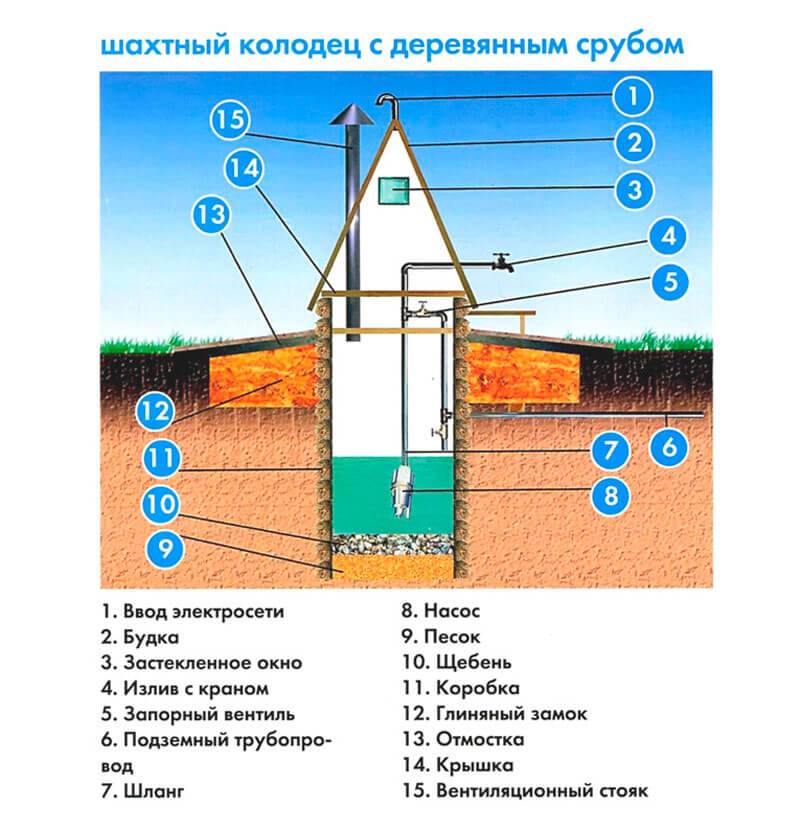
But the construction of a well is not limited to drilling a mine and its strengthening. To do this, we equip the upper part of the structure - the head.
Well head insulation
We equip a blind area around the well - a small platform made of concrete or carefully compacted rubble
The blind area should go at least 1 m from the mine on each side and, importantly, is built after a certain time after construction is completed, when the soil settles
Blind area around the well Scheme of constructive layers of the blind area Blind area from a mixture of crumpled clay and crushed stone Blind area insulation
We also build a canopy over the structure to prevent precipitation from entering the mine. If a pump is used to supply water, then it is better to close the shaft completely, leaving a small hole for the hose and cable.
Safety measures during work
While working in the mine, it is necessary to wear a helmet to prevent earth and stones from getting into the head when lifting the container up. You should also regularly check the strength of the connection of the cable or rope with the container.

In addition, check the air daily for the presence of poisonous gas before starting work. This can be done with an ordinary candle - the cessation of its burning signals the presence of gas. In this case, it is necessary to remove the accumulated gas with a fan or vacuum cleaner.


In any case, working alone when digging a well - even for a short time - is not recommended.
The final chord of building a well for a summer residence is the device of a stylized house above the well, in the design of which all the imagination of the household will be used.
Digging methods
There are two technologies for digging a well. Both methods are used, just at different depths. And both have flaws.
Alternate installation of rings
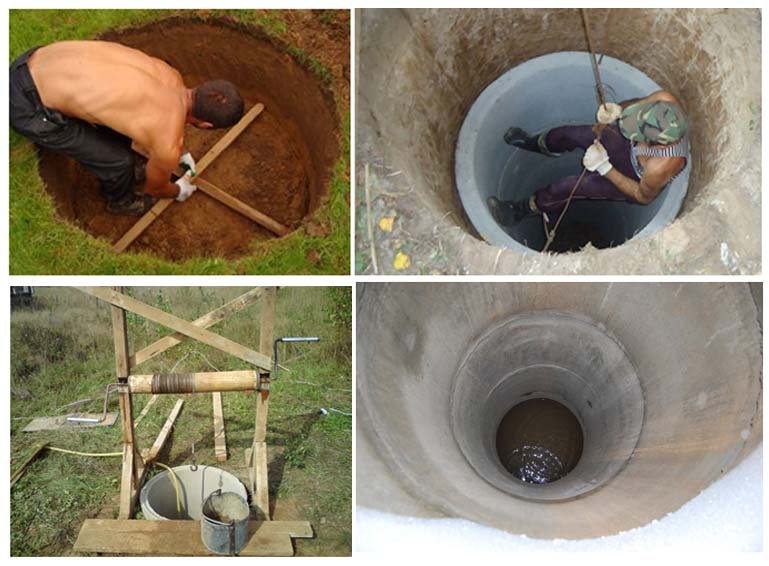
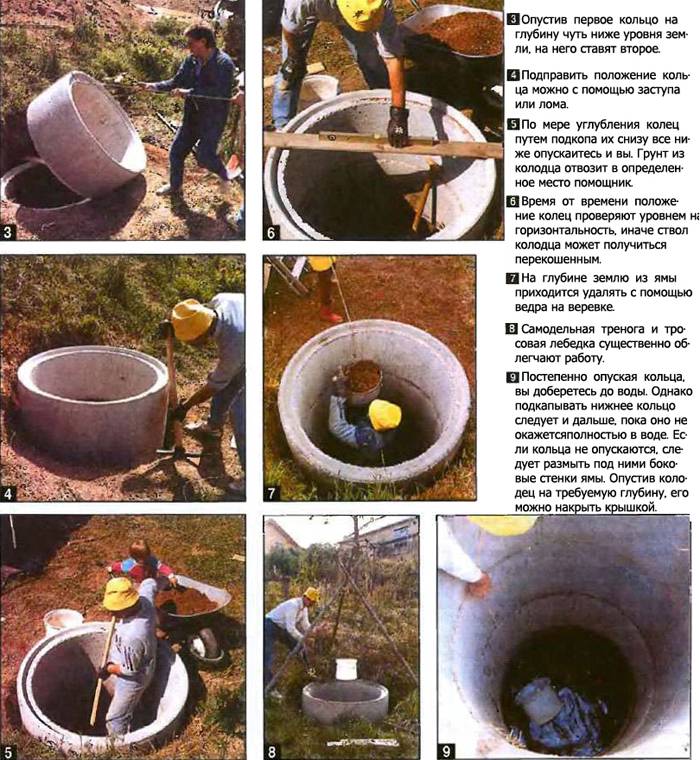
The first ring is placed on the ground, which is gradually removed from the inside and under the side. Gradually the ring descends. Here is a very important point: it is necessary to ensure that it falls straight down, without distortions. Otherwise, the mine will turn out to be inclined and, sooner or later, the sedimentation of the rings will stop.
To avoid distortion, it is necessary to control the verticality of the walls. They do this by tying a plumb line to the bar and laying it on the ring. Additionally, you can control the top level.
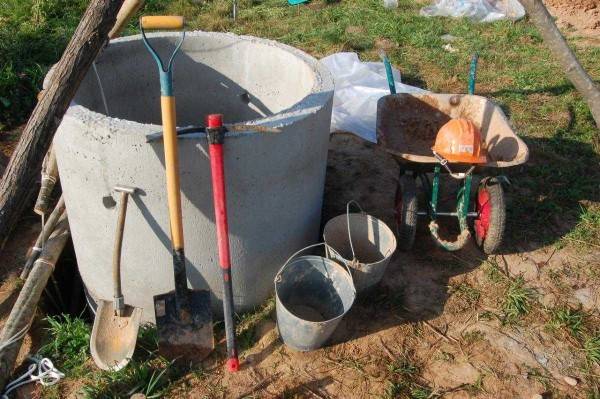
Tools needed for digging a well
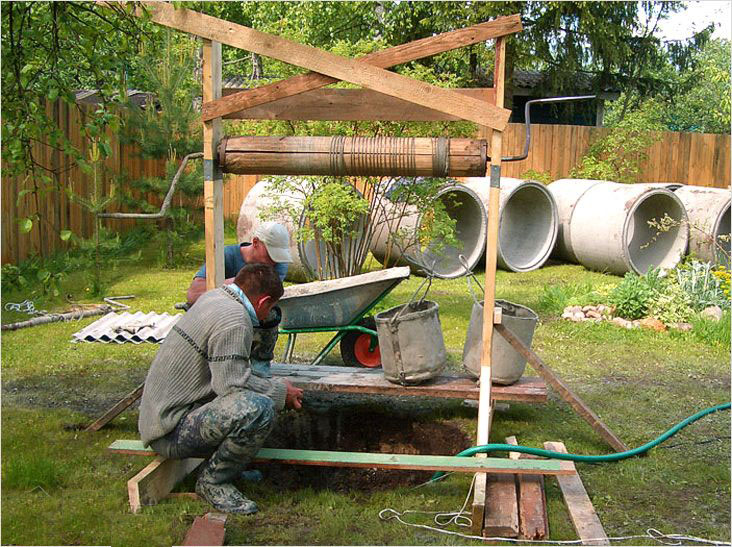
When the upper edge of the ring is level with the ground, the next one is rolled. It is placed strictly on top. The work continues. If on the first ring the soil can be thrown over the side with a shovel with a shortened handle, then on the next one you have to take it out with the help of a gate or a tripod and a block. Thus, at least two people must work, and at least three, or even four, are needed to turn the rings. So it is impossible to dig a well on your own, in one hand. Unless to adapt the winch.
So, gradually, the depth of the well increases. When the ring drops to the level with the ground, a new one is placed on it. For descent, use driven brackets or ladders (more correctly, brackets).
The advantages of this method of digging a well:
- You can control how tight and even the ring has become.
- You can lay the same rubber gaskets that will ensure tightness or put them on the solution.
- The walls do not crumble.
These are all pluses. Now for the cons. Working inside the ring is inconvenient and difficult physically. Therefore, according to this method, they dig mainly to a shallow depth - 7-8 meters. And in the mine they work in turn.
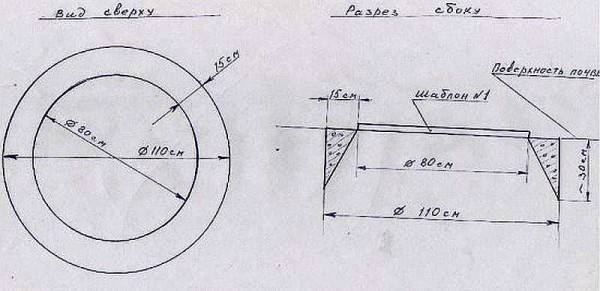
The structure of the "knife" for easier penetration of soil when digging wells
Another point: when digging a deck with rings, you can speed up the process of settling and facilitate the passage of soil, you can use a knife. It is made of concrete, it is poured into the ground at the very beginning. To form it, they dig a groove in a circle. In cross section, it has a triangular shape (see figure). Its inner diameter coincides with the inner diameter of the rings used, the outer one is slightly larger. After the concrete has gained strength, a “regular” ring is placed on this ring and work begins.
Installation of rings after reaching the aquifer
First, a mine is dug without rings. At the same time, keep an eye on the walls. At the first sign of shedding, they put the rings inside and continue to deepen according to the first method.
If the soil does not crumble throughout the entire length, having reached the aquifer, they stop. Using a crane or manipulator, rings are placed in the shaft. Then, they deepen another couple of rings according to the first method, increasing the debit.


First, they dig a mine to the aquifer, then they put rings in it
The excavation technique is the same here: as long as the depth allows, it is simply thrown out with a shovel. Then they put a tripod and a gate and raise it in buckets. After installing the rings, the gap between the walls of the shaft and the ring is filled and rammed. In this case, the upper several rings can be sealed from the outside (with bituminous impregnation, for example, or with other coating waterproofing).
When working, it is also necessary to control the verticality of the walls, but it can be adjusted within certain limits. The control method is similar - a plumb line tied to a bar and lowered into the mine.
Advantages of this method:
- The shaft is wider, it is more convenient to work in it, which allows you to make deeper wells.
- It is possible to make external sealing of several upper rings, which minimizes the possibility of ingress of the most polluted waters.
More disadvantages:
- It is difficult to control the tightness of the junction of the rings: it is forbidden to be in the shaft during installation. It is impossible to move an already installed ring in it. It weighs hundreds of kilograms.
- You can miss the moment, and the mine will crumble.
- The backfill density of the gap between the shaft wall and the rings remains less than the "native" soil. As a result, melt and rain water will seep inward, where it will get inside through the cracks. To avoid this, a protective circle of waterproof material (waterproofing membrane) is made around the well with a slope from the walls of the well.
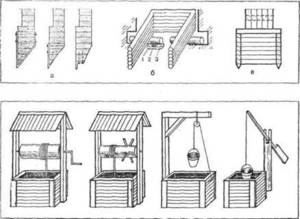
Well construction methods
- Open - it is the fastest, but the most time-consuming. If you calculate how much the work will cost, it turns out that they will cost much more than the materials. A pit is dug on the territory and concrete rings are lowered down. The pit should be wider than them by 20 cm on each side. You cannot complete the task alone. Digging hundreds of cubic meters of soil is better with an excavator than with a shovel. Assembly of prefabricated elements is only possible with a crane.
- Mine - a wide well is made in the ground and strengthened as it is deepened with logs or other materials. This is not the most convenient way. In addition, it does not allow you to install heavy items with your own hands. It should be noted that this method is not safe - the earthen wall may collapse.
- Pipe - a plastic pipe is immersed in the ground. Its bottom is closed by a concrete plug. The walls immersed in the aquifer are perforated.The method is well suited for areas where the aquifer lies close to the surface - it is quite difficult to mount a wide five-meter pipe.
- Closed - the concrete ring is immersed in a pit with a depth of about 2 m. Soil is evenly removed from under it from the inside, lowering the sides lower and lower. New tiers are installed on top. This solution allows you to build a solid mine yourself. Time can be reduced if one person works below, the other lifts the soil in a bucket on a rope. It is this method that we will consider in the article.
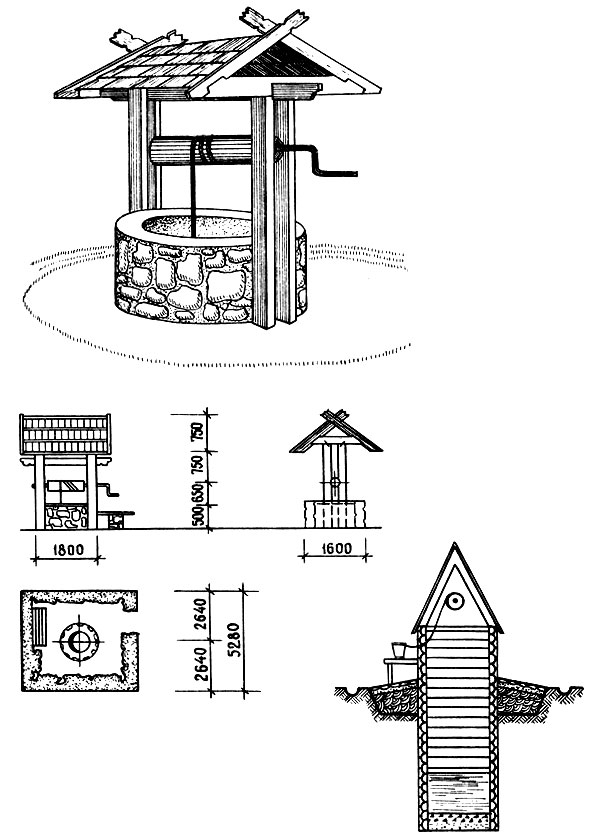
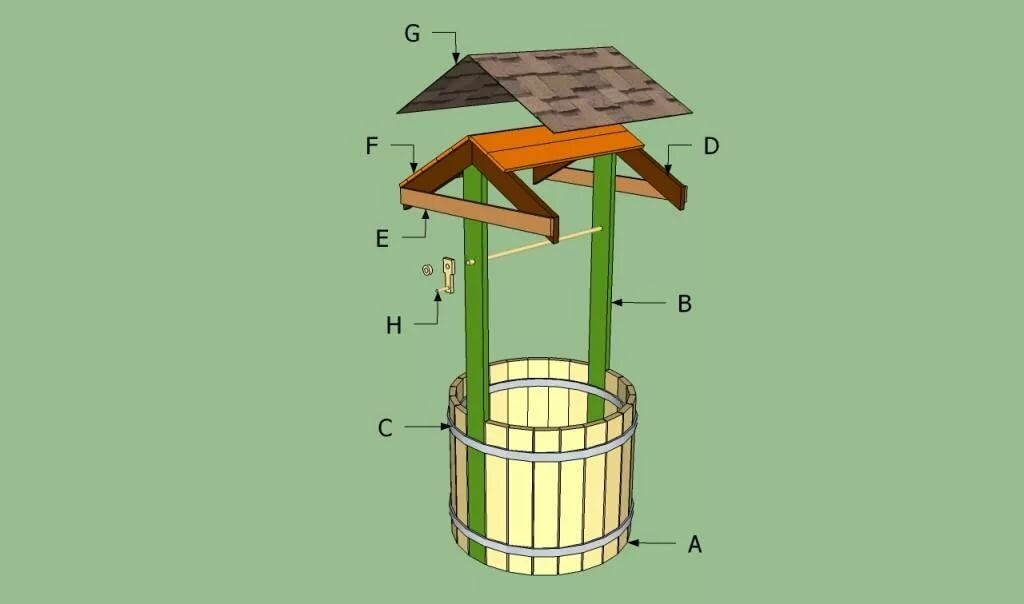
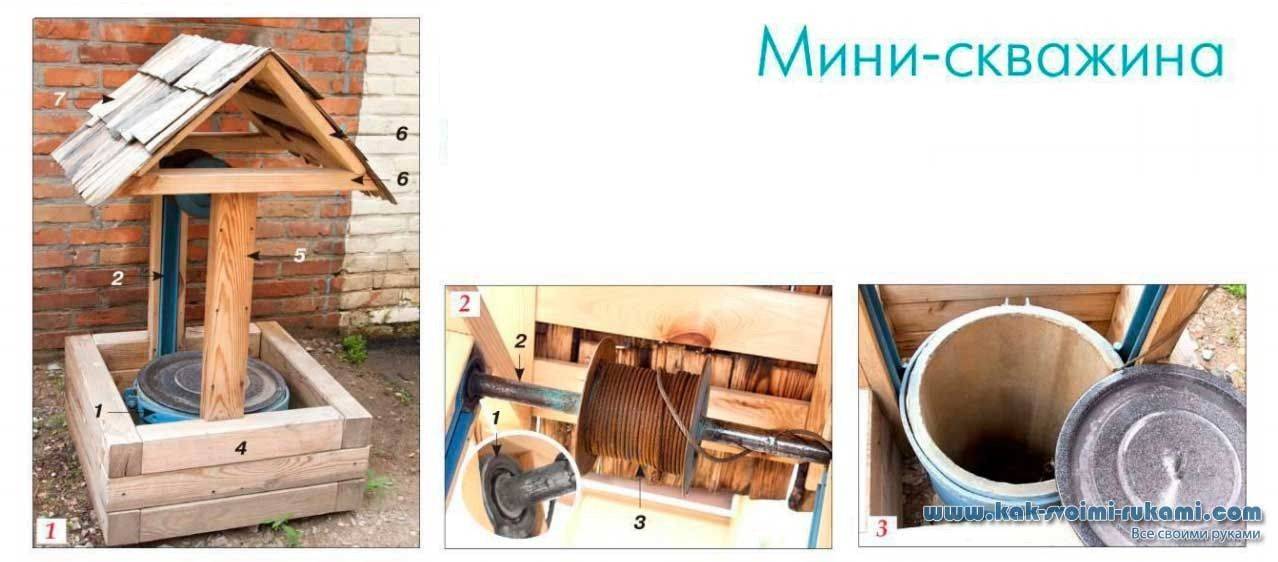
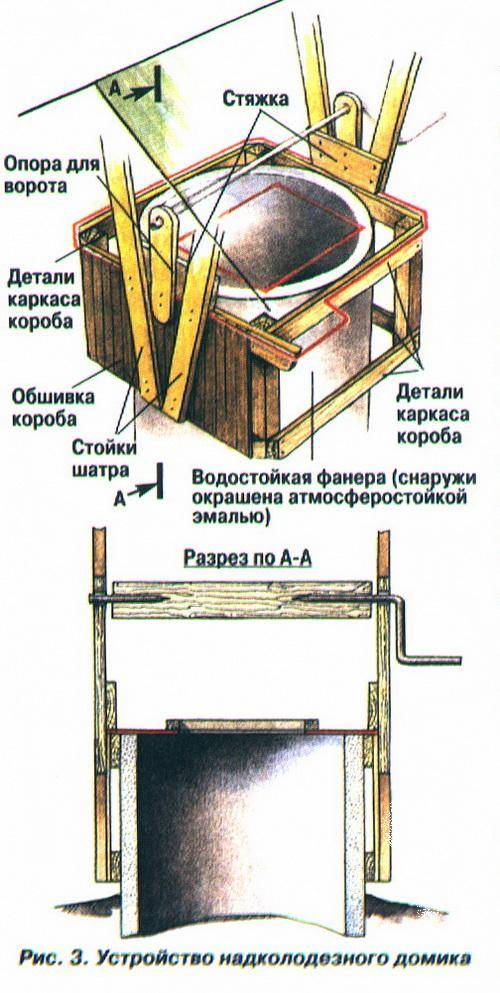
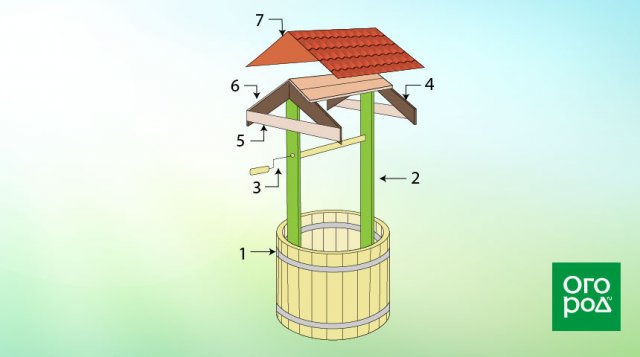
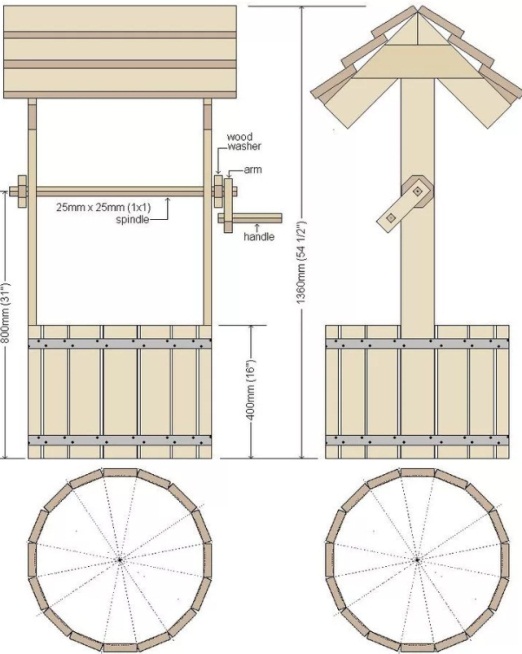
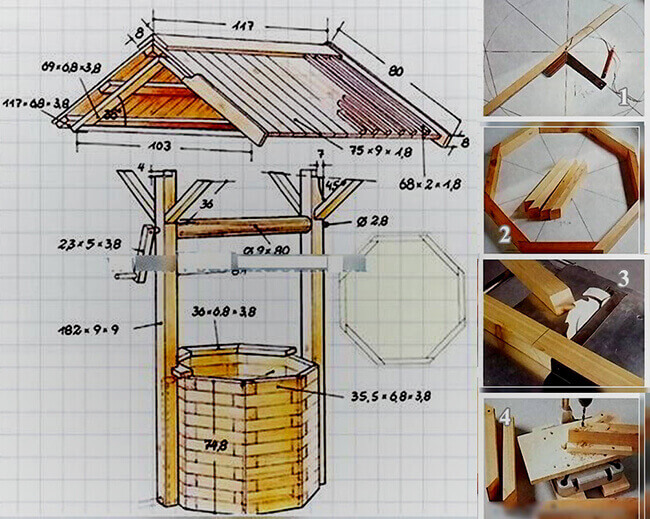
Step-by-step instructions for making a house for a well
-
Measure the diameter or width of the well head. Based on these dimensions, the perimeter of the wooden base of the structure will be calculated.
Frame base
- To make a wooden frame from a bar with a section of 50x100 mm. It is more convenient to do it on a flat surface, checking the design using the building level.
-
To the frame, perpendicular to its base, attach 2 beams (vertical racks) with a section of 50x100 mm and a length of 72 cm. At the top, connect them with a beam with a section of 50x50 mm, which will play the role of a skate.
The design is ready for installation on the well ring
-
Connect the vertical racks to the base of the frame (in its corners) using rafters. In order for the rafters to fit snugly, it is necessary to cut the upper ends of the racks on both sides at angles of 45 degrees.
The upper ends of the vertical posts are sawn on both sides at an angle of 45 degrees
- To the base of one of the sides of the frame (in the place where the door will be), attach a wide board. In the future, buckets of water from the well will be placed on it. Its width should not be less than 30 cm.
-
On the remaining sides, fill boards of smaller width.This is necessary for the strength of the structure and keeping it on the well ring.
Fixing the structure to the concrete ring
-
Attach the finished frame to the concrete ring of the well with bolts. To do this, it is necessary to combine the holes of the racks and the concrete ring, into which insert the bolts and tighten the nuts.
Vertical beams are bolted to the concrete ring
-
Install the gate with the handle on the vertical posts. Attach it to the structure.
The gate is fixed with metal plates to vertical posts
-
Attach a door with a handle and a latch to the frame.
The surface of the slopes is ready for covering with roofing material
- Sheathe the gables and slopes of the frame with boards. The end boards of the slopes should extend beyond the structure. This will play the role of a visor and protect the gables from getting wet.
- Fasten the roofing material to the roof slopes.
The frame must have the correct geometric shape, since displacements and distortions in the future will adversely affect the integrity of the structure. The joints of the wooden frame elements can be further strengthened with metal corners. For this, self-tapping screws with a rare thread pitch with a diameter of 3.0 to 4.0 mm and a length of 20 to 30 mm are suitable.
When the structure is installed on the well ring, you can begin to manufacture the gate. This device is necessary for lifting and lowering the bucket.
Well gate
Round log with a length of 90 cm and a diameter of 20 cm or more. The length of the gate should be 4-5 cm less than the distance between the vertical posts. This makes it possible not to touch the post with the edge of the gate.
The dimensions of the metal elements must exactly match the openings of the gate
- It must first be cleaned of bark, leveled with a planer and sanded.
- To maintain a cylindrical shape, wrap the edges of the log with wire or cover with a metal collar.
- At the ends of the log, in the center, drill holes with a diameter of 2 cm and a depth of 5 cm.
Before making the gate, the log must be dry and without cracks.
- Fasten metal washers with similar holes from above. This is necessary to prevent the destruction and cracking of wood during operation.
- Drill the same holes at the same height in the uprights. Then insert metal bushings there.
- Drive metal rods into the finished holes of the log: on the left - 20 cm, on the right - the L-shaped handle of the gate.
Metal parts for manual gate
- Hang the gate with metal parts on vertical posts.
- Attach a chain to the collar and hang a water container from it.
Do-it-yourself door to the house
To one of the sides of the frame, fix 3 bars (intended for the door frame) with a section of 50x50 mm;
The beams are attached to the rafters and the base of the entire structure.
In accordance with the dimensions of the frame, assemble the door from identical boards. Top, bottom and diagonally fitted boards are fastened with bars;
- Attach metal hinges to the door;
- Then install the door on the frame and fasten the hinges to the screws or nails;
Door hinges fixed with nails
- Fasten the handle and latch on the outside of the door;
- Check the door. It should not catch when opening and closing.
Installation of roofing material
The last step in building a house for a well will be installing a waterproofing layer on the roof. This will preserve the wood and extend the life of the structure.Roofing material or, as in our case, soft tiles are used as protection against water.


Soft tile was chosen as the roof
The device of sewer wells made of concrete
When the preparatory work is completed, the process of mounting the well begins.
In the case of a concrete or reinforced concrete structure, the arrangement of the sewer well will look like this:
- first, the base is prepared, for which a monolithic slab or a 100 mm concrete pad is used;
- further, trays are installed in sewer wells, which must be reinforced with a metal mesh;
- pipe ends are sealed with concrete and bitumen;
- the inner surface of the concrete rings must be insulated with bitumen;
- when the tray hardens enough, it is possible to lay the rings of the well itself into it and mount the floor slab, for which cement mortar is used;
- all seams between structural elements must be treated with a solution;
- after grouting with concrete, it is necessary to provide the seams with good waterproofing;
- the tray is treated with cement plaster;
- at the pipe connection points, a clay lock is equipped, which should be 300 mm wider than the outer diameter of the pipeline and 600 mm higher;
- one of the final steps is to check the design for operability, for which the entire system is completely filled with water. If no leaks appear after a day, then the system is functioning normally;
- then the walls of the well are filled up, and all this is compacted;
- a blind area of 1.5 meters wide is installed around the well;
- all visible seams are treated with bitumen.
The device of a sewer well made of concrete rings, described above, is no different from the arrangement of a brick structure, with the only difference being that in the latter, concreting is replaced by brickwork. The rest of the workflow will look the same.
There are also overflow wells, which have a somewhat more complicated structure compared to the structures described above (for more details: “Drop-off sewer wells are an important need“).
In addition to the tray, one or more conditions may be required to equip the overflow well:
- riser installation;
- water tower installation;
- arrangement of a water-breaking element;
- creation of a practical profile;
- pit arrangement.
The basic principle of installing wells does not change, with the exception of minor differences. In particular, before installing a drop well, it is necessary to lay a metal plate under its base, which prevents concrete deformation.
Thus, the composition of the differential well includes:
- riser;
- water pillow;
- metal plate at the base;
- intake funnel.
The funnel is used to neutralize the rarefaction that occurs due to the high speed of movement of effluents. The use of practical profiles is quite rare, since it is justified only on pipes with a diameter of more than 600 mm and with a drop height exceeding 3 m. As a rule, such pipelines are not used in private households, and overflow wells are a rare occurrence, but other types sewer wells are in demand.
According to regulatory enactments, the device of a well for sewerage is justified in such situations:
- if the pipeline needs to be laid at a shallower depth;
- if the main highway crosses other communication networks located underground;
- if necessary, adjust the speed of movement of effluents;
- in the last flooded well, immediately before the discharge of wastewater into the water intake.
In addition to the reasons described in SNiP, there are others that necessitate the installation of a differential sewer well on the site:
- if there is a large difference in heights between the optimal depth of the sewer at the site and the level of the wastewater discharge point into the receiver (this option is often justified, since laying the pipeline at a shallower depth allows you to perform less work);
- in the presence of engineering networks located in the underground space and crossing the sewer system;
- if there is a need to control the rate of movement of wastewater in the system. Too high speed has a bad effect on the self-cleaning of the system from deposits on the walls, as well as too low speed - in this case, deposits will accumulate too quickly, and the use of fast current is required to eliminate them. Its meaning is to increase the fluid flow rate in a small section of the pipeline.
Well device and types
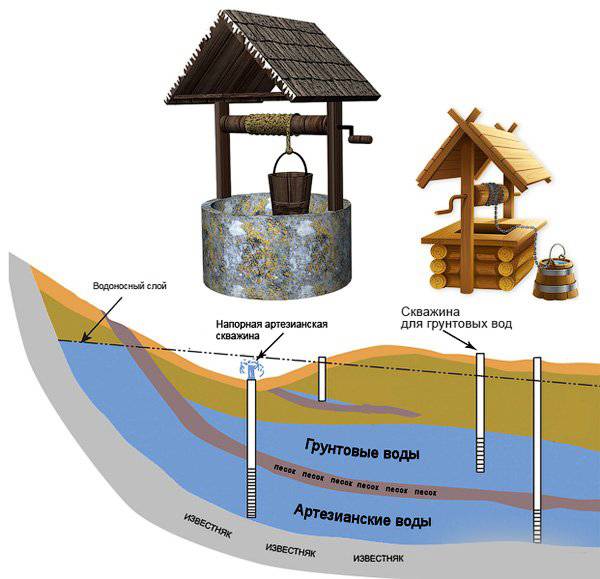
A well is a vertical system with a reinforced surface and a structure for supplying water from underground sources (wells or groundwater). According to the mechanism of the rise of internal waters, this can be:
- a Russian well, water is obtained from it thanks to a rope wound on a special drum, at the end of which a bucket is tied;
- a well-shaduf, in which a crane-type lever is used to raise water from the mine;
- Archimedean screw, in which water rises in large portions.
Drinking wells use only:
- groundwater of spring origin;
- artesian waters that get out from the depths due to the force of natural pressure.
According to the material for strengthening the inner walls, wells can be:
- wooden;
- brick;
- concrete;
- stone.
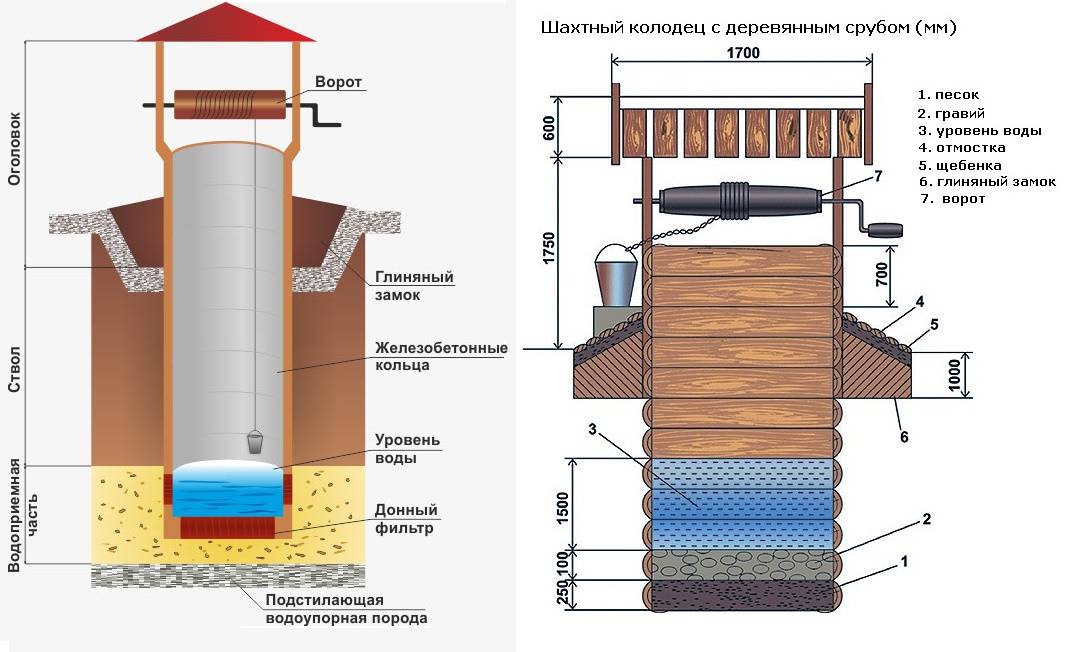
hoist stack the filter
The part that is above the ground is called the head, it is covered with a lid, protecting it from debris and winter icing. The part located underground is called the shaft, it is a shaft dug deep into the mine, the walls of which are reinforced. The shape of the mine is most often round (the most convenient), square (the simplest) and any other (rectangular, hexagonal, etc.).
Concrete, brick and stone wells are dug with a round shaft.
How to make a structure from a cover and a canopy
If the well is properly insulated, it will not freeze and can be used all year round. The outer walls in this case should also be insulated. The answer to the question - whether to close the well with a lock - depends on whether there are children in the house


It is important whether the village is guarded. Intruders can get into the unguarded territory and steal the pump located inside under the hatch
What materials are used
- Wood or its analogues - chipboard and plywood.
- Metal.
- Plastic.
The latter option is inferior to the previous ones in terms of strength and decorative qualities.

Instagram @dom_sad_dacha
Instagram @dom_sad_dacha
wooden lid
Most often, boards from a natural array are used - they are easier to process. They tolerate cold and mechanical stress well.It is better to choose oak, linden or birch.
For work, you will need blanks with a section of 2x15 cm and bars 4x4 cm. From them we will put together a shield according to the size of the concrete neck. The bars are placed both above and below, leaving a smooth surface outside.
The natural array will quickly become unusable if it is not treated with antiseptics and varnished. Also suitable for street paint. To change the shade of wood, tinting darkening varnishes are used. The processed and dried parts are cut to length and connected with two bars. Fastening with self-tapping screws will last longer than ordinary nails.
To create a round cover, markings are drawn on the surface of the shield. A small nail is driven into its center and a rope with a pencil is tied to it. With the help of such a compass, you can accurately draw a circle. The radius depends on the length of the rope.
It is more convenient to cut a curved contour and cut a hole under the door with a jigsaw. Sections are treated with antiseptics and varnish. There should be no open areas. The door is knocked together in the same way as the lid, but instead of bars it is better to take narrow slats. Fittings - handles and hinges - must be protected against corrosion. Wrought iron, aluminum and galvanized steel work best.
Boards can be fastened on the front side with forged iron strips, stylized antique.
The shield is mounted on the base with the help of anchors, punching through it. There is another way. The bottom is fastened with steel wide corners, evenly spaced on the inner circumference. Before closing a well made of concrete rings or logs, you need to check whether it can withstand the fasteners. If the material crumbles, it is reinforced with mortar and reinforcement.The top ring may need to be replaced with a new one.
The final stage of work
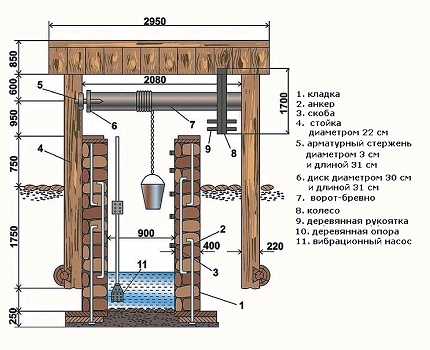
The elevation of the aerial part should be 80 cm above the zero mark. The sinus around the concrete well is filled with a gravel-sand mixture. In order to prevent surface runoff and atmospheric water from entering the well, a clay castle is made around it. To do this, clay or loam is poured around the working, 1.5 m deep and up to 1 m wide, and then compacted.

After that, water is pumped. Competent pumping implies a sparing mode of water change by several pumpings not to the bottom with obligatory breaks to restore the previous level. Then the country well is left to be filled with water: the normal water level is about 1.5 rings.
See the best ideas for bath design projects for a summer residence or a private house here. You will find original ideas for landscape design of a private house here.
Conclusions and useful video on the topic
Those who would be interested in listening to expert advice in a slightly expanded and different version can watch the following video:
Work on the arrangement of a well mine is not as difficult as it is laborious. And it is not always necessary to dig the earth's surface, delving into it ten meters.


Much more often, the aquifer passes at a depth of 4 to 7 meters. Alternately changing, two strong guys are quite capable of digging such a mine in two days. The main thing is the desire and the tool!
Tell us about how you dug and equipped a well in your summer cottage with your own hands. Share technological subtleties that site visitors can use. Leave, post photos and ask questions in the block below.


