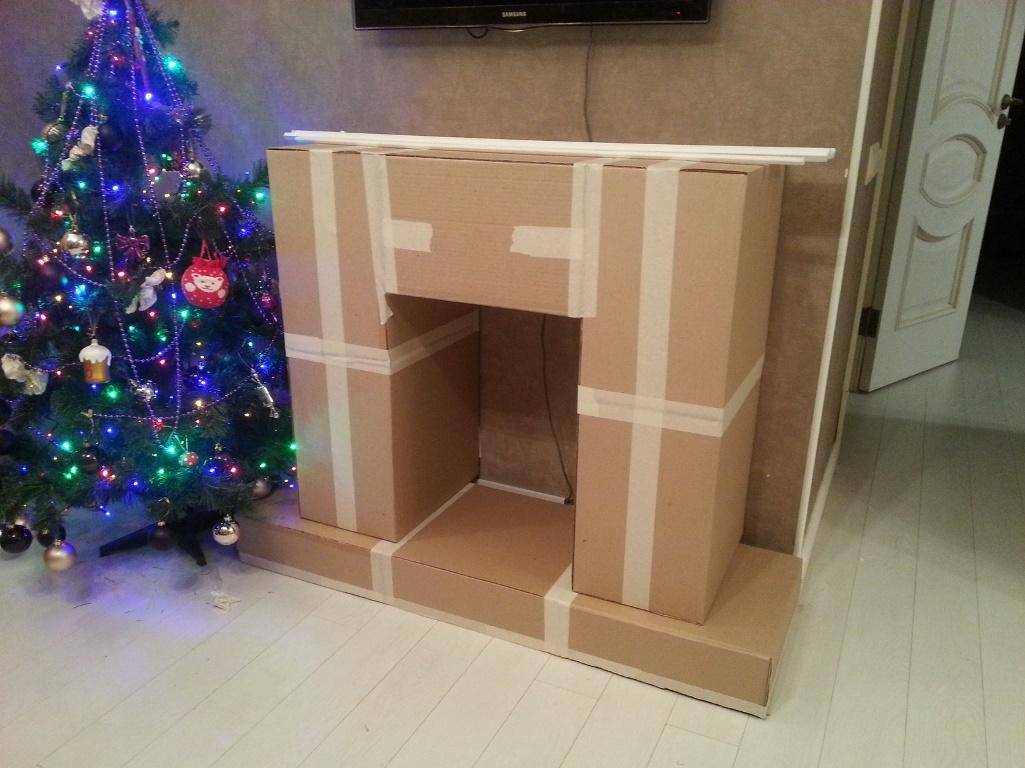
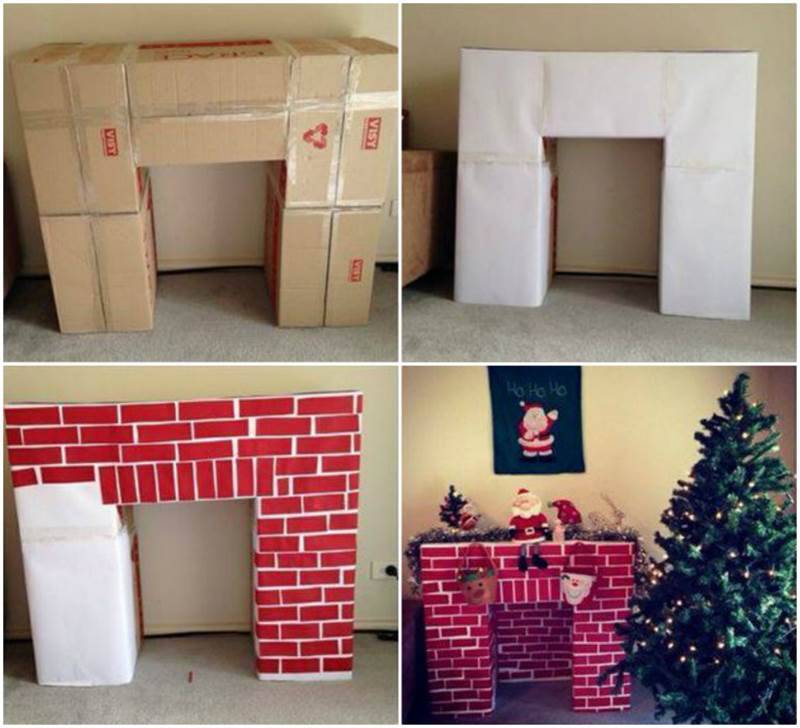
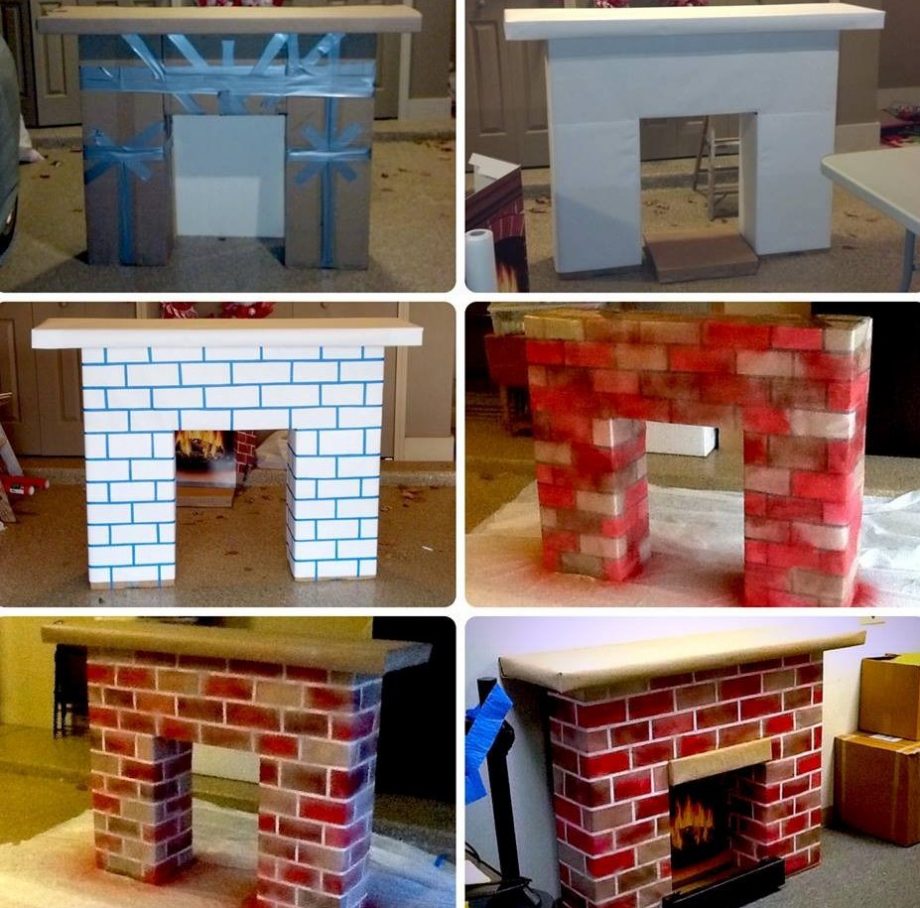
- No. 1. False fireplace from cardboard boxes
- Corner fireplace from boxes
- Imitation of the hearth in the interior of the apartment
- Do-it-yourself decorative false fireplace in 1 day. How to make a decorative fireplace yourself.
- False fireplace or imitation fireplace, what to choose?
- The technology of building a false fireplace in an apartment
- How to make a fake plywood fireplace
- What is a fake fireplace and why is it needed
- Preparatory activities
- Do-it-yourself corner false fireplace from boxes
- Do-it-yourself brick masonry
- Building a fireplace - step by step instructions
- An example of ordering a fireplace with an arch
- Components of a fireplace
- How to make a cardboard fireplace with your own hands - step by step instructions
- Large and simple Christmas fireplace
- Angular
- Fake model trapezoid
- Homemade option
- Children's option
- How easy it is to make bricks
- Imitation fire
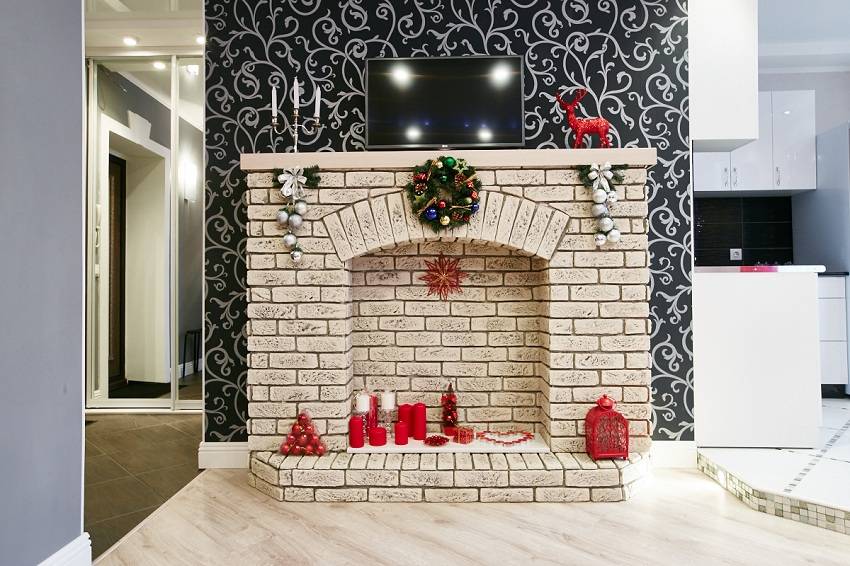
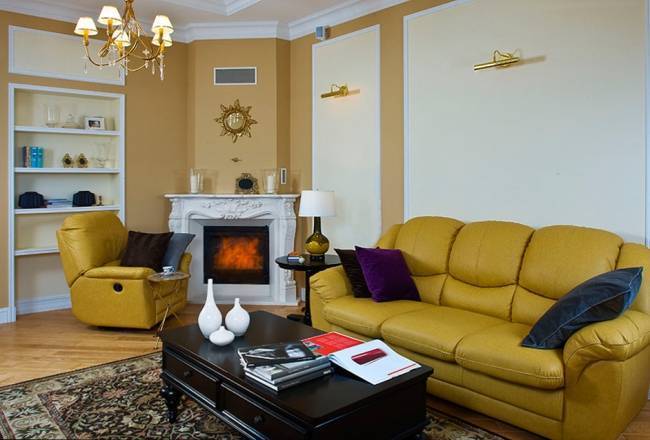
- False fireplace in the interior of the living room
- Foundation arrangement
- combustion chamber
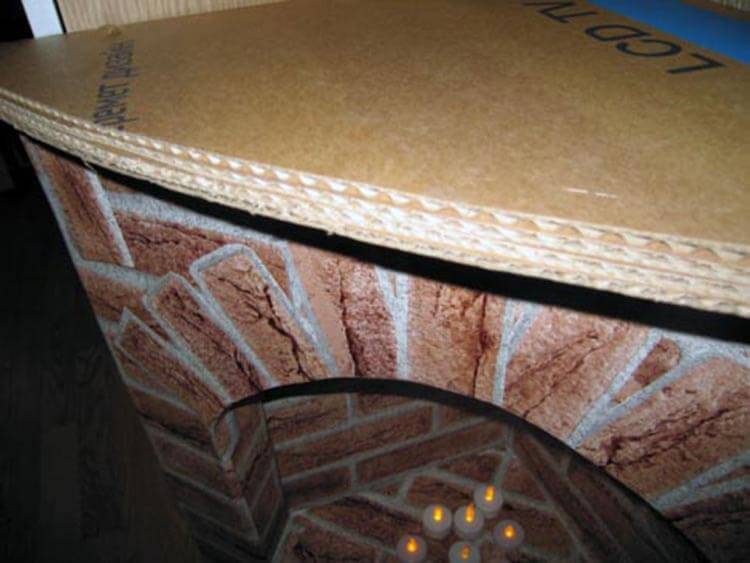
No. 1. False fireplace from cardboard boxes
Having a large amount of cardboard or small cardboard boxes for shoes or small appliances, you can very simply “build” a real fireplace. In addition to cardboard, you will need:
- a lot of wood glue;
- masking tape;
- roulette;
- scissors or stationery knife;
- something heavy as a press;
- writing something.
The beauty of this method lies not only in its ridiculous cost, but in the fact that the creation process can be carried out in a playful way, in which your children will gladly take part. Moreover, nothing needs to be drilled, and there is nothing to spoil. So, let's begin.
For the first time, we recommend using simpler forms for making a portal. Moreover, such a false fireplace can be used as a disposable one. For example, make it for the new year and hold a small family photo session against its background. You will get a lot of positive and memorable moments, surprise your friends and relatives and make the most unusual decoration from the most ordinary materials.
If you have a large box from large equipment, then you need to carefully unfold it and make a pattern. To do this, draw on its surface the dimensions of the back and side walls. You should get a rectangle, which must be folded with the letter P. The sides must be made voluminous. To do this, they should be folded, as shown in the figure.
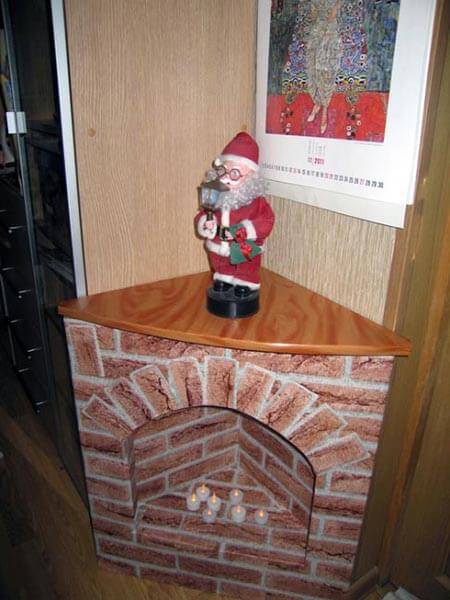
Corner fireplace from boxes
If you have a small room and there is nowhere to put even an artificial fireplace, but you have found a free corner, then this version of a decorative fireplace for the new year will be just right for you.
In order for the fireplace to successfully fit into your room, look for a box that is suitable in size.
On the front of the fireplace, make a cut in a semicircle. At the top, make two arcs, creating the shape of a triangle. We fix all the details with tape or glue. The back of the box needs to be cut off and adjusted to your angle in the apartment. The tape will help you hold the sides of the box together.
The resulting fireplace can be pasted over with paper or painted. The brightest and most believable fireplace will turn out if you make an imitation of a brick.You can make a countertop out of plywood, or use several layers of cardboard for this.
It remains only to decorate the New Year's fireplace. It can be toys for the Christmas tree, figurines, as well as decorative artificial candles.
Imitation of the hearth in the interior of the apartment

artificial oven
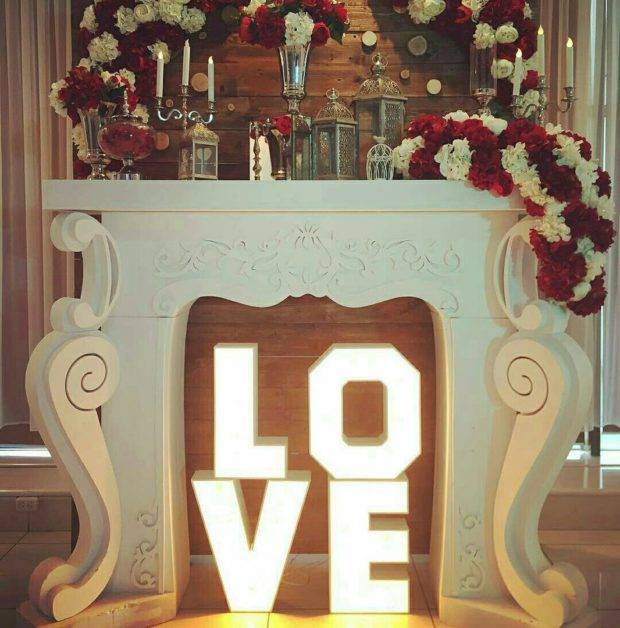
A false fireplace can be decorated in any style, from ornate baroque to minimalist high-tech.
- Classic pieces look noble and solid. They are trimmed with materials under an expensive stone, for example, marble. The front side is decorated with bas-reliefs, stucco
- Products in the spirit of Art Nouveau deny any pretentiousness, openwork and classics. Strict lines, straight forms, a minimum of design are welcome. It can be a simple box against the wall, with a highlight in the form of a catchy color or metal tubes in the finish.
- Country style is the interior of a cozy village house. A bulky fireplace, decorated with artificial brick, wood, will perfectly fit here. A rough wooden beam can be installed as a mantelpiece
In the care of decorating and decorating your stove, do not forget to arrange the territory closest to it. It is reasonable if a recreation area is located in this place. There are comfortable sofas, a small table for a pleasant tea party.
Candlesticks, photographs, paintings, figurines are placed on the mantelpiece. On the floor, you can lay a carpet with a long pile, a rug knitted from thick cords or the skin of a wild animal.
Imagine how pretty your living room will be if a cozy, homely fireplace appears in it! How nice it will be to spend evenings with your family next to him for an exciting board game. A device assembled by one's own hands will delight not only the owners, but also guests, friends, and acquaintances.

Niche as a hearth
This is a wonderful element of decor, which is able to play a dominant role in the interior. Or become one of his stylish attributes. Such an installation will never go out of fashion, so the design of your apartment will always be stylish and original.


Before starting work, watch a five-minute video that shows how to independently assemble an artificial hearth from improvised materials in one day:
Do-it-yourself decorative false fireplace in 1 day. How to make a decorative fireplace yourself.
Do-it-yourself false fireplace from improvised materials: 140 photos in the interior, assembly video + step-by-step instructions
Customer ratings: 5 (1 votes)
False fireplace or imitation fireplace, what to choose?
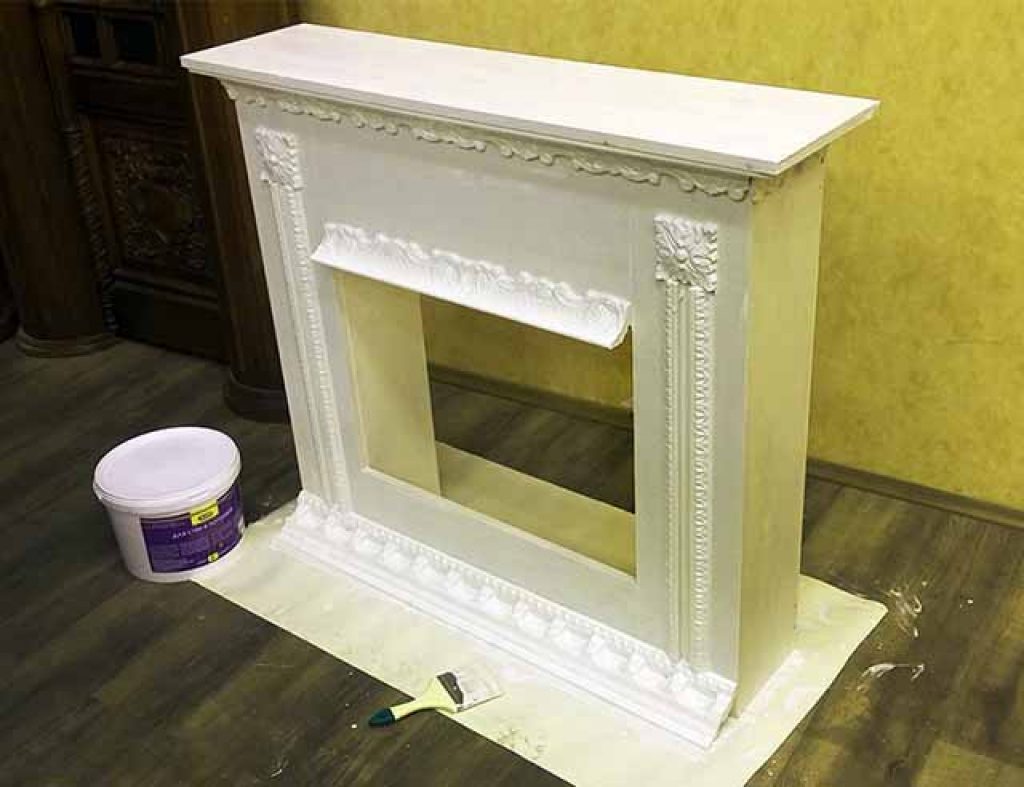
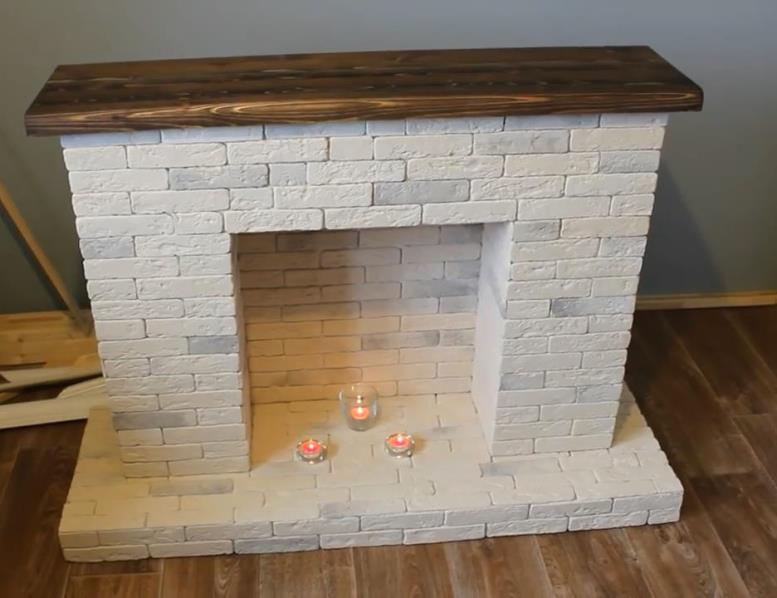
Laying a real fireplace is an expensive pleasure that is not available to owners of typical apartments, especially in panel houses, due to the increased load. The way out in this case can be a false fireplace, powered by electricity and simulating the burning of a flame. At the same time, you will not have problems with the delivery of firewood, smoke, soot, and you will not have to coordinate these works with anyone. A modern electric fireplace looks quite natural, the main thing is to make a suitable frame, or portal. It is most often made from an available material - drywall, fixed on a frame from a profile, and then finished to your taste.
The technology of building a false fireplace in an apartment
- Draw a sketch of the fireplace and select the finishing material - the thickness of the drywall will depend on it. For finishing with decorative stone or porcelain stoneware, it is better to choose drywall with a thickness of 12 mm, for lighter materials, a thickness of 8 mm is also suitable. Indicate all dimensions on the sketch and calculate the amount of material.In the sketch, it is imperative to provide a place for installing an electric fireplace in compliance with the gaps indicated in the passport.
- At the installation site of the fireplace, it is necessary to level the floors if necessary, and also provide for a connection point for an electrical appliance. From a drywall profile, a frame is made according to a sketch, fastening it to metal screws. If it is necessary to make roundings, the U-shaped profile is cut with scissors for metal on the sides and the required radius is bent.
- Pre-cut drywall parts are fixed to the frame from the profile. Drywall is quite easy to cut with a sharp thin knife. Fasten the sheets with hardened self-tapping screws. The seams are puttied using sickle tape. They fix the decoration and decorative elements, stucco molding, mantelpiece. Interior lighting can also give your fireplace a unique style and originality.
- Install the electric fireplace in the "furnace", connect it to the mains, and if there is imitation of smoke - to the water source.
The given technologies, of course, are not a dogma. Your imagination will tell you which fireplace will look more original: corner or classic English, and also tell you how best to decorate it, what accessories to choose and how to decorate the mantelpiece. The main thing is that with the advent of a fireplace, warmth and unprecedented comfort will reign in your apartment.
How to make a fake plywood fireplace

Wooden slat frame
In this case, it will not be possible to purchase a ready-made portal. It will need to be built independently.
1Make calculations and create a drawing. Take any scheme from the Internet as a basis
3Install the frame of wooden slats. Fasten them with nails
4 Sheathe it with plywood sheets. Optionally add decorative elements: podium, crossbars, columns
5 Attach the firebox to the back wall at the desired height
6Wrap the entire structure with self-adhesive film. It is better to choose wood or stone print
7Attach the structure to the wall
8Pour pebbles, firewood, sand or other decorative composition into the "oven"
9Order the fireplace grate in advance. At the last stage, it is attached to the firebox window with metal wire.
Such a fireplace is easy to carry from place to place, as the design is one-piece and removable.
Do-it-yourself candlesticks: for the new year, from a jar, glass, wood or plaster, from bottles. Master class at home | (120+ Photos & Videos)
What is a fake fireplace and why is it needed
In a city apartment, conditions will not allow you to install an ordinary fireplace. The absence of chimneys, floors that are not designed for such loads are the main obstacles in order to obtain permission to build such a structure. False fireplaces come to the rescue, which you can easily assemble on your own, without special skills in construction work.
Of course, you can buy an electric fireplace - such devices are now common, and their installation does not take much time and effort. But creating a fireplace with your own hands is a very exciting activity, it gives vent to imagination, allows you to make an exclusive thing. In addition, an open fire in an apartment is optional (and it is unlikely that you will be allowed to do this), and a false fireplace will serve as a multifunctional decoration for you.

The fake fireplace looks like the real one
Artificial fireplaces have the following advantages:
- cheapness - you need money only for materials;
- availability of materials necessary for the manufacture of the structure;
- the ability to change the decor at any time according to your mood;
- use in decorating inexpensive, but original and beautiful materials.
False fireplaces are divided into 3 groups:
- Reliable artificial fireplaces completely imitate the real ones, respecting both the dimensions and the principles of design. Inside the firebox, you can install a bio-fireplace burner, which will provide an almost exact effect of a burning hearth. Quite an expensive option, but it looks the most believable.
- Conditional false fireplaces have a portal protruding from the wall. They can be decorated according to your taste and desire. The furnace hole is usually filled with firewood or candles are placed there.
- Symbolic can be made from any materials. Their peculiarity is that they are not at all like an ordinary fireplace. It can even be a picture made on the wall with some decorative elements.
Preparatory activities
The design of a false fireplace, whether it is angular or rectangular, usually involves the presence of two basic elements: a portal and an apparatus inside. A massive structure is called a portal, designed to imitate a stove, and a biofireplace burner or an electric fireplace can act as an apparatus. In principle, you can not install the device inside, then it is easy to decorate the firebox with firewood, candles, spruce branches or other decorative elements.
In the future, any decorative coating can be easily fixed to the drywall base: tiles, mosaics, gypsum moldings, plastic panels with imitation of brickwork, and whatever.
Before starting work, it is advisable to choose a suitable place where the false fireplace would fit perfectly.Many people choose a corner fireplace because it takes up less space. An excellent solution would be to place the dummy opposite the front door in an unused corner. With this arrangement, the fireplace immediately becomes the main focus in the interior of the room, the center of attention.
You can easily be inspired by ideas from the Internet, it’s also easy to find even a drawing of a drywall corner fireplace with dimensions. You will only have to adjust them to fit your realities. It is necessary to choose the appearance of the fireplace in such a way that it does not particularly stand out from the style of the entire room, but better supports the given style.


At the final stage of preparation, the necessary tools for construction and suitable building materials should be collected. Let's briefly go over the materials, you will certainly need:
- Metal profile for the construction of a frame for drywall.
- To make a solid structure, you will need self-tapping screws for metal and wood to fix drywall.
- Drywall for sheathing the frame and creating a false fireplace shape.
- To align the corners, recesses from the screws, plaster is required.
- A primer is required to prepare for tiling. Before painting, it is also better to prime the drywall.
- At the preparation stage, you should decide how the finishing will be done and purchase the appropriate material: tiles, plastic panels, mosaics.
Additionally, you may need various decorative elements: corners, moldings and more.
To make a drywall corner fireplace, you will need a construction tool:
- For marking, you will need a pencil or marker, ruler, tape measure, level, plumb line.
- For basic work, you will need a screwdriver, a puncher, an electric jigsaw, a construction knife, metal shears, pliers, a screwdriver, a hammer.
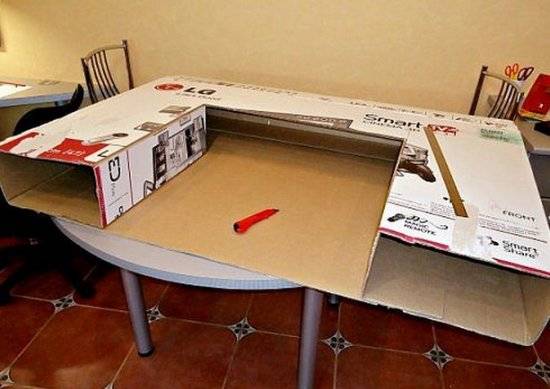
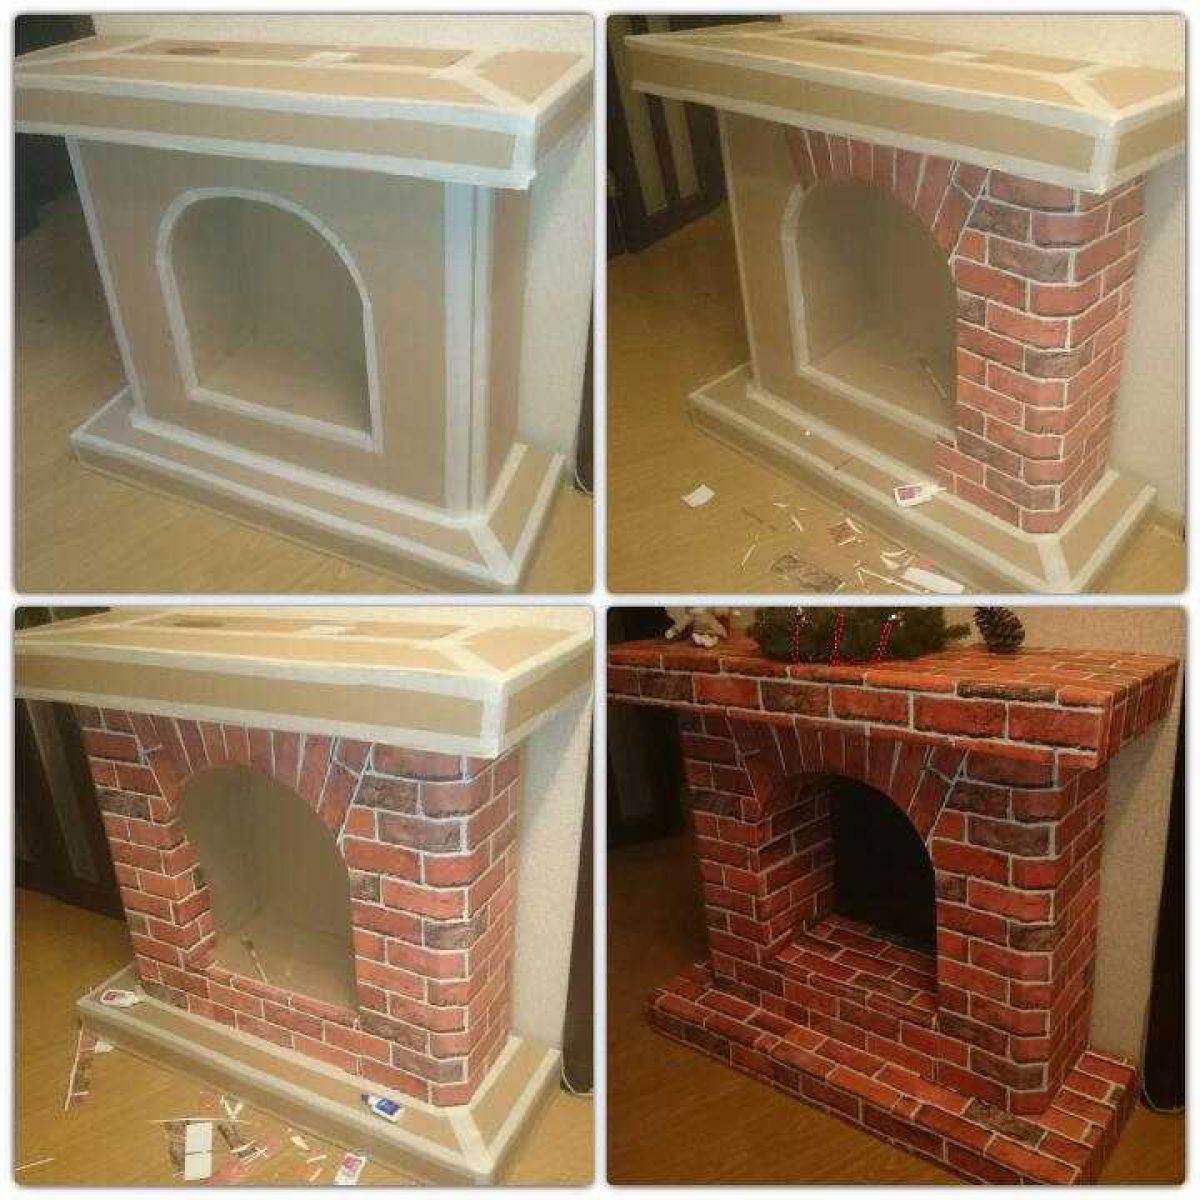
Do-it-yourself corner false fireplace from boxes
If there is not enough space in the room, then it is possible to build a corner fireplace structure from the boxes. How to make a New Year's fireplace from angular boxes, our instructions will tell.
First you need to find a place to install the fireplace and take measurements from it. The box should roughly fit the size of the corner. A semicircular cut is made from below in such a way as to carefully fold the cardboard parts inward. From above, you need to make cuts in the form of two arcs, so that the back of the box folds into a triangle in the shape of the corner of the room. From the inside, a triangular-shaped box must be fixed with adhesive tape or polymer glue.
Unnecessary parts of the box on the back side are cut off and form a triangle shape under the walls. The frame of the corner fireplace must be pasted over with paper or painted with white paint. After that, bricks or a film "under the brickwork" are glued onto the dried blank.
From plywood or thick cardboard, folded in several layers, they make a mantelpiece of the desired size of an angular shape and paste over it with a “wood-like” film. On the front side, the mantelpiece should protrude a few centimeters above the base of the structure. It is glued with double-sided construction tape to the base.
Do-it-yourself brick masonry
First, soak the bricks in water (until air bubbles come out). Since a dry brick sucks moisture out of the solution, which leads to a decrease in its strength. Next, we proceed to the independent construction of the fireplace.

Bookmark the first row.Stepping back from the edge of the foundation by 5 centimeters, assemble the first tier dry. Then it needs to be aligned: in level, height and angles. Next, we lay all the stones on the solution, controlling the horizontal level.
Then we build the walls of the fireplace
It is important to maintain a seam thickness of no more than 5 centimeters

Before laying the smoke box, you need to lay out the structure without mortar (dry). Only in this way, it will be possible to accurately adjust all the corners. Fireplace doors before installation are wrapped with asbestos at the points of contact with the wall.

When building a chimney, add cement to the mortar instead of clay.

Drying takes place within 14 days. After that, a test kindling is carried out.

Building a fireplace - step by step instructions
Do-it-yourself fireplace stoves are made using drawings. For the most part, do-it-yourself wood-burning fireplaces are preferred.


To begin with, remember the general rules of fireplace work.
- Each next row is first laid out dry. All bricks are hewn and adjusted to each other, and only then the row is assembled for mortar.
- In each row, the corner bricks are laid first, then along the perimeter, and only then the central ones. Each stage is checked by level.
- Do not lay dry bricks. Everyone needs to be dipped in water.
- The seam should be completely filled with mortar and be as thin as possible.
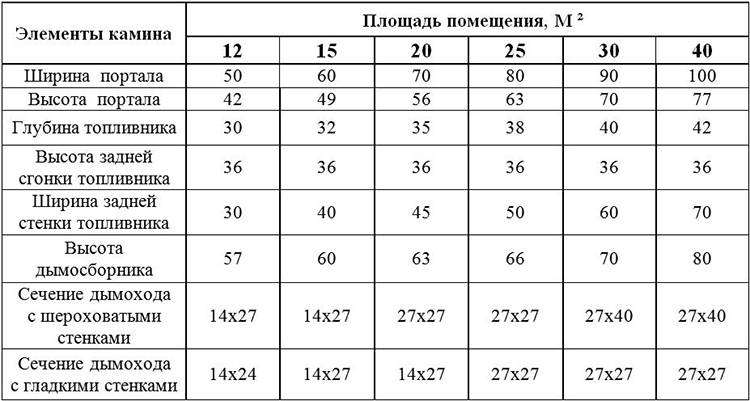
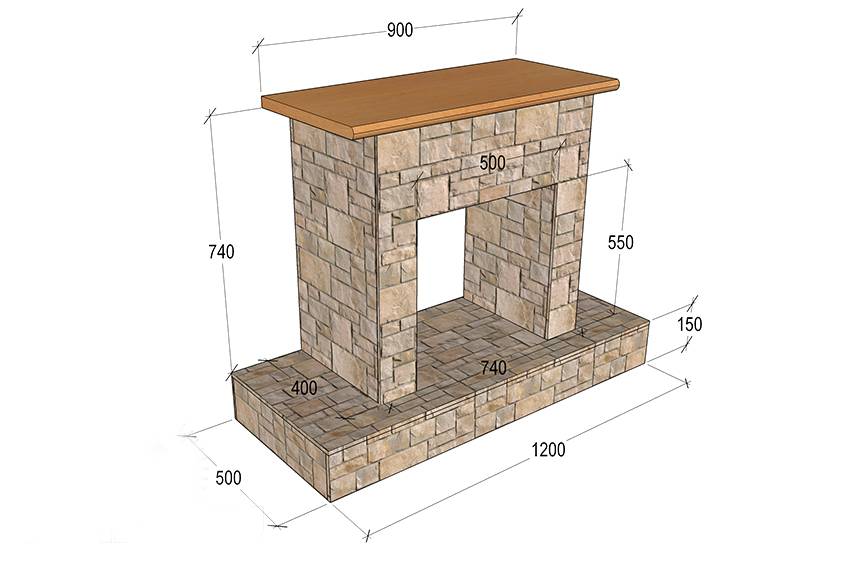
Fireplace elements and dimensions depending on the area of \u200b\u200bthe room
Do-it-yourself fireplace ordering. A fireplace model is selected and its order is printed. This will be an instruction that must be carefully followed. For convenience, you can circle each completed row with a pencil.
Waterproofing. Roofing or roofing material spreads on the foundation.
If the fireplace is large, the control cord is pulled, and the main work begins.
An example of ordering a fireplace with an arch
The first two rows are made deaf. The first row can be laid on edge.
An ash pan is built into the second row.
All metal structures (doors, grilles) are installed with the expectation of thermal expansion. The gap should be 5-10 mm and filled with asbestos.
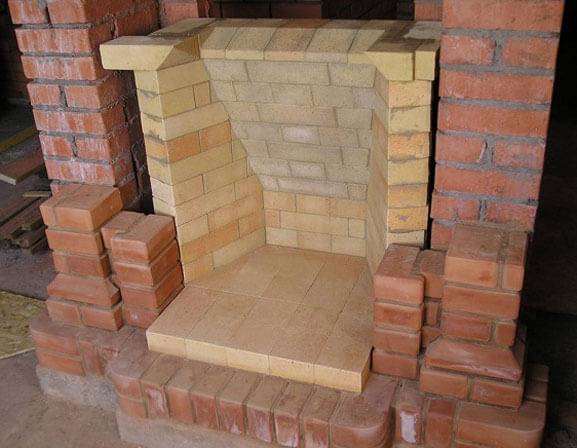
3rd row. The bottom of the fuel chamber made of refractory bricks is laid out on the edge. Here and below, the refractory brick is not tied up with red. The grate is installed.
4-7th row. Beginning of chamber formation. If, as here, several bricks are to be shaped, it will be convenient to number the bricks while they are laid out dry. The walls inside the firebox cannot be plastered, therefore, having laid out several rows, each time the bricks are wiped with a damp cloth.

Ordering a fireplace with an arch
8th row. The slope of the rear wall is necessary for the free exit of smoke.
9-14th row. Arch formation. The steeper the vault, the stronger it will be and withstand a greater load. In order to lay out the vault, it is necessary to make a special formwork from chipboard - it circled. 2 identical blanks are knocked together at a distance of about 10 cm. They are installed in the right place and an arch is laid out along them, symmetrically from two sides to the middle.
15th. Tooth device. This is a protrusion inside the fuel chamber, designed to keep ash and sediment out of the fireplace and keep the draft good.
19-20th row - narrowing of the chimney. Curvilinear surfaces are displayed with a brick overlap of approximately 6 cm.
21-22nd chimney.
23rd. A latch that fits the size.
Fluff is arranged at the place where the pipe passes through the ceiling.
Further, not clay, but cement mortar for masonry is used (sand: cement 3: 1).
To protect against precipitation, a deflector is installed on the top of the pipe.
Components of a fireplace
Scheme of the fireplace and its principle of operation
Before I start assembling the fireplace, I will show you what main parts it consists of.
Of course, many people know that its main components are the firebox and chimney, but there are also many other elements:
- Ash pan.
- Smoke collector.
- convection system.
- Heating device.
- Latch for cleaning ash.
- Grate.
- Lining (Internal protective lining).
- Flame cutter.
- Doors for protection.
Each of these elements ensures comfortable and safe work with the fireplace, while the main process falls on the firebox and chimney, which ensures stable air circulation inside the fireplace system. Do not forget about the "portal" - it is this part of the fireplace that falls under the decor.


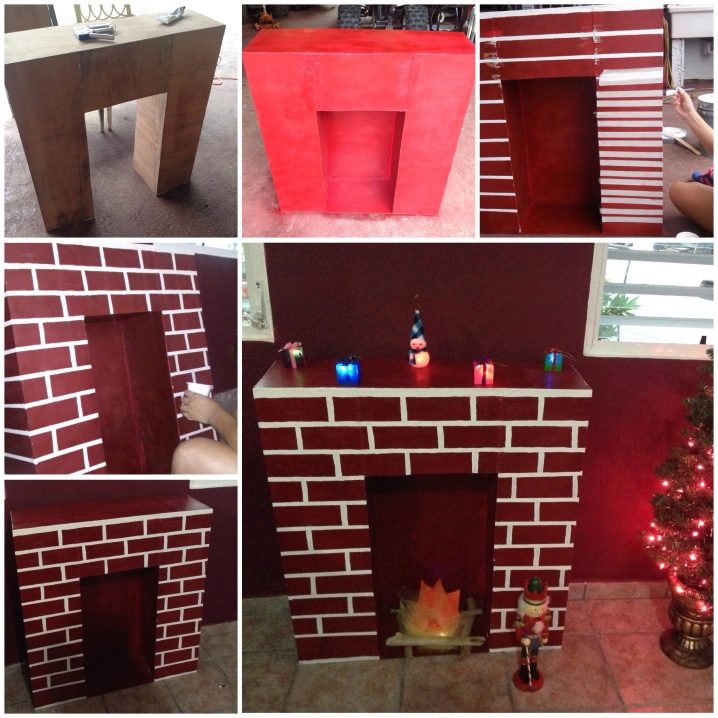


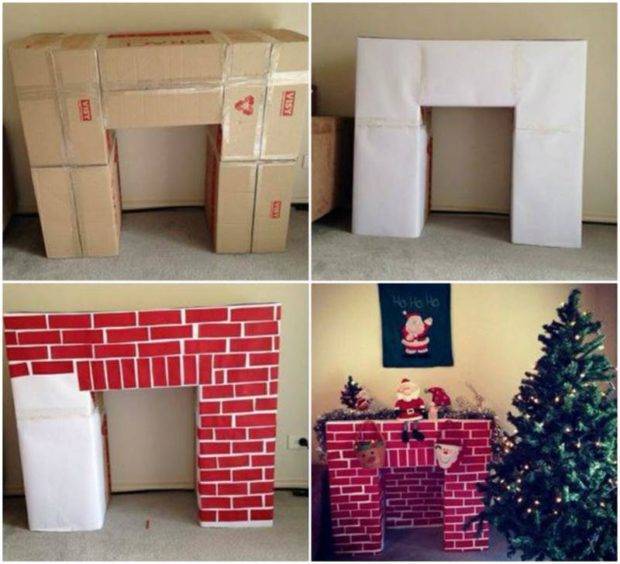
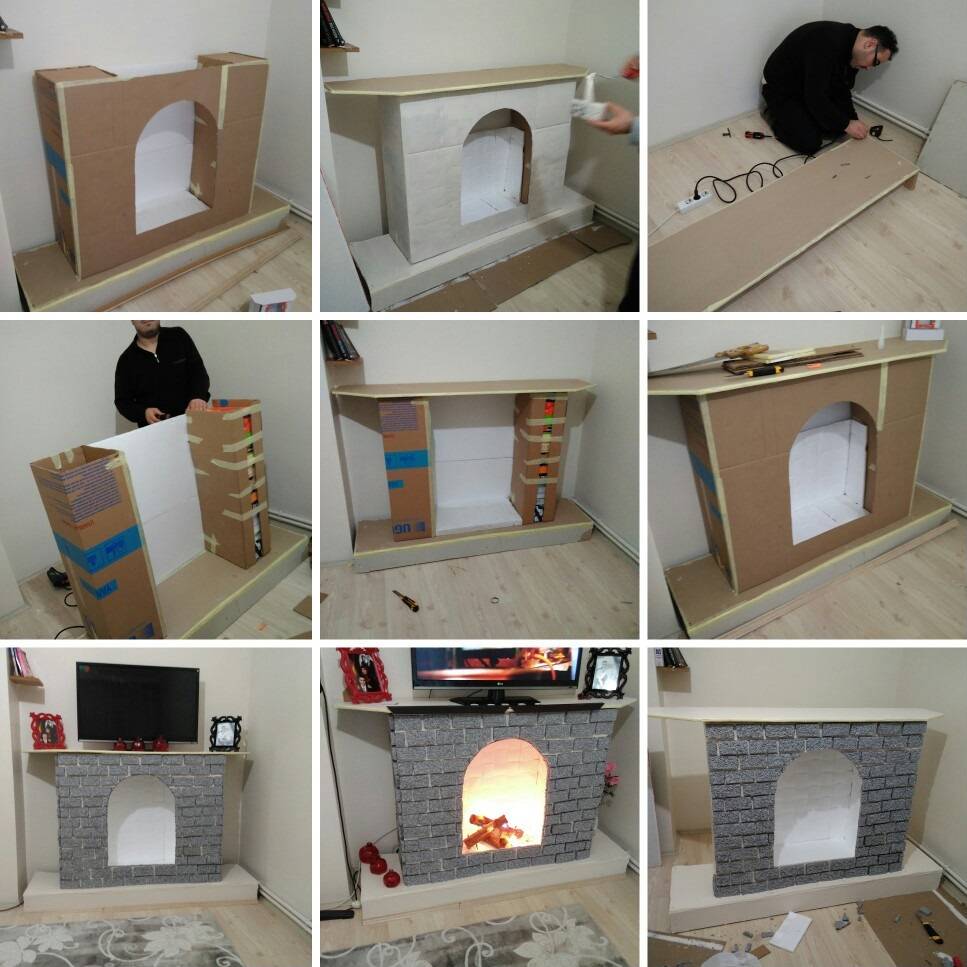
How to make a cardboard fireplace with your own hands - step by step instructions
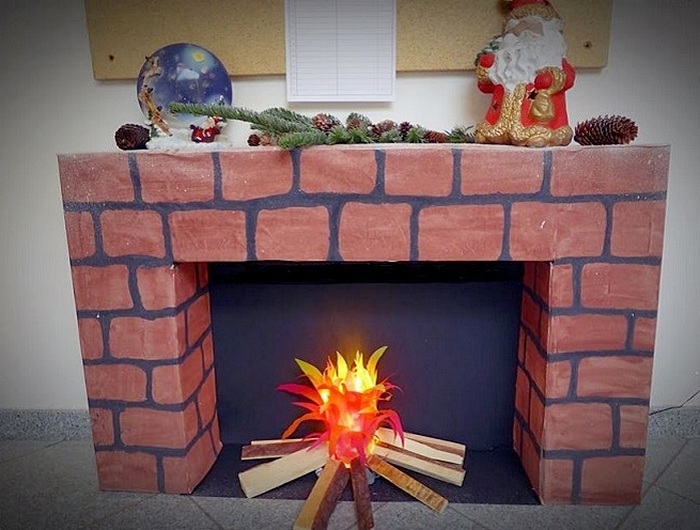
I have already started the topic, and again I invite you to my creative workshop to show how to make a cardboard fireplace. This is probably the most popular material that is in every home. We buy equipment, receive parcels, and you can even buy such boxes easily. And how to use them to create a festive mood for the new year? Now I will show with the help of photo video.
Large and simple Christmas fireplace
I started with this particular model, because it takes no more than an hour to make it. And from materials:
- 10 boxes;
- pasting paper;
- Glue;
- Scotch;
- Paper with masonry print;
- Scissors.
We make a fireplace with our own hands step by step instructions:
- Fasten in the letter "P" of the box.
- We cover with the first layer, pasting paper. It will make invisible all the flaws and irregularities.
- We decorate. We need an artificial "brick".
The dimensions of this design are rather big.It's worth considering! Or use small boxes.
Angular
This corner decor for the holiday is very easy to make:
- You only need to remove one side of the rectangle (width). Just cut the cardboard near this side. And then we bend the box so that we get a triangle.
- Fasten with tape.
- We make a hole, a furnace.
- From above we cover the craft with wallpaper. And inside (furnace) too.
- The lid is several layers of cardboard. To give it a decorative look, we glue it with a film under a tree.
The fireplace is small. But this is because it is made from one box. If you use 2-3, then the sizes will be larger.
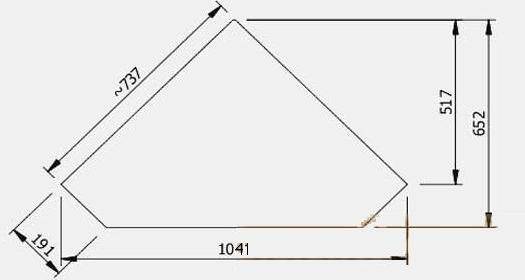
Fake model trapezoid
Looks unusual! And the thing is that the side part is not a rectangle, but a trapezoid. How to do it?
We make an add-on to the main box
It remains only to give a New Year's look with the help of garlands, Christmas trees and toys.
Homemade option
Here we need patterns. All the necessary parameters are indicated in the video.
Cut out the details: The video has a detailed diagram of the product.
First. In a rectangle (94 by 92 cm) we cut a hole, stepping back from the top 34 cm and from the side 23 cm. Second. In the same rectangle, we make a hole, retreating 18 cm from the side.
In the first part we make cuts approx. 17cm.
We need a rectangle 92 by 94 cm.
In four more parts (94 by 32) we make cuts, not reaching the top by 17 cm.
In two more details (34 by 32) we make similar cuts.
We connect. We put on long parts on the sides, and short ones in the middle. We glue all the "seams".
Now we have a real miracle at home, with which the holidays will pass in a warm atmosphere of comfort.
Children's option
I called it baby because even a baby can handle it.
- We make 3 valves (two side and one large), on which the box closes, by cutting off 5-10 cm (depending on the size of the box).
- Uncircumcised valve open. This is the bottom of the structure.
- It remains to glue and decorate the craft. We decorate to taste.
You can stick small cardboard bricks, then stick toilet paper on PVA glue diluted with water, paint it with paint after drying, as we did in the video about the brick photophone.
How easy it is to make bricks
There are several options:
- glue cardboard bricks,
- paint on putty,
- glue paper cut out or take a ready-made self-adhesive,
- draw
More about the last method. Not everyone can draw so many bricks. To make your job easier, apply paint to the sponge of the right size and make prints. Here, too, there are two options: either we apply paint around the perimeter of the sponge or completely fill the entire surface with paint, the effect depends on the method of application.


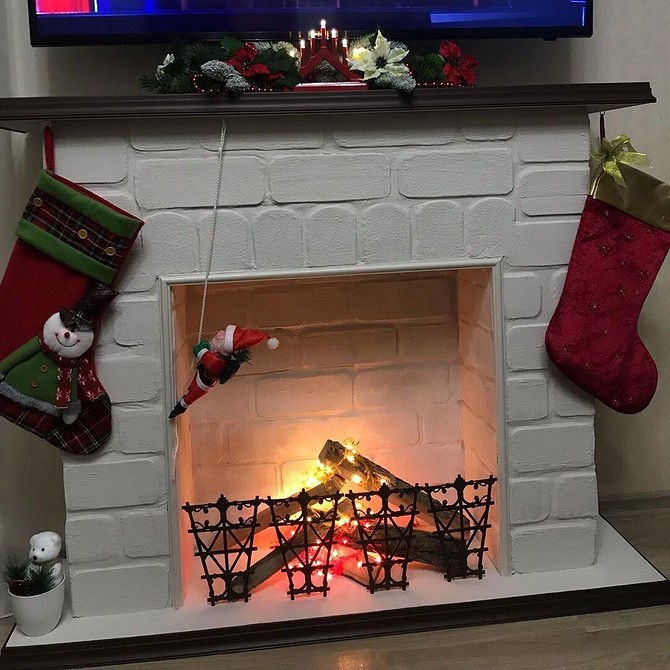
Imitation fire
What is a fireplace without fire? Garlands, electronic candles, hemp, stones or even paper will help us out.
All models are different. You may find one you want to make yourself! And do not forget to decorate with a New Year's wreath and a New Year's garland with your own hands.
False fireplace in the interior of the living room
Due to the fact that a false fireplace is absolutely safe in terms of fire safety, it can be placed in any room. Even in the children's room. An exception are structures equipped with candles or electrical elements. With a strong desire and the availability of space, you can equip a fireplace in the dining room. But many are inclined to believe that the living room is still the most appropriate room for this.Just imagine how you are sitting in the evening, after a hard day's work, howling in your favorite chair with a cup of delicious coffee or a glass of wine, and enjoying the view of a burning fire. And all this in an ordinary apartment ...
Foundation arrangement
- The bottom of the pit with a depth equal to the foundation of the house should be tamped;
- Lay on the bottom and compact the sand with a layer of at least 0.1 m;
- Fill the pit with a rubble stone to the level of the soil, filling the gaps with a solution of lime with clay or a cement mixture;
- Level the concrete from above, and after hardening, cover with two layers of roofing material;
- Mount the timber formwork to the floor of the room. The dimensions of the foundation in all directions must exceed the dimensions of the fireplace by 5 cm;
- Make a mesh of steel reinforcement with a diameter of 1.2 to 1.5 cm and install it using wooden blocks at a height of 50 mm from the waterproofing;
- Concrete mortar (cement grade M400 - 1 hour, crushed stone - 5 hours, sand - 3 hours) pour into the formwork and use a level to create a horizontal surface;
- Within 7 days, the concrete will harden, then remove the formwork and cover the foundation with bituminous mastic. Wait another 3 weeks, and then cover the foundation with 2 layers of roofing felt waterproofing.


combustion chamber
There are open and closed combustion chambers. The structure of the closed structure must necessarily include additional components - a gate and transparent doors made of refractory glass. The easiest option would be to buy a finished combustion chamber - this will greatly simplify the installation work, and the cast-iron closed furnaces look very good.
The arrangement of the fuel chamber is one of the most problematic and difficult stages of installing a fireplace.The firebox located under the chimney must necessarily have a chimney tooth, which is necessary for the efficient operation of the entire structure. In order to prolong the service life of a metal firebox, it is desirable to lay out its inner walls from fireclay bricks, which will minimize the contact of open fire with the material used to make the chamber.
Since the main workflow takes place in the furnace, it is worth considering it right now:
- The fuel is removed from the fuel basket, which is usually located under the firebox, and placed on the grate located in the chamber;
- The firewood set on fire is set on fire, and the intensity of their burning is regulated by means of a slide gate, which provides oxygen access to the working area (if the fireplace has an open firebox, then the combustion process can only be changed by adding firewood);
- The burned fuel becomes ash and enters the ash pan located directly under the grate (the collected ash must be removed periodically, so a retractable ash pan would be the best option);
- The gas released during combustion enters the street through the chimney (for the greatest efficiency, it is worth equipping the chimney with forced draft, which will also allow you to regulate the heat transfer of the fireplace).
The second option is somewhat more difficult to arrange - it involves mounting the back wall at an angle of 30 degrees towards the inside of the fireplace. If you make a fireplace with your own hands using such a scheme, then the advantage will be an increased reflection of thermal energy into the room.


