- The choice of the finished device
- How to connect a dimmer with your own hands?
- Instructions for connecting a dimmer for LED lamps
- Types of dimmers
- Simple dimmer
- Circuit elements
- The main purpose and essence of the dimmer
- Connecting a dimmer to an LED lamp (chandelier)
- Dimmer classification for LED lamps
- Place and method of installation
- According to the principle of management
- Mechanics
- Sensor
- "Remote"
- Installation of a differential machine in a switchboard
- Monoblock dimmer - simple and convenient
- Requirements and operating tips
- The principle of operation and the main types of dimmers
- Classification of the dimmer by type of execution
- Classification of dimmers by control method
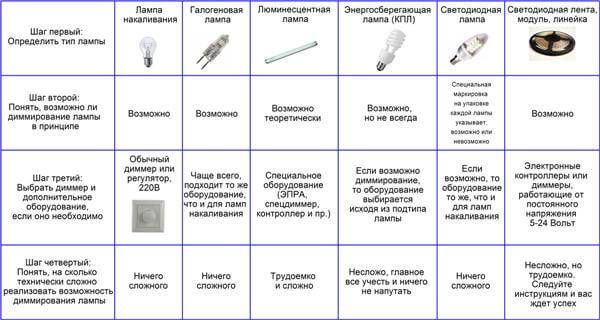
- Classification by type of lamps
- Video - Rules for connecting lamps to a dimmer
- Video - A few words about the dimmer for LEDs
- What will be needed for work?
- The main purpose and essence of the dimmer
- Features of selection and operation
The choice of the finished device
The most popular are dimmers manufactured under the name Schneider, Makel and Legrand. The latest electronic devices are created with power from 300 to 1000 watts
Usually, when choosing a dimmer, attention is paid to the price.
to other important dimmer selection criteria include:
- ease of use, because some may like a keyboard device, while others may like a controller with a remote control;
- type of device that can either be combined or not combined with the interior of the house;
- regulator brand, as more well-known brands are of good quality and at the same time sold at an affordable price.
 It is recommended to select a device in 4 steps
Dimmers of the popular Legrand brand are suitable for any lamps, including lighting fixtures 220 and 12 V. To determine which regulator is needed for a lamp, you need to use the following formula: multiply the number of bulbs in a lighting fixture by the power of one light source. For example, for a device with 12 12 V bulbs, a dimmer with a power of at least 144 V is suitable.
How to connect a dimmer with your own hands?
Make a connection dimmer for led lamps can be independently. To do this, you need to have minimal knowledge in the field of electrics and have a screwdriver.
Instructions for connecting a dimmer for LED lamps
The procedure for connecting the device using the Legrand regulator as an example:
- The first step will be to turn off the electricity in the household network. Using the indicator, it is necessary to determine the phase power line. Disassemble the voltage regulator with a screwdriver and release the socket.
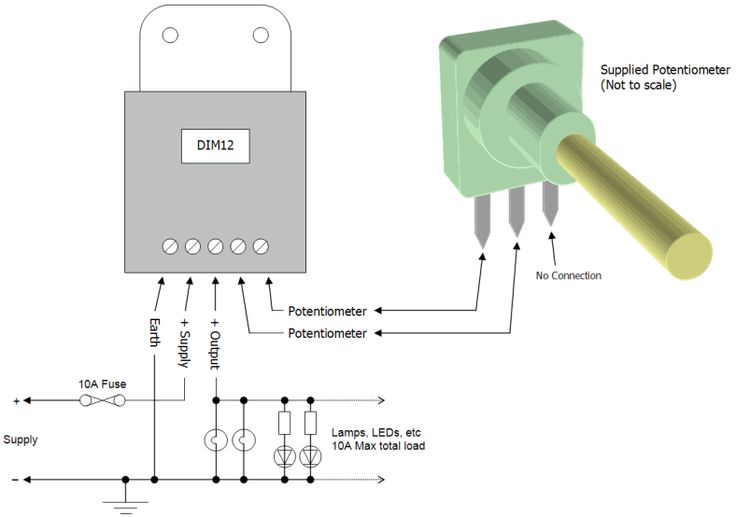
- There are three connectors on the body of the device. The first is the phase, the second is the load, and the third is for connecting additional switches. The dimmer package includes a circuit, with its help the connection will be made.
- Using a Phillips screwdriver, loosen the clamping bolts and install the circuit contacts into the connectors. When connecting, use the pinout. In our example, the white wire contact is the phase, and the blue one is for connecting the load.After installing the wires, the bolts are clamped, this is required to ensure high-quality contact. But it is not recommended to pinch the screws so as not to damage the contact.
- Then the dimmer is installed in the socket, it must be securely fixed in the box itself with two screws.
- The next step will be the installation of a protective plastic frame and buttons. The key is mounted taking into account the nuances specified in the service documentation. Typically, a wide button is designed to turn the light on and off, and a narrow button is needed to adjust the brightness of the light.
- At the final stage, the diagnostics of the operation of the regulatory device is performed; before that, it is necessary to turn on the electricity in the network.
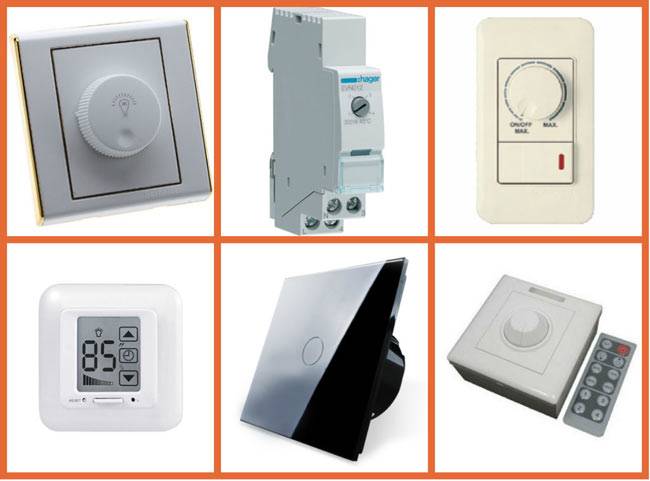
Types of dimmers
Electronic devices for adjusting the brightness of light are created according to several parameters. The main thing that distinguishes dimmers from each other is the type of execution. According to him, light intensity regulators are:
- modular, that is, used in a switchboard located in the corridor or entrance;
- coupled with a switch, which is mounted in a special box and forced to work by pressing a button;
- monoblock, used instead of a switch.
The last type of electronic devices - monoblock dimmers - are divided into types depending on the control method. Therefore, dimmers are further subdivided into the following devices:
- rotary (equipped with a handle, which, if directed to the left, turns off the light, and when turned to the right, increases the intensity of illumination);
- rotary-push, acting in the same way as ordinary rotary, but differing in that they turn on the light only after lightly pressing the handle;
- keyboards, which are devices, one part of which is responsible for turning on and off the light, and the second for decreasing and increasing its brightness.
An essential role in choosing a dimmer is played by the type of lamp, the light from which must be adjusted. For example, it is customary to equip incandescent lamps with simple electronic devices that carry out their task by changing the voltage. Standard dimmers are also well suited for halogen lamps connected to a 220 V power source.
 One dimmer is connected to an incandescent lamp and the other is connected to a halogen lamp.
If you need to regulate the light supply from a halogen lamp operating at a voltage of 12 or 24 V, then you will have to use a more complex device. It is desirable that the dimmer for such a lighting device work together with a step-down transformer. If the device for current conversion winding, it is recommended to use a dimmer marked with the letters "RL". And together with an electronic transformer, it is more reasonable to use a regulator marked "C".
 Version of the device for devices operating from a voltage of not more than 24 V
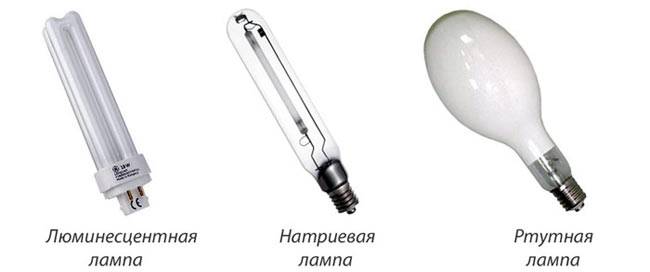
Lamps with light emitting diodes require the use of a light intensity regulator of a special kind, that is, a device that modulates the frequency of the current in pulses. For energy saving or fluorescent lamp choosing a dimmer is not easy. The most acceptable option is a dimmer, whose circuit includes an electronic starter.
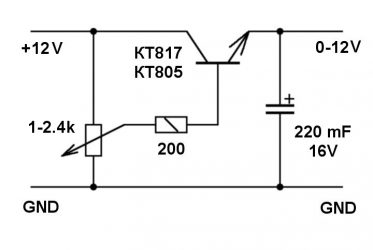
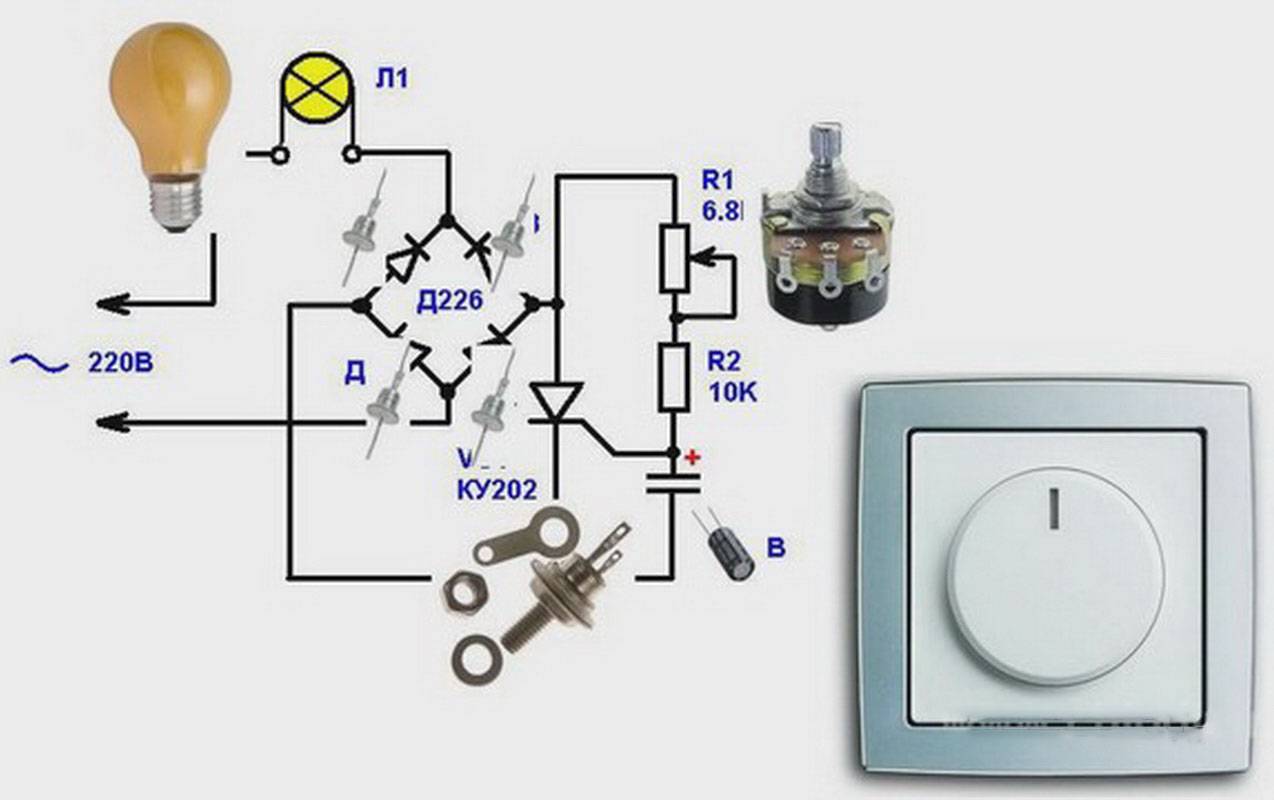
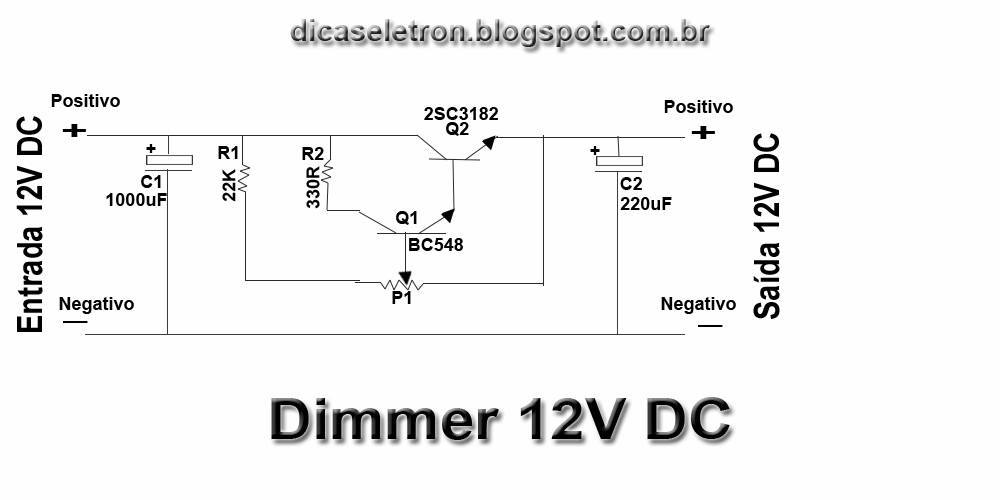
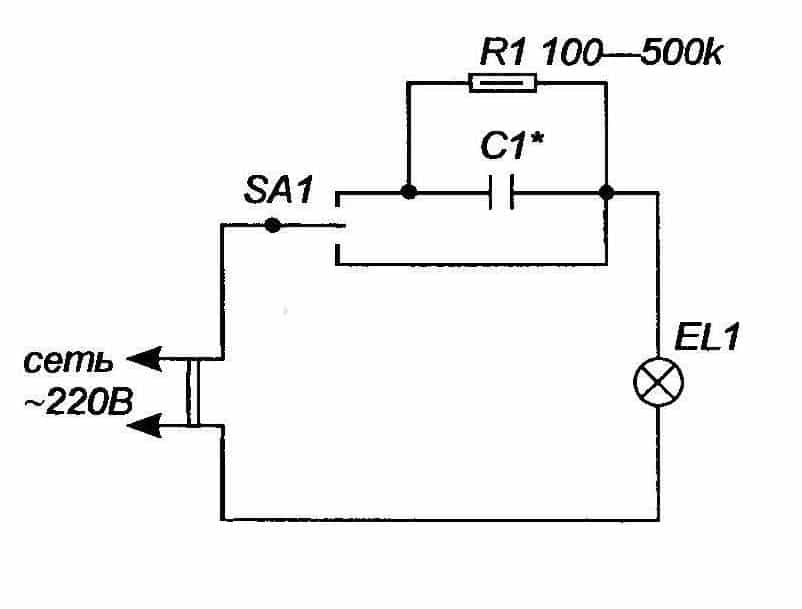
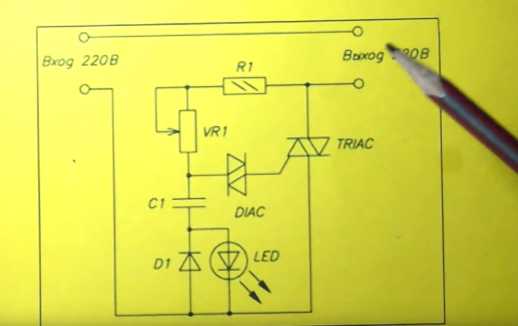
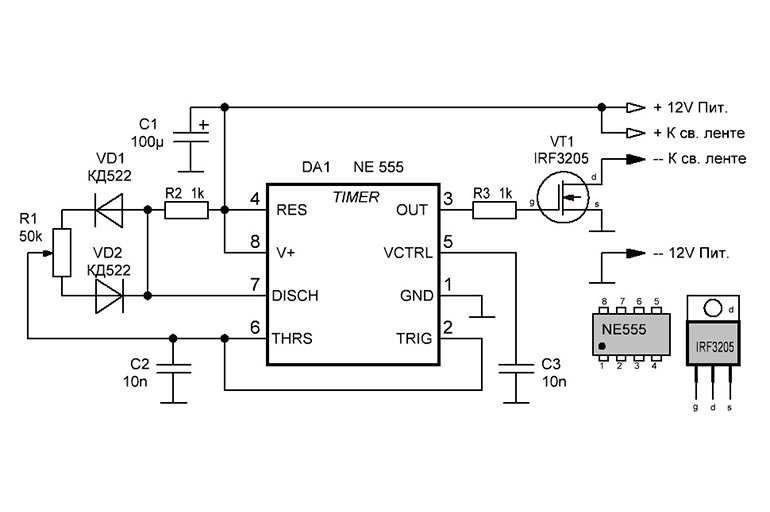
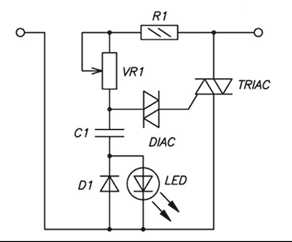
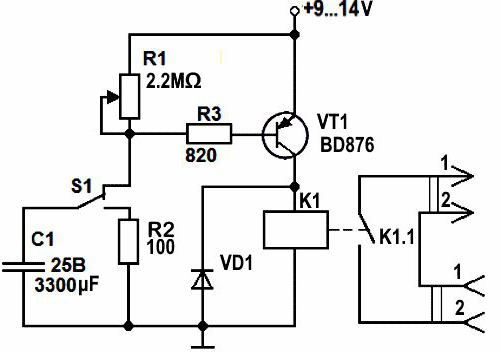
Simple dimmer
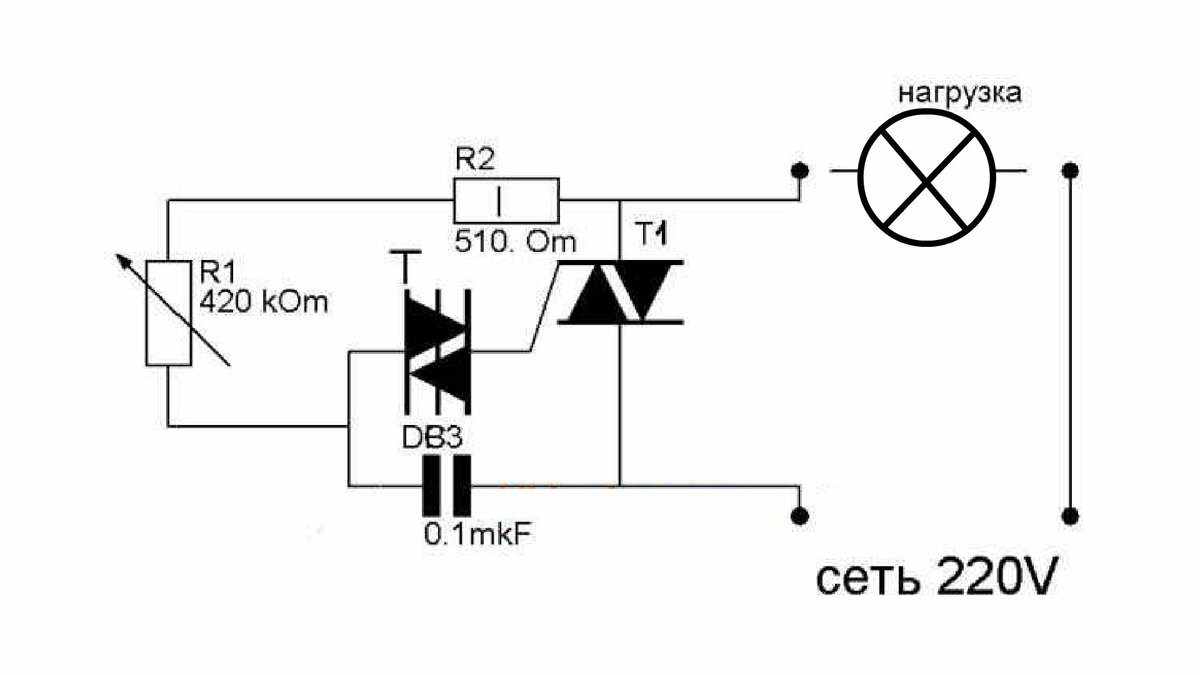
The easiest way to put into operation is a dimmer that operates with a dinistor and a triac. The first device is a semiconductor device that performs its task in several ways.In other words, the dinister looks like two connected diodes located opposite each other. And the simister is a complicated thyristor that starts to pass current at the moment the control current is applied to the electrode.
In addition to the dinister and simister, the simple dimmer circuit includes resistors - constant and variable. Together with them, several diodes and a capacitor are also used.
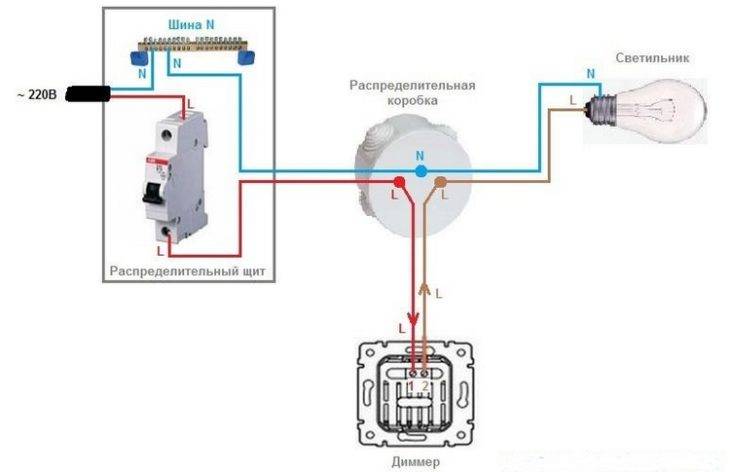 The device is connected with the switchboard, junction box and luminaire
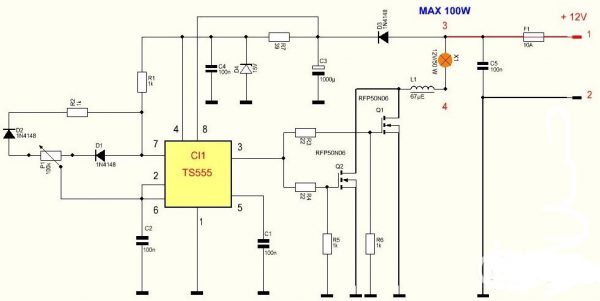
Circuit elements
Let's start by deciding what elements we need for the lighting dimmer circuit.

In fact, the circuits are quite simple and will not require any scarce details; even a not very experienced radio amateur can deal with them.
- Triac. This is a triode symmetrical thyristor, otherwise it is also called a triac (the name came from the English language). It is a semiconductor device, which is a thyristor variety. It is used for switching operations in 220 V electrical circuits. The triac has two main power outputs, to which the load is connected in series. When the triac is closed, there is no conduction in it and the load turns off. As soon as an unlocking signal is applied to it, conduction appears between its electrodes and the load is turned on. Its main characteristic is the holding current. As long as a current exceeding this value flows through its electrodes, the triac remains open.
- Dinistor. It belongs to semiconductor devices, is a kind of thyristors, and has bidirectional conductivity.If we consider the principle of its operation in more detail, then the dinistor is two diodes that are connected towards each other. Dinistor is also called diac in another way.
- Diode. This is an electronic element, which, depending on which direction the electric current takes, has different conductivity. It has two electrodes - a cathode and an anode. When a forward voltage is applied to the diode, it is open; in the case of reverse voltage, the diode is closed.
- non-polar capacitor. Their main difference from other capacitors is that they can be connected to an electrical circuit without observing polarity. Polarity reversal is allowed during operation.
- Fixed and variable resistors. In electrical circuits, they are considered a passive element. A fixed resistor has a certain resistance; for a variable, this value can change. Their main purpose is to convert current into voltage or vice versa voltage into current, absorb electrical energy, limit current. A variable resistor is also called a potentiometer, it has a movable output contact, the so-called engine.
- LED for indicator. This is a semiconductor device that has an electron-hole transition. When an electric current is passed through it in the forward direction, it creates optical radiation.
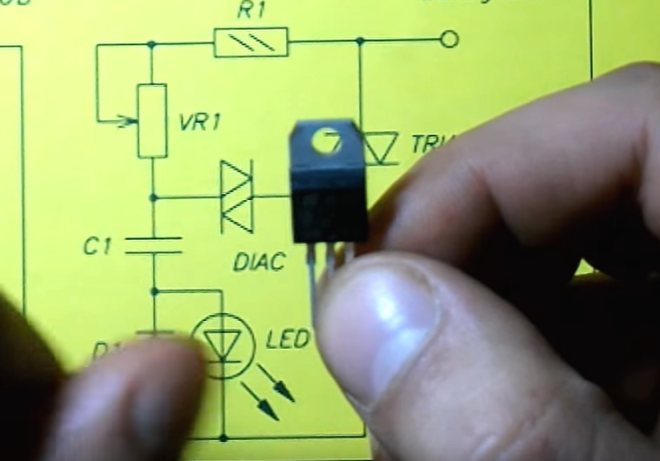
The triac dimmer circuit uses a phase adjustment method. In this case, the triac is the main regulatory element, the load power depends on its parameters, which can be connected to this scheme. For example, if you use a triac VT 12-600, then you can adjust load power up to 1 kW.If you want to make your dimmer for a more powerful load, then choose a triac with large parameters accordingly.


The main purpose and essence of the dimmer
A few words about what a dimmer is and why is it needed at all?
This device is electronic, designed to use it to change the electrical power. Most often, in this way they change the brightness of lighting devices. Works with incandescent and LED lamps.
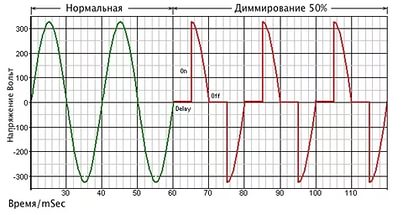
The electrical network supplies a current that has a sinusoidal shape. In order for the light bulb to change its brightness, a cut-off sine wave is required to be applied to it. It is possible to cut off the leading or trailing front of the wave due to the thyristors installed in the dimmer circuit. This helps to reduce the voltage supplied to the lamp, which accordingly leads to a decrease in power and brightness of the light.
Important to remember! Such regulators generate electromagnetic interference. To reduce them, an inductive-capacitive filter or a choke is included in the dimmer circuit
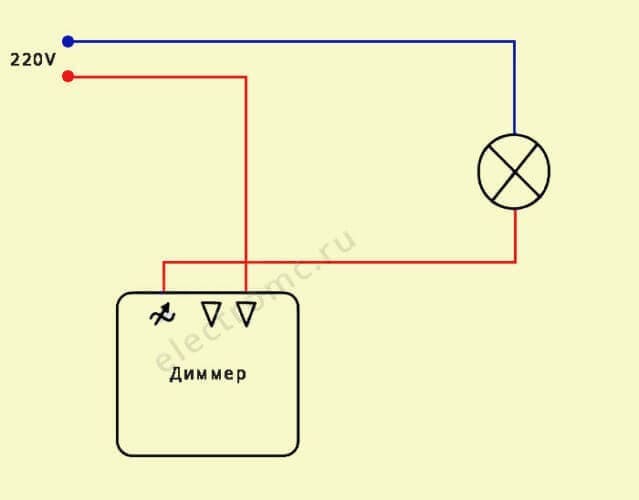
Connecting a dimmer to an LED lamp (chandelier)
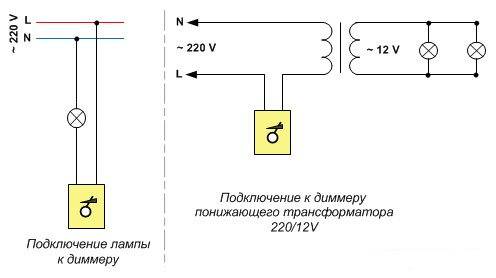
In the process of connecting to an LED lamp, you must first follow the standard scheme for connecting it. It involves ensuring that the phase goes to the dimmer. After that, you should direct the wire from the output contact of the dimmer to the lighting fixture.
Separately, it is worth paying attention to such features of connecting a dimmer:
- Devices of different types cannot be connected to one dimmer (LED lamps together with fluorescent lamps).
- All contacts must be connected correctly. Otherwise, the lamps may burn out.
- Do not connect too many lamps to one regulator. There should be no more than ten.
- All lamps connected to the dimmer must be of the same type and the same power. Universal devices have the possibility of both manual and automatic selection of the output signal shape. This is necessary for more correct work with the load. In addition, in such cases, it becomes possible to limit the lower voltage limit.
Dimmer classification for LED lamps
When buying dimmers, you need to take into account that variators for energy-saving, LED and conventional incandescent lamps have certain differences and classification. Dimmers are divided according to design features, method and place of installation, control principle and other characteristics.
A variety of dimmers makes it easy to choose the right device
Place and method of installation
According to the place of installation, dimmers are divided into remote, modular and wall-mounted.
- Modular. This type of dimmer is mounted on a DIN rail in a distribution board together with an RCD. Such variators can be easily installed or replaced at any time, but for this device it is necessary to provide for the laying of a separate wire during repair or construction. Modular dimmers are perfect for home improvement according to the "smart home" system.
- Remote. These are small devices 20÷30 mm long and having three control sensors. Since they provide for remote control, such dimmers can be mounted next to the lamp or directly in the lighting fixture itself. The dimmer can be installed simultaneously with the chandelier and does not require chasing the walls or ceiling. An ideal option if it is decided to install variators for lighting, and the repair has already been done.
Remote control of the dimmer is quite convenient
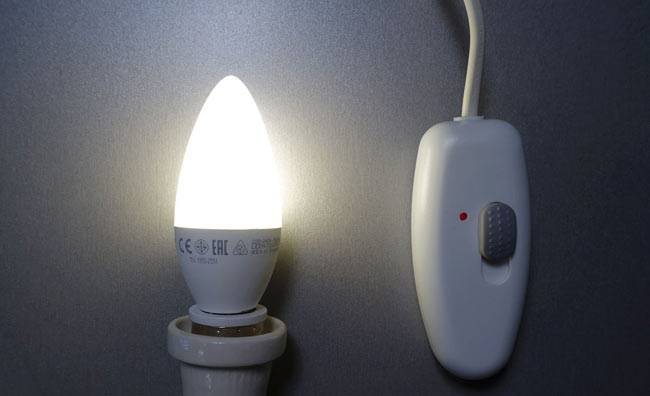
Wall. Similar dimmers are mounted accurately as well as sockets and switches directly in the room where the dimmable LED lamps are located. The installation of such a dimmer must be carried out before the repair and application of the finish coating, since the installation requires chasing the walls or ceiling.
According to the principle of management
If we talk about the principle of controlling the dimmer and, then they, in turn, are divided into mechanical, sensory and remote.
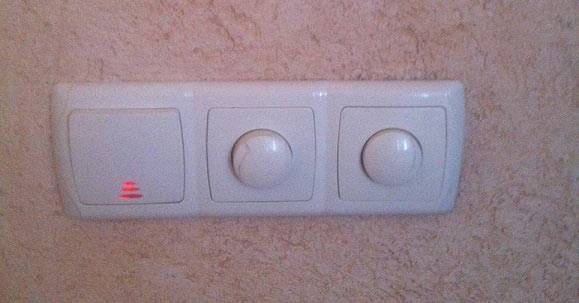
Mechanics
Mechanically controlled lighting variators are the earliest and simplest devices for adjusting the intensity of the luminous flux of lamps. On the body of the dimmer there is a rotating round knob, through which the variable resistor is controlled and, accordingly, the lamps are turned on and off.


Good old and trouble-free mechanical dimmer
Among mechanical dimmers there are push-button and keyboard models. Such devices, as well as conventional switches, have a key to turn off the lighting fixture from the mains.
Sensor
Touch control dimmers have a more solid and modern look. To dim LED lamps, you just need to lightly touch the touch screen. However, these dimmers are more expensive than their mechanical counterparts.
Such a touch dimmer will not leave anyone indifferent
"Remote"
Technology enhances comfort
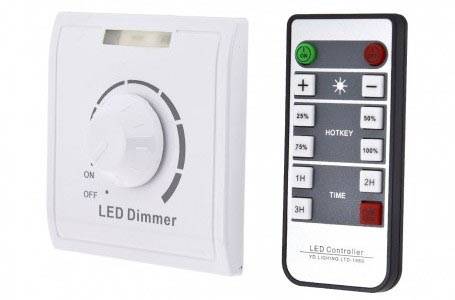
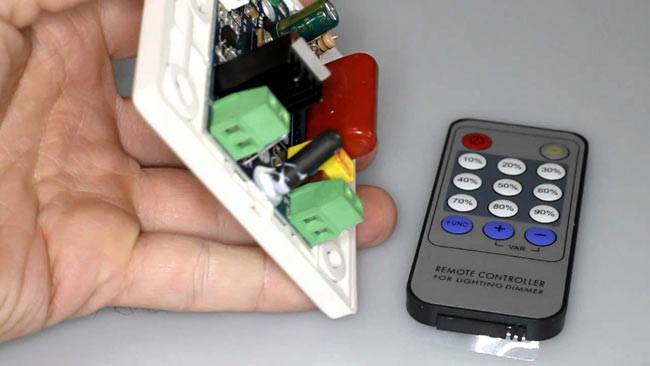
Remote control dimmers are equipped with a remote control, with which the optimal level of luminous intensity of the lamps is adjusted via a radio channel or via an infrared port.Radio control is possible even from the street, while the remote control with an infrared port can only perform settings when pointing it directly at the dimmer.
Dimmer with radio remote control
There are also models of dimmers that allow you to control lighting via Wi-Fi, and they are mainly used in smart home systems.
One of the varieties of dimmers are acoustic dimmers that respond to claps or voice commands.
Installation of a differential machine in a switchboard
After selecting the difavtomat connection scheme, it is necessary to install it correctly with integration into the electrical network. Most often, the differential switch is mounted in the switchboard where the electricity meter is installed, but sometimes a set of modular devices is installed in an additional junction box that is located indoors. In both cases, rules and steps for connecting a device are the same.
The installation technology of difavtomat, at first glance, is very simple! But even such work can be done with errors, which we will discuss below.
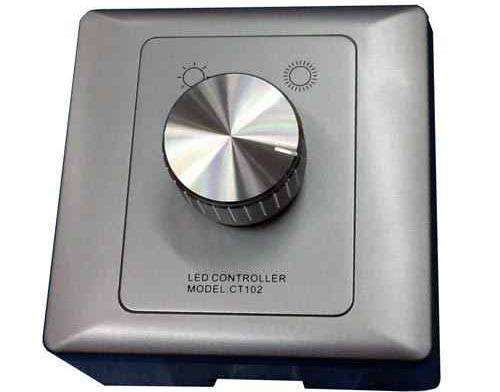
Monoblock dimmer - simple and convenient
Such dimmers come in various modifications. They differ from each other in terms of control. It can be:
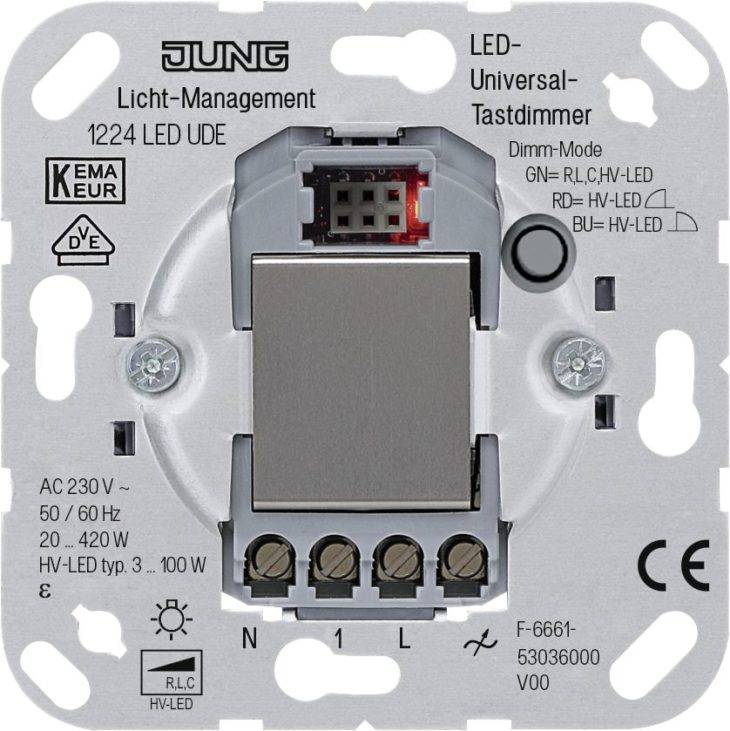
- Touch. Professionals call devices with this control option the most reliable in operation. In fact, there is nothing to break in them, since there are no mechanical elements in the regulators. You just need to lightly touch the dimmer screen to activate it.
- Rotary. To turn off the lamp, you need to turn the device dial all the way to the left. A variation of such a dimmer is a rotary-push mechanism.The user needs to click on the device to turn it off or on. And the very setting of the required level of illumination is carried out by turning the dial.
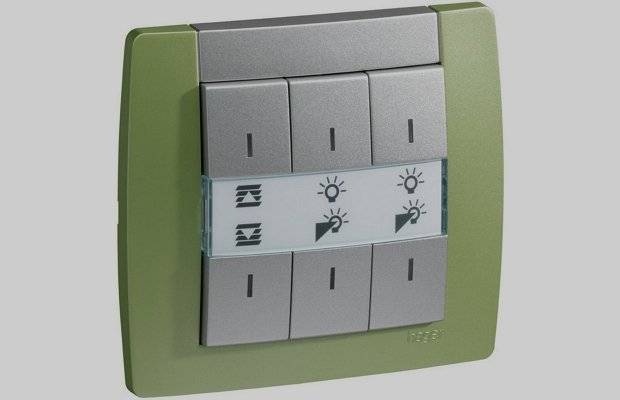
- Keyboard. It is outwardly impossible to distinguish such a dimmer from a conventional switch. You need to press a key to turn on the light and hold it down for a certain amount of time. As long as the key is pressed, the light intensity increases.
Monoblock rocker dimmer
Requirements and operating tips
Before installing and connecting the device (and the dimmer connection diagram will be discussed a little later), you should familiarize yourself with the basic requirements and recommendations. All of them are listed below.
If an LED dimmer is connected, then the power of the lighting device that is used with it must be at least 40 W
So, in the case of lower power, the operational life of your product will be noticeably reduced.
It is also important that the power of the dimmer is greater than the total power of all the fixtures.
It is strongly not recommended to install the device in a room where the air temperature is more than 25 degrees. The fact is that overheating will negatively affect subsequent work.
In the case of connecting a dimmer to LEDs, the device must be selected exclusively high-quality
Otherwise, it may simply not cope with lighting control.
Finally, in the case of connecting the device to fluorescent lamps, as noted above, a special device must be selected.

The principle of operation and the main types of dimmers
Before installing a dimer, you should understand how it generally works.As for the principle of operation, in this case it is quite simple. The dimmer pre-regulates the voltage supply to the lighting fixture in the room. If you properly deal with this, then the device will be able to change the voltage supply to the lamp from 0 to 100 percent.


The lower the voltage will be applied, the correspondingly lower will be the brightness of the lighting in the room. In addition, this device has various design variations. There are several parameters at once by which modern dimmers are classified. Let's get acquainted with each of them in more detail.
Classification of the dimmer by type of execution
From this point of view, all dimmers are divided into three large groups, consider them.
- Model. Such devices are intended for installation in a switchboard. With their help, you can adjust, as well as turn on the lighting in places that can be classified as public (this can be a corridor or, for example, a staircase, an entrance).
- Monoblock. Representatives of this category are mounted instead of a conventional switch. That is why problems with installing such dimmers with your own hands often do not arise at all. The devices are quite popular, so recently they have acquired some subspecies that differ in the way they are controlled.
- With switch. And such devices are installed in a special box, where sockets are often mounted. As for the control organ, in this case the button acts as such (not always, but in most cases).
Classification of dimmers by control method
So, monoblock household models can have, as we just noted, several control options.
- Rotary models. They have a special rotating handle.If you move it to the leftmost position, this will turn off the lighting, and if you turn it to the right, the brightness of the lamps will increase.
- Keyboard models. Outwardly, they are an exact copy of a two-button circuit breaker. The purpose of the first key is to adjust the brightness of the light, and the second is to turn it off / on.
- Turn-and-push models. They operate on almost the same principle as rotary ones, however, they differ in that in order to turn on the lighting, you need to drown the handle a little.
The most convenient are rightfully considered dimmers with a remote control function. Thanks to the remote control, you will be able to adjust the brightness of the light from anywhere in the room. In addition, some models also perform the function of a switch. Each has its own dimmer connection scheme, but more on that later.
Classification by type of lamps
We cannot but agree that the use of different regulators for each particular type of lamp is at least strange. But the fact is that modern lamps are very diverse and have a variety of design features.
As for incandescent lamps, the simplest dimmers are used for them, which operate according to an extremely simple principle: the brightness of the illumination of the filaments is regulated by changing the voltage. In addition, such dimmers can also be used for halogen lamps powered by a standard 220-volt voltage. Finally, the device data design itself is not fundamentally complex.
Video - Rules for connecting lamps to a dimmer


But for halogen bulbs operating from 12-24 volts, more complex dimmers are used.Ideally, a step-down transformer should be present in the connection diagram, but if this is not possible for one reason or another, you can choose a dimmer according to the type of an existing transformer. If the latter is electronic, then you will need a model marked C, and if winding - marked RL.
Finally, a special dimmer must be used with LED dumps, which pulse modulates the frequency of the current.
Video - A few words about the dimmer for LEDs
The most difficult in terms of adjusting the intensity of lighting are fluorescent lamps (or, as they are also called, energy-saving). Many even believe that such lighting networks should not be dimmed at all. But if you do not agree with these people, then be sure to include an electronic starter (or electronic ballast for short) in the circuit.
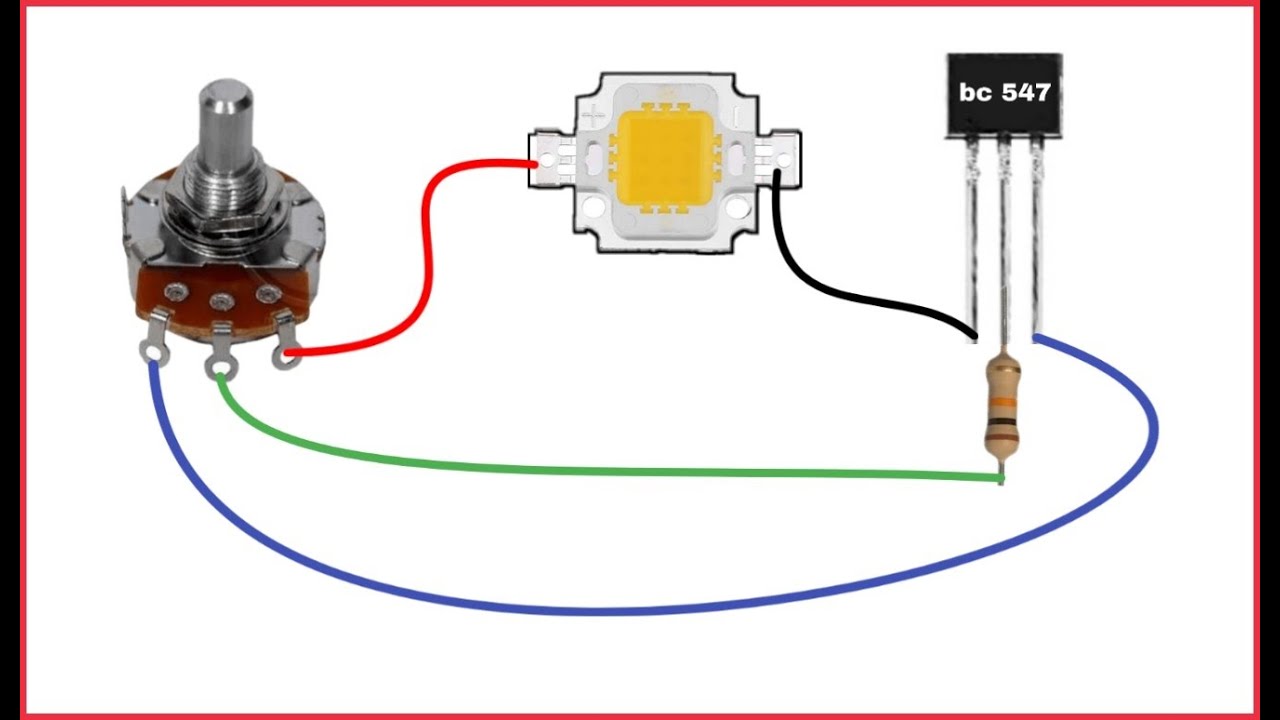
What will be needed for work?
A dimmer is a dimmer that allows you to change the intensity of light in a room by turning a knob or pressing a key.
According to the type of adjustment of the power of the glow, they are:
- resistive;
- transformer;
- semiconductor.
The first option is the simplest, but it cannot be called economical, since a decrease in the brightness of the glow does not change the load power. The other two are much more efficient, but also have more complex design. Depending on the principle of operation, it will depend on what parts the dimmer includes. In order not to be distracted from work, it is better to stock up on everything you need in advance.
For the examples below, you will need the following electronic elements:
- Triac - is a key in the circuit, used to open or lock a section of the circuit from the flow of electric current.It is used in circuits with a supply voltage of 220V, has three outputs - two power and one control.
- Thyristor - also installed as a key and transferred to a stable state, necessary for the operation of the circuit.
- A microcircuit is a more complex element of an electronic circuit with its own logic and control features.
- Dinistor - is also a semiconductor element that passes electric current in two directions.
- A diode is a unidirectional semiconductor that opens from the direct flow of electric current and is locked from the reverse.
- A capacitor is a capacitive element whose main task is to accumulate the required amount of charge on the plates. For the manufacture of homemade dimmers, it is better to use a non-polar model.
- Resistors - are active resistance, for dimmers they are used in voltage dividers and current-setting circuits. Both fixed and variable resistors are useful in circuits.
- LEDs - useful for providing light indication in the dimmer.
Depending on the specific circuit and device of the dimmer, the set of necessary parts will also depend, all of the above does not need to be purchased. Note that some of these can be salvaged from old TVs, radios, and other appliances you no longer use. Next, consider examples of specific schemes.
It's interesting: how connect a three-gang switch light - diagram, how to connect correctly, instructions installation with video
The main purpose and essence of the dimmer
A few words about what a dimmer is and why is it needed at all?
This device is electronic, designed to use it to change the electrical power. Most often, in this way they change the brightness of lighting devices.Works with incandescent and LED lamps.

The electrical network supplies a current that has a sinusoidal shape. In order for the light bulb to change its brightness, a cut-off sine wave is required to be applied to it. It is possible to cut off the leading or trailing front of the wave due to the thyristors installed in the dimmer circuit. This helps to reduce the voltage supplied to the lamp, which accordingly leads to a decrease in power and brightness of the light.
Important to remember! Such regulators generate electromagnetic interference. To reduce them, an inductive-capacitive filter or a choke is included in the dimmer circuit
Features of selection and operation
When choosing a dimmer, you need to pay attention not only to what lamps it can work with and what functions it has. It is also necessary to look at what total load it is designed for. A maximum of one light dimmer can "pull" 1000 watts of load, but most models are designed for 400-700 watts
Eminent manufacturers, depending on the power, have a significant difference in price. Chinese products do not have a tangible difference in cost.


| name | Power | Maximum current | Compatibility | Price | Manufacturer |
|---|---|---|---|---|---|
| Volsten V01-11-D11-S Magenta 9008 | 600 W | 2 A | Incandescent lamps | 546 rub | Russia/China |
| TDM Valdai RL | 600 W | 1 A | Incandescent lamps | 308 rub | Russia/China |
| MAKEL Mimoza | 1000 W/IP 20 | 4 A | Incandescent lamps | 1200 rub | Turkey |
| Lezard Mira 701-1010-157 | 1000W/IP20 | 2 A | Incandescent lamps | 770 rub | Turkey/China |
The second point to remember is that dimmers work with a minimum load. Those, in most cases, have a minimum of 40 watts, some thousanders have 100 watts.If the connected lamps are of lower power, they may flicker or not light up. This happens when LEDs are used instead of incandescent bulbs. In this case, one of the lamps is left old (incandescent), which will provide the required minimum load.
Other features of operation are related to compatibility. As already mentioned, conventional dimmers cannot work with fluorescent lamps (including energy-saving ones). Halogen ones simply do not react to changes in the shape of the pulse. And if you decide to replace incandescent bulbs with more economical ones, most likely you will have to change the dimmer as well.


