- Basic rules and regulations
- Chimney installation rules
- Chimney Safety
- water tank
- Scheme of the device of the bath chimney
- Cleaning
- How to install?
- Chimney classification
- Step by Step Installation Guide
- How to run a chimney through the ceiling with your own hands
- Sauna stove chimney device: which design is better?
- Scheme of a brick structure
- Scheme of a metal chimney
- Types of passage nodes through the ceiling
Basic rules and regulations
Before you lead the pipe in the bath through the wall and equip the chimney, you need to study the basic safety rules, since one of them can actually save your life. Rules for installing a chimney in a bath:
- In no case should the chimney and ventilation systems be connected;
- Do not use components that are not provided for by the design of the chimney;
- The device of the chimney in the bath for a wood-burning stove is carried out only by proven methods;
- If the bath is located near flammable areas, high-quality insulation is required. Otherwise, the installation of a chimney in the bath is strictly prohibited;
- To cover the ventilation outlet and the final section of the chimney, it is necessary to use different fungi.
Also check out some useful tips that will come in handy when installing a pipe in a bathhouse on an iron stove:
- Corrugated pipes are often used to equip chimneys, which is completely undesirable. The fact is that soot and soot settle on the corrugated surface, thereby increasing the risk of fire and reducing the draft of the chimney;
- Also, you should not bring the chimney in the bath through the wall, equipping it outside the building if the pipe used is single-layer. This can be fraught with rapid destruction of the pipe due to the large amount of condensate;
- To calculate the diameter when installing a pipe in a bath, it is best to resort to the help of a specialist in order to avoid unpleasant oversights;
- In no case should two chimney systems be combined without prior approval from special authorities.
Chimney installation rules
Places where the pipe passes through the ceiling and other building structures should be considered taking into account the fact that they are lined with wood from the inside, that is, combustible material
At the same time, it does not matter what material the wall or ceiling itself is built from, it is enough that there is a combustible lining. In general, the postulates of laying chimney channels sound like this:
- before installing a metal or masonry brick oven, you need to choose a good place so that the future chimney of the bath does not fall on the supporting structures of the roof. It makes no sense then to make unnecessary turns of the pipe, and it is impossible to turn a brick channel. The total number of pipe turns should not exceed 3;
- the horizontal section from the stove to the tie-in into the vertical channel should not exceed 1 m in length. The exception is the flue inclined at an angle of 45 °, sometimes used instead of the horizontal one. But even here you should not get carried away, make this segment as short as possible;
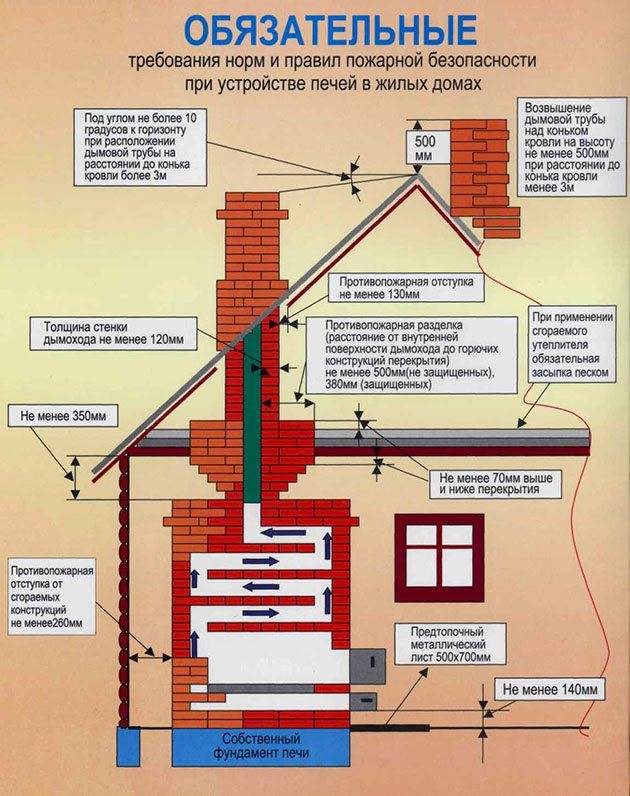
- a single-walled metal chimney must be separated from unprotected combustible floor materials at a distance of 0.5 m. If combustible surfaces are covered with a non-combustible screen, the gap can be reduced to 38 cm. All requirements of fire safety standards are detailed in the figure below;
- the same figure shows how to correctly install the chimney in height so that its cut does not fall into the leeward zone. Then the force of natural traction will decrease significantly;
- the vertical gas duct must be equipped with a system for cleaning and draining condensate.
Starting from the attic floor, it is strongly recommended to protect a single-wall pipe with a heat-insulating layer of fireproof insulation, the best option is basalt fiber. Outside, the insulation is wrapped in a galvanized steel casing. Then condensate will not appear outside the pipe, and the attic space will be protected from fire. When installing a chimney through a wall, the same indents are observed as for passing through the ceiling.
Chimney Safety
It is imperative to ensure high fire safety of the chimney for the bath
To do this, as mentioned above, pay special attention to the tightness of the joints of individual parts of the pipe, as well as to the cutting when the chimney passes through the floors and roof
In places where the pipe will pass through the ceiling, it is necessary to isolate it from the wooden elements with heat-resistant material - this can be asbestos, mineral wool, sand or expanded clay.
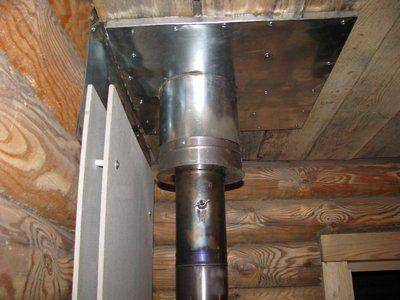
- To do this, a metal panel with a hole is fixed to the ceiling at the place where the chimney passes through, through which the pipe will be passed.
- From the side of the attic, a kind of box is arranged, which should be 10-15 centimeters higher than the attic floor. Insulating material is laid or poured into it, which will protect the wooden floor from the high temperatures of the chimney. The pipe must be at least 25 centimeters from combustible floor materials.
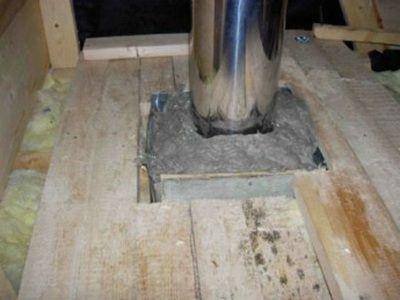
Pipe passage through the ceiling
It is very important to arrange thermal insulation protection not only in the ceiling, but also on the wooden wall of the bath. Basically, bath buildings are built from pine, and its wood is quite resinous and can easily overheat and even burn out from the high temperatures of the nearby chimney
Therefore, the wall must be secured with a non-combustible material - it can be a special drywall, asbestos, masonry, foil mineral wool, or a combination.
It is very important to protect not only the ceiling, but also the walls
- After passing through the attic, the chimney channel is led through the roof and rises above it by at least one and a half meters.
- Around the chimney, when passing through the roofing, waterproofing is arranged, which will keep the roof crate from moisture, and hence from the appearance of mold and destruction.
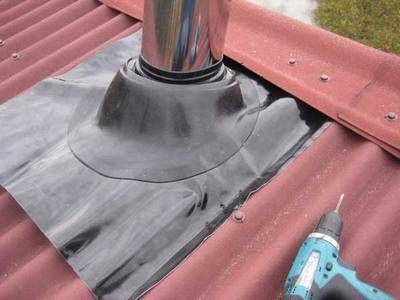
The passage through the roof needs waterproofing
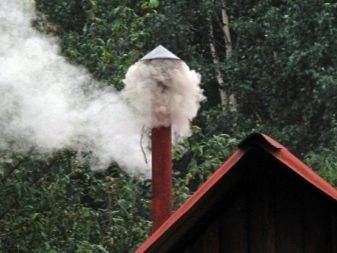
A special protective fungus is put on top of the pipe head and a spark arrestor is arranged.
water tank
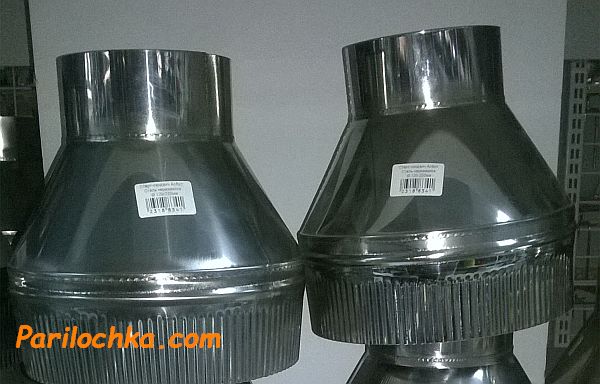
A metal tank for heating water is sometimes built into the chimney system of a bath, built from metal sandwich pipes, inside which an uninsulated part of the chimney passes. Tanks can have a different volume - this will primarily depend on the power of the selected furnace.


When choosing this chimney accessory, it is best to pay attention to a stainless steel product that will last a long time. Naturally, you need to focus on the diameter of the chimney pipe to which the tank will be fixed.
It is better to purchase the entire set as a kit so that you do not have to disassemble the already assembled structure.
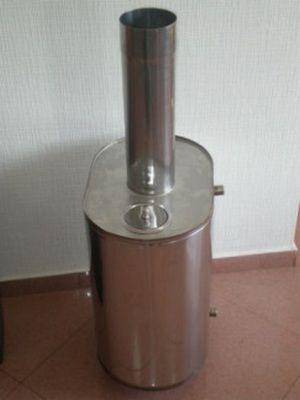
Finished chimney section with water tank
Branch pipes are provided on the water tank, on which sections of chimney pipes are put on. They must fit tightly with each other, otherwise the thrust will decrease, and carbon monoxide may enter the room.
A metal water tank is also built into the design of a brick chimney. In this case, the hot air from the furnace, passing next to it, heats the water poured into the tank. When building a container, it is necessary to provide a place in the wall of the chimney, where there will be a tap and a branch pipe with a tap to fill the tank.
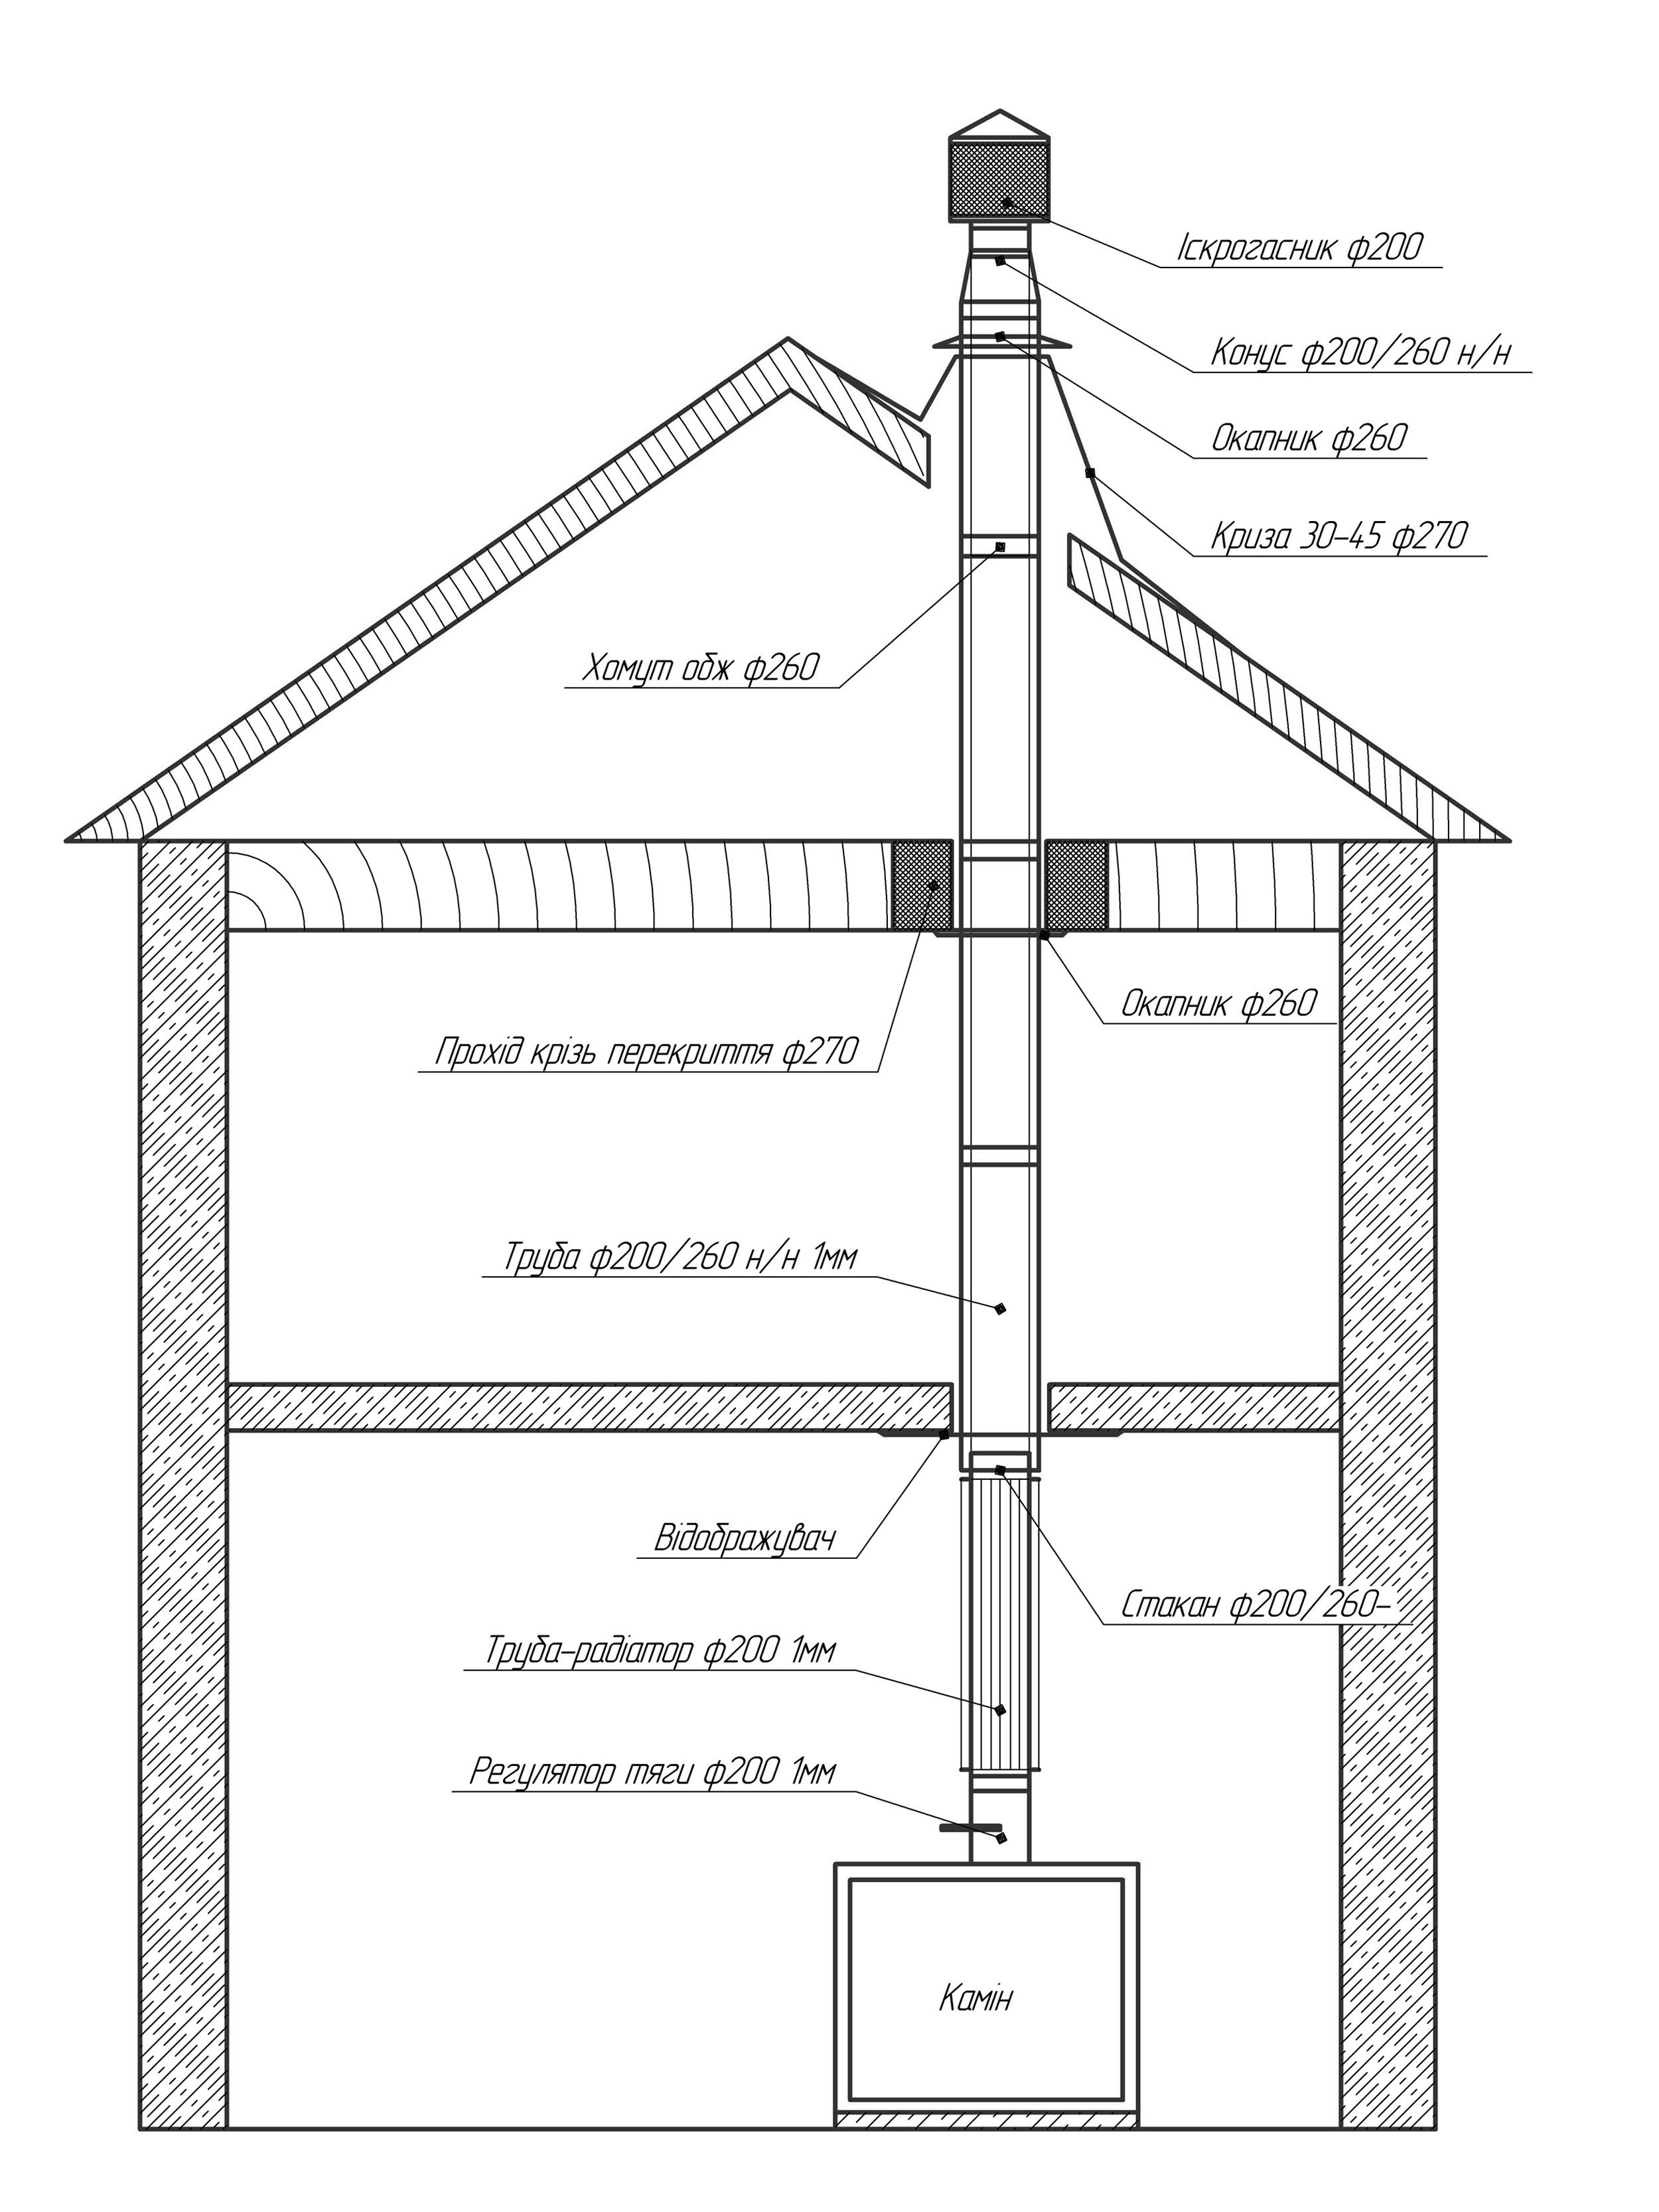
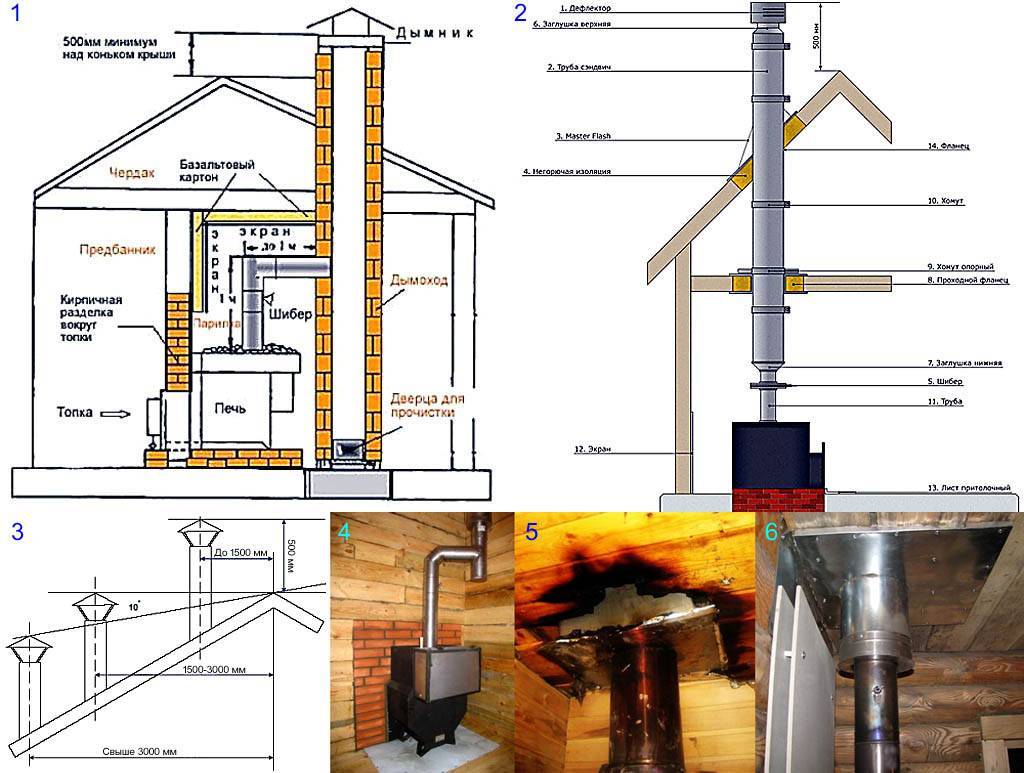
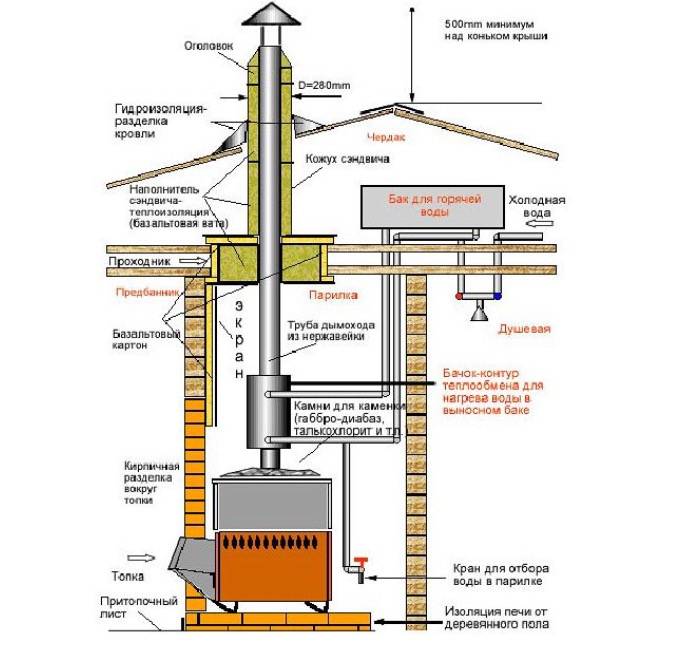
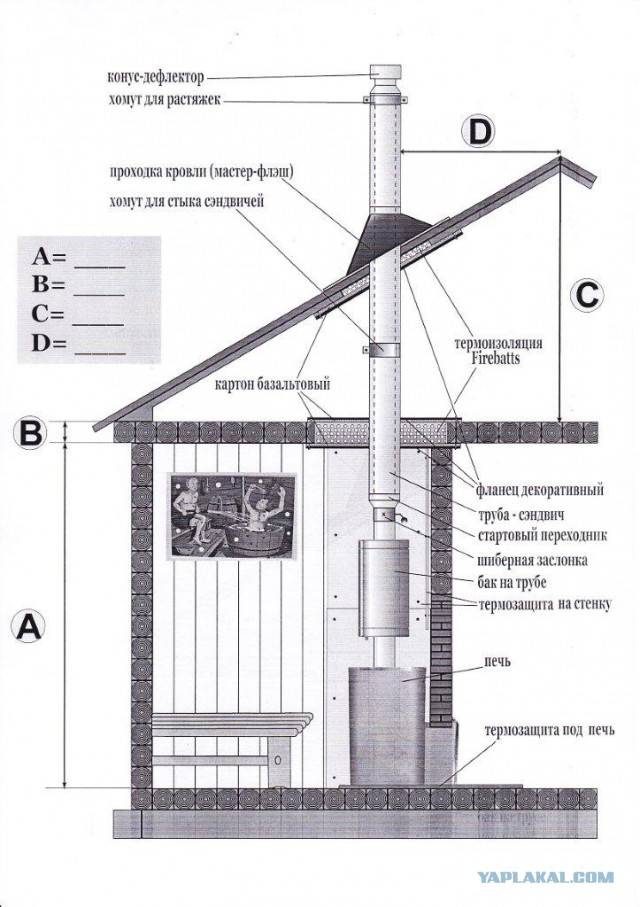
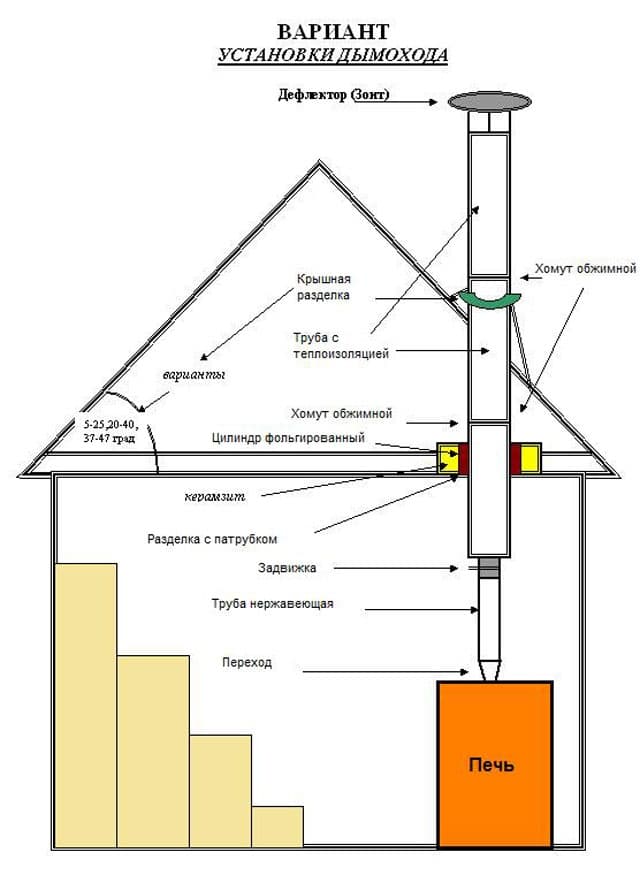
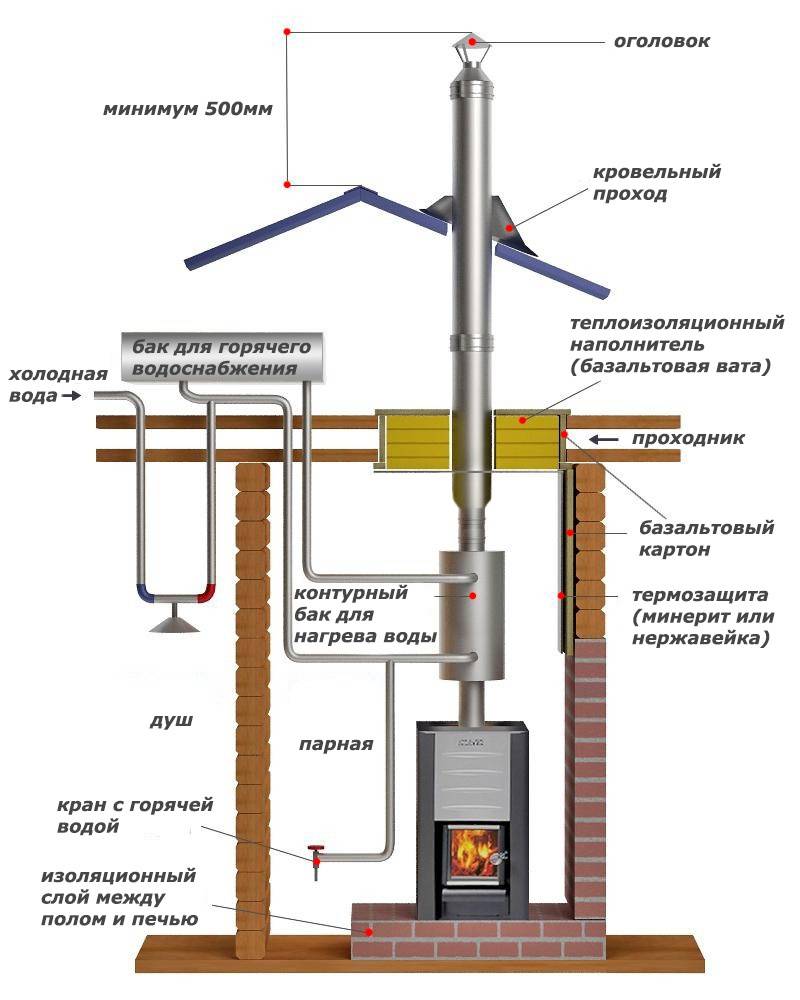
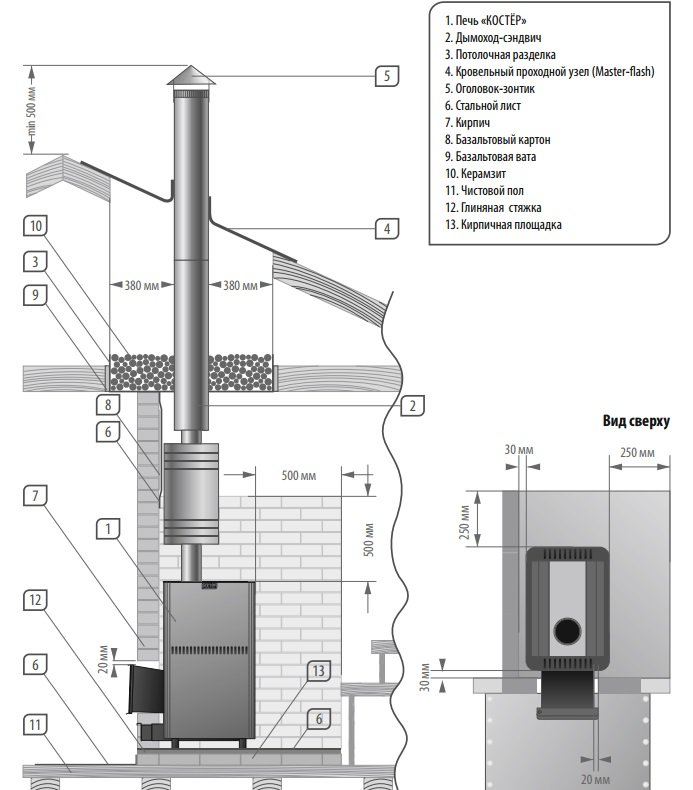
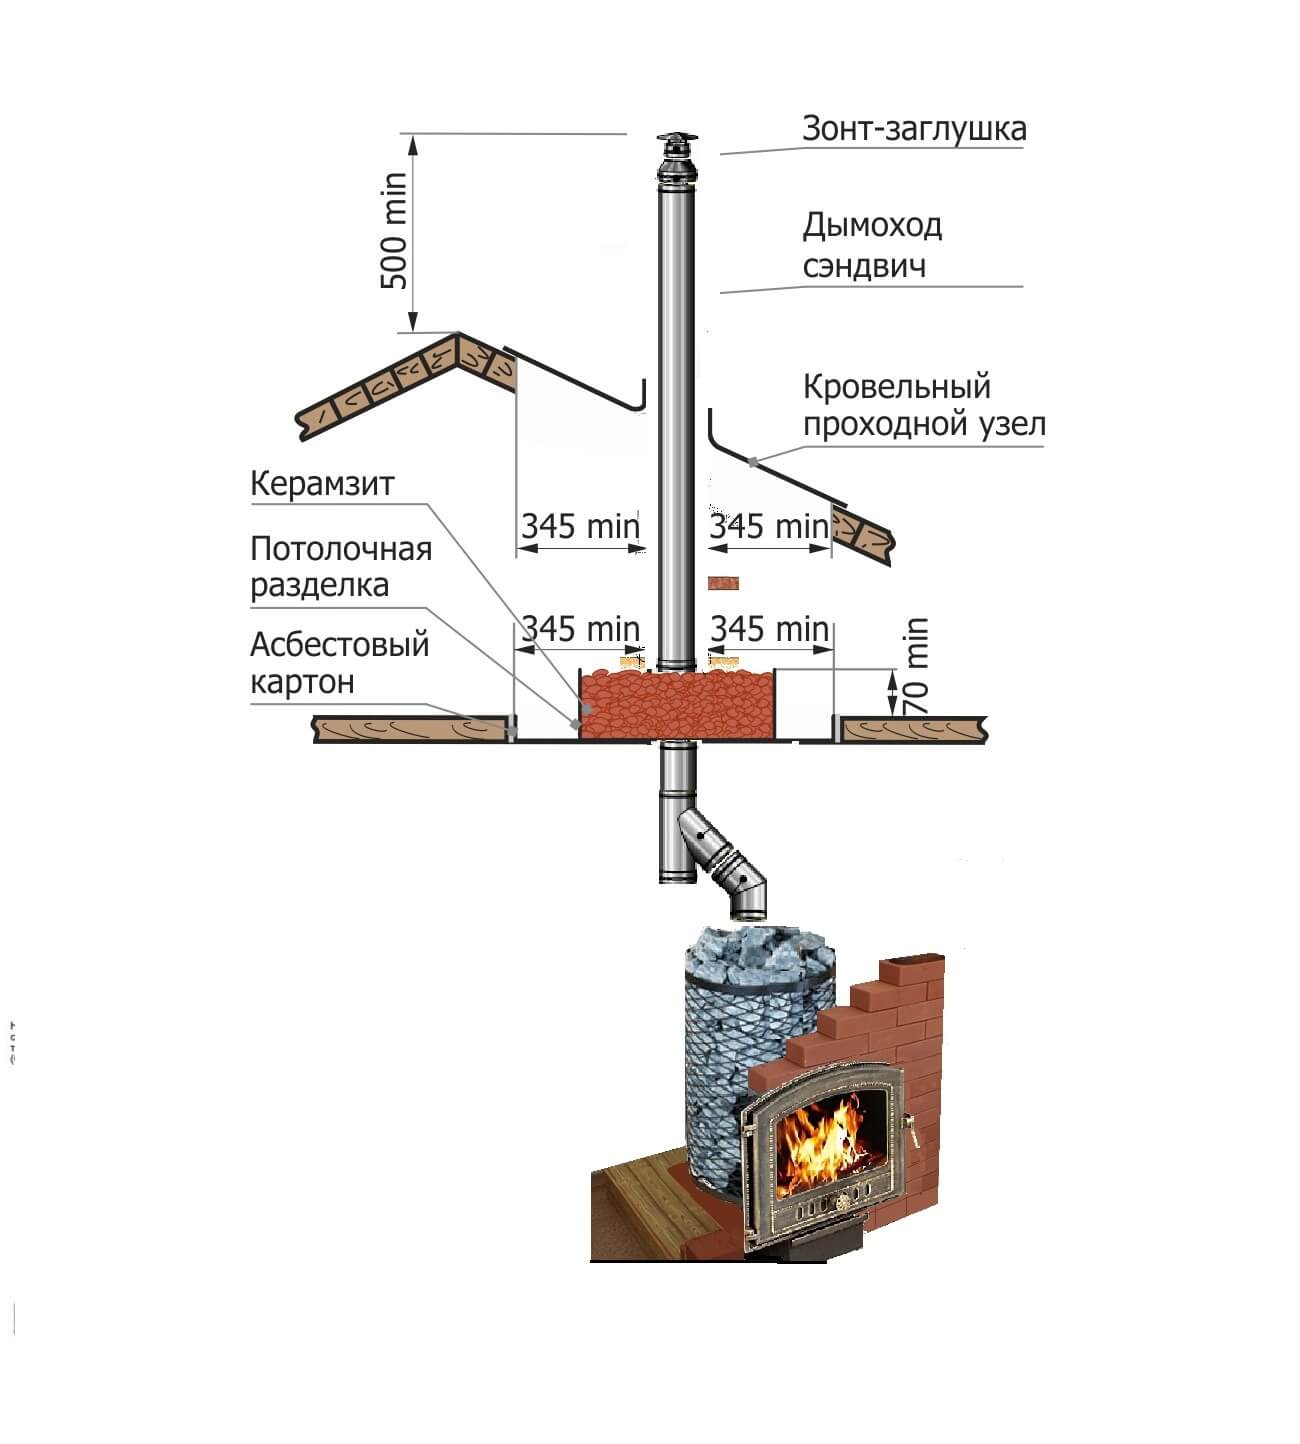
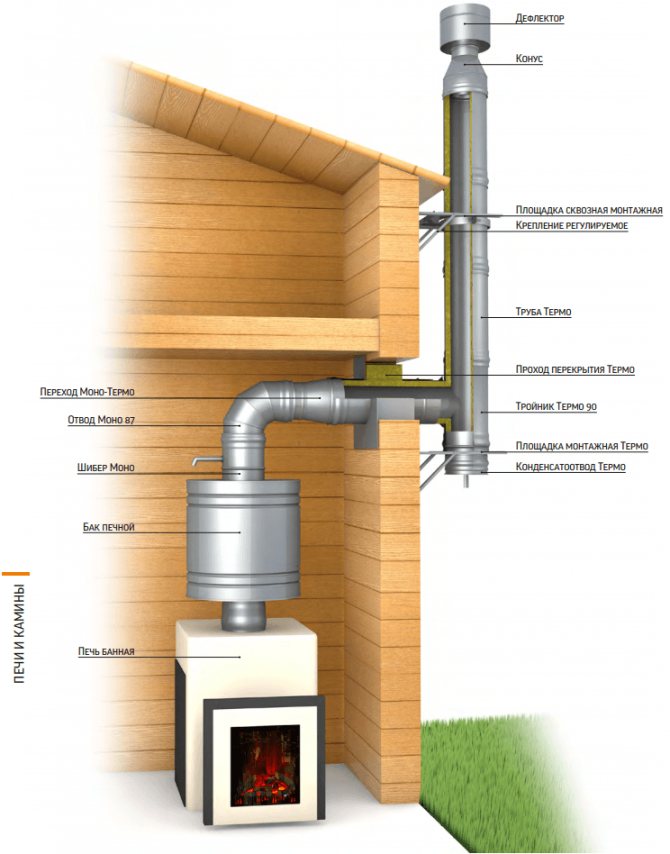
Scheme of the device of the bath chimney
In this diagram, all the above sections of the chimney system of the sauna stove are clearly visible.
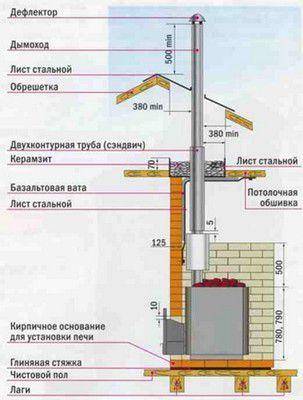
Approximate general scheme of a bath chimney device
It is worth noting that the sauna stove with its firebox usually goes into another room - a dressing room. This is provided so that there is no risk of getting burned during washing, and so that the attendant has the opportunity to put firewood in the firebox all the time.
Directly in the bath room, the stove itself is located with a metal crate, which encloses the red-hot walls and is 10-15 centimeters away from them.Pebble stones are laid in this distance, which, when heated, give off heat to the room, and if you want to get steam, they splash plain water or an infusion of fragrant herbs on them. The chimney and the tank arranged on it in this embodiment are also located in the bathhouse.
Cast iron stove with railing, metal chimney and water tank
The figure also shows how the chimney should pass through the floors and roofs and how to ensure complete safety of its operation.
Based on this scheme, you can easily arrange a chimney yourself if you strictly follow all the norms, rules, sizes and volumes of insulating materials.
Cleaning
The sauna chimney is cleaned at least twice a year - in spring and autumn. There are a number of reasons for this: condensate formed, foreign objects entering the pipe, but often chimney cleaned of soot and soot. The latter depends on the type of fuel used: special briquettes or eurofirewood slow down the accumulation of soot, but wood fuel increases the frequency of cleaning.
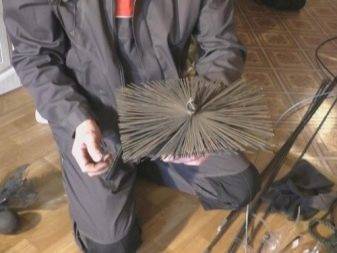
To date, there are three popular ways to clean the chimney. The traditional means of cleaning the chimney is considered to be a ruff, which can be bought at any hardware store or made from improvised materials.

To make this simple device, you will need a broom with plastic rods, a washer, a screw and a cable one and a half or two meters long with a load of two to three kilograms. The process of making a ruff looks like this:
-
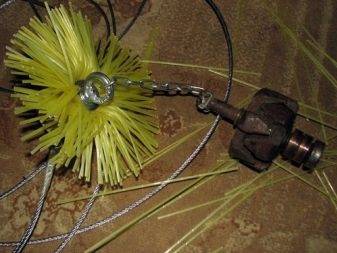
The rods of the broom are placed in boiling water to soften, then they are unbent in different directions and evenly distributed.
-
The unbent rods are fixed with a washer and a self-tapping screw.
-
At the base of the ruff, a cable with a load is attached with brackets.
-
The final step is to adjust the size, because the ruff should be slightly larger than the chimney. A template cut out of cardboard will help determine the size correctly.
-


Cleaning the chimney with a ruff is very simple. A load is lowered into the chimney, then a ruff, and then the pipe is cleaned with translational movements. Another "home" cleaning tool is a hose.
Folk remedies like potato peels or combustible fuel are also simple and effective. In the first case, a bucket of potato peelings is thrown into a red-hot oven (it can be less - it all depends on the internal dimensions of the oven). The starch released from the cleanings reacts with soot and it is self-removed within two to three days. True, experts advise once again to clean the chimney with a brush or hose.

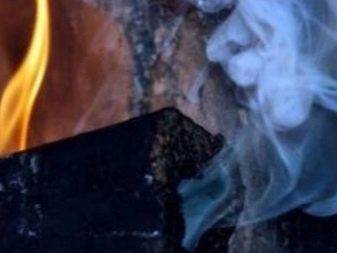
High combustibility fuel is dry aspen firewood. You open the blower, the chimney valve, the combustion chamber door and keep the fire going for two to three hours. During this time, soot and soot burn out completely. For such cleaning the chimney must withstand temperatures of more than a thousand degrees.
Modern liquid and solid chemicals are gaining popularity, which are placed in the furnace along with firewood or coal. They quickly clean the chimney, are affordable, inexpensive and safe.
How to install?
For arranging a chimney with your own hands, metal pipes are an ideal material option. They reduce the cost of construction, as well as labor costs. Installation of the chimney begins to the stove already installed in the bath. Up to the first knee, an ordinary iron pipe is installed. Proper fastening will provide special designs with refractory characteristics.
The initial part is attached to the furnace pipe.A gate is immediately installed - a valve that will allow you to add or decrease traction force. Then a hole is made in the roof, which can be square. Next, a metal box is assembled with a through hole corresponding to the size of the structure. Through it, the chimney will be brought to the attic. The height of the box should be greater than the materials for finishing the ceiling.
The box is securely fixed in the ceiling. The free space of the box is filled with mineral wool or expanded clay. In the attic, the structure is covered with a lid with a hole for the pipe. A sheet of heat-resistant material is fixed at the chimney passage point. The upper pipe is protected with sheets of mineral wool or asbestos. A special waterproof cuff is used as thermal insulation. Gaps can be treated with sealant.
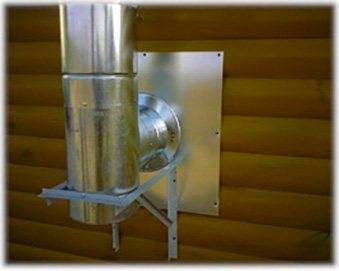
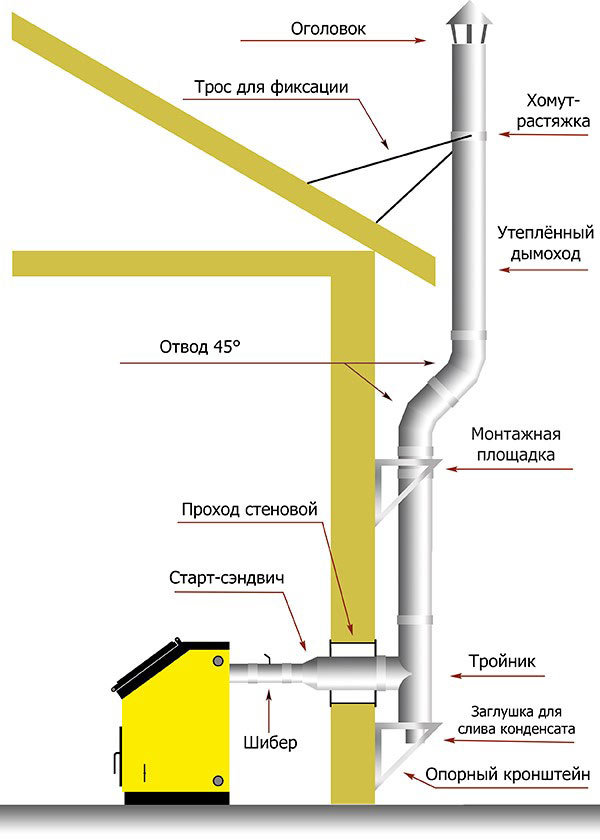
Even lower labor costs will require the installation of an external metal chimney. The device assumes the presence of a suitable hole in the wall (not in the roof). To turn the pipe from the furnace, a special elbow is purchased. Bends are different, choose the option that suits you.
The outlet is installed on the stove pipe. Then a tee is placed on the outside. From it, the chimney is routed up along the wall, if necessary down. As wall insulation, it is correct to use a similar metal box filled with non-combustible bulk material.
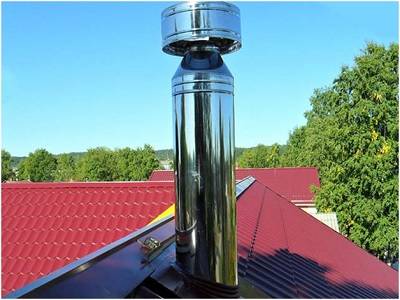
When arranging an external structure, it is important that it rises 50-60 cm above the ridge: such an installation will guarantee good traction. To protect the chimney from small debris and rain, a special umbrella is put on top.
Brick chimneys can be root or mounted. The best option for sauna stoves is root.If the oven is made of brick, then a structure of the same material is attached. If the furnace is made of metal, the brick chimney is connected to the pipe with a special pipe.
A brick chimney is arranged in the form of a square pillar, which is equipped with a well-shaped section. The size of the section is related to the power of the sauna stove, it can be half a brick, a brick or two bricks. The basis for a brick structure is a foundation of the same thickness with a sauna stove, which forms a single whole with it. The pipe is raised to the desired height, where the valve is installed.
Immediately mark the place for the structure on the ceiling and in the roof. To maintain strict verticals, use a level. Start work with laying the overhead part, for which there is already a point on the stove. Run the brick rows evenly: any unevenness will degrade the quality of the traction force. Control the placement of each row. For control, a stretched thread between the corner of the initial row and the corner of the hole in the roof is suitable.
Fluff is laid to protect the ceiling from fire. Fluffing is an expansion of the outer walls of the pipe, which also ensures the stability of the structure. The widest point of the fluff should be at the level of the ceiling material. After completing the laying of the fluff, the chimney is fixed with edged boards. Further, the fluff narrows, the pipe is aligned to the initial value.
The outer perimeter of the chimney is laid out until the appearance of the roofing material. At the top, a structure is being built that will serve to drain rainwater. It has increased dimensions by about a quarter of a brick. Spread the design according to a similar principle with fluff. Its height is interconnected with the angle of inclination of the roof.
Next lay out the neck of the chimney. It is allowed to install a metal cap on top of the structure
The joints of the brick chimney and the roof structure must be carefully sealed. Choose methods of work and additional elements depending on the type of roofing material
The methods of this work are different, decisions on the use of one method or another are made at the site of the pipe installation.
It is difficult to install a brick chimney with your own hands correctly. In addition, the design is expensive. Therefore, you should not start bricklaying if you saw brick and trowel only on video. Modern materials allow the construction of simpler and more efficient pipe designs for a bath.


Chimney classification
The chimney for the bath can be equipped in several ways, depending on the location of the stove. Ways to organize the removal of smoke from the bath are classified according to the following parameters:
- material used. To make chimney pipes use metal or heat-resistant brick. Brickwork is considered a more traditional option, but modern stove-makers prefer the metal chimney of a sauna stove. Its advantage is quick do-it-yourself installation.
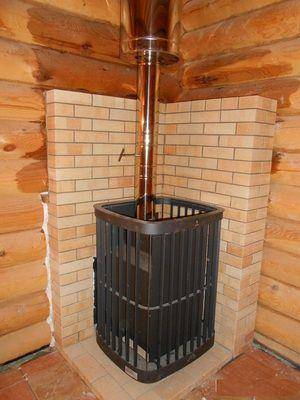
- Mounting method. The chimney in the bath is installed inside or outside the building. Installation of an external chimney system is a North American technology, according to which pipes are led out through the wall to the street. It was developed in response to the shortcomings of the indoor method, which involves running a pipe through the ceiling to the roof.
The internal and external appearance of the chimney of the bath The choice of material and the method by which the installation is carried out depends on the financial capabilities, placement of the furnace and the building skills of the master. Experienced stove-makers do not recommend that those who arrange a chimney with their own hands without experience do not combine it with a ventilation system, this can be unsafe.
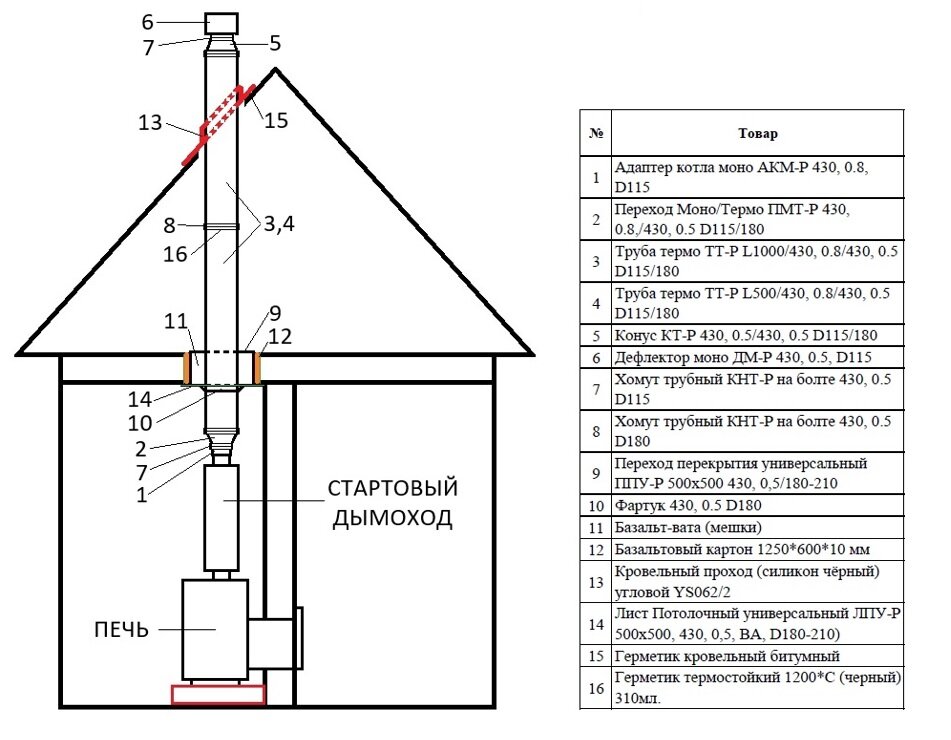
Step by Step Installation Guide
If you do not have enough skills in this area, then it is better to stay on a strictly vertical chimney with cutting pipes on the ceiling of the bath. Installation is carried out according to the following algorithm:
- The first step is to purchase the materials that will be needed in the process. These include: directly pipes of the correct diameter, clamps, rubber gaskets for waterproofing, expanded clay, umbrella, refractory asbestos;
- Before installing the furnace, the surface behind it is polished with refractory asbestos;
After installing the furnace structure, we proceed to the installation of the chimney flue in the bath. To do this, a gate is installed on the stove pipe, which is the primary part of the chimney, equipped with a special valve. It serves to regulate the draft force in the chimney. If the valve is half closed, the flow of passing air will be reduced, and therefore the heat in the bath will remain longer;
In a predetermined place on the ceiling, a drawing of the future hole is made. Its diameter must exceed the diameter of the chimney. Next, according to the finished drawing, an opening for the pipe is cut out. We strongly recommend that you equip a metal box with which the chimney will crash into the ceiling. After the pipe is passed through this node, it is tightly covered with expanded clay or laid with basalt wool.The part of the ceiling closest to the pipe is cleaned with refractory asbestos;
Further, according to the same principle as in the case of the ceiling, a hole is cut in the roof. In order to carefully guide the pipe through the rafter legs, bends are used. It is important to remember about safety, so if the material with which the roof is lined is combustible, the exit point is protected by a metal or asbestos sheet;
When the pipe is removed through the roof, a rubber tight seal must be attached on top of it, which serves as a waterproofing of the chimney. The seal is treated with a fire-resistant sealant so that moisture ingress is completely excluded;
The components of the chimney must be installed until you reach the desired height of the structure. After that, a special umbrella is attached to the top of the pipe, which is called a "fungus", to protect it from various precipitation, debris and tree branches.
Information. The key feature of a well-equipped chimney is that even after 7-8 hours after the heating of the bath, heat remains in the room.
How to run a chimney through the ceiling with your own hands
It is desirable to start at the design stage. The location of the furnace must be matched with the position of the ceiling beams and roof rafters. In this case, you do not have to redo anything at all. At the same time, a decision on the size of the PPU is made. If you do it “according to GOST”, that is, 38 or 50 cm from a bare pipe, then it will most likely be impossible to fit between the ceiling beams without undercutting. If you use PPU store options that are far from GOST, then you won’t need to cut anything even with a standard beam step of 60 cm.
However, we still provide a drawing showing how to properly trim the ceiling beam, which interferes with the passage of PPU.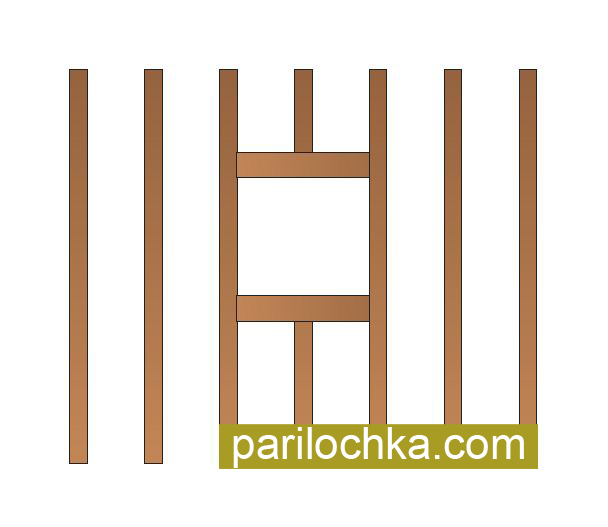
Just in case, we clarify that a similar design is also used for trimming the rafters, but in this case it is necessary to make the adjacent trimmed rafters double (full length).
Those who, for some reason, do not want to make a hole exactly above the stove, can either make an L-shaped chimney that will lead the pipe to another place in the ceiling, or bring it out at an inclination of 45 degrees - the difference is determined by the amount of offset - if it is greater meters, then an inclined version is made, if less - L-shaped. It is only then necessary to give a reliable support to the chimney so that it holds a vertical position.
But this is a technical solution, but how good it is for a steam room is another question. To be honest, it's not good at all. And the extra IR radiation from the additional meters of the chimney will not add health to visitors, alas.
ADVICE! In order not to have to suffer so much, put a roof plan on the floor plan with the foundation for the furnace - you will immediately see where the chimney will go. At this stage, you can adjust the plan itself.
So, preparation for penetration is desirable even before the final filing of the ceiling. If everything is calculated correctly, you will only have to cut a piece of lining with vapor protection, insulation and waterproofing. Well, if they put a rough and finishing floor on the second floor, then they too. But the beams will remain intact.
You can cut with what is at hand, for example, with a jigsaw.
Next, you need to choose what exactly you will finish with mineralite or calcium silicate, or basalt cardboard - a box on the outside or the walls of the hole. Let's do both.After fixing the slab insulation, the box is inserted into the hole and fixed from below to the screws.
IMPORTANT! The center of the hole in the ceiling must match the center of the pipe. To do this, use a plumb line and align the centers .. A pipe is mounted below
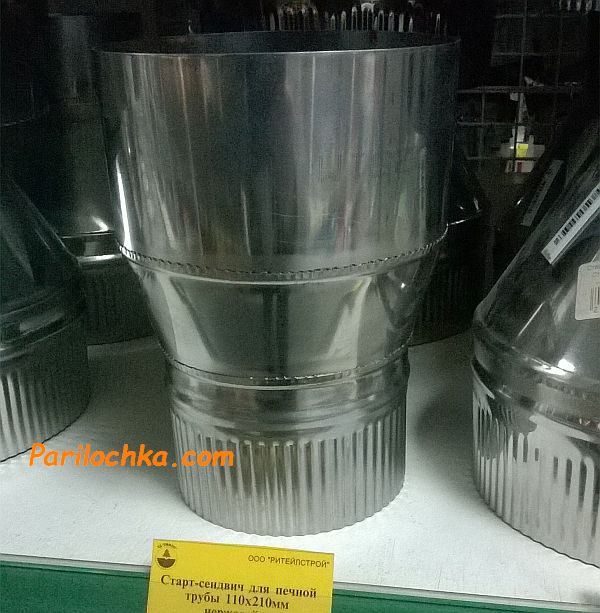
If you chose a sandwich, then first put a monopipe on the furnace nozzle, not forgetting to fix all connections with high-temperature sealant. Closer to the ceiling, a start is put on a monotube - this is an adapter for a sandwich. The sandwich is already being threaded through the PPU hole
The pipe is mounted below. If you chose a sandwich, then first put a monopipe on the furnace nozzle, not forgetting to fix all connections with high-temperature sealant. Closer to the ceiling, a start is put on a monotube - this is an adapter for a sandwich. Already the sandwich is threaded through the PPU hole.
Check the verticals! The pipe must be provided with fasteners to the wall, which will fix it in a strictly vertical position.
After the sandwich is threaded into the PPU, the space between it and the walls of the box is filled with another heater - mineral wool, expanded clay or ceramic wool. Minvata from this list we like the least. Expanded clay is perfect for a budget option.


BY THE WAY! The bottom of the box can be laid out with the same calcium silicate and the lid can also be finished from the inside with it.
We close the lid and fix it on the attic floor with self-tapping screws (it protrudes a little beyond the hole). On this specifically, the passage of the chimney through the ceiling, carried out by one's own hands, can be considered complete. Next - the output through the roof.
Sauna stove chimney device: which design is better?
In the entire design of the bath, the chimney is assigned an important role - the removal of combustion products.
In addition, by skillfully manipulating the air flow through the chimney, you can adjust the fuel consumption and the ability of the stove to give off heat.
Thanks to the chimney, you can maintain a fire even during the process of soaring in the bath.
The device of the chimney often varies in terms of type and materials of manufacture. Depending on the installation method, chimneys are divided into:
- internal, which allows for additional heating of the room, but creates an increased threat to fire safety;
- external, which do not pose a threat of fire, but will require additional fuel for heating.
From the point of view of technology, the internal location of the chimney is more complicated, but it allows you to save a valuable resource - heat. In conditions of high cost of energy resources, this factor has a significant impact when choosing the type of chimney design.
Important! When choosing the installation of an external chimney, the chimney is additionally insulated using mineral wool, and the pipes are carried out outside, along the facade of the building. The device of chimney pipes also differs depending on the materials of manufacture.
There are a considerable number of them, but two structures are fundamentally distinguished - a brick and a chimney made of a metal pipe.
The device of chimney pipes also differs depending on the materials of manufacture. There are a considerable number of them, but two designs stand out in principle - a brick and a chimney made of a metal pipe.
Scheme of a brick structure
The main advantage of a brick chimney is heat resistance and thermal conductivity.
However, it is worth noting that the construction of this type of chimney is a very time-consuming and painstaking task. Such chimneys are usually used for metal and stone stoves.
The main material during construction is refractory bricks, and a solution based on clay or special “furnace” mixtures is also used.
During the construction of the chimney, the necessary moment is to maintain the ideal evenness of the masonry of both the structure as a whole and its individual functional elements.
In order to smooth the planes and reduce the amount of soot and condensate accumulated in the chimney, the pipe is plastered from the inside, smoothing out the seams and irregularities. In addition, it will positively affect traction.
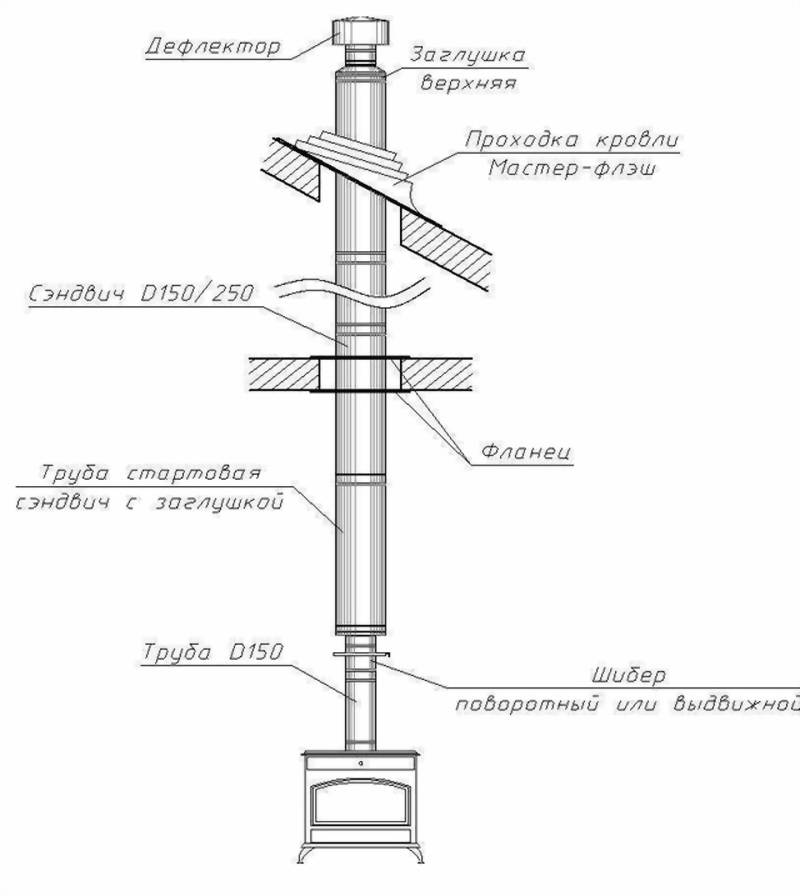
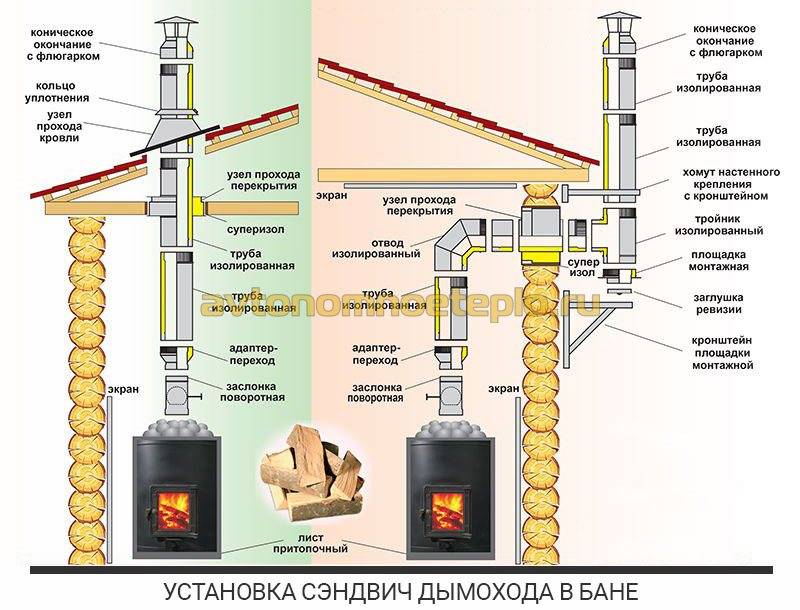
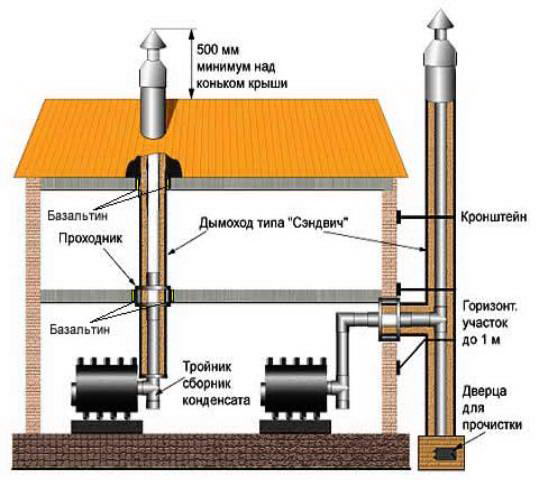
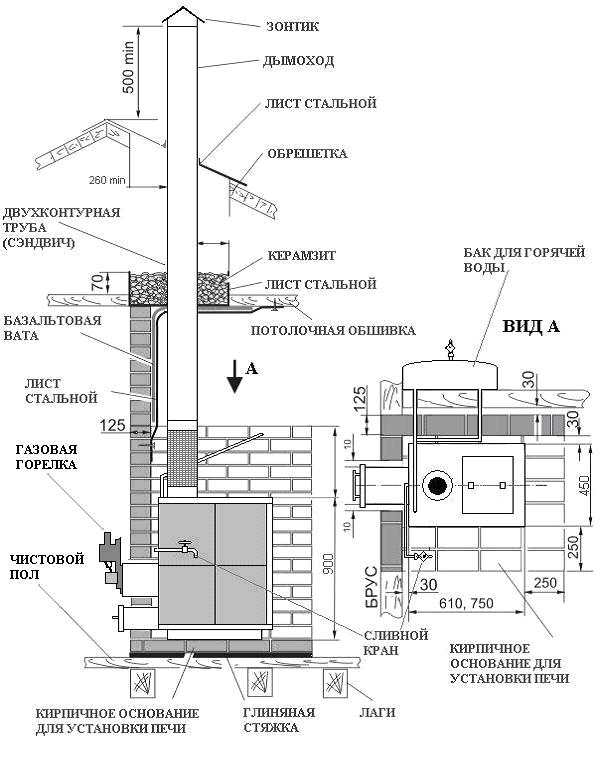
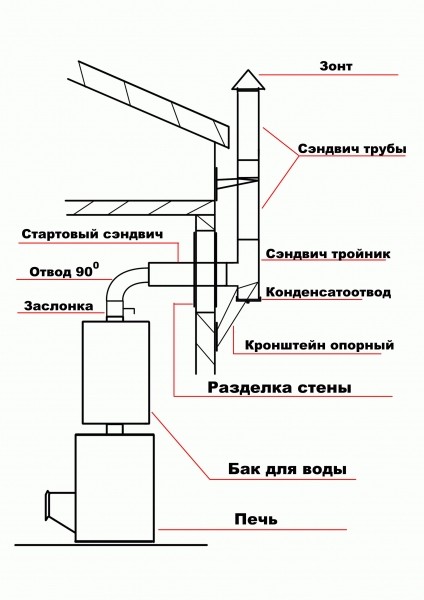
Scheme of a metal chimney
Metal chimneys are easy to install and will cost an order of magnitude cheaper. However, unlike a brick structure, metal has a very high heat transfer. It is not uncommon for a fire to occur as a result of burning a metal chimney pipe.
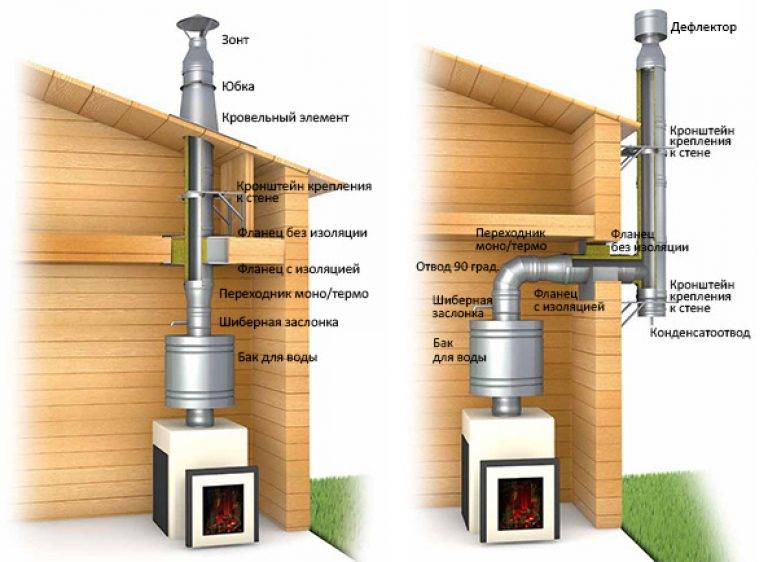
Chimneys made of steel pipes are installed directly on top of the stove. Most often, a cross section of 115 mm is required, but this figure may vary depending on the power of the heat source or the specific recommendations of the manufacturer.

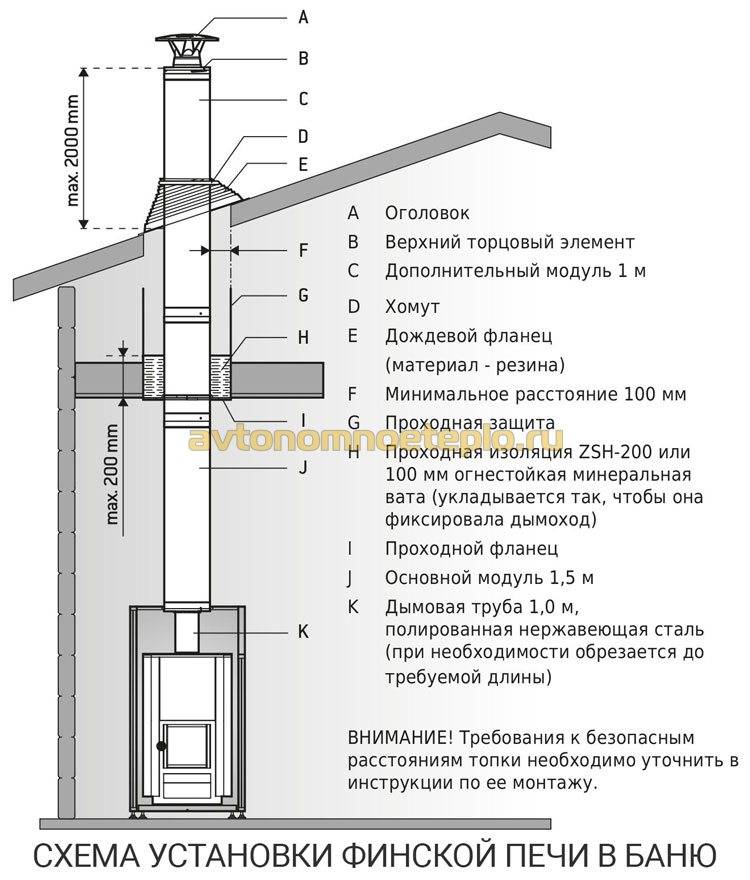
Photo 1. Schemes of two options for installing a metal chimney: inside the house and outside.


As experience shows, stainless steel pipes are the best material for the manufacture of this kind of chimney. Its structure can be single, subject to good insulation. However, there is a more practical solution - a sandwich pipe. Such a channel, in fact, consists of two pipes of different diameters, and the space between them is filled with thermal insulation materials, in particular, mineral wool.
There are a number of features and requirements that are put forward for steel chimneys:
- the inner wall thickness should be from 0.8 mm;
- steel must be resistant to temperatures up to 850 ° C inclusive;
- the thickness indicator of basalt filling should start from 50 mm, and its density - from 120 mg / m3;
- it is better to choose the model of the outer pipe also made of stainless steel.
Types of passage nodes through the ceiling
The flue through a ceiling and a roof of a bath passes through the protected openings. One of the main conditions for the safety of people in a heated building is the heating of the structures of the roof, ceiling and walls near the pipe to a temperature not exceeding 50 °C. Fire safety requirements for the installation of chimneys are set out in SP 7.13130.2013. Heating, ventilation and air conditioning. fire safety requirements.
To pass the pipe from the bath through the structures of the ceiling or roof, a ceiling passage assembly is mounted - a prefabricated box with flanges. A heater is laid between the flanges. The box isolates the surrounding structures from the heated surface of the pipe. You can make it yourself, it's not very difficult.
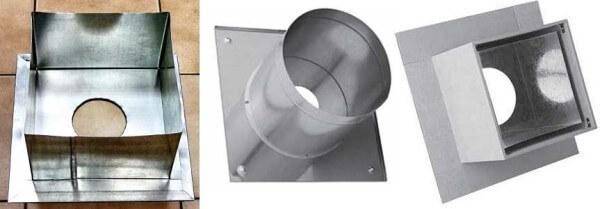
For the speed and convenience of pipes passing through the roof and ceiling, the industry produces ready-made passage units. They are round and square. As a rule, these units are made of stainless steel with a heat insulator, sometimes mineralite - cement boards with fiber (mineral, cellulose). Previously, asbestos-cement slabs (flat slate) were used, but asbestos is carcinogenic, and their use indoors is prohibited by sanitary standards. After all, it is not a roof or a fence, the asbestos dust from which is washed away by rains and blown away by the wind.Sometimes there are passage units made of galvanized steel, but in humid bath air they quickly rust, so they are used only as a last resort.
Mineral wool is mainly used as a heater (heat insulator), but expanded clay, clay, a mixture of clay with expanded clay are allowed. Mineral wool has a very significant drawback - when wet, it becomes heat-conducting (due to water), and after drying, it does not fully restore thermal insulation properties.
If the flange, the body of the passage unit is made of steel, and the ceiling structures include combustible elements (wood, foam), then a layer of mineral wool should be laid between the structures and the steel elements. Otherwise, the structures may char or even burn.


