
- Kinds
- Equipment for fireplaces
- Calculation of the parameters of the chimney
- Rules for selecting the length of the chimney
- Calculation of the section of the chimney
- Brick chimney technology.
- Do-it-yourself tool for laying a brick chimney chimney:
- Steps for making a brick chimney:
- Installation: recommendations and diagrams, the main stages of the installation of the chimney
- General requirements
- Installation steps
- Video description
- Connecting a ceramic chimney
- Video description
- Laying the chimney - brick by brick
- Stage I. Preparatory work
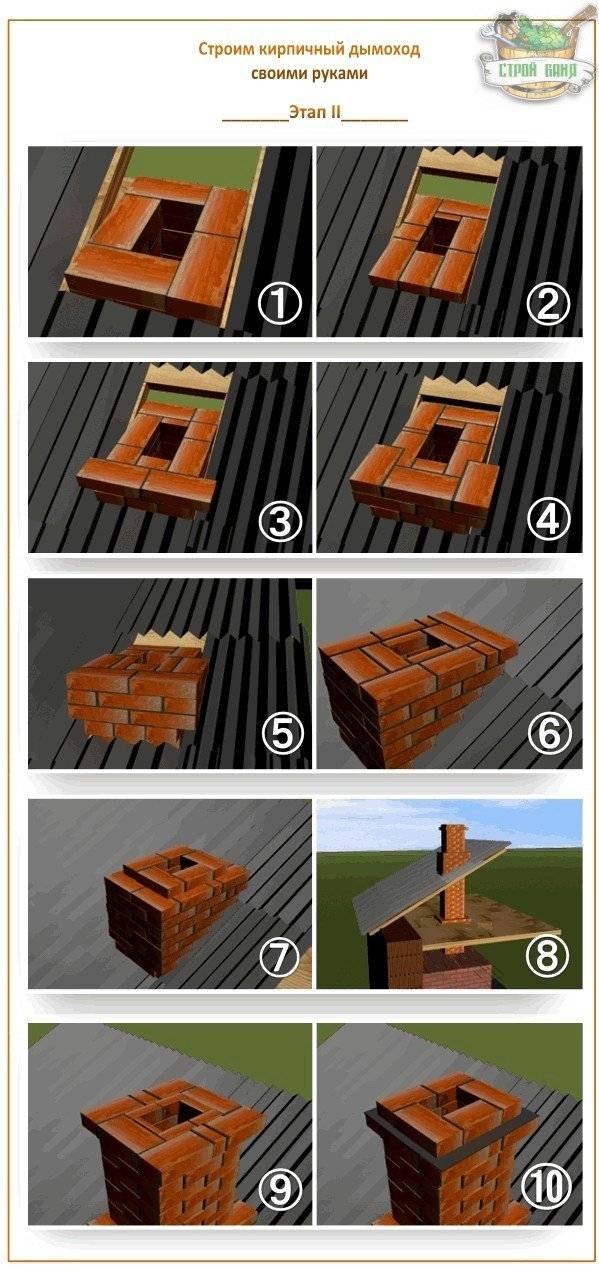
- Stage II. Chimney masonry
- Stage III. Fastening and thermal insulation
- Benefits of a steel chimney
- Classification of chimney structures
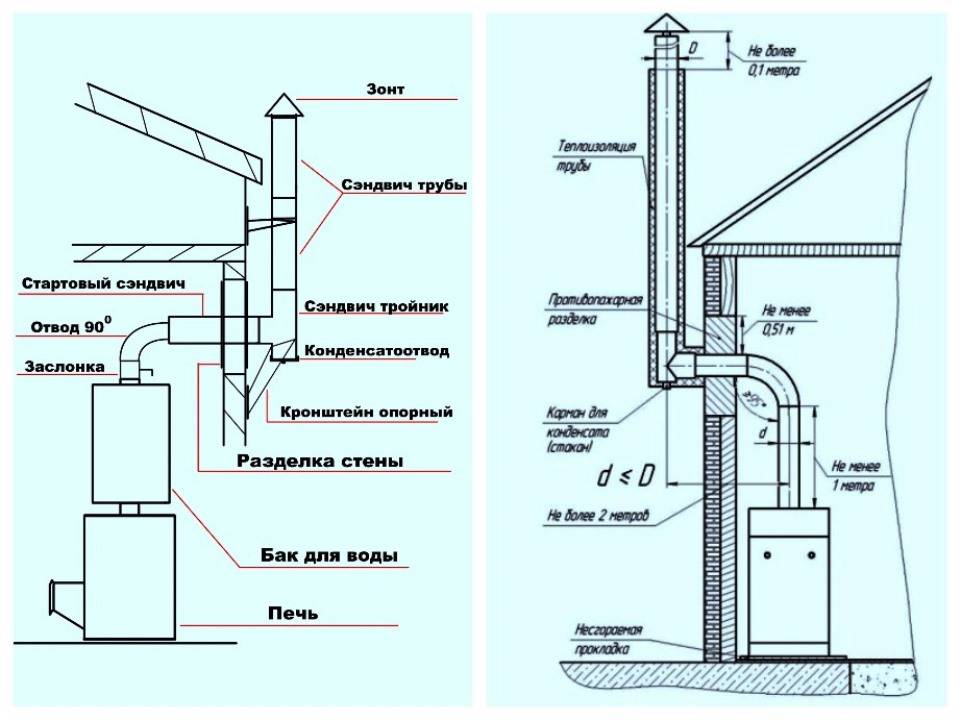
- Sandwich setup diagrams
- The device of a metal sandwich chimney
- Materials for installing a metal structure
- Schemes of installation of a sandwich chimney
- Inner pipe tips
- When two in one is bad
- Construction types
- Fireplace chimney diagram
Kinds

Chimney made of sandwich pipes
Chimney devices come in several types and have their own requirements for construction and installation. do-it-yourself equipment.
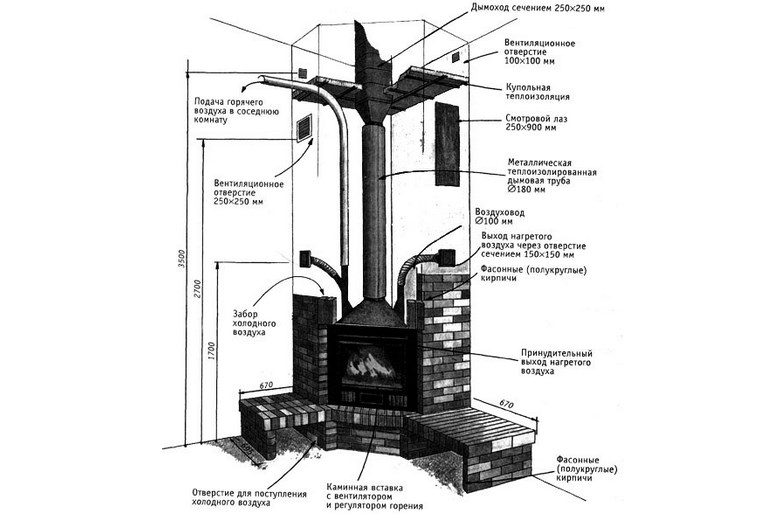
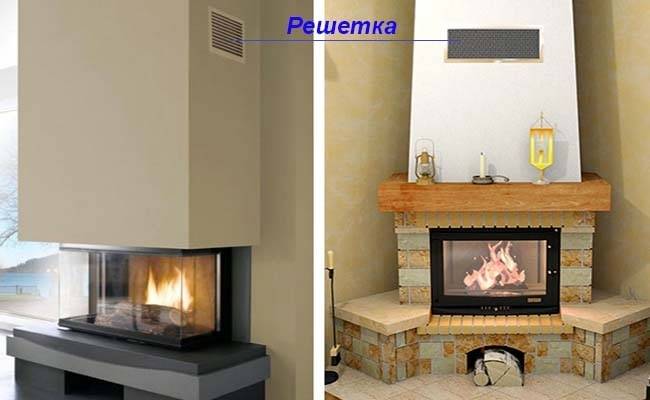
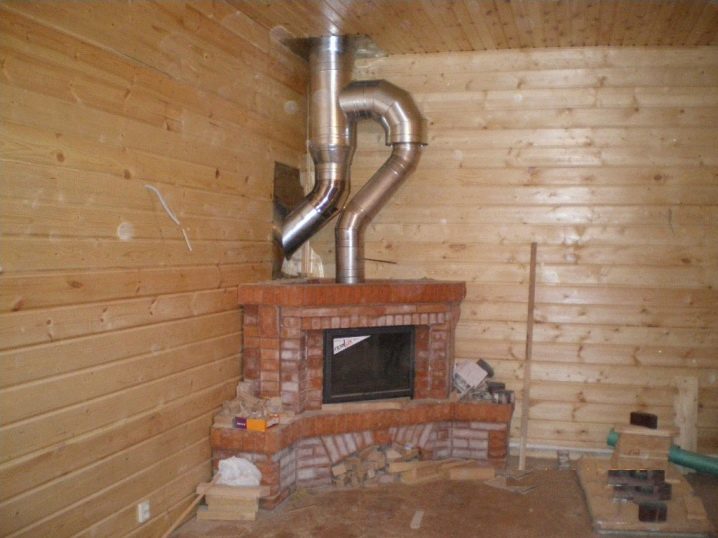
Equipment for fireplaces
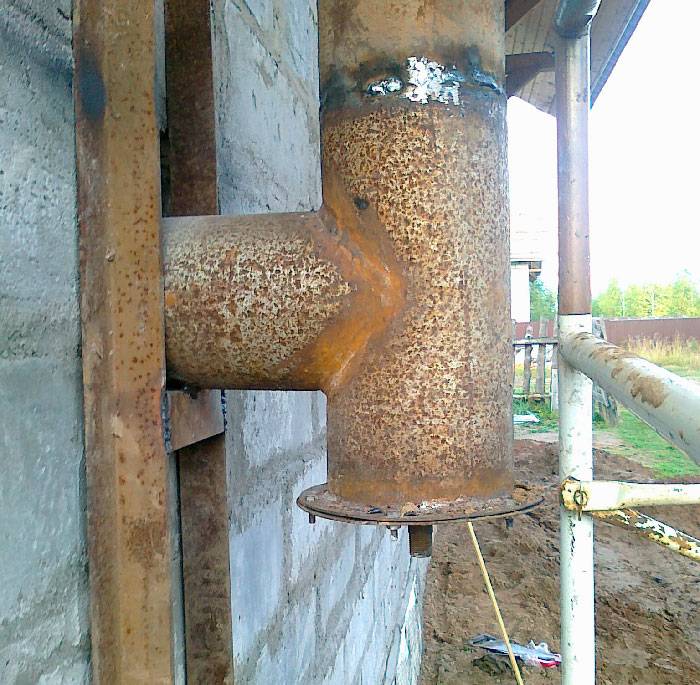
Chimney devices for fireplaces, along with equipment for stoves, have the same requirements for installing equipment.If heating a room is not the main task for a fireplace, then it is quite possible to use a radiator pipe, which is a device for increasing the heat transfer area.

Pipe-radiator
Thermal insulation is one of the important rules for installing a chimney for a fireplace. A sandwich chimney located near a wooden or plastic cover must be protected using basalt-based materials for this.
Calculation of the parameters of the chimney
Basis for calculation of height and diameter chimney - an indicator of power.
The height of the chimney directly affects the performance of the boiler or furnace. For household appliances, it is 5 m. This characteristic is provided SNiP requirements for residential ovens. The measurement is carried out from the grate of the device to the cap. At a lower height, the natural draft in the furnace will not ensure efficient combustion of the fuel, it will smoke and not produce the optimal amount of heat. However, the possibility of increasing the height is limited. Experiencing the natural resistance of the pipe walls, the air will slow down if the channel is too long, which will also lead to a decrease in thrust.
Rules for selecting the length of the chimney
For a private house, the calculation of the height of the chimney is based on certain rules:
- The pipe must be at least 5 m.
- Exceeding the end of the chimney above a conventionally flat roof by at least 50 cm.
- For a pitched roof, a pipe whose axis is not further than 1.5 m from the ridge, and if there are superstructures, then from their highest point, the excess value is 0.5 m.
- When the distance to the ridge is 1.5–3.0 m, the end of the pipe should not be lower than the level of the ridge.
- When removing the chimney at a distance of more than 3 m from the ridge, in particular, for outdoor installation, the angle between the horizon and the conditional straight line between the ridge and the end of the pipe must be at least 10 degrees.
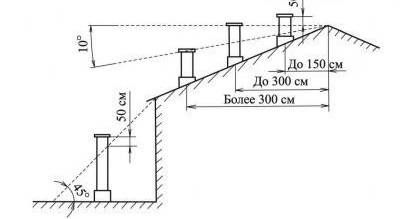
The height of the pipe depends on its location.
Calculation of the section of the chimney
The following procedure for determining the size of the channel is valid for a circular section. It is the optimal form, since the flue gases do not move in a monolithic straight jet, but the flow is swirled, and they move in a spiral. In rectangular channels, vortices are formed at the corners, which slow down the movement of gases. To calculate the cross section, the result should be multiplied by 1.5.
You will need the following initial data:
- Furnace power, that is, the amount of heat generated by the device per unit time at full load.
- The flue gas temperature at the outlet of the furnace is usually taken in the range of 150–200 degrees.
- The speed of movement of gases through the channel (is 2 m / s).
- Chimney height.
- The value of natural draft (is 4 MPa per 1 m of the smoke channel).
The dependence of the size of the chimney section on the volume of fuel burned is obvious.
Smoke does not move in a straight line
To perform the calculation, you need to use the converted circle area formula: D2 \u003d 4 x S * Pi, where D is the diameter of the smoke channel, S is the cross-sectional area, Pi is the number pi equal to 3.14.
To calculate the cross-sectional area, it is necessary to determine the gas volume at the place of their exit from the furnace into the chimney.This value is calculated depending on the volume of fuel burned and is determined from the ratio Vgas \u003d B x Vtop x (1 + t / 273) / 3600, where Vgas is the volume of gases, B is the amount of fuel burned, Vtop is a tabular coefficient, which can be found in GOST 2127, t is the temperature of the gases at the outlet of the furnace, a value usually taken in the range of 150–200 degrees.
The cross-sectional area is determined by the ratio of the volume of passing gases to the speed of its movement, that is, according to the formula S = Vgas / W. In the final version, the desired value is determined by the relation D2 = Vgasx4/PixW.
Having made the necessary calculations, you will get the result - the diameter of the chimney should be 17 cm. This ratio is true for a furnace in which 10 kg of fuel burns per hour with a moisture content of 25%.
The calculation is made for cases when non-standard heating units are used. If the power of the device is known, it is enough to apply the parameters of the chimney recommended by specialists:
- for devices with power up to 3.5 kW - 140 x 140 mm;
- at 3.5–5.0 kW - 140 x 200 mm;
- at a power of 5.0–70 kV - 200 x 270 mm.
For chimneys of circular cross section, its area should not be less than the calculated value of a rectangular one.
Brick chimney technology.
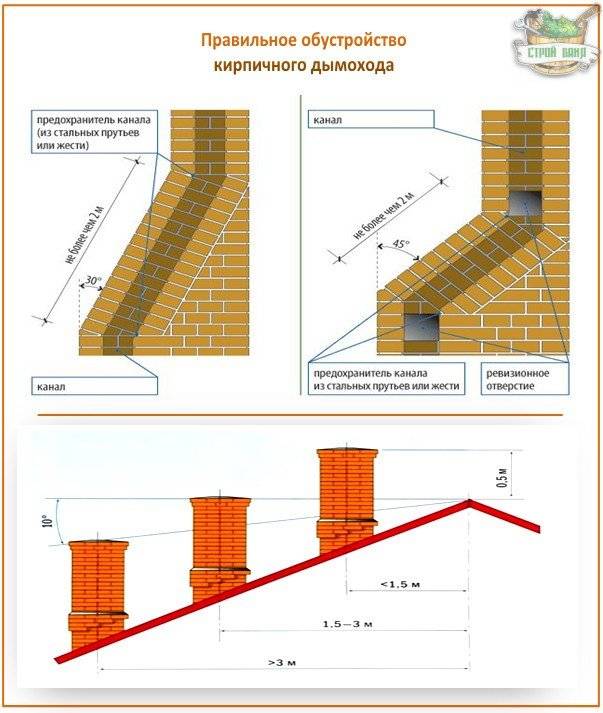
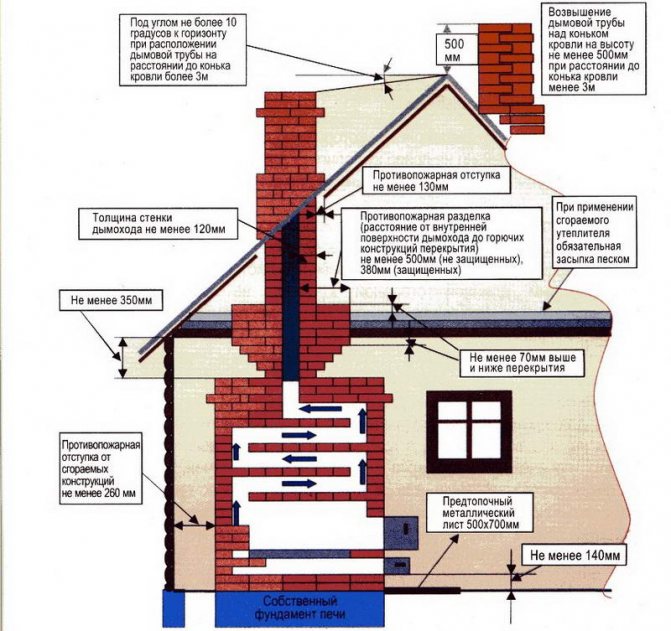
A brick chimney must stand strictly vertically and, if possible, have a flat, without protrusions, inner surface. If necessary, make a withdrawal, it should not go to the side by more than a meter and at an angle of at least 60 degrees to the horizon.


The internal section of the furnace chimney must be at least 140x140 mm and the height of the pipe must be at least 5 m from the level of the grate to create sufficient draft.But if the height of the chimney is less than 5m, then you can install a deflector-diffuser, a nozzle that improves traction due to ejection.
If the house is two-story and on the second floor there is also a stove, stove, fireplace, then a separate chimney is made for each hearth. Since the draft is better at the lower hearth, and with simultaneous heating, the upper one will certainly smoke.
In places where a chimney made of bricks adjoins wooden structures with their own hands, they make a thickening of the masonry, cutting, in 1-1.5 bricks. The distance of beams and combustible structures to the chimney must be at least 25 cm. This distance is covered from below with sheets of asbestos cement or metal, and from above they are covered with expanded clay or sand.
So that the chimney is not covered with snow, it is brought to a height of half a meter relative to the roof. Do not forget to protect the end of the chimney head from being destroyed by atmospheric precipitation; for this, you can use a metal cap or turn it around with sheet steel.
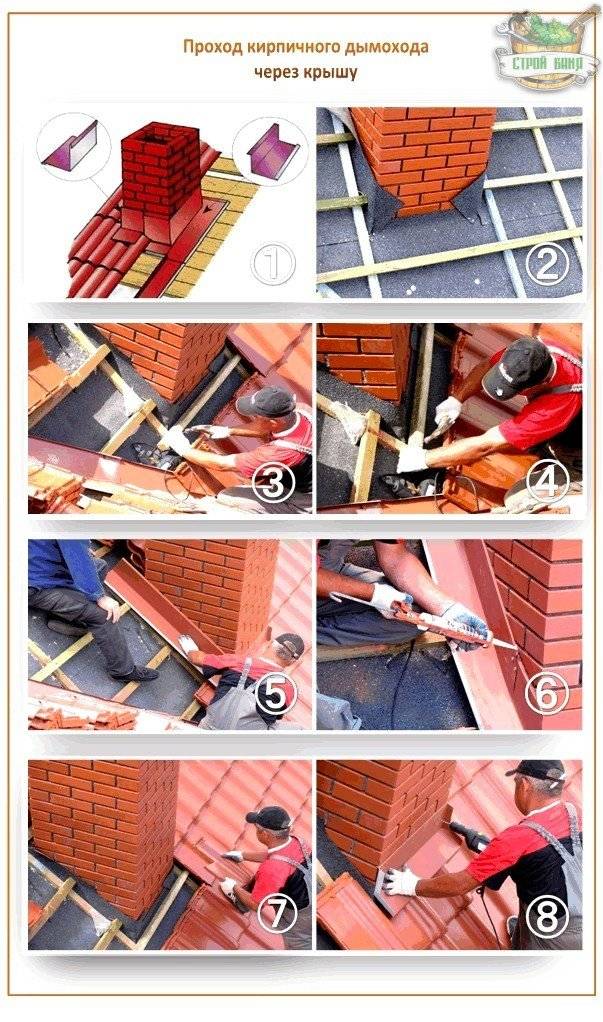
In the place where the brick chimney passes through the roof, an otter is made to close the gap between the chimney and the roof. To ensure a normal drain, the slots are covered with sheets of roofing steel.
To avoid tipping over the draft into the chimney, its head is made beveled or a deflector can be installed.
Do-it-yourself tool for laying a brick chimney chimney:
* Solution. Clay-sand or lime-sand.
* Brick. Red, fireclay or hearth.
* Hammer pick, trowel, trowel.
* Rule, level, plumb, meter.
* container for solution.
* Asbestos-cement slab.
* Sheet iron.
Steps for making a brick chimney:
1) You will need to stock up on the tools and materials that you will need when laying out the chimney. These are brick, sheet iron, mortar, mortar container and masonry trowel. Wear gloves for extra protection.
2) Next, you need to familiarize yourself with the structure of your chimney. It consists of a neck, a riser, a head, a smoke damper and a metal cap. They lay out a brick pipe from bricks that are connected with mortar. We use an asbestos-cement slab to isolate the pipe from wooden structures.
3) We carry out brickwork tightly, do not leave gaps. We apply a little mortar to the place where the brick is laid (bed), level it, moisten the brick in water, apply a little more mortar to the end or mating edge and put the brick in a sliding motion with pressure towards the vertical seam in place. In case of unsuccessful laying, the brick is removed, it is unnecessary to correct it by tapping, it is cleaned with the bed, wetted and re-laid. Otherwise, air leaks occur, which will spoil the craving for the furnace and the gas flow will increase. We identify and eliminate all existing leaks. Masonry joints should be 0.5 cm horizontal and 1 cm vertical. Every 5-6 rows of masonry, the inside of the chimney is wiped with a wet cloth, the seams are overwritten.
4) We make the section of the pipe (transverse) square or rectangular. The shape of your pipe affects the level of resistance in the chimney (hydraulic). It is also a condition for maintaining and creating the necessary traction. A round sectional shape is also optimal, but it is very difficult to create such a shape using brickwork.
5) We avoid sloping chimneys during the production of the pipe, because additional air resistance occurs at the points of rotation. But if there is no way without turns, then they need to be done at an angle of 60 degrees. Also, do not make a large diameter pipe, as the gases will cool faster in this pipe and the heating efficiency will be lower.
6) Above the roof, to the thickness of a single brick, we lay out the walls of the chimney chimney, but do not forget about the headboard and the ridge canopy. The headband is best done without a cornice, because the wind should blow it perfectly and therefore such a solution will allow better removal of gases. The upper part of the brick chimney is laid with their own hands on a sand-cement mortar.
Do-it-yourself brick chimney is a very difficult and crucial moment, so you need to take this very seriously, but it is better to entrust this matter to specialists.
Source-Build Your Own House
Installation: recommendations and diagrams, the main stages of the installation of the chimney
The installation of the chimney is divided into several stages - this is the preparatory work, the installation itself, then the connection, start-up and, if necessary, debugging of the entire system.
General requirements
When combining several heat generating installations, a separate chimney is created for each of them. In exceptional cases, a tie-in to a common chimney is allowed, but the difference in at least one meter high.
First, the parameters of the chimney are designed and calculated, which are based on the recommendations of the manufacturers of gas boilers.
When summarizing the calculated result, the inner section of the pipe cannot be less than the diameter of the boiler outlet pipe.And according to the check according to NPB-98 (fire safety standards), the initial speed of the natural gas flow should be 6-10 m / s. And besides, the cross section of such a channel must correspond to the overall performance of the unit (8 cm2 per 1 kW of power).
Installation steps
Chimneys for gas boilers are mounted outside (add-on system) and inside the building. The simplest is the installation of the outer pipe.
Installation of an external chimney
Installation of a chimney near a wall-mounted boiler is done as follows:
- A hole is cut in the wall. Then a piece of pipe is inserted into it.
- A vertical riser is assembled.
- The joints are sealed with a refractory mixture.
- Fixed with wall brackets.
- An umbrella is attached to the top to protect it from rain.
- An anti-corrosion coating is applied if the pipe is made of metal.
Proper installation of the chimney guarantees its impermeability, good draft, and prevents soot from accumulating. Installation performed by specialists will significantly reduce the cost of maintaining this system.


In the case of arranging an opening for a pipe in the roof of a house, special boxes with aprons are used. In this case, the design as a whole is influenced by such factors as:
- The material from which the pipe is made.
- Exterior design of the chimney.
- Type of roofing.
The main factor influencing the choice of design is the temperature of the gas that passes through the pipe. At the same time, according to the standards, the distance between the chimney pipe and combustible materials must be at least 150 mm. The most advanced is the assembly system by segments, where all elements are assembled by cold forming.
Video description
How the chimney pipe is installed, see the following video:
Connecting a ceramic chimney
Ceramic chimneys themselves are almost eternal, but since this is a rather fragile material, you need to clearly imagine how the connection (docking) of the metal part of the chimney and the ceramic one is correctly performed.
Docking can only be done in two ways:
By smoke - a metal pipe is inserted into a ceramic
It is important to remember here that the outer diameter of the metal pipe should be smaller than that of the ceramic one. Since the thermal expansion of the metal is much greater than that of ceramics, otherwise the steel pipe, when heated, will simply break the ceramic one.
For condensate - a metal pipe is put on a ceramic one.
For both methods, specialists use special adapters, which, on the one hand, are equipped with a gasket for contact with a metal pipe, and on the other, which contacts directly with the chimney, are wrapped with a ceramic cord.
Docking should be carried out through a single-wall pipe - it has a higher heat transfer coefficient. This means that the smoke will have time to cool down a little before it reaches the adapter, which ultimately extends the life of all materials.
Video description
Read more about connecting to a ceramic chimney in the following video:
VDPO shows great requirements for chimneys for gas boilers, because of this, it must be installed by specialized teams. Since competent installation guarantees not only long-term operation of the device, but also makes living conditions in a private house safe.
Laying the chimney - brick by brick
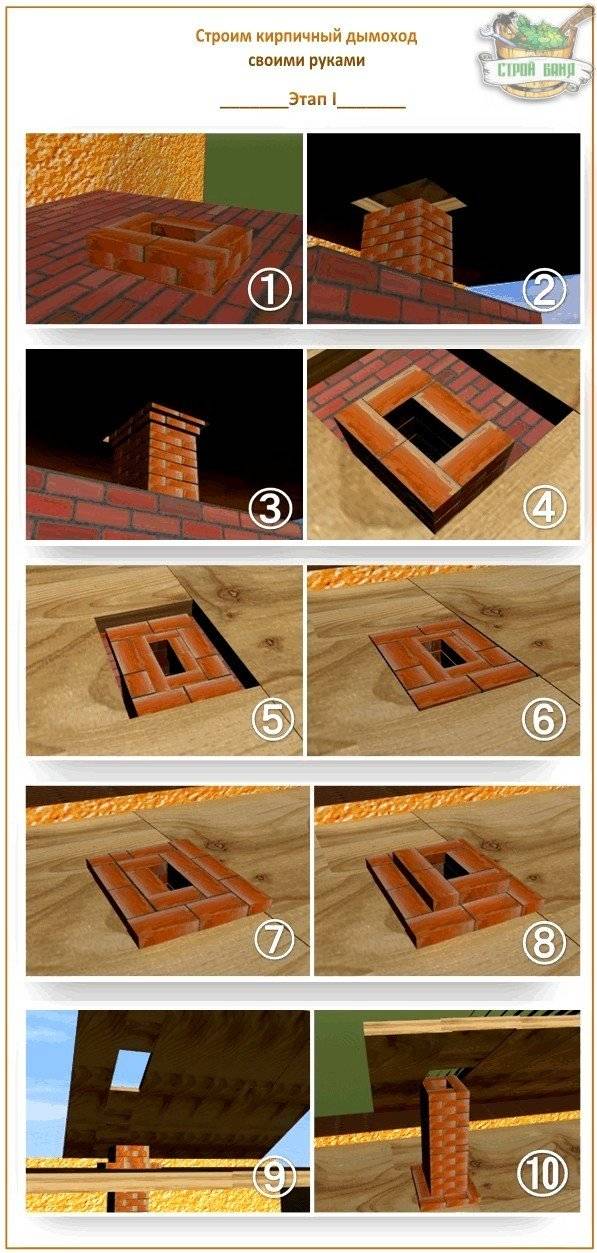
How exactly the construction and lining of a brick chimney takes place, you can see in a step-by-step photo and video, you also have an order at your disposal.And we will give you practical tips along the way that will help you achieve good quality work at all stages.
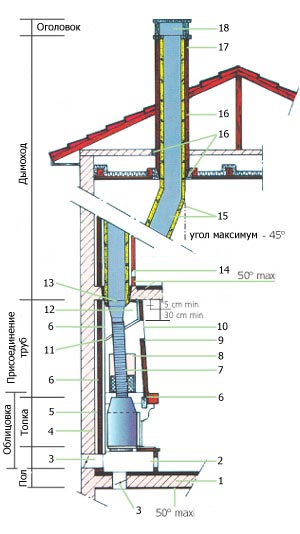
Stage I. Preparatory work
First of all, familiarize yourself with the drawings for the construction of the chimney. Take the usual standard chimney scheme for this, do not risk it. If you have an ordinary wood-burning stove, you need a layout of a completely brick chimney, and if the stove is gas, then one in which there will additionally be a metal pipe of a special alloy.
Before starting to lay a brick chimney, a rectangular foundation is built for it. It can be built from solid brick or concrete with metal reinforcement, the main thing is that it should be at least 30 cm in height. And the width of the foundation should be 15 cm larger than the chimney itself.
Stage II. Chimney masonry
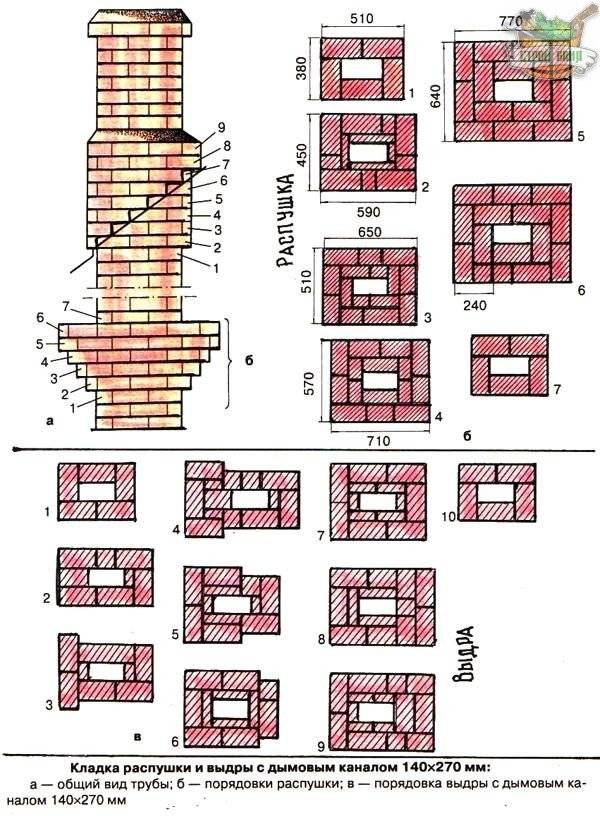
You can carefully consider how a standard brick chimney is laid, according to the detailed diagram below:
Whatever the height of your bath, you will need to build a chimney no less than 5 meters high - otherwise there will be no draft. It is necessary to lay out such a chimney with a special refractory or red solid brick. As a binder, you can use a cement-lime or cement-sand mortar, and where the temperature is especially high, you will need a special mixture for laying the stove.
Experienced stove-makers chip off the desired piece from a brick with one blow to it - but if you do not have such a skill, use a regular grinder and a marker to mark. It is these tools that will allow you to make accurate plates for the smoke channel in the cut and otter area.
Try to make the seams as thin as possible - then the chimney will be strong.The optimal thickness of the seams for a brick chimney is 15 mm. To form a cut and an otter, use metal rods for convenience - mount them directly into the brickwork, but so that the reinforcement does not cross the smoke channel itself. Keep in mind that both the width and height of your chimney will directly depend on how thick you will make the seams at the masonry - they must necessarily be the same! In general, the thickness of the walls of a brick chimney is about 10 cm, which really provides reliable fire safety.


Finish the inner surface of the chimney for smoothness with plaster. What for? The fact is that the more rough the chimney in the nutria, the more soot will settle on its walls. And it worsens traction and one day it may simply catch fire, which is completely unsafe. Just make sure you apply the plaster correctly. Many experienced stove-makers also believe that the brick chimney must also be whitewashed from the outside - this will immediately show where the soot seeps through a completely imperceptible gap.
Stage III. Fastening and thermal insulation
If you build such a chimney directly against the wall, then fasten it to it for reliability with metal anchors every 30 cm. Where the chimney will be connected to the ceiling and roof, lay asbestos fabric or fiberglass. Although the brick heats up slowly, the risk of something burning should be reduced to a minimum
Another rule: a brick chimney should rise above the roof ridge by at least half a meter - this is important
That outer part of the chimney, which is higher than the roof of the bath, must be insulated and finished with facing bricks or special roofing. Like this. If you follow all the technologies when building a brick chimney in your bath, it will turn out to be much safer, stronger and more reliable than the most modern modular systems at an exorbitant price.
Benefits of a steel chimney
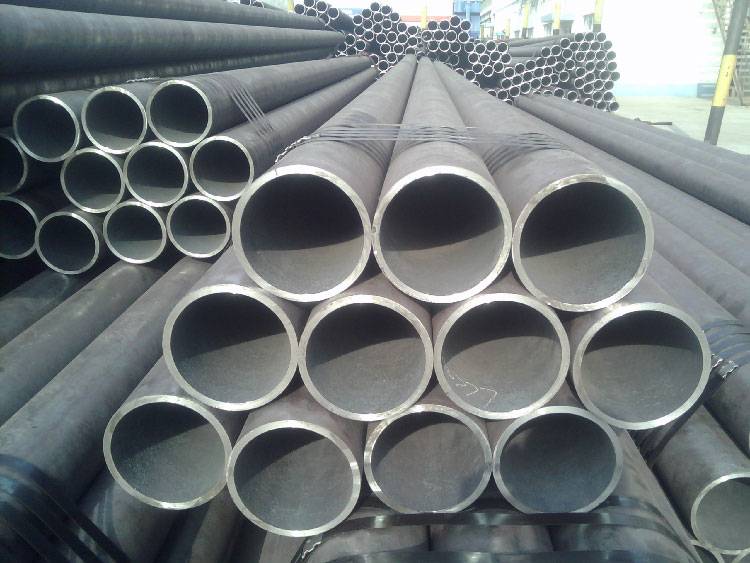
Chimney pipes are made of metal, ceramics and bricks. Metal pipes are currently in the greatest demand. Of all the varieties of this material, it is recommended to choose steel. Steel pipes for chimneys are coated with special solutions that make the material resistant to all adverse effects of the internal environment of the chimney.
When choosing a pipe, it is necessary to take into account the parameters of the heating appliances and fuel used. The material from which the pipes are made must withstand higher temperatures than the fuel can create.
When using some types of heating appliances chemically active substances are found among the incompletely oxidized combustion products. They can damage the chimney, which is not sufficiently resistant to chemicals. Some unburned particles can ignite, creating sparks. Therefore, the material from which the pipe is made must be refractory.
The advantages of steel pipes are:
- Ease of installation. Steel pipes do not require the installation of a special foundation, they do not require complex engineering solutions or special installation tools. You can install them yourself without prior preparation. Due to the plasticity of the material, complex technical structures can be created.
- Light weight.It is easy to transport, lift and move them independently without a team of workers, which also simplifies installation.
- Resistant to high temperatures. Steel products are suitable for appliances that run on any fuel. They do not melt at maximum temperature loads.
- chemical inertness. Steel does not interact with chemicals that can be formed as under-oxidized combustion products. These substances are not capable of destroying it.
- Corrosion resistance. This advantage applies to specially coated pipes and stainless steel. The material itself corrodes quickly. It should be borne in mind that in addition to the internal environment, external adverse factors, such as precipitation, affect the chimney pipe. Preference should be given to coated pipes.
- Smooth inner walls. On a rough surface, combustion products settle, turning into soot, gradually reducing the clearance. This reduces the draft in the chimney. Steel is completely smooth, the risk of soot settling on their surface is minimal.
We recommend to read: Why are pipes noisy or buzzing heating in the apartment, and How to fix it
Classification of chimney structures
Before you install a chimney pipe through a wall, you should consider the types of construction. By design, it is single-walled and double-walled. The first option is made of sheet steel. It is inexpensive and suitable for installation in country houses, cottages. The disadvantage of the product is a short service life. For effective operation, the structure will have to be insulated.
Double-wall chimneys are sandwich systems that are recommended for installation in wooden houses.
The chimney is multi-layered and has low thermal conductivity, which is extremely important for flammable materials
According to the material of construction, there are:
- Brick. Often, their construction requires a foundation, and for proper masonry, certain building skills. This option is acceptable when building a fireplace in the house.
- Steel. Stainless material is cheap, but requires external thermal insulation. If this is not done, then condensate will accumulate inside the pipes, which will affect the quality of traction. More moisture can get into the furnace and extinguish the flame. It will be difficult to re-ignite the cauldron.

steel chimney
- Asbestos-cement. Such products are heavy and fragile. They require a foundation to install. Under the influence of hot gases and moisture, such products are destroyed faster.
- Ceramic. Such a chimney is able to withstand temperatures of more than 100 degrees, but needs thermal insulation and careful operation. Installation of such pipes is difficult, but they are expensive.
- From sandwich pipes. The preferred option for building a chimney on the street. For the production of the product, two pipes are taken, placed in each other. Between them there is a heat-insulating layer. The system is mounted simply and quickly.
When choosing a material, not only its technical characteristics are taken into account, but also decorativeness.
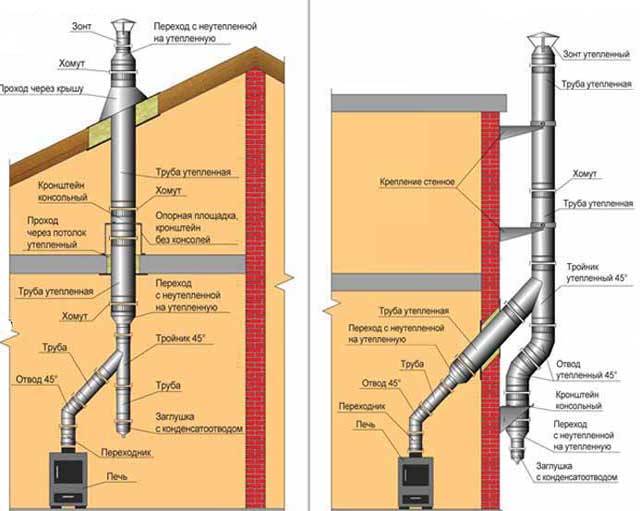
Sandwich setup diagrams
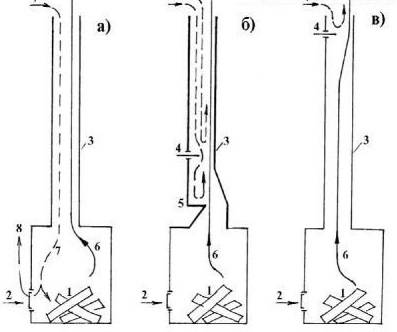
There are 3 ways to make a chimney from modular sandwich pipes:
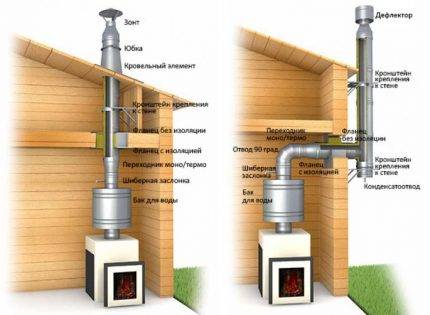
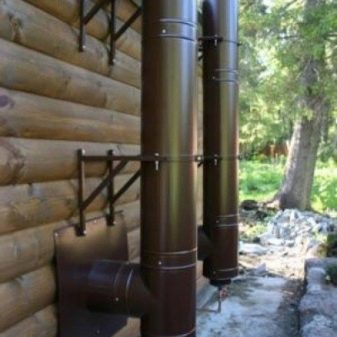
- The vertical part is located on the street, attached to the outer wall of the building. The horizontal chimney crosses the outer fence, enters the house and is connected to the boiler (furnace) nozzle.
- The vertical smoke channel passes through the roof, descends into the boiler room and ends with a condensate collector.The heat generator is connected to it by a horizontal pipe.
- The shaft again crosses all roof structures, but is connected directly to the heater, without a pocket and horizontal sections.
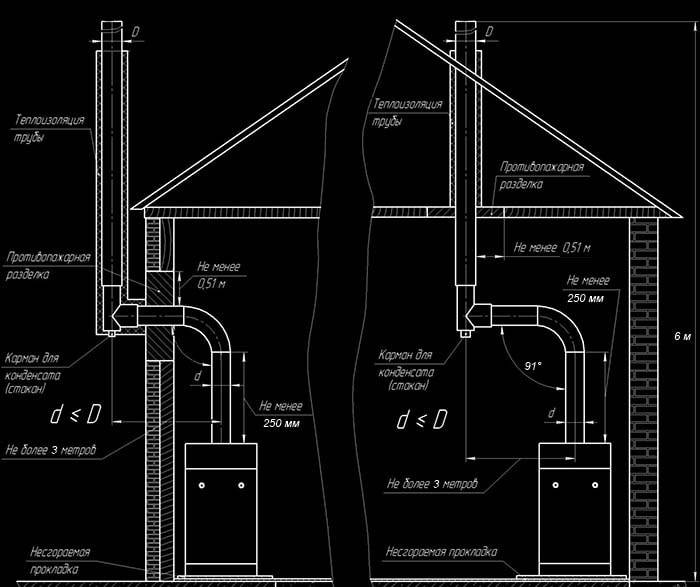
Installation diagram of a wall-mounted chimney (left) and an internal channel passing through the roof (right)
The first option is suitable for ready-made houses of any type - frame, brick, log. Your task is to put the boiler against the outer wall, bring the sandwich to the street, then fix the main pipe. In terms of financial and labor costs, this is the most profitable way to install a chimney.


Installing a modular system according to the second scheme is much more difficult. In a one-story house, you will have to go through the ceiling and roof slope, arranging fire cuts. In a two-story house, the pipeline will get inside the room and make you think about decorative cladding. But you do not need to bypass the roof overhang and fix the end of the chimney with braces.
The latter option is suitable for sauna stoves and fireplace inserts. The former are very hot and practically do not condense, the latter are hidden behind a fire-resistant drywall finish. To organize the cooling of the sandwich channel, ventilation is provided in the space between the lining and the pipe. The photo above shows convection grates that remove heated air from under the casing of the fireplace insert.
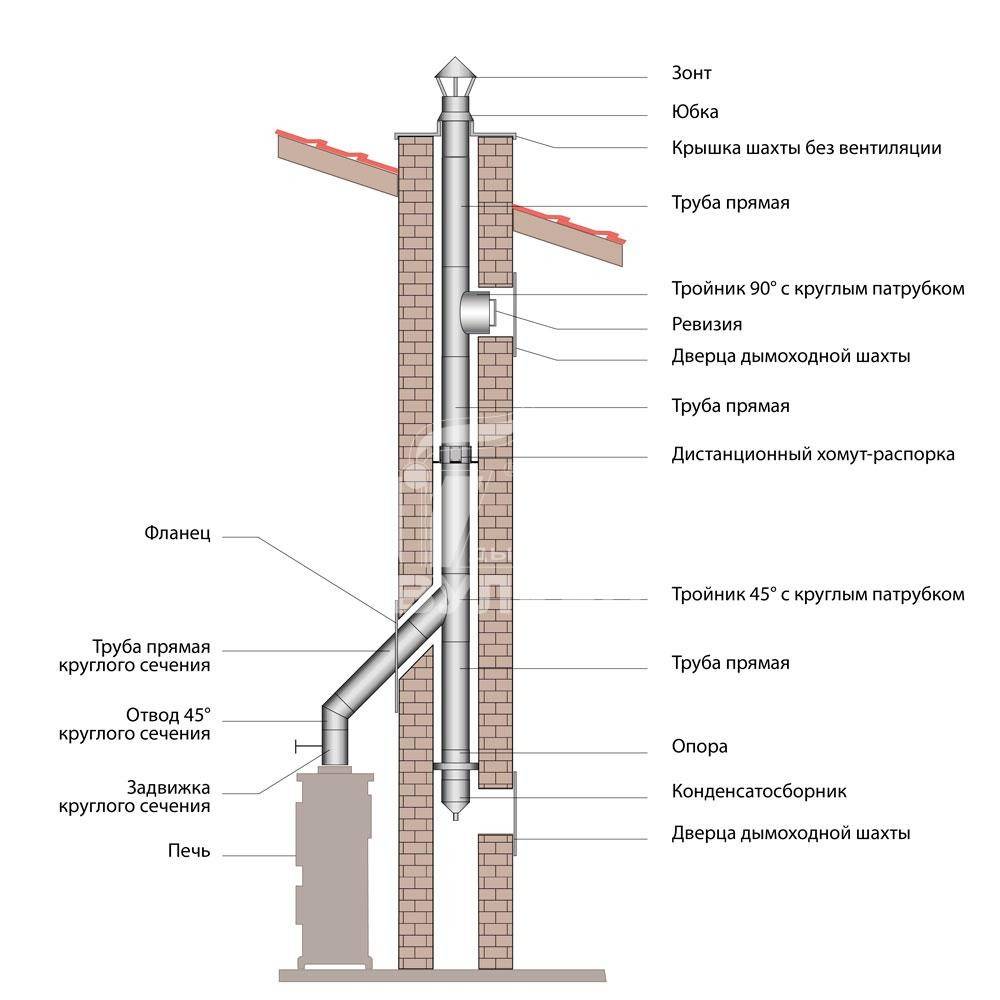
The device of a metal sandwich chimney
Steel chimneys are popular both in industrial construction and for the improvement of the private sector. Their installation resembles the assembly of a ceramic structure, respectively, it is easier than the construction of a brick pipe. Let's consider in more detail how to make a metal chimney correctly, avoiding mistakes.
Materials for installing a metal structure
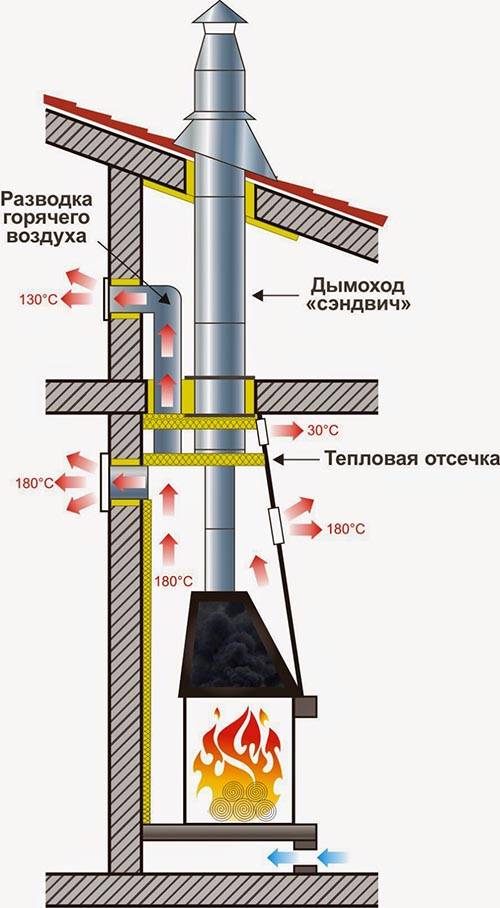
A sandwich chimney is a sealed system of pipes and adapters leading from a heat generator to the roof space. It can pass inside the building (internal) and outside, along the wall (external).
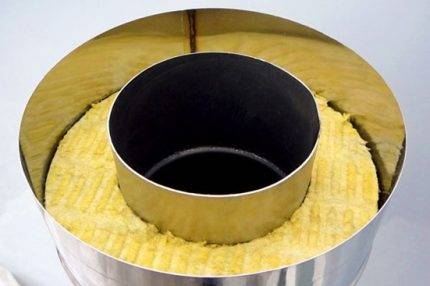
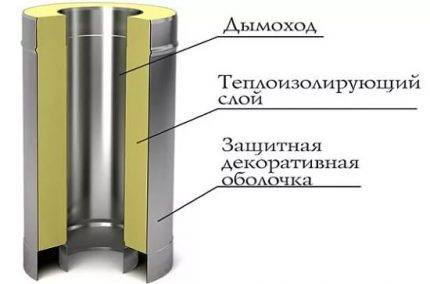 Sandwich pipe is a three-layer part consisting of from two steel pipesbetween which a layer of insulation is laid. Fragments of stainless steel are connected by welding
Non-combustible thermal insulation material has a different thickness - on average from 2.5 cm to 10 cm. Manufacturers most often use one of the best materials - dense basalt wool (from 200 kg / m³).
To assemble the chimney, you will need to connect several parts of various shapes, using the method of connecting tapered ends and sockets. Simply put, one element is inserted into another. From the outside, the joints are reinforced with overhead clamps, which are tightly tightened after installation.
The advantages of a three-layer design: protection of the chimney, minimal formation of condensate, organization of stable draft, the ability to install the system both on the inside and outside of the house
When installing a steel chimney inside the building, the holes in the ceilings and roof are much smaller in diameter than for brick or ceramic counterparts.
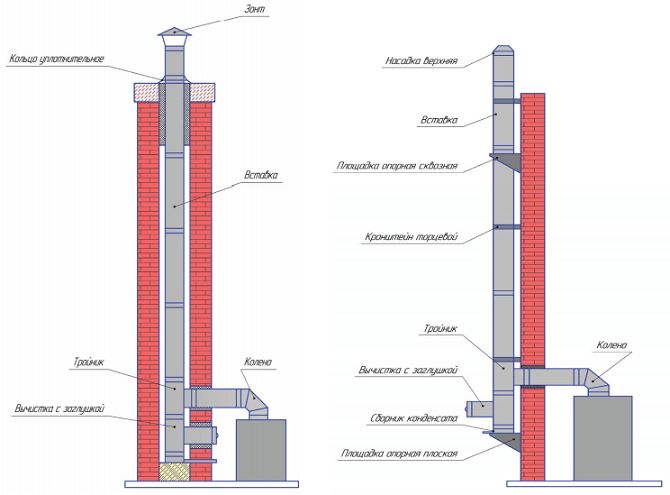
Schemes of installation of a sandwich chimney
Let's consider two schemes for installing a sandwich chimney: with an internal arrangement, which requires the organization of holes in the roof and ceilings, and with external installation, which is made from the outside and is installed parallel to the wall of the house.
 Each of the schemes has advantages: the internal equipment generates less condensate, the external device is easier to implement and is produced with only one opening.
The internal installation scheme is often used in baths, since a steel pipe can simultaneously heat both stones and a water tank. If the bath is not installed separately, but is an extension to the house, this is the most appropriate and effective option.
The disadvantages of the internal system are the need to make holes in the ceilings and roof, as well as a decrease in usable space.
To install an external system, it is enough to make one hole in the wall and ensure the vertical position of the pipes using brackets. The outlet of the pipes to the outside reduces the risk of poisoning by combustion waste. Minus - the arrangement of additional protection from the effects of the external environment.
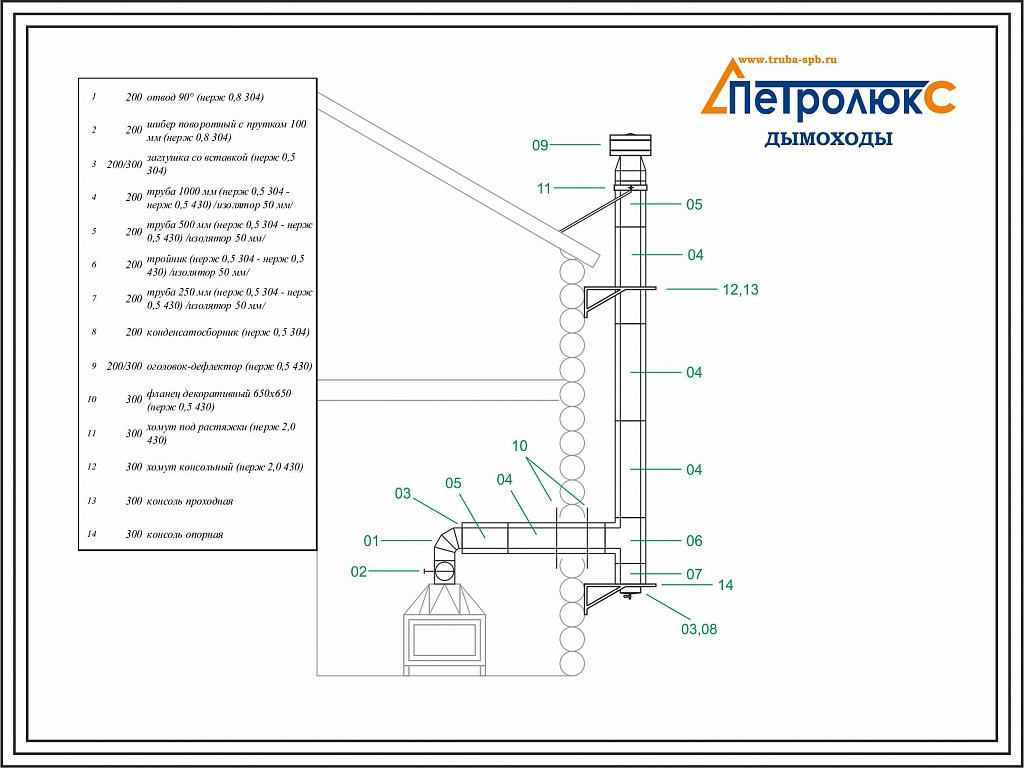
The order of installation work:
- connection to the boiler (or other heat source) adapter;
- punching a hole in the wall (average size - 40 cm x 40 cm), upholstery with fireproof material;
- installation in the wall of a passage block with thermal insulation;
- installation of a horizontal pipe section from the boiler (furnace) to the hole in the wall;
- arrangement of the support unit from the outside (platforms on brackets);
- installation of a vertical pipe;
- fastening at the top of the cone and head.
When assembling, it is necessary to focus on the technical documentation prepared during the drafting process.
Inner pipe tips
When choosing an internal model, you need to remember some technological nuances
For example, it is important to install a valve in the transition area from the boiler so that it is possible to save heat
Docking of two adjacent elements in the transition section is prohibited. The location of the attic rafters and beams should be taken into account: the farther they are from the chimney, the better. Read more about self-assembly of a sandwich chimney in this material.

Transitions through floors and roofs require the use of fire-retardant thermal insulation materials, such as mineral wool, and the installation of protective blocks, which can be called a "sandwich in a sandwich"
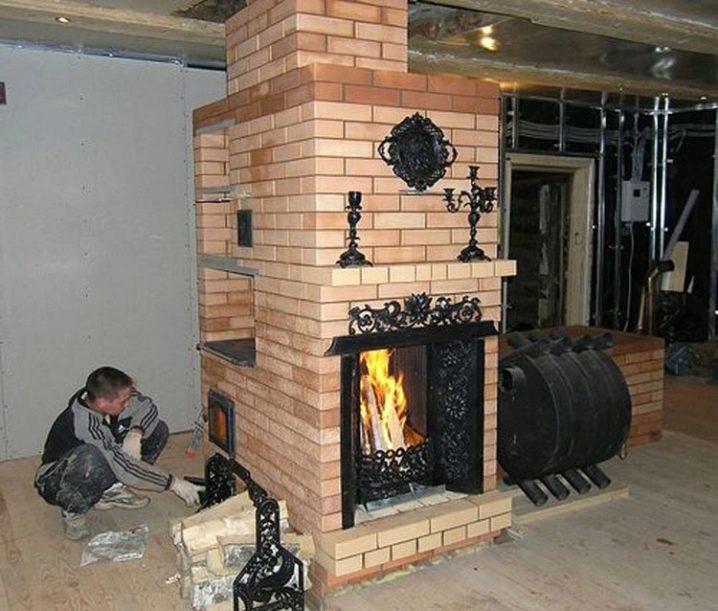
When two in one is bad
You may decide to combine two fireplaces into one chimney. In theory, this can be done, but in practice, such a solution will require compliance with many additional conditions:
- you will need to sheathe the chimney;
- choose the optimal chimney according to the design and height;
- increase the cross section in the smoke channel;
- install plugs to completely block the smoke channel;
- when kindling fireplaces, observe the order;
- adjust the draft in one and the other fireplace, which will not be so easy to do.
A simultaneous firebox with several hearths and one chimney is always a problem:
- with a chimney design;
- with roof penetrations;
- with connection options;
- with air exchange in the room;
- with economizer;
- with draft compensator and combustion support;
- with forced ventilation;
- with a side outlet, which can worsen traction and increase the formation of condensate.
There will be so many questions that it will become clear that the best solution for two fireplaces will be this: one chimney for one fireplace, and two fireplaces and chimneys will need two.
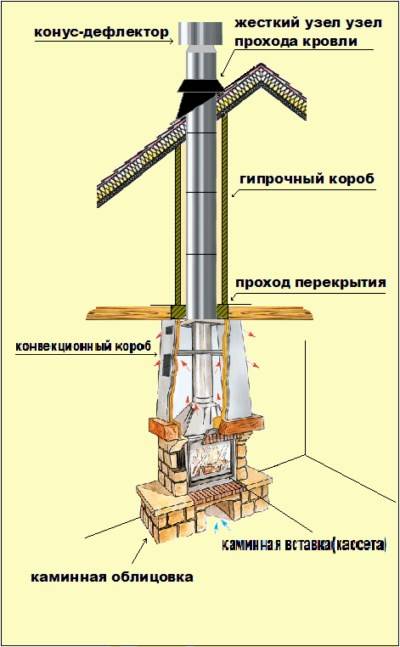
Construction types
Installation of chimneys and stoves is carried out only after choosing the type of construction:
- Built-in. It is located vertically and thus well removes combustion products to the outside. At its cost, this chimney design option is the most budgetary, simple and affordable;
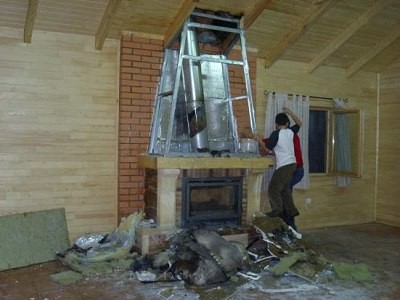
- Suspended. It is used for island stoves, which are located in the center of the room. The hood is attached to the roof ceiling, exclusively on load-bearing walls. Metal structures have the lowest weight and the best ratio of quality and cost;
- Support. Models are completely based on the hearth with a firebox. For them, the construction of an additional foundation is necessary.

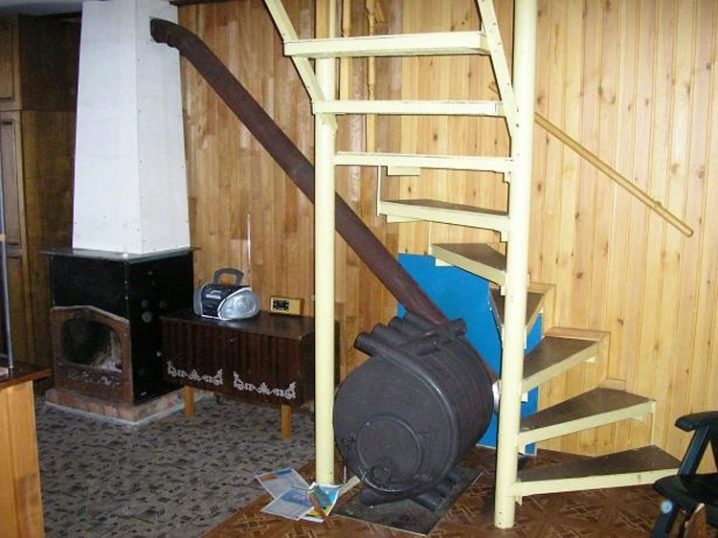
Installation of a chimney with a metal firebox
Installation of a chimney with a metal firebox
Mounting do-it-yourself chimney
Do-it-yourself chimney installation
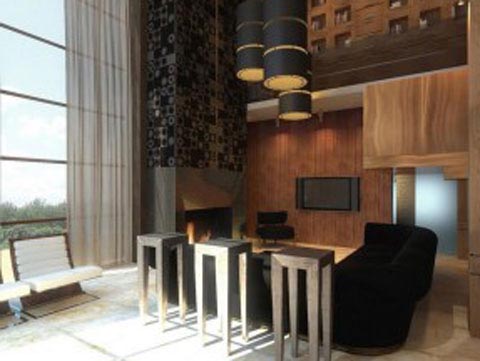
Fireplace chimney diagram
Depending on the installation method and location, the following types of fireplace schemes are distinguished:
- Embedded. They are vertical flue ducts. They are laid in the main wall during the construction of the house. They are the most economical option.
- Suspended. They can be equipped already in the finished building. Mainly used for island fireplaces. The element is attached to the load-bearing structures of the roof and ceiling slabs using cable-stayed braces and brackets. To create the effect of a "floating" chimney, it is necessary that the floor slab above the fireplace be able to withstand the weight of the structure. Therefore, preference is often given to metal models, since they have a much smaller mass in comparison with other types of similar chimneys.
- Chimneys supported by a fireplace. They are a hybrid solution, as they have similarities with both suspended and built-in structures. Such chimneys significantly make the fireplace itself heavier, and therefore it is necessary to lay an independent foundation under it.
 Depending on the materials used, chimneys can be:
- brick. For such structures, burnt solid clay bricks are used. To create a chimney, sand, clay, cement and water are also needed. Such designs are most suitable for fireplaces that run on solid fuels. Brickwork has shown to be effective at high smoke temperatures. In this case, condensation of water vapor is excluded. It is worth saying that it is very dangerous for brick chimneys to burn undried wood. The fact is that during the combustion of such firewood, condensate forms, which, mixing with soot, turns into a sticky mass that can settle on the walls of the chimney and lead to its destruction. The chimney lining must be solid. It is not recommended to lay out the chimney in parts between the ceilings. In order to protect the chimney from condensate, a metal insert made of acid-resistant steel is inserted into it.
- Steel. Chimneys are made of heat-resistant stainless steel. Such pipes are much lighter than brick ones, due to this they do not need a foundation. Thanks to this, chimneys of a similar design are much easier to install. This type of chimney is durable and resistant to corrosion. And in view of the fact that the pipes have a round cross-section, an optimal result is achieved for the extraction of combustion products.In addition, the walls of a steel chimney are less susceptible to soot deposits, and therefore the cleaning of chimney fireplaces will be less frequent, although it is still worthwhile to clean the chimney from soot regularly. The good news is that you can do the cleaning of the chimney with your own hands. Another advantage of this material is the ability to install a chimney in an already built house.
But along with the advantages, steel chimneys also have weaknesses - high cost and low self-supporting capacity. Steel chimneys can be assembled according to two types of technology: - sandwich pipe for the chimney; - hot pipes.Sandwich chimneys is a structure that consists of a round pipe with a special fire-resistant insulation layer inside. The internal insulator takes the brunt of high temperatures and aggressive substances. Such a chimney is not susceptible to fire and has a low thermal conductivity (for more details: “Do-it-yourself sandwich chimney”). hot chimneys are pipes without a layer of thermal insulation. They are suitable for laying a chimney in an existing shaft. Flexible pipes allow you to organize the removal of combustion products from the furnace without the use of rotary structures and intermediate connections (for more details: "Flexible chimney - characteristic"). The tightness and reliability of the joints is ensured through the use of special mastics.
- Ceramic. Fireclay ceramic pipes for chimneys appeared on the domestic market relatively recently. They have all the advantages of steel pipes, besides they are distinguished by high reliability and durability. The pipe consists of an inner ceramic pipe, an insulation layer, and a steel casing or light foam concrete as the outer layer.The cost of such chimneys is slightly higher than structures made of other materials. But thanks to a fairly long service life, the money spent is fully paid off.
- glass. This stuff is a bit exotic. Nevertheless, it provides low thermal inertia and a long service life. In addition, such chimneys are not susceptible to moisture and corrosion. The disadvantages of glass chimneys include the high cost and complexity of installation.


