- Step 7: Addition
- Invention history
- Vacuum cleaners with cyclone filter
- Design features
- Principle of operation
- Popular brands of cyclone vacuum cleaners
- Operating tips
- How to choose a vacuum cleaner with a cyclone filter
- Homemade cyclone from a household vacuum cleaner
- Making a cyclone filter
- Creating a retaining ring and curly insert
- Retaining ring installation
- Installing the side pipe
- Setting the top entry
- Curly insert installation
- Assembling the cyclone filter
- Recommendations
- DIY manufacturing
- What solutions are optimal for ventilation of a woodworking shop
- Do-it-yourself snail for a chip blower
- Making a cyclone from a barrel
- Staged production of the Cyclone
- Without cone
- with cone
- Simple Cyclone
Step 7: Addition
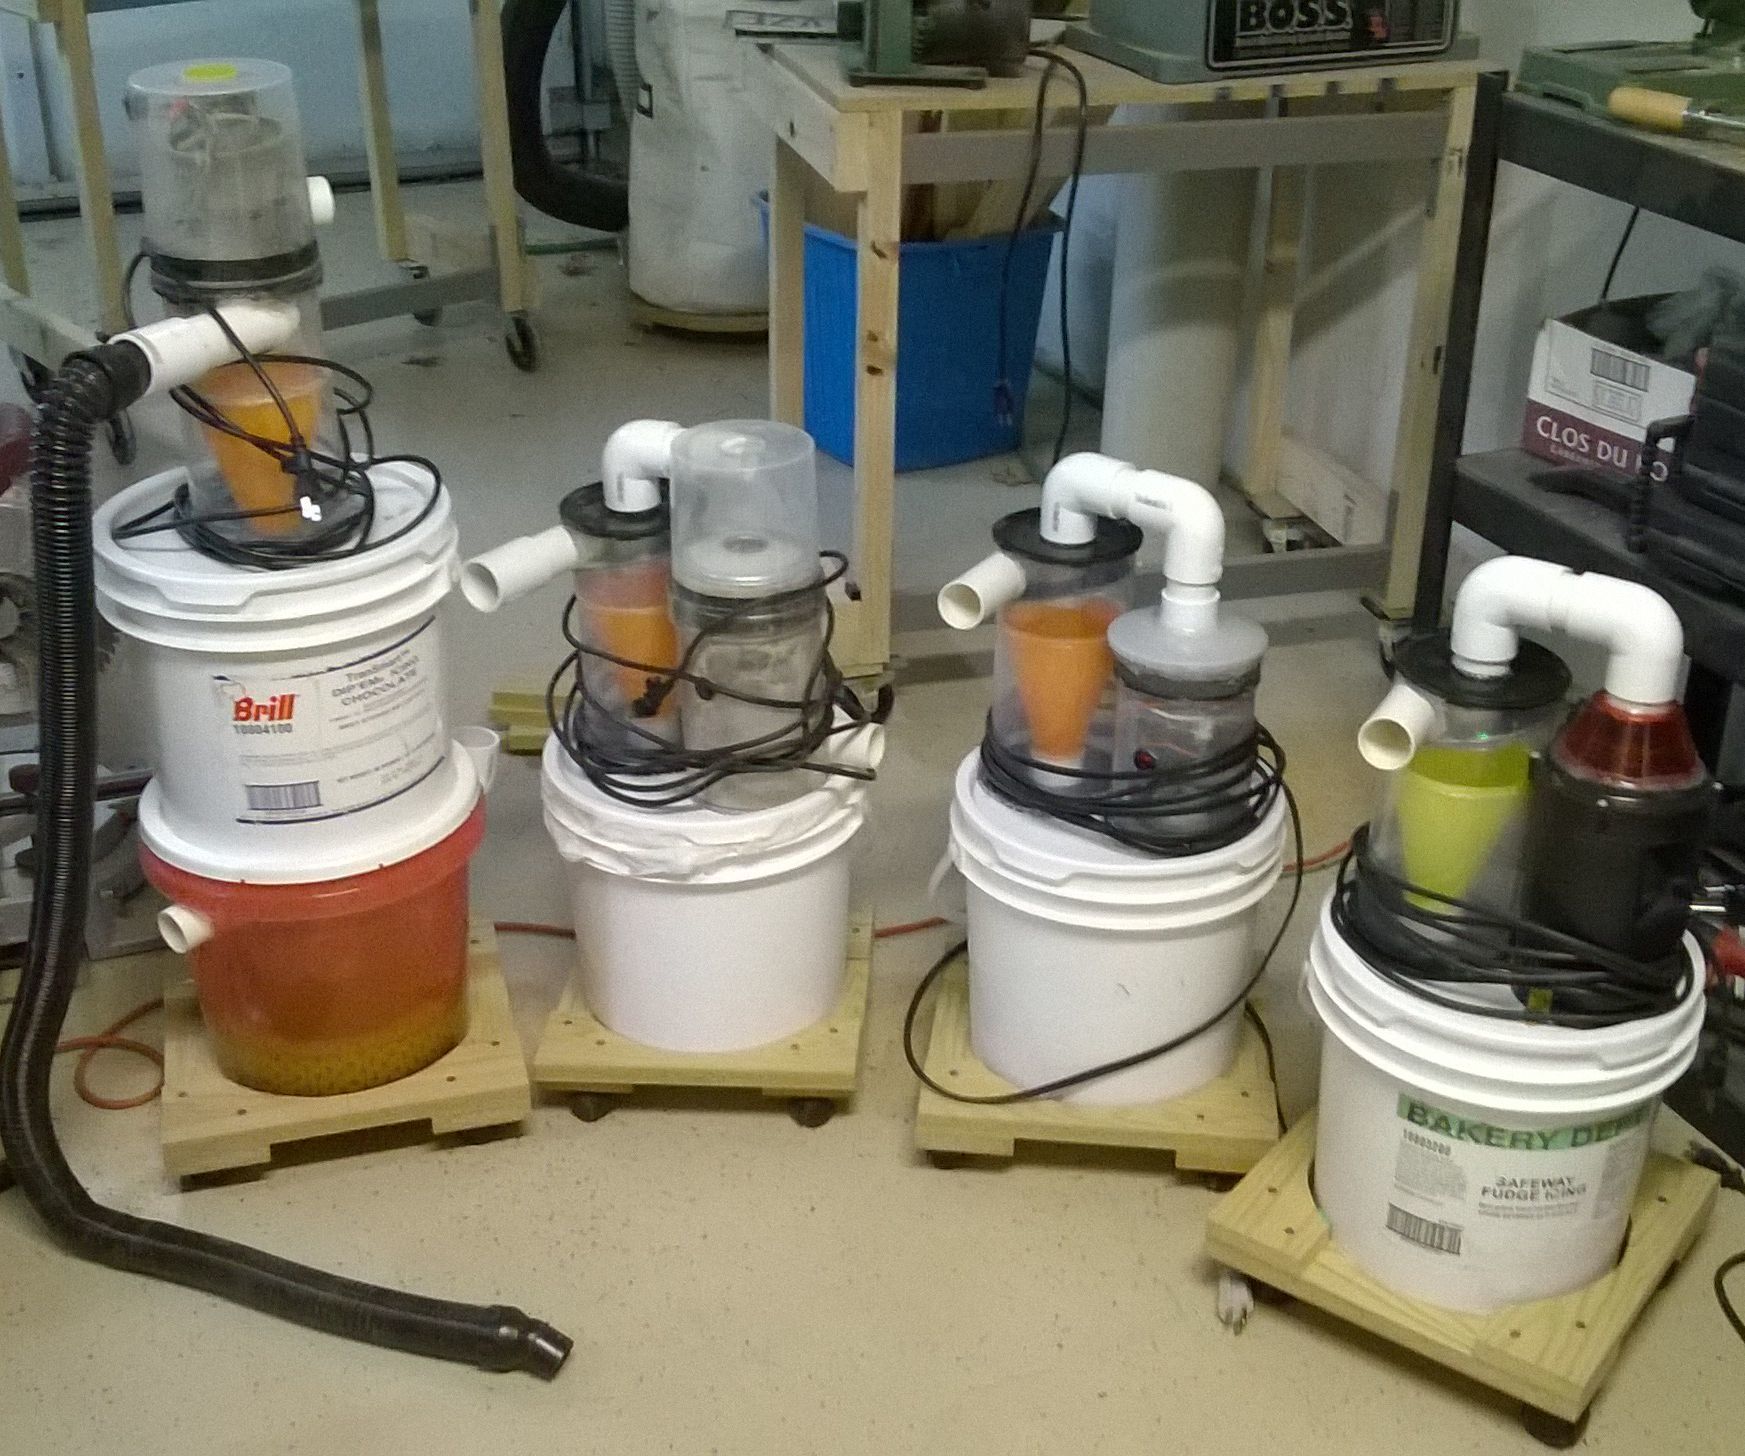
Moving a cyclone and a vacuum cleaner around the workshop is not a very easy task, so I think a rolling cart can be practical and useful.
The construction of the trolley is very simple and can only be built with plywood. There are no dimensions here, because you will have to adjust the dimensions to fit your dust container.
I will only say that the base is made of two sheets of plywood, the top of which has a hole in which a bucket sits.
You can also add Velcro to secure the vacuum cleaner and make two wooden handles on the plastic bucket so it doesn't fall when emptying the bottom bucket.
Invention history
Until recently, all vacuum cleaners included a garbage bag. However, in the late 1970s, the British engineer D. Dyson offered the world a completely different design. The engineer was not happy with how quickly vacuum cleaner bags clogged and their suction power dropped. Not finding a suitable option among the cleaners existing at that time, he developed his own copy of the technique.
It was a new type of vacuum cleaner - cyclone. Dyson took the principle of air purifiers as the basis of his invention. In them, the flow twists inside in a spiral, increasing the speed in the area of the narrowing of the collector. For 15 years of work, the engineer created 5127 prototypes of a modern vacuum cleaner. Only in 1986 the Japanese company Apex Inc. undertook the production of one of the Dyson models. He was given the name G-Force.
In 1993, the engineer opened his research center, where he continued to improve his technology. Here he managed to create a device that could collect even fine dust. The Dyson vacuum cleaner, whose price is still at a fairly high level today, is one of the best options for such equipment.
Almost every modern company in this industry uses this technology. But each of them has its own unique engineering solutions, improvements.
Vacuum cleaners with cyclone filter
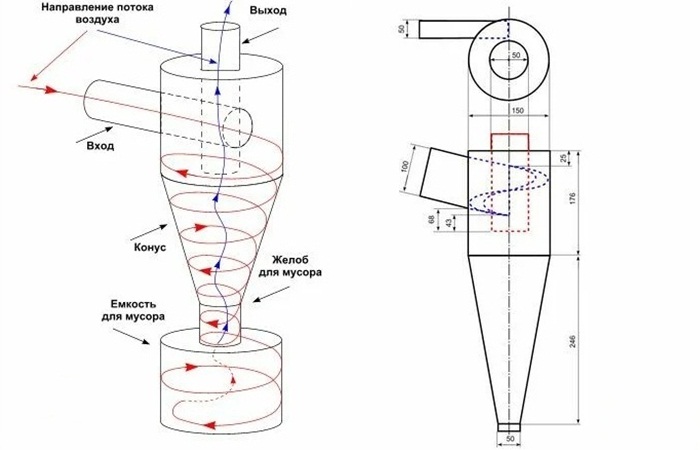
The difference between the cyclone filter and the others is the suction system and the method of processing debris. In appearance, this is an ordinary cylinder with a filter, but the procedure for drawing in and swirling the flow goes through several stages.
Design features
Under the action of centrifugal force, debris is separated from the air, which prevents its penetration back into the room with the exhaust. The flask where the swirling process takes place usually consists of transparent plastic, so you can see not only the clogging, but also the operation of the cyclone.
Principle of operation
Air with debris is drawn into the side opening of the filter by a vacuum cleaner, thereby creating a centrifuge. With a spiral swirl, the debris is separated from the main stream and leans against the walls of the container. Dust microparticles swirl longer, and may even remain in the stream. To filter it, another filter is already installed in the form of foam rubber or fabric. Multi-level cleaning requires high power, so when buying a vacuum cleaner, consider this parameter in the first place.
Popular brands of cyclone vacuum cleaners
The most popular brands of vacuum cleaners with different types of designs:
- Dyson. The brand produces mainly vertical cordless vacuum cleaners. The main difference from analogues lies in the universal and in-depth air purification, which practically does not allow dust microparticles to pass through.
- Samsung. The famous brand is popular among fans of horizontal vacuum cleaners. The company regularly develops unique technologies that improve the quality and convenience of home cleaning. Of the latter, the Anti-Tangle function can be distinguished, which significantly increases engine speed. Accordingly, the swirl speed also changes and does not allow long debris to wrap around the filter.
- Xiaomi. The Chinese brand is famous for its robotic vacuum cleaners, which are extensive with a wide variety of functions. Despite the small design, the vacuum cleaner has a high power.However, a small dust container gets clogged fairly quickly.
Operating tips
Caring for the cyclone filter is quite simple - disconnect the structure from the vacuum cleaner and open it. Empty the debris and put the filter back in. Unlike the aqua function, the container does not need to be rinsed with water, however, if necessary, it can be wiped with a wet sponge and soap or detergent. The main condition is to dry the filter before cleaning, since dust residues can accumulate in a single mass and block the free passage of air, which can lead to damage to the device.
How to choose a vacuum cleaner with a cyclone filter
On the market you can find a wide variety of brands with a huge list of functions, but not all of them will be in demand during operation. Choose a vacuum cleaner only among the brands that have already proven themselves, as cheap devices with great functionality may not correspond to reality and quickly fail.
You also need to decide on the type of vacuum cleaner. If cleaning will be done in one or more rooms with little accumulation of debris, buy a vertical design with a power cord or battery. The cyclone filter in them works quite efficiently, while being easily removed and cleaned.
For large rooms and cleaning companies, it is recommended to choose among horizontal vacuum cleaners, as they have more power and a capacitive dust collector. The centrifuge in this case works faster, which allows you to clean the surface of dust efficiently.
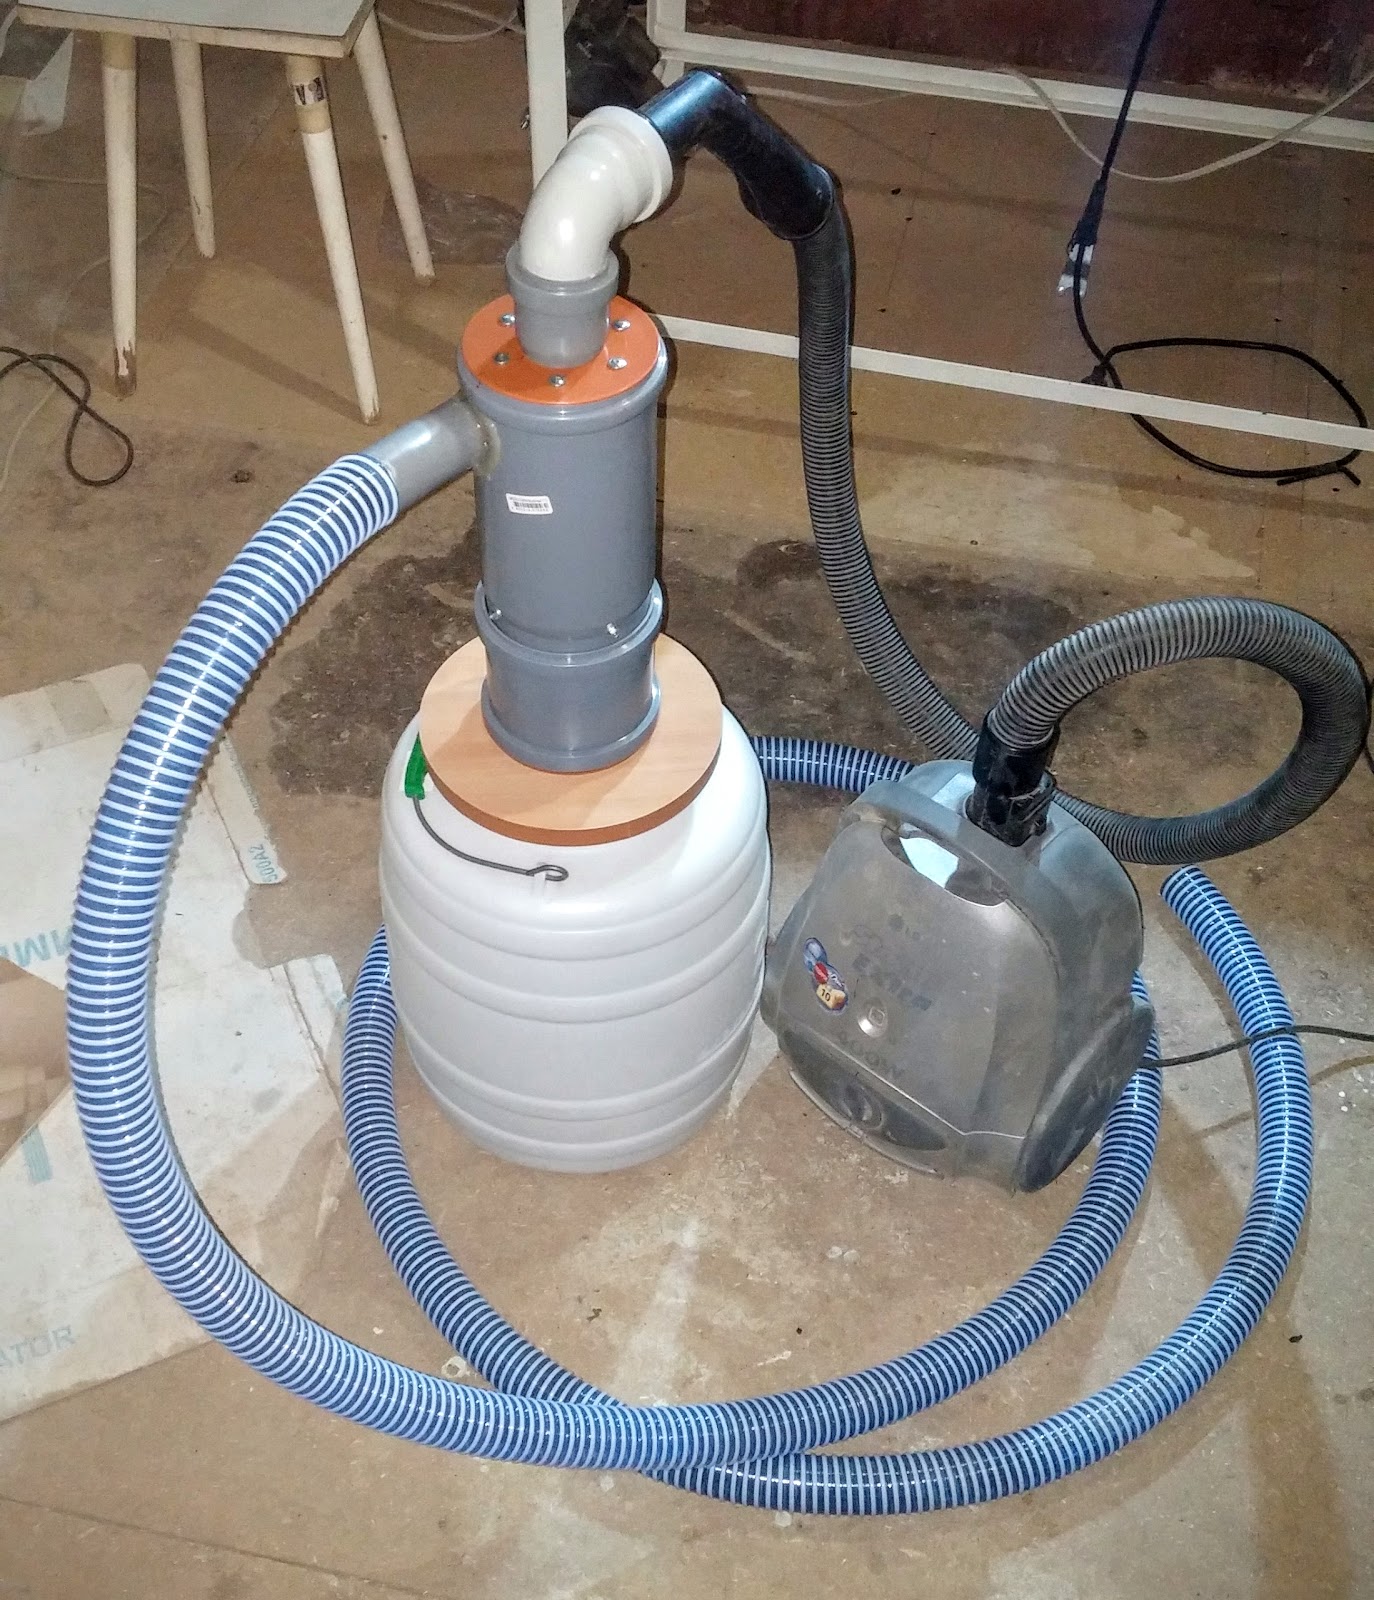
Homemade cyclone from a household vacuum cleaner
The first method has been presented on the Internet and on YouTube for quite some time. You can easily find many videos with similar homemade cyclones.
However, they cause quite legitimate questions and skepticism among professional builders. Therefore, you should immediately make a reservation that they are mostly suitable for cleaning wood chips.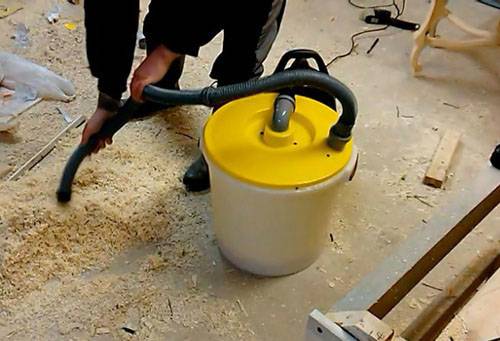
But it is better not to work with cement dust with such devices. Under it, the second option is more “imprisoned”.
The main "trick" that will allow you to calmly suck in kilograms of garbage, wood, metal filings and at the same time not worry about the frequent change of filter bags, is a home-made "separator".
It will then need to be constructed from several components. For the entire assembly you will need:
conventional vacuum cleaner
thick plastic bucket with lid
A bucket of Shitrok putty is best here. It is harder to flatten it with a vacuum.


plastic sewer pipe d-40mm
polypropylene sewer outlet at 90 degrees with a diameter of 40mm
crown 40mm or stationery knife
First of all, drill or carefully cut a through hole for the tube in the center of the bucket lid.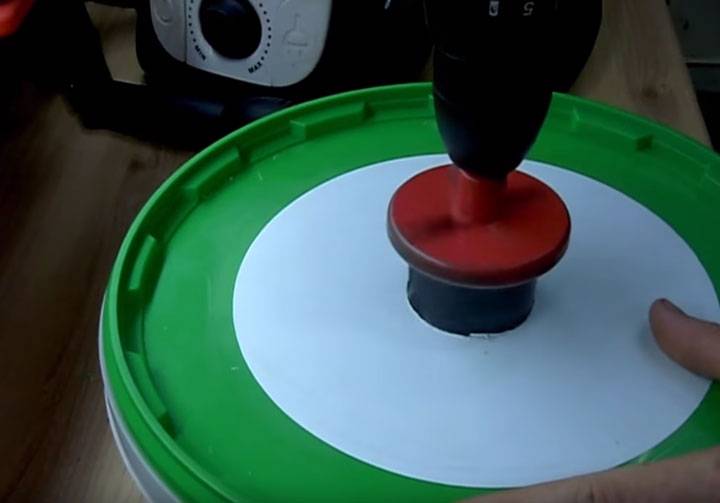
Mark the second hole closer to the edges of the cover, where the stiffener is.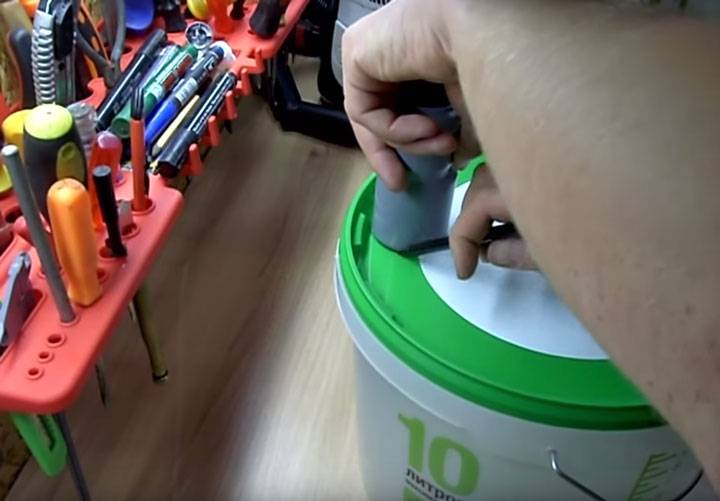
If you do not have a special crown, then first pierce the intended circle with an awl and carefully cut it with a clerical knife.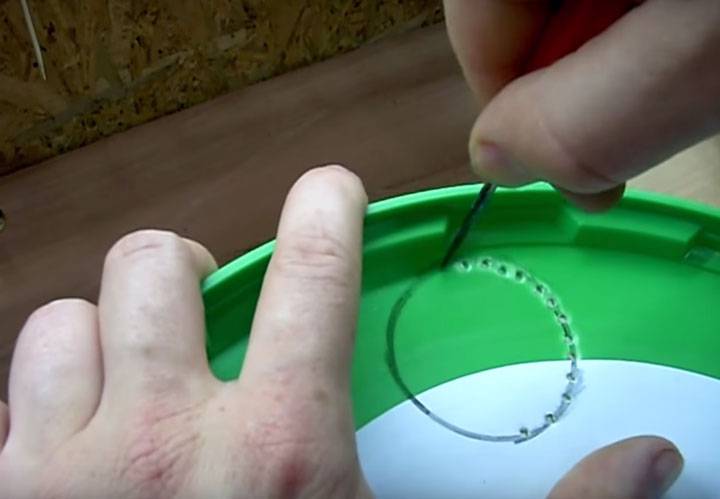
The edges will be uneven, but they can be processed with a round file.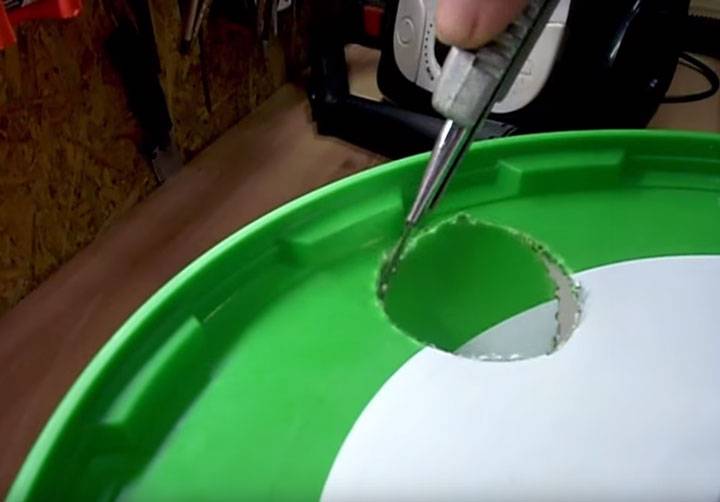
Two sewer outlets are inserted into these holes. So that they hold securely and there is no additional air leakage, it is better to glue them.
To do this, first sand the edges of the tube with sandpaper or a file to create a rough surface.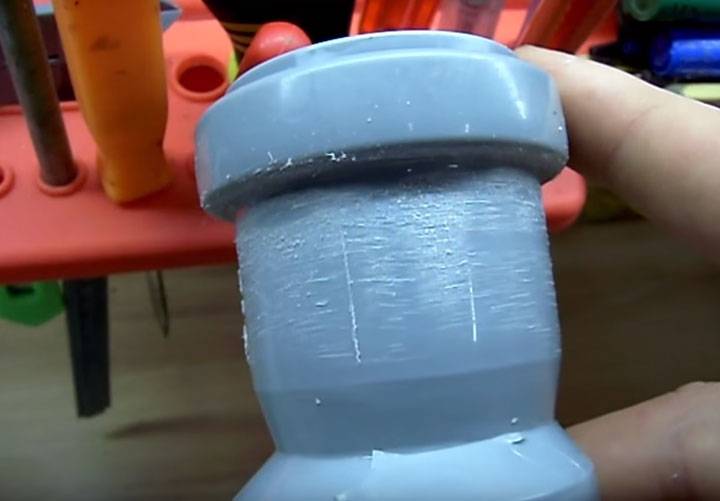
Do the same operation with the lid.
After that, insert the tube inside the cover and apply a thick layer of glue with a thermal gun.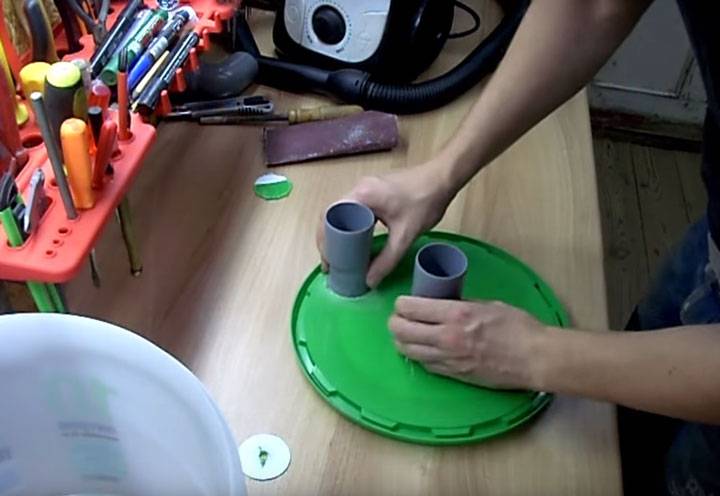
Don't feel sorry for Clay. This will help create good tightness in these places and tightly close all the cracks.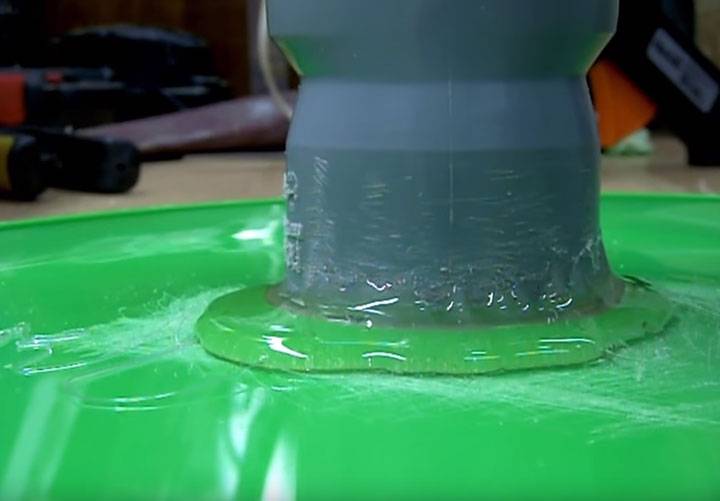
There is really another option in which you can do without glue and fan pipes at all. To do this, purchase rubber adapters from Leroy Merlin.
They come in different diameters. Choose according to your hose size.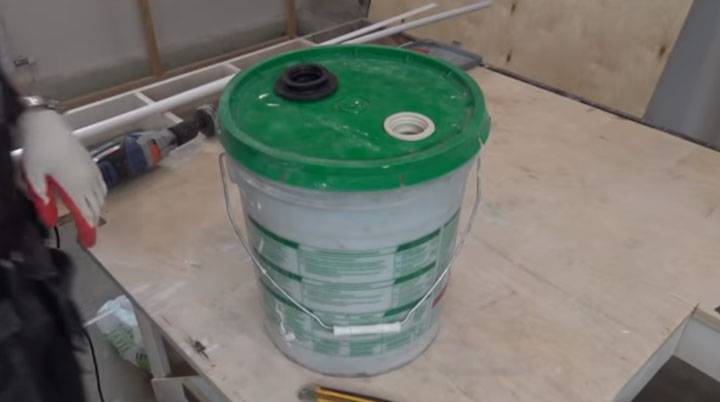
For example, a tube from a 35mm hose is tightly inserted into a 40/32 coupling. But in a 40mm pipe it will hang out. We'll have to wind up something and collective farm.
On the tube that is located on the edge of the cover, put on a sewer outlet at 90 degrees.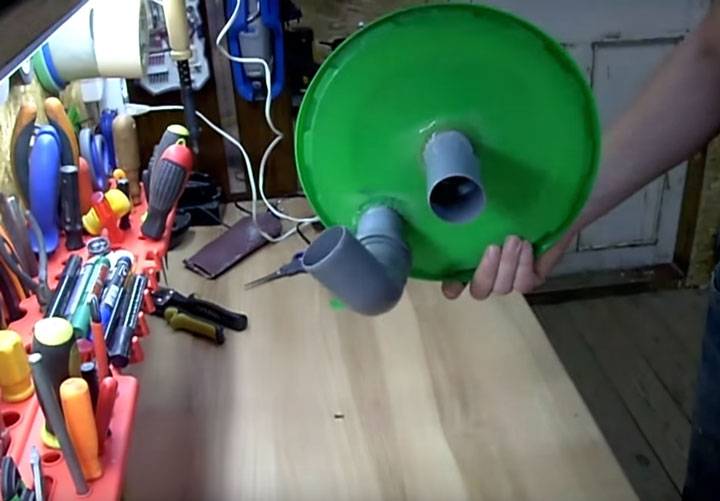
On this, the design of the separator can be said to be almost ready. Install the lid with taps on the bucket.
The air intake hose from the vacuum cleaner is inserted into the central hole.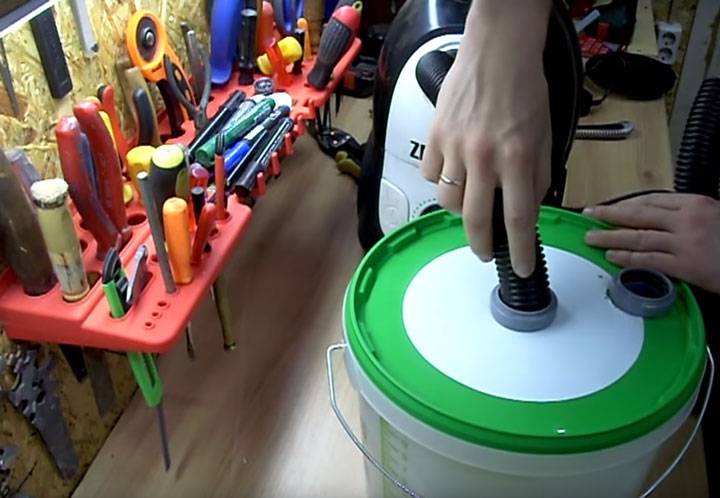
And the piece with which you will collect all the garbage and dust is stuck into the corner joint.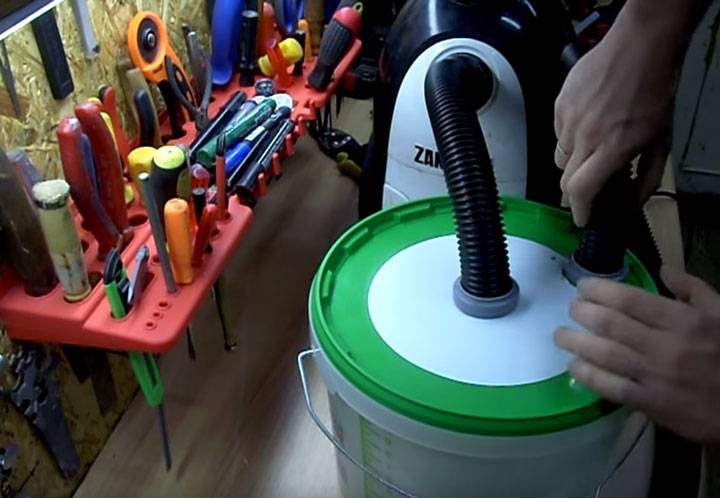
It is desirable that o-rings be present in the tubes according to the size of the corrugated hoses of the vacuum cleaner.
This completes the entire assembly. You can plug the vacuum cleaner into the network and use it.

The principle of operation here is the following. Coarse dust sucked into the container falls to the bottom of the container. At the same time, it does not fall into the zone where the air is pumped out directly.
Three factors help in this matter:
gravity
friction
centrifugal force
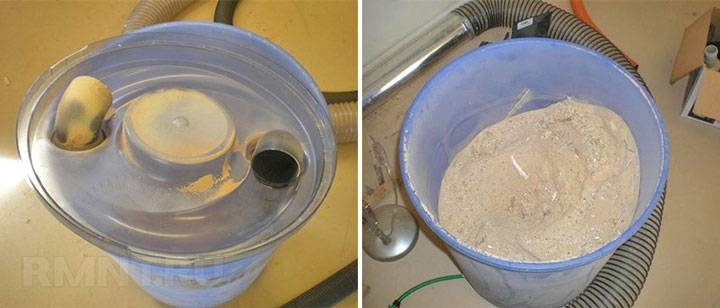
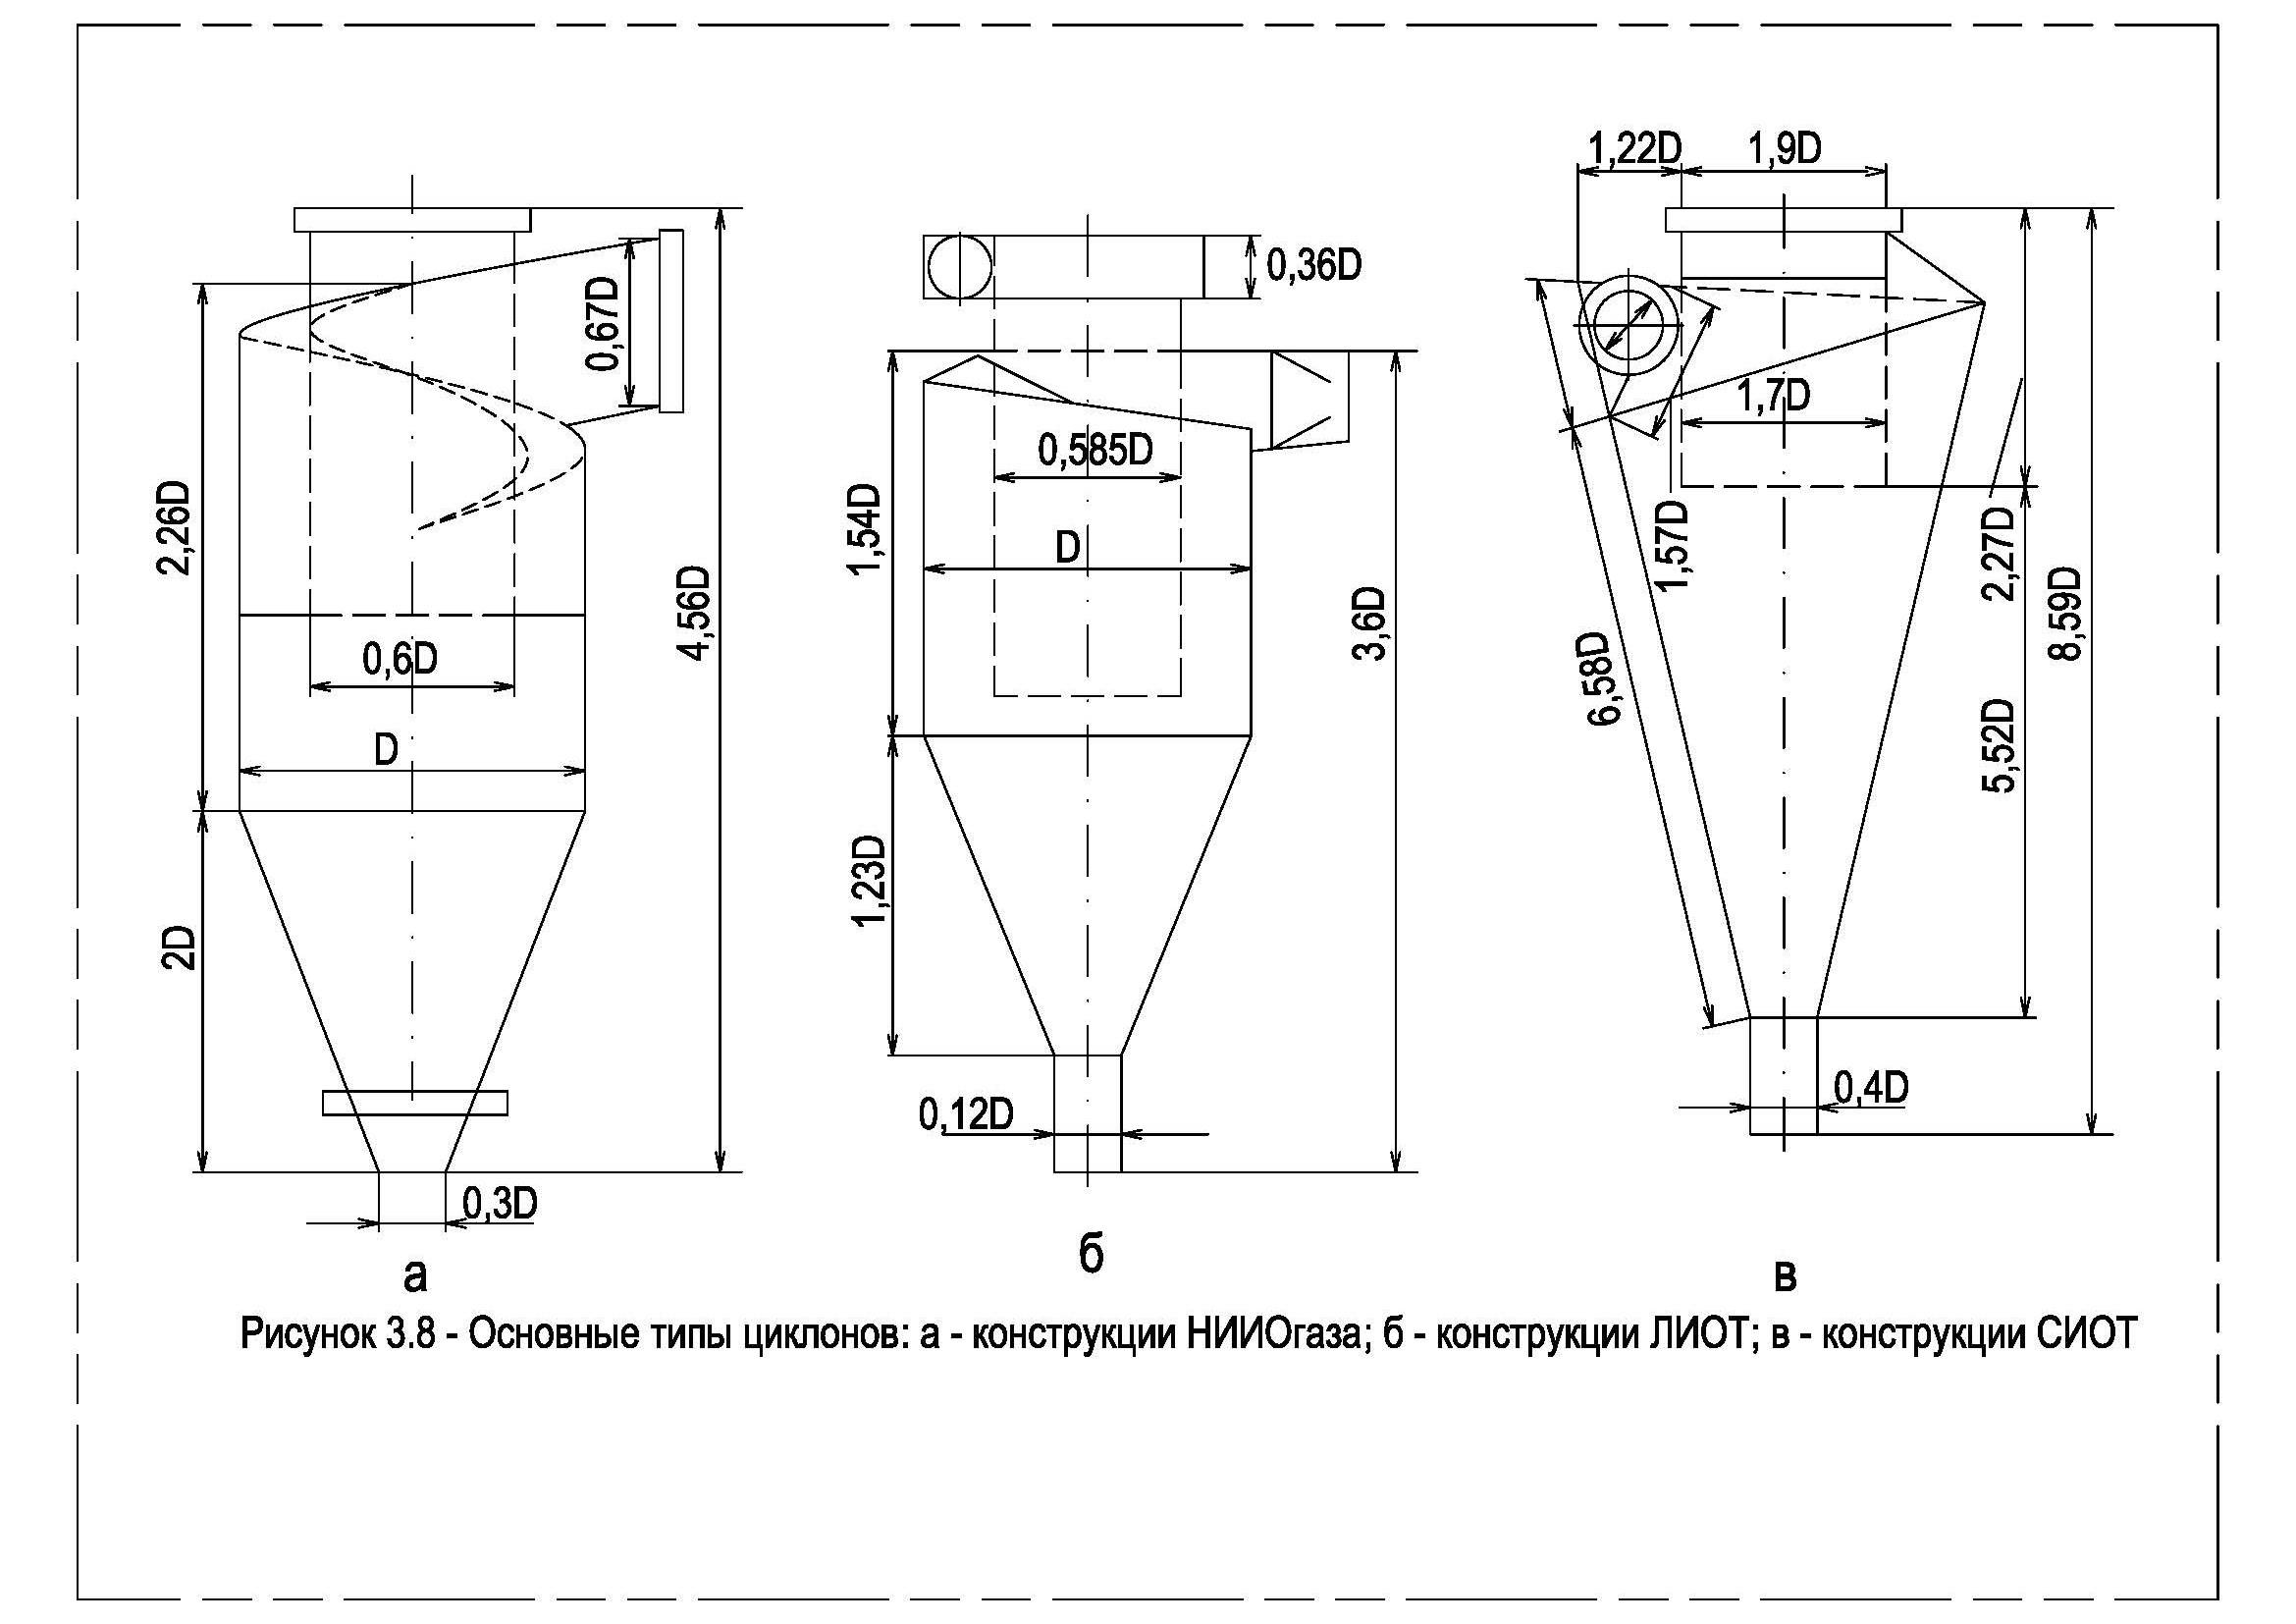
Typically, such a cyclone on factory designs has the shape of a cone, but cylindrical specimens also often do a good job with this task.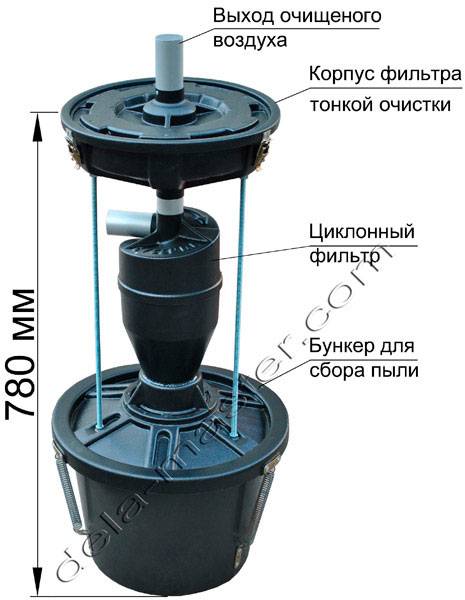
True, the higher the bucket, the better the installation will work. Much here depends on the correct pairing of the design of the container and the power of the vacuum cleaner.Here is a plate from Chinese cyclones on the correct selection of the diameter of the hoses and the power of the units.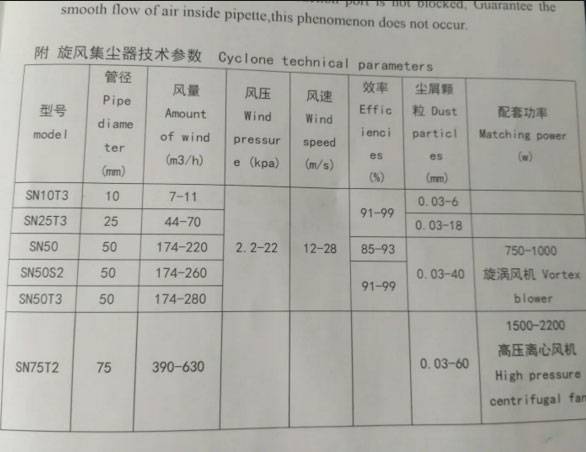


In cylindrical buckets, the tangential air flow enters not through a curved side wall, but through a flat lid. It is much easier to assemble such a device.
Also, if you have several buckets, you can use them one by one. Just take the cover off one and put it on the other. And this is even easier to do than in bulky cyclones.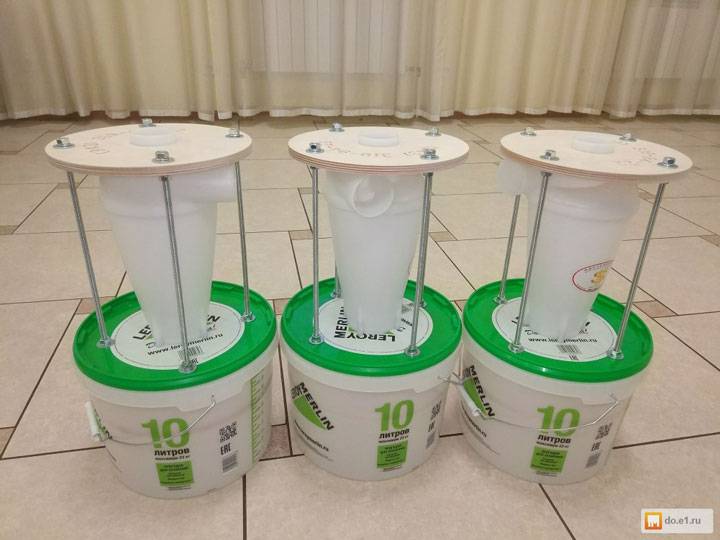
Further, at the very end of the work, simply take out the filled containers at once. This is a great time saver.
If you have a powerful vacuum cleaner, instead of a plastic emulsion paint bucket, it is better to use a metal tank of the same shape. Otherwise, the bucket will collapse and flatten it.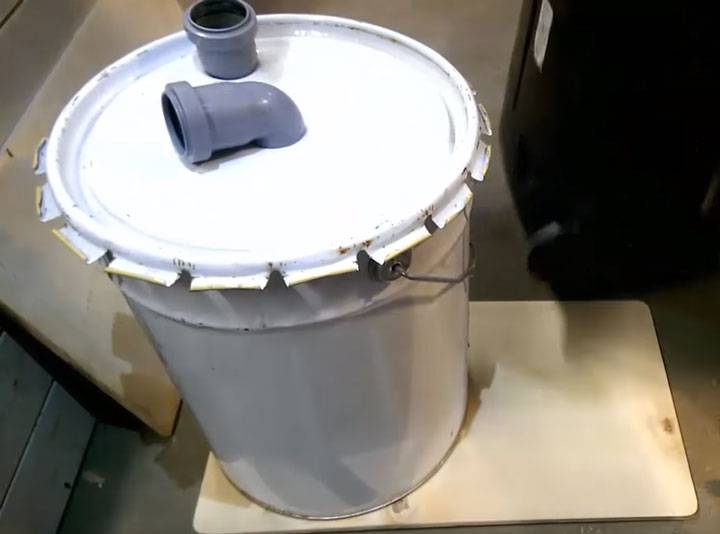
The power regulator comes to the rescue in this case. If it is of course present in your model.
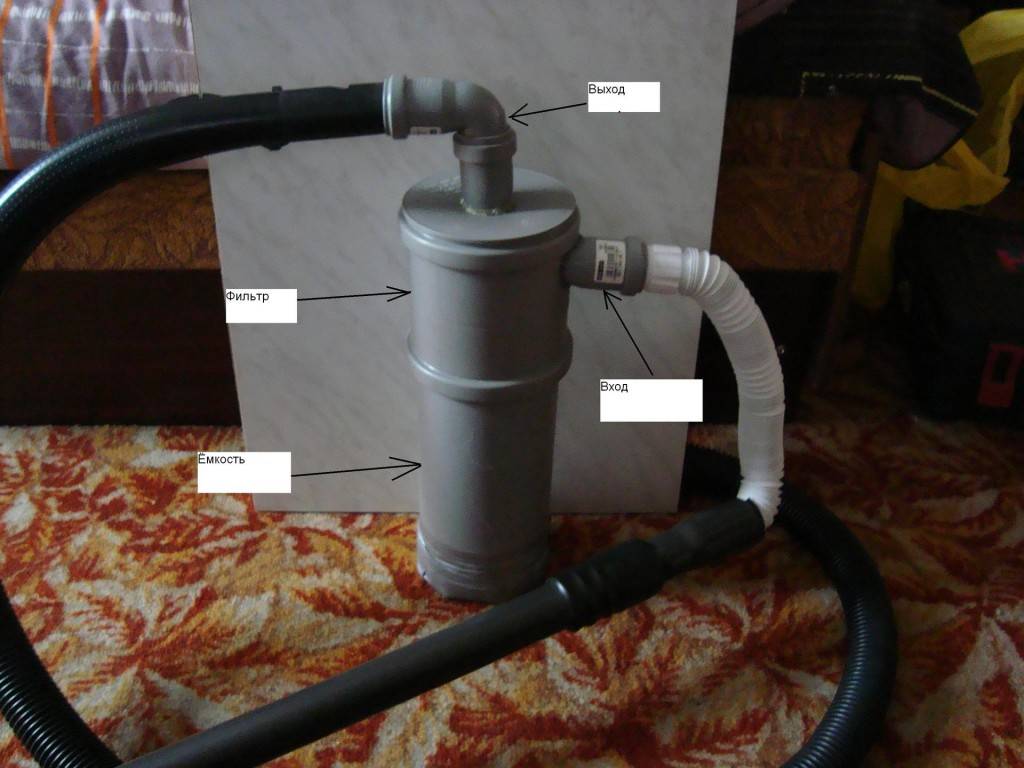
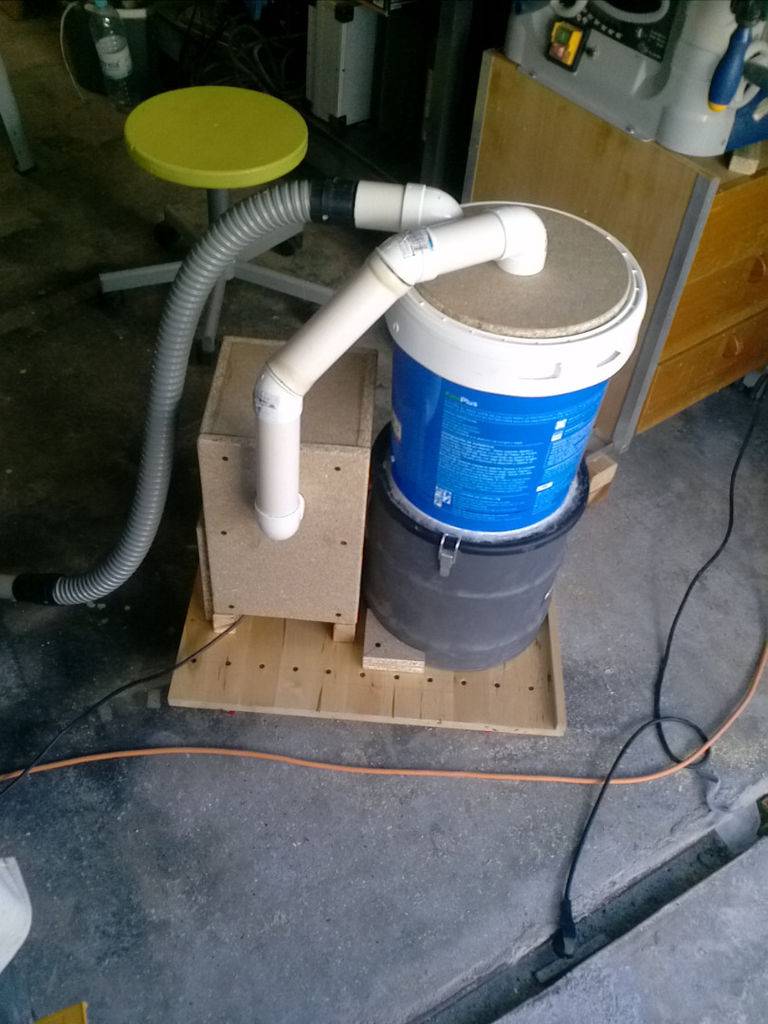
Making a cyclone filter
Creating a homemade chip blower consists of a number of steps:
- Creating a retaining ring and curly insert
- Retaining ring installation
- Installing the side pipe
- Setting the top entry
- Curly insert installation
- Assembling the cyclone filter
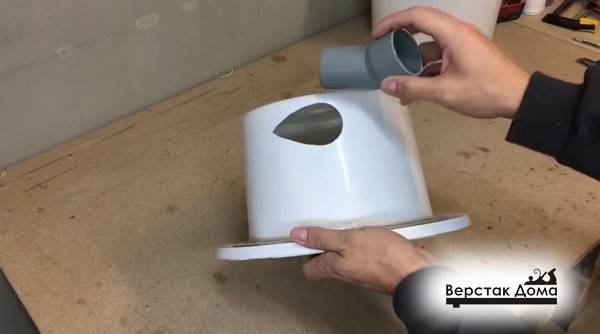
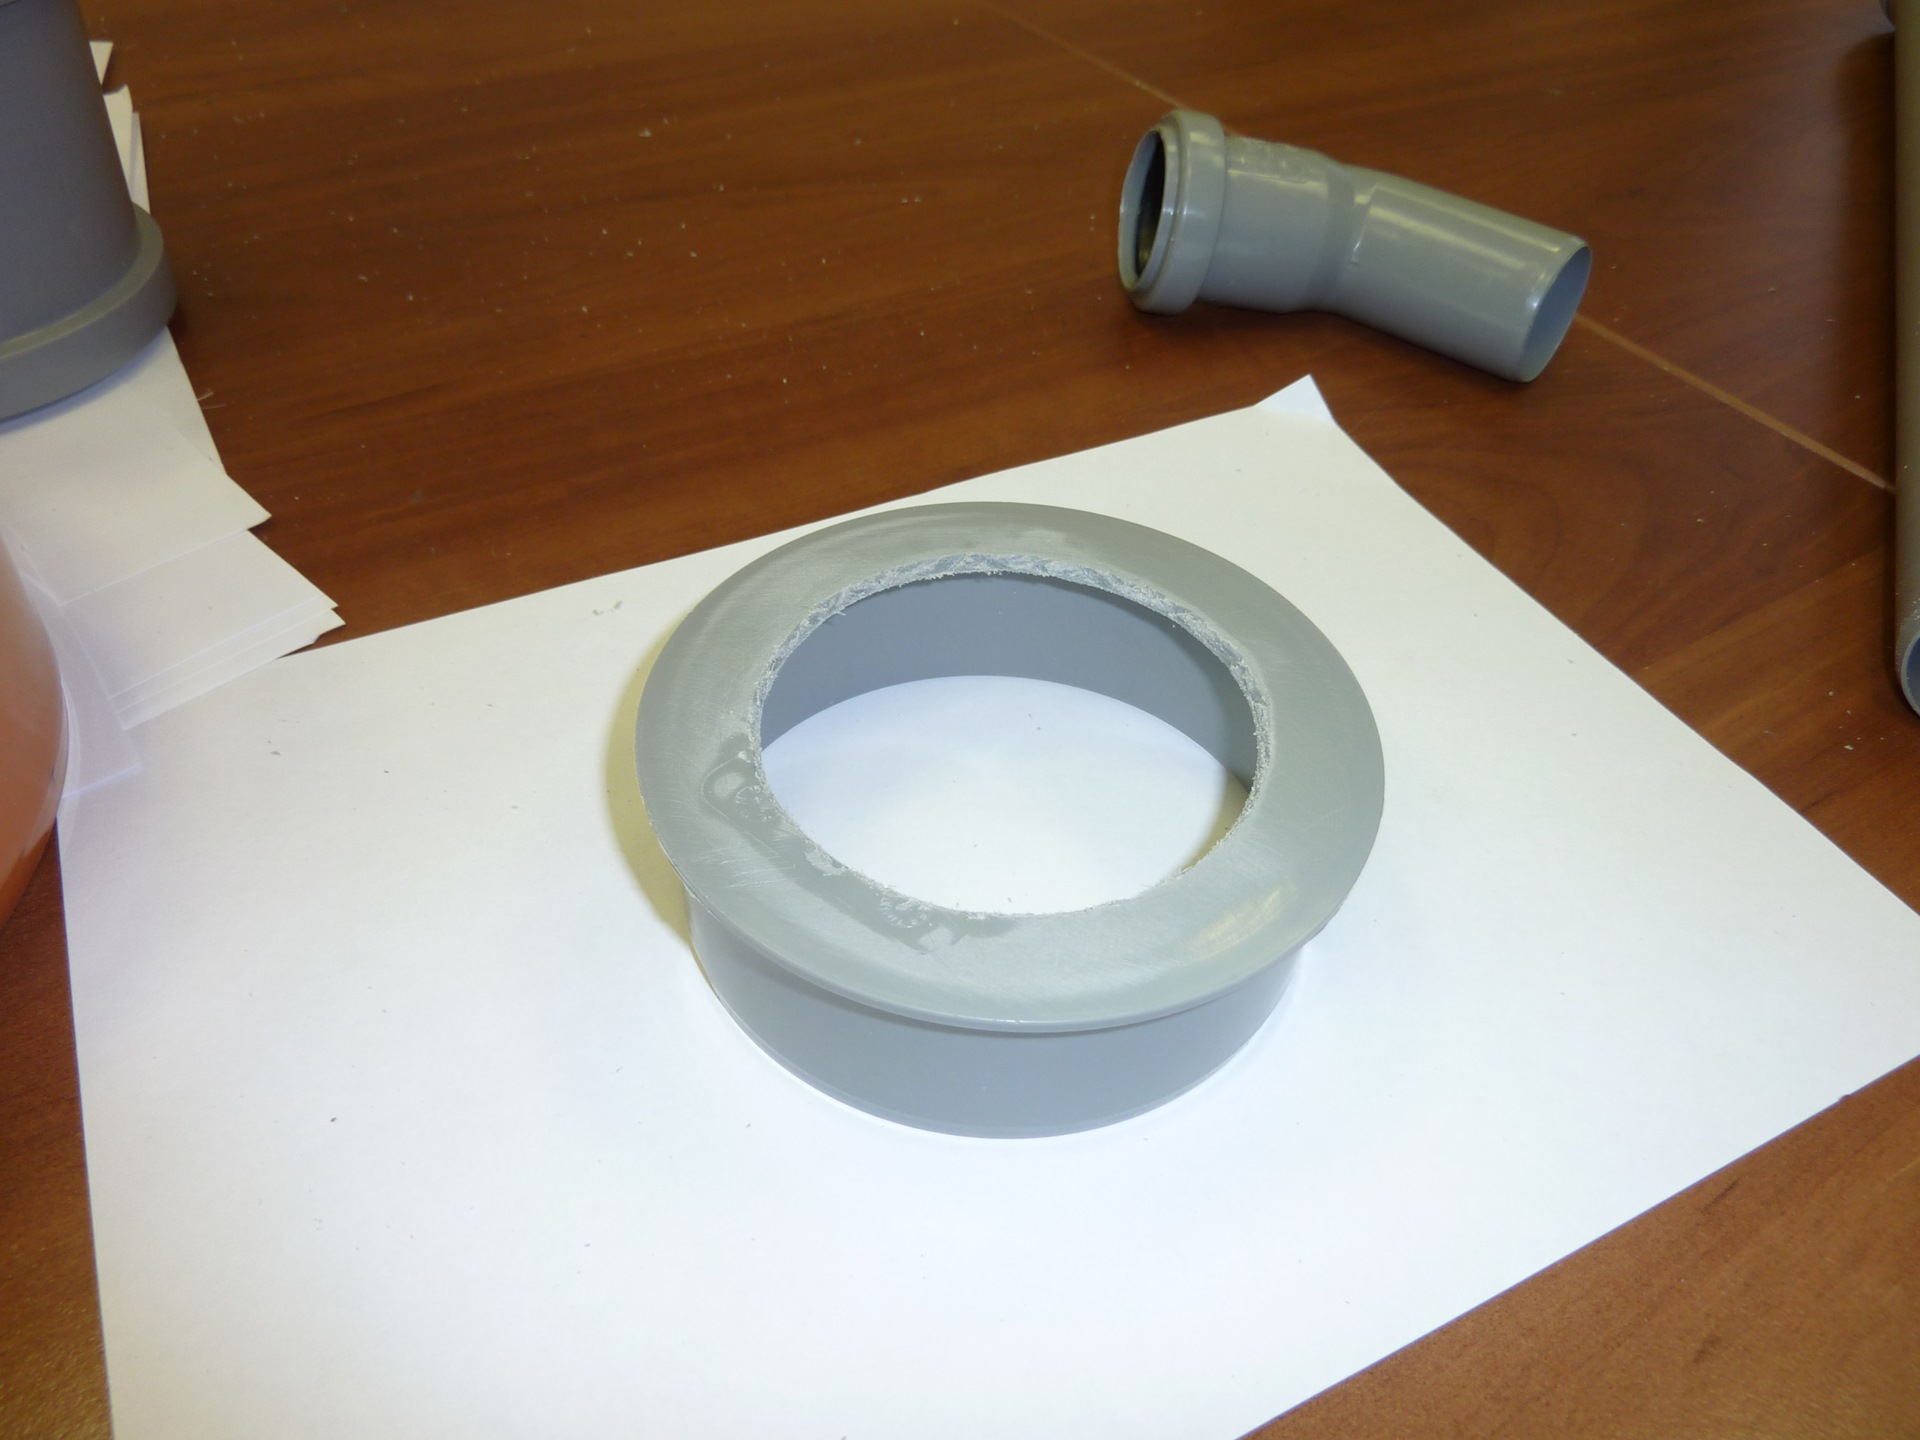
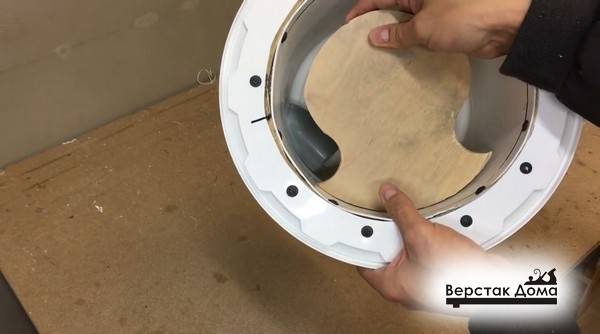
Creating a retaining ring and curly insert
It is necessary to cut off the side of the small bucket, which is used to attach the lid. As a result, you should get such a cylinder (well, a little on a cone).
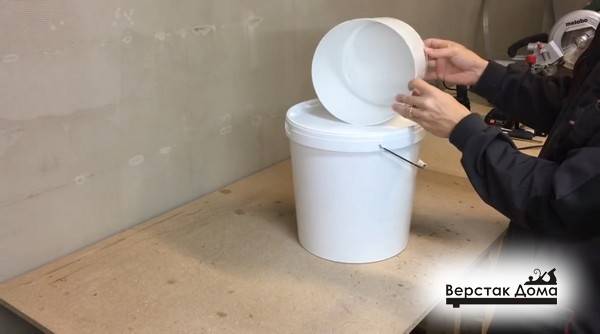
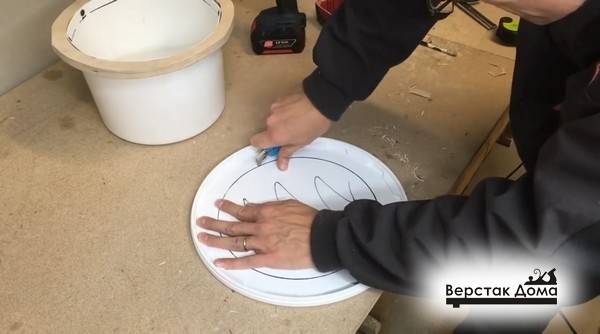
We make markings - we put a small bucket on plywood and draw a line along the edge - we get a circle.
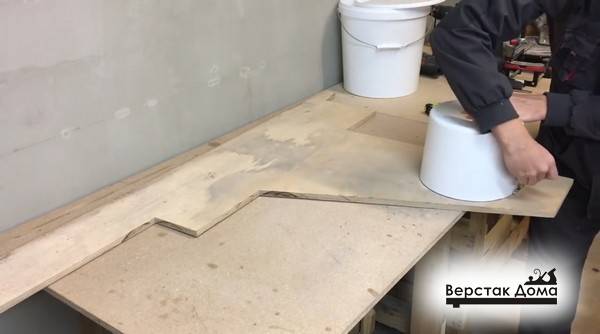
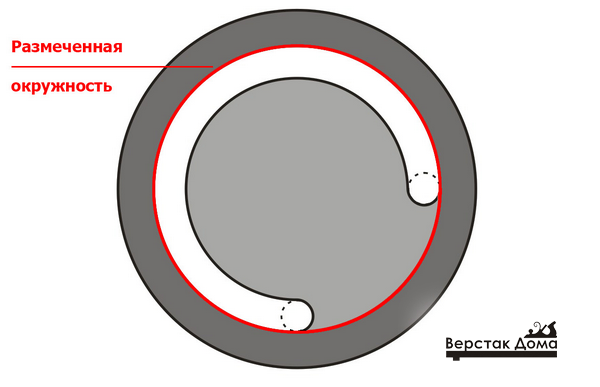
Then we determine the center of this circle (see the school geometry course) and mark out another circle, the radius of which is 30 mm larger than the existing one. Then we mark the ring and the curly insert, as shown in the figure.
Markup is best done accurately or, at worst, “by eye”.
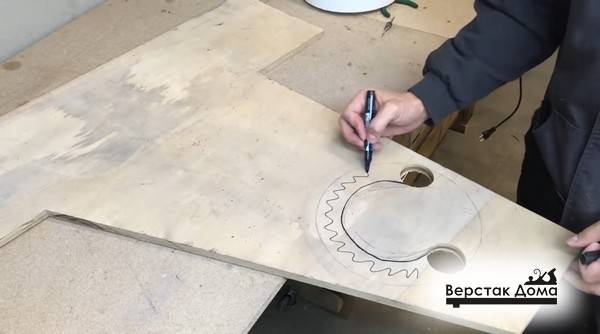
We cut out the resulting parts with an electric jigsaw.
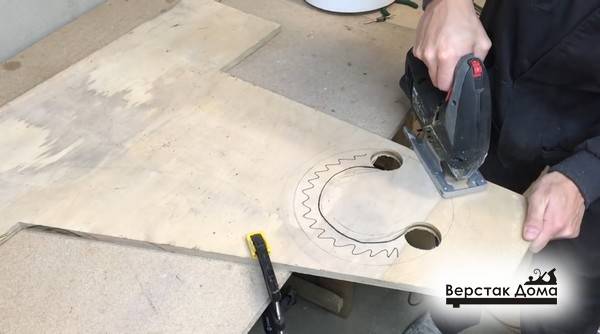
As a result, two blanks should be obtained - a fixing ring and a curly insert.

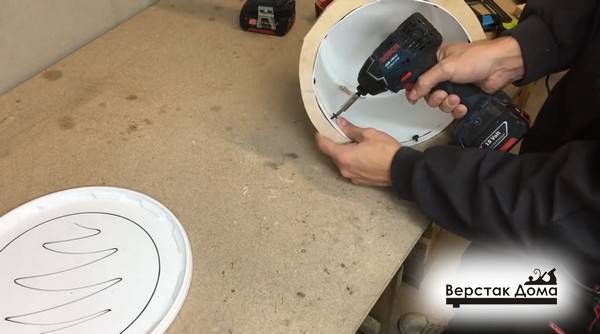
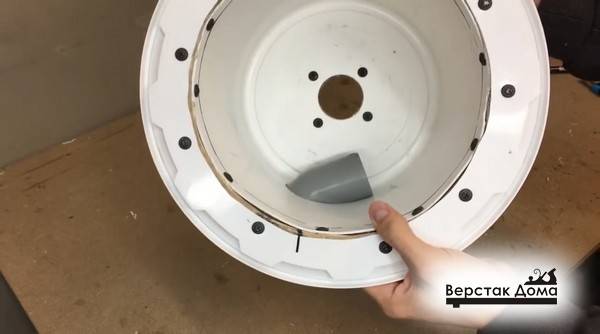
Retaining ring installation
We fix the ring on the edge of the small bucket so that we get a rim. Fastening is done with self-tapping screws. It is advisable to pre-drill the holes so as not to split the plywood.
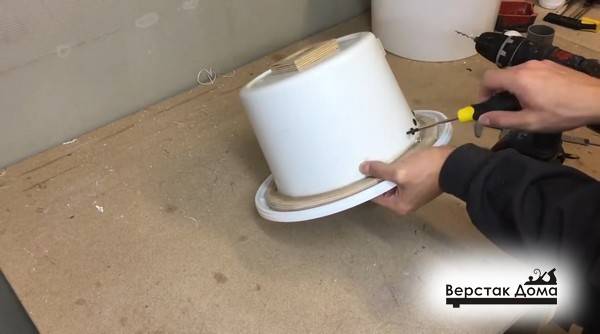
We mark the roof of a large bucket. For marking, you need to put the bucket itself on the lid of a large bucket and circle its outline. Marking is best done with a felt-tip pen, as the trace is clearly visible.
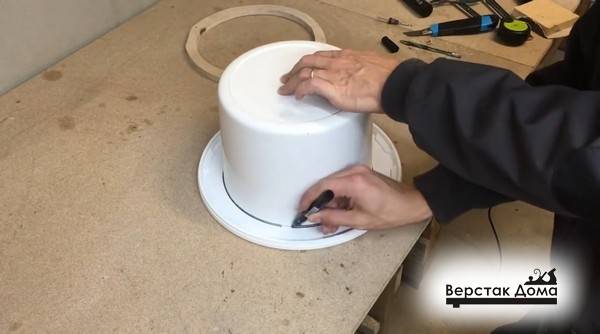
And cut with a knife.
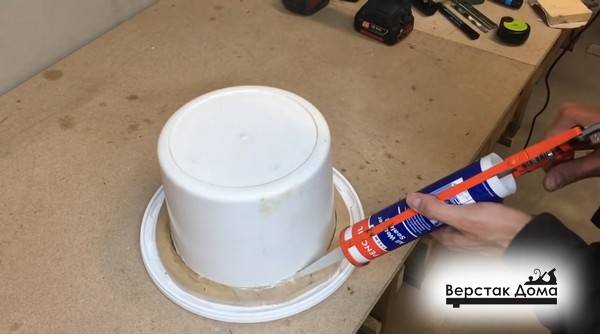
We install the cut-out cover on the side of the small bucket and fix it with self-tapping screws.
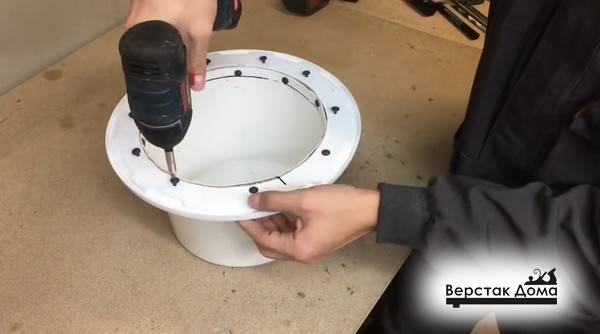
It is important to note that all connections must be tight, respectively, before installing the cover, the connection point must be smeared with sealant. You also need to smear the junction of the wooden ring and the small bucket
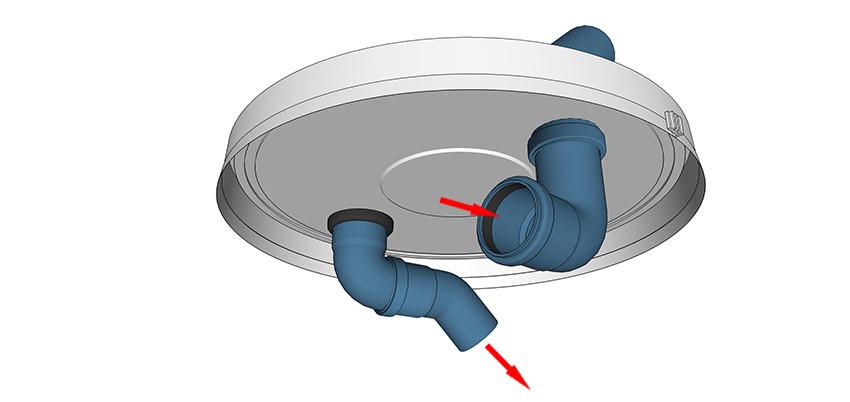
Installing the side pipe
The side pipe is made from a sewer outlet of 30 degrees (or 45 degrees). To install it, you need to drill a hole in the top of the small bucket with a crown.
Note that the bottom of the small bucket is now the top.
After the hole is drilled, you need to give it a teardrop shape with a knife for a tighter fit of the pipe.
We put the pipe on the sealant and fix it with a self-tapping screw.
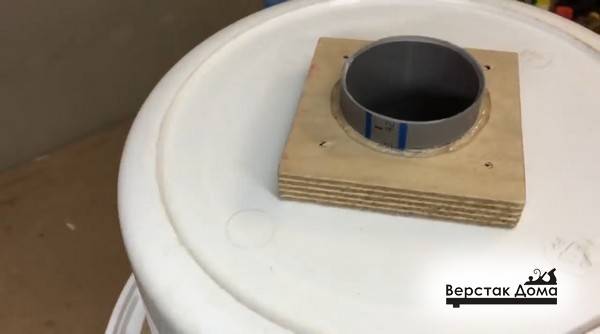
Setting the top entry
To make the top entry, you need to drill a hole in the upper part of the chip cutter (small bucket), that is, in the center of the former bottom.
For a strong fixation of the inlet pipe, it is necessary to use an additional strength element in the form of a square blank made of plywood 20 mm thick with a central hole for a 50 mm pipe.
This workpiece is fastened from below with four self-tapping screws. Before installation, for tightness, the joint must be smeared with sealant.


We install the upper pipe without additional fastening - just on the sealant.
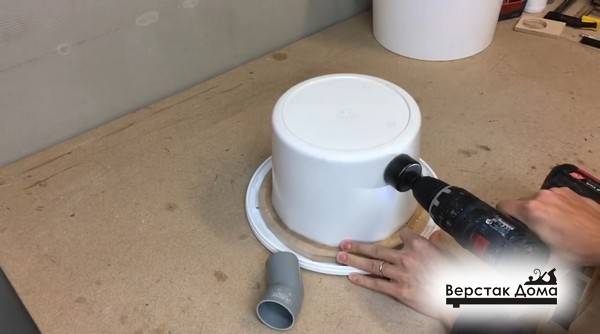
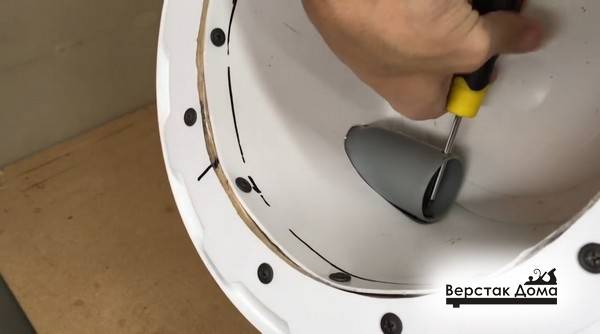
Curly insert installation
The shaped insert is a very important component of a homemade chip blower, it must be fixed inside the cyclone filter, as shown in the photo.
Fastening is carried out using self-tapping screws through the outer wall of the cyclone.
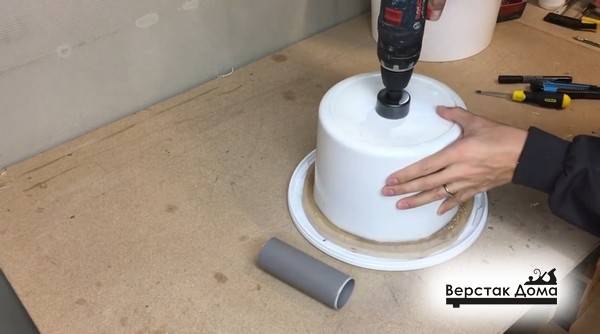
Assembling the cyclone filter
The assembly is extremely simple - you just need to put the resulting design on a large bucket. The final height of the product is 520 mm.
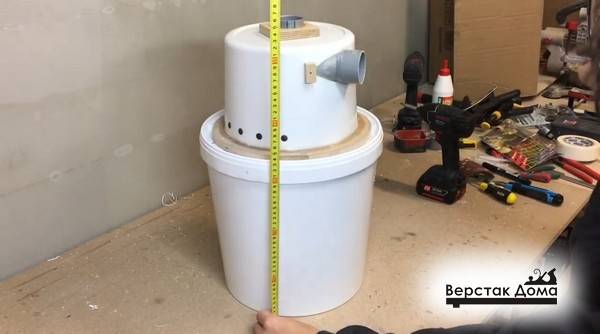
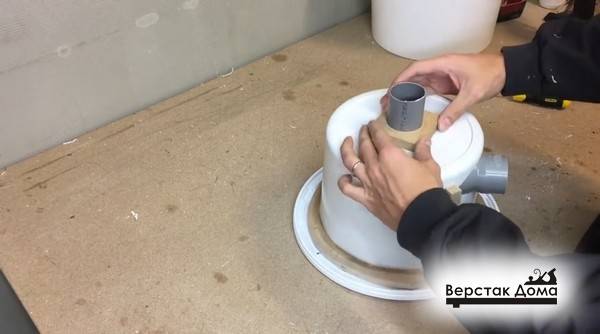
Then you need to connect the air ducts correctly:
- Upper nozzle - to a household vacuum cleaner
- Angled elbow entering from the side at an angle - to the hose.
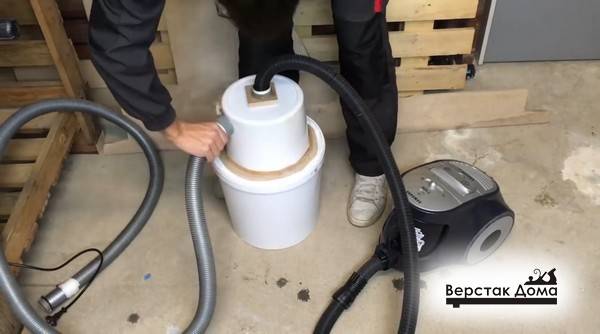
Homemade cyclone vacuum cleaner (chip blower) is ready.
Recommendations
Before creating the Cyclone, you need to take into account a few important tips so that the result is a reliable and powerful product:
- To optimize the operation of the vacuum cleaner, two hoses must be connected at once: for blowing and suction.
- The tightness of the container must be checked regularly. If a bucket with microcracks is used, the filter will have to be completely redone, since dust will leak out through any defective places.
- It is desirable to supplement the device with a water tank.
- It is better to use a metal container under the waste container, as it is stronger than a plastic container.
DIY manufacturing
Before starting work, you need to remember that it will not be difficult to build such a simple device, therefore, after mastering the principles, you can immediately make your own masterful improvements to the mechanism.
When making a cyclone with your own hands from improvised materials, you need:
Capacity of 10-25 liters (tank, plastic can, bucket, barrel, etc.)
It is important to take a base that does not have internal ribs, otherwise the air flow will be interrupted due to interference. Some experts cut out a wooden frame for the container and combine it with plexiglass, however, this takes time for woodworking.
Polypropylene elbow with 30 and 90 degree inclination
A 30 degree elbow will create a vortex flow (centrifuge).
The pipe is about 1.5 m long, depending on the volume of the container.
Corrugated hose 2 meters long. It can immediately be divided into two identical hoses, one is designed to collect dust, the other is attached directly to the vacuum cleaner itself.
Oil filter or any alternative (rubber plug with many small holes or fabric breathable material).
To make a vacuum cleaner with your own hands, you need:
- In the lid of the container, it is necessary to make a hole for a 90-degree polypropylene elbow and in the side of the container itself the same hole for a 30-degree elbow.
- A filter is placed inside the container, already connected to a polypropylene elbow.
- All openings should be sealed tightly with sealant.
What solutions are optimal for ventilation of a woodworking shop
- For production facilities, it is recommended to install an aspiration ventilation system in the form of a combination of local umbrellas and general exhaust ventilation.
- The power, volume, speed of movement of air masses and other parameters of exhaust fans are calculated based on the technical characteristics of the main equipment.
- Exhaust fans for shelters (umbrellas) should be selected with such power as to organize a discharge sufficient to ensure sufficient air movement through the duct network and prevent particles and waste from the woodworking process from settling.
- Local suctions should be connected to the general exhaust ventilation system.
- Wood dust and waste from the floor are removed with special floor and underfloor type suctions.
- A feature of general ventilation for such premises is the cleaning system. The air is cleaned of dust with the help of special dust settling chambers and filters.
- It is better to supply air to buildings dispersed, cooled air, in winter, is supplied to the upper zone, and in summer it can be supplied through windows.
- Ceiling fans will help air-condition the room - they work well in large and medium-sized rooms, and the direction of the airflow will be an advantage, which will prevent sawdust from moving wood around the building.
- When designing an air duct system, a system of hermetically sealed hatches must be provided. This feature is necessary for maintenance of ventilation equipment.
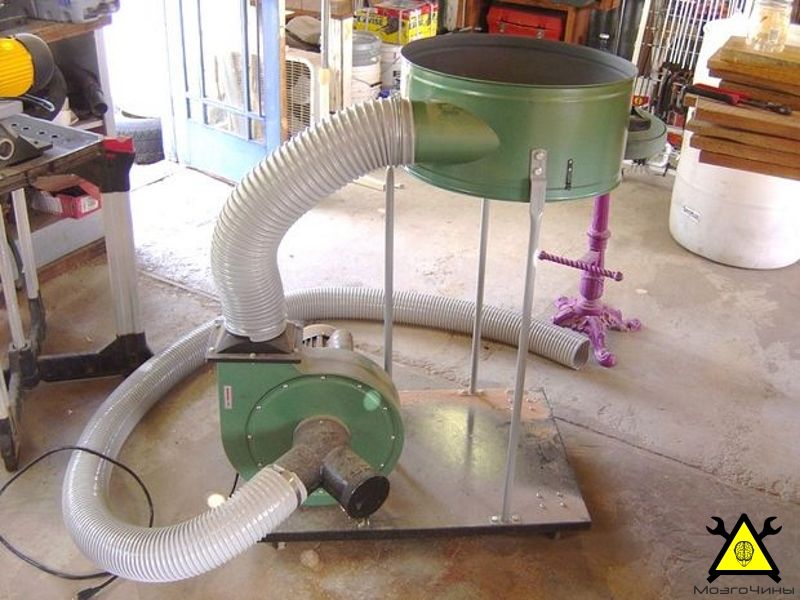
Do-it-yourself snail for a chip blower
The power of a household vacuum cleaner for some types of processing wooden blanks is insufficient.To clean large volumes of air, they make a snail-type chip blower with their own hands. The body of the device resembles a snail shell in its shape.
Craftsmen make the body of the snail from two types of materials - metal and wood. Creating a metal case will require the use of a welding machine and the ability to handle this equipment. There is another way - making a snail from construction plywood.
To work with plywood in a home workshop, you need to have a jigsaw, drill and other woodworking tools. The most important part of the exhaust fan is the air intake wheel. It is made from lightweight materials such as wood, plastic and the like. The impeller is assembled in such a way that the blades are bent or rotated by the inner edge with respect to the wheel radius line by 450.
The outlet is connected to the cyclone filter with the help of adapters and hoses. The axis of the air intake wheel is connected directly to the motor shaft or a belt drive is installed, which is preferable to coaxial docking. Firstly, the pulley on the wheel axle is easier to isolate from the side opening of the volute, which increases the performance of the device. Secondly, the removal of the electric motor contributes to its necessary cooling.


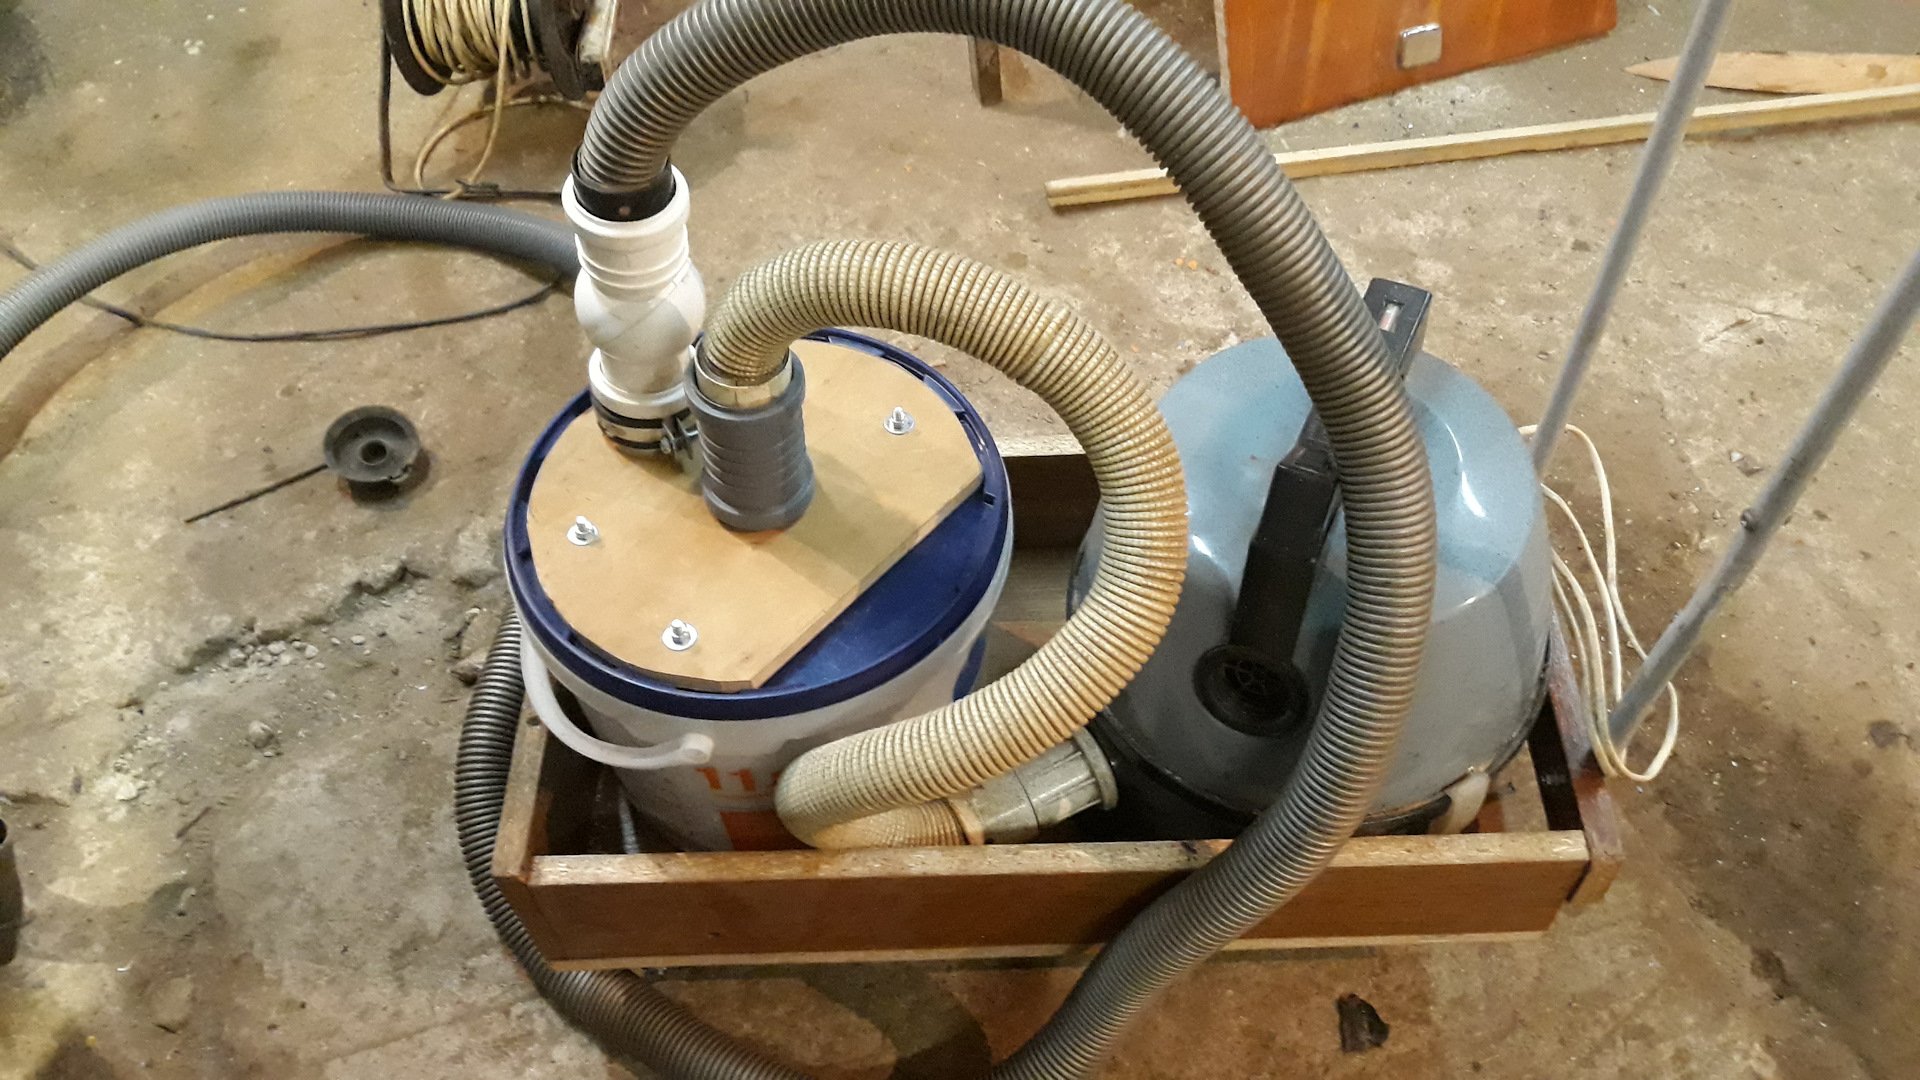
Making a cyclone from a barrel
If there is a modern vacuum cleaner at home, it will not work to connect it to a bucket according to the Ural principle due to the design features and a different shape. The cyclone for such a unit is made as a separately connected filter with hoses. It is more convenient to make a garbage container from a plastic barrel with a threaded lid.The manufacturing principle is similar, but in addition you will need a new oil filter from the car. Smooth pipes are replaced by PVC elbows with an angle of 45o and 90o.
The assembly of the cyclone is carried out in the following order:
On the lid of the barrel, a hole for a 90° elbow is cut in the center. Three strips are cut from galvanized sheet steel. The blanks on one side are connected with a hairpin. The petals are bent in a pyramid, the free ends of which are bolted to the lid around the hole.
The knee is inserted into the hole, sealed with a hot gun or glue. An engine oil filter is put on the pyramidal holder, clamping it with a nut with a wide washer.
To protect against dust, the filter is wrapped with a nylon stocking. A galvanized chipper is made around it, protecting it from impacts of large debris.
A hole is cut in the side wall of the barrel. A 45° elbow is inserted with a downward turn. Inside the barrel, the pipe is fixed to the side wall with a clamp. The joint is carefully sealed.
All elements of the cyclone are ready. The lid with the filter is screwed onto the barrel. The upper branch pipe is connected with a hose to a vacuum cleaner, and a corrugation is connected to the side outlet to draw in debris.
Staged production of the Cyclone
Consider different options for making a Cyclone for a vacuum cleaner with your own hands from sewer pipes and how to make such a device according to step-by-step instructions with drawings and photo examples.
Without cone
For the construction of a bucket and sewer pipes you will need:
- oil filter;
- plastic bucket;
- sewer PVC elbows at 45° and 90°.
- pipe with a cross section of 40 mm and a length of 1 m;
- corrugated pipe 2 m long and 40 mm in diameter.
The design process is:
- We cut a hole in the center of the bucket lid so that a 90 ° angled plastic pipe enters it, to which the vacuum cleaner will be connected.
- Seal the gaps with sealant.
- We cut another hole in the side of the bucket and insert a 45 ° elbow.
- We use corrugation as a connecting element with a knee.
- We join the filter outlet with the knee in the bucket lid.
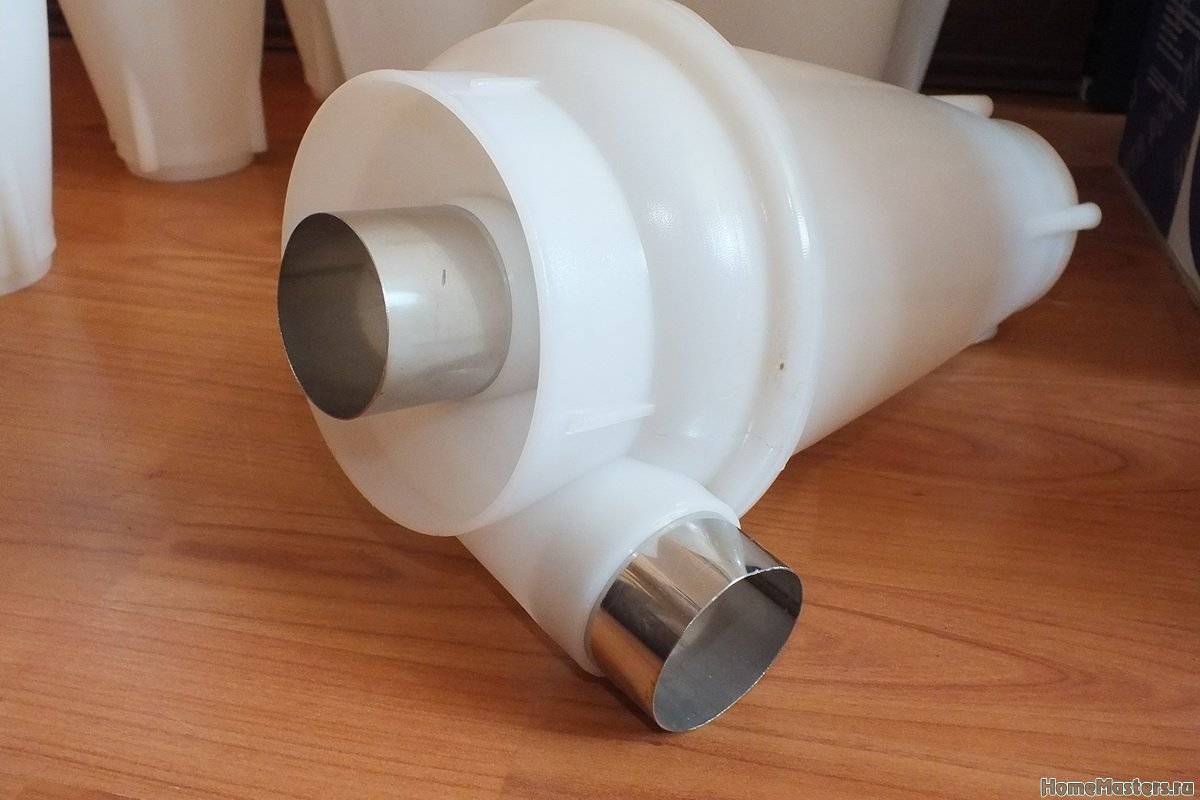
with cone
To make such a device, you need to prepare:
- traffic cone;
- round wooden sticks;
- large capacity;
- plastic elbows with a diameter of 50 mm at 45° and 90°;
- a piece of PVC pipe 50 mm;
- corrugated pipe;
- thick plywood;
- fixture.
We make the filter in this way:
- From plywood we cut out a platform for a cone in the form of a square measuring 40 * 40 cm and a circle equal to the inner diameter of the cone.
- We fasten the two parts together with self-tapping screws or glue and drill a hole in the center for a 50 mm PVC pipe.
- We make a platform of 40x40 cm from plywood and make a hole in the center, the diameter of which should correspond to the diameter of the top of the cone.
- We fix four round sticks to the platform from item 3 and firmly insert the cone.
- On the side, near the base of the cone, we make a hole with a diameter of 50 mm and insert a pipe into it, smearing the seam with sealant.
- We apply the platform from clause 2 to the vertical posts and fasten the part to the screws. Using wooden holders, we fix the pipe that enters the lower part of the cone, after which we insert another pipe and an elbow into the hole in the center.
- We install the cone on top of the garbage container, connect the vacuum cleaner pipe and the garbage suction pipe, and check the device’s performance.
Simple Cyclone
If you need a vacuum cleaner to clean the workplace after working with a CNC router or similar equipment, you can assemble a simple and compact Cyclone from PVC sewer pipes and plastic bottles.
For assembly you will need:
- 2 corrugated hoses to the vacuum cleaner;
- PVC pipes with a diameter of 40 and 100 mm;
- sheet of metal 0.2-0.5 mm thick;
- 2 plastic bottles for 2.5 liters and one for 5 liters;
- metal scissors;
- electric drill with drills;
- riveter;
- hot glue gun.
We make the filter in this way:
- From a pipe with a cross section of 100 mm we cut off an even piece 50 cm long, which will serve as the body of the device.
- We cut off two pieces of a 40 mm pipe 40 and 15 cm long, after which we draw 3 circles with the inner diameter of the body on a sheet of metal. In the center of these circles we draw more circles with a diameter of a smaller pipe.
- We cut out the metal parts with scissors, then cut them to the middle and cut out the inner circles. Then, using rivets, we connect all the elements together in the form of a spiral, which we put on a 40 mm pipe, evenly distribute the turns and fix them with hot glue.
- We place the spiral in a large pipe and leave a little protrusion outward.
- In the upper part of the body we make a hole for the suction pipe, clean off the burrs for a snug fit.
- We place the pipe in the hole, sealing the junction with hot glue.
- From a 5 liter bottle, cut off the upper part, from which we remove the neck. The resulting hole is adjusted to a 40 mm pipe, after which we put the part on the body and glue it with hot glue.
- We cut off most of the 2.5 l container and put it on the bottom of the case with obligatory gluing.
- We make a connecting element from two plugs, drilling out the middle.We strengthen the bottle that will be used for garbage with welding electrodes. To do this, glue them around the bottle with adhesive tape. We screw the container into place and connect the suction and outlet hoses.
Too thin corrugated tubes should not be used, because during operation they will emit a strong whistle.
You can learn more about making a homemade Cyclone from the video.


