- We understand the principle of work
- Fuel tank manufacturing
- How to make a biofireplace with your own hands - step by step instructions
- Design and drawings
- Case manufacturing
- Chassis installation steps
- Installing the fuel block and burner
- Fireplace decoration
- Do-it-yourself biofireplace from drywall
- Making bio-fireplaces with your own hands
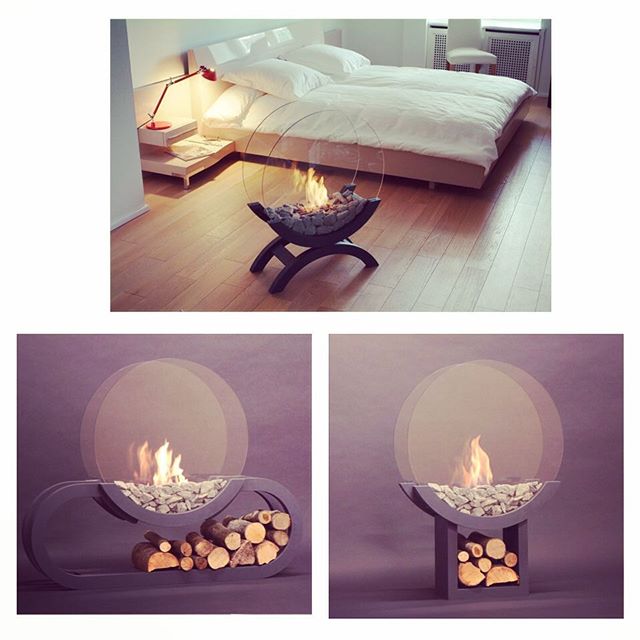
- Variety #1 desktop
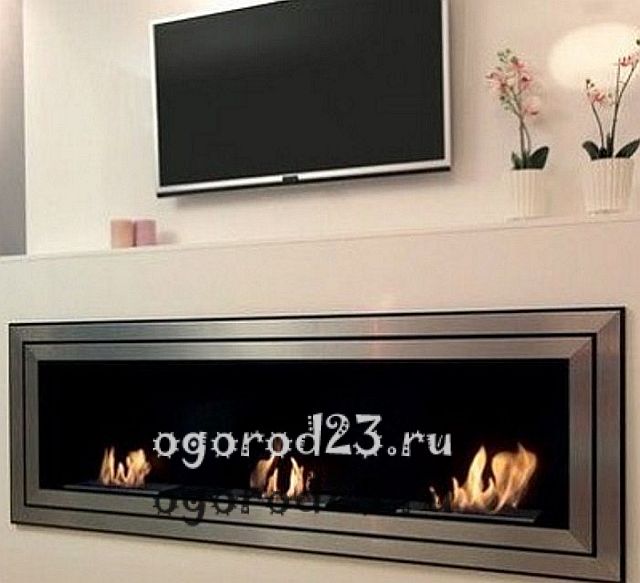
- Variety #2 wall mounted
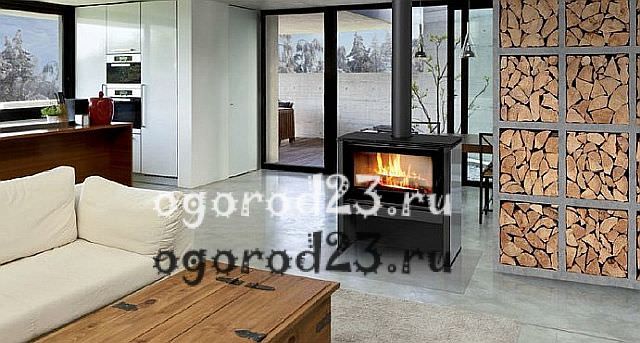
- Variety #3 floor standing
- Biofireplaces, what are
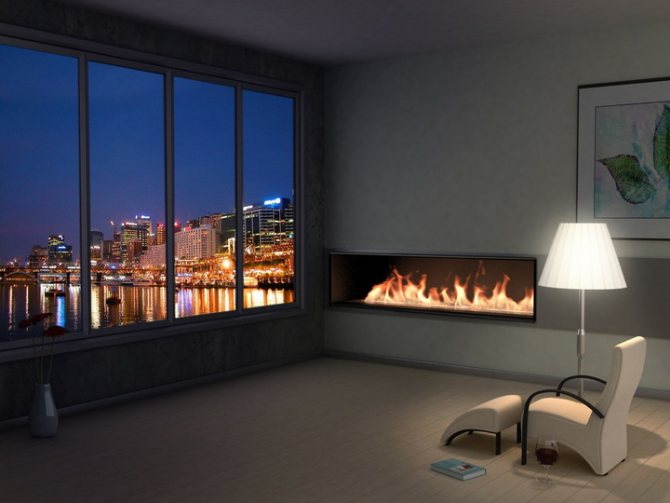
- Built-in biofireplace
- Floor biofireplace
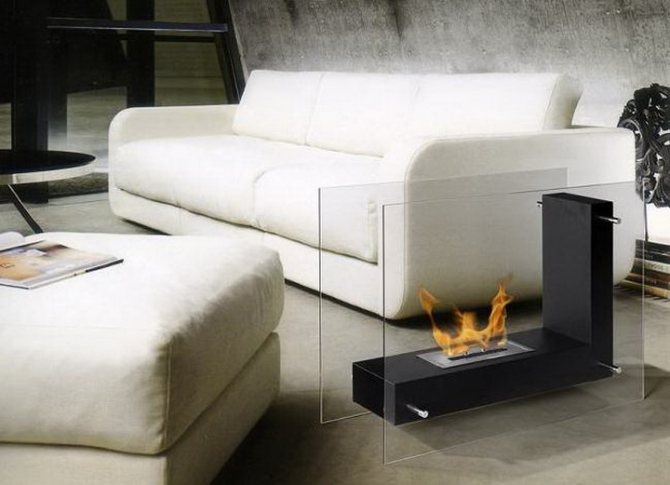
- Wall biofireplace
- Desktop biofireplace
- Preparation for the manufacture of a biofireplace
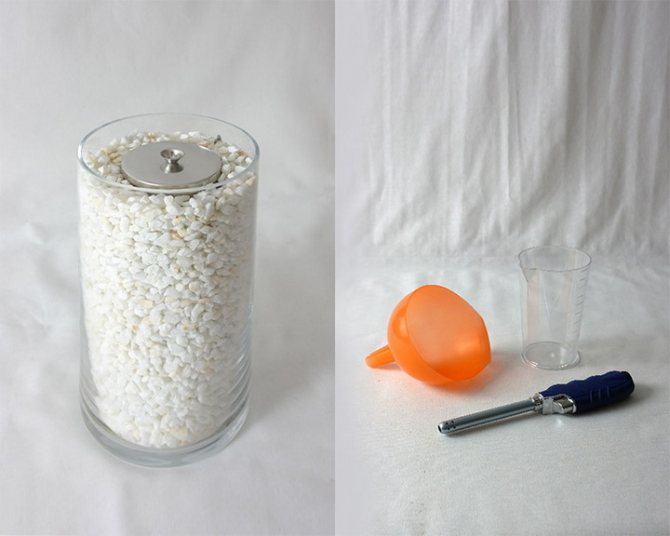
- Materials and tools
- DIY desktop biofireplace
- Do-it-yourself outdoor biofireplace
- Do-it-yourself biofireplace burner
- Fuel for biofireplace
- Composition of natural fuel
We understand the principle of work
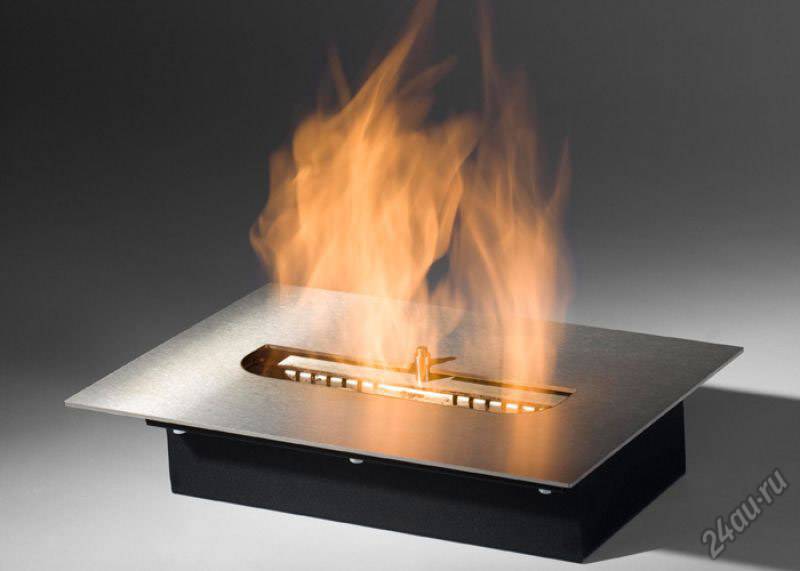
The biofireplace owes its existence to devices invented long ago - an ordinary alcohol burner and an oil lamp. The principle of operation is as follows: an element of finely porous material - a wick - is immersed in a container with liquid fuel. The fuel, obeying the physical law of the capillary rise of the liquid, soaks it to the very top and evaporates through the open opening. If these pairs are set on fire, then we get an even steady flame, as shown in the photo.
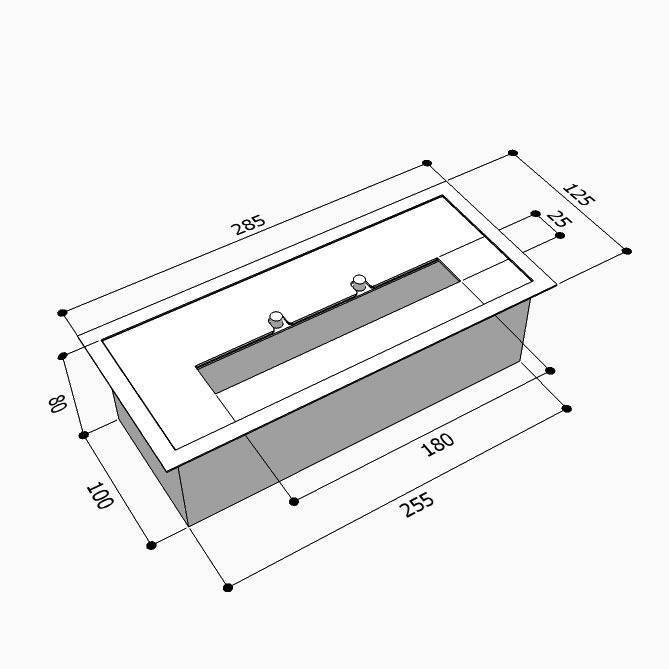
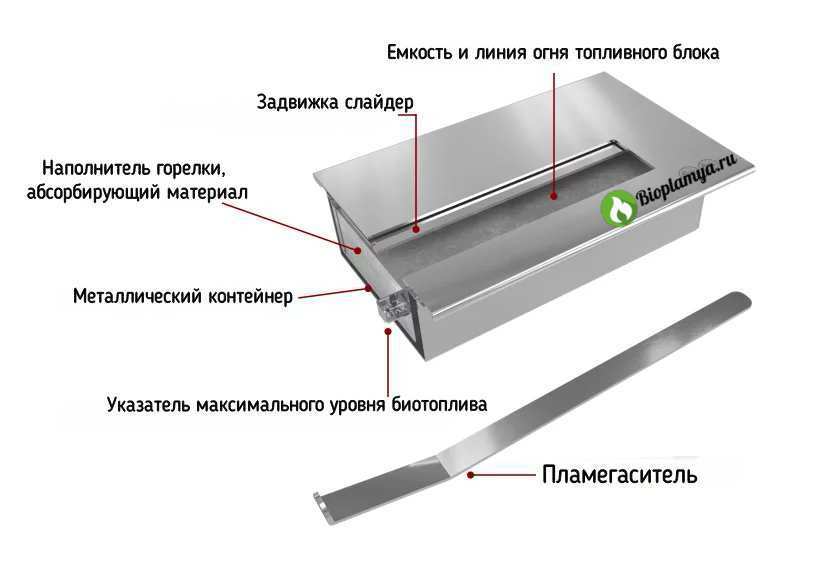
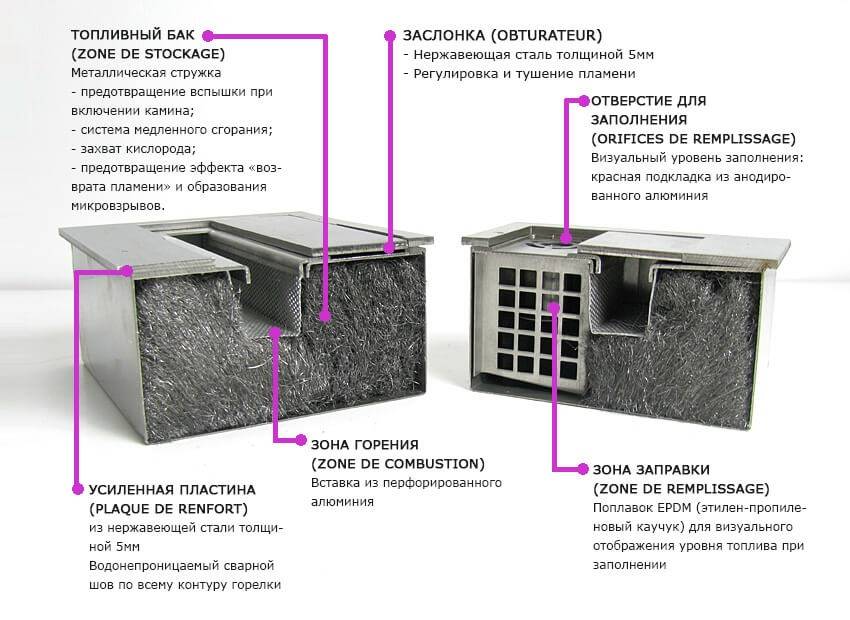
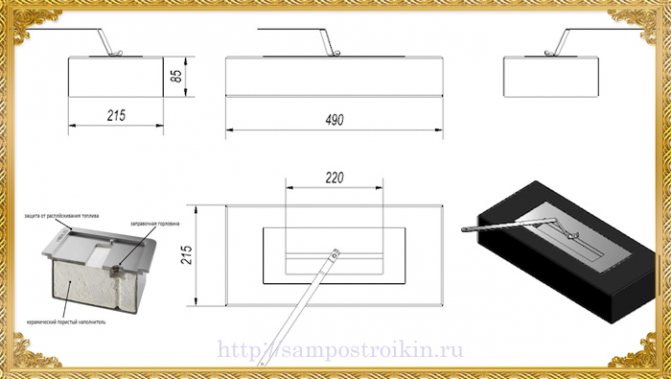
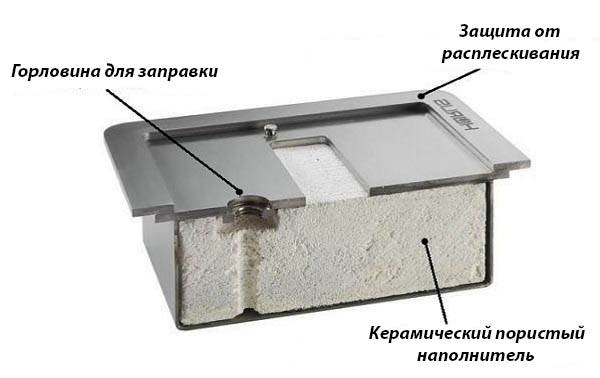
The heart of a biofireplace made from modern materials is a fuel block of a round or oblong shape. It includes the following main elements (shown in the diagram below):
- a stainless steel container with a filling neck, equipped with an open opening on top - a burner;
- a damper or cover that blocks the access of air and is designed to extinguish the fireplace;
- fireproof ceramic filler with many small pores;
- a system of sides that does not allow fuel to splash out;
- small portable structures are equipped with rollover ignition protection.

In cheaper versions, non-combustible fiber can be used instead of ceramic.
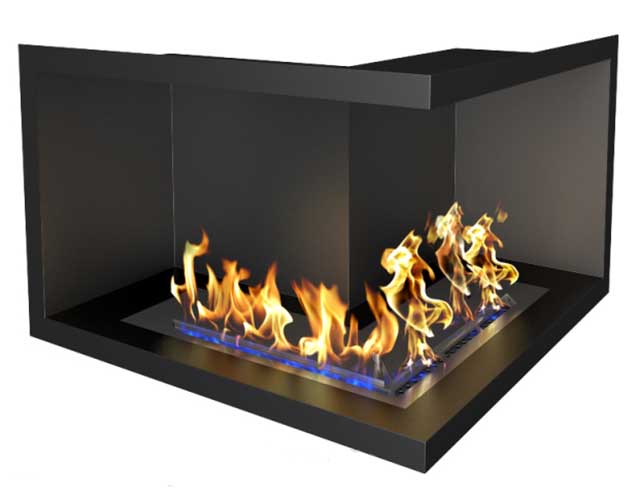
Corner version of the wall-mounted biofireplace
According to the design method, eco-fireplaces are divided into the following varieties:
- Desktop. They differ in small size and mobility, but require accuracy in the process of use. The product must not be placed and kindled under combustible interior items (for example, shelves).
- Floor models are equipped with both a point and an oblong burner. They can be carried, but put - only on the floor.
- Wall-mounted options are rectangular in shape and can be equipped with several burners.
- Embedded. Designed for installation in a niche or inside a finished fireplace portal.
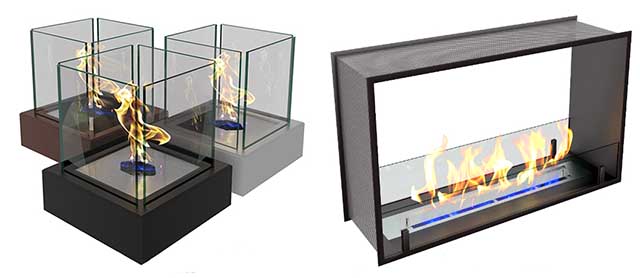
Desktop models (left) and built-in (right)
How the factory-made biofireplace firebox functions, see the video:
Fuel tank manufacturing
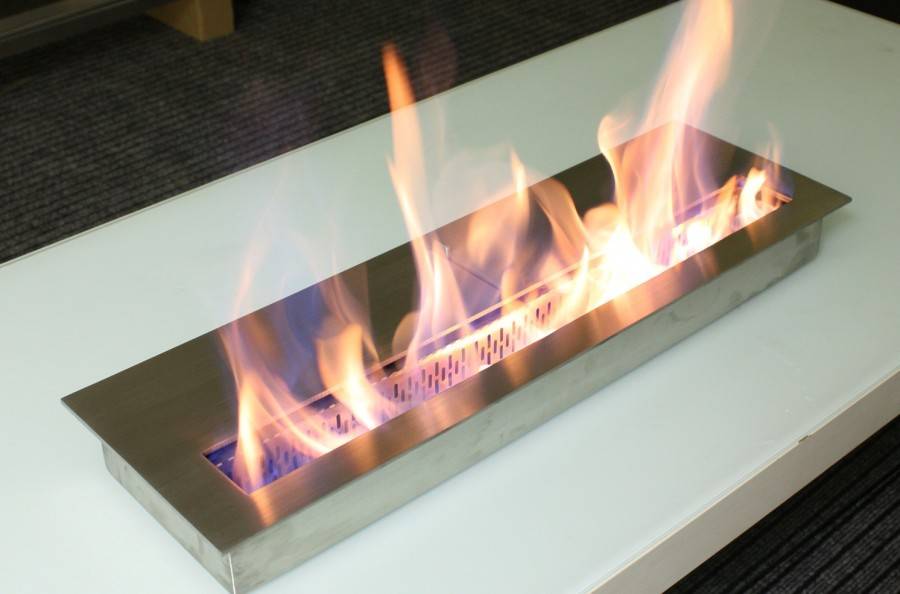
The most difficult part of a biofireplace is its heating elements - a burner or a fuel tank.
To make a simple burner, it is enough to fill a simple tin can with fuel.It can be easily installed in most tabletop fireplaces, however, it will not suffice for more complex designs.
In this case, fuel tanks are used - special containers for biofuel, equipped with a stack or plate with holes for even distribution of combustible vapors, as well as flaps for closing the tank. If you are not sure of your ability to make it yourself, you should purchase a ready-made factory product, or contact a specialist.
In containers made in a factory way, a special porous filler is used. It is impregnated with fuel and contributes to efficient evaporation. Using it in homemade tanks can be problematic and not necessary.


When preparing the container, the following points should be considered:
When choosing the main material, heat-resistant compounds should be preferred. Hardened metal would be the best choice. It combines high resistance to extreme high temperatures and good processing flexibility.
Compartments for storing fuel should be made with a thick bottom, and a firebox made of high-strength material. In this case, the biofireplace will be as safe as possible and the possibility of deformation of the areas in contact with the flame is excluded.
In order for the fuel vapors to be distributed evenly, a grid or a metal bar with holes is installed on top of the firebox.
For ease of ignition, a wick dipped in a combustible liquid is used. Otherwise, special fireplace matches with a long wooden base must be used each time the fireplace is lit.
After assembly, you need to check the design for defects
Particular attention should be paid to leaks.All seams must be sealed, fuel must not leak
Otherwise, fire may occur outside the tank.
It is recommended to install a sash that will completely close the firebox. It will prevent the flow of oxygen, which means that the fireplace can be safely extinguished at any time.
Advice! Before you make a fuel tank yourself, we recommend that you familiarize yourself with ready-made solutions and take them as a basis. This will avoid many of the most common mistakes.
This video shows an example of a simple self-made fuel tank at home:
How to make a biofireplace with your own hands - step by step instructions
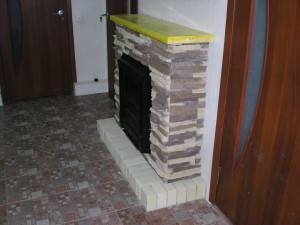
A floor biofireplace in its appearance can be indistinguishable from a real one, lined with bricks and having a chimney. The structural solution of the case may be different:
- with columns;
- with ledges;
- have the shape of a bowl or curbstone with legs.
The basis of a biofireplace is easier and cheaper to build from drywall and metal profiles. From these materials it is possible to make a geometrically correct, semicircular or wavy body. Instead of plasterboard, you can use wood, durable plastic or metal.
Design and drawings
At the design stage of a biofireplace, its dimensions and installation location are determined. Floor structures are stationary, so you need to choose a place so that the fireplace harmoniously fits into the interior after changing the design of the room or acquiring new furniture. For small apartments, medium-sized floor structures indicated in the drawing are suitable.
The drawing will help you quickly make all the necessary details of the fireplace
Case manufacturing
To install the biofireplace body you will need:
- drywall 9 mm thick;
- metal profile PP 60/27;
- self-tapping screws;
- screwdriver;
- sickle;
- primer;
- putty;
- spatula with a narrow metal blade;
- roulette;
- ruler;
- bubble level at least 80 cm long;
- pencil or marker.
Suitable for decorating the case:
- fake diamond;
- ceramic tile;
- plastic panels "under the brick" or "under the stone".
Chassis installation steps
-
Wall and floor markings. Focusing on the previously drawn up drawing, mark the corner points of the back wall of the fireplace on the wall and connect them with straight lines. On the floor, mark the location of the front wall of the cabinet.
Make markings on the floor and wall, attach metal profiles
-
Frame installation. Build a structure frame from a metal profile. Keep in mind that the strips should not be in close contact with each other. There should be a gap of 2-3 mm between them. This will prevent the structure from warping during its heating and cooling.
Mount the fireplace body from a metal profile
-
Frame sheathing. Using a jigsaw or a clerical knife, cut the plasterboard sheets of the desired size. Attach them to the metal profile frame. Hats of self-tapping screws "drown" in the GKL by 1-2 mm.
Cutting sheets of drywall
-
Preparation of drywall for finishing. Glue the joints of the GKL sheets with glass cloth mesh tape - sickle. Apply putty in the places where the screws are installed and cover the sickle with a thin layer. After the putty dries, start sanding it. To do this, use a special trowel with a grinding mesh.
Finished body sheathed with drywall
-
Hull lining.Paste the body of the biofireplace with previously selected facing materials.
To finish the fireplace body, use only special facing materials.
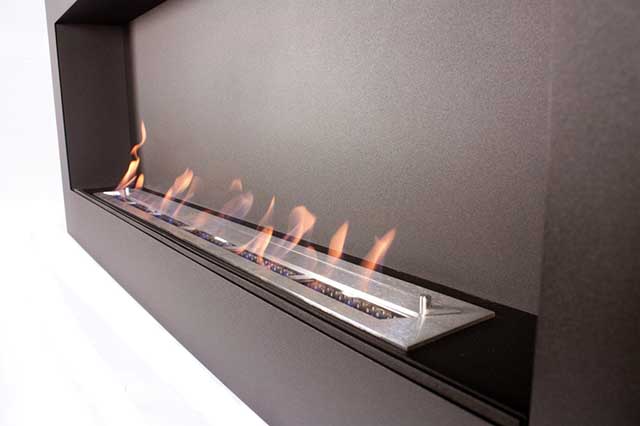
Installing the fuel block and burner
You can make a metal container for the fuel block with your own hands from 2 mm thick stainless steel. It is necessary to make a rectangular structure with a bottom and low sides. The dimensions of the block must correspond to the dimensions of the case.


The burner is a metal cartridge that is installed in the tank. Together they form a fuel block. An important element of the burner is a perforated damper, with which the flame is extinguished and its intensity is regulated.
When making your own, consider the following:
- the burner must freely enter the metal container;
- the top panel of the burner may be a slotted metal plate;
- the internal cavity of the burner can be filled with mineral wool insulation or medical wool.
The principle of operation of the fuel block:
- eco-fuel is poured into a metal container;
- burner filler absorbs liquid;
- ignite the fuel with a lighter.
Fireplace decoration
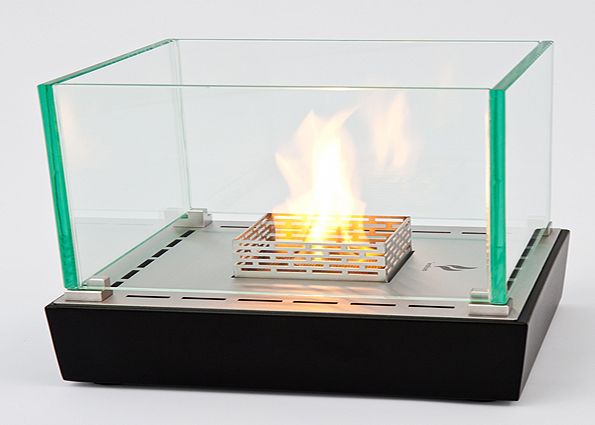
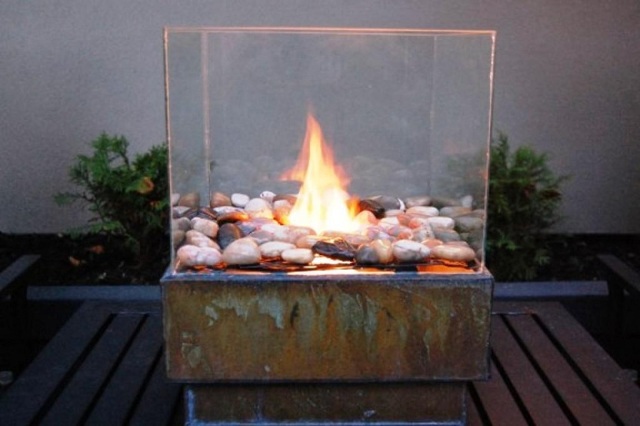
A protective screen made of ordinary window glass with polished edges is installed on the front wall of the biofireplace. The fuel block is decorated with ceramic firewood or stones.
Do-it-yourself biofireplace from drywall
The chosen place determines the shape according to which the biofireplace will be made - angular or straight, along the wall. Anyone who sets out to create a hearth at home should prepare or find a sketch with instructions on how to make a bio-fireplace himself, and purchase the necessary materials:
- Drywall and profiles for it.
- Self-tapping screws.
- Interior finishing materials, such as ceramic tiles and heat-resistant adhesive for them.
- Material for exterior decoration, for example, stone.
- Cotton wool, grout and finishing putty.
Drawings of finished bio-fireplaces contain information on how to make bio-fireplaces, namely, determine the dimensions. However, the design of the structure can be absolutely anything - just use your imagination.
When everything is ready to get started, you can proceed to the sequential execution of the following steps:
According to the instructions, marking lines are drawn on the wall, to which the formed guides for the biofireplace body are subsequently attached. With the help of self-tapping screws, rack profiles and a frame are placed.
Using a plumb line, you need to check the correct location of all elements
Further, during the construction of a biofireplace, the frame is sheathed with drywall. The optimal distance at which it should be fastened is from 10 to 15 cm. When performing this work, it is also necessary to lay a layer of mineral wool about 5 cm thick in the furnace area.
The direction of the fibers - vertical or chaotic - of mineral wool affects the properties that it best provides. So, a material with a chaotic direction is suitable for biofireplaces, which better provides thermal insulation properties.
A recess is left at the bottom of the furnace, into which the burner will be installed in the future. Then, with the help of non-combustible materials, the bottom of the biofireplace is formed. From the outside, the drywall is puttied and lined with the selected material.
For cladding, a material that is more suitable for the interior and the price parameter is chosen. The main thing is that it is fireproof.
The remaining seams are rubbed, the surface is wiped with a damp and dry cloth.After that, when building a biofireplace with your own hands, you can start decorating - add a burner, lay out decorative elements. Additional protective measures can also be taken, such as installing fire-resistant glass on the front wall.
The burner allows you to reproduce the fire evenly, in bright color, without flashes. Some models of burners contain protection against fuel spillage during tipping.
Making bio-fireplaces with your own hands
How to make a biofireplace with your own hands? It's easy just if the hands grow from the right place. For the manufacture we need the following tools, materials:
- Glass. Pieces are available at glass cutting points. You can take the old aquarium.
- glass cutter
- Silicone sealant (glue glass).
- Stainless steel mesh.
- Metal box.
- Small stones.
- Fuel for biofireplace.
- Wick (piece of cord).
- Metal glass for fuel.
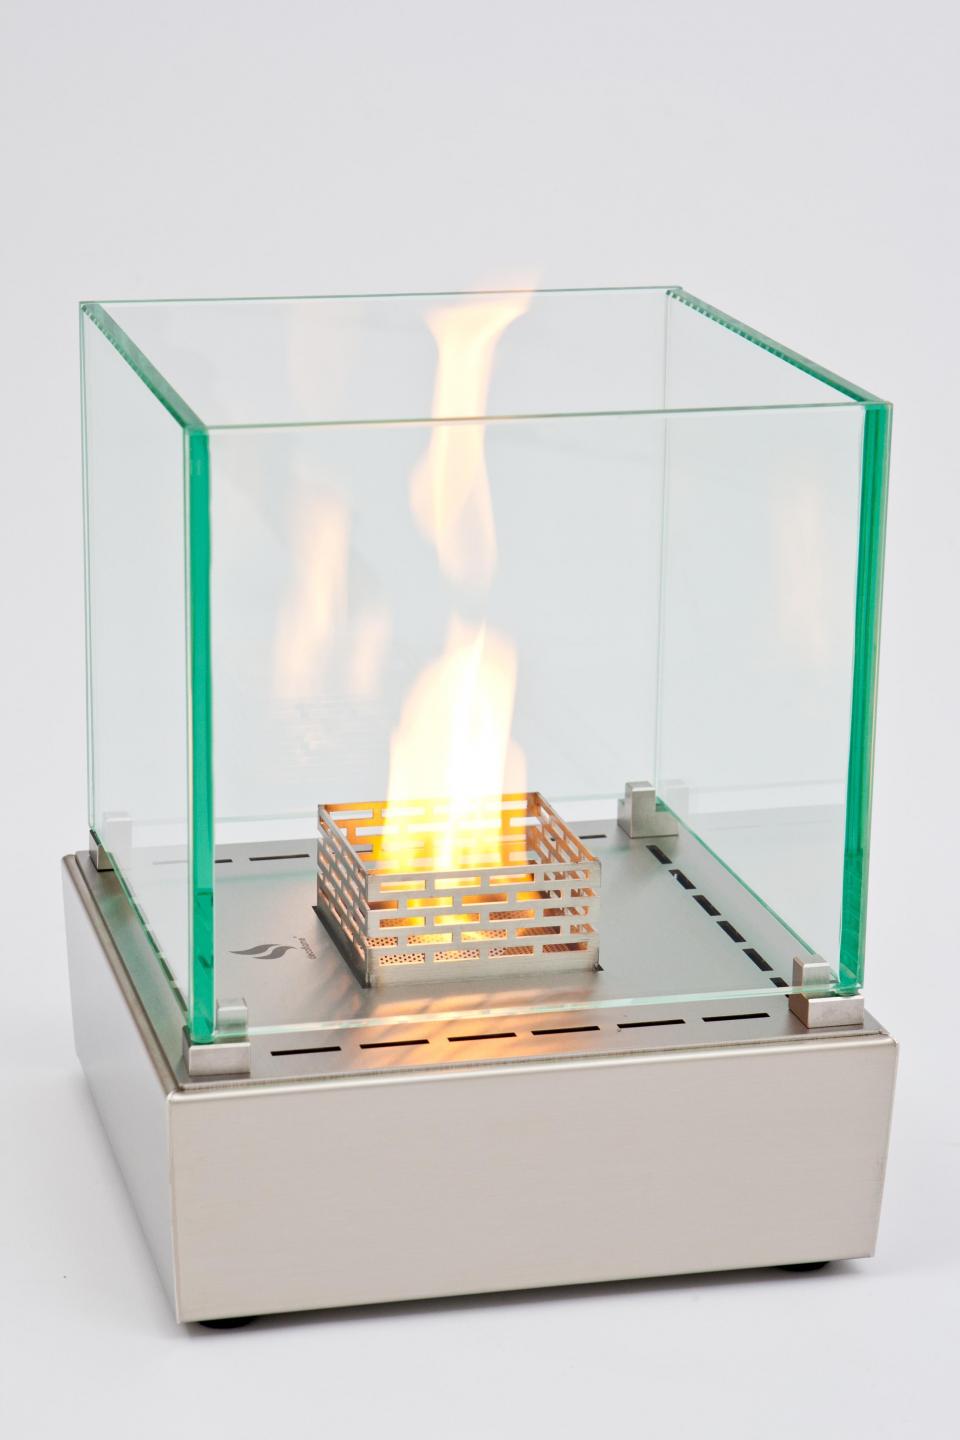
Variety #1 desktop
First, on paper, figure out how to make a biofireplace. Sketch a simple drawing with dimensions. When designing a desktop fireplace, keep in mind that the distance from the burner to the nearest glass should be 16 cm or more. If there are 2 or more burners, then the distance between the burners is also more than 16 cm. As a result, on paper we get a desktop fireplace.


The manufacturing process will look like this:
As a basis, we took a metal box of a certain size (according to the drawing). Under it we will customize all the other components.
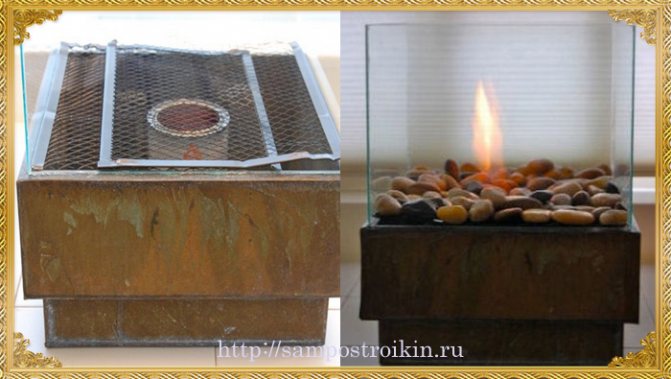
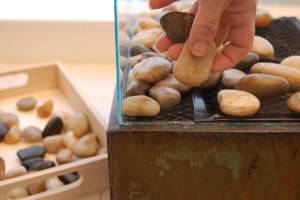
We take a grid of iron. We cut it to the size of a metal box. It is better to take 2 layers of mesh. On the grid, spread the stones over the entire area. Stones are not only a beautiful accessory for our heat generator.They perfectly accumulate, give off thermal energy. They do this evenly, over the entire covered area.
We take a regular cord. Cut off a piece of the desired length. Immerse the cord in a glass of fuel, light it. With the help of simple manipulations, the biofireplace device was made quickly. Above, we got the answer to the question "How to make a burner for a biofireplace with your own hands"?

Variety #2 wall mounted
This type of heat aggregates has a flat, elongated shape. This shape makes it easier to mount the structure to the wall. The front part of the device, for security reasons, is covered with glass. The side walls of the device can also be made of glass. The back wall is made of non-combustible material. Usually this is hardware decoded in various designs. Hanging this fireplace is easy. Special fasteners are screwed to the wall, then the fireplace is fixed. The device does not pose a fire hazard, because the body, the walls heat up slightly. Due to the low heat, a person will not get burned by touching the case.
The manufacturing principle is the same as the desktop device. You make a drawing, specifying the dimensions, materials. Next, you make the product itself, hang it on the wall. The production of bio-fireplaces at home is a simple matter, not a troublesome business.
Variety #3 floor standing
We put this type on the floor, on our legs. In fact, this is a table fireplace, only on a large scale. You can put it on the podium. The bottom will not warm up much. Based on this, the device can be hoisted on any straight, flat surface. Size, shape are different rooms. A big plus of this device is mobility.
Drag to a new location - a matter of 1 minute.You can quickly heat any room by simply moving the unit to a new location. We see that it is easy, simple to make a biofireplace with your own hands.
Biofireplaces, what are
An incredibly wide range of all sizes and shapes: corner, wall, floor, built-in, desktop. Let's look at each of the options in more detail.
Built-in biofireplace
These models are considered one of the most popular, they can be rectangular, round, closed with a glass-ceramic screen or open. The body of such devices is made of steel, designed to interact with high temperatures. Optionally, such units can be installed not only in the wall of the apartment, but also in pieces of furniture (for example, in a table). Quite often in the photo you can see a biofireplace under the TV - it looks beautiful, practical, the device performs its functions and does not take up space in the room. The TV is most often located in the living room, where all family members gather, so the fire is constantly in sight.
Similarly, both floor-standing and wall-mounted models can be located under the TV, but it is the built-in one that looks more modern. A specially equipped niche is prepared for it, which is covered (sheathed) with non-combustible materials. The decorative frame is made in the general style of the interior, as a result, the whole structure looks harmonious. With a close location of the biofireplace and the TV, it is necessary to take into account the heat generated by the fireplace. So that the lower part of the TV does not heat up, it can also be “deepened” into the wall or maintain a distance of 1 meter between them.
Biofireplace and TV in the apartment:
Floor biofireplace
Convenient in all respects - it can be moved from room to room, change its location in the room. The design of such eco-fireplaces is diverse, you can always choose a device with just such an exterior finish that will be in harmony with the interior of your apartment. In a word, the floor model includes all the characteristics of biofireplaces described above, only it can be moved around the apartment at your discretion.


Floor models, photo:
Wall biofireplace
This is an ideal solution for classrooms, offices, small rooms. In principle, the wall model can be placed anywhere, even in the bathroom. It does not take up much space, often used as a night light. The case of such a device is made of heat-resistant materials. Wall-mounted biofireplaces can be of any shape and any size. For heavy units, reliable fastening is required.
Wall models:
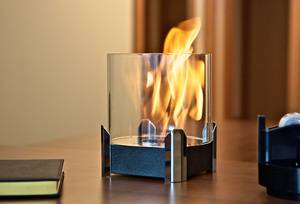
Desktop biofireplace
Models of this type are a source of live fire right on your table or on a shelf. It can be placed in the kitchen, bathroom, bedroom or living room, it will look appropriate everywhere, and its presence will significantly change the familiar interior of the apartment. The design of desktop models is so diverse that anyone can find an option to their liking. The acceptable cost of such mobile devices will not cause significant damage to your budget. A small desktop biofireplace will transform even the smallest room.
Desktop Models:
Preparation for the manufacture of a biofireplace
For self-manufacturing of a fireplace, first of all, you should decide on its type, take the necessary measurements, and make a sketch of the future model. This will help you avoid mistakes while working.
Materials and tools
You can make a biofireplace at home using ordinary glass, for example, from an A4 photo frame, a glass cutter, silicone sealant, metal mesh, a barbecue or oven mesh, a metal box, pebbles or other heat-resistant stone, fuel and wick.
DIY desktop biofireplace
Its construction steps are as follows:
- We calculate the distance between the burner and the protective screen. It must exceed 15 cm to avoid damage to the glass. We measure the distance between the burners - it should be more than 16 square meters. cm.
- Fuel tank preparation. You can use a simple square or rectangular metal box, not forgetting the distance from the flame to the glass.
- Coloring the box to enhance its aesthetics. It is produced only from the outside, since it is possible to ignite or release toxic substances from the paint applied to the inner surface.
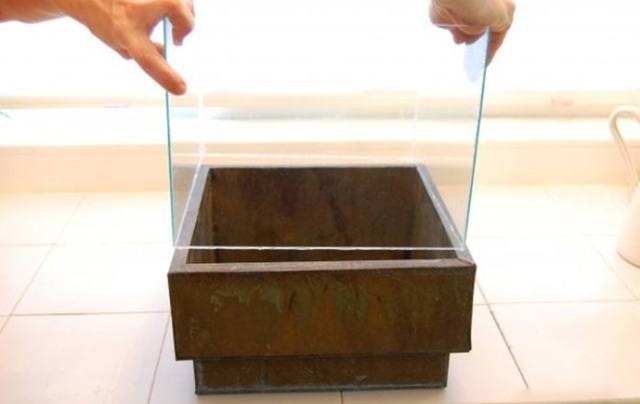
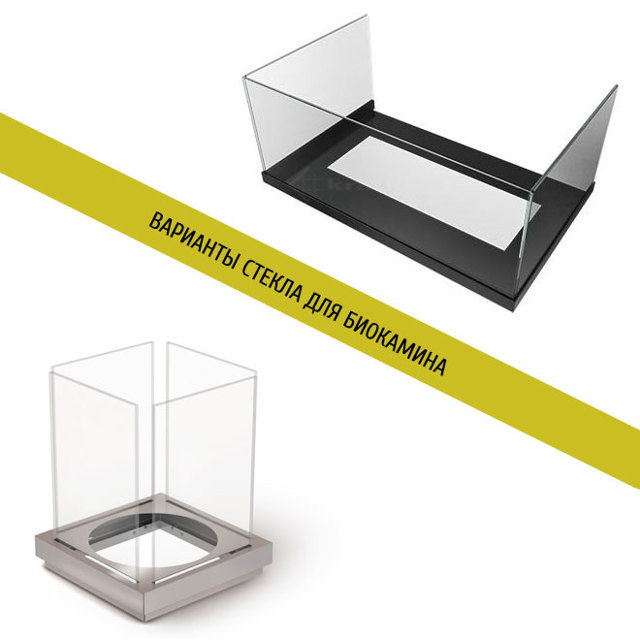
- Creation of a protective glass casing. It can be made from ordinary 3mm glass or 4 glasses from a photo frame, which are sized to fit a metal box.
- Glasses are glued together with silicone sealant, fixed between supports, which can be any fixed objects, and left in this state for a day until the sealant dries.
- Excess sealant is removed with a blade.
- Biofuel preparation. Only a metal can is suitable for storing it, even if it was sold in a plastic one. The jar is placed at the bottom of the box.One standard container of fuel will support combustion for several hours, after which it will need to be replaced - you will need to remove stones and mesh or fill in a new portion with a large syringe.
- Cutting the mesh to cover the box. This can also be done in two layers. Its fastening will be more reliable if you use wire, but do not forget that the mesh must be removed to replace the fuel can.
- Laying stones on the grid. They are needed not only as a decorative element, but also for uniform heat distribution between the grill and the screen.
- Ignition of a biofireplace with a torch, lowered through a grid into a container with fuel.
Do-it-yourself outdoor biofireplace
To design a floor biofireplace you need:
- Prepare materials: drywall sheet, 2 square meters of thermal insulation material, 2 square meters of tiles with glue, 8-9 meters of metal profile, a hundred screws and self-tapping screws, grout, stones or other decorative elements, a heating unit.
- Assembly of the frame with screws and a metal profile.
- Sheathing the frame with drywall and self-tapping screws, two layers for each wall, between which glass wool or other thermal insulation will need to be placed.
- Cladding with tiles or other similar material. To do this, you need to carefully lay it out in accordance with the idea, for example, a fireplace can be made plain or a pattern can be added.
- Seam grouting.
- Drying.
- Installing the heating block in its place.
Do-it-yourself biofireplace burner
The most reliable material for the burner is stainless steel. Its walls must be thick enough to avoid deformation when heated.You should also be very careful when assembling, as unreliable fastening or a defect will disable the biofireplace.
It is desirable that the burner be solid, so there is less chance that the fuel will spill out. A paint can is best suited for this role, the main thing is to make sure that its size is suitable for the fireplace, and that there are no cracks or holes on it.
Those who are not looking for easy ways can make the burner completely themselves, it is not difficult, since it looks like a large matchbox with an oblong hole in the top for pouring biofuel. Sheets of metal 1.5-2 mm are welded at the seams. You can add glass wool to it, which acts as a wick, and a damper that will regulate the flame and extinguish it.
The burner is ignited with an ordinary wick, for example, a cord dipped in biofuel, the end of which will rise above stones or other decorative elements.
Fuel for biofireplace
Bioethanol can be used as a fuel, it is sold in specialized stores, but it can also be made at home, since it consists of gasoline, which is filled with lighters and ordinary medical alcohol, mixed 1 to 9. After mixing and shaking, the mixture is usable.


Composition of natural fuel
Predominantly natural fuel consists of renewable and environmentally friendly raw materials. This includes, for example, corn and cane, from which alcohol or bioethanol is made, which do not have color and odor.
Ethanol makes fire blue, so it's mixed with certain additives. Biofuel consists of the following components:
- 95% bioethanol;
- 1% methyl ethyl ketone and denaturing component;
- 4% distilled water.
 To prevent the internal use of liquid as alcohol, Bitrex of the crystalline type is added to it.
Brands and composition of fuel may vary slightly, which affects its price.
As for fuel consumption, it is determined by the number of burners and the power of the unit.


