- Tips and ideas for creating
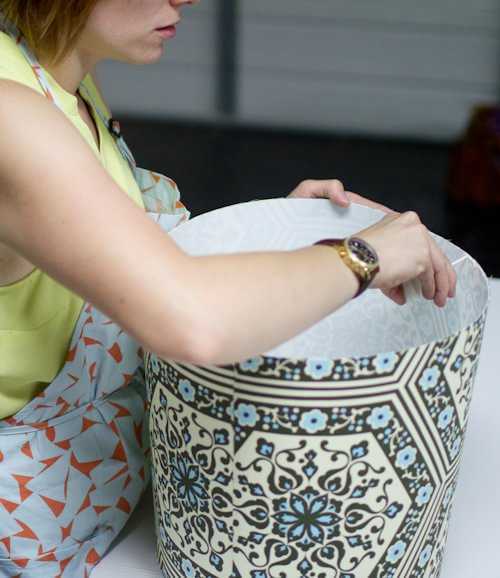
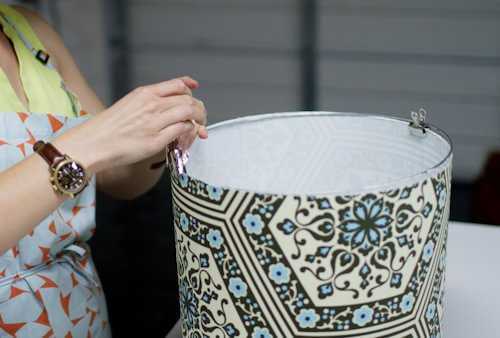
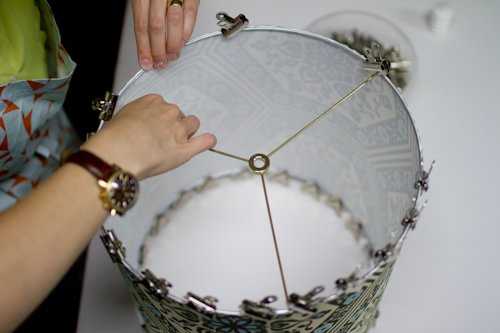
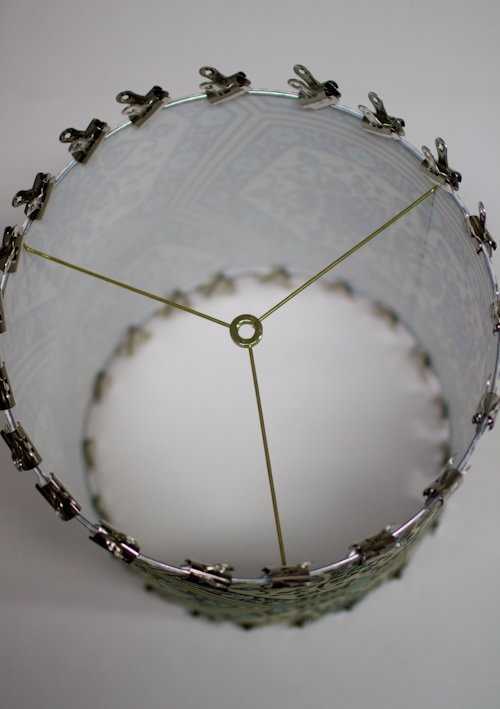
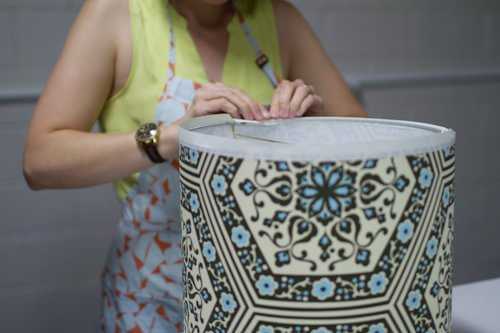
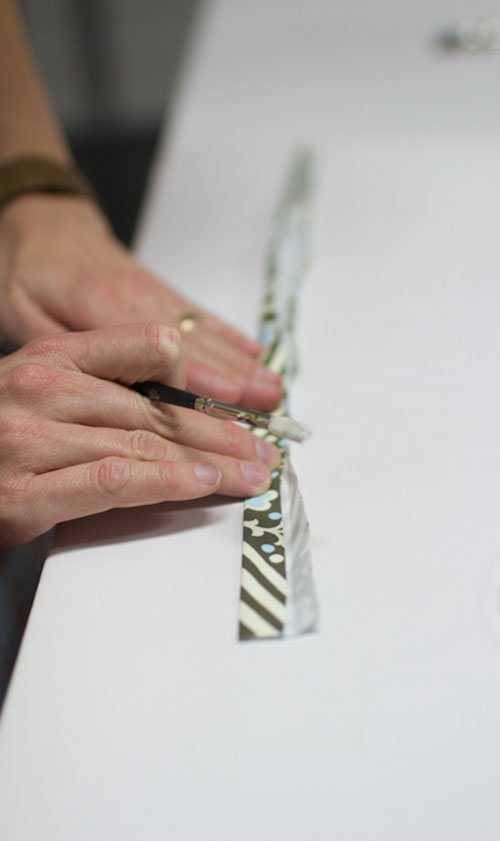
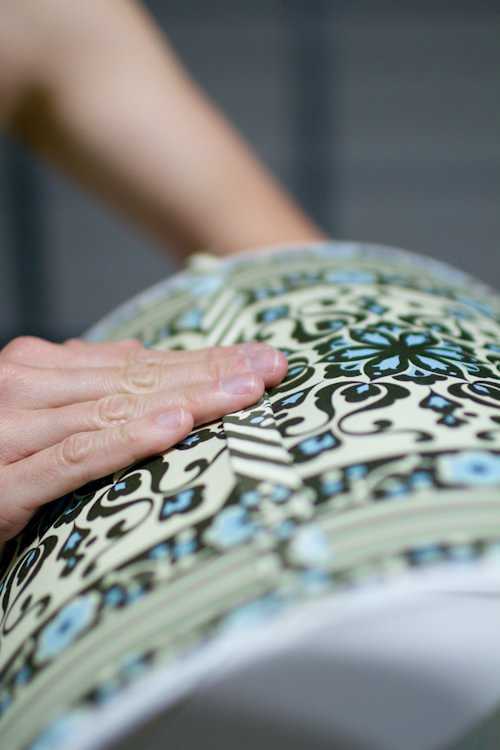
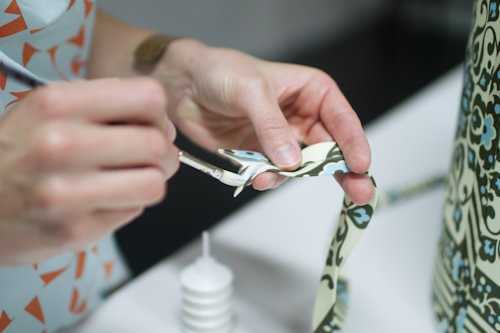
- How to cover a lampshade with fabric with your own hands
- How to make a lampshade with your own hands. Lampshade made of threads in the shape of a ball and a lamp from it
- How to make a lampshade with your own hands. Lampshade made of threads in the shape of a ball and a lamp from it
- lampshade frame for lamp
- Frame manufacturing
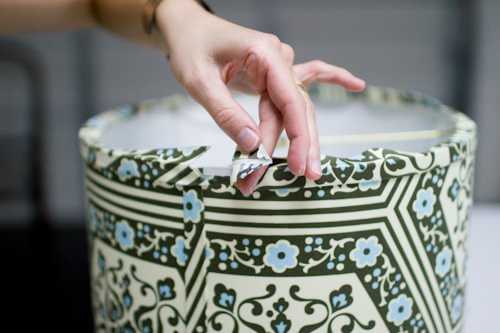
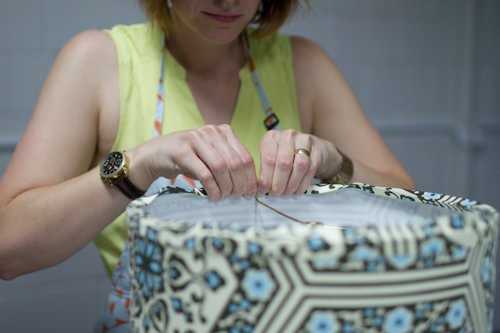
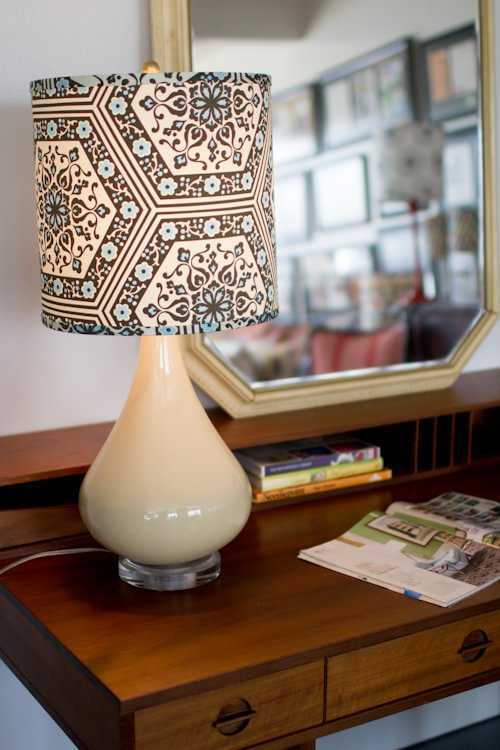
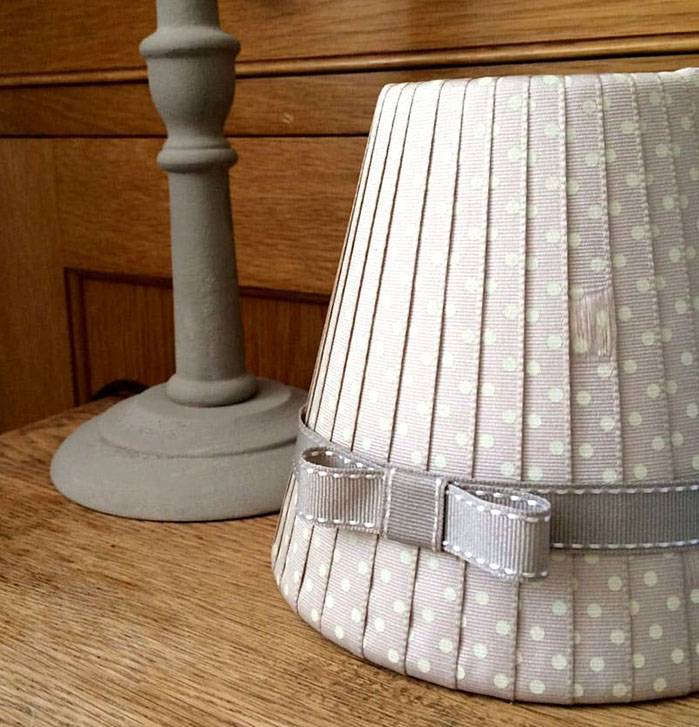
- Fabric lampshade decoration
- Lampshade in Provencal style
- Lampshade with fabric flowers
- Do-it-yourself lampshade from scraps
- Lampshade made of unusual materials
- How to make a lampshade from paper raw materials
- How to make a lampshade out of wood
- How to make a paper lampshade with your own hands
- Origami paper lampshade
- What do you need to work
- Detailed instructions for making a lampshade using the origami technique
- Lampshade from disposable paper plates
- What do you need to work
- Manufacturing instructions
- How to make a lampshade with your own hands from different fabrics and threads
- Transparent fabric
- What do you need to work
- Master class on making and decorating
- thick fabric
- Step-by-step instructions for making and decorating a canvas lampshade
- Master class on making a lampshade from threads without a frame
- What materials and tools will be needed
- Detailed master class on making and decorating
- Shade made of beads and artificial flowers
- Homemade frame
- Do-it-yourself frame for a lampshade made of wire: base and additions
- How to make a frameless lampshade from threads
- The main methods for updating the lampshade for a table lamp with your own hands
- Conclusion
Tips and ideas for creating
Plafond from free-form newspaper tubes
Homemade decorative items can be made from almost any material. Designers offer such unusual ways to make a do-it-yourself ceiling lamp:
- Use cut bottoms from one and a half liter plastic bottles. The elements are fastened together in the form of a circle with glue
- Recall school labor lessons and use the papier-mâché technique - paste over an inflated ball with a large number of layers of thin paper
- Make tubes from old newspapers and magazines, from which to form a ceiling of a strict geometric or arbitrary shape
- Assemble a stained-glass lampshade from cabochons or rhinestones on a heat-resistant basis. Alternative option - colored gel glue for decorating with glitter
- A frameless lampshade using the technique of gluing threads onto a ball is made from knitted napkins, clothesline, decorative ribbons
- Lampshades made of threads using macrame technique look unusual in the interior
- A cheap, but no less spectacular way to decorate a lamp is paper trim. There are options for covering the frame with a sheet of fabric or making complex origami figures for an unusual decor.
- Even an ordinary glass jar with a plug, fixed on a suspension cord, can become a lampshade
- The most popular ways to decorate the fabric base of the ceiling are to use beads, beads, lace, chiffon flowers, braid, fringe
Glass jar chandelier
Creating a lampshade for different types of lamps requires more imagination and creative inclinations than the skills of a builder.Therefore, even children will cope with the process, for whom making a frameless object or decorating a finished frame will be a pleasant entertainment.
Variants of ready-made homemade paper shades
The main thing in this business is to follow safety rules and choose the right materials: fire-resistant, natural and high-quality.
How to fit a frame from an old lamp with a cloth, the video says -
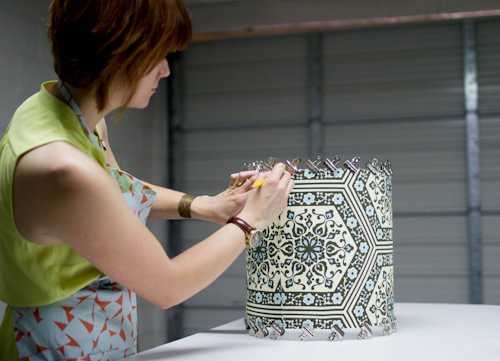
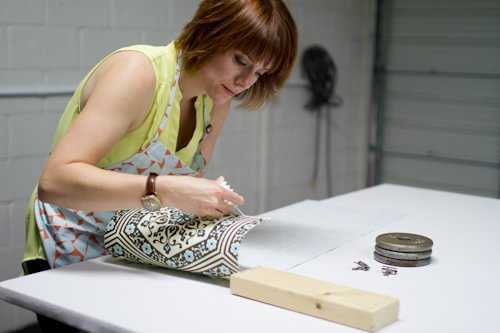
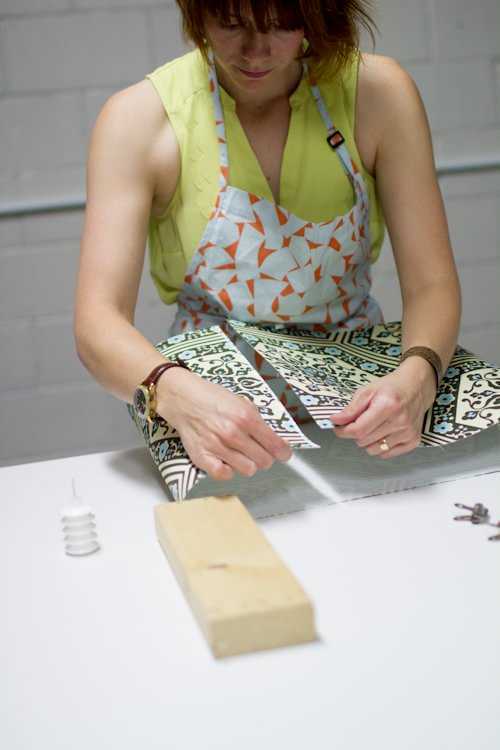
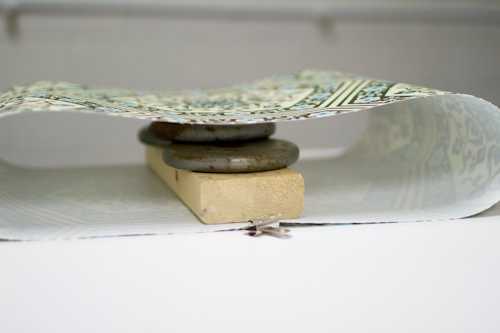
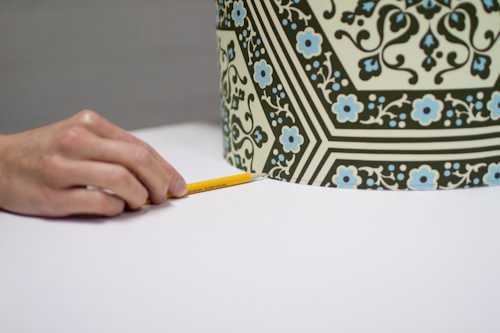
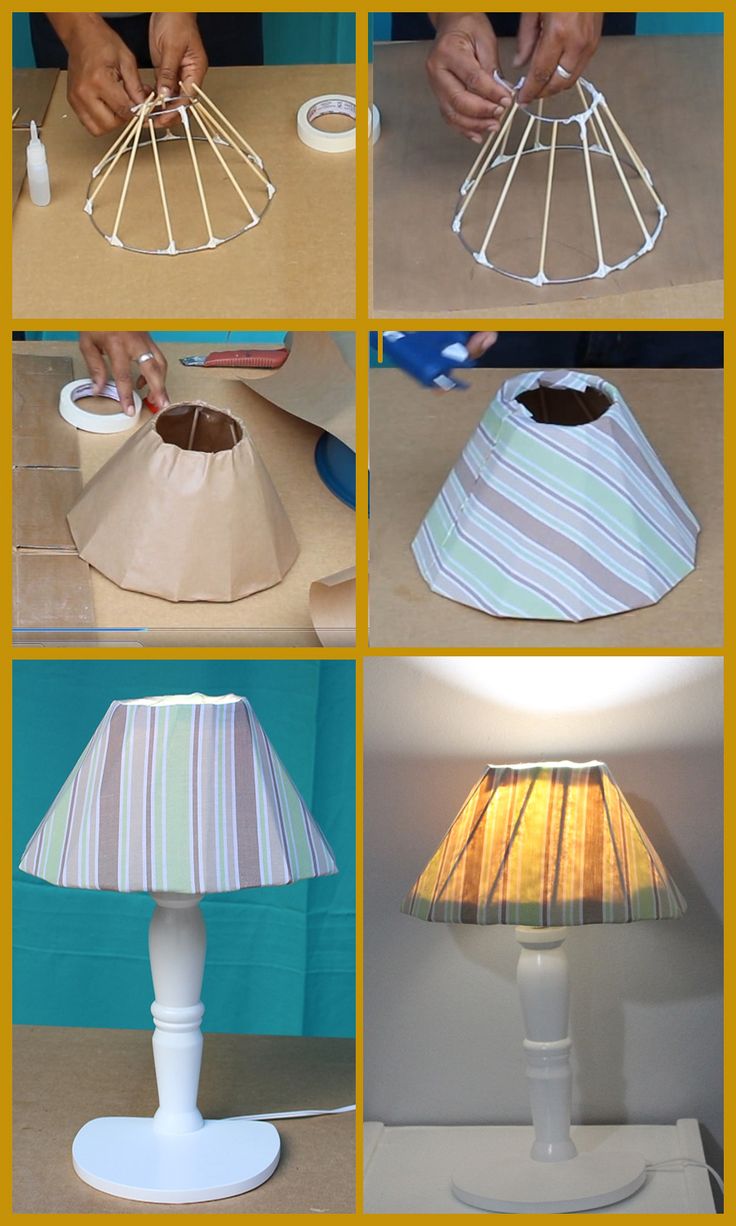
How to cover a lampshade with fabric with your own hands
Lampshade: a unique piece of furniture that you can make with your own hands from available materials | 150+ Photo Ideas & Videos
Detailed instructions for creating a lampshade in the form of a ball of threads are given in the format of a master class -
How to make a lampshade with your own hands. Lampshade made of threads in the shape of a ball and a lamp from it
Lampshade: a unique piece of furniture that you can make with your own hands from available materials | 150+ Photo Ideas & Videos
A quick and easy way to make a paper lampshade for a table lamp, which you can understand even without explanation, is given in the video -
How to make a lampshade with your own hands. Lampshade made of threads in the shape of a ball and a lamp from it
Lampshade: a unique piece of furniture that you can make with your own hands from available materials | 150+ Photo Ideas & Videos
Do-it-yourself furniture and other wood products: drawings of benches, tables, swings, birdhouses and other household items (85+ Photos & Videos)
lampshade frame for lamp
To update the lamp, you can use the old frame. A detailed inspection will help determine whether it is suitable for further use. Rusty spots, chips, cracks, breakage. If they are minor, then it is worth repairing.

If everything is hopeless, then you need to buy an inexpensive lamp and take its frame.But you can make or take items that are on the farm for such a purpose:
- plastic pot for indoor flowers;
- metal or plastic wastebasket;
- a piece of wire mesh of certain dimensions, the edges of which are connected;
- plastic bottle of 5 liters;
- wooden sticks made of bamboo, which can be connected with glue and wire;
- wire base of two circles interconnected in several places.

In fact, if you think about it, then there are much more ideas and methods for making a lampshade and a frame for it, you just have to think about it.

Light bulbs for a homemade lamp are better for safety reasons to take LED or energy-saving ones. Then the lampshade surface will not heat up, deteriorate, or cause harm.


Frame manufacturing
The frame is the foundation. If you don’t like the old design, you can completely make a new lampshade, giving its frame the necessary shape. You can purchase a ready-made frame in a specialized store or make it yourself from wire.
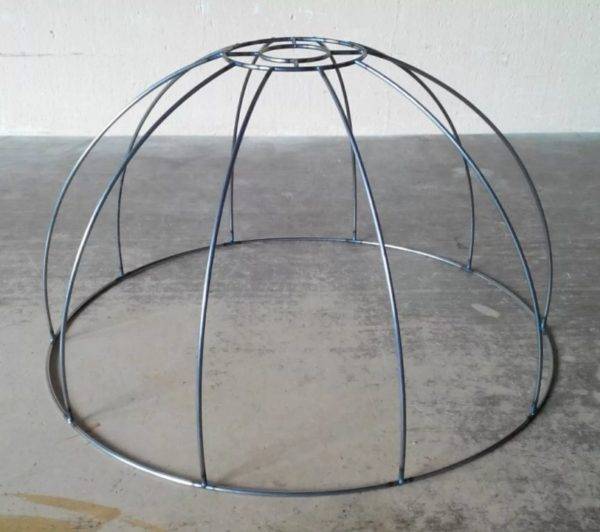
The frame determines the shape of the lampshade and its design.
Table 1. Making a wire frame
| Illustration | Description |
|---|---|
| Step 1 | Using a ruler and wire cutters, you need to prepare two pieces of wire, the length of which will correspond to the perimeter of the lampshade. |
| Step 2 | With the help of pliers, the wire is bent and a circle is formed, for the adhesion of which a loop and a hook located at opposite ends of the wire are used. |
| Step 3 | The loops are bent with pliers. |
| Step 4 | Having measured the height of the lampshade, cut off two pieces of straight, even wire with a margin for making loops on both sides. |
| Step 5 | On a piece of wire, loops are bent from the ends. |
| Step 6 | One end of the wire is fixed to one circle with a loop, the other end is attached to the second circle. Also fix the second piece of wire. In order for the vertical parts to be fixed in one place, they are glued together using “cold welding”. |
| Step 7 | The next step is to prepare 4 pieces of wire, the length of which will correspond to the radius of the circle with allowances for the loops and minus the length of the radius of the circle for the light bulb. |
| Step 8 | A circle of small radius, which will be put on a cartridge with a light bulb, is fixed using 4 pieces of wire obtained for “cold welding”. |
Fabric lampshade decoration
A table lamp with a lampshade looks much nicer than just an ordinary bare lamp. But if a solid color is chosen for the lampshade, then you can decorate it in an original way. Here are some ideas on how to make an interesting fabric lampshade decoration.


![[master class] DIY lampshade | 150+ photo ideas](https://fix.housecope.com/wp-content/uploads/9/a/6/9a67998aac1453b6a1b4f7b7850803e9.jpe)
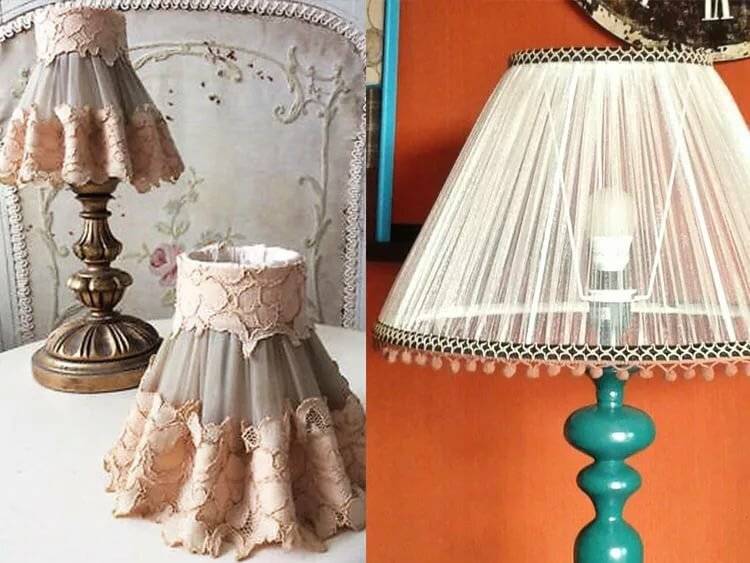

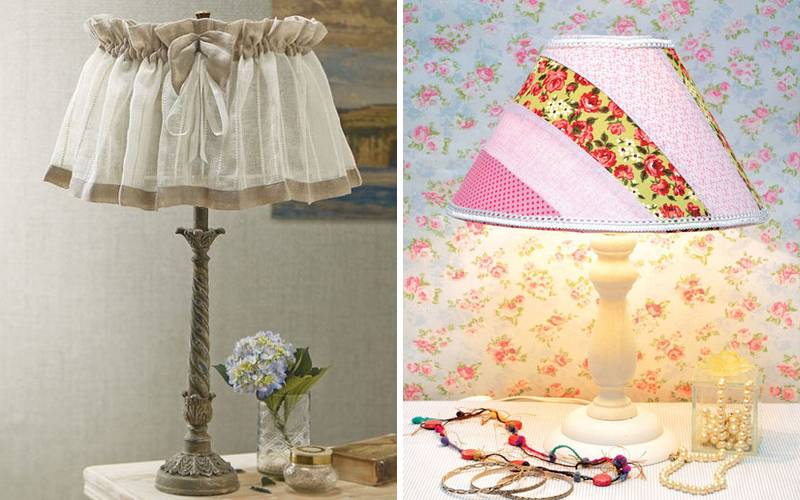
Lampshade in Provencal style
In order to decorate a plain lampshade, you will need a piece of fabric and a fringe. Usually, green, turquoise and pastel shades of colors are used for the Provence style, checkered colors or floral patterns are also suitable.
First you need to choose a suitable fabric for a plain lampshade and cut out two strips from it - one to decorate the top of the lampshade. This strip of fabric should be long enough to completely wrap around the circle and make a bow. The second strip should have the circumference of the bottom of the lampshade, and a fringe must be sewn to it. You can do this on a sewing machine.
All free edges of the fabric must be processed so that it does not crumble. After that, using glue or thread with a needle, you need to attach the fringed ribbon to the base of the lampshade so that the fringe hangs down.
Then you need to decorate the top of the lampshade. To do this, you need to glue or also sew the ribbon along the circumference, and tie the free edges with a bow.
Lace can also be used for a Provencal-style lampshade. This element is good because it can be simply glued to the fabric.
Can do lace flowers, stripes, or full wrap fabric lampshade lace doilies.
Lampshade with fabric flowers
Another unusual idea that will allow a table lamp with a lampshade to look like a flower bed is decorating with fabric flowers.
Fabric of delicate shades is perfect for flowers, you can use, for example, organza or chiffon, or you can simply take, for example, an old sweater, cut strips and twist roses out of them.
The lampshade can be decorated with just a few flowers, but if you have time and patience, you can make a whole bunch of flowers to completely cover the lampshade.
Do-it-yourself lampshade from scraps
If there are many pieces of different fabrics at home, you can make a lampshade from multi-colored shreds.
In order to make such a lampshade, it is necessary to use the technique of sewing pieces to the fabric base. The easiest way is to cut a piece of fabric to the size of the frame and divide it into several wedges.
Then you need to sew patches to each wedge the way you like - you can sew strips of fabric diagonally, or make small squares. So that the process does not drag out, it is better to use a sewing machine.
After that, all the wedges with patches will need to be sewn together and glued to the base of the lampshade.
Such a lamp can perfectly fit into the country style!
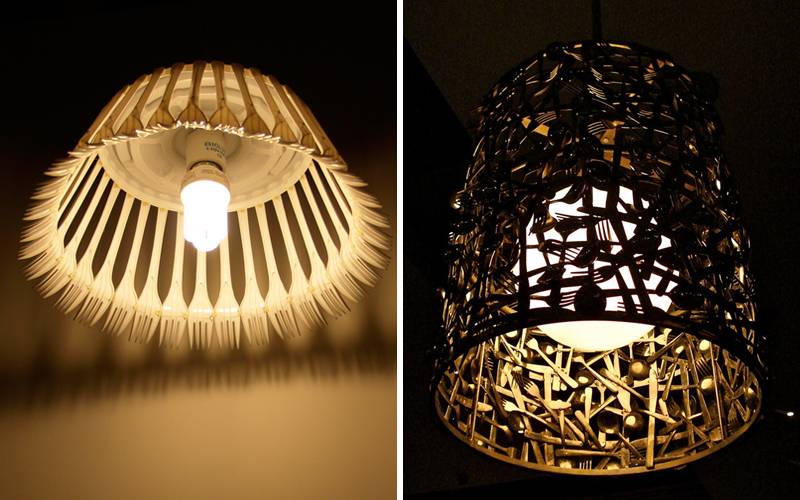
Lampshade made of unusual materials
When the lampshade is made independently, you can give free rein to your imagination and experiment. To make an original thing, you must first find an unusual material.
It is very interesting, for example, in the kitchen, a lampshade made of burlap can look. This fabric transmits light well. Such a lampshade can be decorated with some wooden details, for example, clothespins or wooden beads and buttons.
You can also use grandmother's old lace napkins to decorate. Also on such a lampshade you can write something with white or black paint, as they usually write on bags.
For a teenager's room, you can sew an American-style lampshade. This will require denim. And you don’t have to buy it, you can just cut old jeans - every person will surely have such a thing.
Such a lampshade can be decorated, for example, with a denim pocket, where you can insert an artificial flower or a piece of a checkered handkerchief. Also for such a lampshade, you can use the application. For this, pieces of leather are suitable.
For example, for a lamp that will stand in a girl's room or bedroom, you can sew a delicate mesh lampshade. This fabric can be found in any sewing store.
It will be interesting to look at the lampshade, which is made of several layers of mesh - it will resemble a ballerina's tutu or a fluffy skirt.
The following two tabs change content below.
Magazine founder, blogger, coach. We invite authors, designers and shops to cooperate.
How to make a lampshade from paper raw materials
Paper can serve as an available material for constructing the coating. It has a number of advantages over other types of raw materials:
- cheap;
- light in weight, some designs are easy to fold,
- gives you the opportunity to show imagination, you can experiment with it indefinitely;
- affordable, there is a variety of options for density and texture;
- no complicated tools are needed for work, except perhaps scissors, glue and a pencil with a ruler.

Moreover, the product can turn out so original and magnificent that it will delight households and guests. Photos of do-it-yourself paper lampshades can be found in large numbers on the Internet, and for some it has become a good way to earn money.

Here's how to make an interesting chandelier shade that will brighten up any room in the house.
Tools:
- rim made of metal or wood;
- patterns of butterflies, dragonflies or birds;
- glue gun;
- thin fishing line or kapron threads;
- thick paper for work (cardboard, velvet).

Step by step work:
- Leave the rim from an old chandelier or make a circle of ideal shape from a fairly thick wire, which will serve as the basis. Wrap with light paper to match the color of the room or paint.
- Cut out dragonflies, butterflies, flying birds using templates.
- Glue 2 identical blanks along the line of symmetry so that each model receives 4 wings.
- Attach to the fishing line with a glue gun or with a needle, piercing each figure. There can be 5-6 pieces on one thread.
- Tie the pendant to the base. There should be a lot of fishing lines or nylon threads. Additionally, you can decorate with large beads.

Such a chandelier is elegant and airy, adding space and lightness to the atmosphere.

In fact, there are many different techniques and methods for creating paper lampshades. For example, origami, or, having prepared a lot of paper tubes, paste over a five-liter plastic container.The original ceiling can be built from corrugated paper, napkins, wallpaper remnants.


How to make a lampshade out of wood
Wooden shades can be divided into solid and composite. Solid ones are usually made from solid wood or plywood (lames stacked and glued together) by mechanical turning and milling, or by hand. The variety of designs here is endless, but the manufacturing process is laborious and requires a certain level of skill.
Usually, thin boards are used for such work, assembled into the desired shape with an adhesive method. However, a more successful option for scattering light is the use of natural sliced or peeled veneer. These are plates with a thickness of 0.6 ... 8 mm, which are easy to bend, glue, attach to a wooden frame.
The technique of working with a wooden frame and veneer is based on the basic condition: the wood is processed with sandpaper of gradually increasing grit until the desired smoothness is obtained. Treatment with impregnating oils or varnish is carried out, depending on the design, before or after assembly. To connect large / heavy parts, it is better, in addition to glue, to use wood screws or the tenon-groove assembly principle.
For a better understanding of the complexity of manufacturing a wooden lampshade, we suggest watching a master class on creating a lamp from solid wood and veneer.
Using a slightly more complex technology, you can make a lampshade with your own hands for a chandelier made of veneer or thin plastic (thick paper, cardboard).
The assembly of lampshades from individual strips or branches implies the presence of a main part that serves as a support for the cartridge into which a standard type lamp is screwed.When using LEDs, such a part can be omitted from the design, replacing it with a base plate. Plywood, veneer, slats, branches, straws are used as a material for decoration and light diffusion.
Very interesting models can be obtained by mounting a lamp from wooden cubes or parallelepipeds with gaps, on wooden or metal pins.
Using this technology, you can make a lampshade for a bath, but it is imperative to use waterproof cartridges and lamps that are allowed to be mounted in wet rooms.
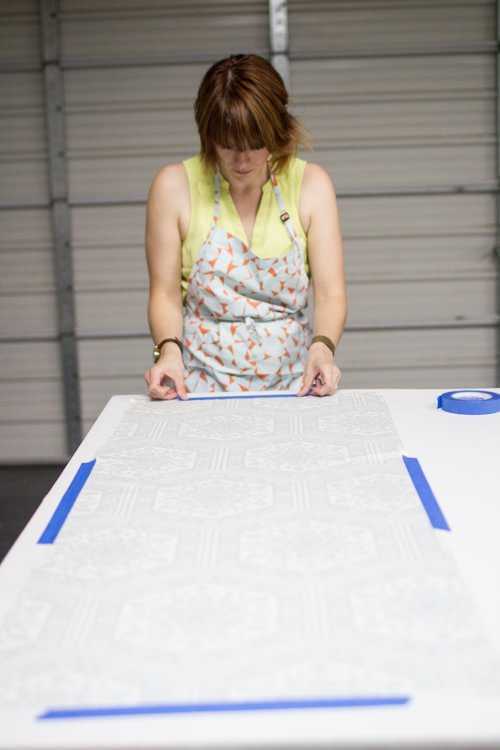
How to make a paper lampshade with your own hands
Paper is a versatile material. Firstly, it's cheap, and secondly, even if you spoil something, you can simply redo it at no cost.
Origami paper lampshade
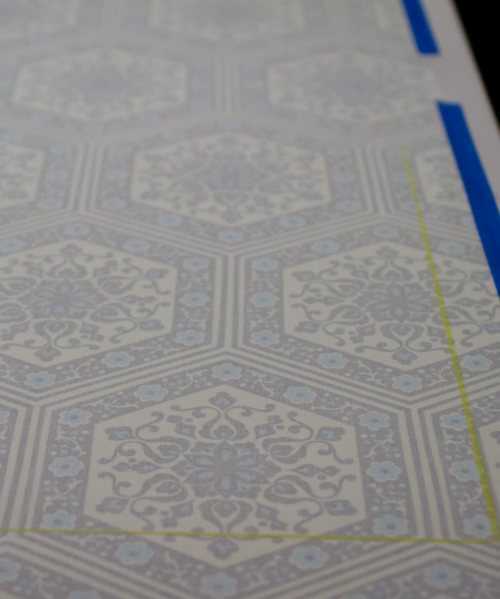
You can make a unique lampshade with your own hands from light plain solid wallpaper using the origami technique. In the evening, the play of shadows will attract the eye, creating a romantic mood.
What do you need to work
For work we need:
- frame for a cylindrical lampshade;
- white dense wallpaper, you can take with a textured base;
- a sheet of yellow paper to create a template in sizes 30 × 21 cm;
- ruler;
- glue "Moment";
- plastic five-liter bottle;
- pencil;
- scissors and ruler.
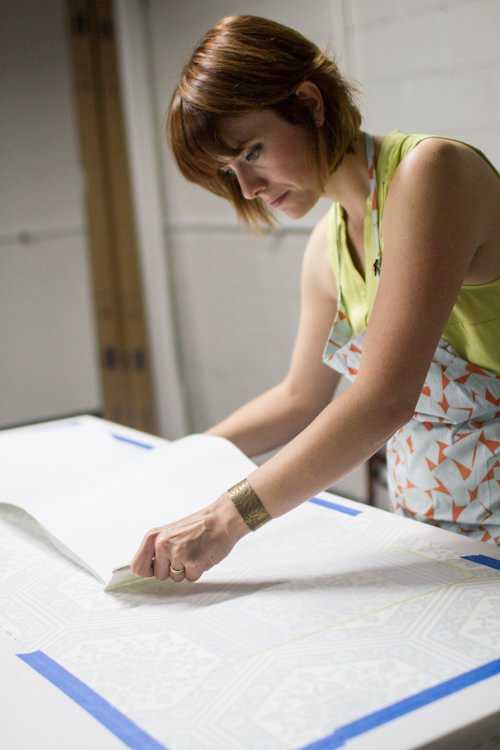
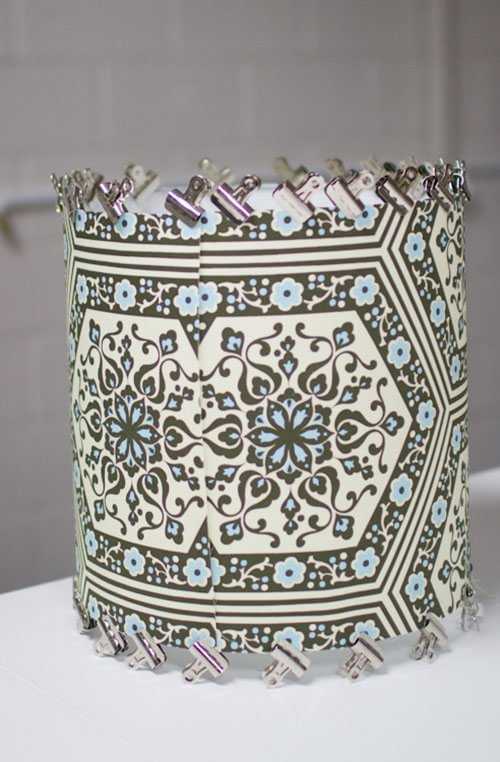
Detailed instructions for making a lampshade using the origami technique
Consider a master class on creating a lampshade using the origami technique in more detail.
| Illustration | Work description |
| Connect the center points diagonally, horizontally and vertically as shown in the figure. | |
| Retreat from the central point along the width of the leaf 4 cm towards the middle, along the long side - 3 cm. | |
| From the marked points, draw an arc with a compass with a radius of 2.5 cm. | |
| On the width of the sheet from the junction of the arc with the line, retreat 3 cm and draw a line to the right on both sides. | |
| Cut out the template and cut it as shown in the picture. | |
| Cut off a sheet of white wallpaper, fold it in half, coat one side of the PVA and spread the glue evenly with a brush. | |
| Fold the paper in half and iron the surface carefully. | |
| Attach the blank to paper and cut out the outline with a clerical knife. | |
| Make cuts as on the template. | |
| Roll the sheet into a tube, securing the sides in the slots. | |
| Cut off the neck of a plastic five-liter bottle and glue the blanks with Moment glue. | |
| On the base, make a hole for the cord and fix the cartridge with the LED bulb. | |
| Agree, it turned out a real work of art. |
You can watch the video in more detail about the whole process:
Watch this video on YouTube
Lampshade from disposable paper plates
The original lampshade for a cylindrical base can be made from plain paper plates. Such a lamp will serve as a night light in the nursery or create a romantic mood in the interior in the evening, it will successfully fit into the living room and study, as well as into the bedroom.
What do you need to work
For work we need:
- thermal gun;
- frame 13 cm high and 15 cm in diameter, previously pasted over with white paper;
- paper plates with a diameter of 18 cm - 50 pcs.;
- ruler, scissors and pencil.
Manufacturing instructions
Looking at the laconic design of the lamp, no one will guess that it is made from ordinary disposable plates. You can experiment with shades and additionally color the material or decorate it as you wish.So, step by step instructions for making a lampshade.
- Fold the plate in half, measure from the center line 0.5 cm to the side and cut. We will use this blank as a template.
- Attach the template to each plate, first on one side, push the cut line with knitting needles or scissors, then repeat the steps on the other side. You should learn 2 parallel lines.
- Fold the plate along the lines, the fold width should be no more than 1 cm.
- Glue the plates to the frame as close as possible to each other with the place of the fold.
It is very easy to calculate the number of plates, for this the diameter of the frame must be divided by the width of the fold
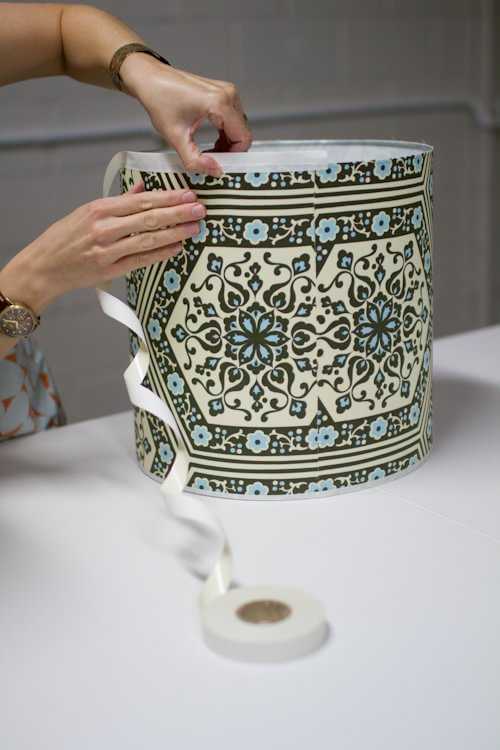
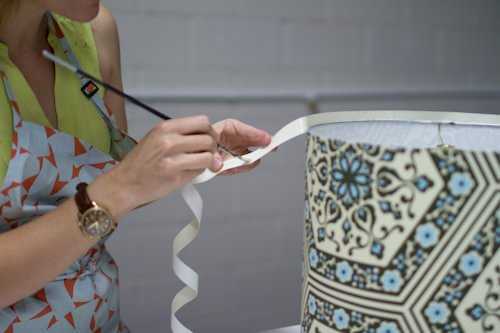
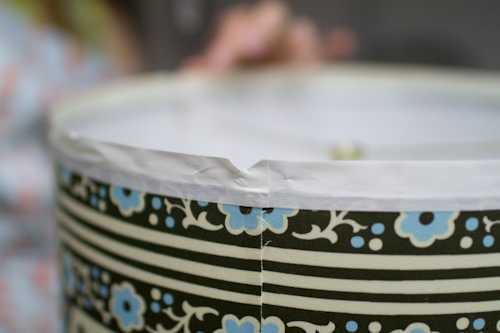
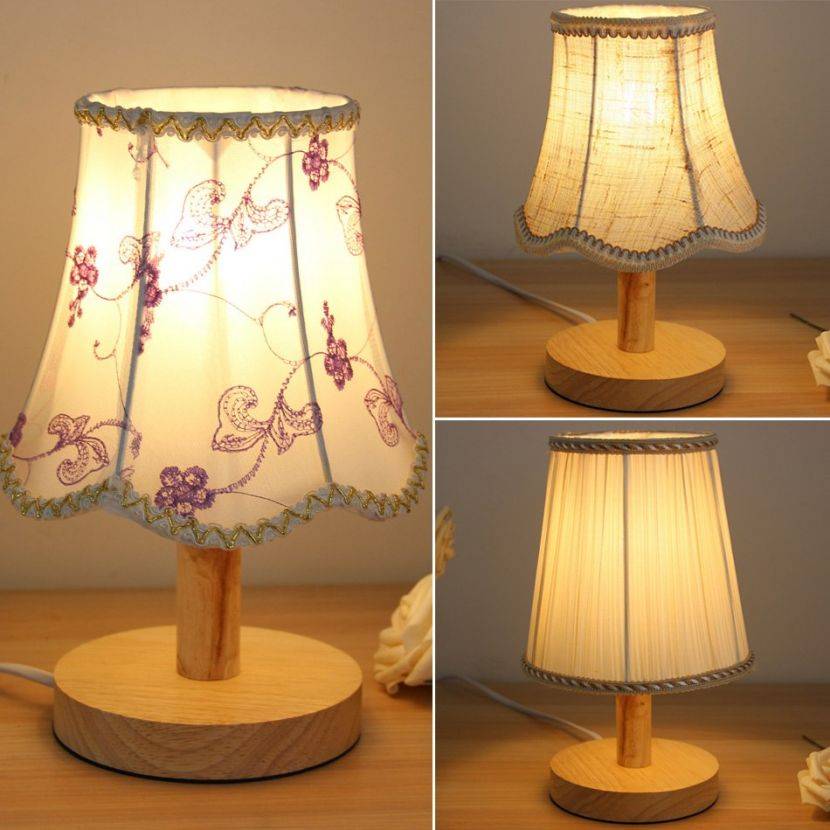
How to make a lampshade with your own hands from different fabrics and threads
So, we have prepared the basis. It's time to start decorating it. We invite you to come up with some creative ideas with us. Our master classes will help to cope with this task.


Transparent fabric
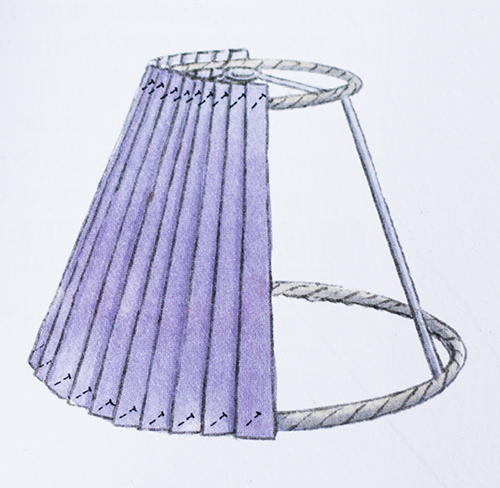
If the frame is made with high quality, it can be covered with a thin fabric, the shade of which will either be in contrast or in tone with the base, depending on the idea. Everything that is convenient for you to work with is suitable: silk, taffeta, tulle or tulle.
You can simply cover the old lampshade of a table lamp with lace and decorate with ribbons
What do you need to work
The lampshade can be made in several ways, for example, simply wrap the frame with a cloth without using a sewing machine. We offer an unusual option in the form of a jellyfish for the little princess's children's room. To sew a lampshade for a floor lamp, we need:
- chiffon;
- scissors and marker;
- candle and glue gun.
Master class on making and decorating
We offer to make an unusual lampshade in the form of a jellyfish together with us, which will radically change the interior and bring a touch of fantasy and creativity.
| Illustration | Work description |
| First you need to make shuttlecocks. To do this, cut out a circle on paper and cut it in a spiral. | |
| Pin the template to the fabric, circle with a thin marker and cut out. | |
| Burn all places of cuts over a candle so that they do not bloom. You need to make several such tentacles. | |
| Tie the tentacles to the frame, the more there are, the more elegant the lamp will turn out. | |
| Throw a prepared piece of square-shaped chiffon onto the frame and tie it with a ribbon. | |
| Tuck the edges of the cut inward and glue with a heat gun. | |
| You can make air folds by planting the fabric on the glue. | |
| Such a lamp will decorate the room of a little princess. |
In more detail, the entire progress of work can be viewed on the video:
Watch this video on YouTube
thick fabric
Before sewing a lampshade made of thick fabric, bring it to the included light and see if it transmits rays, if such lighting is enough for you. Do not try to completely repeat the old lamp, use your imagination to create a creative cover. For example, for a girl's room, you can make it in the form of a skirt, for a boy - a geographical map, for the kitchen in the form of a napkin with cutlery pockets.
For work we need:
- the cloth;
- paper;
- pencil and thermal gun;
- scissors and sewing machine;
- decor.
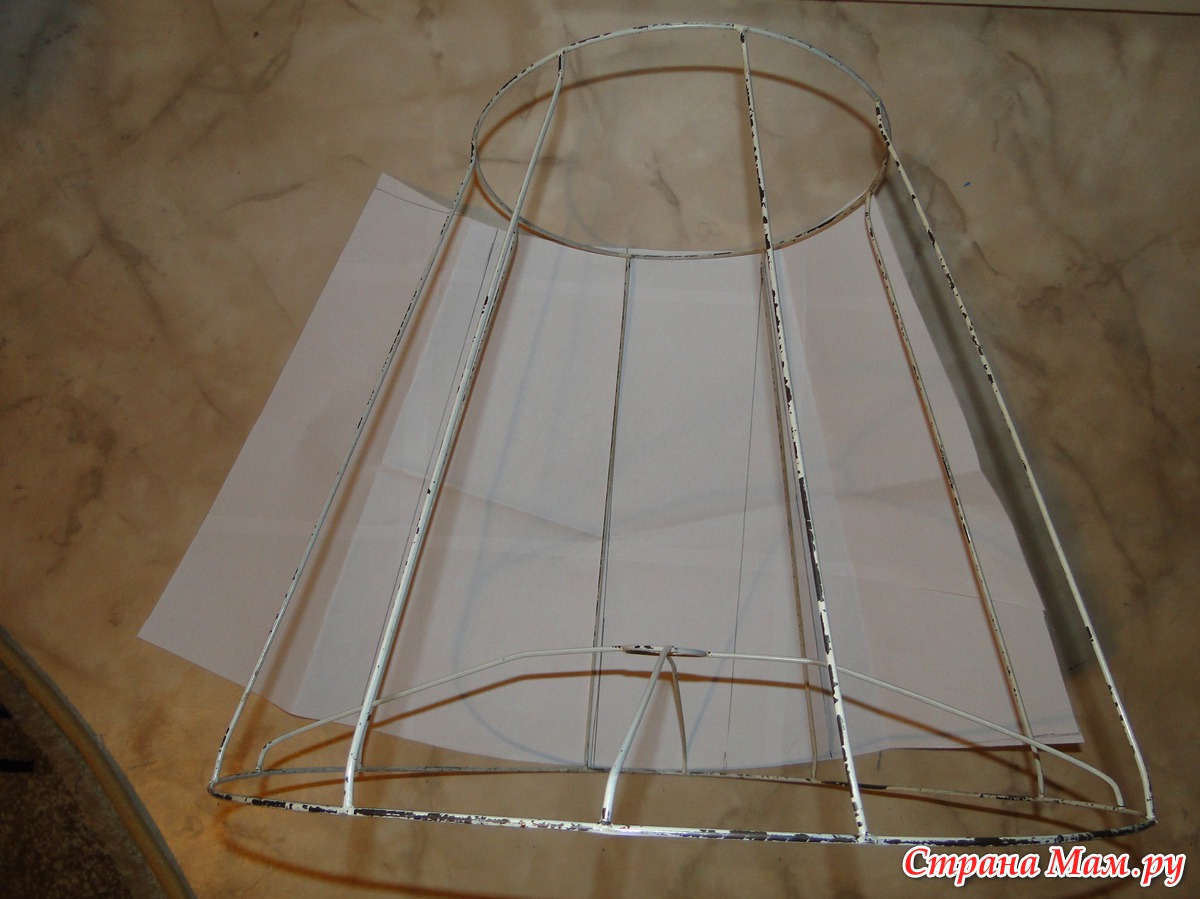
Step-by-step instructions for making and decorating a canvas lampshade
We will make the simplest lamp cover, for the manufacture of which we will need only 30-60 minutes.
- Wrap the frame with paper and mark the main places with a pencil. This will be our pattern.
- Transfer the template to the fabric with a chalk or pencil, remembering to allow for seam allowances of 1-1.5 cm on each side.
- Cut out the pattern, hem the edges and sew on the side.
- Insert the frame, fix the edges of the lampshade on top and bottom with glue and tuck.
- The cover is almost ready, it remains to decorate it at your discretion.
Master class on making a lampshade from threads without a frame
If you do not have a frame, it does not matter, we will show you how to make a lampshade for a chandelier without it. It can be absolutely any form. A balloon and even a small cardboard box are suitable as a basis.
What materials and tools will be needed
For work we need:
- balloon;
- rectangular vase;
- plastic bag;
- food film;
- cotton threads;
- PVA glue;
- scissors.
Detailed master class on making and decorating
Before starting work, inflate the balloon to the desired size and tie the tail with threads. Then we look and repeat all the actions for us.
| Illustration | Work description |
| Spread the PVA ball and wrap it with thread. At the bottom, leave room for the cartridge. Wind the threads in a chaotic manner. At the end of the work, generously grease the entire surface with PVA, after a while go through the glue again and leave it to dry completely overnight. | |
| After the glue dries, pierce the ball, when air comes out of it, just cut it and pull it out. For the second ceiling, we need a vase. It must be wrapped in a plastic bag and pressed tightly with cling film. It will hold the shape of a vase. | |
| Moisten the thread in glue and wrap the vase in a chaotic manner. Coat with glue twice and leave overnight to dry completely. | |
| In the morning, first remove the vase, then the bag, the cling film will need to be carefully peeled off the walls. We got two different lampshades, but made in the same way. | |
| This is how lampshades look different in the interior. |
Additionally, you can decorate the lampshades with flower petals, glass beads or beautiful pendants, the main thing is not to overdo it with the decor.
Shade made of beads and artificial flowers
A very beautiful creation that requires painstaking and perseverance. You will need many colors, beads or large beads, fishing line, a needle and thread and glue. It is most convenient to place flowers on a frame with cardboard. It used to be very fashionable to decorate the walls with bouquets of artificial flowers, so they are probably gathering dust somewhere in your boxes. And in just a few hours, or even earlier, you will look at them completely differently. Separate the buds and some petals from the stems. You can even remove the plastic holders, but then you need to grab the petals with thread so that they do not fall apart. So the parts will fit most tightly to the cardboard and stick easily. Arrange flowers and petals on the frame, filling the entire space. Well, if there are several varieties of flowers. You can make a beautiful flower arrangement on a lampshade from a plain fabric.
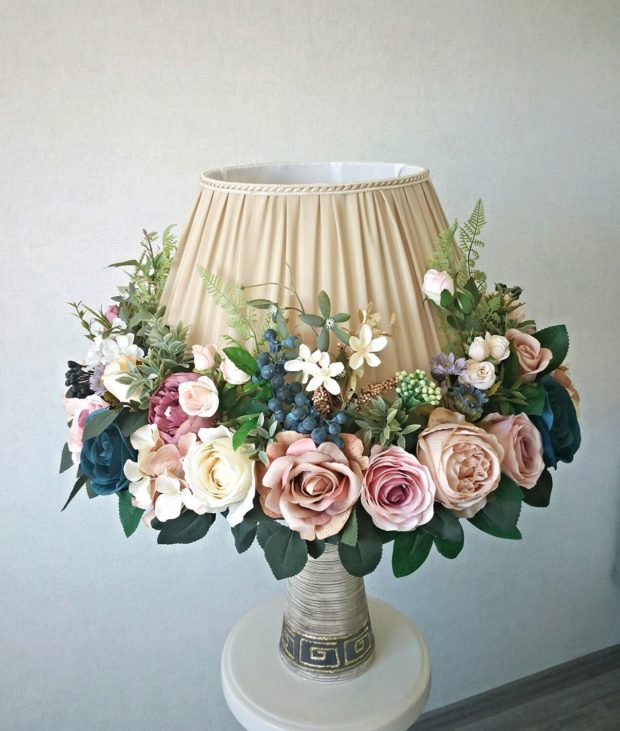 Imagine that you are making a bouquet, and you yourself will understand how best to proceed. Along the edge of the lampshade, you can add a fringe of several beads on a fishing line, or glue them in different places on the petals. You can glue a few butterflies or a dragonfly, in general, whatever you consider necessary. And large beads strung on a nylon thread can be used as the main material.As in the example with ribbons, it is necessary to fill the entire perimeter of the frame with beads, fixing the thread alternately on the upper and lower rings.
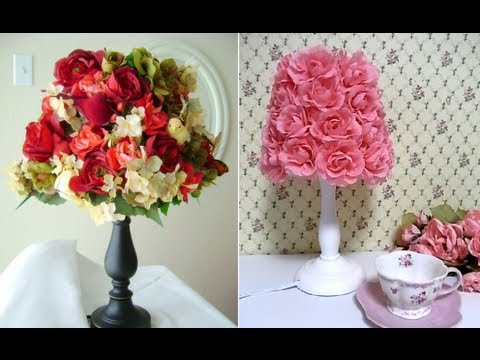
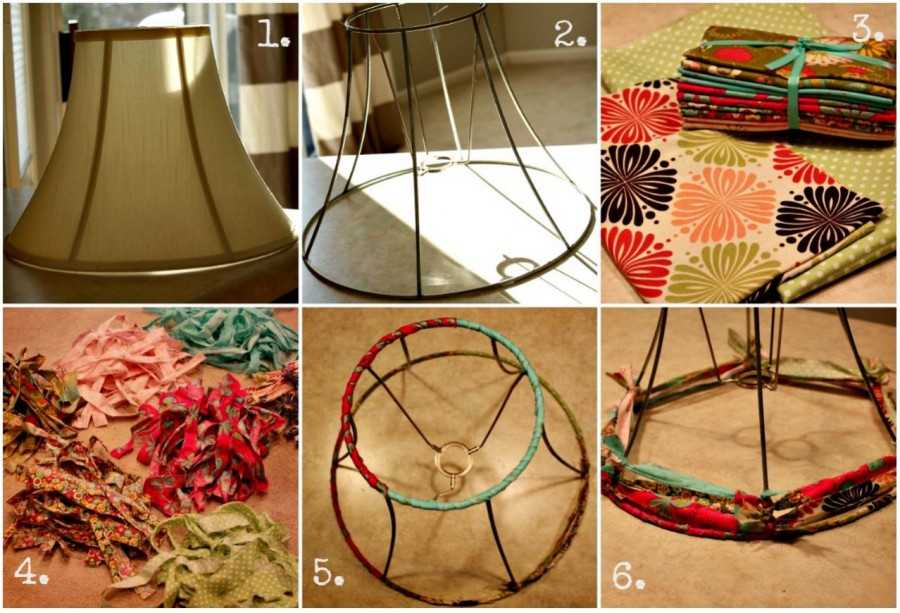
Homemade frame
Without a doubt, the interior of any room should be filled with a special atmosphere where you can feel the comfort and harmony of the home environment. In this regard, every detail deserves attention, even, it would seem, at first glance, a trifle! And lighting fixtures are generally a separate conversation, and in some cases they occupy a central place in the overall picture of the interior.
And as we know, it is not always possible to get what you want at a reasonable price. Therefore, we are increasingly inclined towards the need to manufacture such products ourselves. This is especially true in cases where only the bases of old chandeliers, floor lamps, and table lamps remain. It's a sin not to take advantage of the opportunity! Just a few more words worth mentioning about the types of lampshades:
- frame structure;
- frameless products.
At the same time, each of them has its own characteristics. But if you imagine everything in a general way, they also have similarities.
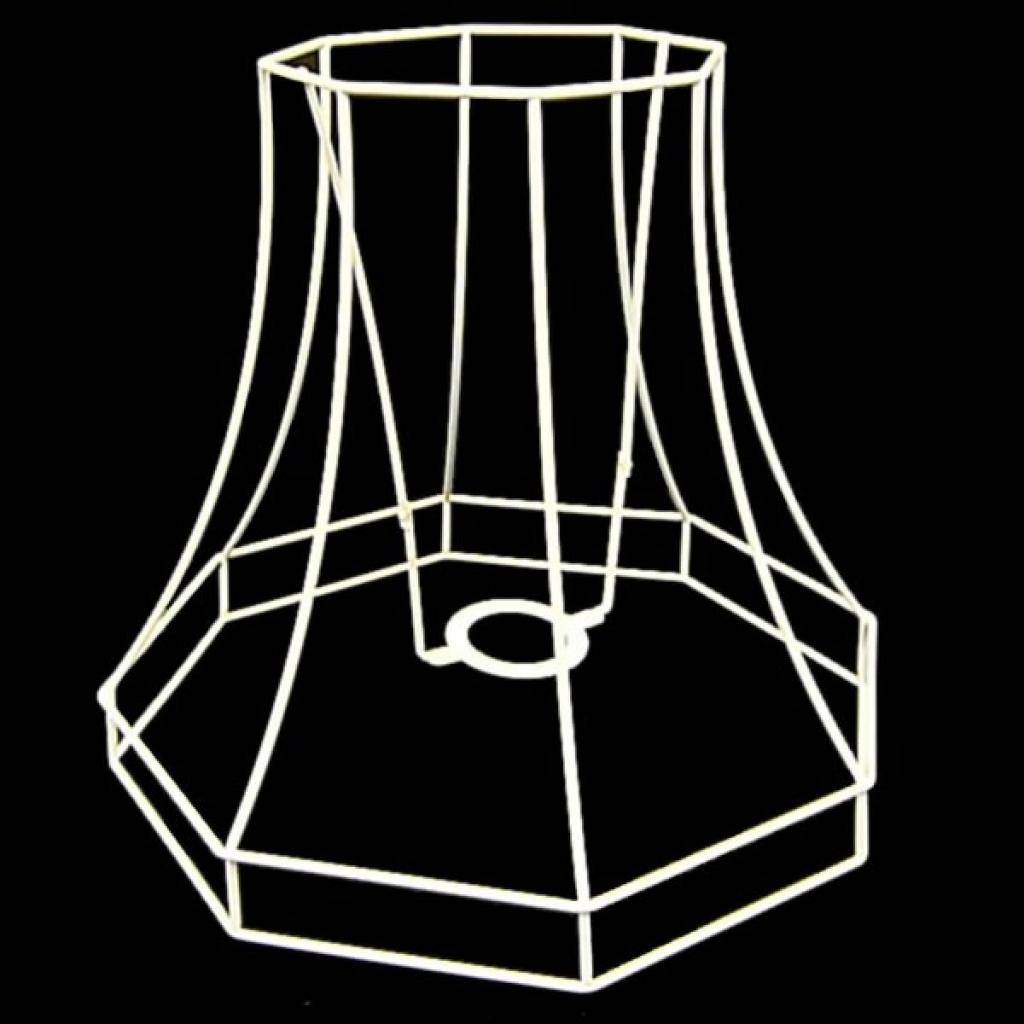
Do-it-yourself frame for a lampshade made of wire: base and additions
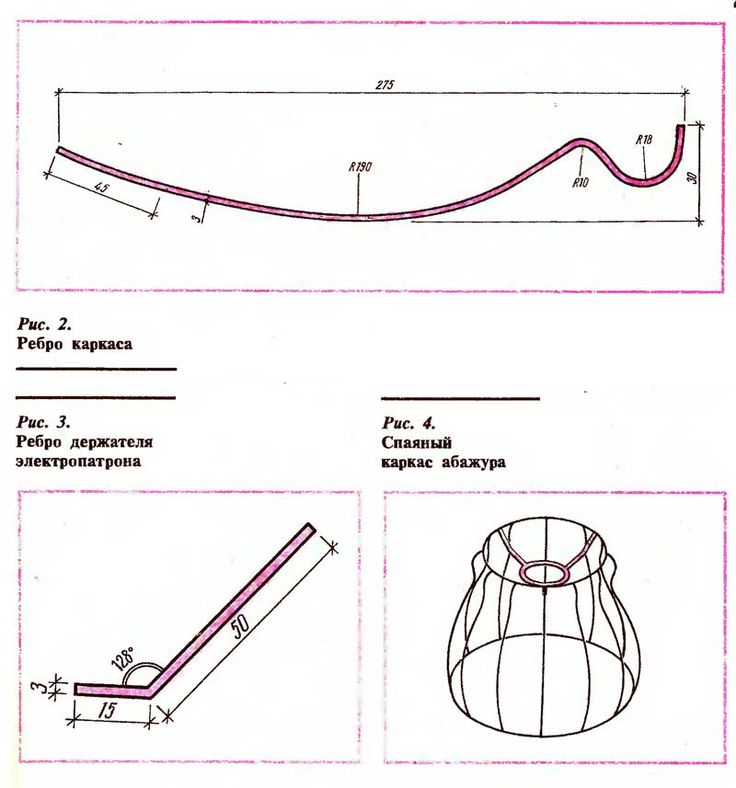
The main types of frames are shown in the figure.
They are based on basic details that give the product the shape of a circle, oval, square, rectangle, and so on, as well as auxiliary ones. They define the geometry of the lateral surface - from straight lines or convex / concave. Fragments are also required that connect the lampshade to the support - the lamp leg - and do not allow the finishing materials to touch the light source.
Required for work:
- hard steel wire (copper, aluminum) with a diameter of 3 ... 5 mm (depending on the size of the structure and the weight of the finishing materials) or a thin metal strip. Individual pieces of wire can be replaced with wire mesh;
- decoration material - fabric, natural or artificial leather, rope (threads, twine, ribbons), vine (straw, wire, newspaper tubes and other options) for braiding the frame and so on;
- tools - wire cutters, pliers and round nose pliers - for work.
When planning to make a lampshade with your own hands for a round or oval floor lamp, you must first calculate the size and number of intermediate racks. The smaller the distance between them, the rounder the design will turn out. Usually, for a base circle with a diameter of 150 ... 200 mm, a step of 50 ... 80 mm is chosen.
Having cut off the necessary pieces of wire (strips, nets), they are bent and fastened with a thinner wire or soldered (welded). For convenience, the initial fixation can be done with a wire tie.
Having fastened the frame in this way, you can verify the correctness of the resulting shape and, if necessary, correct it. After that, permanent fastening is performed.
Interesting: how to check if the wire is suitable for the job? To do this, it is necessary to put the assembled “roughly” frame on its side, twist it, throw a piece of heavy fabric on it. If no deformation has occurred, the rigidity is sufficient; if not, it is better to choose a wire with a large diameter or from another material. You may need to change how the parts are attached.
To make it easier to connect fragments of wire, its ends can be bent into a ring with the help of round-nose pliers.Sanding with a small grit (40-80 grit) of the joints will help prevent slipping.


For a better understanding of the principles of working with wire, you should familiarize yourself with a master class on making a simple lampshade for a tabletop. DIY lamps wire and fabric.
It is not necessary to use textiles to scatter and muffle the light flux. Masters successfully use the techniques of crocheting and knitting, patchwork, weaving tatting and many others. Interestingly, all the options for braiding the frame help to hide the flaws in the connections of its parts.
Low light absorption coefficient is provided by lace or thin fabrics (organza, gas, chiffon, silk, mesh), high - dense (velvet, brocade, thick silk, velor, linen, cotton, wool).
Important: if the frame is not made of wire, but of wooden slats (twigs), it is not necessary to completely hide it behind the fabric. Carefully connected elements will become part of a unique design
To decorate the edges of the ceiling (and at the same time hide unsuccessful seams, frame) will help fringe, ready-made or home-made. Braid or ribbon lace is suitable for decor and masking flaws on the side surface.
The braided wire with beads or beads looks very impressive.
Another interesting option is to braid the frame with strips of fabric, ribbon or rope.
In addition, on a neatly made frame (wire, wood) you can place any other finishes - from beads and spoons to chains and clothespins.
You can leave the frame without decorations, picking up lamps with a diffusing body. However, for this it is necessary to ensure the maximum quality of assembly of parts and process their surface.
How to make a frameless lampshade from threads
It is quite possible to prepare a ceiling for a lamp or chandelier, even if there is no frame. The shape can be cylindrical, rectangular or round.
For a round product you need:
- Balloon;
- Cotton thread or twine;
- PVA glue with a brush;
- Scissors.
Step by step process:
- Inflate the balloon to the required size and secure with a thread.
- Cover the inflated surface liberally with glue using a brush.
- Gradually wind the thread from the ball around the ball in different directions, leaving room for the light bulb holder. Periodically lubricate with glue. A thread ball is formed. Repeat the glue on top.
- Leave for 1 day and wait for the product to dry completely.
- Pierce the ball and easily remove it from the thread structure. In this case, the form should be preserved.
- Now you can try on the ceiling. Decorate as desired with beads, flowers, sequins.
The main methods for updating the lampshade for a table lamp with your own hands
If there is an old table lamp in the house that does not fit in any way, you should not immediately throw it away, because with minimal effort, the lamp can be given a new life. Even if there is no old lamp, you can make a lampshade frame for a table lamp yourself. To do this, you need to get pliers and thick wire. The main advantage of using flexible wire is that the lampshade can be given any shape. A variety of options are used to tighten the frame, for example:


![[master class] DIY lampshade | 150+ photo ideas](https://fix.housecope.com/wp-content/uploads/7/d/4/7d4e62925f40b8b95b72f743ae7fe5e7.jpeg)


- camera roll;
- beads;
- wallpaper;
- knitted napkins and lace;
- plastic;
- grid;
- the cloth;
- thick paper.
You can update the old lampshade in the lamp with the help of improvised materials
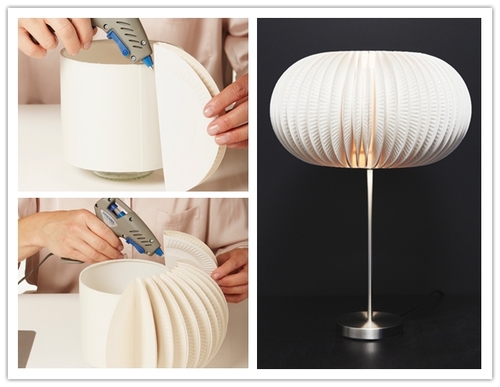
To make a lampshade out of paper, you will need to take a dense material that will last longer. For example, a ceiling made of dense non-woven wallpaper will be both attractive and durable. Rice paper can be used to restore an old lampshade that has lost its appeal. The most popular option is an accordion-shaped lampshade, to create which you will need a wallpaper cut of about 50 cm 30 cm wide. To do this, the wallpaper is neatly folded with an accordion, and then the resulting base is pierced with an awl, and laces are threaded into the hole, after which the structure is glued together.
Another attractive option is a metal mesh lampshade, which is sold at a hardware store, and you can also look for scraps in the garage or in the country. Due to the pliability of the material, you can get a product of any shape, but plafonds in the form of an ellipse or a ball are more popular. Having created the base, it is decorated with laces, pendants, beadwork or any other decorative elements.
Independent production of a table lamp only at first glance seems difficult. By and large, all the necessary parts can be purchased at any hardware store, and the missing tool is easy to rent. In addition, the manufacture of exclusive lamps does not require a lot of time. If all the materials are available, then you can design a table lamp in 1-3 days - it all depends on the selected materials and design features.
Conclusion
The chandelier is the single most important element of the upper part of the room, it can create symmetry and other geometric accents.To hang a beautiful, stylish, designer lamp in your room, it is not necessary to buy it in a store. Every home has enough items and tools to do everything on their own. In most cases, a blank, scissors, paper, glue, thread, frame, varnish and paints are enough. Sometimes you may need the help of an electrician. Most "handmade" lamps are made of wood, plastic, paper, glass, textiles or metals. There are also more exotic options using different designs, small parts, molds. A homemade chandelier should not only perform an aesthetic function, but also illuminate the room with high quality. It must be designed wisely.


