- Water meter installation diagram
- Where and how to put: choosing a place for a water meter
- What and why should be in the scheme
- Optional Schema Elements
- Water meter installation diagram
- Where and how to put: choosing a place for a water meter
- What and why should be in the scheme
- Optional Schema Elements
- Actions after installation
- Water meter commissioning
- Who is authorized to install meters?
- Install on your own or through a company?
- Self-installation procedure
- How to hire a good firm and what they should do
- Preparing for installation
- Installation of water meters by campaign representatives
- How to prepare a water meter for insertion into a pipe?
- Comparison of tariffs with and without a water meter
- How much do you have to pay for community services?
- What is the need for water meters
- Possible meter malfunctions
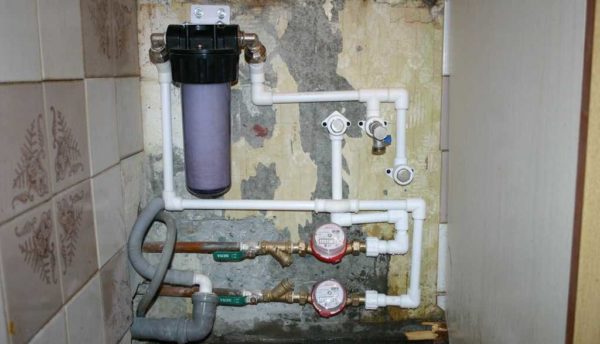
- What needs to be prepared before installation?
Water meter installation diagram
It doesn’t matter whether you install the meter through a company or do it yourself, you need to know how the correct scheme should look like - it is very desirable to control the process
Where and how to put: choosing a place for a water meter
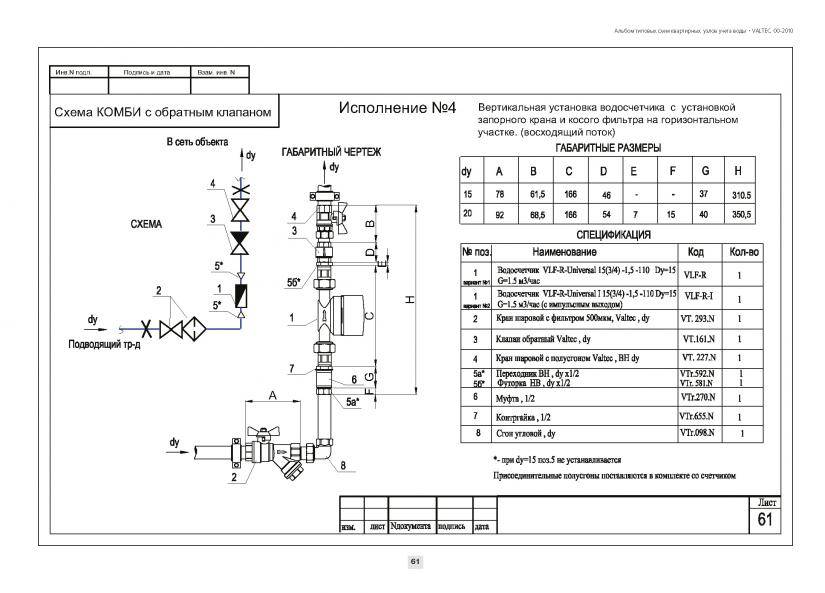
They put meters immediately after the riser in a straight section to the first branch to plumbing fixtures.There are water meters, the installation of which is possible only in a horizontal position, there are models with the possibility of vertical installation. Just keep in mind that in a horizontal position, the accuracy of the device is higher than in a vertical one and it is not a fact that it will count less. So it is highly desirable to find a way to put it "lying".

Installation of water meters is desirable in a horizontal direction
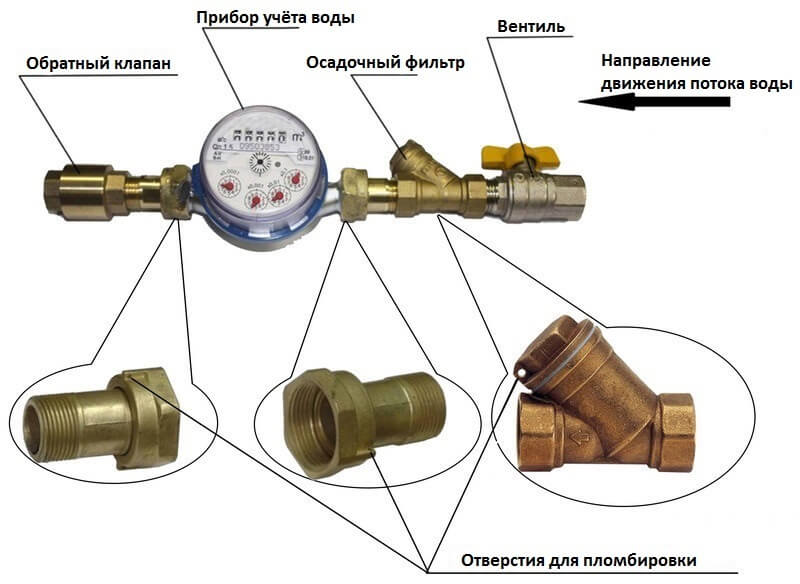
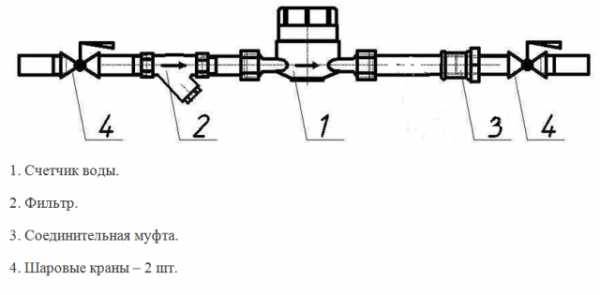
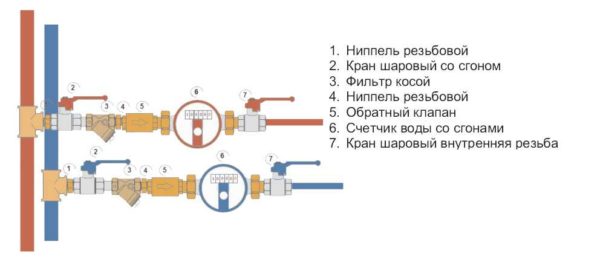
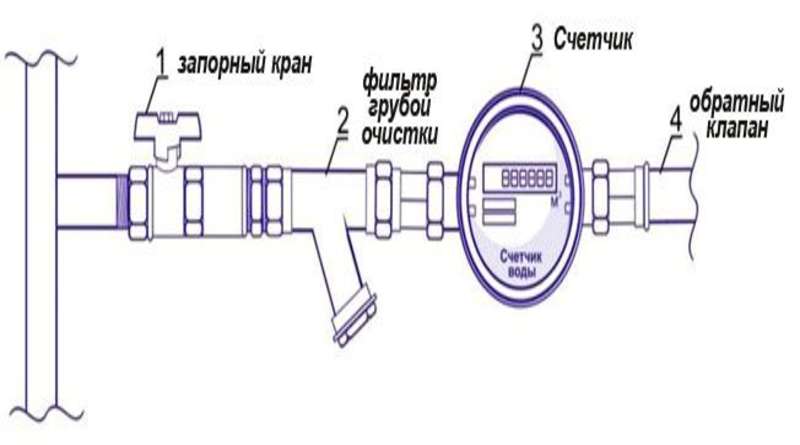
What and why should be in the scheme
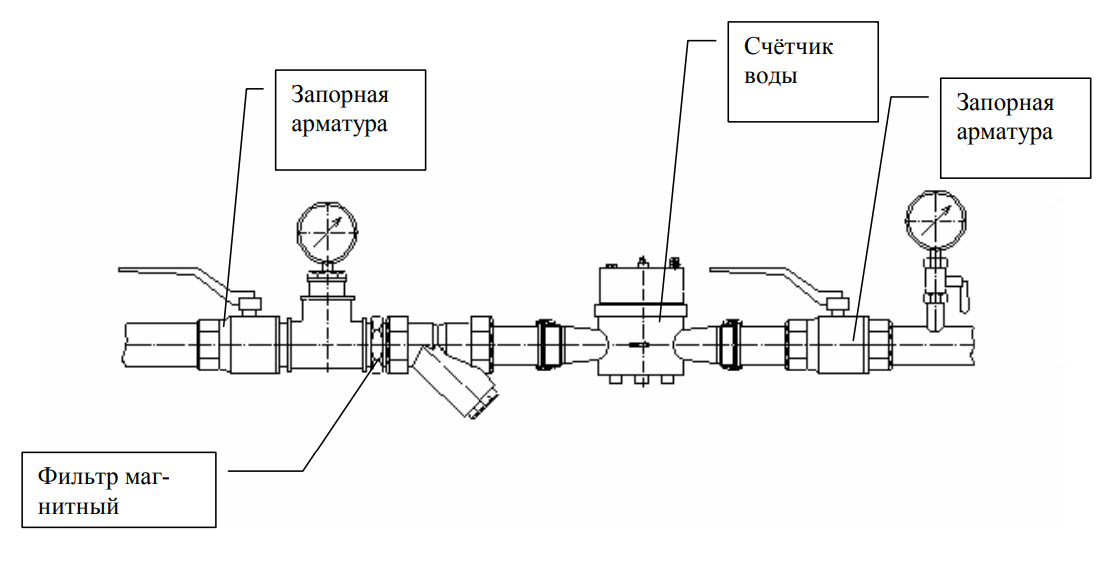
The standard scheme for installing a water meter looks like this:
- a ball valve is screwed onto the pipe coming from the riser,
- a coarse filter is installed,
- counter;
-
further wiring.
Now more about what each element is needed for.
A ball shut-off valve is needed to turn off the water if necessary - fix the mixer, clean the filter, change the meter, etc. Therefore, its presence is mandatory. It must be placed so that it is convenient to turn the valve.
The coarse filter captures the largest particles that are in the water supply. It must be placed so that the outlet is directed downwards. Otherwise, it will clog up quickly.
All these elements most often have an internal thread. So that they can be connected to each other, connecting elements are used, which are often called "drives". They have external threads on both sides and a small section of a flat pipe (in some cases, only a few millimeters at all). With their help, everything is connected to each other.
Optional Schema Elements
Often a check valve is placed after the counter. It is required so that in the absence of analysis, the water does not go in the opposite direction. It also eliminates the increase in reading in the presence of unstable pressure.
He also cuts off two more unpleasant situations: and does not allow cold water to flow from one pipeline to another. This happens if someone has a hygienic shower installed on the riser (on the toilet or bidet), a shower cabin with cheap faucets. They do not have non-return valves and such overflow is possible.
Scheme with check valve
If the pressure of cold water is higher than hot water, then cold water reduces the temperature of the hot water supply, and in the opposite situation, from the tap cold water can go hot. Therefore, the installation of a check valve for both cold and hot water is highly desirable, but not required.

Scheme of installing a water meter with stopcocks on both sides
Sometimes, after the check valve, it is recommended to install another shut-off valve. It is needed so that when removing the meter or when cleaning the same filter, water from the pipes in the apartment does not drain to the floor. In principle, you can substitute a container, but this is not always possible. There are about 6 liters of water in the pipes of an ordinary apartment, collecting from the floor is not the most pleasant experience. But this strapping element is placed or not at the request of the owner.
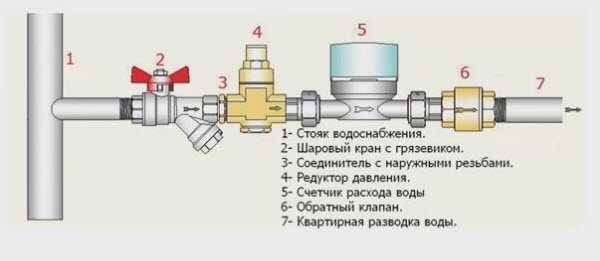
Scheme with pressure reducer
There is another device that can be installed - a pressure reducer. It stabilizes the pressure in the system, extending the "life" of all household appliances and faucets / faucets. Placed after the coarse filter. Not the cheapest thing, but very useful.


Water meter installation diagram
It doesn’t matter whether you install the meter through a company or do it yourself, you need to know how the correct scheme should look like - it is very desirable to control the process
Where and how to put: choosing a place for a water meter
They put meters immediately after the riser in a straight section to the first branch to plumbing fixtures. There are water meters, the installation of which is possible only in a horizontal position, there are models with the possibility of vertical installation. Just keep in mind that in a horizontal position, the accuracy of the device is higher than in a vertical one and it is not a fact that it will count less. So it is highly desirable to find a way to put it "lying".
Installation of water meters is desirable in a horizontal direction
What and why should be in the scheme
The standard scheme for installing a water meter looks like this:
- a ball valve is screwed onto the pipe coming from the riser,
- a coarse filter is installed,
- counter;
- further wiring.
Installation of water meters with a minimum number of elements
Now more about what each element is needed for.
A ball shut-off valve is needed to turn off the water if necessary - fix the mixer, clean the filter, change the meter, etc. Therefore, its presence is mandatory. It must be placed so that it is convenient to turn the valve.
The coarse filter captures the largest particles that are in the water supply. It must be placed so that the outlet is directed downwards. Otherwise, it will clog up quickly.
All these elements most often have an internal thread. So that they can be connected to each other, connecting elements are used, which are often called "drives". They have external threads on both sides and a small section of a flat pipe (in some cases, only a few millimeters at all). With their help, everything is connected to each other.
Optional Schema Elements
Often a check valve is placed after the counter.It is required so that in the absence of analysis, the water does not go in the opposite direction. It also eliminates the increase in reading in the presence of unstable pressure.
He also cuts off two more unpleasant situations: and does not allow cold water to flow from one pipeline to another. This happens if someone has a hygienic shower installed on the riser (on the toilet or bidet), a shower cabin with cheap faucets. They do not have non-return valves and such overflow is possible.
Scheme with check valve
If the pressure of cold water is higher than hot water, then cold water reduces the temperature of the hot water supply, and in the opposite situation, hot water can flow from the cold water tap. Therefore, the installation of a check valve for both cold and hot water is highly desirable, but not required.
Scheme of installing a water meter with stopcocks on both sides
Sometimes, after the check valve, it is recommended to install another shut-off valve. It is needed so that when removing the meter or when cleaning the same filter, water from the pipes in the apartment does not drain to the floor. In principle, you can substitute a container, but this is not always possible. There are about 6 liters of water in the pipes of an ordinary apartment, collecting from the floor is not the most pleasant experience. But this strapping element is placed or not at the request of the owner.


Scheme with pressure reducer
There is another device that can be installed - a pressure reducer. It stabilizes the pressure in the system, extending the "life" of all household appliances and faucets / faucets. Placed after the coarse filter. Not the cheapest thing, but very useful.
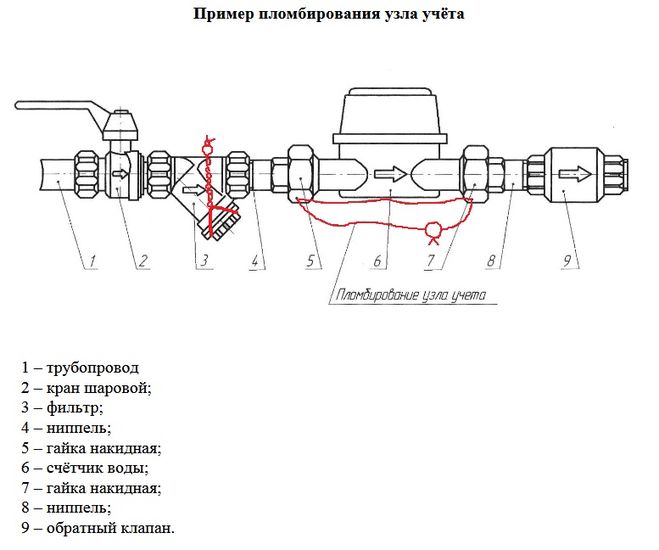
Actions after installation
After self-installation of the water meter, checking its performance, you should call a specialist from the management company to check the meter and seal it.
After that, he must make an appropriate mark in the passport and transfer the data to the REU. From this moment, the meter is considered accepted for operation, and readings can be taken from it.
We must not forget that there is a certain periodicity for verification of meters for subject of correctness.
For a hot water meter, the verification period is once every 6 years, and for a cold water meter - once every 4 years. For verification, you can contact the REU or a specialized company.
Water meter commissioning
 After completing the installation work and checking for leaks at the joints, you can safely use water, but payment will still be made at the rate of residents registered in the apartment, and not according to the meter. Therefore, it is urgently necessary to notify the organization involved in providing water to the consumer about the installation of the device.
Not later than in 3 working days, an inspector or a person authorized in this matter will come to seal the water meter. At the same time, the homeowner must have a technical passport for the water meter and an act on the inspection of the device; no additional documentation is required. The main thing is that there is no external damage to the device or seal.
The inspector will draw up an act confirming the commissioning of the water meter and seal all the connecting nodes. In addition, the consumer and the inspector will conclude a service contract
At the same time, it is important to carefully study all the clauses of the contract, since there are cases when an inappropriate amount of the subscription fee for service or insurance for breaking the seal was entered in the documents in an inconspicuous font and an unknown, quarterly check of the device at the expense of the subscriber
Immediately after the conclusion of the contract, payment for water will be made in accordance with the indications indicated on the device. As for the technical passport for the water meter, the inspector withdraws it for the time of making a copy, and then returns it to the subscriber. In order not to worry about the documents for the meter, you can independently make high-quality photocopies of all pages of the registration certificate in advance and transfer them to an authorized person of the water utility.
Who is authorized to install meters?
- Homeowners associations, management companies or DEZs are responsible for installing meters in apartment buildings. It is necessary to write an application with a request to install and register a water meter.
These organizations do not always carry out the technical part of the installation of devices, recommending trusted companies, but you need to start the design with them.
- In new buildings, meters are installed by the developer at the construction stage, as prescribed by the above law. If the house or cottage is built independently, then for permission to insert water meters into the water supply system, you must contact the local branch of the water utility or the Directorate of a Single Customer (DEZ).
- In private sector homes, permission and registration is carried out by the local water utility or DEZ. Most often, they themselves do the whole complex of works.
- This issue in municipal apartments is resolved through municipalities, prefectures, administrations of districts and city districts, that is, in state authorities that are the landlord. The application is submitted to the department in charge of public services. They also recommend companies that can perform installation work.
- And finally, there is a universal way that almost everyone can use. Construction and repair organizations involved in the installation of measuring equipment will independently perform the entire procedure.
After installing the meter, the owner will only have to call a specialist from the utility service involved in water supply to seal the meter, conclude a service contract and re-register the personal account from standard accounting to accounting according to the water meter.
If utilities refuse for any reason to permit the installation and registration of a water metering device, request a refusal in writing and contact the Prosecutor's Office or the Antimonopoly Committee.
In 2010, the issuance of licenses (“SRO permits”) was canceled, so any organization or private specialist in this field can insert a meter. You need to make sure that the installer is reliable and competent, look for reviews about him on the Internet, use the recommendations of friends and acquaintances.
Everything you would like to know about installing water meters can be found here.
Install on your own or through a company?
Under current legislation, the installation of water meters is at the expense of the homeowner. That is, you must buy a meter, install it at your own expense. The installed water meters are sealed by representatives of the water utility or the DEZ free of charge.
Self-installation procedure
Self-installation of water meters is possible. Nobody should object. You just have to do everything yourself - and install the meter, and call the representative of the Housing Office to seal it. What you need:
- purchase a meter and all the necessary details;
- agree and pay for the disconnection of the cold / hot water riser (contact the operational campaign, set the date and time);
- install a meter, turn on the water;
- call a representative of the water utility or DEZ (in different regions in different ways) to seal it, get the commissioning certificate in hand;
- go with the act and passport of the meter (there must be a serial number, a stamp of the store, the date of factory verification) to the DEZ and register the water meter.
Self-installation of water meters is not prohibited
All papers are considered, a standard contract is filled out, you sign it, on this it is considered that you pay for water according to the meter.
How to hire a good firm and what they should do
There are two ways to find a company that installs water meters: take a list in the DEZ or find it on the Internet yourself. The list will already include firms that have licenses, but obviously not all that work in this area. On the Internet, it is necessary to check the availability of a license. A copy of it must be posted on the site.


Then, in any case, you should read the standard contract that the company will conclude with you. It should contain a complete list of services. The conditions can be different - someone provides their counter, someone puts yours, someone comes with their spare parts, someone works with what the owner has. By combining the list of services provided and make a choice.
No hassle, but decent money
Previously, the contract contained a clause on service maintenance, and without it, firms did not want to install meters. Today, this item is recognized as illegal, since it is not necessary to actually service the meter, and it should not be in the clause, and if it is, you have the right to refuse these services and not pay for them.
Preparing for installation
If you have chosen a different campaign, you must leave them an application. There are two options - some firms accept applications on their website and may even offer a discount for this, while others prefer to see you in the office and sign an agreement.
First, company representatives inspect the installation site
In any case, first a campaign representative arrives (you agree on the date and time of arrival), inspects the “field of activity”, assesses the condition of the pipes, takes measurements, and often takes photos of communications. All this is necessary in order to be able to develop a meter connection diagram and quickly assemble it. Then you should call and clarify the date and time of installation of the water meter. In this conversation, you need to find out who is negotiating the shutdown of the risers with the operational campaign. Normal firms take it upon themselves.
Installation of water meters by campaign representatives
At the appointed time, a campaign representative (sometimes two) arrives and does the work. In theory, they should agree with you what and how to put, but this does not always happen. At the end of the work (usually takes about 2 hours), they give you a certificate of completion and a special paper on which the factory numbers of the metering devices are written.After that, you must call a representative of the govodokanal or DEZ to seal the meter (different organizations deal with this in different regions). The sealing of counters is a free service, you will only need to agree on the time.
In the normal condition of the pipes, the installation of water meters for professionals takes about 2 hours
In the act that you were given during installation, the initial readings of the meter must be affixed (they are different from zero, since the device is verified at the factory). With this act, a photocopy of the organization's license and your water meter's passport, you go to the DEZ, sign a standard contract.
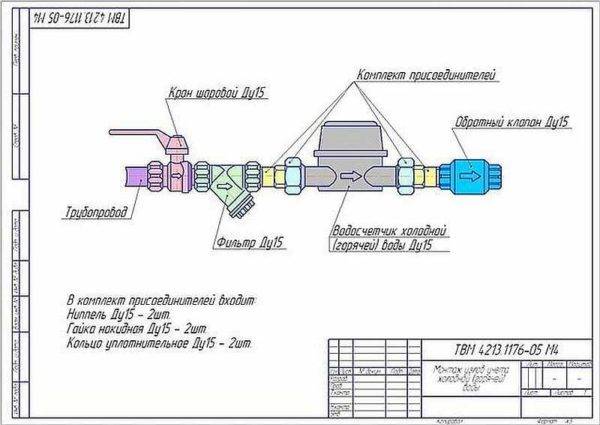
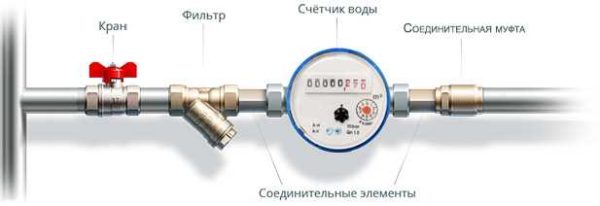
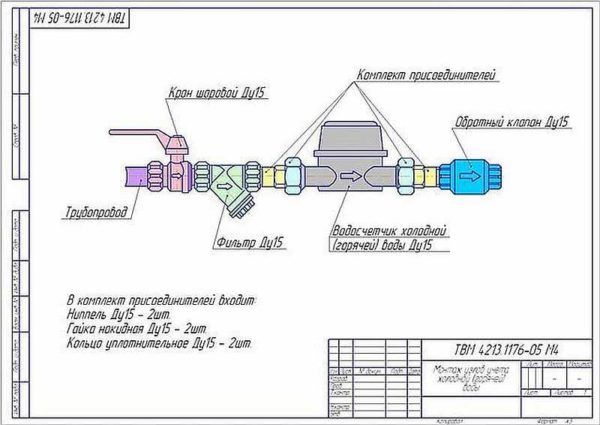
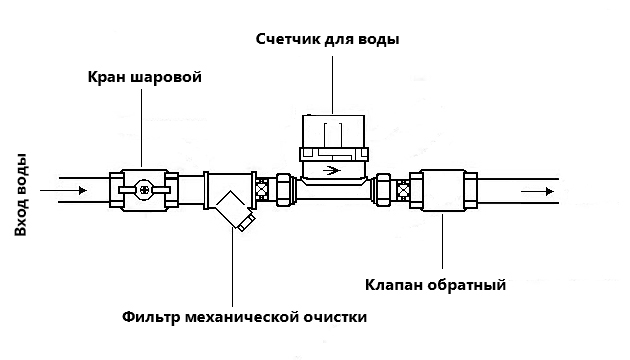
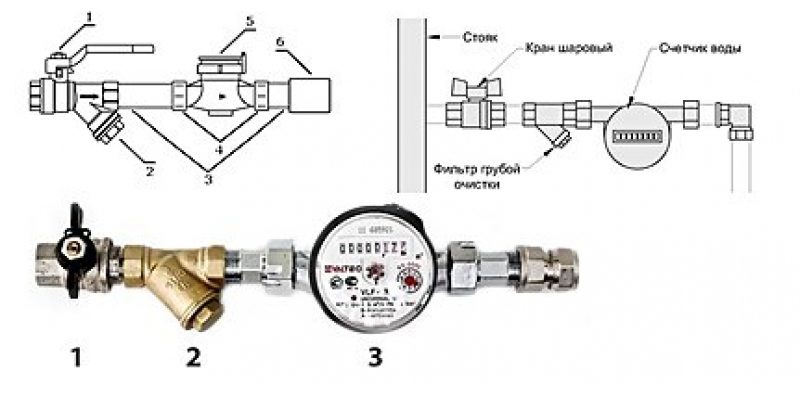
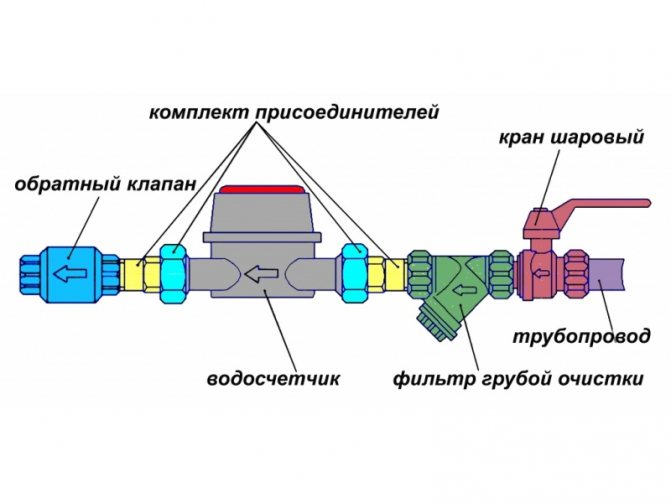
How to prepare a water meter for insertion into a pipe?
Before installing the water meter, it is necessary to connect a coarse filter to it. This device will protect the water meter mechanism from large particles of debris, the ingress of which can shorten the life of the device.
In addition to the filter, it is necessary to connect a check valve to the water meter, which acts as a protection against rewinding readings
Water utility inspectors pay attention to the presence of a check valve and do not accept the device into operation without this plumbing device
Together with the water meter, a coarse water filter and a check valve are installed, which prevents the meter reading from being unwinded.
Together with the meter, union nuts (American) should be included in the kit, allowing, if necessary, to remove the meter without harm to pipes and other elements of the plumbing system. The tightness of the union nuts with the check valve and the filter is ensured with the help of FUM tape or tow.
When self-assembling the water consumption metering unit, it is necessary to follow the direction of the arrows placed by the manufacturer on each component. Marks in the form of arrows show the direction in which water should flow through the meter. The American is screwed to the filter from the side of the sharp end of the arrow, to the non-return valve - from the reverse side (the tail of the arrow).
If you confuse the direction of the arrows on the filter, check valve and the water meter itself during assembly, you will not be able to seal the meter. The representative of the water utility will check the correct installation of each element of the block
On the water meter, the manufacturer also indicates the desired direction of water with an arrow. If you ignore this mark, then the correct operation of the device cannot be guaranteed. Depending on the design of the water meter, the water supply to plumbing fixtures may even stop. The arrow on the device must be oriented in the direction from the shut-off valve embedded in the water riser. The instructions attached by the manufacturer to the water meter indicate the connection diagram of the water meter to the water supply system. When self-assembling, these recommendations should be taken into account.
Comparison of tariffs with and without a water meter
The owners of premises with a meter pay for utilities according to indications - in this case, everything is quite simple.
Homeowners without metering devices will have to pay according to the standards, so it is important for them to take into account, which establishes the procedure for determining the rate of resource consumption per person. According to this document, the final decision is approved by the local authorities
For example, in Moscow, the rate of consumption of cold water is 6.94 m3, hot water - 4.75 m3, and in St. Petersburg 4.90 m3 and 3.48 m3, respectively
According to this document, the final decision is approved by the local authorities. For example, in Moscow, the rate of consumption of cold water is 6.94 m3, hot water - 4.75 m3, and in St. Petersburg 4.90 m3 and 3.48 m3, respectively.


The installed meter simplifies the process of calculating the amount due: it is enough to find the product of the device readings and the current tariff, taking into account the category of water supply.
In the absence of a device, the owner of the premises needs to:
- Find out the number of persons registered in this residential area.
- Clarify the water standard established by local authorities for the current period.
- Find out rates.
- Take into account the multiplying factor, which was introduced by Decree of the Government of the Russian Federation No. 344 of 2013. It applies to premises where a metering device is not installed or it is in a faulty condition. This indicator is 1.5.
For a more complete understanding, it is worth analyzing a specific example of calculating water fees without a meter for a family of three, registered in St. Petersburg:
- the rate of consumption of cold water per person - 4.9 m3;
- tariff for 1 m3 of cold water - 30.8 rubles;
- DHW consumption rate per person - 3.49 m3;
- the tariff for 1 m3 of hot water supply is 106.5 rubles.
The amount payable for water supply is determined as follows:
- For cold water 679.1 rubles = 3 * 4.9 * 30.8 * 1.5.
- For hot water 1,672.6 rubles = 3 * 3.49 * 106.5 * 1.5.
- Total 2351.7 rubles = 1672.6 + 679.1.
The real average monthly water consumption per person is: 2.92 m3 of cold water and 2.04 m3 of hot water. That is, the same family of three, after installing the meter, will need to pay:
- For cold water 269.8 rubles = 3 * 2.92 * 30.8.
- For hot water 651.8 rubles = 3 * 2.04 * 106.5.
- Total 921.6 rubles = 269.8 + 651.8.
After installing the meter, a family from St. Petersburg will have to pay almost 3 times less, which speaks in favor of the availability of the necessary equipment.
How much do you have to pay for community services?
The receipt for utilities also has a column "Common house needs", which the owners of MKD are forced to pay. This item includes the cost of water for cleaning premises, entrances, elevators, watering the club in the adjacent area, etc.
How much you have to pay depends on the availability of a common house and individual metering device.
If the devices are installed, payment is made as follows:
- When calculating ODN, first of all, readings are taken - PU shows how much resources were consumed by MKD during the reporting period.
For example, 2 thousand m3 is the amount of water that was used both for general house consumption and for individual consumption (by apartment owners).
- Further, the readings of the IPU, which were provided by the owners of the premises, are summarized. For example, 1.8 thousand m3. To ensure the correctness of the flow balance, the values for the general and individual devices are taken at the same time.
- At the third stage, the volume of consumption is allocated for the maintenance of common areas: 200 m3 = 2,000 - 1,800 (as much was spent on watering flower beds, washing entrances, etc.).
- The fourth step is the distribution of ODN to all tenants. To do this, you need to determine the volume per 1 m2. Let's say the total area of the MKD is 7 thousand m2. Then the desired value will be: 0.038 m3 = 200/7,000.
- To obtain a calculation for a specific apartment, you need to multiply the identified volume by the area of \u200b\u200bhousing. For example, it is 50 m2: 1.9 m3 = 0.038 * 50.
At the end, payment is calculated taking into account regional tariffs. A family from St. Petersburg will have to pay: 58.5 rubles = 1.9 * 30.8. If there is no common house meter, the calculation is carried out according to the established standards, taking into account the multiplying factor, which implies an increase in the amount by 4-5 times.
What is the need for water meters
In accordance with the legislation of the Russian Federation, since 2015, each owner of an apartment or a private house is required to install a hot and cold water consumption meter.
Despite the fact that the deadline for the widespread equipping of apartments and houses with individual water meters is constantly being pushed back, according to Government Decree No. 306, HOAs and the UK have the right to impose increased tariffs for water use for residents who have not yet installed these devices.
Water meters are purchased independently, and the installation can be ordered from a local management company or a specialized company. In this case, you will need to pay a certain amount. To save on installation, you can install the water meter yourself. This is not as difficult as it might seem at first glance.
Possible meter malfunctions
A malfunction of the water meter is indicated by the lack of response to water consumption or the constant movement of numbers on the scoreboard at a time when no one opens the tap.
There are several common reasons why the counter broke:
- low water pressure or blockage in pipes;
- incorrect installation or depressurization of the device;
- water temperature for which the device is not designed.
In all cases, the water meter readings are incorrect. It is impossible to make calculations based on them.
As practice shows, most often the consumer is interested in what to do if the hot water meter does not change readings. This happens due to exceeding the permissible temperature standards when supplying hot water.
You can prevent such a malfunction by periodically checking the maximum temperature threshold. It must not exceed 90°C.
What needs to be prepared before installation?
When choosing a suitable type of meter, it is advisable to take into account not only the characteristics declared by the manufacturer, but also real reviews left by users who managed to buy and install a specific model.
After choosing a metering device, you need to make sure that the package contains everything you need to install the metering unit.
It is also worth deciding on the place where the counter will be directly installed. For normal operation of the flowmeter, natural or artificial lighting is required, the air temperature is at least 5 °C, and service space is available.


In this case, you need to follow some rules:
- It is necessary to prepare a place for the upcoming work. It seems like a trifle, but working when something interferes is extremely inconvenient and takes more time and effort.
- If the pipes are not suitable for use, care must be taken to replace them.
- The metering device kit should include: a coarse filter, a check valve, union nuts (American) and the metering device itself. If something is missing, you must definitely buy it, otherwise the counter will not be sealed.
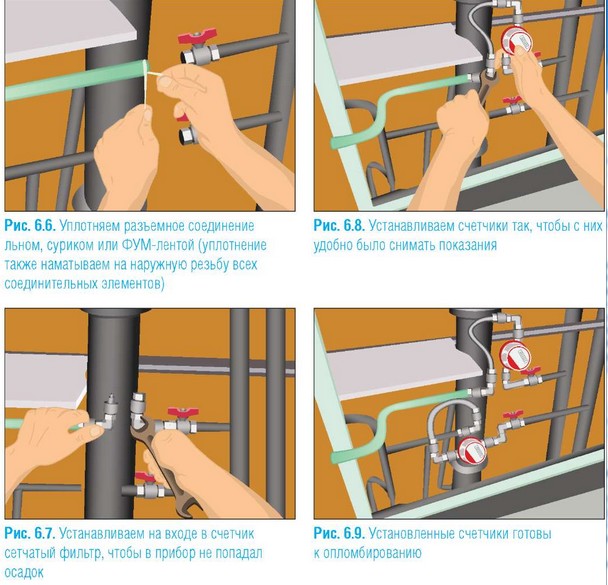
- When installing the meter yourself, make sure that there are gaskets (rubber or paronite), plumbing seals (tow, Fum tape);
- You should stock up on tools for working with pipes: scissors for cutting plastic pipes, an iron for forming joints, a set of keys, etc.
Let's consider each detail of the future node in more detail, why it is needed. The shut-off valve is used to regulate the flow of water. Usually ball valves are used.
They are easy to use, but quickly fail in an intermediate state between “closed” and “open”.
Before proceeding with the installation of a water flow control and measuring device, it is necessary to think over the scheme of its installation and stock up on the necessary details
The coarse filter is used to prevent large insoluble particles such as grains of sand contained in water from entering the mechanism of the device.
Filters for mechanical flow cleaning are of two types, straight and oblique (only oblique is used to install the meter).
The non-return valve serves mainly to prevent the meter reading from being unwinded, and also, in the absence of parsing, prevents the water from going in the opposite direction.
Americans, if necessary, will help to dismantle the water meter without consequences for the water supply system.
Other elements can also be installed in the water meter assembly. They are optional, but will be very helpful.
This is a shut-off valve after the check valve (so that when the meter is removed, the water does not drain to the floor), the pressure reducer is installed after the coarse filter, which stabilizes the pressure in the system and extends the life of household appliances.
Before installing water meters, it is necessary to carefully prepare the workplace and stock up on the necessary tools to carry out the entire cycle of work
Now the water meter itself:
- When buying, it is necessary to verify the identity of the numbers in the passport and their analogues stamped on the water meter.
- It is necessary to make sure that there is a certificate and a stamp in the passport with the date of factory verification.
- And it’s a good idea to take a sales receipt in the store and issue a guarantee; in case of a malfunction, if there is an act and a check, the counter must be replaced.
Try to purchase a water meter in a specialized store, and not in the market, it will be easier to replace in the event of a breakdown.
After making sure that you have everything you need, you can proceed to install the water meter.
Before purchasing a measuring device, it is necessary to carefully study its passport. It contains not only the characteristics of the technical device, but also information about the verifications carried out


