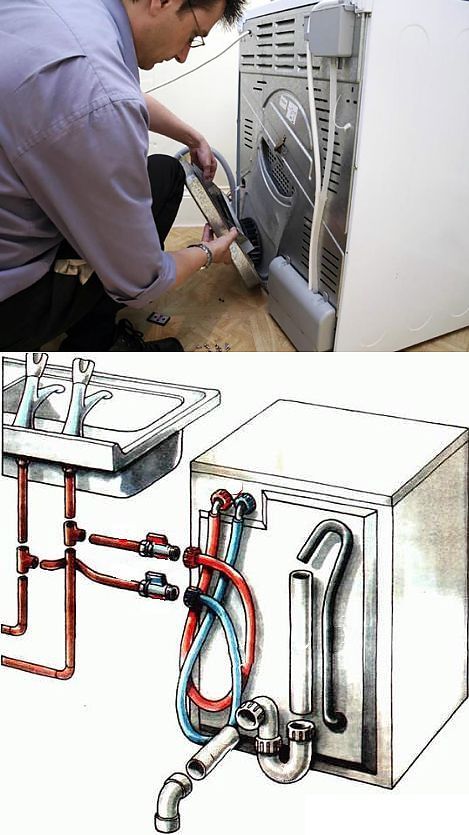
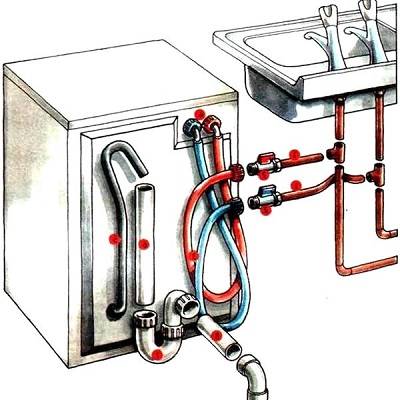
- Connecting the washing machine to the water supply
- Accommodation options
- Washing machine installation
- Trial run
- How to connect the washing machine to the water supply?
- The first stage of installing a washing machine
- Choosing the right place
- The procedure for connecting the automatic machine
- Connecting to hot water: how effective is it
- Step #3. How to choose and prepare a place to install a washing machine: 3 simple recommendations
- Washing machine leveling
- Water connection
- From steel pipes
- From polypropylene and metal-plastic pipes
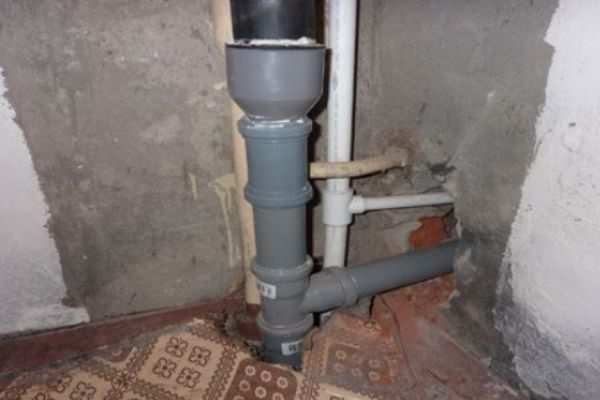
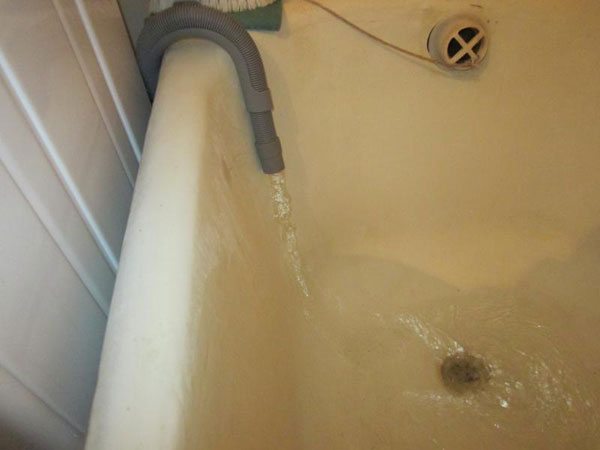
- We connect the washing machine to the sewer
- Water connection
- Necessary materials and tools
Connecting the washing machine to the water supply
The process of supplying water to the washing machine is simple. We will tell you how to install and connect the washing machine. Connection schemes may be different, but the general requirements must always be observed:
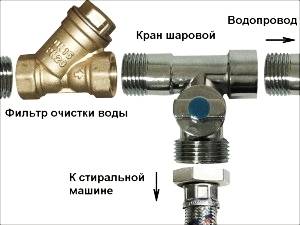
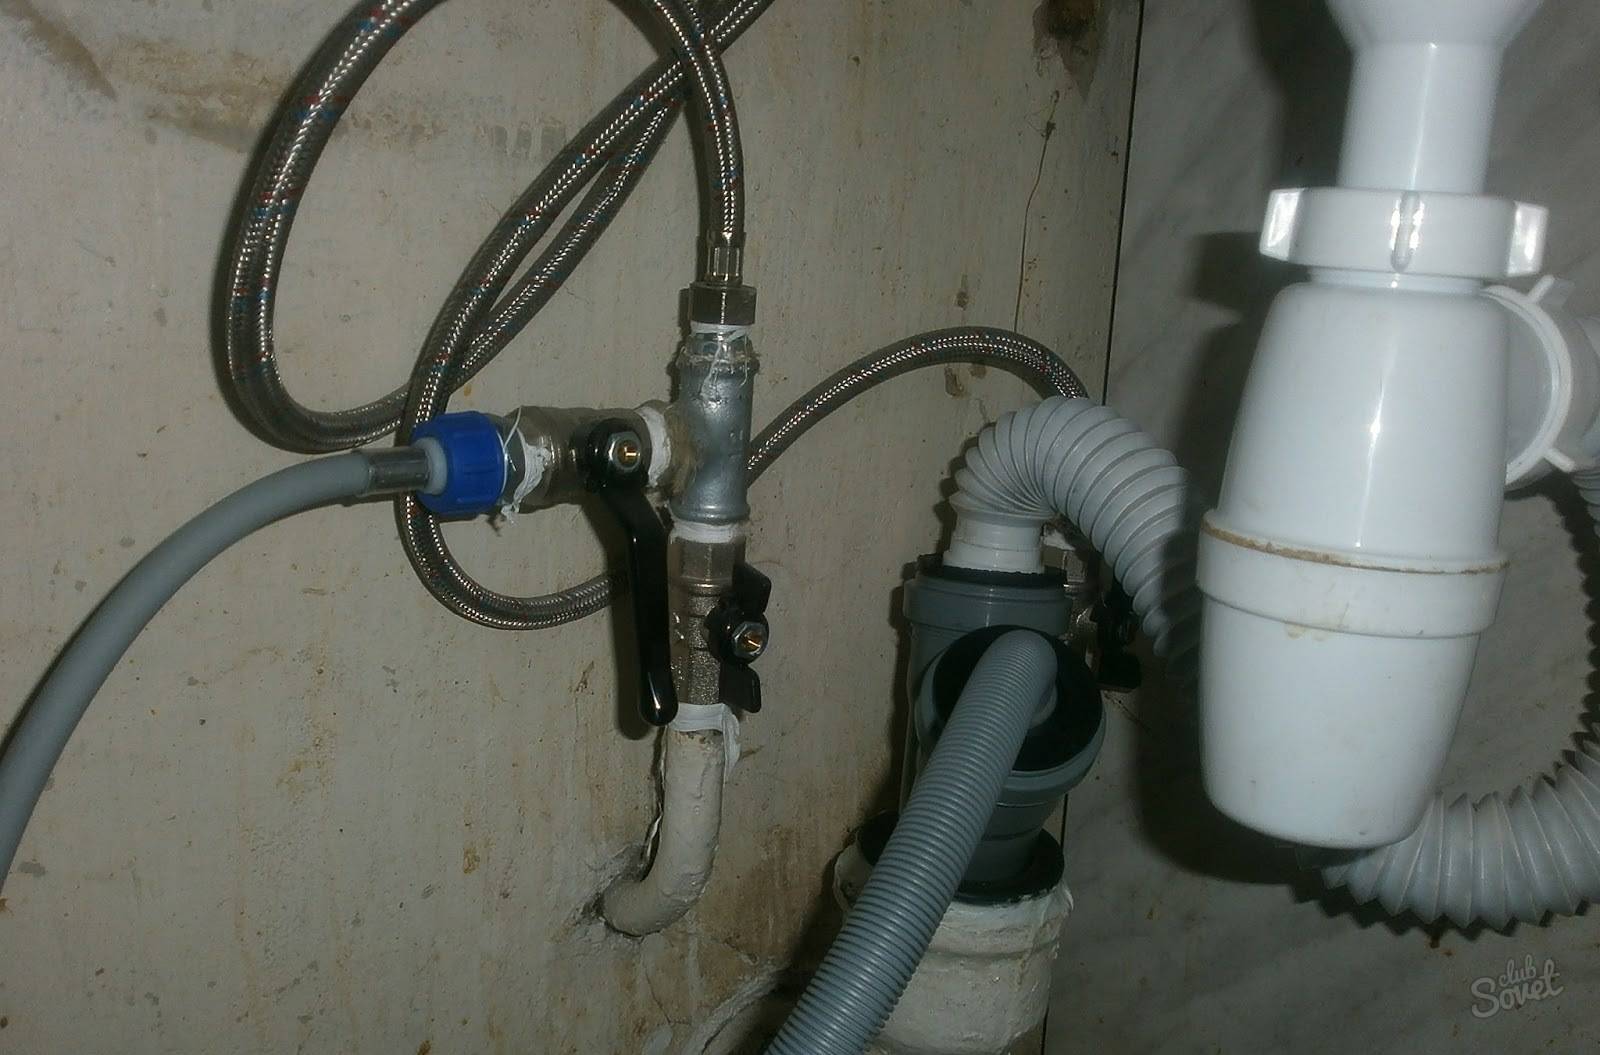
- The outlet of the pipeline supplying water to the washing machine must be equipped with shut-off valves. The use of ball valves is recommended. Then, if a leak occurs, it will be possible to quickly shut off the water supply to the machine.
- The pressure in the pipes should not be less than one atmosphere. With insufficient pressure, you will have to install a special pump.
- Clogged water can quickly damage the mechanism of the washing machine. As a rule, most of their models are equipped with standard mechanical filters. If water of increased hardness enters the apartment, it is recommended to additionally install a polyphosphate filter. It is a flask filled with an active substance that prevents scale formation. The filter media is easy to change as you use it.
To connect the washing machine, flexible hoses with a diameter of ¾ inch are usually used. The hot water supply is used very rarely, so one hose is enough to supply cold water.
- If there are metal pipes in the apartment, then it is easiest to make a do-it-yourself connection using a compression coupling. Its two halves are bolted to the pipe, securely fixing the gasket. After that, a hole in a pipe with a diameter of 10 mm is drilled directly through the outlet with a tap thread. A ball valve is installed, and a flexible hose going to the machine is attached to it. The joints are sealed with rubber cuffs.
- A tee is placed on metal-plastic pipes. After a tie-in is made in the right place and a fitting is installed, a faucet and a flexible hose are mounted. You can connect the washing machine to the water supply.
- Sometimes a method is used to supply water to the machine through a tee on the water outlet for a mixer or flush tank. But at the same time, before each wash, you will have to unscrew the flexible hose leading to the mixer. Therefore, this method can be considered only as a temporary option.
Accommodation options
There are several places where you can put a washing machine:
- toilet;
- bathroom or combined bathroom;
- kitchen;
- the corridor.
The most problematic option is the corridor. Usually there are no required communications in the corridor - no sewerage, no water. We'll have to "pull" them to the installation site, which is not at all easy. But sometimes it's the only option. In the photo below there are some interesting solutions for how you can put the typewriter in the corridor.
Option to install a washing machine in a narrow corridor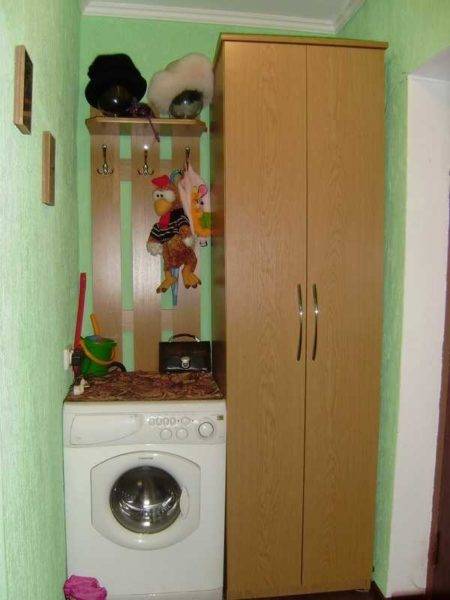 Making something similar to a portal is also an option.
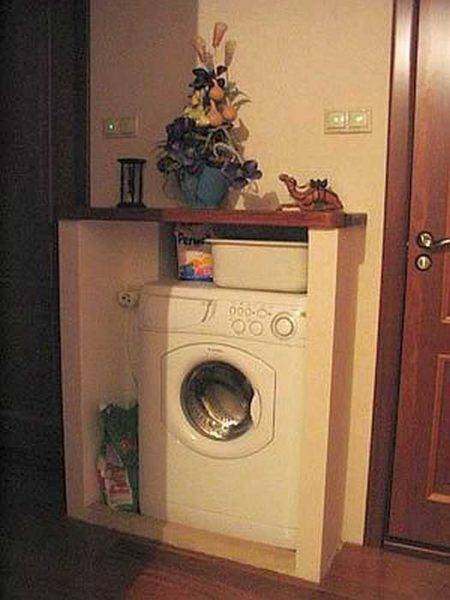 Hide in a nightstand
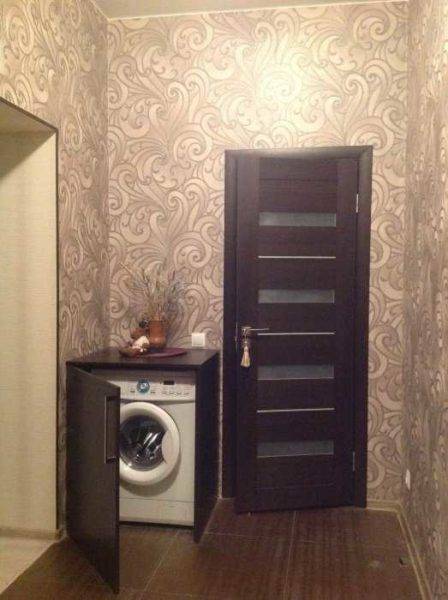 Embed in hallway furniture
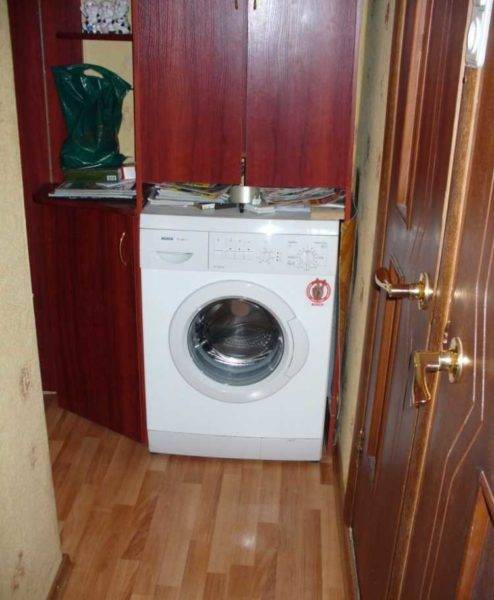
The toilet has all communications, but in typical high-rise buildings the dimensions of this room are such that it is sometimes difficult to turn around - there is no space at all. In this case, washing machines are installed above the toilet. To do this, a shelf is made so that while sitting on the toilet, it does not touch the head. It is clear that it must be very strong and reliable, and the machine - with very good shock absorbers. The washing machine must be installed perfectly, otherwise it may fall during operation. In general, with this method of installing the washing machine, it does not hurt to make some planks that will prevent it from falling off the shelf.
The shelf is solid and reliable, but slippery - you need a rubber mat for shock absorption under the legs. Powerful corners are monolithic in the wall, a washing machine is installed on them. Plastic stops were removed from the legs, and holes were drilled in the corners for the remaining screws.
The yixtion is reliable, it is only important that the corners do not tear out of the wall from vibration. You can close it with vertical blinds. This is already a whole locker. Only the doors are missing
The bathroom is the room where the washing machine is most often placed.
However, in some apartments the bathroom area is too small, they barely fit the washbasin and bathtub. For such cases, there are alternative options.
Recently, washing machines are increasingly being installed in the kitchen along with other household appliances, where it is also possible to connect to the water supply, sewerage and electrical networks.
To make everything look organic, you need to choose a typewriter of such a height that it fits into the size, and the sink itself is better than a square one - then they will become wall to wall. If there is not enough space, you can at least slide part of the body under the sink.
Put the washing machine next to the sink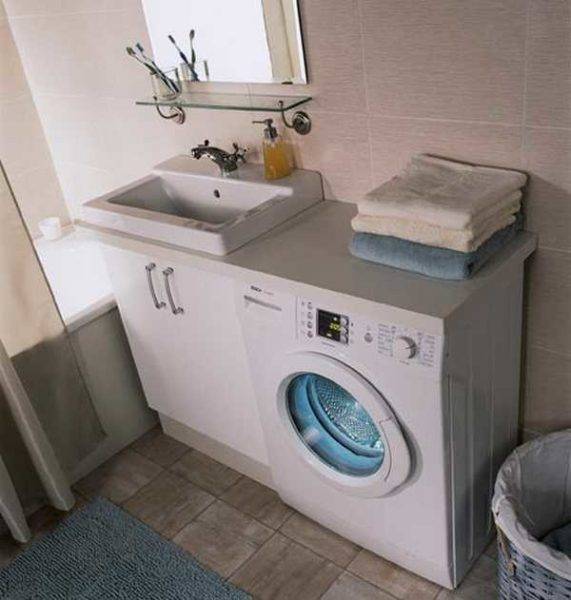 Fashionable now countertops in the bathroom can be finished with mosaics
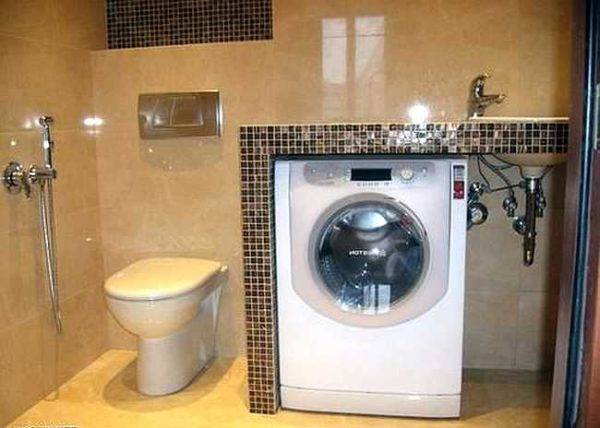 If space permits, just put the machine next to the sink
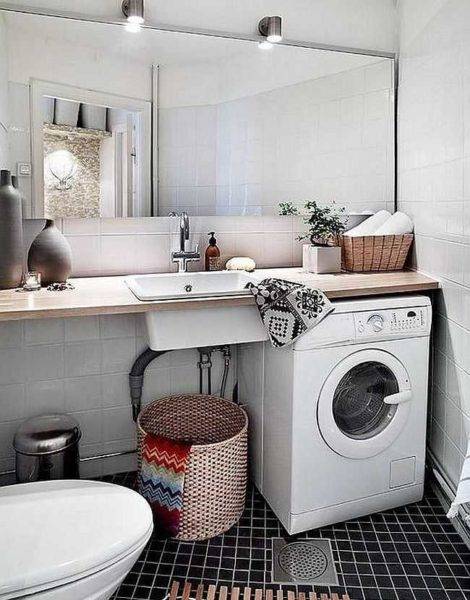
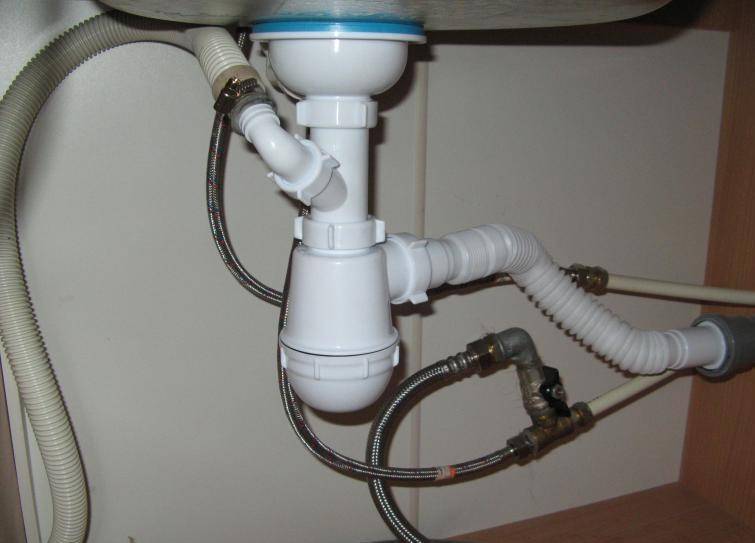
There is a more compact way - to put the washing machine under the sink. Only the sink needs a special shape - so that the siphon is installed at the back.
To put the washing machine under the sink you need a special sink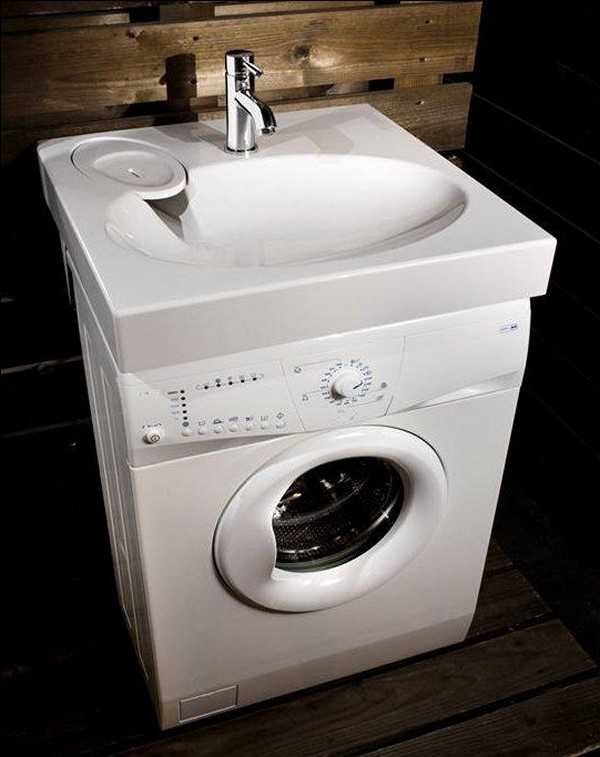 One of the sinks under which you can put a washing machine
The next option for installing a washing machine in the bathroom is on the side of the bath - between its side and the wall. Today, the dimensions of the cases can be narrow, so this option is a reality.
Narrow hulls are no longer uncommon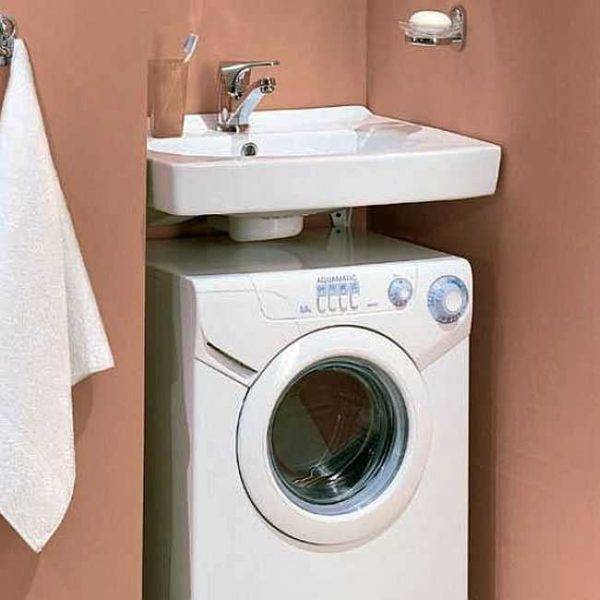 Between bathroom and toilet
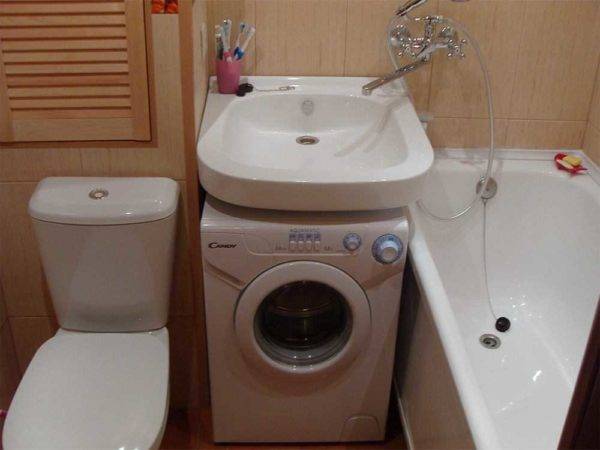 The sink should not be smaller than the body
 No one bothers to install a sink from above
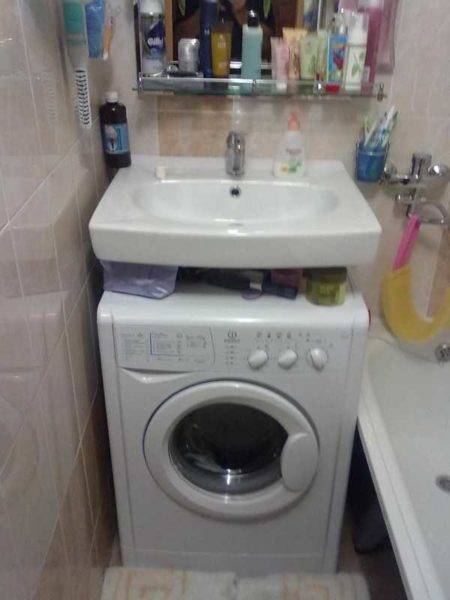
One moment, putting such equipment in bathrooms or combined bathrooms is not a good idea. Humid air negatively affects the body, it begins to rust quickly. However, there is usually not much space, although in principle you can put the car under the washbasin or hang shelves above it. In general, it's up to you to decide.
Another popular place to install a washing machine is the kitchen. Built into the kitchen set. Sometimes they close the doors, sometimes they don't. This is left to the discretion of the owners.There are some interesting photos in the gallery.
Doors with porthole cutout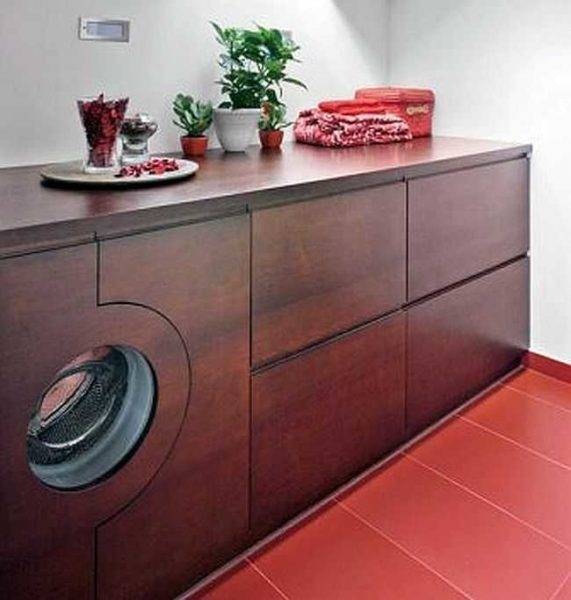 Put in kitchen cabinet
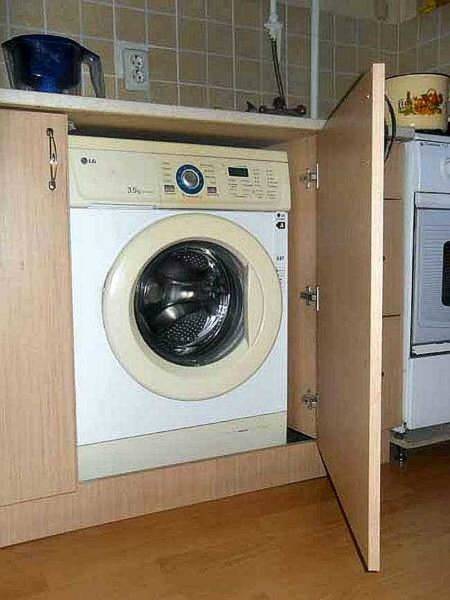 In the kitchen set, the washing machine looks quite organic
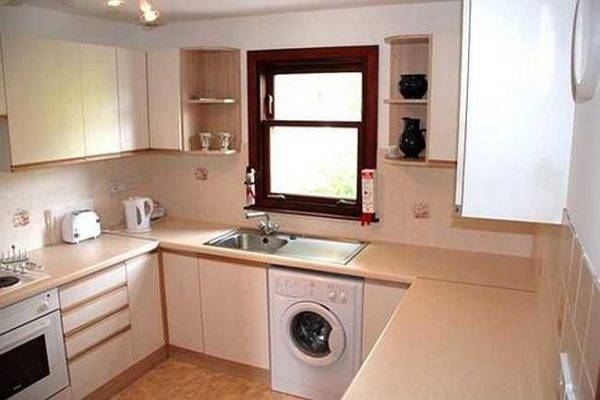
Washing machine installation
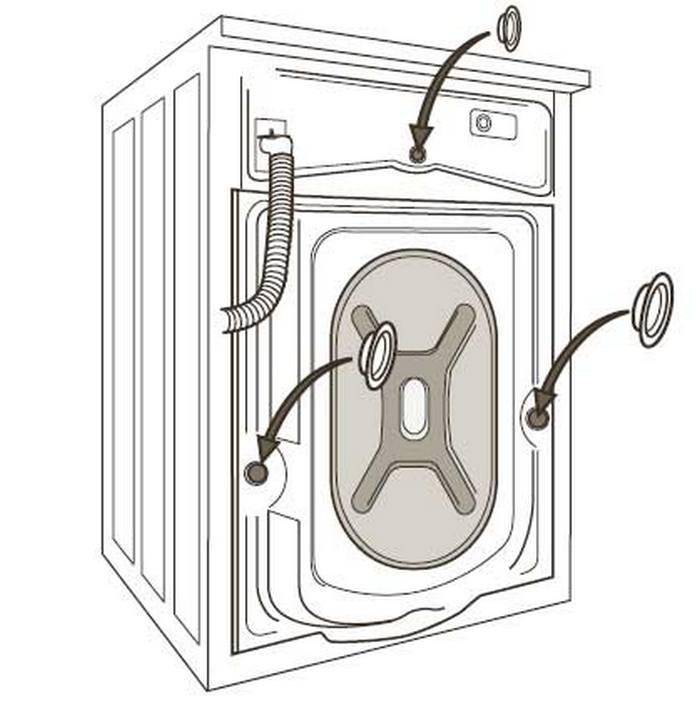
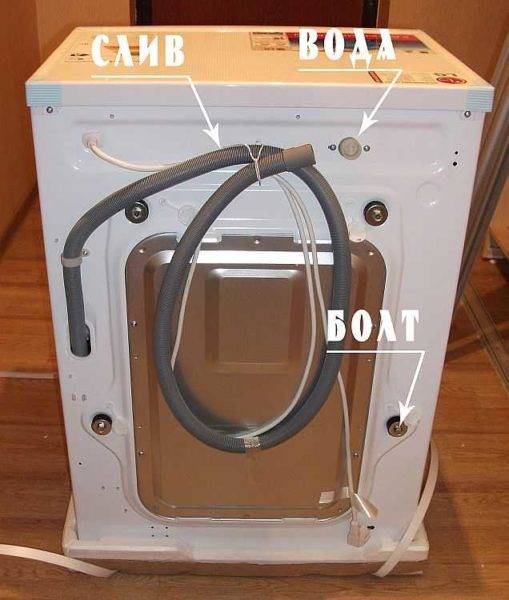
Before starting the installation, the washing machine is released from the packaging, inspected to check the integrity, and the locking bolts are removed. They are installed by the manufacturer at the factory and are intended to fix the drum during transportation. But you can’t leave them in the car after installation, as this leads to a breakdown of the chassis. The bolts are twisted with an open-end wrench and removed from the housing along with plastic bushings, and the plugs included in the kit are inserted into the holes.
On a new machine, you need to unscrew the transport screws and remove the plugs
Transport bolts hold the entire drum suspension in a fixed state, so as not to damage it during transportation
Stub
Now you can start installation.
Step 1. The washing machine is placed in the chosen place, the level is placed on the top cover, the height is adjusted with the help of the legs. The machine should stand level, without distortions, not too close to the wall. On the sides, there should also be at least small gaps between the walls of the machine and furniture or plumbing.


The machine needs to be level
Machine legs
Step 2. After making sure that the placement is correct, the machine is pushed forward a little to facilitate access to communications.
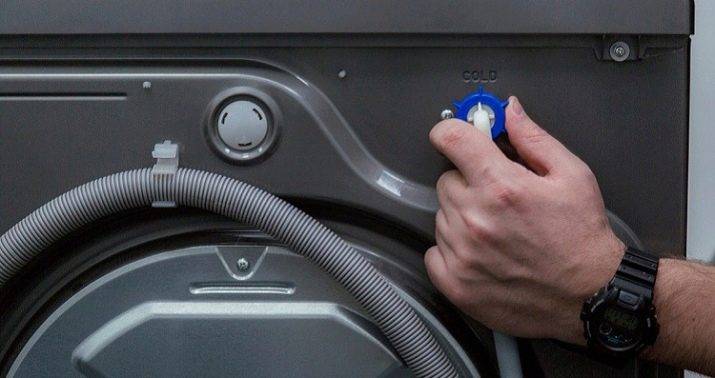
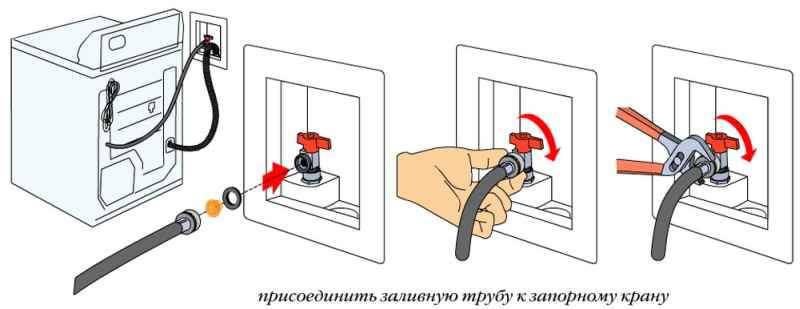
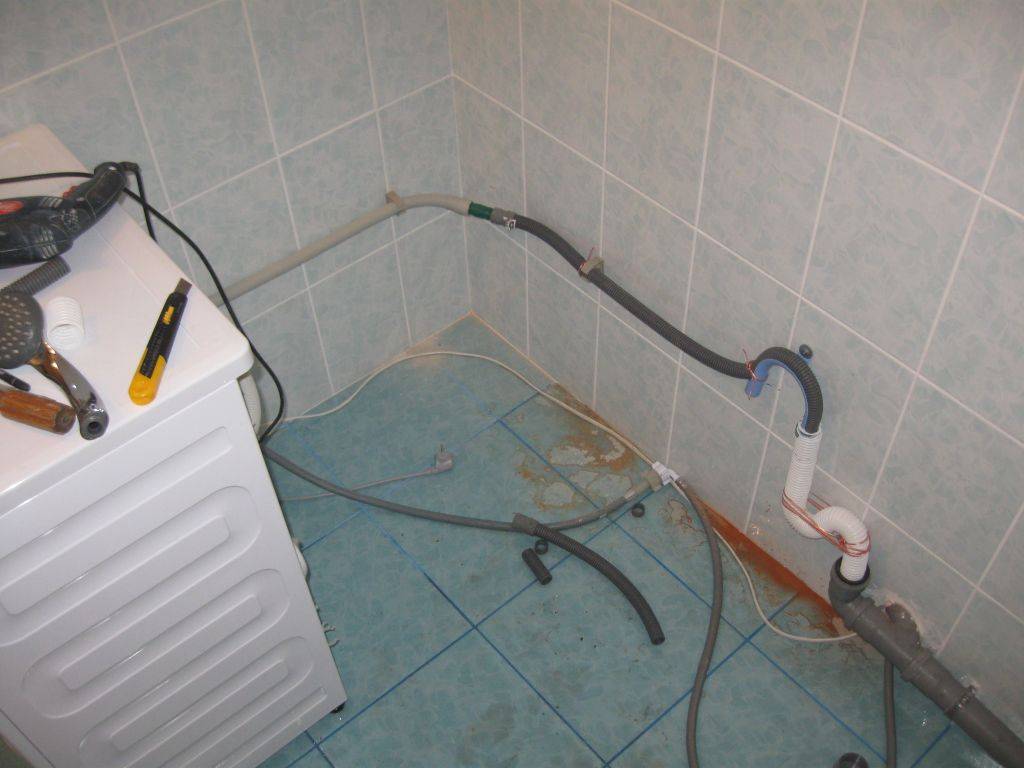
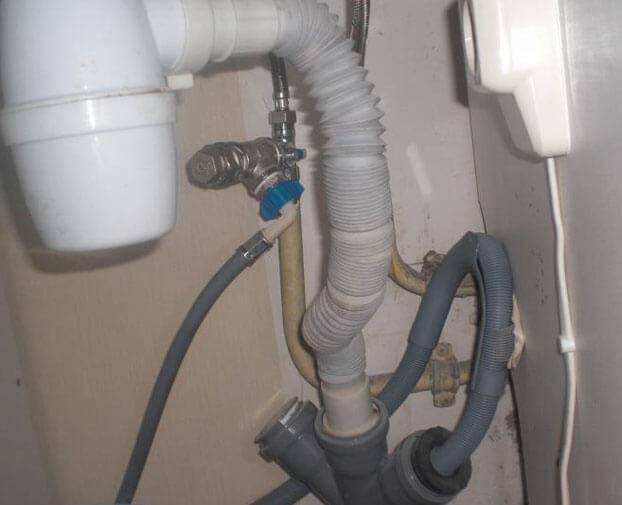
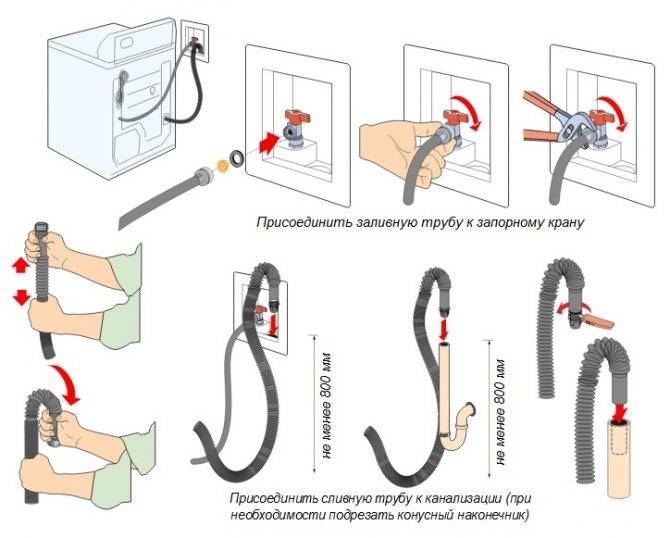
Step 3. Connect to the water supply. They take a water supply hose, insert a filter on one side (usually it comes with a kit), screw it to the fitting on the rear wall of the machine, and the other end to the tap on the water pipe, after inserting the gasket.
The filter can be installed in the form of a mesh in a hose, or in the body of a washing machine
Filling hose
One end of the hose is screwed to the machine
Inlet hose connection
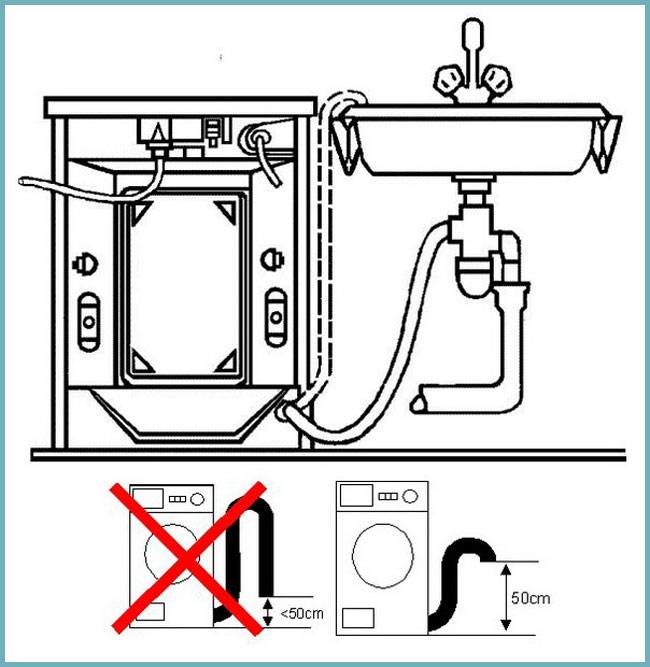
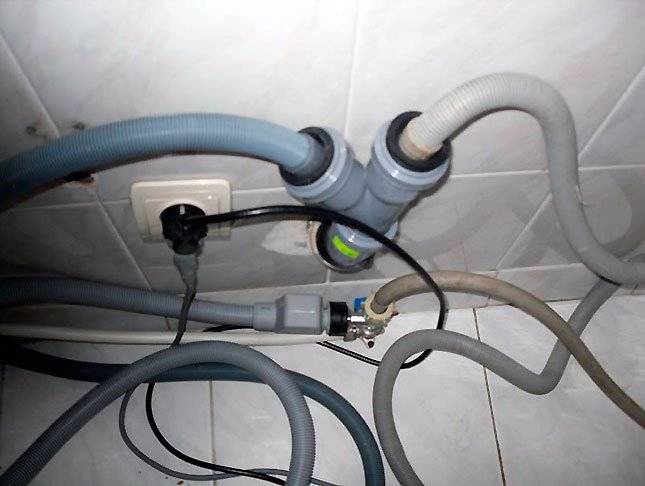
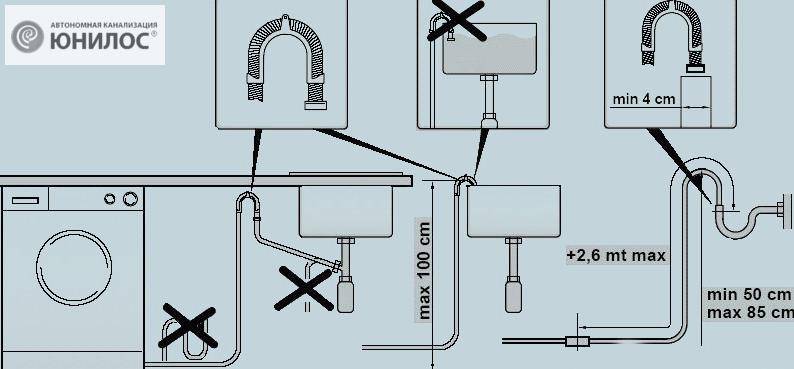
Step 4 Connect the drain hose next: insert its end into the drain hole and tighten the nut tightly. The length of this hose must not exceed 4 m in order to ensure the normal drainage of used water.
Drain hose connection
If it is necessary to extend the hose with water supply, we use a second hose and an adapter coupling
Step 5. Both hoses are filled into the corresponding recesses on the back of the machine to prevent kinks. After that, the washing machine is installed in a permanent place and the location is again checked by level. Now it remains only to connect the washing machine to the outlet and check its operation in test mode.
Plug in the machine
Trial run
Trial run
First you need to take the passport of the device and put it in front of you in order to check the data during the verification process. A test run is carried out without loading laundry, with only water and a small amount of powder. So, they turn on the water supply to the tank of the machine, while recording the filling time to the specified mark. Immediately after this, all connections are inspected, and if a leak is detected, the water is drained and the problematic connection is sealed again. If no leaks are visible, you can turn on the machine.
The water should heat up to the desired temperature within 5-7 minutes, so note the time and check with the device's passport.While the water is heating, listen carefully: the device should work almost silently, and any rustles, creaks, knocks indicate a malfunction. If there are no extraneous sounds, check the operation of other functions, including the drain. After turning off the machine, once again inspect the hoses, connections, floor around the body. Everything must be dry and clean. Ladder in the bathroom read on the site.
How to connect the washing machine to the water supply?
As for connecting the washing machine to cold water, below will be presented step-by-step instructions with which you can connect yourself:
Scheme of connecting the inlet hose of the washing machine through a tee to the water supply
- First you need to choose a place to connect. Of course, the best place will be the area where the connection of the metal-plastic pipe with the flexible hose of the mixer is marked. In principle, it is also possible to connect to a shower tap;
- then unscrew the flexible hose;
- then we wind the fumlent on the thread of the tee and, directly, install the tee itself;
- also, a fumlent is wound on the remaining two threads and flexible hoses from a washing machine and a washbasin faucet are connected;
- Finally, you need to tighten all threaded connections with a wrench.
Connecting the washing machine to the plumbing system
It is worth noting that it is imperative to check the presence of o-rings at both ends of the inlet hose, since it is they who prevent the flow of water at the joints.
Another option for connecting the washing machine hose to the water supply
There is another option for connecting the machine to the water supply, by connecting the inlet (inlet) hose to the drain tap in the bathroom or sink.
If you decide to use this method, then you will need a longer inlet hose. One end of the hose in this case is screwed to the tap after the gander is disconnected. People who choose to connect this system claim that the process itself takes a little over a minute.


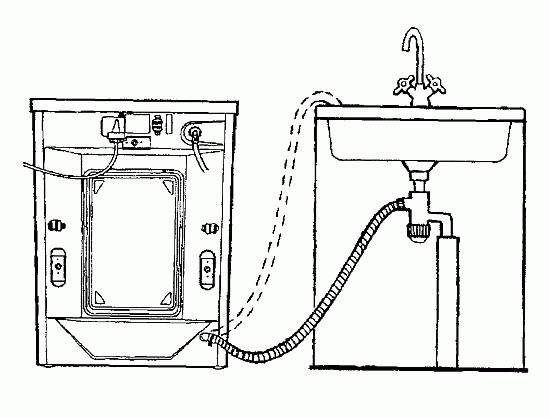
At the same time, they are completely sure that they avoid water leaks during the downtime of the machine, because the connection of the supply hose was not carried out permanently.
Special attention deserves the moment that today many modern automatic units are equipped with a special system that blocks the water supply to the disconnected machine.
Such equipment is equipped with an inlet hose, which has a block of electromagnetic valves at the end. These valves are connected by wires to the machine, which, in fact, carry out control.

If desired, you can buy a special inlet hose with automatic leakage protection
The whole system is inside a flexible casing. That is, when the machine is turned off, the valve automatically shuts off the flow of water into the device.
This is very convenient and reliable, because, for example, when the light is turned off, you will be sure that when the machine is turned off, it will not continue to pump cold water into itself from the water supply.
As you can see the connection of the washing sewerage and plumbing machines quite doable on your own. The main thing is to follow the established rules and follow the instructions that come with the equipment.
A properly connected washing machine will serve you for a long time and faithfully.
If suddenly you doubt something or are not sure about the correctness of your actions, then you can always seek help from specialists. Of course, a specialist will cope with the installation of the device much better and faster, but he will have to pay for this.
The equipment will work smoothly and for a long time only if all the necessary installation measures are carried out as expected and in accordance with the standards.
It is worth saying that if you purchased a dishwasher, then its installation is carried out according to the same principle. All installation activities are identical to those when installing a washing machine.
Naturally, in this case, it is also necessary to first read the instructions for the equipment, which must necessarily go to it when selling.
The first stage of installing a washing machine
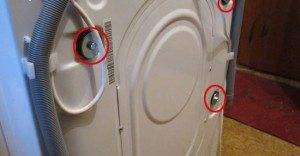 And so, we have already released the deliverers, now we move on to the next part of our work. Namely - the removal of transport bolts. They are located on the back of the washing machine.
These bolts are needed to fix the tank. And they are used so that during transportation the tank does not hang out inside and does not damage anything inside the machine. Until they are removed, the tank of the machine will not be able to spin. And even more than that, turning it on in this state can lead to a breakdown!
Therefore, we can easily remove them with a wrench or pliers. We plug the holes that appear with plastic plugs. They are included in the kit along with instructions and other things. Bolts can be saved. They may be needed if you decide to move or transport your washing machine somewhere.In this case, you screw them back and protect the machine from possible damage during transport.
Choosing the right place
Whether you install the washing machine yourself or call a specialist, in any case, you need to prepare the place. The machine must correspond to the selected position in terms of volume. Simply put, she has to fit in there. In some cases it is worth choosing washing machine based on the amount of free space you have. If there is not enough free space, then it is necessary to measure in advance all the dimensions of the prepared space and build on them. If you have a lot of free space, then you can not worry and buy any model you like.
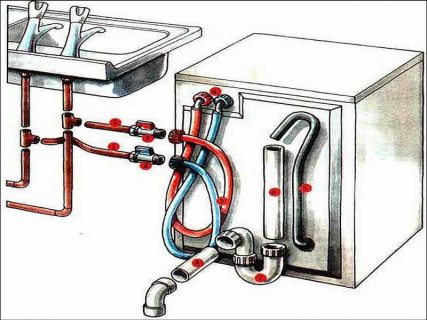
The procedure for connecting the automatic machine
To start the operation of the washing device, it is necessary to choose the optimal place for its placement. Then prepare the washer for connection work.
After that, it remains to correctly perform the following steps:
- align the device, giving it the optimal position;
- connect to the water supply for the intake of water needed for washing;
- connect to the sewerage system to drain water during the implementation of a given program (washing, soaking, rinsing, spinning);
- connect to the mains to ensure the supply of electric current that drives the motor of the unit.
Next, we will go through all of the above steps in detail.
Connecting to hot water: how effective is it
Sometimes, by independently making a connection to the water supply, many bring the machine to hot water. To do this, they also use a tee for ordinary pipes, and a tee - a fitting for metal-plastic ones.
When connected to hot water, you can save electricity, but at the same time, you need to consider ways to supply hot water:
- centralized hot water supply;
- heating with local water heaters.
With a centralized supply of hot water, its temperature is + 50 ... + 70 degrees. The device in the initial stage of washing can take such a temperature as an emergency and stop the whole process. Therefore, if all utility organizations comply with all hot water supply standards, then in this case only cold water supply is possible.
When heated by local heaters, connection to hot water is possible only with the condition of constant temperature change on the water heater. When soaking linen, the water temperature should not exceed 40 degrees, at the time of washing, choose the temperature based on the degree of soiling of the linen, rinse at the lowest possible temperature.
Therefore, when connecting to hot water, weigh the pros and cons.
Step #3. How to choose and prepare a place to install a washing machine: 3 simple recommendations
Which rooms are best suited for permanent installation
In this matter, the main role is usually assigned to the hostess, and she is guided by the area of the rooms in the apartment and their functional purpose, which is correct.
However, it is worth considering other factors: for normal washing, a close location of at least three communications is necessary:
- a water tap with the ability to quickly shut off the water pressure;
- sewers for draining contaminated streams;
- an electrical outlet that supplies electricity to electric motors and an automation system.
And they are only in the bathroom, toilet, kitchen. According to local conditions, you have to choose one of these premises. Sometimes the place in them is extremely limited. Then consider other options, for example, a corridor.


But in this case, there will be difficulties with connecting to water and sewerage.
What is the role of gender and why should you pay attention to its quality?
Household washers are not fixed in any way in the room, they are simply installed on the floor and strictly set to the horizon level.
Relatively quiet operation and high-quality washing is achieved due to:
- own weight of the structure;
- balanced operation of the rotating load compensation mechanism;
- taking into account the permissible load level of linen.
If your device is not installed rigidly, but on a wobbly floor, then washing will occur with great noise and problems. And this is typical for uneven plank flooring, poor-quality laying of laminate, staggering parquet.
Such installation sites should be avoided, but it is best to repair them with high quality. Methods for leveling surfaces depend on the type of coating.
It is important for us to end up with a solid and even structure that can reliably withstand vibrating loads. Otherwise, the jumping body will finish off the already loosened floor. How to check the working place of the machine and its secure installation
How to check the working place of the machine and its secure installation
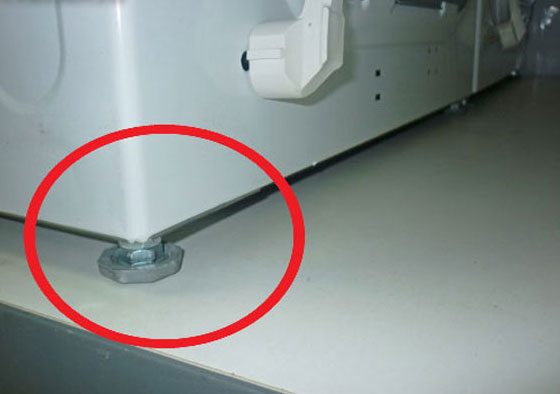
Manufacturers create cases with strict geometry, when the upper surface is clearly parallel to the lower plane, and all sides are strictly perpendicular to them.
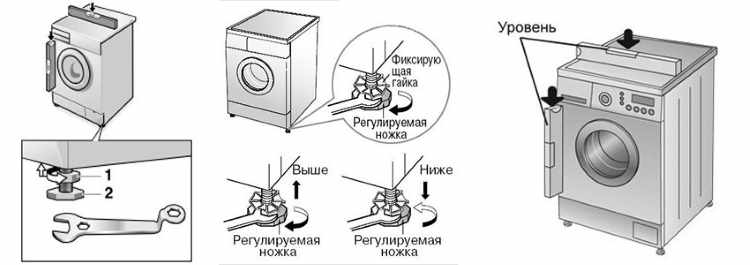
This property allows you to clearly set the washing machine even on slightly inclined floors in terms of level.It is enough to put the spirit level on the top cover and set the necessary protrusion with the adjusting screws on the lower legs.
This adjustment is carried out in three steps:
- the lock nut (position 1) is released with a wrench;
- the adjusting screw is released or wrapped to the required length, controlled by the spirit level (position 2);
- the created protrusion is fixed with a lock nut (item 3).
Four of these screws are mounted on the bottom of the case. Each one needs to be fine-tuned. After that, the level is again placed on the body, and with two hands they forcefully act on its various parts.
A securely installed washing machine should not wobble, move or slip. In the ideal case, the hands will feel a single monolithic structure that is not amenable to such power loads.
Remember well: only a clear installation of the body on a flat floor provides an optimal washing regime. It will save your nerves and will not give the neighbors cause for concern.
Washing machine leveling
The device is installed in a certain sequence. In the process of alignment, the correct legs play a role. On sale there are models on which only two of them are regulated, and there are where all four are regulated.
Before installing the machine, it is necessary to check the floor surface for the horizontal line, only after making sure that the surface is absolutely flat, you can begin to install the equipment.
For a safe washing process, the machine must be leveled. Not everyone knows how to properly install a washing machine, especially if the surface on which the machine is installed is uneven.
To make sure the surface is even, a building level is used when installing the machine. If there are significant drops, hills or, vice versa, pits at the installation site, it will not be possible to install the machine evenly. The floor surface must be leveled first.
After leveling the floor, the machine must be connected to the water supply and sewerage, so that after the final installation, the equipment can no longer be moved. Using a wrench, the locknut on the legs is unscrewed.
Next, the machine is installed in a permanent place and, using the building level, the surface of the machine is leveled. Focusing on the level, adjusting the legs achieves a flat surface.
Installing and leveling the washing machine
The corner of the washing machine rises when the corresponding leg is unscrewed, therefore, by twisting it in the opposite direction, the corner drops. It is necessary to control the level in several zones.
The level is placed on the top cover of the machine, first along, and then across and diagonally. All indicators should point to zero, or the control bubble in the level should be exactly in the middle.
Despite the fact that the level shows zero on the horizontal surface of the machine, it is necessary to check that the vertical sides are also in line with the level.
After all the legs are set to the desired length, its surfaces remain equal relative to the level of the nut and are fixed to maintain the selected position.
Installing a washing machine by level is not only an aesthetically external necessity, but also a characteristic, if it is not observed, it is pointless to expect high-quality work from a typewriter.
An uneven position will cause the drum to move, especially when inside heavy laundry, which in turn will lead to an uneven position relative to the axis. As a result of an unstable position, the machine can move during the washing process, vibrate strongly.


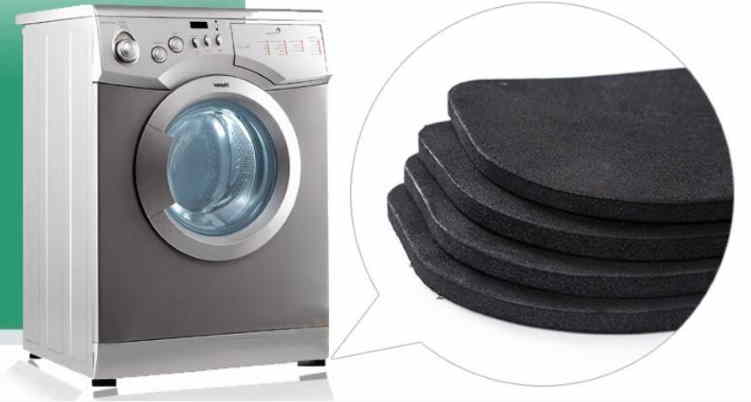
Rubber pads to reduce vibration
Vibration and movements during washing will contribute to the rapid wear of the fixing and other elements inside the device.
Special rubber pads allow not only to reduce vibration, but also to create additional shock absorption and also fix the machine in place.
- If during the spinning process the machine remains in place, there is no visible vibration, then it is installed in compliance with all the rules.
- When spinning, the machine vibrates, rattles or moves, additional adjustment of the position is necessary.
- If anti-vibration pads are not used, it is worth purchasing them and installing them under the legs.
It is better to choose a level length of approximately 40 cm, with a bubble, and not electronic or laser. It is this type of level that is more suitable for leveling small surfaces.
If it is not at hand, then you can replace it with a plastic container into which water with dye is poured, and on the outside, at the level of the edge of the water, a strictly horizontal line is applied, which will serve as a reference point. If, after adjusting at a homemade level, the strip and the liquid level clearly coincide, and the device is stable, does not stagger, then the machine is installed correctly.
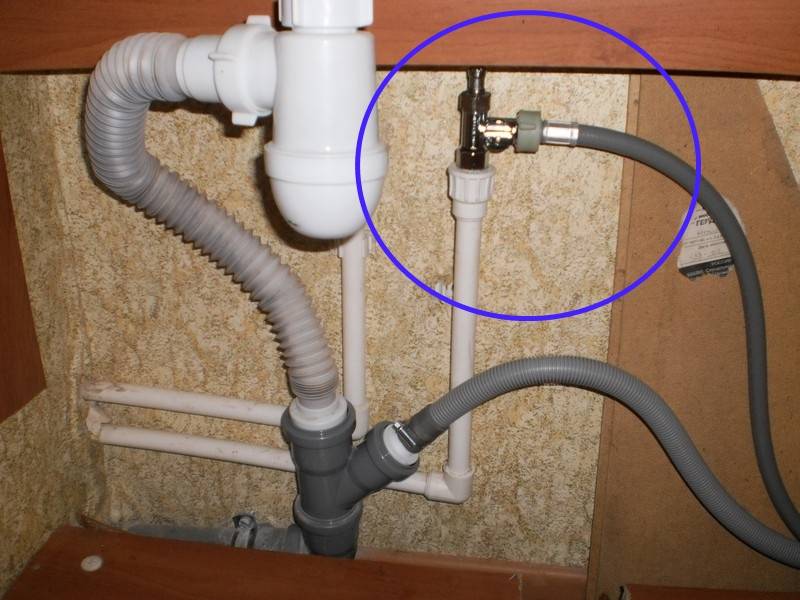
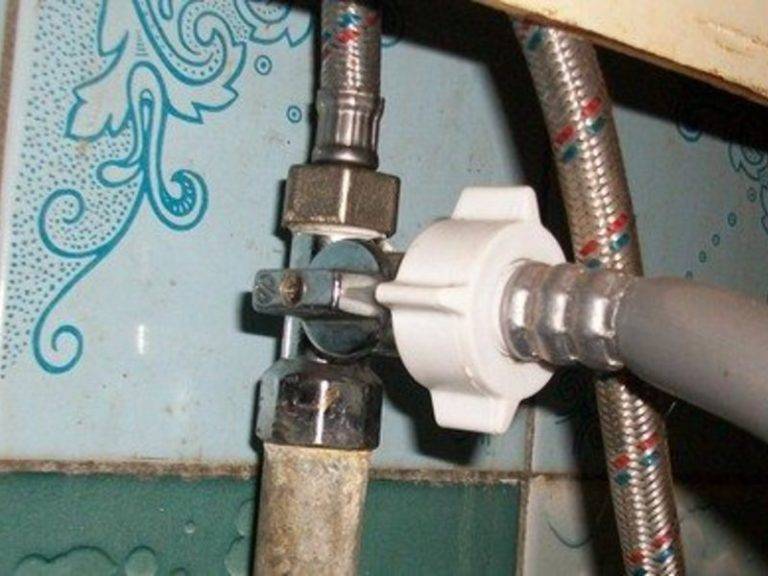
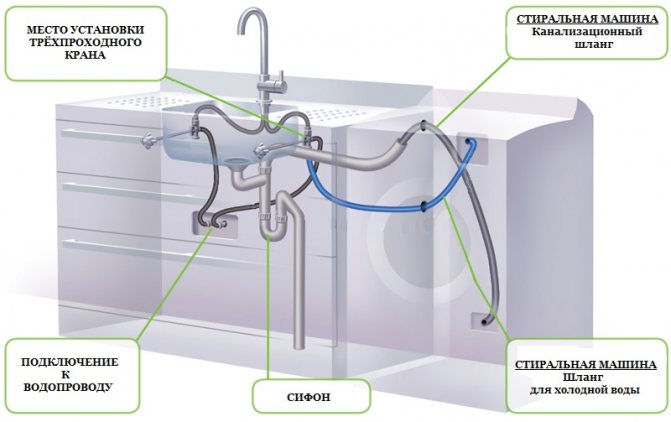
Water connection
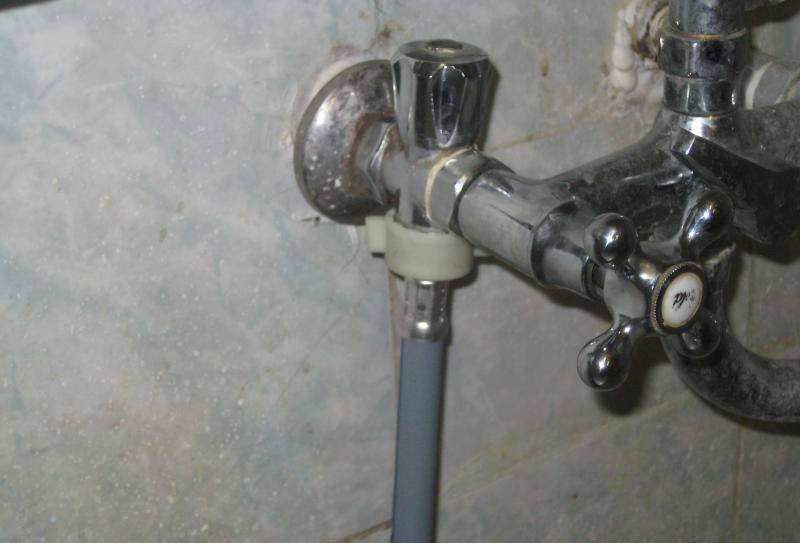
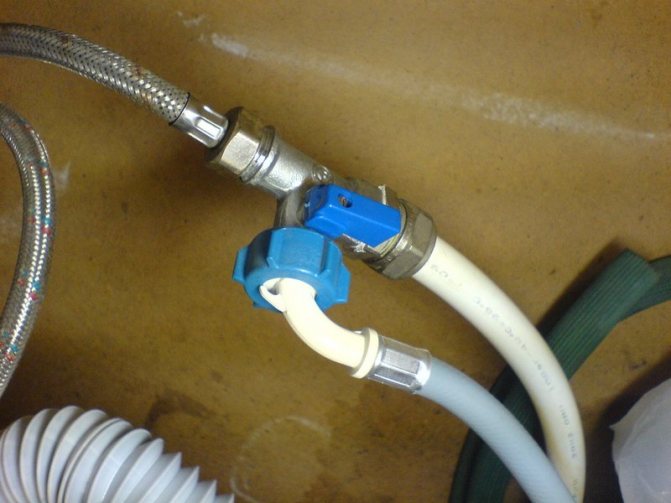
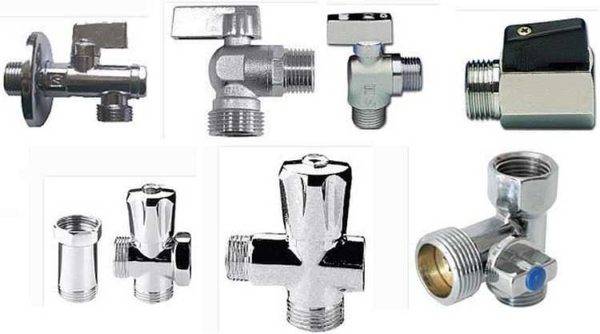
Before directly installing the water supply hose, a special tap must be installed separately in the water pipe for such a connection.It is called a valve for connecting a washing machine.
Its main feature is the size of the threaded connection for the water supply hose. The size is ¾ inch or 20 mm, while the diameter of the plumbing thread is ½ inch (approximately 15 mm).
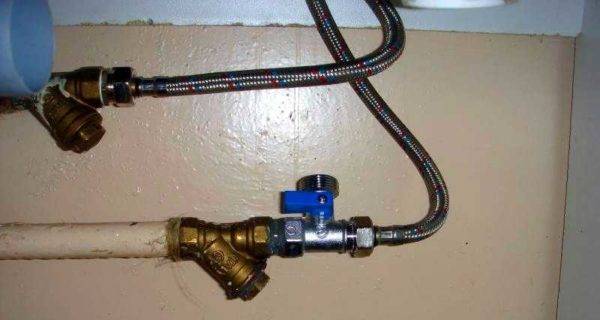
The simplest and cheapest solution for connecting the machine to the water supply is to install a three-way valve to connect the washing machine.
The valve is inexpensive, sold at any hardware store with a plumbing department and does not require rebuilding the plumbing system. It is installed at the junction of the cold water supply hose to the washbasin and the cold water outlet of the water supply system.
How to install a three-way valve:
- turn off the supply of cold water to the sink;
- disconnect the cold water supply hose from the water supply;
- a sealant (fum, flax) is wound on the threaded connection of the water pipe in a clockwise direction (i.e. to the right);
- we wind the three-way valve onto the threaded connection of the water pipe until it stops;
- on the opposite end of the valve we wind the washbasin cold water supply hose;
- smoothly open the supply of cold water to the water supply and check the connections for leaks.
 When the valve is installed correctly, water leakage is excluded. In exactly the same way, a three-way valve can be connected to a kitchen sink or toilet.
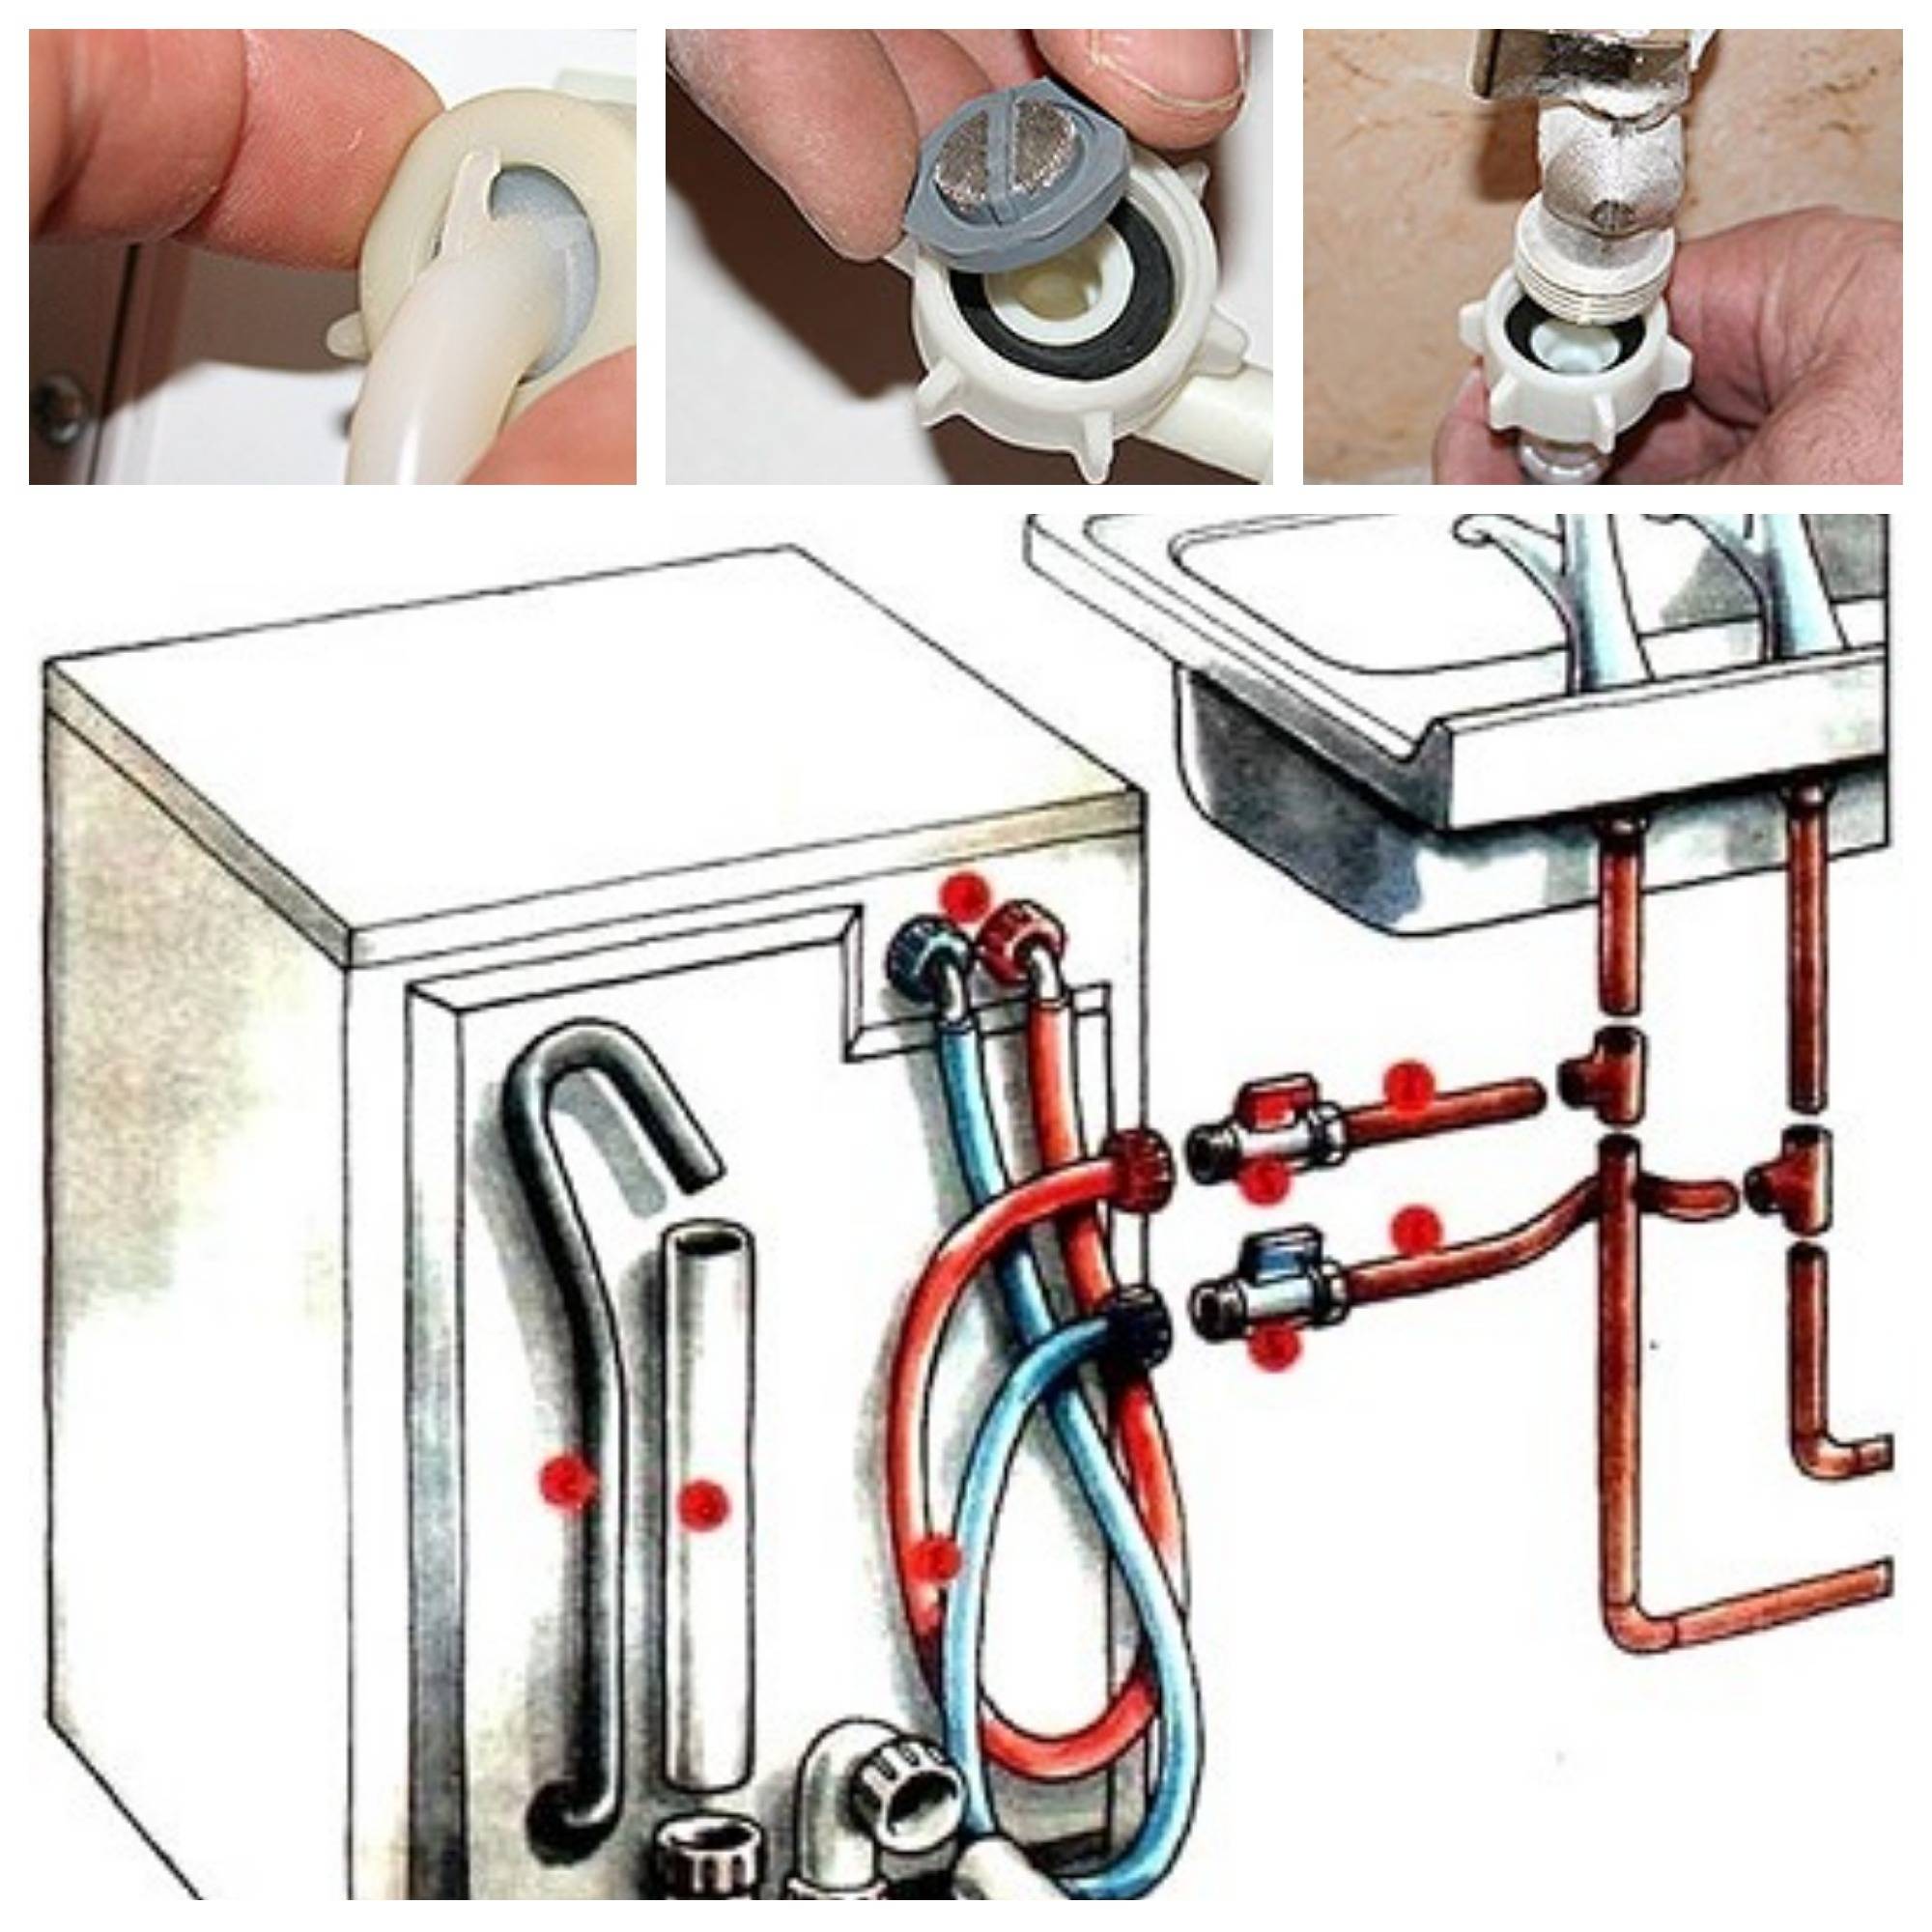
We wind one end of the water supply hose onto the threaded connection of the rear panel of the washing machine, and the other end onto the threaded connection of the three-way valve.
The main advantage of this installation method is that it is suitable for any type of water supply: steel, metal-plastic or polypropylene. Also, this method is ideal if the water pipes are hidden in the wall.
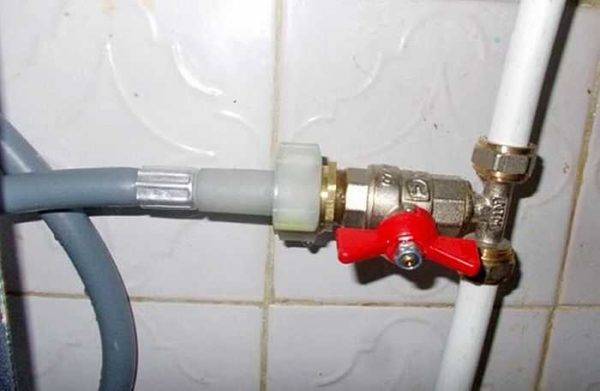
From steel pipes
For implementation water supply to the washing the machine requires the installation of a conventional valve to connect the washing machine. To make such an installation, it is most advisable to make an insert into the water supply.
Insert production procedure:
- shut off the cold water supply;
- drill a hole 10.5 mm in diameter in the wall of the water pipe;
- we install a special collar with a flange and a threaded outlet on the pipe. The flange must necessarily fall into the hole you made in the pipe;
- on the threaded connection of the clamp clockwise (to the right), tightly wrap the sealant. Sealant - linen or fum;
- we wind the valve onto the threaded connection of the clamp until it stops;
- smoothly open the supply of cold water to the water supply and check the connections for leakage;
- we wind one end of the water supply hose onto the threaded connection of the rear panel of the washing machine, and the other end onto the threaded connection of the valve.
From polypropylene and metal-plastic pipes
It is possible to install a valve for connecting a washing machine in the manner described above, that is, by inserting it into the water supply. The advantage of this method is the relative simplicity and minimal availability of tools and equipment.
 The next method is more aesthetic in terms of beauty, but requires special equipment (a welding machine for polypropylene pipes, mechanical or hydraulic pipe shears) and handling skills.
The essence of this method of installing a valve for a washing machine is that it requires cutting out a part of the pipe and a tee is installed in this place.
A fitting is mounted to the outlet of the tee (combined polypropylene coupling with external thread), and only then the valve itself is installed on the coupling. The washing machine is connected to the valve.
A tee with one threaded outlet and two connectors for metal-plastic pipes is also inserted into the water supply system from metal-plastic pipes. The valve itself is mounted directly on the threaded outlet.
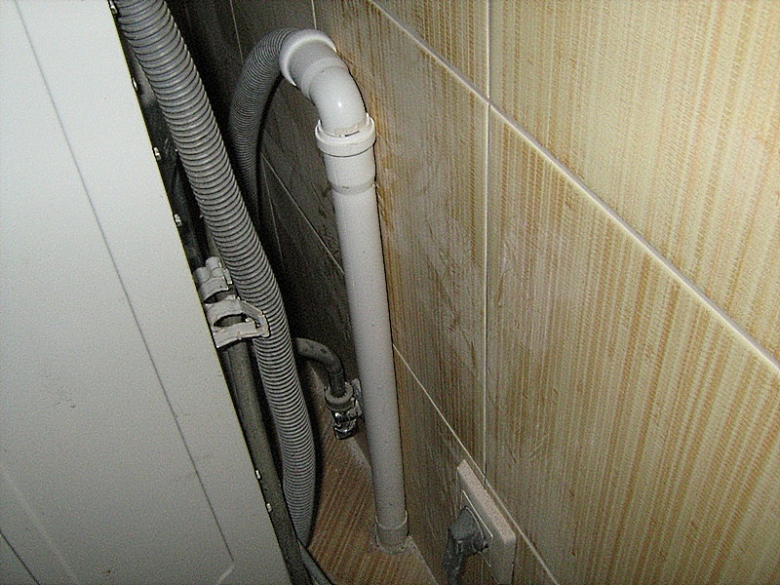
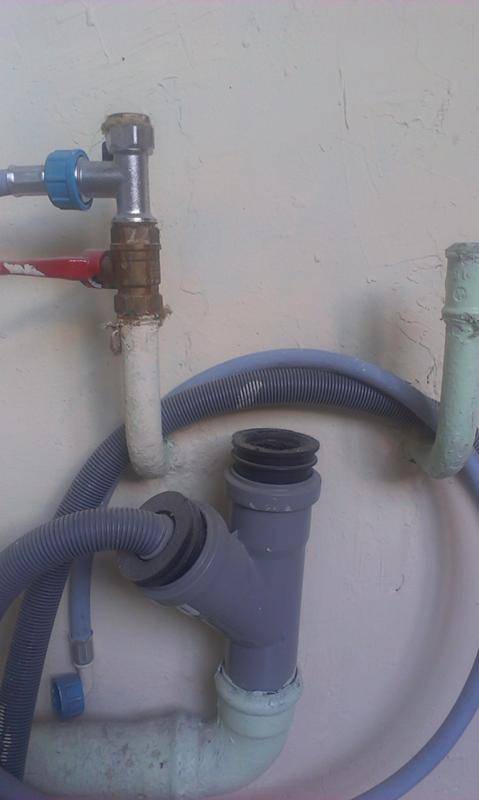
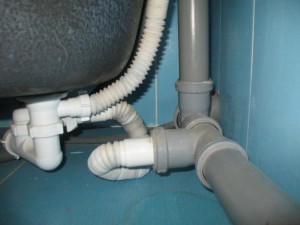
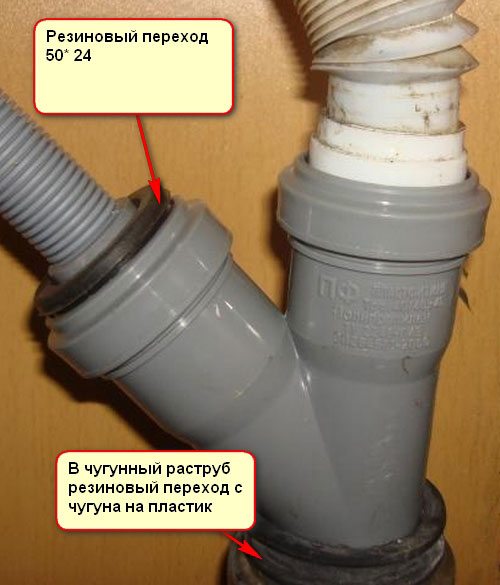
We connect the washing machine to the sewer
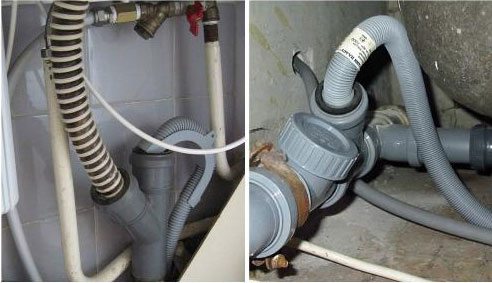
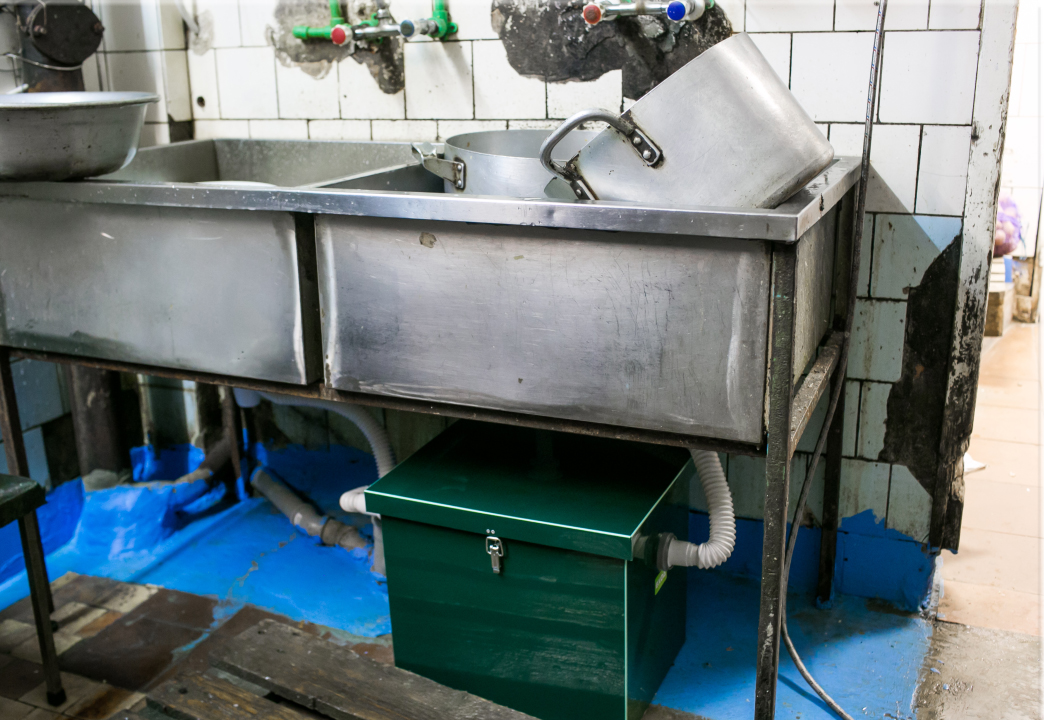
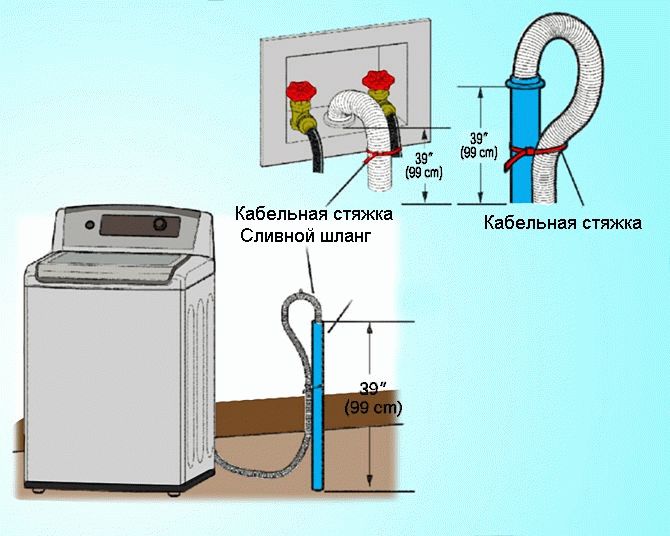
To connect the washing machine to the sewer, you need to buy a siphon. And after installing the siphon, we will attach our drain hose to it. The hose connection must be secure to prevent water leakage.
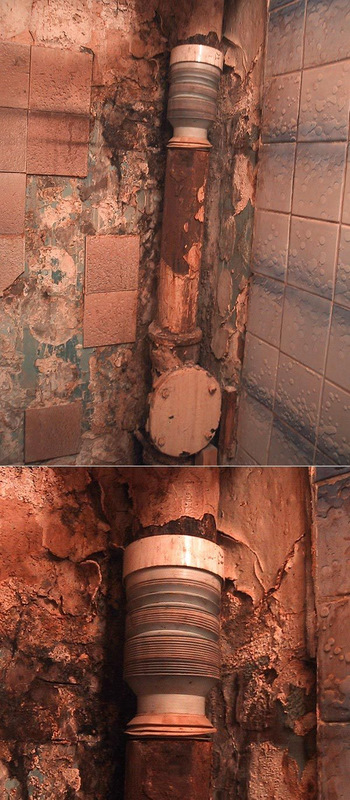
You can also connect the drain to the cast iron pipe. You can see how to do this in the photo below.
There is also an option with draining water into the bathroom. See photo:
After you have connected your washing machine to all necessary communications, it must be aligned. For this you need a level.
The whole process is pretty simple. Put the level on the typewriter, look in which direction the warp and remove it. In order to change the tilt of the case in one direction or another, you need to increase or decrease the height of the legs. To do this, you just need to twist them in one direction or another.
After our machine is installed, it's time for a test wash "idle". That is, without things. Add some washing powder and start washing.When the cycle is over, you can safely throw in dirty laundry and enjoy the fruits of your new washing machine.
Below you can watch the whole process in video format. Happy installation!


Water connection
First, about what water the washing machine is connected to. Generally - to the cold. The water is then heated as needed by the heating elements. Some owners, in order to save money, connect to hot water. This means less energy is used when washing. But the savings are doubtful - more hot water is spent. If a meter is installed on the hot water supply, then it is cheaper to pay for electricity than for hot water. It is also worth considering that connecting a washing machine to hot water is not very good in relation to linen: the proteins curl up from the temperature and then do not wash well.
This was about ordinary washers, but there are models that connect to both hot and cold water. They have not one water inlet on the back wall, but two. They are very rare in our country - there is too little demand, and the prices for such equipment are much higher.
There are washing machines that connect to both hot and cold water.
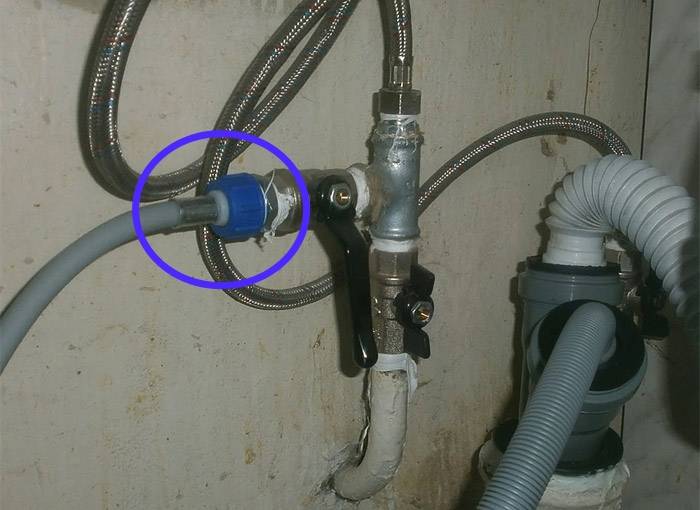
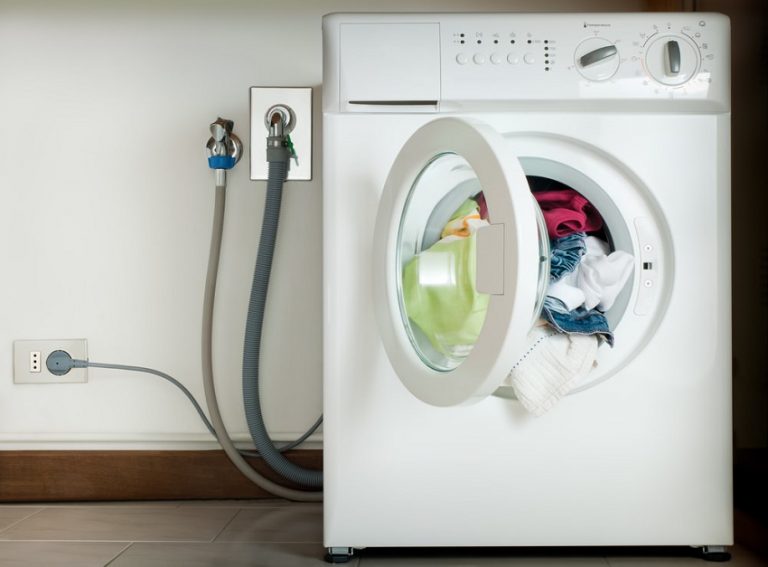
Now about the connection itself. The washing machine comes with a rubber hose that you need to connect the washing machine to the water. Its length is 70-80 cm, which is not always enough. If necessary, in stores selling plumbing, you can buy a longer one (3 meters is not the limit, it seems).
This hose is screwed onto the corresponding outlet on the rear wall. There should be a sealing rubber gasket, so there is no need to rewind. Tighten the union nut of the hose (plastic) by hand, if you use wrenches, then just tighten it by half a turn.Not more.
Screw the inlet hose to a special outlet on the rear wall of the housing
The other end of the hose must be connected to the plumbing system. If you have a free outlet somewhere, ending with a tap - great, if not, you need to make a tie-in.
If there is a free water outlet, connecting the washing machine to the water supply is very simple - put a filter, and a hose to it. All
The easiest way is with plastic, polypropylene or metal-plastic pipes - they bought a tee (with one transition to metal), soldered / installed. If the water supply is diluted with a metal pipe, you will have to embed the tee by welding.
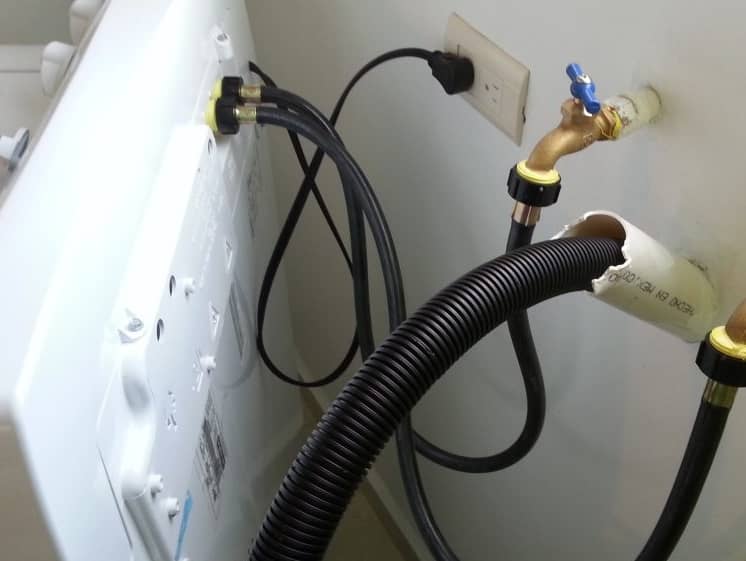
In any case, a crane is placed after the tee. Simpler and cheaper - ball. Here, when installing it, you can wrap linen tow on the thread and grease it with paste.
After the tee, put a ball valve, already connect the hose to it
There are also tees with taps for connecting washing machines and other household appliances. The same ball valve is installed in one of the outlets, but everything is done in one body. It looks more compact, but if the tap fails, you will have to change the entire tee, but it costs decently.
Faucets and tees for connecting household appliances
Sometimes it is advised to put a filter before the tap. Of course, it will not be superfluous, but if there is a filter at the entrance to an apartment or house, then there is no urgent need for it.
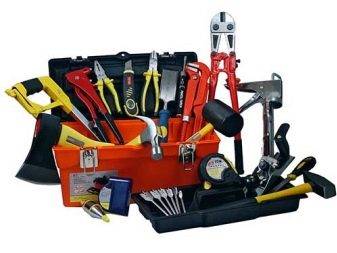
Necessary materials and tools
As with any work, you need to start connecting the machine after purchasing all the necessary materials and fixtures.
As for the materials, here you will need:
- siphon - through it the drain hose will be connected to the pipe;
- metal-braided flexible hose - it will be required for cold liquid (the dimensions of such an element are 3/4 inches);
- a polyethylene hose will be needed for draining (often short hoses are included in the kit, but they simply do not reach the connecting section);
- a tee designed for a metal-plastic pipe with a shut-off valve (3/4 inch);
- three-core wire having a cross section of at least 2.5 square meters. mm - it is useful for an outlet through which household appliances will be connected to electricity (note that if the given part has a too small cross section, it may be overloaded and even ignited, therefore it is recommended to carry out a number of calculations of the cable cross section);
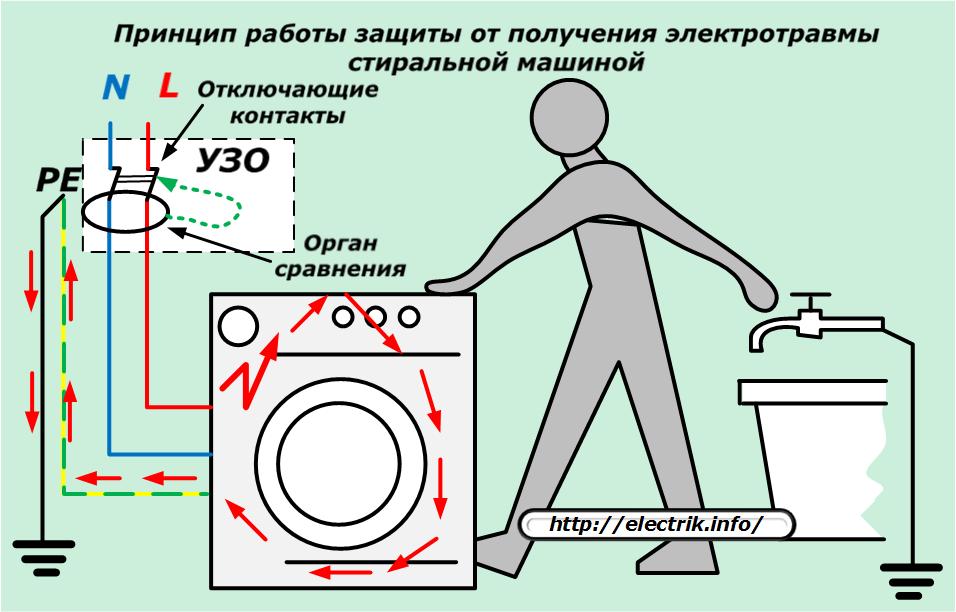
- 16A auto switch and RCD - such details will protect households from electric shock, as well as insure the machine from serious damage.
When connecting to the sewer and plumbing systems, you will need a supply of the following devices:
- adjustable / wrench;
- special ball valve;
- fitting, tee or compression coupling (the choice depends on the specific type of pipes in the system);
- threaded adapter;
- withdrawal (if required);
- flexible hose.