- Customization Features
- The purpose of the tuner and its location
- Proper tuner installation
- Interfaces and control elements
- Connection and setup
- Connecting and setting up a satellite tuner yourself
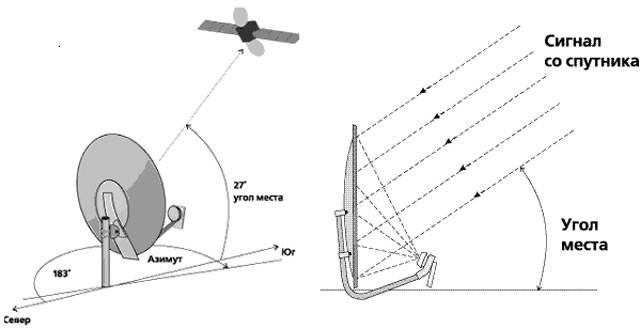
- Antenna tuning
- Antenna adjustment and tuning
- Registration
- Installation and connection errors
- Registration
- Installation and configuration of a satellite dish for Tricolor and NTV +
- Mounting brackets on the wall
- Installation of a satellite dish Telekarta
- Pre-positioning satellite dish Telekarta
- Telecard setup
- Tuners
- Cable installation
- F-connector connection
- Multiswitch connection diagrams
- How to collect multifeed
- DiSEqC connection
Customization Features
The next step in setting up MTS satellite TV is to prepare the receiver for operation. For this you will need:
- Insert a SIM card into the appropriate slot or connect the cam module to the TV.
- Wait for the 3g signal to initialize.
- Log in by choosing the appropriate method and simply following the prompts of the system.
- Set basic hardware settings.
- Start automatic search for TV channels.
- Wait for the process to complete and save the results.
Authorization on a smart TV will prove to be a little more complicated, as users will have to specify more parameters.You can find out the exact data in the instructions for the equipment or on the provider's website.
The purpose of the tuner and its location
For users, and there are many of them, who are completely ignorant of radio and television electronics, the word “tuner” is perceived as difficult to fully understand.
However, there is nothing complicated in this word, since, in fact, it hides the usual meaning of the signal receiver.
One of the many design variations of the receiver (tuner) of a television signal from a satellite, traditionally representing the basis of a satellite system along with a "dish" - a satellite dish
In this case, we are talking about a television signal receiver broadcast via satellite.
The signal received by the tuner is converted for consistent processing by the TV. As a result, the user visually perceives on the TV screen the television picture formed by the signal.
Before proceeding with the installation of the tuner, we recommend that you read our other articles, where we described in detail how to properly install a satellite dish with your own hands and set up a “dish” for a satellite.
Proper tuner installation
After purchasing a television receiver, the user will need to configure it. That is, perform a series of sequential steps according to the instructions before the received signal is converted correctly and displayed on the TV screen.
Further, this process will be considered in detail using the example of the tuner of the Tricolor TV system.
Even before starting the settings, the tuner should be installed on a flat, solid surface, preferably next to the TV, but no closer than 10-15 cm from the screen panel or rear wall.
Approximately so it is necessary to place the device near the television receiver.Proper installation of the tuner - when a flat hard surface is used and the technical distances between it and the TV are observed
The receiver module must be installed with unobstructed airflow to the ventilation areas, usually the bottom and top covers or side covers. Violation of the ventilation mode threatens with overheating and malfunctions of the device.
Typically, the scope of delivery is:
- tuner module;
- control panel (RC);
- power adapter module;
- connecting cable type 3RCA.
The locally installed tuner must be connected with the appropriate cables to the TV. This operation must be carried out with the network cable disconnected.
Interfaces and control elements
The case of a standard tuner is rectangular, has a front and rear panel, where the operation controls and system interfaces are located. The former, as a rule, occupy the front panel area. The latter are located in the area of the rear case panel.
Of the control elements, the main ones are the power on / off button, the buttons for changing modes and channels, the information display and the user card slot.
The interface component of a modern tuner provides the end user with a variety of options for connecting an image output source and sound transmission
Interfaces are usually located on the rear panel. The number of interfaces of a modern tuner is quite large and can reach more than 10:
- Under the RF cable (RF OUT) connection with TV.
- Under the terrestrial antenna cable (RF IN).
- Connecting to another tuner (LNB OUT).
- Satellite dish cable connection (LNB IN).
- Composite video (VIDEO).
- Under connection with a computer (USB).
- TV connection (SCART).
- TV connection (HDMI).
- Connecting sound through the "tulip" (AUDIO).
In the same place - on the rear panel there is traditionally a socket for the power adapter plug, sometimes mode switches and fuses.
Connecting cable option (SCART/3RSA) that can be used when connecting the output of a satellite TV tuner to the input interface of a standard TV receiver
Connecting the tuner with a cable to a television receiver is usually done using a "SCART" cable (full wiring) through the appropriate connector.
However, other options are not excluded, including the RF OUT signal through the standard antenna input of the TV. But in these options, the quality of the image and sound is reduced.
Connection and setup
Setting up satellite dishes does not start on its own until they are connected to the receiver. To do this, you need to prepare the cable (wind the F-ku on it) and transfer it from the converter (head) to the tuner.
We prepare the coaxial cable according to the algorithm:
- Cut off the insulating layer (1.5 cm from the edge) of the cable;
- We bend a shiny braid (from small aluminum strands) outward;
- We release the core of the cable from the foil screen (you need to get rid of about 8-9 mm of the screen);
- We clean the core (the main copper core) from the remaining enamel and put on the F-ku.
- It remains to make sure that the core "peeps" out of the F-ki by no more than 2 mm. All excess must be cut off with wire cutters.
- We do the same with the other end of the cable (having previously measured the required length on our own).
- We connect the cable to the converter (if there are several, then use the disk to combine them into one), and pull the other end to the receiver.
System installation is complete, the next step is configuration.
The antenna is set correctly and "looks" at the satellite (approximately so far). We go into the settings of the receiver and select, for example, the Sirius satellite. For it, you need to specify the frequency "11766", the speed "2750" and the polarization "H". Two bars will appear on the screen: the first shows that the dish has caught the signal, the second shows its power. If the satellite dish is installed correctly, you should see at least 40% signal strength. It remains only to improve the quality, which is still in the region of zero. We leave the TV and go to the plate. It is desirable that you can see the changes on the signal scale. But if you can’t monitor them yourself, leave an assistant who can correct your actions - it will be easier to set up the system with him.


Start by turning the satellite dish all the way up to the right. From this position, slowly, constantly observing the signal level from the satellite, rotate the dish to the left.
If the signal could not be caught, it is necessary to lower the antenna a couple of millimeters (the fasteners are usually marked), and then repeat the rotation of the dish.
Setting up a satellite dish on its own just implies a painstaking search for a signal by manual adjustment.
First you need to achieve at least 20% quality, after which you can fix the satellite dish stronger. After that, with light manipulations (literally by degree), we turn the plate left and right in search of 40%. But even this is not enough. For good work, you need at least 60-80%. Further "adjustment" is made by manipulating the converter, which must be turned clockwise or counterclockwise. When the signal level is satisfactory, you can proceed to debug the side converters (if you do not have them, skip this step).
Setting up additional heads will be much easier, since the main antenna already picks up the signal in full. It remains only to indicate your satellite for each converter (select in the receiver settings, as well as indicate the frequency, speed and polarization) and by rotating or bending the head leg to catch an acceptable signal.
Connecting and setting up a satellite tuner yourself
Before proceeding to the answer to the question of how to set up channels on a satellite dish, you should connect the tuner to the TV yourself. To do this, you can use several options from manufacturers.
Table 1. Connecting the tuner to the TV yourself
| How | Image |
|---|---|
| Connect using a standard HDMI cable, the necessary connector is available in almost all modern TVs. | 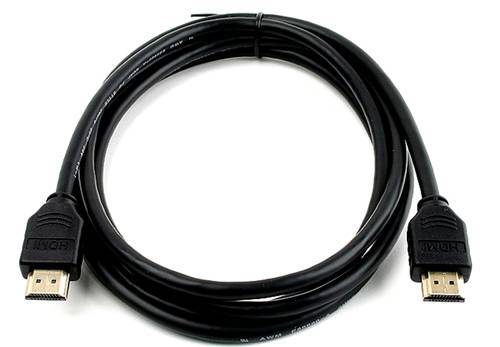 |
| Sometimes a scart-to-scart (comb) cable may be included. | 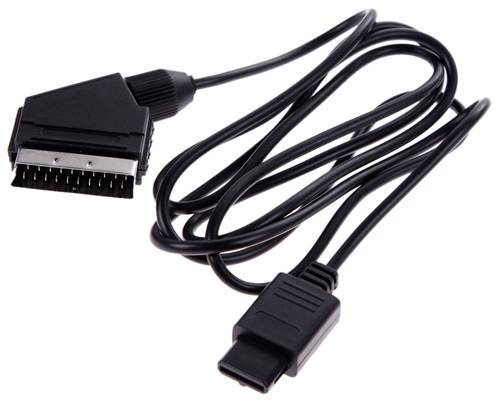 |
| Tulips are one of the most common ways to connect a tuner and TV. Insert by color into the corresponding connectors on the back or front of the TV. | 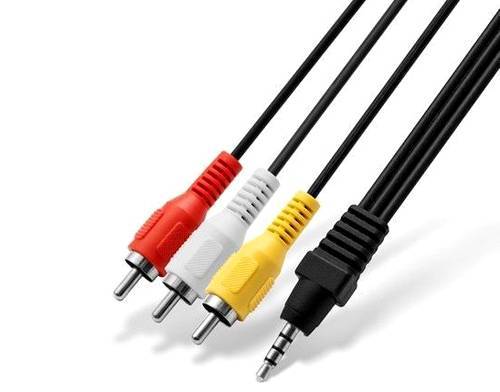 |
| Another version of tulips Y, Pb, Pr can also be found in the configuration. | |
| The last option is a coaxial cable input using RF OUT. |  |
After connecting the equipment and turning it on to the network, go directly to setting up channels on TV. To do this, first press the menu button on the remote control from the tuner. If nothing happens on the TV screen, something is not connected correctly or not included in the network.
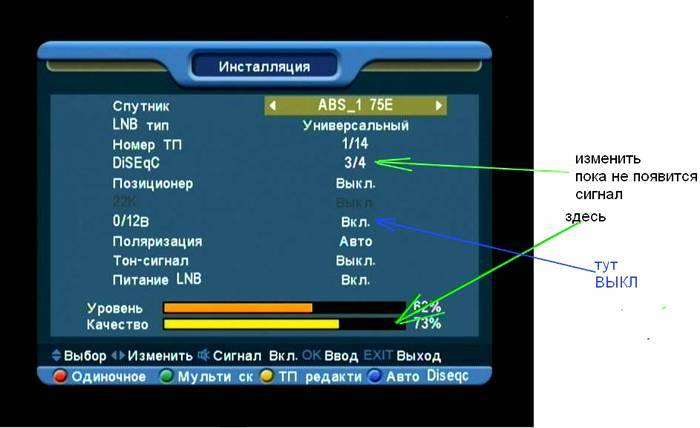
Satellite TV menu
It remains to perform the last settings and search for channels:
- Enter the menu.
- Open settings or installation.
- At the bottom of the screen in the window that opens, there will be two scales showing the signal quality.
- Basic settings are set by default. Choose the name of the satellite.
- In line LNB indicate the type of convector.
- Do not touch the rest of the data, just check if the LNB is powered on.
When the power scales show high numbers, connect the coaxial cable that goes from the convector to the receiver. In this case, F-connectors should be prepared in advance. Here is a video on the correct connection.
Antenna tuning
After all the installation work on installing the Tricolor TV satellite dish is done, we proceed to the part of self-tuning and adjusting the antenna. The signal received by the TV from the installed Tricolor plate, respectively, will be equal to the quality of the work performed. Therefore, do not spare your time and effort, carefully follow all the instructions. If you want the best possible quality and reliability of the Tricolor TV satellite dish, do not allow even the slightest error or deviation from the instructions.
Antenna adjustment and tuning
Initially, it is worth checking that the dish is looking strictly to the south and that there are no obstacles and the possibility of their appearance in the path of its signal. Then we begin to independently adjust the antenna. Using the receiver’s remote control, we turn on the signal information screen (button i), after which we can observe two scales “Signal strength” and “Signal quality”, with the help of these data we will carry out the adjustment.
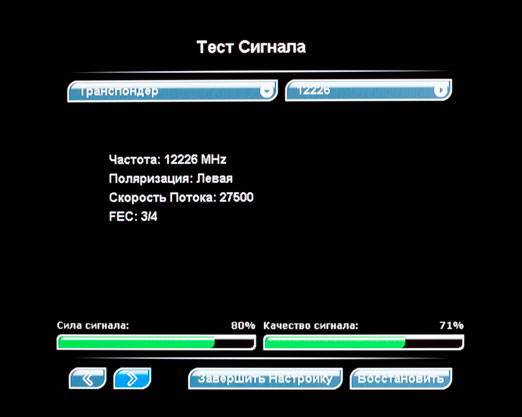
We bring the dish of the satellite dish to a vertical position and begin to move it to the sides in segments of 1 centimeter, looking at the scales, achieving their fullness of at least 70%.And we also take into account the three-second delay of the TV signal (that is, we shifted by 1 cm - we waited 3 seconds to receive the signal).
ADVICE. Look around: if the neighbors already have a Tricolor TV satellite dish, then try to achieve the same location and directivity vector, this will reduce the time spent on adjusting the signal!

We receive the signal and carry out the same manipulations to obtain the best signal quality (feel for the point with the best level of signal strength and quality), while looking at the quality of the image and sound - there should be no interference.
ADVICE. You will need the help of 1 more person to set up, as you will not be able to adjust the antenna and observe signal levels at the same time!
We get the desired image and sound quality, do not forget to tighten the mounting bolts, fix the position of the dish.
Note. If, when adjusting, the signal strength scale fills up, but the quality scale does not, the dish has caught the wrong satellite. The same reason, if both scales are filled above 70%, but there is no picture!
Registration
The best option for registering a satellite dish is through the Tricolor TV website. Follow the instructions and fill out all registration forms to receive an agreement number and an activated card. You will find all the necessary data for registration and contact information in the kit. If there is no possibility of accessing the Internet, you can register over the phone, spending a little more time. The contract itself will be sent to you by mail.
Now we can enjoy the result of our own work and use high-quality digital television. Tricolor TV brings more than 120 channels and high quality digital radio into your home at a tariff plan with a price of 400 to 2000 rubles per year.With the work done, we can pay for more than a year and a half of the operation of TV channels for the money saved on a specialist installer.


Installation and connection errors
1
At the very beginning, make no mistake with the fasteners of the traverse to accommodate the converters. It should be installed under the bracket, not on top of it.
Otherwise, there will be big problems with finding a signal even on the central head. It will be the wrong focus that will be to blame.
2
 Pass-through sockets are the first enemy of satellite TV. From such devices, there may not be a signal at all.
Therefore, only terminal ones can be used. Often they are paired with television.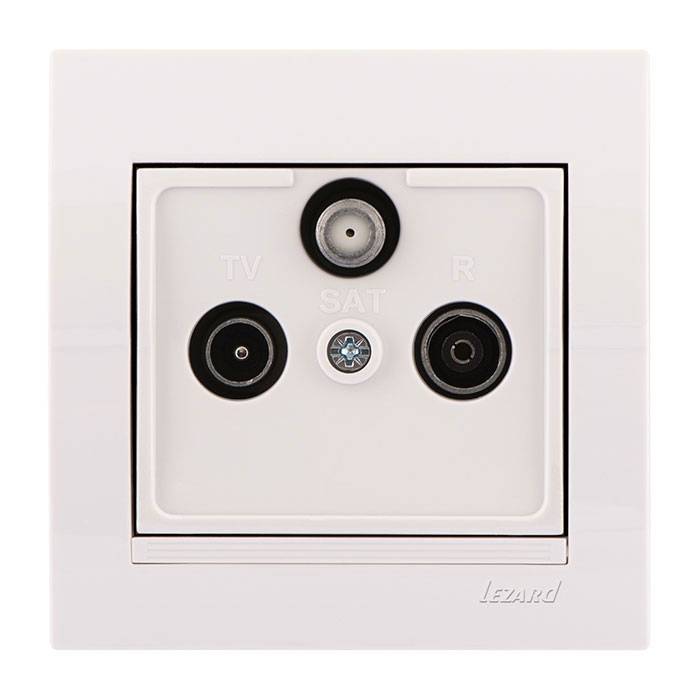
3
They can only be used for analog television. Satellite TV should not have any splitters. The fact is that the broadcast of channels usually occurs on two polarizations.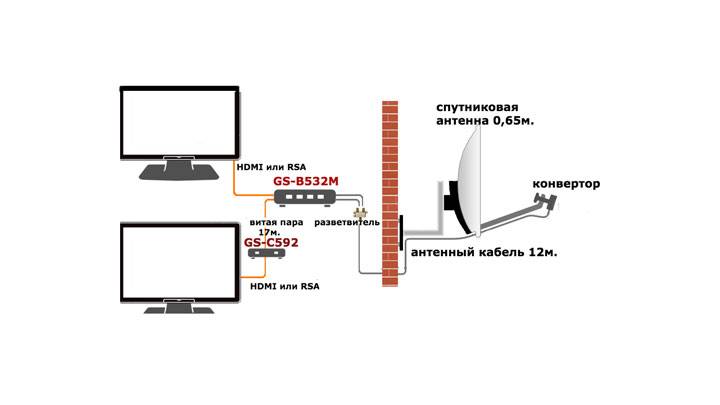
And the splitter is not able to simultaneously pass them through itself. As a result, some channels on some TV will simply be absent.
4
Any connection is a loss of signal quality, including seemingly convenient sockets.
Make sure that there are no connections in places of high humidity - attics. In bad weather, the signal will generally disappear because of this.
5
 Do not buy a Chinese cable of dubious production. Almost half of the level of the signal that comes from the dish to the receiver can depend on the quality of the cable.
6
Never wrap a dysek in a plastic bag. Even if this saves you from direct raindrops, condensation will still form inside over time.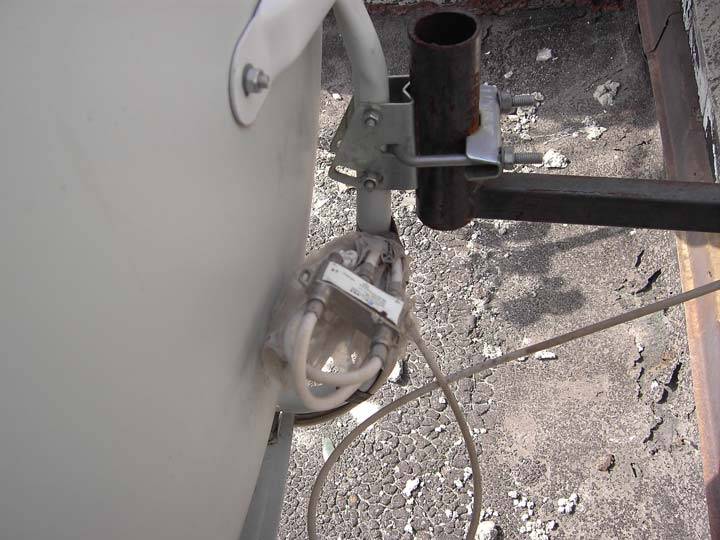
And it is he who will cause the failure of the switch, which necessarily requires ventilation and communication with air.The simplest and cheapest option - an empty plastic bottle - also does not really save.
Therefore, it is best to place a waterproof box next to the plate and install the switch in it.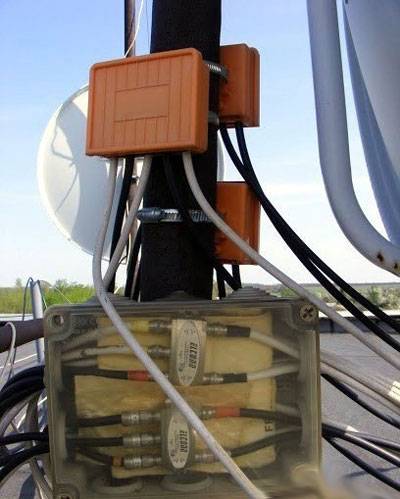
7
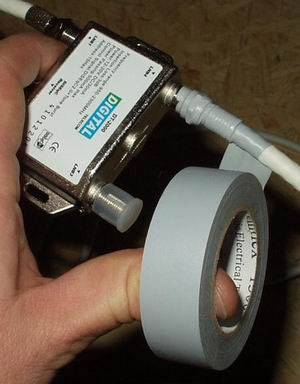 Also, do not tape the F connectors. Such insulation does not help much against rust, and only worsens the situation, since moisture sooner or later still penetrates under the electrical tape.
And instead of gradually evaporating or rolling off the connector surface, it lingers on it and accelerates the corrosion process several times. Also remember to put an insulating cap on the free Diseqc port.
Sources - h
Registration
Without registration in the TricolorTV system, it is impossible to use the services of this company. The procedure can be performed both through the Tricolor Internet portal (there is a bot assistant on the site), and at the sales office. The contact center also accepts requests for activation.
Registration implies the transfer of personal data from you to Tricolor. Therefore, to complete the procedure, you will need a passport. Do not forget to also indicate the correct address - the address of the equipment connection.


Activation via the Internet occurs through an online form with subsequent notification of the user about the success or failure of the procedure. After it, you can finally insert the smart card into the receiver and proceed to the next step.
Installation and configuration of a satellite dish for Tricolor and NTV +
Since Tricolor and NTV + broadcast from the same satellite, the algorithm for installing, configuring and connecting the antenna to the TV will be the same for them:
- To get started, purchase a satellite dish of sufficient diameter.
- Buy equipment for receiving a signal from a dish:
- receiver and access card (for NTV +), from 5000 rubles.
- if you have a TV with a CL + connector, then you can purchase a special module and a card (for NTV +), from 3000 rubles.
- a digital two-tuner receiver (for Tricolor, from 7800 rubles) or a ready-made kit along with a Tricolor dish with a TV module (8300 rubles) or a receiver that allows you to later connect 2 TVs (17800 rubles).
- you can purchase any receiver on your own, having previously specified its compatibility with the operator's signal on the website or in the technical support service.
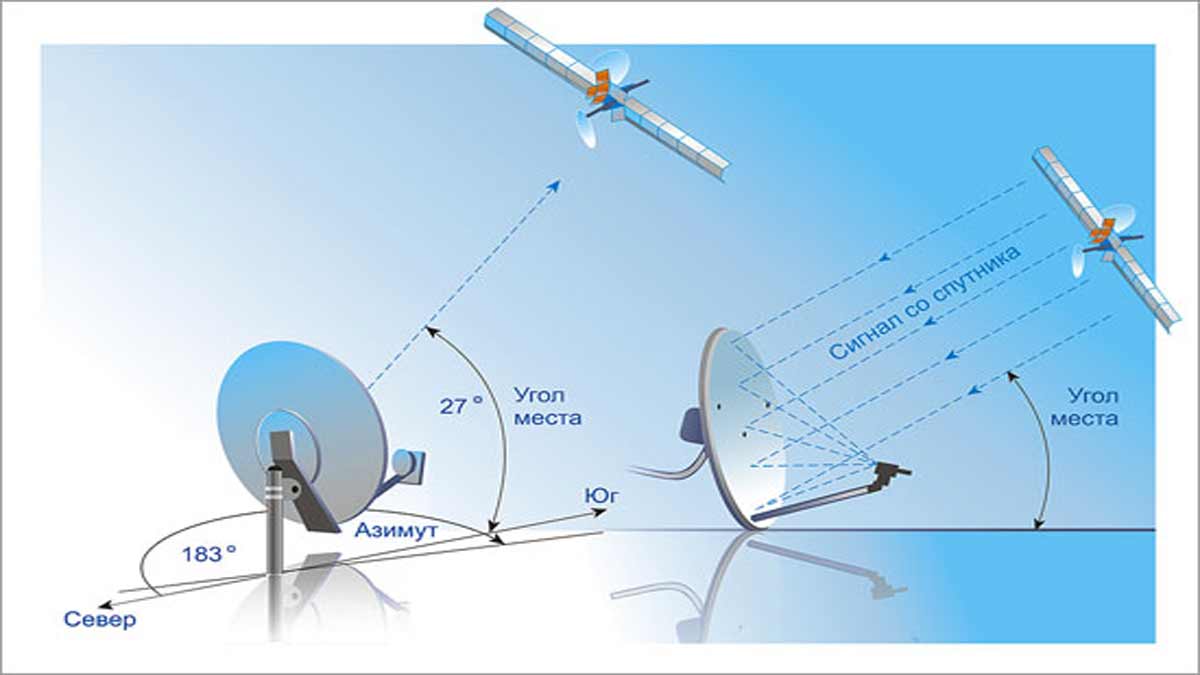
- When all the equipment is ready, you can proceed with the installation. For the European part of Russia, the satellite is located in the south, so the antenna must be installed on the southern part of the building.
- There should be no obstacles on the signal receiving line. Try to mount the plate higher.
- Attach the bracket to the wall with anchor bolts. It should be firmly screwed on and not wobble.
- Assemble the plate according to the instructions for it and fix it on the bracket.
- Install the converter on a special holder and connect the cable to it. It is better to install the converter with the connector down to avoid precipitation.
- Now you need to connect the receiver to the converter and TV. If you are using a module, then insert it into a special connector, and connect the cable from the antenna to the TV.
- Turn on your TV and receiver. Antenna installation is complete. Next, you need to tune it exactly to the satellite and search for channels.
In the case of NTV + and Tricolor, which broadcast from one satellite, no additional equipment is required for setup. After south installation is complete, fine-tune:
-
Go to the "Search for channels" menu on the receiver (or TV if you connected it directly). For Tricolor and NTV+, the satellite name should be Eutelsat 36B or 36C.
- Press the "i" button on the receiver's remote control or similar on the TV remote control (according to the instructions for the model) to see the signal level and signal quality. Or go to the menu "Settings", "System", section "Signal Information".
- On the screen you will see two scales, strength and quality. It is necessary to achieve the highest values, from 70 to 100%. To do this, slowly rotate the antenna, approximately 3-5 mm, fixing each position for 1-2 seconds, so that the receiver has time to respond to the change in position.
- Remember that you can rotate in azimuth (in the horizontal plane) and in angle (in the vertical plane).
- After you get the best signal, turn on the automatic channel search on the receiver. If you purchased your receiver from a satellite TV supplier, then most likely it is already programmed with the desired channels.
- You will need to insert an operator access card, possibly go through the registration and activation procedure and enter a password. Follow your carrier's connection instructions.
You can also use special tables, which show the approximate location of the plate in the corner and azimuth for different cities of Russia. Such tables are easy to find for Tricolor, NTV +, and, if desired, for other satellites.
Mounting brackets on the wall
Basically, the bracket is fixed with plastic dowels 12x80 (mm) or metal anchor bolts.
Depending on the fastener you choose, be sure to bring the appropriate wrench with you.
We attach the bracket to the wall in such a way that nothing interferes with the future antenna.In turn, your antenna should also not interfere with the signal for already installed neighboring antennas.
Try to choose a strong and reliable wall surface. The distance from the wall corner to the bolts must be sufficient so that when the bolts are tightened, the corner does not split. Mark the holes for the bracket with a pencil. Depending on the chosen fastener, we drill holes in the wall of the desired diameter, to a depth slightly greater than the length of the dowel or anchor.
Setting up antennas and converters for satellites
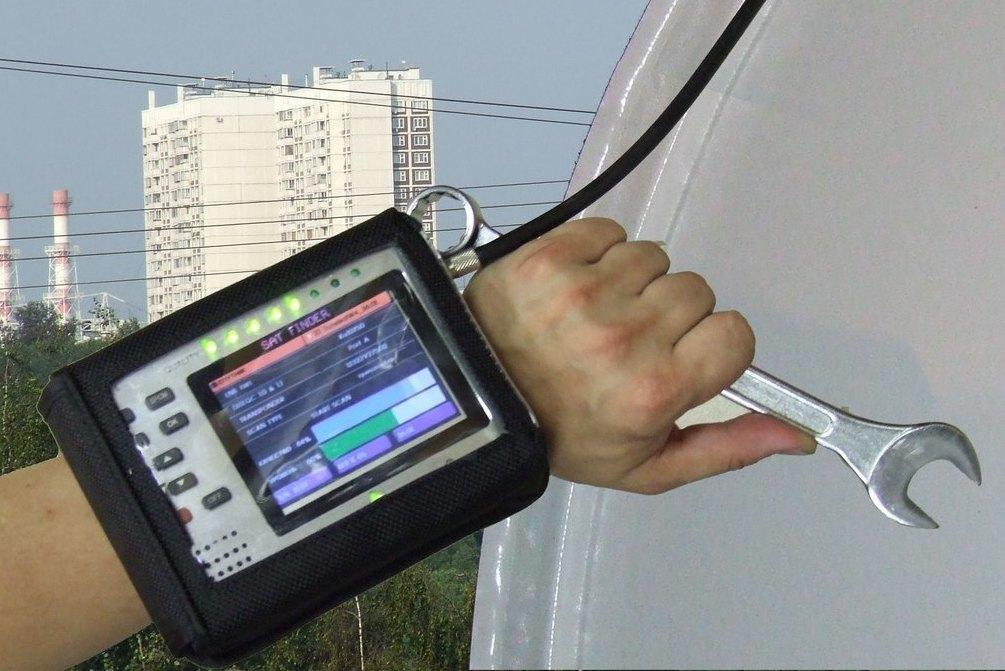
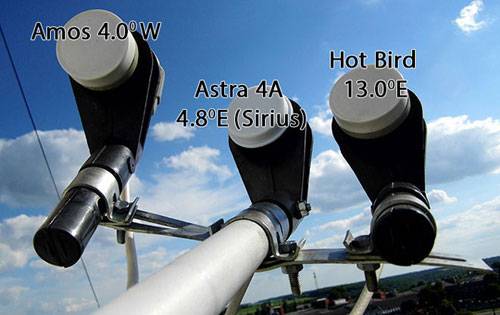
First of all, we recommend viewing the article. At first glance, this is a fairly simple operation, but if you do not follow some rules, you can seriously damage the connected equipment. At this stage, you can hang the antennas on the brackets. If you intend to install an antenna on the roof, then to set up the antenna you will need a small TV and a tuned receiver (for example, let's take the most common today "Globo", "Orton" or their analogues of the model 4100c (or 4050c)).
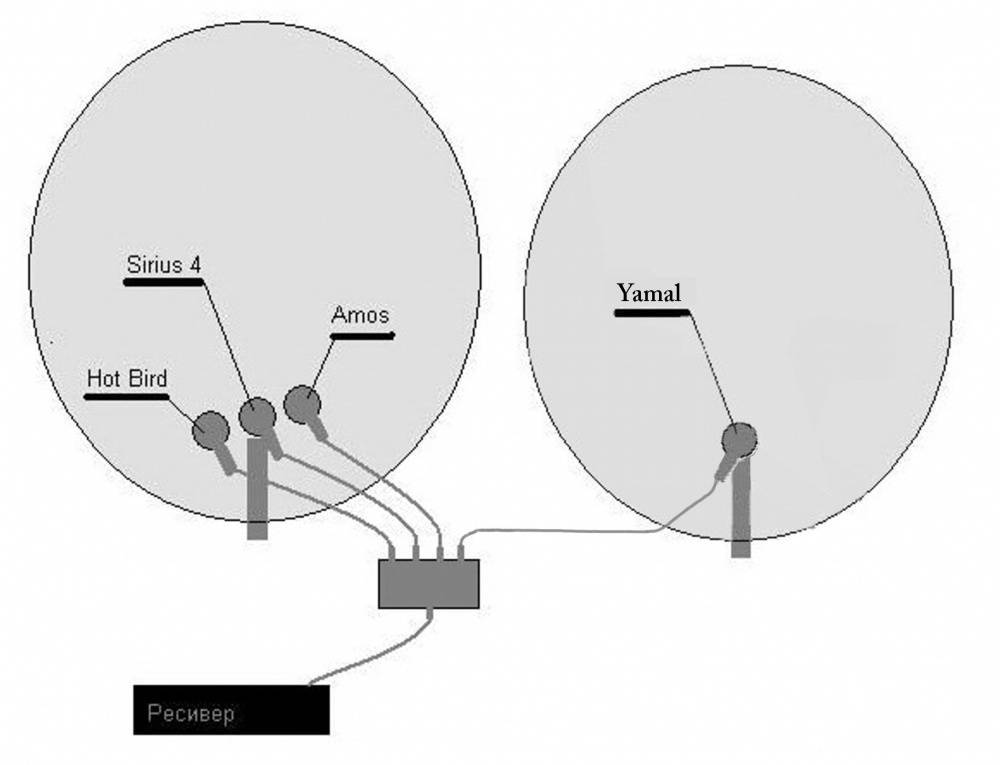
Consider setting up an antenna for 3 satellites (Amos, Sirius, HotBird). First you need to tune the antenna to the Sirius (Astra) satellite. To do this, connect one end of the cable to the central converter, and the other to the receiver's input (LNB in).
All manipulations with the connectors must be carried out with the receiver turned off.
The receiver needs to be connected to the TV, press the “OK” button on the receiver’s remote control, go to the Sirius satellite, select a working channel, for example “Rada” or “2 + 2”, press the “OK” button again to go to the selected channel.
In the lower right corner under the viewing window, information about the channel and two scales will appear: the first shows the signal level, and the second shows its quality. Antennas are tuned according to the lower “quality” scale.Slowly rotate the antenna horizontally and vertically until a signal appears on the scale. Now move the antenna literally by a millimeter, trying to get a stronger signal. Further, tightening the nuts, it is necessary to achieve the maximum possible signal. By turning the converter around its axis, you can still raise the signal (more on polarization is written on the page). Do not try to catch a 100% signal, this is unrealistic. Press the “Exit” button and watch the signal on other channels of this satellite. Channels from the same satellite may have different signal quality - this is normal. To tune in to the satellite, turn off the receiver, unscrew the cable from the middle converter, connect it to the converter on the right (it's the top one),
and turn on the receiver according to the previous example on the working channel of the Amos satellite, for example, “1 + 1” or “New Channel”. Adjusting bolts of the multifeed, and turning the converter around its axis, we achieve the maximum signal from this satellite.
In the same way, we connect to the left, lowest converter, and set up the satellite (“1TVRUS” (ORT), “RTR” channels).
Installation of a satellite dish Telekarta
The Internet is full of instructions and recommendations for installing satellite dishes. There is only one rule here: the antenna must be fixed securely on a stationary surface. Therefore, we have no illusions and take up the perforator
For mounting on the wall of a panel house, I used universal dowels ZUM 12x71 complete with self-tapping screws for them with a hexagonal head (bolt) turnkey 13 75 mm long.
The pipe section on which the antenna is attached must be strictly vertical. Therefore, when mounting the bracket, it is not a sin to use the “level”.But if it is not there, then a simple plumb line with a weight will do, unless, of course, there is no wind.


Telekarta on its website posted the best instructions for installing and configuring satellite dishes. Therefore, to whom in my story there are not enough pictures, download the instructions here. In it, we look at how to cut the antenna cable and fix the F-type connectors at the ends.
After fixing the bracket, you can start assembling the plate. Connect the cable and do not forget to rotate the converter around its axis according to the data indicated above. Determining the direction of rotation is very simple. By default, the antenna cable exits the converter vertically down. We need to turn the bottom of the converter towards the South. In my case it is about 30°.
Why does this procedure need to be performed "on the ground"? The fact is that after the plate is already mounted, you simply may not have enough arm length to reach the converter.
Then we mount the plate on the bracket, fix it, but do not tighten the nuts so that it can be moved in the horizontal and vertical plane.
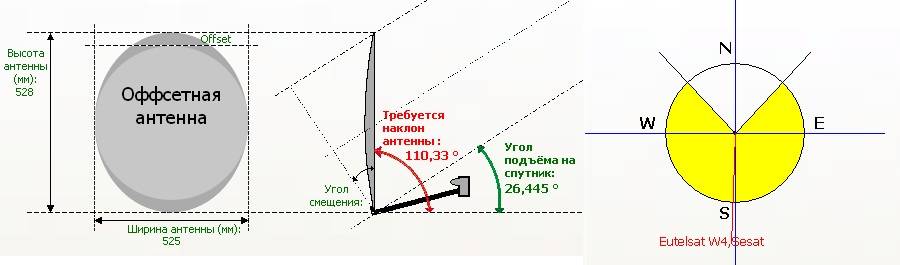
Pre-positioning satellite dish Telekarta
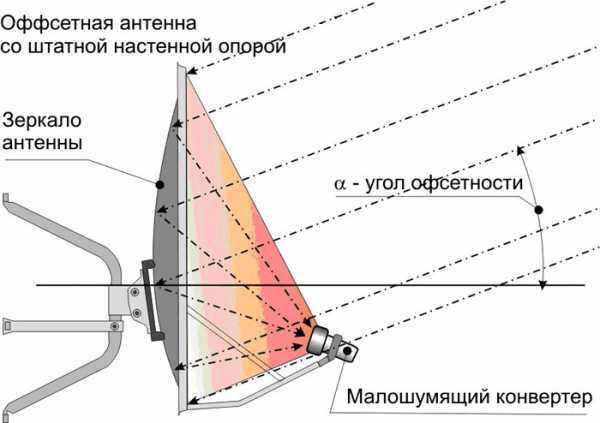
Now is the time to remember the height of the satellite above the horizon. In Volgograd, the elevation angle is 22.1°. And since our plate is offset, it is located almost vertically, that is, it “looks” straight ahead, and not at the sky. To be more precise, the vertical angle of the plate is -1°, that is, visually it looks at the ground! But don't be afraid of this. Just look at the picture of how the offset plate works and everything will fall into place.
This arrangement has a plus, precipitation in the form of snow and rain does not accumulate in the antenna. Therefore, we orient the antenna mirror so that it looks a little into the ground. And then, according to earthly landmarks, we direct towards the satellite.
This completes the pre-configuration and you can start connecting the wires.
Telecard setup
Connect all wires with the equipment turned off. That is, the satellite receiver and TV must be disconnected from the network. You can connect the Telecard receiver to the TV through "tulips" or SCART.
Turn on the TV and receiver. We switch the TV to display a signal from an external source, usually "AV". And you will most likely see the following:
This picture says that the Globo X90 TV and satellite receiver are working, but the antenna is not tuned to the satellite.
Since we do not have any measuring instruments, we will use the capabilities of the receiver itself. Why press the MENU button on the remote control. And select the antenna settings item.
When the dish is not tuned to the satellite, or at least not perfectly tuned. Then the signal strength readings are about 45%, and the quality value is only 5%.
Naturally, at this moment you will not see any TV shows. Our task is to tune the antenna so that the power readings are at least 90%, and the quality is more than 70%.
I will say right away that you will get a stable image with a quality value of 50% or more. But still, one should strive for higher values. In order not to depend on the vagaries of nature, during rain, snow, etc.
Tuners
From English tuner - "receiver". The device is capable of extracting information from the surrounding electromagnetic waves. Inside is a whole complex of devices that perform the necessary operations.
A typical receiver consists of the main stages:
- Bandpass filter of trimmer type. The cascade functions on the basis of a resonant circuit: like a gate, it passes one channel from the range.
- The filtered signal is amplified to the level necessary for the correct operation of subsequent stages - a high-frequency amplifier. The next stage lowers the frequency to a standard value that can be recognized by the detector.
- The local oscillator lowers the received frequency to a fixed value (465 kHz).
- The new frequency is amplified in the intermediate frequency amplifier.
- The detector extracts information from the received signal. The specific implementation scheme depends on the encoding method used.
- The low frequency amplifier adds energy to the information signal. The viewer, the listener perceives the result of the tuner's efforts.
A similar scheme is typical for superheterodyne tuners. Most modern devices process the signal in this way. TV tuner for TV has two separate receiving circuits for sound, picture. Satellite information is encoded: if the tuner is received from a dish, an access key is required to decrypt the signal.
The tuner is sold as a separate device (in the form of an expansion board for a personal computer), but more often it is included in the equipment:
- a player with an FM tuner for receiving radio broadcasts;
- home cinema with a TV tuner for watching programs from a satellite;
- plasma panel with TV tuner.
The TV tuner can be produced as a single unit with the FM tuner. More often it concerns expansion boards for personal computers. Electronics do not care what to play: video, music. The popularity of TV tuners has fallen: servers for online programs have appeared on the Internet.But paid channels are only available via satellite.


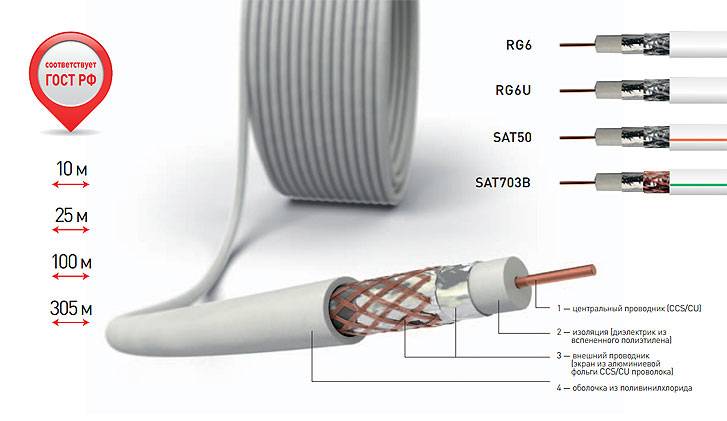
Cable installation
Before installing the cable, you need to choose a place where you can make a hole for it. If the antenna will hang on the facade of the building, drilling is recommended to be done in the following parts of the wall:
- in the corner of the window frame;
- in the wall at floor level.
If the antenna will be on the roof, the cable must be laid along the facade of the building. It must be fixed both on the roof and near the window on the wall through the window frame. It is also allowed to run the cable through the low-current risers of the structure.
F-connector connection
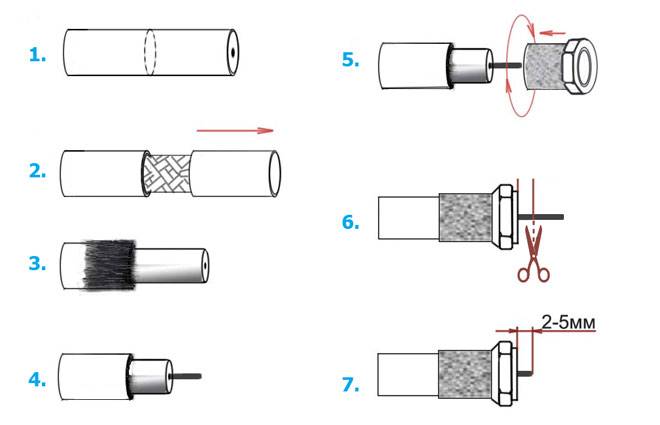
In order to connect coaxial cables, they must be stripped. After that, you need to put on the F-connectors. This happens in the following order:
- cutting the upper sheath of the cable at a distance of 2 cm without damaging the screen;
- accurate bending of the wire onto the sheath;
- removal of insulation from the central core protruding from the screen by 2 mm;
- winding the F-connector;
- shortening the excess stock of the central core, leaving 2-5 mm from the plane of the connector.
The described method of connecting the F-connector is the simplest.
Multiswitch connection diagrams
The choice of a multiswitch should be based on two important factors: the number of cables and the number of TVs in the house. The most commonly used basic schemes for connecting these devices are:
- The Amos 2/3 4.0w satellite requires only 1 SAT cable. Reception of TV channels: horizontal polarization (H) and lower range (Low) – multiswitch input H, Low.
- Astra 5.0E satellite requires 2 SAT cables.Reception of TV channels: horizontal polarization (H) and upper range (High) - multiswitch input H, High, vertical polarization (V) and upper range (High) - multiswitch input V, High.
- The Eutelsat 36.0E satellite, which has NTV+ channels, requires 2 SAT cables. Reception of TV channels: horizontal polarization (H) and upper range (High) - multiswitch input H, High, vertical polarization (V) and upper range (High) - multiswitch input V, High.
- For the Eutelsat 36.0E satellite, which has Tricolor TV channels, you need 1 SAT cable. Reception of TV channels: horizontal polarization (H) and upper range (High) – multiswitch input H, High.
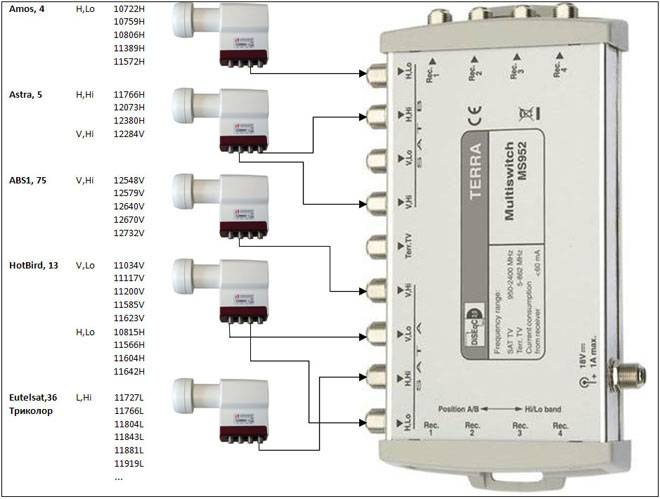
If a multiswitch is used, Diseqc is no longer required.
How to collect multifeed
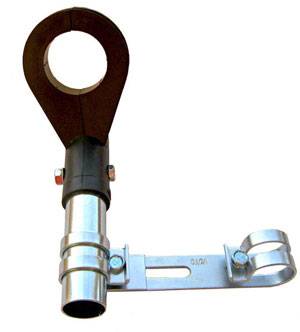
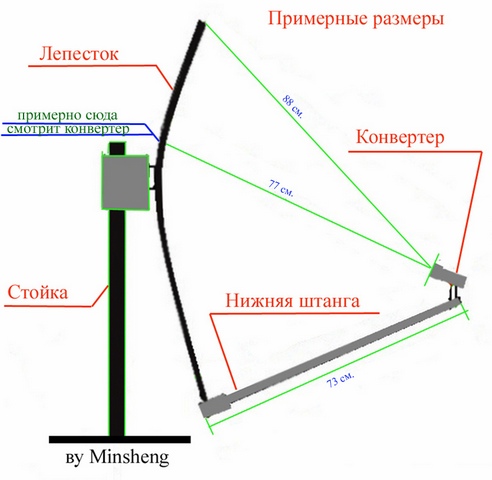
A collapsible multifeed kit often comes with two ears of different sizes. The smaller one needs to be put on the plastic tube. In turn, the large one must be fixed to the central traverse. Relative to each other, the ears can be located in different ways: both at the same level and in different planes. The first way is more common. The second one facilitates the initial setup and saves time when searching for additional satellites. This option should be used in cases where different heads will catch the signal of several satellite devices.
The third head should be placed on the same plane as one of the previous ones. The difference between different converters depends, among other things, on the diameter of the mirror. The smaller it is, the closer the heads should be to each other.
After screwing the strap, you need to pay attention to the angle between the axis of the plastic and the attachment to the traverse. It should be around 90 degrees
In addition, it is necessary to take into account the fact that the multifeed closest to the dish should be exactly the one that is configured to receive a signal from the closest satellite.
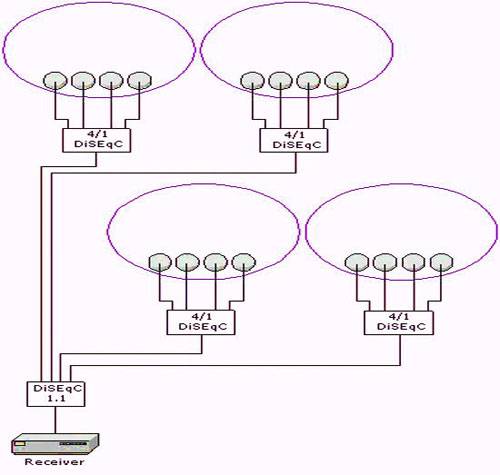
DiSEqC connection
If there is DiSEqC (Digital Satellite Equipment Control - dysek or disk), antenna tuning should be done in the following sequence of actions:
- connecting cables to the heads;
- setting heads on DiSEqC.
If any satellite on the receiver is set to 1 port, then on DiSEqC it must be in the appropriate place. The central single connector is for tuner output.