- How to properly screw a self-tapping screw into various materials
- Concrete
- Ceramic tiles and bricks
- Soft non-ferrous metals
- hard metals
- Plastic
- Wood and wood boards
- Classification
- For metal
- Roofing
- Furniture or confirmation
- In what wave should the self-tapping screw be fastened? Theory and practice
- Screws and self-tapping screws
- Mounting on brackets or hooks
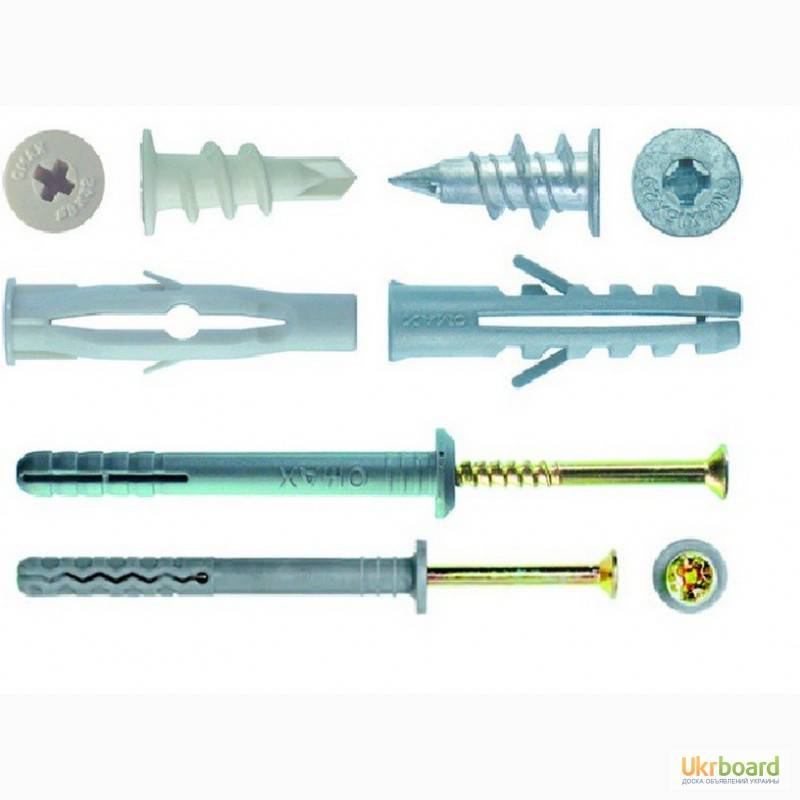
- Four-segment dowel
- Dowel-"butterfly"
- "Driva"
- "Umbrella"
- Dowel mole
- We analyze popular installation errors
- self-tapping screw does not hold in mdf
- Which ones to choose?
- Purpose
- Fastening technology
- load capacity
- How to fix the screws in the table
- Auxiliary tools
- How to screw a self-tapping screw into a brick. How to screw a screw into a brick wall
- First things first, tools first
- Main fastening rules
- Ways to work
- How to magnetize a bat yourself
- Stages of work on fasteners
- 3.
- What is and purpose
How to properly screw a self-tapping screw into various materials
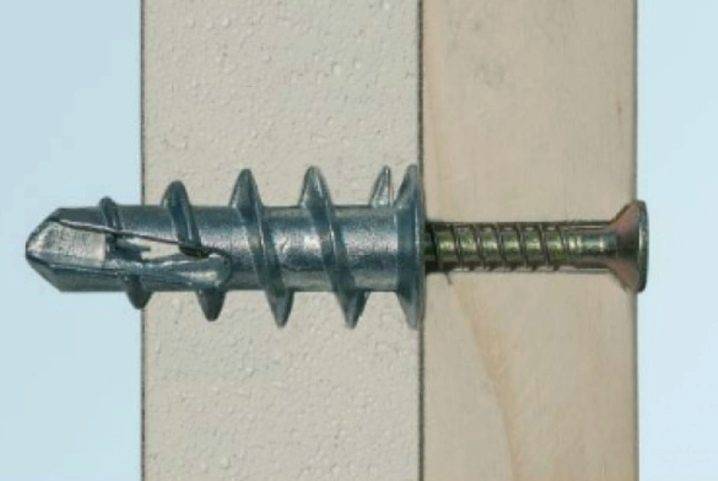
Concrete
Perhaps, the method of installation in concrete is now known to everyone: first you need to install a dowel into it, and then you need to screw the self-tapping screw into this already installed dowel. According to many craftsmen, the reliability of fixation increases significantly if the surface of the dowel is lubricated with the appropriate glue.
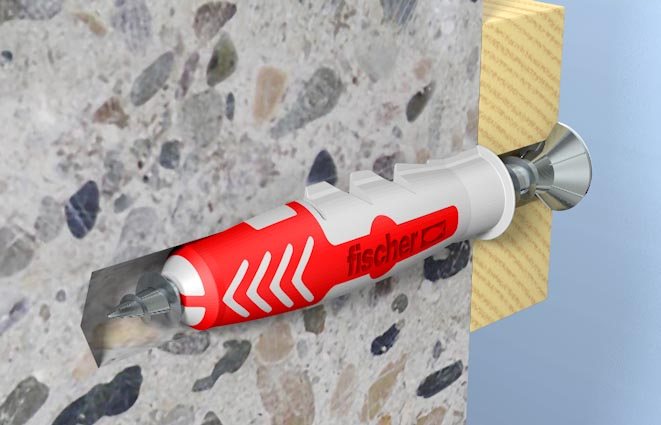
For drilling holes, it is best to use a puncher, the rules for choosing which we have already written earlier.By installing self-tapping screws on dowels, you can use both universal products and wood.
Ceramic tiles and bricks
If necessary, screw a self-tapping screw into a brick or ceramic tile, proceed in the same way as with concrete. But for drilling holes, it is better to use a drill.
Soft non-ferrous metals
In order for the fastening in such metals to be reliable, before screwing the product into them, a hole of a very small diameter, smaller than the diameter of the self-tapping screw, should be drilled. Screwing it in is done without much wisdom. The only important point is that it is necessary to use products of only a universal type.
hard metals
The diameter of the pre-drilled hole in such material should be equal to or slightly larger than the diameter of the universal self-tapping screw, excluding its thread. However, some hard metals - cast iron, for example - are simply too tough for self-tapping screws.
Plastic
Self-tapping screws are far from suitable for all types of plastic, some of its varieties can simply collapse when screwed in. If you are completely sure that your plastic product is not one of them, then in this case you should use the technology that was described above for soft metals, using wood-threaded screws.
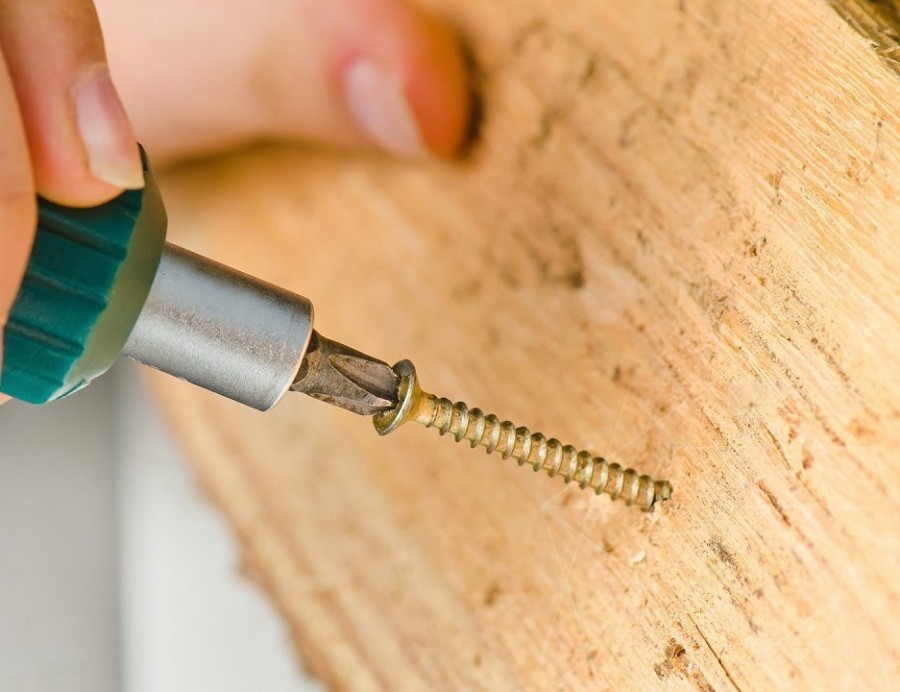
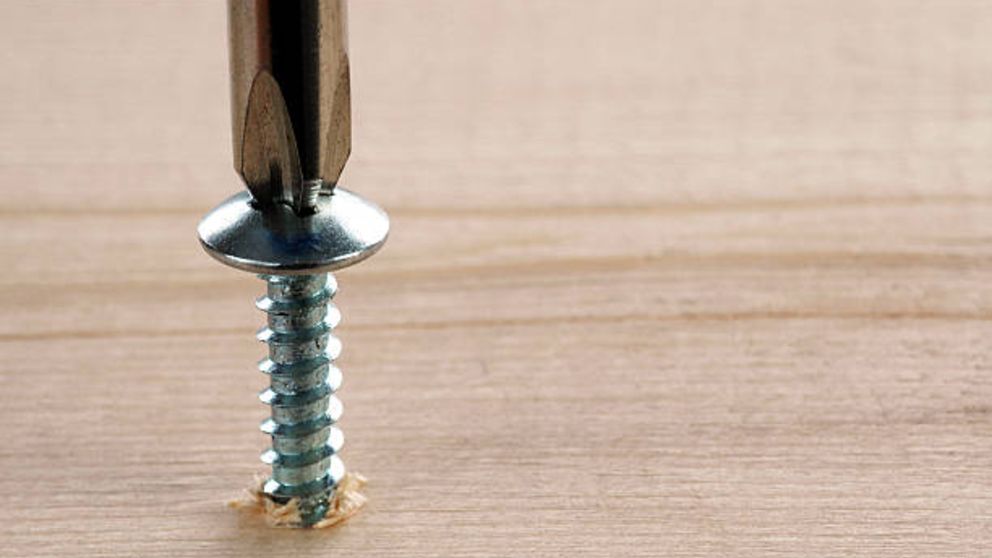
Wood and wood boards
Naturally, in this case, you should again use self-tapping screws with threads for wood. If they are screwed into thin boards or slabs, as well as into hardwoods, then a thin receiving hole must first be drilled. The easiest way to work with thick boards made of softwoods: no tricks are required for this.
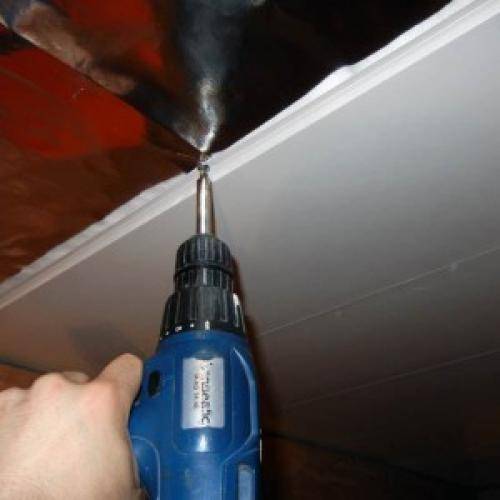
Drywall: pay special attention!
Drywall is a material, screwing screws into which is associated with the largest number of different nuances. The main ones include:
- the optimal screwing step for this fastener is a distance of about 70 cm;
- using a screwdriver during work, you should start immediately from the maximum speed, gradually reducing it as the self-tapping screw deepens;
- when working with a conventional screwdriver, it is necessary to monitor the smoothness and restraint of movements;
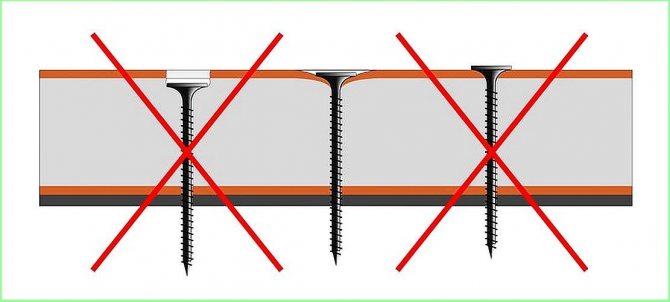
- the head of the twisted self-tapping screw should press the cardboard surface of the sheet without breaking through it. This condition is the key to maximum strength of the future design;
- if the surface of the sheet turned out to be broken, the self-tapping screw should be removed, the hole should be puttied and a new place should be chosen for installing fasteners at a distance of about 5-9 cm.
When working with drywall, the type of self-tapping screw is selected based on the material of the supporting crate. If it is wooden, then self-tapping screws with threads for wood are used, if it is metal, then universal ones.
So, we introduced you to the basic rules that allow you to screw a self-tapping screw into any metal so that the maximum reliability of the structures you create is ensured. We hope that our recommendations will allow you to exclude any marriage and make any repair as you originally intended.
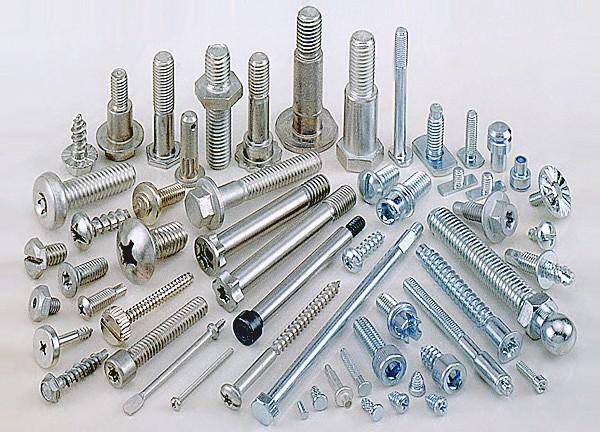
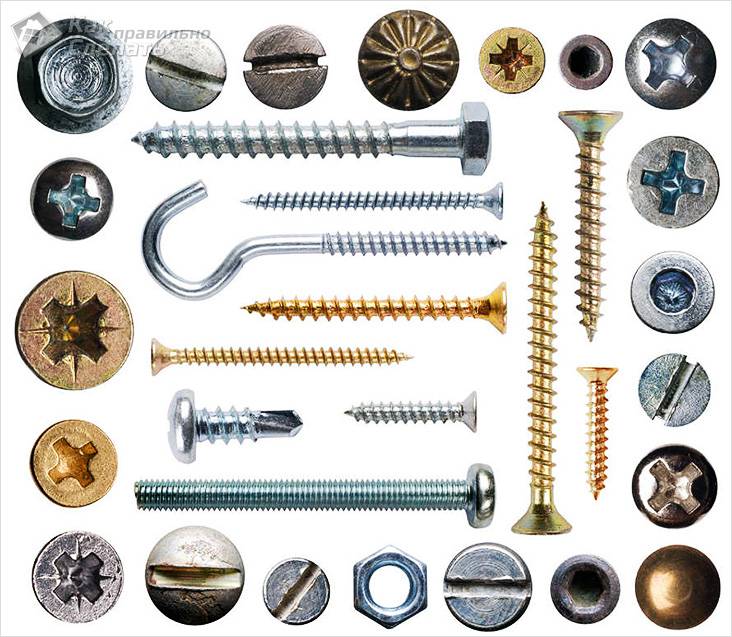
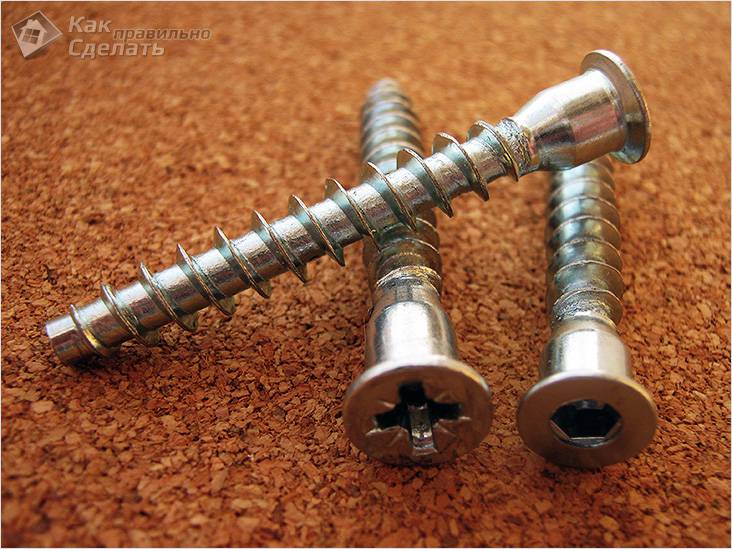
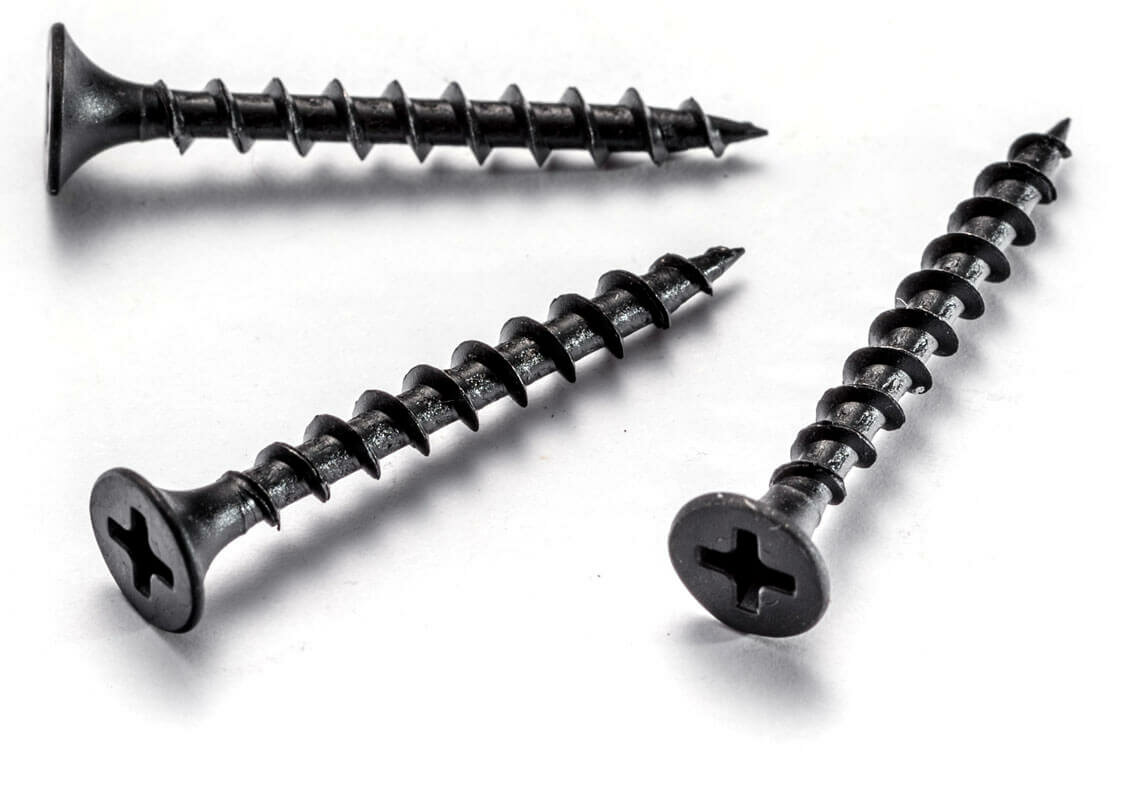
Classification
This fastener is made from different materialssuch as brass, stainless steel and carbon steel. Also, self-tapping screws have different coatings, such as:
- galvanized (yellow);
- oxidized black;
- phosphated black;
- without cover.
They differ in the type of head:
- semi-cylindrical;
- secret;
- hexagonal;
- hemispherical.
The use of one or another self-tapping screw depends on the density of the material that you plan to mount. Therefore, before buying this product, you need to decide on the following:
- Connection operating conditions.
- Is it necessary to drill a hole before screwing?
- What material should it be wrapped in?
- What material will be attached.
Based on this, you make the appropriate choice, whether it will be a self-tapping screw for metal, wood or concrete.
The main difference between self-tapping screws for wood is a rare carving, unlike their counterparts designed for metal. Such fasteners can be black, golden and white. So, if it is necessary to fasten a golden loop on the door, then a golden self-tapping screw is selected accordingly. In most cases, the choice falls on a black screw.
For metal
As already mentioned, the thread on such a self-tapping screw has a frequent pitch. This is due to the fact that the metal is a fairly hard material, so the clutch must be made strong. Moreover, some metals should not be pre-drilled, for example, tin. As for thicker metals, you will need to make a hole.
Roofing
Such self-tapping screws are used for fastening roofing sheet material. It must be equipped with a rubber seal. As a result, the connection, in addition to strength, becomes airtight.


Furniture or confirmation
This type of self-tapping screw requires pre-drilling a hole in the piece of furniture. A hex wrench is used to tighten it.
These are perhaps the most common types of self-tapping screws that are used in various areas of construction. Let's look at the details of how to screw one or another self-tapping screw into different surfaces.
In what wave should the self-tapping screw be fastened? Theory and practice
And now we turn to the most controversial issue. The fact is that as long as corrugated board exists on sale, disputes over its installation do not subside.
How to fix the self-tapping screw correctly: in the upper or lower wave? It would seem, why do such questions arise at all, if the manufacturer clearly indicates that the fastening occurs in the lower wave?
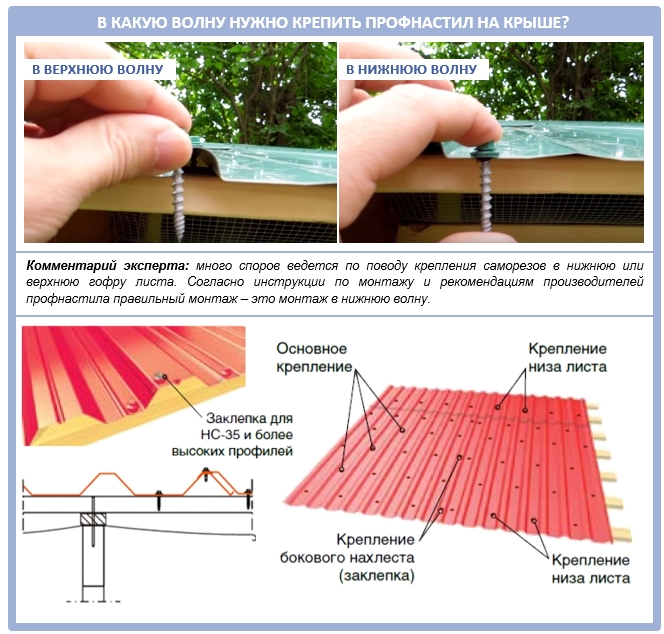
Actually the question makes sense. The self-tapping screw in the lower wave securely presses the profiled sheet to the crate, and the roof itself looks protected. But, at the same time, the water along the slopes always goes along the lower wave, and such a mount is always in the water, unlike the upper one.
At the same time, any error during the installation process is a roof leak and rapid corrosion of the roofing material. Therefore, an unusual, but justified in practical terms, solution to the issue is offered by the roofers themselves:
- If the roof is mounted by professionals in whom you are sure, then let them screw the self-tapping screw into the lower wave;
- If the team is unreliable and there is a risk that the masters will not comply with all the technological subtleties, it is better to go to the top. This method will not affect the overall strength of the roof in any way, but during rain, problematic attachment points will not create problems.
But remember! In case of violation of the installation instructions supplied by the manufacturer, the guarantee for the finished roof does not apply. Therefore, weigh the pros and cons and choose the appropriate styling option.
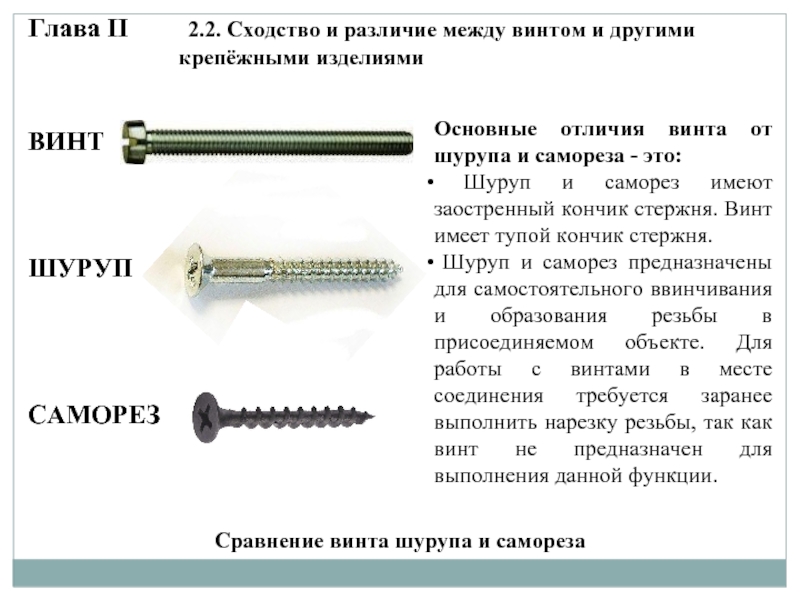
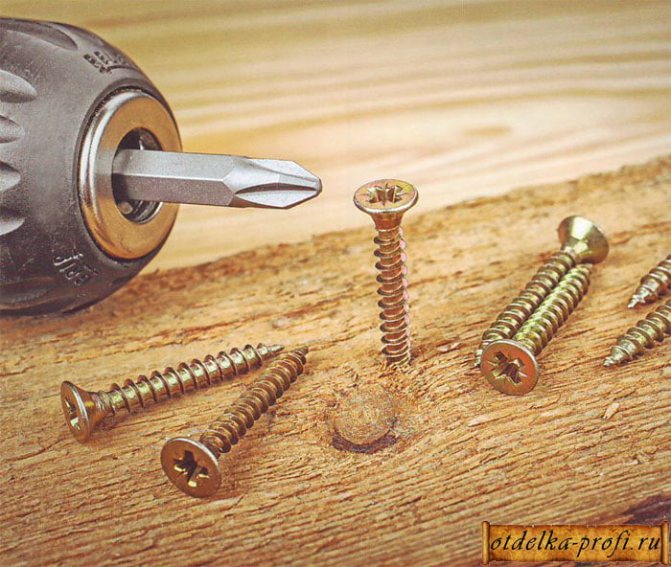
Screws and self-tapping screws
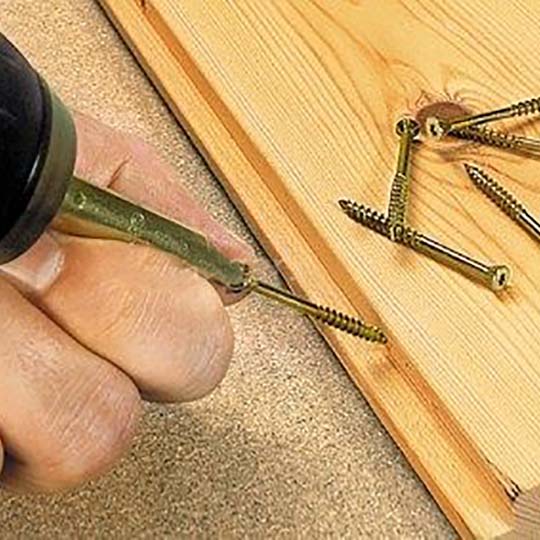
Wood screws and self-tapping screws are convenient and practical fasteners to use. They give reliability and strength to the connection of wooden parts and can be a worthy replacement for conventional nails.
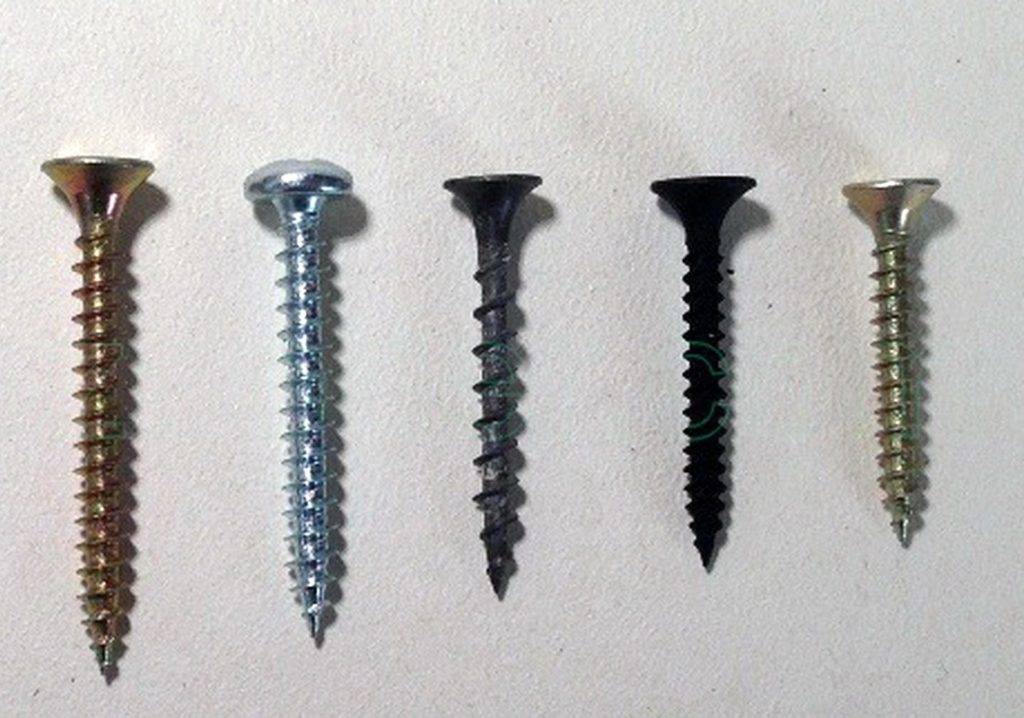
Screw
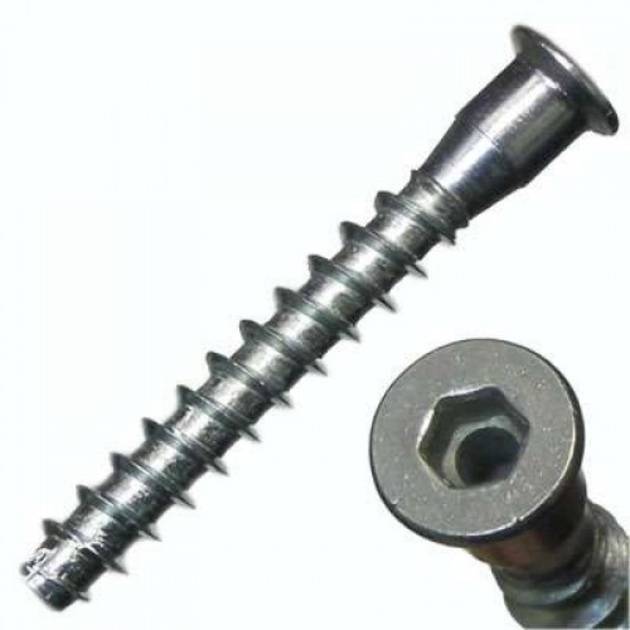
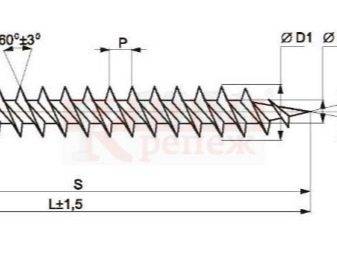
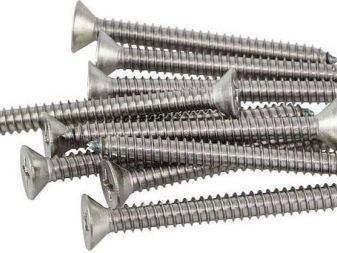
- this is a fastener, the core of which is 2/3 threaded, and on the cap there is a slot or a cross-shaped notch for a screwdriver. In order not to confuse a screw with a screw (which is practically not used in carpentry), remember that the screw has a tapered end. Self-tapping screws are very popular. When screwed in, they create a thread in the connection hole. Self-tapping screws, like simple screws, can be of different lengths and thicknesses, with different slots and head shapes, but on a self-tapping screw, the thread is made for the entire length, up to the head itself - this is their main visual difference.
Countersunk head screws
useful for connecting parts where the head should be flush with the surface or recessed inward, as well as for fastening fittings.
Screws with semi countersunk head
most often used for fastening metal parts to wood (for example, corners for shelves) where design features allow.
Pan head screws
used for fastening sheet material, due to the thickness of which a countersunk head cannot be used, in places where the protruding head does not interfere with the design features or appearance of the product (for example, the back walls of cabinets).
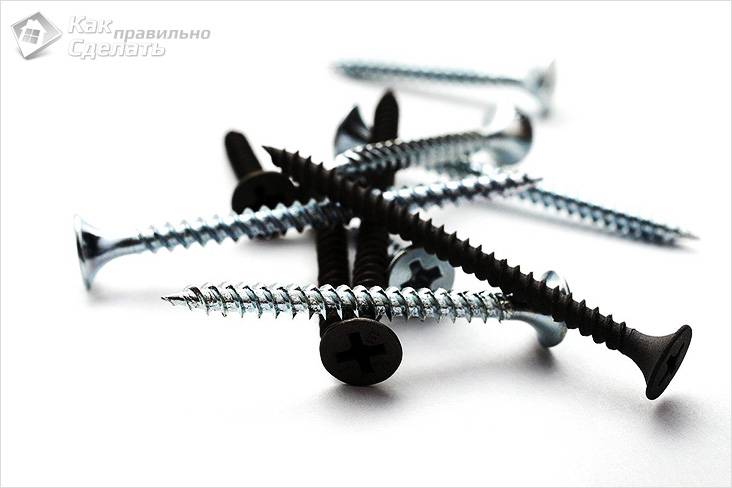
Black screws
with a large pitch (the distance between the turns) of the thread - these are the most common and cheapest self-tapping screws. They attach drywall to profiles or wooden blocks, wood to wood and are used for those jobs where appearance is not particularly important. The thickness of such self-tapping screws depends on their length: the longer the self-tapping screw, the larger in diameter it is.The hat is hidden, when fastened, it becomes flush with wood or drywall. Cons of black self-tapping screws: unattractive appearance and lack of coating, which over time causes rusting of the hat.
yellow or white
with a protective coating - decorative self-tapping screws, the thread goes along the entire length of the self-tapping screw, a hidden hat. Sizes start with the smallest - 10-12 mm long and more. They are much more expensive than black ones, but hold the material worse. They are taken for finishing, decorative work, for fastening in dowels in the wall. The hat does not rust and does not spoil the appearance.
Self-tapping capercaillie
- This is a very large screw. It is used in places where there is a lot of pressure or load. The capercaillie screw has a hexagonal head. To secure it, you will need open end wrench or screwdriver with a special bit-head of the right size. Under such self-tapping screws, it is imperative to drill a tree, otherwise, due to its thickness, either it will not be possible to screw it into a tree, or the self-tapping screw will split the wood.
Advice.To make it easier to screw in the capercaillie screw, you can first lower it into engine oil .


Screws and self-tapping screws for chipboard
made of hardened steel, with a countersunk head. They are used in the same way as universal fasteners. For large diameters, a pilot hole is needed, small screws can be screwed in without it.
Frame screws and self-tapping screws
from hardened steel with a large thread pitch are needed, among other things, for screwing into the edge (side part of the plate) of chipboard, since they do not split the chipboard and relatively thin wood. To facilitate the work, you can pre-drill pilot holes for them.

Mounting on brackets or hooks
Pretty simple way.For this, brackets or hooks are purchased, which are fixed to the wall surface with self-tapping screws. Fasteners can be made on the rack of the frame - so it will be stronger. A large area of the bracket will distribute the load, and this will securely fix the self-tapping screw in drywall.
However, this method still cannot provide normal fasteners for dimensional elements of furniture or other items.
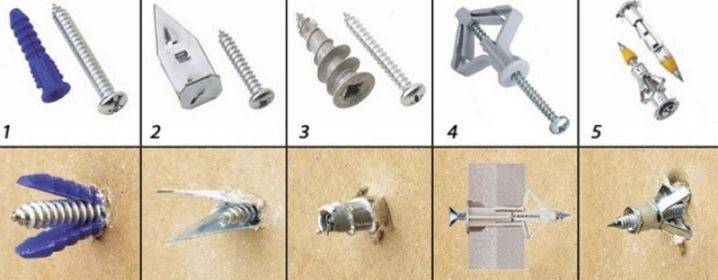
Four-segment dowel
Such dowels, due to their structure in the void, begin to curl up into a knot, due to which, firstly, the load is evenly distributed, and secondly, it will not rotate and will be firmly fixed in the drywall wall thanks to its ribs.
To fix it, you need to make holes in the wall exactly in diameter and screw in a self-tapping screw.
Dowel-"butterfly"
Fasteners on drywall of various kinds of shelves, lamps and chandeliers will perfectly perform the dowel-"butterfly". The fastener itself is made of nylon. The ribs firmly fix it, which will save it from turning, the side will not allow it to fall into the walls. But the main thing is the design, which, when the screw is screwed in, opens into two halves in the form of wings that rest against the drywall on the other side. The load is distributed and the mount is firmly fixed.
The fixing method is the same as in the previous version.
"Driva"
This is a short and thick nylon type of fastener with screw threads on the body. It is screwed directly into the drywall with a special nozzle - "driva". You can also use the traditional method by drilling a hole of 8 millimeters. Fasteners in drywall using this method are able to withstand a maximum load of 25-30 kilograms each.
One fastener "driva" can withstand a load of 25-30 kilograms.
"Umbrella"
Attaching heavy objects to a plasterboard wall will provide an umbrella-type dowel. It is made of metal and has the form of either a screw or a hook. The design opens behind the drywall and evenly distributes the load on the surface.
Installation of such fasteners is traditional. Holes are drilled into which fasteners are inserted and a screw is screwed in. The hook option is a great solution for attaching all kinds of chandeliers and lamps.
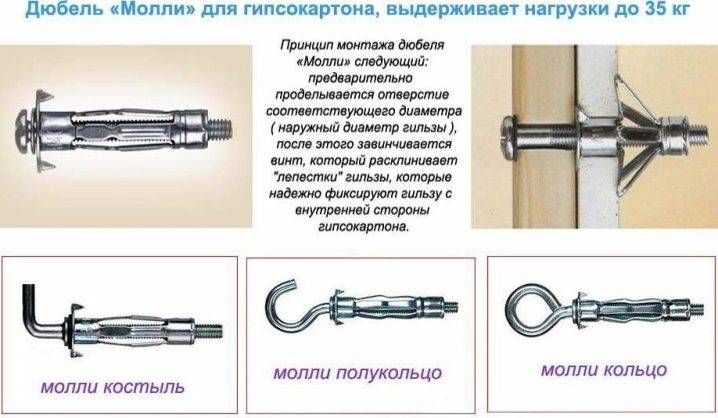
Dowel mole
Dowels of the Molly system will perfectly provide fastening to a plasterboard wall of various elements - from small lamps to massive wall cabinets.
By design, this is a metal dowel with slots on the sides and a screw. For mounting, specialized tongs are used. But if you need to fix several elements, you can do without them.
Installation is carried out as follows: a hole is punched in drywall with a drill along the diameter of the dowel. In the middle of the fastener slots, the wings are slightly bent and the screw is slightly tucked. We insert the fastener and screw it in until it stops.
The structure will open on the other side, and the legs will sit firmly on the surface, evenly distributing the load.
When choosing a dowel mole, you need to choose the correct diameter of the fastener, then you can easily hang not only something light, but also, for example, a massive wardrobe.
The diameter of the fastening material is selected depending on the weight category of the item. For example, a wall-hung kitchen cupboard with dimensions of approximately 600 × 900 millimeters can be freely hung on a six-millimeter mole.
Fastening to drywall in one of the suitable ways will reliably last a long time, the main thing is to correctly follow the installation technology and choose the right material.
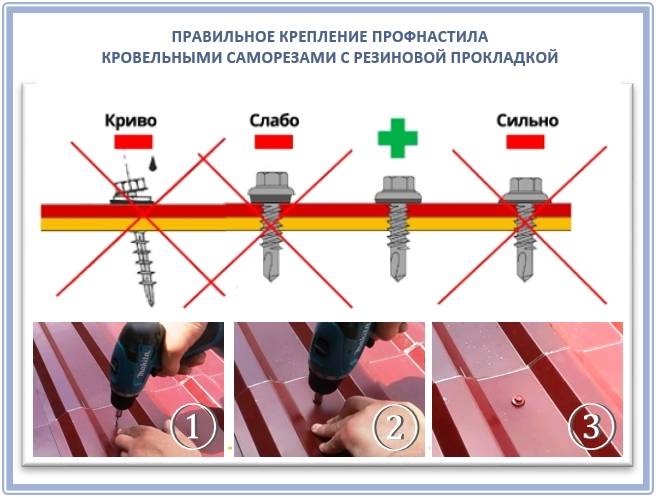
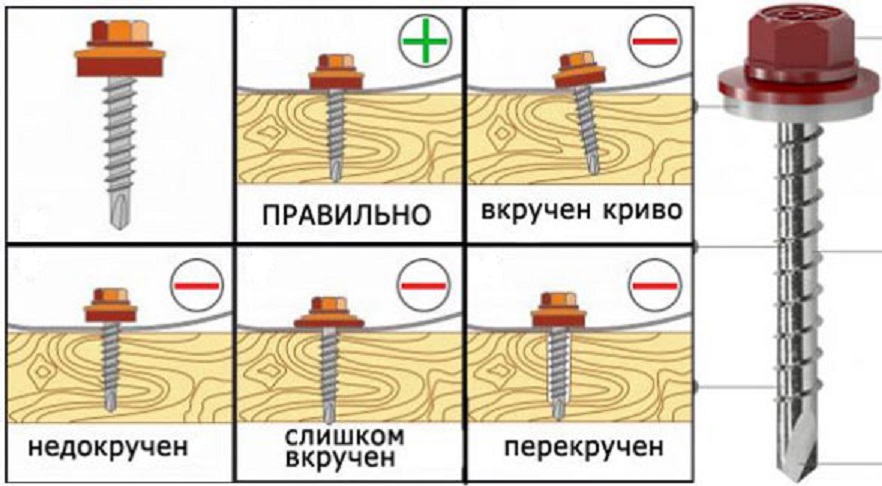
We analyze popular installation errors
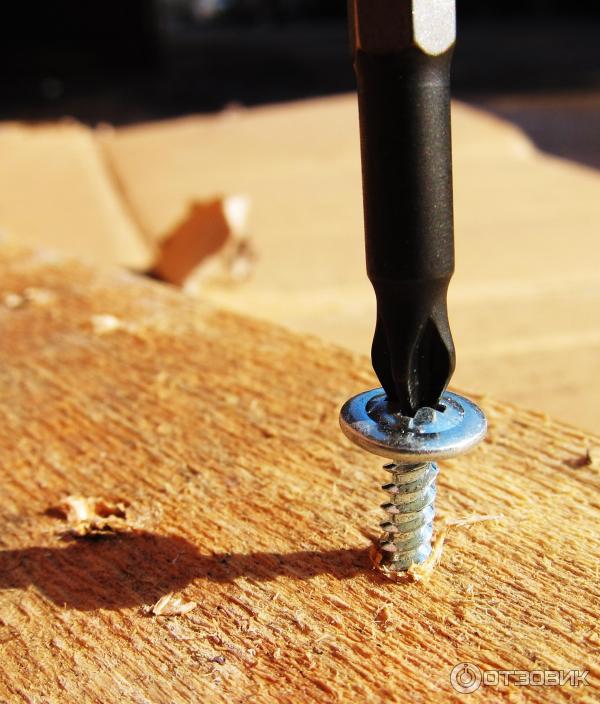
Let's look at the main mistakes - the more you know about them, the more reliable your roof will be:
- Too big drill. The result - no tightness and bearing capacity of the connection.
- Too thin drill. This will certainly lead to either broken fasteners or biting of the thread - its partial destruction. And of course, you can’t call such a high-quality mount.
- The screw is too loose. In this case, the rubber gasket will not fit snugly against the surface of the metal sheet, and moisture will easily get under it.
- The screw is screwed in too tightly. In this case, the rubber gasket will quickly crack due to overvoltage and begin to let water through.
The following illustration will help you understand this:
To avoid overtightening the washer or breaking the drill, use the appropriate tool. For this purpose, a screwdriver with a low rotation speed (up to 1800 revolutions) is suitable, which allows you to control the angle of entry of the self-tapping screw into the roof.


Be careful: self-tapping screws for corrugated board are equipped with a washer, which is sensitive to constriction when screwing.
But what to do if you screwed the screw in the wrong place (for example, didn’t hit the crate), and twice? There is a way out: you need to close the hole from the self-tapping screw with sealant and a rivet. As a result, the consequences of improper fasteners will be almost invisible:
Another good tip for the same problem:
As you can see, everyone can make a mistake, but if you know how to fix it, then problems in the future can be avoided.
self-tapping screw does not hold in mdf
PROMEBELclub - Forum for furniture makers: heads of furniture enterprises, designers, designers, craftsmen, technologists and everyone who is related to the furniture business. Programs for furniture design, design, for complex automation of a furniture enterprise. Furniture literature and teaching aids. Forum Rules Help Calendar All topics read. We perfectly understand how difficult it can be for a new member of our forum to navigate in all the variety of sections and topics. And although on the forum you can already find answers to most questions related to the furniture business, it is quite difficult for a newcomer to the forum to do this. Therefore, this section was created to adapt newcomers to the forum and quickly answer professional questions of interest. Ask - and the old-timers of the forum will answer you.
What to do if the hinge is pulled out of the closet, chipboard door, how do it yourself. Detailed And then we twist the self-tapping screw there.
Which ones to choose?
The type of fastener is one of the main factors affecting the reliability and quality of drywall fastening.
Therefore, special attention should be paid to their choice.
When buying self-tapping screws, it is advisable to consider a few simple rules.
Give preference to self-tapping screws with a countersunk head. This will allow you to easily drown them into the drywall structure. It is undesirable to use hardware for such work that has a head in the form of a hemisphere.
The self-tapping screw must match the type of base.For example, in a log house, wood fasteners are used, which will easily enter the tree and secure the sheet. A similar algorithm can also be used for wooden frames that are formed when sheathing a ceiling or walls.
The length of the screw is selected individually for a specific situation.
It is important that it enters the inside of the frame by no less than 2-3 cm. This is especially true for self-tapping screws, which are not supplemented with dowels and represent the main fixing element.
The choice of dowels for plasterboard structures is an important step and involves the evaluation of several parameters.
Purpose
Today, dowels can be used to attach drywall to the base or fix other products on top of this material. If you need to attach a baguette or a skirting board in the kitchen, then a butterfly or a driva can be the solution. The molly dowel does an excellent job of fastening shelves or plumbing fixtures.
Fastening technology
Screwing the dowel-driva is not difficult. If you need to use other types of structures, you should understand that they need additional space. This is due to the fact that when the butterfly is opened, the support systems move. Therefore, if a drywall sheet is attached tightly to the main wall, it is technically unrealistic to use such fasteners. The solution to this problem is the usual dowel-nails and the right size of the self-tapping screw.
load capacity
Almost all varieties are used for fastening structures over drywall. Fixing heavy products (for example, a massive chandelier, shelf, cabinet) is carried out only with the help of special anchors or molly dowels. These systems are capable of supporting weights up to 50 kg.Driva has proven itself well when fixing structures weighing up to 30 kg. Butterflies are considered the simplest and most unreliable, with which you can hang structures weighing up to 11 kg.
How to fix the screws in the table
Situation number two. You urgently needed to go away on urgent business to a friend or a friend)). However, the wife's stern look does not bode well. We need to appease her immediately!


Ideal: fix something quickly. For example, an old coffee table inherited from grandfather. The screws in it have long been loosened, and it is about to fall apart under the weight of last year's magazines.
We do the following. We unscrew the screws from the sockets, insert a couple of matches into the holes, pour a little of any glue for reliability and screw it in again.
For a while, the table will be like new, and you, accordingly, are beyond all suspicion. That should be enough to get you on your way.
Auxiliary tools
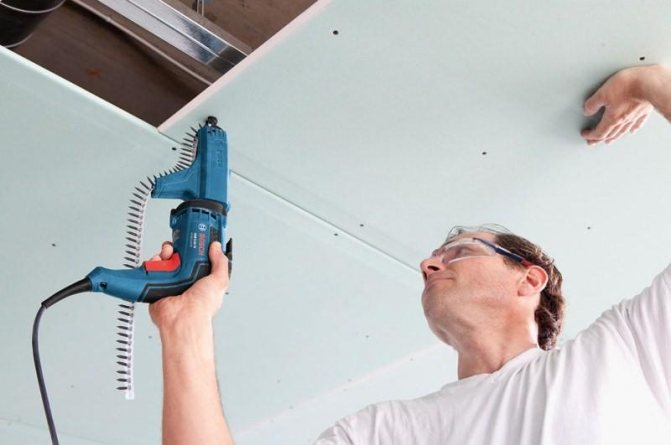
Before you screw a self-tapping screw into drywall, you need to think about tools that can make the job easier. Let's see what tools and fixtures you can use:
-
curly screwdriver is a classic of the genre. With its help, pressure is always easily controlled. With such tools, the screws will be screwed in as they should. The main disadvantage is the complexity of the work. A lot of effort will have to be put into tightening several hundred screws with a screwdriver;
- a screwdriver has long become an indispensable tool during repair work using gypsum boards. At first, it will be difficult for a beginner to screw the screws to the desired depth the first time.It will be necessary to adjust the power of the screwdriver so that the screws are fully twisted, but do not break through the drywall sheet. Unfortunately, not every instrument has a power regulator;
- the tape screwdriver is known only to professionals. This tool is quite expensive so that an ordinary person who makes repairs at home can afford it. With a tape screwdriver, many questions regarding how to fix a self-tapping screw in drywall disappear. This tool has a special tape where the screws are already inserted. You just need to attach it to the drywall and press the button, and the self-tapping screw will squeeze out of the tape and screw into the surface;
- limiter bit. A similar device is used on conventional screwdrivers so that the self-tapping screw is recessed to the desired depth. A stopper bit should be used by anyone who first encounters the need to drive self-tapping screws into drywall.
Tape screwdriver will speed up the process of screwing screws into drywall
How to screw a self-tapping screw into a brick. How to screw a screw into a brick wall
First things first, tools first
nails, screws, rivets, anchors
Reliable fastening of the structure is a guarantee that it will last a long time without requiring additional repairs
In this regard, it is very important to choose reliable tools and fasteners. And this choice must be approached with all responsibility.
You will need special tools. An impact drill is best.
You can also choose a conventional drill, to which a victorious tip is selected. But in this case, the work will be more complicated.In terms of cost, this will result in approximately the following figures: from 800 rubles for the tool itself and from 40 to 50 rubles in addition for the drill. The dimensions considered to be running are diameters of 6 and 8 mm.
The list of materials that such tools can work with is extensive. Their choice will depend on the future load of the hinged structure. The most popular are the following:
- self-tapping screws for bricks;
- dowels (will help withstand a large load);
- anchors (capable of holding very heavy things);
- rivets (for delicate glass shelves);
- corners (for small cabinets and shelves);
- ordinary nails in combination with all the rest.
It is also important to consider what kind of product is used for laying the surface - it can be either solid or hollow. The types and grades of this product will also tell you how reliable the self-tapping screws used for bricks are.
Main fastening rules
correct fastening of screws
Before starting work, you need to learn some rules. They will help not to spoil the surface and carry out the correct fastening:
- The most basic requirement that must be met when attaching something to a wall made of such material is not to spoil the mortar that holds the blocks together.
- It is best to use a drill. It will help to avoid cracks that may appear if, for example, you try to “drive” self-tapping screws into a brick with a puncher.
- Drilling should be slow and gradual. This approach will help to fix any element in a similar wall.
Ways to work
work with screws
There are several ways to help make it easier to place fasteners on such a wall. Some of them are quite interesting:
If we are working with dowel nails, it is important to prepare a container of water - in it we will periodically cool the drill. You can wrap electrical tape on the drill itself, which will serve as a limiter
After the hole is ready, insert the glass of the dowel and hammer in the nail.
In order to facilitate the process that self-tapping screws driven into bricks go through, you can use the "old" method. The dowel inserted into the drilled hole is strengthened with a wooden peg.
Another "old-fashioned" way will be that a hole is drilled, a cork or chopik, previously soaked in PVA glue, is screwed into it. Then the “excess” peeking out of the wall is cut off and a self-tapping screw is screwed in. But such a mount is considered short-lived.
It is best to use dowels for work, designed specifically for a brick wall. They have protrusions that will not allow it to turn, even if a screw or nail is screwed. This rule applies even to a hollow brick, in which it will fold into a knot and take up all the required volume.
When you want to decorate an external wall (for example, the entrance of a house), you can use corners along with dowels and self-tapping screws. They will not only connect the structure and the wall, but will even become supporting elements.
How to magnetize a bat yourself
If there are no special magnetic attachments, adhesive tape, or electrical tape at hand, then in this case you can try to magnetize the bat on your own at home. To do this, you need to take two magnets (preferably neodymium) and place a bit between them.It is worth noting right away that this is a very lengthy process that takes a lot of time.


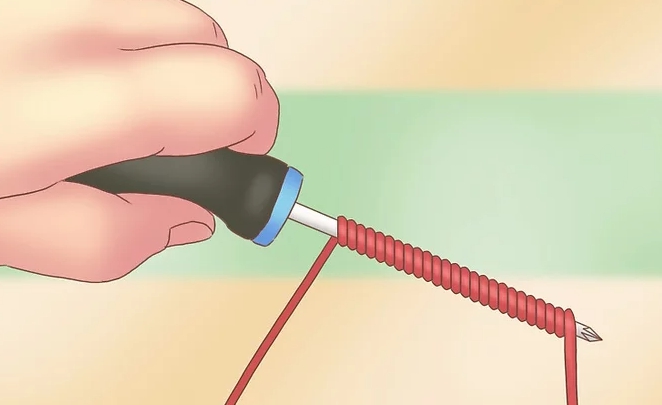
You can use a battery to magnetize the bit. To do this, you need to take a piece of copper wire, remove the insulation from it and wrap it in small turns along the bit. Then the edges of the wire must be connected to the battery, after which the bit will begin to be magnetized. However, it should be noted that in this case the magnetization effect will last for a short time.
It is worth noting that today there are special devices on the market that allow you to magnetize a variety of objects and hand tools. In addition to bits, such devices are perfect for magnetizing screwdrivers. Their advantages include the fact that they almost instantly magnetize any metal object.
There are several different ways and life hacks that allow you to screw self-tapping screws into hard-to-reach places, holding them directly on the screwdriver bit, preventing them from constantly slipping off. However, if there are no special magnetic nozzles at hand, it is inconvenient to constantly use adhesive tape or electrical tape (after all, when carrying out complex work, when you need to screw in a large number of screws, it is very problematic to constantly wrap them with electrical tape). In this case, you can take two small magnets, for example from the cheapest Chinese headphones, and attach them to the surface of the bit. After that, a magnetic field will appear, which will not allow the screw to break.
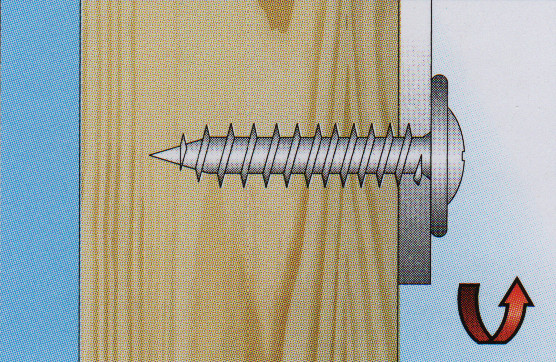
Stages of work on fasteners
Screw manufacturers are not always responsible for their products. There are screws on sale, in the caps of which the screwdriver is not inserted at all, for the reason that the slot is made shallow, or there are burrs in it.It's better to throw them away. When purchasing good screws, follow some rules to tighten them reliably and efficiently:
- drill a hole in the first part;
- make sure that the diameter of the hole is equal to the diameter of the screw (including its smooth part and thread);
- insert the screw into the hole without force;
- drill a hole in the second part;
- check that its diameter matches the diameter of the screw, but without taking into account the thread, because the screw must enter here already with force;
- countersink the hole in the first part.
If the craftsman has a special drill that helps combine the two steps (drilling and countersinking), the process is simplified and accelerated. Keep in mind that any special drill can only fit specific models of screws.
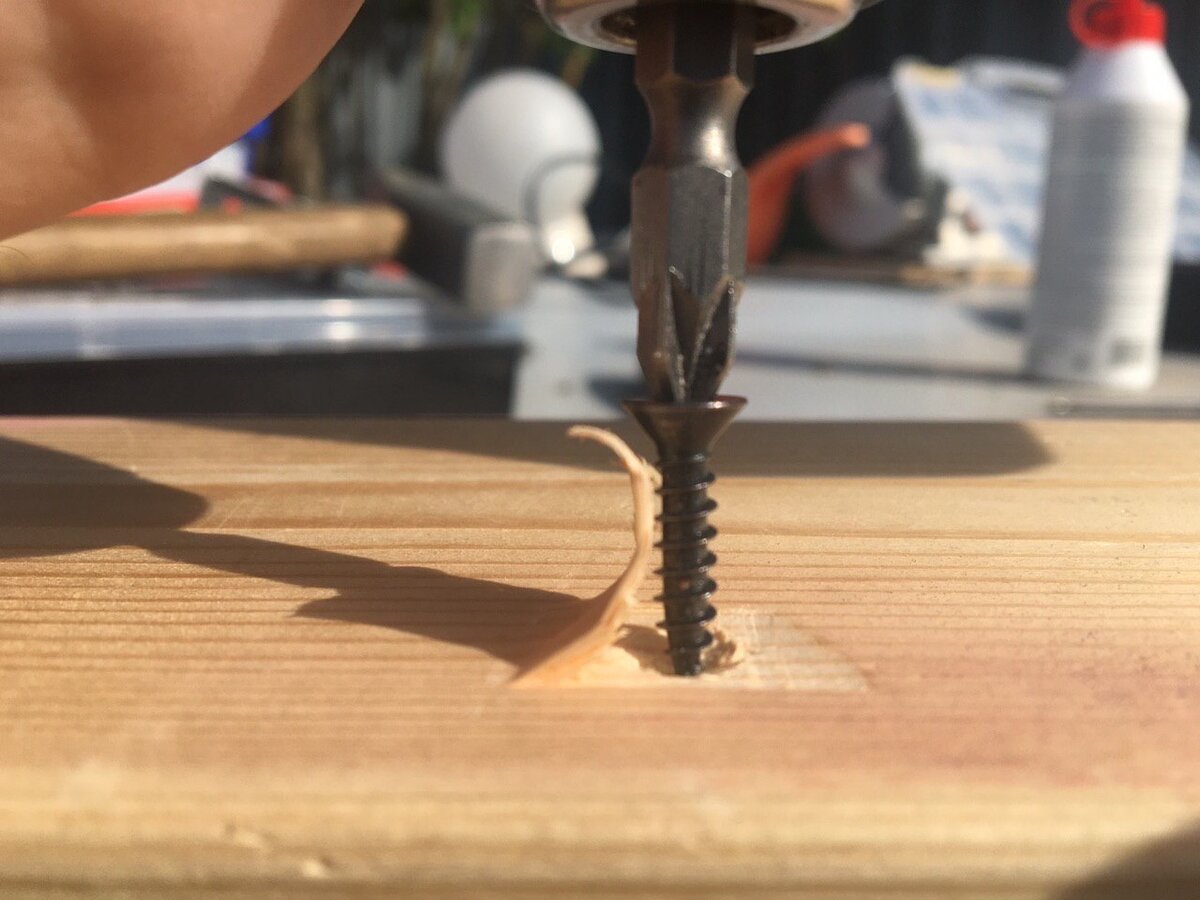
3.
Any screw or self-tapping screw has some volume, and when we screw a screw or self-tapping screw into wood, we thereby try to reduce the volume of wood by the volume of the screw. No miracle happens. Partially, the volume of wood decreases due to the crushing of wood, i.e. due to inelastic deformations. Moreover, the dumber the screw or screw (and self-tapping screws are also blunt), the greater the proportion of inelastic deformations that occur under the tip of the screw, which means that you need to put pressure on the screw or screw to make these deformations. Part of the volume is released by splitting the wood along the fibers, while a gap appears between the fibers, and scientifically speaking, a crack. The width of the crack opening depends not only on the factors listed in paragraph 2, but also on the geometric dimensions of the product and the point of application of the load.The larger the geometrical parameters of the product and the closer the point of screwing the screw to the center of gravity of the section, the smaller the width of the crack opening, which again means that more effort must be applied to tighten the screw or screw in such a place. And the smaller the width and height of the product and the closer the place where the screw is screwed to the edge, the more likely it is that the product will not only crack, but also split, and then it will be very easy to tighten the screw or screw, but there will be no benefit from such a screw or screw, but only one continuous harm. The rest of the volume for the screw being screwed in is released due to elastic deformations. The distribution of internal stresses in the body of wood during elastic deformations leads to the appearance of cracks. A similar situation is observed when screwing self-tapping screws into parts made of chipboard or OSB of small sizes, chipboard or oriented strand boards have less strength than wood.
What is and purpose
A furniture screw is a special fastener, the main purpose of which is to connect parts made of wood materials by screwing in and creating a thread inside the product. It is used in the assembly of furniture structures, joinery and building products, since such fastening has a positive effect on the quality of furniture, its service life, and aesthetics.
It is used for such building materials that are used in the production of cabinet furniture, such as:
- massive wooden sheets;
- chipboard;
- fibreboard;
- chipboard;
- plywood;
- thin drywall.
Externally, a furniture screw is a rod made of metal and decorated:
- a head of a certain shape, which is part of the fastener, and also serves to transmit torque;
- slot - a recess of a certain shape at the end of the head of the hardware;
- massive, widely protruding above the main rod, thread, the lower turns of which are conical and have notches;
- sharp tip.
Due to the large threaded and rod surface, the load on the parts to be twisted is minimized. As a result, the assembled structure becomes resistant to any impact. Also, the screws are in close contact with the fastened material due to the same diameter of the smooth and core parts of the hardware.
In the production of furniture screws, high-quality high-strength carbon steel is used, which, due to its chemical composition and heat treatment, has the necessary set of mechanical characteristics. This allows you to easily remove the hardware from the material in case of improper installation. To improve the anti-corrosion properties, the screws are treated with a special composition based on nickel, zinc, brass.
Furniture screw has advantages and disadvantages. Positive features include:
- reliable and stable fixation;
- the easiest installation;
- ability to withstand high fracture loads;
- the possibility of connecting structural elements one after another;
- tight contraction of furniture parts;
- does not require special skills, complex auxiliary devices.
In addition to the advantages, it is necessary to identify the disadvantages of screws for furniture:
- the need to mask products with a plastic plug in the color of the material;
- the elements connected with the help of hardware cannot be disassembled, since the structure will not withstand repeated assembly.
The furniture screw is responsible for fastening the parts of the furniture body together, fastening shelves, connecting sections. The reliability of the connection, safety, the ability to easily disassemble and assemble furniture without prejudice to it if it is necessary to move depends on it.