- Switch repair
- Necessary tools and materials
- How to disassemble the switch
- Contact cleaning
- Other Possible Problems and Solutions
- How to assemble a switch
- Video: repair and replacement of the switch
- Video
- Dismantling tools
- power outage
- Removing the key
- Frame dismantling
- Switch disassembly
- Disconnect wiring
- Nuances when disassembling various types of switches
- How to remove the switch from the wall?
- Removing a key
- Removing the frame
- Removing the switch mechanism from the socket
- Disconnecting wires
- Circuit breaker assembly process
- Varieties of switches
- How to disassemble the light switch?
- Preparatory work
- Replacing a faulty light switch
Switch repair
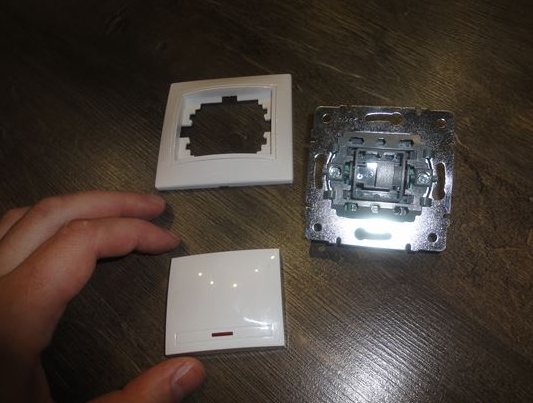
Not always the old switch needs to be thrown away and replaced with a new one. Sometimes it is enough to repair it. The switch device is quite simple and can be repaired in case of a breakdown without much difficulty. If you carefully consider the disassembled switch, you can understand that the main function in it is performed by a contact pair, which moves from one position to another by the force of mechanical action. In one position, the electrical circuit is connected, in the other it is disconnected.
Necessary tools and materials
To disassemble and assemble the switch, you will need only one tool - a flat-blade screwdriver, the size of which is 3-5 mm. To clean the contacts, you need a piece of fine-grained sandpaper or a needle file.
Disassembly of the circuit breaker is carried out using a conventional flat-blade screwdriver.
How to disassemble the switch
The process of disassembling the switch has been described above. For convenience, we present it here again.
- If the switch is already in (on) the wall, disassembly begins with the removal of the key. This is easy to do by prying it with a screwdriver from the side.
- Next, unscrew the two screws that secure the protective frame to the base.
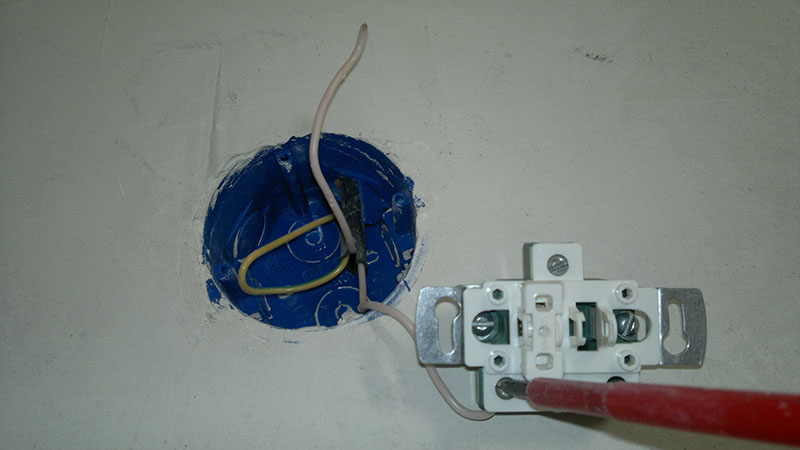
- After that, the base is removed from the socket, for which two screws of the spacer mechanism are loosened. It is not necessary to unscrew them completely, after one or two turns on both sides, the spacer legs will loosen, and the switch will fall out freely, hanging on the wires.
- Next, the wires are disconnected. To do this, loosen the two screws that hold the wire in the terminal. The disassembly is completed. The switch is removed from the socket, then the wires are disconnected from it
Modern switches consist of a non-separable base, which simply changes in case of damage.
Contact cleaning
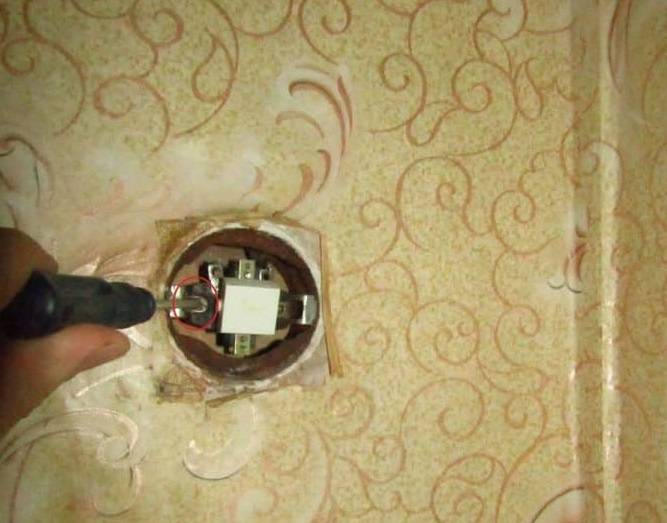
If the switch is unstable (it turns on, then does not turn on the lamp), most likely, the reason lies in the burnt contacts. Upon closer inspection, such contacts may turn out to be slightly charred or even melted. This happens because the wire is not firmly fixed in the terminal block. Another reason may be a power surge in the network at the time of switching on. A lamp with too much power can also cause damage to the contacts over time.Be that as it may, contact must be restored, then it will continue to serve properly. To do this, it is cleaned with fine sandpaper until a uniform metallic color appears.
Fine sandpaper is used to clean the contacts.
Sometimes the conductor may turn out to be tinned, that is, treated with tin. Then instead of sandpaper it is better to use a small file - a file.
Other Possible Problems and Solutions
Other problems with switches are rare. But there are times when a foreign body or some kind of debris gets inside the switch. For example, during renovation. Then it needs to be disassembled and thoroughly cleaned of everything superfluous, it is advisable to blow the base with a vacuum cleaner. As a rule, after this, the operation of the switch is adjusted again.
How to assemble a switch
Assembly is in reverse order. If the repair is carried out for the first time, you can lay out the parts on the table in the order of disassembly or take pictures in stages. When repairing a single-gang switch, the location of the wires does not matter. But if there are two or three keys in it, then in order to avoid confusion, it is better to immediately mark the incoming core with a marker. They can also mark the place of its connection.
When installing a two-gang switch, it is necessary to correctly connect the lead wire (phase), which is better to mark when disassembling
You can check the result of the repair after installing the base in the socket. To do this, turn on the mains power on the shield and test the switch. If it works in normal mode, you can complete the assembly, install the protective case and key.
Video: repair and replacement of the switch
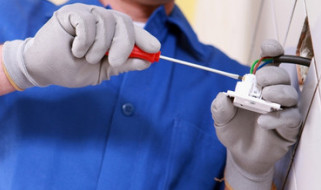
Getting started on replacing the lighting switch, you need to take care of safety measures. It must be remembered that electric current can cause damage to health and is a danger to life. It is necessary to observe the main rule of health protection, which is that installation should only take place when the devices are disconnected from the mains.
This is interesting: Illuminated switch - how to connect according to the diagram, device, how turn off the indicator, etc.
Video
Of the tool, we only need a flat screwdriver, an indicator one will do.
We begin to disassemble the switch:
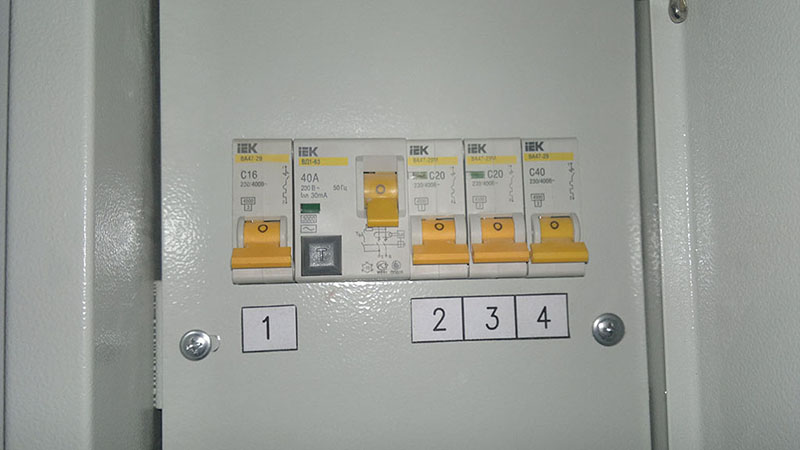
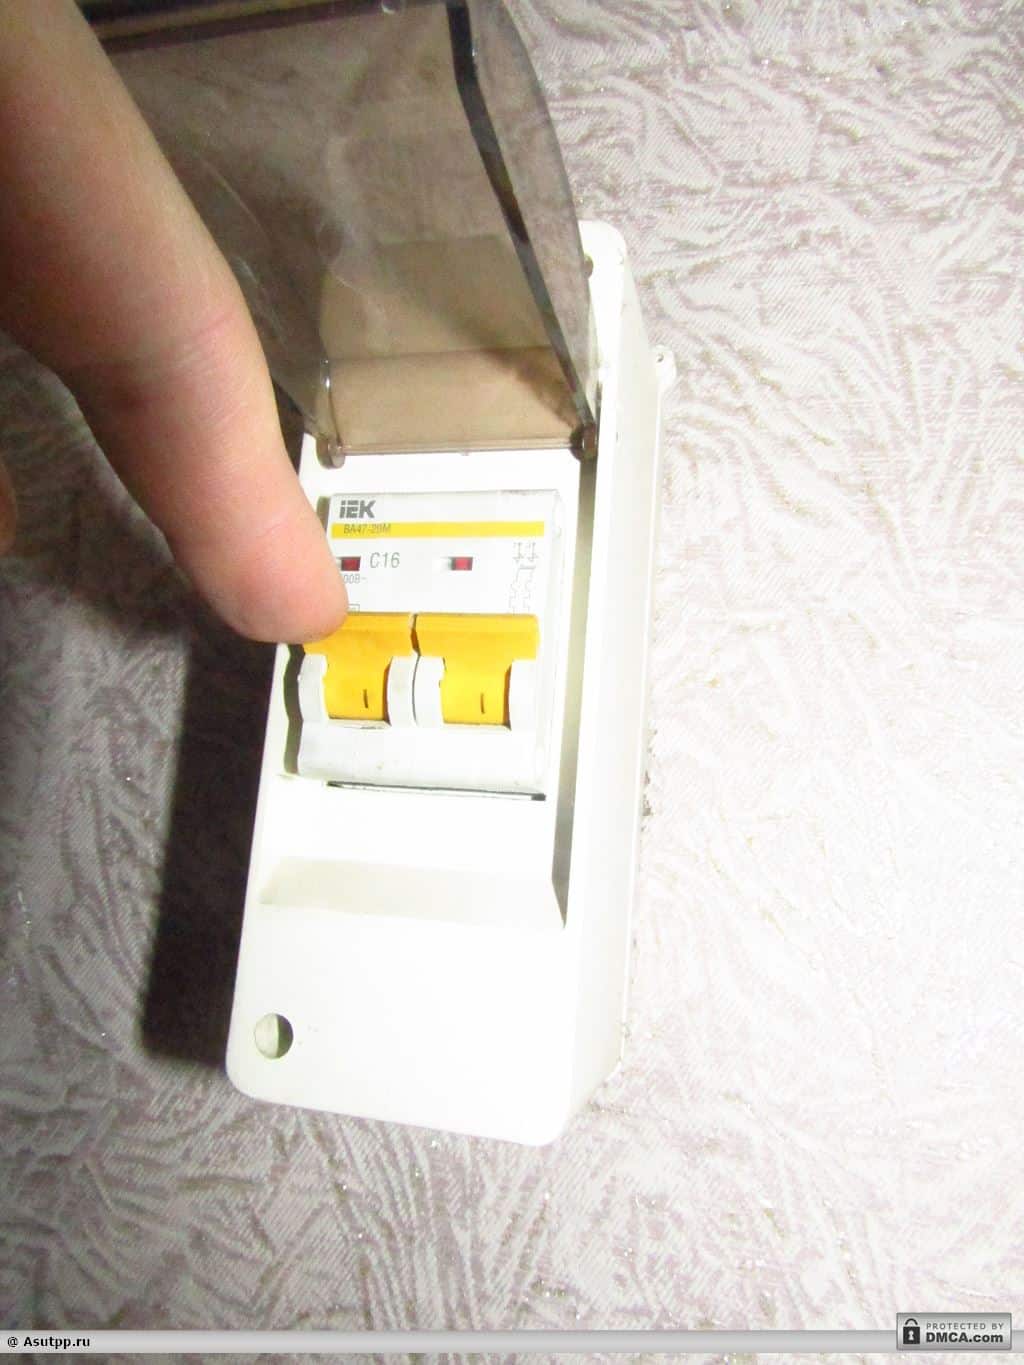
1. Turn off the electricity first!
To do this, in the electrical panel, it is necessary to transfer the levers of the circuit breakers to the "off" state, usually this is the position in which the lever is pointing down. Which machine needs to be turned off, if they are not signed, is determined empirically, turning them off one by one, and checking, with an indicator screwdriver, the presence of voltage in the switch wiring. As a last resort, turn everything off. But then once again make sure that there is no electric current at the place of work!
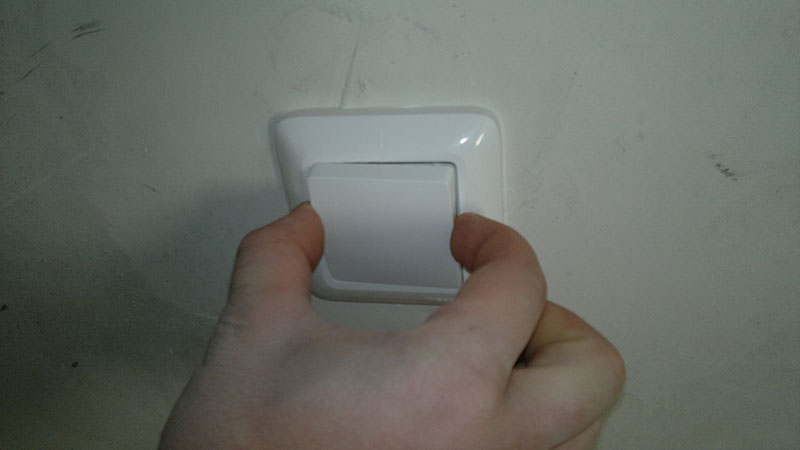
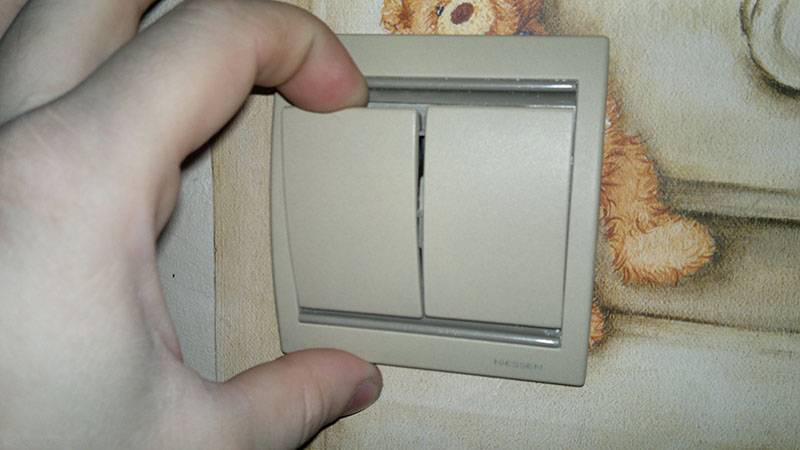
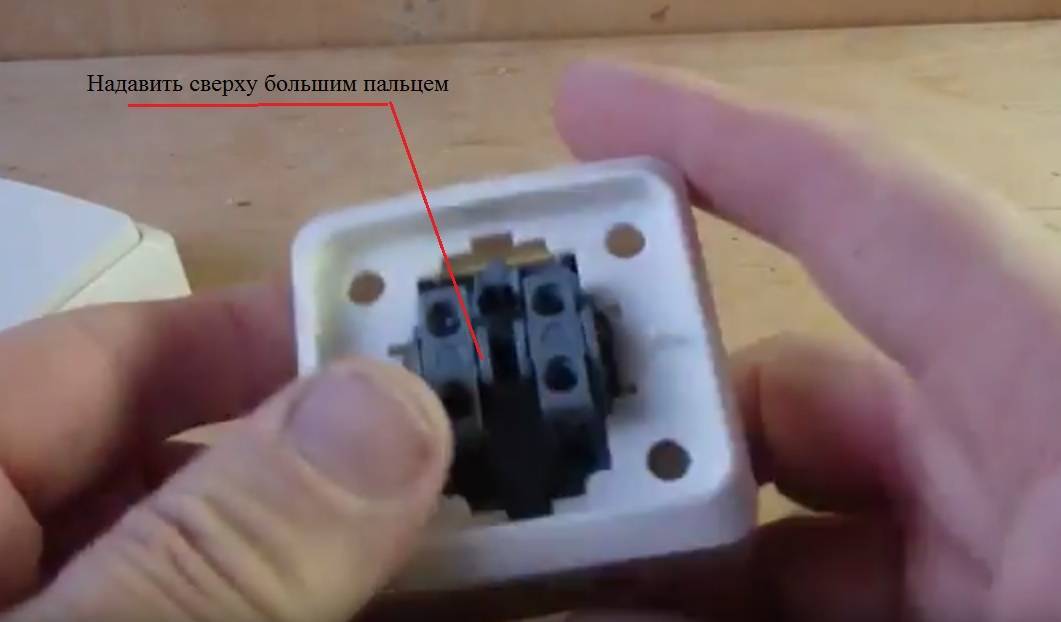
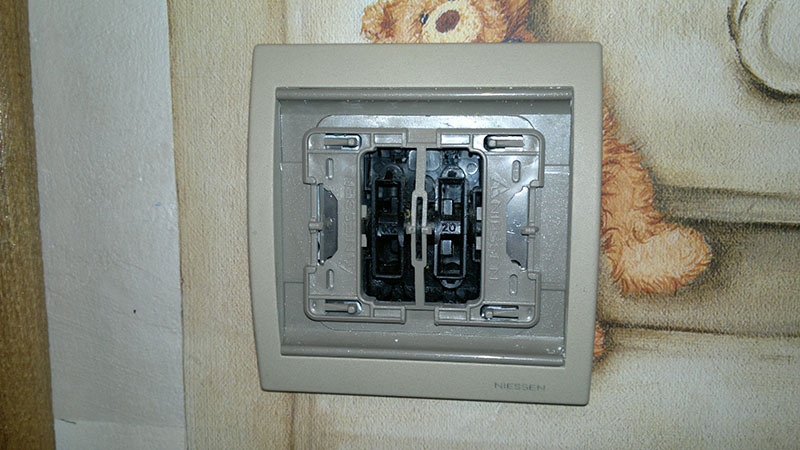
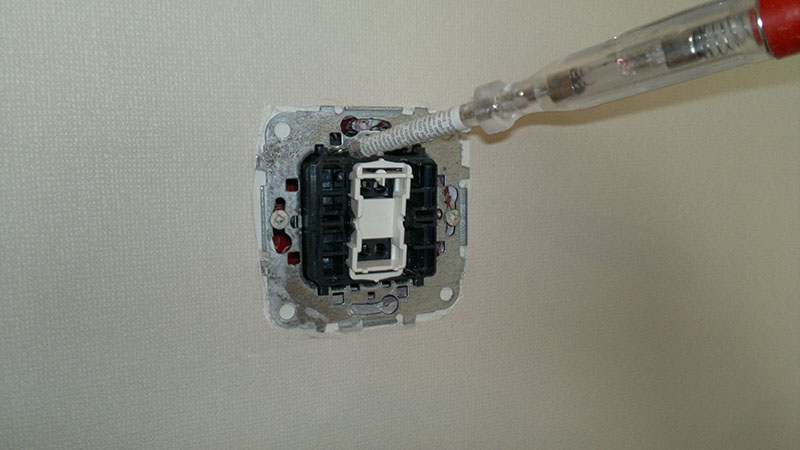
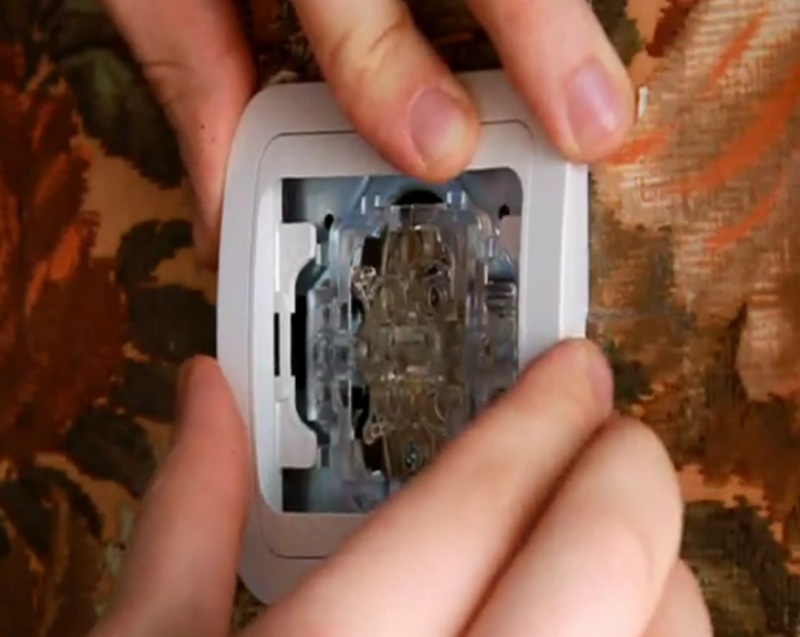
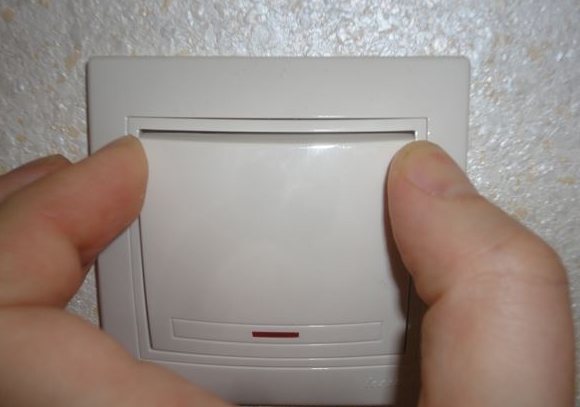
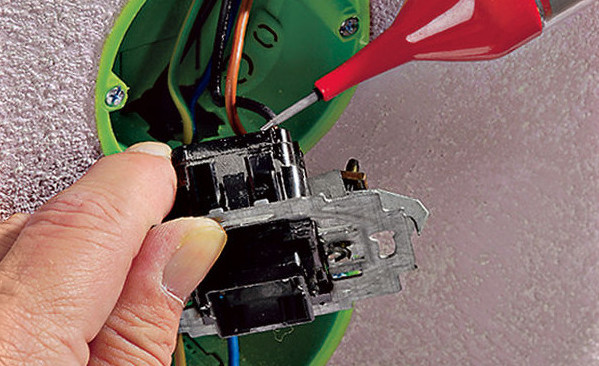
2. The main secret that you need to know if you want to disassemble the switch is the need to first remove the key (or keys if there are several)
. To do this, try to take hold of the protruding parts of the key from the side and, squeezing, pull it towards you. The images below show this method of removing the key from the Wessen switch.
Prima series. In this case, when pressed, the axial guide keys come out of the grooves, after which it can be easily removed.
3.If you are unable to grab the key from the sides, try to grab hold of any protruding part and pull it towards you.
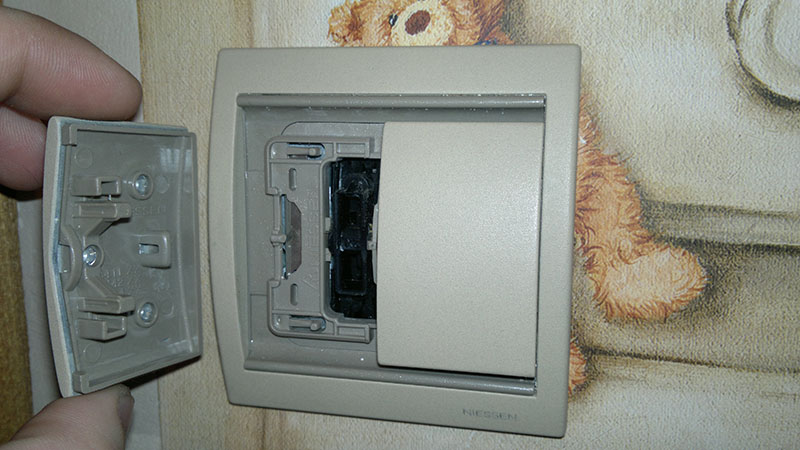
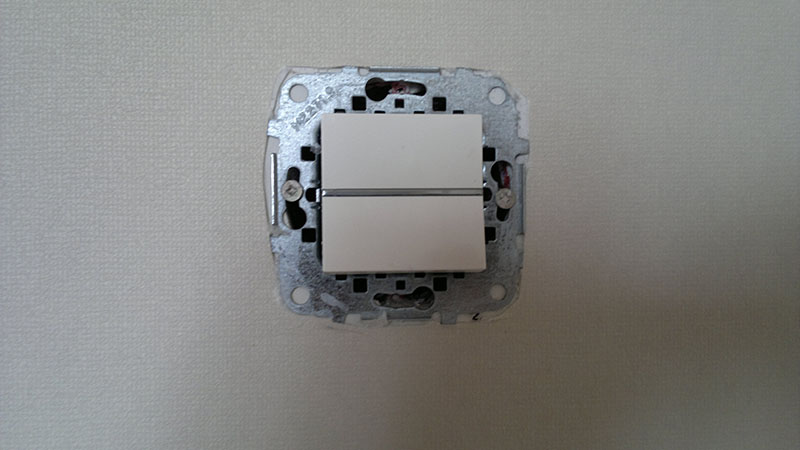
, often the key is fixed in the switch mechanism without a latch and it is enough just to pull it out. An example of this is shown in the images below - where from the two-key switch abb
niessen
olas
we, in this way, alternately remove the keys.
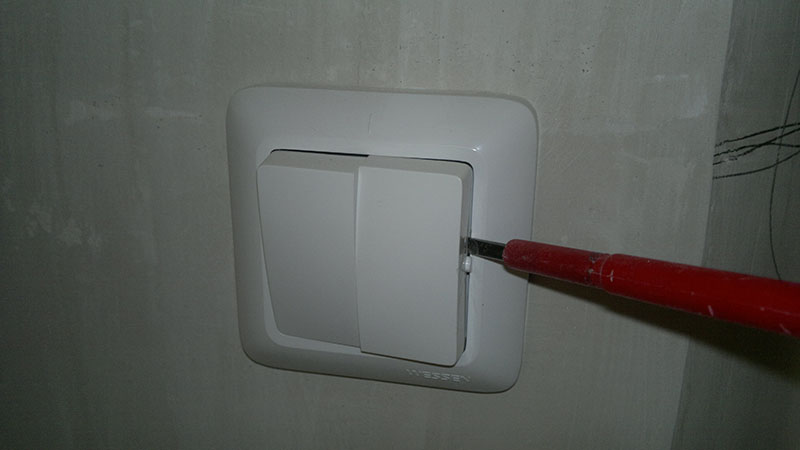
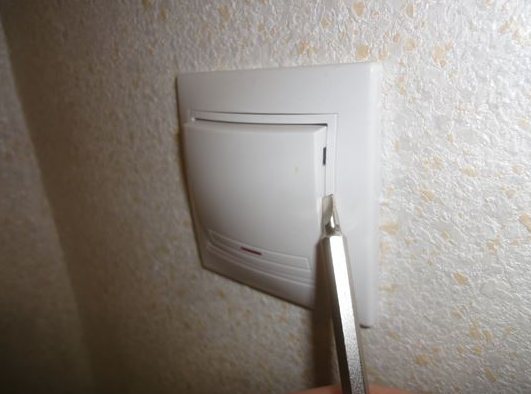
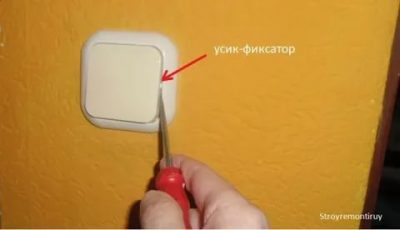
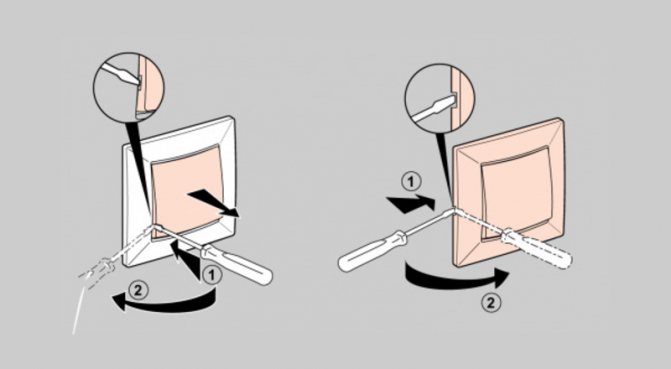
4. If you failed to disconnect in this way, then it is necessary, very carefully, to pry off the key with a straight screwdriver
Be careful not to ruin the appearance of the switch
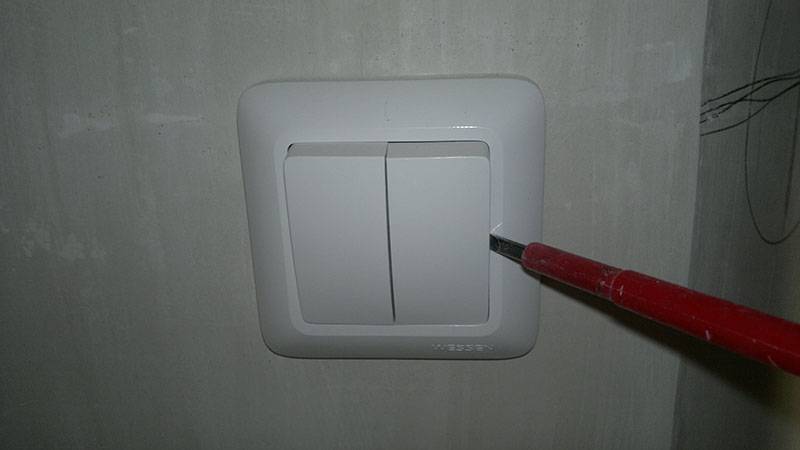
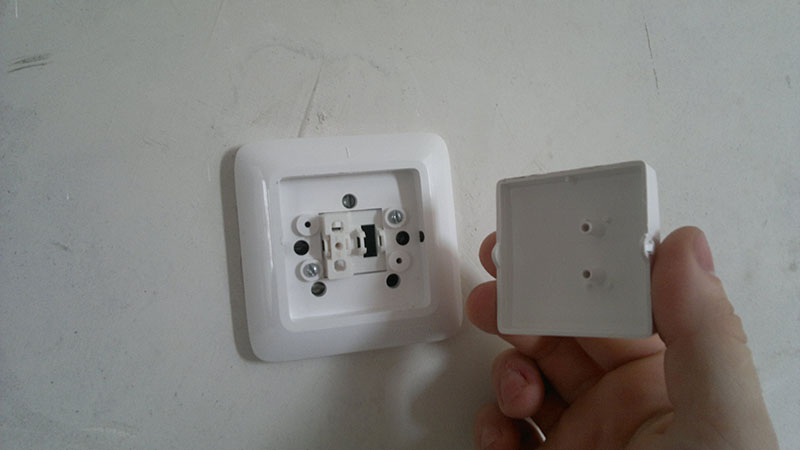
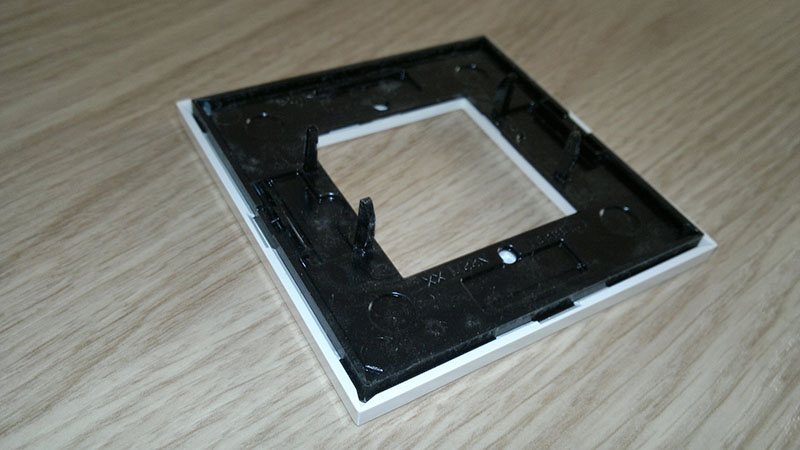
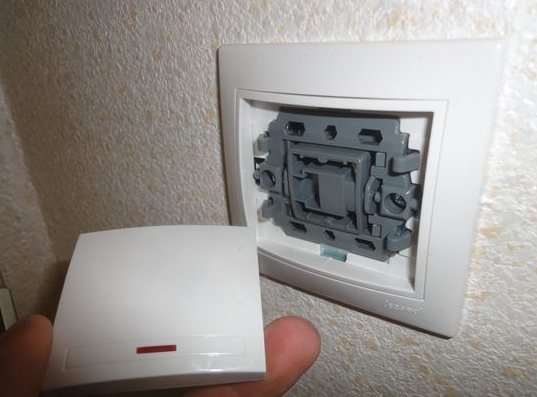
5. After the key has been safely removed, it is necessary to disconnect the switch frame
. Most often there are three options for attaching the frame to the mechanism.


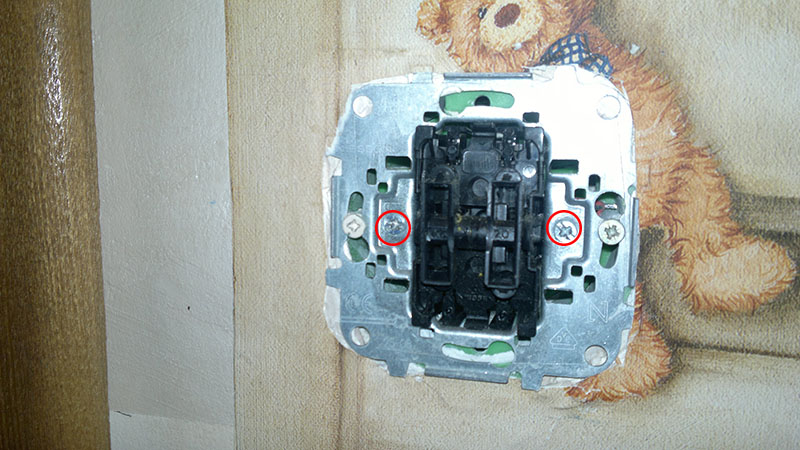
The first type we see in Wessen switches
Prima series, where the frame is solid and attached to the mechanism with the help of two bolts that must be unscrewed in order to remove it.

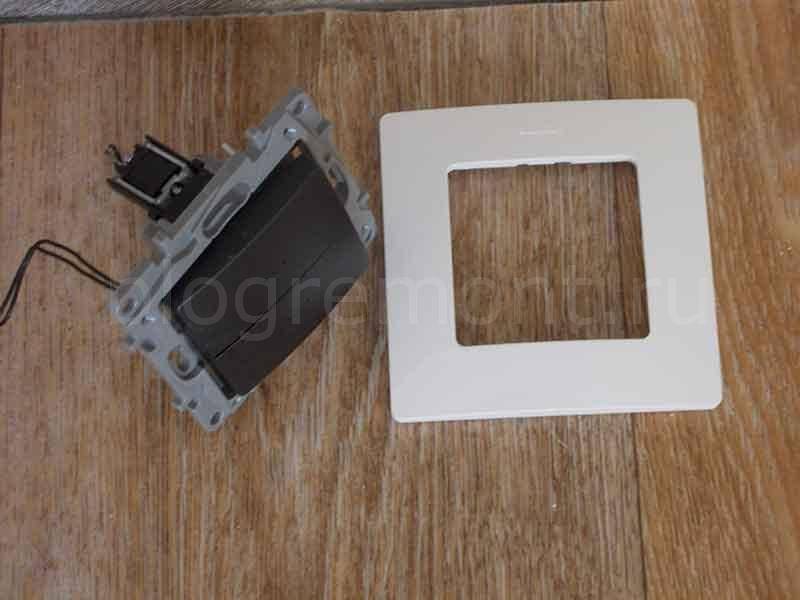
The second type of fastening of the frame to the mechanism, we can see at the ABB Niessen Olas switch. Here, a special fastener is used for fixing, which is installed in the grooves of the caliper to fix the frame and can be easily removed during disassembly. To do this, you just need to pull it towards you or pull it out by prying it with a flat screwdriver.

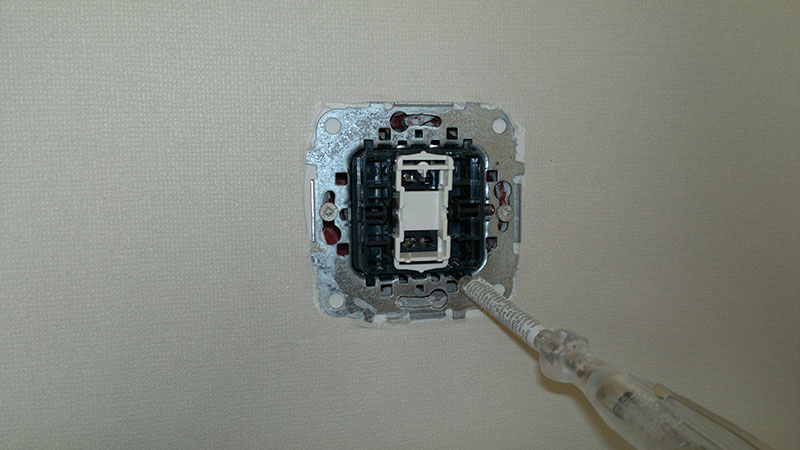
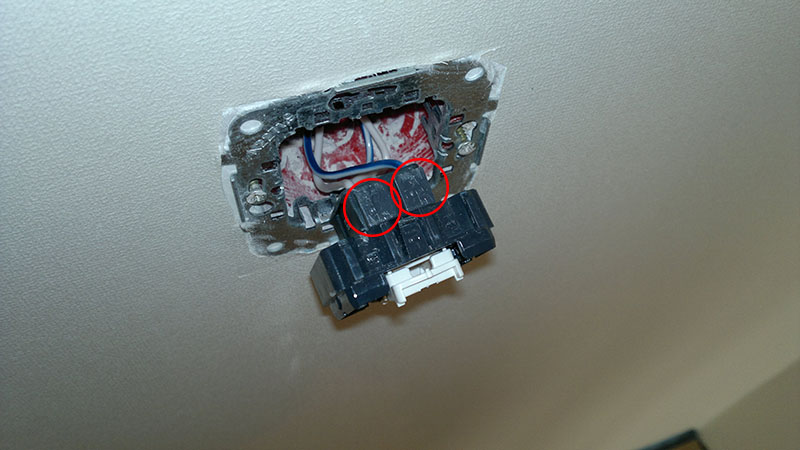
The third type of fastening can be observed in the modular mechanisms of ABB Niessen Zenit switches, in this case there are “lugs” on the frame itself that fix the frame in the switch support. At the same time, it is more convenient to disassemble such a switch by removing the frame first. After that, in order to remove the mechanism, it is necessary, as shown in the image below, with a straight screwdriver, through special grooves in the caliper, unfasten the retaining fasteners.
At the same time, it is more convenient to disassemble such a switch by removing the frame first. After that, in order to remove the mechanism, it is necessary, as shown in the image below, with a straight screwdriver, through special grooves in the caliper, unfasten the retaining fasteners.
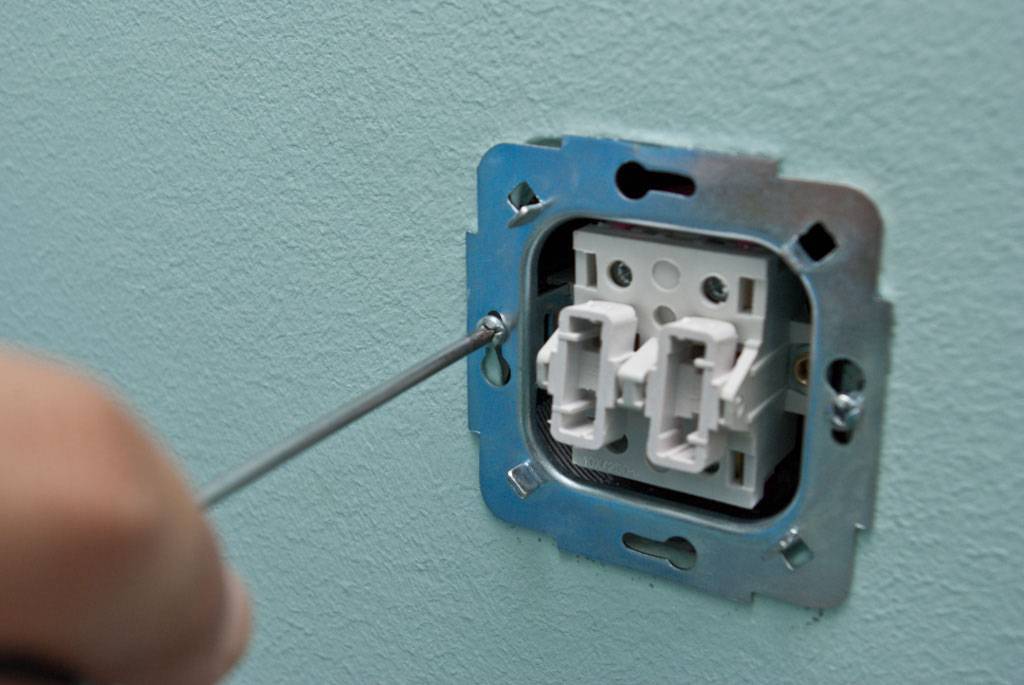
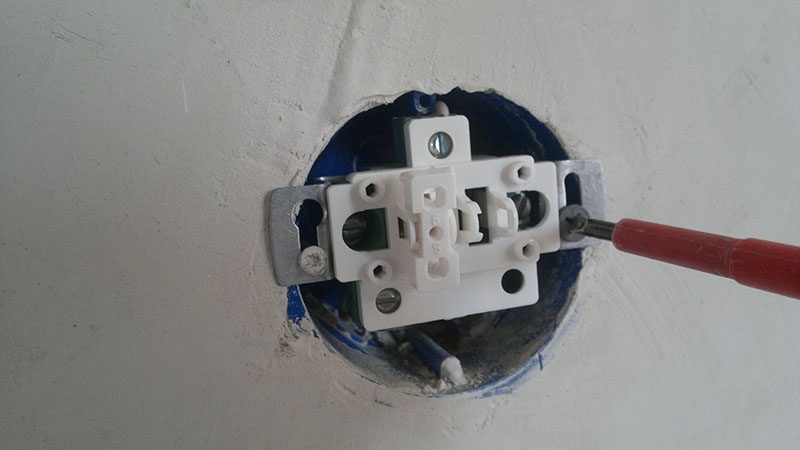
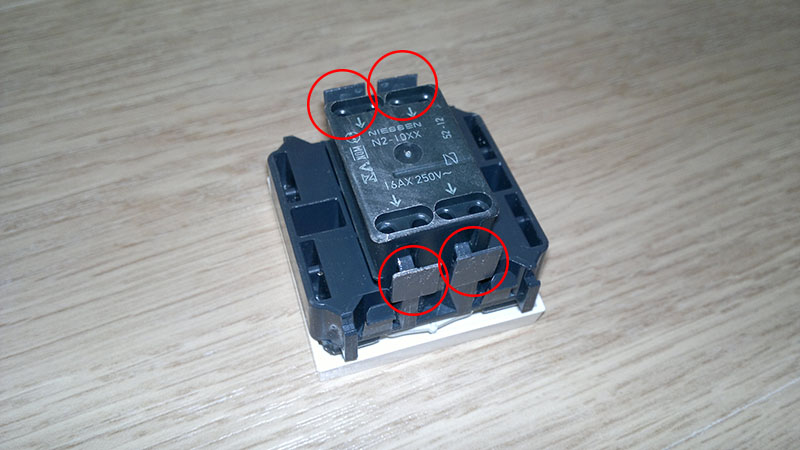
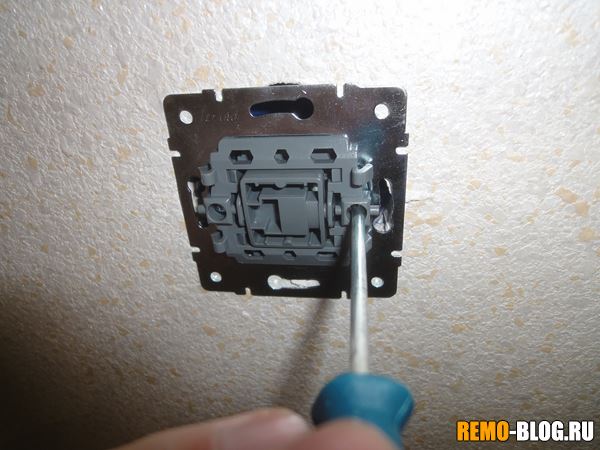
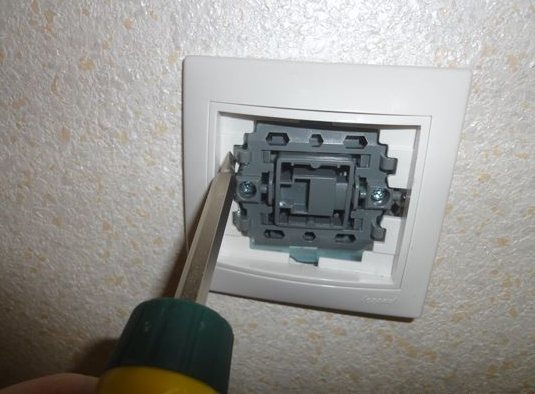
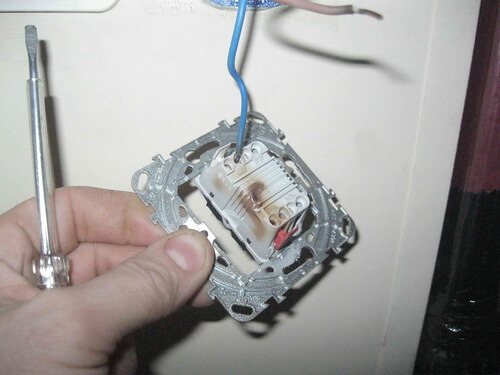
6. When the frame is removed, we take out the mechanism from, for this we unscrew the retaining screws located on the sides. Also, the switch mechanisms can be fixed in the mounting box, using their own fasteners, spacer type, in this case, we loosen the screws responsible for this on the mechanism, they are marked in the image below.
7. The last step is to disconnect the wires from the switch mechanism. Depending on the type of fastening, be it screw terminals or spring terminalsthe technology is different. In the case of screw terminals, loosen the bolts in the terminals and remove the wires.
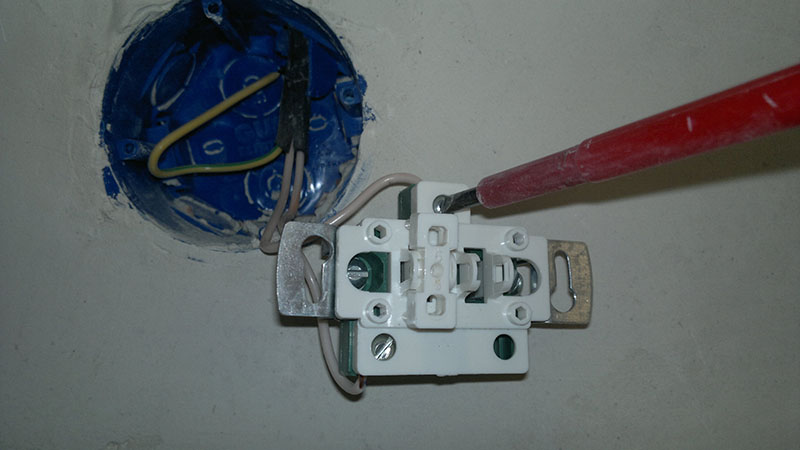
And if the switch has self-clamping terminals, then you need to press the corresponding levers and pull the wires out of the terminals.
That's all, the switch is disassembled and disconnected.
Sometimes, for one reason or another, it is necessary to dismantle and remove the light switch available in any dwelling. Before starting work, you should familiarize yourself with some of the nuances that allow you to carry out the process correctly. In the article we will tell you how to disassemble the light switch, we will give detailed step-by-step instructions.
Dismantling tools
If the problem is still in the light switch, you need to prepare the tools for work.
You will need the following tools and materials:
- screwdrivers (cross and flat);
- pliers with insulated handles;
- knife with a plastic handle;
- voltage indicator;
- insulating tape.
There is a lot of dust inside electrical structures.In order not to stain interior items, it is recommended to move them away from the switch or cover them with plastic wrap.


power outage
Before dismantling the switch, you must turn off the power in the apartment or house. This is done in the electrical box. Usually the shield is located on the stairwell or inside the apartment - at the front door. If you are not sure which switch belongs to a particular room, it is better to turn off all the available ones. Otherwise, there is a high risk of electric shock.
The lever on the machine is turned to the lower position. When the power is off, you should double-check the presence of voltage with an indicator.
Removing the key
The process of removing the switch begins with the removal of the key. Without this, it will not be possible to continue the dismantling work.
It is not difficult to dismantle the key, however, specific steps may differ depending on the design of the switch, so you should carefully study the mechanism of a particular device.
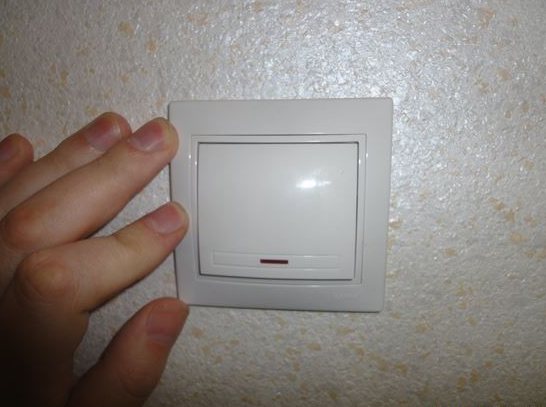
The easiest way to remove a key is to pull it towards you. This is usually enough to remove the button.
In some models, simply pulling the key will not help. Dismantling in such switches is carried out by prying off special connectors on the side of the device with a screwdriver.
Frame dismantling
During disassembly of the switch, you will need to remove the frame. The most common types of frames are:
- Screw. Usually held on by screws. Removed with a screwdriver.
- clamping. Such models have special clamps. To pull out the frame, just bend the clips. It is recommended to remove the sides of the frame one by one, and not all at once, so as not to damage the structure.
Switch disassembly
Next, proceed to dismantle the switch housing. To do this, you need a screwdriver. The type of tool used depends on the design features of the screws on the frame.
Disconnect wiring
On many types of switches, most of the wires are held in place by the use of bolts. To disconnect the wires, you just need to loosen the wires and pull the switch in your direction.
This completes the removal of the switch. You should remember the sequence of operations performed: if the internal mechanisms are in order (the parts are not melted), the device will need to be assembled in the reverse order. If mechanical damage is found, it makes no sense to restore the switch - it's easier to go to the store and buy a new one.
Nuances when disassembling various types of switches
Three-gang switches are often used to power a large number of spotlights, ceiling lighting and other lighting fixtures. The design of such models is characterized by rather thin keys. But, as for two-gang, the dismantling of a three-gang switch begins with the removal of each of them in turn. Many models, to simplify this procedure, are equipped with a small rectangular hole at the bottom of the keys, into which a screwdriver can easily enter.
If you want to disassemble the dimmer (adjustable switch with rotary knob). Then its dismantling is fundamentally no different from the classical model. The only difference is that instead of keys, you have to remove the knob first.
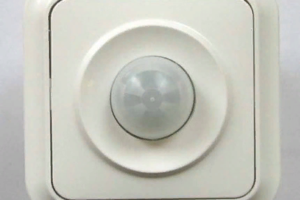
The touch switch is disassembled by removing the outer panel.For this purpose, you can use both a regular screwdriver and a special pick, which you can make yourself from wire, if it is not included.
In this case, special care must be taken so that the glass does not crack.
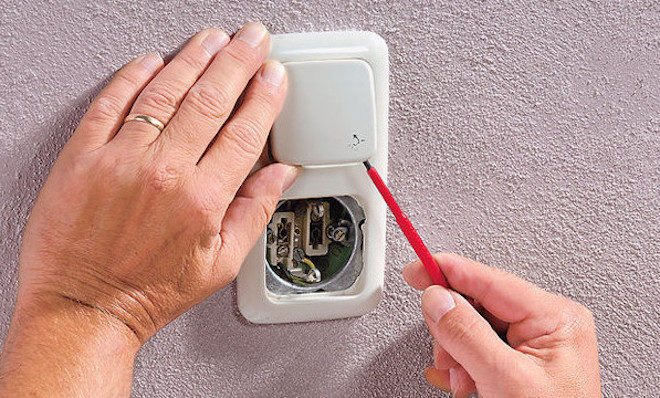
If the switch is paired with a socket, then to dismantle the first one, you will need to remove the socket along with it. In this case, the socket cover will have to be removed, since one of the fastening bolts is often hidden under it.
Pass-through switches have the same design as conventional ones, and, accordingly, the same disassembly procedure. The only difference is the number of wires, since the phase is connected in several positions at the same time.
The only difference is the number of wires, since the phase is connected in several positions at the same time.
This is interesting: Feed-through switches or bistable relay
How to remove the switch from the wall?
Light switches usually have a significant operating margin, so that they do not have to be dismantled regularly.
However, if such a need has nevertheless come, then this should be done very carefully, and strictly following the sequence, so as not to damage the insides of the device, which are almost 90% plastic.
Removing a key
Disassembling the switch primarily involves removing the key. Removing the key from the switch is quite simple. If you do not remove the key, then you will not be able to complete the disassembly process.
Before removing, you need to study the mechanism of your switch. It can be different and therefore the withdrawal process is also different. The easiest way to remove the button is to pull it towards you.In most cases, this method works great.


But there are also switches on which you will not be able to perform this process correctly. That is why you will need to find special connectors on its sides. After you find them, you need to pry them with a screwdriver.
When you remove the key with a screwdriver, be sure to calculate your efforts. If this is not done, then you can damage it.
Removing the frame
Disassembling the switch also involves removing the frame. Frames can also be different. Here are the main types of frames that you can find:
- Screw. They are usually fastened with small screws that simply need to be unscrewed with a screwdriver.
- clamping. This type of switches may have special clamps in their design. To remove the frame, these clips simply need to be bent. For greater convenience, it is better to remove one side, and then the other.
Removing the switch mechanism from the socket
After removing the frame, the stage of detaching the mechanism from the socket follows. To do this, you need to unscrew the screws located on the sides that hold the mechanism in the socket with a screwdriver.
Some mechanisms are mounted on "struts". Legs are installed on the sides of them, which, when the screw is tightened, disperse to the sides, thereby securing the mechanism in the socket.
Also, some mechanisms can be mounted in an installation box, then you need to loosen the screws on the box and remove it.
Disconnecting wires
On many switches, most wire attachments are bolted.To turn them off, you just need to loosen these fasteners and pull the switch towards you.

Now the whole disassembly process is finished. As you can see, disassembling the light switch with your own hands is quite simple. You don't need a lot of knowledge to complete this process. You just need to study our article, which describes this process in detail. Do not turn on the electricity immediately, as the wires will immediately be energized. If the replacement of the switch is not carried out immediately, then the wires must simply be isolated.
To date, disassembling the switch involves the removal of its three main parts. You will need to reverse this process when assembling the switch.
Circuit breaker assembly process
During the assembly or replacement of the mechanism with a new one, the process is carried out in the opposite direction. First, you need to fix the wires. Then fix the mounting box in the socket, then carefully put on the frame and insert the keys. If you are dismantling the switch during repairs, and are not going to install a new one, you need to remember that after turning on the electricity, the bare wires will be live, so they need to be insulated.
How to disassemble the video switch be sure to see
Varieties of switches
Manufacturers produce a large number of different switches, they differ from each other in many ways. In order to understand, we will consider them in more detail.
Table 1. Types of switches according to the method of connecting wires.
| View | Description |
|---|---|
| With clamp and screws | To connect the contacts in such a device, a clamp is installed, which is fixed to the screws.The installation of this connection is complicated, but a high-quality contact is obtained. Of course, over time, the connection becomes loose, then you have to tighten the screws. It is believed that this connection method is suitable in the presence of aluminum wires. |
| Mechanisms with springs | This is a modern version of the clamp with screws. Here, under the spring, there is a special plate that fixes the bare wire. This results in a quality connection. However, this is a rather primitive way of installation. The disadvantage of the design is that the wire must be clamped in accordance with the rules. Otherwise, the device will be faulty. These switches are compatible with copper wiring. |
Table 2. Types of switches by mounting method.
| Type of | Description |
|---|---|
| Overhead | So it is customary to call devices that are first applied to the wall, and then fixed. They look less aesthetically pleasing because they stick out. Often such devices are used in the presence of external wiring. At the same time, the devices differ in functionality, ease of installation. |
| Embedded | Under such switches, an opening in the wall is prepared in advance. Due to this feature, installation is complicated, but in the end the device will look aesthetically pleasing. Only the outer panel may protrude slightly from the wall. Such devices are suitable for concealed wiring. |
Table 3. Varieties of switches by control method.
| View, illustration | Description |
|---|---|
 with keys with keys | These devices consist of contacts that are inside and a rocking mechanism with a spring. The first version of such a device is a mechanism with a ball that moves when pressed. The second option is a spring-loaded frame, it also rolls from side to side. Such switches can have either one or several keys. They differ in long-term operation with proper installation. |
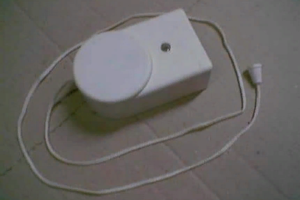 cord type cord type | At the peak of their popularity, such devices were in 1975. At the same time, they are installed on modern lamps of various types. So, a durable cord comes out of the body of the switch, which is enough to pull to turn the device on or off. This lace is fixed on a special lever that interacts with the turn block. |
 Touch Touch | The operation of these devices occurs without mechanical action. In order to turn the switch on or off, you need to touch the panel located on the outside with your finger. The sensor element reacts to touch, due to which it sends a signal to the electrical circuit. This signal is converted into a special command. |
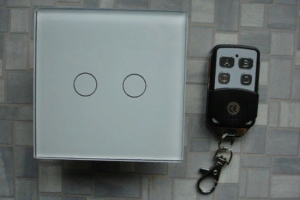 with remote control with remote control | Such a device assumes the possibility of controlling the lighting device at a distance. This happens due to the presence of a special remote control. The switch in this case acts as a receiver. The remote control is a type of small plastic keychain. The distance of its performance will also depend on the materials from which the floors are made. However, the signal is received even at a distance of 18 meters. |
 With built-in sensor With built-in sensor | As a rule, these devices react to certain changes around. Most often, this is the movement of a massive object, which is why a signal is sent to the controller. These are programmable switches. Therefore, the user can independently decide under what circumstances the device will turn on. |
How to disassemble the light switch?
So, in the initial position, you have a key switch securely fixed inside the strobe. To get started, prepare a tool in order to quickly disassemble the case - an indicator screwdriver, which will be enough.

The instructions for disassembling the light switch in the apartment are as follows:
Turn off the machine that protects the electrical wiring from network overloads and short circuits.
Verify that there is no electricity in the room using an indicator screwdriver.
Remove key(s)
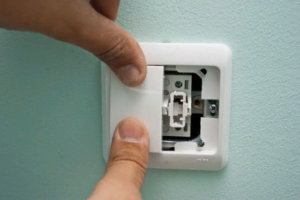
It doesn't matter what type of switch you use: single-gang, double or three-gang. To remove the key, you need to squeeze it with your fingers on the sides (in the middle) and carefully remove it from the case (as shown in the photo). Sometimes the part firmly “sits” inside the case and in order to get it, you need to pry off one of the edges with a screwdriver
Sometimes the part firmly "sits" inside the case and in order to get it, you need to pry off one of the edges with a screwdriver.
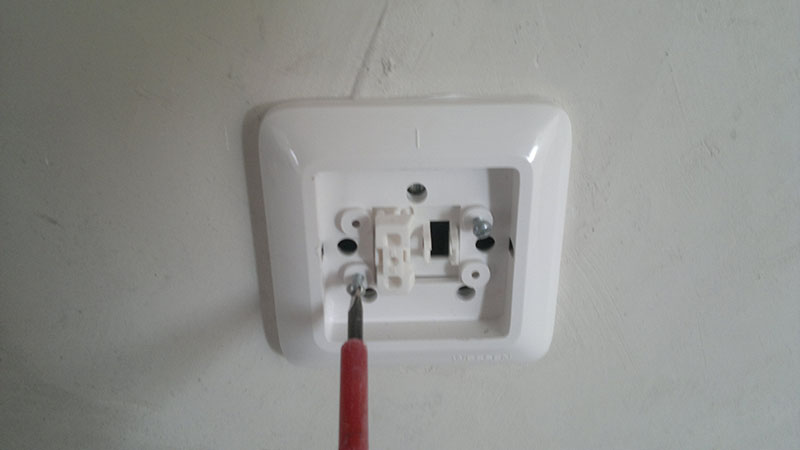
Remove the decorative frame. In some cases, the frame is fixed with two bolts from the inside, less often the part is held by grooves, which you need to lightly press with a screwdriver to disassemble the electrical accessories. Another option for fixing the frame is with the help of an additional element that is attached to the grooves of the caliper.


Remove the "core" from the socket. On the sides of the case there are two screws that secure the mechanism to the wall. All you need to do is unscrew them with a screwdriver. There is another option for holding the case in the socket - with bursting paws. They need to be loosened by unscrewing the bolts on the sides that regulate the angle of expansion.
Disconnect lead wires.Phase, ground and zero can be fixed with self-clamping terminals or screw clamps. In the first case, you just need to press the locking levers and pull the wires from the connectors. Screw terminals must be unscrewed with a screwdriver and carefully remove the wires.
That's the whole instruction for disassembling the light switch. As you can see, there is nothing complicated in such an event.
Visual video tutorials will allow you to see in more detail all the stages of unwinding:
As for the repair (for the sake of which it was necessary to disassemble the light switch), then everything boils down to the following actions:
- If the effects of the melting of the mechanism are visible inside the case (the plastic has turned yellow, some areas are charred), you can throw away the product without hesitation and go to the store to buy a new one. To date, the cost of a key switch is not too high, but safety is much more important!
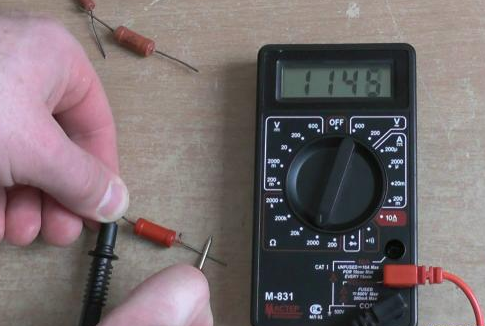
- If there is no visible damage, try re-inserting the wires and tighten them carefully, because. maybe the contact just loosened up, causing the switch to stop working. If it doesn’t help, most likely the reason is in the wiring, try ringing it with a multimeter, based on which draw conclusions.
After finding the cause of the breakdown, and most likely it is a weak contact, the assembly is carried out in the reverse order. We hope that now you understand how to disassemble the light switch with your own hands!
Also read:
Preparatory work
Before starting all work, you will need to turn off the electricity in the house or apartment. This can be done on the electrical panel, which is usually located at the entrance. After you complete this process, you will need to check the mains voltage using a multimeter. Here is a photo of this device.
If you have failed this device, then the repair of the light switch should be carried out using the following devices:
- Standard indicator for checking voltage.
- Standard size screwdriver.
- Fine sandpaper and marker.
These are all the tools you may need to repair a switch.
Replacing a faulty light switch
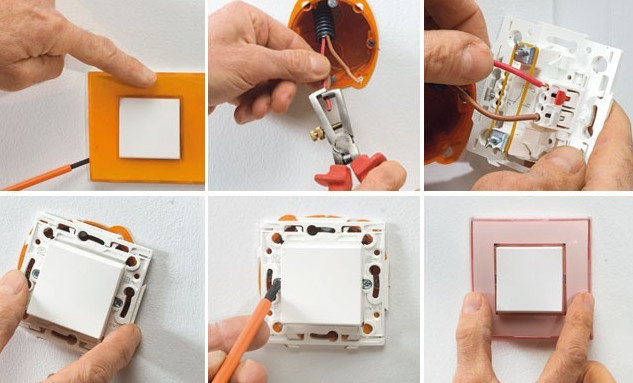
Switch repair or replacement the most qualified and safe will be performed by an electrician who has access to electrical work. In any case, the room where the replacement of the installation product is supposed to be carried out must be de-energized. Disassembly of the old-style switches is carried out by unscrewing the fastener holding the protective cover. With new European products, first of all, it is necessary to separate the key from the body, using a screwdriver inserted into the middle part of the side gap.
After a visual inspection, it is determined from which side (top or bottom) the wires approach the current-carrying clamps. To avoid unnecessary problems, the new switch should have a similar design. It may differ in that the terminals will be located on the other side, to reach which the wires will not be possible due to insufficient length. The product will have to be installed upside down, and this will change the usual standard of inclusion. To turn on the light, you will need to press the bottom of the key and vice versa. Small currents flow through the lighting conductors, so if you want to leave the usual standard: turning on / off the lighting, you can use spring terminals to build up wires that can easily fit in the box along with the switch.
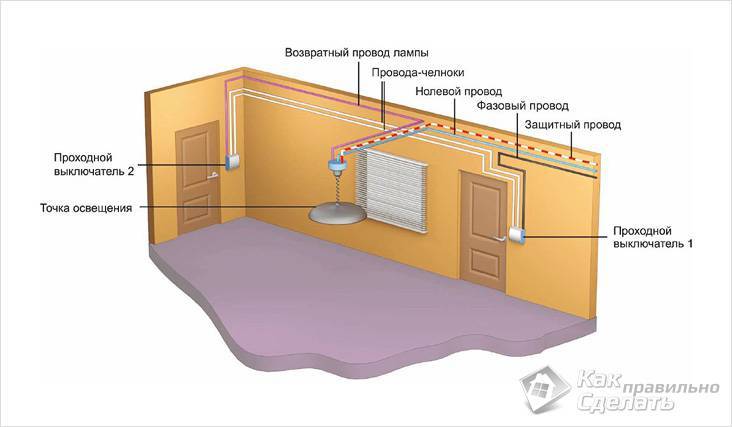
For a single-gang switch, there will be no difference how to connect the wires. For the two-key and three-key versions, one wire must be common (supply), and the rest will feed the corresponding fixtures. For a three-gang switch, you need a four-wire conductor. The common wire (supply) must not be interchanged with other conductors, otherwise the switch will not work correctly. In addition, the common (feeding) wire must be phase. That is, all switches in the house should work to break not the neutral conductor, but the mains voltage phase. Otherwise, when replacing electric lamps, a person may be shocked by touching at the same time, for example, a hot or cold water riser, even if the switch is turned off. For complete safety during the replacement of lamps or repair of fixtures, it will be correct to de-energize the line using the circuit breaker in the electrical panel.
A specialist can check for the correct connection of the phase to electrical installations using a screwdriver indicator or using a multimeter.
switch - power supply control
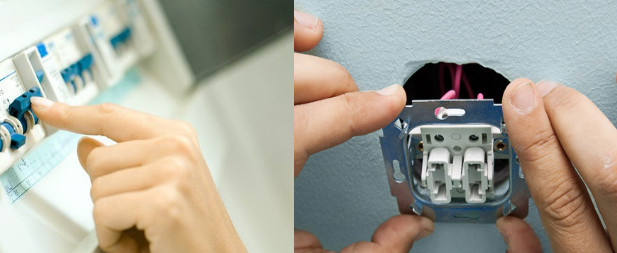
The dismantling of a faulty switch is carried out by loosening the mounting clamps and removing it from the box. If required, strip the ends of the wiring and isolate dangerous places. The new product is installed in the reverse order, fixing the necessary fasteners. After applying voltage, check the clarity of operation of the product, the correctness of switching.


Replacing a failed electrical switch is no more difficult than replacing a socket.Power supply lines for lighting fixtures in apartment wiring have a lower maximum current value, are made of thinner wire, approximately 1.0-1.5 mm in diameter. This is quite enough to feed a large chandelier in the hall, which has 5 bulbs with a power of 75 W, and even more so a 100-watt lamp in the hallway or in the kitchen. If energy-saving lamps are used in the house, then the load on the lighting wiring will be even less.
Surely it happened while doing repairs to run into a problem how to change a switch. It's not a tricky thing, but
scary, electricity after all, suddenly you can’t figure out the wires. Well, it is not clear what to connect where and to what to fasten.
In fact, there is nothing complicated here and there is nothing to be afraid of, everything is just like hammering a nail into a wall. After reading this article, in which everything is detailed, you will never again have a question, how to change a switch.
So, we have a switch that needs to be changed.
First of all, you need to dismantle the old switch, and only then proceed to install a new one.


