- Typical causes of device malfunctions
- Bathroom ventilation
- Recommendations of engineers when choosing ventilation for the bathroom
- How to install a fan in the bathroom
- The principle of connecting to the mains
- Control by switching on/off lighting
- Why do you need a bathroom fan timer?
- Connecting a bathroom timer
- Bathroom timer connection diagram
- Connection via switch
- How to connect an exhaust fan to a switch
- About the design of the most non-separable fans
- Standard diagram of a kitchen hood device
- Disassembly of the device: step by step instructions
- Dismantling of external ventilation parts
- Cleaning and checking
- Testing and assembly
- How to remove the cover from the fan vents
- Vents hood repair. Wire replacement.
- Dismantling the kitchen hood
- Types of exhaust fans
- duct fan
- Choosing a device for ventilation
- Power calculation
- Device diameter
- The backlight does not turn on and / or the fan speed cannot be switched
Typical causes of device malfunctions
To understand the causes of possible malfunctions with the hood, you need to know the principle of operation of the device. It is based on two-stroke indoor air purification:
- All large molecular particles of the intake air volume are cleaned.
- Filters all macro- and microelements of incoming oxygen.
metal filter
The further cleaning process depends on the type of apparatus design (combined, circulation, evacuation) and filtration elements.
What malfunctions can occur:
- a problem with ventilation in the apartment - before installing the hood, you need a channel. If it is clogged, then all the circulating air filled with unpleasant odors will return back to the apartment or to the neighbors, and condensation will settle on the windows. Checking the traction force is very simple: you need to bring a lit lighter to the ventilation grill. If the flame deviates towards the air flow, this means that everything is in order with the ventilation;
-
contamination of the grease trap or filter in the hood - instructions for preventive maintenance against contamination of filters or self-cleaning of grease traps are included with the hood;
- malfunction of the lighting element - if the hood itself functions well, but the lighting does not work, most likely the light bulb has burned out. It is necessary to unscrew the grate and replace the lighting element, any housewife can easily cope with this task;
- lack of electrical power - the cause of this may be mechanical damage to the cord. A peculiar smell and soft insulation in small sections of the cord may indicate that it has burned out;
- a problem with the switches - to eliminate this malfunction, it is necessary to disassemble the hood and change the broken buttons.
Switch board and button replacement
Also, the reasons for the poor operation of the device may be a breakdown of the electronic interface, poor contact in the plug or socket, loosening of the terminals in the hood housing.
In order to protect the device from power surges, it is worth purchasing a special voltage relay.
It is not difficult to repair the hood with your own hands. It is enough to carefully study the mechanism of operation of the device, and the troubleshooting process will not be difficult.
Bathroom ventilation
In this room, ventilation is necessary to remove a large amount of moisture that accumulates here constantly. Thanks to the presence of an exhaust hood, it is easy to breathe in the room, plumbing and household items do not deteriorate, mold and fungus do not appear.

Recommendations of engineers when choosing ventilation for the bathroom
Engineers recommend not to purchase expensive equipment of large sizes. The main thing is to correctly calculate the required power
Experts advise to pay attention to the power of the wiring in the room. Since the hood has considerable power and pressure, the cable may be damaged due to an overload of the electrical network.
When buying, quality, its productivity, dimensions are taken into account.
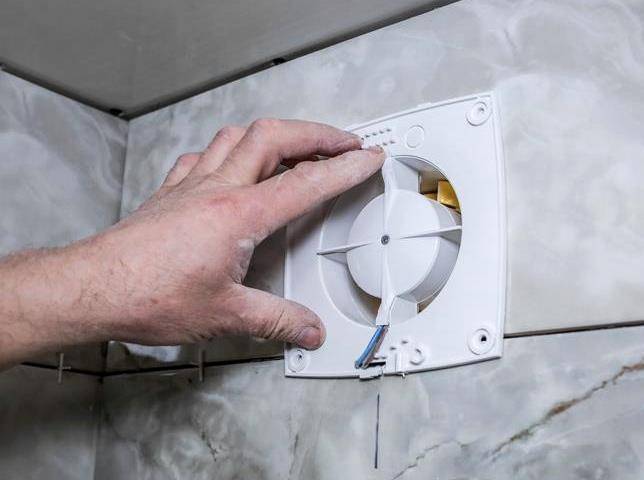
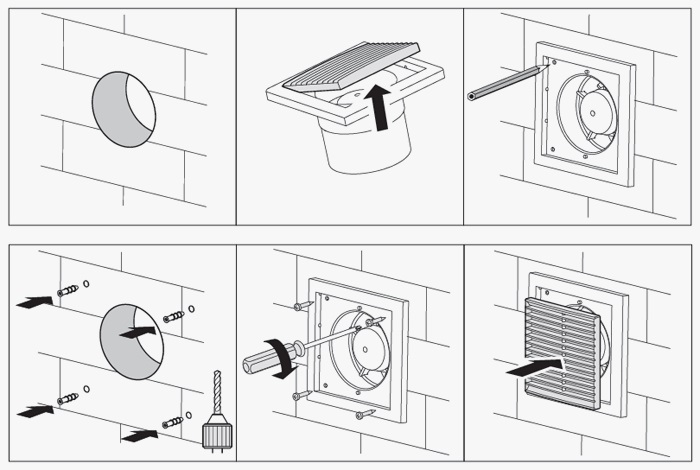
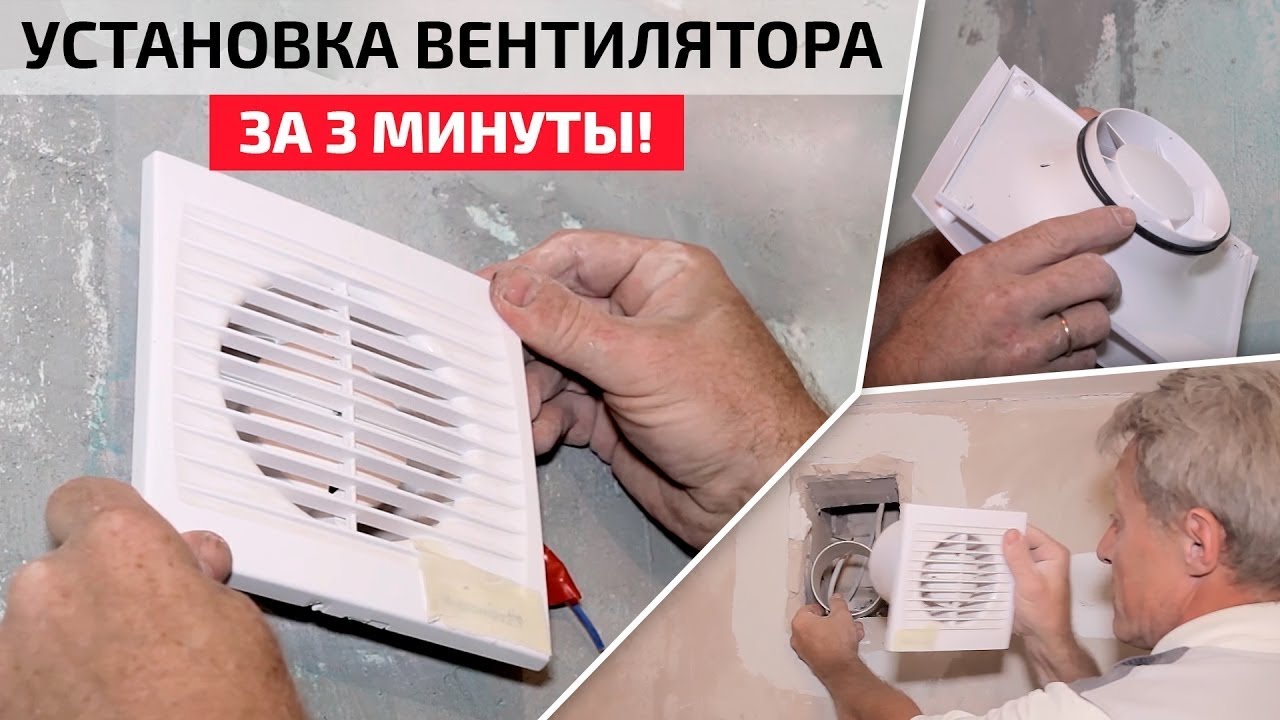
How to install a fan in the bathroom
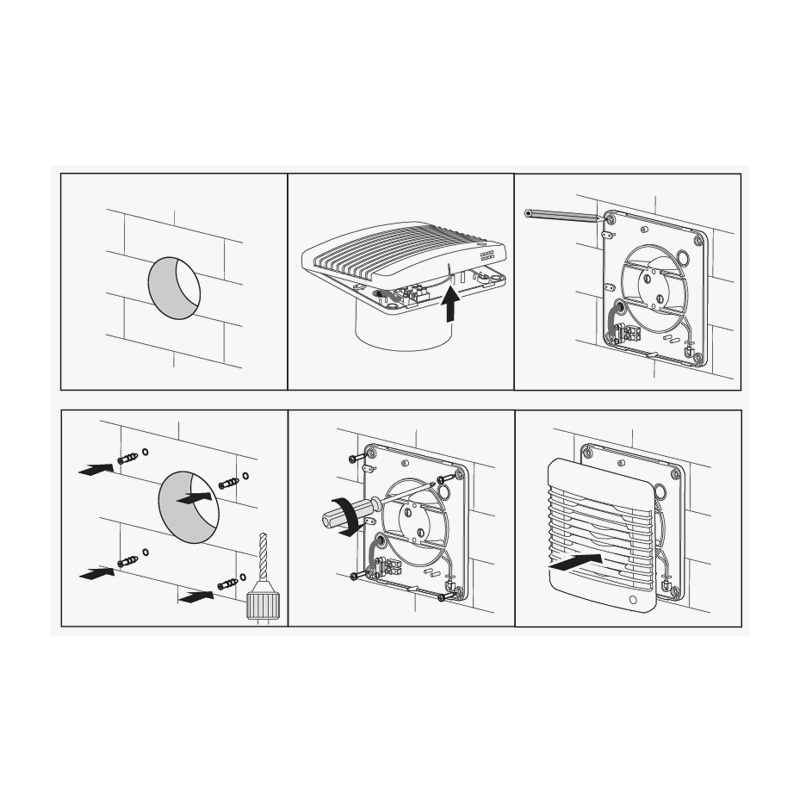
During installation, you must follow the rules:
- remove the cover;
- places that will be adjacent to the surface of the wall, grease with liquid nails or reliable glue;
- place the product in a hole in the wall (the working part is hidden);
- press the body well;
- install an anti-moxite net;
- put the cover on, fixing it with dowels or screws.
At the end of the work, wires are laid, and the structure is connected to the mains.
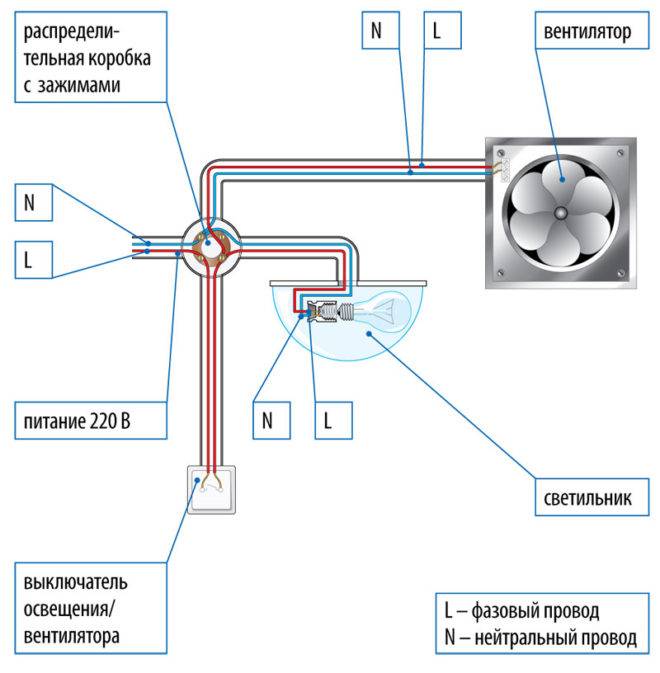
The principle of connecting to the mains
There is a separate wiring to the ventilation duct for automatic activation using device programming or a motion sensor. If the model has a cord, then you can turn on the system mechanically.

Control by switching on/off lighting
Often, electrical equipment turns on at the moment when the light in the room comes on. But since the hood is usually needed during bathing, this option is not very convenient - electricity is wasted, for example, during washing. Therefore, it is better to automate the system in order to save energy and additional convenience.
Why do you need a bathroom fan timer?
The hood equipped with a timer will turn on when the light is turned on, and turn off after a few minutes, after the person who took the shower left the bathroom. During this time, the device extracts moist air. If the stay in the room was short-lived, then the design will not turn on, since there is no need for its work.
Connecting a bathroom timer
The timer is a compact device. It should be connected using 6 pins. To connect correctly, you need to use the diagram.
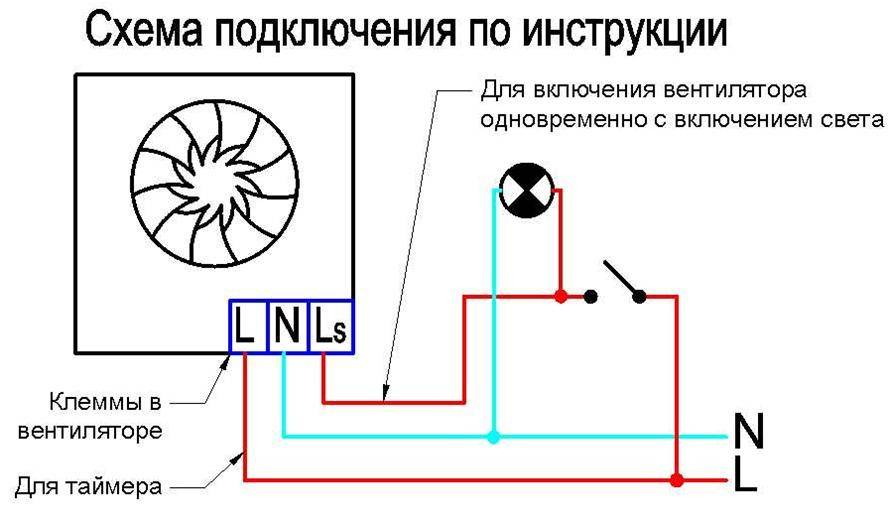


Bathroom timer connection diagram

Connection via switch
Before you start connecting the power wires, you need to turn off the switches on the shield. Then the front panel of the device is removed, and wiring is inserted into it through the channels.
How to connect an exhaust fan to a switch
The wires are connected to the terminals of the device located under the cover. In the absence of grounding, 2 wires are enough: phase and zero. The wires are connected to the terminals, strengthened, tightened with bolts, a protective cover is placed.
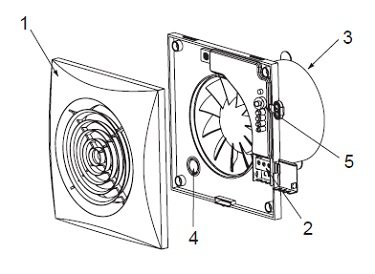
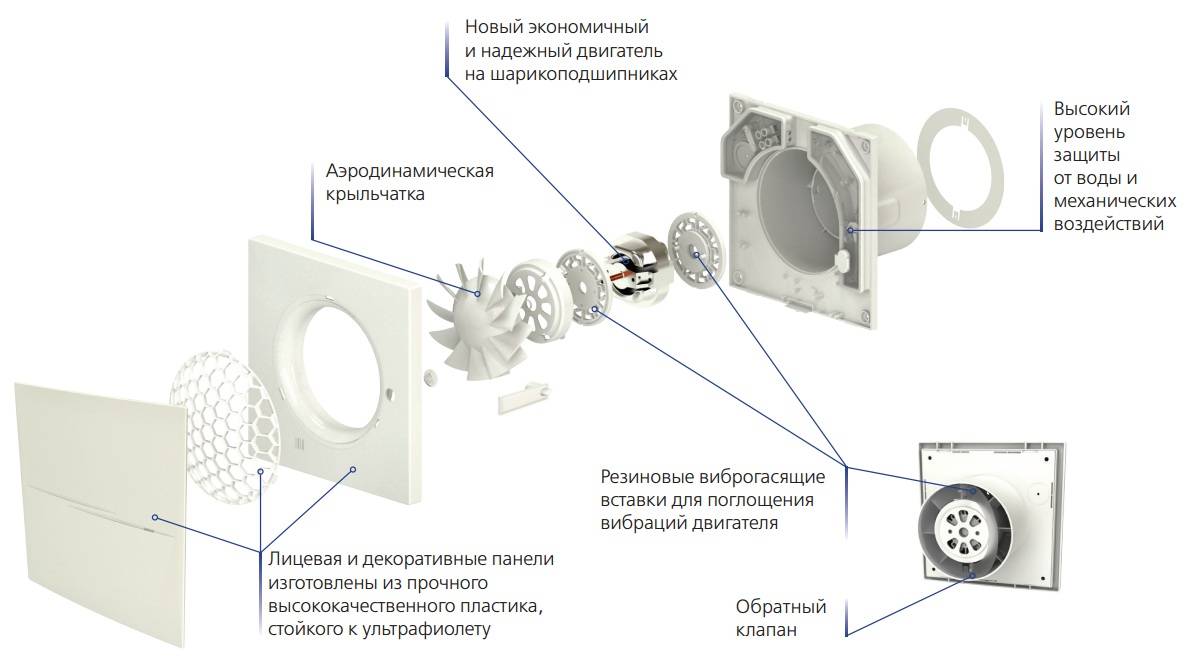
About the design of the most non-separable fans
This drawing is a sectional view of a non-separable fan bearing assembly.
The impeller axle lock, made of hard plastic, has three trap-type latches that securely hold the axle.
At the end of the axis there is a mushroom-shaped heel, which is pressed against the fluoroplastic gasket by the magnetic field of the engine. These two parts form a thrust bearing that prevents axial runout of the rotor. In small fans, the gasket may be missing.
The plain bearing sleeve is fixed with two or three latches on the motor frame.
To disassemble the fan, we need to drill one or two process holes. Through one of them, you can cut off the latches holding the bearing sleeve, and through the other, knock out the axle or axle together with the retainer and sleeve.
Standard diagram of a kitchen hood device
Equipment of any modification of the hood (Krona, Bosch, Asko, Elikor) contains standard components:
- four-speed motor - provides regulation of the power of the air flow of the exhaust fan. Due to this, air masses pass through the filters, in which heavy particles of fat are retained;
- filters - today there are many different filters for circulation modules: ceramic, carbon, hydrogen, carbon-plastic, fiber-optic, absorption. All of them work on the principle of rough cleaning of all types of material;
-
lighting lamps. The hob is illuminated with LED lamps, halogen, ultrasonic and other light sources;
- speed switching scheme - in various modifications of kitchen hoods, it is carried out using such elements as a switch, voltage regulator, dimmer, portable devices (switches, buttons, toggle switches).
Hood scheme
By installing a special application on your mobile phone, you can set the operating mode of the kitchen hood.
Disassembly of the device: step by step instructions
Dismantling of external ventilation parts
To dismantle the engine, it is necessary to disassemble the external parts of the kitchen ventilation. In this case, you can access the engine system.
To do this, you need to take the necessary tools and materials.
Attention
You need to prepare a suitable diameter screwdriver. In this case, there should be several screwdrivers, since some parts can be voluminous and hooked with large screws, and some elements are microscopic in size and can only be dismantled with special tools designed to carefully remove parts .. When the engine is removed from the device, its resistance is checked windings
To do this, a harness is prepared in advance that goes from the board to the electric motor. In this case, you can simultaneously diagnose malfunctions in the motor and try to repair it without removing it from the hood.
The method is less convenient, since it will first require a set of additional work. It is better to dismantle the engine itself and not touch other parts in the ventilation housing
When the motor is removed from the device, the resistance of its windings is checked. To do this, a harness is prepared in advance that goes from the board to the electric motor.In this case, you can simultaneously diagnose malfunctions in the motor and try to repair it without removing it from the hood.
The method is less convenient, since it will first require a set of additional work. It is better to dismantle the engine itself and not touch other parts in the ventilation housing.
Cleaning and checking
- Whatever caused the failure of the ventilation motor, remove dirt, lubricate the bearing with oil.
- The dismantled motor is placed on a horizontal surface and the starting condensate is checked.
- In the absence of a short circuit, it is returned to its place.
- If the conder is broken, then it is replaced with a similar one in terms of capacity and operating voltage.
After cleaning all the grooves, dry small parts well. Cleaning can be done with a soft cloth that does not leave streaks, does not scratch the surface. After cleaning, the serviceability of the engine is checked. The problem of its failure to work could be due to clogging of parts. After cleaning, the design can become serviceable.
When the motor is installed in place, its performance is checked. If the problem also persists, the ventilation works very poorly, then the engine must be replaced or some of its components have broken. The device is again removed from the fan and its performance is checked in detail.


Testing and assembly
- If the broken motor cannot be replaced, you can try short-circuiting its wires. Such testing will help determine the quality of the motor with shorter wires. Wiring fault repair is rare. Branded hoods are designed so that the motors in them rarely burn out. This leads to the fact that the operation of the motor cannot be disturbed due to problems with electricity.But this applies only to modern technology.
- If we talk about a simple hood with a simple engine, then everything is much more complicated. You will have to test and assemble such a part in ventilation several times in a row. Be sure to apply mains voltage to the working and starting windings. There are situations that the motor is buzzing (this means the health of the electrical network), but refuses to work.
The engine can pick up speed in the on state when it is manually scrolled. This situation indicates a malfunction of the starting winding. It needs to be removed from the motor and replaced.
- The hood motor is checked by ringing the windings according to the scheme indicated in the instruction manual. If at least one winding does not ring, then the engine must be repaired or given to a service center. And in the most difficult cases - completely change it to a serviceable one, which also not everyone can do on their own at home.
- Incandescent or halogen bulbs are easy to change. They are simply turned out of the hood, checked for performance. In this case, the procedure can be performed in any suitable cartridge or base.
- Repair of LED systems will require additional steps. You will need to remove the lamps and connect them to a low voltage DC source. A converter adapter is connected to the system, which will help to obtain the 3 V voltage required for the LED.
The converter adapter is also checked with a tester for compliance with the voltage required for operation. When using a standard 220V LED lamp in the system, the repair only includes cleaning the contacts in the lamp base.
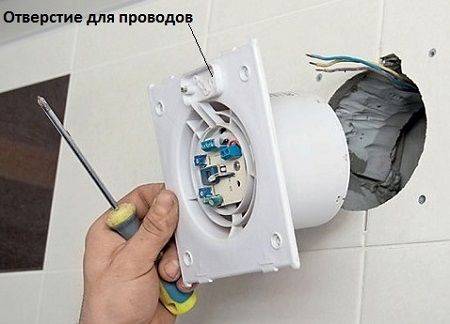
How to remove the cover from the fan vents
Exhaust fan cleaning. prolong the life of the exhaust fan
Installing a fan in the bathroom is a very good idea. Thanks to this, you can ventilate the room in a matter of minutes. Thanks to the fan installed in the exhaust pipe, the draft itself is increased, which is useful for increasing the humidity in the bathroom or after a smoke break.
However, over time, especially if in the bathroom or smoking in the toilet, the hood becomes very dirty. As a result, traction is weakened. In addition, over time, the lubrication in the motor bearings runs out, and the fan starts to work poorly and may even burn out. Therefore, it should be periodically prevented.
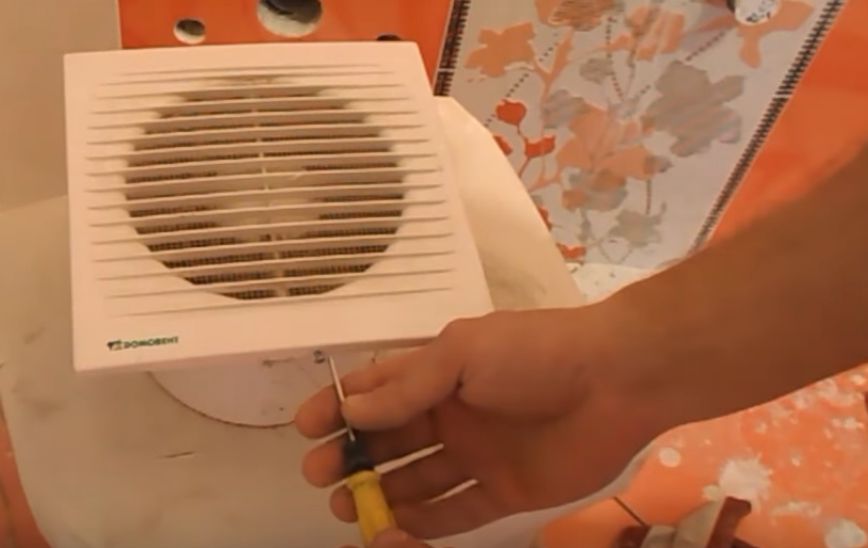
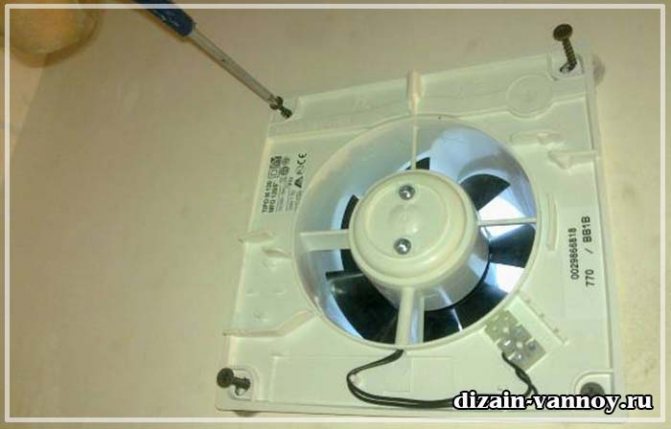
If your fan starts to squeak and change speed through a wedge, don't rush to throw it away, it can still extend its life. Remove the fan first. Usually fastened with four screws. It is connected to the power supply using a conventional two-wire terminal. It is convenient to connect the fan to a switch so that it can be turned on and off as needed.
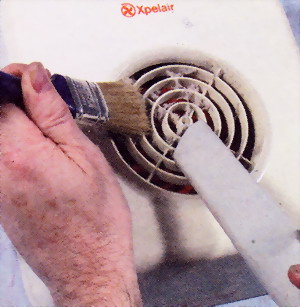
So the fan is strong dirty, the engine jams and overheats, so it needs to be lubricated and cleaned.
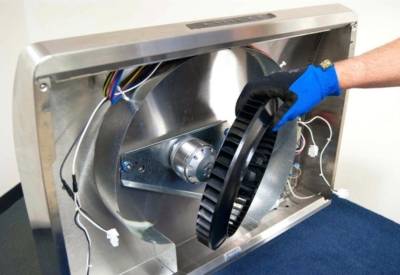
Figure 1. Fan disassembly begins with the removal of the impeller. It is attached to the motor shaft with a conical threaded collet, the nut must be unscrewed clockwise.
Figure 2. After unscrewing the nut, the fan impeller can be easily removed from the shaft.
Vents hood repair. Wire replacement.
The break wire has been torn off. Wet and get off. The hood had to be opened for replacement.
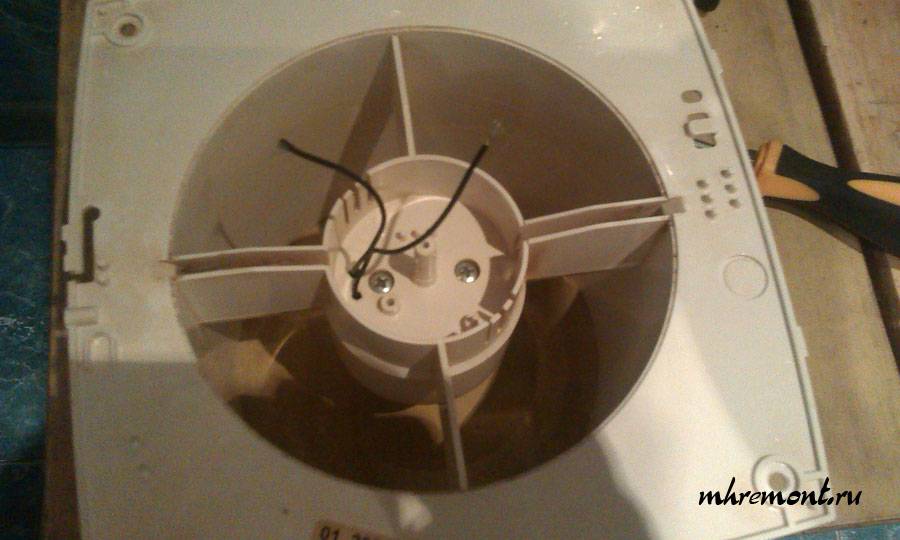
Rice. 3. Turn the fan front and disconnect the motor wires from the terminals. Otherwise take off the engine will fail.
And to remove the engine, it is mounted on two screws.
Figure 4 The motor is mounted in the fan housing with two screws. to remove the engine they must be rejected. When removing the engine, it must be supported. If you are taking apart a fan that has been running recently, wear gloves because the motor is hot. Or let the engine cool before disassembly.
Here is the engine fan.
Figure 5 To lubricate the fan, apply a few drops of oil to the front and rear bearings. It is convenient to use a medical syringe with a needle. It is necessary to drip oil when the shaft enters the motor housing from one side and from the other.


Come on cool. Then clean and lubricate it. For lubrication, the fan needs literally two drops of machine oil, not a lot to pour. One drop is needed for the front bearing, the other for the rear. Then turn the motor rotor (shaft) by hand to distribute the oil. You immediately feel that the rotation has become much better. Now the engine will not jam and overheat.
Then we remove all the details under running water.
Rice. 6 All plastic parts are washed with water using detergents. All parts must be thoroughly dried before assembly.
Now we assemble his fan and install it.
Rice. 7 Fan assembly. The motor is installed first, then the clamp is connected, and then the impeller is attached. The assembled fan is installed in place and connected to a power source.
We looked at how easy it is to bring an old fan back to life. In most cases, fan failure is due to contamination and lack of oil in the motor bearings. By cleaning and lubricating the motor, you can regularly extend the life of the fan.The whole job takes no more than 10-15 minutes and saves time and money that could be spent on a new bathroom or kitchen fan.
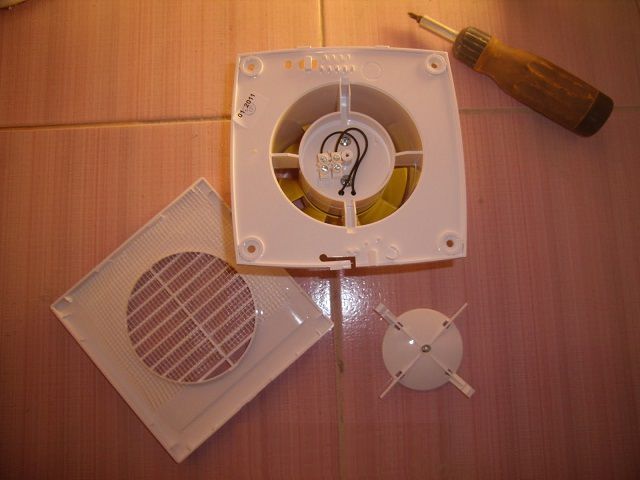
Dismantling the kitchen hood
The need to remove the hood can arise not only because of problems in operation. Periodically it is necessary to clean the filter and wash the unit. For the average consumer, dismantling and dismantling the hood will not take much time. Manufacturers have done everything to make this process as simple as possible.
- Before dismantling the hood, it must be disconnected from the mains.
- When disassembling the hood in the kitchen, reread the instructions, as each model may have its own characteristics.
- Remove the grille filters located on the bottom panel by moving the latches (clamps).
- Disconnect the lighting connectors.
- Remove the fan: unscrew the impeller from the stopper and release it from the motor. Sometimes there is a spring clip or other fastening in the design.
- The last to remove the control board and the engine (there may be two).
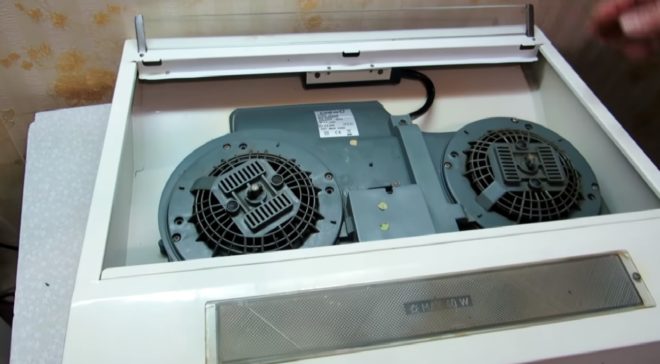
Image taken from
This is how the dismantling of the hood looks like. There are models that are even easier to disassemble, since they consist of blocks that are independent of each other. For example, to remove the motor, it is not at all necessary to remove the backlight unit.
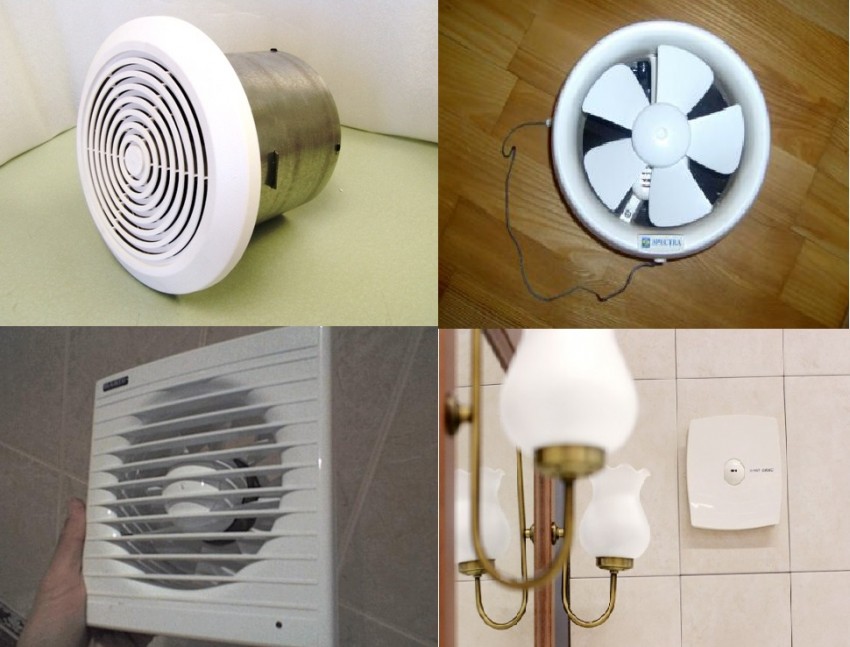
Types of exhaust fans

All appliances for forced exhaust in the bathroom are divided into several types:
- Launch method. Without control and with control by means of sensors and a remote control.
- At the place of installation. Wall fans are often used for exhaust hoods, they can be easily removed if necessary, for preventive maintenance or replacement.
But there are also ceiling devices for ventilation, they have many advantages:
- great performance;
- simple installation;
- the ability to hide the fan housing behind the false ceiling;
- nice design.
And also ventilating devices for hoods are divided according to the depth of installation. There are overhead fans and those built into the wall at the same level.
- By type of construction.
In order to understand which fan is best suited for bathroom and toilet hoods, you need to imagine their device.
There are four of them, but only two types are used in everyday life:
- Axial. The most popular model for use in bathrooms, since its installation is the easiest. The device is a cylinder, inside of which there is an engine with blades on the shaft. You just need to insert it into the ventilation well and fix it.
- Radial (centrifugal). He received such a name because of the principled work, when air masses rush outward due to centrifugal force.
There are also channel devices. These ventilating devices are used for exhaust in hospitals, schools, kindergartens and other institutions.
Industrial installations are also used. As the name implies, such fans are used in production workshops and factories.
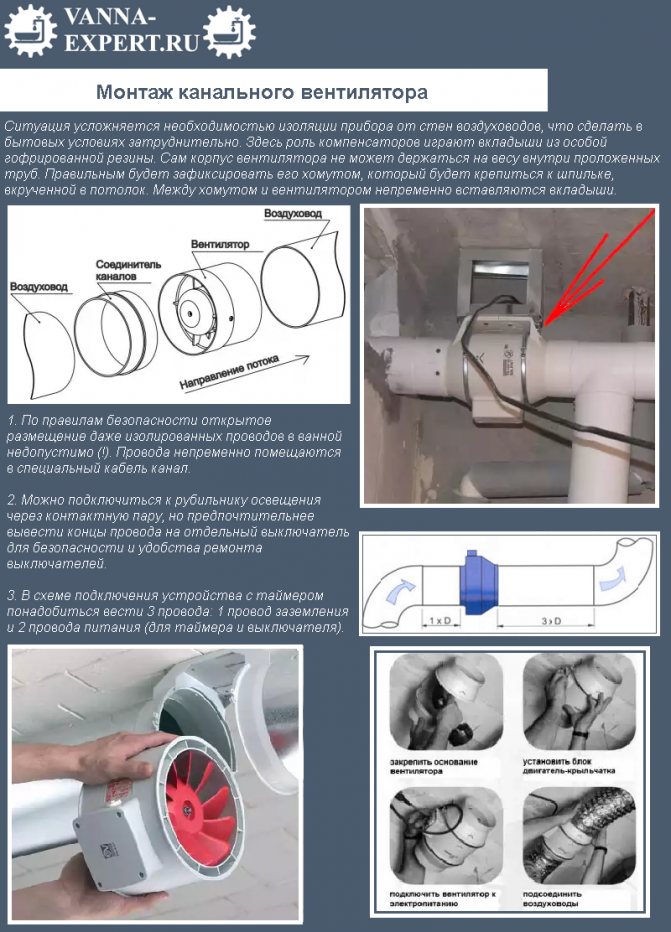
duct fan
Today, the most popular type of fans is the duct fan. The reason is that its principle of operation is similar to that of an air conditioner. It not only cleans the air, but also maintains it at a certain temperature. With all this, the channel type in its structure is the most difficult to repair. Therefore, few are able to independently identify the cause of its malfunction.
By the way, there can also be several reasons. From banal pollution to overheating of the electric motor.The reason, characteristic only for the channel type, may be the need to change the direction of the channel. In any case, the mechanism requires disassembly and careful inspection.


The duct-type fan itself is only a part of the air filtration system, but its most important part. It directs air to the filtration and purification system.
Fan disassembly depends on many factors. First of all, this is the method of its factory assembly. Parts can be connected with bolts, self-tapping screws, etc., or they can be welded. In addition, duct fans are assembled specifically for the filtration system. Depending on it, the design and assembly schemes may be different. Therefore, the disassembly of the most popular type of duct fan, the square one, will be described.
For disassembly, you will need a screwdriver and pliers.
Incision
Algorithm for disassembling a square-type duct fan:
1. Turn off the power.
2. Disconnect the working unit from the filtration system. The fan is the edge link of the system, so separating it will not be a difficult task. The pipeline is connected to one of the walls of the mechanism. As a rule, the pipe is not welded, but bolted. Therefore, it is easy to separate it with a screwdriver.
3. Remove the machine from the wall. As in the case of the bathroom fixture, the duct cannot be disassembled without being removed from the wall.
After dismantling, the whole mechanism is, in fact, a fan inside a large square box. With the help of its walls, the direction of the collected air is regulated. Therefore, if a change of direction is required, the box will be the main element of the disassembly. The device itself, in this case, does not require disassembly.If it is required to check the engine or evaluate the integrity of the blades, it is required to dismantle and disassemble the fan itself.
4. Remove the blades. They are attached to the electric motor with a nut along the main working axis. The nut is easily unscrewed with pliers. The electric motor itself is in most cases welded to the box, so it is most often not dismantled.
5. After removing the blades, access to the engine opens. On the back side, as in cases with other types of fans, it is bolted
When removing and inspecting the motor, be careful not to damage the cables
Backside. Motor cover
In addition to square, other duct-type devices are also widely used in ventilation systems. Their form depends on their purpose and location. However, the difference between these machines is only in the forms of their "boxes". The fans themselves work according to an identical scheme, and, therefore, they are disassembled in the same way.
Summing up, it is safe to say that fans are not such a complex system. They are quite simple to assemble and disassemble, but require accuracy and literacy. And if their disassembly and maintenance in proper condition is made systematic, then over time, disassembly will become a familiar and simple process, and the mechanism will last much longer.
Choosing a device for ventilation
When arranging the hood in the bathroom, you will need to choose the right fan.
Consider the parameters that you should pay attention to:
First you need to know its power, that is, how much air it can move through the system. Basically, this value depends on the diameter of the product.
Fan diameter. This indicator will be discussed in more detail below.
An important factor is the design of the device. Some manufacturers produce fans with a replaceable outer panel. Models Elicent, Electrolux, Ballu are available with different shades of color.
Beautiful and fashionable, the appliance can be placed in such a way that it will be the center of attention when entering the bathroom. And you can, on the contrary, hide behind the panel, and it will not be visible


The only condition that must be observed is to prevent its contact with external electrical wiring, because the device will have to be in a zone of high humidity.
When choosing, pay attention to the noise of the fan, since excess noise in the bathroom is annoying. The noise level that does not affect hearing should not exceed 25-27 dB.
You also need to pay attention to the guarantee that the manufacturer provides. If its period is less than 12 months, then it is better to refrain from buying this model.
Let's analyze in more detail some characteristics of the fan.
Power calculation
- First you need to calculate the volume of the room.
V= a × b × h, where:
a - the length of the room;
c - width;
h is the height;
V is the volume of the room.
a. For example, a bathroom has dimensions: 1.5 - length; 1.5 - width; 2.8 - height. By multiplying, find out the volume of the room. It is equal to 1.5 × 1.5 × 2.8 = 6.3 m³. Round up to 6 m³.
- To calculate the performance, it is necessary to multiply the volume of the room by the air exchange rate (this value is determined from the SNiP reference book). The number of air replacement in the bathroom is 6-8 times, for the toilet this figure is 8-10 times. A specific number is selected depending on the number of family members who have used the procedures in these rooms.
- Accordingly, from the table we select the desired air exchange rate, for example, we take an indicator of 8 for the bathroom. We multiply 6 m³ × 8 = 48 m³ / h. In other words, 48 m³ of air must be replaced in one hour.
According to the calculations for the bathroom, you need to choose the appropriate fan. This usually adds up to 30% of the overall performance of the device.
Device diameter
Now in the market of ventilation equipment you can find products with different cross-sections of the duct. The classic sizes include: 100, 105, 125, 160 mm and others. It is necessary to select such devices according to the diameter, first of all, based on the size of the opening of the ventilation shaft.
Secondly, on the required parameters of the product. For example, the power of the exhaust device will significantly depend on the diameter of the blades. Obviously, the larger the diameter, the greater the performance of the device.
In houses built in the 60s and 70s, the apartments are relatively small, and there the best option would be a diameter of 105 mm. In new buildings of recent decades, apartments are rented with a larger area, in this case it is recommended to make a choice of 125 or 160 mm.
The backlight does not turn on and / or the fan speed cannot be switched
Typically, the lack of light in the hood is due to two reasons. Bulb burnt out or switch defective. A bad contact on the switch often results in no backlight. On hoods with a mechanical type of control, it is not uncommon for a button to stick due to dirt getting inside. You can fix the problem by disassembling and cleaning the switch. If the contacts are oxidized, then they are cleaned and assembled in the reverse order.

The inability to switch speeds is also caused by a malfunction of the buttons.The number of revolutions is switched by several buttons located in one block. After removing the protective screen, check the integrity of the contacts and tracks on the board. In the absence of visible damage, the circuit is checked by a tester. If the circuit is in order, the cause of the malfunction is probably in the starting capacitor, which has burned out.


