- Features of dismantling units with vertical loading
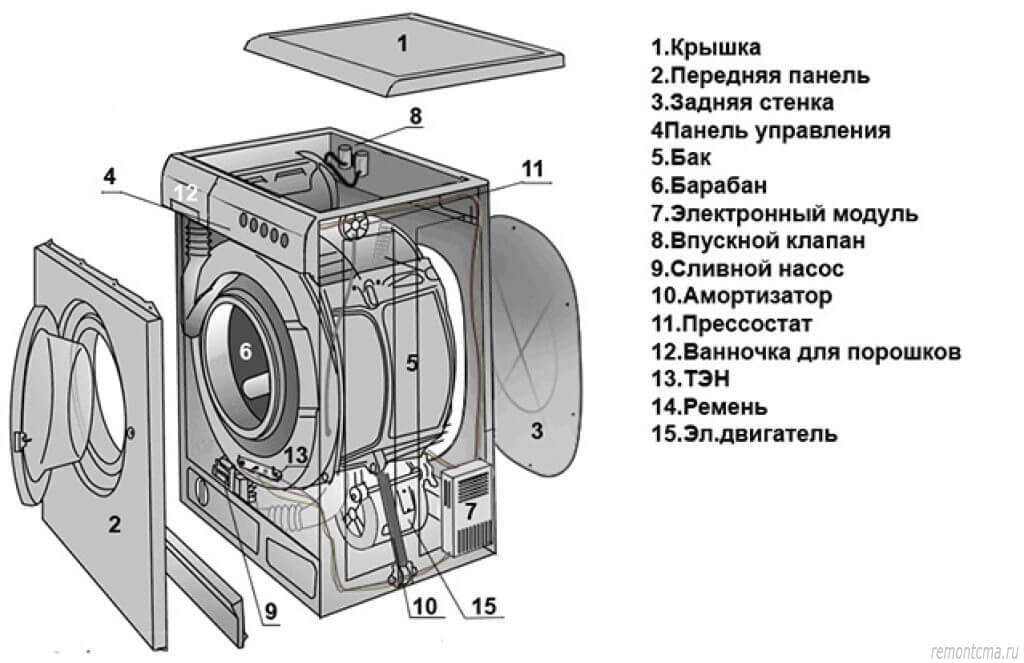
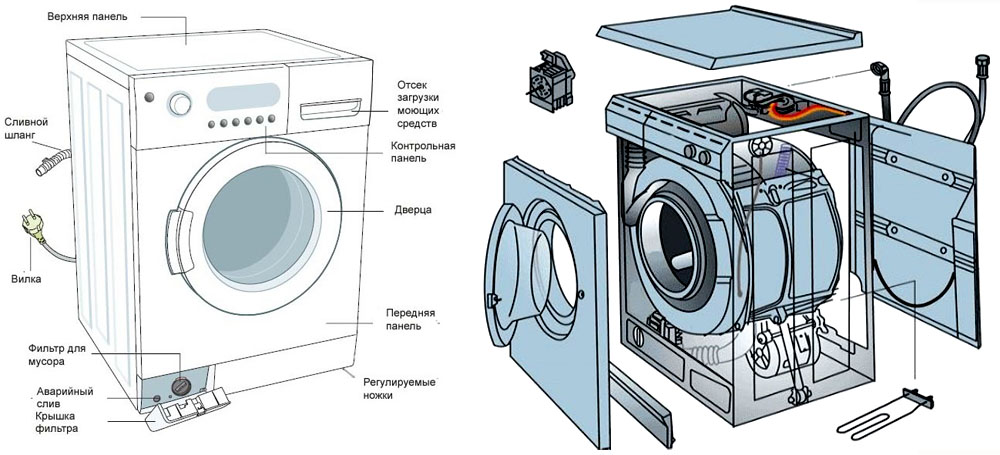
- Device device
- With horizontal loading
- Top Loader
- Care Tips
- Which brand do you prefer?
- Removing the drum from the tank body
- We continue to disassemble the machine
- Causes of breakdown and do-it-yourself repair of the washing machine programmer
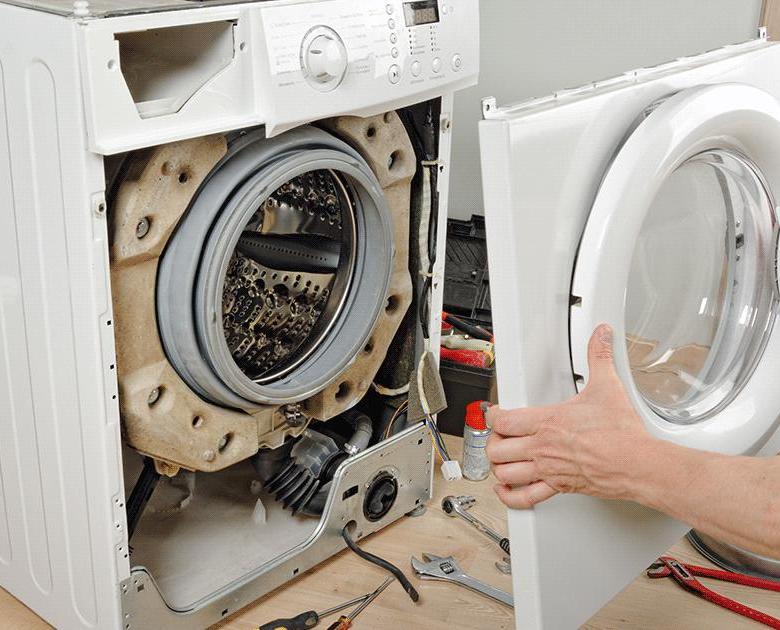
- Preparatory work
- Basic information about disassembling equipment
- Features of dismantling units with vertical loading
- Stepping through
- Control Panel
- Bringing in a new machine
- Process Features
- Front loading machine
- With vertical
- How to assemble a Samsung washing machine
- How to prepare for disassembly
- Power off the device
- Turn off the water supply
- Prepare these tools
- Record disassembly sequence
- Tank disassembly rules
- Disassembly of the washing machine and its subsequent repair
- Replacing the heating element
- Conclusions and useful video on the topic
Features of dismantling units with vertical loading
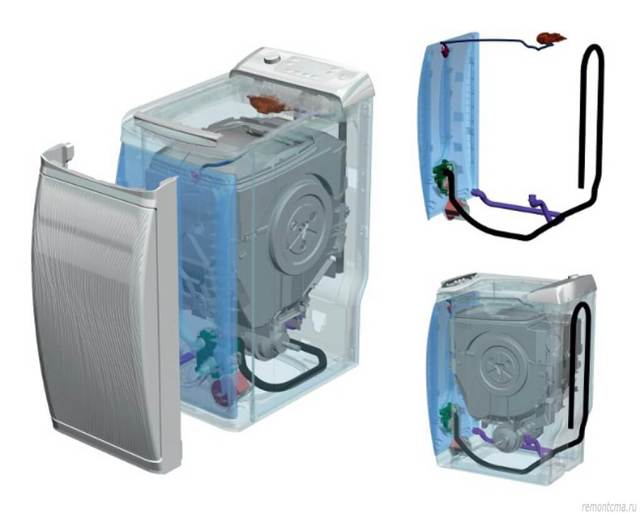
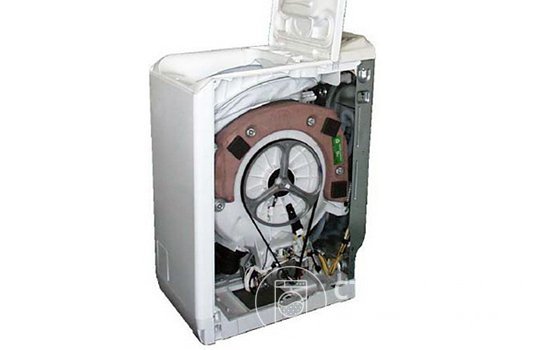
Top-loading washing machines have most of the same parts as front-loading models: tank, drum, motor, shock absorbers, etc.
 In the photo you can see the device of a top-loading washing machine
To disassemble such a unit, you will also have to remove the side panels of the case and the top cover, but you need to start from the control panel.The bolts holding the part can be found on the sides, and in some models it is mounted on special latches. In this case, the panel can be pry off with a screwdriver and carefully shifted by disconnecting the wires. Under the part is the control board, which also needs to be dismantled.
Then remove the top cover (its fasteners can usually be found under the control board) and side panels, and carefully disconnect the clamp from the drum.
Further actions will consist in the sequential removal of all parts. The bearings in a top-loading washing machine are located on both sides of the drum.
Do not forget that in the instruction manual for your unit there is a diagram of the location of all parts and their fasteners. Do not rush, act carefully, and you will succeed.
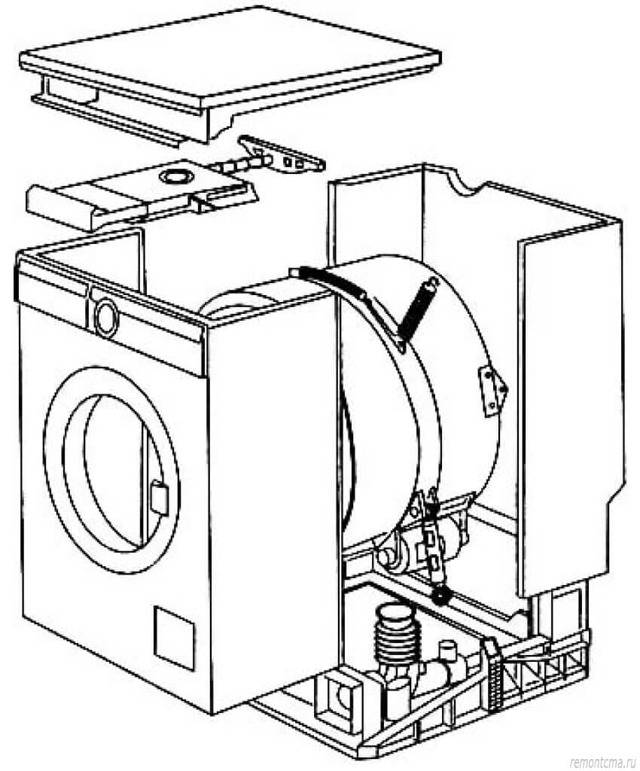
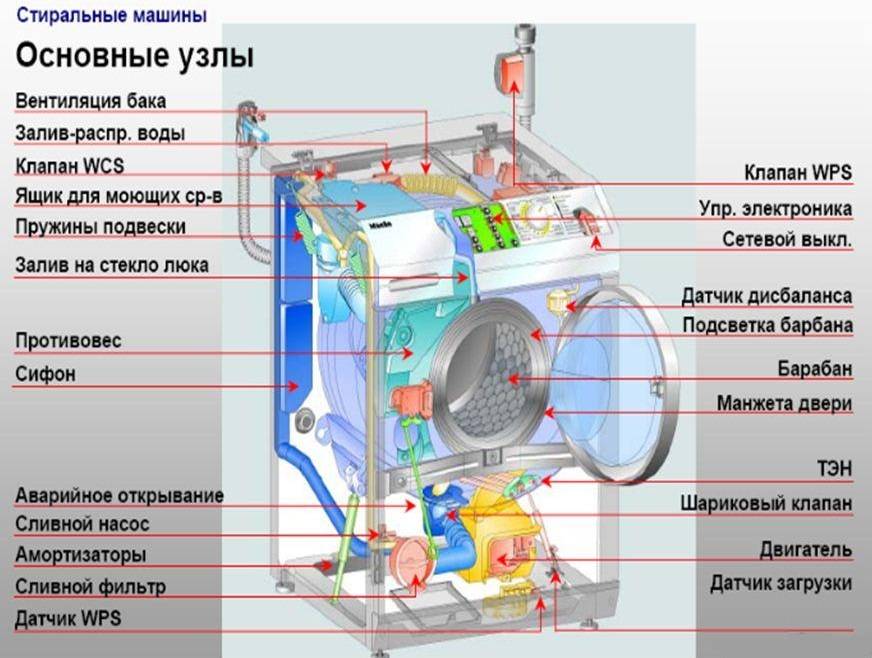
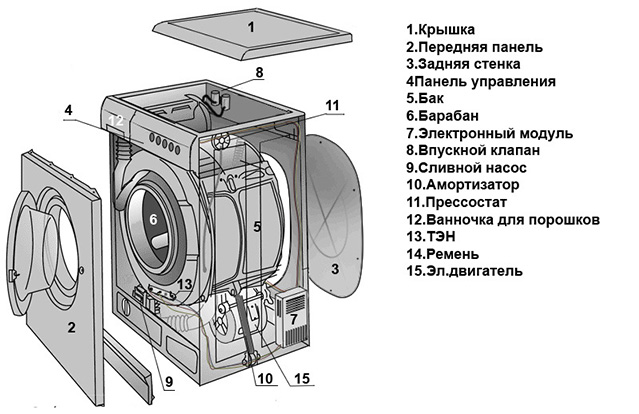
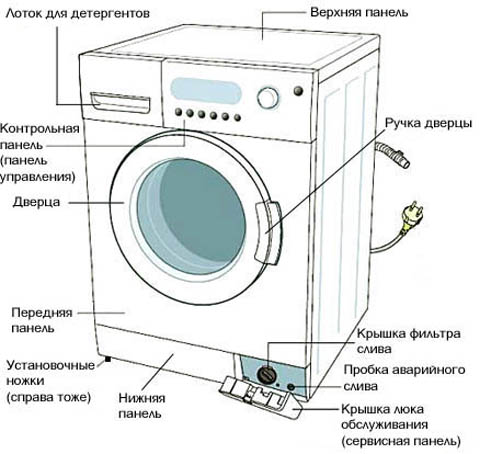
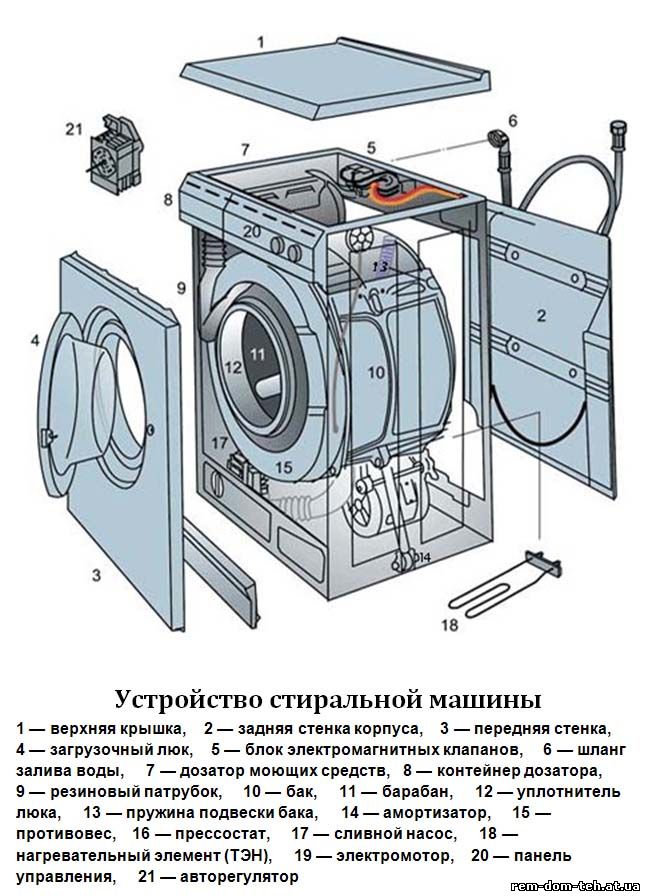
Device device
Machines with vertical and horizontal loading are arranged differently. When disassembling, consider the features of each type.
With horizontal loading
As part of the device:
- inlet valve and water supply valve,
- water supply hose,
- fan,
- drying condenser,
- branch pipes,
- filter,
- cuff,
- duct,
- heating elements,
- drying chamber.
Top Loader

As part of the device:
- dispenser,
- springs,
- inlet, drain and connecting hoses,
- electromagnetic three-section inlet valve,
- tank,
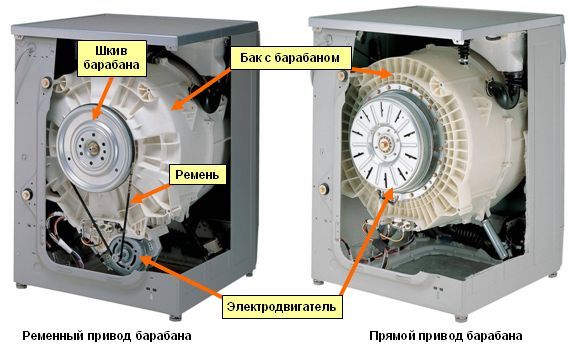
- drum and its pulley,
- inlet hose,
- power block,
- temperature sensors and liquid level switches,
- electric tubular heater,
- electric motor,
- electric pump,
- noise suppression and drain filters,
- counterweights.
Care Tips
The best repair is the one that never happened, so it's easier to keep the thing than to try to restore it later.In order not to have to deal with this, it is necessary to follow all the instructions that are available in the operating instructions.
- Do not overload the machine with laundry. Due to overload, not only things will not be washed normally, but the bearings and the support shaft will also wear out.
- Do not start the machine with a half empty drum. This will cause everything to pile up on one side during the spin cycle and create an imbalance in the drum, which will cause the machine to vibrate a lot. This runout on the shaft severely breaks the bearings and seal, after which it becomes necessary to repair.
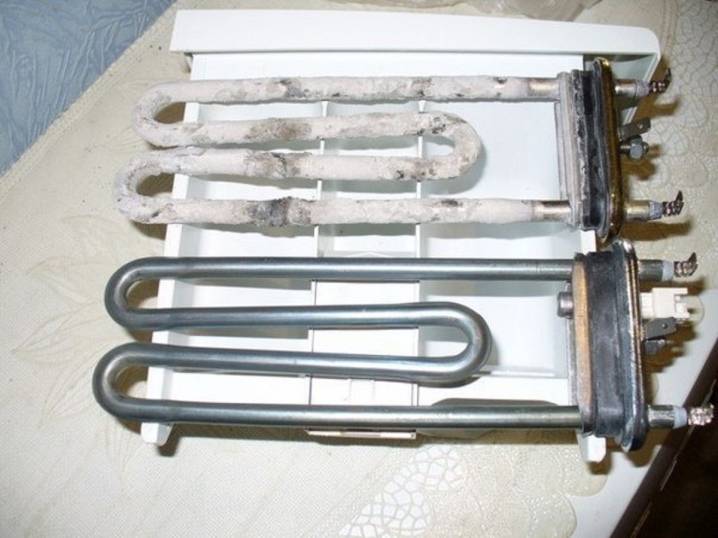
- Hard water leaves scale on the heating elements, which leads to a decrease in their resource. This problem can be solved by installing special filters in the water supply, which reduce the carbonate hardness of the water. Due to this, the scale will be significantly less, which means that the service life of the heating element will be longer. It happens that scale accumulates on the drum - from here it must be removed with special means.
- Clean the dirt filter of the machine regularly. It is located in its lower part, most often on the right side. Its clogging will lead to the fact that the water will stop draining from the machine, and it will not be possible to do without a complete analysis of the drain system and its cleaning.
- Do not pour too much powder into the tray. The remains of the wet powder, when dried, turn into a very hard substance that can clog the water supply pipes to the tank. Use exactly the amount of powder that is necessary for this washing program.
- Never send items to the launderer that may contain small items in their pockets, such as paper clips, buttons, and other similar items.During the cycle, they will fly out of the pockets and cause serious damage to the drum. Keep track of this when preparing things for the scheduled wash.
For information on how to saw and glue a non-separable washing machine tank, see below.
Which brand do you prefer?
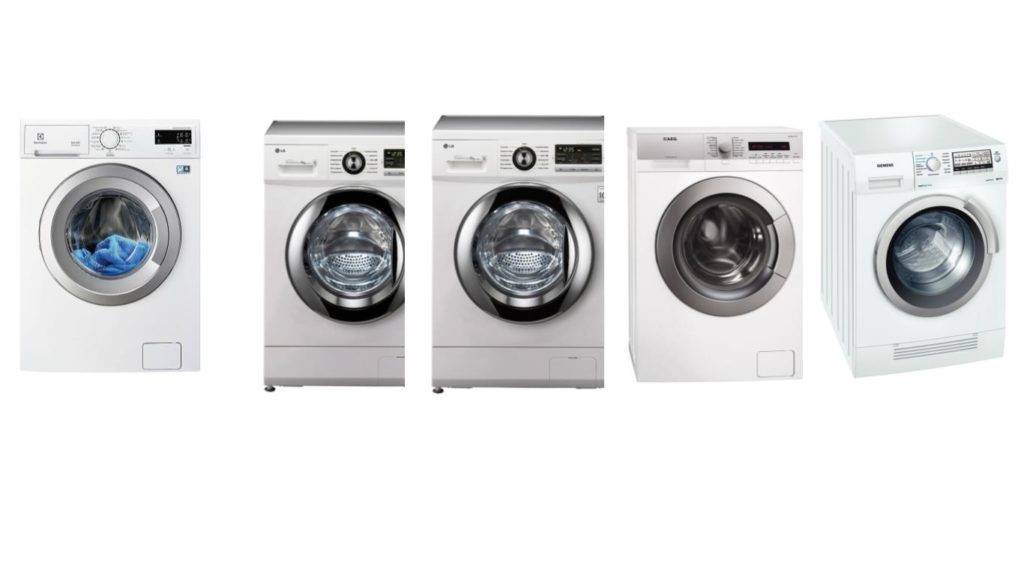
Having decided on the functionality that you really need, proceed to solve an equally difficult task - choosing a device brand. How to choose the right washing machine from the point of view of the manufacturer? Even experts do not undertake to unequivocally answer the question of which brand makes the best washing machines. Every brand has its pros and cons.
Such popular brands of washing machines as LG, Beko, Indesit, Samsung, Hotpoint Ariston, Candy, Whirpool, Gorenje, Zanussi, Atlant are famous for quite good quality and decent functionality. These manufacturers often lead the sales ratings, because they produce a wide range of equipment designed for every taste and budget. The cost varies depending on the set of functions, so the buyer can choose a model in both the budget and the middle or high price segment.
 Some manufacturers lure customers by offering good service support.
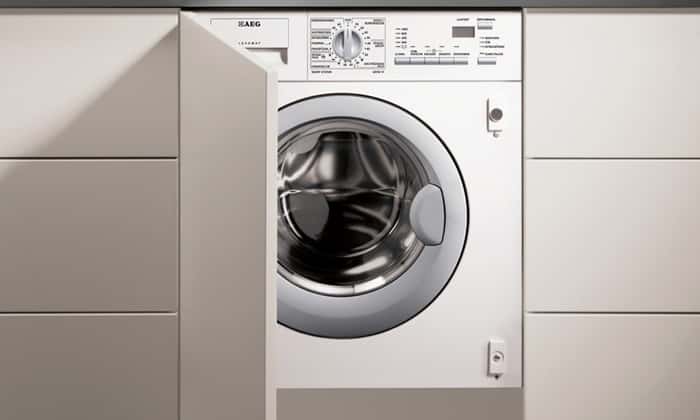
The most popular in terms of price and quality are the brands Siemens, Bosch, Electrolux, AEG, Hitachi. The cost of such washing machines may differ markedly from the units of the previous category, but this is justified by maximum reliability. Manufacturers focus on high build quality and materials, and offer a large selection of models, including budget lines of washing machines.
 Bosch washing machines have long won the trust of consumers
It would not be superfluous to mention the manufacturers of luxury appliances - Miele, Smeg, Asko, Schulthess. The products of these brands are expensive, but they are of high quality and can last more than 15-20 years. Usually it is bought for professional use, for example, in laundries. Also, the buyer has to overpay for the exclusive design of devices that some brands offer.
Removing the drum from the tank body
The washing machine tank weighs up to 10 kilograms. But extracting it with your own hands alone is a dubious undertaking, so we recommend calling a friend / neighbor for help. Together we take out the tank from the springs and pull it out. We unscrew the front counterweight (this part most often looks like a massive half-ring) and remove it. We turn the tank with the open side down, providing ourselves with access to the pulley.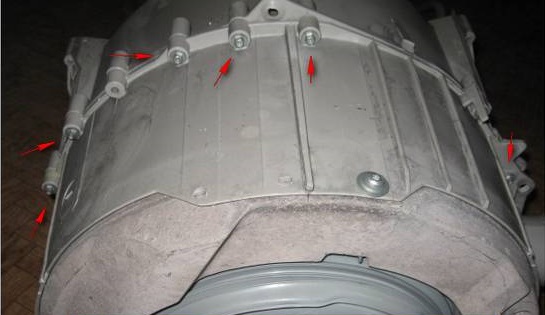
To prevent the pulley with the drum shaft from scrolling, block it with a bar. Loosen the bolt in the middle of the pulley with a hex screwdriver. If the bolt does not lend itself, lubricate it with WD-40. Wait a bit and try again. During manipulation, be careful not to break the hexagon.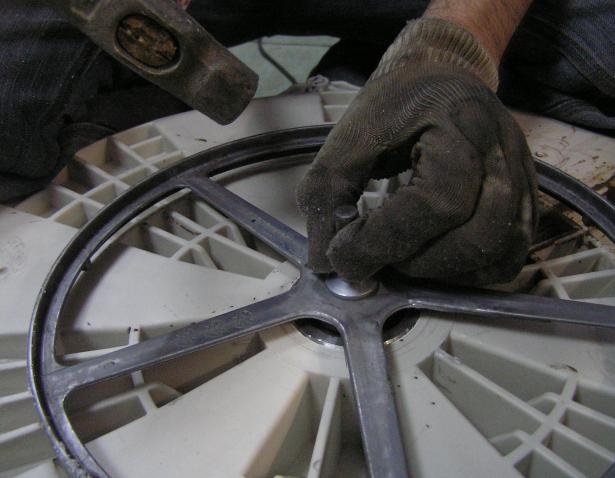
The bolt is unscrewed counterclockwise. The process is difficult, since the fastener is filled with a special compound that gives the connection a special strength so that it does not fall apart from vibration. Some craftsmen recommend heating the bolt with a gas burner to facilitate work. We still recommend using WD-40 lubricant, as using a torch can damage other parts of the machine. Grab the pulley with both hands. Pull the part up, swinging from side to side. After removing the spare part, disassemble the tank body into two halves.


Now take an 8mm socket wrench and unscrew all the screws holding the tank together. After that, the latter splits into two halves. But we still have the back part, fastened to the drum with the help of bearings mounted on the shaft.
They will have to be removed with the tank itself. We select any old bolt suitable for the shaft thread (where we unscrewed the screw holding the pulley) and screw it in. Then we substitute a small wooden block, and lightly tap on it with a hammer until the back wall of the tank comes off the bearing. So, we removed the wall, and we were left with a part of the drum with a cross and a shaft installed on it. An oil seal and a bearing are put on the shaft. Let's move on to the hardest step.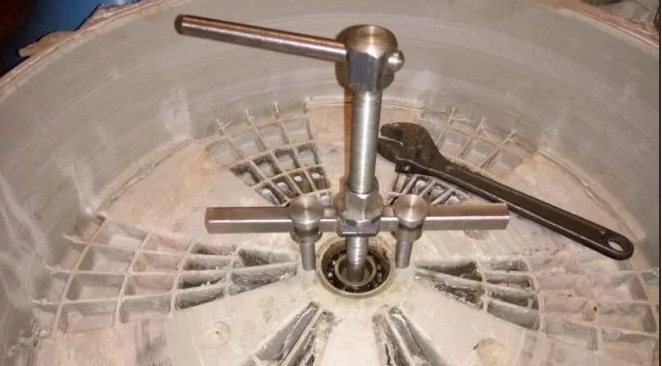
- We drive the grips of the puller under the bearing.
- Slowly twisting the thread of the puller, we create a certain tension.
- Lubricate the bearing well with WD-40.
- We wait about half an hour.
- After that, we continue to unscrew the thread and, as a result, remove the bearing, and after it the oil seal.
Now you know all the intricacies of disassembling a Siemens washing machine with your own hands. By removing the parts one by one, you can easily get to the nodes and elements that need repair. When reassembling, carefully follow the instructions without skipping a single step.
Share your opinion - leave a comment
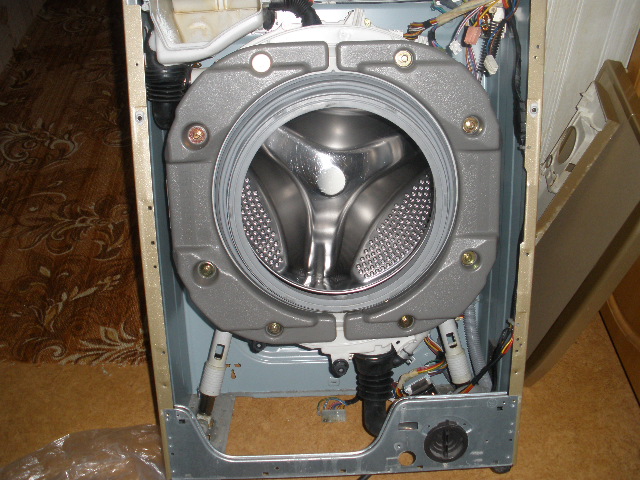
We continue to disassemble the machine
After that, you can remove the inlet hose that fits the tank. In order to do this, it is necessary to remove the fixing clamp with pliers. Then the hose no longer holds anything and can be removed. Next, remove the hose going to the pressure switch. To do this, we again need to first remove the clamp.
Next, remove the inner clamp, which fixes the rubber cuff on the tank of the machine. And let's remove this very cuff. Next, remove the back wall of the car. It is attached with screws. We will twist them with a screwdriver without any problems and remove them.
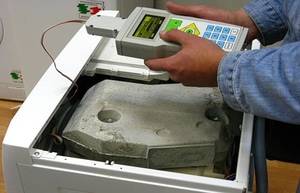
Next, we will remove the counterweights. They can be located both in front of the machine and behind. In appearance, they are something similar to concrete blocks. They are needed so that the washing machine does not vibrate much during the spin cycle and other washing modes. They are usually fastened with long bolts. We twist the bolts. We remove counterweights.
Then we remove the heating element (heater). In most machines, it is located on the back side at the bottom of the tank. In some models, it is located in front, also at the bottom of the tank. In order to remove it, you need to twist the fixing nut. It is located in the middle. Then click on the protruding hairpin. The one with which you twisted the nut. It needs to be pushed in. If this cannot be done by hand, you can gently tap on it with a hammer. Next, we hook the heating element with something flat and carefully remove it.
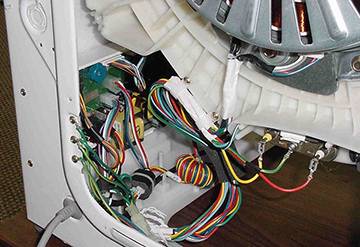
Then remove the drive belt. It goes from the engine of the machine to the pulley, which is attached to the tank. We will also remove the wires that may be on the tank and motor. We remove the fixing elements of the engine and remove it.
Now our tank is suspended on springs from below and is fixed by shock absorbers from below. We twist the shock absorbers, slowly remove the springs. And take out the tank. If you need to disassemble the tank, then this is not difficult. First, we twist the bolt that fixes the pulley. We remove the pulley. The shaft is pressed into the tank. Then we divide the tank into two halves, for this you need to remove the clamp.
By the way, some models include non-separable - disposable tanks.Some craftsmen saw them with a hand saw. And then they assemble using bolts and waterproof sealant.
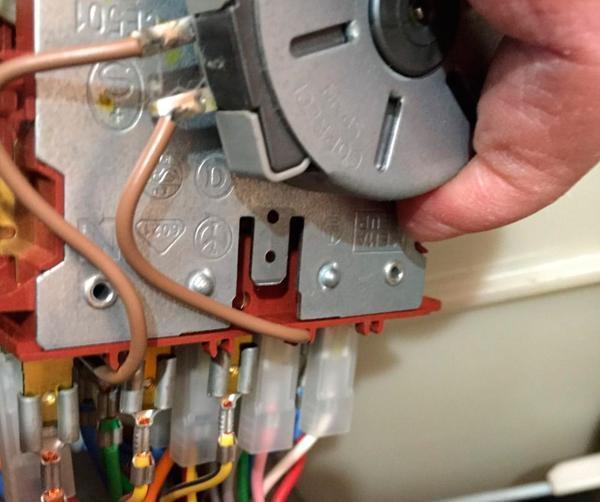
Causes of breakdown and do-it-yourself repair of the washing machine programmer
The programmer is one of the main components in the washer, which is responsible for choosing the desired washing mode. This part is also called a command device or a timer, it is used in most automatic washing machines and looks like a round knob pushed forward on the control panel that switches programs.
The breakdown of the command device can happen due to the following reasons:
- 1 of the elements of the control unit failed, including the programmer.
- During the period of work, the program goes astray, the time is not what was chosen.
- In some models of washing machines, an external indicator of a breakdown may be the flashing of all indicators on the control panel.
The command apparatus, despite its reliability, can also fail after 10 years of operation. The main reason, which is called by professionals, is improper maintenance and poor handling of household appliances. So, for example, if during the washing period, the baby turns the handle, then because of this, the command device may break. Also, the part may break due to power surges in the mains.
Well, marriage is not excluded when creating an element. Repair should begin with the correct disassembly of the part. The problem is that each model has its own nuances. Consider the features of disassembling the command apparatus using the example of the Ariston washing machine. It is necessary to remove and disassemble the programmer. When the cover is removed, you can see the board under it, you need to remove it. Then you need to check the gears and, if there is debris, remove it. If there are burnt elements or tracks on the board, they will need to be soldered again.If there are no burnt places, then you need to take a multimeter and measure the resistance at the contacts of the board, something, yes, there is. Next, you need to remove the gears and get the motor core. Then you should see if all the elements are intact, wipe the device with alcohol and assemble in the reverse order.
Professionals do not advise repairing Miele or Siemens machine programmers on their own. And in the Gorenie washing machines, command devices with a soldered control board are installed. In this case, the master should repair.
Preparatory work
Before you start disassembling the Indesit washing machine with your own hands, it is worth preparing the necessary tools. In the design of the equipment, various types of fasteners are used, requiring different types of accessories for their dismantling:
As a result of frequent work and increased loads of a vibrating nature in technology the following components wear out:
- Bearings and seal. As a result of frequent vibration during high-speed rotation of the drum, the bearing on the drum shaft breaks, which causes a leak from under the stuffing box.
- TEN - in the event of radial beats, the metal drum begins to rub against the heating element, which in the process of further work can result in a short circuit.
- Control fee. Due to the leakage of the stuffing box, the controller may fail, which usually occurs due to a short circuit in the tachogenerator on the engine. The fact is that constructively, the developers placed the engine under the very drum, and if a leak appears, then it will definitely fall on the motor, flooding the anchor with a tachogenerator.
- shock absorbers. If the machine has worked for several years, then the vibration of the drum increases, which is associated with poor depreciation.The design of the Indesid washing machine uses 2 shock absorbers and springs on which the drum is suspended. Due to frequent vibrating loads, they work out, which leads to a deterioration in the quality of work, which is expressed by bouncing.
- Branch pipes. The drain system of the washing machine has a drain pipe with a shut-off valve. It usually collects debris that can cause a malfunction or a leak.
- Front rubber seal. The door of the Indesit washing machine, when closed, rests against a special sealing cuff that closes the opening between the body and the rotating tank. Due to frequent vibration and bouncing of the tank, it is gradually deformed, which can lead to tearing. And also the cause of its damage can be any sharp object that got into the washing machine along with clothes.
In addition to the above, there are many other problems in Indesit machines, which may occur in washing machines for one reason or another. In any case, to eliminate them, you will need to disassemble the equipment, and this can be done according to the instructions below using the example of the Indesit wisl 86 or wisl 104 model.


Almost all manufactured types of washing machines of this brand have a similar device, since their design was copied from the equally famous world brand Siemens with some modifications. However, it is in these modifications that most often a breakdown occurs.
Basic information about disassembling equipment
The first step is to make a reservation that it will not take so much time to disassemble the Indesid washing machine on your own. As practice shows, it will take no more than 4 hours to completely dismantle all units.Unless, of course, you do not resort to disassembling a plastic tank to replace bearings, an oil seal or a drum.
But if you still have to remove the tank to replace the bearings, then the time may increase by a few more hours, because in budget models, which are increasingly offered on the market, it consists of two welded halves.
From the point of view of service centers, the tank is non-separable, therefore it must be completely replaced. But the craftsmen found a way sawing it along the glued seam ordinary hacksaw for metal. We will talk about how to disassemble the drum of the Indesit washing machine below in the article, but for now we will dismantle the components in sequential order.
Features of dismantling units with vertical loading
How to disassemble an Indesit top-loading washing machine? The procedure will not differ much from that described above, because the device contains the same elements as a front-loading washing machine (pressure switch, water intake valve, drum, tank, control board, pump, etc.). The main differences are that the axis of the “vertical” drum is structurally made on two bearings, and sometimes there is a self-positioning sensor on the tank (fixing the drum with the flaps up).
 In the photo you can see the device of a top-loading washing machine
We begin to disassemble the unit from the control panel, unscrewing the screws holding it on the sides or simply prying the part with a screwdriver and sliding it towards you, not forgetting to disconnect the contacts. Under the panel is the control board, which we also dismantle.
Then we remove the top cover (its fasteners are usually placed under the control board) and side panels, carefully disconnect the clamp from the drum.
Further actions will consist in the sequential removal of all parts. Bearings in a top-loading washing machine are located on both sides of the drum, so it will take a little longer to remove them.
We will be glad if our article helps you repair the washing machine yourself. Follow the instruction manual, do not rush, be careful, and you will succeed!
Stepping through
Before you get started, read the diagram and procedure for disassembling the LG washing machine.
The only difference between LG machines is the presence of a direct drive, which must be taken into account when dismantling.
Do-it-yourself disassembly of the LG washing machine begins with the removal of the panels.
Using a Phillips screwdriver, go to the back panel and unscrew the two screws on top that hold the top panel. Keep the bolts in one place so they don't get lost. Now, slide the cover forward a little, remove it from the body and set it aside.
In modern models of ElGee washing machines, there is a service hatch at the back. It is closed with a metal cover, which is held on by bolts. Unscrew the bolts around the perimeter of the hatch, remove and set aside. Now you have access to the internal details of the CM.
Control Panel
To remove the panel, you need to pull out the detergent dispenser tray. Pull it towards you while pressing the latch in the center. Just behind the tray you will see three screws. Unscrew them, as well as one screw on the opposite side with a Phillips screwdriver.
How to remove the front cover of LG washing machine:
Counterweights make the tank heavier, preventing it from hitting the walls during vibration. After removing the panel, you will see two counterweights around the SMA hatch.


To remove them, unscrew the bolts using a torx head. You are already on your way to completely dismantling the LG machine. Also remove the top counterweight.
Now you need to disconnect all the parts that are located on top of the tank.
To remove the hopper of the dispenser tray, unscrew the screws from the top, disconnect the pipe coming from the bottom. Disconnect the inlet valve contacts. To pull out the valve, unscrew the two screws on the back. Pull out the hopper with the valve.

First you need to disconnect the drain pipe. Using pliers, loosen the metal clamp of the pipe and disconnect it. Sometimes these clamps are fixed with a bolt that needs to be unscrewed.
Unplug the wire connectors leading to the heating element. It is not necessary to get the heating element itself. Before disassembling the LG washing machine, remove the motor:
- Remove the motor cover by unscrewing the central screw.
- You will see six more mounts located on the engine.
- Loosen all screws.
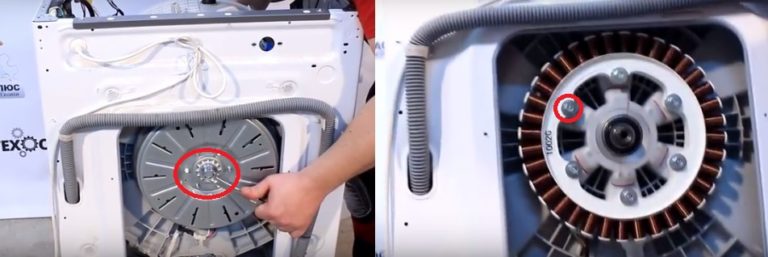
After you have removed the motor, the tank at the back no longer holds anything, except for the racks.
Racks CM are attached with plastic rods. Take a 14mm head, bring it to the back of the rack and slide it onto the bolt. In this way, you will neutralize the latches, which otherwise would not allow you to get the stem.
Grab the edge of the rod with pliers, pull it towards you and pull it out.

Now let's look at how to remove the drum and tank in the LG washing machine.
The tank remained hanging on the hooks. All that is needed is to remove it from the hooks by lifting it up a little. Lay it on a flat surface.
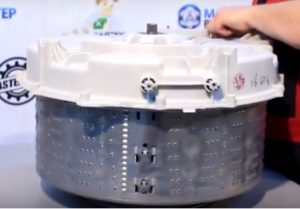
Before complete disassembly, it remains only to get the drum.

- Unscrew the bolts holding the two parts of the tank around the perimeter.
- Set the top half aside.
- Flip the bottom. Lightly tap the bushing with a hammer to pop the drum out of the tank.
Self-disassembly of the machine and preparation for repair are over.
For those who are going to do the work themselves, we offer additional help - a video on how to disassemble an LG washing machine:
Bringing in a new machine
It is much more difficult for one to transfer a washing machine, only bought in a store. It is impossible to disassemble the machine, otherwise the warranty will no longer apply to it. It will be easier for users living in houses equipped with an elevator. But what should a person whose apartment is located on the 5th floor of a high-rise building without a lift do?
To preserve your own health, it is better to hire movers, but if self-lifting is a matter of principle, get a kravchushka cart, which will still be useful on the farm in the future. With it, it will be easier to raise the machine to the floor.
Make sure the design is solid. Install the washing machine on the trolley, fasten the machine firmly with a belt, tilt the kravchuchka towards you and carefully drag it up the stairs to the desired floor. Even when choosing this method of lifting the equipment, you will have to make some efforts, but the load on the body will be an order of magnitude less than when carrying the device with your bare hands.


Process Features
Depending on the type of load, the methods for disassembling washing machines will differ. If the procedure is performed for the first time, you must strictly follow the instructions so as not to damage the device.
Front loading machine
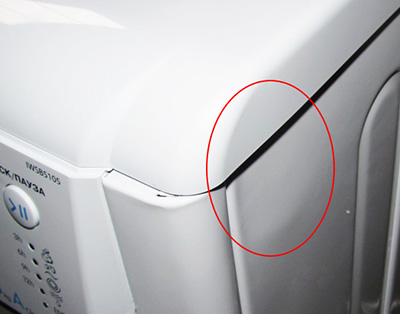
You need to start disassembly by removing the top cover.To do this, unscrew the 2 screws that are located on the back of the device. The lid is pushed back 15 cm and lifted.
Further algorithm of actions:
Dismantling of the hopper and control panel. First you need to remove the detergent dispenser hopper. To do this, press the latch located at the base of the hopper and pull the container towards you again. It comes out easily and doesn't require much effort. Fasteners holding the control panel can be found behind the hopper. They are unscrewed: there are 2 screws in front and 1 screw is on the right. Separate the panel with a screwdriver, prying it on the left side.
Removing the front panel. It must be pulled on the bottom edge to release it from the top latches. Then the panel is gently pushed back, but without sudden movements. Behind you can find a lot of wires, you need to pull them out one at a time, snapping off the latches.
Removing the bottom panel. It is fixed with 3 latches. It is convenient to pry it with a slotted screwdriver, inserting the tool into the existing slot. First, it is pushed away in the center, and then along the edges, after which the panel easily moves away.
Removing the front panel on which the door is located. It is fixed with 2 screws on the bottom and 2 screws on the top. They are twisted. As a result, the panel will be held on small hooks.
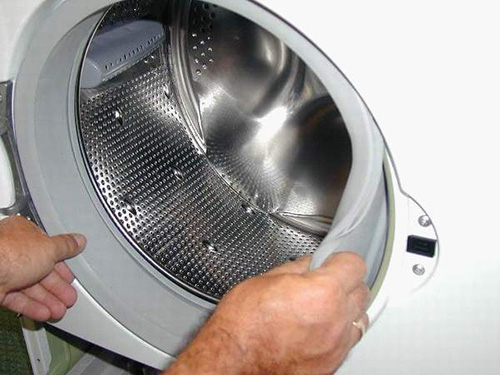
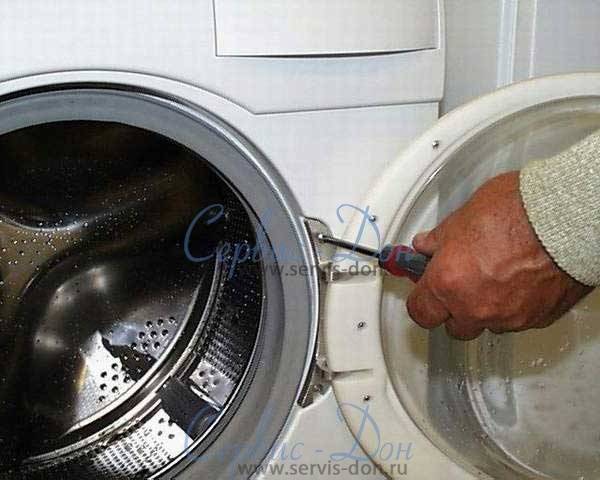
Removing the seal. If you open the door, you will find that it is connected to the rubber piece. The fixing ring of the cuff is hooked with a flat screwdriver and slightly pulled towards you. Behind it there will be a tightening metal clamp in the form of a spring. You need to find its latch and open it with a flat screwdriver.
Then they pass it around the entire circumference of the ring to disconnect it
The tool must be handled with care. Otherwise, the torn cuff will have to be changed.
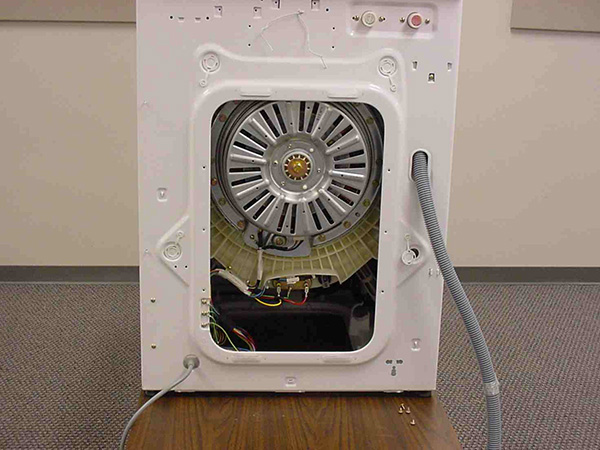
Removing the rear panel
This process will not be difficult. It is enough to remove the 4 screws with which it is screwed.
Disconnecting hoses. They lead to the tank of the machine (filling and draining), to the pressure switch and to the powder tray.
Disconnecting the wires leading to the heating element and the temperature sensor. The heater itself is located in the front lower part of the tank, under the drum. To remove it, you need to unscrew the nuts. After that, the heating element will easily come out of the socket. When removing the wires, it is necessary to mark their location with colored markers.
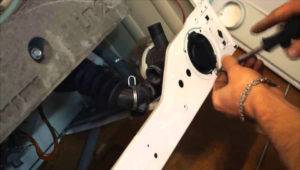
Dismantling counterweights. There are 2 of them in the washing machine: above the tank and below it. They are fastened with bolts. Since the loads are heavy, they must be removed carefully.
Assistance is required to remove the tank. It's hard to do it with just one pair of hands. First you need to disconnect the shock absorbers, and then carefully remove the tank from the springs and pull it out. After that, remove the belt and motor. At the end, the pulley is dismantled by unscrewing the middle bolt. If it is rusty, it is lubricated with WD-40.
There are bearings inside the drum. To remove them, the tank must be disassembled. If it is soldered, it is sawn with a hacksaw. This process is very laborious and not all craftsmen undertake such work. In this case, it is easier to purchase a new drum. Provided that the tank is collapsible, replacing the bearings will not be difficult.
By following the indicated sequence of actions, you can completely disassemble the washing machine.
With vertical
Disassembling a top-loading machine is more difficult. Such devices are rare in Russia.
The procedure is as follows:
- unscrew the screws located on the sides;
- move the block to your side;
- disconnect all wires;
- remove the washing machine panel.
Further analysis of the device is carried out according to the same type as the front-loading washing machine: remove the tray, panels, clamp. The process ends with the removal of the drum, the replacement or repair of failed parts.
How to assemble a Samsung washing machine
Dismantled dismantled, but put it back does not come out? To prevent this from happening, you should use either a notebook or a smartphone. In the case of a notebook, you will need to write down each of your disassembly steps, so that later, by reading it from the bottom up, you can assemble it.
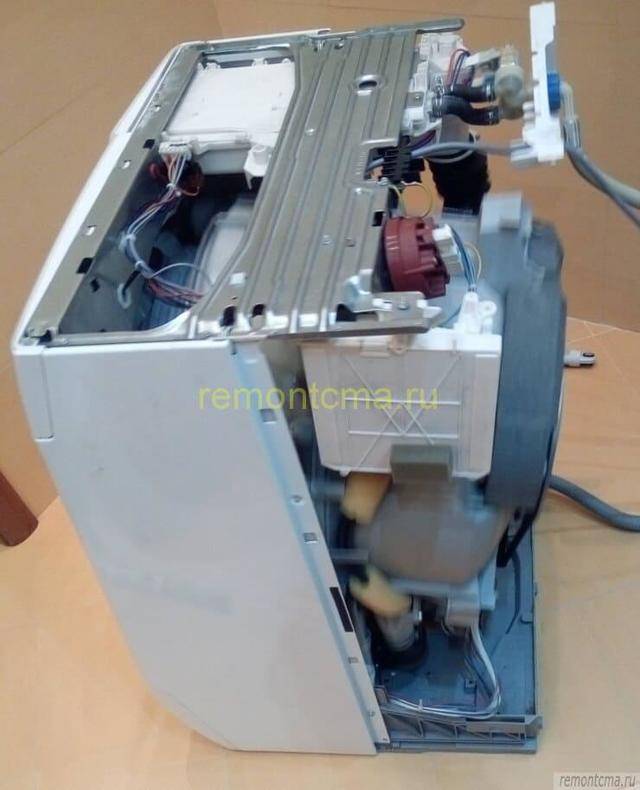
 After completing these preparatory work, you can begin to remove the tank.
The time for all the work will increase several times. This is all much easier to do with a smartphone. Take a photo of each step and at the end scroll from the last to the first photo and collect.
 Each technique has its own lifespan.
How to prepare for disassembly
Power off the device
Never disassemble the washer with the power on. This will harm the machine and, first of all, its owner.
Turn off the water supply
Turn off the water supply to the machine, as well as the drain hose from the water valve to the sewer. And drain the rest of the water.
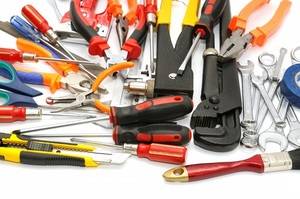
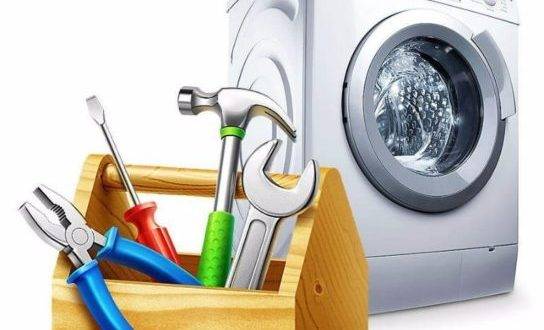
Prepare these tools
- service hook;
- wrenches with a diameter of 8, 9, 19;
- screwdriver with a flat end;
- Phillips screwdriver;
- wire cutters or pliers needed for clamping clamps;
- construction clippers;
- pliers with insulated handles;
- curved pliers (somewhat similar to tongs).
Record disassembly sequence
We recommend recording or filming the disassembly process, this will save a lot of time in the future when you start to assemble the washer back.
Tank disassembly rules
You need not only to know how to disassemble the drum on a washing machine, but also to properly prepare for this.
In the process of work, do not forget that:
- The tank with the drum comes out of the washing machine very carefully. Most modern tanks are made of plastic, and this material is subject to the slightest mechanical stress. Probably, when removing the tank, you may need the help of a friend.
- If your tank is non-separable, it will have to be sawn. Before this process, it is recommended to drill many, many holes along the seam with a thin drill to reassemble the part. This way you will avoid misalignment of the halves and ensure a good seal. Stock up on sealant.
- When cutting the tank, it is forbidden to make a bevel, even a couple of millimeters, to the side.
- The screw that holds the drum pulley cannot be unscrewed without effort. But, excessive diligence is likely to be able to break the head, providing this with unnecessary problems.
- The rear part of the part can be removed from the shaft by light blows on it.
- If the bearing is stuck, an automotive puller can come to the rescue. It is allowed to heat it with a blowtorch before removing it.
Disassembly of the washing machine and its subsequent repair
To identify what exactly is broken, you will be helped by the error codes that many washing devices display on the display.
If there are no such clues in your machine, then the “symptoms” of washing failures, as well as an inspection of the “insides” of the washer and knowledge of certain subtleties, will indicate the real cause of the breakdown.
Suppose, in order to understand that bearings have become predisposing to failure, you should open the hatch door and lift the drum with your hand. If there is play, then the problem is really in the bearings.
Here are some common breakdowns and how to fix them.
Replacing the heating element
Let's take a look at how the water heater element is replaced.
- If the water stops heating, then the heating element should be replaced. Buy a part that fits your typewriter, then find a diagram of a specific type of machine. As a rule, simple dismantling of the back panel of the washer helps.
- Under the tank you will see the end part of the heating element and the terminal. Their location is best captured by taking a picture on the phone.
- Wires and terminals should be disconnected, loosen the central screw. Next, using a screwdriver, pick up the heater by the edge and try to loosen it from side to side, pulling it towards you a little.
- Do the cleaning inside the repair site.
- Install a new element, tighten the screw and connect everything according to the photographed diagram.
Pump and drain system
 Quite often, the problem appears precisely in the drain system (water either stops draining altogether, or flows out, but very slowly). First, you should check the filter, which is located behind the plinth service panel and the hoses that go from it to the pump and back. It is in this interval that a blockage appears, which is not difficult to eliminate.


"To check the operation of the pump, you can remove it from the device"
Sometimes it also happens that foreign objects could damage the impeller of the washing machine. In such cases, the pump will have to be replaced with a new one.
Assembly
If during disassembly you photographed everything you need, then after that it will be enough to carry out all the work, but only in the reverse order.
But before you put the hatch cuff in place, clean it from dirt.
It can be quite difficult to install the fixing spring in place. For convenience, fasten it with a wire at the top, and then pull it counterclockwise.
And in conclusion…
It is quite possible to make repairs, clean or change a part in the tank of an automatic washing machine, as the experience of many home craftsmen shows.
TOP stores of washing machines and household appliances:
- /- household appliances store, a large catalog of washing machines
- - Inexpensive hardware store.
- — profitable modern online store of home appliances
- — a modern online store of home appliances and electronics, cheaper than offline stores!
Conclusions and useful video on the topic
A detailed description of the self-analysis of the Samsung washing machine with a front-loading type of laundry. Interesting design features of the model and curious nuances that arise during the disassembly process.
How to disassemble the LG washing machine at home. Detailed execution of all processes step by step.
Features of self-disassembly of the Atlant brand washing machine at home. Step by step video instruction in the following video:
Parsing a washing machine is a meticulous process that requires attention. If the breakdown concerns only a separate part of the system, it is not necessary to completely disassemble the unit. When malfunctions are observed in the main nodes, efforts will have to be made to fix the problem. A step-by-step instruction that describes the process in an accessible way will help in this.Having such a cheat sheet at hand, even a person with minimal experience will cope with the repair of the washer.


