- Locking options
- Lever with ball mechanism
- Disc models of cranes
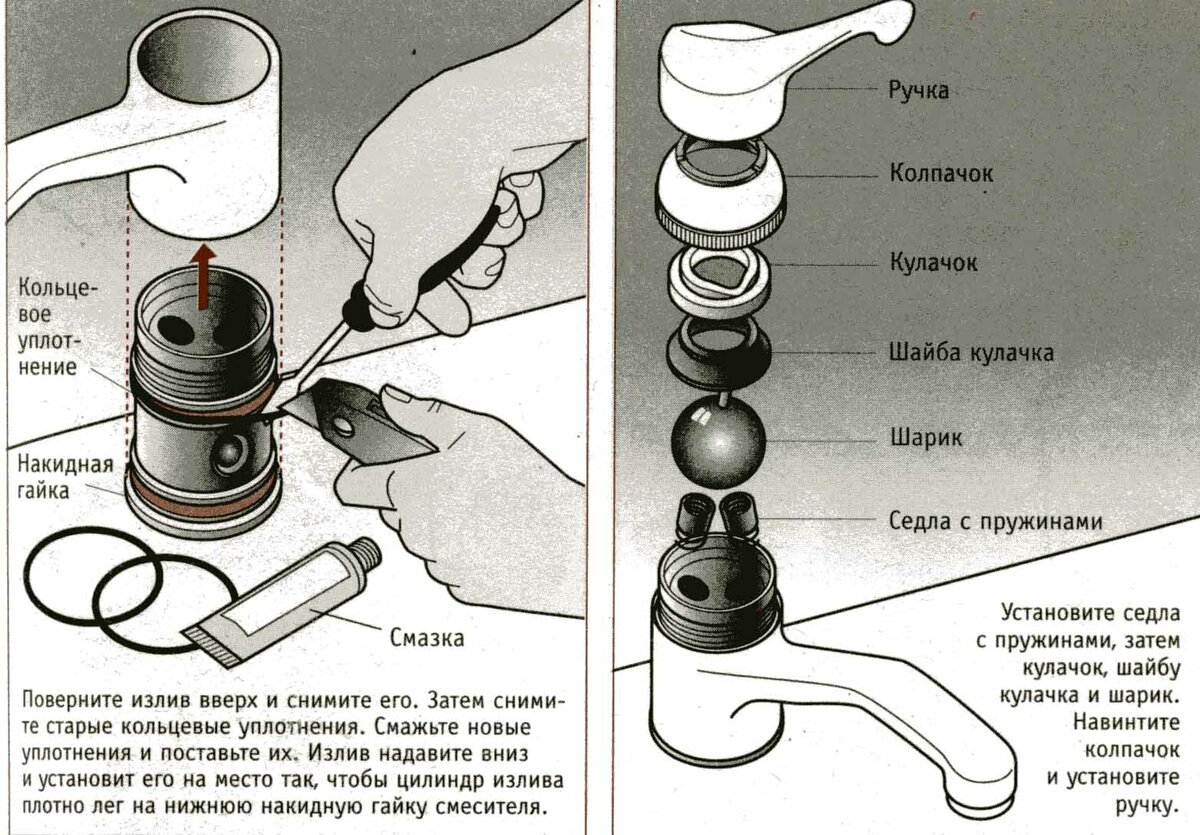
- How to remove the old
- Step-by-step instructions for disassembling the crane
- wrench prices
- Typical malfunctions and methods for their elimination
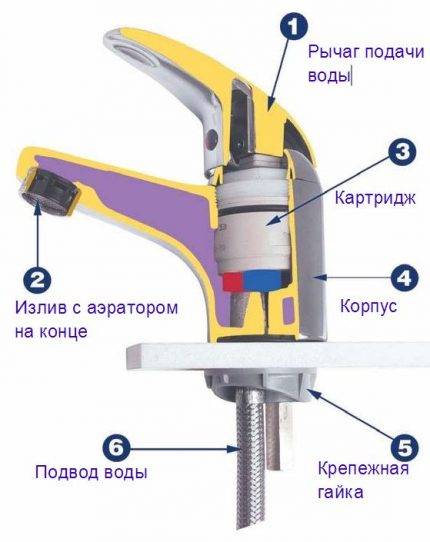
- Faucet mixer repair
- Single Lever Faucet Repair
- Faucet assembly
- How to repair a single-lever ball mixer
- Blockage removal
- Replacing rubber seals
- Switch Troubleshooting
- Switch Spring Replacement
- Faucet assembly
- Causes of mixer failures
- Repair of a ceramic faucet box
- Step-by-step instructions for disassembling the crane
- wrench prices
- Care instructions
Locking options
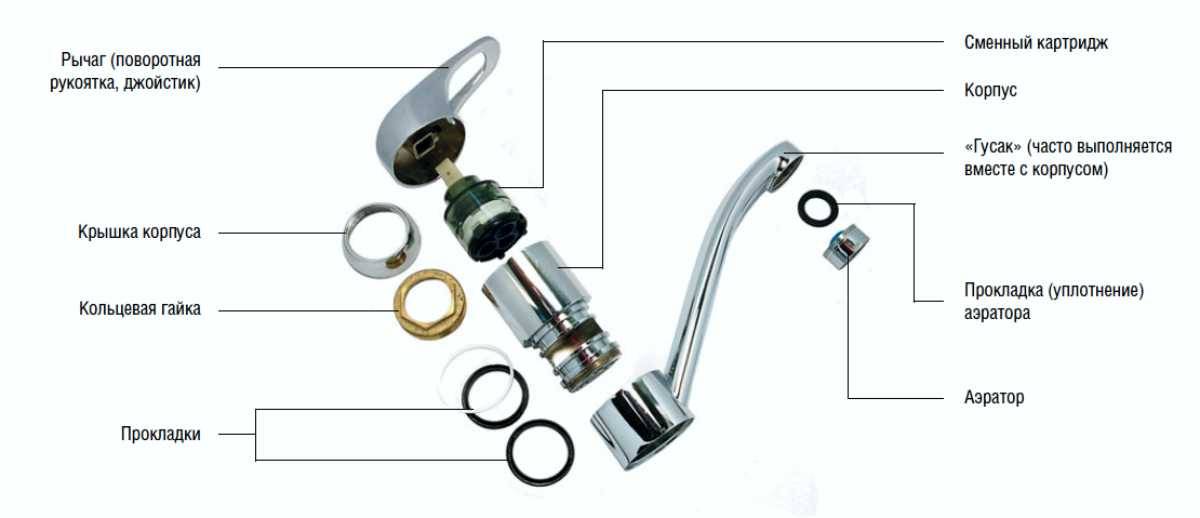
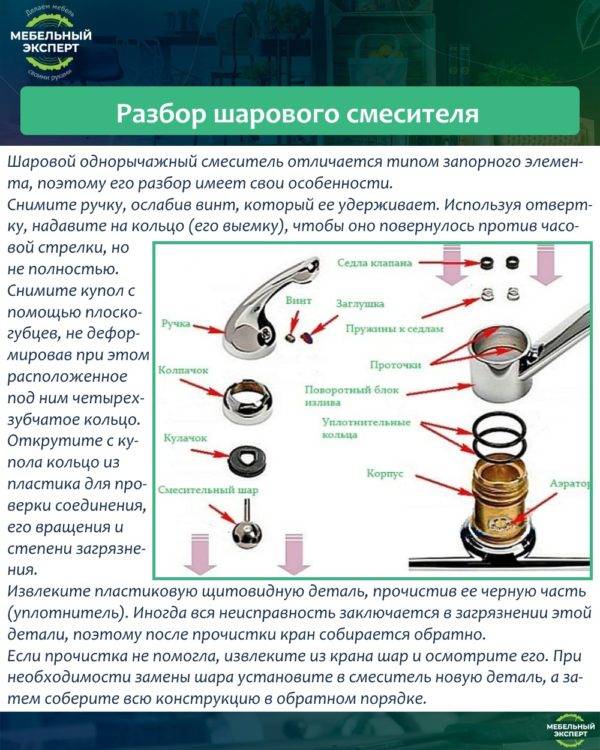
In models with one lever, two types of nodes that regulate the flow of water can be used. Consider their device in more detail.
Lever with ball mechanism
Such an assembly is a ball made of stainless steel, in which special holes and fasteners are provided, with the help of which the sleeve with the ball located inside is attached to the structure.
When the lever is turned, the holes on the ball are displaced, blocking or freeing the path for the movement of cold and hot water, due to which the temperature and flow pressure are regulated.
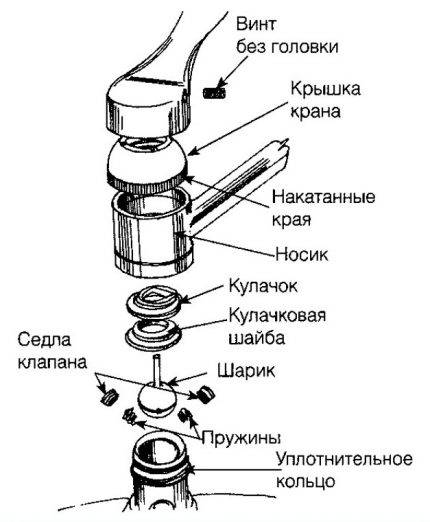 Schematic representation of a single-lever valve with a ball functional unit, with detailed coverage of all fastening, safety and other service elements
Lever valves with a ball mechanism perfectly tolerate hydraulic shocks.
However, such models have a number of disadvantages, which include:
- relative high cost;
- rapid accumulation of scale on the ball element;
- intensive wear of rubber gaskets.
- the complexity of the repair, because of which it is often necessary to dismantle the old one and select a new mixer.
Due to the listed disadvantages, mixers of a similar design are less and less used in everyday life and in production. In contrast, ball valves installed in front of plumbing on water supply pipes to control the water supply have almost completely replaced valve models.
Disc models of cranes
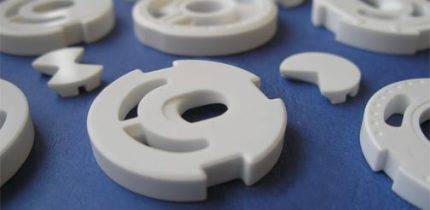
Such accessories are favored by consumers and professionals. The operating mechanism of such mixers is ceramic disk cartridges, similar to the ceramic disk mechanisms used in two-valve devices.
 The disk mixer, a schematic representation of which is shown in the figure, is considered a more practical functional model, since it allows the replacement of the cartridge
Outwardly, this element looks like a plastic cylinder, usually blue. However, two plates are hidden under the case, made of snow-white, carefully polished ceramics. One of these disks can move depending on the change in the position of the lever.
In order for water to enter the spout, it is necessary that the holes on the upper and lower parts coincide. If this does not happen, the flow is blocked and does not enter the tap.
Disk models have several advantages:
- moderate cost;
- the possibility of replacing cartridge elements, which facilitates repairs;
- resistance to the formation of scale, which almost does not accumulate on ceramic surfaces.
The weak point of such structures is their sensitivity to foreign inclusions in the water flow, as well as to sudden pressure surges in the water network.
 The discs of the cartridges are made of well-polished ceramic, which guarantees a good fit. The service life of mixers largely depends on the quality of these parts.
How to remove the old
Before starting work, turn off the water supply to the tap, drain the remnants that are in the pipes. Now you can start replacing the faucet in the kitchen. To remove the old faucet from the sink, unscrew the nut that is screwed onto its body from the bottom of the sink. If the sink is installed in a kitchen cabinet, it is very inconvenient to work. It's better to remove the washer. For this you will have to:
- Open the siphon. There are many designs of siphons, but each has a nut that must be unscrewed. It is hard to confuse it - it has protrusions for a better grip. Unscrew the nut, remove the lower part of the siphon.
- Unscrew the hot and cold water hoses that go to the mixer. The cap nuts are usually removed. To do this, you need a key for 22 or 24.
- Cut the sealant around the perimeter of the sink, if any.
-
Loosen the screws securing the sink to the countertop. You will see the bolts if you "dive" into the table.
Now you can lift and turn the sink. Here you will see a nut that needs to be unscrewed. You will need two wrenches for this job. One is holding the body from the “front” side of the sink, the second is unscrewing the nut.
Sometimes it is very difficult to remove the old faucet in the kitchen: it “sticks”.For this case, kerosene or universal grease in cans of WD-40 is suitable. Both substances have a low density and are able to seep into microscopic cracks. The composition or kerosene is applied to the connection that needs to be disassembled, they wait 10-15 minutes, they try to unscrew it.
If all the tricks did not help, there is a simple method that is suitable if the old mixer is not going to be used anywhere else: you can cut the body along with the nut with a grinder. The method is tough, but after suffering for an hour in an attempt to remove the nut, they resort to it.
If the faucet is installed on the countertop, you will have to work “from the inside” - crawl into the closet with a flashlight, and unscrew the nut in this way.
Step-by-step instructions for disassembling the crane
As always, before starting work, you need to check the availability of tools and fixtures, otherwise you will have to interrupt the disassembly due to the lack of something. Prepare:
- a set of open-end wrenches or an adjustable wrench;
- a screwdriver for an asterisk and an ordinary one;
- hex key;
- mounting knife.
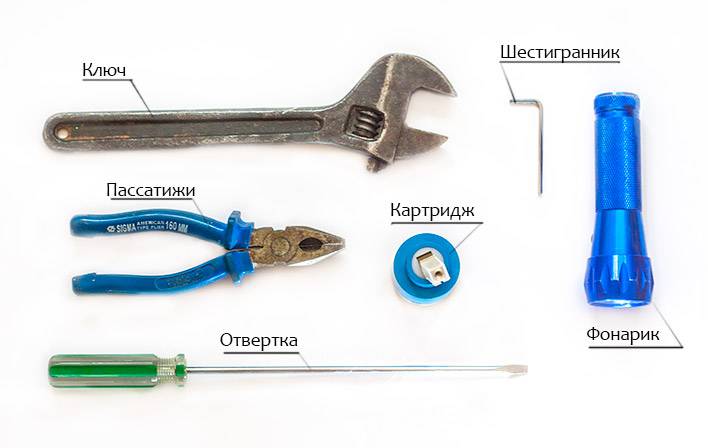
Need to stock up on tools
wrench prices
Adjustable wrench
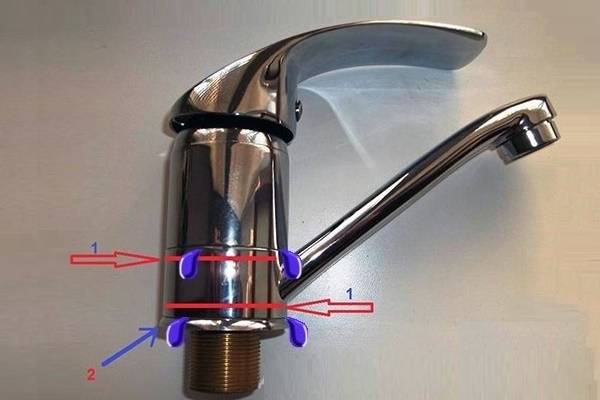
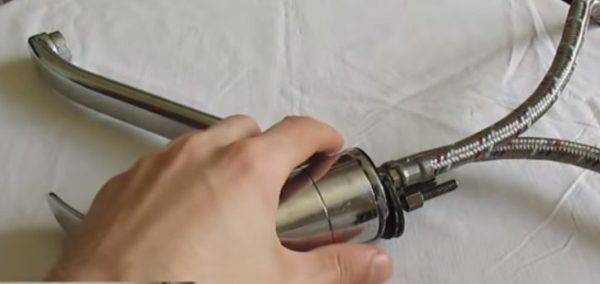
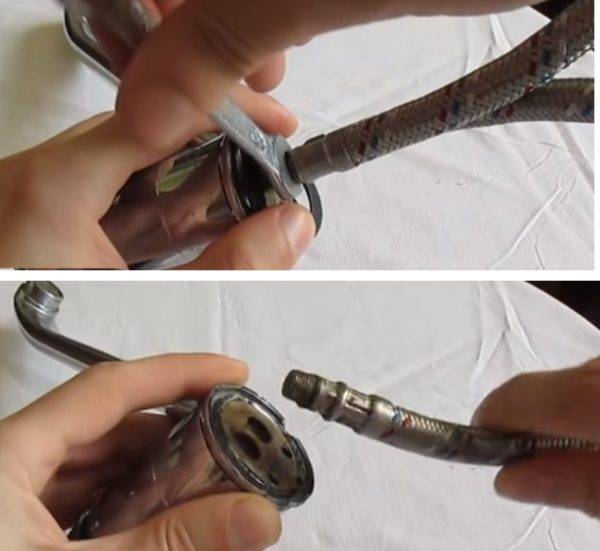
Step 1. To facilitate the work, remove the faucet from the sink. It can be fixed with two studs and a special metal washer or large nut. Mounting method depends on device type and manufacturer.
First you need to remove the mixer
Step 2 Unscrew the studs, for this they have a slot for an ordinary screwdriver.
Unscrew both pins
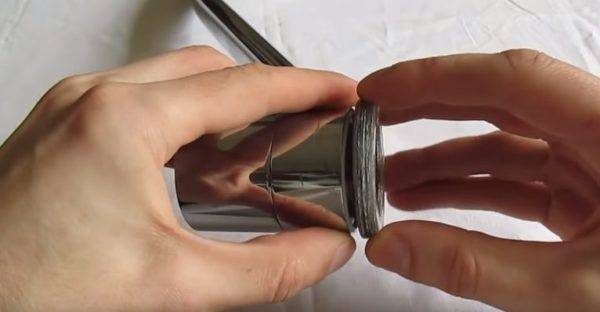
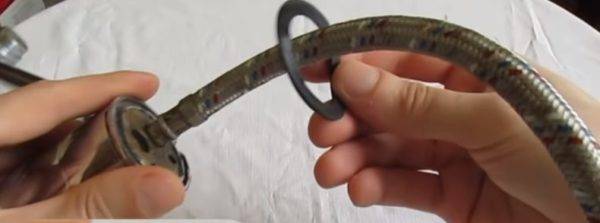
Step 3. Remove the round rubber seal. It prevents water from entering from the top surface of the sink down. Such leaks occur only as a result of gross errors during the installation of the mixer; during operation, the gasket does not wear out and does not lose its original properties.


Remove the rubber pad
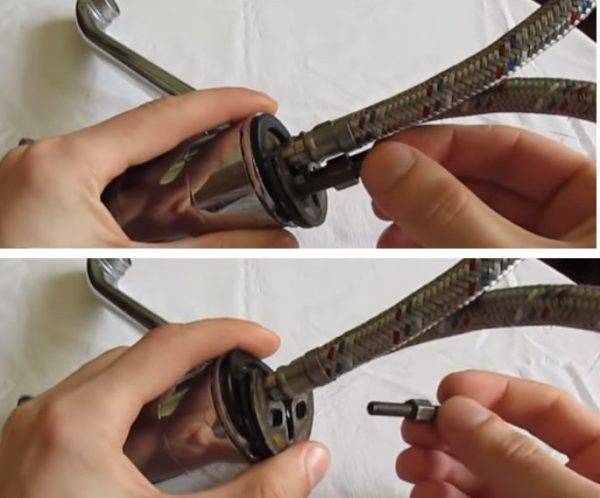
Step 4. Gently twist two flexible hoses, one for hot and one for cold water. There is not enough space under the sink, in connection with this, the hoses have a reduced diameter compared to ordinary ones. In addition, they have a small nut, if for standard ones you need an 11 mm open-end wrench, then here the nut size is only 8 mm. Keep this in mind when preparing the single lever mixer disassembly tool.
Unscrew water supply hoses
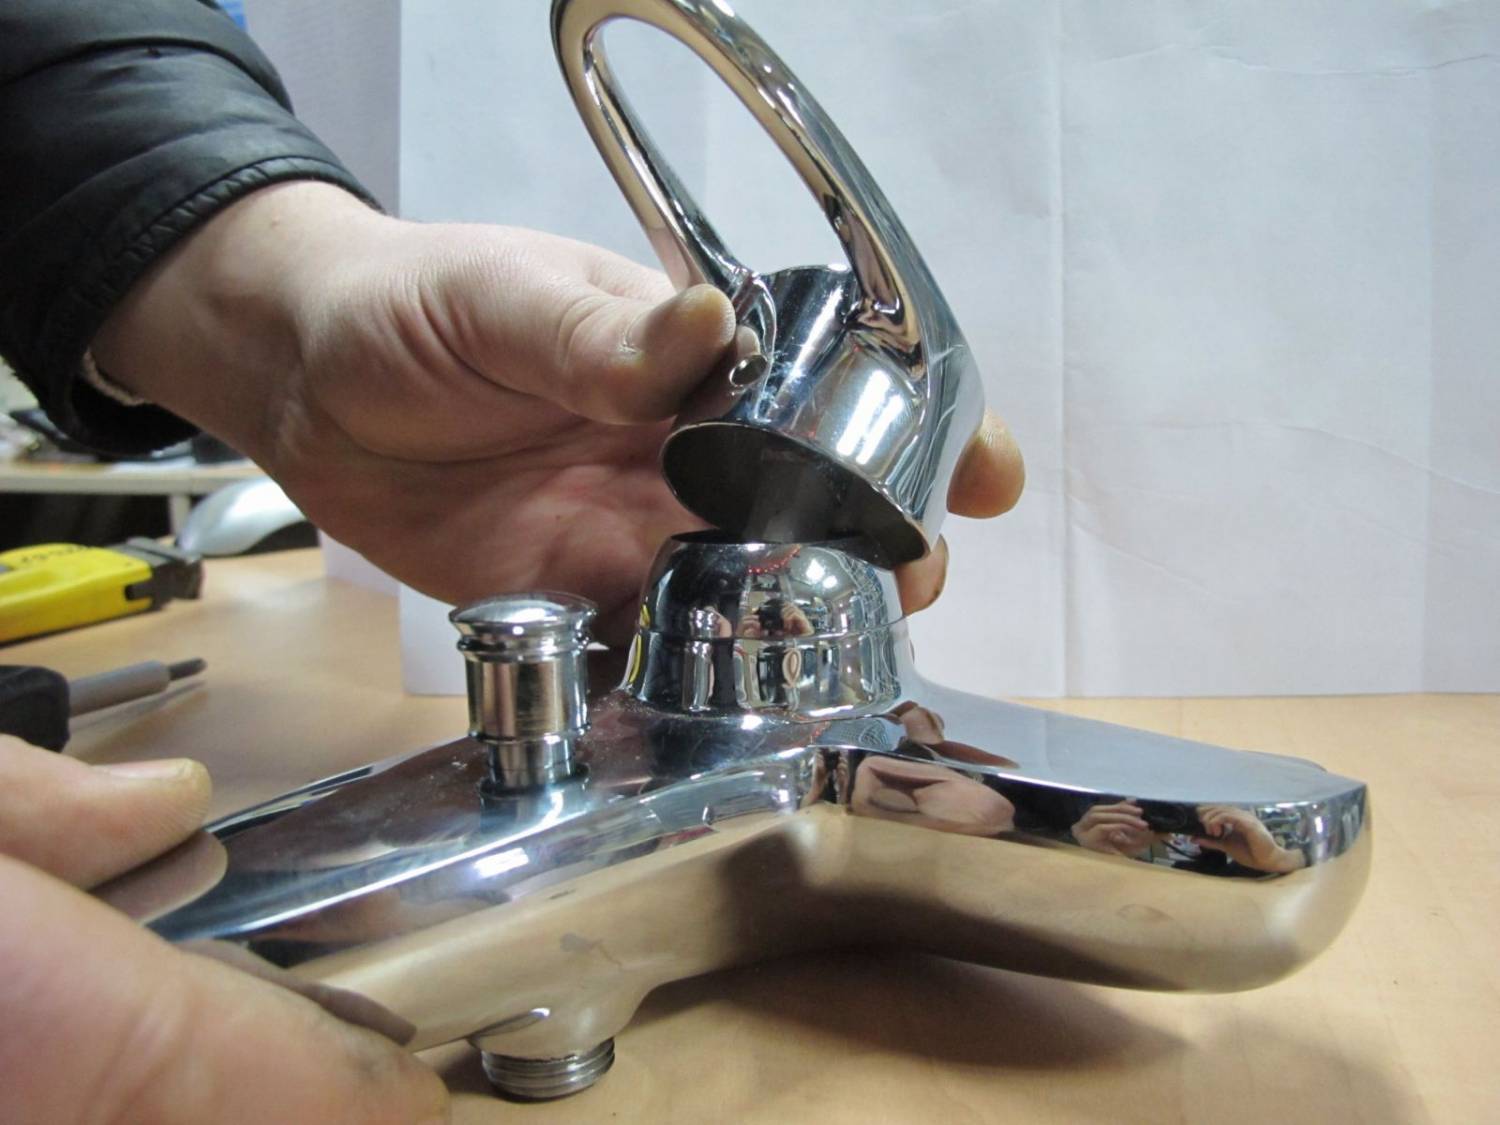
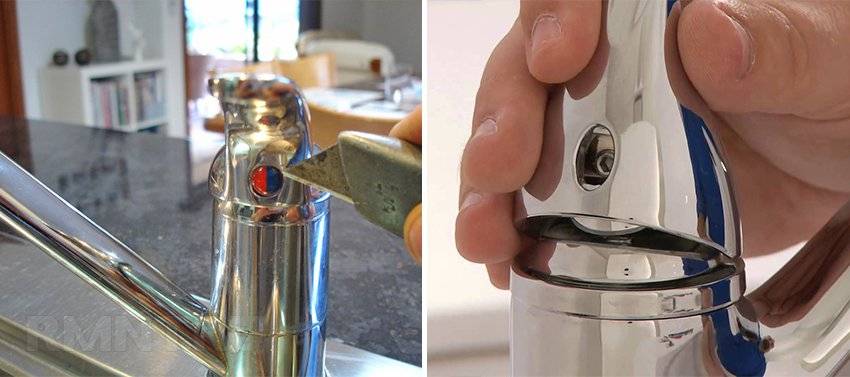
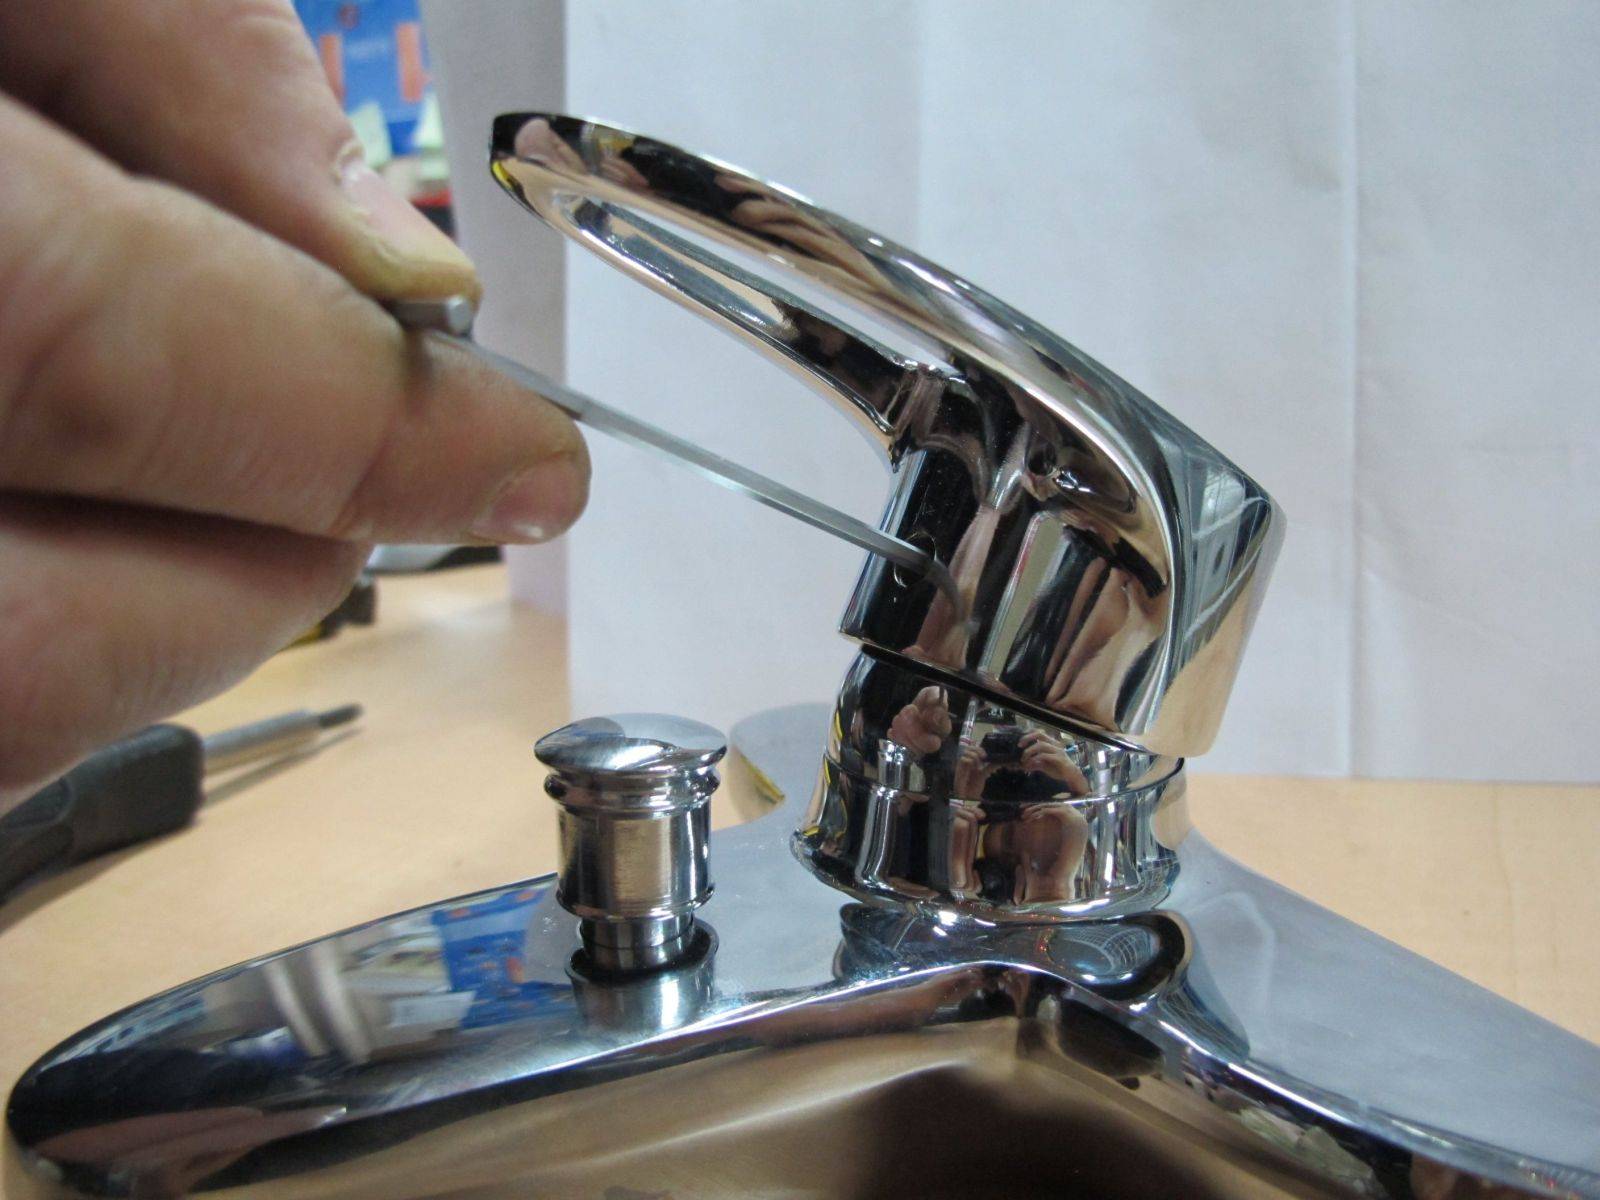
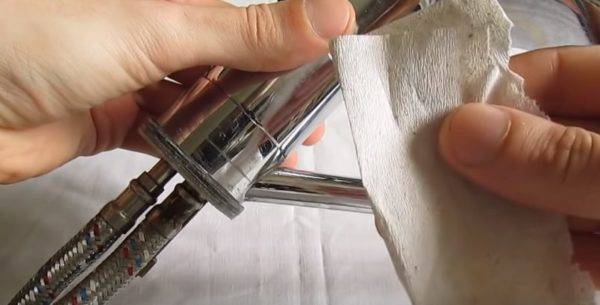
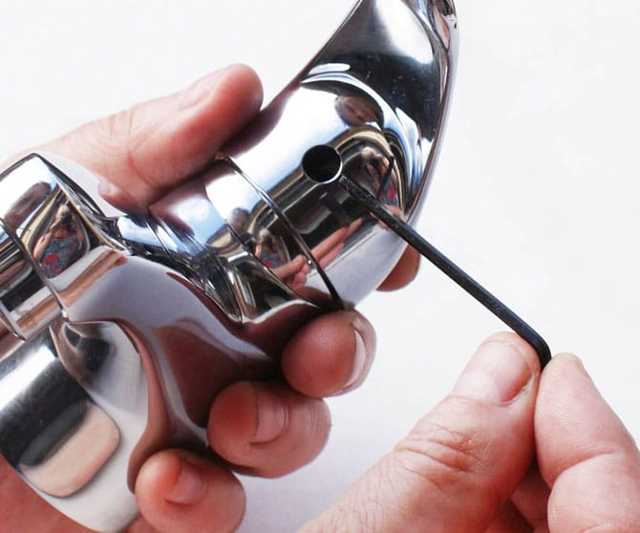
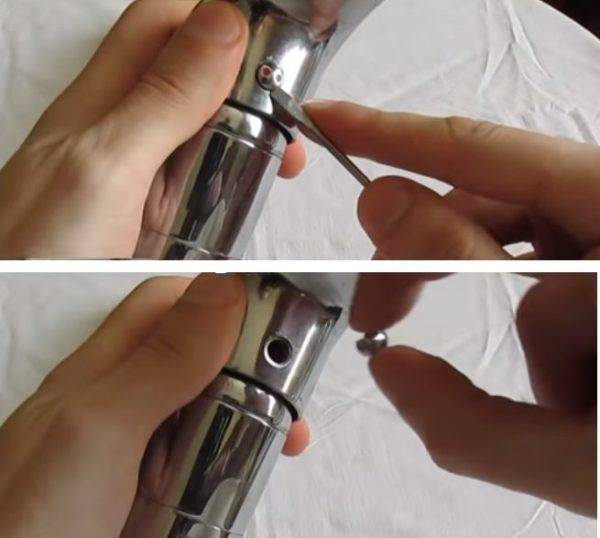
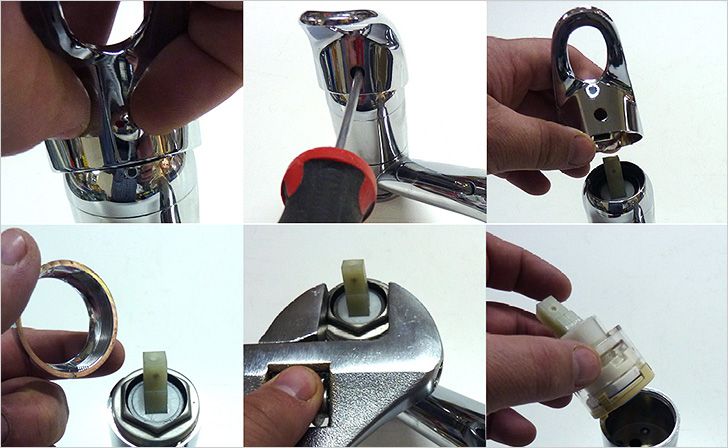
Step 5. Using a small screwdriver or other sharp object, pry off the cap of the pivot arm fixing screw. There are red and blue marks on it, remember their position. During assembly and connection of the faucet, do not confuse the cold and hot water hoses, otherwise the faucet will work the other way around. This is not critical, but it causes certain inconveniences in the initial periods of use, you will have to get used to the opposite algorithm for regulating water parameters.
The screw cap must be pry off with a screwdriver.
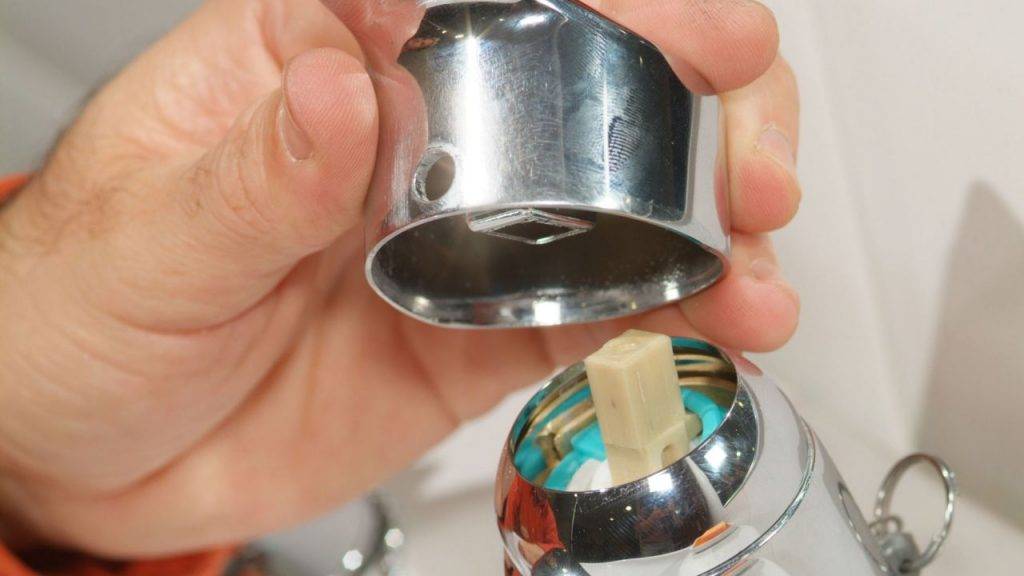
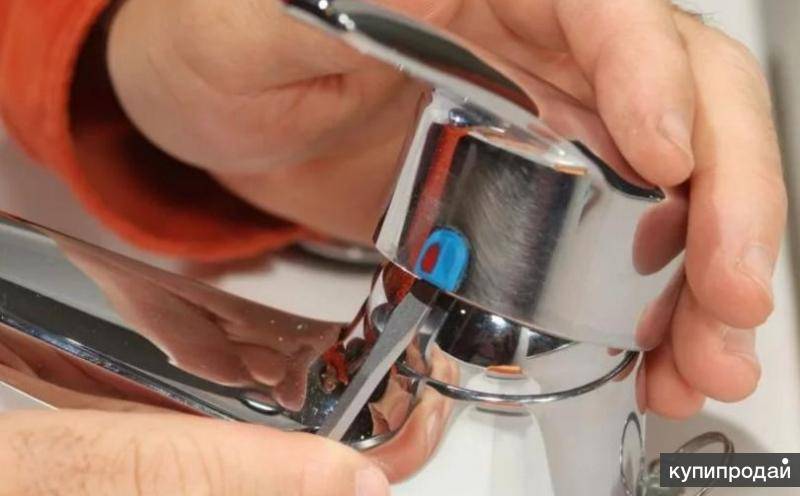
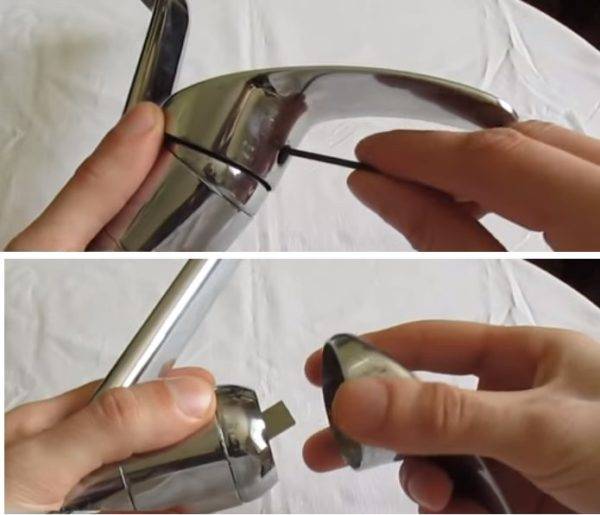
Step 6. Unscrew the lever fixing screw with a hex wrench.
Release the hardware half a turn and constantly try to remove the lever. It is fixed to the rod in a small recess; for complete disengagement, more than 1.5–2.0 turns of the screw are not required.
Unscrew the screw and carefully remove the lever
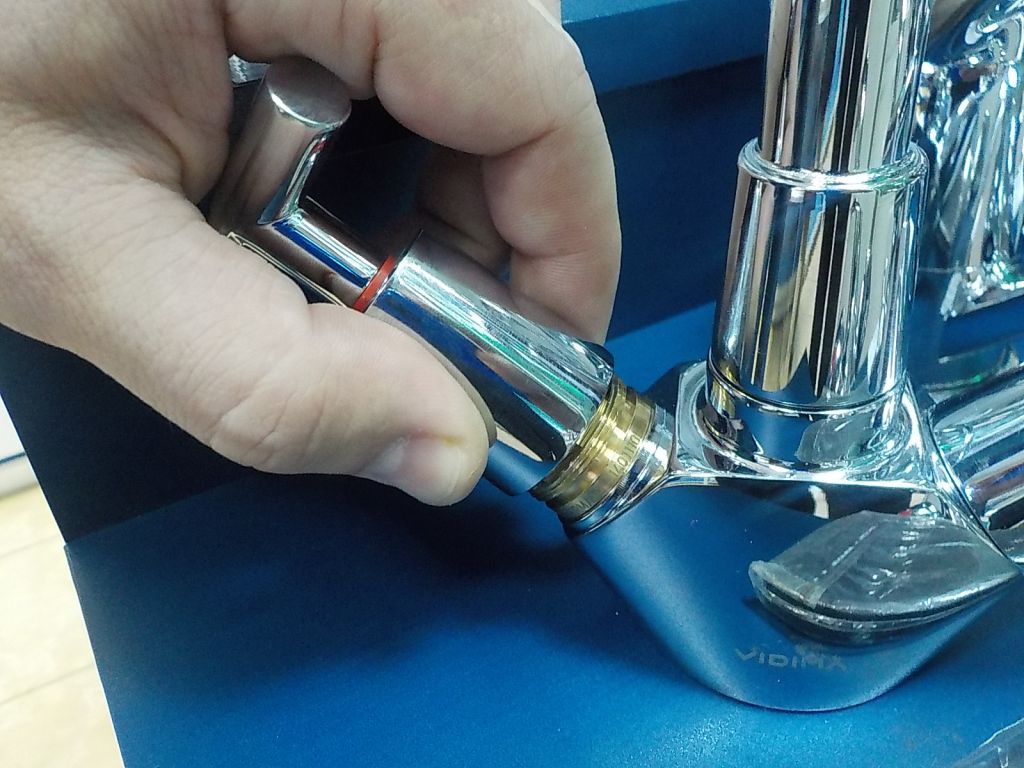
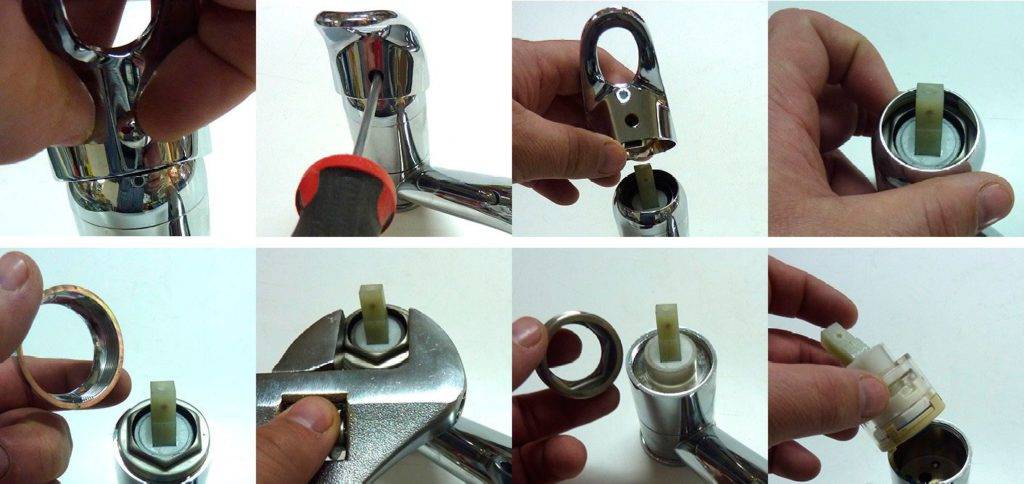
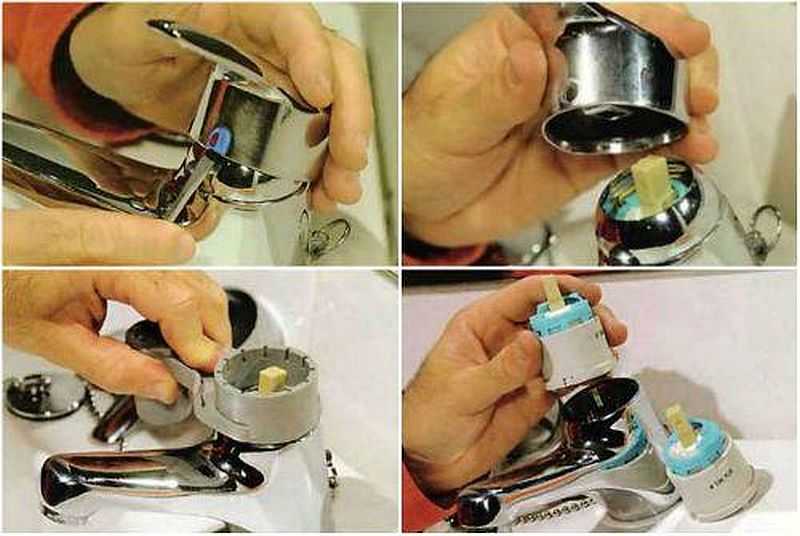
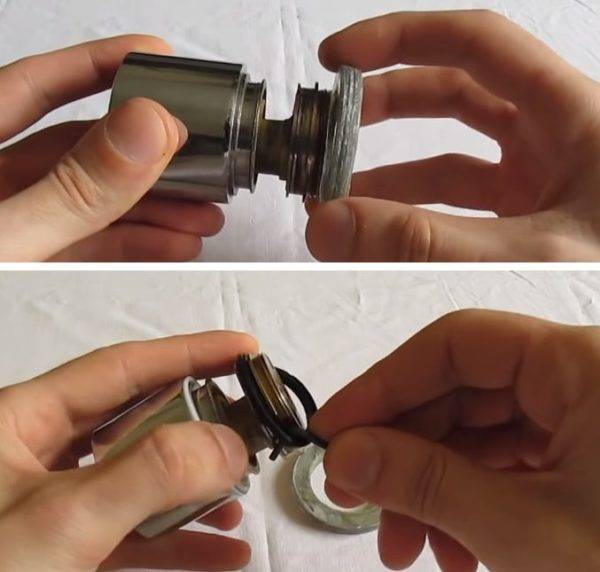
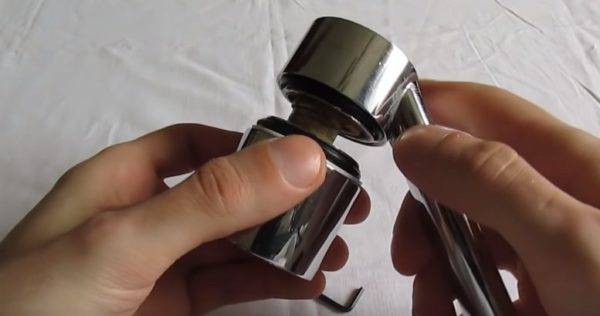
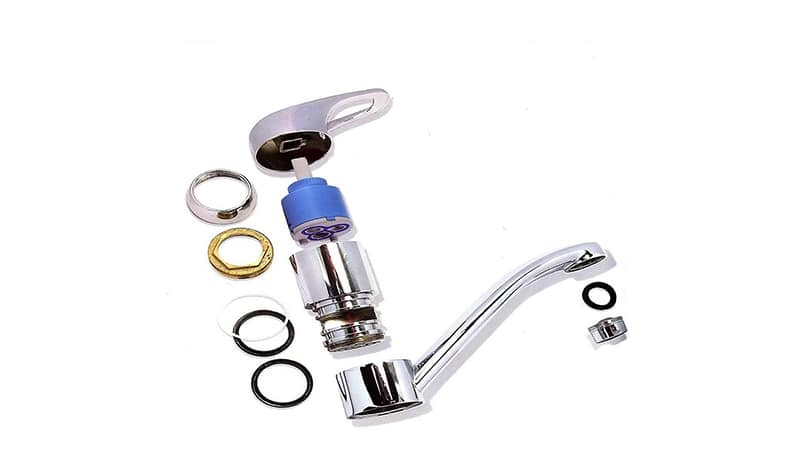
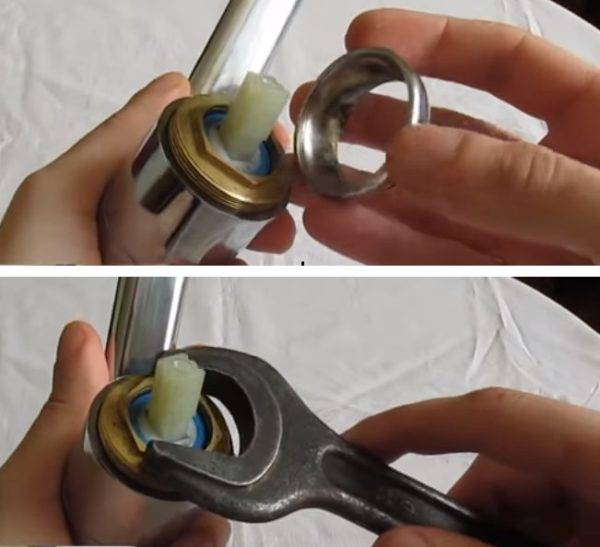
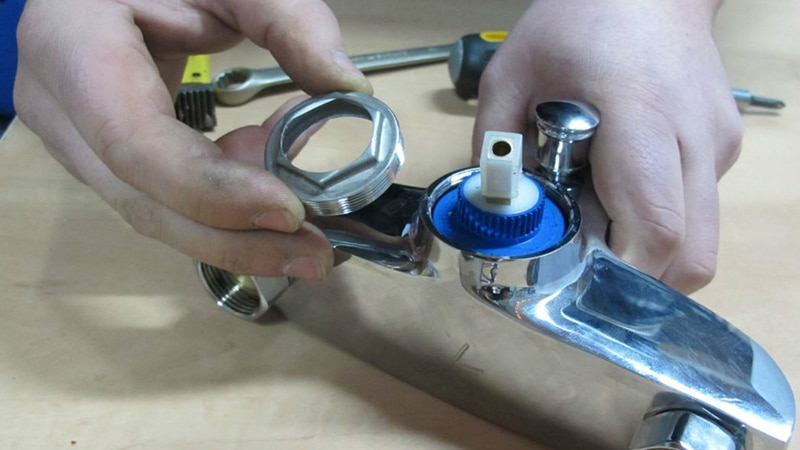
Step 7. Unscrew the top cover on the faucet body, it is held on the external thread of the clamping nut. Remove the clamping nut that secures the cartridge in the housing. To do this, you need to use a wrench.
To remove the clamping nut, you will need an open end wrench.
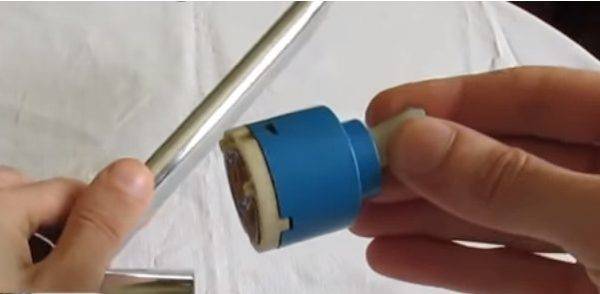
Step 8 Remove the cartridge from the faucet.
Remove the cartridge from the faucet
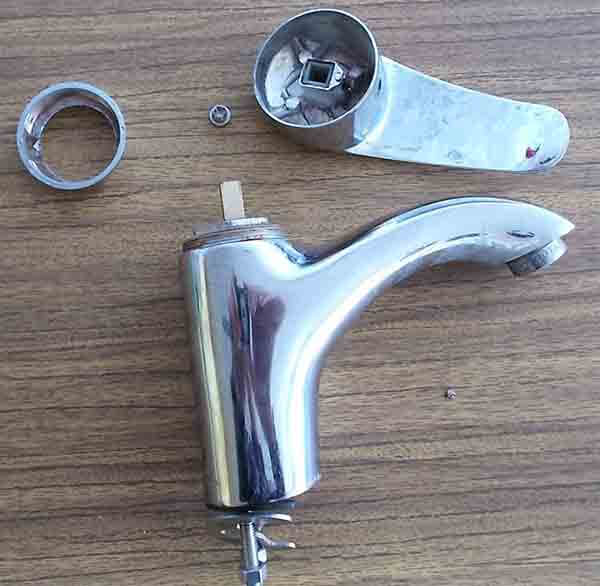
The mechanism is disassembled, now it is necessary to inspect it to determine the cause of the problem. Unless, of course, you disassembled the device just to find out its internal structure.

Ball mixer disassembly
This is interesting: Iddis mixers - characteristics and types
Typical malfunctions and methods for their elimination
According to the principle of operation, all mixers are divided into the following types:
valve devices. The basis of the mixer are two taps designed to supply cold and hot water. Such devices are considered the most common and most reliable;
The most popular type of faucets with two valves
single-lever. At the heart of the device is a rotary lever, which regulates both the amount of cold or hot water supply and the total pressure of the liquid. Single-lever mixers are more whimsical to water quality, therefore, when choosing such a device, it is recommended to install additional filters;
Device with one control lever
sensory. Relatively new type of mixer. The device is turned on thanks to the installed photocell, which reacts to the presentation of hands.
Automatic plumbing device with sensor
Touch-type faucets cannot be repaired at home.
Faucet mixer repair
The most frequent breakdowns of the faucet mixer in the bathroom are:
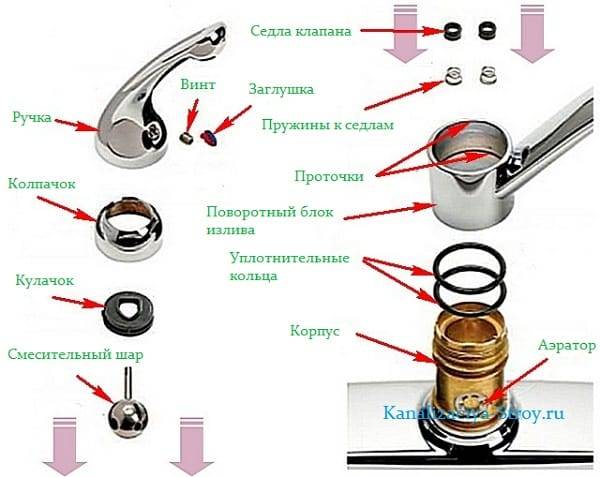
- Faucet leak. The causes of the malfunction may be the natural wear of the gasket or damage to the crane box. Repair of a ball valve is carried out according to the following scheme:
- shut off the water supply to the plumbing device;
- remove the decorative cap (plug) from the leaking faucet, which is most often simply inserted into the groove;
- unscrew the screw located under the plug;
- unscrew the crane box (use an adjustable wrench or wrench of the appropriate size);
- replace the gasket or crane box (in the presence of visible damage to this device);
- reassemble in reverse order.
Repair sequence
- Shower diverter leak. The reasons are also natural wear and tear or poor quality water. Repair of this malfunction is carried out in the following order:
- the water supply to the mixer is blocked;
- the decorative cap and switch are removed;
- with the help of an adjustable (wrench) wrench, the shower nut is unscrewed;
- the gasket is replaced and reassembled in reverse order.
Shower diverter gasket replacement technology
- Leakage at the connection point of the shower hose, shower head or gander. Repairs should be made in the following order:
- the nut fixing the hose is unscrewed (a shower head or a gander, respectively);
- the gasket is replaced and the mixer assembly is assembled.
In some models of mixers, in addition to replacing the gasket, additional sealing of the thread with FUM tape or other similar materials is required.
Elimination of leaks in shower connection point hose
Single Lever Faucet Repair
Typical breakdowns of a single-lever mixer are eliminated in the following ways:
- Reducing the pressure of the crane jet. The cause of the malfunction is a clogged aerator. To clean the aerator, you must:
- remove the device, which, as a rule, is fastened with a threaded method;
- rinse the strainer under the pressure of water or air;
- install the aerator in its original place.
Faucet aerator cleaning
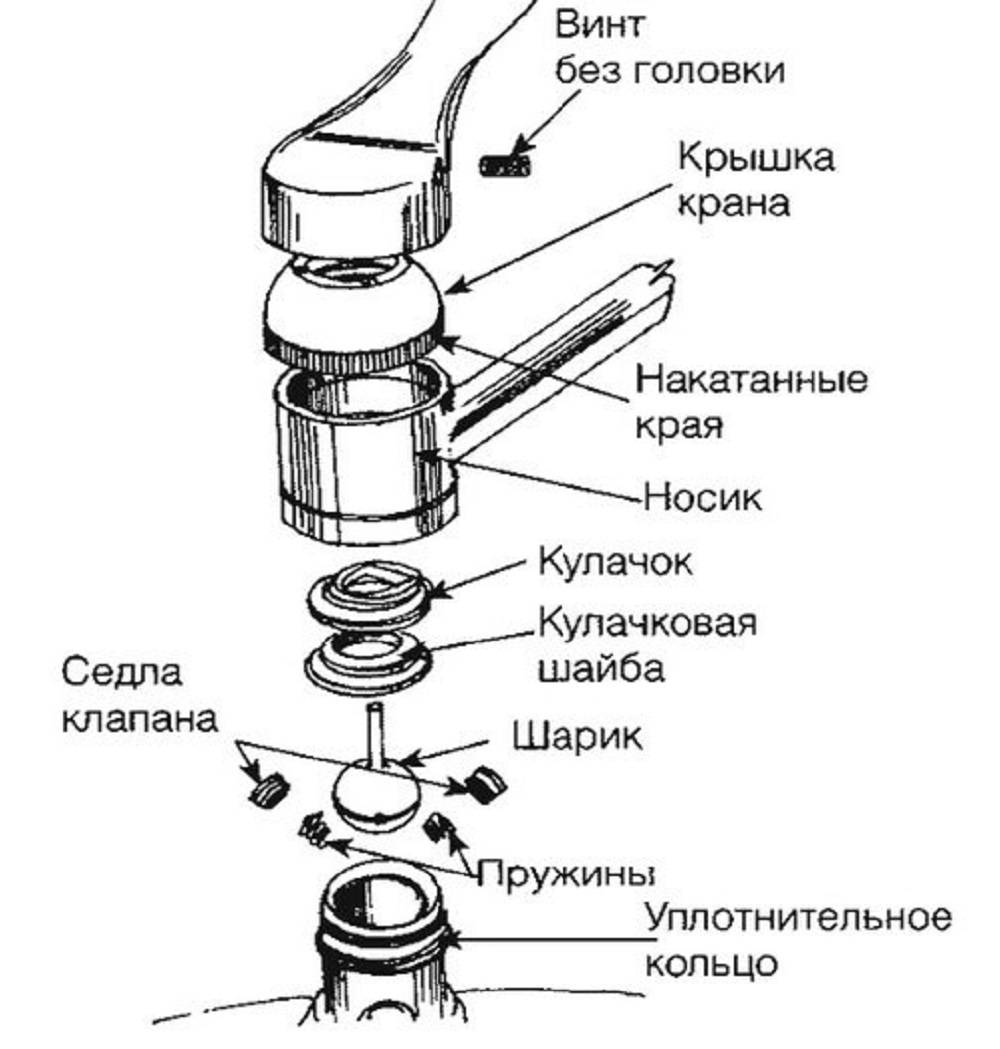
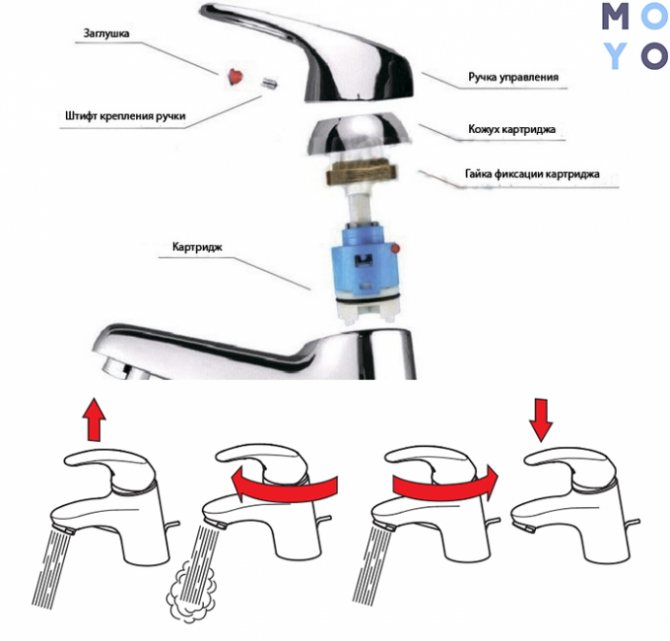
- Control lever leak.The cause of the malfunction is a problem in the operation of the cartridge - a special device in which hot and cold water is mixed. You won’t be able to repair the cartridge yourself, but you can replace the device yourself to fix the leak. The work is done in the following order:
- the decorative cap is removed from the switch housing;
- the screw fixing the lever is loosened;
- the lever body and the decorative element located under it are removed;
- using an adjustable (wrench) wrench, the cartridge is removed;
- a new device is installed and assembled in the reverse order.
It is recommended to select a new cartridge based on the device that has become unusable, that is, after removing the old cartridge.
Scheme for disassembling a single-lever faucet to replace the cartridge
- Leaks at the points of connection of the shower hose, shower head and faucet goose are eliminated according to the scheme of valve faucets.
Ways to eliminate breakdowns of a single-lever mixer are presented in the video.


If you can’t cope with the malfunction of the mixer on your own, then you will need the help of a professional plumber.
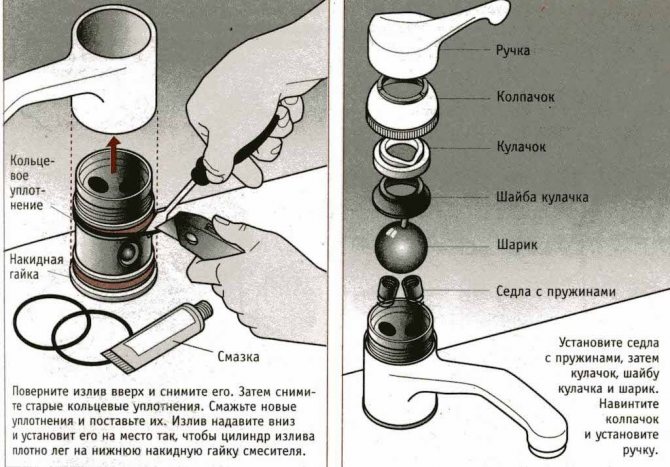
Faucet assembly
Do not forget that a hand-made nut does not have the same strength, it is necessary to assemble individual elements with extreme caution. Step 1. Unscrew the nut, check its progress
Put on new rubber seals
Unscrew the nut, check its progress. Put on new rubber seals
Step 1. Unscrew the nut, check its progress. Put on new rubber seals.
Remove the nut and install new o-rings
Step 2 Carefully put the spout on the faucet, before that, do not forget to put the bottom nylon gasket in place.It performs the function of a bearing when turning the spout. To facilitate the process, it is recommended to use technical petroleum jelly or ordinary soapy water. Moisten the surfaces, the composition will greatly reduce the friction forces and facilitate the assembly process.
Screw the top of the faucet
Step 3. Put on the top gasket and tighten the self-made nut from the discs. Tighten it with a little force. Remember that the task of the nut is not to compress the nylon gaskets or rubber seals, but only to hold all the parts of the crane together and prevent them from wobbling.

Tighten a homemade nut
And one moment. The pressing force with the nut will increase after the final installation of the faucet on the sink and fixing the device with studs with a washer.
The valve is assembled, it is advisable to check the tightness. To do this, temporarily connect the hoses to water sources and turn on the mixer. Leaks will appear in a few seconds. If everything is normal, then you can install the device in its place. Disassembly, repair and assembly takes no more than two hours, which is much faster and cheaper than going shopping in search of a new lever mixer.

Connect the hoses to the mixer and check for leaks
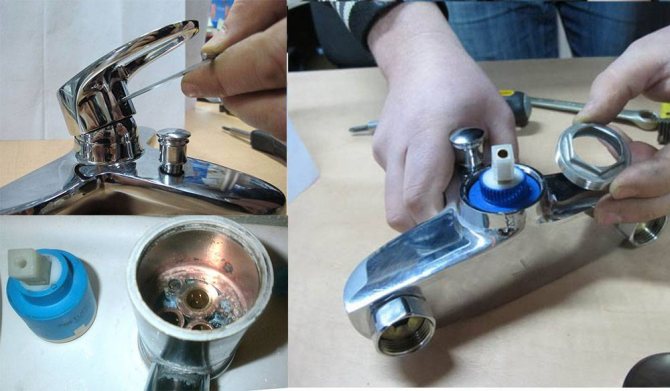
How to repair a single-lever ball mixer
The order of actions to be performed depends on the malfunction that has occurred. We offer you to figure out how to fix the mixer, depending on what problem arose during the repair work.
Repairs can be done by yourself
Blockage removal
About the existence of such problems are indicated by weak pressure water. To clear the blockage:
- disassemble the single-lever mixer by removing the nut from the spout;
- remove and thoroughly rinse the mesh, removing all collected abrasive substances;
- reinstall all structural elements.
Remove all accumulated dirt from the mesh
Replacing rubber seals
With insufficient tightness of the elements, the single-lever faucet begins to leak. In such a situation, it's time to replace the rubber seals with new ones. You can do this in the following way:
Switch Troubleshooting
If you experience difficulties when switching the operating mode of a single-lever faucet, you can fix the problem as follows:
When choosing a lubricant, you should pay attention to the universal compositions offered by many manufacturers and having positive reviews:
Seals must be the correct size
Switch Spring Replacement
If you have difficulty returning the switch to its original position, the spring may need to be replaced. As a repair part, it is worth choosing a smaller diameter spring with a protective coating. Repair is carried out as follows:


- we disassemble the crane;
- remove the stem with the wound spring and remove it;
- using pliers, wind a new spring onto the stem;
- assemble and install the switch.
The failure of the switch to return to the starting position can be corrected
Faucet assembly
Do not forget that a hand-made nut does not have the same strength, it is necessary to assemble individual elements with extreme caution. Step 1
Unscrew the nut, check its progress. Put on new rubber seals
Step 1. Unscrew the nut, check its progress. Put on new rubber seals.

Remove the nut and install new o-rings
Step 2Carefully put the spout on the faucet, before that, do not forget to put the lower nylon gasket in place. It performs the function of a bearing when turning the spout. To facilitate the process, it is recommended to use technical petroleum jelly or ordinary soapy water. Moisten the surfaces, the composition will greatly reduce the friction forces and facilitate the assembly process.

Screw the top of the faucet
Step 3. Put on the top gasket and tighten the self-made nut from the discs. Tighten it with a little force. Remember that the task of the nut is not to compress the nylon gaskets or rubber seals, but only to hold all the parts of the crane together and prevent them from wobbling.
Tighten a homemade nut
And one moment. The pressing force with the nut will increase after the final installation of the faucet on the sink and fixing the device with studs with a washer.
The valve is assembled, it is advisable to check the tightness. To do this, temporarily connect the hoses to water sources and turn on the mixer. Leaks will appear in a few seconds. If everything is normal, then you can install the device in its place. Disassembly, repair and assembly takes no more than two hours, which is much faster and cheaper than going shopping in search of a new lever mixer.
Connect the hoses to the mixer and check for leaks
Causes of mixer failures
To start repairing the mixer, you need to know the frequent problems and malfunctions of mixers that may occur during operation.
The second reason may be that the production uses old-style materials, for example, if you use rubber for a gasket, then such a gasket will last less than silicone.The important point is that the silicone gasket is less deformed and does not collapse from drying out.
The most common cause in our time can be called hard and dirty water that goes through pipes. Such water forms deposits in mixers and contributes to the destruction of seals and other parts of the device. Also, this reason contributes to the corrosion of metals.
These were the reasons for the breakdowns of the mixers, and now we need to sort out the specific malfunctions that may occur.
Mixer failures are not uncommon, because:
- the quality of water supplied to residential premises from the general water supply system is quite low. The water may also contain some impurities that adversely affect the internal structure of the mixer;
- the use of low-quality consumables: gaskets or rings, clamping nuts, and so on, which also leads to rapid wear and, accordingly, the formation of leaks;
- low quality of the mixer itself. Often, the cheapest models with a small amount of functionality are installed in the bathroom, which leads to a decrease in the service life;
- incorrect installation of the device;
- factory marriage, leading to the formation of cracks on the body of sanitary equipment.
To reduce the frequency of repairs, it is recommended to purchase faucets from reliable manufacturers such as GROHE, JACOB DELAFON, ROCA, LEMARK or WasserKRAFT.
Repair of a ceramic faucet box
Repair of a water faucet box with ceramic plates consists in replacing a worn plastic washer:
- Remove the stem retainer from the crane box requiring repair.
- Take the crane box in your left hand, clenched into a loose fist, with the stem from the side of the thumb, and squeeze the body of the product with the ring of the index and thumb.
- Press the thumb or the palm of your right hand on the stem of the crane box with sufficient force, and all the contents will fall out of the body into the loosely clenched left palm.
- Remove the remnants of the pressure washer if it is really worn out and the reason for the need for repair in it (this will be immediately visible by its thickness and appearance, and sometimes only fragments of the washer remain).
- Pick up a copper wire with a diameter of about 1 mm, wrap a ring of wire on the rod of the crane box in the place where the plastic washer was. If necessary, grind it on both sides with fine emery, if the assembled ceramic bushing will be difficult to rotate (you need to check by installing the product on the mixer).
- In some crane boxes, a home-made clamping washer made of 1 mm wire can expand so much that the stem will slip through it and the tightness will be broken. In this case, you will have to connect the ends of the copper ring by soldering, then grind off the excess solder, or take a wire of a larger diameter, and flatten the washer out of it to 1 mm. Such a ring will first have to be installed in the body of the crane box, and only then the rod should be inserted.
- Before final assembly and installation of the repaired bushing in the mixer, apply a little waterproof grease to the copper ring.
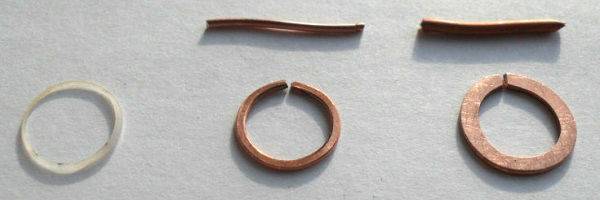
Left to right: worn plastic washer; ring out copper wire Ø 1.2 mm; wire ring Ø 1.8 mm.
Step-by-step instructions for disassembling the crane
As always, before starting work, you need to check the availability of tools and fixtures, otherwise you will have to interrupt the disassembly due to the lack of something. Prepare:
- a set of open-end wrenches or an adjustable wrench;
- a screwdriver for an asterisk and an ordinary one;
- hex key;
- mounting knife.

Need to stock up on tools
wrench prices
Adjustable wrench
Step 1. To facilitate the work, remove the faucet from the sink. It can be fixed with two studs and a special metal washer or large nut. Mounting method depends on device type and manufacturer.


First you need to remove the mixer
Step 2 Unscrew the studs, for this they have a slot for an ordinary screwdriver.
Unscrew both pins
Step 3. Remove the round rubber seal. It prevents water from entering from the top surface of the sink down. Such leaks occur only as a result of gross errors during the installation of the mixer; during operation, the gasket does not wear out and does not lose its original properties.
Remove the rubber pad
Step 4. Gently twist two flexible hoses, one for hot and one for cold water. There is not enough space under the sink, in connection with this, the hoses have a reduced diameter compared to ordinary ones. In addition, they have a small nut, if for standard ones you need an 11 mm open-end wrench, then here the nut size is only 8 mm. Keep this in mind when preparing the single lever mixer disassembly tool.
Unscrew water supply hoses
Step 5. Using a small screwdriver or other sharp object, pry off the cap of the pivot arm fixing screw. There are red and blue marks on it, remember their position.During assembly and connection of the faucet, do not confuse the cold and hot water hoses, otherwise the faucet will work the other way around. This is not critical, but it causes certain inconveniences in the initial periods of use, you will have to get used to the opposite algorithm for regulating water parameters.
The screw cap must be pry off with a screwdriver.
Step 6. Unscrew the lever fixing screw with a hex wrench.
Release the hardware half a turn and constantly try to remove the lever. It is fixed to the rod in a small recess; for complete disengagement, more than 1.5–2.0 turns of the screw are not required.
Unscrew the screw and carefully remove the lever
Step 7. Unscrew the top cover on the faucet body, it is held on the external thread of the clamping nut. Remove the clamping nut that secures the cartridge in the housing. To do this, you need to use a wrench.
To remove the clamping nut, you will need an open end wrench.
Step 8 Remove the cartridge from the faucet.
Remove the cartridge from the faucet
The mechanism is disassembled, now it is necessary to inspect it to determine the cause of the problem. Unless, of course, you disassembled the device just to find out its internal structure.
Ball mixer disassembly
Care instructions
 Brass construction
The device will no longer have to be repaired if, during its purchase and during operation, follow the recommendations of experts:
- Buy devices made of brass, they are strong and durable, unlike products made of silumin.
- Along with the installation of the mixer, it is desirable to install a good filter for water purification.
- Docking places should be treated with sealant, and fum-tape should be wound on all threaded connections.
- Do not wait until a leak appears, but regularly check the condition of the rubber gaskets.
- At the time of purchase, you must carefully read the characteristics of the device, and before installation, study the installation and assembly diagram.
No less serious approach to external care type of mixer for kitchen sink, sink or bathtub. Soapy water and lemon juice remove stains and stains formed on the case. To do this, moisten a sponge or soft cloth with one of these solutions and wipe all parts of the faucet.


More complex contaminants are removed using special detergents. They are effective and do not contain aggressive substances that can harm the chrome surface. These include: Grohe GrohClean, Ravak Cleaner Chrome, Meine Liebe. The main thing is to read the instructions so as not to exceed the recommended dosage.
It is strictly forbidden to clean the mixers with metal brushes or coarse sponges. Products containing formic and phosphoric acid, vinegar, chlorine and alkali are prohibited. After each cleaning, the remnants of any product, even a special one, should be washed off with water and wiped dry with a cloth.
And yet, the formation of a leak is the most unpleasant thing that can happen to a faucet. If it is not eliminated in time, it will have to be replaced in the future.
Therefore, it is so important to understand the device of the mixer, as well as to have at hand all the necessary spare parts and tools for its repair.


