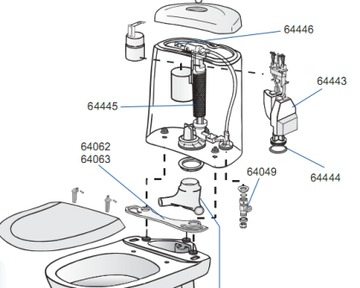
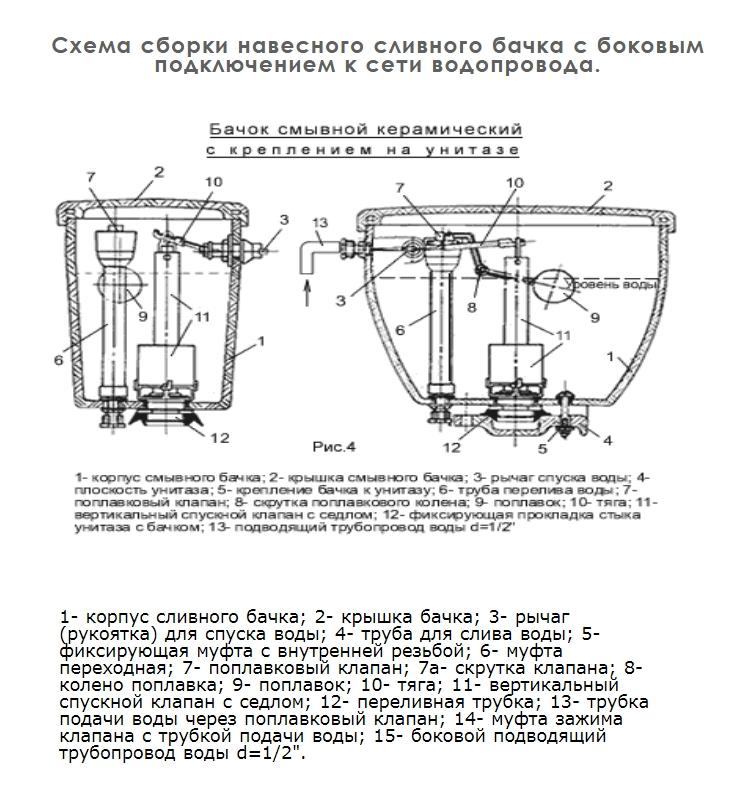
- The structure of the toilet
- How to open the toilet cistern
- Toilet flush problems
- Modern toilets with button
- Dual flush
- The procedure for opening different options for drain tanks
- Possibilities for adjustment and repair
- How to adjust the water level in the tank
- Toilet cistern leaks
- The tank does not draw water
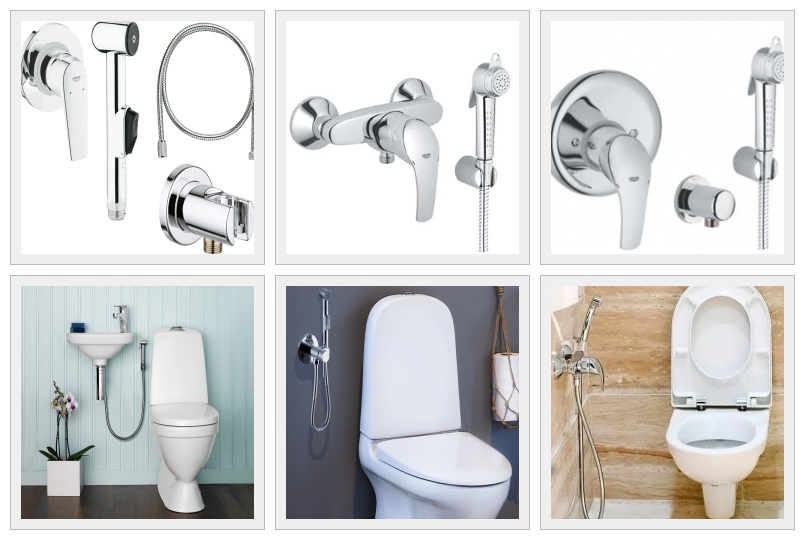
- How to choose separately and are they sold
- How to choose fittings for a drain tank
- How the fittings for the toilet cistern with bottom connection are arranged
- installation
The structure of the toilet
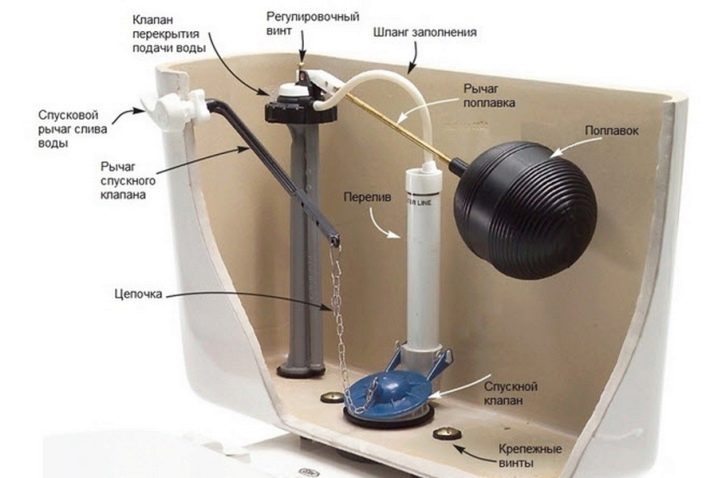
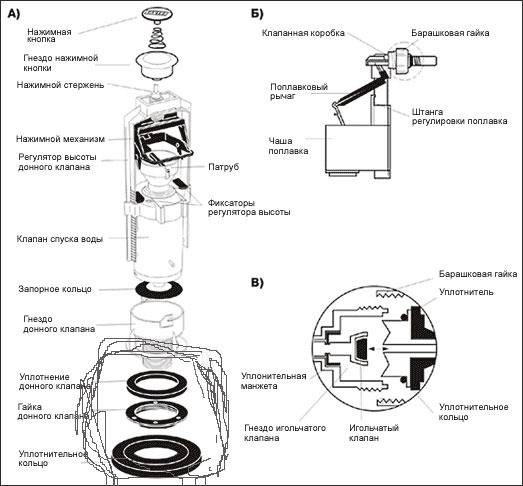
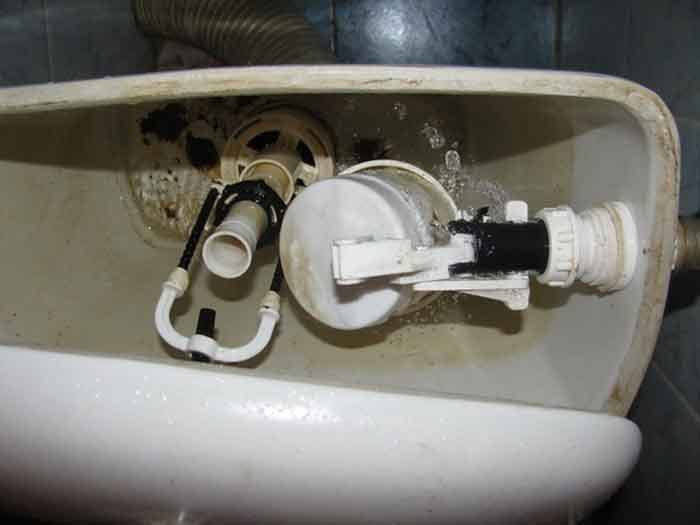
As a rule, the toilet bowl consists of two main parts: a drain bowl and a drain tank. The latter has a device for draining water, it can be a button, a rope or a chain, a pedal or a lever. There is nothing special in the bowl itself, except for the device of the partition from below. It blocks the way back to sewer waste. This occurs due to the water vortex at the drain moment.
The hardest part is the inside of the tank. They are equipped with a float that falls when the water is drained. When it reaches the very bottom, the valve mechanism is activated and the descent of the liquid is blocked, it is recruited. To avoid overfilling the tank, there is also a valve on top, similar to the first one. When the water reaches it, it stops gathering.
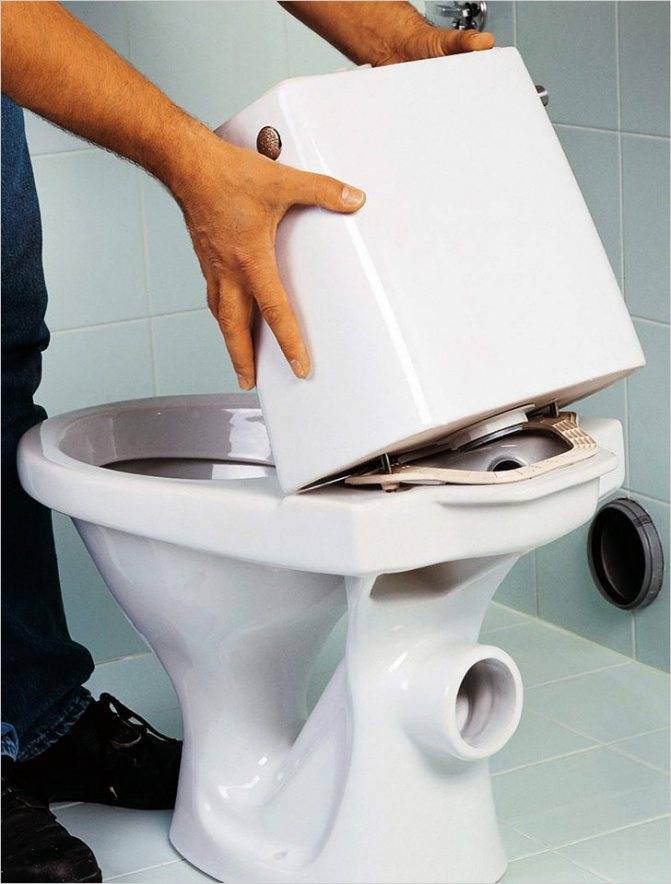
How to open the toilet cistern
Toilet flush problems
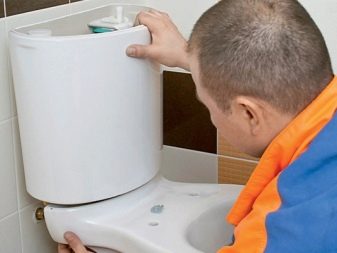
The toilet is an essential item in every home. When it breaks, the whole family suffers. If you can't call a plumber, you can try to fix it yourself.
Scheme of the device of the drain tank.
But in order to understand what is the cause of the malfunction, you need to figure out how to open the toilet cistern. After all, most often breakdowns occur in it, since this is the most problematic part of the device.
Scheme of the device of the drain tank.
The main causes of malfunctions:
- No water inflow.
- Continuous filling.
- Leakage.
- Continuous flushing of water into the toilet.
Absolutely any toilet tank is a container of water, covered with a lid on top that can be opened. Distinguish between the lateral or upper position of the water release mechanism. The lateral arrangement, when the tank is located high at the top, and the water is drained after you pull the chain, is now extremely rare. Most modern toilets have a top trigger. It can either be a knob to be pulled up or a button to be pressed.
Modern toilets with button
Scheme of a toilet bowl with a button.
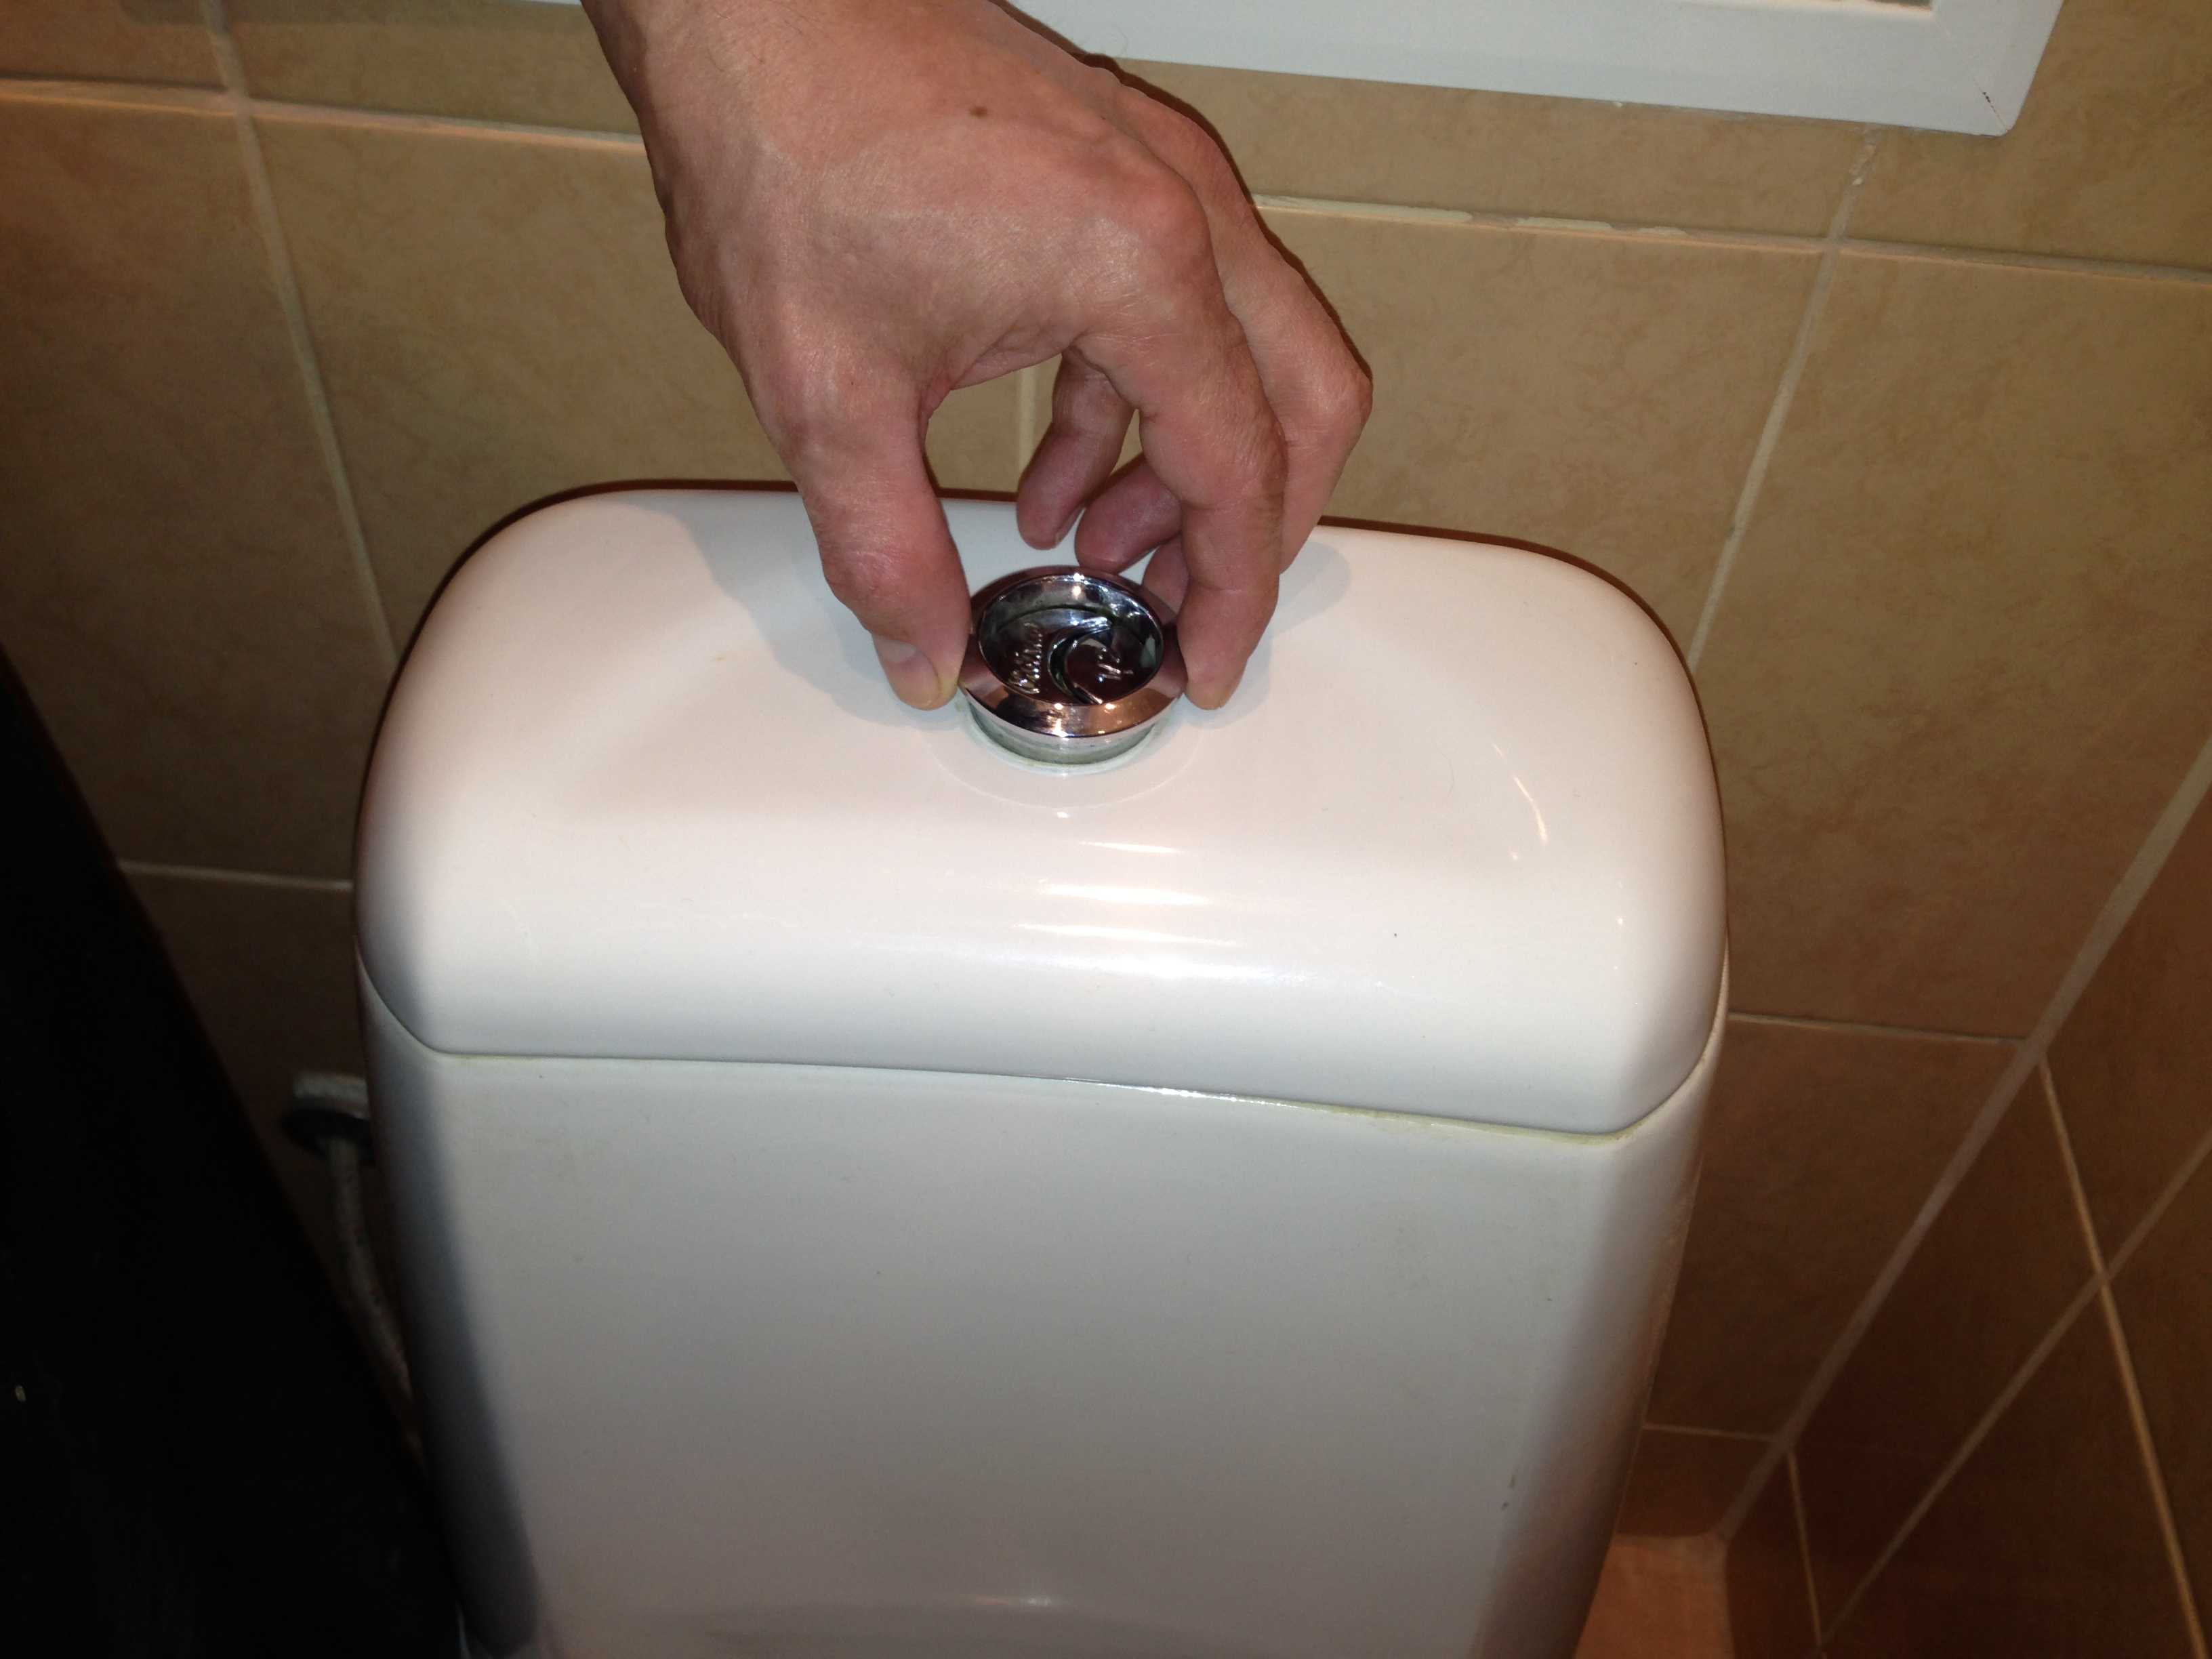
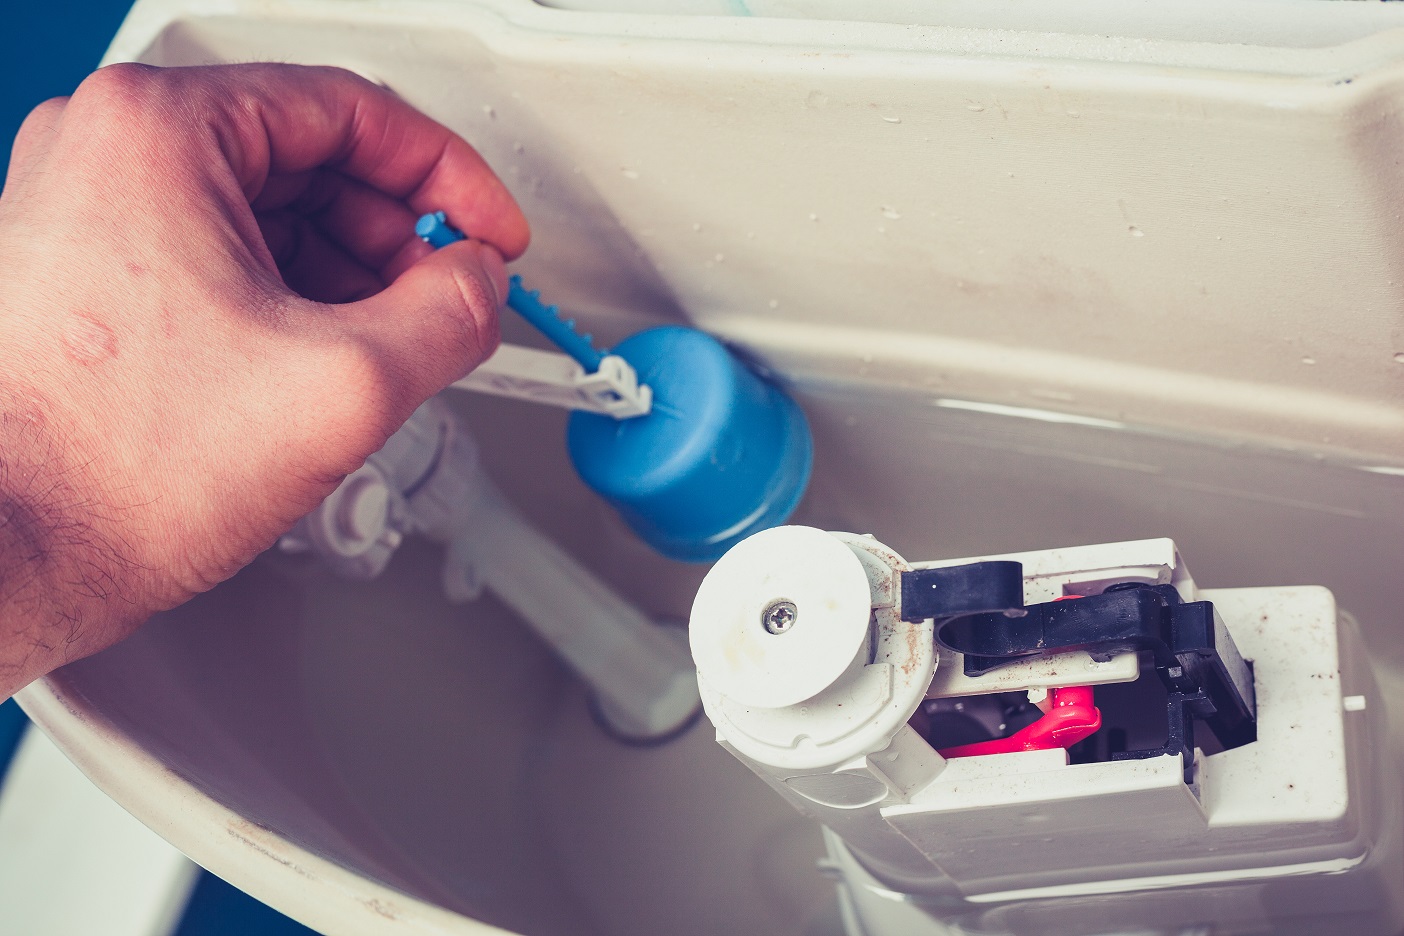
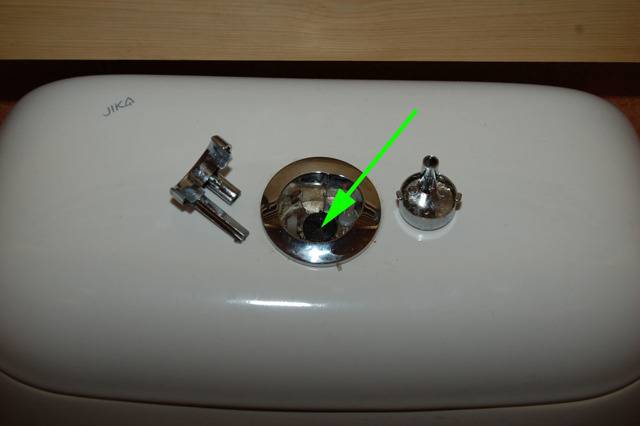
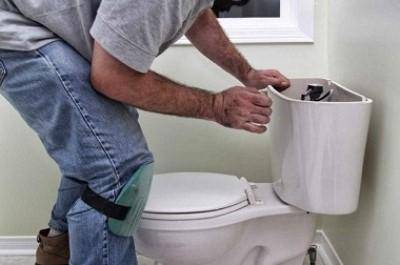
On toilets, where the water is drained by lifting the rod up, first unscrew the ball located at the end of this rod, then remove the lid by simply lifting it up. But how to open the tank of a modern device if the lid does not rise at all? By the way, for some reason, many plumbers are trying to convince that a toilet with a button cannot be opened, because it is a non-separable structure. This is not true. Modern toilet models equipped with one or two flush buttons have a push-button glass that prevents the lid from lifting.To open such a tank, you need to press your fingers on the chrome ring that is located around the button and turn it counterclockwise. If you have not opened the lid for many years, the threads may become stuck. Try turning it to one side and the other. You can drop a little machine oil, and then try to turn the bezel again.
If the bezel slips under your fingers, use a screwdriver or other flat tool
Gently pressing a screwdriver on the ring, you need to try to slightly move it counterclockwise. After a shift of at least a couple of millimeters, it will begin to rotate much more freely, and it will be easy to unscrew it with your fingers.
Unscrewing it will release the plastic cylinder. After that, lift the lid and turn it across the reservoir body by 90 degrees. The button block is held with a double-sided clothespin. Depending on the model of the toilet, the clothespin is either unfastened or unscrewed. After that, it will be possible to completely remove the lid and open the tank.


If the toilet is equipped with a double button, then it is not unscrewed, but simply removed. First you need to sink one of the halves, then a small groove will become visible on the side. It should be carefully tucked with a screwdriver and first pull out one and then the second halves up. When both parts of the button are removed, the screw head will become visible, by unscrewing which it will be possible to open the tank. In some models with a double button, you need to first press on one half, then on the other, and then, grabbing the jumper, unscrew it.
When carrying out plumbing work, do not forget about safety precautions. First, turn off the water supply valve and empty the tank
Lay all items that will be removed from the toilet on a flat surface. Make sure that small parts are not swallowed by pets. Set the removed cover aside. Because if you accidentally knock it over or drop something heavy on it and it breaks, you won't be able to buy it separately. Then you have to change the whole tank.
Dual flush
The working volume of the toilet bowl is 4 or 6 liters. In order to save water, flushing mechanisms have been developed with two modes of operation:
- in the standard version, the entire volume of liquid from the tank is drained into the bowl;
- in the "economy" mode - half the volume, i.e. 2 or 3 liters.
Management is implemented in different ways. It can be a two-button system or a one-button system with two pressing options - weak and strong.
Dual flush mechanism
The advantages of a dual-mode drain include more economical water consumption. But we must not forget about the disadvantage - the more complex the mechanism, the more elements it contains, the higher the risk of breakage and the more difficult it is to fix the malfunction.
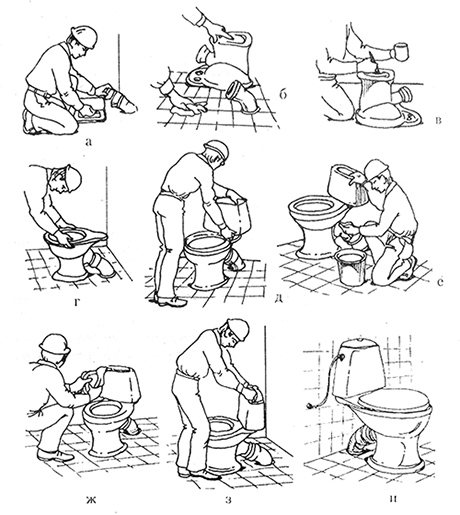
The procedure for opening different options for drain tanks
To remove the tank cover, you will need a screwdriver, pliers and a knife.
Some models of clay cisterns make it easy to remove the lid, since the drain button is not attached to the flush mechanism. However, there are other options for tanks, before removing the cover of which you will have to work a little.
Exist toilet flush cisterns with trigger handles. You need to be extremely careful when parsing these structures. If at least one element is damaged, difficulties may arise in further work.Before starting to disassemble such models, it is necessary to close the cabinet door with valves, if any. If the drain control lever is located on the side of the tank, and there are no additional buttons / levers on the cover, you just need to lift it up and remove it.
If the design of the tank involves draining water by pulling up the rod passing through the cover, unscrew the ball located at the end of the rod. Then you can open the structure in the above way.
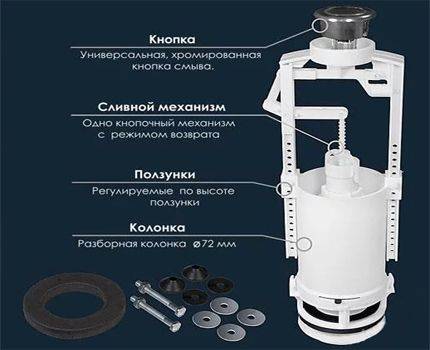
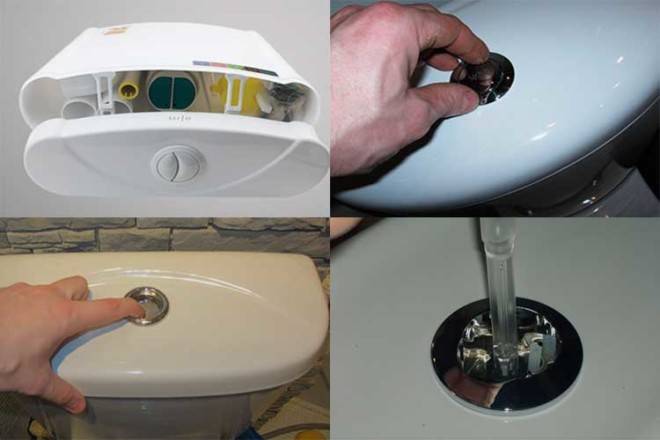
Less convenient for disassembling tanks, controlled by buttons, and not by rods / levers. However, due to the fact that such models provide additional features (for example, draining at will - for three and six liters of water), they are beginning to be in increasing demand. To remove the cover with the button located on it, you must first unscrew the tube located around the button or two semicircular buttons. Outside, it is a ring. In the event that instead of two buttons there is one that can swing in both directions, you first need to pull it out.
Scheme of a drain tank with an open lid.
However, even after these actions, the cover cannot be removed - it will only be possible to slightly move it up. This is enough to rotate the lid so that it is in position across the body of the toilet bowl. Having arranged it in this way, it is necessary to unfasten the latches of the button assembly and remove the cover along with it.


So that the cover does not interfere with the process of opening the cabinet door with valves, it should be removed and placed in a place where it cannot be touched and broken. If, however, the lid breaks, you will have to change the tank, since it is not sold separately.Before replacing the float or the valve controlled by it, it is imperative to open the door, shut off the cold water supply and close it again. Otherwise, there is a possibility of flooding due to overflow of the tank.
After that, it is recommended to check it several times in operation without a lid. Make sure that the valve is guaranteed to close every time the float is raised. Only after such a check should everything be assembled in the reverse order.
As can be seen from the above measures, removing the toilet cistern lid is not difficult. You just need to understand each specific design. In this case, the analysis of the drain mechanism must be carried out strictly according to the instructions. It is always attached to the purchased toilet.
It is important to remember that taking apart something is much easier than reassembling it. If it so happened that there is no instruction, you need to memorize the sequence of disassembly and location of parts with particular accuracy.
Possibilities for adjustment and repair
During the operation of the toilet, various minor problems arise from time to time. You should not immediately run to the store and buy a new filling in the tank, since some problems can be solved in no more than half an hour. At the same time, it is not necessary to invite a specialist and pay him money, but it is enough to try to do it yourself.
A quick and 100% way to fix a leaking toilet cistern
Watch this video on YouTube
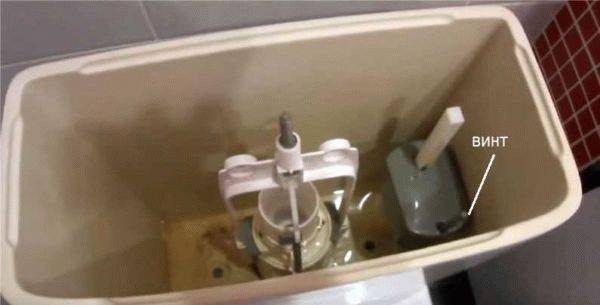
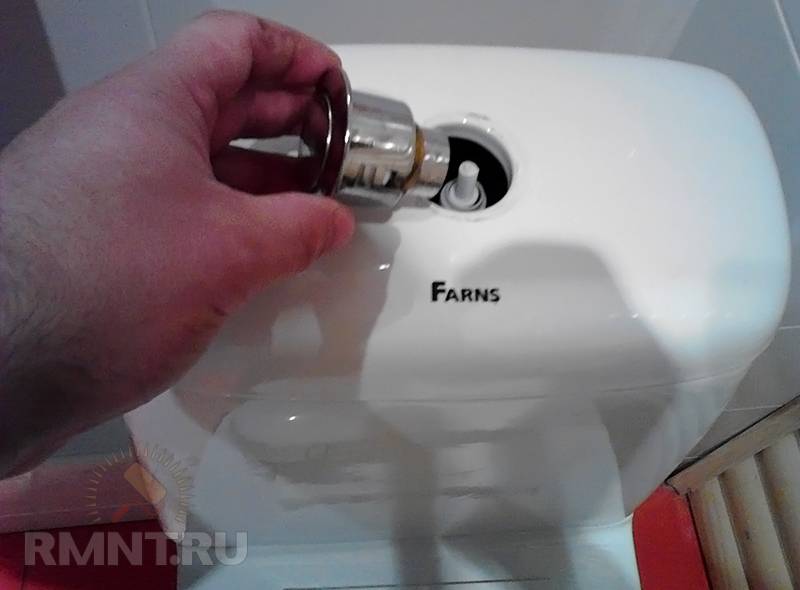
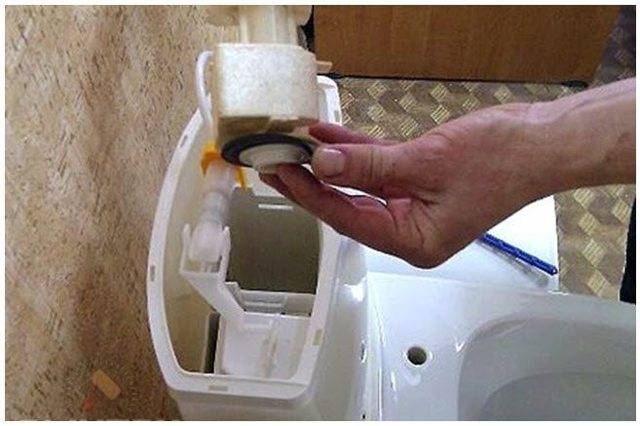
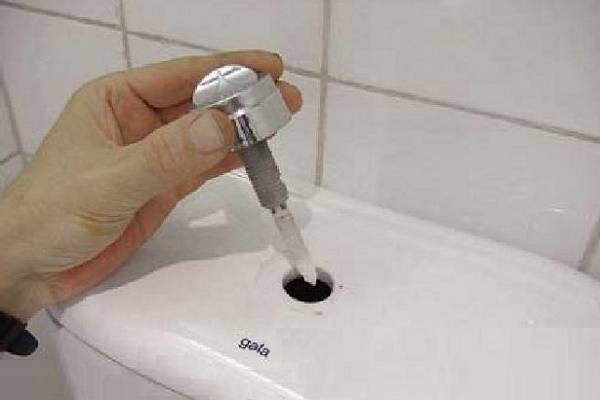
How to adjust the water level in the tank
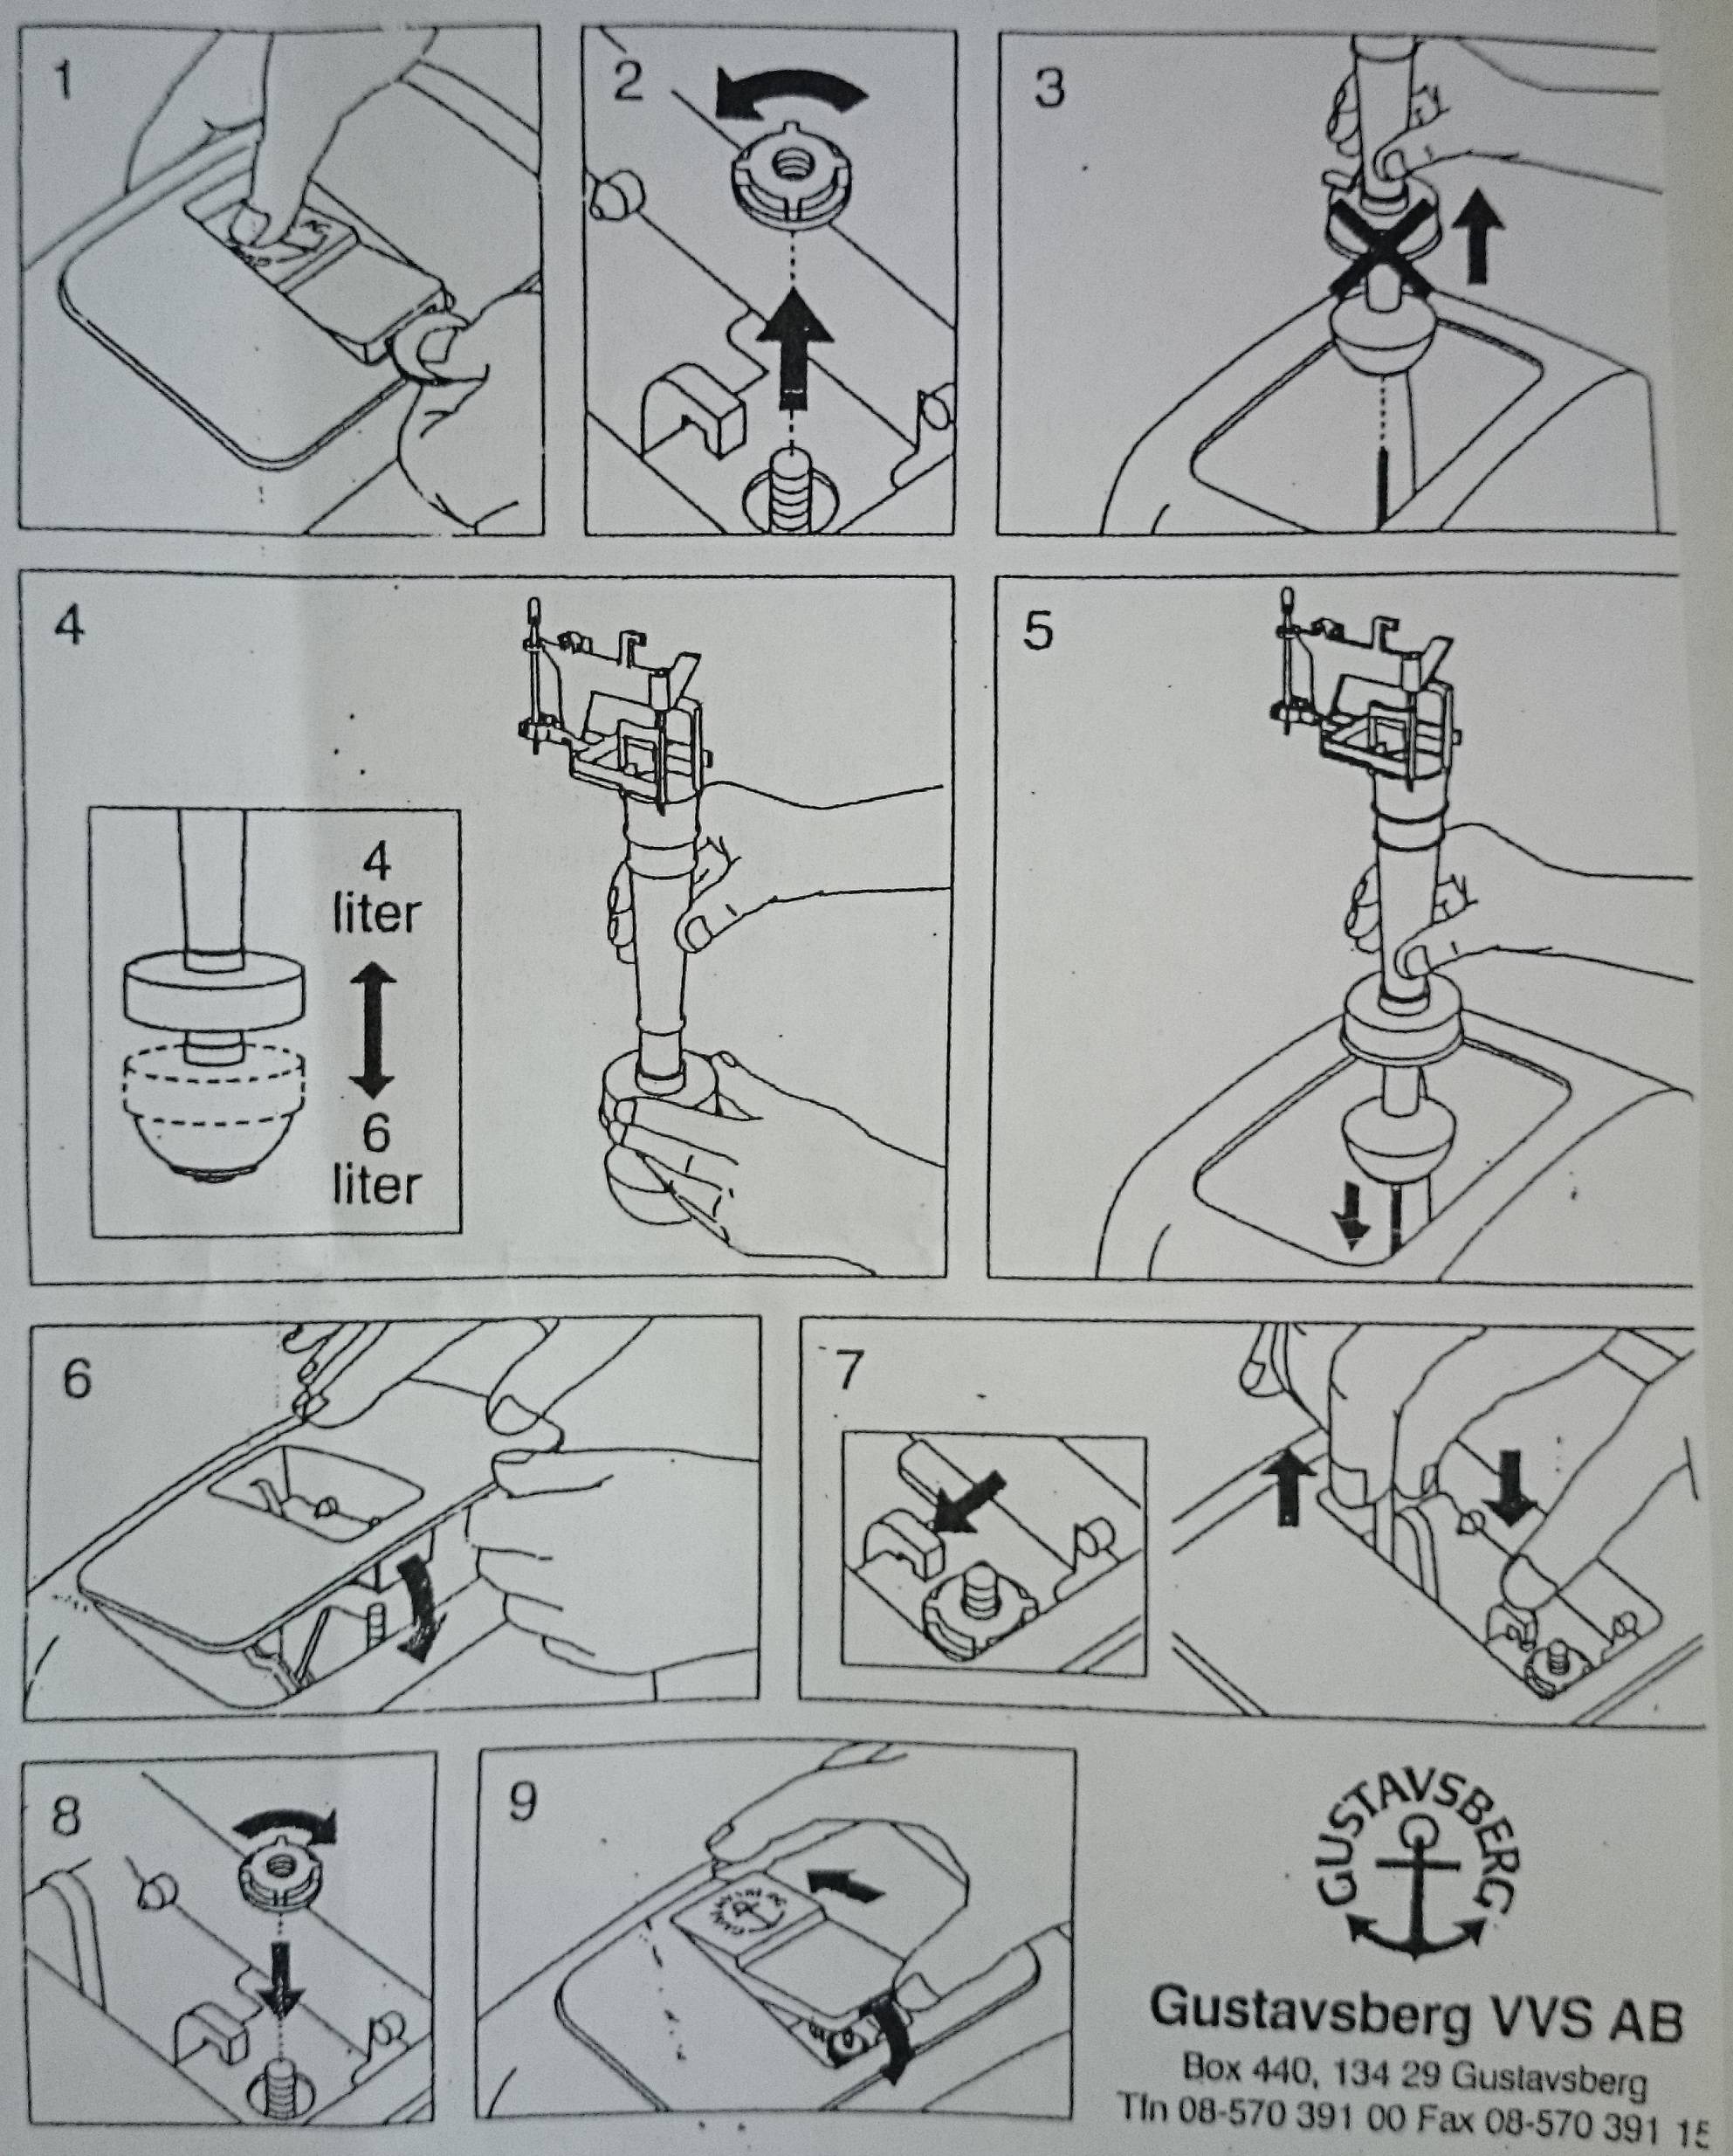
In devices with a bottom water supply, it is always better to adjust the water level after installing the toilet, since they are all adjusted at the factory to the maximum level, which can be redundant and uneconomical.To adjust the level in the drain tank, it is enough:
- Drain the water tank and turn off the water supply.
- Unscrew the button.
- Remove cover.
- Adjust the height of the float using a special screw located at the top of the float mechanism.
- Close the tank with a lid and install the button.
There are cases when, after installing the toilet, water constantly flows from the tank. This indicates that the water level in the tank is high enough and the water flows through the overflow system. In this case, it is necessary to reduce the water level by lowering the float according to the technology described above.
Setting the Fittings in the cistern
Watch this video on YouTube
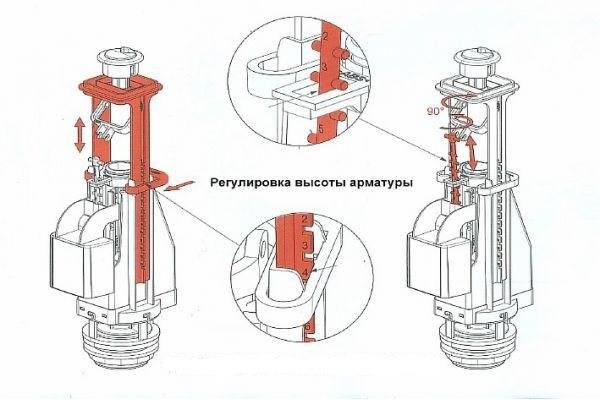
If the float mechanism consists of a curved lever, then the water level is adjusted by bending this lever, which is even easier
It is important to understand that the lower the float in the tank, the less water it will take.
Bending the float lever changes the water level
Toilet cistern leaks
Water leaks in the toilet are possible even if the water level is normal, but then you will have to look for other reasons. Water may leak if:
- The sealing gum of the drain valve has silted up, so it will have to be cleaned. For this you will have to:
-
- Turn off the water supply and empty the tank.
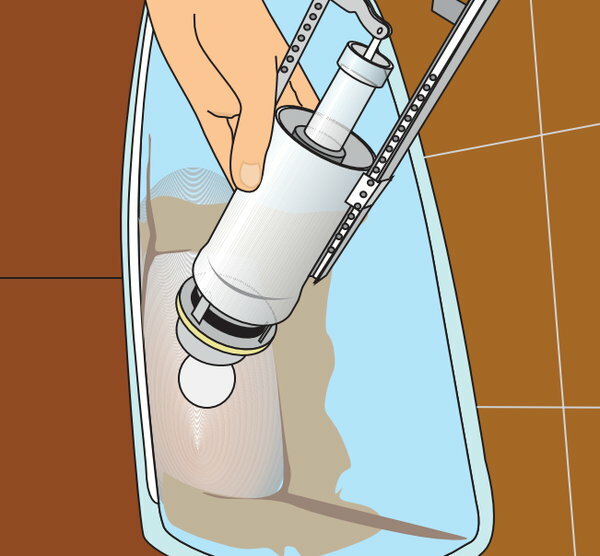
- Remove the water release mechanism.
- Remove the bleed valve and carefully inspect the gasket. If necessary, it is cleaned or polished with a fine emery cloth.
- Install the mechanism back into the drain tank, turn on the water and test the device. If this does not help, then you will have to replace the gasket.
How to eliminate water leakage from the toilet bowl, HOW TO REALLY SAVE SUPER WATER!
Watch this video on YouTube
The escapement mechanism was demolished during operation. This is easy to check, just press the mechanism with your hand. If the water stops flowing, then that's the way it is. In this case, you can make the glass heavier by adding some weight to the bottom of the glass. Adding weight


In any case, you will have to disassemble the mechanism, and then assemble it and check it. If these little tricks do not help, then it is better to buy a new drain mechanism and replace the old one with it. In fact, this is the best option.
Leak in toilet drain
Watch this video on YouTube
The tank does not draw water
There is also such a problem that water is not drawn into the tank at all or is drawn, but rather slowly. If the water pressure is normal, then the reason is obvious - the filter, tube or valve is clogged. The way out of this situation is quite simple and comes down to cleaning the filter, tube or inlet valve. To do this, you will have to completely remove the water supply mechanism, and then assemble everything as it was.
How to do it right, you can see in the video.
What to do if there is no water in the tank
Watch this video on YouTube
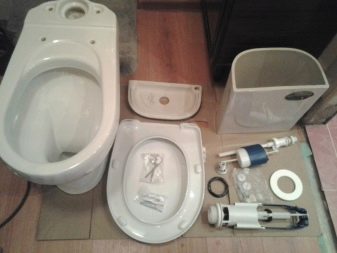
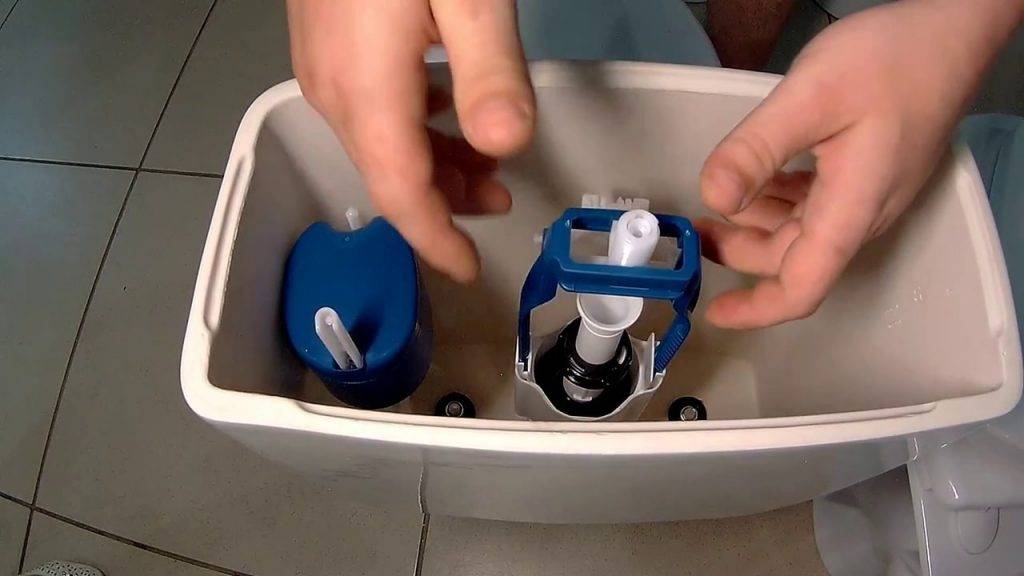
How to choose separately and are they sold
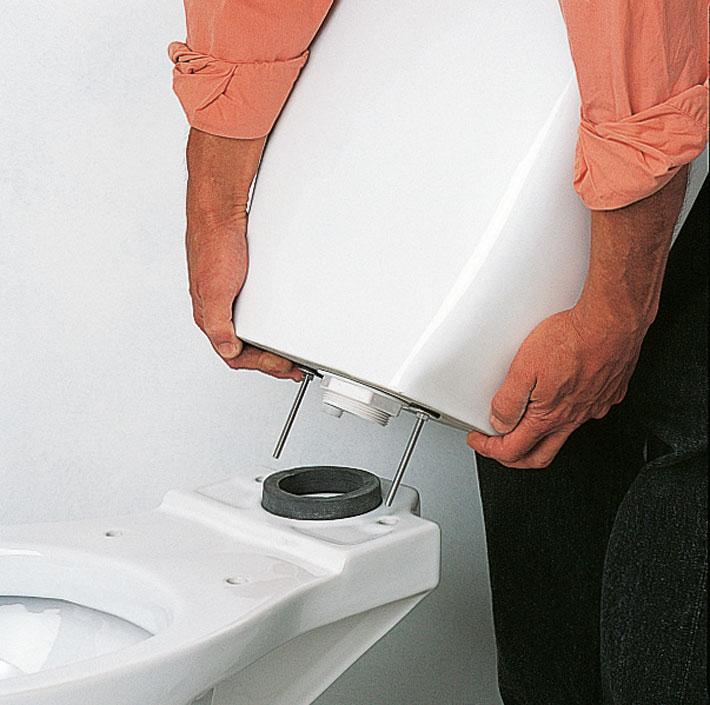
When choosing a new container, it is worth considering that the dimensions of the mount and the places reserved for it are not standardized and can differ significantly from each other. Because of this, there is no guarantee that it will be possible to find a container of suitable dimensions.
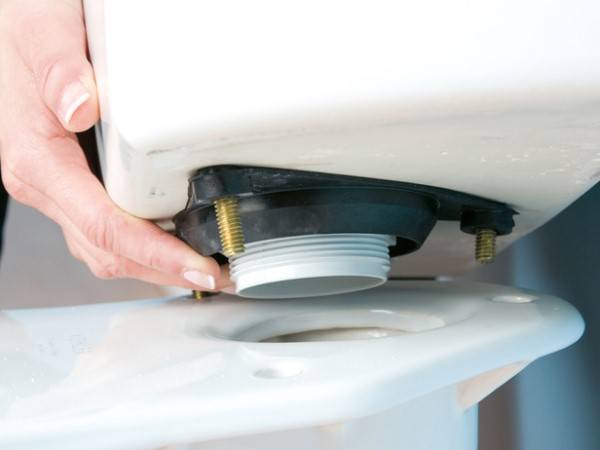
Photo 1. The process of connecting the tank to the toilet, all fasteners and decorative washers fit.
You can try to find a similar model by the name of the manufacturer.
Reference! Usually the name of the company is indicated on the drain button or on the decorative washer of modern toilets.For older models, you will have to focus strictly on dimensions.
Try to remove the tank yourself, take a picture of it and the shelf of the bowl, measure the distance of the attachment points from each other and, based on this data, go around the stores in search of something similar.
For the correct choice of the tank of modern models, it is necessary to pay attention to the following parameters:
- Method of attachment to the toilet bowl. On some models, the toilet bowl and the shelf are made separately, while an additional mount is included in the kit, on others this design is the same.
- The shape of the tank (elongated, stretched horizontally).
- Type of water supply: bottom or side.
- Required volume of water consumed when draining. For models with buttons, it is half the total.
- Design and colors. Everything here is up to the taste of the buyer.
Important! The main thing is that the holes for attaching the drain tank to the toilet coincide. For this, it is necessary to know the exact dimensions between the axes of the bolts.
For models of the old Soviet model, the selection rules are slightly different:
Choose ceramic rather than plastic cisterns. Plastic is much lighter, but ceramic is stronger
Much less common are products made of cast iron and faience.
On tanks of old samples, the water supply is most often lateral.
Pay attention to the method of attachment: to the wall or directly to the toilet bowl.
Draining method: by raising the lever or lowering the side chain (for hanging from the ceiling).
The dimensions of the old tank. Select containers in the store, taking into account the diameter of the drain hole and the distance from the axes of the mounting bolts (if the tank is attached directly to the toilet bowl).
Color matching to an old toilet - try to find a similar shade.
How to choose fittings for a drain tank
Initially, the diameter of the water intake pipe is measured with a tape measure, a ruler. At 1.5 cm eyeliner - 3/8 inch, at 2.0 cm - ½ inch.


It is better to buy fittings of the same model as the old one. To do this, dismantle the failed mechanism, show a sample to the sales assistant. Now fittings are often sold already assembled, which will not require additional effort.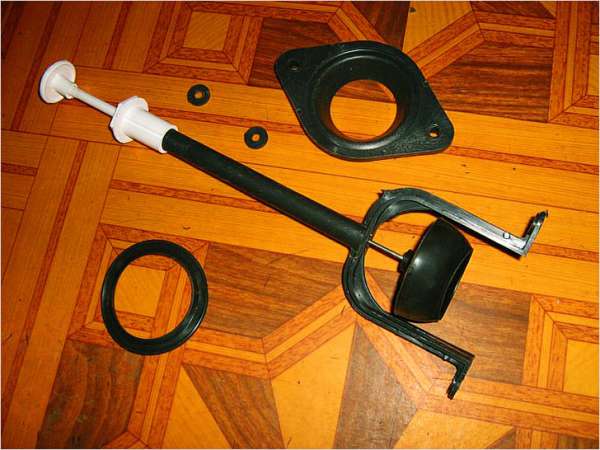
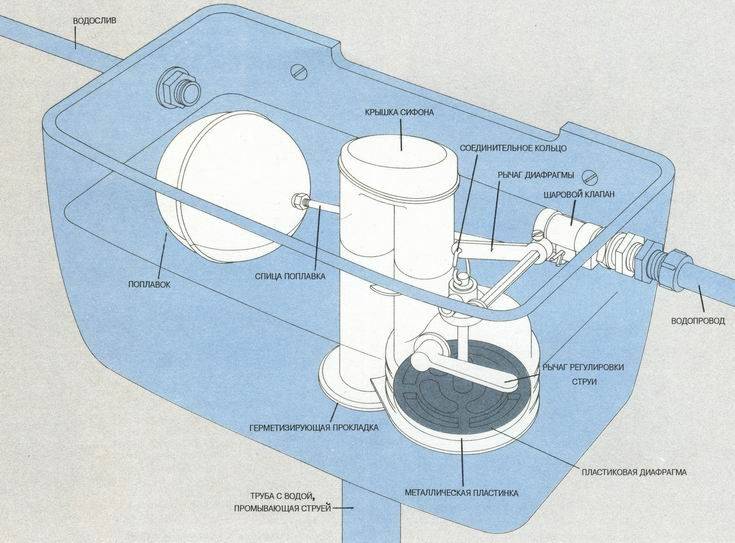
How the fittings for the toilet cistern with bottom connection are arranged
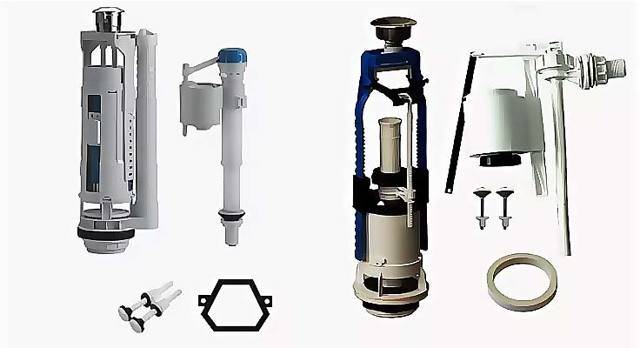
The materials from which fittings are made are plastic, metal, bronze. Plastic is the most popular, but fragile material, the cost of a product made from it is low, bronze, respectively, is a more durable material and the cost of a product made from it is quite high. There is nothing complicated in the structure of the fittings of the drain tank. Despite the variety of models, the principle of constructing reinforcement is the same.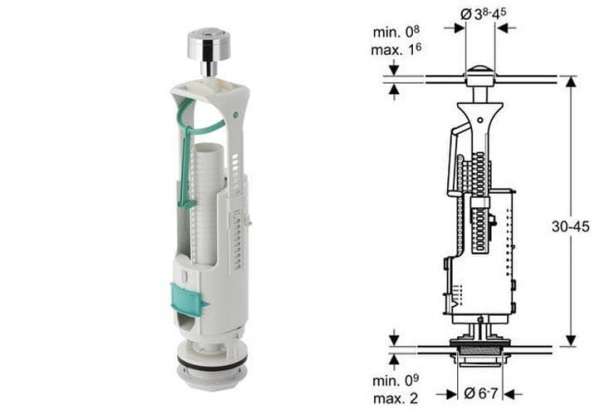
The fittings intended for the lower eyeliner are divided into:
The drain mechanism is fixed in the tank with a union nut. To seal the joint, special seals are put on the downpipe before installation, and a gasket is placed between the drain tank and the bowl, which prevents water from flowing. Water is drained by pressing the button or, with a rod drain device, by lifting the lever up.
The push-button device, in turn, is divided into:
- a one-button device that provides complete draining, that is, the entire tank is emptied;
- a two-button device, in which it is possible to completely and partially empty the tank, respectively, such a drain device has two valves.
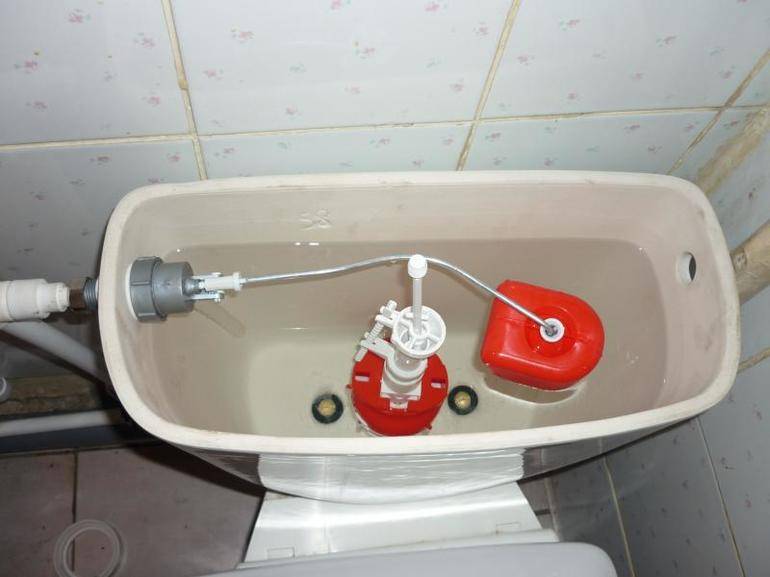
There can also be a float of different designs:
- With a piston - the float is attached to the piston, with pressure on the lever, the drain opens, when water is drawn in, it closes the valve;
- With a membrane - the mechanism of action, as with a piston.
The shut-off valves consist of: a float, a water overflow tube, a push-button mechanism for draining water, a rod, a glass, a membrane valve. Draining occurs as follows: after pressing the button, water flows out of the tank, the float goes down, the membrane valve opens with a pull, and water flows from the water pipe, which fills the flush tank. The float rises to a set level, which limits the thrust. The diaphragm valve then closes, preventing further water ingress.
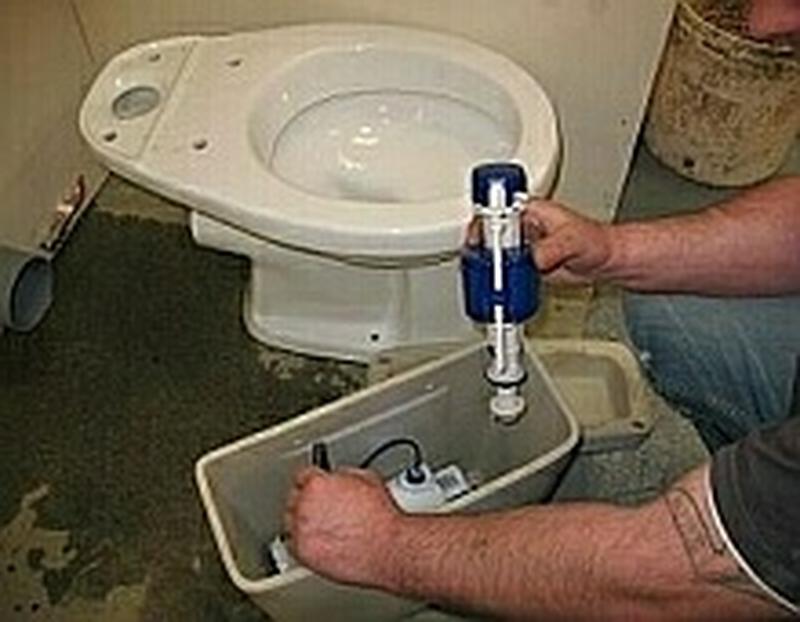
Materials and tools required for installation and replacement of fittings
- Roulette, you can get by with a regular ruler.
- Adjustable wrench No. 1.
- Spanners.
- Fittings.
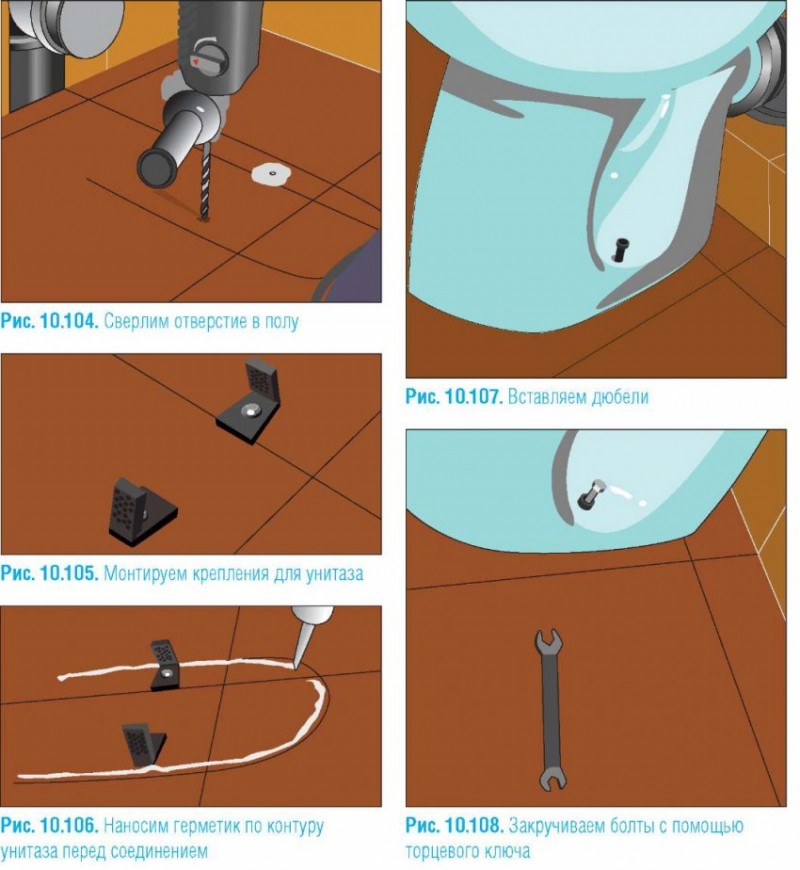
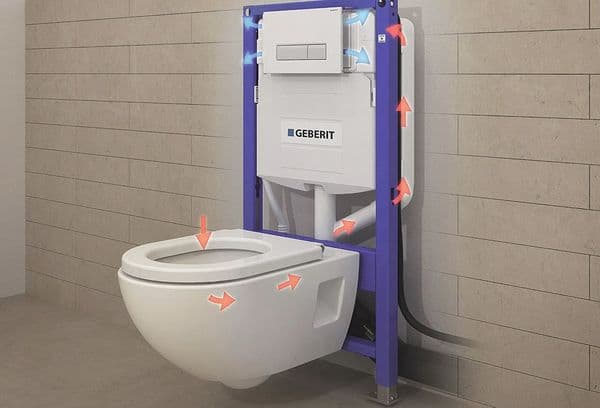
installation
The most difficult thing is to remove the mechanism from the built-in tank. The main problem is the limited space. Access to the stem, tubes and supply hoses is through a narrow opening under the frame.
The bar itself for the buttons can be folding (after dismantling the front plug, the bar opens like a book, and the buttons do not need to be removed from the mounts) and single (having removed the trim, you will have to remove the buttons). In a number of models, the bar with buttons is fastened with screws to the mounting frame, in others (cheaper) it is fixed directly to the wall.
Step by step instructions (on the example of Geberit Delta):
- Raise and remove the trim with buttons.
- Unscrew the screws on the sides and the pushers in the center.
- Remove frame.
- Release the fasteners and remove the shutter.
- Dismantle the block with two rocker arms (transmitting movement from pushers to rods with plugs).
- Remove the inlet valve (it is not necessary to remove it from the hoses - it is enough to bring it out).
- Remove the retainer of the drain valves (to do this, unclench the "mustache").
- Remove drain valves. At Geberit Delta, their device is designed to work in a narrow space. First you need to turn and remove the upper end of the left valve. Then bend the right valve (press sideways until it clicks). In this form, the structure rises quite easily and then passes into the hole in the wall.
Overflow mechanism repair on the example of Grohe:
- Having pressed the latches, dismantle the front panel with buttons.
- Loosen the nut and disconnect the water supply hose.
- Pull up, twisting so that the spikes come out of the grooves, and pull out through the window.
The drain valve is just as easy to remove: you need to pull it up until it clicks, and then remove it through a hole in the wall.