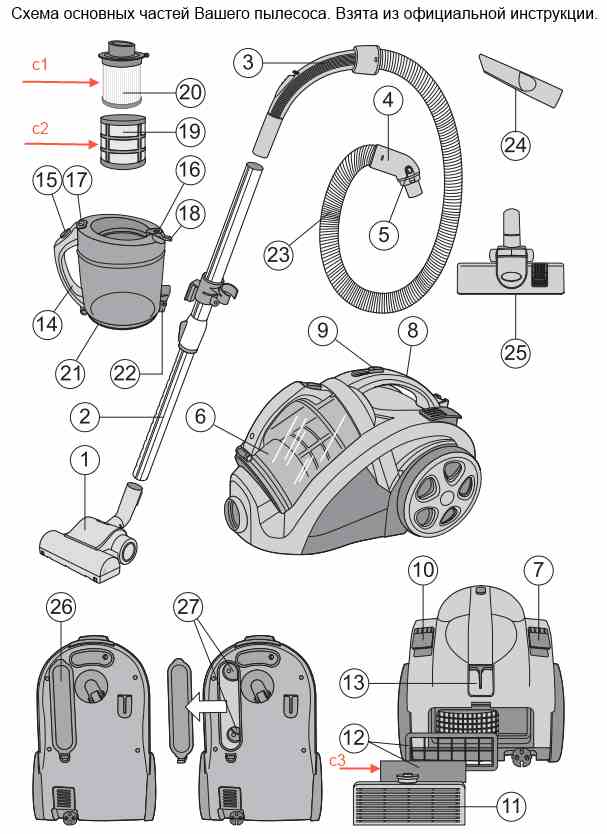
- Step-by-step instructions for disassembling the engine
- Smoke, fire, short circuit
- How is the problem solved, and is it possible to prevent it?
- The preparatory stage for disassembling the Samsung vacuum cleaner
- What tools will be needed
- Case disassembly
- Disassembly step by step
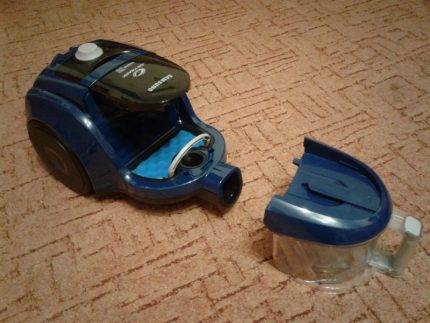
- Disconnect the hose and disassemble the body
- We remove the motor
- Removing the engine cover
- We take out the brushes by unscrewing the clamping screws
- Loosen the rotor nut
- Disassemble the air pump wheel
- Carefully inspect the rotor, stator and bearings for damage
- If bearings are damaged: how to remove
- If the windings are damaged: how to disassemble the anchor
- How to disassemble and clean the turbo brush
- The sequence of disassembling the vacuum cleaner on the example of Samsung 1600w
- Engine disassembly
- Types and causes of engine breakdowns
- Case disassembly
- Reasons for disassembling the vacuum cleaner motor
- The sequence of disassembling the vacuum cleaner on the example of Samsung 1600w
- Engine disassembly
- Engine disassembly
- The sequence of disassembling the vacuum cleaner on the example of Samsung 1600w
- Engine disassembly
- Minor malfunctions and their elimination
- Problem #1 - Suction power dropped sharply
- Problem #2 - Clogged Vacuum Cleaner Filters
- Problem # 3 - the device does not turn on
- The principle of repairing a household appliance
- Vacuum cleaner breakdown prevention
- Preventive engine care
- General recommendations for the care of the unit
- The main problems of the Samsung 1600w vacuum cleaner
- The principle and device of the vacuum cleaner
Step-by-step instructions for disassembling the engine
The next step in repairing a Samsung vacuum cleaner is to inspect and repair the motor of the device. To repair the Samsung vacuum cleaner engine, first you need to disassemble it. This is done as follows:
Using a screwdriver, the two side bolts located at the top of the case are unscrewed.
Rotate the body a little and look at the engine. If you try to remove it, you will find that the coil is preventing you from doing this.
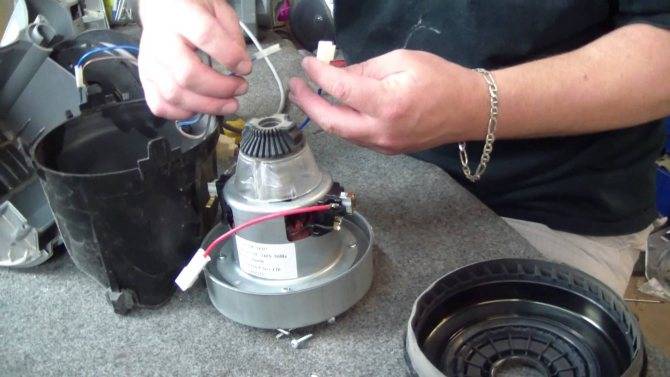
Carefully release the engine from its wires and disconnect all connectors.
Carefully pull out the coil wires so that the coil itself remains on the body, and remove the motor.
After the engine is removed, you need to repeat the cleaning again.
Now you need to remove the sealing gum. To do this, unscrew the two side bolts.
Using a screwdriver, the two halves of the engine housing are separated.
Next, the engine itself is removed from the plastic case.
Look at the top of the engine
You will see rolling. They need to be bent in the opposite direction. Then a screwdriver is stuck into any slot. Both halves are separated from each other. Thus, the turbine is released from the casing.
Using a 12 socket head, a bolt is unscrewed
What is important: the thread is left-handed, so when removing the bolt, it must be turned clockwise. In this case, it is necessary to jam the engine stator with small wooden blocks
The entire structure must be supported.
Now you can remove the turbine.
Remove the washer and unscrew the two bolts.
At the bottom you will find four more screws that need to be unscrewed.
Next, you need to remove the brushes, after unscrewing all the bolts.
We knock out the anchor. We insert the key into the hole and knock on it with a hammer
The engine will pop out.
Pay attention to the bearings. If they are in good condition, they can be oiled.
Remove duster with tweezers
If the bearing spins with a rustling sound and remains dry, it needs to be cleaned and lubricated. You can use a carburetor cleaner to clean it.
Reassemble the vacuum cleaner in reverse order.
Your specific vacuum cleaner model may need different care. Wipe with a slightly damp cloth and a little cleaner over the plastic parts of the vacuum cleaner. In any case, however, you should regularly clean the outside of the vacuum cleaner. . You must remember that cleaning the air conditioning filters will ensure optimal performance of the air conditioner as well as normal energy consumption.
Smoke, fire, short circuit
Grab the top panel of the front panel and pull down or lift it up to open. Then lift the panel slightly. Hold the pen and lift it up. Then pull the air filter towards you and slide it down. Air cleaning. Washable foam air filter that traps large air particles. The filter can be cleaned with a vacuum cleaner or by hand washing.
How to disassemble the vacuum cleaner video, see below:
If desired, you can even rewind the stator of the vacuum cleaner motor. How to rewind the vacuum cleaner motor video, see below:
How is the problem solved, and is it possible to prevent it?
Why isn't the vacuum cleaner working? Consider the banal reasons that any user can handle. Automation failure can occur for the following reasons:
- Filling the dust container.This will be evidenced by the presence of the smell of dust.
- Entry of large debris. Large sizes of dirt stuck in the air duct interfere with the passage of the air flow sucked in by the vacuum cleaner.
- Jamming in the litter hose. Evidence of this change in sound when you turn on the device.
- Contamination of the pre-motor filter. During this process, an unpleasant burning smell appears.
Consider the possibilities of repairing a malfunction of a Samsung vacuum cleaner, and what to do when vacuum cleaner does not turn on. You can fix the above problems yourself, but still it is better not to allow them initially. To do this, you will need to disconnect the equipment from the power source, then disassemble the device and clean the rubbish accumulated inside.
To access the dust container, remove the top cover. Some dust collectors can be cleaned or replaced with new ones. It is also advisable to wash the dust container and dry it. In order not to spill dirt and dust, close the existing valve for tightness. When reinstalling the dust collector, make sure that the mouth fits snugly against the bag holder. If this does not happen, then dirt and dust will seep into the structure, which will lead to overheating of the motor and accumulation of dirt on the components.
Additional care requires filters. Be sure to read the instructions and find out how many filters are installed in your vacuum cleaner model. All filters installed in the structure should be checked. Some types of filters can be washed with a stream of water for cleaning. But before installation in the structure, be sure to dry it. Turning on the vacuum cleaner with a wet filter will cause damage. Periodic replacement is carried out according to the manufacturer's recommendation.When the filter has served its useful life, it is replaced with a new one. The filter period is indicated in the operating book.
All replacement consumables, filters, brushes and other accessories can be purchased at a specialized store.
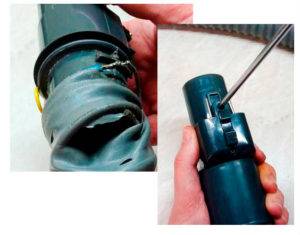 To remove blockage in the nozzle, unscrew the corrugated accessory from the body, inspect its integrity and remove accumulated dirt and screw it back on. Dirt stuck in the corrugated handle leads to no air flow.
But still, if the vacuum cleaner does not turn on, what should I do? If the troubleshooting is serious, it is better to contact specialized craftsmen who can solve this difficulty.
But it is worth remembering that the main possible breakdowns occur due to engine overheating. It is worth adhering to the following rules:
- To prevent overheating, use the vacuum cleaner when cleaning for no more than 30 minutes. At maximum mode, use the device for no more than 10-15 minutes. Longer operation may cause overheating, for this, allow the device to rest and cool down.
- Keep the dust container full of accumulated dirt and dust. An excess of dirt and dust will not allow the air flow to pass, which will lead to overheating of the electric motor. And also an excess of dust in the dust collector will lead to clogging of the structure inside the device.
- Clean the home protection filter in time. Large contamination can lead to the formation of an unpleasant burning smell.
- Avoid sucking up large objects that could block the blower. Before using the vacuum cleaner to clean the floor covering, you should collect large rubbish and accidentally dropped things by hand.
- Noise levels need to be monitored.If the sound changes, this may indicate a clogged brush or pleat.
Monitor the performance of your home assistant, and provide timely care for the vacuum cleaner and its replacement consumables. Then it will be easier to avoid breakage of equipment to maintain cleanliness in the house.
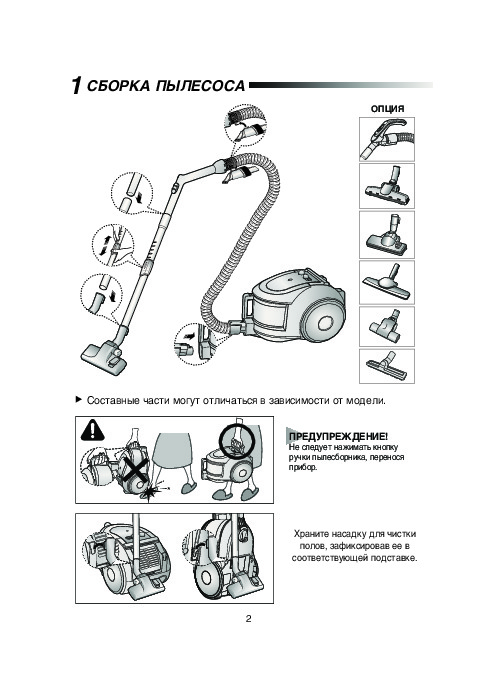
The preparatory stage for disassembling the Samsung vacuum cleaner
You can notice trouble if you use equipment for some time. You know what sound is characteristic of your Samsung and the smallest changes in it or in the operation of the device will be noticeable to you.

The failure of many parts will lead to financial problems.
A broken engine in a vacuum cleaner is noticeable by: intermittent sounds, throws out dust, smells of burning. If it is not possible to give it to the master, then disassembling the Samsung 1800 w vacuum cleaner with your own hands, videos and photos will be helpers.
What tools will be needed
Need to clean the dust bag or change it? Special devices and skills are not needed. They are needed in cases of problems with the engine, wires, board elements. They will become:
- file;
- awl;
- pliers;
- sandpaper;
- vise;
- construction knife;
- spare connectors and wiring.
Use tools to disassemble the vacuum cleaner.
In cases of replacing small parts, you will not have to spend a lot
But to replace a large and expensive component, you can pay attention to an alternative. With the condition of good material from which it is made
Case disassembly
The upper part of the body is fastened with self-tapping screws. Unscrew them with a screwdriver and a screwdriver to remove the cover. If you are removing the dust box, also remove the screws underneath.


The main part of the body rests on self-tapping screws or special latches. After removal, access to the motherboard opens. If you are sure that the board is operating normally, put it aside so as not to damage it during diagnostics and repairs. To do this, disconnect its connectors and unscrew the screw in the central part.
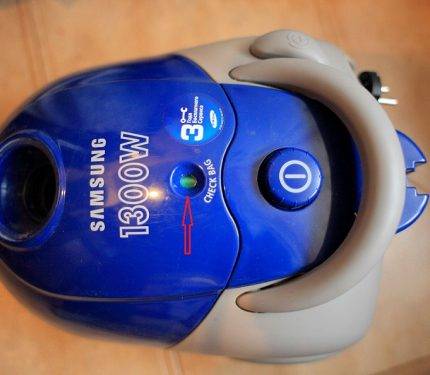
Next to the engine is a check valve - a small button that is pulled out quite simply. The valve is needed to stop the operation of the engine, in case it clogs with a powerful suction force. Without a valve, the electric motor can burn out.
To gain access to the motor itself, remove the bolted cover and circumferential rubber plates. Also next to the motor may be protective pads made of foam rubber or felt. They fix the position of the engine and do not allow it to touch the walls of the casing.
Disassembly step by step
Here we will tell you how to get to the vacuum cleaner motor, and consider the disassembly process in more detail.
Disconnect the hose and disassemble the body
As a rule, it is necessary to unscrew the four bolts holding the two halves of the case with a long Phillips screwdriver. Sometimes you will have to remove some overhead elements, such as a turbine. The main thing is not to damage anything and unscrew all the bolts before separating the body parts.
We remove the motor
Before removing the motor, disconnect the power terminals and other electronics.
Removing the engine cover
The lid is sealed with a seam around the entire perimeter. To remove it, gently press the seam with pliers. Under the influence of light blows, the cover should separate from the main body.
We take out the brushes by unscrewing the clamping screws
As a rule, the brushes are pressed against the rotor with small springs - if the clamps are unscrewed, the springs can fly out in an unknown direction.
Check the carbon brushes for wear: they must fit evenly and tightly against the motor commutator and be of sufficient thickness. The thickness must be compared with the depth of the grooves into which they are inserted on the engine, having previously measured it with a caliper.
Some motors do not have brushes at all: these are brushless motors with an asynchronous motor and a squirrel-cage rotor. They are rare, but if you did not find brushes on your vacuum cleaner, do not be surprised and continue disassembling.
Loosen the rotor nut
To unscrew the fastener, first treat it with WD-40 or similar. Then make clamping bars in place of the brushes so that the commutator (the part of the motor between them) does not rotate when spinning up. The size and shape are the same as the brushes, but slightly longer so that the bars protrude from the body.
Clamp the collector with bars using a vise or clamp. After that, the nut can be easily unwound with a wrench clockwise.
Disassemble the air pump wheel
The procedure is highly dependent on the brand of the model and, as a rule, does not cause difficulties. The main task is to free the working shaft of the electric motor. Carefully look at how the working tool is mounted on the shaft, whether it has additional fasteners in the form of screws or cotter pins. Carefully remove and remove everything. As a rule, friction washers are present on the shaft along with the wheel, which also need to be treated with WD-40.
Carefully inspect the rotor, stator and bearings for damage
If the bearings are worn, the guide mounts will often loosen due to vibration.Check - if everything is in order, move on. If the bearing fails, do not try to repair it: bring it in for repair or replace it with a new one. In specialized stores, sellers will 100% find an analogue, the main thing is not to throw away the collapsed part.
It is possible that the windings or their insulation are damaged - scuffs or burnt insulating varnish are visible. Ideally, it would be to ring the winding with a multimeter (more on this below).
Disassemble the engine further so that the anchor can be handed over for rewinding. If everything is in order with the windings and only the bearing has broken, try to assemble the device and turn it on after replacing the bearing.
If there are no obvious burn marks on the winding, it may be intact and there is no need to rewind. But in the presence of scuffs with a metallic sheen of copper, it is better to play it safe.
If bearings are damaged: how to remove
In a good way, a special puller is needed here, but the bearing races can be removed from the shaft with a screwdriver and a hammer. The main thing is to do everything carefully and take your time: the impacts on the bearing races should not be too hard.
If the windings are damaged: how to disassemble the anchor
To disassemble the anchor, you need to rewind the engine. Rewinding at home is very difficult, so we recommend that you take the part to professionals.
Let's summarize the instructions with another example in the video:


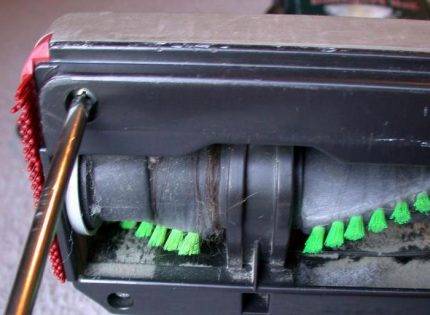
How to disassemble and clean the turbo brush
Once every six months, it is advisable to clean such a nozzle for a vacuum cleaner more thoroughly. To do this, you need to disassemble it:
- Remove the protective cover.
- Turn the nozzle over. On the inside you will see 6 screws. Unscrew them with a screwdriver.
- Carefully disassemble the brush into two halves.
- Wipe the inside with a clean cloth.Hard-to-reach places can be cleaned with a pipe from a vacuum cleaner.
- Remove hair, hair and dirt from all parts of the mechanism. To do this, you can use the same tweezers and scissors.
- Collect the brush.
That's the whole cleaning process. In principle, it is not difficult to do this even without outside help. If pets live in the house, then the nozzle will have to be disassembled every 3 months, then it will be able to work with maximum force.
"Cleanliness is the key to health." It's not just a slogan. This is a correct and up-to-date statement.
Today, various devices help to put things in order, invented not only by the “lazy”, as the joke says, but in general for convenience and ease of work.
The sequence of disassembling the vacuum cleaner on the example of Samsung 1600w
Disassembly of any equipment begins with preparation. And the correct sequence. We cannot reach the heart of the device until we remove everything that covers it.

You can disassemble the vacuum cleaner yourself, using the instructions.
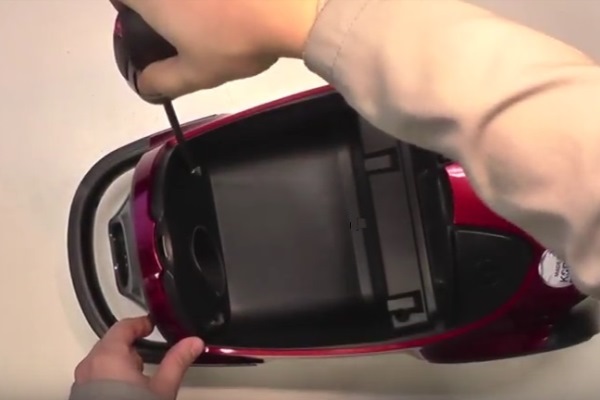
You can open it like this:
- Disconnect everything that can interfere and unwind the case. With a screwdriver, we unscrew all the screws, including hidden ones, which can be near the buttons. After unscrewing all the parts that can hold the vacuum cleaner shell, remove it. If it doesn't work out, inspect again, there may be hidden latches.
- Disconnect the electrical installation. You can see it on the connectors.
- We remove the engine from the entire plastic case by unscrewing it from the bed.
Proper diagnosis is the key to success.
Engine disassembly
The heart of the vacuum cleaner has a step-by-step unfolding process.
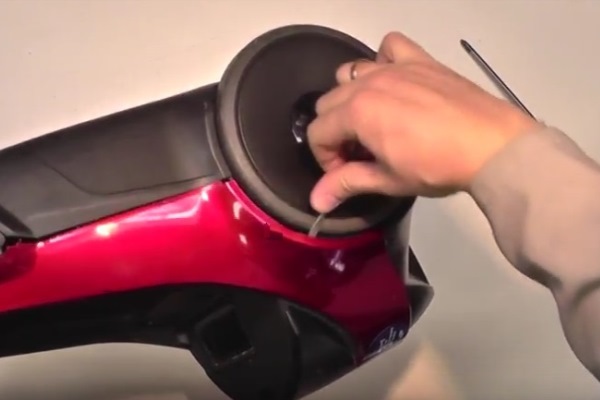
- First you need to remove the impeller. But for this you need to perform certain actions. Remove the front cover. Use a thin screwdriver to bend the side of the casing so that the screwdriver gets inside.Move the top of the casing aside and the impeller becomes accessible.
- We unscrew the nut on the impeller.
- We remove the screws of the case, but the brushes should already be removed by this point.
- Pull out the anchor.
- Remove the bearing with threaded pullers.
The filters get clogged, the debris is poorly drawn in, there is an additional load on the motor and, as a result, it breaks.
Types and causes of engine breakdowns
If the unit refuses to work at all, the problem may be in the power supply system. If the electrical circuit and brushes are in good condition, damage to the motor windings is possible. Low speeds, excessive noise and vibration indicate problems in the bearings holding the armature. Faulty current collectors and worn brushes cause sparking.
Turbine overload is a common cause of engine failure. In continuous mode, the vacuum cleaner should work for about 30-40 minutes. With longer loads, as a result of overheating, some materials in the motor lose their properties, and it fails. Not very attentive housewives rarely clean the dust bag and do not monitor the condition of the filters, which also leads to overheating. Sometimes foreign objects get into the hose that interfere with free suction - this is another reason for overloading the motor.
Moisture penetration has an adverse effect on the engine. The turbine mainly consists of metal parts, therefore it is subject to corrosion. In addition, under the action of moisture, dust particles are formed on the blades, which over time hinder the operation of the turbine.
One of the most common causes of engine breakdowns can be considered power surges in our electrical networks.One surge of voltage is sometimes enough to completely disable the motor. In some cases, partial combustion of the turbine is possible. The pump will continue to run, but will not last long. For electrical appliances, not only high, but also low voltage indicators are dangerous.
To eliminate the problems that have appeared, it is necessary to disassemble the engine of the unit. Before proceeding with dismantling, you should familiarize yourself with the location of the individual fastening parts. Disassembling this household appliance is not particularly difficult, but it has some subtleties. In general, despite the very large number of brands and models, all vacuum cleaners with minor deviations are equipped with the same motors.
Case disassembly
The complexity of disassembling the case lies in the presence of hidden bolts. The manufacturer hides them under buttons, covers and other details. Repair work begins with the preparation of the tool. Be sure to need a set of straight and curly screwdrivers.
And now, screws are often found not under a Phillips screwdriver, but triangular or asterisks. To test the wires, fuse, switch contacts, you need a multimeter. It is advisable to have tweezers handy to grab small screws.
If you plan to disassemble the electric motor, you will need a bearing puller, a hammer, a set of wrenches ranging in size from 8 to 17 mm. From the materials you need Litol lubricant, WD-40 rust corrosive liquid, new bearings and brushes.
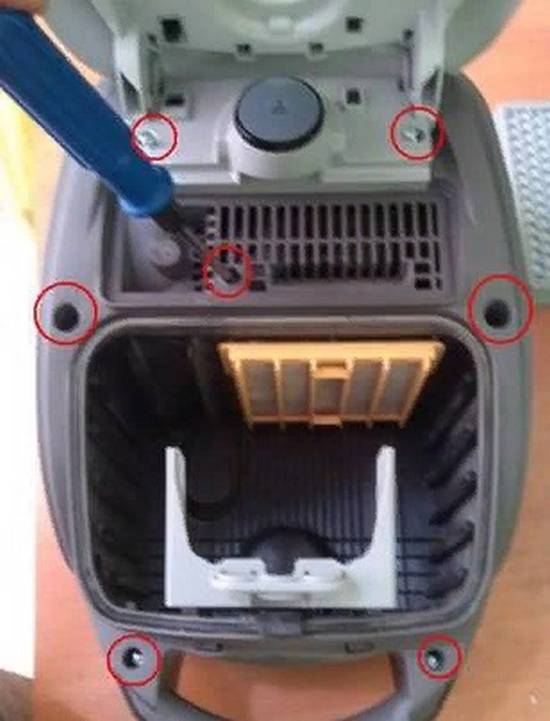
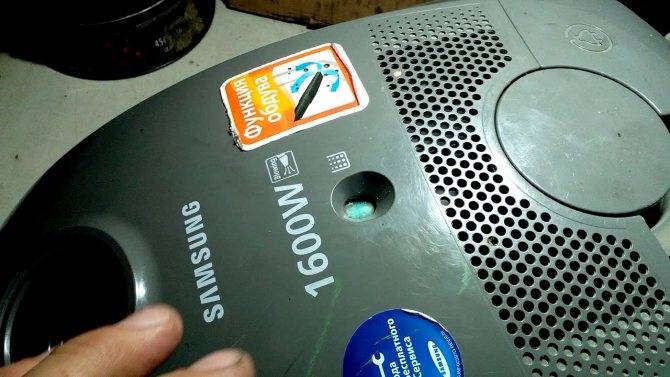
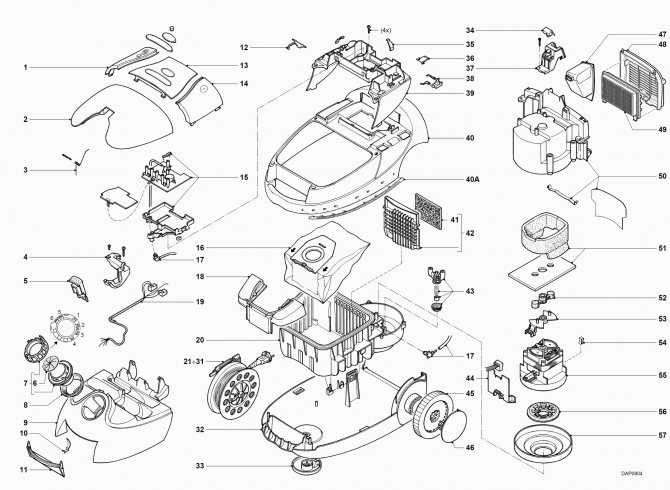
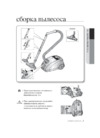
The disassembly of the case begins with the unscrewing of all visible screws. At Samsung they are usually not hidden. The approximate location of the screws is shown in red circles in the photo, but each model may vary.If the top cover of the case did not succumb to removal, then somewhere else there is a hidden mount. Moreover, these may not be screws, but latches on the case.
After detaching the top cover from the bottom of the case, do not rush to remove it sharply. There may be wires coming from the electronic unit. In order not to cut them off, the chips are disconnected on the board. Now you can carefully remove the cover. The review includes an electric motor with wires, as well as other electrical parts located inside the lower half of the housing.
The top cover with screws is set aside so that nothing is lost.
Reasons for disassembling the vacuum cleaner motor
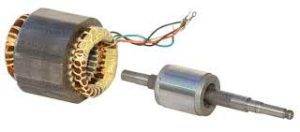 The motor unit of the vacuum cleaner, in turn, consists of 2 fundamental mechanisms:
- Collector engine;
- Fan.
The fan is attached to the rotary shaft, due to which the suction process takes place. As a rule, the main reason for the failure of the motor is a careless attitude to it or a long service life.
Manufacturers of household appliances solved the problem with the first option by installing a thermostat that shows the temperature on modern models. Such a device has an electric motor - a motor for a lg vacuum cleaner. When the critical temperature is reached, the thermostat automatically turns off the unit. To continue using the unit, leave it for a while until it cools down properly.


Another question that owners of household appliances are interested in is “Why do brushes spark?”. Like rapid overheating, as well as a strong hum, this problem also applies to a vacuum cleaner malfunction. In such cases, the best solution is to replace the motor. But there are situations when the vacuum cleaner engine, nevertheless, can be saved and rehabilitated.These include: an early loss of suction power. Do not rush to conclusions, perhaps the power drops due to the neglected state of the filters and brushes. Beforehand, always, it is necessary to check the equipment. By the way, the repair of the armature of the electric motor, depending on the level of depreciation, costs 70% of the cost of the complete motor, so it is recommended to purchase a new product.
Although, on the other hand, the design of household vacuum cleaners from different manufacturers is similar, so trying to fix a vacuum cleaner machine at home is still worth a try.
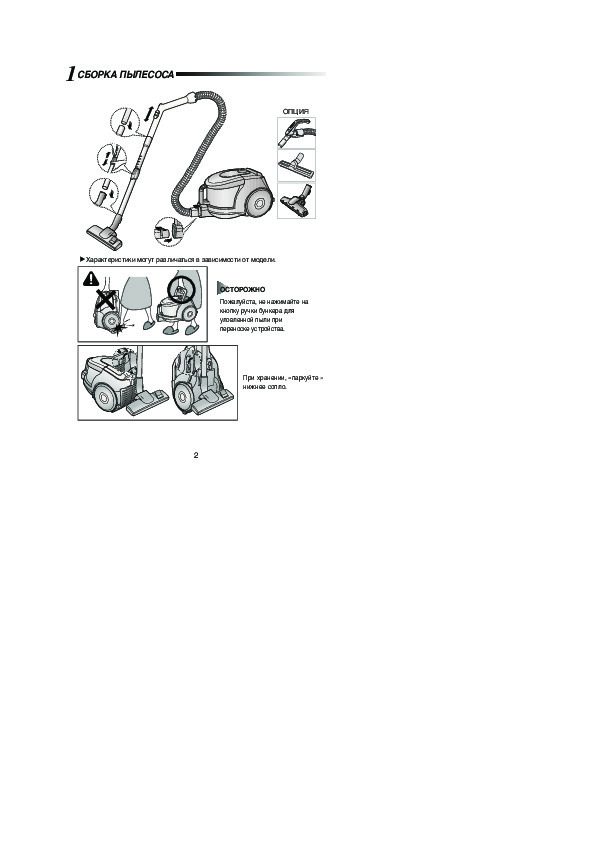
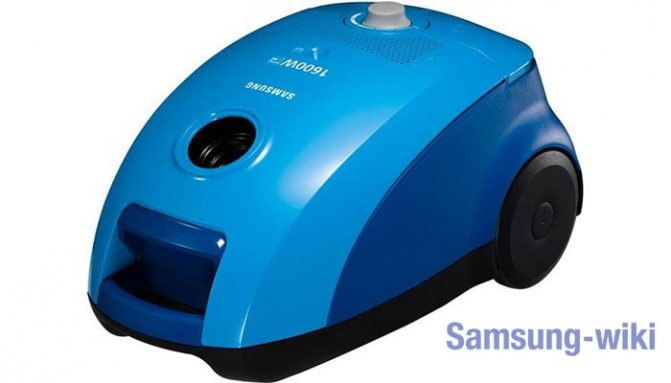
The sequence of disassembling the vacuum cleaner on the example of Samsung 1600w
Disassembly of any equipment begins with preparation. And the correct sequence. We cannot reach the heart of the device until we remove everything that covers it.

You can disassemble the vacuum cleaner yourself, using the instructions.
You can open it like this:
- Disconnect everything that can interfere and unwind the case. With a screwdriver, we unscrew all the screws, including hidden ones, which can be near the buttons. After unscrewing all the parts that can hold the vacuum cleaner shell, remove it. If it doesn't work out, inspect again, there may be hidden latches.
- Disconnect the electrical installation. You can see it on the connectors.
- We remove the engine from the entire plastic case by unscrewing it from the bed.

Proper diagnosis is the key to success.
Engine disassembly
The heart of the vacuum cleaner has a step-by-step unfolding process.
- First you need to remove the impeller. But for this you need to perform certain actions. Remove the front cover. Use a thin screwdriver to bend the side of the casing so that the screwdriver gets inside. Move the top of the casing aside and the impeller becomes accessible.
- We unscrew the nut on the impeller.
- We remove the screws of the case, but the brushes should already be removed by this point.
- Pull out the anchor.
- Remove the bearing with threaded pullers.

The filters get clogged, the debris is poorly drawn in, there is an additional load on the motor and, as a result, it breaks.
Engine disassembly
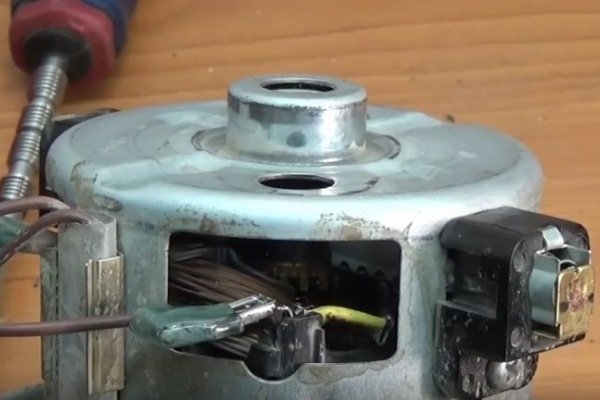
Since the majority of vacuum cleaner malfunctions occur due to the engine, it often has to be disassembled for repair.

This process is not difficult and is as follows. With a thin screwdriver, carefully remove the impeller casing. As a result, access to the nut of its fastening opens. After unscrewing this nut, you need to remove the motor brushes and unscrew the coupling screws of the housing
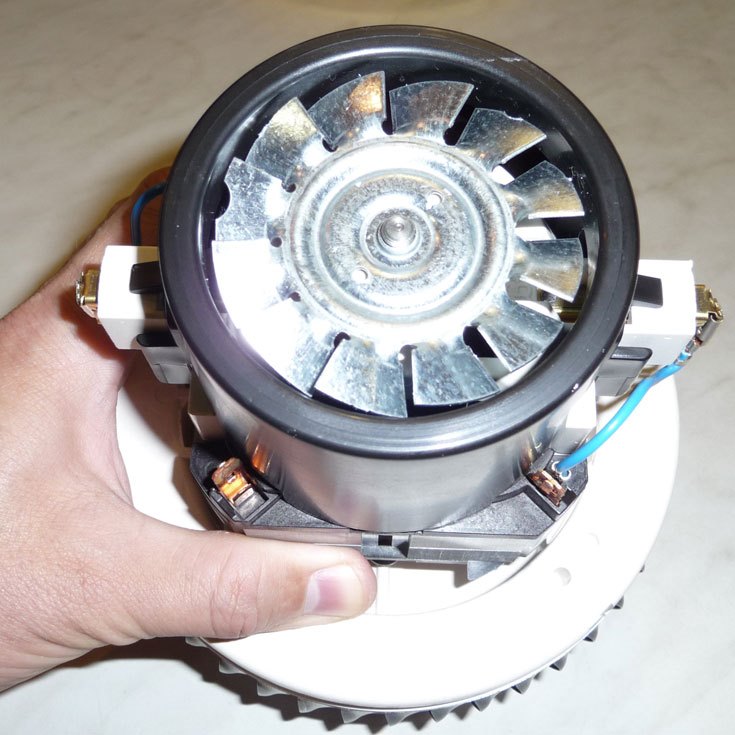
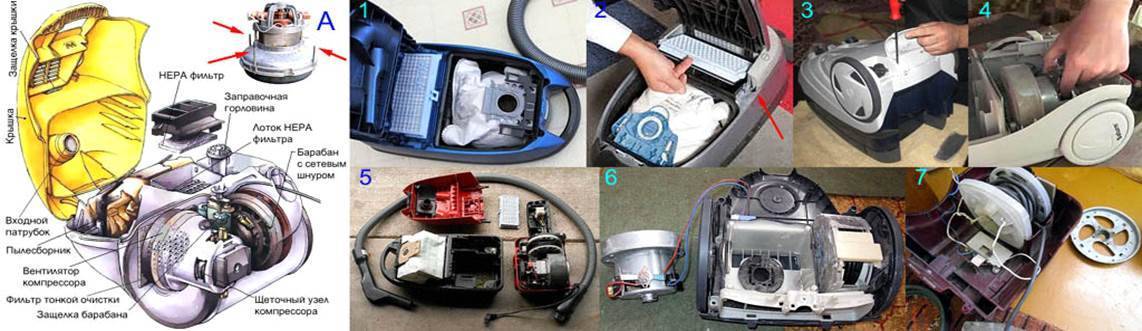
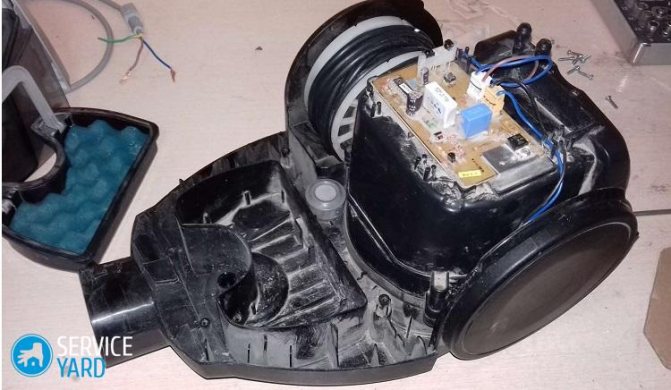
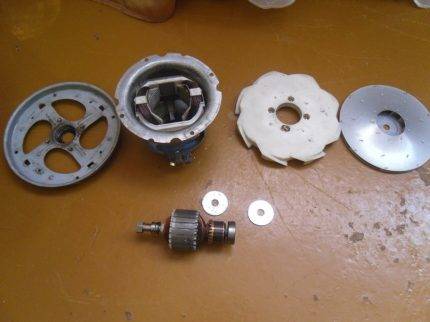
It remains to carefully remove the anchor, and you can begin to remove the bearings. As a result of the work done in the workplace, you should get something like this picture (pictured)
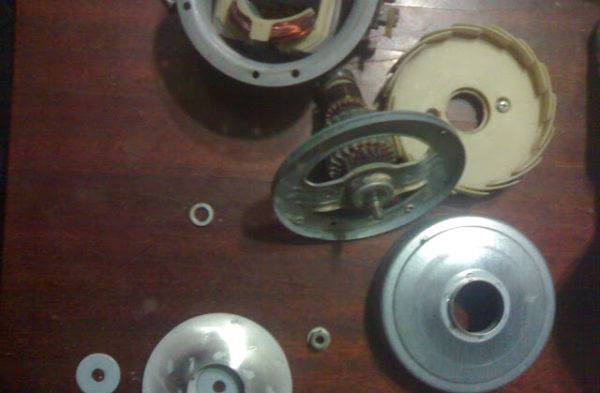
To remove bearings, an available tool is usually enough, but sometimes a special puller is required. After disassembly, all parts are thoroughly cleaned of dust and dirt.
Particular attention is paid to the seating surfaces of the bearings and the motor manifold
The sequence of disassembling the vacuum cleaner on the example of Samsung 1600w
Disassembly of any equipment begins with preparation. And the correct sequence. We cannot reach the heart of the device until we remove everything that covers it.
You can disassemble the vacuum cleaner yourself, using the instructions.
You can open it like this:
- Disconnect everything that can interfere and unwind the case. With a screwdriver, we unscrew all the screws, including hidden ones, which can be near the buttons. After unscrewing all the parts that can hold the vacuum cleaner shell, remove it. If it doesn't work out, inspect again, there may be hidden latches.
- Disconnect the electrical installation.You can see it on the connectors.
- We remove the engine from the entire plastic case by unscrewing it from the bed.
Proper diagnosis is the key to success.
Engine disassembly
The heart of the vacuum cleaner has a step-by-step unfolding process.
- First you need to remove the impeller. But for this you need to perform certain actions. Remove the front cover. Use a thin screwdriver to bend the side of the casing so that the screwdriver gets inside. Move the top of the casing aside and the impeller becomes accessible.
- We unscrew the nut on the impeller.
- We remove the screws of the case, but the brushes should already be removed by this point.
- Pull out the anchor.
- Remove the bearing with threaded pullers.
The filters get clogged, the debris is poorly drawn in, there is an additional load on the motor and, as a result, it breaks.
Minor malfunctions and their elimination
If the vacuum cleaner begins to "behave" - perform its functions incorrectly, make a loud noise, vibrate - it needs help.
Most often, the cause of the malfunction is the cleaning process itself: the dust bag is completely filled or one of the filters is clogged with debris.
Some vacuum cleaners are easy to disassemble, others require certain knowledge. In order not to be mistaken, we recommend that you often look at the instructions, which are equipped with diagrams and tips.


Usually you can deal with the problem on your own. But if you are not good at repairing equipment, it is better to take the device to a service center, to specialists.
Problem #1 - Suction power dropped sharply
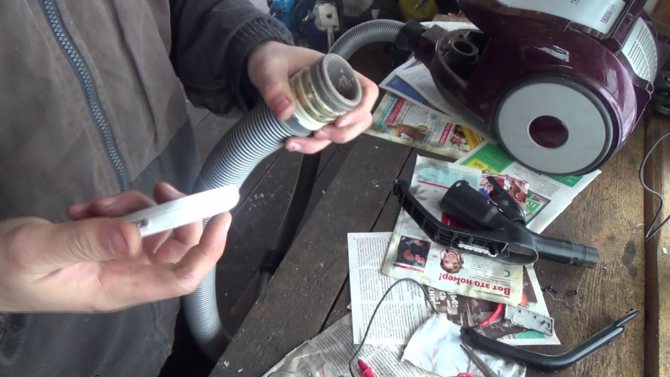
If you notice that dust is poorly absorbed, and small debris remains completely untouched on the floor, you will have to find out the cause by partial disassembly.First you need to make sure that everything is in order with the pipe, hose and brush.
Procedure:
- disconnect the hose from the vacuum cleaner;
- separate the pipe from the hose;
- remove the nozzle;
- carefully inspect each part;
- try to blow out the pipe and hose.
If a large object (a plastic bag, a sock, a sheet of paper) gets into one of the elements, you need to carefully remove it, then assemble it in the reverse order and try to start the device.
Sometimes the thrust weakens simply because the power regulator was accidentally touched and set to minimum. Be sure to check it before any disassembly steps.
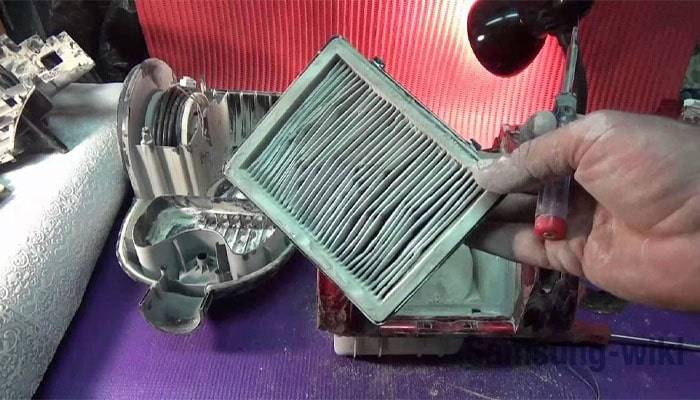
Problem #2 - Clogged Vacuum Cleaner Filters
Unusual sound, weak traction, stoppage of work - the consequences of clogged filters. For devices with a filling indicator, this can also be determined by the lit red light. In modern devices, everything is provided so that filters can be easily and quickly delivered.
Usually, two main elements need to be cleaned - a plastic cyclone filter (a transparent reservoir with compartments) and a sponge enclosed in a plastic container. But sometimes it is necessary to replace the HEPA filter, and for washing units - additional engine protection.
Photo tips for disassembly, cleaning and replacement:
Image gallery
Photo from

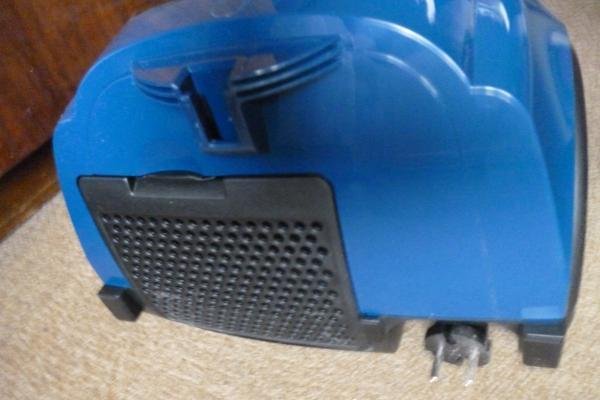
To get to the fine filter, you need to remove the cover, which is located at the back of the device.
If the filter is clean, then the reason is not in it - we install it in place. It is better to replace a dirty part with a new one, although some try to wash it off
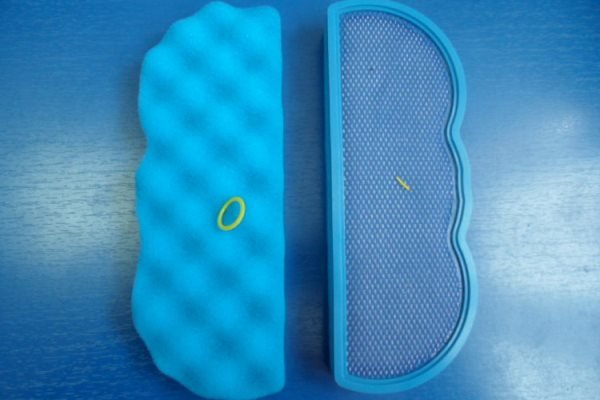
The finest dust remains in the sponge filter. It is usually inserted into the lid of the tank and encased in a small plastic container. Sponge cleans well with soapy water
Container with cyclone filter
Plastic grill to protect the HEPA filter
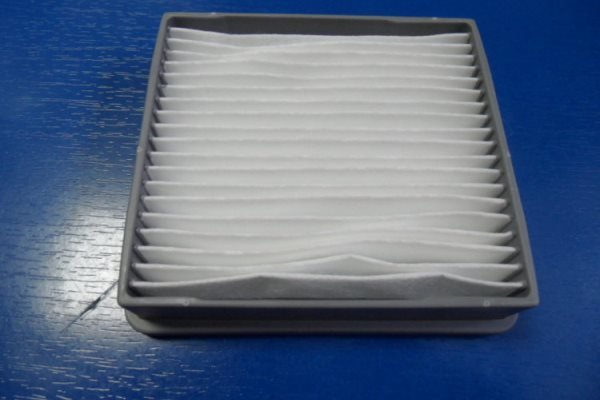
New HEPA filter for Samsung
Sponge filter in a container
As you can see, disassembling a Samsung vacuum cleaner for cleaning filters is elementary and quick. Elements are washed in warm water with a non-aggressive detergent. Then they need to be dried and reassembled.
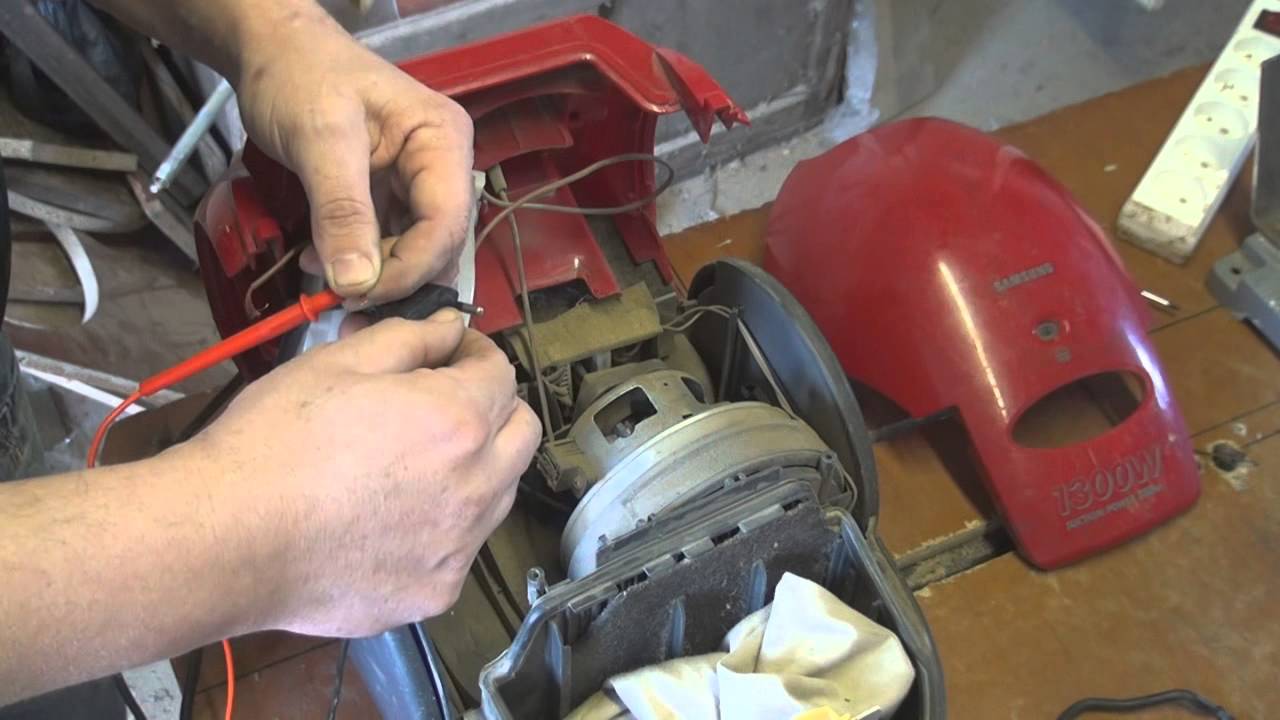
Problem # 3 - the device does not turn on
The standard check when the device is not working is to turn it on to the network. Make sure the power cord is plugged into a power outlet and the power adjustment button is set to the correct setting.
If the indication does not work, and the vacuum cleaner does not make noise, most likely you will have to repair or change the motor. But problems with the board are also possible, so disassembling the case is necessary in any case.
The principle of repairing a household appliance
In order to repair the Samsung vacuum cleaner yourself, you should read the instruction manual for its operation.
First you need to unplug the power cord from the outlet, pay attention to external signs to determine the location and nature of the breakdown.
In a modern vacuum cleaner, there is a full-flow cooling of the motor with purified air. On the case, detachable parts are connected using screw clamps with six self-tapping screws, two of which hold the front part of the mounting cover, and four are located on the opposite side. The handle is fixed from below with two self-tapping screws, the end is held by the same amount. The electronic board for engine control is covered with the top cover of the housing and secured with four plastic locks on latches (grooves with protrusions).


The Samsung vacuum cleaner repair method is simple and easy to understand. You must first prepare the necessary tool:
- Several different screwdrivers, pliers.
- Different heads with an awl.
- Small hammer, soldering iron with a clean rag.
- A supply of WD-40 fluid, EP-2 lubricant or Litol-24.
- A tester that is necessary to carry out the continuity of electrical circuits.
- Camera.
Vacuum cleaner breakdown prevention
Proper care must be taken to extend the life of your equipment. Regular preventive maintenance of malfunctions ensures high-quality and uninterrupted operation of the unit, and also prevents the occurrence of sudden breakdowns or failures during use.
Periodic visual inspection of the device will allow you to identify worn parts and assemblies, and replace them in time. Timely replacement of spare parts is necessary in order to avoid more serious damage to other parts.
Preventive engine care
Caring for the electric motor and early diagnosis of malfunctions prevents possible failures in the operation of equipment.
 It is recommended to disassemble the engine once every 1-2 years, lubricate it, change gaskets, sealing gum, clean filters, and also change bearings when they are worn
Disassembly of the vacuum cleaner should be carried out in the following order:
- take out the trash can or bag, filter element;
- unscrew the housing cover;
- clean all parts and mechanisms from a layer of dust;
- unscrew the bolts and disconnect the engine;
- disassemble it into parts, rinse, lubricate, check the condition of the winding, brush-collector assembly, bearings;
- if necessary, replace worn parts;
- clean the HEPA filter.
Next, you need to assemble the device in reverse order.
General recommendations for the care of the unit
Since the main function of the vacuum cleaner is to clean the room from dust, it must be regularly freed from accumulated debris.
To prevent overheating and breakage of components, mechanisms of the device, it is recommended:
- after each cleaning, check the cleanliness of the filters and, if necessary, clean them;
- empty the dust bag, garbage container in a timely manner;
- store equipment in a dry place, preventing water from entering the engine and internal parts;
- do not allow the ingress of sharp objects that can damage important components of the device;
- observe the operating mode of the unit and do not overheat it.
If problems with the device still occur, follow the above basic recommendations for troubleshooting the vacuum cleaner.
The main problems of the Samsung 1600w vacuum cleaner
Have you noticed that the vacuum cleaner began to work worse? If the device begins to suck dust worse, make louder noise and vibrate strongly, the cause of the malfunction should be found. Most mid-range Samsung vacuum cleaner models have a similar device, so most of them have similar reasons.
The main causes of breakdowns are:
- Suction power drop - may occur due to mechanical damage to the tube or hose, an object stuck in them, or a motor malfunction.
- Clogged filters. If the device has a special indicator, it will light up and you can clean the filter, but if there is no indicator, the main sign of filter clogging will be a decrease in draft and increased noise during operation of the device. In modern models, the filter is removed and cleaned very easily.
- The device does not turn on at all or works intermittently. The buzz of a working vacuum cleaner becomes intermittent, it begins to smell of dust or burnt wires.In order to finally make sure that the vacuum cleaner is malfunctioning, try reconnecting it to other outlets - if it works anyway, then the device needs to be disassembled and the cause of the breakdown understood.
- The cord does not retract, the plug malfunctions, the wires are exposed - this problem is solved without disassembling the case.
After a brief diagnosis, it is necessary to disassemble the device for search for the cause of the breakdown and, possibly, its rapid elimination.
The principle and device of the vacuum cleaner
The choice of vacuum cleaners is expanding. Main options:
- For dry cleaning;
- with aquafilter;
- washing vacuum cleaner.
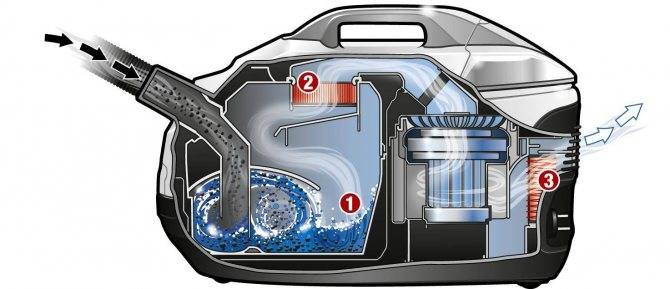
The most common and lightest is a vacuum cleaner for dry cleaning. The principle of operation of modern vacuum cleaners and old ones is the same.
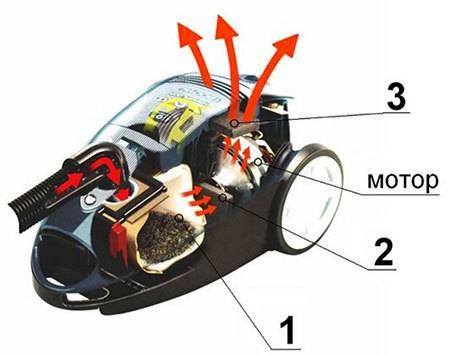
After starting, all debris is sucked in by a vacuum fan. Once inside, the garbage goes through several stages of filtration. Often, these are: at the entrance of the garbage, in the motor part, and at the exit. Each of the stages protects the vacuum cleaner from damage by large particles.
The first sign that the filter is clogged is the suction power drops.
All dust and dirt is collected in a special bag. They can be reusable and replaceable from paper. There are models of vacuum cleaners that use a container system instead of a bag. All the dirt settles on the walls of the container, and then the purified air also comes out.


