- How to ensure the stable operation of the water supply system
- Checking the pressure accumulator
- Video - Why the pumping station often turns on
- 1 Most common pump failures
- Should I change the pump along with the timing belt
- How to disassemble the unit to diagnose a breakdown
- Repair of the pump "Vodomet" 60/52: how it's done
- Troubleshooting Algorithm
- Stage 1: careful external examination
- Stage 2: a closer look from the inside
- Step 3: Troubleshooting the electrical problem
- Stage 4: correction of mechanical violations
- How to disassemble the drain pump
- The pump "Kid" works, but does not pump water
- Maintenance and overhaul
- What pumps are most often installed in wells
- Typical breakdowns of pumps of different brands
- Checking the power line
- The main malfunctions of submersible pumps
- The pump is not working
- The pump works but does not pump
- Low machine performance
- Frequent switching on and off of the device
- Water is supplied with pulsation
- The buzz of the machine is heard, but the water does not pump
- The unit does not turn off
How to ensure the stable operation of the water supply system
In order for the plumbing system to function successfully, it is necessary to provide a certain level of pressure and water pressure. When there is no access to centralized water supply, this problem is easily solved with the help of a pumping station. It usually consists of:
- pump;
- membrane storage tank;
- automatic control unit (pressure switch, pressure gauge, etc.).
The pump pumps water, which enters the tank. When the pressure in the tank reaches a certain maximum level, the pump is switched off. Gradually, the water from the tank is consumed for various needs and the pressure drops. At a minimum pressure level, the pump turns on again and water enters the tank. The process is controlled automatically.
With the help of such a unit, it is possible to provide water supply to a house, a bathhouse and other buildings located on the site. Having studied the principle of operation, you need to start studying possible breakdowns and ways to eliminate them.
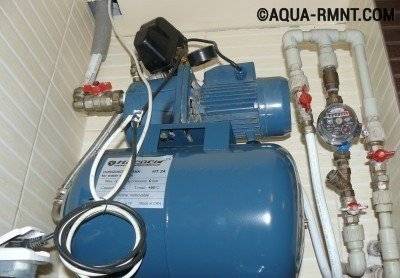
Having studied the principle of operation and the device of the pumping station, you can do its own repair
Checking the pressure accumulator
The next device that needs to be adjusted or checked is the accumulator.
Diaphragm Hydraulic Pressure Accumulator Device
Excessively frequent switching on of the centrifugal pump in the station can occur due to the fact that there are damages in the accumulator tank causing water leakage. Also, during operation, the rubber membrane of this device may be damaged or significantly stretched.
You can correct the deficiency either by replacing the components, or by completely replacing the accumulator.
By the way, checking the integrity of the rubber membrane in this device is very simple. This can be done without disassembling the tank. You just need to press the nipple valve located on the part of the pressure accumulator that should be filled with air. When you press the valve, air should be bled from it.If water comes out of the valve hole, then things are bad and the rubber membrane, or even the entire hydraulic pressure accumulator, will have to be changed.
Unstable, jerky operation of the centrifugal pump complex in the station can also be the result of hidden leaks in the autonomous water supply pipe system. The situation is complicated by the fact that leakage can occur in a pipe located under the surface of the earth. It is quite difficult to identify such a malfunction.
However, if you approach such a problem consistently, then it can also be solved. To do this, it is necessary to successively, segment by segment, shut off the entire water supply system and pump water into it under pressure and leave it for a while. A pressure gauge must be connected to each segment to be tested. If for several tens of minutes the pressure gauge needle maintains its position, then this segment of the water supply system has retained its tightness. In this case, you should go to the next segment and so on until a leak is detected.
Leak in the pipeline
As you can see, troubleshooting that causes the station centrifugal pump to turn on too often can take quite a long time. However, without fixing this breakdown, you run the risk of damaging your pump much earlier than the deadline set by the manufacturer.
To get more deeply acquainted with the composition and procedure for repairing pumping equipment stations. watch the video tutorial.
Video - Why the pumping station often turns on
Pump for a septic tank Your suburban area is the ultimate dream of many citizens, capable of bringing exactly the same amount.
Do-it-yourself pumping station repair If you want to move from a city apartment to a private house or country house, then you will undoubtedly have to.
Do-it-yourself heat pump There is a certain amount of heat in any environment that surrounds us, but provided that its temperature.
I have a 15 liter hydraulic accumulator in my pumping station (DAB, Italy). If you increase its capacity by adding, for example, another 50 liters, the pump will work longer to gain the desired pressure, and it will turn on less often. But will it disrupt the operation of the station?
station with an ejector what to do with it if I want to connect to the main water supply?
there is an automatic pump dzhileks jumbo 70 50 with a small hydraulic accumulator when filling the pool, the pump constantly turns on (the pool is large) is it possible to make the pump work constantly and not turn on, turn off every 2 minutes
pumping station caliber-800. After connecting the water heater to 80 liters, the water supply became jerky and the pump periodically turns on for a few seconds when we do not use water. There are no visible leaks.
1 Most common pump failures
We all know that a pump is an ordinary device, a mechanism that does not differ in any complexity, but this is a judgment only at first glance.
The pump consists of an engine, an impeller, and also in the middle of the pump there is a shaft, seals and all this closes the housing. The above parts are constantly in operation, which leads to gradual wear.


That is why it is necessary to occasionally repair the pump, since the device is constantly in operation and is in the water.Yes, not all pumps work in water, such as Gilex surface pumps, which work on the surface at the same time as hydraulic accumulators, which can also be installed separately on the surface.
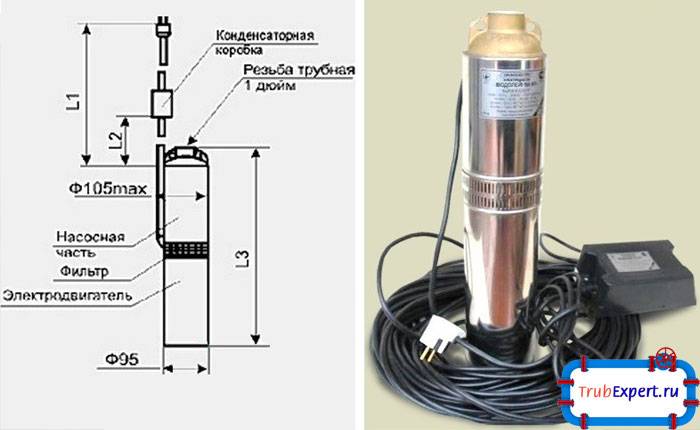
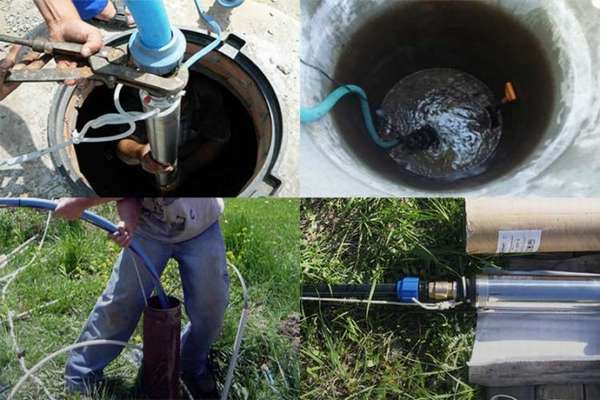
But, Gileks surface pumps also need repairs. Let's take, for example, a submersible pump, from such a well-known manufacturer as Gileks Vodomet. This device is in the water (well or well) constantly. Some of us do not even take it out for the winter, and this is a gross mistake.
The Gileks Water Jet pump has a lightweight design, and it is really easy to repair it yourself. But if you are not an expert in this, you will not only not repair it, but you can even damage the pump even worse. But if the situation is such that there is a slight breakdown of the pump on the face, then you can do it yourself.
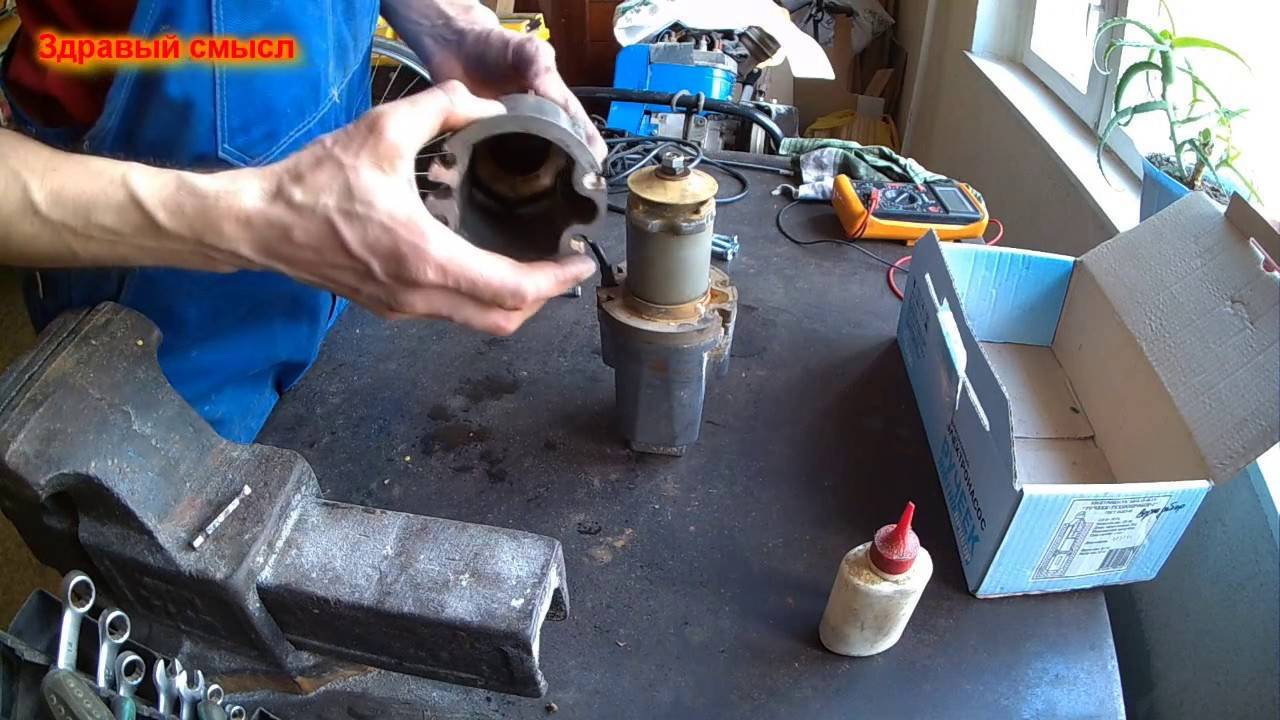
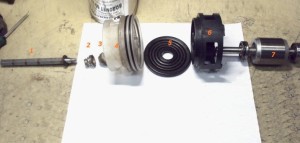
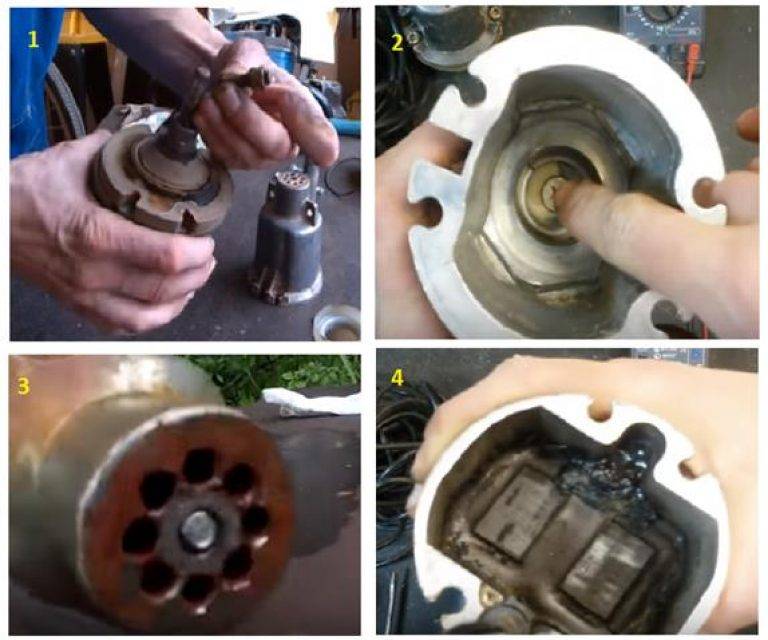
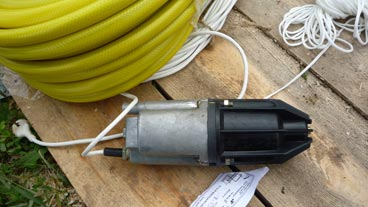
We disassemble the Gilex pump
The main thing who is going to repair submersible and surface pumps should understand their design, as well as how they are connected correctly. The most famous pump failures, which we will discuss separately in this article.
Check pumps are very easy and affordable.
For example, if the pump is connected to 220 W and it does not respond, then there is a breakdown with the contacts or with the supply wire. Solving this problem is easy, you just need to have a tester. They check the contacts of the pump
If there is no signal during the test, then the contact is damaged.
You should also pay attention to the contact, it may become damp or change color. If, when connecting 220 W, all mechanisms do not react, then the main cable is interrupted
This is the most common failure in water pumps. Their disadvantage is that their cable is very poorly protected, and is constantly in limbo.
If during operation you notice a hum in the engine, uneven operation is felt, clicks are heard, this indicates that there are problems with the engine and the pump impeller. To finally understand this, you must first disassemble the pump and inspect it. It may be that the pump impeller simply cracked and the bearings flew out or failed. These are the most painful pump problems.
If you see that the engine does not work at all, then the problem is in it. And in this case, you will not be able to fix it with your own hands. Especially such a breakdown occurs in submersible models. If we disassemble a specific model, let's take the Vodomet 50/25 pump engine as an example, then it is not repaired or disassembled at all. In them, the winding can most often burn out. But replacing the winding in such models is a moot point. It is better if you have such a breakdown, replace the engine with a new one, as Gilex manufacturers are constantly replenishing the range of spare parts.
If we talk about Gilex Jumbo, then in such surface pumps the engine often burns out and quickly wears out. And all this happens from the dry running of the pump. Surface pumps are more likely to break down from dry running than, for example, submersible units.
Accessories for the pump Gileks
Let's go back to the Gilex Jumbo pump. In it, breakdowns such as poor water pressure in the system occur. The main reasons for this are: the pressure switch does not work and the accumulator does not work, as well as general problems of the pump as a whole.
First, let's analyze the first breakdown, it is the relay that goes astray.
It is easy and simple to check its performance, and if you notice that everything is not so smooth with it, it is very easy to set up. If we talk about hydraulic accumulators, then there are the following breakdowns:
Rupture of the air membrane. And we can only check this when we disassemble the tank. If there is a large amount of air in the membrane, then the system is completely unbalanced, as a result of which the pressure drops.
Accessories for the pump Dzhileks Vodomet
The pump itself can also react badly, but this happens very rarely. Most often, working elements come out of the pump, and the pump simply does not cope with its task of pumping water. And if the working elements of the pump come out, during operation you notice a hum, the impeller does not rotate well. If there are other signs of a breakdown, then most likely the relay or hydraulic accumulator has failed.
Should I change the pump along with the timing belt
As a rule, the life of the pump is approximately 2 times longer than that of the timing belt, so you can replace the pump together with every second replacement of the timing belt.

Disassembled car engine.
It is irrational to change the pump separately, and if there is the slightest suspicion that it will not survive another lifetime of the belt, then it is better to replace everything at once in a complex. Since modern cars experience a shortage of engine compartment space and getting to the pump and timing belt is the same long and thorny path, it would be unreasonable to disassemble half of your vehicle again in a couple of months to replace the water pump.
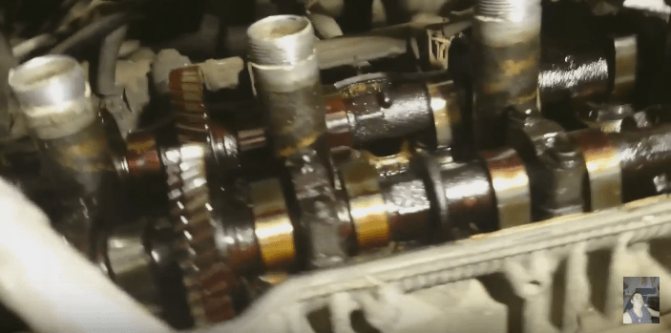
Minor camshaft wear
The cost of the pump and timing belt is not as high as the services for installing them, you can do it yourself, especially if you have a great desire to save money.True, this will require tools and a lot of time, especially if you are doing this for the first time. However, if you have doubts about your abilities, it is better to trust professionals.
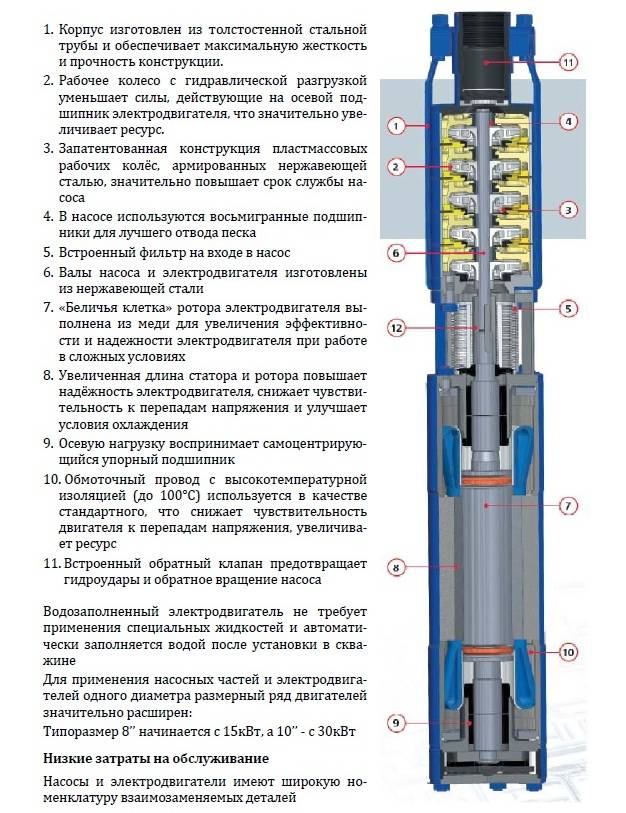
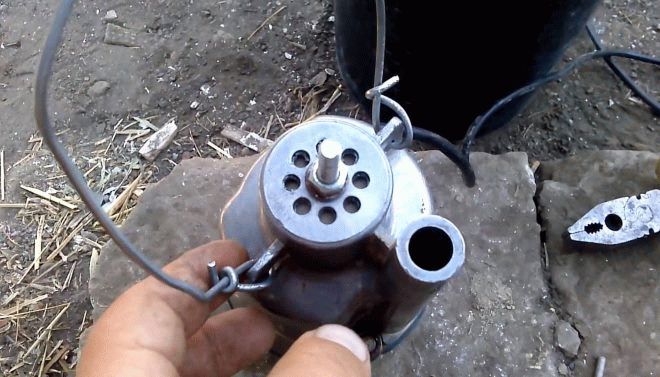
How to disassemble the unit to diagnose a breakdown
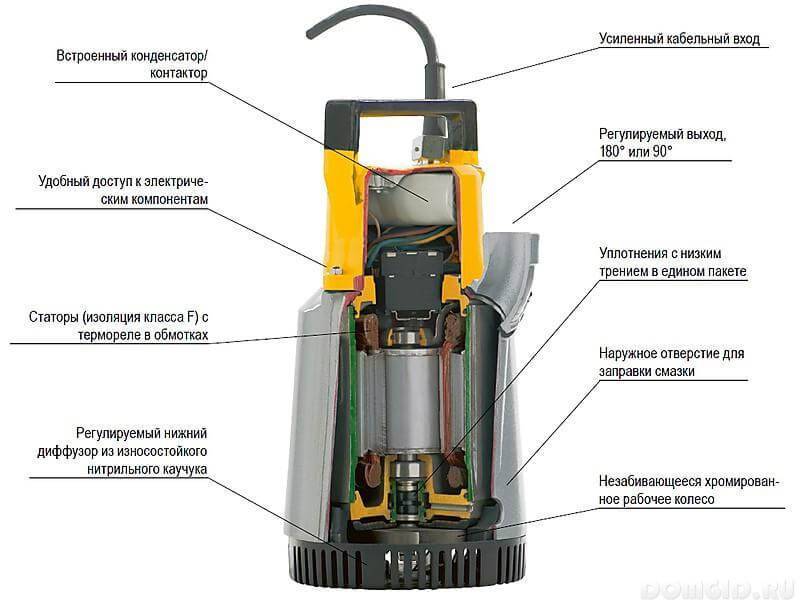
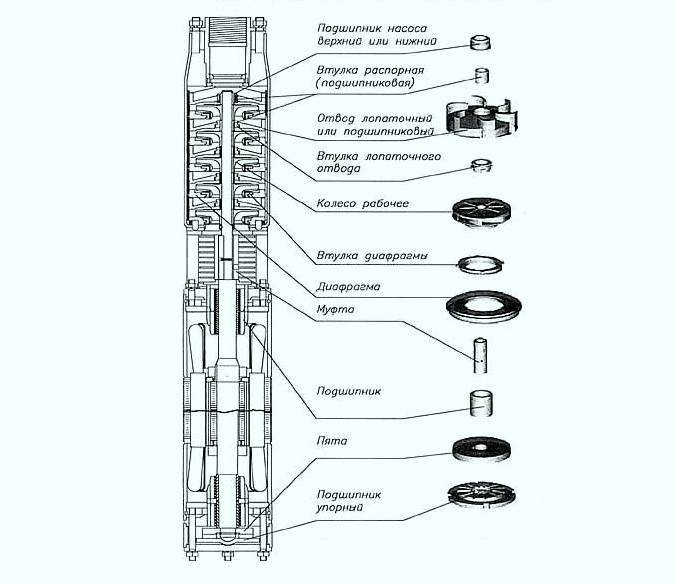
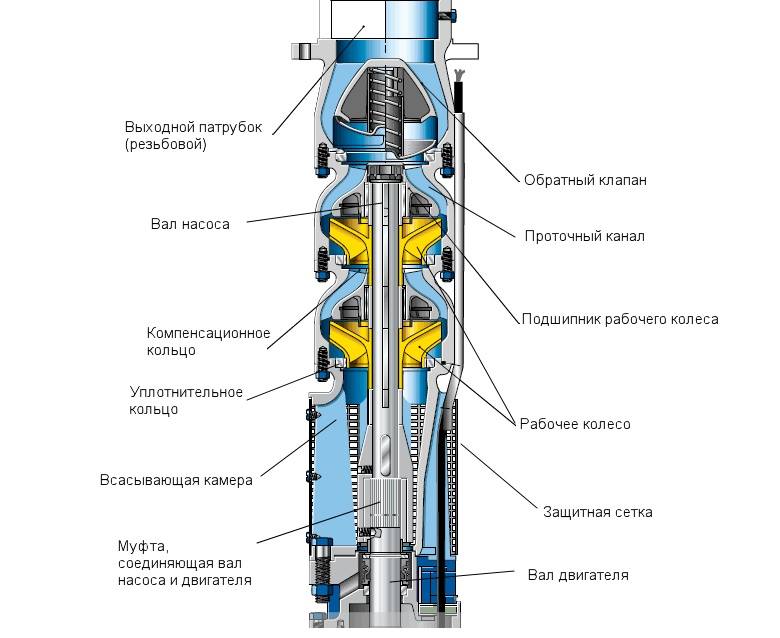
In case of pump breakdowns requiring replacement of parts located inside its housing, disassembly of the unit will be required. A submersible pump consists of a motor compartment and a compartment with one or more impellers, the purpose of which is to capture water. Below is a diagram of the device of that part of the centrifugal pump where the impellers are installed.
As can be seen from the figure, the impellers are mounted on the shaft of the unit. The more of them, the higher the pressure created by the pump. The rotary engine is located in the second compartment of the hydraulic machine. It is in a sealed case, and to open it, you need to know some of the nuances.
So, in order to move from theory to practice and disassemble the pump, follow these steps (depending on the manufacturer, the design of the unit may differ).
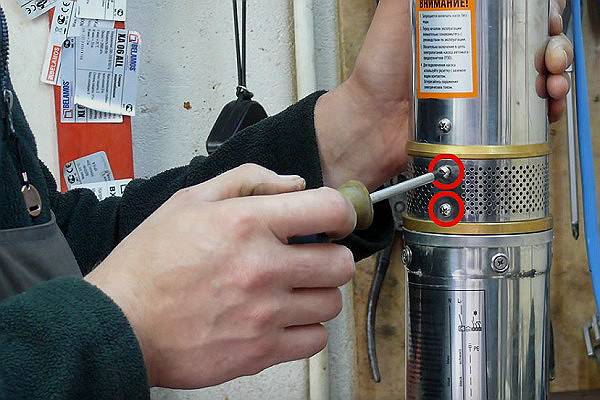
-
Unscrew the 2 screws holding the mesh of the device.
- Remove the mesh and turn the motor shaft by hand. If it does not spin, then the problem may be either in the engine compartment or in the pumping part of the apparatus.
- First you need to disassemble the pumping part of the device. Unscrew the 4 screws holding the power cable channel and disconnect it from the machine body.
- Next, unscrew the 4 nuts holding the pump flange.
- After unscrewing the fasteners, separate the pumping part of the apparatus from the engine. At this stage, it is possible to determine in which section the jamming occurred. If the shaft of the pump compartment does not rotate, then this assembly must be disassembled.
- Unscrew all fasteners holding the lower flange of the pump part of the unit.
- An adapter must be screwed into the fitting located at the top of the block, which will help keep the threads from damage.
- Secure the pump in a vise.
- Having picked up a suitable tool, unscrew the bottom flange.
- The impeller assembly can now be pulled out and inspected for faults.
- Next, you should check the support shaft for wear or play.
- To replace (if necessary) the impellers, it is necessary to fix the shaft in a vice and unscrew the top nut.
- At the next stage, the blocks are removed, washed and, if necessary, replaced with new ones.
- The assembly of the pumping part of the apparatus is carried out in the reverse order.
- To disassemble the electric motor, it must also be fixed in a vise.
- Next, remove the plastic flange protection by unscrewing the fasteners.
- Remove the retaining ring holding the cover with a pair of pliers.
- Remove the cover using a slotted screwdriver.
- Remove the rubber membrane from the housing.
- Remove the capacitor.
- At this stage, you can check the oil level, its quality, identify the cause of jamming, etc. The engine block is assembled in the reverse order.
Repair of the pump "Vodomet" 60/52: how it's done
Submersible pumps fail for three reasons:
- Firstly, in case of silting of the impeller.
- Secondly, in the event of a break in the electrical cable.
- Thirdly, in case of failure of the components of the engine compartment (stator or rotor).
Moreover, when diagnosing a problem, one should be guided by the following rules:
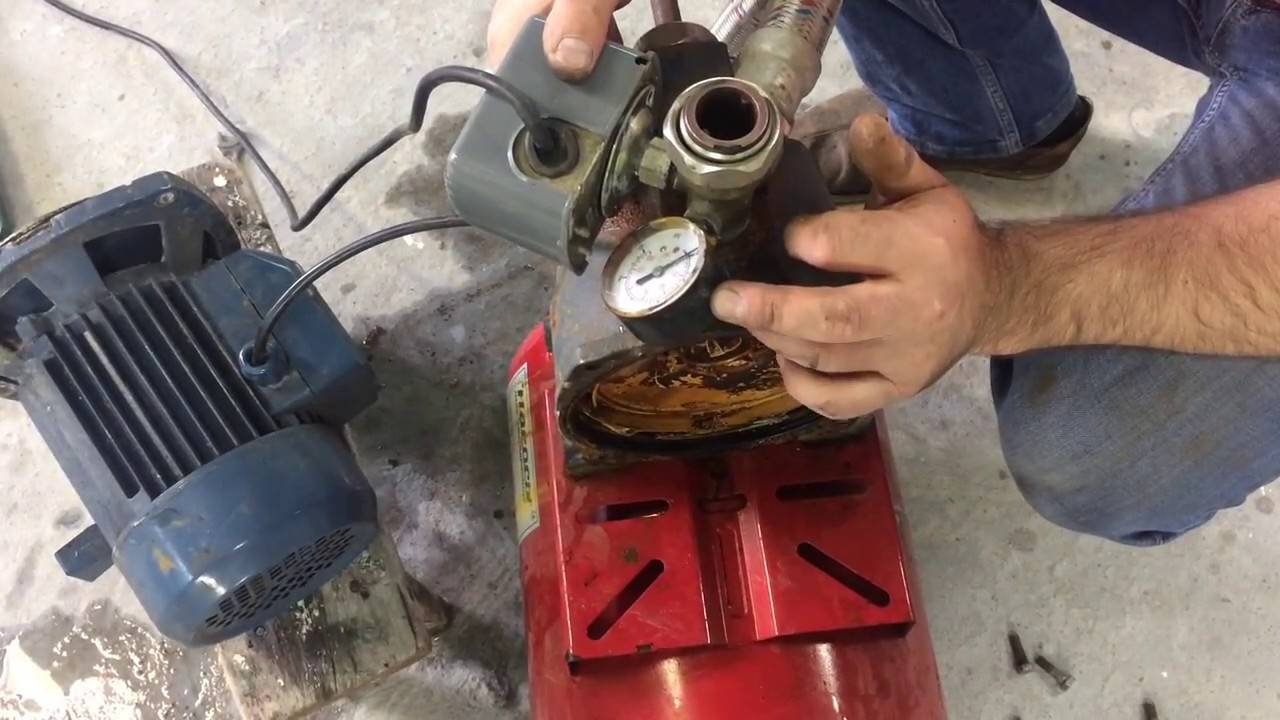
Repair of the pump Vodomet 60-52
- If during the test run the shaft rotates at the pump extracted from the well, then the impeller is the problem area. Clean it of sludge and the pump can be assembled in the reverse order.
- If the pump does not even turn on, then you need to check (ring the tester) the power cable. If there is voltage at the engine compartment terminals, then the cable is intact. Well, if not, then it will have to be replaced with a new one. Finding a break and fixing it with twisting or soldering is far from the best idea. After all, the tightness of the cable will still be violated.
- If everything is in order with the cable, then the problem is in the engine. And the pump will have to be disassembled to the engine compartment, to extract and rewind the stator or rotor.
And in each case, the repair of the unit begins with a complete disassembly.
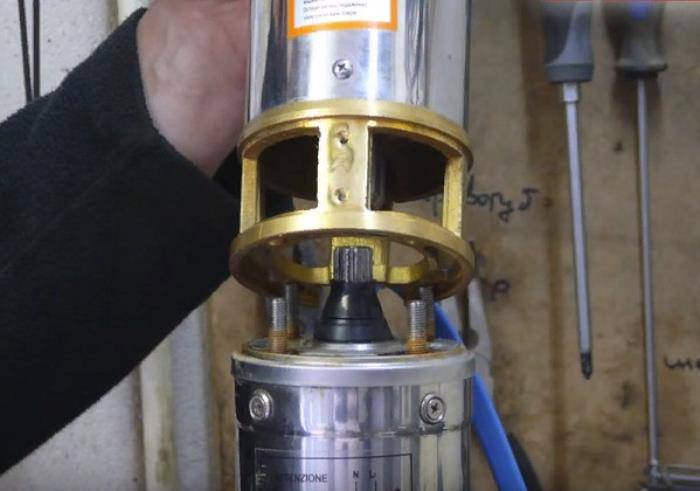
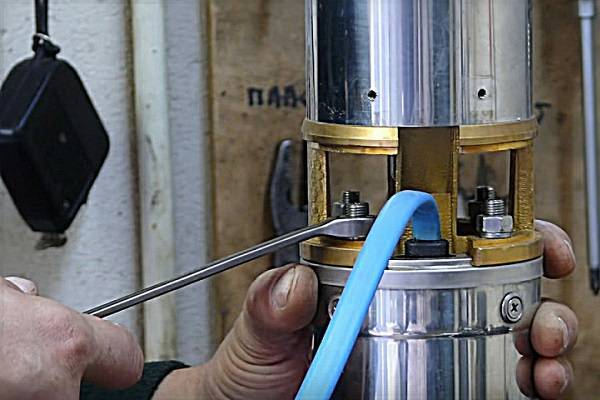
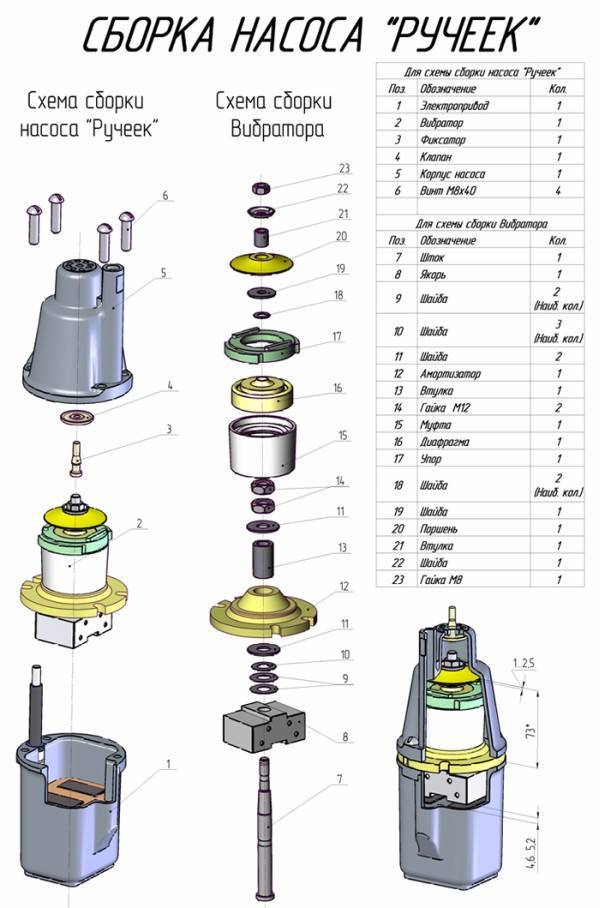
Moreover, the recommended procedure for disassembling the submersible unit model 60/52 is as follows:
Accessories for the pump
- A short cylinder with a perforated bottom is screwed from the end of the pump - a filter element that protects the impeller from silting.
- Next, all washers, "glasses" and disks are removed from the pump motor shaft, in the reverse order described above (in the overview of the impeller design). Moreover, all the numerous elements should be laid on a flat area of the workbench in the order of extraction from the body. After all, the impeller consists of 16 parts. And that's not counting the same number of anti-friction washers.
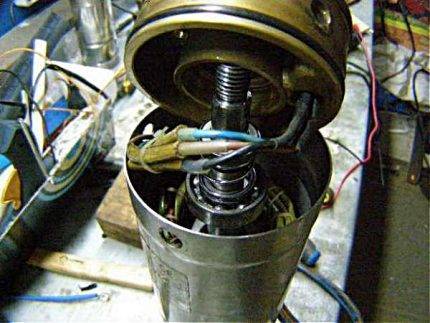
- Further disassembly to the level of the engine compartment begins with the removal of the engine retaining ring that closes its cover. To do this, by hitting the top fitting with a mallet, move the engine down, and then, pulling the cord, return it to its place. Moreover, after all the manipulations, the sealing ring will remain in the “shifted” position.Next, the retaining ring is displaced by blowing with a screwdriver into the part closest to the body. The stopper will warp, after which it can be removed.
- After that, you need to disconnect the wires by opening the cover of the corresponding compartment, and, using a screwdriver and a mallet, “knock out” the engine from the case.
After being removed from the housing, the impeller elements are washed and dried, and the engine is sent for diagnostics and repair to a specialized workshop. After cleaning the impeller and updating the engine, the Vodomet 60/52 pump is assembled in the reverse order to that described above.
Published: 23.09.2014
Troubleshooting Algorithm
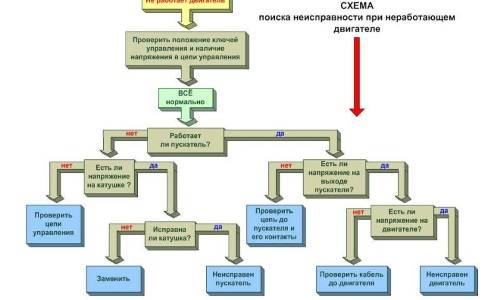
Troubleshooting.
If the unit pumps water weakly or stops working completely, you need to turn it off and lift it up. Then you should disconnect the hose and check for obvious damage to the device.
Stage 1: careful external examination
If microcracks are visible on the surface of the case, it is necessary to replace it. If the integrity of the unit is not broken, the tester should check the resistance of the coils (the norm is about 10 Ohms) and the absence of their short circuit to the metal casing. A burnt coil should be replaced by a specialist.
Then you need to lightly blow into both nozzles of the pump - the air should pass unhindered. With sharp exhalations into the inlet, the valve should close.
Then we immerse the apparatus for 5-6 hours in water with the addition of 9% table vinegar to dissolve limescale. Rinse it again with clean water.
Then, gradually releasing the locknut and the clamping nut on the pump intake, we repair the valve clearances. The norm is 0.5-0.8 mm. At a finely adjusted device, lowered into a container of water without a hose, a fountain appears 0.5-1 m high.
Stage 2: a closer look from the inside
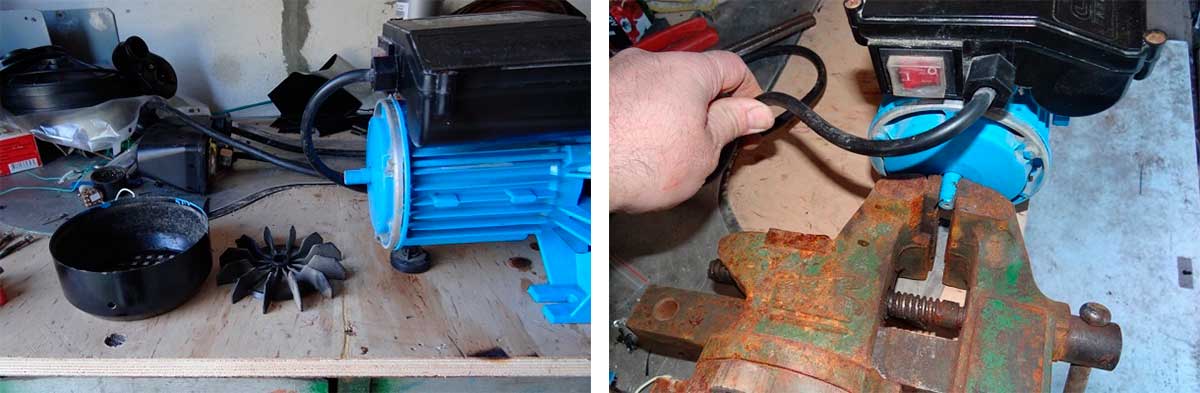
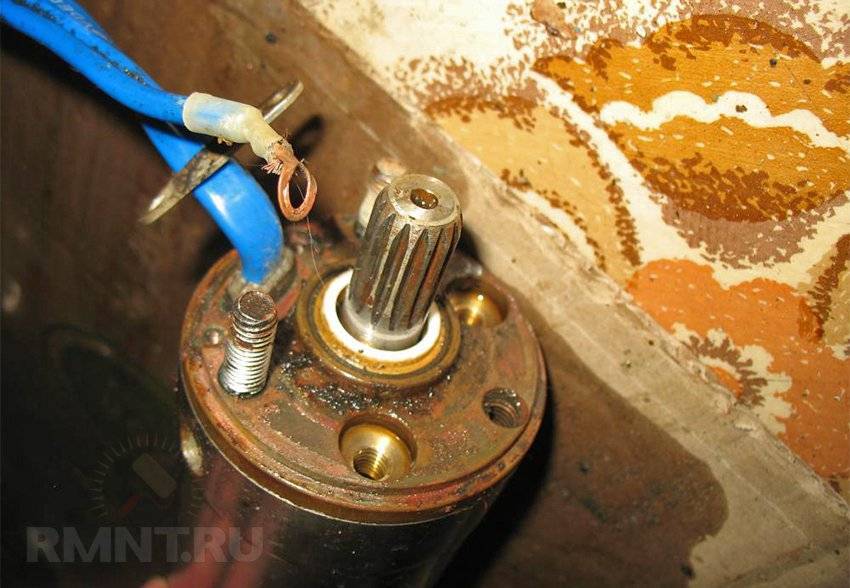
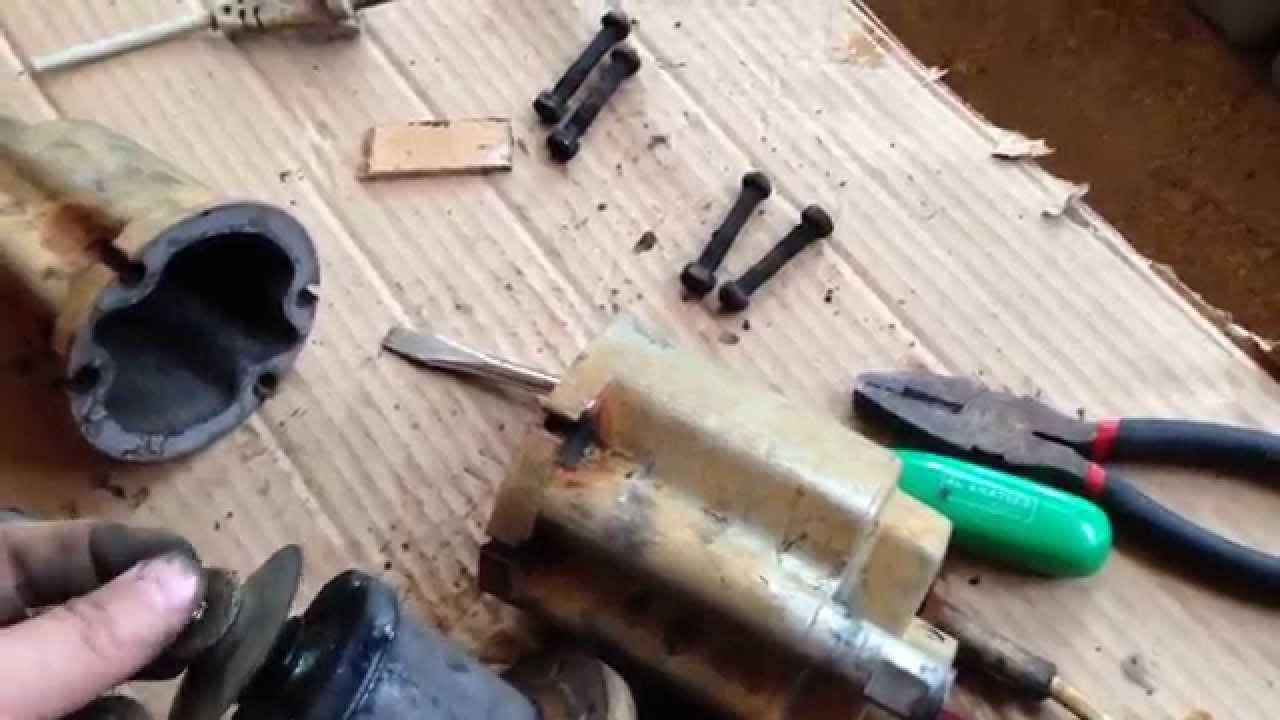
To find a defect, disassembly of the unit is required. You can do it yourself. Necessary:
To find the cause of the breakdown, it is necessary to disassemble the pump.
- Scratch the symbols on the case with a sharp object, so that later, during assembly, exactly combine the lower and upper parts along them.
- Loosen all the screws fixing the pump cover at the same time. If they are very rusty, cut off the hats with a grinder.
- Take out the piston, core, rubber gaskets.
Assemble the device in the exact reverse order. In this case, it is necessary:
- exactly fit the piston disc, it must be at least 4 mm from the coil;
- combine the openings of the housing and gaskets, otherwise the unit will be depressurized;
- free from litter all its internal space;
- check - if it is in good condition, a fountain 0.5-1 m high should appear.
Step 3: Troubleshooting the electrical problem
If you need to repair an electrician, it is better to contact the factory. A burnt coil is easier and cheaper to replace with a new unit.
If the electromagnet has completely peeled off, you can try to fix this problem with your own hands:
- take out the electromagnet;
- apply on it and on the inner surface of the body with a grinder intersecting grooves up to 2 mm deep;
- lubricate the compound with glass sealant and press the magnet into place using a press;
- after the composition has solidified, assemble the pump.
Stage 4: correction of mechanical violations
Procedure:
- The tearing of the membrane can be eliminated with rubber glue.
- A broken shock absorber should be replaced with a new spare part.
- A worn piston must also be replaced. From it you need to pull out the sleeve and press it into a new part. Between the piston and the body, it is necessary to adjust the gap of 4-5 mm by removing or adding washers.
- The required distance between the anchor and the yoke is achieved by adjusting the washers and locknuts, the final tightening of which is carried out when it is 6-8 mm.
- The projections of the coils and the rod anchor must necessarily match. Adjustment is carried out by loosening the nuts.
- A gap of 0.6-0.8 mm between the new valve and the water intake hole is achieved by tightening the screw.
The operating conditions of the vibration pump must be exactly observed. They are described in detail in the technical data sheet of the device. Then the probability of breakdowns of the "Baby" will be minimal.
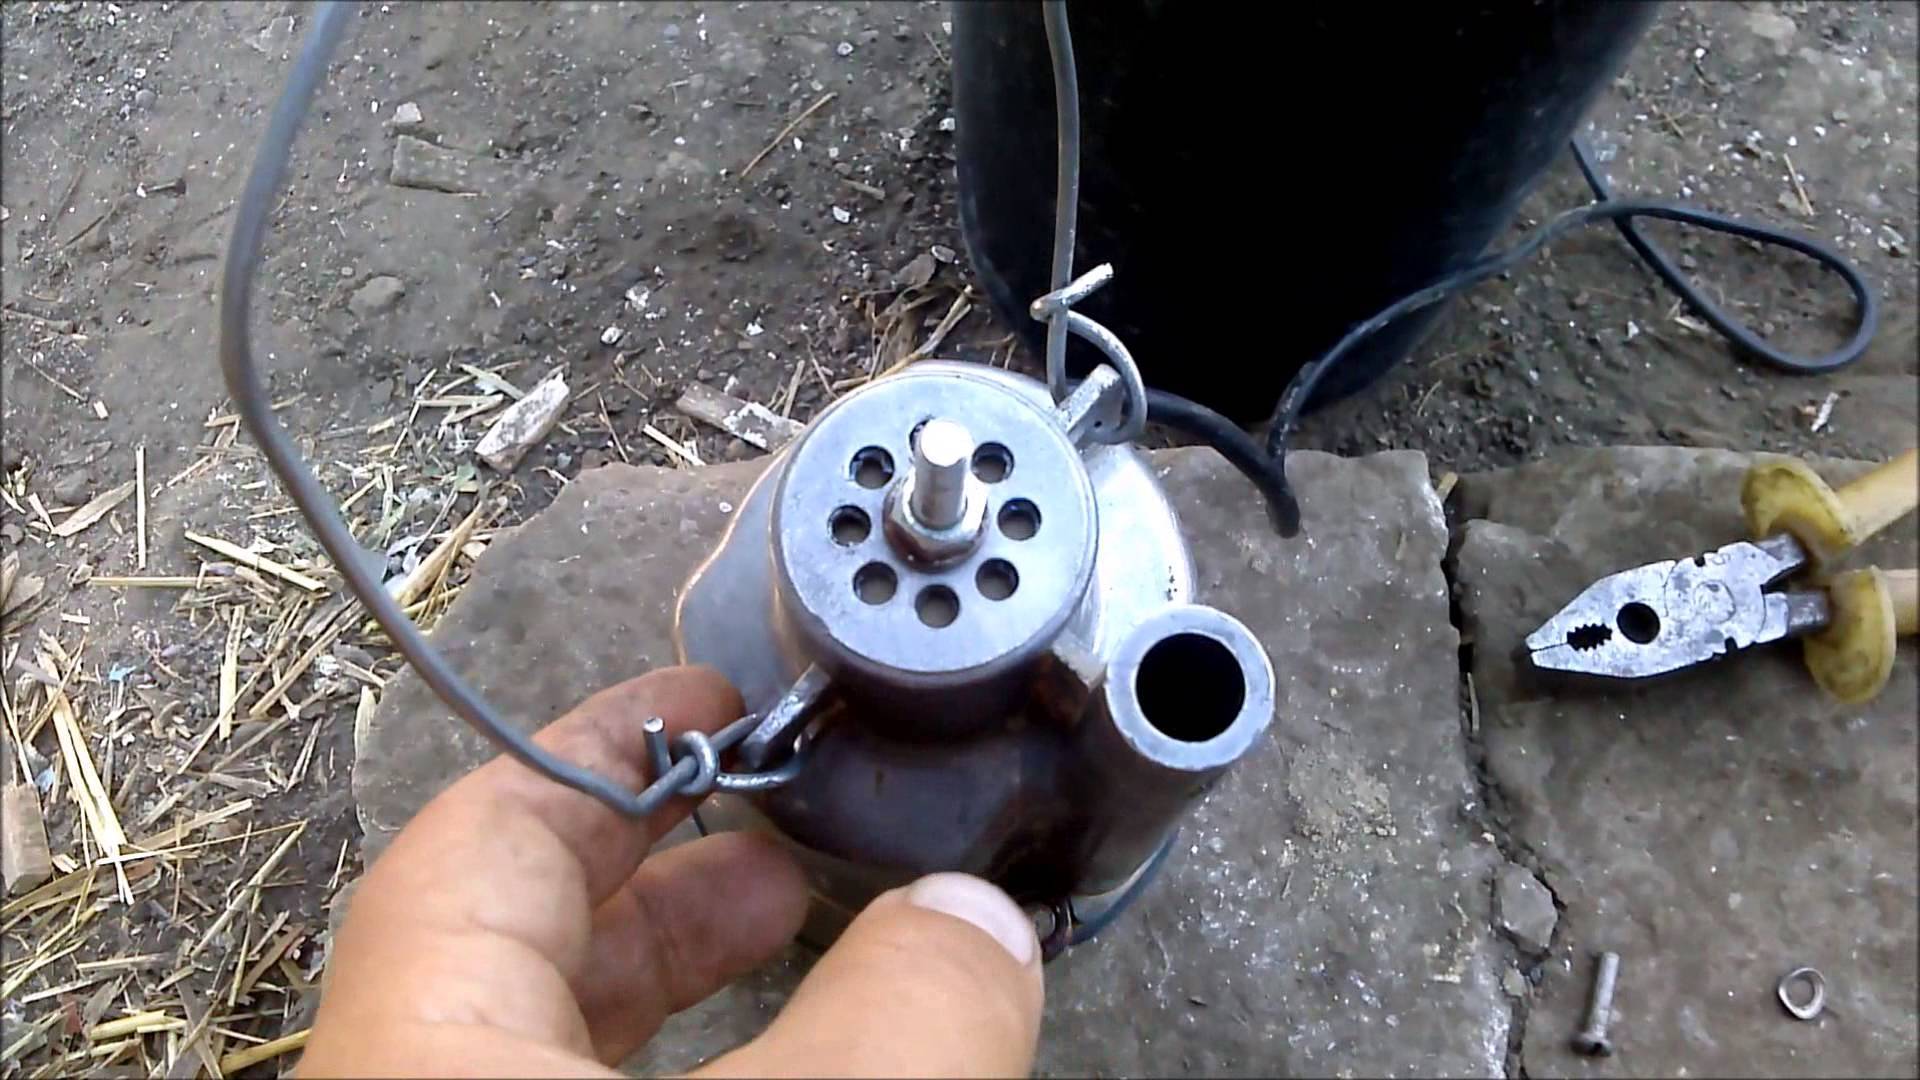
How to disassemble the drain pump
Parsing is carried out in several successive stages:
- We turn the pump upside down with the filters and carefully clamp the housing in a vise. We remove the filter mesh, then the protective casing, under which the impeller is installed. For different models, it is fastened with bolts, clips, or twisted with a thread.
- We unscrew the fixing nut holding the impeller on the stem. These nuts have a left-hand thread, so they are unscrewed by turning clockwise. We remove the impeller, and if it is worn out, replace it with a new one.
- When the impeller is intact, disassembly should be continued until the cause of the malfunction is identified. We unscrew the connecting bolts on the case, as a result of which it is divided into two components, connected to each other by a loop of multi-colored wires.If you need to disconnect them, you should first photograph their location.
- To separate the motor from the housing, you should lightly tap the rod with a hammer, as it is pressed into the housing very tightly. After removing the motor from the housing, the electrical part of the pumping equipment is diagnosed.
The pump "Kid" works, but does not pump water
- Loosening the locknut in the adjusting screw located at the water intake. Turn the screw to change the efficiency of the pump.
- Damage to the rubber pump cuff. You can see this malfunction only after disassembling the device. Outwardly, this knot looks like a pair of saucers, located with the bottoms to each other. Their diameter is about 4 centimeters. Such cuffs cost a penny and are sold in specialized stores.
- Breakage of the rocking rod. This is a pretty serious bug. It is pressed into a neighboring unit and it is extremely difficult to change it without specialized equipment. You can repair such a breakdown by having at your disposal a second faulty pump - a donor.
Do-it-yourself pump repair "Kid"
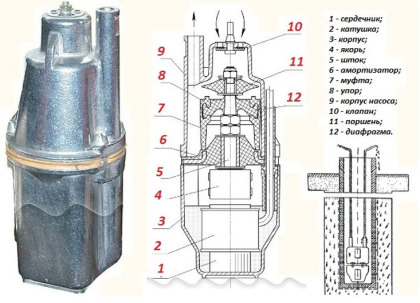
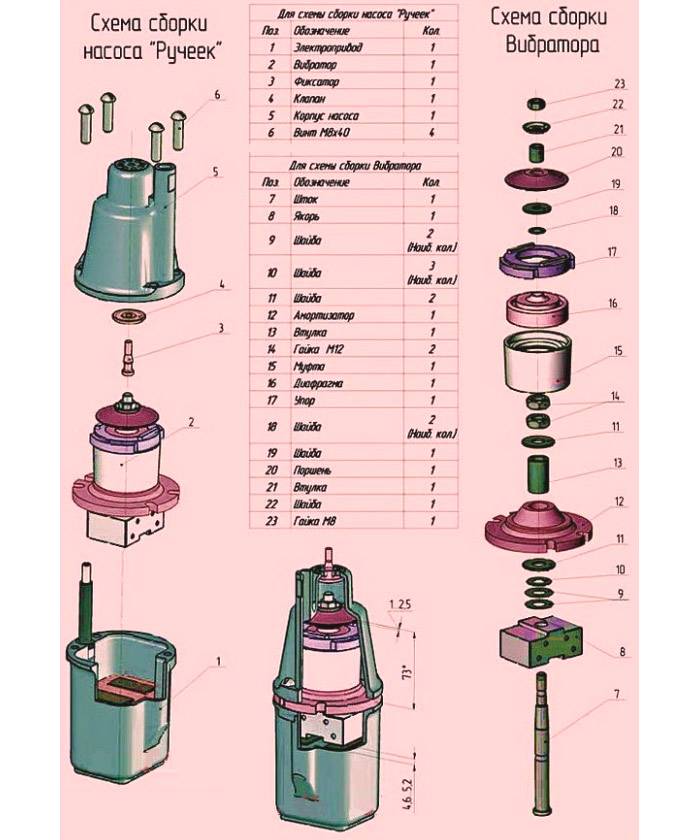
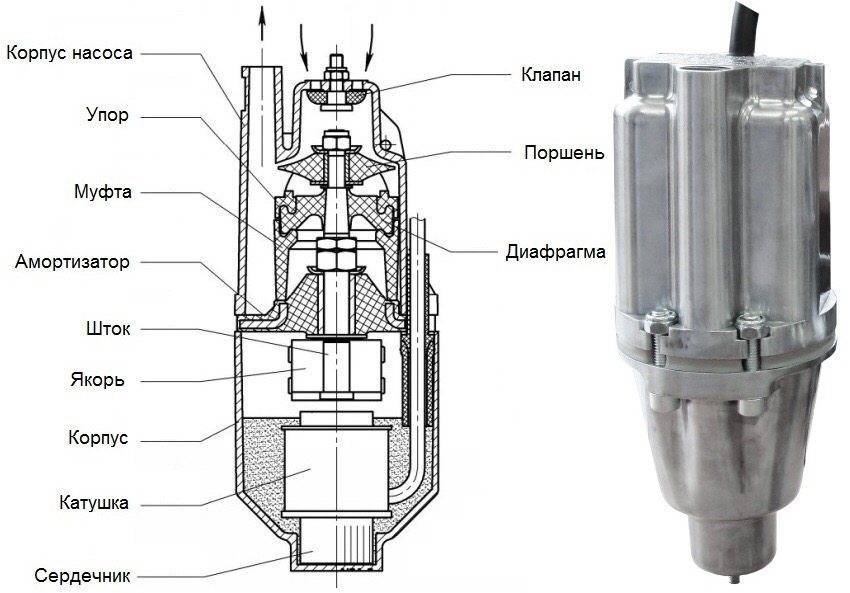
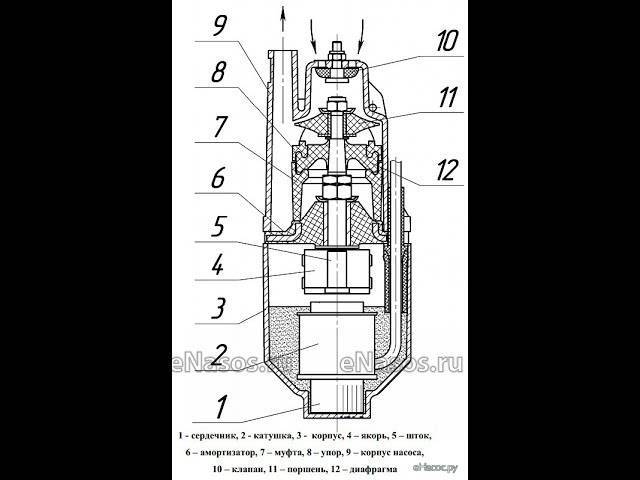
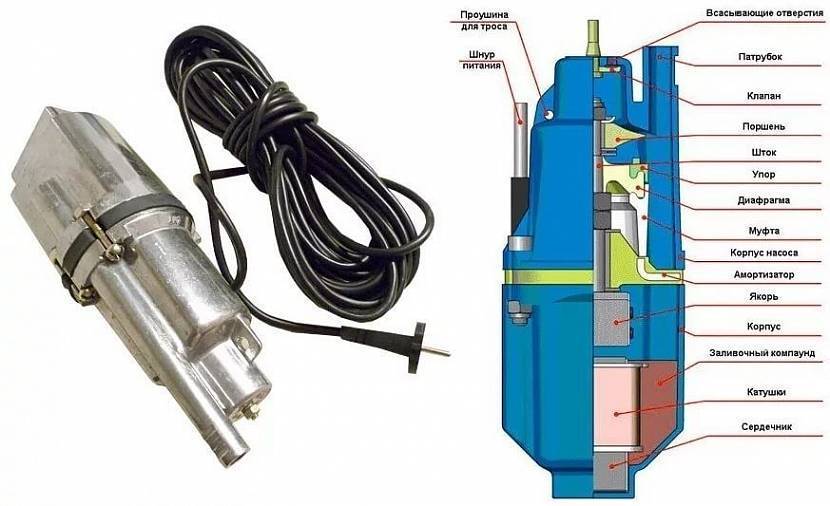
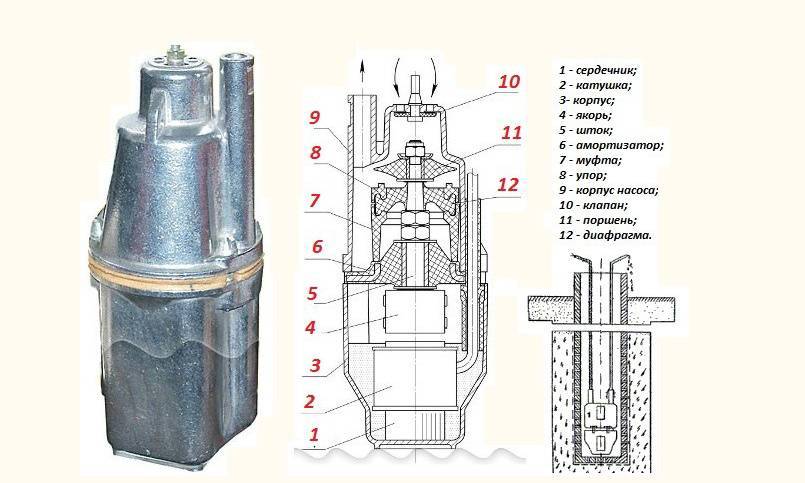
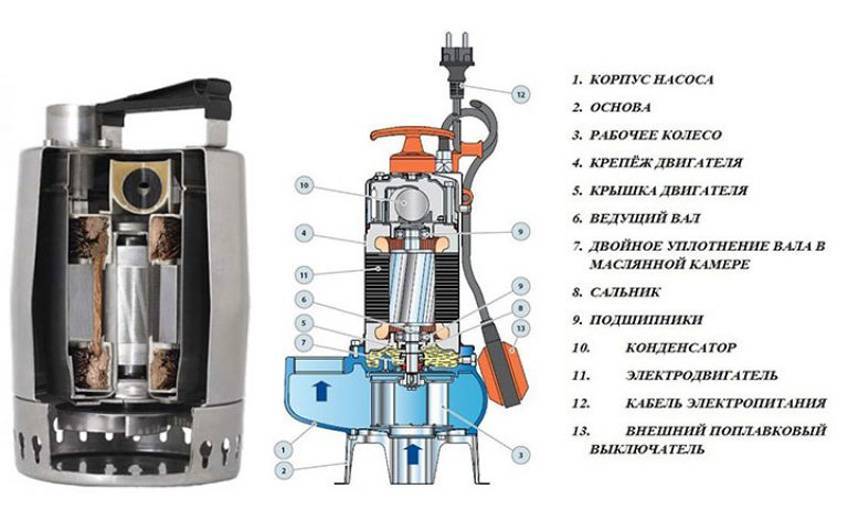
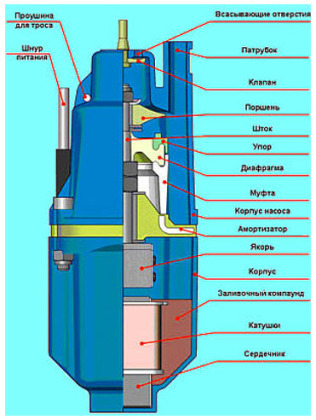
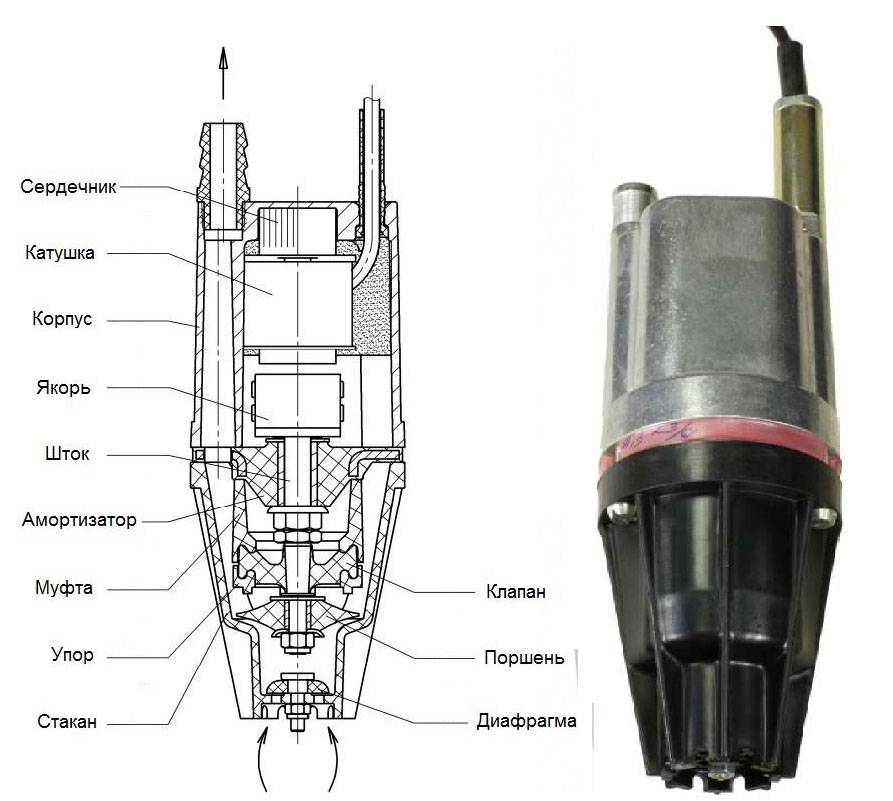
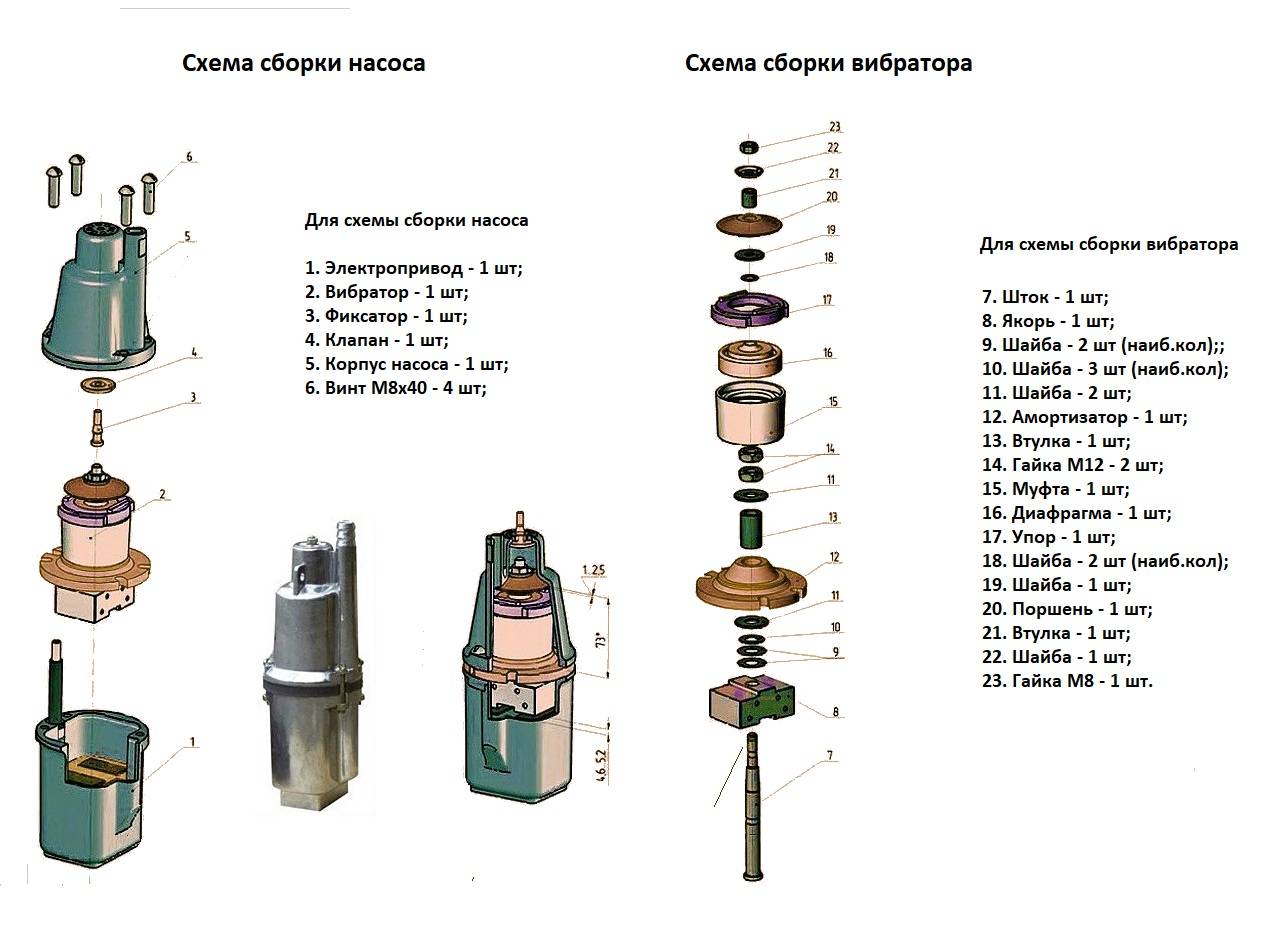
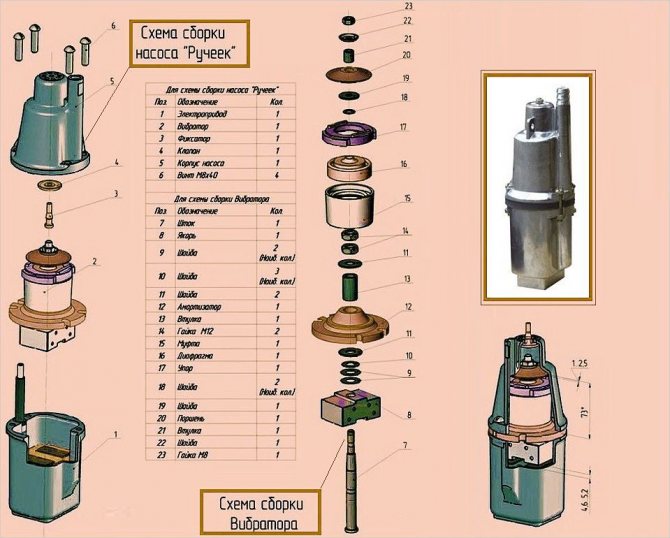
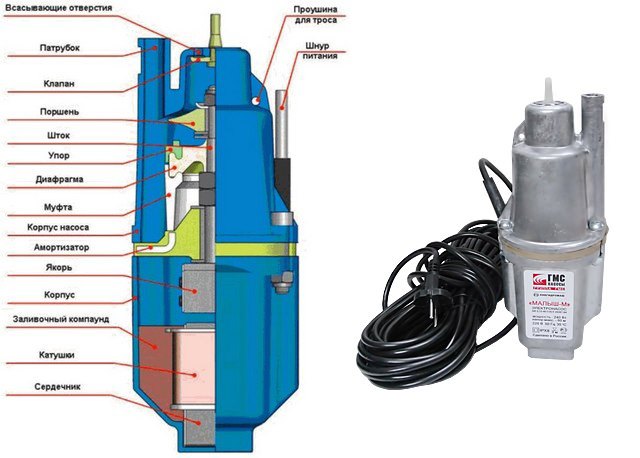
Components of a submersible vibration pumping device
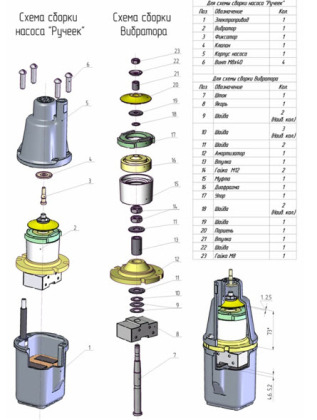
Components of vibration submersible pumping devices
Do-it-yourself pump repair "Kid"

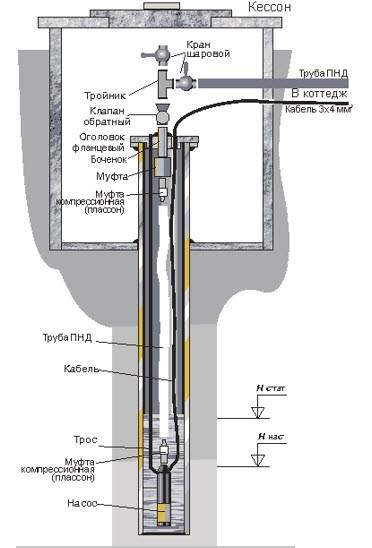
Placement of submersible pumping equipment
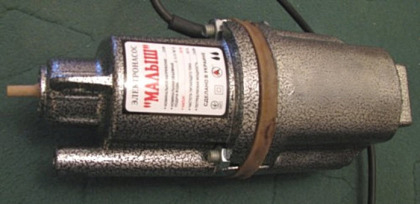
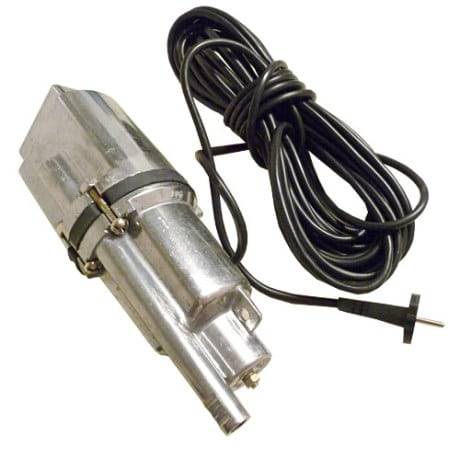
Baby pump as standard
The geometric dimensions of the pump "Kid"
Maintenance and overhaul
In order to avoid malfunctions, it is necessary to carry out maintenance of the Gnome electric pump recommended by the manufacturer in a timely manner. TO includes:
- oil change every 200-250 hours of operation;
- checking the level and quality of oil - 2 times a month;
- flushing the pump with clean water after pumping water with a high content of solid particles;
- adjustment of the gap between the impeller and the diaphragm;
- inspection of the housing, bearings, impeller and shaft.
The current repair of pumps "Gnome" is carried out when signs of malfunction appear or when the pump is not working. Major repairs must be made after 25 thousand hours of operation. Overhaul begins with dismantling the unit and determining the feasibility of repair work.
To fill the oil, put the pump on its side and unscrew the plug (17), then drain the used oil and fill in fresh industrial oil.
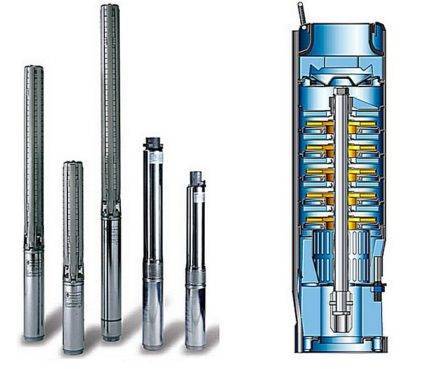
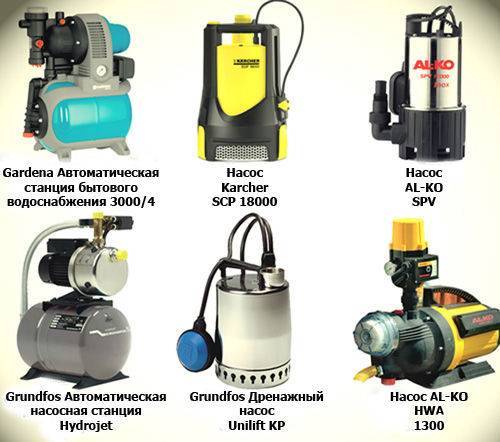
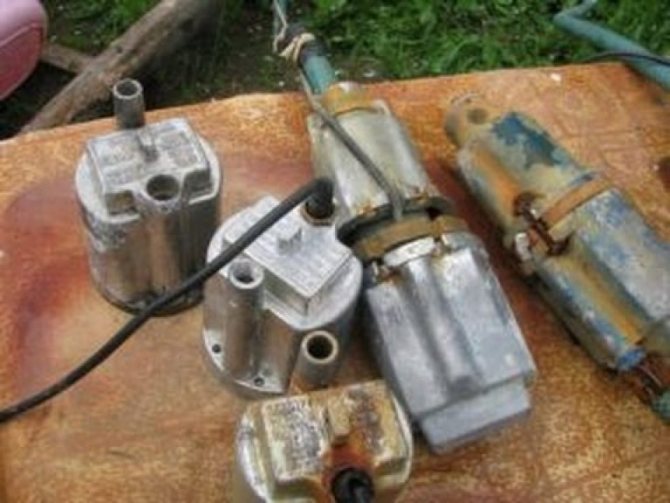
What pumps are most often installed in wells
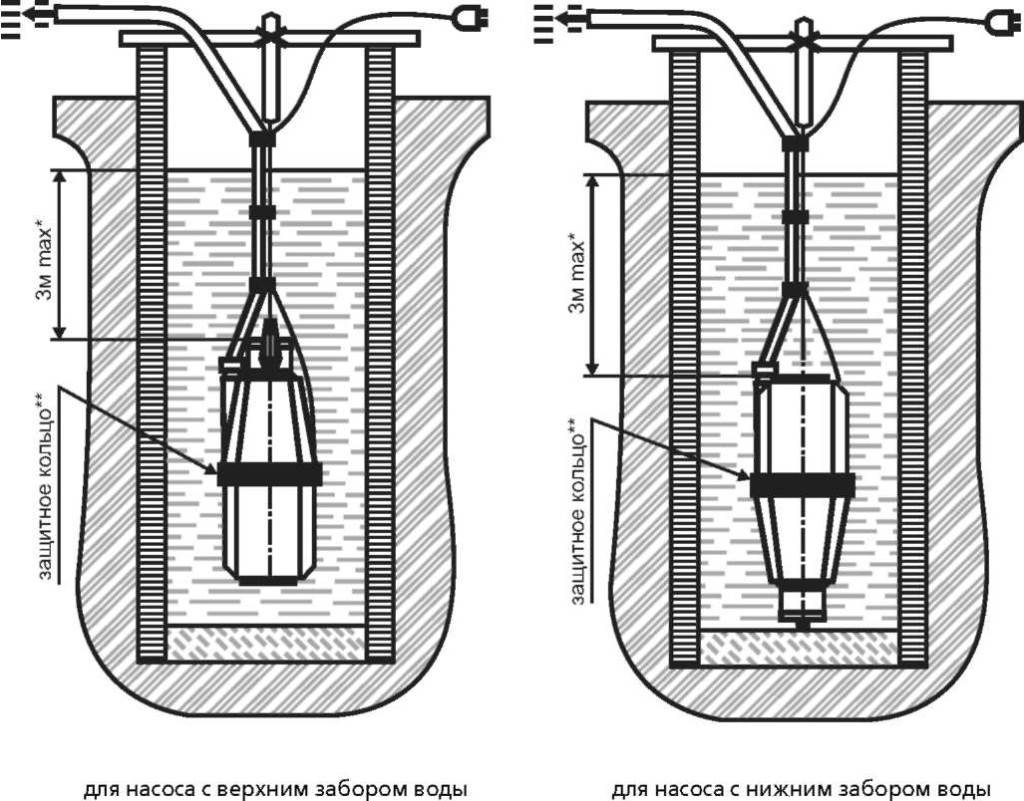
There are vibration and centrifugal models. Among the vibrational brands, the most popular among our compatriots are the brands "Aquarius", "Brook", "Kid". Of the centrifugal, the most popular is the Water Cannon. The main difference between centrifugal and vibrating devices lies in the design of the working part. In the first, the liquid is pumped through one or more impellers, and in the second, with the help of membranes. The inlet pipe can be located at the top or bottom, depending on the specific model.
Vibratory pumps work due to electromagnetic vibrations, causing the membrane to deform and create a pressure difference. The operation of the device is controlled by automation, which is triggered at increased loads, overheating of the engine, turning off the electric motor. If the water intake pipe is located on top, then the engine is placed in the lower part of the housing, where it is better cooled. The advantage of the upper intake is also that the pump does not draw sand and silt from the bottom.The lower suction pipe slows down the silting process of the well by lifting and pumping silt particles along with water.


In centrifugal models, the difference in pressure is created due to the centrifugal force created by the rotating blades of the impellers. These pumps are more convenient and versatile than vibration pumps. In terms of price / quality ratio, this is the best option for wells. If vibration pumps gradually destroy the casing during operation, especially if the pipes are narrow, then centrifugal pumps do not have such a negative impact. Their only disadvantage is that it is more difficult to choose a model for a small diameter well.
Typical breakdowns of pumps of different brands
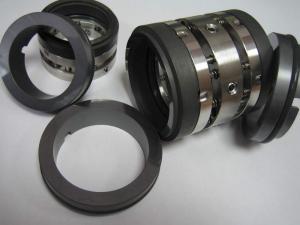
The equipment of popular domestic and foreign brands has its own characteristic breakdowns. The devices of the Danish manufacturer Grundfos, despite their reliability and endurance, need regular replacement of mechanical seals. If this is not done in a timely manner, water will penetrate inside and damage the winding.
It is not advisable to service the unit at home. The specific design requires that repairs be carried out by a specialist with experience, ideally an employee of a company service center.
A pronounced buzz and a head that has fallen to a minimum indicate that the impeller has worn out or has shifted along the axis in the pump. The device must be disassembled, cleaned of sand, replaced damaged elements and installed new seals
Gilex units often leak fluid from the electric motor. Replacing it is possible, but only with a similar composition.
Some masters believe that it is not necessary to buy an expensive substance. You can get by with glycerin or transformer oil. However, this is not the best advice.The equipment does not tolerate filling with alternative means very well and can completely fail after such an operation.
It is better not to repair the device yourself, but to entrust this task to qualified specialists. They are guaranteed to fill the engine with the original composition and do it in strict accordance with the wishes of the manufacturer. After service, it will work as well as on the first day of purchase.
Wear of the seals is indicated by a low oil level in the pump motor. It is best to replace them as soon as possible. This will keep the motor from overheating.
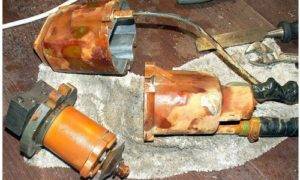
In devices "Kid" of the Russian enterprise Livgidromash, coils often fail. Provokes this trouble work "dry". A strong noise heard when turned on without pumping out water indicates a break in the central axis, to which the membranes with an anchor are attached. This breakdown is easy to detect after disassembling the unit.
Replacing the axle even at home is not difficult. But finding a part for sale is really a problem.
Aquarius pumps tend to overheat. This disadvantage is especially active when the equipment works in shallow wells. Repairs are expensive and sometimes amount to about 50% of the original cost. Many users in such cases prefer to buy a new device, however, from a different manufacturer.
The same problem is typical for the Brook models. Despite the modern design and compliance with current European standards, they do not tolerate continuous operation.
The manufacturer says that the devices can continuously pump water for no longer than 7 hours. However, almost always such a load leads to overheating. In order to avoid problems, it is better to take breaks and let the equipment rest every 2-3 hours. In this way, the life of the pump can be extended.
Do not start water pumping devices when the shut-off valve is closed. In the future, this will lead to breakdown of pumping equipment. Valve must be opened before turning on.
Pumping equipment "Vodomet" is considered quite reliable and operationally stable. Most of the breakdowns here are due to misuse. Also, equipment in contact with contaminated water quickly becomes clogged with silt and sand. In this case, the pumping part of the unit needs to be replaced.
When a problem that has arisen cannot be solved at home, it is worth seeking help from professional masters of a certified service center. They will quickly determine what happened to the equipment and restore its performance. Or they will recommend purchasing and installing a new pump if the old one cannot be repaired or it is not economically viable
The pump is clogged with sand and does not pump water. How to deal with one of the most common problems of pumping equipment will tell the following video:
Checking the power line
Primary diagnostics of the pump includes its removal from the well and short-term switching on “dry” with control of shaft rotation
At the same time, attention should be paid to the nature of the engine buzz: it should not experience additional load, crackling, rustling and uneven hum are categorically unacceptable
Please note that you need to check the pump without reconnecting to the mains. The length and section of the wire must be the same as in everyday work.
This is due to the fact that a voltage drop on the power line of more than 30-50 meters can be very significant, in addition, a fracture of the cores, insulation breakdown and malfunctions of protective and starting automation cannot be ruled out.
Damage to the insulation of the network cable
First of all, disconnect one of the power wires from the pump terminal block and measure the voltage - it should not be lower than the permissible passport values. If the voltage drop is too strong, then replace the cable with a better or larger section. Also, in a completely disconnected cable, measure the resistance between the cores and each of them separately. In the first case, the multimeter will not give readings in any of the ranges, the opposite indicates a breakdown of the insulation, which is typical for PVA grades insulated with foamed PVC compound. The value of the resistance of the current-carrying conductors themselves will bring more clarity to the problem of voltage drop, help to eliminate the influence of transient resistances on the terminal clamps.
Also, do not forget to find out if the circuit breaker has failed. Its rating is precisely matched to the pump, so that at the slightest overload, the power is turned off, preventing damage to the motor part. Circuit breakers with a tripping characteristic "A" are mainly used, the rating is selected and regulated both by the pump power, and by the supply voltage and line length.
The main malfunctions of submersible pumps
If failures are noticed in the operation of a submersible pump, then it is not always necessary to remove it from the well for inspection.This recommendation applies only to pumping stations in which a pressure switch is installed. It is because of him that the device may not turn on, turn off or create poor water pressure. Therefore, the operability of the pressure sensor is first checked, and after that, if necessary, the pump is removed from the well.
Water pump malfunctions will be easier to diagnose if you first familiarize yourself with the most common failures of this unit.
The pump is not working
The reasons that the pump does not work may be as follows.
- The electrical protection has tripped. In this case, disconnect the machine from the mains and turn on the machine again. If it knocks it out again, then the problem should not be sought in the pumping equipment. But when the machine is turned on normally, do not turn on the pump anymore, you must first find the reason why the protection worked.
- The fuses have blown. If, after replacement, they burn out again, then you need to look for the cause in the power cable of the unit or in the place where it is connected to the mains.
- An underwater cable has been damaged. Remove the device and check the cord.
- The pump dry-run protection has tripped. Before starting the machine, make sure that it is immersed in the liquid to the required depth.
Also, the reason that the device does not turn on may lie in the incorrect operation of the pressure switch installed in the pumping station. The start pressure of the pump motor needs to be adjusted.
The pump works but does not pump
There may also be several reasons why the device does not pump water.
- Stop valve closed. Turn off the machine and slowly open the tap.In the future, pumping equipment should not be started with the valve closed, otherwise it will fail.
- The water level in the well has dropped below the pump. It is necessary to calculate the dynamic water level and immerse the device to the required depth.
- Check valve stuck. In this case, it is required to disassemble the valve and clean it, if necessary, replace it with a new one.
- The intake filter is clogged. To clean the filter, the hydraulic machine is removed and the filter mesh is cleaned and washed.
Low machine performance
Advice! If the performance of pumping equipment drops, the mains voltage should be checked first. It is because of its reduced value that the engine of the unit cannot gain the necessary power.
Also, performance degradation causes:
- partial clogging of valves and valves installed in the water supply system;
- partially clogged lifting pipe of the apparatus;
- pipeline depressurization;
- incorrect adjustment of the pressure switch (applies to pumping stations).
Frequent switching on and off of the device
This problem occurs if the submersible pump is paired with a hydraulic accumulator. In this case, frequent starts and stops of the unit can be provoked by the following factors:
- in the hydraulic tank there was a decrease in pressure below the minimum (by default it should be 1.5 bar);
- there was a rupture of a rubber pear or diaphragm in the tank;
- the pressure switch is not working properly.
Water is supplied with pulsation
If you notice that the water from the tap does not flow in a constant stream, then this is a sign of a decrease in the water level in the well below the dynamic one.It is necessary to lower the pump deeper if the distance to the bottom of the shaft allows this.
The buzz of the machine is heard, but the water does not pump
If the pump is buzzing, and at the same time water is not pumped out of the well, then there may be several reasons:
- there was a “gluing” of the impeller of the apparatus with its body due to long-term storage of the device without water;
- defective engine start capacitor;
- dipped voltage in the network;
- the impeller of the pump has jammed due to dirt collected in the body of the apparatus.
The unit does not turn off
If the automation does not work, the pump will work without stopping, even if excessive pressure is created in the hydraulic tank (seen from the pressure gauge). The fault is the pressure switch, which is out of order or incorrectly adjusted.


